
Sign in to your MUO account

The Domain Name System (DNS) converts domain names into IP addresses. Web browsers use these IP addresses to load webpages and ensure that you don’t have to memorize the IP addresses of each website.
Sometimes you’ll want to see which DNS server your PC is connecting to, either because the one you’re using has gone down or because you want to swap to a faster or more secure alternative. Fortunately, there are multiple ways to view which DNS server you’re using on Windows 11.
The Settings menu is the central hub of a Windows PC. It enables you to adjust preferences, configure the OS, and manage all the connected devices. You can also use the Windows settings to check your current DNS server on Windows 11.
Here’s how:
- Launch the Start menu by pressing the Win key.
- In the search bar, type Settings and press Enter. It’ll open the Settings menu.
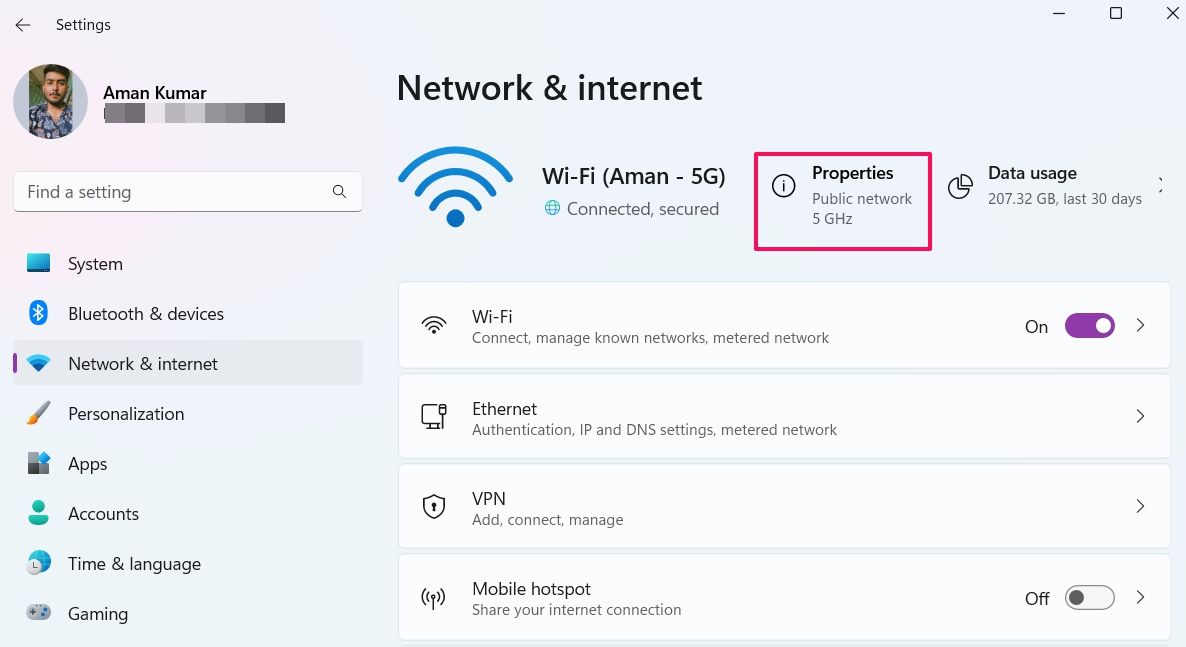
- Choose Network & Internet from the left panel.
-
Select the Properties option next to the name of the connected network.

-
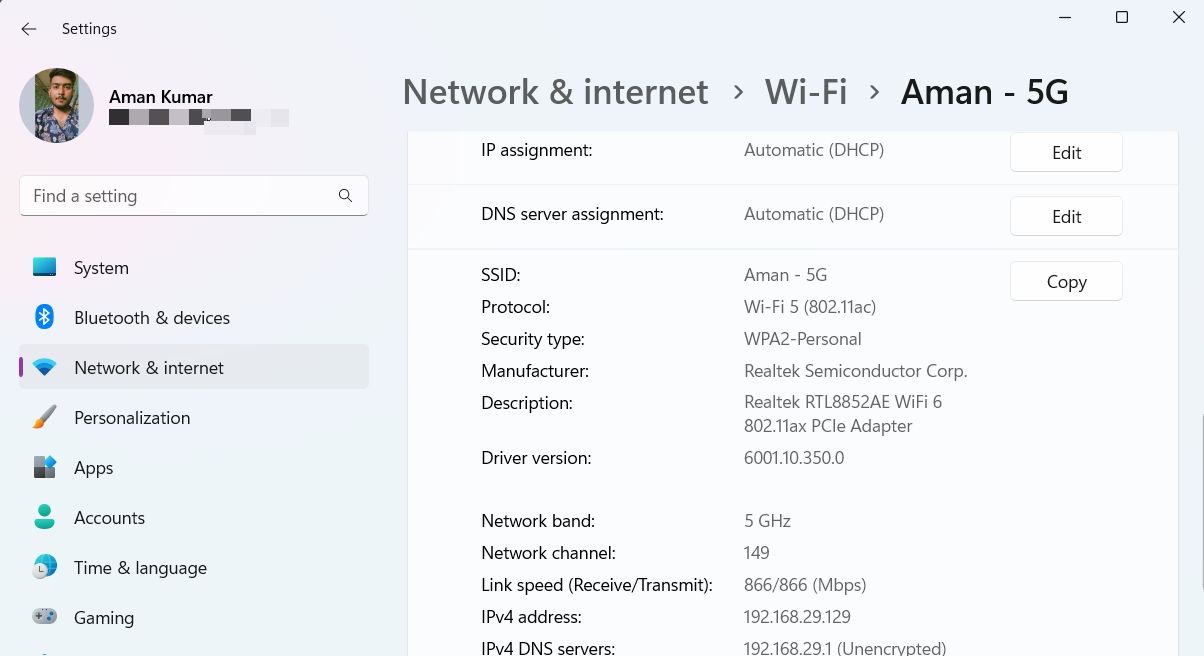
In the following window, you can see the DNS server. It’ll be next to IPv4 DNS Servers option.

2. How to Check Your DNS Server Using the Control Panel
The Control Panel is an essential Windows component that allows you to configure various system settings. You can use it to manage applications, enable or disable hardware, change user accounts, solve system issues, and check DNS servers.
To check DNS servers using the Control Panel, follow these instructions:
- Open the Run dialog box using the Win + R hotkeys.
- In the search bar, type Control Panel and press Enter. It’ll open the Control Panel window.
- Change the View by to Large icons.
- Select Network and Sharing Center.
-
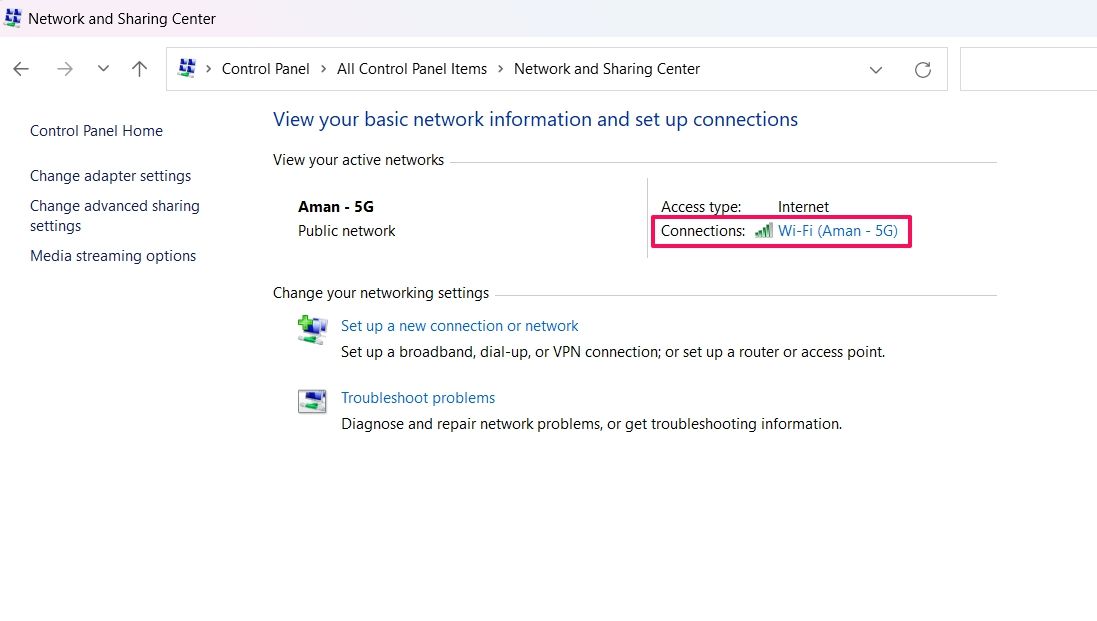
Click the link next to the Connections option.

-
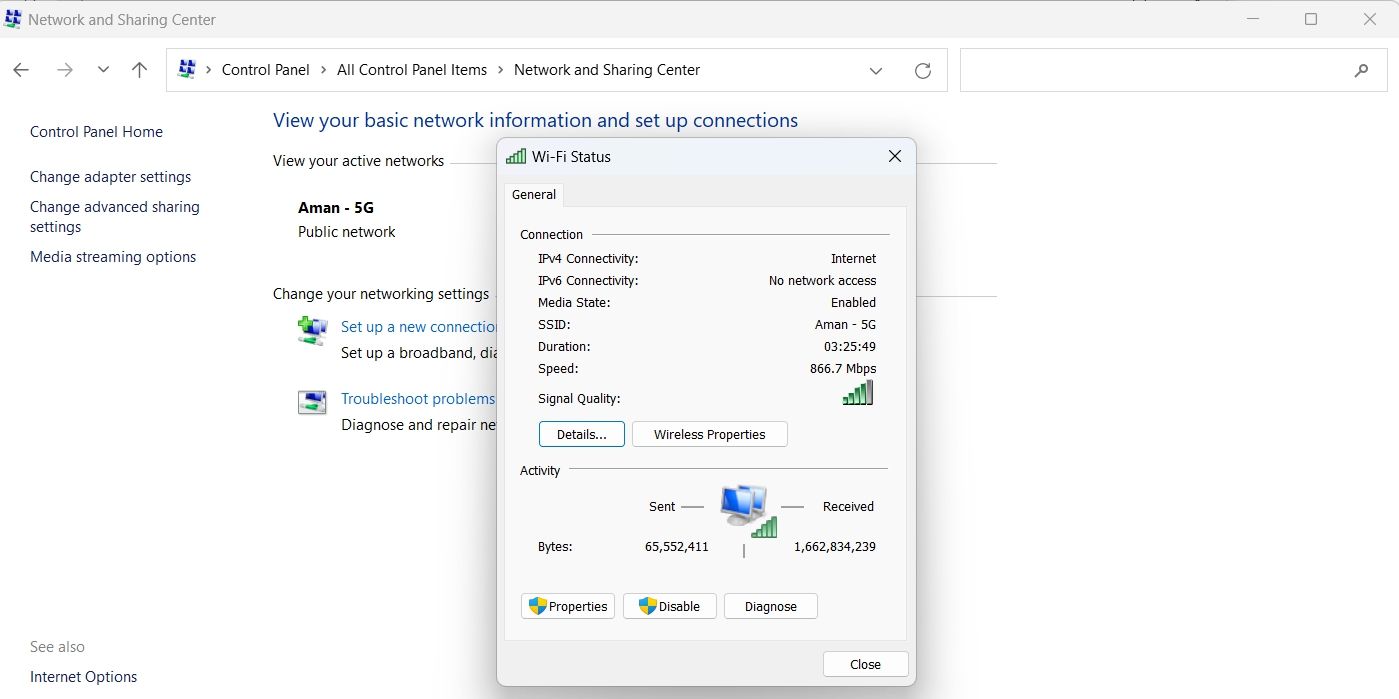
Click the Details button in the window that appears.

-
You can see the DNS servers in the new window that crops up. It’ll be next to IPv4 DNS server option.

3. How to Check Your DNS Server Using the Command Prompt
The Command Prompt is the command line interface for Windows OS, which is an interesting way to interact with computers using text commands. You can use Command Prompt to list and change directories, create or delete files and folders, manage networks, and much more.
You can use the Command Prompt to check your current DNS server as well. Here’s how:
- Open the Start menu, type Command Prompt and choose Run as administrator from the right pane.
- In the Command Prompt window, type ipconfig /all and press Enter.
-
You can see the DNS servers in the information that appears on the screen.

4. How to Check Your DNS Server Using the Windows PowerShell
You can use Windows PowerShell to perform various tasks, including checking the set DNS servers on your computer. Here’s how to do it:
- Open Windows PowerShell using one of the many ways to open Windows PowerShell.
-
In the PowerShell window, type Get-DnsClientServerAddress and press Enter.

You can see the DNS servers next to your network type. If you are using a Wi-Fi connection, the DNS server will be present next to the Wi-Fi option. Whereas, if you are using an Ethernet, the DNS servers will be present next to the Ethernet option.
How Do You Prefer to Check Your DNS Server on Windows 11?
Now you know all the working ways to check DNS servers on Windows 11. All these methods are quick and easy to execute. You can pick the one that you find most easy to perform.
Sometimes, the default DNS server might not be among the fastest. In such a case, you can change your server to numerous alternatives.
Do you know how to find the IP addresses of your DNS servers? Would you like to learn how to do that? If you are a Windows 11 or Windows 10 user, there are many methods to find the addresses of the DNS servers that your computer or device is using. You can find this information in the Settings app, by running a command in PowerShell, and by other means. For more details on this subject, read this tutorial:
NOTE: If you don’t know what DNS servers are, you might want to read this article first: What is DNS? How is it useful?. If you got here looking for ways to change your DNS servers, here’s How to change DNS settings in Windows.
1. How to find your DNS servers in Windows 11 via Settings
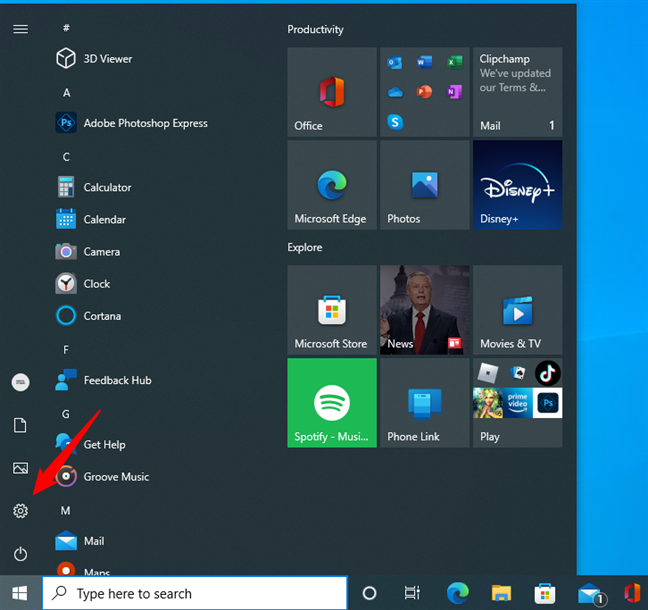
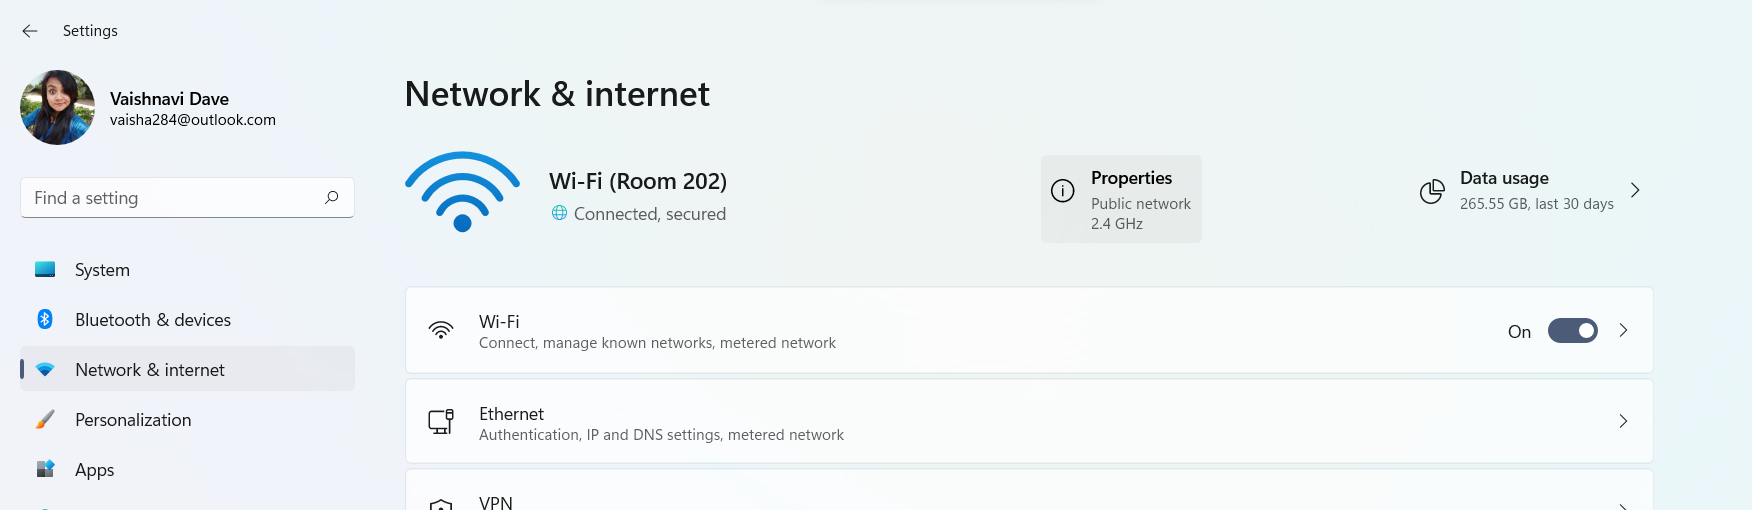
If you’re using Windows 11, the Settings app offers one of the easiest ways to determine your DNS. So, start by opening Settings: you can launch it quickly by clicking/taping on its Pinned button from the Start Menu or using the Windows + I keyboard shortcut.
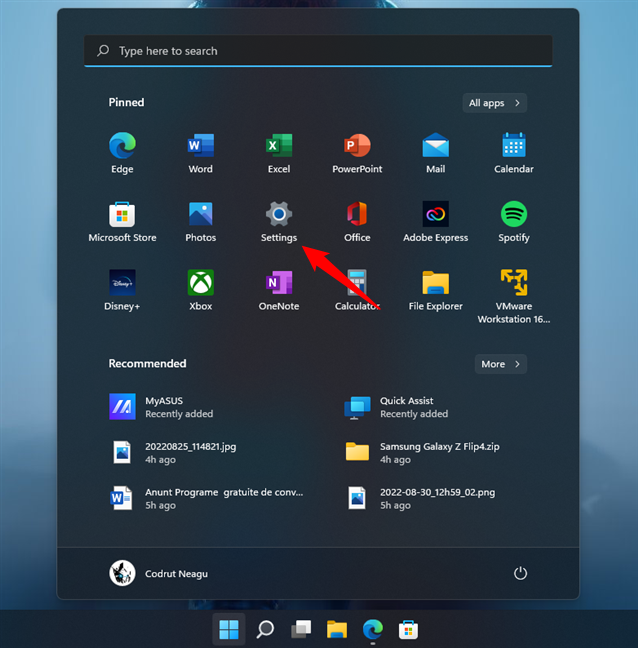
The Settings shortcut from Windows 11’s Start Menu
In the Settings app, select Network & internet on the left sidebar, and click or tap Properties on the right, next to the name of your current network connection.
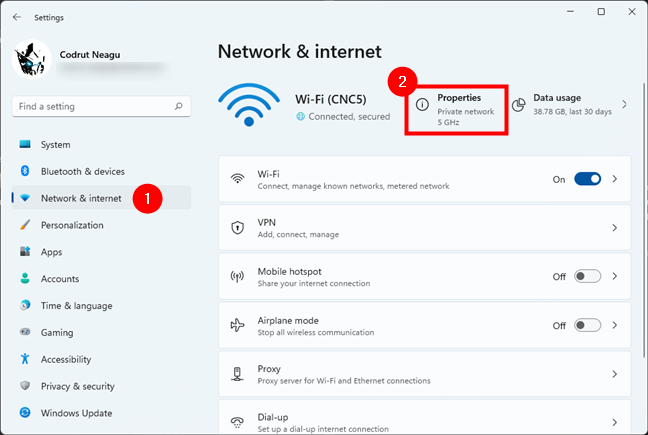
Opening the Properties of current network connection
Alternatively, in the list on the right of the Settings app, click or tap on the entry corresponding to your network connection type. If you connect via Wi-Fi, press Wi-Fi; if you connect through a wired network connection, click or tap Ethernet.
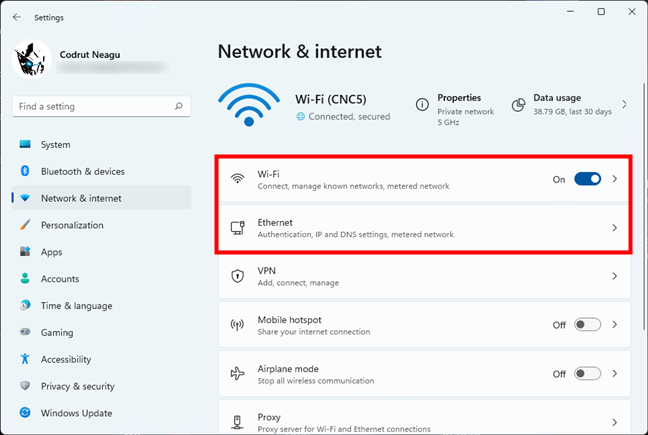
Access the settings for Wi-Fi or Ethernet
Either way, you’ll get to a page that shows all your Wi-Fi or Ethernet network connections, depending on which one you accessed. Click or tap on the name of your connection to see its details.
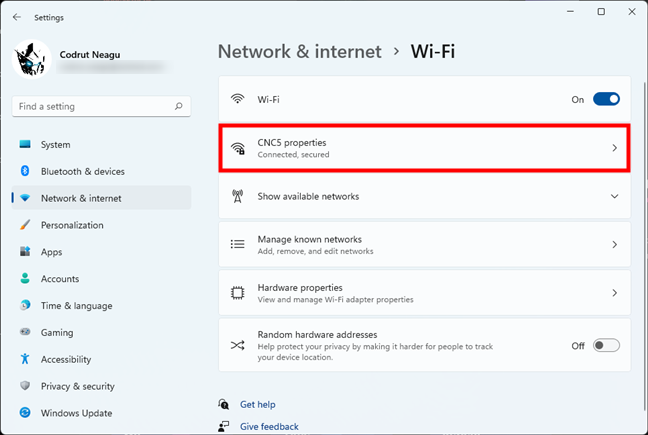
The network connection currently in use
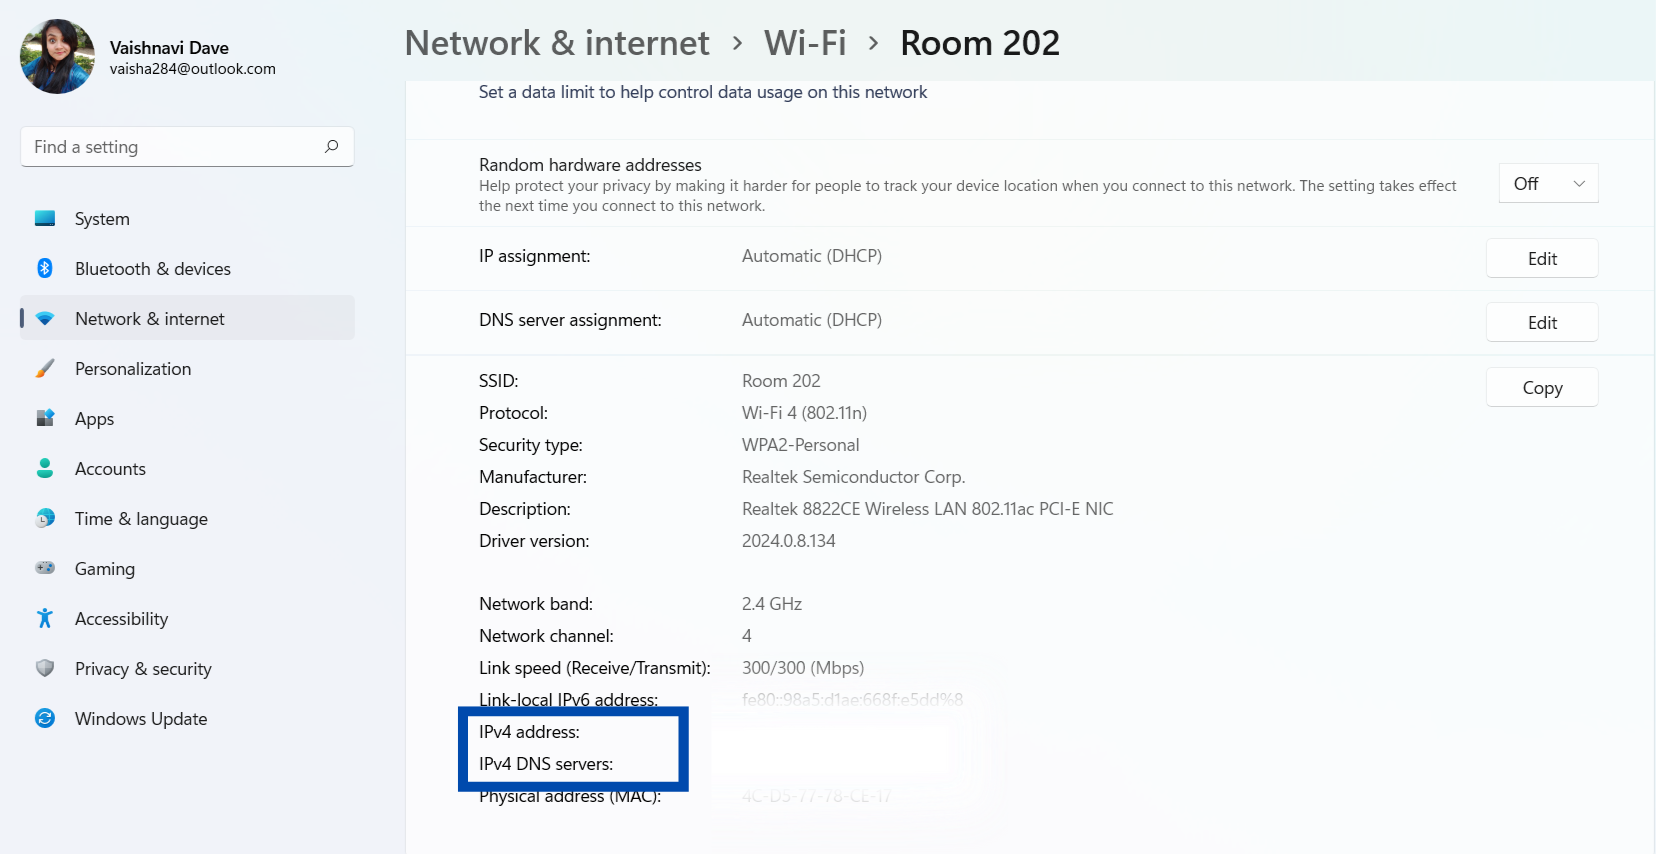
On the network connection’s page, scroll down to the bottom of the page. There, you’ll find what your IPv6 DNS servers and IPv4 DNS servers are.
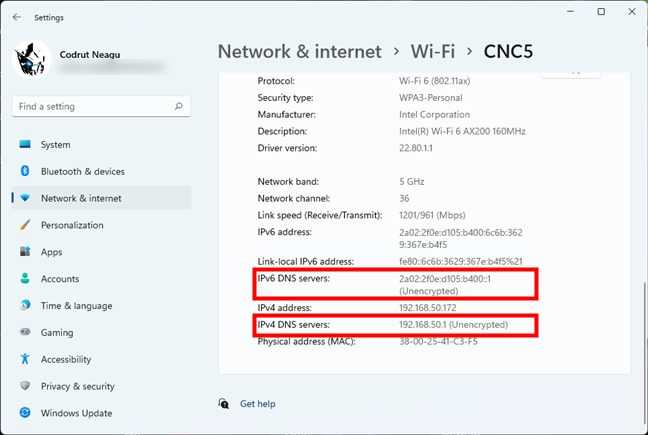
Windows 11 DNS servers are listed in the Settings app
TIP: Here’s how to find your public IP address in Windows 11 and Windows 10.
2. How to find your DNS servers in Windows 10 via Settings
Similarly, one of the most straightforward ways to find your DNS in Windows 10 is to check your network connection information in the Settings app. Start by opening Settings: click or tap on its button from the Start Menu or press Windows + I on your keyboard.
The Settings button from Windows 10’s Start Menu
In the Settings app, open the Network & Internet category.
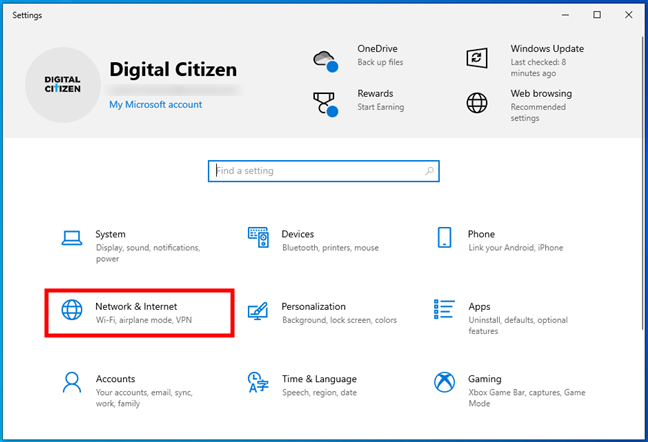
The Network & Internet category from Windows 10’s Settings
On the left side of the window, select the network connection for which you want to check the DNS settings. If you’re using a wired network connection, you should select Ethernet. Otherwise, if you’re using a wireless network connection, go to Wi-Fi. Then, click or tap on your network connection on the right side of the window.
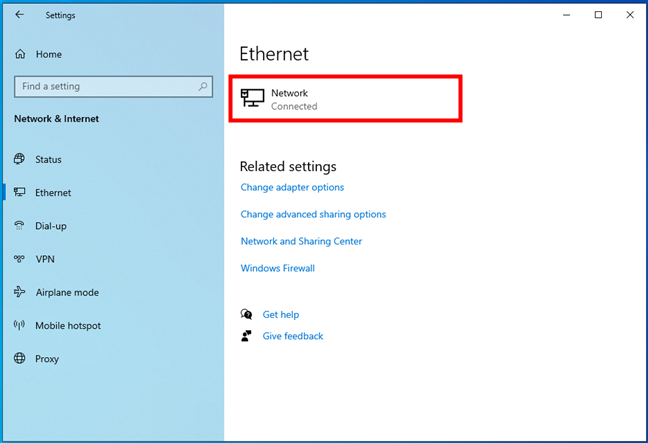
The network to which the Windows 10 PC is connected
This opens a page that shows the details of your network connection. Scroll down to get to the Properties section. Look at the information displayed there, and you should find the details of your DNS: both the IPv4 DNS server address and the IPv6 DNS server address.
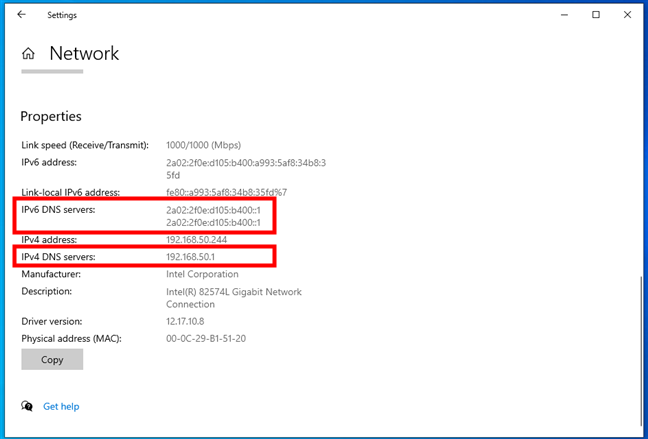
The DNS servers used by the network connection
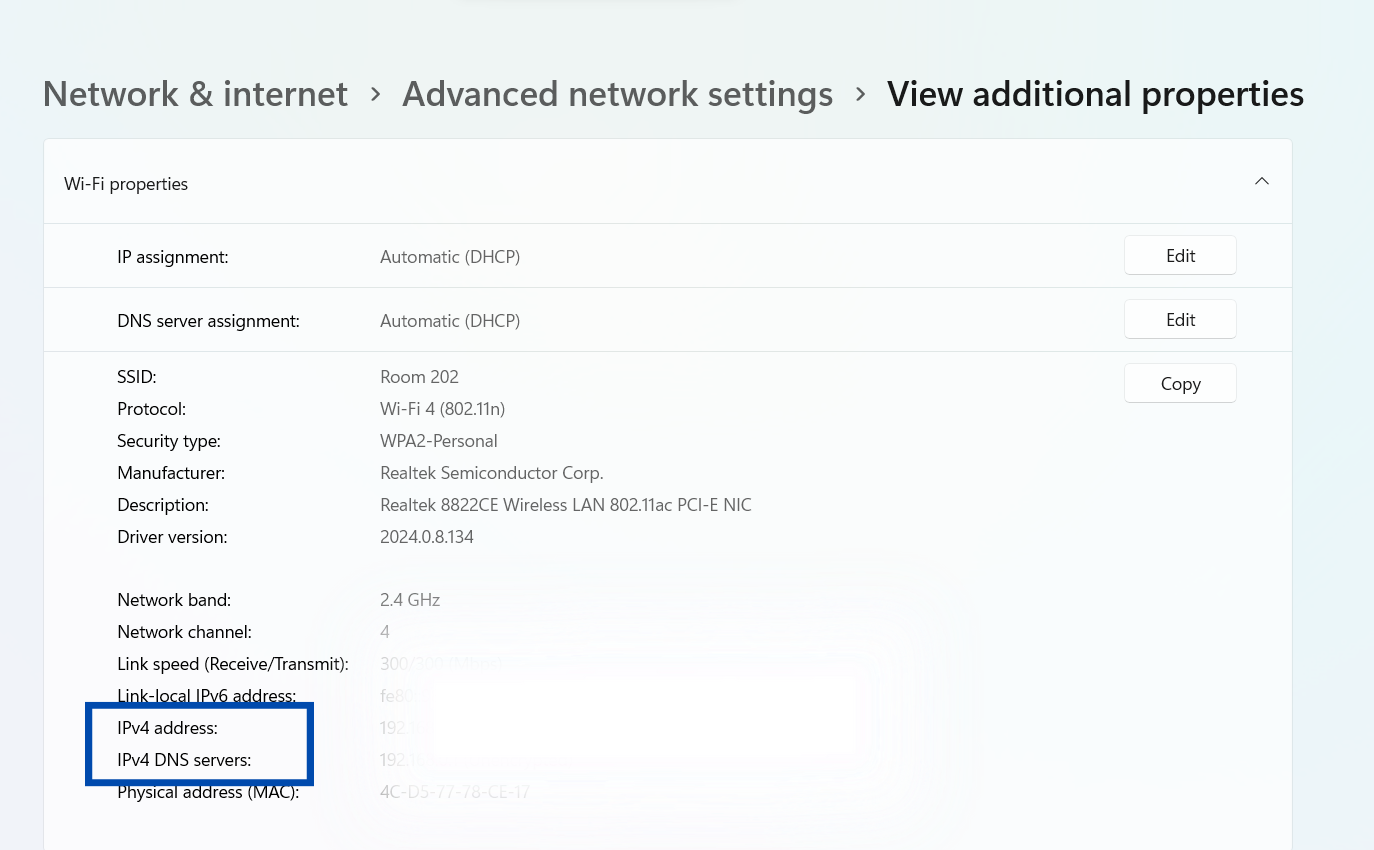
3. How to find your DNS in Windows 11 from the Advanced network settings
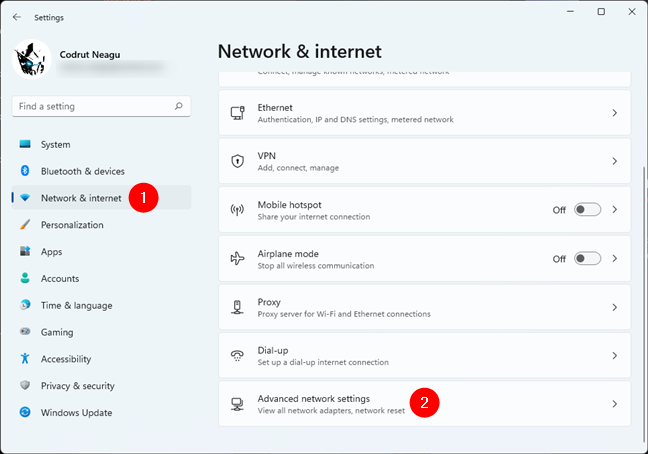
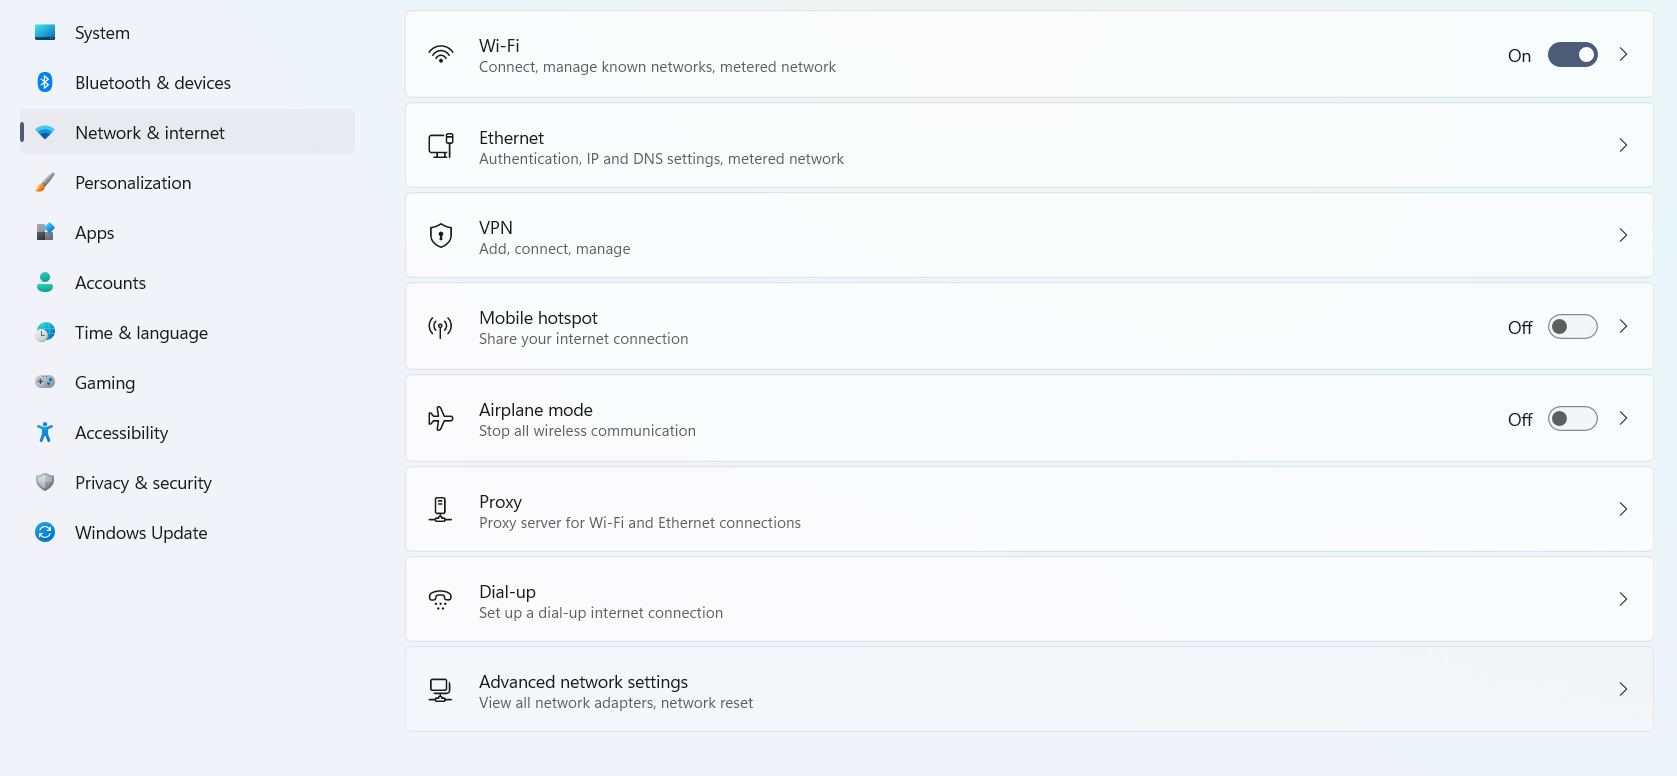
There’s also another place in Windows 11’s Settings app where you can find what your DNS is: the Advanced network settings. Launch Settings (Windows + I), head to Network & internet and click or tap on Advanced network settings at the bottom of the list on the right.
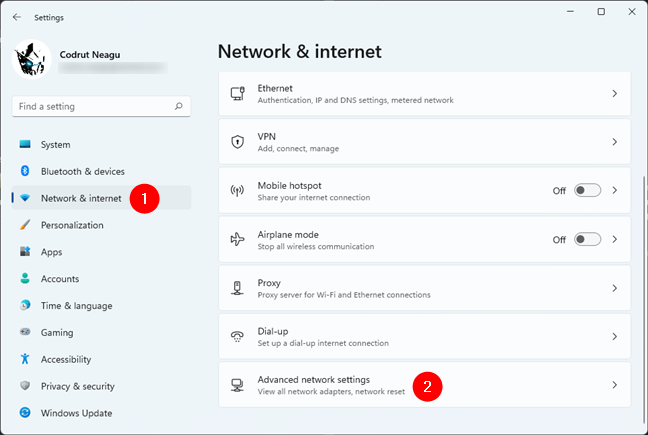
How to open Advanced network settings in Windows 11
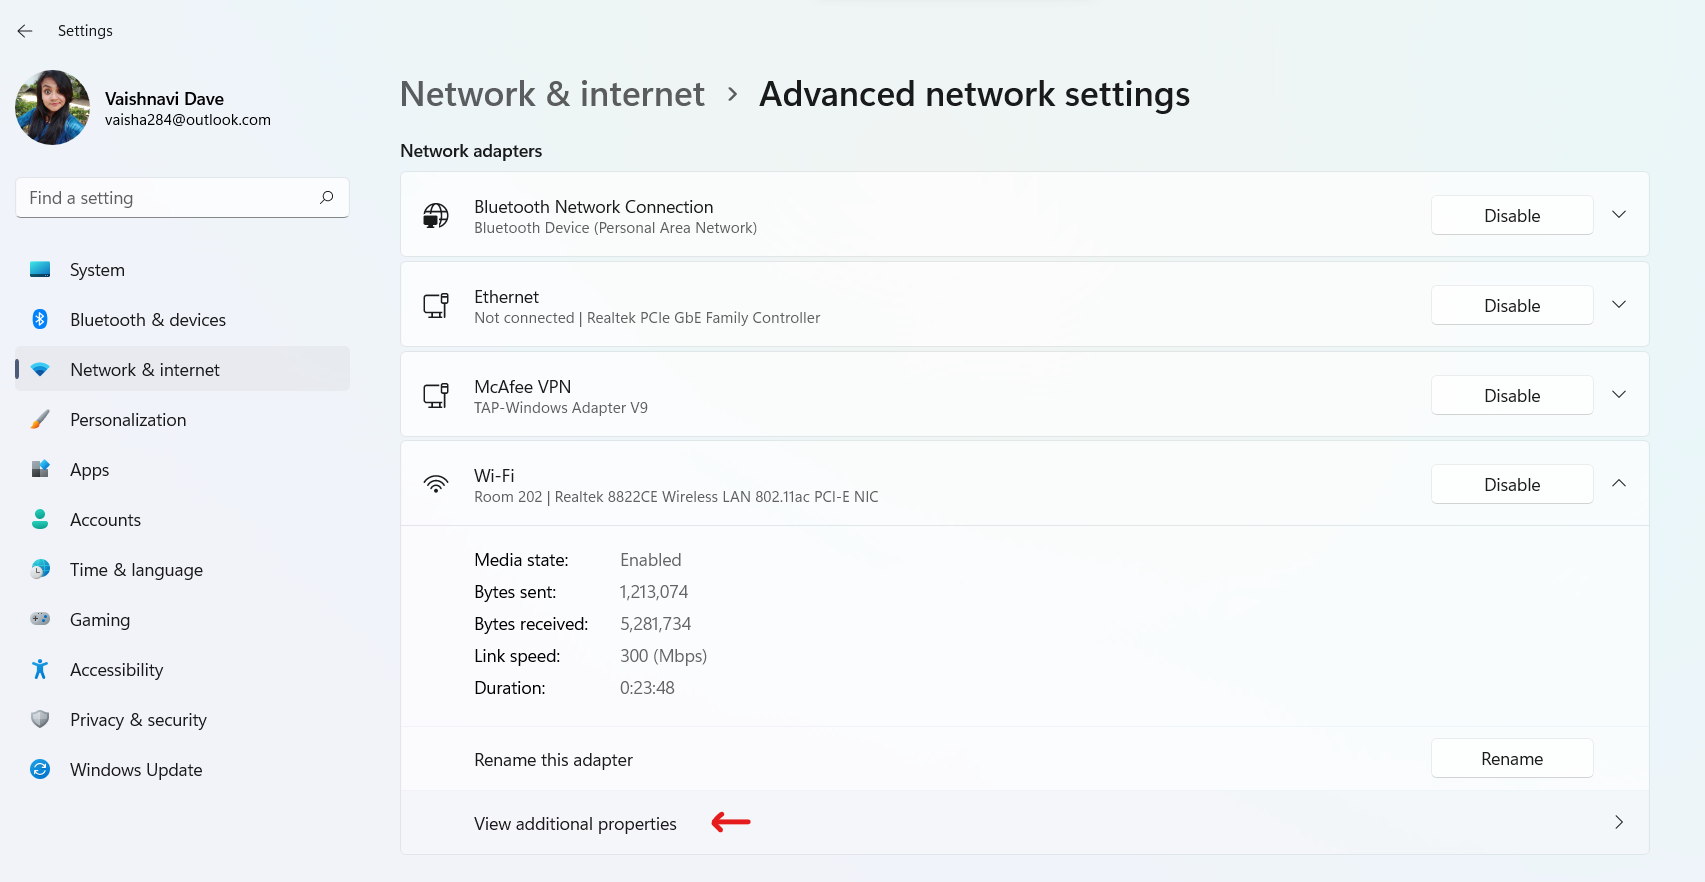
On the Advanced network settings page, look for your network card in the Network adapters list. When you find it, click or tap on its name or the small arrow to its right.
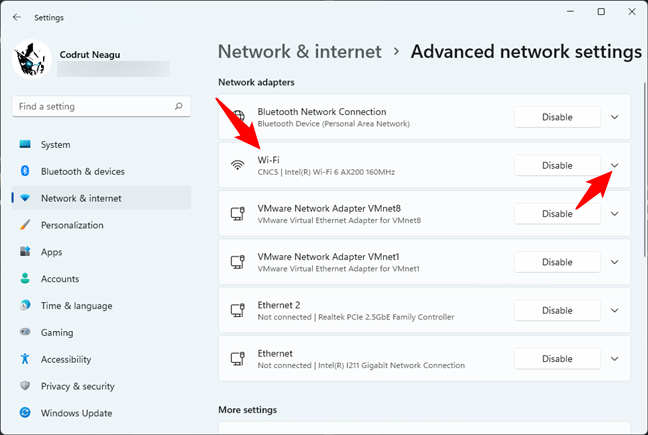
Click or tap on the network adapter currently in use
This will make Settings show you additional information and options for the selected network adapter. Click or tap on View additional properties.
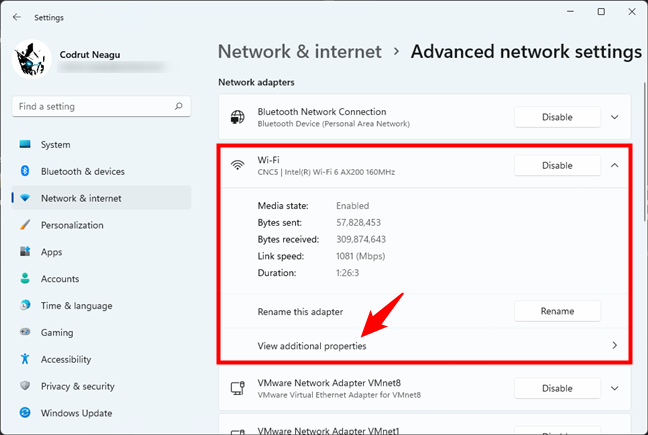
View additional properties of a network adapter
The Settings app will then let you see additional properties of the network adapter you selected earlier. Among them, you’ll also find the DNS servers used by your Windows 11 PC.
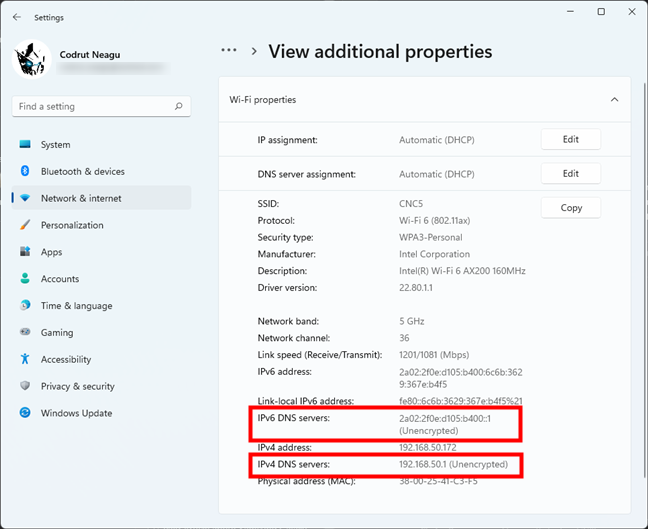
How to check what DNS servers are used by Windows 11
4. How to find your DNS from the Network Connections window
The Network Connections window offers you another way to check your DNS settings in both Windows 11 and Windows 10.
If you’re using Windows 11, launch Settings (Windows + I), select Network & internet on the left sidebar, and click or tap Advanced network settings on the right.
Open Advanced network settings in Windows 11
Scroll down and click or tap the More network adapter options link under Related settings.
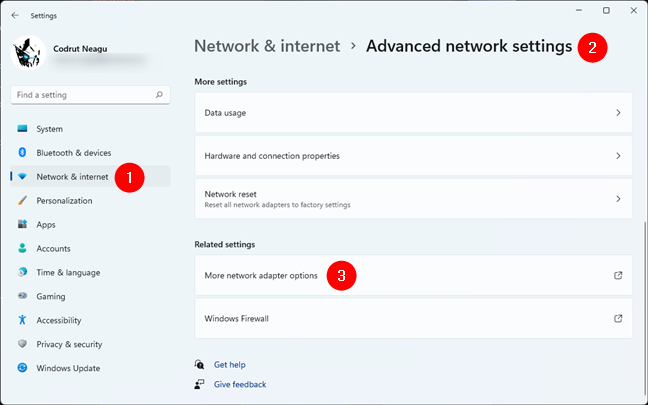
More network adapter settings
If you’re using Windows 10, open the Settings app and go to Network & Internet. Then, click or tap the Change adapter options button on the Status page.
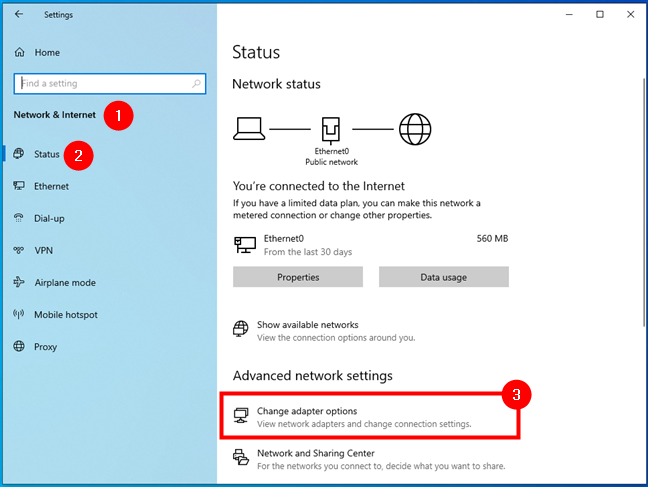
The Change adapter options button from the Status page
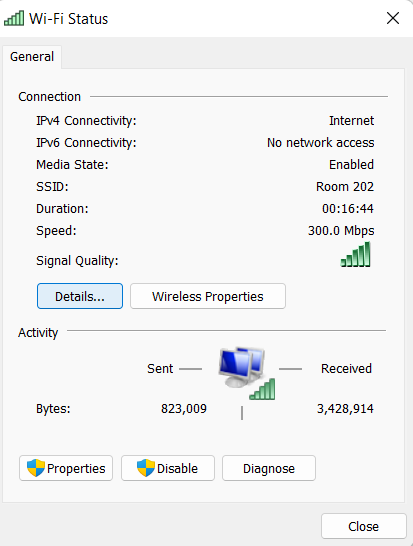
Whether you use Windows 11 or Windows 10, the earlier steps open the Network Connections window. Inside it, double-click or double-tap on the network adapter for which you want to find the DNS settings. In our case, that would be the Wi-Fi network adapter highlighted below.

Opening the Status of a network connection
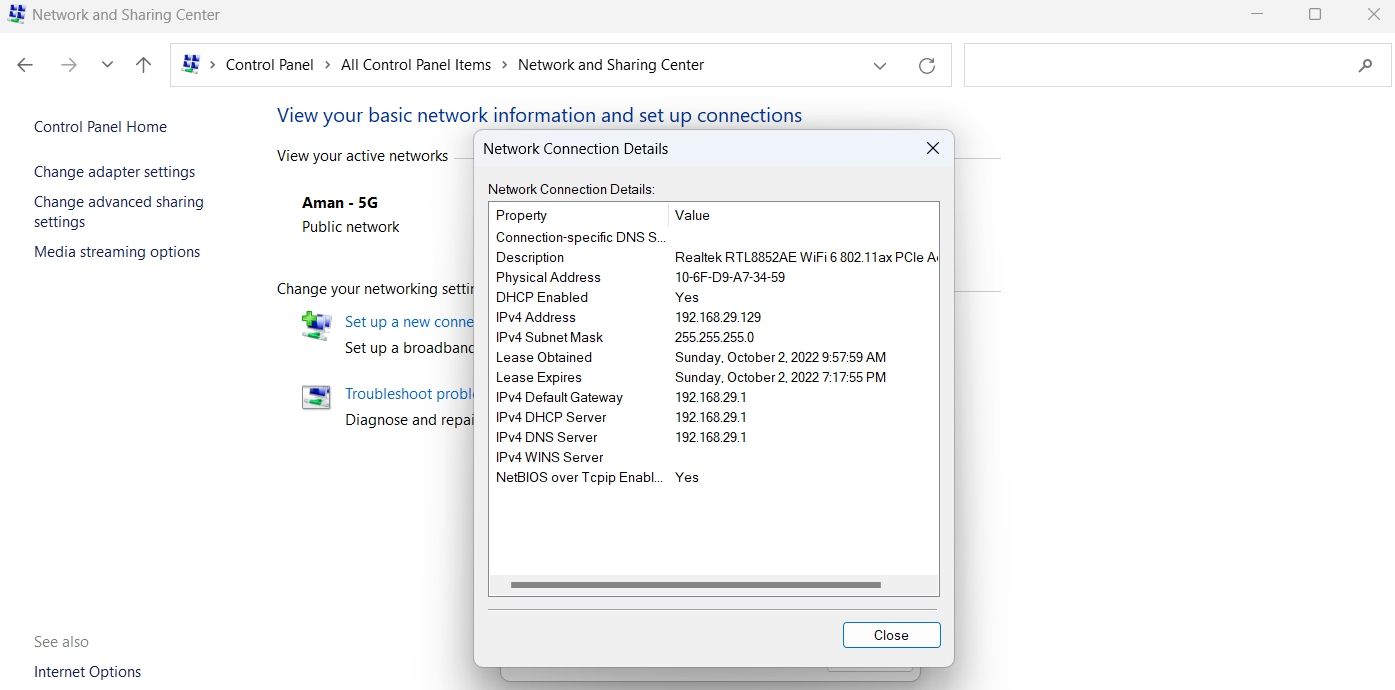
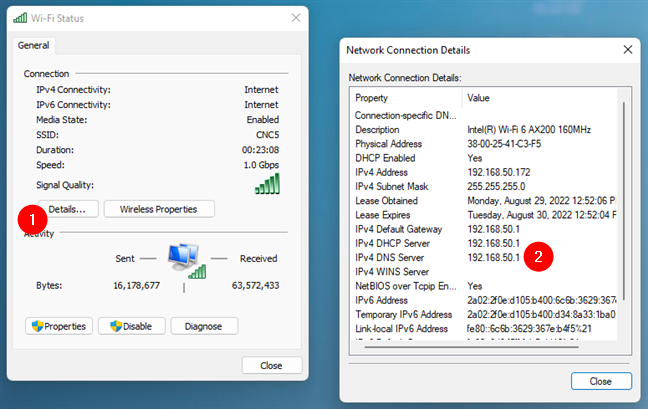
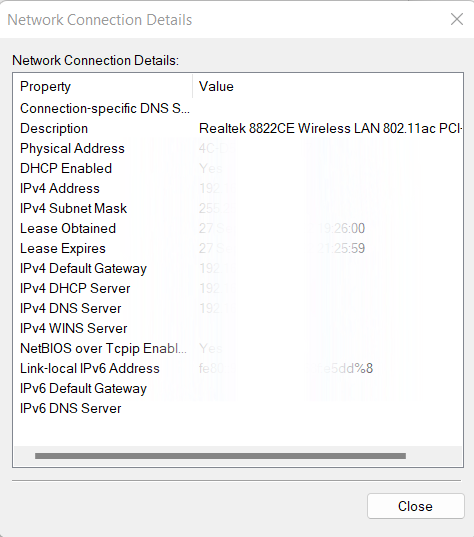
The previous action opens another window that shows you the Status of the selected network adapter. On it, click or tap on the Details button from the Connection area. Then, in the Network Connection Details window, you can find which DNS servers your Windows 11 or Windows 10 computer or device is using. They are listed next to IPv4 DNS Server and IPv6 DNS Server.
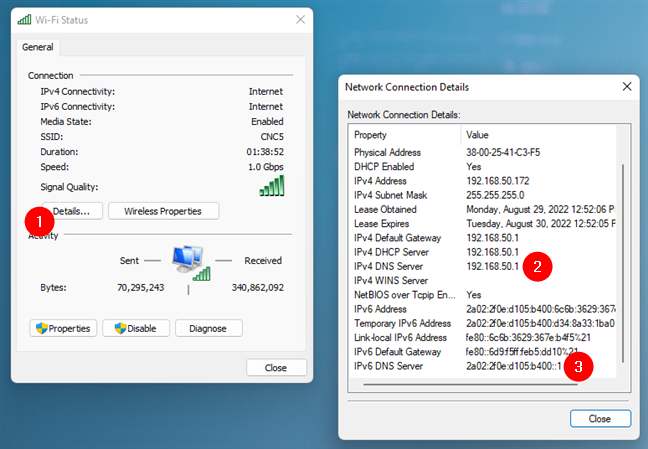
The DNS servers used by a network connection
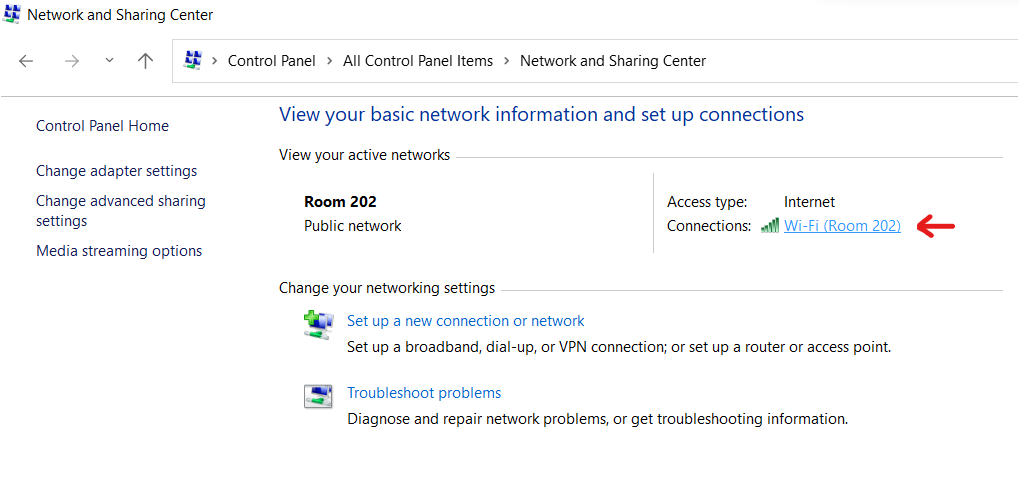
5. How to find your DNS using the Network and Sharing Center
Another way to find the IP addresses of your DNS servers is via the Network and Sharing Center. And it works the same way in Windows 11 and Windows 10. Open the Network and Sharing Center (Control Panel > Network and Internet > Network and Sharing Center) and click or tap on the network adapter you use to connect to the internet. In our case, for example, that would be the Wi-Fi adapter.
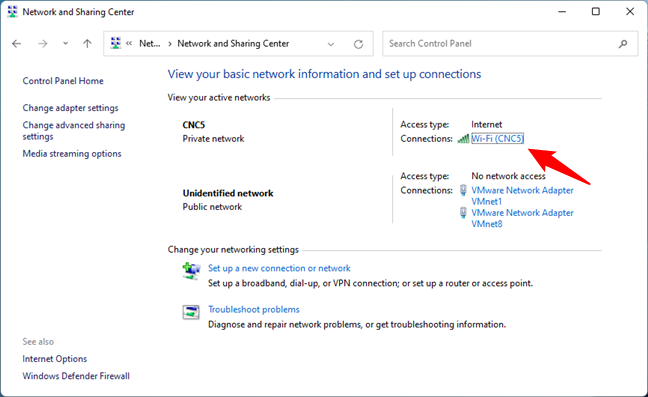
Opening the Status of a network connection from the Network and Sharing Center
This opens the same Status window we’ve shown you in the previous method in this article. Click or tap on the Details button. Then, the Network Connection Details window shows you the DNS servers used by your Windows 11 or Windows 10 computer or device in the text lines called IPv4 DNS Server and IPv6 DNS Server.
The IP addresses of the DNS servers
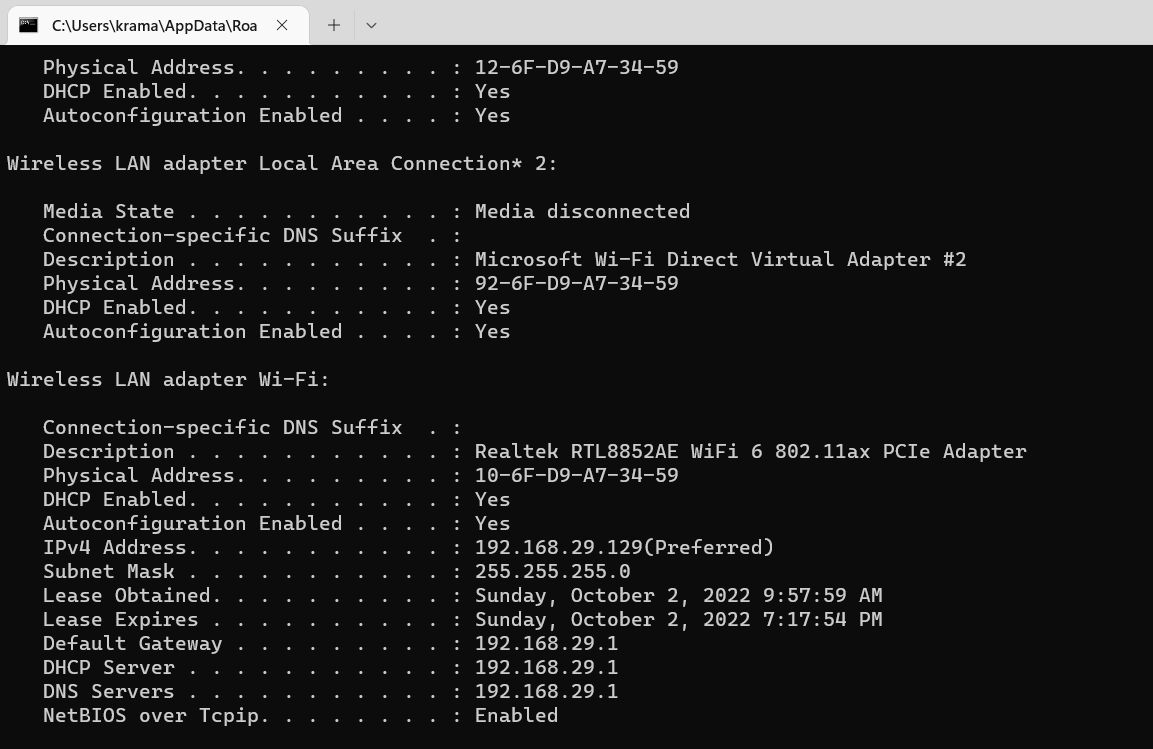
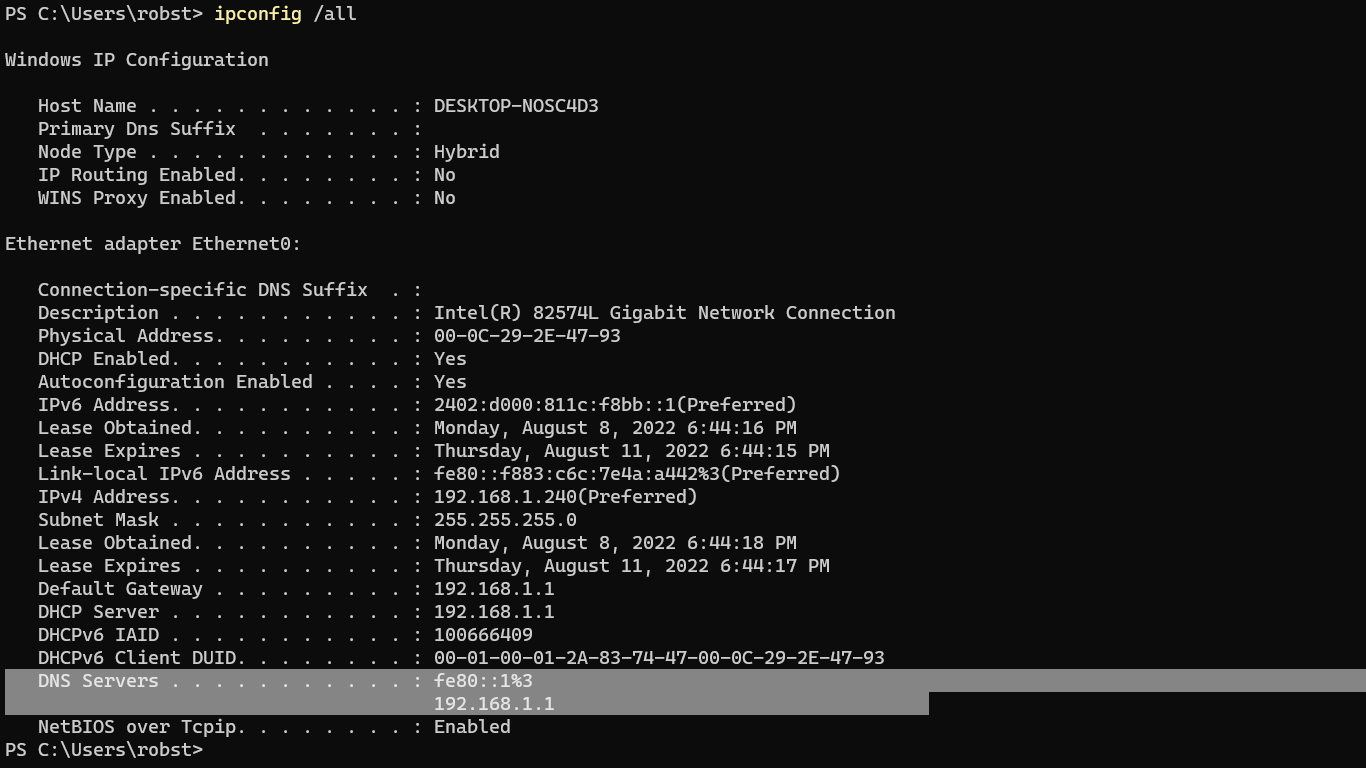
6. How to find your DNS with the ipconfig command
We have a slightly faster way of finding out which DNS servers you use on your Windows 11 or Windows 10 computer or device. Open the standalone Command Prompt or PowerShell, or open a tab for either of them in Windows Terminal. Then, in the command-line environment, run this command:
ipconfig /all
Then, look through the information displayed, and you should find both the IPv4 and IPv6 DNS servers used by all your network adapters.
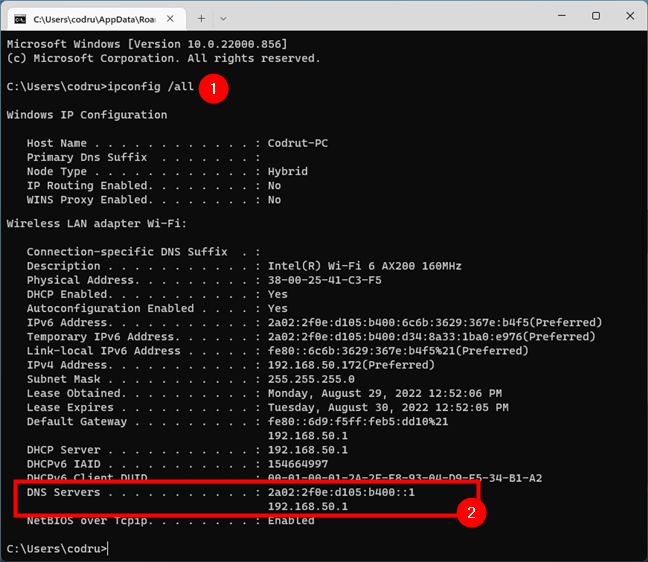
Running the ipconfig command to find the DNS servers in CMD
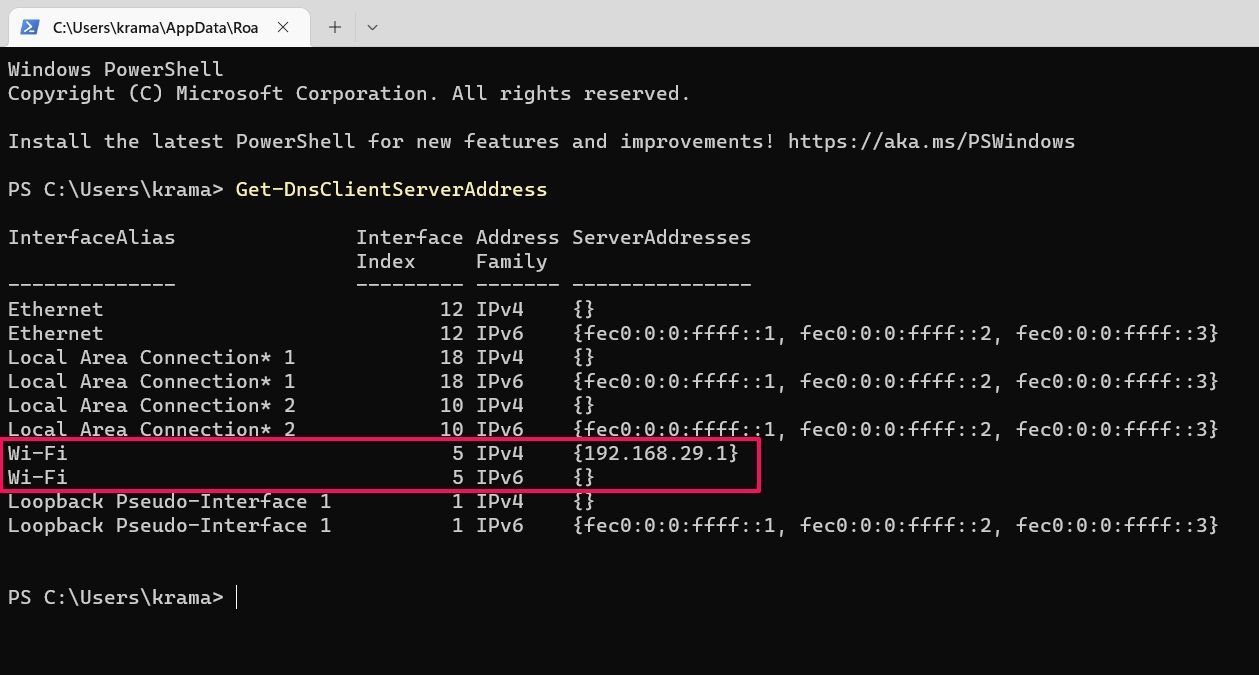
7. How to find your DNS servers with a dedicated PowerShell command
In the end, probably the fastest way to find your DNS servers in either Windows 11 or Windows 10 is offered by PowerShell. Open it, and run this command:
Get-DnsClientServerAddress
This will instantly show you all the DNS servers used by all your network adapters (both IPv4 and IPv6).

Find the DNS servers in PowerShell
That’s it!
What’s your favorite way of finding your DNS servers?
Now you know not one or two but seven different methods of finding out the IP addresses of your local DNS servers. Which is your preferred one? Do you know others that we might have missed? Don’t hesitate to leave a comment below and let us know.
When you are searching for a domain name or loading your favorite websites, it is the DNS (Domain Name System) server that is responsible for making it possible in your system. Your Windows 11 device has IPv4 and IPv6 DNS servers assigned to the network adaptor. In a case where you subscribe to the Internet Service Provider (ISP), the device users their DNS server by default. You can find out which server is used and even change it as well. This article presents various options guiding you on how to find DNS servers used in Windows 11 device of yours.
Page Contents
The used DNS server in your system could be custom DNS for the browsers (like Google Chrome, Firefox, Microsoft Edge), or connected to the VPN, to the router, or could be the one provided by your ISP. To find out which server is used in your Windows 11 device, there are following six different options along with step-by-step process on how to go about them.
Option-1: Settings Application to find DNS Servers
- First, Open the Settings Application and go to Network & Internet.
- Here, tap on Properties for the connected Network as shown in the screenshot below.
- Now click on the network connection that you want to know the DNS server details for. It will expand and show you the details of the IPv4 DNS Servers and IPv6 DNS server addresses used by this network.
Option-2: Network Connections in Control Panel to find DNS servers
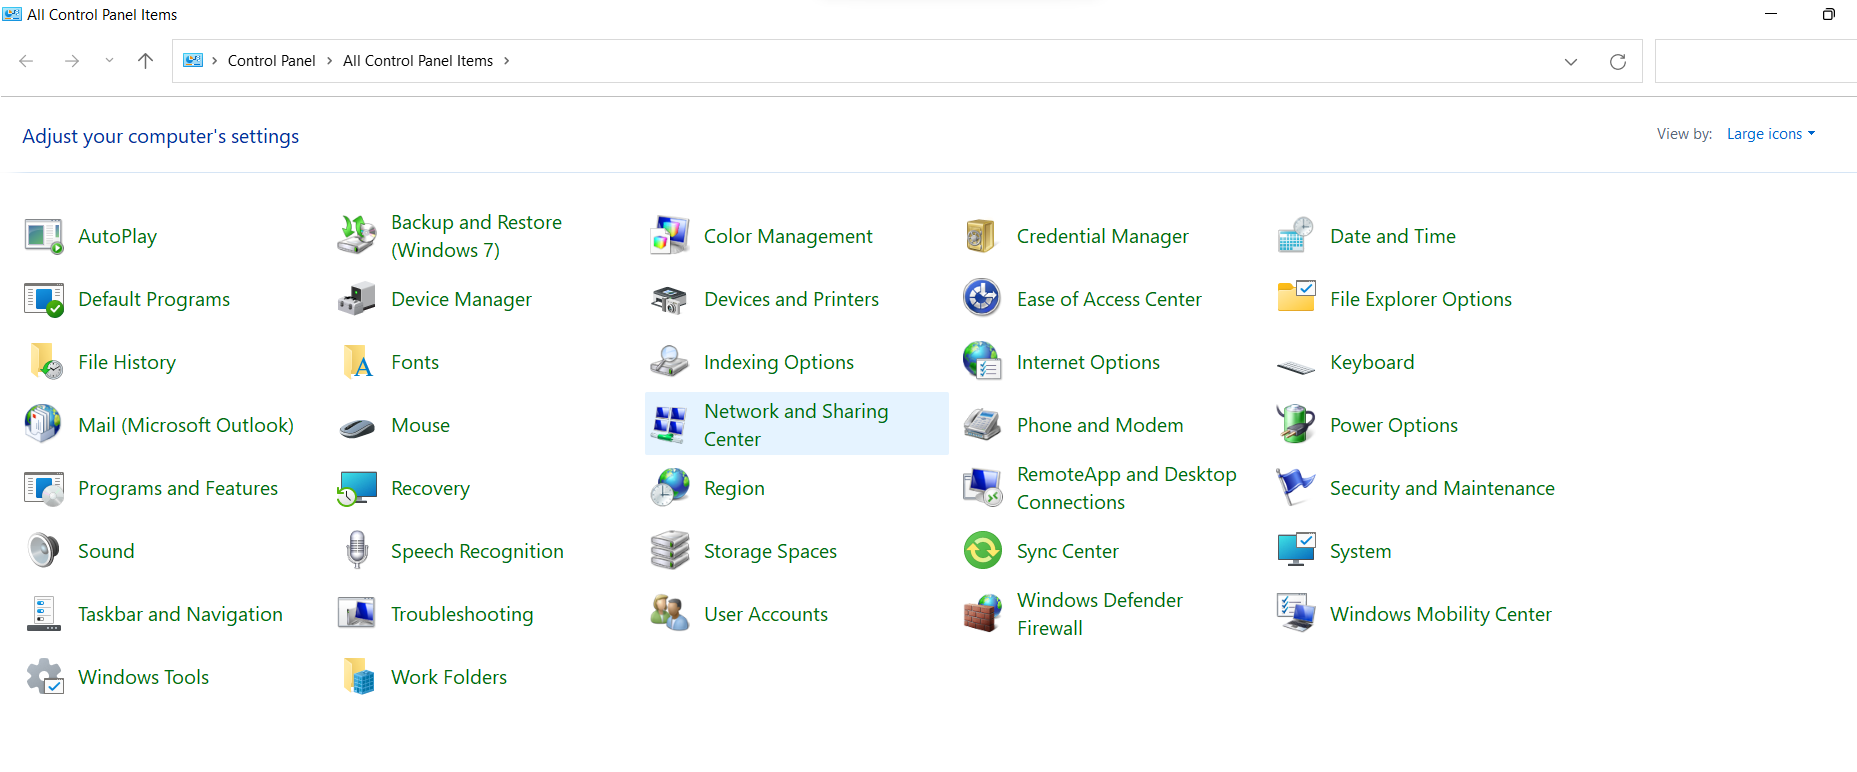
- Open the Control Panel by searching for it in the windows Menu.
- Here, go to Network and Sharing Center.
- Now, click on Change Adapter Settings in the left side of the screen.
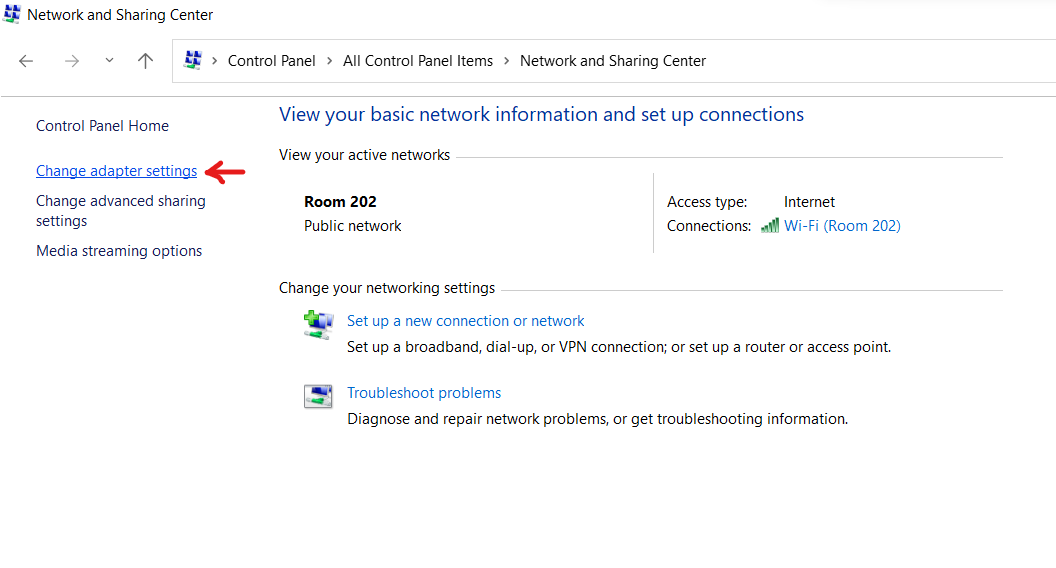
- Click on the network adaptor you want to know the DNS server details for.
- In the box that opens, click on details… to find out about the DNS servers used by this network connection.
Option-3: Advanced Network Settings
- Using the settings application, go to the Network & Internet section and click on Advanced Network Settings.
- Here, from the list of Network Adaptors, choose the one you wish to know the details for. Once it expands, click on View additional Properties.
You will be able to see the IPv4 and IPv6 DNS details for this network connection.
Option-4: Using “Get-DnsClientServerAddress” command
- Search for Windows Powershell in the Start Menu and open it.
- Type the command mentioned below in the black window that opens and press Enter.
Get-DnsClientServerAddress | Format-Table -AutoSize
You will be able to see DNS server details for all the Networks used on your device.
Option-5: Using “ipconfig” command
- This method can be carried out with the help of Windows Powershell or the Command Prompt. Search for either in the Start Menu and run it as administrator.
- In the black window that opens, write the following command and press Enter.
ipconfig /all
This will show all Server address used by all available network adaptors.
Option-6: Through Network and Sharing Center
- Open the Control Panel from the Windows menu and go to the Network & Sharing Center as shown in option 2.
- In this screen, click on the network connection link that you will find next to the connection for which you wish to know the DNS server address details.
- You will see a box as shown in option 2. Click on Details…
Hence, we have covered six different ways to guide you on how to find can find DNS servers used in Windows 11 device.
RELATED ARTICLES
In this tutorial, we will learn how to find your DNS Server settings in Windows 10 using the netsh or ipconfig command. We will also look at how to use the nslookup command to find name servers for a domain.
To find DNS Server settings on Windows 10, run the following command on CMD or PowerShell:
netsh interface ipv4 show dnsserversThe above command displays DNS servers that have been configured for IPv4. To check IPv6 DNS settings, run the following command:
netsh interface ipv6 show dnsserversIf your PC has multiple network interfaces, you may find different DNS server addresses under each interface. You can run the following command to check which interfaces are currently active:
netsh interface show interfaceWindows users can also use the ipconfig /all command to find DNS Server Addresses:
ipconfig /allYou will see an output similar to the following:
How To Change DNS Settings in Windows 10/11.
Using Nslookup Command to Find Nameservers for a Domain
If you want to find a nameserver for a domain name, then run the nslookup command as follows (replace example.com with the actual name of the domain you want to check):
nslookup -type=ns example.comThe command returns the name servers responsible for the domain name (under the answer section). The following is an example output of the nslookup command.
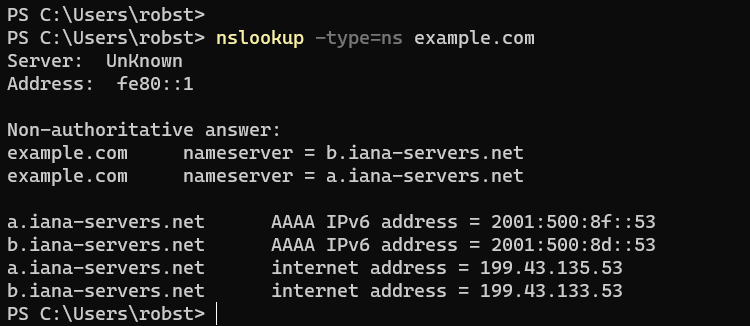
The -type=ns tells nslookup to search for name servers responsible for that domain. You will see at least two name servers for every domain name.
Click on this link to learn more about the nslookup command.
A DNS server is a computer designated to translate domain names into IP addresses. When a user wants to access a website, Windows takes the domain name typed in and requests the IP address for that domain from the DNS server.
Also, note that Windows keeps a local DNS cache so that it does not have to contact the DNS server every time.
Readers help support Windows Report. We may get a commission if you buy through our links.
Read our disclosure page to find out how can you help Windows Report sustain the editorial team. Read more
Internet is a big part of our everyday life, and even though most of us use the Internet on daily basis, many people don’t know how the Internet actually works.
Internet relies heavily on DNS, and in case you’re not familiar with it, today we’ll explain to you want DNS is and how it works.
What is DNS and how does it work?
You might have heard the term DNS before. DNS stands for Domain Name System and it’s a standard used for managing IP addresses. DNS was designed in 1983, and it’s a crucial part of the Internet that allows us to access websites with ease.
Every website has its own IP address, and computers use that IP address to connect to a certain website. If you’re not familiar with IP addresses, we suggest that you read one of our previous articles and learn what is an IP address and how it works.
You can even enter that address in your browser and it will open Google’s website for you. Since every website has its own IP address, it would be quite difficult for humans to memorize the IP address of every website that they want to access, therefore DNS was invented.
To explain it simply, DNS works as a phonebook, it has the names of all websites and their IP addresses, and it allows users to quickly find and access a certain website simply by entering its name instead of using the website’s IP address.
In order for DNS to work, it has to use DNS servers. As we mentioned, DNS servers hold information regarding all websites such as the URL of the website and the website’s IP address.
When you enter a certain URL into your browser’s address bar, you actually contact a DNS server that searches for an IP address that matches that URL.
If the address is found, you are immediately connected to that IP address. If the DNS server doesn’t have that URL and IP address in its database, it will contact a different DNS server and the process will repeat itself until the matching IP address is found.
We have to mention that computers cache DNS responses and your computer should have IP addresses of websites that you already visited, so you’ll be able to access them faster.
- READ ALSO: Fix: ‘Windows sockets registry entries required for network connectivity are missing’ on Windows 10
How can I check my DNS address on Windows 10?
Unlike humans, computers use IP addresses to connect to websites. Every website has its own IP address and you can easily find the IP address of any website.
You can easily find the address of the DNS server that you’re using by following these methods.
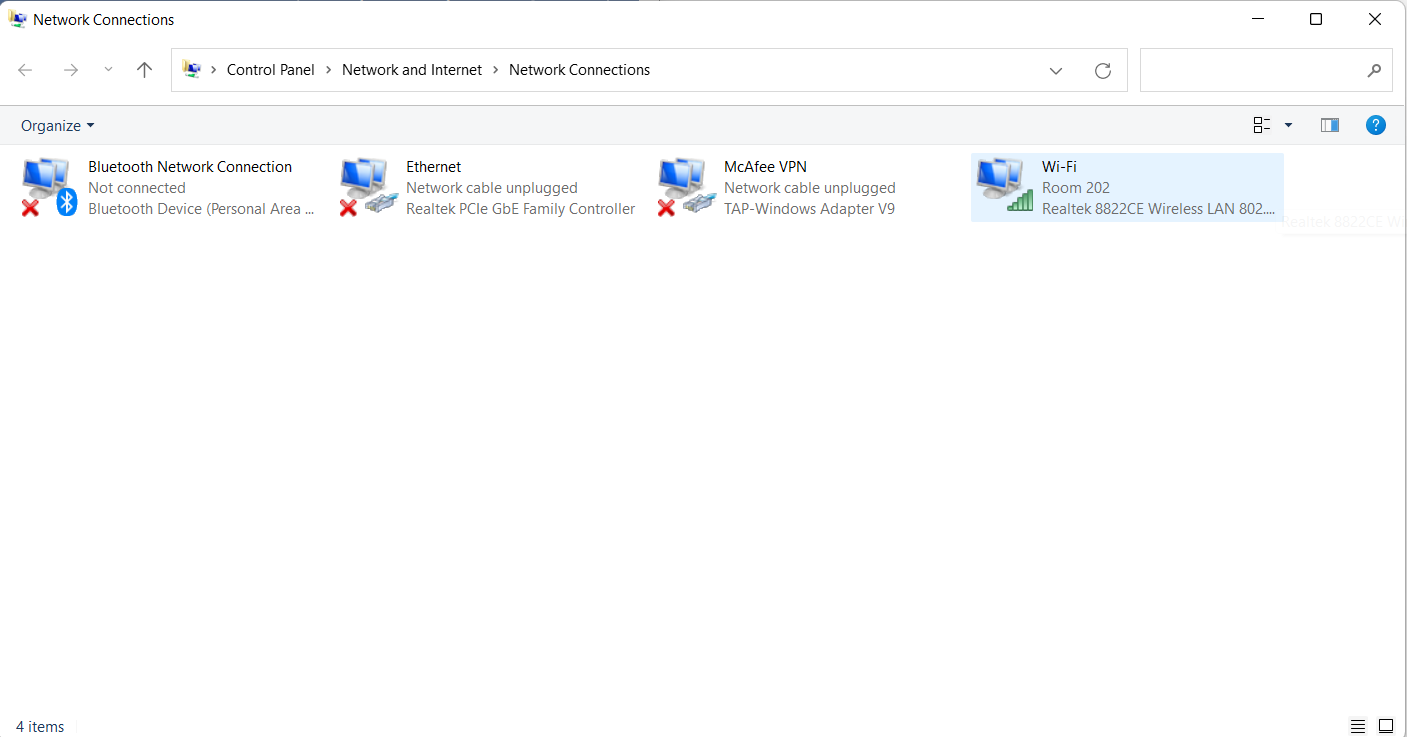
1. Via Network Connections
- Press Windows Key + X and select Network Connections from the menu.
- When the Network Connection window opens find your active connection, right click it and choose Status.

- Click the Details button.
- Locate IPv4 DNS Servers property and you should see the address of your current DNS server.

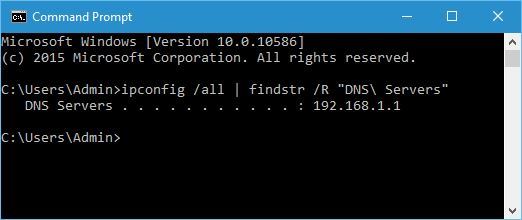
2. Via Command Prompt
Alternatively, you can see the address of your DNS server by using Command Prompt. To do that, open Command Prompt and enter ipconfig /all | findstr /R “DNS\ Servers”.
If you’re using a router, it’s most likely that the router is forwarding your requests to your ISP’s DNS servers.
Bear in mind that you don’t have to use your ISP’s DNS servers since you can easily change that address to any other DNS server, such as Google’s Public DNS for example.
How can I change my DNS server on Windows 10?
-
1. Press the Windows key and type Network Connections in the search box.
-
2. Open Network Connections by clicking on the first result and locate your current connection.
-
3. Right click it and choose Properties from the menu.

-
4. Choose Internet Protocol Version 4 (TCP/IPv4), and then click the Properties button.
-
5. Select Use the following DNS server addresses.
-
6. Manually input the IP addresses you want to change the server address to. For example, Google’s Public DNS addresses are 8.8.8.8 and 8.8.4.4.

-
7. Press OK to save the changes.
If your ISP DNS servers are slow, you might want to consider using a custom DNS server. You can set your preferred DNS address through the Network Connections settings.
Bear in mind that sometimes custom DNS servers might work slower for you, so if you don’t have any problems with your current DNS server you shouldn’t change it.


It’s worth mentioning that sometimes malicious software and users can change your preferred DNS server and lead you to scam websites designed to steal your personal information.
If you notice anything strange with websites that you frequently visit, be sure to check your DNS settings.
For a more in-depth guide on how to set up the DNS server 1.1.1.1 on Windows 10, check out our dedicated article.
- How to protect your Windows 10 device on public Wi-Fi
- Windows 10/11 can’t connect to this network [Complete Fix]
- Fix: Windows could not detect this network’s proxy settings
- Network Protocol missing in Windows 10/11 [FULL GUIDE]
- Fix: Windows 10 can’t Connect to router
How can I find my computer’s IP address?
- Open Command Prompt. To do that, press Windows Key + X to open the Power User Menu and select Command Prompt.
- When Command Prompt opens enter ping www.google.com. Bear in mind that you can use any other website. Press Enter.

- Now you should see a specific IP address, in our case that was 216.58.214.228.

DNS is an integral part of the Internet, and without it, the Internet wouldn’t be the same.
We hope that you learned a thing or two from this article and that you now better understand how the Internet and DNS work.
If you have any questions, let us know in the comments section below.
Milan Stanojevic
Windows Toubleshooting Expert
Milan has been enthusiastic about technology ever since his childhood days, and this led him to take interest in all PC-related technologies. He’s a PC enthusiast and he spends most of his time learning about computers and technology.
Before joining WindowsReport, he worked as a front-end web developer. Now, he’s one of the Troubleshooting experts in our worldwide team, specializing in Windows errors & software issues.