
- To run shell scripts on Windows, you must enable WSL and Virtual Machine Platform, install a WSL distro, and use “Bash Script.sh” to execute it.
- Alternatively, use third-party tools like Cygwin, Cmder to run Linux commands on top of Windows OS.
If you have worked with Linux distributions and repositories, you would know what shell scripts are. To run shell scripts on top of a Windows computer can be challenging, as the process is not quite straightforward.
Shell scripts are a piece of code written in plain text but have the “.SH” file extension. These are usually used to automate tasks and execute Linux or Unix packages. These are written in Bash and start with “#! /bin/sh“.
You do not need to install a Linux or Unix distribution alongside your Windows operating system to run a shell script. In this article, we’ll show you how to run a shell script on a Windows PC.
Table of Contents
What are Shell (.SH) Files
The Linux/Unix operating system uses shell or .SH script files to perform certain tasks. In comparison, it can be substituted by Windows batch files for the Windows operating systems, which are used to execute commands on a computer.
The Batch language is a simple and interpreted programming language, unlike C++ or C#. However, you do not have to translate a shell script file to batch to perform similar tasks on a Windows computer, as you do on a Linux PC.
There are different methods to run the same .SH file on a Windows computer as on a Linux system. Let us show you how to run a shell file on a Windows PC.
Run Shell Script (.SH) File on Windows
There are both native and third-party methods to run shell files on a Windows computer. You can use Cygwin, or a third-party tool of your choice, to run a shell script on Windows OS. Alternatively, you can install the Windows Subsystem for Linux feature on Windows and then execute the shell script file through it.
Below you’ll find the methods to run the file using both methods.
Run Shell Script File using Windows Subsystem for Linux (WSL)
This section has been divided into 3 steps to make the process easier to understand. You must do the following 3 things to run a shell script file in the given order:
- Install WSL
- Install a Linux distro
- Run the shell script file
Note: If you are performing these steps on a Virtual Machine, then you will need to enable Nested Virtualization.
Install WSL
Use the following steps to install WSL on your computer:
-
Press the Windows Key + R shortcut keys to open the Run Command box.
-
Type in “optionalfeatures” and press Enter.
Open the Optional Features applet -
Select “Windows Subsystem for Linux” and “Virtual Machine Platform,” and then click Ok.
 Scripts In Windows 2")
Enable WSL and Virtual Machine Platform The wizard will now install WSL.
-
When the installation is completed, click “Restart now.”
Restart computer
 Scripts In Windows 2")
 Scripts In Windows 3")
Once the computer restarts, it is time to install a Linux distro.
Install a Linux Distribution
Use the following steps to install a Linux distribution:
-
When it restarts, press Windows Key + R again to open Run.
-
Type in “cmd” and press CTRL + Shift + Enter to run Command Prompt as administrator.
-
Run the following command to obtain a list of available Linux distros:
wsl --list --online
Get list of all available Linux distros in Command Prompt Note down the name of the distro you want to install.
-
Use the following command to install the preferred distro while substituting its name:
wsl --install -d [DistributionName]
Install a Linux distro in WSL The distro will now begin to download and install.
-
Set up a username and password.
Set up username and password -
Restart the computer.
 Scripts In Windows 4")
 Scripts In Windows 5")
 Scripts In Windows 6")
Now, the next step is to simply run the shell script file.
Run the Shell Script File
Follow the simple steps below to run the shell script file on a Windows PC:
-
Press the Windows Key + R again to open Run.
-
Type in “cmd” and press CTRL + Shift + Enter to run Command Prompt as administrator.
-
Use the CD cmdlet to change the directory to the location of the shell script file.
CD [PathToShellScriptFile]
Change directory to the shell script file location -
Now, use the following command to run the shell script file while substituting [ShellFileName] with the complete and correct name of the shell file:
Bash [ShellFileName].sh
Run the shell script file using Windows Subsystem for Linux
 Scripts In Windows 7")
 Scripts In Windows 8")
This is how you run a shell script (.SH) file on a Windows computer using WSL.
If this seems like a lengthy process for you, then you can also use the alternative method given below.
Run Shell Script File using Third-Party Tools
You can also run a shell script file on a Windows computer using a third-party tool. In the steps below, we have used Cygwin.
Follow these steps to run a .SH file on a Windows PC:
-
First, download and install Cygwin from their official website.
-
Once installed, run the Cygwin app.
-
In the Cygwin terminal, use the
CDcommand to change the directory to the shell script file location.Note: In Cygwin, the syntax to change the directory is different from Command Prompt or PowerShell. Use the following command syntax and example in the image to change your directory in Cygwin.
CD /cygdrive/[driveLetter]/[Subfolder1]/[Subfolder2]
Change directory to the shell script file location in Cygwin -
Now, make the shell script file executable through this command:
chmod +x [ShellFileName].sh
Make the shell script file executable -
Now, use the following syntax to run the shell script file:
./[ShellFileName].sh
Run shell script file on Windows using Cygwin
 Scripts In Windows 9")
 Scripts In Windows 10")
 Scripts In Windows 11")
These are the two methods to run shell script files (.SH) on a Windows PC. Of course, there are many other third-party tools available that allow you to run Linux and Unix files on a Windows computer.
Frequently Asked Questions (FAQs)
How to create a shell script (.SH) file?
I you know what you want to write inside the shell script file, all you need to do is follow these simple rules:
– Create a new notepad file
– Start the script with “#! /bin/sh”
– Write the code below it
– Save the file with a “.sh” extension
– To run the script, type “bash [FileName].sh” after navigating to the folder.
Can I run shell scripts on Windows?
Yes, shell script files can be executed on a Windows computer using Windows Subsystem for Linux, or third-party tools like Cygwin, kiTTY, ConEmu, Cmder, etc.
Why use shell scripts on Windows?
Shell scripts are used to perform repetitive tasks to save time and resources. They are also used to automate tasks. With the WSL feature, Microsoft has opened doors to natively run shell scripts on Windows operating systems.
In the modern days of CI/CD automation scripts, obtaining the absolute path of a shell script is the base for any useful script in a coding repository. Whether you want to automate filesystem operations, download content to a certain location, or write build scripts, you will need to get the location of your main directory in your scripts.
For this reason, we’ll look at different ways to get the absolute path of a script with a shell command. In addition, the methods we introduce in this post should be fairly portable between shell environments (bash, zsh, etc).
If you’ve just started out writing shell scripts, you may find it useful to read my post about the most useful terminal commands for beginners!
Video – How To Get The Path Of A Shell Script While Writing A Utility Script (Unzipping)
If you’re a visual learner, the video below shows you the best way to get a script path. Feel free to read the remaining sections for the same content in writen form!
Two Different Ways To Get The Path Of A Script: $0 Vs $BASH_SOURCE
Long story short, we rely on two different shell variables that contain (the relative) path of the script being executed.
Firstly, we will look at the variable $0, which should contain the path of the script being executed. Unsurprisingly, this is probably the most popular option out there, as it’s very simple to use and it’s fairly well defined in non-bash shells.
Similarly, we also look at the ${BASH_SOURCE[i]} variable (array), which in bash-derived shells, contains information about the definitions of call stack functions. More specifically. ${BASH_SOURCE[0]}, or simply $BASH_SOURCE, should contain the filename of the called script.
In short, if you’re using a bash-like shell, the preferred way to get the relative path to the current script is by using $BASH_SOURCE. However, if your system does not have a bash-like shell, use $0. If you’re wondering why, take a look at the top answers on this slack overflow question: $BASH_SOURCE vs $0.
Hence, I highly recommend using the following line to get the relative path to the current script:
SCRIPT_PATH="${BASH_SOURCE:-$0}"Needless to say, the line above attempts to access the value of $BASH_SOURCE , and if that is defined in your shell, it will store it in $SCRIPT_PATH. However, if $BASH_SOURCE isn’t defined, $SCRIPT_PATH will contain the value of $0 instead.
Considering the example in the previous section, the variable $SCRIPT_PATH contains the relative path of the current script. Essentially, we will use that variable with the realpath and dirname commands to get the absolute path of our script! The perfect way to get the absolute path and directory to a script is shown in the script box below.
SCRIPT_PATH="${BASH_SOURCE:-$0}"
echo "Value of SCRIPT_PATH: ${SCRIPT_PATH}"

ABS_SCRIPT_PATH="$(realpath "${SCRIPT_PATH}")"
echo "Value of ABS_SCRIPT_PATH: ${ABS_SCRIPT_PATH}"

ABS_DIRECTORY="$(dirname "${ABS_SCRIPT_PATH}")"
echo "Value of ABS_DIRECTORY: ${ABS_DIRECTORY}"
Furthermore, when I saved the above block to the file script_dir.sh in my home directory, and executed it with the following commands:
# make the script executable
chmod +x /home/matheus/script_dir.sh

./home/matheus/script_dir.sh
I got the following output.
$ ./script_dir.sh
Value of SCRIPT_PATH: ./script_dir.sh
Value of ABS_SCRIPT_PATH: /home/matheus/script_dir.sh
Value of ABS_DIRECTORY: /home/matheus
And voilà! You can now use the above lines in your tooling scripts.
Have I missed anything? Do you have any feedback or questions? Have you noticed a mistake/typo? Feel free to comment below and I’ll answer ASAP! Thanks for reading.
Some shell scripts must run in a specific working directory. To achieve this, you can add a cd command to the working directory before executing the shell script.
The default working folder ($SCHEDULER_DATA) is the one containing the ‘config’, ‘jobs’, etc. folders, so on a Win-7 installation with default settings, this is:
C:\ProgramData\sos-berlin.com\jobscheduler\scheduler-id\
where ‘scheduler-id’ is the ID of the JobScheduler.
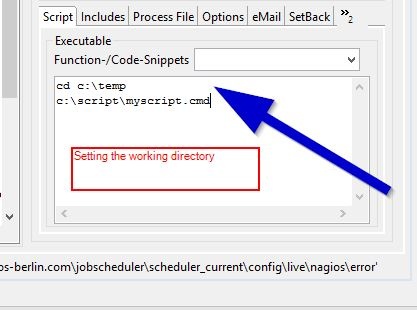
 <job  task="5" stop_on_error="no" order="yes" warn_if_longer_than="30:00" name="job1">
    <script  language="shell">
        <![CDATA[
 cd c:\temp
 c:\script\myscript.cmd
         ]]>
    </script>
 </job>
It is also possible to configure this as an extra file with just the cd command and add this file to the script with an include. This is helpful when you attempt to move a job from test to production without changing the configuration but with another working directory on the production site.
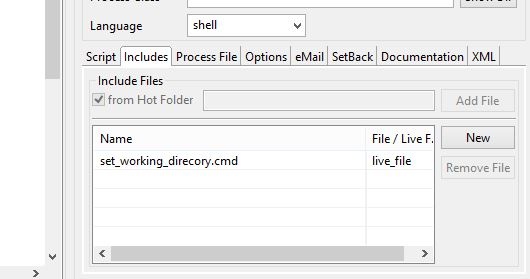
<job  tasks="5" stop_on_error="no" order="yes" warn_if_longer_than="30:00" name="job1">
   <script  language="shell">
       <include  live_file="set_working_direcory.cmd"/>
       <![CDATA[
c:\script\myscript.cmd
       ]]>
   </script>
</job>
see also:
- FAQ — Scripting
In the evolving technological landscape, navigating different operating systems and their unique functionalities is an essential skill. A prominent instance is the requirement to run .sh or shell script files on Windows 10. The demand to handle such tasks typically arises for developers, system administrators, or tech enthusiasts who work across different platforms or those who frequently interact with Unix-based environments such as Linux.
Unlike Unix-based systems, Windows does not inherently offer support for these .sh files. Despite this, there are efficient methods to bridge this gap and run shell scripts successfully on Windows 10.
This article serves as a comprehensive guide to understanding and implementing these methods, simplifying the otherwise daunting task. We shall guide you through a sequence of procedures and tools that enable you to run .sh files, bridging the gap between Windows and Unix-based systems.
So, let’s dive in, simplify the technicalities, and take one step further in mastering cross-platform operations.
What are Shell Scripts?
Shell scripts, denoted by the .sh extension, are a series of commands written in plain text file format. They’re essentially a batch job that instructs the system on what tasks to perform. You might be asking, “Why do we use them?” Let’s discuss this next.
Role and Importance of Shell Scripts
Shell scripts automate repetitive tasks, thereby diminishing the chances of errors and conserving precious time. They play an integral role in software development and system administration. Intrigued? Let’s delve into the basics of running a shell script.
Method 1: Using Windows Subsystem for Linux (WSL)
The Windows Subsystem for Linux (WSL) is an environment within Windows 10 that allows running native Linux command-line tools directly on Windows without requiring dual-boot or virtualization. It serves as a compatibility layer for running Linux binaries natively on Windows 10 and hence, is a powerful tool for executing shell scripts.
To install WSL, follow these steps:
- Enable the WSL feature: Open the “Turn Windows features on or off” dialog box, which you can access via the Control Panel or by typing the phrase into the Windows search bar.

In this dialog, scroll down and check the option titled “Windows Subsystem for Linux.” Once you click “OK,” Windows will prompt you to restart your computer in order to implement the changes.

- Download a Linux distribution: Once you’ve enabled WSL and rebooted your system, the next step is to download a Linux distribution from the Microsoft Store. Some of the popular distributions include Ubuntu, Debian, and openSUSE. Once the download and installation process has concluded, you will find yourself equipped with a fully operational Linux environment integrated within your Windows system.
After successfully installing WSL and a Linux distribution, you can run shell scripts as follows:
- Open the WSL: Start by launching the WSL. You can do this by typing the name of your installed Linux distribution into the Windows search bar and pressing Enter.
- Navigate to the script’s directory: In the Linux command line, navigate to the directory containing your shell script file using the ‘cd’ (Change Directory) command. As an illustration, if your script resides in the Documents directory, you should input ‘cd Documents’ and then hit the Enter key.
- Execute the script: Finally, you can run your shell script by typing ‘sh’ followed by the name of your script. For instance, if your script is named ‘myscript.sh’, you would type ‘sh myscript.sh’ and press Enter.
Method 2: Using a GUI Method
Apart from the above method, you can also execute shell scripts in a graphical user interface (GUI) setting, particularly when using a Linux distribution or WSL with a desktop environment. This method provides a more intuitive way of running shell scripts for those who prefer graphical over command-line interfaces.
Here’s how to execute a shell script using this method:
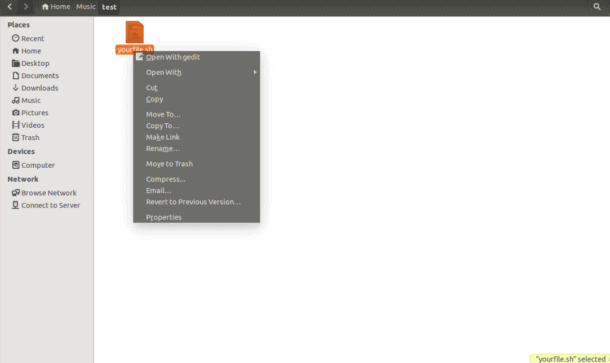
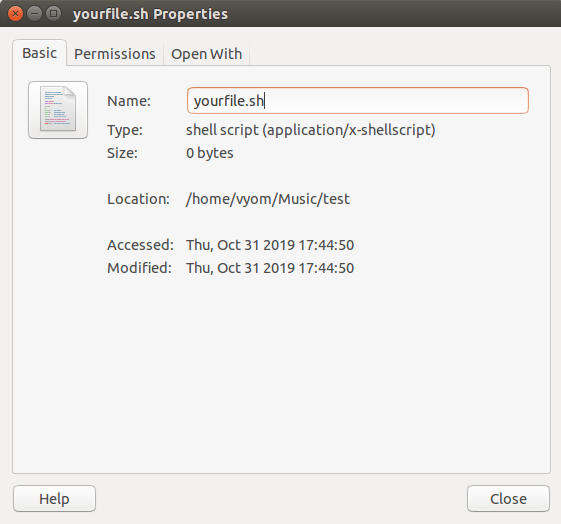
- Access file properties: Start by right-clicking on the .sh file you want to run. Upon right-clicking and accessing the context menu, opt for the “Properties” choice. This will initiate the opening of a fresh window showcasing a range of attributes linked to the file.
- Navigate to permissions: Within the file properties window, you will encounter multiple tabs. Proceed to click on the tab marked as “Permissions.” This tab grants you the capability to adjust various permissions related to access and execution for the file.
- Modify execution permissions: Look for a checkbox labeled “Allow executing file as a program” under the “Execute” section. Check this box to grant your file the necessary permissions to run as a script.
- Apply changes: After making the necessary permission modifications, save the changes by selecting the “Apply” button. Following that, click on the “OK” button to close the properties window. At this point, your shell script possesses the required permissions for execution.
- Run the script: Finally, run the script by double-clicking on the .sh file. If the system prompts you to choose between “Run in Terminal,” “Display,” “Cancel,” or “Run,” select “Run in Terminal” for command-line scripts.
By following these steps, you can execute shell scripts using the GUI method. While this approach might not be suited for all scenarios, it does provide a more visual way of handling shell scripts, especially for users less comfortable with command-line interfaces.
Conclusion
Executing shell scripts in a Windows environment might initially seem like a complex task, given the fundamentally different architectures of Windows and Unix-like systems. However, with the right tools and methods at your disposal, you can run .sh or shell script files on Windows 10 effectively and efficiently.
Throughout this guide, we’ve explored multiple ways to achieve this, ranging from using Git Bash, the powerful Windows Subsystem for Linux (WSL), to utilizing a graphical user interface.
A .SH file is a simple text file that contains the commands and a little logic to it. There are several ways to run a .SH file. A .SH file is very similar to the batch file of the Windows operating system and can be run in the Linux-based operating system. It is also possible to run .SH file in Windows 10 using Windows Subsystem for Linux.
In this tutorial, we will show you how to run .SH files in Linux and Windows 10 systems.
In this section, we will show you how to run .SH file in Linux with examples.
Basic Steps to Run .SH Files
Before running .SH files, you will need to give execute permission on your file that you want to run. You can set execute permission with the following command:
chmod +x yourfilename.sh
Or
chmod 755 yourfilename.sh
Next, you can run your .SH file by running the following command:
sh yourfilename.sh
Or
bash yourfilename.sh
Or
./yourfilename.sh
Run .SH file as a root User
In some cases, you will need root access to install application or make system level modifications with .SH file. You can run .SH file as a root user by using the sudo command as shown below:
sudo bash yourfilename.sh
Type your user password and hit Enter to execute the .SH file.
You can also use su command to login with superuser and execute the .SH file.
First, switch the user to root with the following command:
su -
Next, run .SH file with the following command:
bash yourfilename.sh
Run .SH file with CHMOD Command
You can also use chmod command to run .SH file. First, set the execute permission on your file with the following command:
chmod +x yourfilename.sh
Next, run .SH file with the following command:
./yourfilename.sh
If your file is located at /opt directory then run the following command:
./opt/yourfilename.sh
Run .SH file with GUI Method
You can also run .SH file with Graphical user interface. To do so, first right click on the file that you want to run as shown below:
Next, click on the Properties. You should see the following screen:
Next, click on the permisssion tab and select Allow executing file as a program as shown below.
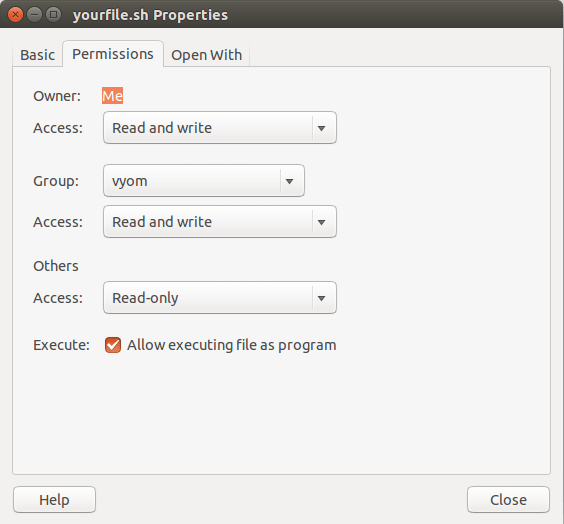
Next, double click on the file to execute the file.
Run .SH files in Windows 10
There are several ways to run .SH files in Windows 10 operating systems.
Run .SH file with WSL
WSL stands for “Windows Subsystem for Linux” is a compatibility layer for running Linux binary executables natively on Windows 10 and Windows Server 2019. It allows you to run native Linux command-line tools directly on Windows.
First, you will need to install WSL in your Windows 10 systems.
To do so, go to Settings > Update & Security > For Developers and check the Developer Mode radio button. Then, search for “Windows Features”, choose “Turn Windows features on or off”.
Next, scroll down, find WSL, check the box and install it. After installing WSL, you will need to restart your system to finish the installation.
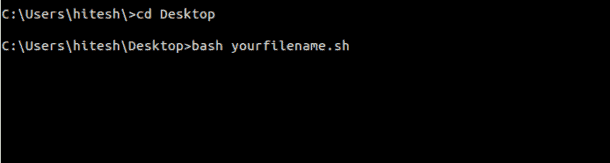
Next, open the Command prompt, change the directory where yourfilename.sh is located and type bash yourfilename.sh to execute your file as shown below:
Run .SH File with Ubuntu on Windows 10
If you want to run .SH file in a Linux environment on Windows 10 then you will need to install Ubuntu or any other Linux distros on Windows 10.
You can install Ubuntu on Windows 10 by following the below steps.
First, go to Settings > Update & Security > For Developers and check the Developer Mode radio button. Then, search for “Windows Features”, choose “Turn Windows features on or off”.
Next, scroll down, find “Windows Subsystem for Linux (Beta)”, check the box and click Ok to install it. Once the installation has been finished, you will need to restart your system to finish installing the requested changes.
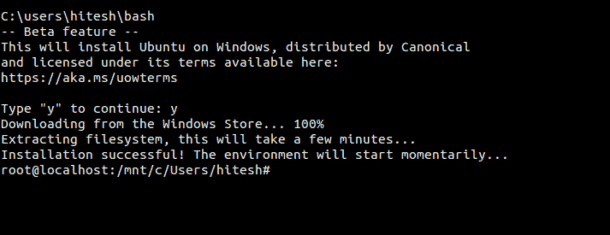
Next, open your Command prompt, type bash and hit Enter to install Ubuntu on Windows 10. Once the installation has been finished you should see the following screen:
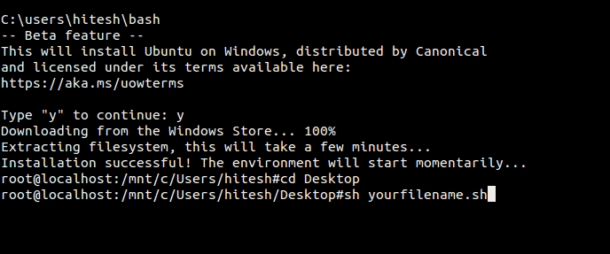
Now, change the directory with cd command to the directory where yourfilename.sh is located and hit Enter to run the file as shown below:
Conclusion
In the above tutorial, we learned how to run .SH files in Linux and Windows 10 operating systems. I hope you have now enough knowledge to run .SH files in Linux and Windows 10.