
В диспетчере задач Windows 11 или Windows 10 вы можете обратить внимание на процесс «Хост Windows Shell Experience» и соответствующий ему исполняемый файл ShellExperienceHost.exe — обычно процесс приостановлен, но в некоторых случаях вызывает проблемы: может нагружать процессор или вызывать подозрения о том, что процесс — вредоносный.
В этой инструкции подробно о том, что представляется собой процесс ShellExperienceHost.exe, для чего он используется и о решении возможных проблем с этим процессом.
Назначение процесса ShellExperienceHost.exe
Оригинальный процесс ShellExperienceHost.exe является родным системным процессом Windows 11 или Windows 10 и не представляет какой-либо угрозы. В изначальных версиях Windows 10 он полностью обеспечивал работу меню «Пуск» и работу универсальных приложений в оконном режиме.

В текущих версиях ОС для меню «Пуск» выделен отдельный процесс — StartMenuExperienceHost.exe, однако и ShellExperienceHost.exe продолжает использоваться, в частности для:
- Всплывающих панелей меню Пуск — например, при нажатии по дате и времени в панели задач, открытии панели быстрых действий.
- Для функций «виртуальный тачпад» и «меню пера».
- Отображения системного меню «Поделиться».
- Показа системных уведомлений.
Файл оригинального системного процесса ShellExperienceHost.exe располагается в папке
C:\Windows\SystemApps\ShellExperienceHost_cw5n1h2txyewy

При иных расположениях (определить папку можно, нажав правой кнопкой мыши по процессу в диспетчере задач и выбрав пункт «Открыть расположение файла») имеет смысл проверить файл процесса на вирусы, например, с помощью VirusTotal.com и выполнить проверку компьютера на наличие вредоносных программ.
Вы можете принудительно завершить (снять задачу) этот процесс в диспетчере задач, в современных версиях Windows 11 и 10 это не приводит к сбоям, однако, при некоторых действиях, таких как нажатие по часам в панели задач Хост Windows Shell Experience будет запущен снова.
Решение возможных проблем с ShellExperienceHost.exe
В большинстве случаев Windows Shell Experience не вызывает каких-либо проблем при работе системы, однако, если вы наблюдаете высокую нагрузку на процессор с его стороны, сбои, либо «странное» поведение этого процесса, разобраться с проблемами могут помочь следующие пункты:
- При высокой нагрузке на процессор со стороны ShellExperienceHost.exe — попробуйте отключить (удалить) сторонние средства, модифицирующие внешний вид Windows 11/10, в старых версиях Windows 10 также может помочь отключение функций слайд-шоу для обоев рабочего стола и автоматического контрастного цвета в параметрах персонализации.
- Если на компьютере появляются уведомления с рекламой в рамках процесса ShellExperienceHost.exe, вероятнее всего дело не в самом процессе, а в том, что он используется для уведомлений браузеров. Проверьте настройки уведомлений в них, например, в Google Chrome для этого требуется зайти в Настройки — Конфиденциальность и безопасность — Настройки сайтов — Уведомления (и отключить уведомления для нежелательных сайтов). В Edge нужные настройки можно найти в «Параметры» — «Файлы cookie и разрешения для сайтов» — пункт «Все сайты» в разделе «Разрешения для сайтов».
- При постоянных сбоях процесса попробуйте установить последние доступные обновления Windows, а также выполнить проверку целостности системных файлов Windows с помощью команды sfc /scannow, запущенной в командной строке от имени администратора. Подробнее: Восстановление системных файлов Windows 11 (подойдет и для Windows 10).
- В дополнение к предыдущему пункту, можно попробовать следующую команду PowerShell для перерегистрации приложения Windows Shell Experience Host:
Get-AppxPackage -AllUsers Microsoft.Windows.ShellExperienceHost | Foreach {Add-AppxPackage -DisableDevelopmentMode -Register "$($_.InstallLocation)AppXManifest.xml"} - Если есть основания полагать, что проблемы с процессом — результат наличия вирусов, выполните сканирование компьютера, например, с помощью Kaspersky Virus Removal Tool (не требует установки и не конфликтует с уже имеющимися антивирусами).
Если у вас есть другие вопросы, касающиеся процесса ShellExperienceHost.exe, вы можете задать их в комментариях ниже — я постараюсь помочь.
,
If you are a Windows 10/11 user and you cannot open the Start menu or the Cortana search bar and the Windows Troubleshooter displays the error «Microsoft.Windows.ShellExperienceHost and Microsoft.Windows.Cortana applications need to be installed correctly«, continue below to fix the problem.
Problems with the Start menu and search function in Windows 10/11 can be caused by various reasons, such as corrupted system files, faulty Windows updates, outdated drivers, malware, etc. But don’t worry, in this guide you will find step-by-step instructions to fix the «Microsoft.Windows.ShellExperienceHost» and «Microsoft.Windows.Cortana» applications need to be installed correctly» issue.
This is a comprehensive guide to fix the»Start Menu not working» & «Search not working» problems in Windows 10.
How to fix: «ShellExperienceHost» and «Cortana» applications need to be installed correctly» on Windows 10.
Method 1: Restart Windows Explorer.
One of the simplest solutions to fix the mentioned error is to restart Windows Explorer. Restarting Windows Explorer will refresh the desktop and taskbar, including the Start menu and Cortana search bar.
1. Press Ctrl + Shift + Esc on your keyboard to open the Task Manager.
2. Find and select the «Windows Explorer» process under the «Processes» tab in the Task Manager window and click the Restart button on the bottom right.

3. After you click «Restart», your taskbar and desktop icons will disappear for a few seconds and then reappear. When this happens, check to see if the problem has been resolved.
Method 2: Install Pending Windows Updates.
The «ShellExperienceHost» & «Cortana application» errors may occur if important Windows updates are missing. So, check for missing Updates and if any found install them.
1. Press the Windows + R keys to open the Run dialog box.
2. Type ms-settings:windowsupdate in the run command box and press Enter.

3. Click Check for updates and if any updates found click Install to install them.

Method 3. Run CTF Loader (ctfmon.exe).
The CTF Loader (ctfmon.exe), is a legitimate Windows process (ctfmon.exe), which controls the User Input and the Language bar. In some cases, the ‘ctfmon.exe’ process may not function properly and must be started again. To restart, the CTF Loader (ctfmon.exe) process:
1. Simultaneously press the Windows + R keys to open run command box.
2. In run command box, copy paste the below command and press Enter:
- C:\Windows\system32\ctfmon.exe
3. Now try to see if the Start menu and the Search is working.
Method 4: Repair Windows with DISK & SFC commands.
Since many Windows errors are most often caused by corrupted system files, try to see if the problem is solved by fixing them.
1. Press the Windows + R keys to open the Run dialog box
2. In the run command box, type: cmd and press Ctrl + Shift + Enter to open Command Prompt as Administrator.
3. At the command prompt window, type the following command & press Enter:
- Dism.exe /Online /Cleanup-Image /Restorehealth

4. Be patient until DISM repairs component store. When the operation is completed, (you should be informed that the component store corruption was repaired), give this command and press Enter:
- SFC /SCANNOW

5. When SFC scan is completed, restart your computer.
6. After restart check if the problem is fixed.
Method 5. Check if the Problem persists in Safe Mode.
Safe mode boots Windows in its most minimal configuration, with a limited selection of files and drivers. Starting Windows in safe mode is not the solution to the problem, but it will help you determine if the problem is caused by bugs in the operating system or by some other third-party program or device driver.
1. Press the Windows + R keys to open the Run dialog box
2. In the run command box, type: msconfig and press Enter to open the System Configuration utility.

3. Go to the Boot tab, tick the Safe boot checkbox and click Apply and OK.

4. Finally click the Restart button to restart your PC in Safe Mode.
5. When windows enters safe mode, check if the Start menu and the Cortana Search are working. Now according the result, proceed as follows:
-
If the error does not occur in safe mode, usually means that the default Windows settings and basic device drivers are not causing the problem. At such a case proceed to Method-6 below to re-install the Graphics drivers.
-
If the error also occurs in safe mode, then proceed to Method-7 to disable the third-party startup programs.
Method 6: Reinstall Graphics Driver.
Drivers are software components that allow hardware components to communicate with the operating system. When a driver becomes outdated or corrupted, it can interfere with the proper functioning of the ShellExperienceHost and Cortana applications, leading to problems.
1. Right-click on the Start menu and select Device Manager.

2. Expand the Display adapters section.
3. Right-click on your display adapter and select Uninstall Device.

4. At next window, choose to Delete the driver software for this device and click Uninstall.
5. Wait a few seconds and then restart your PC.
6. After restart, Windows will automatically re-install the graphics driver from the Windows Update servers.
* Note: To make sure the driver installation is complete, go to again Device Manager and check that your display adapter model is listed there. If not, check and install all available Windows updates or install the latest graphics driver from the GPU manufacturer’s support site.
7. If the problem persists after reinstalling the graphics drivers, proceed to next methods.
Method 7. Disable Third-Party Startup Programs.
Many times, a non-Microsoft program launched at Windows startup can cause the Start menu not to work. So, proceed and disable any third-party startup programs as instructed below, and see if this fixes the issue.
1. Press Ctrl + Shift + Esc on your keyboard to open the Task Manager.
2. At Startup tab, select and Disable any third-party (non-Microsoft) programs that are running at Windows startup (e.g. iTunes, Dropbox, uTorrent, etc.)*

3. When done, restart your PC.
4. Finally, if after rebooting the problem is resolved, then turn on the disabled programs one-by one-to find the culprit.
Method 8. Disable Third-party services.
Sometimes the reported problem may occur because of a third-party service. To see if this happens:
1. Press the Windows + R keys to open the Run dialog box.
2. In the run command box, type: msconfig and press Enter to open the System Configuration utility.

3. In the System Configuration utility, select the Services tab and…
a. Check the Hide all Microsoft services box.
b. Click the Disable all button to disable all the non-Microsoft Services.
c. Click Apply > OK and then click Restart to reboot your PC.

4. If the problem is resolved after disabling the third-party services, follow the same steps as above and enable again one-by-one the disabled services and restart your pc, until you find which one is causing the problem.
* Note: If the problem persists, enable all the disabled services (using the same steps) and continue to the next method.
Method 9. Uninstall Dropbox.
Dropbox is a cloud storage and file syncing service that can cause conflicts with the «ShellExperienceHost» and Cortana apps, and many users have reported that removing Dropbox is the solution to the problem.
1. Press the Windows + R keys to open the Run dialog box.
2. Type appwiz.cpl in the Run dialog box and press Enter to open Programs and Features in Control Panel.

3. In the Programs and Features select the «Dropbox» (if installed) and then right-click on it and select Uninstall from the context menu.

4. When the uninstall is completed, restart your PC and check if the problem persists. If the issue is resolved, go ahead and install the latest version of Dropbox if you need it.
Method 10. Scan for Viruses & Malware.
Viruses or malicious programs can cause your PC to work abnormally. So,use this Malware Scan and Removal Guide to check and remove viruses or/and malicious programs that may be running on your computer.*
* Important: In some cases a third-party antivirus program can cause the start menu and the search bar to crash or freeze. At such a case, I suggest to temporarily uninstall the AV program and then to check if the issue is fixed. If yes, then install your AV program again or find another AV program to protect your PC. *
* Note: If you have installed Spybot AV then probably this is causing the problem.
Method 11. Re-install Windows.ShellExperienceHost & Windows.Cortana
The «Microsoft.Windows.ShellExperienceHost» and «Microsoft.Windows.Cortana» applications need to be installed correctly error can occur due to issues with their installation or registration on your system.
1. Simultaneously press the Windows + R keys to open run command box.
2. Type powershell and then press CTRL + SHIFT + ENTER to open PowerShell as Administrator.
3. Inside the Administrator PowerShell window, (copy &) paste the following command but DO NOT press Enter yet.
- Get-AppxPackage Microsoft.Windows.ShellExperienceHost | Foreach{Add-AppxPackage -DisableDevelopmentMode -Register «$($_.InstallLocation)\AppXManifest.xml»}
4. Then press Ctrl+ALT+DEL and open Task Manager.
5. (Now you have to be fast …)…
1. At the Processes tab, right-click at Windows Shell Experience Host and click End Task.
2. Then, click immediately at the PowerShell window and press Enter.

6. When done, copy-paste the following command in PowerShell to re-install the Cortana app.
- Get-AppxPackage Microsoft.Windows.Cortana | Foreach {Add-AppxPackage -DisableDevelopmentMode -Register «$($_.InstallLocation)\AppXManifest.xml»}

Method 12. Re-install all Modern Apps on your account:.
1. Simultaneously press the Windows + R keys to open run command box.
2. Type powershell and then press CTRL + SHIFT + ENTER to open PowerShell as Administrator.
3. Inside the Administrator PowerShell window, (copy &) paste the the following command & press Enter:
Get-AppXPackage | Foreach {Add-AppxPackage -DisableDevelopmentMode -Register «$($_.InstallLocation)\AppXManifest.xml»}

4. When the deployment operation process is completed, ignore any errors and close the PowerShell window.
5. Reboot your computer and then check if the start menu and the Cortana search is working.
Method 13. Reinstall System Apps, Cortana & ShellExperienceHost for all Users.
1. Open PowerShell as Administrator and give the following three (3) commands in order:
- Get-AppXPackage -AllUsers |Where-Object {$_.InstallLocation -like «*SystemApps*»} | Foreach {Add-AppxPackage -DisableDevelopmentMode -Register «$($_.InstallLocation)\AppXManifest.xml»}
- Get-AppXPackage -AllUsers |Where-Object {$_.InstallLocation -like «*Cortana*»} | Foreach {Add-AppxPackage -DisableDevelopmentMode -Register «$($_.InstallLocation)\AppXManifest.xml»}
- Get-AppXPackage -AllUsers |Where-Object {$_.InstallLocation -like «*ShellExperienceHost*»} | Foreach {Add-AppxPackage -DisableDevelopmentMode -Register «$($_.InstallLocation)\AppXManifest.xml»}

5. Reboot your computer and then check if the problem is resolved.
Method 14: Create a New User Account
Creating a new user account can help you determine if the problem is caused by a corrupted user profile or not. Simply put, if the error does not occur in the new user account, then this indicates that your user profile is corrupted. Otherwise, If the error still appears in the new profile, then the problem is in the operating system.
1. Press the Windows + I keys on your keyboard to open the Settings app. Then click on Accounts.

2. Select Family & other users on the left pane and then click Add someone else to this PC on the right.

3. Now, click I don’t have this person’s sign-in information to add a new local account.

4. Then click Add a user without a Microsoft account and follow the on-screen instructions to create the new account.

5. After account creation, right-click on the Start menu and select Shut down or sign-out > Sign-out. (or restart your PC and select the new account at the login screen)
6. After you have logged in to the new account, check if the problem persists and if so, login back in to your regular account and continue with the next method.* If not, transfer all files and settings from your regular account to the new one.
* Suggestion: If you have reached this point and the problem has not been fixed I would suggest you to preform a Windows 10 Repair/Upgrade rather than wasting more time trying the following methods.
Method 15. Disable Windows Push Notification Service «WpnUserService»
The «WpnUserService» (Windows Push Notification Services) is a Windows service that enables third-party developers to send notifications updates to their own apps.
Disabling this service can prevent the system from sending or receiving push notifications on the notification center, but it can correct the «Microsoft.Windows.ShellExperienceHost» and «Microsoft.Windows.Cortana» applications need to be installed correctly» error.
1. Press the Windows + R keys to open the Run dialog box.
2. In the run command box, type: regedit and press Enter.

3. From the left pane navigate to this key:
- HKEY_LOCAL_MACHINE\SYSTEM\CurrentControlSet\Services\WpnUserService.

4. At the right-pane, right-click on Start key and select Modify.

5. Change the value from 2 to 4 and click OK.
6. Then close the editor and restart your computer to see if the Start menu works properly. If not, follow the same steps to change the «Start» value back to «2» and then continue to next method.
Method 16. Reset DCOM Permissions.
DCOM (Distributed Component Object Model) is a Microsoft software component that allows COM objects to communicate with each other over the network.
If the DCOM permissions are corrupted, or incorrectly modified after installing an application or Windows update, this may result in the Start menu and Cortana search not working. To restore DCOM permissions, proceed as follows:
1. Open the Registry Editor and navigate to the following location:
- HKEY_LOCAL_MACHINE\SOFTWARE\Microsoft\Ole
2. At the right pane, delete the following REG_BINARY values (if exist):
-
- DefaultAccessPermission
- DefaultLaunchPermission
- MachineAccessRestriction
- MachineLaunchRestriction

3. Close the Registry Editor, restart your PC and check if the problem is resolved.
Method 17. Changes Permissions on «HKEY_CLASSES_ROOT» key.
Some users reported that after giving READ permissions to «ALL APPLICATION PACKAGES» on the «HKEY_CLASSES_ROOT» registry key, the problem is solved.
1. Open the Registry Editor.
2. Right-click on HKEY_CLASSES_ROOT and select Permissions.

2. Now check if ALL APPLICATION PACKAGES exist under «Group or Usernames» and have Read permissions (as in the screenshot below). If not, continue to next step, otherwise skip to next method.*
* Note: If ALL APPLICATION PACKAGES are present but without Read permissions, check the corresponding box (Read), click OK and then close Registry Editor and check if the problem is resolved.

3. If ALL APPLICATION PACKAGES missing under «Group or Usernames», click the Add button.

4. Type «ALL APPLICATION PACKAGES» under the objects name box and click Check Names and then OK.

6. Now select the ALL APPLICATION PACKAGES and click the Read permission checkbox (as in the above below). Then click OK, exit from Registry Editor and check if the problem is resolved.
Method 18. Delete the «Search» registry key-folder.
Another solution that can fix the Start menu and Search issues on Windows 10, is to delete all the current search settings. To do that:
1. Open the Registry Editor and navigate to the following location:
- HKEY_CURRENT_USER\SOFTWARE\Microsoft\Windows\CurrentVersion\Search
2. On the left pane, right-click on the Search folder and choose Delete. Click Yes to confirm your decision.

3. Close the Registry Editor, restart your PC and check if the problem is resolved.
Method 19. Repair Windows 10 with an in-place Upgrade.
The final method that usually works, to fix Windows 10 problems, is to perform a Windows 10 Repair-Upgrade, by using the detailed instructions on this article: How to repair Windows 10.
That’s it! Which method worked for you?
Let me know if this guide has helped you by leaving your comment about your experience. Please like and share this guide to help others.
If this article was useful for you, please consider supporting us by making a donation. Even $1 can a make a huge difference for us in our effort to continue to help others while keeping this site free:
- Author
- Recent Posts
Konstantinos is the founder and administrator of Wintips.org. Since 1995 he works and provides IT support as a computer and network expert to individuals and large companies. He is specialized in solving problems related to Windows or other Microsoft products (Windows Server, Office, Microsoft 365, etc.).
-
Home
-
News
- Fix: Windows Shell Experience Host Suspended On Windows 10
By Sarah |
Last Updated
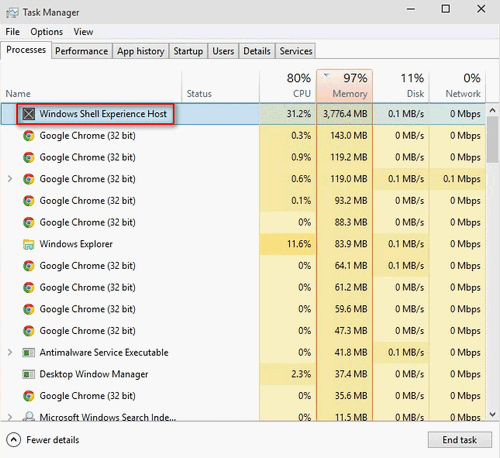
As an official apart of Windows operating system, the Windows Shell Experience Host is always running in the background of your PC. If you open the Task Manager, you can see it. However, most people reported a problem about this process: they find Windows Shell Experience Host suspended and use too much of the CPU and memory.
Windows Shell Experience Host Is Suspended
What Is Windows Shell Experience Host
Considering that many of the ordinary Windows users don’t even know the existence of Windows Shell Experience Host, I’d like to introduce it in brief firstly. Windows Shell Experience Host, also known as ShellExperienceHost.exe, is actually an organic component of a Windows operating system. Though it is not shown to you while working, you can go to find it manually in Task Manager.
The main function of Windows Shell Experience Host is:
- It is in charge of the present of universal apps in a windowed interface.
- It offers the Universal App integration in Windows Explorer (Windows Shell).
- It deals with some graphical elements of the interface, such as taskbar transparency, start menu, and new visuals for notification area (like calendar).
In short, the Windows Shell Experience Host serves as a kind of visual manager on your PC since it was first introduced with Windows 10. However, some users reported the error: Windows Shell Experience Host suspended (the host takes too much CPU and memory), so they desperately need a solution to fix it. (Go to the home page to get some applications in order to protect your system and data before fixing Windows Shell Experience Host error).
Solved – Windows Script Host Error On Windows 10.
How to Fix When You Find ShellExperienceHost.exe Suspended
After finding the Windows Shell Experience Host not responding, some users would ask whether they can disable it or not. In fact, Microsoft doesn’t allow them to do so since it will block the necessary visuals in Windows 10.
Now, I will introduce 3 effective ways to deal with Windows Shell Experience Host stopped working.
Way 1: update system and software.
Firstly, make sure your operating system is updated to the latest version:
- Click on the Windows logo button in the lower left corner.
- Click on the Settings icon (look like a gear) from the left sidebar.
- Select Update & Security from the pop-up Settings window.
- Click on the Check for updates button to make sure there is no new update available.
- Please agree to update to the latest version if your system is not.
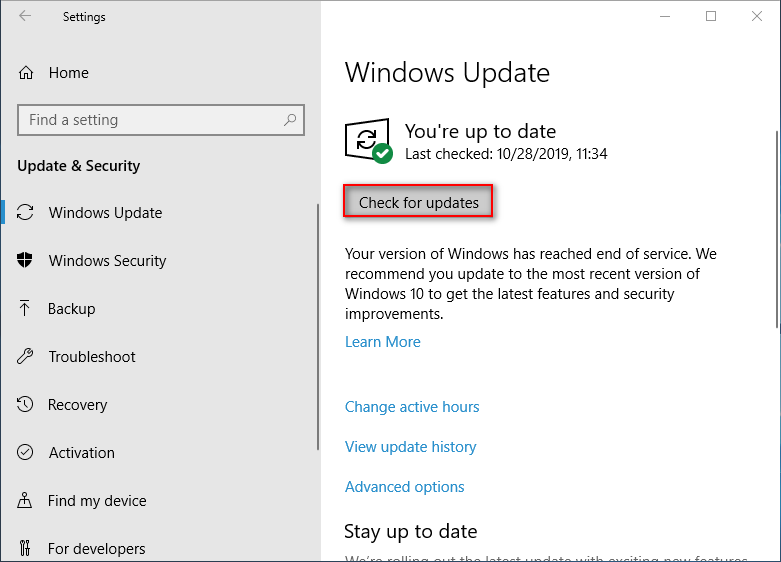
After that, you also need to update your BIOS, Graphics Software, and Power Management Drivers (some users said they have fixed the Windows Shell Experience Host not running problem by updating these things).
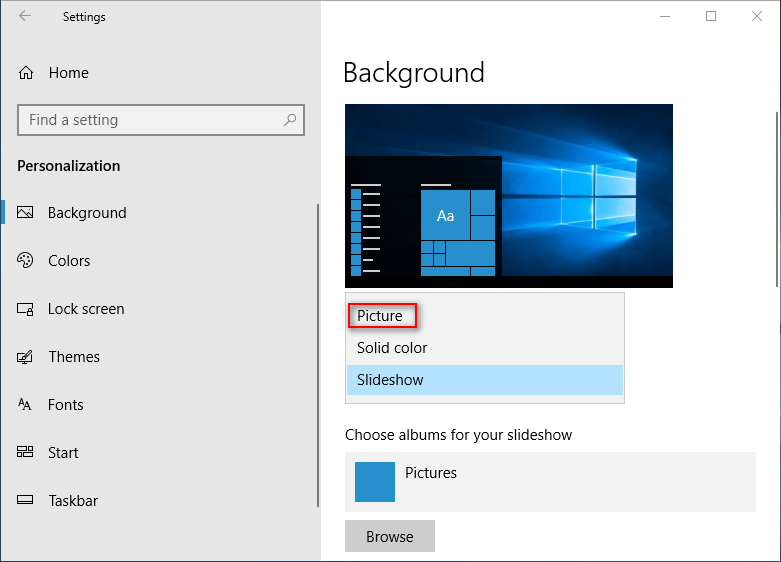
Way 2: disable slideshow and automatic color change.
Firstly, select picture to replace slideshow.
- Repeat step 1 and step 2 to open Settings app.
- Select Personalization.
- Make sure Background is chosen in left sidebar.
- Look for the Background section in the right pane and click on the arrow under it.
- Choose Picture from the drop-down list.
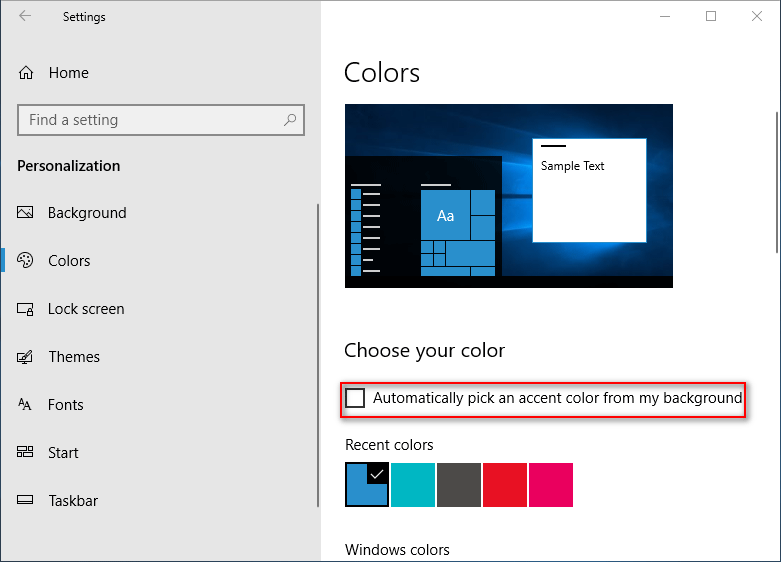
Secondly, uncheck automatic color changing option.
- Open Settings and select Personalization.
- Select Colors in the left sidebar.
- Look for the Choose your color section in the right pane.
- Uncheck Automatically pick an accent color from my background.
Click here to know how to change Windows 10 desktop background.
Way 3: run System File Checker.
- Right click on the Windows logo button.
- Choose Windows PowerShell (Admin).
- Click Yes in the User Account Control window.
- Type sfc /scannow and press Enter.
- Wait for the command to complete (it may take some time).

If above methods failed, there are also other solutions to Windows Shell Experience Host high CPU usage.
- Re-register your Start menu.
- Try Clean Boot.
- Run System Maintenance Troubleshooter.
- Set affinity to limit CPU.
- Troubleshoot Windows Registry.
- Crete a new account.
Many users have fixed the error Windows Shell Experience Host suspended by using above solutions.
About The Author
Position: Columnist
Sarah has been working as an editor at MiniTool since she graduated from university. Sarah aims at helping users with their computer problems such as disk errors and data loss. She feels a sense of accomplishment to see that users get their issues fixed relying on her articles. Besides, she likes to make friends and listen to music after work.
Продолжаем серию статей, где разбираем предназначение различных процессов, найти которые вы можете внутри Диспетчера задач. Потребность в подобных статьях объясняется простым любопытством пользователей (многим интересно, зачем нужны эти десятки процессов) или необходимостью узнать, почему тот или иной процесс в определенных условиях начинает больше потреблять ресурсы компьютера, а именно память, процессор, диск или сеть. Эта статья рассказывает о том, что такое Хост Windows Shell Experience и что делать, если он постоянно грузит процессор.
Хост Windows Shell Experience – что это?
Сразу же отметим, что этот процесс является частью Windows 10. Это системный компонент, который работает всегда и обеспечивает вам работу универсальных приложений Windows. Кроме того, на его цифровые плечи возложена задача управлять графическими элементами интерфейса, вроде меню Пуск, прозрачности панели задач, всплывающие меню сетевого подключения, громкости, центра уведомлений и так далее. Хост Windows Shell Experience также управляет изменением фонового изображения рабочего стола, если пользователь активировал слайд-шоу.
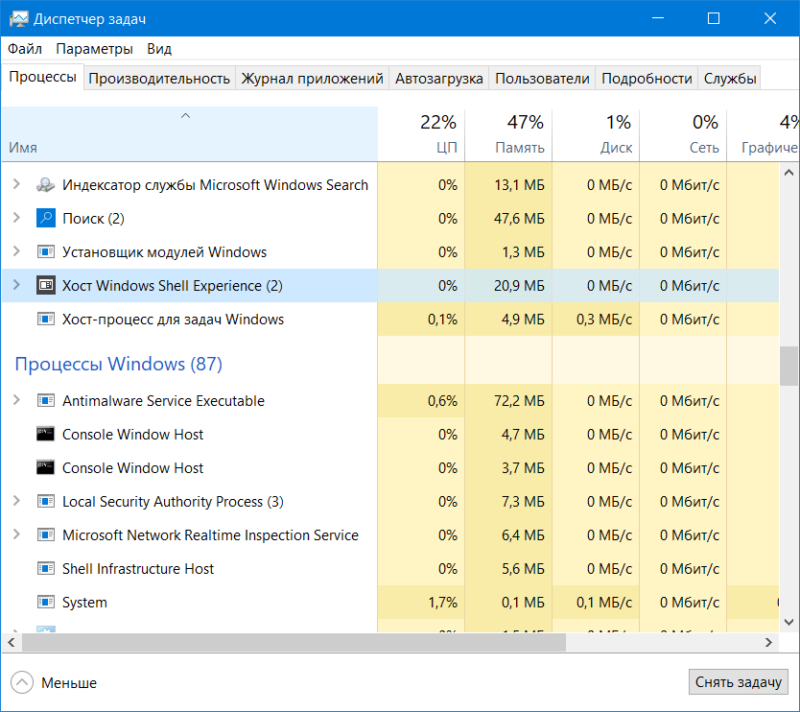
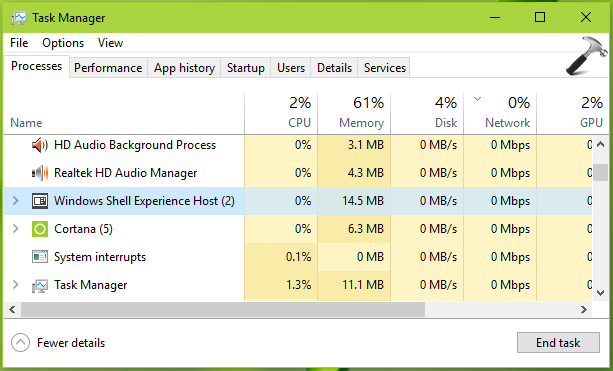
Хост Windows Shell Experience в своей привычной среде обитания. 0% нагрузки на ЦП и десяток мегабайт в оперативке.
Само имя процесса подсказывает его предназначение. Windows Shell – оболочка Windows. Окна, панели, кнопки и другие элементы интерфейса – все это работа Хост Windows Shell Experience.
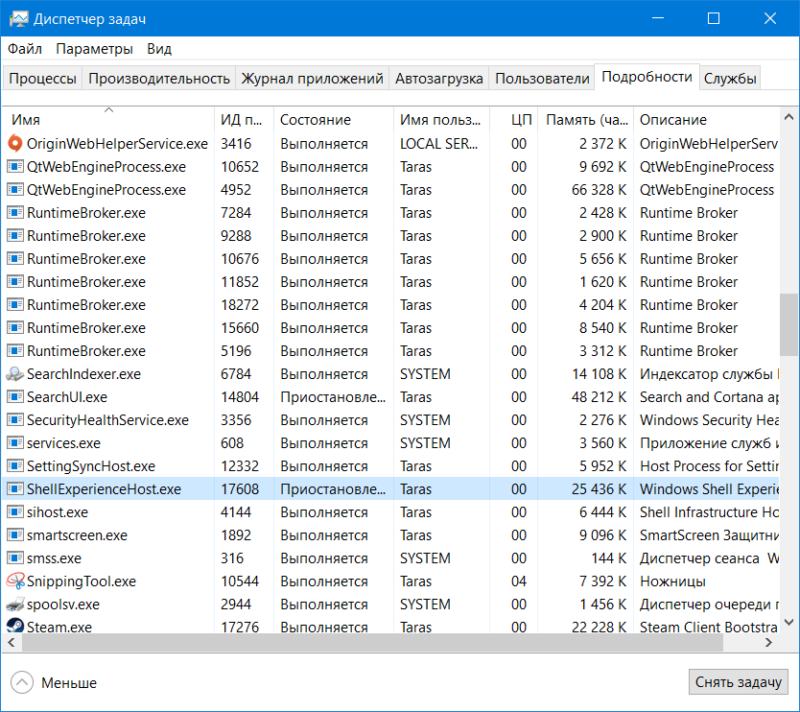
Вид сбоку, а точнее — из вкладки «Подробности».
Когда Windows 10 только появилась на свет и начала распространятся в виде бесплатного обновления, многие пользователи жаловались на неадекватное поведение процесса Хост Windows Shell Experience. Он сильно грузил процессор, а также потреблял много памяти. Хотя эти проблемы (они в основном были связаны с процессом апгрейда с Windows 7 / 8.1 до Windows 10) уже исправили, пользователи иногда все-таки сталкиваются с тем, что Хост Windows Shell Experience начинает дичать.
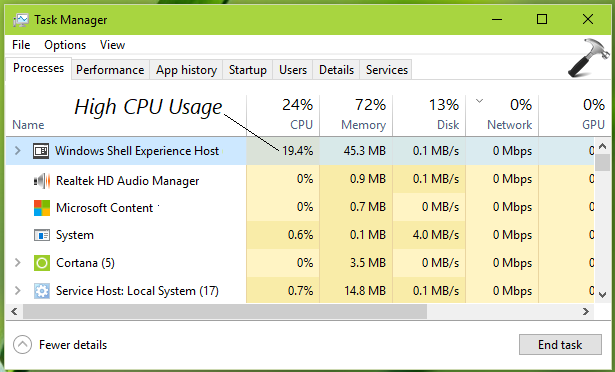
Хост Windows Shell Experience грузит процессор
В обычных условиях Хост Windows Shell Experience фактически никак не влияет на производительность компьютера. Несмотря на важность его существования, нормально работающий процесс Хост Windows Shell Experience не грузит процессор вообще, а объем потребляемой памяти не превышает нескольких десятков мегабайт. Нагрузка на процессор может слегка подскочить, когда вы открываете приложения или перемещаете окна, но она опять же, не должна превышать лишь пары процентов.
Как уже было сказано выше, бывают случаи, когда Хост Windows Shell Experience начинает постоянно напрягать процессор на уровне 20-30%, а объем потребляемой памяти вырастает до пары сотен мегабайт. В таком случае вам надо попытаться собственноручно решить ситуацию.
Как отключить Хост Windows Experience Host
Вручную вам не стоит его отключать, да и вы не сможете это сделать. Это важный системный процесс, отвечающий за графику в Windows 10. Даже если вы снимите эту задачу в диспетчере задач, система активирует ее повторно буквально спустя несколько секунд. Причину повышенной нагрузки таким образом не решить. Для этого есть другие методы.
Прежде всего проверьте наличие обновлений для операционной системы и установленных приложений. Быть может, обновление Windows или какого-нибудь из установленных приложений исправит ситуацию. После обновления дайте компьютеру пару минут на то, чтобы прийти в чувство. Можно также попробовать перезагрузить систему (в очень большом количестве случаев помогает именно перезагрузка) и затем понаблюдать за поведением процесса. Если ничего из этого не помогло, двигайтесь далее.
Зачастую проблемы в работе процесса Хост Windows Shell Experience спрятаны в системе слайд-шоу рабочего стола. Вполне нормально, если в процессе смены фонового изображения процесс немного нагружает процессор / память. Но после этого нагрузка должна упасть до минимума. Если не падает, сделайте следующее:
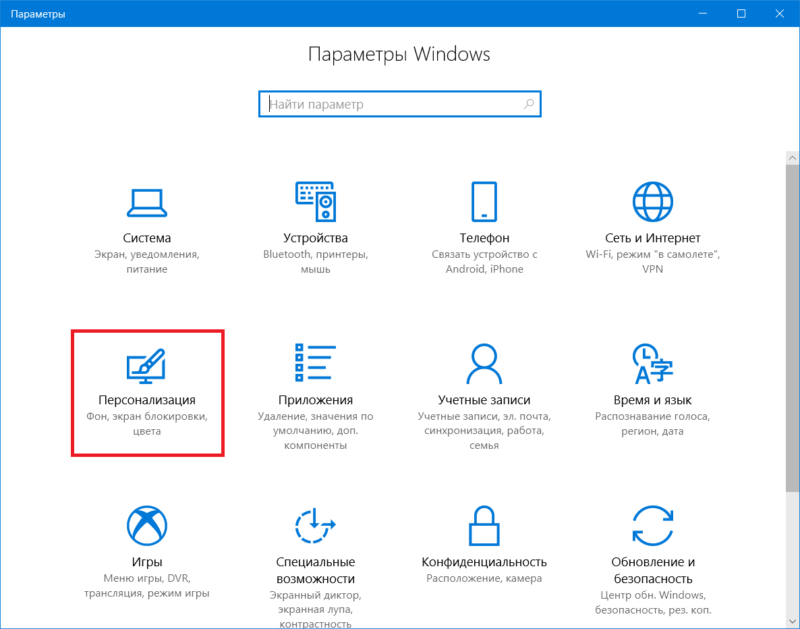
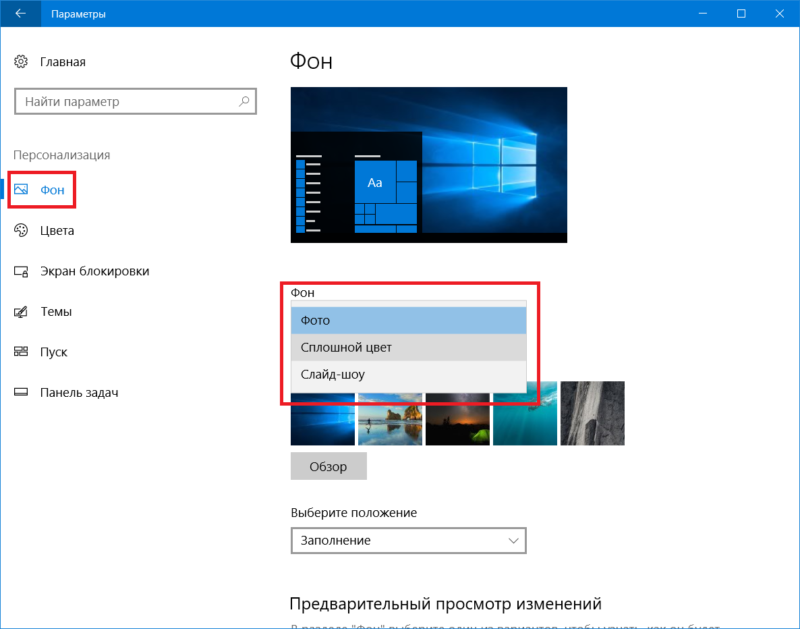
- Нажмите Win + I (вы можете открыть Параметры любым удобным вам способом) и перейдите в раздел Персонализация – Фон.

- Вместо Слайд-шоу установите параметр Сплошной цвет. После этого понаблюдайте за работой процесса. Если нагрузка упала до минимальной и держится в пределах нормы, можно попробовать установить одно изображение в качестве фоновой картинки.
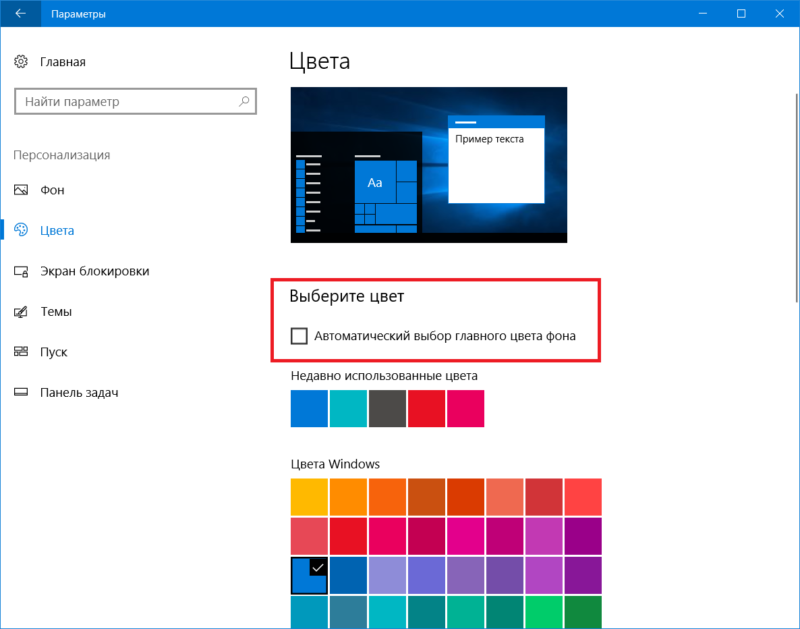
Другая причина может прятаться в система автоматического подбора акцентного цвета в зависимости от установленного изображения. Если на рабочем столе у вас картинка с синими цветами, цвет системы будет автоматически установлен на синий. Попробуйте отключить эту функцию.
- Откройте параметры (Win + I) и затем перейдите в раздел Персонализация – Цвета.
- Снимите флажок с параметра Автоматический выбор главного цвета фона. Можете также установить любой другой цвет, чтобы сбросить этот параметр. Опять же, пару минут последите за процессом. Если все пришло в нормальное состояние, значит вы нашли причину повышенной нагрузки на процессор. Если же не помогло, двигайтесь далее.
Третий вариант – отключение параметров прозрачности. Он расположен на том же экране, что и автоматический выбор главного цвета фона. Отключите параметр Эффекты прозрачности и посмотрите на эффект.

Хост Windows Experience Host – вирус?
Скорее всего нет. На момент написания этой статьи не было случаев, когда какой-то вирус выдавал себя за системный процесс Хост Experience Host. Все же есть способом, который поможет вам лишний раз убедиться в том, что вы имеете дело с подлинным системным компонентом, а не какой-то заразой.
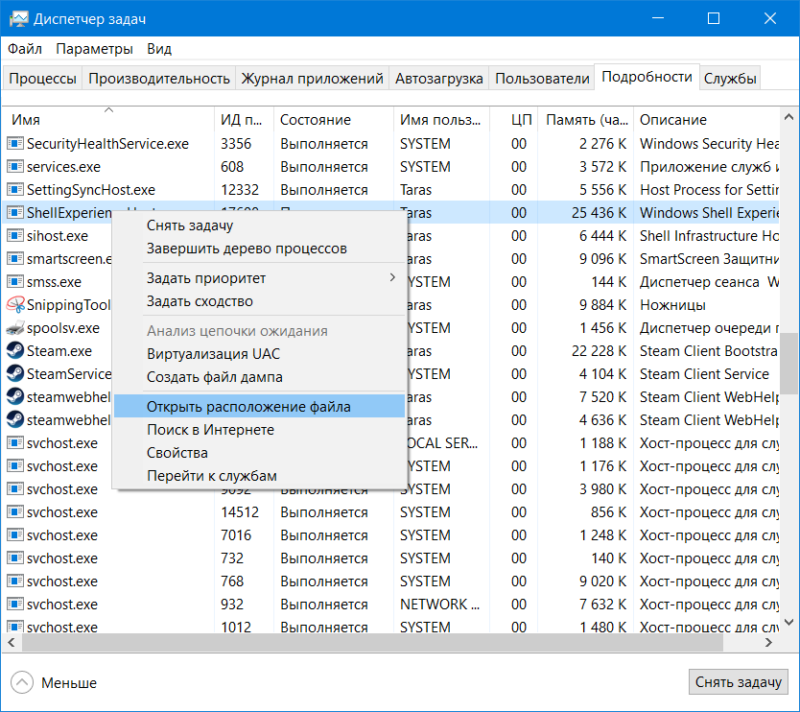
- Откройте Диспетчер задач (все возможный способы открыть Диспетчер задач описаны в статье «Как открыть Диспетчер задач») и перейдите на вкладку Подробности.
- Найдите в списке процессов ShellExperienceHost.exe. Кликните на строчку Имя, чтобы отсортировать процессы по алфавитному порядку и скорее найти нужный вам.
- Нажмите правой кнопкой мыши по ShellExperienceHost.exe и выберите Открыть расположение файла.

- Система должна открыть Проводник по адресу C:\Windows\SystemApps\SHellExperienceHost_cw5n1h2txyewy. Файл ShellExperienceHost будет автоматически выделен.

- Далее кликните по файлу правой кнопкой мыши и выберите Свойства. Откройте вкладку Подробно и убедитесь, что описание соответствует аналогичному на скриншоте.


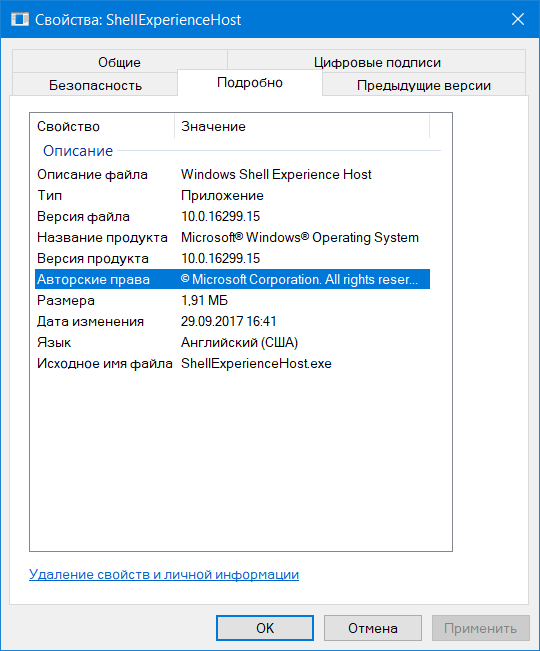
Если у вас все именно так, как мы описали, тогда Хост Windows Shell Experience точно не является вирусом, а причина повышенной нагрузки или потребления ресурсов заключается в другом. Попробуйте описанные выше способы, чтобы привести этот системный процесс в адекватное состояние.
Usually, we refer Windows Shell as the graphical user interface (GUI) in Windows operating systems (OSes). This GUI can contain the visual elements which users see on their Desktop and running programs/applications. As we all know that some of the processes in Windows may require same functionality of resources. When the processes require similar resources, there will be duplication of processes using same resource. To avoid this duplication, group of processes shares a framework which is known as “host“. There are many type of hosts present in Windows OSes.
Windows 10 introduces a new host, called as Windows Shell Experience Host. First, let see what it is actually.
What Is Windows Shell Experience Host In Windows 10?
Well, Windows Shell Experience Host/Microsoft.Windows.ShellExperienceHost or ShellExperienceHost.exe is a process host in Windows 10. It is responsible to drive visuals on Start Menu, Action Center, Timeline feature (including Task View function as well), File Explorer, Taskbar etc. It may handle few elements on Desktop as well. The owner of this host by default is TrustedInstaller. This keeps running in background and you can easily locate it in Task Manager window, as shown below:
Some of the newbies to Windows 10 may treat this host as mysterious and often label it as “virus”, which is obviously wrong. In fact in absence of this host, Start Menu and other related elements managed by it won’t work as expected. This host file can be located at %WinDir%\SystemApps\ShellExperienceHost_cw5n1h2txyewy.
FIX: Windows Shell Experience Host High CPU Usage
From past experiences, we have often seen users reporting this common issue of high CPU usage by Windows Shell Experience Host. Usually, the host is not supposed to use CPU to such higher limits, but if you configure personalization settings to highly dynamic states, the host has no option left.
In order to reduce high CPU usage problem with Windows Shell Experience Host, you can try these things:
1. Run System File Checker scan. If it fails, try DISM commands to repair inbox corruption.
2. Turn off the transparency effects and select static accent color.
3. If you’ve enabled Windows Spotlight or slideshow feature, turn it off temporarily and see if it helps.
4. If you’re using any third-party customization programs, remove them.
We hope after trying above mentioned suggestions, Windows Shell Experience Host should reduce high CPU usage.
That’s it!
Related: “Microsoft.Windows.ShellExperienceHost” and “Microsoft.Windows.Cortana” applications need to be installed correctly.