
By Timothy Tibbettson 06/15/2023 |
Shadow Copy or Volume Shadow Copy Service (VSS) is a part of Windows 10, 8, 7, and Vista that takes a snapshot of your entire drive manually or automatically. If you manage your own backups, you can disable this service.
Shadow Copy or Volume Shadow Copy Service (VSS) is a great way to restore corrupted or accidentally deleted files, including a Ransomware attack or other malware.
Video tutorial:
Press the Windows Key + R, type in services.msc, and press Enter.
Scroll down to Volume Shadow Copy, and double-click it.
If running, click Stop.
Click on the dropdown box next to Service status.
Click on Disabled.
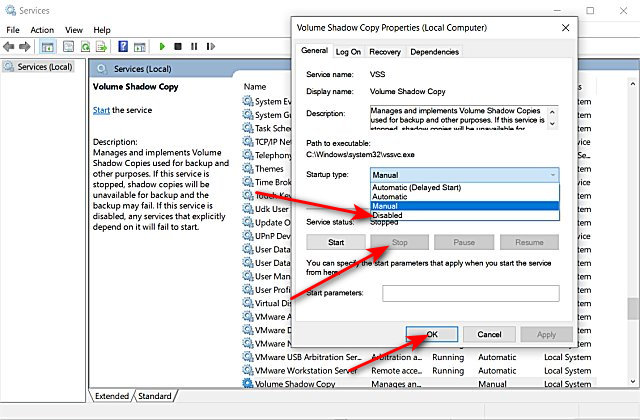
Click on OK.
Similar:
comments powered by Disqus
Volume shadow copy is a feature on all versions of the Microsoft Windows operating systems that allows backup copies of files or folders on a specified volume, either automatically or manually. To disable the volume shadow copy, the service has to be stopped. The service can be stopped from the volume shadow copy properties window and Windows administrative tools.
What is Volume Shadow Copy?
Volume Shadow Copy, also known as Snapshot Service or VSS, is a feature embedded in Windows 2003 and later in all releases of Microsoft Windows. This technology allows you to make manual or automatic backup copies or snapshots of a file or folder on a specific volume. Shadow Copy technology requires the file system to be NTFS.
Note that once the volume shadow copy is disabled, there is no use for previous versions of a file or folder element. To lighten the properties of a file or folder, you must remove the previous versions tab through changes in the registry. If disk space poses a problem, you can edit the disk space allocated to shadow copies so that you don’t have to disable the volume shadow copy.
How to disable Volume Shadow Copy?
- Click Start and type
services.mc
into the search bar.
- Hit Enter.
- An option for Volume Shadow Copy will appear. Double-click on the icon.
- Change the startup type to Manual, and then click Stop.
- Move to the Recovery tab:
- Set the First failure, Second failure, and Subsequent failures options to Take No Action.
- Press OK to confirm.
How to edit the disk space allocated to Shadow Copy?
If you do not want to disable shadow copies and would prefer to customize the maximum disk space allocated to this service, here’s a quick tutorial.
- Go to your Start menu, and navigate to All Programs > Accessories.
- Right-click on the Command Prompt > Run as administrator.
- Next, type the following command:
vssadmin resize shadowstorage/On = C: / For = C: / maxsize = 3GB
Note:
- The / On = C: indicates that the photos will be saved on the C drive.
- The / For = C: indicates that the photographs are those of the C drive.
- The / maxsize = 3 GB indicates the size allocated to instant snapshots. In this case, that total is 3 GB.
Confirm by pressing OK.
How to disable previous Shadow Copy versions?
Now that the service is disabled, all Previous Versions are useless. In order to lighten the menu and properties of elements, it is best to remove it. However, before proceeding with this, it is highly recommended that you back up your registry:
- Open the Registry Editor and locate the following key:
HKEY_LOCAL_MACHINE\SOFTWARE\Policies\Microsoft\
- Create a new key with the name PreviousVersions by going to the Edit menu > New > Key.
- Next, create a new DWORD (32-bit) under the latter key by using the name DisableLocalPage. You can do this by going to the Edit menu > New > DWORD (32-bit).
- Double-click this value and put 1 in the data fields.
Do you need more help with Windows 10? Check out our forum!
Shadow Copy Windows 10/11 can help you back up your data and protect it from loss. You must be curious about what it is and how to enable/disable Shadow Copy in Windows 10/11. Read this stepwise article from MiniTool to follow a comprehensive tutorial on how this tool works and an all-around way for backup.
Shadow Copy is a technology available in Windows 11/10/8/7 that can create backup copies or snapshots of computer volumes/files on a local disk, external hard drive, or network drive, whether you are in use or not. It is implemented as a Windows service called the Volume Shadow Copy service, also known as Volume Snapshots Service or VSS.
Shadow Copy requires the NTFS or ReFS file system to create and restore shadow copies. Any Windows component using this technology can create Shadow Copies on local or external volumes (creating a Windows backup or system restore point, for example).
In addition, you can use the Shadow Copy feature to restore lost files. In Windows 10/11, you can choose to use Windows Previous Versions, which are copies of files and folders and sometimes serve as Shadow Copies. With it, you can first look through your old Shadow Copies and restore your lost files.
At the same time, Shadow Copy can also be able to restore the system. As long as a system point is created, you will have a valid Shadow Copy. When the Windows 10/11 system does not work normally, you can restore Windows 10/11 to the previous normal state with a system restore point.
To learn more information about Shadow Copy, you can click on Shadow Copy from Wiki.
From the above information, now you may understand Shadow Copy is such a handy tool. Therefore, it’s necessary for you to know how to use it. Follow the next part to learn more details.
How to Configure a Shadow Copy in Windows 10/11
If you want to set up a Shadow Copy, first you should enable Shadow Copy in Windows 10/11. This process is very easy. Meanwhile, if you need to delete Shadow Copies, all these operations are straightforward with several simple steps as well. The Shadow Copy feature ensures the continuity of data backup and restorability. Read this part carefully, it will show you how to enable Shadow Copy in Windows 10/11 with the following methods.
1. Enable Volume Shadow Copy Service Using System Restore Points
Setting restore points is an optional way to enable Shadow Copy in Windows 10/11. Here’s how to do it.
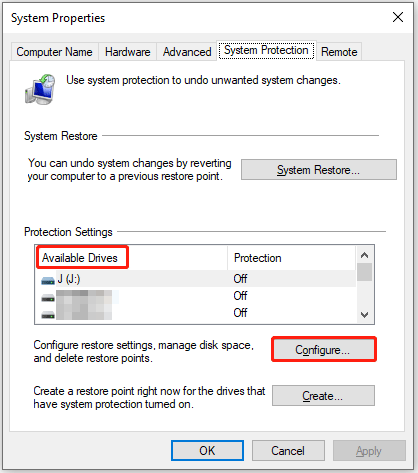
Step 1: Input Create a restore point into the search box of Windows and choose it.
Step 2: Choose a drive from the Available Drives menu and then click on the Configure button.
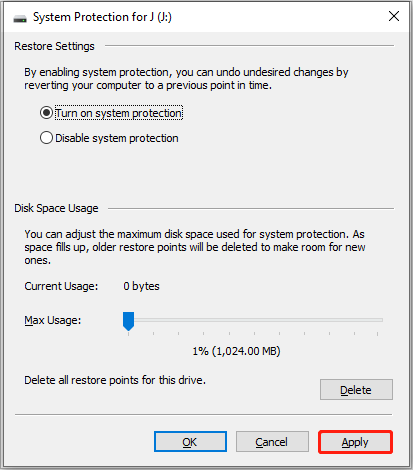
Step 3: Check the option for Turn on system protection, click the Apply button to enable the setting, and then click OK.
Step 4: Click the Create option to create a restore point to turn on the volume Shadow Copy service. Then you can type a description to help you identify the restore point in the pop-up window.
2. Use Task Scheduler to Turn on Shadow Copy Windows 10/11
Utilizing Task Scheduler is a more accurate way to turn on Shadow Copy Windows 10/11. With it, you can set up a specific time to create a Shadow Copy.
Here’s how to enable Shadow Copy in Windows 10/11 using Task Scheduler.
Step 1: Locate the search bar, go ahead by typing Task Scheduler, and click on it to enter its interface.
Step 2: Choose Create Task… from the right panel and name this task under the General section.
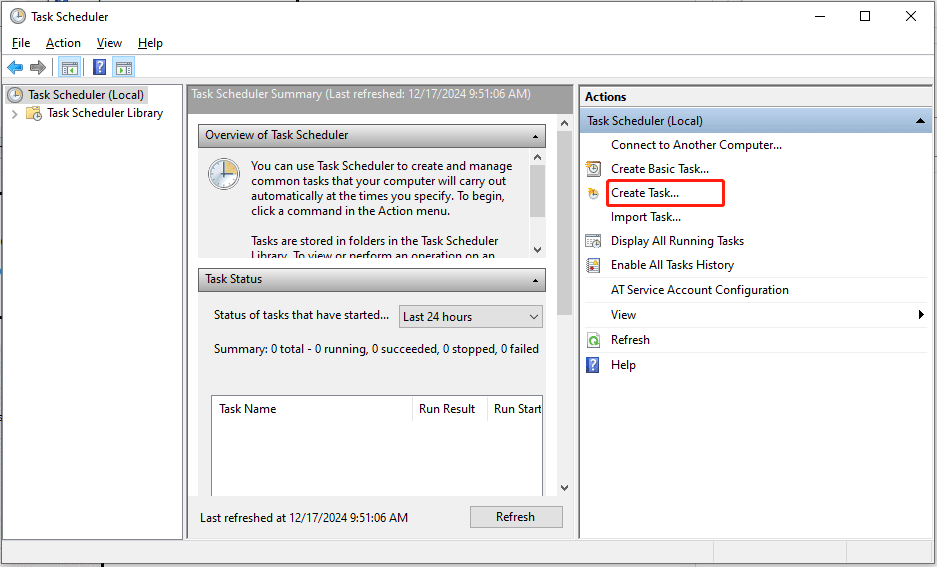
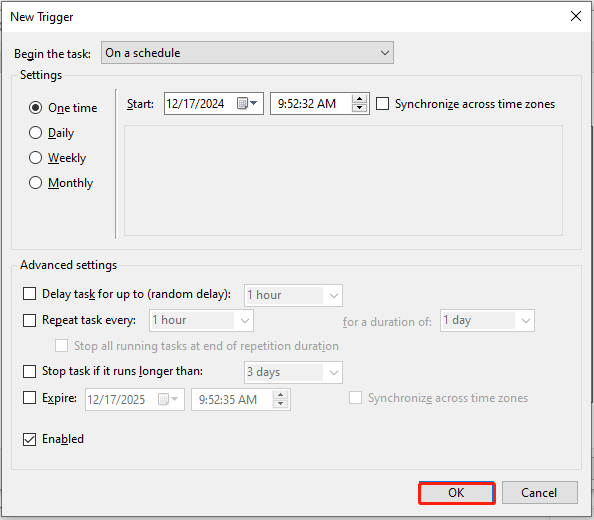
Step 3: Click Trigger and then click the New… button to create a new trigger. Now in the popup window, you can make settings as per your needs. When done, click OK to go on.
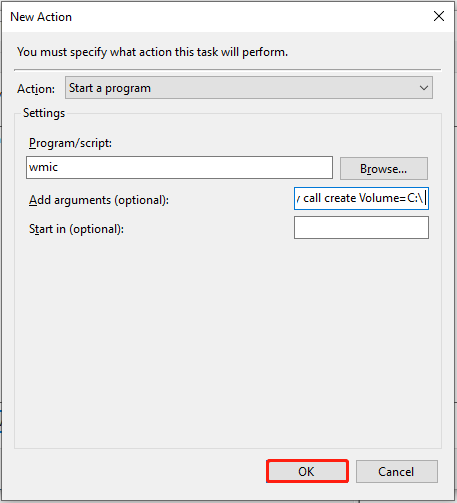
Step 4: Click the Actions button and choose New… to specify what actions this task will perform.
Step 5: Next type wmic under the Program/script: section and then input shadowcopy call create Volume=C:\ at the right side of the Add arguments (optional): section. Click OK to back to the Actions interface and then click OK to finish the settings.
Disable Shadow Copy in Windows 10/11 for System Restore
In case you would not like to use Shadow Copy Windows 10/11, you can follow the introductions below to turn off it. Here’s how to do it.
Step 1: Type Control Panel in the search bar of Windows and click it to enter its interface.
Step 2: Select System and Security, locate the System option, and click it. Alternatively, you can select System with the way View by Small icons.
Step 3: Choose Advanced system settings to continue.
Step 4: Enter the System Properties section and select System Protection.
Step 5: Choose the drive that you have turned on system protection and click Configure… to go on.
Step 6: Check the option of Disable system protection and click on Apply.
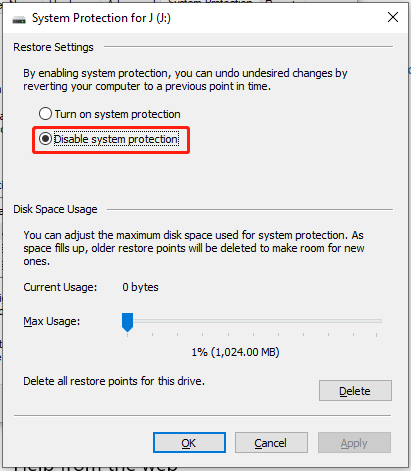
Step 7: You will receive a warning message. Read it carefully and click Yes. After that, click the OK button to exit this window.
Now you have disabled Shadow Copy in Windows 10/11 successfully. Besides, if you encounter some issues when using the Volume Shadow Copy Service, refer to this post for solutions: Quick Fix Volume Shadow Copy Service Errors (for Windows 10/8/7).
Tips:
Although Volume Shadow Copy Service enables you to create a snapshot of a computer file or volume, it cannot replace backup. So, you can create a backup using Backup and Restore (Windows 7) which can help you ensure your system and data are safe.
Backup Files Using Volume Shadow Copy Windows 10/11
After enabling Volume Shadow Copy, run the built-in tools such as Backup and Restore to backup files. But if you want to know more details about it, you can follow the steps below to check.
Step 1: Type Control Panel in the search box on Windows 10/11 and click it. View all the items by Category, choose the System and Security option, and click Backup and Restore (Window 7).
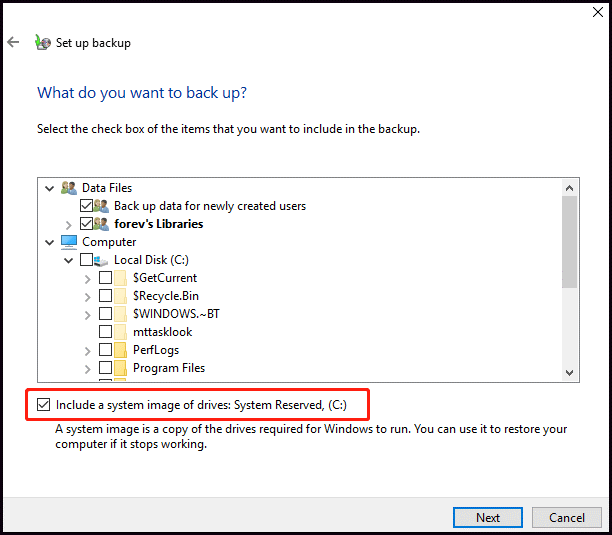
Step 2: Locate Set up backup and tap on it.
Step 3: Select where you want to have your backup saved and click Next.
Step 4: Select Let Windows choose. Orcheck Let me choose tochoosethe items that you want to include in the backup. Check the checkbox – Include a system image of drives if necessary and click Next to continue.
Step 5: Review your backup settings and confirm the same. Finally, click Save settings and run backup.
How to Use Shadow Copies to Restore Files
Under the condition of having shadow copies available on the drive, you can easily use the Previous Versions feature to restore deleted files and earlier specific copies from the snapshot of Shadow Copy. Take certain files that were saved on the Desktop as an example. Here’s how to restore shadow copies.
Step 1: Locate the Desktop folder in the File Explorer. Right-click it and choose Properties.
Step 2: Select the Previous Versions tab, click the right version you want to restore, and click the Restore option.
Tips:
If the files are not listed in the folder menu, you can look for their parent folder and restore it to the previous version. Or perhaps you forgot the location of the lost files, you can also download and install the Shadow Explorer for free. It can help find your shadow copies conveniently.
Versatile Backup Software for Windows 10/11
When it comes to data backup, MiniTool ShadowMaker cannot be ignored. MiniTool ShadowMaker is a professional backup software that helps you do this work to protect your system and data. With this tool, you are allowed to back up files, folders, partitions, and disks as well as the operating system.
The copy of the backup enables you to restore data if a disaster occurs, while also providing the capability to create bootable media. When your computer fails to boot correctly, you can restore your system to the previous state via the created media.
MiniTool ShadowMaker TrialClick to Download100%Clean & Safe
Take backing up Windows 10/11 system as an example.
Step 1: Launch MiniTool Shadowmaker and choose the Backup section.
Step 2: Choose the SOURCE module. There are two source types you can select including Disk and Partition and Folders and Files. Select one you need to back up and click OK to continue.
Step 3: Click the DESTINATION module and choose the destination path where you want to save the image files. Click the OK button.
MiniTool ShadowMaker lets you back up your items to multiple places (User, Computer, Libraries, Shared). Among these places, Shared allows you to back up your files to the shared folder via a network path. You need to:
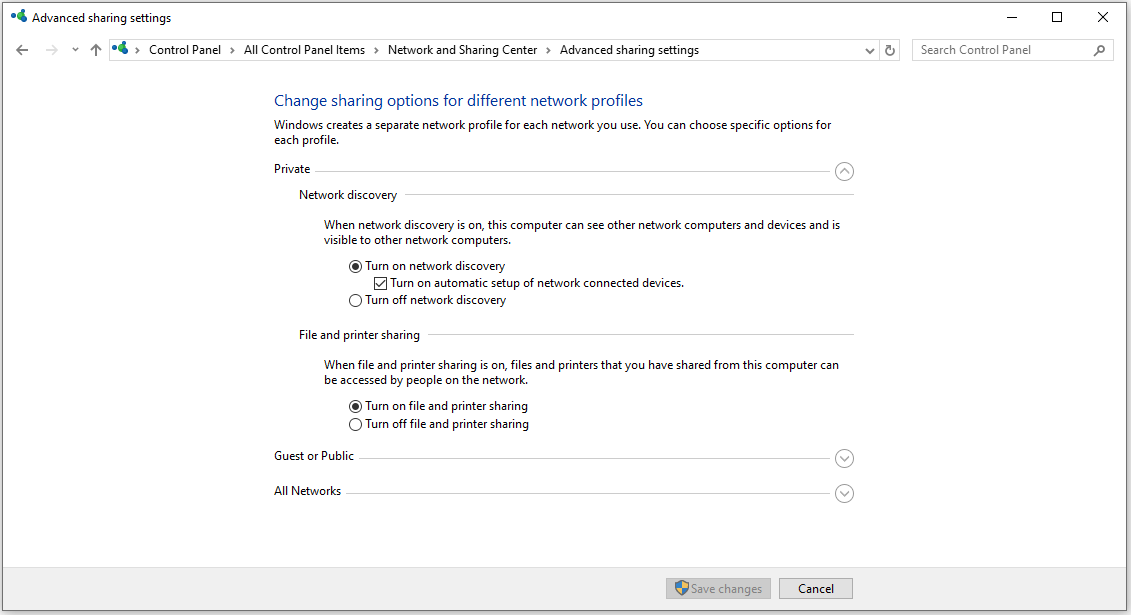
Turn on the network discovery and file sharing.
- Go to Control Panel > Network and Sharing Center > Change advanced sharing settings.
- Turn on network discovery and file sharing under Private, Guest or Public, and All Networks.
Create the shared folder
- Create a shared folder called smelly cat, and create a subfolder called cats (examples).
- Right-click the shared folder and click Properties.
- Choose Sharing and click Share. Then, choose Everyone from the pull-down menu and click Add, choose Read/Write under Permission Level, and click Share.
- Return to the Sharing tab. Click Advanced Sharing… and check the Share this folder in the same window, tap on the Permission button, and check the Allow box next to the Full Control option.
- After creation, go back to the Sharing section and note down the network path.
Choose a network path
Go to the Shared tab and click the Add button.
Type the network path, user name, and password, and click OK.
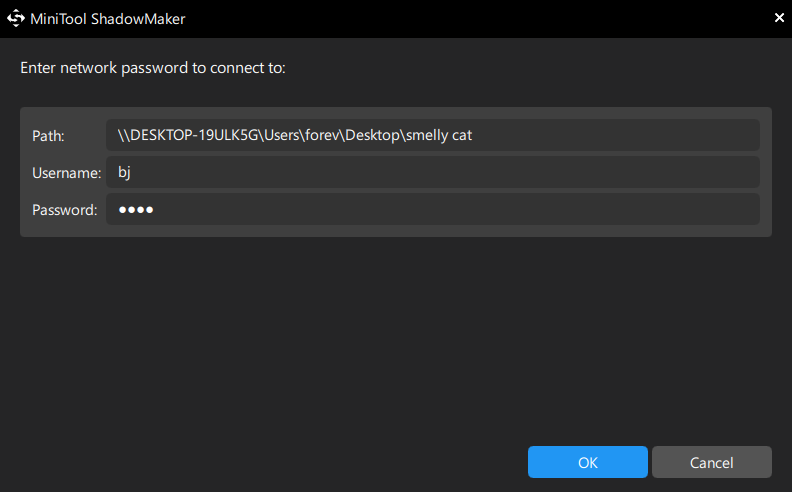
Open the shared folder (smelly cat) and choose the subfolder (cats) as the destination.
Step 4: Before backing up, you can go to Options > Backup options to customize some specific settings according to your needs. Go to the Backup Scheme section to set up the backup type or manage disk space occupied by the backup image files. Make a schedule to automatically back up the item in Schedule Settings.
Tips:
If you need more clarification on it, you can refer to Backup Settings.
Step 5: Click Back Up Now to perform the backup process immediately. Or you can choose Back Up Later to delay the operation. It will finish based on your schedule or restart in the Manage window.
Bottom Line
In conclusion, this article does not just show you much introduction about what Shadow Copy Windows 10/11 is but also shares the methods on how to create a Shadow Copy in Windows 10/11. Meanwhile, it also introduces you to how to perform backups to keep your system and data safe with MiniTool ShadowMaker.
If you have any questions about MiniTool ShadowMaker, please contact us via the email [email protected].
Shadow Copy Windows 10/11 FAQ
Where are shadow copies stored?
Shadow copies are stored locally and found in the System Volume Information folder which is hidden so you need to make it visible.
Is it OK to delete shadow copies?
Yes, it’s safe. This is because your system is working properly and there is no need to retain those specific snapshots that have been created.
PROCEDURE
- Go to the Windows start button and type «services» into the text search box; open the Services program.
- Locate «Volume Shadow Copy» from the list, highlight it, and then and the right-click > Properties.
- From the «Startup type» drop-down menu, select Disabled, and then click Apply and OK.
- Is it safe to disable volume shadow copy?
- Should volume shadow copy service be running?
- Is Volume Shadow Copy enabled by default?
- What is the use of volume shadow copy?
- How do I remove volume shadow copy?
- How do you shadow copy volume?
- Where is Volume Shadow Copy stored?
- How do I fix Volume Shadow Copy Service error?
- How do I know if VSS is enabled?
- How much space does Volume Shadow Copy use?
- How do I restore a shadow copy?
- What is VSS service shutdown?
Is it safe to disable volume shadow copy?
It is not recommended to turn off Volume Shadow Copy. It manages and implements Volume Shadow Copies used for backup and other purposes. If this service is stopped, shadow copies will be unavailable for backup and the backup may fail.
Should volume shadow copy service be running?
The Volume Shadow Copy service doesn’t need to be running all the time or set to Automatic. It’s only used when an app requests it, e.g. a backup app. There is no reason to have it set to anything but Manual.
Is Volume Shadow Copy enabled by default?
Microsoft Volume Shadow Service must be enabled in the OS (it is enabled by default) The system must have an NTFS partition that exists on an internal drive, with at least 100MB of free space for the shadow copies. The drive that contains locked files must have free space available.
What is the use of volume shadow copy?
Shadow Copy (also known as Volume Snapshot Service, Volume Shadow Copy Service or VSS) is a technology included in Microsoft Windows that can create backup copies or snapshots of computer files or volumes, even when they are in use. It is implemented as a Windows service called the Volume Shadow Copy service.
How do I remove volume shadow copy?
Clear Volume Shadow Copies on:
- Click Start > Computer.
- Right click on Local Disk C (C:) and select Properties.
- Accept any alerts from Windows UAC.
- Click the Disk Cleanup button.
- Wait for Disk cleanup to finish calculating.
- Select the More Options tab in the new window.
How do you shadow copy volume?
Open Windows Explorer or the Microsoft Management Console (MMC) Disk Management snap-in, then right-click the drive. Select Properties from the context menu. Select the Shadow Copies tab. Under «Select a volume,» select the volume for which you want to enable Shadow Copies.
Where is Volume Shadow Copy stored?
Volume Shadow Copies are stored on the System Volume Information folder on each drive that has protection enabled.
How do I fix Volume Shadow Copy Service error?
If this error appears during System Restore, setting Volume Shadow Copy to Automatic might fix it:
- Click Start.
- Type services. …
- Press Enter to open the Services utility.
- Find the Volume Shadow Copy item from the list.
- Make sure Volume Shadow Copy is running: check the Status column corresponding to this item.
How do I know if VSS is enabled?
To check the VSS provider/writer status.
- Open a command window. …
- At the command prompt, type vssadmin list providers, and then press ENTER.
- Confirm that Microsoft VSS provider is listed as: …
- Type vssadmin list writers at the command prompt, and then press ENTER.
- Confirm that all the VSS writers are showing:
How much space does Volume Shadow Copy use?
«For volumes less than 500 megabytes, the minimum is 50 megabytes of free space. For volumes more than 500 megabytes, the minimum is 320 megabytes of free space. It is recommended that least 1 gigabyte of free disk space on each volume if the volume size is more than 1 gigabyte.»
How do I restore a shadow copy?
Browse to the folder or create a new one that you wish to restore the previous version to. When you are ready, click on the Copy button. Windows will now recover the previous version of the file from the Shadow Volume Copies and save it in the specified folder.
What is VSS service shutdown?
By far, the most common cause that will cause the ‘The VSS service is shutting down due to idle timeout’ error is system file corruption. … System File Corruption (SFC) is a built-in utility that allows users to scan for corruption and replace the bad files with healthy copies fetched from a locally stored archive.
Shadow copies are a practical solution for quickly recovering previous versions of files without significant downtime. They are particularly beneficial in enterprise IT environments, where data integrity and availability are crucial, and downtime for backups can be disruptive.
Windows Shadow Copy is a simple tool you can use to set up, manage, and configure your shadow copies using Volume Shadow Copy Service (VSS). This blog explains how to use this feature, manage your storage space, and execute advanced configurations.
Shadow copies and terminology explained
Let’s look at some of the basic terminology and concepts you’ll want to understand before jumping into Windows Shadow Copy.
What is a shadow copy?
A shadow copy is a snapshot of your data at a specific moment in time. Imagine you’re working on a document and you want to revert to a version from two hours ago because of a mistake or a change in direction. Creating a shadow copy enables you to do that without losing any work. It’s a safety net that captures and preserves the state of your files at various points so you can access previous versions easily.
What is the difference between shadow copy and backup?
While both shadow copies and backups aim to protect your data, they operate differently. A backup is a comprehensive archive of your data stored in a separate location, which can be used for recovery in case of significant data loss.
Shadow copies, on the other hand, allow for quick recovery of files to earlier versions without the need to restore from a backup. Essentially, backups are your long-term safety net, while shadow copies provide short-term, convenient snapshots.
What is VSS?
Volume Shadow Copy Service (VSS) is a technology that Windows uses to create shadow copies. It’s what allows your system to take these snapshots of your files or even entire volumes of data without interrupting your work. VSS is especially useful in environments where your files are constantly being accessed and changed, as it ensures that backups can be performed without closing files or taking systems offline.
Setting up Windows Shadow Copy
Windows Shadow Copy is a feature included in the Microsoft Windows operating system that allows you to easily create shadow copies even while your files are in use — enabling quick rollbacks to earlier states without the downtime associated with traditional backups. The service monitors changes to files on a volume and automatically creates copies of these files in a shadow copy storage area.
There are a few steps you must follow to enable shadow copies and get Windows Shadow Copy up and running on your device:
- Right-click on ”This PC” on your desktop or in File Explorer, then select ”Properties.”
- Click on ”System protection” on the left sidebar.
- In the “System Properties” window, under the “System Protection” tab, you’ll see a list of drives. Select the drive where Windows is installed (usually C:) and click “Configure.”
- In the next window, select ”Turn on system protection.”
- Adjust the “Max Usage” slider to allocate disk space for shadow copies.
- Click ”Apply” then ”OK.”
You’ve now enabled Shadow Copy, setting up a crucial safeguard for your data.
Disabling Shadow Copy in Windows
If you need to turn off Shadow Copy, perhaps to free up disk space temporarily, follow these steps:
- Right-click on ”This PC”, choose ”Properties”, then “System protection.”
- Select the ‘System Protection’ tab, choose your Windows drive and click “Configure.”
- Select ”Disable system protection.”
- Click ”Apply” and then “OK.”
Remember, this action stops the creation of new shadow copies and might delete existing ones, so use it judiciously.
Managing Windows Shadow Copy storage space
Given the convenience of shadow copies, it’s easy to overlook the disk space they consume. Over time, as snapshots accumulate, they can significantly eat into your storage capacity, which might be a concern, especially on drives with limited space.
Here’s how to manage it without compromising overall system performance:
- Right-click “This PC,” select “Properties” then “System protection”.
- Under the “System Protection” tab, choose your drive and click “Configure.”
- Use the slider under “Max Usage” to set a limit on the space shadow copies can use.
- After adjusting, click “Apply” and “OK”.
Advanced Windows Shadow Copy options
Beyond the basics, Windows Shadow Copy offers a suite of advanced options for those needing finer control over how snapshots are managed. Here’s how to access and adjust them:
Adjusting advanced options via Group Policy Editor
- Press Windows + R, type gpedit.msc, and press “Enter.”
- Navigate to Computer Configuration > Administrative Templates > System > System Restore.
- Adjust settings like the creation frequency and storage locations of shadow copies.
- Make your changes, then apply them.
Adjusting advanced options via Command Line tools
- Open Command Prompt as an administrator.
- Use vssadmin to adjust shadow copy settings directly.
- For example, vssadmin list shadows shows existing shadow copies, while vssadmin resize shadowstorage can change storage allocation.
Advanced configurations and troubleshooting
Even with a well-configured Shadow Copy setup, issues can arise. For troubleshooting or further customizations, these steps can help:
Use Event Viewer
The Event Viewer provides logs that can help identify and resolve issues with Shadow Copy, offering insights into failed snapshot attempts and other anomalies.
- Press Windows + R, type eventvwr.msc and press “Enter.”
- Look under Windows Logs > Application for VSS or System Restore-related messages that can guide troubleshooting.
Leverage vssadmin for diagnostics
This tool can diagnose problems, offering commands to list, create and delete snapshots, giving you hands-on control over troubleshooting processes.
- Open Command Prompt as an administrator.
- Commands like vssadmin list writers and vssadmin list providers can help identify and solve issues with shadow copies.
Restoring data from a Windows shadow copy
Restoring your data using Windows Shadow Copy is straightforward and allows you to retrieve previous versions of files or folders directly from within Windows. Here’s how you can do it:
- Navigate to the file or folder where you want to restore a previous version.
- Right-click on the file or folder and select “Properties” from the context menu. This will open the Properties dialog for the selected item.
- In the Properties dialog, look for a tab labeled “Previous Versions.” Click on this tab to view a list of available shadow copies and previous versions of the file or folder.
- The “Previous Versions” tab will display a list of available versions, along with the dates and times they were created.
- Browse through this list and identify the version you wish to restore. If you’re not sure which version is the right one, you can select a version and click “Open” to view its contents without affecting your current version.
Once you’ve identified the correct version, you have a couple of options:
Restore: To replace the current version of the file or folder with the selected previous version, click “Restore.” Be cautious with this option, as it will overwrite the current version.
Copy: If you prefer not to overwrite the current version, you can click “Copy” to copy the selected version to another location on your system. You can then access both versions of the file or folder.
After selecting “Restore” or “Copy,” follow any additional prompts to complete the process. If you restored the item, check to ensure that the previous version now exists where the current version used to be. If you chose to copy your previous version, navigate to the location where you saved the copy to access it.
[in-context
Monitoring shadow copies
Did you know you can create automated alerts that will monitor your shadow copies or Volume Shadow Copy Service (VSS)? This can help you mitigate the potential risks associated with insufficient backup points. Just follow this PowerShell script to learn how.
- Can you create a shadow copy manually?
Windows automatically creates shadow copies based on your system configurations. Meanwhile, it’s also possible to trigger the creation of shadow copy manually using the vssadmin command-line tool. However, this may require advanced technical knowledge to perform, so caution is needed.
- How to delete old shadow copies to free up disk space?
There are tools that you can use to delete old shadow copies, such as the Disk Cleanup tool and the vssadmin command-line tool. However, be cautious when deleting shadow copies, as you may lose the ability to restore previous versions of your files.
- Can shadow copies recover deleted files?
While shadow copies can help restore previous versions of existing files, they typically don’t capture deleted files. You may need to use data recovery software or explore other methods to recover deleted files. In some cases, you may be able to use shadow copies to recover data from a failed hard drive, but it’s not guaranteed. You may need specialized data recovery services if the hard drive is physically damaged.
- What is the impact of shadow copies on system performance?
Creating and storing shadow copies can consume minimal system resources, especially disk space and CPU cycles. To minimize any performance impact, you can adjust the shadow copy storage settings to limit the amount of disk space used.
- Is it safe to delete shadow copies?
Yes, it is safe to delete shadow copies if you no longer need them. Deleting shadow copies will free up disk space but also remove the ability to restore previous versions of files from those copies. However, as a precaution, always utilize an efficient backup and restore platform.