
Повреждение или удаление системных файлов Windows является основной причиной неполадок в работе операционной системы. Предвидя развитие подобных сценариев, Microsoft реализовала в Windows специальный инструмент — консольную утилиту SFC, способную восстанавливать повреждённые или отсутствующие файлы из хранилища WinSxS, используя для этого базу данных контрольных сумм оригинальных файлов. Утилита может принимать несколько параметров, из которых наиболее часто используемым является /scannow, который в отличие от /veryfyolny передаёт SFC указание не просто проверить файлы, но и восстановить их в случае обнаружения несоответствий.
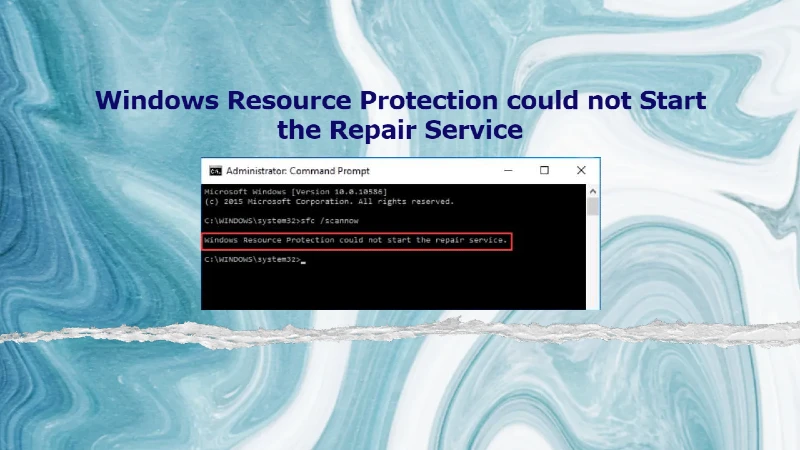
Позволяя восстанавливать системные файлы, SFC сама не застрахована от ошибок, будучи зависима от работы других компонентов Windows. Так, в некоторых случаях при запуске выполнении команды sfc /scannow вы можете получить сообщение «Защите ресурсов Windows не удаётся запустить службу восстановления».
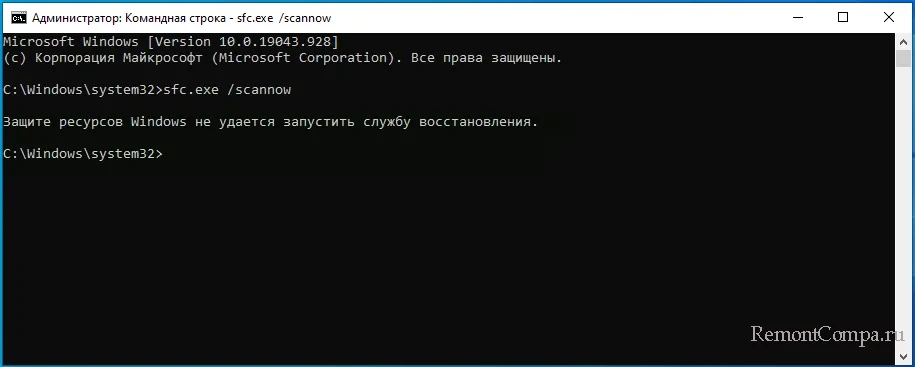
Причины неполадки могут быть разные, но самым распространённой из них являются отсутствие деактивация ряда системных служб. Перейдём, однако, к способам устранения этой ошибки.
Рассмотренный здесь способ не является гарантированно надёжным, применим он только в тех случаях, когда исполняемый файл утилиты SFC располагается в папке, отличной от System32. Например, в служебной папке sysNative, обеспечивающей доступ 32-битным приложениям к 64-битным библиотекам. В этом случае вы можете попробовать запустить сканирование, указав полный путь к исполняемому файлу утилиты SFC. Вот так:
C:\Windows\sysNative\sfc.exe /scannow
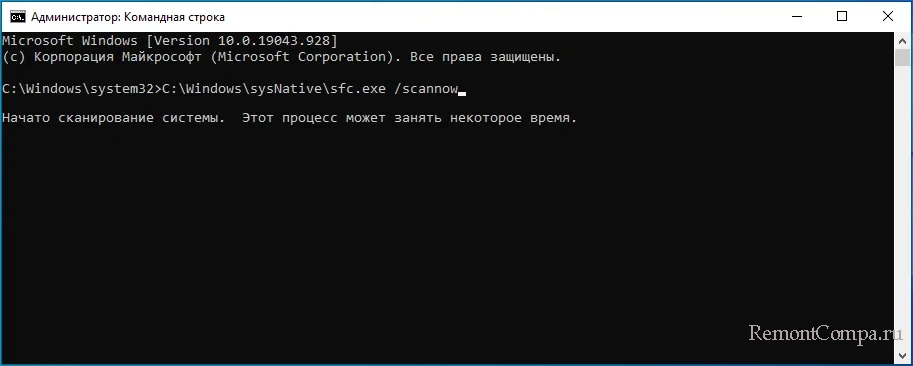
Естественно, командная строка или консоль PowerShell должны быть запущены от имени администратора, так как наличие повышенных прав является обязательным условием работы инструмента восстановления.
В 64-битной системе с ошибкой «Защите ресурсов Windows не удаётся запустить службу восстановления» вы столкнётесь в случае выполнения sfc.exe /scannow из 32-битной версии командной строки или PowerShell, располагающихся в каталоге WinSxS. Поскольку в 64-битной Windows по умолчанию запускаются 64-разрядные версии обеих консолей, такой сценарий является маловероятным, он возможен разве что в том случае, если командная строка или PowerShell запущены из стороннего файлового менеджера. Чтобы исключить данный сценарий, зайдите в папку C:\Windows\System32, запустите из неё файл cmd.exe с правами администратора и выполните в открывшейся командной строке sfc /scannow.

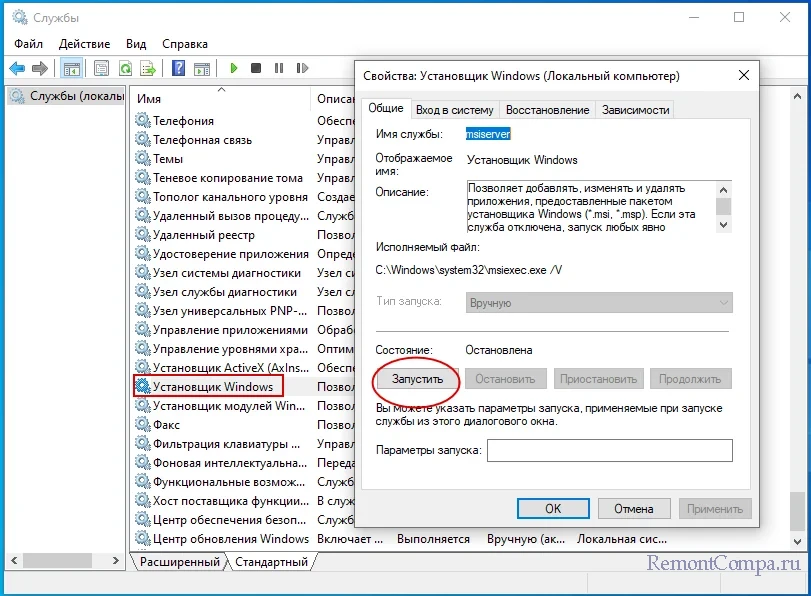
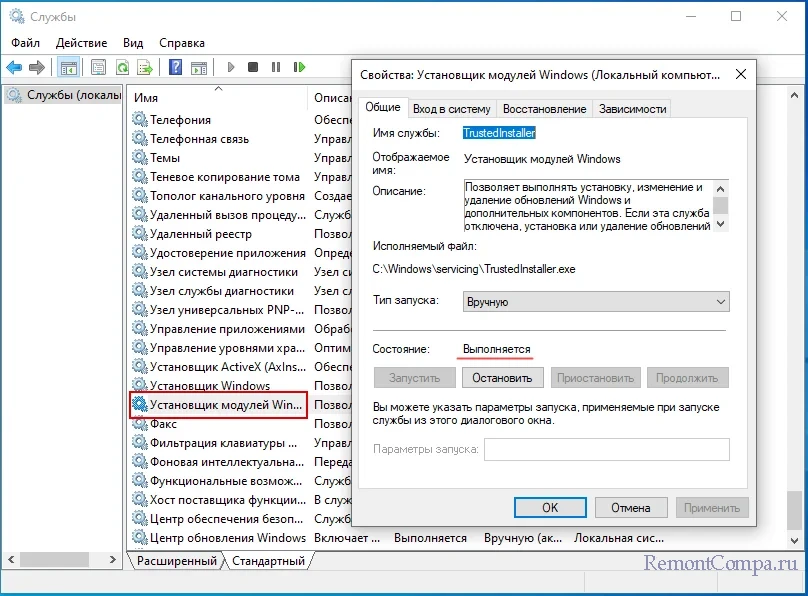
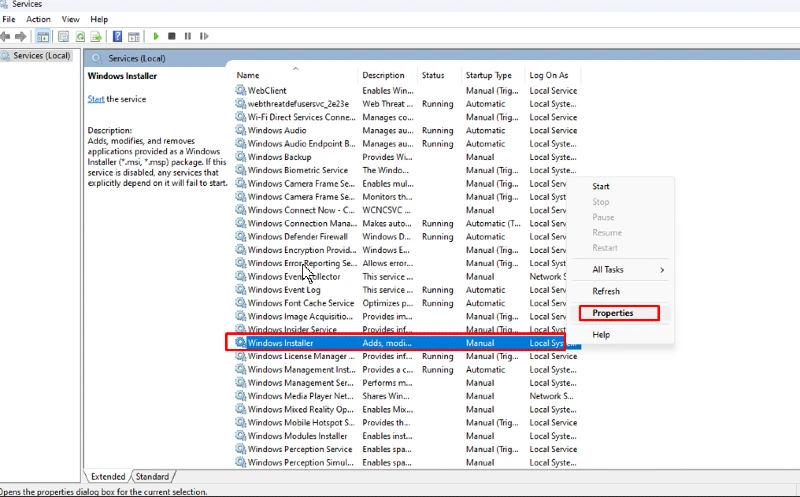
Если описанная выше причины неполадки встречаются достаточно редко, то эта причина, именно деактивация обеспечивающих корректную работу sfc.exe служб является весьма распространённой. Откройте командой services.msc оснастку управления службами и проверьте состояние следующих служб:
• Установщик Windows;
• Установщик модулей Windows.
Для этого открываем их свойства. Обе службы должны находиться в запущенном состоянии и иметь тип запуска «Вручную». Если обе или одна из этих служб отключена или не активна, замените тип запуска на указанной и запустите её одноименной кнопкой, после чего повторите выполнение команды sfc /scannow.
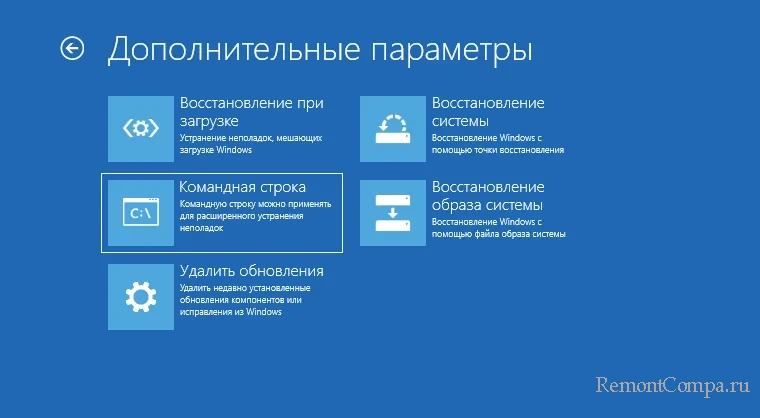
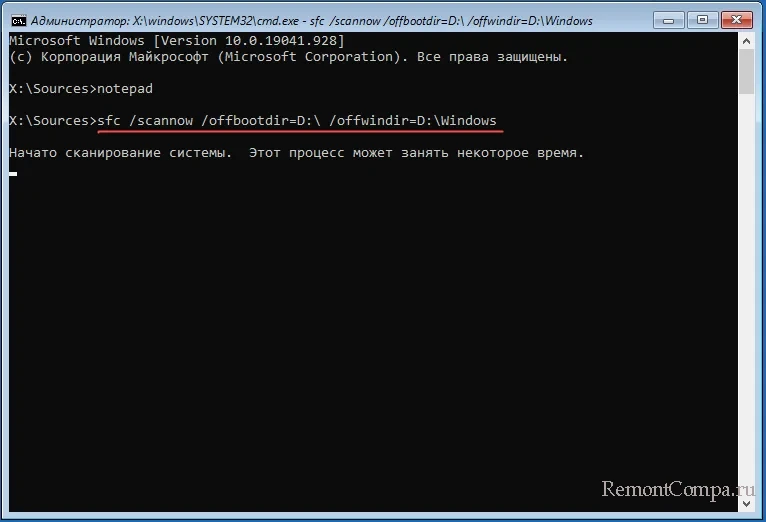
Если выполнить сканирование в работающей системе не удалось, и при этом вы не смогли установить причину неполадки, можете попробовать запустить SFC из среды восстановления, воспользовавшись для этого загрузочным диском и исключив тем самым влияние внутренних факторов. Напоминаем только, что синтаксис команды в загрузочной среде будет несколько отличаться. Помимо /scannow, к команде нужно будет добавить два дополнительных параметра, передав им в качестве аргумента букву системного тома и путь к папке Windows:
sfc /scannow /offbootdir=C:\ /offwindir=C:\Windows
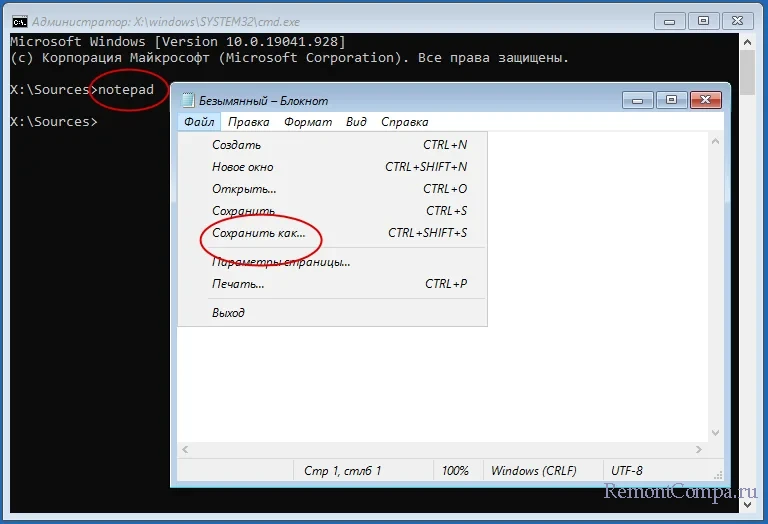
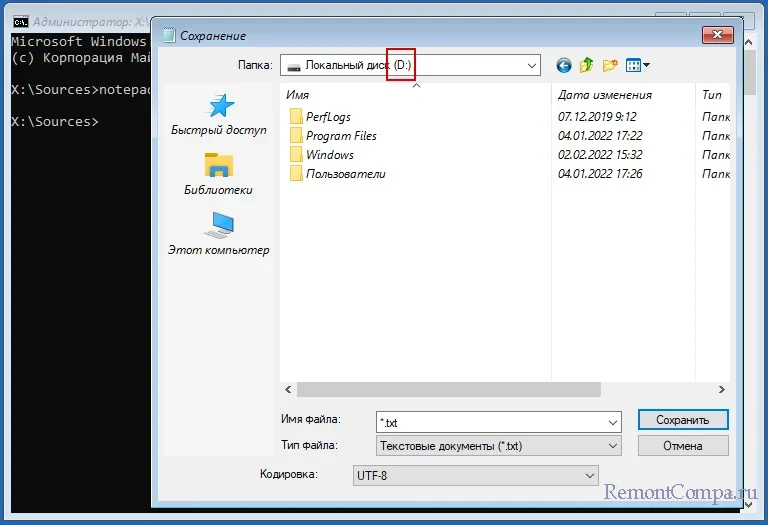
Поскольку в загрузочной среде буквы дисков могут отличаться, перед выполнением команды сканирования рекомендуем уточнить буквы томов. Выполнив в командной строке команду notepad и открыв тем самым Блокнот, перейдите в меню «Файл» → «Сохранить как» и посмотрите в открывшемся Проводнике букву раздела с операционной системой, то есть того раздела, на котором находится папка Windows.
Впрочем, запуск восстановления файлов из среды WinPE это крайнее решение, для начала можно попробовать запустить проверку, загрузившись в безопасном режиме. Инструкции по входу в среду восстановления и загрузке в безопасном режиме не даём, так как на нашем сайте имеется достаточно статей, в которых эта тема освещалась более чем подробно.
System files are necessary for your Windows to operate and run properly. If these system files go corrupted, missing, or damaged, your PC may run into errors. Such errors are usually fixed by running the SFC (System File Checker) scan. But what if you face issues while running this scan?
‘Windows Resource Protection could not start the repair service’ is an error that occurs while you try to run the ‘SFC/Scannow’ command. The error is majorly caused by a malfunctioning or disabled TrustedInstaller.
Why is SFC throwing the ‘Windows Resource Protection Could Not Start the Repair Service’ Error?
System File Checker (SFC) is a Windows built-in tool that helps replace damaged system file versions with the correct ones, thereby fixing many problems. For the System File Checker to work properly, TrustedInstaller needs to be functional.
TrustedInstaller is required to install, modify, and remove Windows updates and other system components. It controls Windows Resource Protection (WRP), which protects against unauthorized modifications, including changes to the system files, registry values, etc.
When the TrustedInstaller malfunctions or remain disabled, the services dependent on it, like SFC and WRP, fail to run and you may get the above error while running the SFC scan.
In this blog, we have shared some quick & easy methods to help you troubleshoot the ‘Windows Resource Protection could not start the repair service’ error.
How to Fix Windows Resource Protection Could Not Start the Repair Service Error?
Let’s start fixing the error with the number one recommended method!
#1 Run Windows Modules Installer (TrustedInstaller) Through the Service Console
Windows TrustedInstaller (Modules Installer) allows installing, removing, or modifying the Windows OS components and updates. If it doesn’t work ideally or malfunctions, you may receive the “Windows Resource Protection Could Not Start the Repair Service” error. You can try to restart it with the following steps and see if the issue gets fixed:
- Open the Run dialog box (press Windows + R), and type services. msc and click OK to access the Service console.
- Now, search Windows Modules Installer, right-click on it, and choose to open its Properties.

- Under the General tab, select Manual from the Startup type drop-down list.

- Now, click Start > Apply under Service status to save the changes.
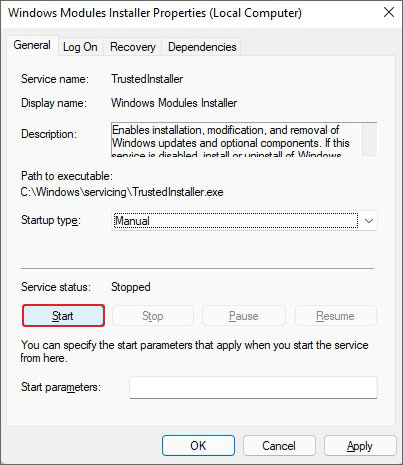
- Finally, close the Service console and see if you can run the system file checker without error.
#2 Start TrustedInstaller Using the Command Prompt
If restarting the TrustedInstaller from Service Console didn’t work in your favor, you can do it using the command prompt. Follow the steps below:
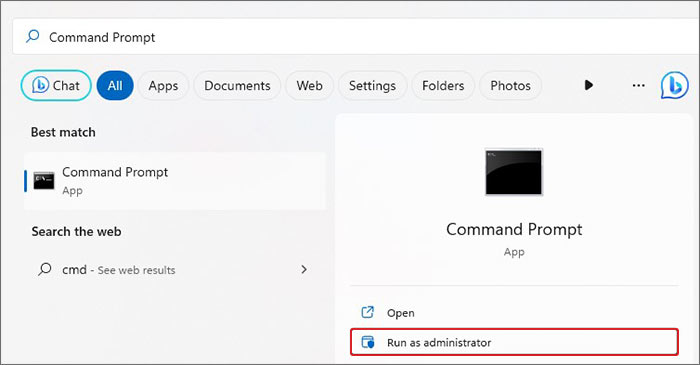
- Press Windows + S to access Windows Search.
- Type CMD and select the Run as administrator option.
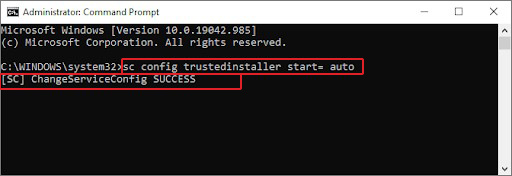
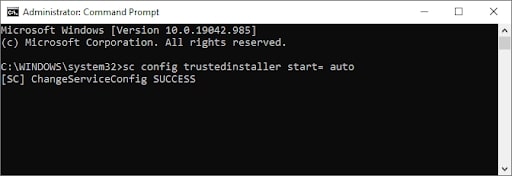
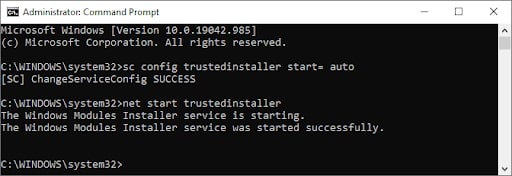
- In the elevated CMD window, type sc config trustedinstaller start= auto command and hit Enter. This command will set the Windows Modules Installer service startup type to Automatic.
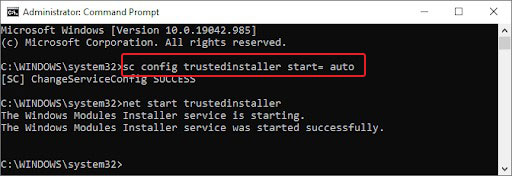
- Once done, you’ll see a ChangeServiceConfig SUCCESS message on the screen.
- Now, type the net start trustedinstaller command and press Enter.
- Once the process is completed, run the SFC command to check if the problem is resolved.
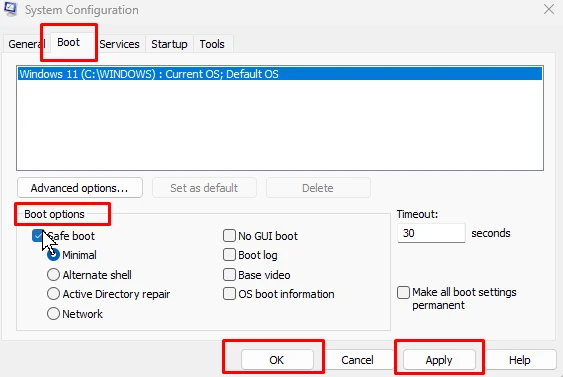
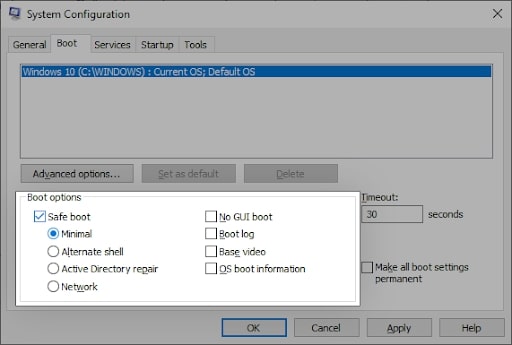
#3 Enable Safe Boot
You may also encounter this system error due to a service or application conflicting with the System File Checker utility. You can enable the Safe Boot and see if you can run SFC:
- Access Windows Search (Windows + S) or Run (Windows + R) dialog box and type msconfig to open System Configuration.
- Go to the Boot tab, click Safe boot, and then choose the Minimal option. Finally, click OK.
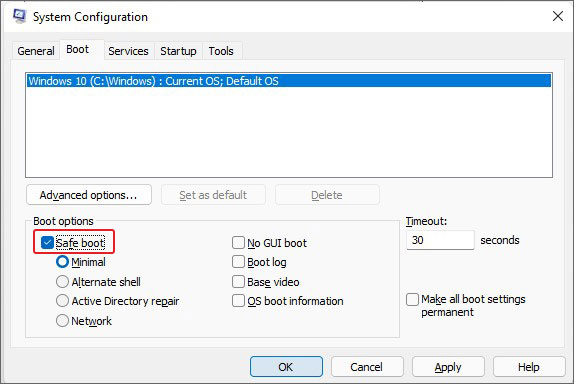
Restart your system and run an SFC scan to see if the problem is fixed.
#4 Run DISM Command
In some cases, users have been able to fix the error by running the DISM command before the SFC scan. DISM (Deployment Image Servicing and Management) is a Windows built-in tool to service and prepare corrupted or broken Windows images, including the images used in Windows RE and Windows Setup. Follow the given steps:
- Open Command Prompt (CMD) and run it as administrator.
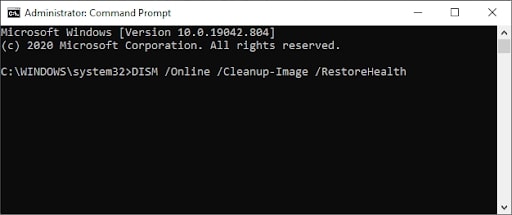
- In the elevated cmd window, you type DISM /Online /Cleanup-Image /RestoreHealth and hit Enter.
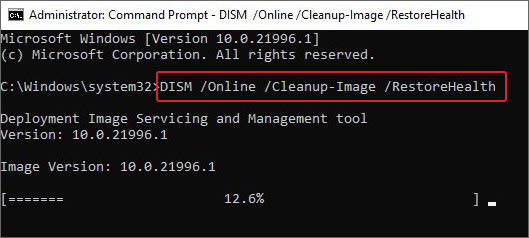
Wait for the scan to complete. Once done, see the results. If there are any instructions to follow, do so. If not, you can run SFC/Scannow command and see if the error is fixed.
#5 Add a TrustedInstaller Expandable String Value to the Registry Editor
This could be your last resort to fix the error. But be careful as meddling with the Registry Editor is not recommended very often, except for errors such as, Code 19, Restart to Repair Drive errors, or fixing Broken Registry Items.
Additionally, incorrect modifications can wreck your system and put your data at risk. Therefore, ensure that you have a backup of your system data. Once sure, you can add a TrustedInstaller Expandable String Value to the Registry Editor with the following steps:
A. Find TrustedInstaller ID and Sub-Folder in File Explorer
- Open File Explorer with Windows + E and navigate to C:\Windows\Servicing\Version path.
- You’ll see a folder named 10.0.219XX.X. This is your TrustedInstaller ID. Copy the folder name to your clipboard.
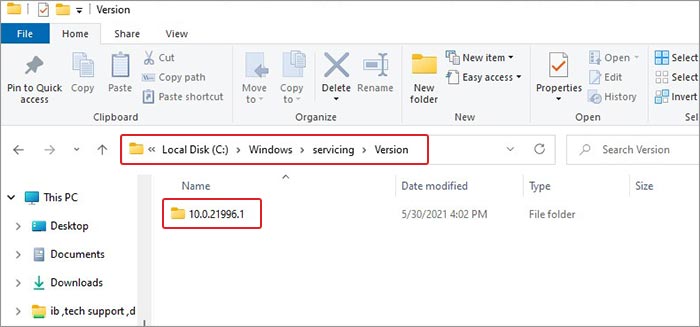
- Now, navigate to the C:\Windows\WinSxS path.
- Afterward, locate the following, depending on your CPU.
x86_microsoft-windows-servicingstack_31bf3856ad364e35_{TrustedInstaller ID} (32bit Windows)
amd64_microsoft-windows-servicingstack_31bf3856ad364e35_{TrustedInstaller ID} (64bit Windows)
- In the above-discussed sub-folder name, TrustedInstaller ID is the name noted previously.
- Copy the folder name and path to the clipboard or notepad.
B. Create Expandable String Value in Registry Editor
Now that you have the required details, add a new expandable string value in the registry editor.
- Open the Run dialog box, type regedit, and hit Enter.
- Now, copy-paste the following address and hit Enter.
HKEY_LOCAL_MACHINE\SOFTWARE\Microsoft\Windows\CurrentVersion\Component Based Servicing\Version.
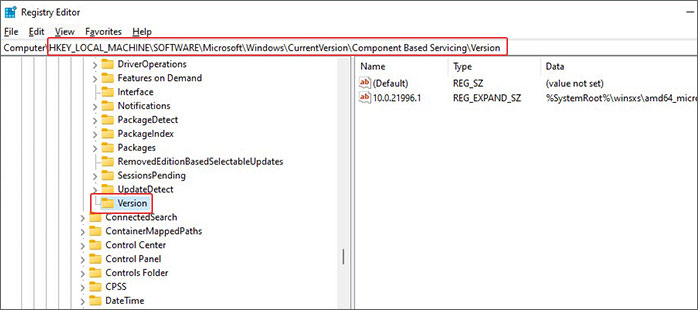
- Now, right-click on the Version, and select New > Expandable String Value.
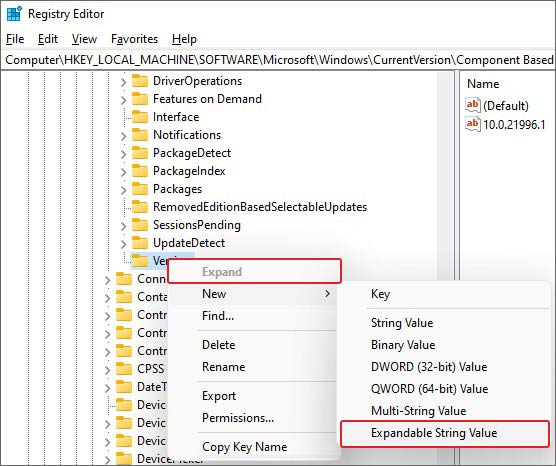
- Rename the value using TrustedINstaller ID. Next, double-click on the newly created value and enter the folder path as given below:
%SystemRoot%\winsxs\amd64_microsoft-windows-servicingstack_31bf3856ad364e35_10.0.19041.1XXX_none_7e3d47227c694b34
- Ensure that you use %SystemRoot% and trim C:\Windows from the folder path.

- Click OK to save the changes and close the editor window.
- Now, reboot your system and see if the issue is resolved.
All these methods have been helpful for users stuck with this error. You can try the solutions and see which works best for you. However, remember that there may be a risk of losing data while modifying Registry entries. Always backup your system data or keep a Windows data recovery software handy to recover deleted or lost data.
People Also Ask
What is TrustedInstaller?
TrustedInstaller.exe is a Windows Modules Installer service that constantly checks for available Windows updates and installs, removed, and modifies them and other system components. You can locate it in C: Windows\servicing.
How do I force a system repair?
You can force repair your system using the Windows built-in Startup Repair utility. Follow the given steps:
- Boot your design using the Windows installation media.
- When you see the Install Windows screen, click Next > Repair your computer > Troubleshoot.
- Afterward, select Advanced options > Startup Repair.
- Once the process is done, reboot your system.
Can SFC fix a blue screen?
Corrupted, missing, or damaged system files are common reasons for blue screen errors. You can boot your PC in Safe Mode and run SFC/scannow command through Command Prompt. SFC (System File Checker) replaces the wrong versions of the files with the correct ones, thus fixing the error.
Can I recover data after facing Windows Resource Protection Error on my system?
Yes. You can use a powerful data recovery software, such as Stellar Data Recovery to recover data. This DIY software efficiently recovers data from formatted, corrupted, or error-affected Windows PCs and storage drives.
Was this article helpful?
YES2
NO
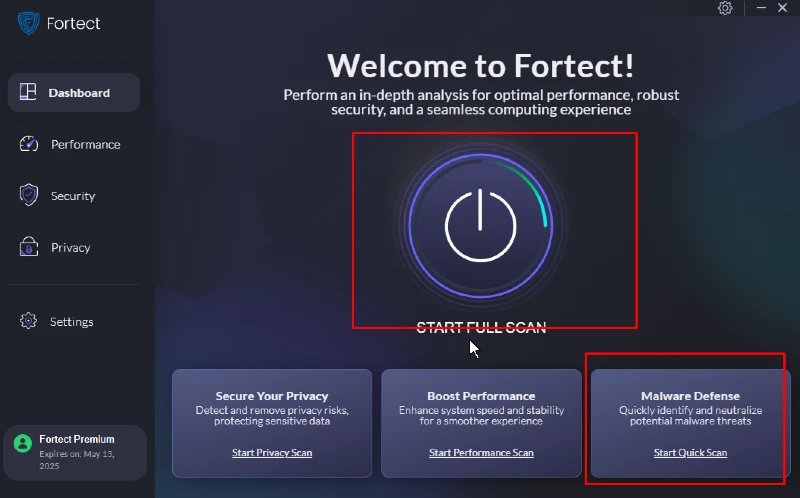
You’re here because you’re getting the error “Windows Resource Protection could not start the repair service” while attempting to execute the System File Checker. Don’t worry; Fortect is here to help with straightforward answers to avoid bothering you further.
We’ll also investigate the potential causes of this error, examine the associated symptoms, and offer step-by-step instructions for troubleshooting and rectifying the situation effectively.
First, let’s examine what a System file checker is.
What is a System File Checker ( SFC )
The System File Checker (SFC) is a handy utility built into Windows that allows users to scan and repair corrupted system files. However, there are instances when the SFC Scannow command fails to execute correctly, displaying the “Windows resource protection could not start the repair service” error.
Other error messages could look like the messages below, but they are the same:
- The SFC Scannow command fails to initiate or complete the scanning and repair process.
- System files may remain corrupted or missing, leading to various issues or instability.
- Error messages or prompts related to the failure of the SFC utility may appear.
We’ll also investigate the potential causes of this error, examine the associated symptoms, and offer step-by-step instructions for troubleshooting and rectifying the situation effectively.
Here are five of the reasons behind the SFC error messages.
Reasons Behind “SFC Scannow command fails to initiate
Several factors can contribute to the occurrence of this error, including but not limited to:
- Corrupted or missing system files are required for the SFC utility to function correctly.
- Insufficient permissions or access rights to run the SFC Scannow command.
- Conflicts with third-party applications or security software that interfere with the SFC process.
- Hardware-related issues, such as faulty RAM or hard disk drives.
- Malware or virus infections may have corrupted system files or interfere with the SFC utility.
Quick Detailed Fix Guide:
- Run the SFC Scannow command in an elevated command prompt with administrative privileges.
- Perform a system file integrity check using the DISM (Deployment Image Servicing and Management) tool.
- Disable third-party antivirus or security software temporarily to eliminate potential conflicts.
- Run the SFC Scannow command safely to bypass any interference from running processes or services.
- To resolve dependencies, use the System File Checker (SFC) and Deployment Image Servicing and Management (DISM) tools in the correct order.
- Perform a clean boot to isolate and identify any conflicting applications or services.
- If applicable, check for and replace faulty hardware components, such as RAM or hard disk drives.
Let’s dig deeper into why we are getting this error message: Windows Resource Protection could not Start the Repair Service.”
Fix Now: Windows Resource Protection could not Start the Repair Service”
Step 1: Enable and start Windows Modules Installer Service (TrustedInstaller)
Ensure that the Windows Modules Installer Service, or TrustedInstaller, is enabled and running. This service manages and installs system updates and plays a crucial role in adequately functioning the SFC utility.
To enable and start the Windows Modules Installer Service, follow these steps:
- Press the Windows key + R to open the Run dialog box.
- Type “services.msc” (without quotes) and press Enter. This will open the Services management console.
- In the Services window, locate the “Trusted Installer” or “Windows Installer” service.
- If the service is not running, right-click on it and select “Start.”
- If the service is disabled, right-click on it and select “Properties.”
- In the Properties window, set the “Startup type” to “Manual,” then click on Start
- Click “Apply” and then “OK” to save the changes.
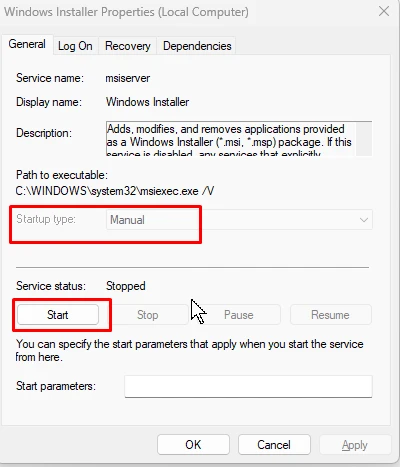
- Restart your computer for the changes to take effect.
- After completing these steps, the Windows Modules Installer Service should be enabled and running, potentially resolving the issue that prevented the System File Checker from starting the repair service.
- Once the service is active, you can try running the “sfc /scannow” command again to scan and repair any corrupted system files.
It’s important to note that if the TrustedInstaller service was disabled or not running for a specific reason, addressing that underlying issue may also be necessary to prevent the problem from recurring.
Step 2: sc config trustedinstaller start= auto Command
This approach is similar to the first step, which uses a command prompt. It may resolve the issue if it’s simple, provided you’re the administrator or owner of your computer. Mind you, sometimes, even if you’re the owner of the computer, you may not be the administrator, and you’ll receive an error such as t”his: You must be an administrator running a console session to
use the SFC utility.” or “Access is denied.”
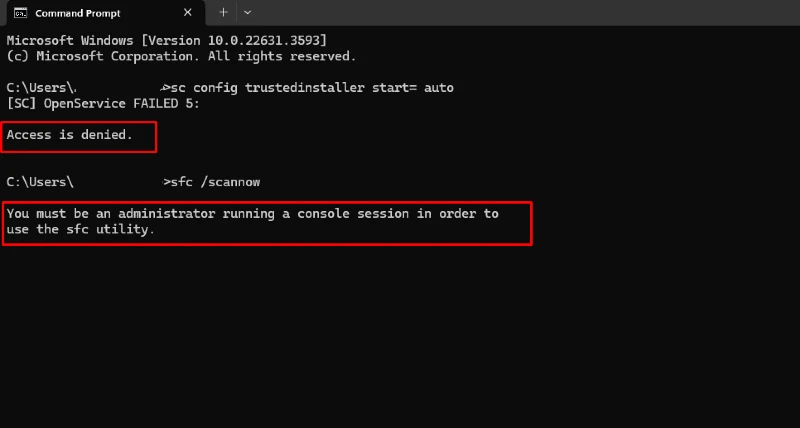
If this is the case, contact your IT or system administrator or the one who set up your computer.
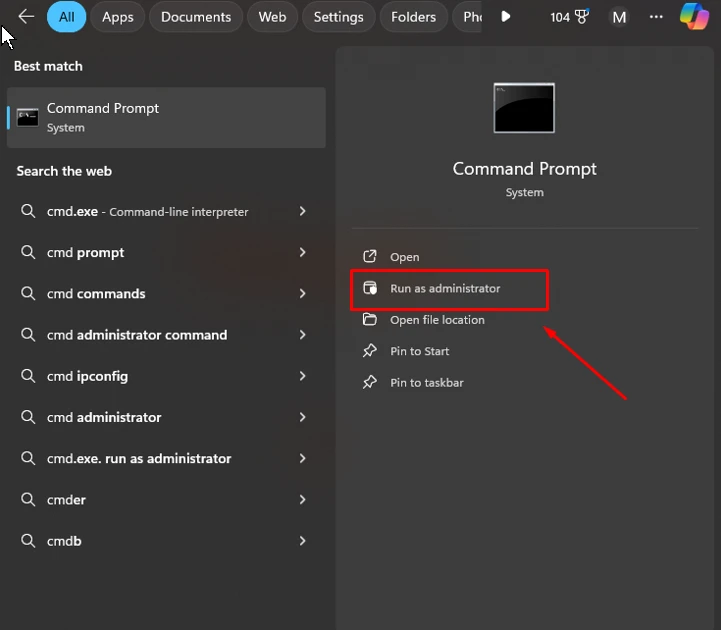
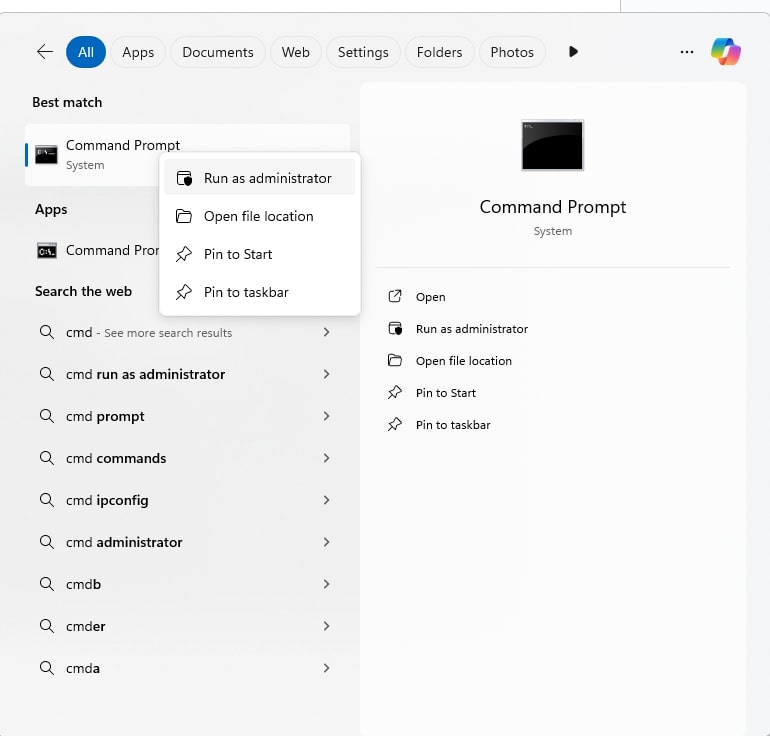
- Type cmd in the search bar near the Start button on your computer.
- On the right side of the screen, select Run as Administrator.
- A black window should appear; type sc config trusted installer start=auto in the C: section next to the user’s name. then ENTER
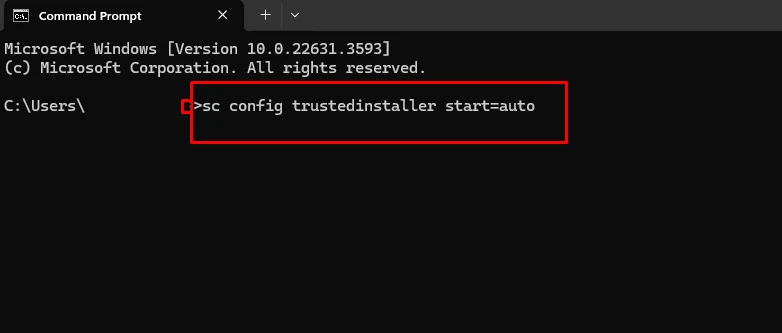
- You should receive a SUCCESS message below your command if everything works correctly.
- A message should say something like: Windows Modules Installer service was started successfully.
- Then, on the C: user section below that message, type sfc/scannow to check if it’s successfully running.
Step 3: Run SFC in Safe Mode
- Press the Windows key + R to open the Run dialog box. Or type run in the search bar near the start button.
- Type “msconfig” and press Enter to open the System Configuration utility.
- In the System Configuration window, navigate to the “Boot” tab.
- Under the “Boot options” section, check the “Safe boot” checkbox.
- Click “OK” to apply the changes and restart your computer in Safe Mode.
- Once in Safe Mode, open an elevated Command Prompt and run the “sfc /scannow” command.
- After the scan completes, restart your computer normally.
Step 4: Run the DISM Command
- Press the Windows key + R to open the Run dialog box.
- Type “cmd” and press Ctrl + Shift + Enter to open an elevated Command Prompt.
- In the Command Prompt window, type the following command and press Enter:
- DISM /Online /Cleanup-Image /RestoreHealth
- This command utilizes the Deployment Image Servicing and Management (DISM) tool to repair corrupted system files.
- Wait for the process to complete, as it may take some time, depending on your system.
Step 5: Install Windows Update
- Press the Windows key + R to open the Run dialog box.
- Type “control update” and press Enter to open the Windows Update settings.
- Click “Check for updates” and install any available updates. If your Windows is up to date, then proceed with other steps.
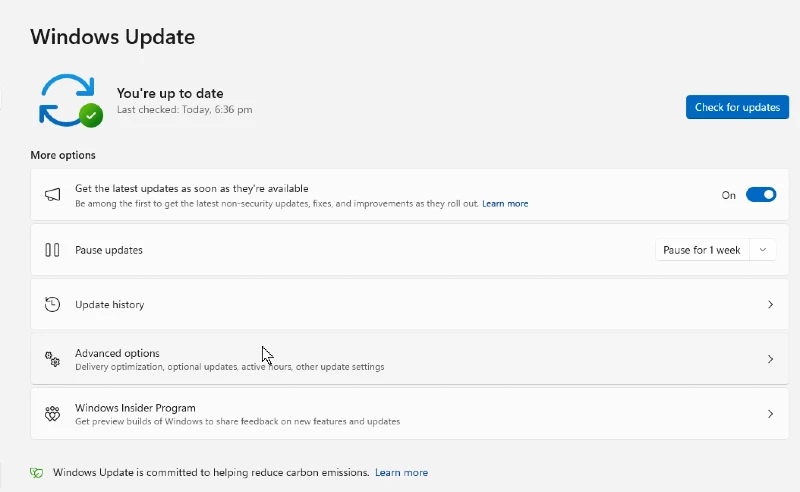
- Restart your computer after the updates are installed.
By following these detailed steps, you should be able to resolve the “Windows Resource Protection could not start the repair service” error and successfully run the System File Checker (SFC) utility.
How to Resolve Issues When the SFC /Scannow Command Fails?
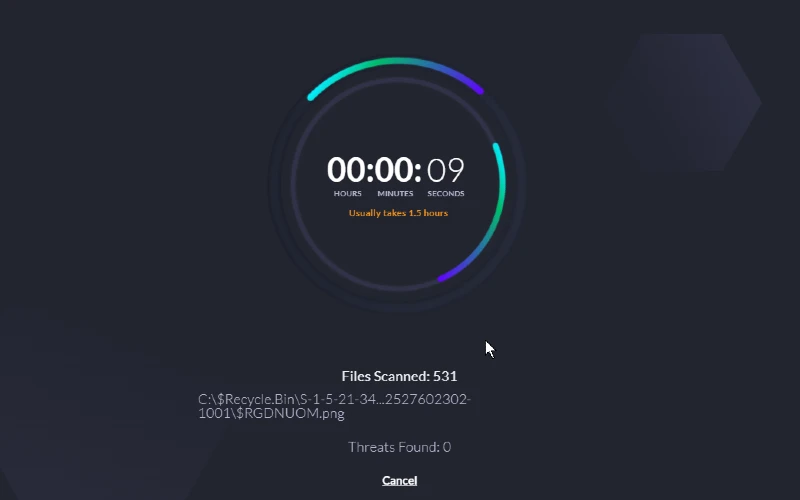
While the steps outlined above can help resolve the “Windows Resource Protection could not start the repair service” error, having a reliable tool like Fortect is essential.
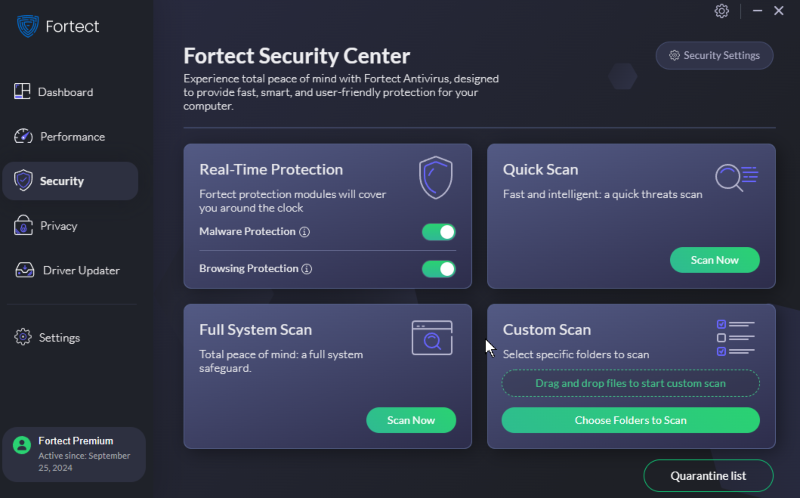
Fortect offers a real-time advanced repair solution for premium users. When a user runs a full system scan and clicks “Start Repair” after the Scan Now button, Fortect executes the standard System File Checker (SFC) scan and applies other advanced fixes.
Its premium repair feature utilizes advanced operating system repair and restoration algorithms to diagnose and resolve issues on the user’s system thoroughly.
This thorough repair goes beyond the SFC scan to provide a deeper repair and optimization for the user’s operating system and files.
Fortect offers a thorough solution that goes beyond just scanning and protecting. Its advanced repair algorithms address corrupted files caused by malware or viruses. Again, this feature is only available for premium users.
If a malware attack causes the issue, Fortect can help with its malware defense capabilities. It monitors and protects downloads, installations, and executables from malware and viruses whenever you install something on your system. Its real-time scanning and detection mechanisms can identify and block malicious files or activities, preventing them from causing further damage or corruption to your files and operating system.
Act now before it’s too late. Download and install the Fortect software today, enabling hassle-free browsing and secure online activities.
Conclusion
The “Windows Resource Protection could not start the repair service” error can be frustrating but not impossible. By following the various methods outlined, such as enabling and starting the TrustedInstaller service, running SFC in Safe Mode, utilizing the DISM command, and ensuring up-to-date Windows updates, you can resolve this issue and successfully execute the System File Checker.
In some cases, addressing hardware-related problems or repairing hard drives may also be necessary. With persistence and the right approach, you can restore the functionality of this essential system utility.
Sara Alsaqaf
If you are trying to run SFC (sfc /scannow) but run into “Windows Resource Protection could not start the repair service” learn how to fix it here.
Are you trying to run the System File Checker (sfc /scannow) but run into the “Windows Resource Protection could not start the repair service” error message? You’ll learn how to fix it here.
The System File Checker is an incredibly useful tool millions of users rely on to fix system-wide issues by restoring missing or corrupted files. It’s able to automatically detect and fix system files causing issues on your computer. But what are you supposed to do when the feature fixing your issues needs fixing as well?
Users have been reporting that when trying to execute the “sfc /scannow” command, they get yet another error message in return: Windows Resource Protection could not start the repair service. There are a few things you can do in order to fix this and successfully run the System File Checker.

Table of Contents
- Why Is the SFC Scan Not Working?
- How Do I Fix the “sfc /scannow” Not Working? Fix Windows Resource Protection Could Not Start the Repair Service Error
- Method 1. Start the Windows Modules Installer (TrustedInstaller)
- Method 2. Use the Command Prompt
- Method 3. Try To Run the System File Checker in Safe Mode
- Method 4. Run the DISM Command
- Final Thoughts
Why Is the SFC Scan Not Working?
Your System File Checker can’t function because of the TrustedInstaller (Windows Modules Installer) service. It’s a necessary service that helps your system install, modify and remove various applications. It also “owns” your system files to prevent other sources from modifying or deleting them.
Despite this, you still may run into issues with corrupted system files and so, you need to use the SFC scan. TrustedInstaller has full access to Windows Resource Protection (WRP) files and registry keys necessary for the SFC scan to work.
This service starts on-demand when executing the “sfc /scannow” command. If the service has been completely disabled, the scan won’t be able to restore any missing or corrupted WRP files.
This issue appears most commonly in Windows 7, but may appear on Windows 8 as well as the latest Windows 10.
How Do I Fix the “sfc /scannow” Not Working? Fix Windows Resource Protection Could Not Start the Repair Service Error
There are a few different solutions to help you if you’re struggling to run the System File Checker and scan your device for corrupt files or missing resources.
Method 1. Start the Windows Modules Installer (TrustedInstaller)
The most straightforward solution is manually starting the required service. It’s important to configure the Windows Modules Installer in a way that allows it to start whenever you try to run the SFC scan. The steps below will guide you through this setup.
- Press the Windows + R keys on your keyboard. This is going to bring up the Run utility.
-
Type in services.msc and click on the OK button. This is going to launch the Services window, which might take a few seconds to fully load.
-
Right-click on the Windows Modules Installer service and choose Properties.

-
Set the Startup type to Manual. If the service isn’t running, click on the Start button. Click Apply, then OK. You should be back at the list of services.
- Close the Services window and try running the “sfc /scannow” command again. If the scan still doesn’t work, move on to the next solution.


Method 2. Use the Command Prompt
This method is essentially the same one as the first but done in the Command Prompt. It’s possible that this solution may work, as you need administrative permissions to make the modification.
- Open the search bar in your taskbar by clicking on the magnifying glass icon. You can also bring it up with the Windows + S keyboard shortcut.
-
Type cmd or Command Prompt in the search bar. When you see it in the results, right-click on it and choose Run as Administrator.
- When prompted by the User Account Control (UAC), click Yes to allow the app to launch with administrative permissions.
-
Once the Command Prompt window is open, type in the following command and press Enter to execute it: sc config trustedinstaller start= auto. If the command worked, you should see the SUCCESS message.
-
Afterwards, execute the following command: net start trustedinstaller. There should be a message about the Windows Modules Installer service starting successfully.
- Now, you can try to run the System File Checker by executing the sfc /scannow command. If you still don’t have any luck running it, try a different method below.


Method 3. Try To Run the System File Checker in Safe Mode
There’s a possibility that a background application or service is interfering with the System File Checker, causing it to not work. In this case, you can try simply executing the scan command in Safe mode. Safe mode boots your system with only the necessary Windows components enabled.
- Press the Windows + R keys on your keyboard. This is going to bring up the Run utility.
-
Type in “msconfig” without the quotation marks and press the Enter key on your keyboard. This will launch the System Configuration application.
-
Switch to the Boot tab. Under Boot options, check Safe boot and keep it on the Minimal setting, then click the OK button.
- Restart your computer. It should boot in Safe mode without any third-party applications, only starting the necessary services. Open the Command Prompt and execute the sfc /scannow command to see if the SFC scan is working.

Method 4. Run the DISM Command
Some users have reported that running the DISM command fixed the System File Checker. The Deployment Image Servicing and Management (DISM) tool re-deploys your system image in order to fix issues directly related to it. The step-by-step instructions to run this scan can be found below.
- Open the search bar in your taskbar by clicking on the magnifying glass icon. You can also bring it up with the Windows + S keyboard shortcut.
-
Type cmd or Command Prompt in the search bar. When you see it in the results, right-click on it and choose Run as Administrator.
- When prompted by the User Account Control (UAC), click Yes to allow the app to launch with administrative permissions.
-
Once the Command Prompt window is open, type in the following command and press Enter to execute it: DISM /Online /Cleanup-Image /RestoreHealth
- Wait for the scan to complete, and then restart your computer. When going back to the Command Prompt, try running the SFC scan and see if it works now.


Final Thoughts
Our Help Center offers hundreds of guides to assist you if you’re in need of further help. Return to us for more informative articles, or get in touch with our experts for immediate assistance.
One More Thing
Would you like to receive promotions, deals, and discounts to get our products for the best price? Don’t forget to subscribe to our newsletter by entering your email address below! Be the first to receive the latest news in your inbox.
You May Also Like
» How to Fix Inaccessible Boot Device Error in Windows 10
» How To Fix ‘Remote Desktop Can’t Connect to the Remote Computer’
» How to Fix the “Default Gateway Is Not Available” Error in Windows 10
Are you trying to execute the System File Checker (sfc /scannow) but suddenly encounter the “Windows Resource Protection could not start the repair service” error message? If you are one of them, then this post is for you. Here, you will learn how to fix this error.
The System File Checker is an extremely useful tool that millions of users use to resolve system-wide problems by replacing files that have become corrupted or missing. It has the ability to automatically identify and repair system files that are causing problems for your computer. However, what should you do if the feature that is supposed to fix your problems also needs to be fixed? It seems intimidating, right?
Users all over the place have been complaining that they received an error message saying that Windows resource protection could not start repair service when they attempted to run the “sfc /scannow” command. To resolve this annoying error and successfully run the System File Checker without any issues, there are a few fixes you can try. But first, let’s understand what exactly the cause of this problem is.
Why Is the SFC Scan Not Working?
Windows comes with a built-in tool called System File Checker (SFC) that helps you replace corrupted system file versions with the right ones, solving a lot of issues. The functionality of TrustedInstaller is required for the System File Checker to operate as intended. Windows updates and other system components cannot be installed, modified, or removed without the use of TrustedInstaller.
It manages Windows Resource Protection (WRP), which guards against unauthorized changes to registry values, system files, and other data. The services that rely on the TrustedInstaller, such as SFC and WRP, stop working when they malfunction or are disabled, and you might receive the sfc /scannow windows resource protection could not start the repair service error. You can resolve this irritating error, “Windows Resource Protection could not start repair service,” by following the quick & simple steps we have provided in this blog post.
How To Fix Error “Windows Resource Protection Could Not Start the Repair Service”
There are several fixes that you can use if you are experiencing problems getting the System File Checker to function and scanning your device for missing or corrupted files. Let’s find out some of the most effective ways.
Method 1. Start the TrustedInstaller (Windows Modules Installer).
Starting the necessary service manually is the easiest way to solve this problem. It is crucial to set up the Windows Modules Installer so that it will launch every time the SFC scan is launched. To troubleshoot this error, you can follow the steps listed below.
- Use the keyboard shortcuts Windows + R to open Windows. This will launch the Run application.
- Enter services.msc, then press the OK button. The Services window will now open, and it may take some time to load completely.
- Choose Properties from the menu by right-clicking on the Windows Modules Installer service.
- Select “manual” as the startup type. Click the Start button to launch the service if it is not already running. Choose Apply, and then OK. You should have returned to the list of services.
- Try executing the “sfc /scannow” command once again after closing the Services window. Proceed to the next solution if the scan is still unsuccessful and you still encounter the Windows resource protection could not start the repair service error.
Method 2. Try to Execute the System File Checker in Safe Mode.
It is possible that the System File Checker is malfunctioning due to interference from a background program or service. In this situation, you could try just running the scan command in safe mode. When your computer boots up in safe mode, only the essential Windows components are active.
- Use the keyboard shortcuts Windows + R to open Windows. This will launch the Run application.
- Enter “msconfig” using the keyboard’s Enter key after typing it without the quote marks. By doing this, the System Configuration application will open.
- Navigate to the Boot tab. Click OK after selecting Safe Boot and maintaining the Minimal setting under Boot options.
- Restart the computer. All necessary services should be started during the safe mode boot, free of any third-party applications.
- Try running the sfc /scannow command in the Command Prompt to see if the SFC scan is functioning or not. If you still face the sfc /scannow windows resource protection could not start the repair service error, proceed to the next fix.
Also know: How to Set Up USB Game Controllers in Windows 11/10
Method 3. Use the Command Prompt To Start TrustedInstaller
The only difference between this method and the first is that it is executed within a command prompt. Since you require administrator permissions to make the change, there is a chance that this solution will work.
- Click the magnifying glass icon to bring up the search bar in your taskbar. Alternatively, you can use the Windows + S keyboard shortcut to open it.
- In the search bar, enter cmd or Command Prompt. Right-click on it and select “Run as Administrator” when you see it in the results.
- Click Yes to give the app administrator permissions when User Account Control (UAC) prompts you.
- After launching the Command Prompt window, enter the below command and press Enter to run it: sc config trustedinstaller start= auto. The SUCCESS message should appear if the command is successful.
- Run the following command after that: net start trustedinstaller. There should be a message indicating that the Windows Modules Installation service has started successfully.
- Using the sfc /scannow command, you can now attempt to launch the System File Checker. If you are still having trouble running it or encountering the Windows resource protection could not start repair service error, try the alternate method listed below.
Method 4. Run the DISM Command
According to some users, the System File Checker issue was fixed by using the DISM command. To resolve issues directly related to your system image, use the Deployment Image Servicing and Management (DISM) tool to redeploy it. You can find the detailed instructions for running this scan below.
- Click the magnifying glass icon to open the taskbar search bar. Alternatively, you can use the Windows + S keyboard shortcut to open it.
- In the search bar, type Command Prompt or cmd. Right-click on it and select Run as Administrator when you see it in the results.
- If User Account Control (UAC) asks you to confirm the app’s launch with administrator rights, select Yes.
- Once the Command Prompt window has opened, enter the command and press Enter to run it: DISM /Online /Cleanup-Image /RestoreHealth
- After the scan is finished, restart your computer. Try running the SFC scan when you return to the Command Prompt to see if it now functions. If you still encounter the sfc /scannow windows resource protection could not start the repair service error, proceed to the next method.
Method 5. Manually Fixing the Registry
This method needs to be used carefully because making the wrong registry change can lead to problems:
- To open the Windows registry, press Windows + R to open the Run window, type regedit, and hit Enter.
- Navigate to the following registry link: HKEY_LOCAL_MACHINE\SOFTWARE\Microsoft\Windows\CurrentVersion\Component Based Servicing\Version:
- To edit the registry values, right-click on the relevant keys (if unsure, seek professional assistance).
- To add an Expandable String Value, right-click on the Version and select New.
- Change the value’s name to correspond with your TrustedInstaller ID. It will look something like this after renaming: 10.0.19041.1XXX.
- Double-click the newly created value, and then copy and paste the folder path found in WinSxS into the Value data field. The value data field should now resemble this:
%SystemRoot%\winsxs\amd64_microsoft-windows-servicingstack_31bf3856ad364e35_10.0.19041.1XXX_none_7e3d47227c694b34.
- Verify that you are using %SystemRoot% correctly and that the folder path does not include “C:\Windows.” To save the changes, click “OK.”
- Restart your computer now to check if the sfc /scannow windows resource protection could not start the repair service problem has been fixed.
Also know: How to Enter BIOS Setup Utility and Check BIOS Version in Windows
Windows resource protection could not start the repair service Error: Fixed
Resolving the “Windows Resource Protection Could Not Start The Repair Service” issue requires a combination of troubleshooting techniques and the utilization of built-in Windows utilities. By following the steps outlined in this article, you can successfully address this error and restore the proper functionality of their system.
It is essential to approach the resolution process systematically, ensuring that each step is carefully executed to achieve the desired outcome. Remember to always back up critical data before making any significant system changes and to seek professional assistance if needed. If you have any questions or concerns, please use the comments section to contact us.