Today, I will provide the solution for an error that comes in Windows Server VMware. The error appears as “No images are available for Windows Server 2022 VMware.“
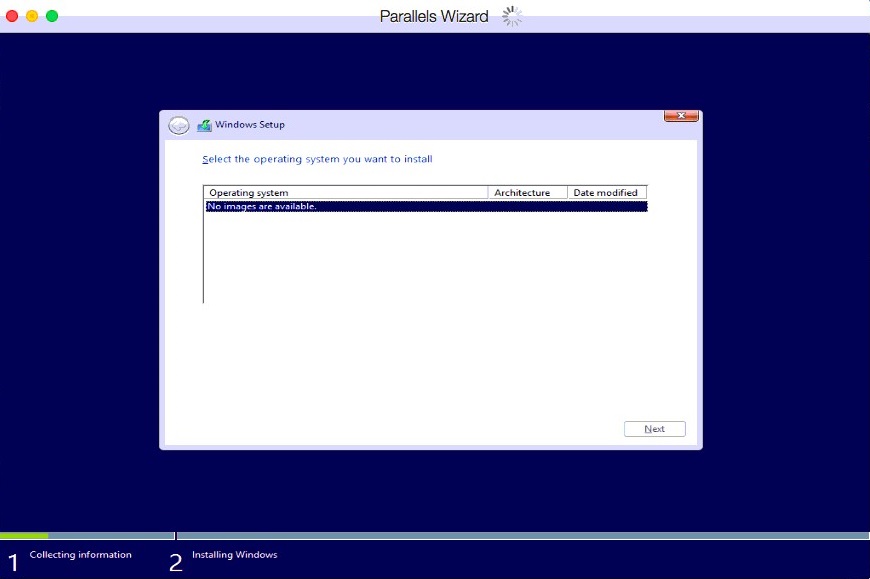
Recently, I was creating a new VM to install the SharePoint On-premises version. There, I want to install Windows Server 2022. But I received an error that says: No images are available. It looks like the screenshot below.

The same error can occur in any version of Windows Server, including Windows 2022, 2019, or 2016.
The “No images are available” message appears when the Windows installation process cannot detect valid installation images on your installation media. This can happen due to:
- Corrupted installation media
- BIOS/UEFI configuration issues
- Hardware compatibility problems
- Driver-related issues
I will explain to you the exact steps I followed to fix the error. Follow the steps below:
- In the New Virtual Machine Wizard, choose Custom (Advanced) to create a virtual machine with advanced options, such as SCSI controller type, virtual disk type, and compatibility with older VMware products.

- Then, choose, I will install the operating system later. The virtual machine will be created with a blank hard disk.

- Then, choose “Microsoft Windows” as shown below and select Version as Windows Server 2022.

- Then, in the next screen, give a Virtual machine name and Location like below:

- Then choose Firmware type as BIOS like below:

- Then, choose the Number of processors and the Number of cores per processor.

- Then choose the RAM required for the virtual machine (VM).

- Then choose Use network address translation (NAT) in Network Type like below:

- Then choose I/O controller types as LSI logic SAS, like below:

- Then choose Virtual disk type as SCSI, as shown below:

- Then choose Create a new virtual disk like below:

- Then choose the Maximum disk size in GB for the Windows Server virtual machine.

- Then you can specify a disk file in the Windows Server VM.

- In the next screen, it will display all the details that you have selected in the above steps.

- Then, click the Finish button to complete the Windows Server virtual machine setup.

- Now you can view the Windows Server virtual machine, select the language, time, and currency format, as well as the keyboard input method.

- Now you can see the Windows Server datacenter desktop experience like below.

In this way, you can fix the error “no images are available on Windows Server“. If you continue to experience difficulties after trying these methods, consider contacting Microsoft Support or your server manufacturer’s technical support team for hardware-specific guidance.
You may like the following tutorials:
- This edition cannot be upgraded error in Windows Server
- Turn Off Microsoft Authenticator App in Microsoft 365
- SharePoint User Information List
- The database engine instance you selected is not valid for this edition of reporting services
- Your Organization’s Policies Don’t Allow You To Share With These Users While Sharing Files In SharePoint Online
I am Krishna.Vandanapu a SharePoint architect working in IT from last 13+ years, I worked in SharePoint 2007, 2010, 2013, 2016 and Office 365. I have extensive hands on experience in customizing SharePoint sites from end to end. Expertise in SharePoint migration tools like Sharegate, Doc Ave and Metalogix. Migrated SharePoint sites from SharePoint 2007 to 2010 and 2010 to 2013 several times seamlessly. Implementing CSOM with Microsoft best practices. Spent quality time in configuring SharePoint application services like User Profile, Search, Managed Meta data services etc. Now exploring SharePoint Framework and SharePoint 2019
Windows setup reports «No images available» when trying to install 8.1 w/ Bootcamp.
Trying to install 8.1 Pro on my iMac, running 10.10.2 Yosemite. Followed all the Bootcamp instructions, used a USB to boot the ISO image of Windows. Everything runs smoothly on the OS side, but when the system restarts I hit a strange error. After entering serial number, I’m taken to this screen.
This is my first time trying bootcamp and my first time since XP trying to use windows, so any help is much appreciated!
iMac,
OS X Yosemite (10.10.2)
Posted on Mar 9, 2015 11:59 AM
Windows setup reports «No images available» when trying to install 8.1 w/ Bootcamp.

How to Fix “No Images are Available” when setting up Windows Server on VMware. To fix the problem, watch this video if you encounter the following error when trying to create a virtual machine in VMware.
Steps
1-In the New virtual machine wizard, choose Custom (advanced).
2- Choose, I will install the operating system later.
3-Give a Virtual machine name and Location.
4-Choose Firmware type as BIOS .
5-Choose Virtual disk type as SCSI.
6-Load the Win Server 2022 ISO image to boot the VM .
1. Select use Win Server 2022 ISO image file.
2. Browse the ISO image.
3. Click Ok.
Enjoy
source
windows server
Symptoms
Unable to create a virtual machine using USB bootable flash drive.
Wizard boots in Windows but Windows Installer shows an error:

Resolution
-
Stop installation process.
- Quit Parallels Desktop.
-
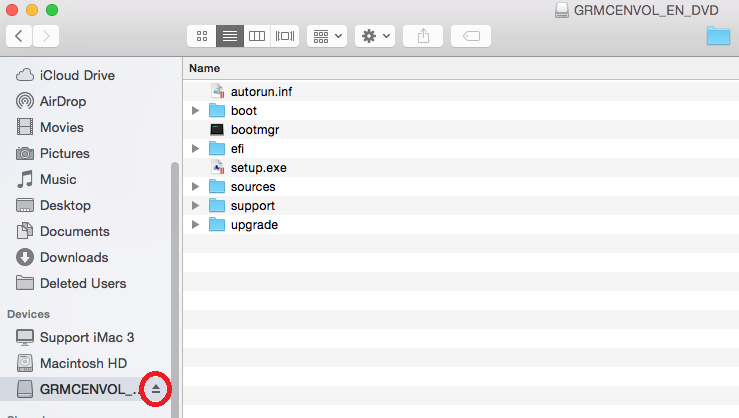
Open Finder and check if Windows installation media mounted. If so, unmount it using Eject button.
- Start Parallels Desktop > click on New
- Click Install Windows or another OS from DVD or image file, then click Continue.
-
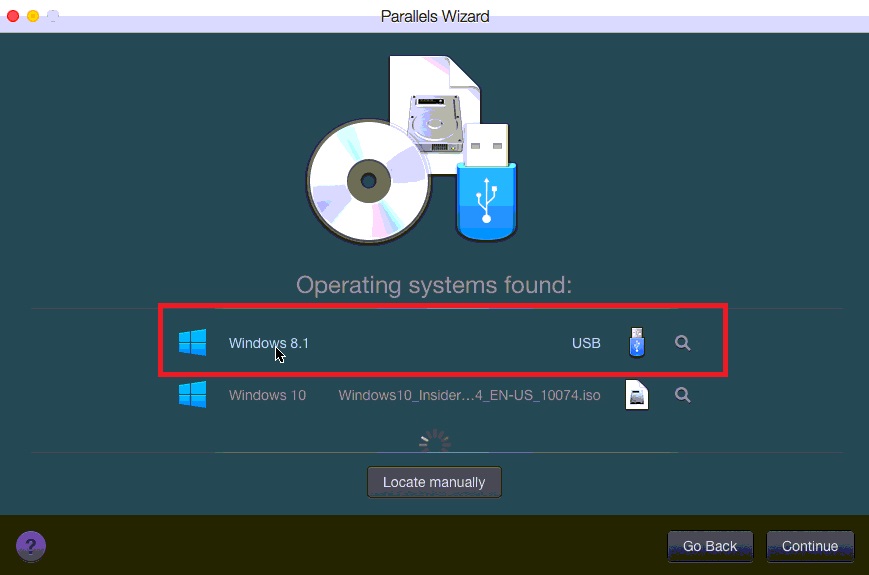
USB flash drive must be detected in Operating systems found list
- Highlight USB source, click on Continue and proceed with the installation.
I’ve been trying to customize a Windows 8.1 Pro x64 install with winreducer, but every single time I create an ISO, I get a message during windows setup saying «no images are available». I’ve checked the forum and another user had this issue which was fixed by not removing some drivers (ex-fat, SCSI, etc), and also by not cleaning the boot wim. I’ve tried this, and several other things, such as using different source Windows 8.1 images, and making sure the computer did not go to sleep mode during the reduction process. However, I am still getting this error. Is anyone else having this issue with the latest build? The last time I used Winreducer was over a year ago and it worked fine. I could really use some help figuring out whether I’m doing something wrong or if this is a bug in the software.
Thanks
hi,
you mean you boot your cd/usb and than you get this «error»?
if yes try this:
— replace the boot.wim from your reduced os with an boot.wim from your untouched iso
if that does not work
— remove the unattanded.xml from the root of your iso
EDIT:
i think this is your problem?
![[ANSWERED] Winreducer 8.1 v1.5.9.0 - Windows Install shows "no images are available" Win8_1](https://2img.net/h/jontriphan.com/wp-content/uploads/2013/01/win8_1.jpg)
if yes try the second option (remove unattanded.xml) i think that could work.
i think that something is wrong with that file, so if thats the problem could you post it here ? (remove your serial before posting)
Yes, that is the problem I’m getting during install.
I replaced the boot.wim from the original ISO. This did not fix the issue. Still seeing the same screen.
Next, I tried removing unattended.xml and this seems to have worked. Excellent. However, I would like to use unattended feature in the future… any guesses what might be causing this error to appear in the unattend settings?
EDIT:
I have «hide boot image selection» checked. Could this be causing the issue? Tested a build with this unchecked and still getting the same issue. Any help finding the culprit here?
so what i was guessing was right.
i could think that this part isnt correct in your file
/IMAGE/INDEX
1
how does it look at your file?
what you could do (for testing) is not check the «hide boot Image» or just delete this part at your file:
/IMAGE/INDEX
1
OnError
normally the value 1 means that the first index is used, so which number do you get?
what you could also do is check your Indexes.
do this:
download my tool:
https://forum.winreducer.net/t1170-krx-product-wim-filelist
start it and select your install.wim file.
next step is click on «Show all Index» and post the result (text or Picture)
do this step again with your boot.wim (just to be sure)
I’m creating a new build now and will upload a picture of the results from your tool as soon as I can. In the mean time, it looks like the unattend.xml file is the culprit and is missing the ImageInstall section in my recent builds. Perhaps this is a new bug in Winreducer, since my unattend.xml file from a year ago works properly. Here is an example:
OLD BUILD (May 2014)
Code:
      <UserData>
        <AcceptEula>true</AcceptEula>
        <ProductKey>
          <Key>XXXX-XXXX-XXXX-XXXX-XXXX</Key>
          <WillShowUI>OnError</WillShowUI>
        </ProductKey>
      </UserData>
      <ImageInstall>
       <OSImage>
          <InstallFrom>
            <MetaData wcm:action="add">
              <Key>/IMAGE/INDEX</Key>
              <Value>1</Value>
            </MetaData>
          </InstallFrom>
         <WillShowUI>OnError</WillShowUI>
      </OSImage>
      </ImageInstall>
NEW BUILD (April 2015)
Code:
      <UserData>
        <AcceptEula>true</AcceptEula>
        <ProductKey>
          <Key>XXXX-XXXX-XXXX-XXXX-XXXX</Key>
          <WillShowUI>OnError</WillShowUI>
        </ProductKey>
      </UserData>
    </component>
  </settings>
The necessary image settings are missing in the new builds. Can anyone else confirm that their unattend files are missing these sections with the most recent version of WinReducer?
By the way, thank you so much for helping me narrow down the issue. I was going crazy thinking my builds were completely corrupt.
ok good for you that its ok now.
what i can say is that it is working for winreducer 7.
but i think winter can say more about it when he gets online
Hello guys,
Are you using an old wccf ? If so could you please try to load your old wccf and verify if the autounatted part in WinReducer is correctly loaded («Hide boot image»).
Which ISO are you using : Already modified or official MS ?
Please let us know !
Have a good day !
I don’t have an old wccf file. I was starting from scratch.
I’m using an unmodified windows 8.1 pro 64 bit ISO.
Ok, thank you for your answer. Your configuration is perfect, so it could be a controller driver trouble.
Have you removed some controller drivers (in remover» tab) ?
No, I haven’t removed any controller drivers, the only drivers I have removed are printer and scanner drivers.
I spoke too soon earlier, the latest build had the correct autounattend file, with the proper Image information. However, I’m still seeing the same result during setup: «no images are available».
Attached is the wccf file from the latest build. Please let me know if you notice any problems that I’m making here.
winreducer.wccf
KrX wrote:
start it and select your install.wim file.
next step is click on «Show all Index» and post the result (text or Picture)do this step again with your boot.wim (just to be sure)
![[ANSWERED] Winreducer 8.1 v1.5.9.0 - Windows Install shows "no images are available" Instal11](https://i.servimg.com/u/f19/19/21/14/51/instal11.jpg)
![[ANSWERED] Winreducer 8.1 v1.5.9.0 - Windows Install shows "no images are available" Bootwi11](https://i.servimg.com/u/f19/19/21/14/51/bootwi11.jpg)
Here you are. :-\ Still looks okay to me. I don’t understand what’s going on. Any insights now?
I’m trying your wccf at the moment …
Oh my goodness. You’re going to hate me for this, but I discovered the problem, and it was completely my fault.
The Windows Serial key I entered was incorrect and therefore it wasn’t allowing me to proceed with the install because the Setup thought that there were no Windows images available for the serial I was using.
Sorry for all the trouble, but kudos to both of you for helping me pinpoint the issue.
so you are using the lateste Version of winreducer and with a new created wccf file (hide boot Image is activated?) and it does not work?
could you look at the unattand.XML you get with this wccf file. does it contain the lines i mentioned above?
ah ok. so now it does work?
Yes, everything seems to be working now.
iahaleem wrote:
Oh my goodness. You’re going to hate me for this, but I discovered the problem, and it was completely my fault.
The Windows Serial key I entered was incorrect and therefore it wasn’t allowing me to proceed with the install because the Setup thought that there were no Windows images available for the serial I was using. <facepalm>
Sorry for all the trouble, but kudos to both of you for helping me pinpoint the issue.
OK, there are no problems, don’t worry, the purpose is to help you solve your troubles, and eventually to see if if it’s not a bug. So in your case, you made an error while you entered your serial number and it hangs.
So just modify your serial in your «autounattended.xml» file, it’s not necessary to recreate your entire ISO … do it only if you need to practice a new slimming down exercise …
You cannot reply to topics in this forum


