
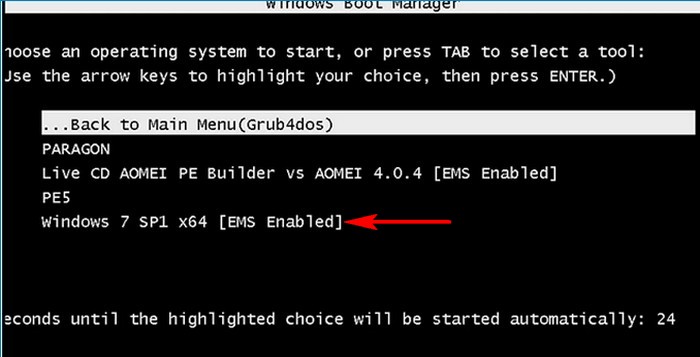
Привет всем! Читатели нашего сайта иногда спрашивают меня: «Что такое [EMS ENABLED] в загрузочном меню флешки?» EMS (Emergency Management Services), это технология, позволяющая удалённо управлять выбранными компонентами серверов, даже если сервер не подключен к сети или другим стандартным средствам удаленного администрирования, поэтому в серверных OS технология ems включена по умолчанию. Загрузочные диски некоторых программ, а также Live CD (в частности AOMEI) созданы на основе среды предустановки Windows (WinPE) серверных операционных систем, соответственно в их меню загрузки EMS будет включена. Как включить или выключить, мы узнаем в сегодняшней статье.
Автор Владимир!
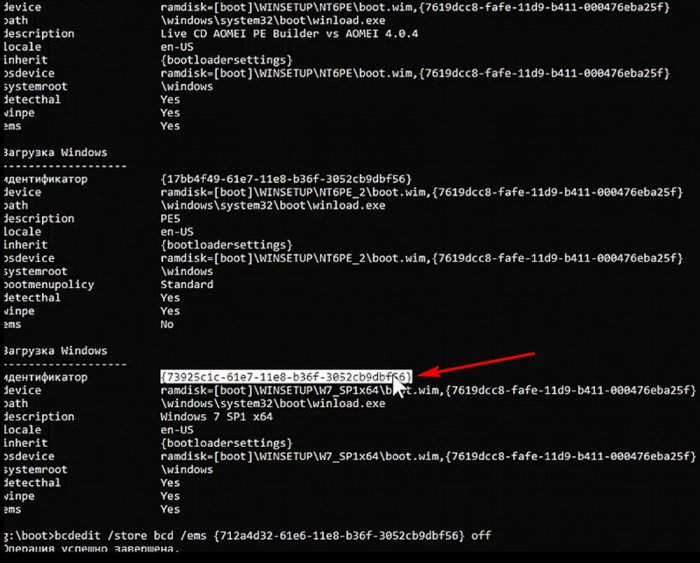
К примеру, меню загрузочной флешки, созданной с помощью WinSetup, в двух загрузочных записях есть [EMS ENABLED], а в двух других [EMS ENABLED] отсутствует.
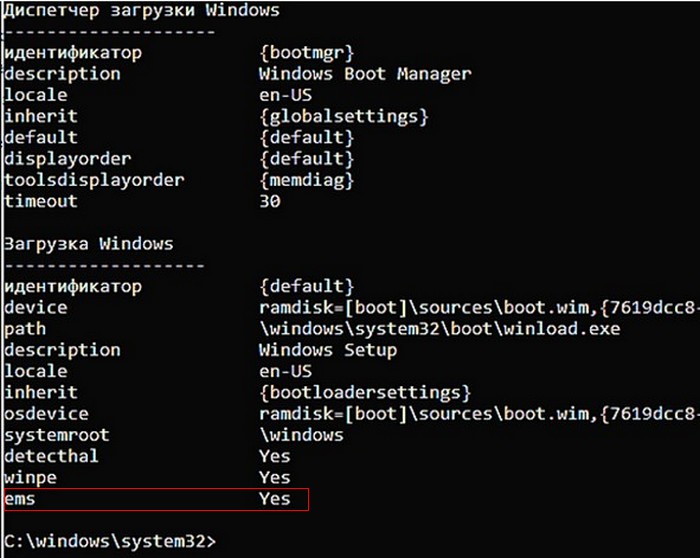
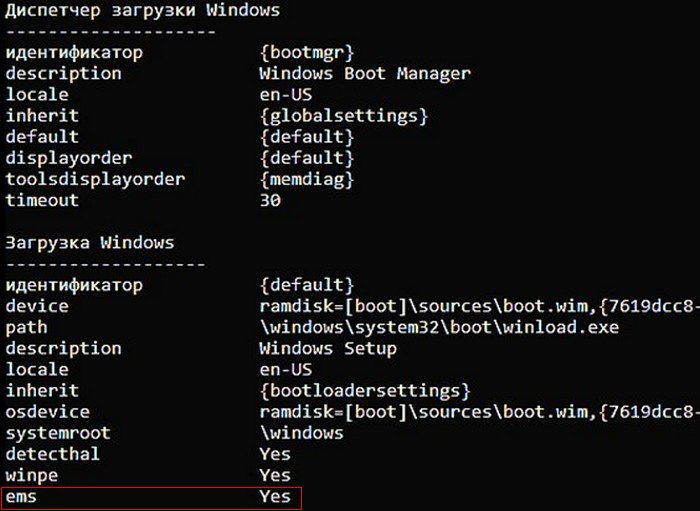
Как я уже заметил, в серверных OS технология ems включена по умолчанию, но важно знать, что в среде предустановки (PE) Windows 7 ems тоже включена по умолчанию (находится в положении yes).
В PE Windows 8 и старше ems выключена по умолчанию.
Загрузочные диски некоторых программ созданы на основе среды предустановки WinPE серверных OS и в их меню загрузки EMS будет включена. Так как программное обеспечение AOMEI создано на основе PE серверной OS, значит (ems в положении yes).
Включить и выключить ems можно с помощью параметров командной строки bcdedit или bootice. На примере своей флешки покажу оба способа. Флешке присвоена буква G, диспетчер загрузки mbr находится:
G:\boot\bcd
диспетчер загрузки uefi находится
G:\efi\microsoft\boot\bcd
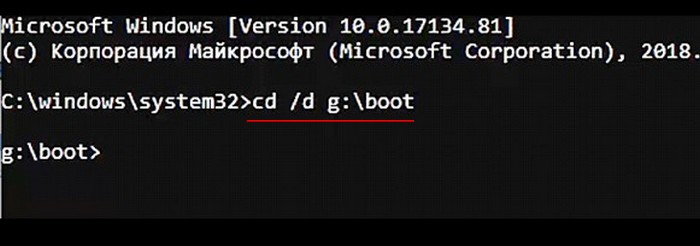
перед редактированием захожу в каталог с диспетчера загрузки mbr командой:
cd /d g:\boot
открываю диспетчер загрузки командой bcdedit /store bcd
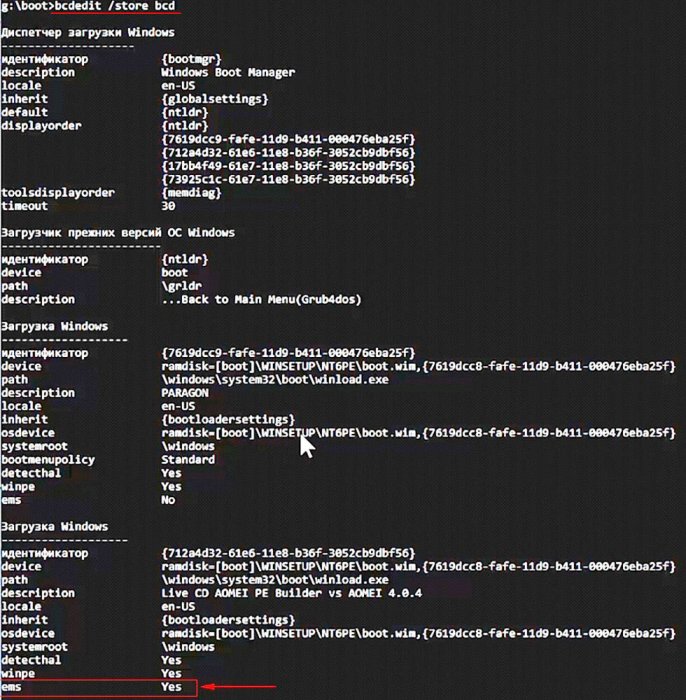
теперь можно редактировать.
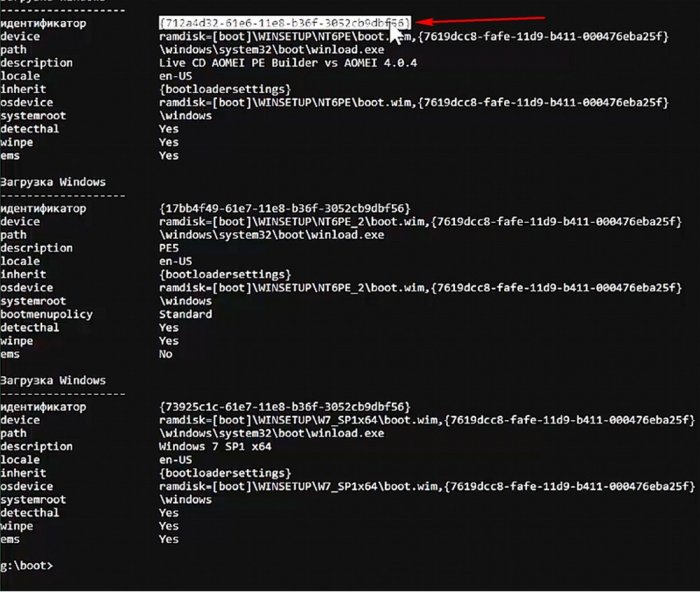
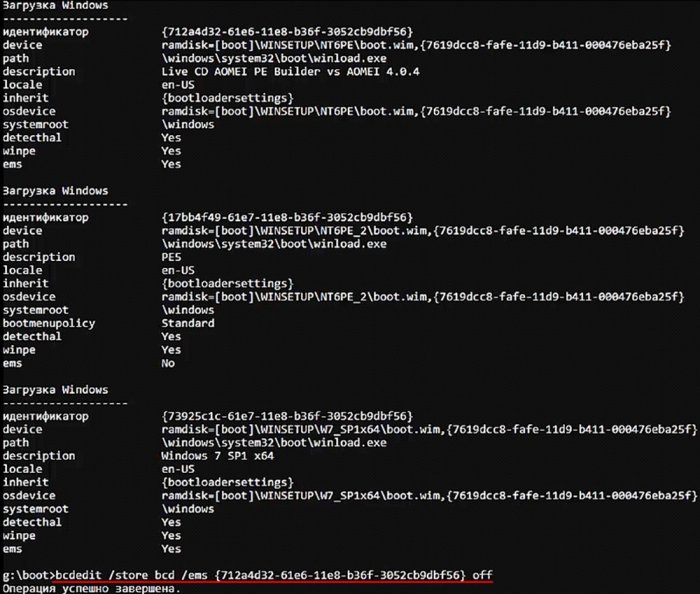
У AOMEI включён ems, отключаю его, сначала копирую ID,
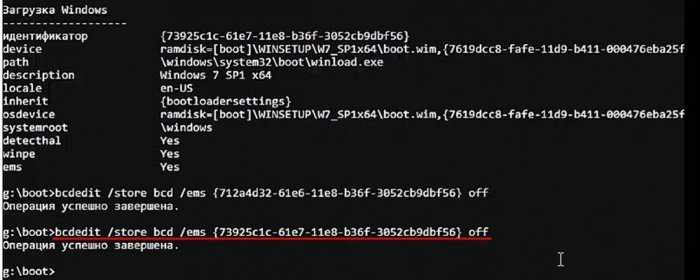
командой bcdedit /store bcd /ems {ID} offотключаю ems.
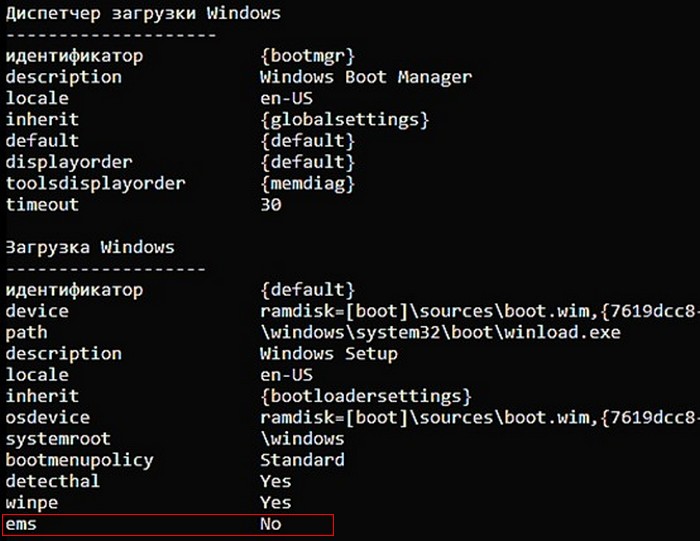
Точно так же отключаю ems в Windows 7
теперь изменю порядок отображения OS и PE. Возврат в меню grub оставлю как есть, а OS и PE поменяю командой
bcdedit /store bcd /displayorder {ID} {ID} {ID} {ID}

Первым {ID} ставим ID загрузочной записи, которую хотим видеть первой, в моём случае это возврат к grub, вторым ID ставим ID загрузочной записи, которую хотим видеть второй, в моём случае win 7 и так далее. Обязательно нужно вводить ID всех загрузочных записей.
Сервис LiveExpert.org (18+) содержит информацию только для совершеннолетних 18+ и может использоваться в информационно-развлекательных целях. Используя Сервис LiveExpert.org, вы принимаете Пользовательское соглашение, Политику конфиденциальности и Политику cookie.
Эксперты Сервиса LiveExpert.org не являются членами команды Сервиса или его представителями. LiveExpert.org проверяет Экспертов и даёт допуск к работе через Сервис, однако не несёт ответственности за обещания и утверждения, указанные на страницах Экспертов и в отзывах других Пользователей об Экспертах Сервиса. LiveExpert.org не гарантирует, что информация, полученная на консультации, приведёт к ожидаемым целям и результату.
Любые консультации Экспертов или ответы на вопросы, содержащиеся в категории вопросов «Медицина» (а также и в других категориях) ни при каких условиях не являются рекламой или оказанием медицинских услуг. Сервис LiveExpert.org не несет ответственность за назначенные Экспертом препараты и рекомендует обращаться в соответствующее лечебное учреждение или к лечащему врачу для согласования возможных рисков от приема рекомендованных экспертами препаратов. Пользователь Сайта, принимая решение следовать рекомендациям Эксперта, берет на себя ответственность за возможные последствия.
LiveExpert Ltd, Mill Mall Tower, 2nd Floor, Wickhams Cay 1, P.O. Box 4406, Road Town, Tortola, British Virgin Islands
Распознавание голоса и речи на C#
UnmanagedCoder 05.05.2025
Интеграция голосового управления в приложения на C# стала намного доступнее благодаря развитию специализированных библиотек и API. При этом многие разработчики до сих пор считают голосовое управление. . .
Реализация своих итераторов в C++
NullReferenced 05.05.2025
Итераторы в C++ — это абстракция, которая связывает весь экосистему Стандартной Библиотеки Шаблонов (STL) в единое целое, позволяя алгоритмам работать с разнородными структурами данных без знания их. . .
Разработка собственного фреймворка для тестирования в C#
UnmanagedCoder 04.05.2025
C# довольно богат готовыми решениями – NUnit, xUnit, MSTest уже давно стали своеобразными динозаврами индустрии. Однако, как и любой динозавр, они не всегда могут протиснуться в узкие коридоры. . .
Распределенная трассировка в Java с помощью OpenTelemetry
Javaican 04.05.2025
Микросервисная архитектура стала краеугольным камнем современной разработки, но вместе с ней пришла и головная боль, знакомая многим — отслеживание прохождения запросов через лабиринт взаимосвязанных. . .
Шаблоны обнаружения сервисов в Kubernetes
Mr. Docker 04.05.2025
Современные Kubernetes-инфраструктуры сталкиваются с серьёзными вызовами. Развертывание в нескольких регионах и облаках одновременно, необходимость обеспечения низкой задержки для глобально. . .
Создаем SPA на C# и Blazor
stackOverflow 04.05.2025
Мир веб-разработки за последние десять лет претерпел коллосальные изменения. Переход от традиционных многостраничных сайтов к одностраничным приложениям (Single Page Applications, SPA) — это. . .
Реализация шаблонов проектирования GoF на C++
NullReferenced 04.05.2025
«Банда четырёх» (Gang of Four или GoF) — Эрих Гамма, Ричард Хелм, Ральф Джонсон и Джон Влиссидес — в 1994 году сформировали канон шаблонов, который выдержал проверку временем. И хотя C++ претерпел. . .
C# и сети: Сокеты, gRPC и SignalR
UnmanagedCoder 04.05.2025
Сетевые технологии не стоят на месте, а вместе с ними эволюционируют и инструменты разработки. В . NET появилось множество решений — от низкоуровневых сокетов, позволяющих управлять каждым байтом. . .
Создание микросервисов с Domain-Driven Design
ArchitectMsa 04.05.2025
Архитектура микросервисов за последние годы превратилась в мощный архитектурный подход, который позволяет разрабатывать гибкие, масштабируемые и устойчивые системы. А если добавить сюда ещё и. . .
Многопоточность в C++: Современные техники C++26
bytestream 04.05.2025
C++ долго жил по принципу «один поток — одна задача» — как старательный солдатик, выполняющий команды одну за другой. В то время, когда процессоры уже обзавелись несколькими ядрами, этот подход стал. . .
Windows 7 is a popular operating system that offers a range of features and functionalities. However, one issue that many users may come across is the «ems enabled» feature, which can cause performance problems and slow down your computer. In this blog post, we will discuss how to disable ems enabled in Windows 7, providing step-by-step instructions and exploring different methods you can use. So, if you’re experiencing issues with ems enabled and want to improve your computer’s performance, keep reading.
Video Tutorial:
What’s Needed
Before we dive into the methods of disabling ems enabled in Windows 7, let’s take a look at what you’ll need to get started. The required items include:
1. A computer running Windows 7: You’ll obviously need a Windows 7 PC or laptop that has the ems enabled feature.
2. Administrator access: To make changes to the system settings, you’ll need administrative access to your computer.
These are the basic requirements to proceed with the methods we will discuss.
What Requires Your Focus?
Disabling ems enabled in Windows 7 may require your focus, as you’ll need to pay attention to the steps and make sure you follow them correctly. It’s important to note that any changes made to system settings can have consequences, so it’s always a good idea to create a backup of your important files before making any modifications. Additionally, be aware that the steps mentioned in this blog post are specific to Windows 7 and may not be applicable to other operating systems. Now, let’s explore the different methods you can use to disable ems enabled in Windows 7.
Method 1: Using System Configuration
To disable ems enabled using the System Configuration tool in Windows 7, follow these steps:
1. Press the Windows key + R to open the Run dialog box.
2. Type «msconfig» (without quotes) and press Enter. This will open the System Configuration window.
3. In the System Configuration window, navigate to the «Boot» tab.
4. Under the «Boot options» section, check the box next to «No GUI boot«.
5. Click on «OK» to save the changes.
6. Restart your computer to apply the changes.
| Pros | Cons |
|---|---|
| 1. Disabling ems enabled can improve the overall performance of your Windows 7 computer. | 1. Modifying system settings may lead to unexpected behavior or instability if done incorrectly. |
| 2. This method is relatively straightforward and does not require any additional software. | 2. Disabling ems enabled may limit certain graphical enhancements during the boot process. |
| 3. Applying changes through System Configuration is reversible, allowing you to re-enable ems enabled if needed. | 3. Limited impact on system performance may be observed depending on the specific hardware and software configuration. |
Method 2: Via MSCONFIG Command
Another method to disable ems enabled in Windows 7 is by using the MSCONFIG command. Here’s how you can do it:
1. Press the Windows key to open the Start menu.
2. In the search field, type «cmd«.
3. Right-click on «cmd.exe» and select «Run as administrator» from the context menu. This will open the Command Prompt with administrative privileges.
4. In the Command Prompt window, type «msconfig» and press Enter.
5. The System Configuration window will appear. Navigate to the «Boot» tab.
6. Under the «Boot options» section, check the box next to «No GUI boot«.
7. Click on «OK» to save the changes.
8. Restart your computer to apply the changes.
| Pros | Cons |
|---|---|
| 1. This method provides an alternative way to access the System Configuration tool for disabling ems enabled. | 1. Care must be taken when using the Command Prompt, as incorrect commands can lead to system issues. |
| 2. Disabling ems enabled through MSCONFIG command is reversible, so you can re-enable it if necessary. | 2. Limited impact on system performance may be observed depending on the specific hardware and software configuration. |
| 3. No additional software or tools are required, as this method utilizes the built-in Command Prompt. | 3. Disabling ems enabled may result in a less visually appealing boot process, as graphical enhancements are turned off. |
Method 3: Using Group Policy Editor
Windows 7 Professional, Enterprise, and Ultimate editions include the Group Policy Editor, which provides advanced configuration options. Here’s how you can disable ems enabled using the Group Policy Editor:
1. Press the Windows key + R to open the Run dialog box.
2. Type «gpedit.msc» (without quotes) and press Enter. This will open the Group Policy Editor.
3. In the Group Policy Editor window, navigate to «Computer Configuration» > «Administrative Templates» > «System» > «Logon«.
4. Locate the «Always Use Classic Logon» policy in the right-hand pane and double-click on it.
5. In the policy settings window, select the «Enabled» option.
6. Click on «OK» to save the changes.
7. Restart your computer to apply the changes.
| Pros | Cons |
|---|---|
| 1. The Group Policy Editor provides a centralized management tool for customizing Windows settings. | 1. This method is only available in Windows 7 Professional, Enterprise, and Ultimate editions. |
| 2. Disabling ems enabled through Group Policy Editor allows for granular control over system configurations. | 2. Changes made through Group Policy Editor may affect other system settings and require additional knowledge and caution. |
| 3. Multiple computers in a network can be managed simultaneously using Group Policy Editor. | 3. Inexperienced users may find the Group Policy Editor’s interface and settings complex and confusing. |
Method 4: Via System Registry
Another way to disable ems enabled in Windows 7 is by making changes in the system registry. Here’s how you can do it:
1. Press the Windows key + R to open the Run dialog box.
2. Type «regedit» (without quotes) and press Enter. This will open the Registry Editor.
3. In the Registry Editor window, navigate to the following path: HKEY_LOCAL_MACHINE\SOFTWARE\Microsoft\Windows NT\CurrentVersion\Winlogon
4. Locate the «EMSenabled» entry in the right-hand pane.
5. Double-click on «EMSenabled» to modify its value.
6. Change the value from «1» to «0«.
7. Click on «OK» to save the changes.
8. Restart your computer to apply the changes.
| Pros | Cons |
|---|---|
| 1. Making changes through the system registry provides direct control over system settings. | 1. Incorrect modifications in the system registry can cause serious issues, so caution is advised. |
| 2. Disabling ems enabled through the registry editor offers a method for advanced users who are comfortable working with the registry. | 2. The registry editor may appear complex and overwhelming for inexperienced users. |
| 3. Changes made in the system registry are permanent until modified or reverted. | 3. It is important to back up the registry or create a system restore point before making any changes. |
Why Can’t I Disable Ems Enabled Windows 7?
There can be a few reasons why you might not be able to disable ems enabled in Windows 7. Here are some possible causes and their fixes:
1. Administrator access: You need to have administrative privileges to make changes to system settings. Ensure that you are logged in with an administrator account or consult your system administrator for assistance.
2. Compatibility issues: Some hardware or software configurations may have specific requirements for ems enabled. Check your system documentation or contact the manufacturer for guidance on disabling ems enabled in such cases.
3. System restrictions: In certain cases, ems enabled may be enforced by system policies or restrictions. If you’re unable to disable it using the methods described above, you may need to consult your organization’s IT department or system administrator for further assistance.
Implications and Recommendations
Disabling ems enabled in Windows 7 can have implications on the overall system performance and appearance. Here are some recommendations to consider:
1. Performance impact: Disabling ems enabled may improve the performance of your computer, especially during the boot process. However, it’s important to note that this may result in a less visually appealing boot sequence, as graphical enhancements are turned off.
2. System stability: Modifying system settings can affect the stability of your computer. Make sure to follow the instructions carefully and consider creating a backup of your important files before making any changes.
3. Consult manufacturer documentation: If you’re unsure about the implications of disabling ems enabled on your specific hardware or software configuration, consult the documentation provided by the manufacturer or seek assistance from their support team.
These recommendations can help you make informed decisions and minimize any potential issues when disabling ems enabled in Windows 7.
5 FAQs about Disabling Ems Enabled Windows 7
Q1: Is it safe to disable ems enabled in Windows 7?
A1: Disabling ems enabled in Windows 7 is generally safe. However, it’s important to be cautious and follow the instructions carefully to avoid any unintended consequences or system errors.
Q2: Will disabling ems enabled improve my computer’s performance?
A2: Yes, disabling ems enabled can potentially improve the performance of your Windows 7 computer, especially during the boot process. However, the impact on performance may vary depending on your specific hardware and software configuration.
Q3: Can I re-enable ems enabled after disabling it?
A3: Yes, most of the methods described in this blog post are reversible, allowing you to re-enable ems enabled if necessary. Simply follow the instructions in reverse or undo the changes made.
Q4: How can I determine if ems enabled is causing performance issues on my Windows 7 computer?
A4: If you’re experiencing performance problems, such as slow boot times or overall system sluggishness, you can try disabling ems enabled as explained in this blog post. If the issues improve after disabling ems enabled, it may indicate that this feature was the cause.
Q5: Will disabling ems enabled impact the appearance of my Windows 7 operating system?
A5: Disabling ems enabled may result in a less visually appealing boot process, as graphical enhancements are turned off. However, the overall appearance of the Windows 7 operating system should remain largely unaffected.
Final Words
Disabling ems enabled in Windows 7 can help improve the performance of your computer, especially during the boot process. By following the methods outlined in this blog post, you can easily disable ems enabled and enjoy a smoother experience. However, always remember to proceed with caution and create a backup of your important files before making any changes to system settings. With the right approach and understanding, you can successfully disable ems enabled in Windows 7 and optimize your computer’s performance.