
Applies ToWindows 11 Windows 10
Before you get started, if you have external displays connected to your PC, choose the display you want to change.
-
Select Start > Settings > System > Display and look at the section that shows your displays.
-
Select the display you want to change. When that’s done, follow the instructions below.


Change the size of text, apps, and other items
-
Stay in, or open, Display settings.Open your Display settings
-
Scroll to the Scale & layout section.
-
Select Scale, then select an option. Typically, it’s best to choose the one that’s marked (Recommended).
Change the display resolution
-
Stay in, or open, Display settings.Open your Display settings
-
In the Display resolution row, select the list and choose an option. It’s usually best to stick with the one that’s marked (Recommended). Monitors can support resolutions that are lower than their native resolutions, but text won’t look as sharp and the display might be small, centered on the screen, edged with black, or stretched.
Note: If you see unexpected changes in your screen resolution, your graphics driver might need to be updated. To see and install available updates, select Start > Settings > Windows Update > Check for updates.
Change the display orientation
Select the Start button, then type settings. Select Settings > System > Display and choose a screen orientation from the drop-down list next to Display orientation.
Windows will recommend an orientation for your screen. If you change the orientation of a monitor, you’ll also need to physically rotate the screen. For example, you’d rotate your external display to use it in portrait instead of landscape.
Change screen orientation
Need more help?
Want more options?
Explore subscription benefits, browse training courses, learn how to secure your device, and more.
Readers help support Windows Report. We may get a commission if you buy through our links.
Read our disclosure page to find out how can you help Windows Report sustain the editorial team. Read more
Sometimes you want to change the resolution of the display to a custom one. In today’s article, we’ll show you how to set custom resolutions on Windows 10.
To do that, just follow the guide below.
How to set a custom resolution on Windows 10?
-
1. Right-click on your desktop and choose NVIDIA Control Panel.
-
2. In the left side-panel, under Display, click on Change resolution.
-
3. In the right section scroll a bit, and under Choose the resolution click the Customize button.

-
4. In the new window that appears, check Enable resolutions not exposed by the display.

-
5. Click on Create Custom Resolution.
-
6. Now, fill in the boxes with the desired values and then hit the Test button.
-
7. If the test is successful and you’re satisfied with the result, Save the resolution.
-
8. If you do not like the result, revert to the previous resolution and start the process once more.
1. Set custom resolution on Windows 10 with Nvidia Control Panel
It is very easy to create a custom resolution on Windows 10 using Nvidia Control Panel, which is pre-installed on most computers.
All you need to do is enter Nvidia’s settings on your desktop and tweak the display settings.


2. Set custom resolutions in Windows 10 with the AMD Catalyst Control Center
- Right-click on your desktop and choose AMD Catalyst Control Center.
- Navigate to Information > Software > copy the 2D driver file path.

- Now, press Windows key + R to open Run, and type regedit. Hit Enter.
- In the Registry Editor, navigate to the 2D path from step 2.
- Double-click the 0000 folder and inside, find the DALNonStandardModesBCD1 registry key.
- Right-click it, select Edit, and then type your desired values in order: The width of the resolution > The height of the resolution > Type four zeros > The refresh rate of your monitor.
- If any of the values don’t add up to a 4-digit number, then start the number with 0.

- Click OK and Restart your PC.
- After the restart, when you launch the AMD Catalyst Control Center, you should find the custom resolution there.


If you’re Windows 10 or 11 PC keeps changing resolution on its own, you needn’t worry. As always, we prepared a series of quick fixes for you to try out and get things sorted.
- Microsoft Office Lens: A Powerful Tool for Capturing and Organizing Information
- Swap Left/Right Speaker in Realtek Audio Console [How to]
3. Use Custom Resolutions/Modes for Intel Graphics driver
- Right-click on your desktop and choose Graphics Proprieties.
- Select Advanced mode if you’re prompted to select an application mode.
- Under the Display Devices tab, check to see if the Custom Resolutions/Modes button is available. If it is, click on it. If it’s not, then go to
C:>Windows>System32>CustomModeApp.exe

and run the app.
-
In Basic Settings, type your preferred values.
- Finally, click on Add and then, when prompted, on Yes.
- If you’re not satisfied with the result, click on the Remove button. If you are, click OK.


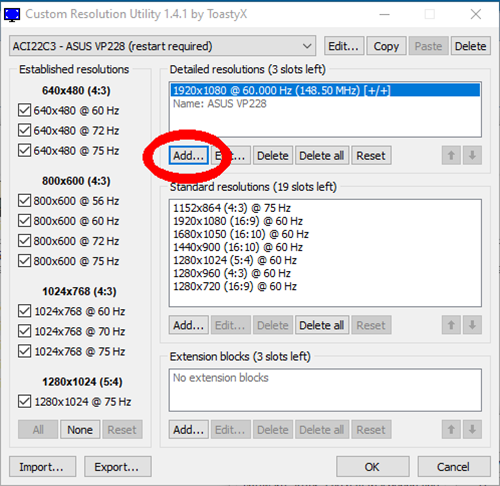
4. Use CRU to set a custom resolution in Windows 10
Additionally, you can use Custom Resolution Utility (CRU) to create a resolution.
The app has support for NVIDIA, AMD, and Intel graphics cards so no matter the system configuration, it will work.
As you can see, it’s not that hard to create and set a custom resolution in Windows 10, regardless of the GPU manufacturer and drivers.
What’s your favorite GPU manufacturer and why? Leave the answer along with any other questions you may have in the comments section below.
Vlad Turiceanu
Windows Editor
Passionate about technology, Windows, and everything that has a power button, he spent most of his time developing new skills and learning more about the tech world.
Coming from a solid background in PC building and software development, with a complete expertise in touch-based devices, he is constantly keeping an eye out for the latest and greatest!
It’s hard to deny that Windows 10 has a wide range of options when it comes to display resolution. Changing the resolution to one of the presets is a cinch, but changing it to a setting that isn’t preloaded is a bit of a process.
There are many reasons why Windows may not offer you the optimal resolution you need. If you find yourself looking for that perfect resolution, there are two options for you. In this article, you’ll learn how to customize your display via the video adapter and by using third-party software.
Why Change Your Resolution?
Among the many purposes of using a resolution outside of the established parameters is gaming. One of the most common cases is for users who want to experience “retro” games in their original resolutions. Like other technologies, computer monitors have come a long way in the last decade or so, and the resolutions that many older games were designed for simply aren’t supported anymore. For hardcore players who want a genuine experience, this is a challenge worth taking on.
Another potential application is to get a feel for what the future holds. 4K monitors are already here, but not everyone has access to them. If you want to get an approximate sense of what those ultra-high resolutions look like, you can do so. To be perfectly clear, no amount of software manipulation will upgrade your monitor’s quality, but at least you can see what having all that desktop space feels like.
Ultimately, you may just want another resolution. More real estate on your screen, convenience for reading, or simple preference are all valid reasons to try out a custom resolution. If you do use these methods to experience ultra-high resolutions, you might also find it useful to resize your fonts and icons to keep up.
Changing Your Display Adapter Settings
The first way to gain access to more resolutions is through your display adapter. This is a simple process that doesn’t require anything except adjusting some settings. There’s no risk in using this method because the resolutions that it gives you access to are guaranteed to be supported by your graphics card, so you’re well-advised to use this procedure if it is suitable for your needs.
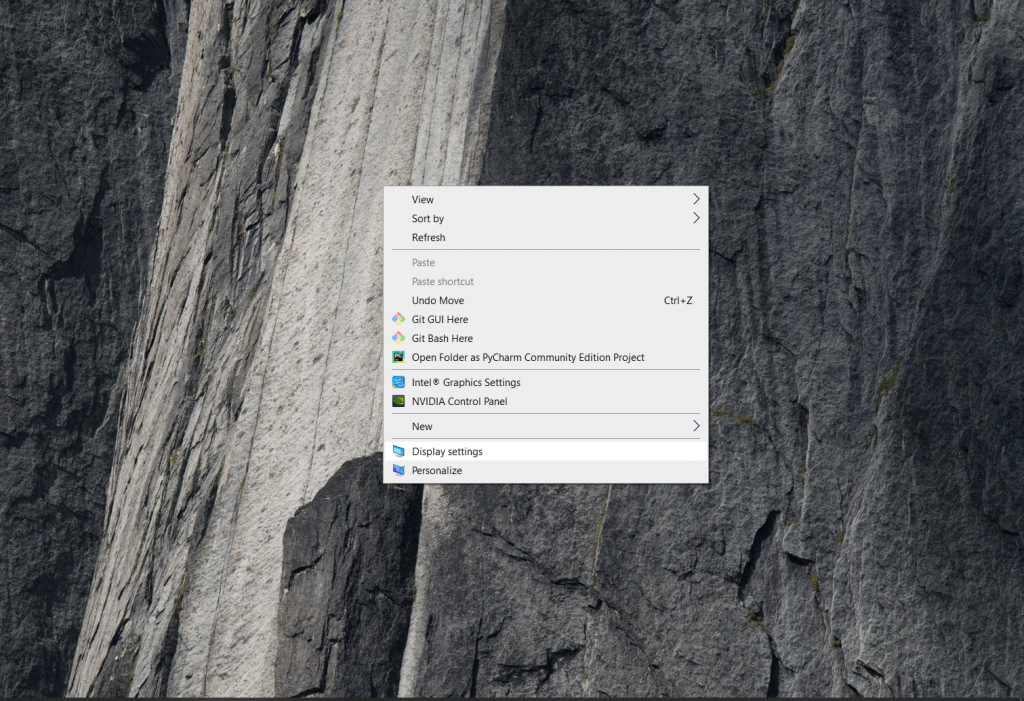
- Right-click anywhere on your desktop to reveal a menu and select Display Settings from that menu. You can also open the Settings menu and select System.

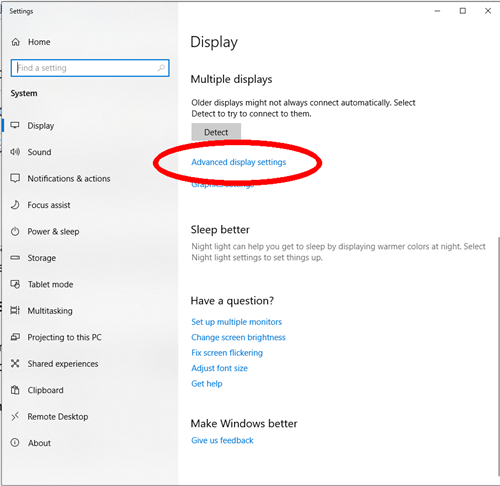
- In the display settings window, scroll down to find Advanced display settings.

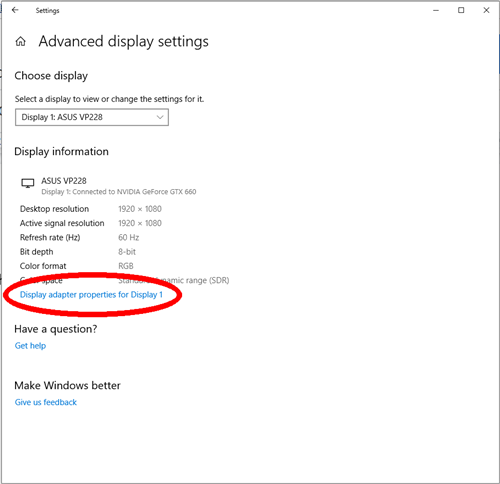
- Once you’ve accessed the advanced settings, click on the Display adapter properties for your monitor.
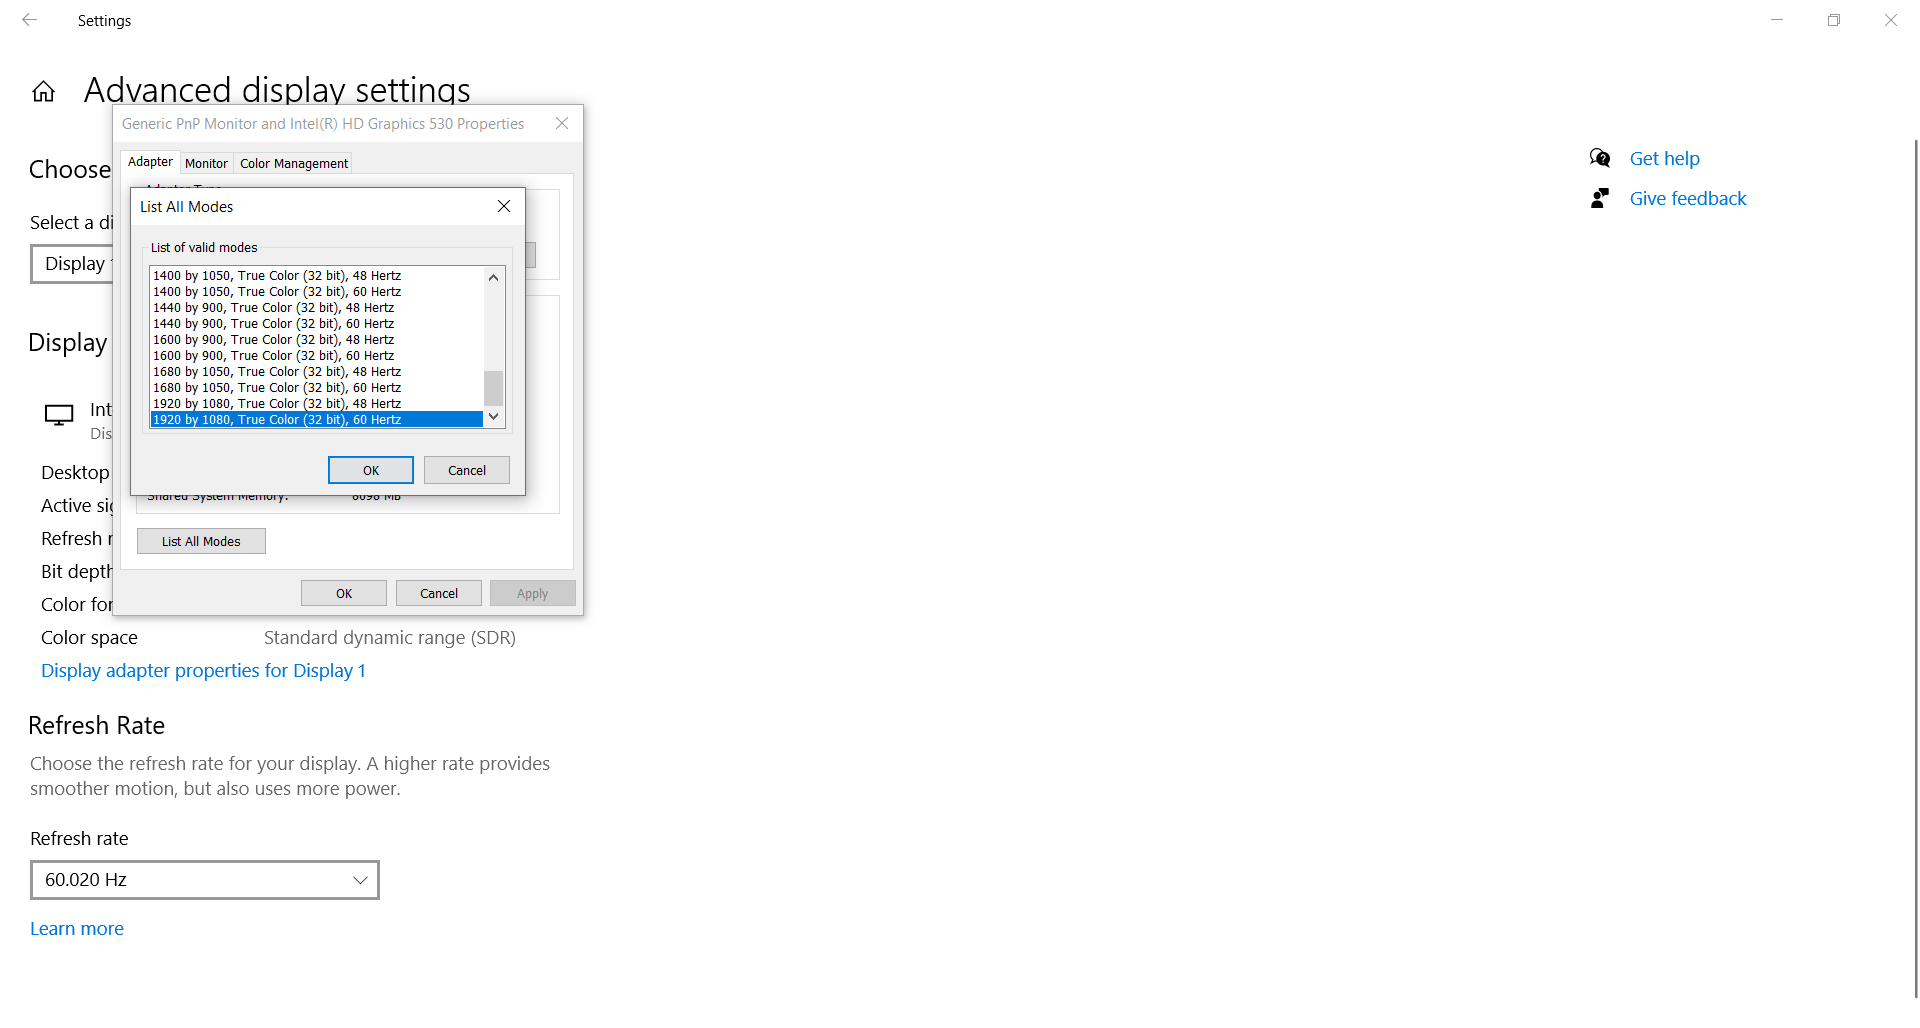
- In the properties, click on the button that reads List All Modes. This will display all the resolutions that your display adapter supports, which is likely to be many more than Windows 10 does. Choose the resolution you want and click Apply to switch to it.

This will act identically to changing the resolution from the display settings. Once you activate the desired resolution, you’ll be prompted to revert the change or keep it.
This is a pretty simple procedure that will give you a broader range of options for your resolution. However, these are also presets, and you may want to go even further and choose a resolution completely defined by you. In that case, you will need third-party software.
A Little Outside Assistance From Custom Resolution Utility
If you still aren’t satisfied, there’s an application designed to help you customize the resolution of your monitor. It’s called Custom Resolution Utility. A word of warning: the application doesn’t work with Intel display adapters, and it functions by making edits to your registry. It’s also a good idea to stick to resolutions that would be normally supported on your device.
The software is free and doesn’t require an installation. Once you download it, simply run it, and it will auto-detect your monitor. Click the Add button when you’ve selected your display, and you will be given the option to create a completely customized resolution.
When you’re done choosing, run the restart application that’s in the zipped file you downloaded. This will restart your display adapter and apply your resolution.
Follow the basic guidelines for aspect ratios to avoid problems. If you end up with a display that isn’t working, use the reset-all executable file that’s also in the zipped download.
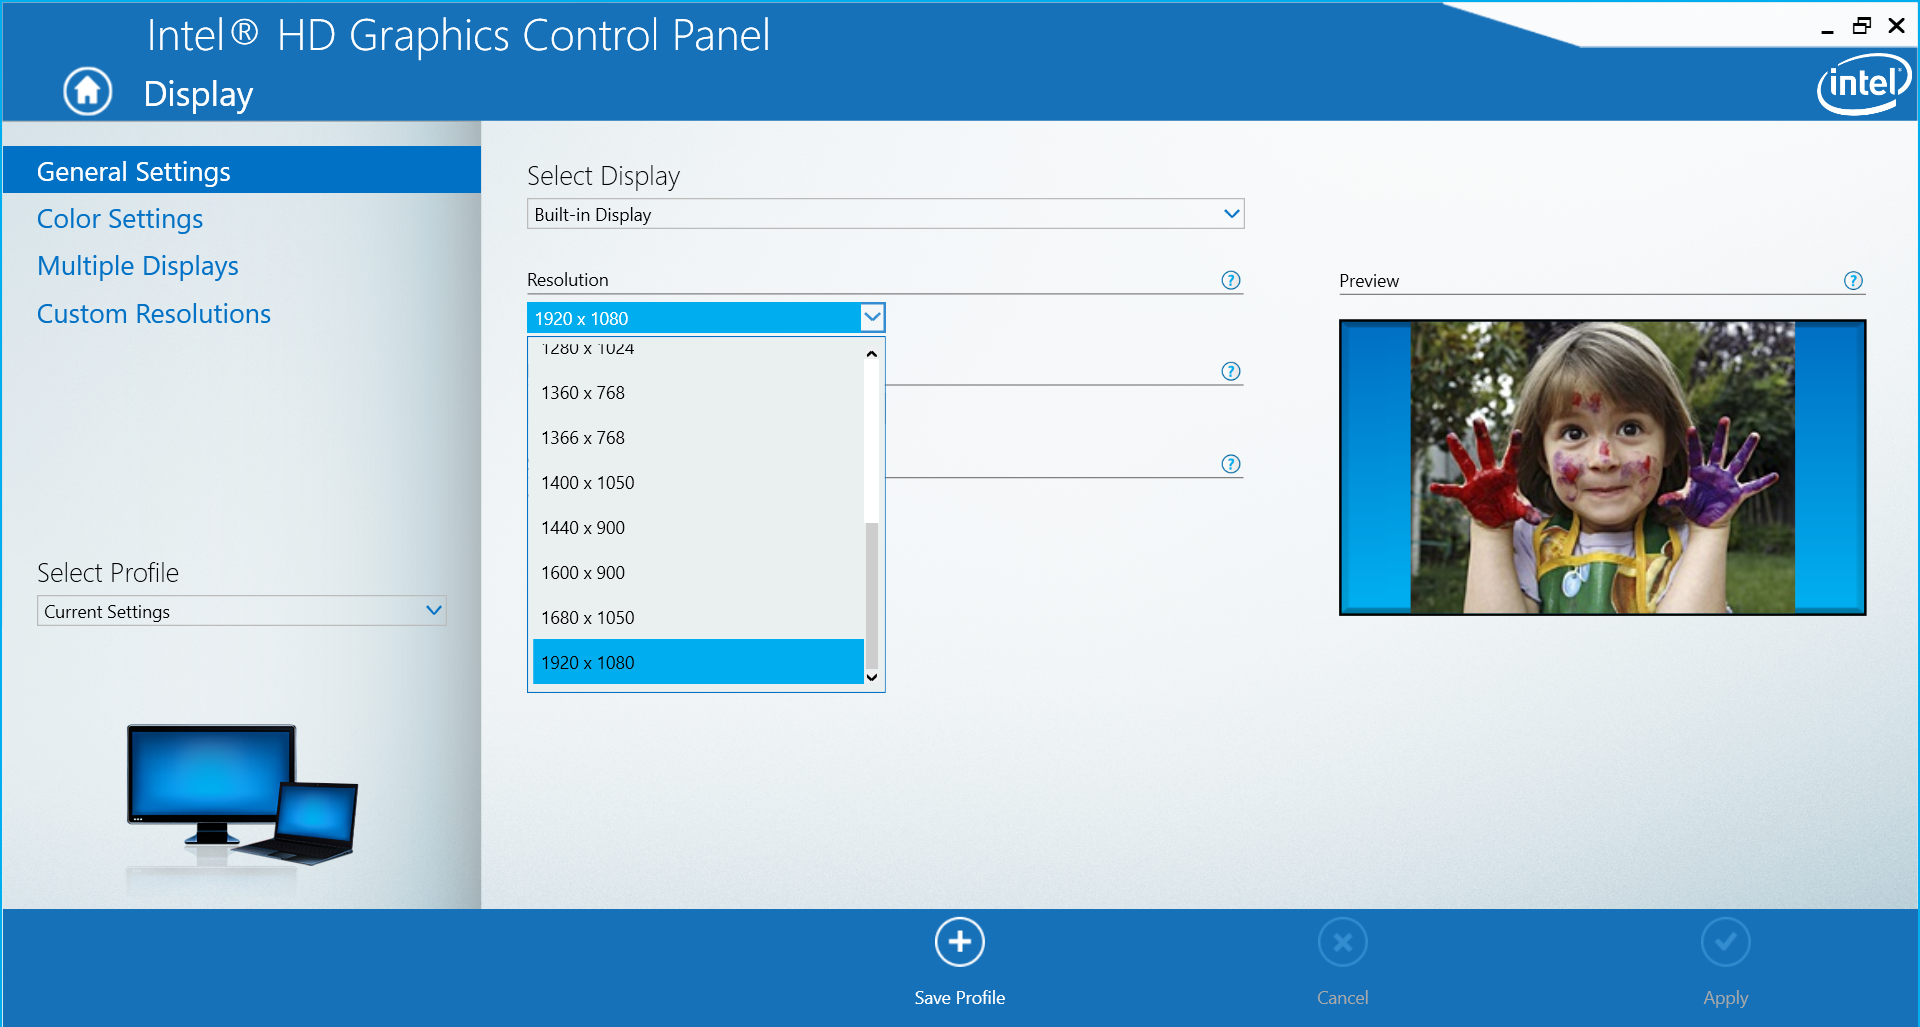
How to Set Custom Resolution in Windows 10 With Intel Graphics
If you have Intel graphics, then you can simply use their built-in control panel to modify and customize your resolution.
- Right-click on your desktop and select Intel Graphics Settings.

- For simple display settings, you can stay on the General Settings page and adjust the Resolution drop-down menu.
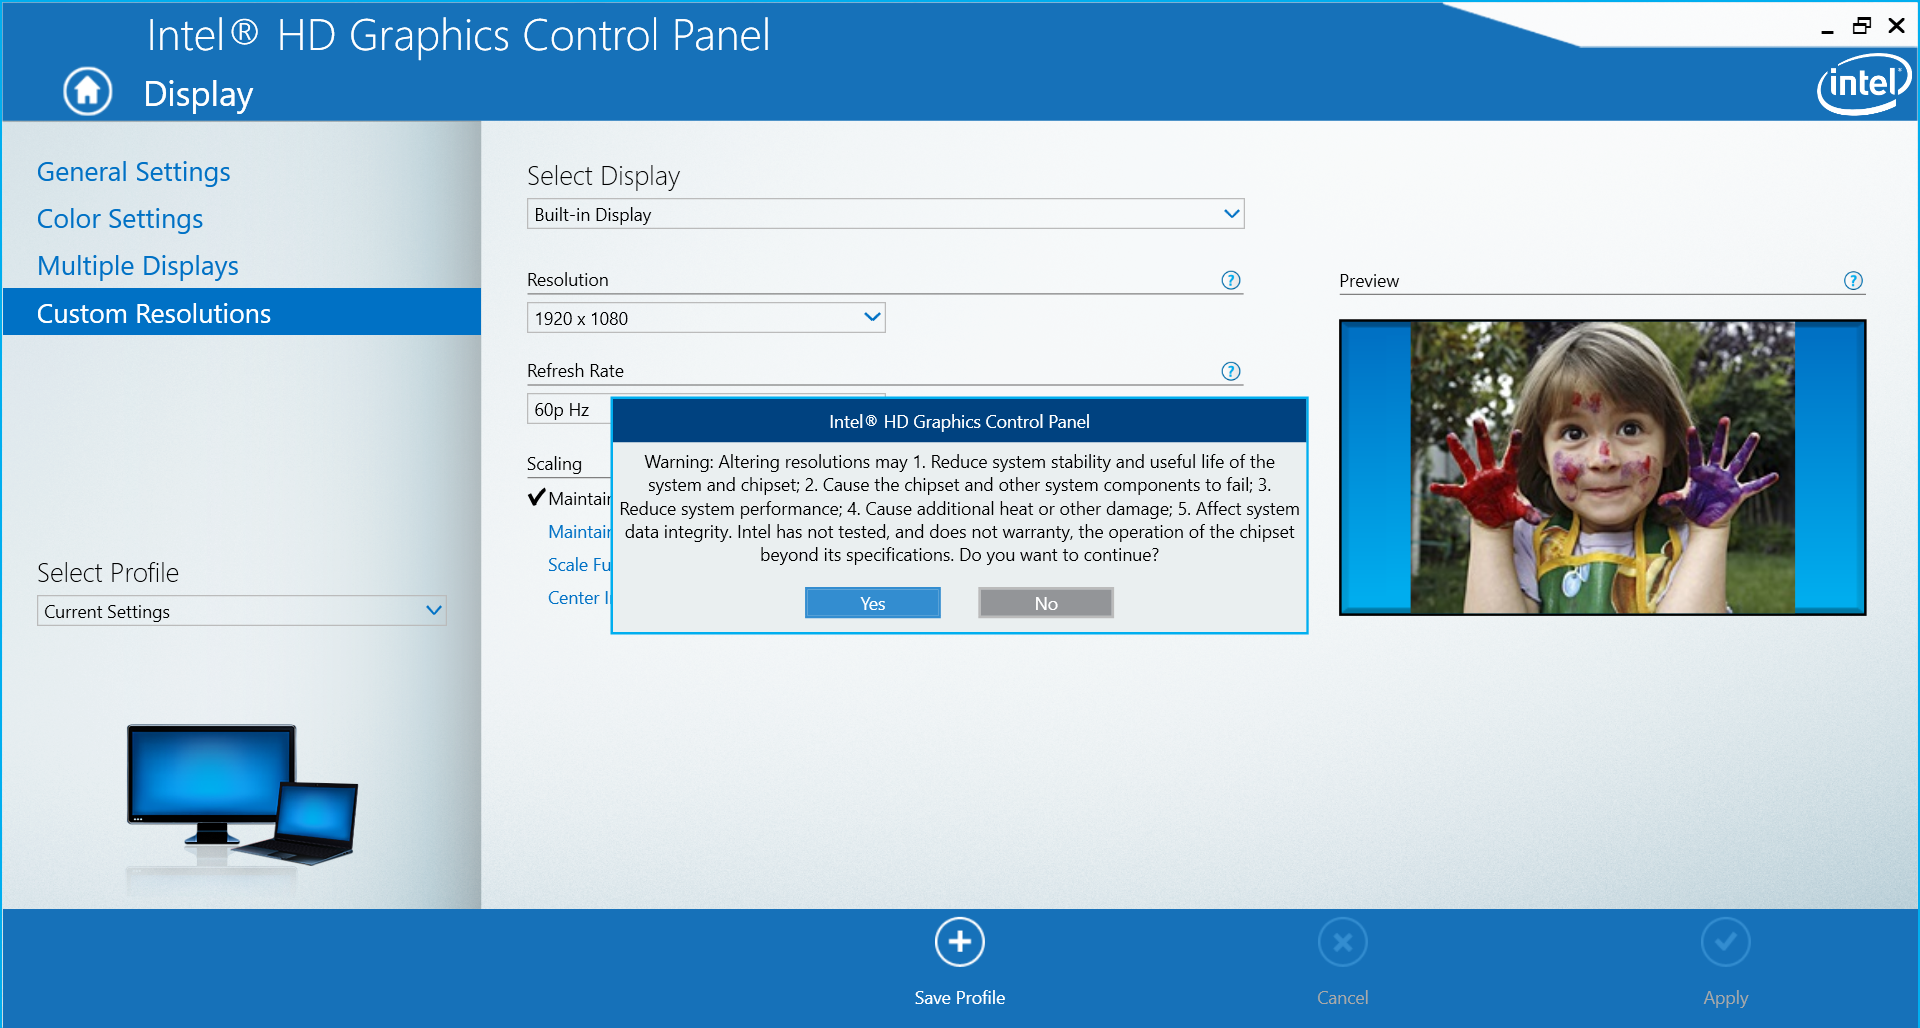
- If you need a custom setting, then select Custom Displays. You’ll be prompted with a warning about the risk of overheating, so make sure you know what you’re doing.
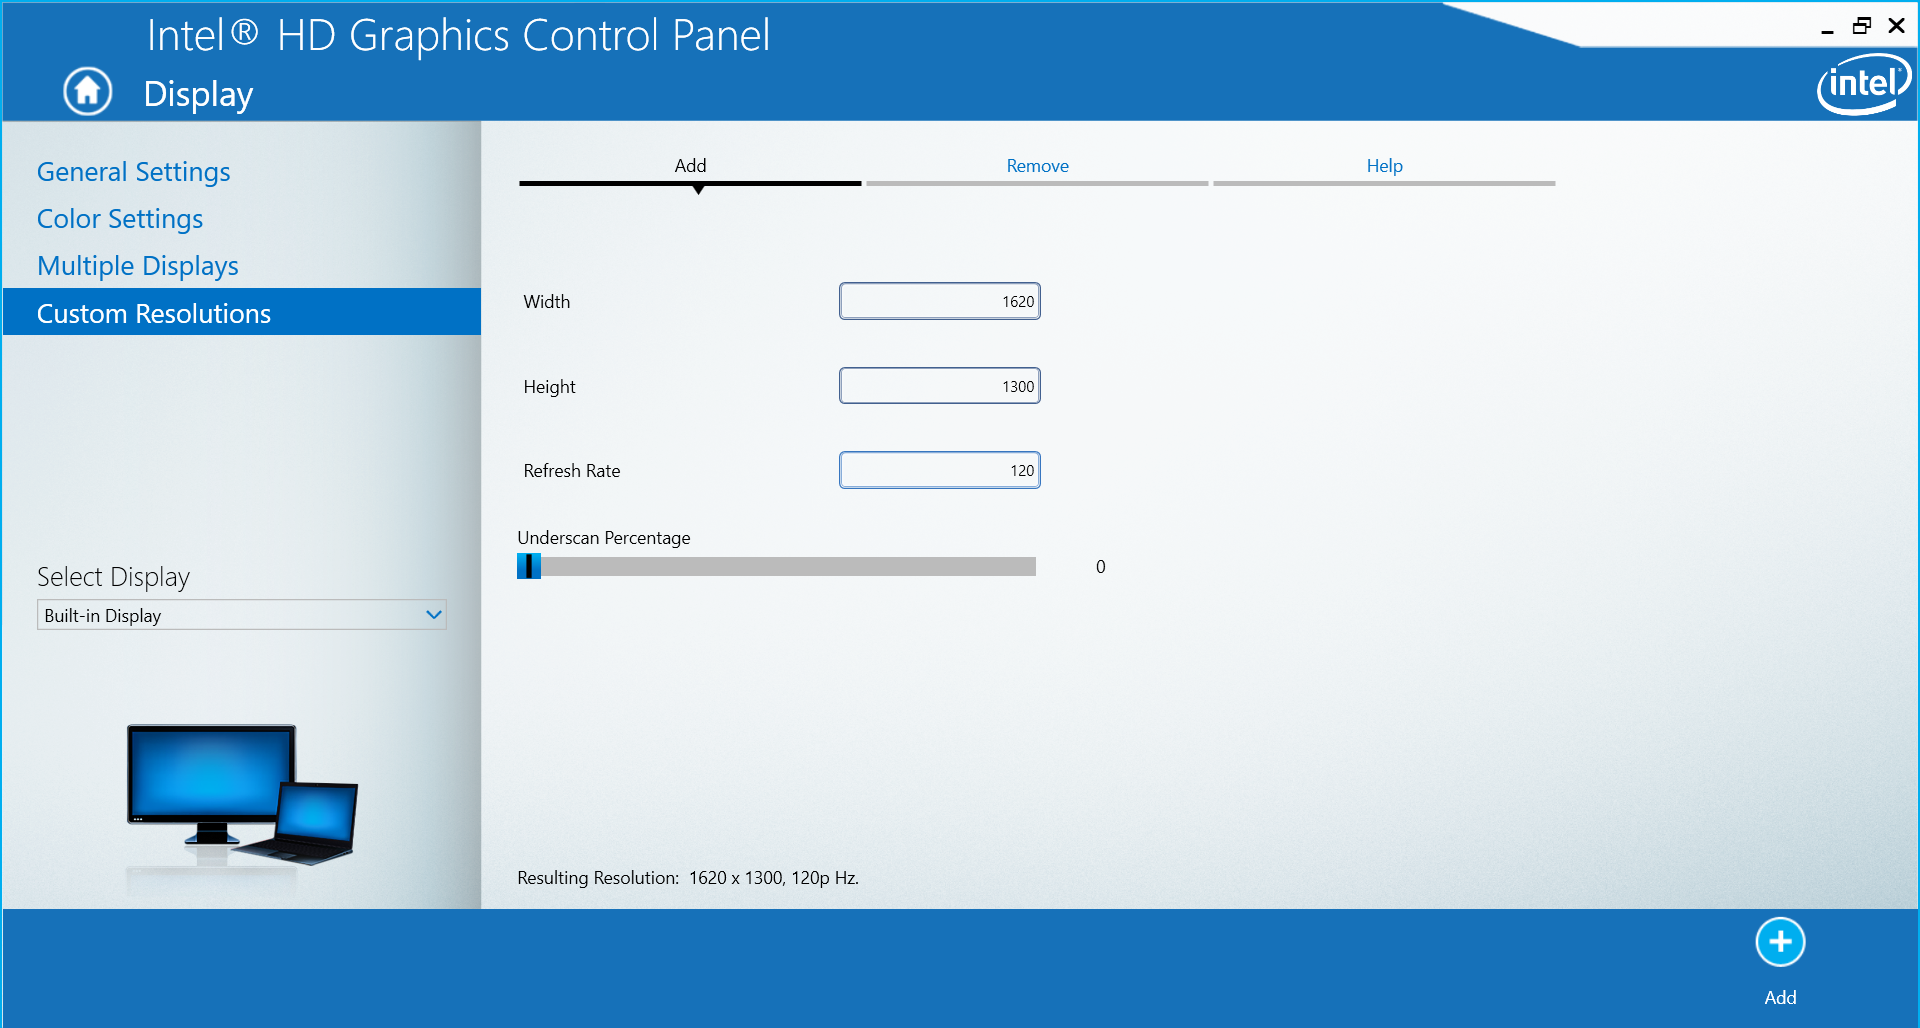
- Enter your desired resolution settings and click Add.

Resolved to Customize
Aside from coding your own application or editing the registry manually, these are the best options available to apply a custom resolution in Windows 10. You can choose the adapter route to avoid any potential issues but sacrifice some customization, or you can go with the Custom Resolution Utility, which grants you full control but may cause minor hiccups in some settings, or you can use the features offered by Intel, AMD, and Nvidia. Customize your resolution until your heart’s content.
Do you know of another way of customizing the resolution on a Windows system? What made you want to customize your resolution in the first place? Let us know in the comments below.
Windows operating system allows you to change the Screen Resolution. But it offers some fixed numbers. Some users want the freedom to choose the best display settings for their PC based on their monitor so that they adjust the screen resolution, color depth, refresh rate, etc. This article takes you through the process of creating and setting custom resolution on Windows 11 or Windows 10.
Is it safe to use Custom Resolution?
You can create & set custom resolution but in some cases, you can overclock monitor refresh rate. Also, it has been found that most screens work well at their native screen resolution. So, it’s advisable to stick to the Recommended screen resolution or at most the pre-set ones.
We’ll see the process of creating and setting custom resolution on Windows computer using the following third-party free tools:
- NVIDIA Control Panel
- AMD Catalyst Control Center
- Intel Graphics Command Center
- Custom Resolution Utility.
By changing or customizing the resolution settings, you can change the look of your screen including Icon Size, Font Size, and Color depth. Which tool to use would depend on your hardware specs and whether your system uses Intel, AMD or NVIDIA.
1] NVIDIA Control Panel
Right-click the empty space on your Windows desktop and select NVIDIA Control Panel entry to open the NVIDIA Control Panel.

Thereafter, in the window that appears, select Change resolution description under the Display heading. Instantly, you’ll be directed to the change resolution panel. Make sure the monitor you wish to create a custom resolution for is selected under the text ‘1. Select the display you would like to change. Hit the Customize button.
When the new window appears, click the Create Custom Resolution button.

Add the values you wish to create for your display. Then, hit the Test button when you are ready to test the new display mode.
If the new mode is accepted by your display, you will see a window, prompting you to confirm the new resolution. Select Yes if all looks good and you are satisfied with saving the new preset.
If the new mode passes the test, you’ll see it listed in the Resolution list for your display.
2] AMD Catalyst Control Center
To create custom display modes using the Custom Resolutions feature, access the AMD Catalyst Control Center. For this, right-clicking on your desktop and selecting AMD Radeon Settings.

Next, select Display and hit the Create button located under the Custom Resolutions menu. If there are more than one display listed, click Create then select the corresponding display that the custom display mode will be created for.
Custom Resolutions offers an array of display settings you can choose from. Enter in the desired value for each applicable setting, then click Save.

After clicking Save, Radeon Settings will check the compatibility of new settings with the display. If compatible, the new settings will be saved as a preset under the Custom Resolutions menu.
3] Intel Graphics Command Center
Inside the Windows Search box, type Intel Graphics Command Center. Click the Intel Graphics Command Center icon to open the application.

Choose the Display tab as shown in the image above. In the Display General Settings, click the Custom button located next to the Resolution setting.
If prompted by a warning message, click Okay to proceed.

When the new window appears with Basic Custom Resolution settings. If desired, click Advanced Settings for more options.
Here, choose the custom resolution or mode values as you desire. Click Yes to accept the changes.
However in recent versions of the Intel Graphics Command Center you may not see this setting; esp. if your hardware that do not support them.
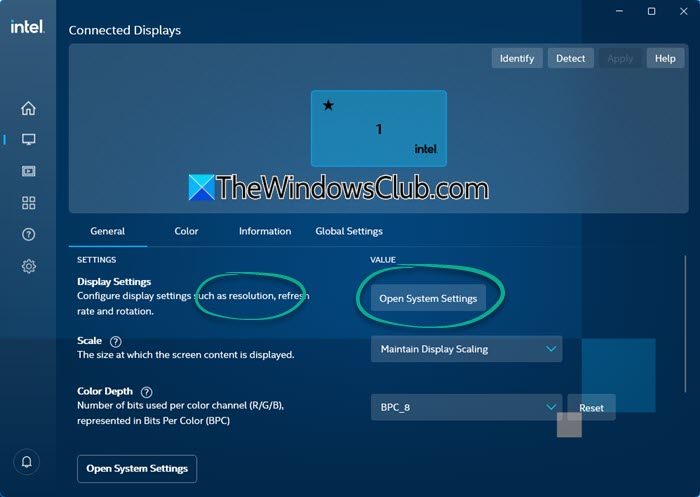
You will instead see a button to open Windows System Settings where you can change the resolution to only the pre-set ones.
TIP: You can also change the Display Resolution using CMD or Script and try to set a custom screen resolution.
4] Custom Resolution Utility
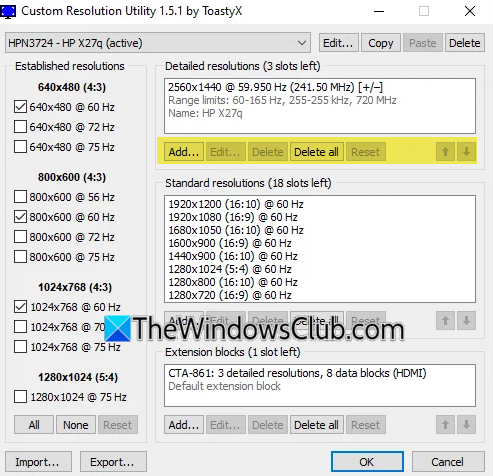
Custom Resolution Utility (CRU) is an EDID editor that focuses on custom resolutions. It lets you add custom resolutions, remove unwanted resolutions, edit FreeSync ranges, and more by creating software EDID overrides in the registry. It does not modify the hardware. You can download it here.
What does Custom Resolution Utility do?
Custom Resolution Utility (CRU) is an EDID (Extended Display Identification) editor, a type of signal intended to transmit native resolution, focusing on custom resolutions. it shows you how the monitor defines resolutions and other capabilities and allows you to tweak it to your liking.
Windows 10: Set Custom Screen Resolution
Windows 10 is a robust operating system that caters to a vast array of hardware configurations and personal preferences. One of the key features that users frequently seek to manipulate is their screen resolution. Custom screen resolution settings allow users to optimize their viewing experience, whether for gaming, professional work, or everyday tasks. In this article, we will explore the concept of screen resolution, why you might want to set a custom resolution, various methods to do so, and troubleshooting tips.
Understanding Screen Resolution
Screen resolution refers to the number of pixels displayed on the screen horizontally and vertically, described as width x height (e.g., 1920×1080). Higher resolutions generally mean clearer images and more screen real estate, but they can also affect performance based on the capabilities of your hardware and graphics card.
Importance of Screen Resolution
- Clarity and Detail: Higher resolutions provide more detail, making images and text sharper and easier to read.
- Gaming Experience: For gamers, the right resolution can mean the difference between a smooth gaming experience and lag. Many games also allow for resolution adjustments to accommodate performance and aesthetics.
- Professional Work: Designers, video editors, and architects often require precise detail in their work. Custom resolutions can help match their workflow and specific project requirements.
Scenarios for Custom Resolutions
There are several instances when you might want to set a custom screen resolution:
- Fit Legacy Software: Software that was designed for older or specific screen formats might not display properly on modern resolutions.
- Projectors and External Displays: When connecting to external displays like projectors or older monitors that do not support standard resolutions.
- Gaming Optimization: Some games perform better at lower resolutions or might not support the monitor’s native resolution.
- Personal Preferences: Depending on the task at hand, you might prefer a non-standard resolution for a more comfortable viewing experience.
Checking Your Current Screen Resolution
Before setting a custom screen resolution, it’s important to know your current settings.
-
Using Control Panel:
- Right-click the desktop and select “Display settings.”
- Scroll down to the “Display resolution” section to see your current resolution listed.
-
Using Settings App:
- Press
Windows + Ito open Settings. - Navigate to «System» > «Display.»
- Under the «Scale and layout» section, view your current resolution.
- Press
How to Set Custom Screen Resolution
There are multiple methods to set a custom screen resolution in Windows 10, depending on your graphics card manufacturer.
Method 1: Using Intel Graphics Command Center
-
Install Intel Graphics Command Center:
If you don’t have it, download it from the Microsoft Store. -
Open Intel Graphics Command Center:
Right-click on the desktop and select «Intel Graphics Settings» or «Graphics Properties.» -
Navigate to Display:
Click on “Display.” -
Custom Resolution:
Look for the “Custom Resolution” option. Input your desired resolution settings and click “Add.” -
Test and Save:
The screen might go black for a moment while it tests the resolution. If it looks fine, choose to keep the settings.
Method 2: Using NVIDIA Control Panel
-
Open NVIDIA Control Panel:
Right-click on the desktop and select “NVIDIA Control Panel.” -
Display Tab:
Navigate to the “Change resolution” option under the “Display” tab. -
Customize:
Click on the “Customize” button. If prompted, check the box that says “Enable resolutions not exposed by the display.” -
Create Custom Resolution:
Click on “Create Custom Resolution,” enter your desired values, and click “Test.” -
Apply Settings:
If the resolution is successful, save your custom resolution.
Method 3: Using AMD Radeon Software
-
Open AMD Radeon Software:
Right-click on the desktop and select “AMD Radeon Settings.” -
Display:
Go to the “Display” tab. -
Create Custom Resolution:
Scroll to find the “Custom Resolutions” section, and click on it. -
Configure Your Resolution:
Enter your desired width, height, refresh rate, and timings. Click on “Save.” -
Test & Apply:
After testing, apply the resolution settings.
Method 4: Using Third-Party Applications
If you are looking for additional flexibility and customizations, third-party applications such as Custom Resolution Utility (CRU) can be used.
-
Download CRU:
Go to the CRU website and download the utility. -
Run CRU:
Open the program. -
Add Custom Resolution:
You can add a new resolution in the appropriate sections. Be cautious about the settings you input as incorrect settings may lead to issues. -
Restart Graphics Driver:
After adding a custom resolution, you will need to restart your GPU drivers for changes to take effect. This can generally be done through the program interface itself.
Troubleshooting Custom Resolution Issues
Sometimes while setting custom resolutions, you might face issues. Here are some common problems and their solutions:
Screen Going Black
- If you set a resolution that the monitor cannot support, the screen may turn black. In this case:
- Wait for 15 seconds, and Windows should revert to the previous resolution.
- If this does not work, boot into Safe Mode and change the resolution back via Display Settings.
Flickering or Display Artifacts
- If your display flickers following a resolution change, it might be because of:
- An incorrect refresh rate setting. Always verify that the refresh rate is compatible with your monitor.
Performance Issues
- Lower resolutions generally improve performance in gaming but be wary of:
- Setting a resolution too low may impact visuals negatively. Always aim for a balance between performance and visual quality.
Unsupported Monitor
- Not all monitors support every resolution, leading to frustration. Before implementing any changes, check your monitor’s specifications.
Conclusion
Setting a custom screen resolution in Windows 10 can dramatically enhance your computing experience, making visuals sharper and more tailored to your needs. Following the methods outlined, you can smoothly navigate through the process, enabling or creating resolutions to better fit your workflow, games, or media consumption. Always remember to proceed with caution, particularly when venturing into untested resolutions, to avoid causing disruption to your setup.
Armed with the knowledge from this comprehensive guide, you can customize your screen experience effectively while keeping an eye on troubleshooting common problems. Enjoy the versatility and power inherent in Windows 10 as you make your screen work just the way you want it.