
Для безопасного запуска сторонних сервисов в Windows можно использовать учетную запись пользователя без прав локального администратора. Для этого нужно изменить настройки локальной политики безопасности и предоставить пользователю права входа в качестве службы.
По умолчанию службы Windows запускаются в контексте привилегированных учетных записей (System, Local Service или Network Service). Чтобы ограничить права службы, можно настроить ее запуск из-под обычного пользователя.
Чтобы изменить учетную запись, из-под которой запускается служба из консоли управления службами (services.msc).
- Запустите консоли, найдите нужную службу и откройте ее свойства
- Перейдите на вкладку Log On. По умолчанию служба запускается от имени Local System.
- Чтобы запустить службу от пользователя, включите опцию This account и укажите учетную запись и ее пароль.

- Когда вы сохраните настройки, появится сообщение:

The account svc_user1 has been granted the Log On As A Service right.
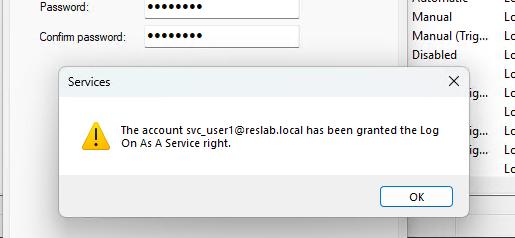
Windows сама предоставила права на запуск служб от имени этого пользователя. Чтобы проверить это, откройте редактор локальной GPO (gpedit.msc).
Перейдите в раздел Computer Configuration -> Windows Settings -> Security Settings -> Local Policies -> User Rights Assignment и найдите политику Log on as a service.
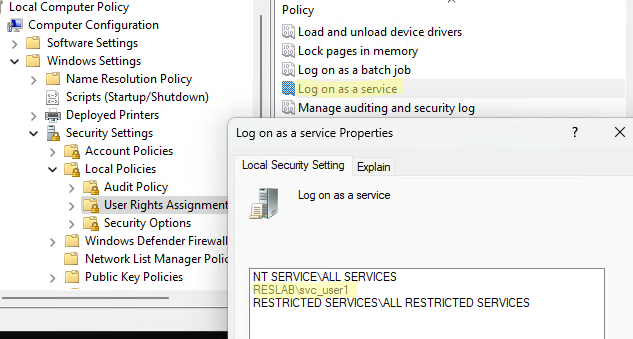
Как вы видите, пользователь был добавлен в эту локальную политику безопасности.
Можно предоставить права запуска служб другим пользователям или группам. Нажмите кнопку Add User or Group и укажите имя пользователя/группы.
Чтобы обновить настройки GPO, выполните команду:
gpupdate /force
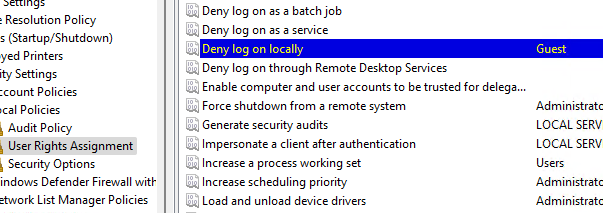
Кроме разрешающей политики, есть еще и политика, которая позволяет запретить запускать службы от имени некоторых пользователей или групп. Эта политика находится в этом же разделе GPO и называется Deny log on as a service. Запрещающая политика имеет более высокий приоритет. Поэтому если добавить пользователя одновременно в Deny log on as a service и Logon as a service, запустить службу от его имени не получится.
Данная политика разрешает определенным учетным записям запускать от своего имени какой-то процесс, как службу Windows. При запуске такого процесса он регистрируется как служба. При этом пользователю не обязательно входить локально.
Запуск служб от имени непривилегированных пользователей позволяет повысить безопасность и стабильность Windows. Естественно, нужно минимизировать количество аккаунтов, которым вы предоставляете право Logon as a service.
Для предоставления права Logon as a service из командной строки можно использовать утилиту ntrights.exe (входит в состав Windows Server 2003 Resource Kit). Скачать ее можно по ссылке из WebArchive.
После установки Resource Kit, чтобы предоставить пользователю права на запуск служб, выполните команду:
ntrights.exe +r SeServiceLogonRight -u RESLAB\svc_user1
Это добавит учетную запись в локальную политику безопасности.
Чтобы убрать права пользователя:
ntrights.exe -r SeServiceLogonRight -u RESLAB\svc_user1
In many of my blog posts (also at other websites) you’re instructed to run programs or applications as an administrator. This hint is crucial when trying to solve an issue, because it gives you additional permissions to complete the actual task. The so-called User Account Control. This blog post shows you how to run most common programs as an administrator
Let’s get started!
Run command prompt (cmd) as administrator
A command prompt allows you to start other programs, scripts or commands. It actually does nothing but wait until you give it a command. To run command prompt
- Click Start
- Type cmd in the Search bar
- Right click Command Prompt that pops up as a search result
- Click Run as administrator
- If prompted for “Do you want to allow this app from an unknown publisher to make changes to your device?”, choose Yes
- In the title bar of the Command Prompt, make sure Administrator: Command Prompt is shown. If it only says Command Prompt, you either
-
- Did not run the Command prompt as administrator. Make sure to fulfill step 4.
- Do not have enough privileges on your computer to run an elevated prompt. Ask your system administrator or owner of the pc for sufficient privileges

-

Run Registry Editor (regedit) as administrator
The registry editor allows you to make changes in the Registry. This often results in a change in configuration settings for the Operating System or for an application. This method is often used when the Graphical User Interface (GUI) doesn’t offer a way to set the setting.
- Click Start
- Type regedit in the Search bar
- Right click Registry Editor that pops up as a search result
- Click Run as administrator
Run Services (services.msc) as administrator
Services is started inside a Microsoft Management Console. It allows you to start and stop OS and application services. You often need administrator privileges to perform these tasks.
- Click Start
- Type services in the Search bar
- Right click Services that pops up as a search result
- Click Run as administrator
In previous Windows versions, you would need to type services.msc . It is still possible to open Services by typing one of the following commands
- services.msc
- mmc services.msc
Run Task Manager (taskmgr) as administrator
Setting an Agent to Run Under a Specific Login Account on Windows
- Open the Windows Services console (Start Menu > Control Panel > Administrative Tools > Services). …
- Click on the Log On tab. …
- Click on the This account radio button. …
- After clicking on the Browse button, the Select User or Service Account dialog will appear.
- What user does a Windows service run under?
- How do I start a service without admin rights?
- What is the difference between service account and user account?
- Can service accounts be logged into?
- How do service accounts work?
- How do I enable login as a service?
- What is a Windows service account?
- What is logon as a service in Windows operating system?
- How do you give a Windows service specific permissions?
- How do I give access to services?
What user does a Windows service run under?
A service should only run under the LocalSystem account if the service requires administrative privileges or must act as part of the operating system on the local computer. Be aware that the service installer should, by default, set up the service to run under a domain user account.
How do I start a service without admin rights?
In the list of services select the service Print Spooler and open its properties. Select the startup mode (Automatic) and click Edit Security. Using the Add button, add a user account or a group to grant permissions to. In our case, Start, stop and pause permission is enough.
What is the difference between service account and user account?
User accounts are used by real users, service accounts are used by system services such as web servers, mail transport agents, databases etc. By convention, and only by convention, service accounts have user IDs in the low range, e.g. < 1000 or so. Except for UID 0, service accounts don’t have any special privileges.
Can service accounts be logged into?
The major concern is that the service account is anonymous and can be used anywhere on the network. Essentially, the credentials used to log into the service account are available to multiple people, and they can make any kind of configuration or manipulation to your AD domain without accountability.
How do service accounts work?
A service account is a special type of Google account intended to represent a non-human user that needs to authenticate and be authorized to access data in Google APIs. Typically, service accounts are used in scenarios such as: Running workloads on virtual machines (VMs).
How do I enable login as a service?
Sign in with administrator privileges to the computer from which you want to provide Log on as Service permission to accounts. Go to Administrative Tools, click Local Security Policy. Expand Local Policy, click User Rights Assignment. In the right pane, right-click Log on as a service and select Properties.
What is a Windows service account?
A service account is a user account that is created explicitly to provide a security context for services running on Windows Server operating systems. The security context determines the service’s ability to access local and network resources. The Windows operating systems rely on services to run various features.
What is logon as a service in Windows operating system?
The Log on as a service user right allows accounts to start network services or services that run continuously on a computer, even when no one is logged on to the console. The risk is reduced because only users who have administrative privileges can install and configure services.
How do you give a Windows service specific permissions?
Right click, choose properties from the menu and select the service tab. Press the permissions button and open the advanced settings. You can grant the various permissions to every User or Group. For example the start/stop/restart rights for the BuiltIn Users Group.
How do I give access to services?
Method 1: (applies to local users)
2, Navigate to the Computer Configuration, Windows Settings, Security Settings, System Services. 3, Double-click the service for which you want to delegate permissions (e.g., Print Spooler). 4, Select the «Define this policy setting» and click Edit Security.
In Windows 10, knowing how to run programs as administrator is very important. By default, apps and games in Windows 10 run without administrator permissions, to prevent unauthorized changes to your system. However, there are times when some programs require administrator permissions to work properly or to run specific commands. Windows 10 offers you the ability to run programs as admin without having to disable anything. Here are all the methods to use «Run as administrator» on any desktop app in Windows 10:
First things first: About UAC and Run as administrator
In early versions of Windows, applications had system-wide privileges, which was a security risk. All of Microsoft’s operating systems from Windows Vista onward, including Windows 10, include UAC or User Account Control, a security feature that prevents unauthorized changes to the operating system. Trying to run an application as administrator is one of the changes that require administrative privileges. Before the selected program is launched, a UAC prompt is triggered, asking for permission. If you run the application from an account without administrator permissions, the UAC prompt asks you to enter an administrator password. Without the admin password, the program does not launch.
In Windows 10, you can only run a program with administrator permissions if it is a desktop app. Some of these applications, like security software, cannot run correctly without having administrative permissions. Windows apps that are installed from the Microsoft Store cannot be run with administrative privileges in Windows 10. Furthermore, they have the same level of permissions as a normal user account, so they are not allowed to make changes to advanced system settings or the Windows Registry.
You can learn more about the difference between desktop apps and UWP apps and figure out which ones you can «Run as administrator» by reading What is a Windows app? How is it different from a desktop app or a program?.
1. Run a program as admin from the contextual menu of its Start Menu shortcut or tile
In Windows 10, you can launch a program with administrative permissions by using the contextual menu of its Start Menu shortcut. First, open the Start Menu. Then, find the shortcut of the program you want to launch in the All apps list, and right-click or press-and-hold on it to open a contextual menu. Click, tap, or hover over the More option, and then click or tap on «Run as administrator.«
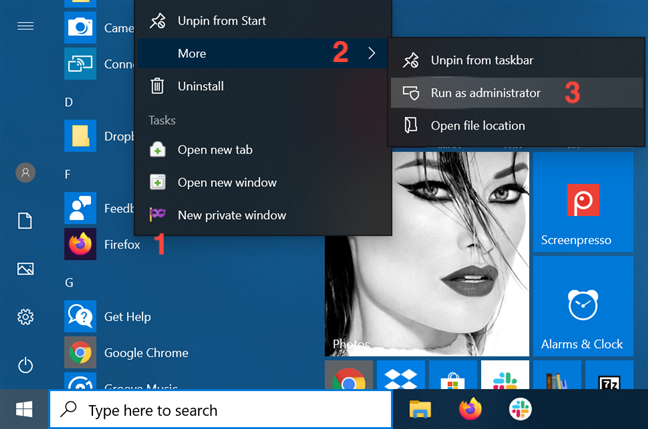
If you have a tile for your desktop app available in the Start Menu, right-click or press-and-hold on it to open a contextual menu. Access More and then click or tap on «Run as administrator.«
2. Run as administrator using «Ctrl + Shift + Click» on its Start Menu shortcut or tile
Open the Start Menu and locate the shortcut of the program you want to launch as administrator. Hold down both the Ctrl and the Shift keys on your keyboard and then click or tap on that program’s shortcut.
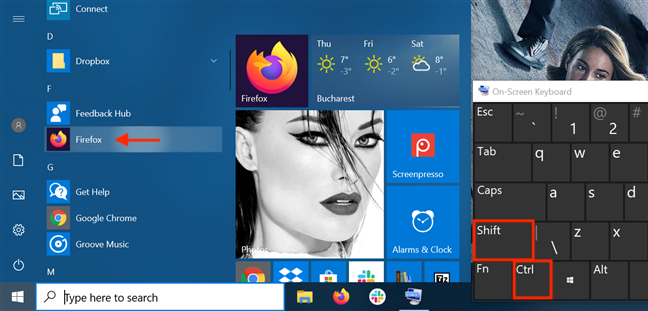
You can also use the «Ctrl + Shift + Click/Tap» shortcut on an app’s Start Menu tile to run it with administrator permissions in Windows 10.
During our tests, this method did not work every time, so if that is the case for you, either try again or consider running the app as administrator another way.
3. Run a program as administrator from its desktop shortcut
Find the desktop shortcut for the program you want to run as admin or create one yourself. Then, right-click or press-and-hold on it to open a contextual menu. Click or tap on the «Run as administrator» option.

4. Run a desktop app as administrator from its taskbar shortcut
In Windows 10, you can also run a desktop app with administrator permissions from its taskbar shortcut. Right-click or press-and-hold on the shortcut, and then right-click or press-and-hold again on the program’s name. Then, from the menu that opens, choose «Run as administrator.»
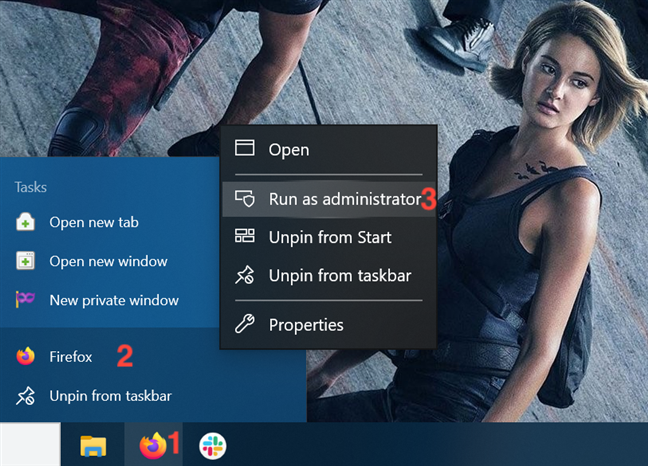
You can also use the «Ctrl + Shift + Click/Tap» shortcut on an app’s taskbar shortcut to run it with administrator permissions in Windows 10.
5. Run a program as administrator from its right-click menu
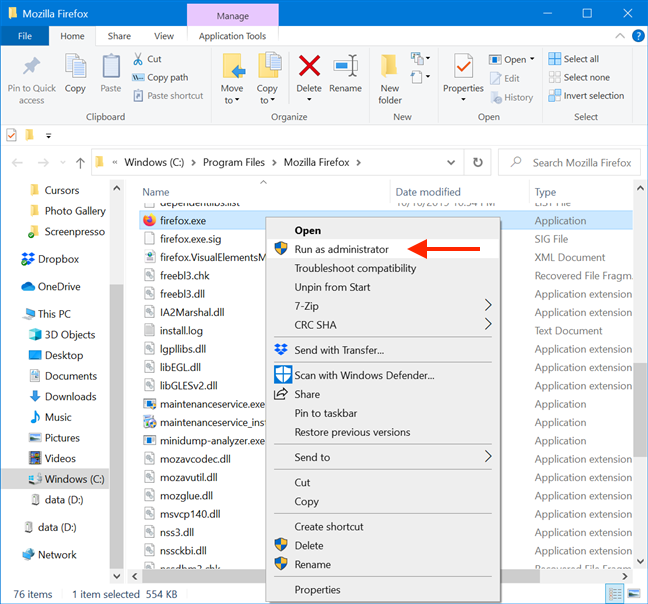
Although easier to find, shortcuts are not the only way to run a program as administrator in Windows 10. You can perform the same action from the main executable file’s contextual menu.
Open File Explorer and find the desktop app’s executable. Right-click or press-and-hold on it to open the contextual menu, and then click or tap on «Run as administrator.«
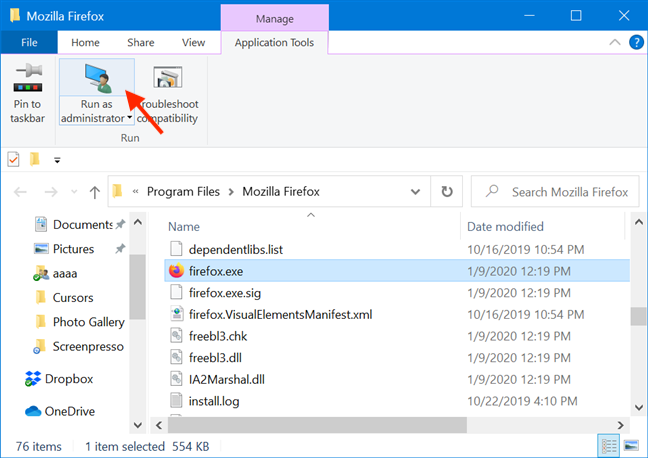
6. Use «Run as administrator» from File Explorer’s ribbon
Find the program’s main executable in File Explorer. Select it, and then click or tap on the Manage tab from the ribbon.
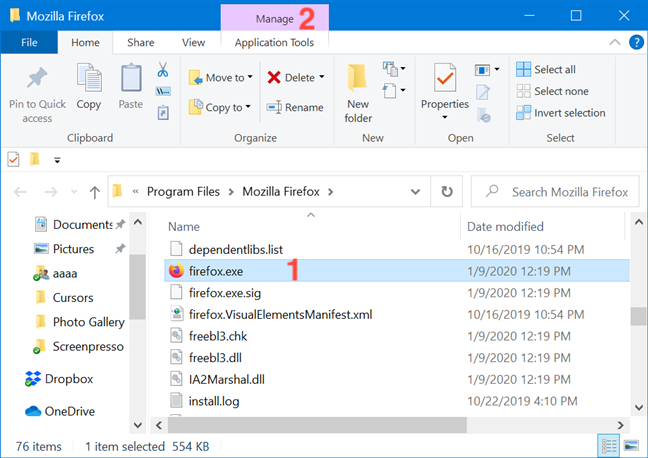
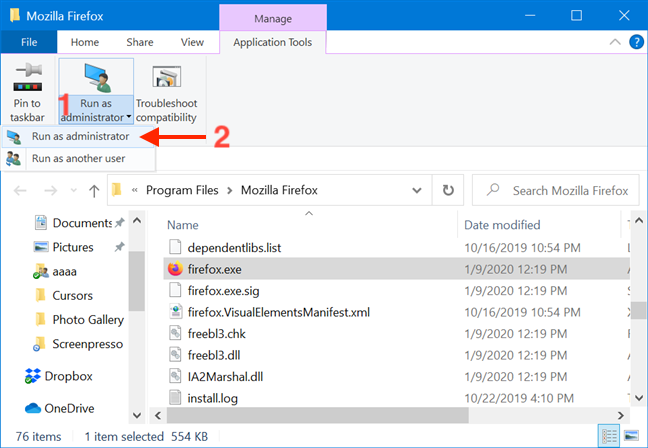
The option you need is displayed in the Run section of Application Tools. Click or tap on the upper half of the «Run as administrator» button to give the selected app admin permissions.
As an alternative, you can also press the lower half of the «Run as administrator» button and then click or tap on the «Run as administrator» option from the drop-down menu.
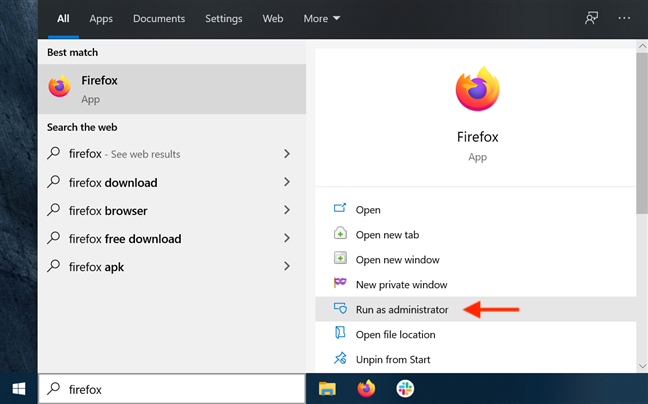
7. Run a desktop app as admin from the Search window
In the taskbar search field, type in the name of the program that needs to run with administrator permissions. Then, click or tap on the «Run as administrator» option displayed on the right side of the Search window.
Obviously, when you see the UAC prompt asking for permission to run the app as admin, click or tap Yes.
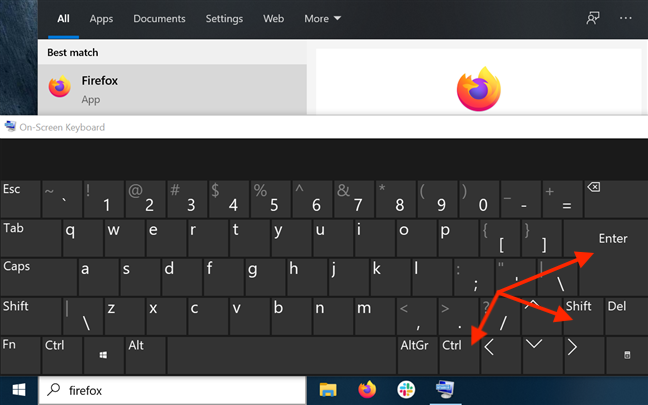
8. Run a program as administrator using «Ctrl + Shift + Enter» on its taskbar search result
Type the name of the program in your taskbar’s search field. If there are multiple results, use the arrow keys on your keyboard to highlight the program you want to run as administrator. Then, simultaneously press the Ctrl + Shift + Enter keys on your keyboard.
9. Run a program as administrator from the Run window
Open the Run window and type in the name of the executable for the program you want to run as administrator. Then hold down the Ctrl and Shift keys on your keyboard and click or tap on OK.
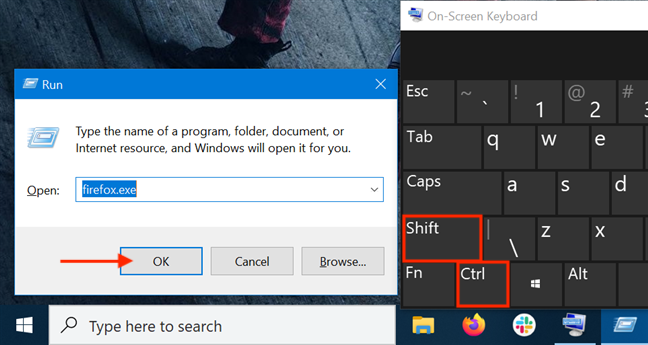
Alternatively, after typing in the name of the program’s main executable, press the Ctrl + Shift + Enter keys on your keyboard at the same time.

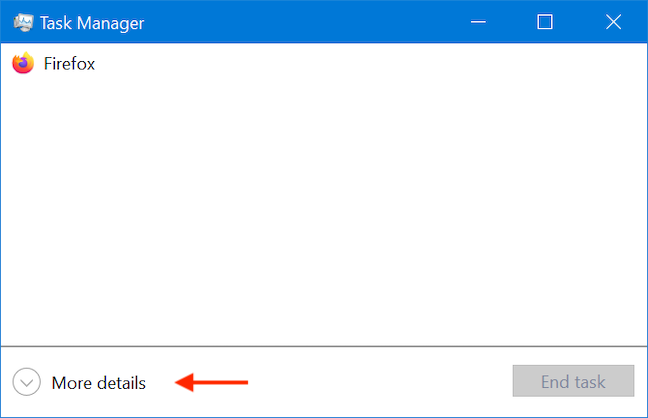
10. Run as admin from the Task Manager
Another way to launch a program as administrator in Windows 10 is to start it using the Task Manager. To begin, open the Task Manager. Then, if it opens up in its compact view, click or tap on the More details button.
In the expanded Task Manager, open the File menu and click or tap on «Run new task.«
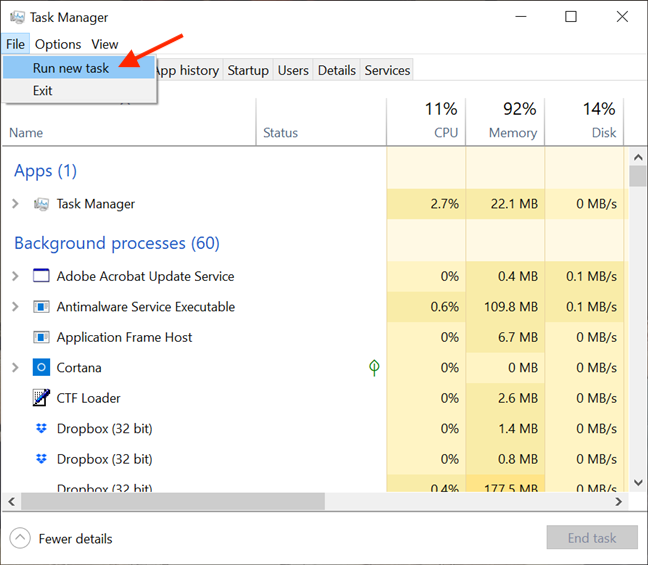
This opens the «Create new task» window. You can use its Open field to enter the path to the program you want to launch as administrator, or you can click or tap on Browse to navigate to it. Then, make sure to check the «Create this task with administrative privileges.» option and click or tap on OK.
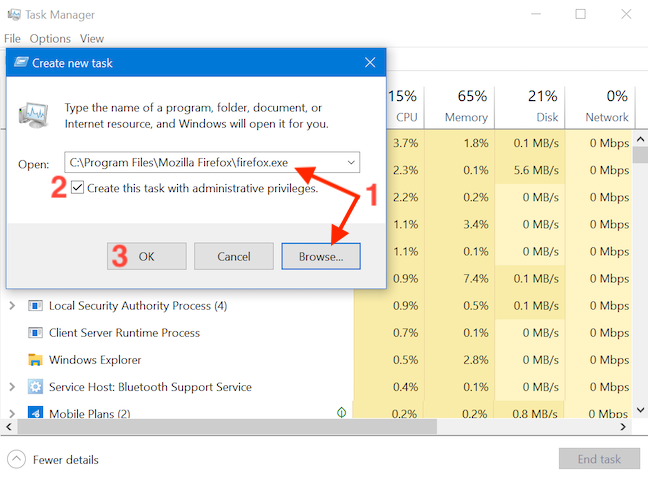
TIP: An advantage of using this method to launch programs as administrator is that you skip the UAC part of the process. That is because the app automatically inherits the permissions of the Task Manager — in our case, administrator permissions — so all you have to do is check the box to enable the option, as seen above. The option is missing if you only have standard user permissions on the device.
11. Run a desktop app as admin using the RunAs command in Command Prompt (CMD) or PowerShell
If the command line is your favorite way of asking your computer to do what you want, you can also access Command Prompt or PowerShell to run a program as administrator. Enter the following command in the CMD or PowerShell window, adjusting it to fit your needs:
runas /user:»your_computer_name\administrator_name» «C:\path\program.exe«
Replace your_computer_name with your computer’s name, administrator_name with the name of a user account that is an administrator on your system, and C:\path\program.exe with the complete path to the program that you want to run as administrator.
As seen in the image below, if you enter the command correctly, you are also asked to enter the administrator’s password. Then, press Enter on your keyboard once again.
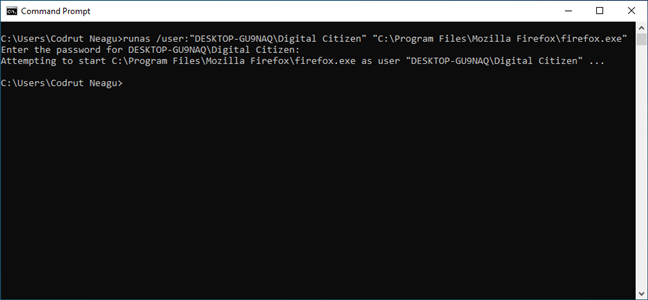
TIP: Using this method to launch programs as administrators, you skip the UAC part of the process.
12. Always run a program with administrator permissions
To avoid constantly having to use the methods illustrated above on desktop apps accessed on a regular basis, you can set a program to always run with administrator permissions.
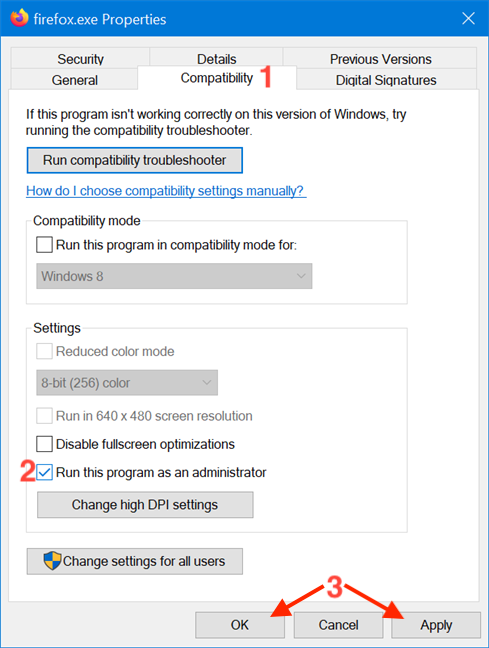
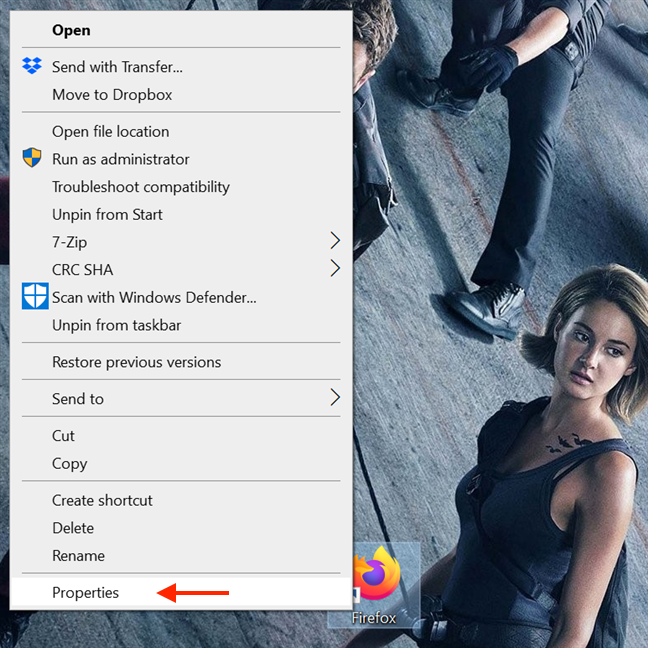
First, open File Explorer and find the main executable of the program you want to run. Right-click or press and hold on it to open the contextual menu. Then, click or tap on Properties.
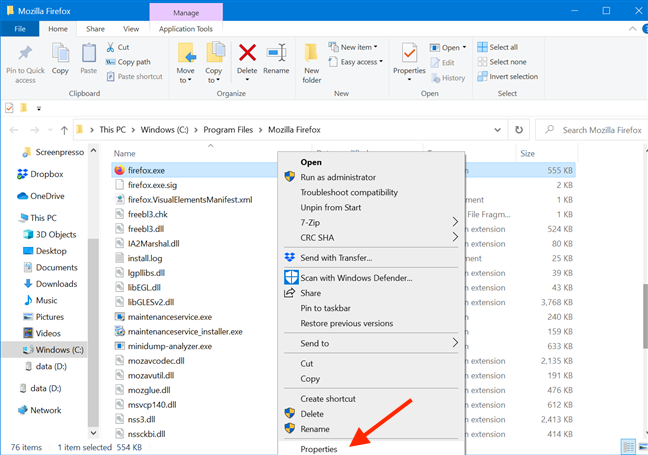
In the Properties window, go to the Compatibility tab. At the bottom of the window, check the box next to the «Run this program as an administrator» option, and then click or tap on Apply or OK.
This setting is applied, and, from now on, the program always runs with administrator permissions. Follow the same steps if you want to disable the option. You can also edit the Properties of a program’s shortcut to avoid tampering with its main executable. To begin, right-click or press-and-hold on a program’s shortcut to access its contextual menu, and click or tap on Properties.
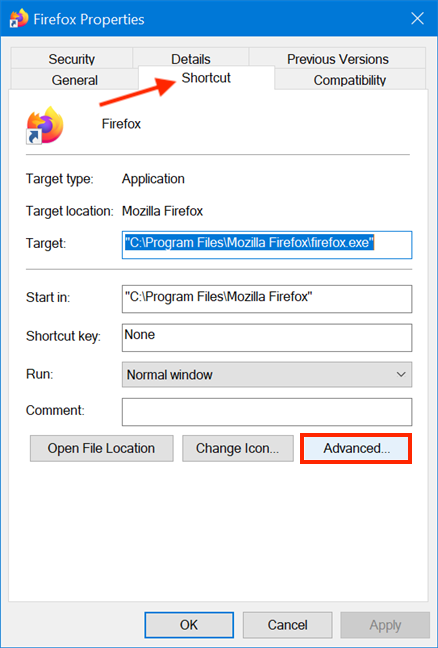
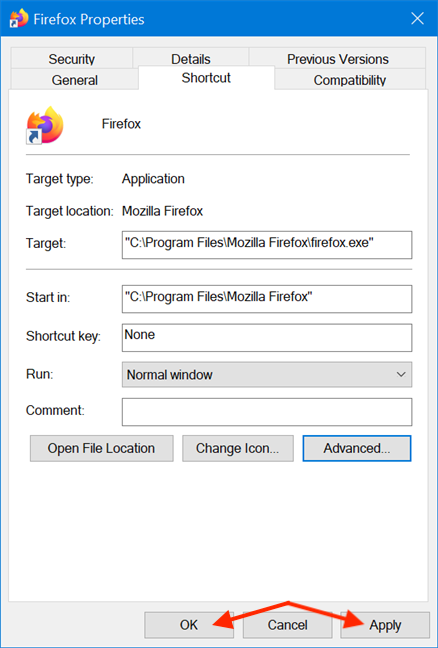
Then, in the shortcut’s Properties window, select the Shortcut tab. Click or tap on the Advanced button to open Advanced Properties.
In the Advanced Properties window, check the box next to «Run as administrator» and then click or tap OK.
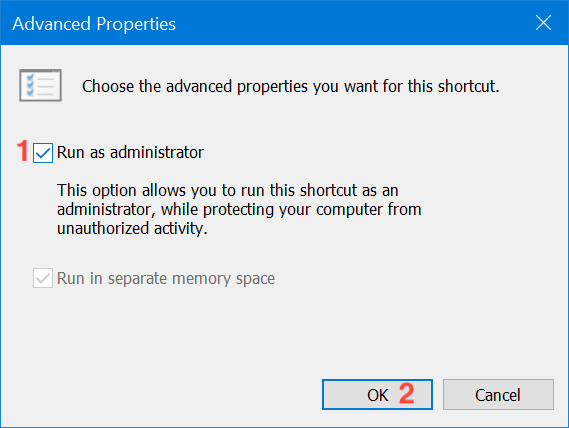
Finally, you are returned to the Properties window, where you have to click or tap on OK or Apply, and you are done.
The settings are applied, and your program works with administrative permissions as long as you open it using the same shortcut. When you use the methods in this section, the UAC prompts you as soon as you try to launch the app.
13. Run a program with administrator permissions and without a UAC prompt
Using the Task Scheduler, you can run a program as administrator without being prompted by the UAC (User Account Control) every time. It is simple, and you don’t have to disable UAC, thus compromising Windows 10’s security. We put together a detailed step by step guide to help you: Use the Windows Task Scheduler to run apps without UAC prompts and admin rights.
Which method(s) do you plan to use?
In Windows 10, there are fewer apps that need to run with administrator permissions than in older versions of Windows. However, a few legitimate programs still require elevated privileges. The main thing to remember is that even if you are logged in with an administrator account, you regularly run apps as a standard user. This means that if you need to run a program that requires administrator permissions, you can just use one of the methods described above and then approve it in the UAC prompt. Which of the method(s) illustrated do you plan to use? Did you already use some of them? Let us know in a comment.
Windows runs programs in user mode by default. If you want to run programs in administrative mode, you will need to specify that explicitly in a Windows OS. Running programs in Windows 11 and Windows 10 as an administrator is easy.
Running an app or a program enables you to perform tasks and functions that were previously inaccessible due to privilege restrictions.
In this article, we discuss a few ways to run programs in the administrative mode in Windows. You may use the method which is convenient for you.
Each method mentioned below will have its own advantages and disadvantages depending upon the situation you are in. For example, for a quick workaround, you may want to use a keyboard shortcut while at other times you may need a more permanent method of opening an app in admin mode.
We will also discuss a method especially useful for power users and system administrators in which we can specify admin credentials one time and use applications without asking for passwords again and again.
Table of Contents
Benefits of Running App/Program as Administrator
The Windows operating system keeps certain files and actions restricted which are only granted access to a certain group, i.e. the administrators. This is so that not everyone has access to critical system files, thus they cannot be manipulated.
Moreover, if any viruses or trojan horses were given administrator control, they could access directories and perform actions beyond your imagination.
Running an application or a program with elevated privileges allows you to perform all actions and (almost) nothing is locked anymore. This gives you full control of the program, and then you may configure or use it as you please.
How to Run Programs in Administrative Mode in Windows
The simplest way to run a program in administrative mode is to right-click the program and select “Run as administrator” from the context menu.
If the current user is not an administrator, Windows will ask for the administrator username and password.
You can go about it in two ways: You can set an app to always run in administrative mode, or you can run an app in administrator mode temporarily, which means that it will only have elevated privileges for the current session.
Let’s check out what other options we have to run programs in administrative mode.
Always Run Program As Administrator
Always Run a Specific Program as Administrator
To always run a specific program as administrator, we will create its shortcut on the desktop and make changes to the shortcut. Please follow the instructions below:
-
Search for the desired program using the Start menu, right-click it, and click “Open file location.”

Open file location The file will now open in File Explorer.
-
Right-click the program and click Properties.
Open program properties -
In the Shortcut tab, click Advanced.
Open advanced properties -
Check the box next to “Run as administrator” and click Ok.
Always run program as administrator


Now when you run the program from the Start Menu, it will run in administrative mode.
Always Run All Programs as Administrator
By not running programs as an administrator, Windows keeps the system secure by not allowing viruses and malware to take admin access without user acknowledgment. But if you want to turn off this feature and always run all programs as administrator, please follow the steps below.
This security feature is called “User Access Control (UAC).” Disabling UAC will also disable asking for administrative privileges.
-
Type in “msconfig” in the Run Command box to open the System Configuration window.
Open System Configuration -
Switch to the Tools tab.
Swich to the Tools tab -
Select “Change UAC settings” and click Launch.
Change UAC settings -
Move the slider to the bottom to turn off User Account Control and click Ok.
Disable UAC


After applying this, you will not be asked anything and all programs will run in administrative mode.
Run Programs as Administrator using RunAs Tool
Windows built-in “RunAs” command allows a user to launch programs with different user credentials than the user you are logged in as now. To use the “RunAs” command, press the Shift key and right-click on the program shortcut to show the “Run As Different User” option in the context menu.
But you have to repeat this step every time you launch that specific program. If you want to always run a program as a specific user then the RunAsTool is for you.
RunAsTool is a portable app in which you can save admin user credentials and then the app can automatically run programs listed in the app as the specific user all the time.
This is especially useful for system administrators who want to give administrative rights to standard users only for specific programs and applications.
-
Download RunAsTool.
-
Extract its contents.
Extract RunAsTool -
Run “RunAsTool.exe” or “RunAsToolx64.exe” (depending on your system architecture).
-
Enter the administrator account’s credentials and click Apply.
Enter credentials -
Now drag and drop the applications you want to run as administrator into the tool.
Drag and drop apps and programs -
Now you can double-click any application from within RunAsTool to run directly in administrative mode without asking for administrator password.


RunAsTool is a portable app so you can easily keep it in a pen drive and run it on any computer within a Windows Active Directory Domain. It’s a lifesaver if you want to give network users administrator access to specific programs instead of giving them local admin privileges.
Temporarily Run Program As Administrator
Keyboard Shortcut to Run a Program in Administrative Mode
You can also run a program in administrator mode directly from the Start menu. Just find the program in the Start Menu, and press Ctrl + Shift keyboard keys and double-click on the program.
This will open the program as an administrator. But you will always need to press Ctrl + Shift keys while opening the programs in admin mode.
You can also use the CTRL + Shift + Enter keys to run a program in administrative mode.
Use the Run Dialog Box to Run Applications with Administrative Privileges
There are some system programs that we start directly from the Run dialog. For example, I always open Command Prompt or PowerShell using Run –> cmd.
If you are using Windows 10 Version 1803 or above, the good news is that you will be able to open the programs in administrative mode directly from the Run dialog.
Just enter the command and press Ctrl + Shift + Enter. This will trigger the Run dialog box to run applications with admin privileges.
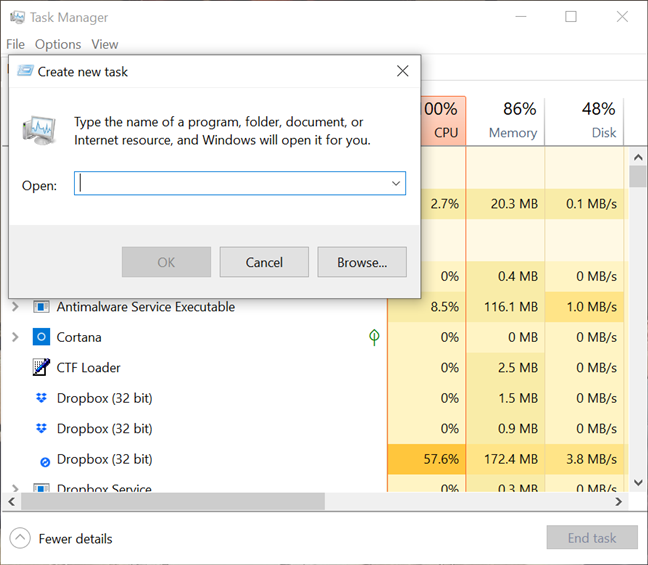
Run Program in Administrative Mode using Task Manager
The Task Manager is used to manage system processes, amongst many other functionalities. You can run a process, which in this case, will be an app executable file, using the Task Manager. Here is how:
-
Open the Task Manager by pressing the CTRL + Shift Esc shortcut keys.
-
Click “Run new task.”

Run a new task -
Enter the file name or the complete path to the program, check the box next to “Create this task with administrative privileges” and then click Ok.
Run program with elevated privileges from Task Manager


Conclusion
All the methods given above can be used for different purposes.
As a power user or a system administrator, you must be aware of all these methods and can use them according to your situation. For a quick application, I use the keyboard shortcut + mouse click method. For domain users, I keep a copy of RunAsTool on a network drive and distribute it to users who want administrative access to specific programs.