Windows service registry settings

Все способы:

  • Вариант 1: «Службы»
  • Вариант 2: «Командная строка»
  • Вариант 3: «Редактор реестра»
  • Список служб, которые можно отключить
  • Вопросы и ответы: 1

Вариант 1: «Службы»

В операционной системе Windows 10 есть отдельное меню с перечнем всех доступных служб, в нем также присутствуют инструменты для их настройки. Далее будет рассказано, как перейти туда и какие функции доступны пользователю:

  1. Откройте утилиту «Службы», например через «Диспетчер задач». Для этого сначала вызовите его комбинацией клавиш Ctrl + Shift + Esc, а затем проследуйте на вкладку «Службы» и в нижней части окна кликните по пункту «Открыть службы».
    настройка служб в windows 10_01

    Читайте также: Как открыть «Службы» в Windows 10

  2. В отобразившемся на экране списке служб найдите ту, которую необходимо настроить, и откройте ее «Свойства». Для этого дважды кликните по названию или нажмите правой кнопкой мыши и выберите пункт «Свойства».
  3. настройка служб в windows 10_02

  4. На вкладке «Общие» находятся основные настройки. Здесь вы можете выбрать тип запуска. Делается это в одноименном выпадающем списке. Всего представлено четыре режима:
    • «Автоматически» — служба будет запускаться автоматически, в зависимости от настроек операционной системы.
    • «Автоматически (отложенный запуск)» — то же самое, что и «Автоматически», только включение будет происходить не сразу после запуска Windows 10.
    • «Вручную» — при запуске компьютера будут применяться последняя выставленная конфигурация. Если служба была отключена, то она не будет запущена автоматически.
    • «Отключена» — сразу после включения компьютера служба будет отключена, пока вы ее не запустите самостоятельно.
  5. настройка служб в windows 10_03

  6. Здесь же вы можете изменить состояние службы: запустить ее, отключить, приостановить или продолжить выполнение. Для этого следует воспользоваться соответствующими кнопками в нижней части окна.
  7. настройка служб в windows 10_04

  8. На вкладке «Вход в систему» осуществляется настройка прав доступа. При установленном переключателе в положение «С системной учетной записью» авторизация будет происходить с правами администратора, соответственно, служба сможет взаимодействовать со всеми системными компонентами. Отдельно вы можете дать разрешение на внесение изменений в конфигурацию рабочего стола.

    Установив переключатель в положение «С учетной записью», вам потребуется дополнительно указать название профиля и его пароль. Впоследствии служба сможет взаимодействовать только с указанным пользователем.

  9. настройка служб в windows 10_05

  10. На вкладке «Восстановление» расположены настройки поведения системы при сбоях в работе выбранной службы. Отдельно задаются параметры для первого сбоя, второго и последующих. Выполняется это посредством выпадающего списка. На выбор есть четыре варианта поведения:
    • «Не выполнять никаких действий» — при сбое никаких действий не будет предпринято, выполнение службы остановится.
    • «Перезапуск службы» — будет совершена автоматическая перезагрузка.
    • «Запуск программы» — выполнится инициализация указанной пользователем программы. Этот вариант требует дополнительной настройки, о чем будет рассказано чуть позже.
    • «Перезагрузка компьютера» — компьютер автоматически перезапустится. Предварительно на экране появится соответствующее уведомление, чтобы пользователь смог успеть сохранить важные данные.
  11. настройка служб в windows 10_06

  12. Чуть ниже можно задать интервал сброса счетчика сбоев. По умолчанию это будет происходить ежедневно, но при необходимости измените показатель. Также есть возможность установить задержку перезапуска некорректно работающей службы. По умолчанию это происходит через одну минуту.
  13. настройка служб в windows 10_07

  14. Если при помощи одного из выпадающих списков вы выбрали значение «Запуск программы», тогда в этом меню активируется блок «Выполнение программы». В нем вы можете выбрать непосредственно само приложение, которое будет запускаться при сбое. Сделать это можно путем указания пути к его исполняемому файлу или через диалоговое окно файлового менеджера, вызываемого посредством кнопки «Обзор». При необходимости задайте дополнительные параметры запуска программы в поле «Параметры командной строки». Если в приложение нужно передать количество возникших ошибок, тогда установите отметку напротив опции «Дописать в командную строку счетчик ошибок (/fail=%1%)».
  15. настройка служб в windows 10_08

  16. На вкладке «Зависимости» нет никаких параметров для изменения, здесь только перечисляются другие службы, обеспечивающие корректную работу текущей.
  17. настройка служб в windows 10_09

  18. После того как настройка будет завершена, не забудьте нажать по кнопкам «Применить» и «ОК», чтобы все внесенные изменения сохранились.
  19. настройка служб в windows 10_10

Вариант 2: «Командная строка»

При необходимости выполнить настройку служб можно через «Командную строку». Соответственно, все действия будут производиться посредством ввода специальных команд. Но сначала откройте консоль — делать это рекомендуется от имени администратора, чтобы получить полный доступ ко всем функциям. На нашем сайте в отдельной статье подробно описывается этот процесс.

Подробнее: Как открыть «Командную строку» от имени администратора в Windows 10

настройка служб в windows 10_11

После того как черное окно консоли появится на экране компьютера, переходите к настройке:

  1. Сначала выведите список всех служб, работающих в операционной системе. Для этого введите приведенную ниже строку и нажмите Enter.

    sc query

    В итоге вы увидите название служб. Здесь вам необходимо запомнить значение напротив строки «Имя_службы». Для поиска нужной обращайте внимание на строку «Выводимое_имя» — именно оно отображается в стандартной утилите «Службы».

  2. настройка служб в windows 10_12

  3. Найдя службу, параметры которой необходимо изменить, рекомендуется предварительно просмотреть ее текущие конфигурационные данные. Делается это посредством представленной ниже команды:

    sc qc <имя_службы>

    После этого на экран выведется развернутая информация о службе. Полезные поля здесь следующие: «Тип_запуска», «Имя_двоичного_файла» и «Зависимости». Изменить же посредством команд вы сможете только тип запуска.

  4. настройка служб в windows 10_13

  5. Когда информация о службе была получена, можно переходить непосредственно к изменению ее работы. Всего доступны три операции: остановка, запуск и удаление. Для их инициализации воспользуйтесь следующими командами:

    sc stop <имя_службы> (остановка)
    sc start <имя_службы> (запуск)
    sc delete <имя_службы> (удаление)

    При успешном выполнении команды вы увидите соответствующее сообщение в окне «Командной строки».

  6. настройка служб в windows 10_14

  7. Также через консоль можно изменить тип запуска службы. Делается это посредством специальной команды со следующим синтаксисом:

    sc config <имя_службы> start= <тип_запуска>

    Всего есть три режима работы: auto — автоматически, demand — вручную, disabled — отключена. После ввода команды на экран выведется отчет с результатом операции.

    настройка служб в windows 10_15

    Важно! После параметра start= обязательно должен стоять пробел, в противном случае появится ошибка.

  8. При необходимости вызовите справку касательно команды sc. Делается это посредством представленной ниже строки. В справке можно посмотреть дополнительные параметры для управления службами.

    sc ?

  9. настройка служб в windows 10_16

Примечание! Если имя службы состоит из двух и более слов, его необходимо взять в одинарные () или двойные («) прямые кавычки. Пример: sc delete "Events Utility".

Вариант 3: «Редактор реестра»

При желании внести изменения в параметры служб в Windows 10 можно путем редактирования соответствующих ключей системного реестра. Но этот способ позволяет только изменить тип запуска — отключить работу службы таким образом не получится. Для выполнения поставленной задачи потребуется сделать следующее:

  1. Откройте окно утилиты «Выполнить» с помощью комбинации клавиш Win + R, а затем введите приведенную ниже команду и нажмите по кнопке «ОК».

    regedit

  2. настройка служб в windows 10_17

  3. В появившемся окне «Редактора реестра» проследуйте по указанному ниже пути, чтобы попасть в директорию с перечнем всех установленных служб в операционной системе.

    HKEY_LOCAL_MACHINE\SYSTEM\CurrentControlSet\Services\

    Для мгновенного перехода в целевую директорию вставьте указанный путь в адресную строку, которая расположена в верхней части интерфейса, и нажмите Enter.

  4. настройка служб в windows 10_18

  5. Находясь в папке «Services», раскройте список подкатегорий, кликнув по стрелочке, находящейся слева от названия. Далее найдите папку с именем службы, которую необходимо изменить, и выберите ее, щелкнув кнопкой мыши.
  6. настройка служб в windows 10_19

  7. В списке содержащихся в директории файлов найдите «Start» и откройте его «Свойства». Сделать это можно либо двойным кликом по названию, либо через контекстное меню. Во втором случае нажмите по файлу правой кнопкой мыши и из появившегося списка опций выберите пункт «Изменить».
  8. настройка служб в windows 10_20

  9. В открывшемся окне введите в поле «Значение» число от 2 до 4. В зависимости от вставленной цифры будет задан определенный режим запуска:
    • 1 — автоматически (отложенный запуск);
    • 2 — автоматически;
    • 3 — вручную;
    • 4 — отключена.

    Укажите желаемое значение и кликните по кнопке «ОК», чтобы сохранить внесенные изменения. После этого окно «Редактора реестра» можно закрыть.

Примечание! Как можно заметить, настройка служб через «Редактор реестра» не предоставляет множества функций. Но преимуществом такого способа является возможность принудительного изменения типа запуска, даже если это не получается сделать через утилиту «Службы» или «Командную строку».

Список служб, которые можно отключить

Многие пользователи под настройкой служб в Windows 10 подразумевают их отключение для повышения производительности компьютера. В таком случае следует знать, без каких именно компонентов операционная система продолжит свою нормальную работу. Поэтому мы предоставляем такой список:

  • «Факс». Если к компьютеру не подключен факс, то ее следует отключить, чтобы она не потребляла ресурсы системы.
  • «Рабочие папки». Если вы не подключены к корпоративной сети, отключите ее.
  • «Служба шифрования дисков BitLocker». Если вы не собираетесь шифровать информацию на диске, тогда ее можно деактивировать.
  • «Служба поддержки Bluetooth». Отключайте только в том случае, если у вашего устройства нет модуля Bluetooth.
  • «Dmwappushservice». Эту службу рекомендуется отключить для сохранения конфиденциальности, так как она отслеживает ваше местоположение.
  • «Служба географического положения». Этот компонент аналогичен предыдущему, поэтому его тоже можно деактивировать.
  • «Служба наблюдения за датчиками». Следит не только за датчиками, но и может менять яркость монитора в зависимости от освещения в комнате (при наличии соответствующего датчика на компьютере). Доступна для свободного отключения.
  • «Superfetch». Рекомендуется отключить пользователям, у которых в компьютере установлен твердотельный накопитель (SSD).
  • «Диспетчер печати». Если вы не пользуетесь принтером, отключите этот компонент.
  • «Биометрическая служба Windows». Если к компьютеру не подключен сканер отпечатка пальца, эта служба будет только потреблять ресурсы системы.
  • «Удаленный реестр». Эта служба позволяет редактировать системный реестр удаленно с другого компьютера. Если эта возможность вам не потребуется, отключите ее.
  • «Брандмауэр». Не нужна, если у вас установлен сторонний антивирус с брандмауэром в комплекте (большинство современных антивирусов как раз обеспечивает комплексную защиту).
  • «Machine Debug Manager». Отключайте только если не занимаетесь программированием на своем устройстве.
  • «Windows Search». Обеспечивает работу поисковой системы в Windows 10. Если эта функция вам не нужна, тогда отключите ее.
  • «Сервер». Требуется для настройки сетевых папок и принтеров. Если ваш компьютер не включен в локальную сеть, тогда отключите.
  • «Служба записи компакт-дисков». Будет полезной только в том случае, если у вас есть дисковод и вы им пользуетесь.
  • «Служба загрузки изображений». Обеспечивает обработку изображений с подключенного к компьютеру сканеру или камеры, иначе только зря потребляет ресурсы операционной системы.
  • «Сетевая служба Xbox Live». Нужна для обеспечения доступа к сервисам Xbox Live. Если ими вы не пользуетесь, тогда отключите этот компонент.
  • «Служба лицензий клиента». Необходима для правильной работы магазина Windows 10. Отключайте, если не пользуетесь им.
  • «Служба маршрутизатора SMS Microsoft Windows». Этот компонент можно отключить, так как он считается устаревшим и не применяется большинством пользователей.
  • «Регистрация ошибок». Обеспечивает отправку отчетов об ошибках на серверы Microsoft. Для пользователя она бесполезна.
  • «Центр обновления Windows». Часто при автоматической работе этой службы наблюдаются притормаживания и высокая нагрузка на центральный процессор. Тем, кому ее работа доставляет неудобства, можно ее отключить, но периодически вручную обновлять операционную систему. Всем остальным юзерам лучше оставить ее включенной.
  • «NVIDIA Stereoscopic 3D Driver Service». Нужна только в той ситуации, если у вас есть 3D-монитор.
  • «NVIDIA Streamer Service». Если вы не играете в компьютерные игры со стримингом изображения, тогда эта служба не нужна.
  • «NVIDIA Streamer Network Service». Тоже будет полезна только стримерам. Если вы таковым не являетесь, тогда отключите.

Важно! Все перечисленные службы могут быть отключены без риска возникновения критических ошибок в работе операционной системы.

Наша группа в TelegramПолезные советы и помощь

Многие статьи, касающиеся решения тех или иных проблем в Windows 11/10 или других версиях ОС, среди прочих шагов могут предлагать попробовать изменить тип запуска служб. Однако не все пользователи знают, как именно это сделать.

В этой инструкции для начинающих подробно о способах изменить тип запуска службы в Windows актуальных версий, а также о том, что делать, если выбор типа запуска не активен.

Оснастка «Службы»

Базовый способ изменения типа запуска службы — использовать соответствующий инструмент их настройки, предусмотренный в Windows. Шаги будут следующими:

  1. Нажмите клавиши Win+R на клавиатуре, либо нажмите правой кнопкой мыши по кнопке «Пуск» и выберите пункт «Выполнить». Введите services.msc и нажмите Enter.
    Открыть services.msc

  2. Откроется список служб Windows. Найдите ту из них, тип запуска которой нужно изменить и дважды кликните по ней мышью, либо, если вы используете клавиатуру — Enter.
    Выбор службы для изменения

  3. Откроются свойства выбранной службы. Достаточно изменить значение в поле «Тип запуска» на нужный вам и применить настройки.
    Выбор типа запуска службы

Тип запуска будет использован при следующей перезагрузке компьютера. Однако, в этом же окне после изменения типа запуска вы можете вручную запустить или остановить службу, в зависимости от того, требуется ли её работа.

При изменении типа запуска этим способом вы можете обнаружить, что для некоторых служб изменение типа запуска недоступно: обычно это происходит для важных системных служб Windows 11/10, отключение которых может привести к проблемам с работой операционной системы.

Выбор типа запуска службы не доступен

Основная рекомендация в этом случае — не трогать такую службу, а добиться желаемого результата иными методами. Однако, если отключение необходимо, вы можете использовать приведённый далее способ изменения типа запуска в редакторе реестра.

Редактор реестра

Параметры служб, включая тип запуска, хранятся в реестре Windows, соответственно для его изменения можно использовать редактор реестра (рекомендую предварительно создать точку восстановления системы):

  1. Нажмите клавиши Win+R на клавиатуре, введите regedit и нажмите Enter
  2. Перейдите к разделу реестра
    HKEY_LOCAL_MACHINE\SYSTEM\CurrentControlSet\Services\
  3. Найдите подраздел, соответствующий имени нужной службы (имена служб можно посмотреть в их свойствах в services.msc на вкладке «Общие») и перейдите к нему.
  4. Дважды нажмите по параметру с именем Start в правой панели редактора реестра и установите для него нужное значение: 2 — Автоматически, 3 — Вручную, 4 — Отключена. Есть ещё два значения: 0 (загрузка) и 1 (система), они не должны использоваться для обычных служб, только для служб драйверов. Также вы можете создать параметр DWORD с именем DelayedAutostart со значением 1, если хотите использовать тип запуска службы «Автоматически» с отложенным запуском.
    Изменение типа запуска службы в реестре

  5. Примените настройки и перезагрузите компьютер.

При изменении параметра Start для некоторых служб вы можете получить сообщение об ошибке «Не удается изменить Start. Ошибка при записи нового значения параметра». Это говорит о том, что изменение для этой службы защищено системой (иногда — антивирусом, в том числе Microsoft Defender с включенной функцией «Защита от подделки»).

Ошибка при записи нового параметра

Возможные действия (при условии, что вы уверены, что хотите продолжить и понимаете риски) описаны в инструкции Как стать владельцем раздела реестра в Windows, также можно попробовать использовать редакторы «удаленного» реестра с LiveCD.

Командная строка

И ещё один метод: изменение типа запуска с помощью командной строки. Достаточно запустить командную строку от имени администратора (именно командную строку, не PowerShell), после чего использовать команды (первая из них останавливает службу, если она запущена):

sc stop "имя_службы"
sc config "имя_службы" start=ТИП_ЗАПУСКА
Изменение типа запуска службы в командной строке

при этом доступны следующие варианты типа запуска:

  • BOOT — Загрузка
  • SYSTEM — Система
  • AUTO — Автоматически
  • DEMAND — Вручную
  • DISABLED — Отключена
  • DELAYED-AUTO — Автоматически (отложенный запуск)

Ещё один вариант команды:

wmic service where name='имя_службы'  call ChangeStartmode Тип_запуска

Существуют и дополнительные возможности изменения типа запуска служб и их отключения:

  • Если требуется отключить все сторонние службы, можно использовать окно конфигурации компьютера msconfig, подробнее: Чистая загрузка Windows
  • Удобно отключить ненужные или включить нужные службы можно в программе Autoruns, доступной в Sysinternals Suite или отдельно.
    Службы в приложении Autoruns

  • Можно использовать (но я бы не стал прямо рекомендовать) сторонние программы «оптимизации» служб, такие как Easy Service Optimizer

I apologize for my presumption,  but thought it was a cool title 😉

Some days ago, I was reflecting on the SeRestorePrivilege and wondering if a user with this privilege could alter a Service Access, for example: grant to everyone the right to stop/start the service,  during a “restore” task.  (don’t expect some cool bypass or exploit here)

As you probably know, each object in Windows has DACL’s & SACL’s which can be configured. The most “intuitive” are obviously files and folder permissions but there are a plenty of other securable objects (https://docs.microsoft.com/en-us/windows/desktop/secauthz/securable-objects)

Given that  our goal is Service permissions, first we will  try to understand how they work and how we can manipulate them.

Service security can be split into 2 parts:

  • Access Rights for the Service Control Manager
  • Access Rights for a Service

We will focus on  Access Rights for the service, which means who can start/stop/pause service and so on. For detailed explanation take a look at this article from Microsoft: https://docs.microsoft.com/it-it/windows/desktop/Services/service-security-and-access-rights

How can we  change the service security settings?

Configuring Service Security and Access Rights is not so an immediate task like, for example, changing DACL’s of file or folder objects. Keep also in mind that it is limited only to privileged users like Administrators and SYSTEM account.

There are some built-in and third party tools which permits changing the DACL’s of a service, for example:

Windows “sc.exe”.  This program has a lot of options and with “sdset” it is possible to modifiy the security setting of a service, but you have to specify it in the cryptic SDDL (Security Description Definition Language). The opposite command “sdshow” will list the SDDL:

sddl2

Note that interactive user (IU) cannot start or stop the BITS service because the necessary rights (RP,WP) are missing. I’m not going to explain in deep this stuff, if interested look here: https://support.microsoft.com/en-us/help/914392/best-practices-and-guidance-for-writers-of-service-discretionary-acces

subinacl.exe from Windows Resource Kit.  This one is much more easier to use. In this example we will grant to everyone the right to start the BITS (Backgound intelligent transfer service)

subinacl

Service Security Editor , a free GUI Utility to set permissions for any Windows Service:

servicesec

And of course, via Group Policy, powershell, etc..

All these tools and utilities relies on this Windows API call, accessible only to high privileged users:

BOOL SetServiceObjectSecurity(
SC_HANDLE hService, 
SECURITY_INFORMATION dwSecurityInformation, 
PSECURITY_DESCRIPTOR lpSecurityDescriptor 
);

Where are the service security settings stored?

Good question! First of all, we have to keep in mind that services have a “default” configuration: Administrators have full control, standard users can only interrogate the service, etc..  Services with non default configuration have their settings stored in the registry under this subkey:

HKLM\System\CurrentControlSet\Services\<servicename>\security

This subkey hosts a REG_BINARY key which is the binary value of the security settings:

regsec.JPG

These “non default” registry settings are read when the Service Control Manager starts (upon boot) and stored in memory.  If we change the service security settings with one of the tools we mentioned before, changes are immediately applied and  stored in memory. During the shutdown process, the new registry values are written.

And the Restore Privilege?

You got it! With the SeRestorePrivilege, even if  we cannot use the  SetServiceObjectSecurity API call, we can restore registry keys, including the security subkey…

Let’s make an example:  we want to grant to everyone full control over BITS service

On our Windows test machine, we just modify the settings with one of the tools:

After that, we restart our box and copy the new  binary value of the security key:

bitsfull

Now that we have the right values, we just need to “restore” the security key with these.  For this purpose we are going to use a small “C” program, here the relevant part:

byte data[] = { 0x01, 0x00, 0x14, 0x80, 0xa4, 0x00, 0x00, 0x00, 0xb4, 0x00, 0x00, 0x00, 0x14, 0x00, 0x00, 0x00, 0x34, 0x00, 0x00, 0x00, 0x02, 
0x00, 0x20, 0x00, 0x01, 0x00, 0x00, 0x00, 0x02, 0xc0, 0x18, 0x00, 0x00, 0x00, 0x0c, 0x00, 0x01, 0x02, 0x00, 0x00, 0x00, 0x00, 0x00, 0x05, 0x20, 0x00, 
0x00, 0x00, 0x20, 0x02, 0x00, 0x00, 0x02, 0x00, 0x70, 0x00, 0x05, 0x00, 0x00, 0x00, 0x00, 0x02, 0x14, 0x00, 0xff, 0x01, 0x0f, 0x00, 0x01, 0x01, 0x00, 
0x00, 0x00, 0x00, 0x00, 0x05, 0x12, 0x00, 0x00, 0x00, 0x00, 0x00, 0x18, 0x00, 0xff, 0x01, 0x0f, 0x00, 0x01, 0x02, 0x00, 0x00, 0x00, 0x00, 0x00, 0x05, 
0x20, 0x00, 0x00, 0x00, 0x20, 0x02, 0x00, 0x00, 0x00, 0x00, 0x14, 0x00, 0xff, 0x01, 0x0f, 0x00, 0x01, 0x01, 0x00, 0x00, 0x00, 0x00, 0x00, 0x01, 0x00, 
0x00, 0x00, 0x00, 0x00, 0x00, 0x14, 0x00, 0x8d, 0x01, 0x02, 0x00, 0x01, 0x01, 0x00, 0x00, 0x00, 0x00, 0x00, 0x05, 0x04, 0x00, 0x00, 0x00, 0x00, 0x00, 
0x14, 0x00, 0x8d, 0x01, 0x02, 0x00, 0x01, 0x01, 0x00, 0x00, 0x00, 0x00, 0x00, 0x05, 0x06, 0x00, 0x00, 0x00, 0x01, 0x02, 0x00, 0x00, 0x00, 0x00, 0x00, 
0x05, 0x20, 0x00, 0x00, 0x00, 0x20, 0x02, 0x00, 0x00, 0x01, 0x02, 0x00, 0x00, 0x00, 0x00, 0x00, 0x05, 0x20, 0x00, 0x00, 0x00, 0x20, 0x02, 0x00, 0x00 };
LSTATUS stat = RegCreateKeyExA(HKEY_LOCAL_MACHINE,
               "SYSTEM\\CurrentControlSet\\Services\\BITS\\Security",
               0,
               NULL,
               REG_OPTION_BACKUP_RESTORE,
               KEY_SET_VALUE,
               NULL,
               &hk,
               NULL);
stat = RegSetValueExA(hk, "security", 0, 
       REG_BINARY, (const BYTE*)data,sizeof(data));
if (stat != ERROR_SUCCESS) {
     printf("[-] Failed writing!", stat);
     exit(EXIT_FAILURE);
}
printf("Setting registry OK\n");

We need of course to enable  the SE_RESTORE_NAME privilege before in our process token.

In an elevated shell, we execute the binary on the victim machine:

restorebits1

and after the reboot we are able to start BITS even with a low privileged user:

restorebits2

And the Take Onwer Privilege?

The concept is the same, we need to take the ownership of the registry key before, grant the necessary access rights (SetNamedSecuityInfo() API calls) on the key and then do the same trick we have seen before.

But wait, one moment! What if we take the onwersip of the service?

dwRes = SetNamedSecurityInfoW(
        L"BITS", 
        SE_SERVICE, 
        OWNER_SECURITY_INFORMATION,
        takeownerboss_sid, 
        NULL,
        NULL,
        NULL);

Yes, this works, but when we set the permissions on the object (again with SetNamedSecurityInfo) we get an error. If we do this with admin rights, it works…

Probably the function will call the underlying SetServiceObjectSecurity which modifies the permissions of the service stored “in memory” and this is precluded to non admins.

Final thoughts

So we were able to change the Service Access Rights with our “restoreboss” user. Nothing really useful i think, but sometimes it’s  just fun  to try to understand some parts of the Windows internal mechanism, do you agree?

Understanding Windows Update Registry Settings

This article aims to help readers better understand where devices are pulling their Windows updates from based on the Windows Update registry settings on the local device. We will cover some of the various states the policy can be in, including Windows Server Update Services (WSUS), Microsoft Configuration Manager (ConfigMgr), Intune, and Co-managed devices.

  • Windows Update Registry Settings are stored in the HKEY_LOCAL_MACHINE\SOFTWARE\Policies\Microsoft\Windows\WindowsUpdate registry key
  • In all scenarios, we need to cover the four different topics:
    • How the registry keys are controlled
    • Where the device get its Updates from
    • What Updates are applied
    • When these Updates apply

Reviewing the registry values will allow you to quickly identify the client’s state and take appropriate troubleshooting or remediation actions.

With all of the registry settings in this article, it’s important to understand where the policy is controlled. It’s better to modify the policy controlling the registry keys instead of directly modifying the keys. Modifying the registry keys with a policy applied will likely revert back once the policy refreshes again.

This article will not cover Delivery Optimization. We will primarily focus on these updates as they are downloaded from WSUS, ConfigMgr, or Intune.

Windows Server Update Services registry settings:

When utilizing a WSUS Server, Group Policy typically handles WSUS registry settings.

You can control most aspects of how the Windows Update registry settings are set up here.

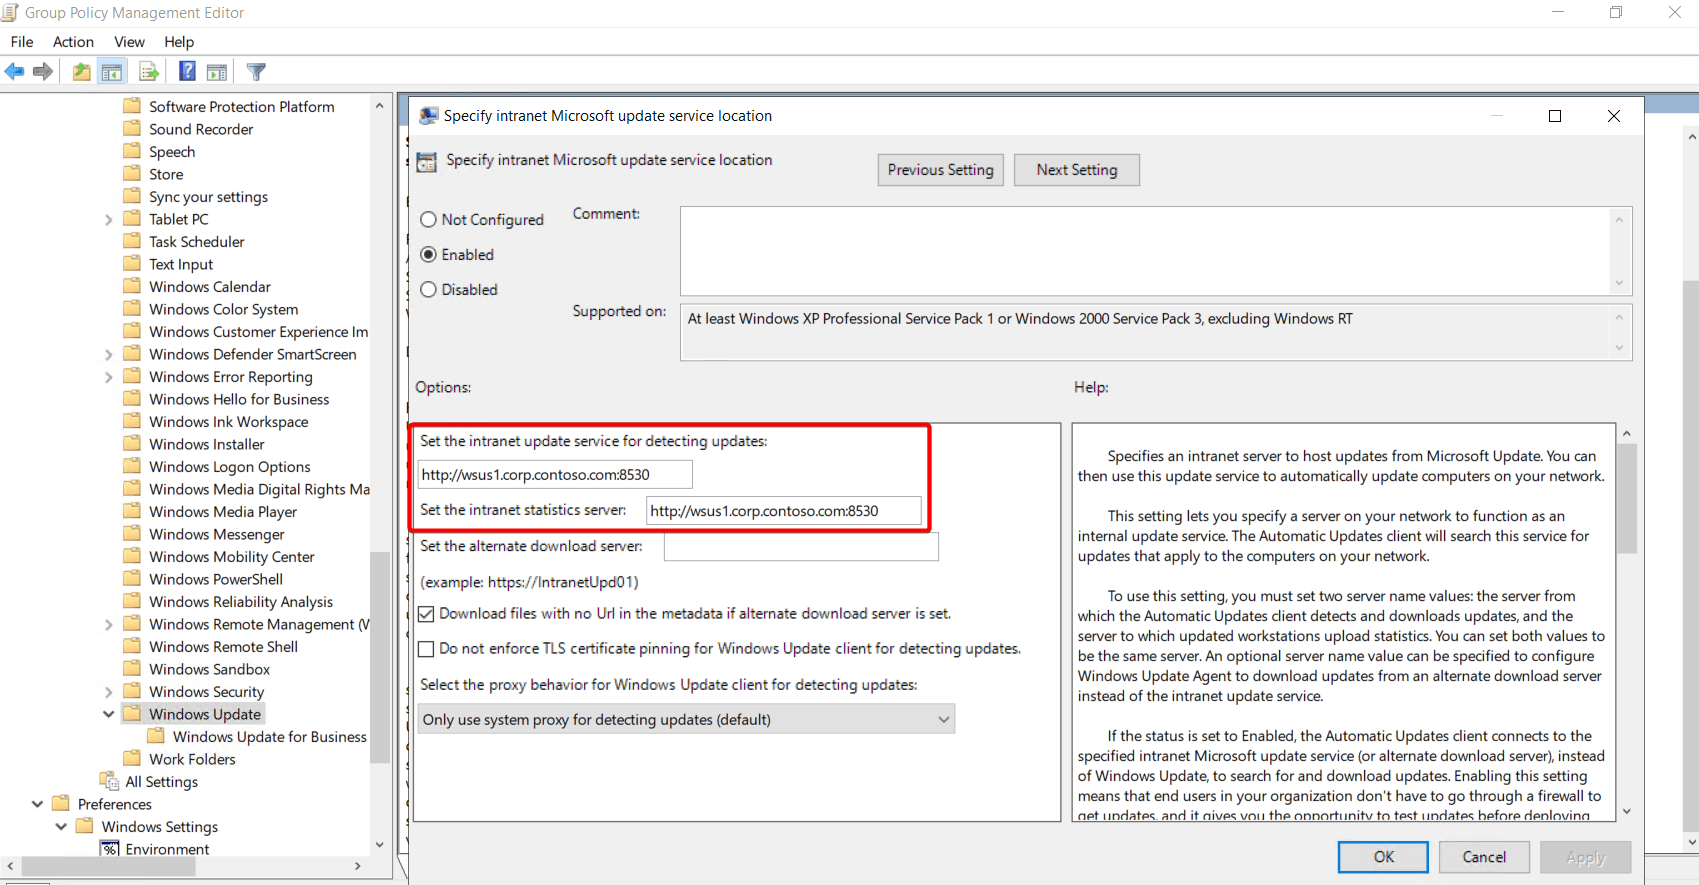
  • The Windows Update registry keys can be configured by policy here: Group Policy Management Editor > Computer Configuration > Policies > Administrative Templates > Windows Components > Windows Update.

    We will use the WSUS server: wsus1.corp.contoso.com

Group Policy Management

In the WindowsUpdate.log, we can see the MoUpdateOrchestrator handles the download:

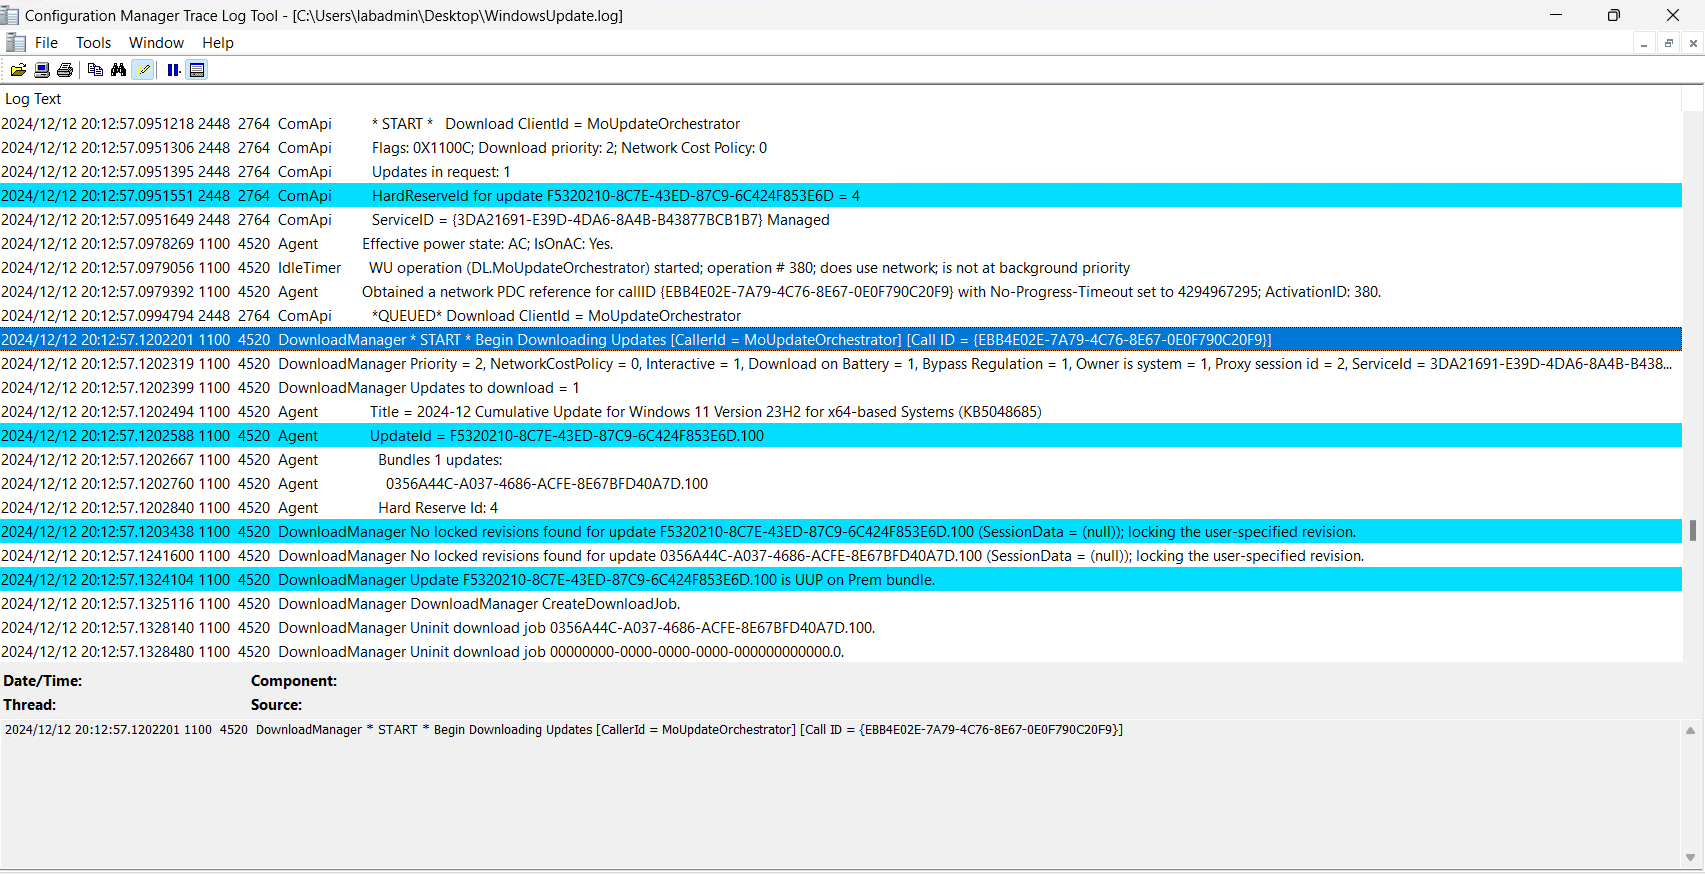
  • More information on how the MoUpdateOrchestrator works can be found here.
  • In the WindowsUpdate.log, we can see the DownloadManager is utilizing the registry settings controlled by the policy above.
DownloadManager using WUServer

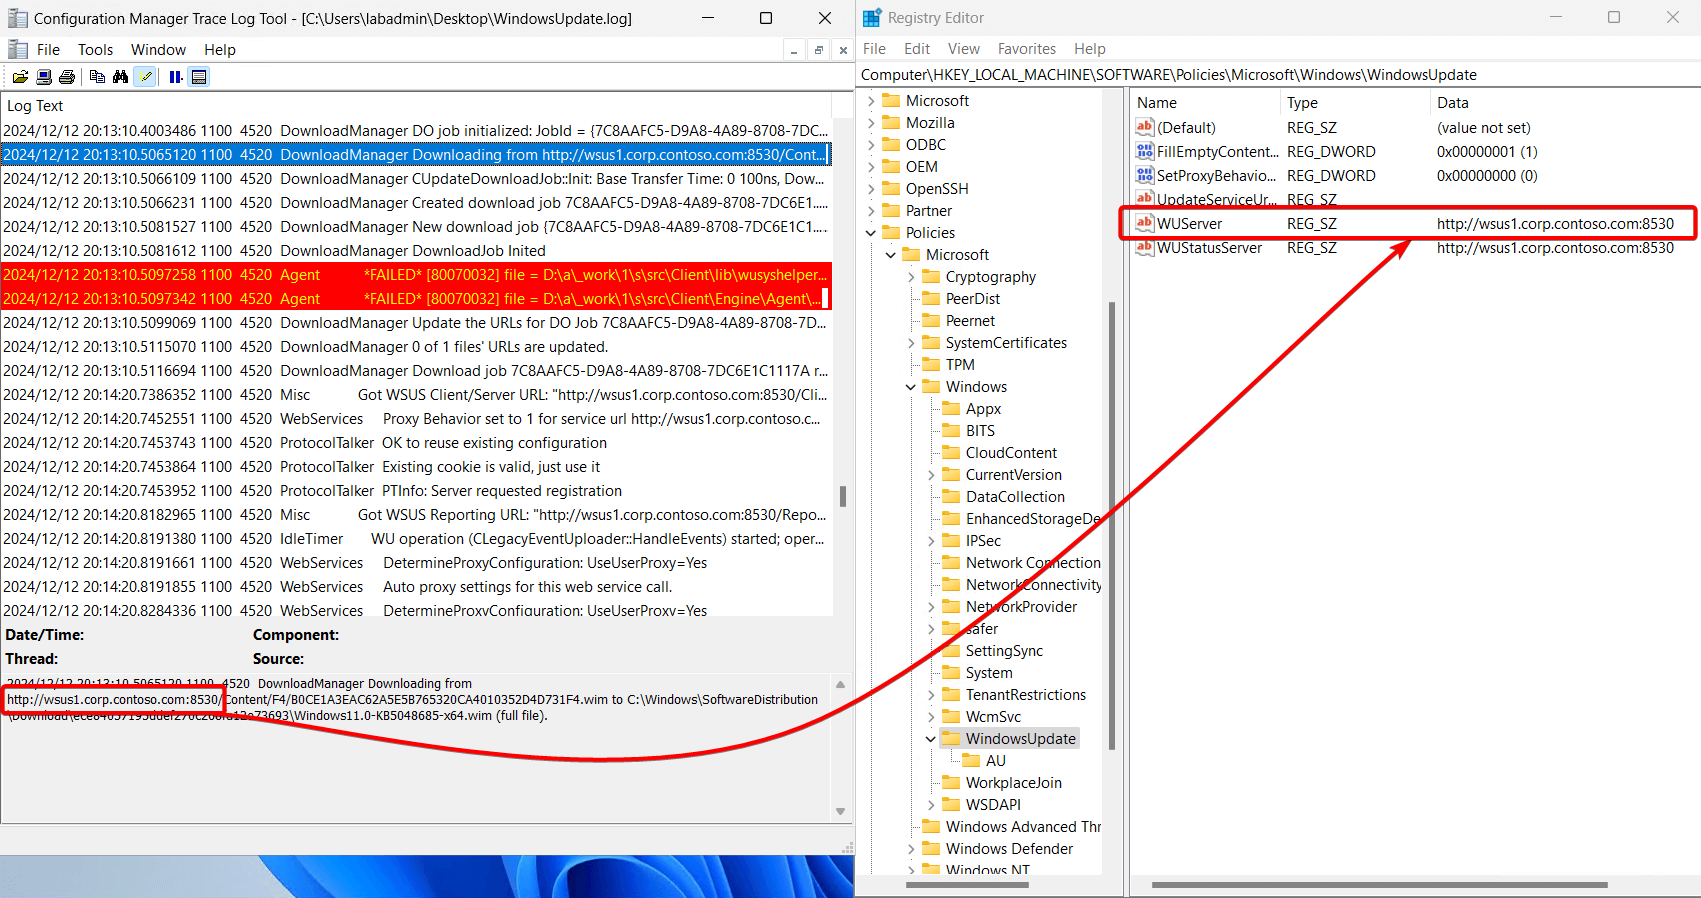
  • When the system checks in with WSUS, there is a check to see where content is going to be downloaded from; in this case, we download directly from wsus1.corp.contoso.com
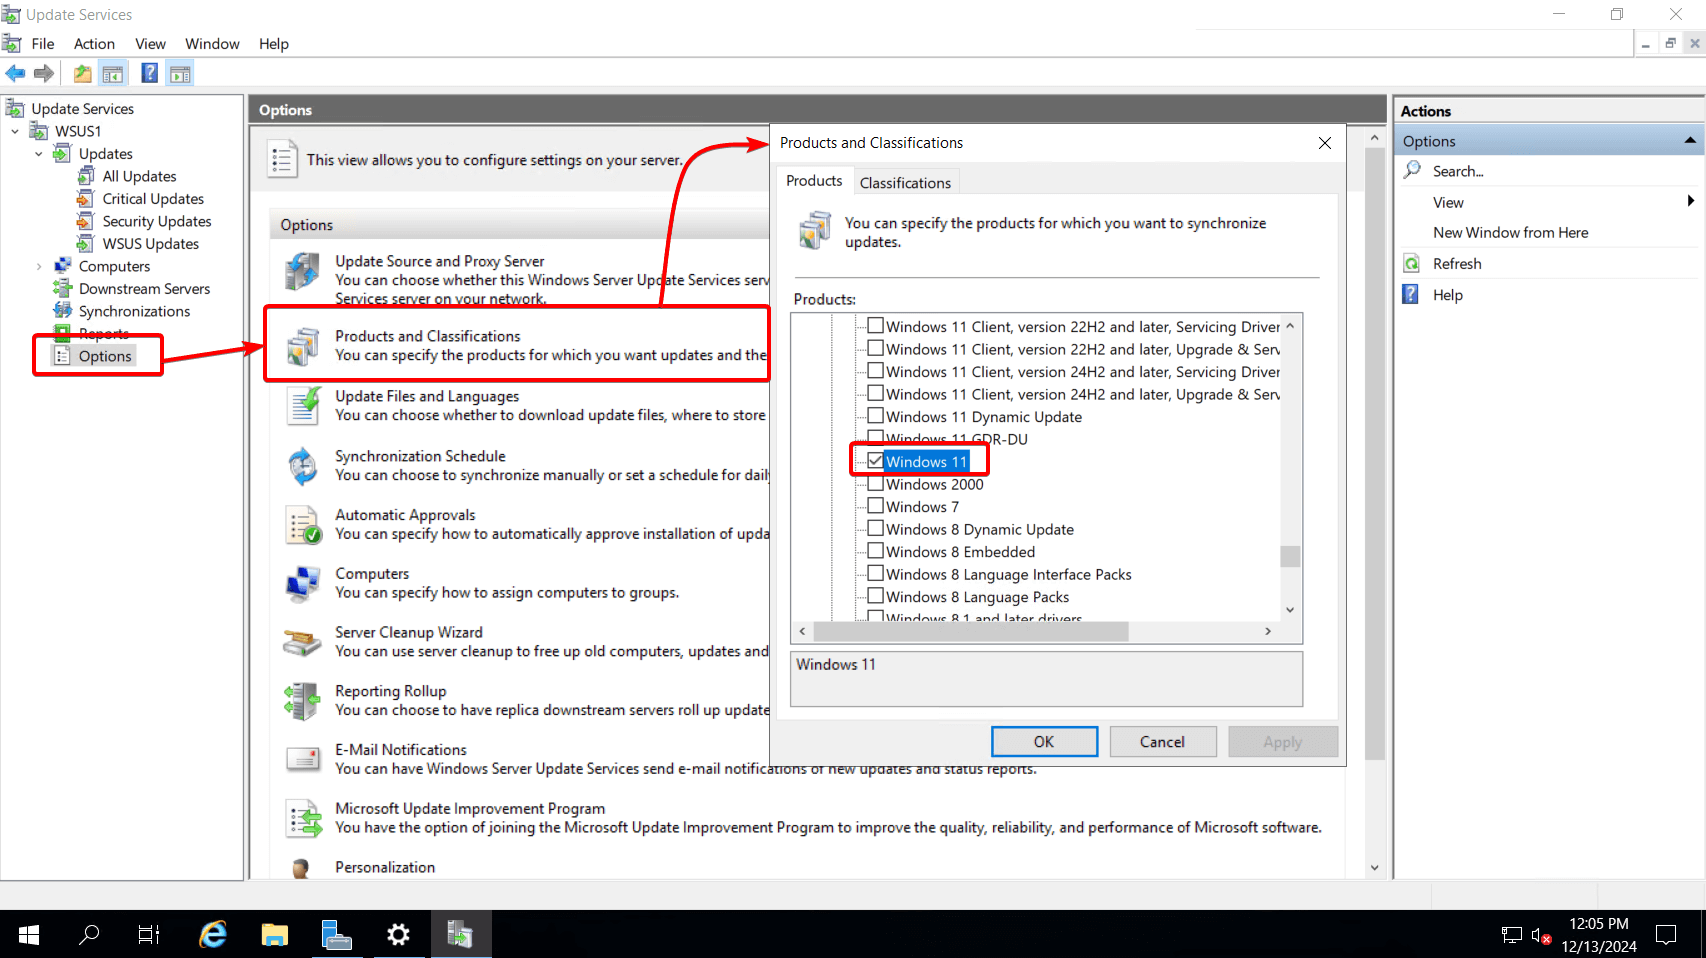
  • To specify which products get installed through WSUS, you need to enable them in Windows Server Update Services > Options > Products and Classifications.
In this example, only Windows 11 updates were enabled and approved.

  • The updates must also be “Approved” either by modifying your “Automatic Approvals” or manually.
  • Alternatively, to save time, you can add third-party updates to WSUS from Patch My PC using the publisher.

Configuring WSUS to automatically download and install the Windows Updates can be configured by Group Policy (notice WSUS Settings is the winning GPO) as well:

  • The registry settings for Automatic Updates are listed here:HKEY_LOCAL_MACHINE\SOFTWARE\Policies\Microsoft\Windows\WindowsUpdate\AU
gpresult vs registry

  • The current settings being utilized lined up with the Group Policy applied.
  • You can automate the updates. However, there are limitations such as maintenance windows, update rings, scheduling reboots, and targeting specific updates. You could, in theory, control most of these options, but it’s a pain to maintain.

Microsoft Configuration Manager registry settings:

Clients will receive their policy from the Client Settings in ConfigMgr when utilizing a ConfigMgr Software Update Point. The Windows Update registry keys can be configured by the policy in Configuration Manager Console > Administration > Client Settings > Software Updates.

  • In this example, we will use the Software Update Point: cm1.corp.contoso.com

Enable Software Updates on clients = Yes

  • Whether the “Install All” button is pushed or the updates are automatically downloaded and applied, the registry entries tell the client to update from your software update point.

HKEY_LOCAL_MACHINESOFTWAREPoliciesMicrosoftWindowsWindowsUpdate with Client Settings Applied

  • Important: Group Policy Objects will override Client Settings and can cause issues with Software Updates. It’s recommended to disable any GPO modifying the Windows Update policies on the client and allow the Client Settings to take effect. Notice here the Winning GPO is Local Group Policy (ie, the settings are coming from ConfigMgr):

Client Settings vs gpresult vs reg settings

  • In the WindowsUpdate.log, we can see the download is handled by CcmExec:

the download is handled by ccmexe as shown in the windowsupdate.log

  • To specify what products get installed through ConfigMgr, you need to deploy the Software Updates either manually or through an Automatic Deployment Rule (ADR). We have an excellent video on how to set these up: How to Deploy Software Updates Using Microsoft SCCM (ADRs, Update Groups, and More)

  • In the lab, these are the options that were selected:

Automatic Deployment Rule data-lazy-src=

The updates and deployments run through various states depending on the deployment settings (forgive my lack of Visio skills). It will look something like this:

Flowchart for Software Updates assigned to a computer

  • Important: A maintenance window check is applied when installing updates; if a maintenance window is not open, the computer will wait for its opening before installing the updates.

  • All of this is handled in ConfigMgr and not shown within the HKEY_LOCAL_MACHINE\SOFTWARE\Policies\Microsoft\Windows\WindowsUpdate\AU key.

Windows Update Registry Settings showing the windowsupdate\au registr key

Intune registry settings:

  • When utilizing Intune, Windows Updates are controlled through Devices > Windows Updates:

intune Windows Updates

  • For Intune Only devices, the registry keys are somewhere completely different. HKEY_LOCAL_MACHINE\SOFTWARE\Microsoft\PolicyManager\current\device\Update

    • Unless a Group Policy or an old ConfigMgr policy is applied for Intune devices, HKEY_LOCAL_MACHINE\SOFTWARE\Policies\Microsoft\Windows\WindowsUpdate is completely blank and doesn’t exist.
HKEY_LOCAL_MACHINE\SOFTWARE\Microsoft\PolicyManager\current\device\Update

  • All of these registry keys can be modified, however: when the Intune Management Extension checks in again the settings will be reverted. Modifying the settings from the Intune console is always recommended instead of manually changing them.

  • Reference this Microsoft Article on how to Troubleshoot Update Rings

In the WindowsUpdate.log, we can see the download is handled by the MoUpdateOrchestrator (same as WSUS):

  • However, this time, the update is being downloaded directly from Microsoft

When it comes to what Updates are going to apply, this depends on the Microsoft Subscription. Update rings, feature updates, quality updates, and driver updates are all applied to different tabs. Prerequisites for Autopatch, including licensing, can be found here.

It looks something like this:

In Intune, you can schedule a delay for these updates, and the reg keys at HKEY_LOCAL_MACHINE\SOFTWARE\Microsoft\PolicyManager\current\device\Update will reflect any policy changes made. However, there are no maintenance windows available. The IME agent checks in once a day and will automatically download and install the updates as needed based on policy.

Understanding PolicyState for Update Policies

Another critical registry key to examine during troubleshooting is:
HKEY_LOCAL_MACHINE\SOFTWARE\Microsoft\WindowsUpdate\UpdatePolicy\PolicyState.

This key provides essential details about the active Windows Update policies on the device, including:

  • PolicySource: Identifies whether the policy is managed by MDM, Group Policy, or another source.

  • PolicyApplication: Confirms whether the policy has been successfully applied.

  • Policy Settings and Values: Displays the active policies, their configurations, and potential conflicts.

Windows Update Registry Settings showing the policystate and policysources

This is particularly useful for diagnosing devices impacted by updates such as KB4023057, which can reset MDM-managed devices to display as “Managed by Group Policy.” For example, if the device unexpectedly falls under Group Policy control, the PolicySource value will confirm the origin of the applied policies.

Administrators can use this key to quickly identify conflicts or mismatches in update management, making it an essential part of any troubleshooting process

Co-managed registry settings Part 1:

Co-Managment is where things start to get a bit strange. Let’s unpack it. This is where my current workload settings are for my test device.

It’s important to note that the registry changes will take effect on the device once the Windows Update policies are directed to Intune for that specific device. The registry keys remain the same whether the device is part of the Pilot Intune collection or if the slider is set fully to Intune for Windows Update Policies. Using the Pilot Intune setting is ideal for testing, as it only applies to the devices included in the collection under the “Staging” tab.

We have an excellent blog on Dual Scan. The purpose of this blog is to help users quickly identify where updates are coming from just by looking at the registry. However, the SCCM client will leave registry entries behind.

The first thing that usually catches my eye are these options here in HKEY_LOCAL_MACHINE\SOFTWARE\Policies\Microsoft\Windows\WindowsUpdate

If the following keys are set to zero, the device pulls these from Windows Update (Intune). According to Microsoft, “If no policies are configured: All of your updates will come from Windows Update.”

Again, going into the registry editor and editing the keys is not recommended. You can do it, but more often than not, the policy controlling these settings will just revert the settings that were manually changed. With the settings above, ConfigMgr is controlling these keys but the gpresult will show “Local Group Policy” as the winning policy.

But on this same device, we can review the HKEY_LOCAL_MACHINE\SOFTWARE\Microsoft\PolicyManager\current\device\Update location and see all of the Intune registry keys.

PolicyManager\current\device\Update  registry location showing the policies

Looking at the WindowsUpdate.log, we can see the MoUpdateOrchestrator is taking over again.

Co-managed registry settings Part 2

To save myself from confusion later, the Client Policy was changed to Not Allow ConfigMgr to run Software Updates on Clients. After doing so, HKEY_LOCAL_MACHINE\SOFTWARE\Policies\Microsoft\Windows\WindowsUpdate was completely removed.

When Configuring Co-Management, you lose the ability to run third-party updates (unless you utilize dual scan). First-party (Microsoft) updates will work because they are downloaded directly from Microsoft. If you want third-party updates and plan on migrating workloads to Intune, enable the ClientApps workload for the same collection as your Windows Update policies. This way, if Patch My PC is building your updates in Intune, no loss of third-party patching will occur.

 enable the ClientApps workload

Summary

As you attempt to identify where the updates are coming from, run a group policy to see how these registry values are being controlled.

  • HKEY_LOCAL_MACHINESOFTWAREPoliciesMicrosoftWindowsWindowsUpdate

    This location is primarily used for WSUS or ConfigMgr

  • HKEY_LOCAL_MACHINESOFTWAREMicrosoftPolicyManagercurrentdeviceUpdate

    This location is primarily used for Intune

Check the Windows Update Log (WindowsUpdate.log)

We’ve explored how Windows Update policies are managed across WSUS, ConfigMgr, Intune, and co-managed devices by understanding the role of registry keys. We’ve seen how to identify where updates are coming from, when they’re applied, and how they’re controlled, all while emphasizing the importance of letting policies govern these settings to avoid conflicts. By focusing on the registry paths, logs, and policy structures, we can effectively troubleshoot and manage updates without introducing unnecessary complications. This knowledge empowers us to maintain a smooth update process tailored to any organization’s needs.

If you’re looking for a faster, hassle-free way to manage application updates, Patch My PC can help. Our affordable solution simplifies app deployment, ensuring your environment stays secure and up to date with minimal effort. Book a demo today to see it in action!

  • Home
  • Windows Services FAQ

Helpful tips for managing your Microsoft Windows 11/10 & Server 2025/2022/2019/2016 Services

GENERAL

  1. What is a Windows Service?

  2. How do I manage a Windows Service?

  3. Where are Windows Services stored/located?

  4. How do I find the name of a Windows Service?

  5. Where can I find the logs for a Windows Service?

  6. How do I start/stop a Windows Service from the command line?

  7. How do I disable a Windows Service from the command line?

  8. How do I remove/delete a Windows Service?

  9. How do I prevent a Windows Service from running?

  10. How do I start (or stop) my Windows Service at a particular time?

  11. How do I grant an account the «Log on as a service» right?

  12. How can I grant a user the right to start/stop/restart a service?

  13. How do I add a dependency to a service?

  14. How do I set the description of a service?

  15. How do I set the executable of a service?

  16. How do I export a list of the Windows Services installed on my server?

  17. Can a Windows Service access a mapped drive?

  18. When should I use a scheduled task instead of a Windows Service?

  19. Can I use SC to install my executable to run as a Windows Service?

  20. How can my Windows Service access an ODBC connection?

  21. Are Windows Services available on UNIX/Linux?

  22. What is an elevated/administrative command prompt? How do I start one?

TROUBLESHOOTING

  1. My service is stuck in the «Stop Pending» (or «Start Pending») state. How do I stop it?

  2. My Windows Service fails to start (or stops working unexpectedly). How do I figure out what’s wrong?

  3. My application works when I run it normally but it fails when started from a Windows Service. What is the problem?

  4. Why doesn’t my Windows Service start automatically after a reboot?

  5. The Stop button is greyed out. How do I stop the service?

  6. My service is disabled. How do I start it?

EVOLUTION

  1. What changed in Windows Vista (2006)?

  2. What changed in Windows Server 2008?

  3. What changed in Windows 7 and Windows Server 2008 R2 (2009)?

  4. What changed in Windows 8 and Windows Server 2012?

  5. What is Session 0 Isolation?

  6. How do I switch to Session 0 from the Command Line?

  7. Why doesn’t «Allow service to interact with desktop» work on Windows 11/10 or Server 2025/2022/2019/2016?

  8. How can I start my non-service application in Session 0?

  9. What does it mean to start my service Automatic (Delayed Start)?

  10. How do I adjust when «Automatic (Delayed start)» start?

  11. What are «Trigger Start Services»?

ERRORS

  1. Windows Service Error 5: Access is denied

  2. Windows Service Error 1053: The service did not respond to the start or control request in a
    timely fashion

  3. Windows Service Error 1061: The service cannot accept control messages at this time

  4. Windows Service Error 1067: The process terminated unexpectedly

  5. Windows Service Error 1068: The dependency service or group failed to start

  6. Windows Service Error 1069: The service did not start due to a logon failure

  7. Windows Service Error 1072: The specified service has been marked for deletion

MICROSOFT SRVANY

  1. What is Srvany?

  2. What is Instsrv?

  3. Where can I download Srvany and Instsrv?

  4. How do I use Srvany to run my application as a service?

  5. Is there a new version of Srvany for Windows Server 2008? For Windows 7?

  6. Is Srvany supported on Windows Server 2008? Windows 7?

  7. Is Srvany supported on Windows Server 2012? Windows 8/8.1?

  8. Is Srvany supported on Windows 10? Windows Server 2019?

  9. Is Srvany supported on 64-bit Windows?

  10. Will Srvany close my application when I stop the service?

  11. How do I remove a Srvany service?

  12. If my program crashes, will Srvany start it again?

  13. Can I use Srvany to run multiple applications on a single server?

  14. Why can’t my application access mapped drives when run with Srvany?

INTERACTIVE / GUI SERVICES

  1. Can a Windows Service have a GUI? Should a Windows Service have a GUI?

  2. Can a Windows Service start a GUI application?

  3. Why won’t the Interactive Service Detection service start on Windows 8 and Windows Server 2012?

  4. How do I disable/suppress the Interactive Services Detection Dialog?

  5. Why can’t I switch to Session 0 on Windows 10?

ADDITIONAL HELP

  1. My question has not been answered here. Can you please help?


  1. What is a Windows Service?

    A Windows Service is an advanced component/feature of Microsoft Windows that supports the management of
    long running, background processes and applications.

    Unlike regular programs that are started by a user and run only while that user is logged on,
    a Windows Service can start before any user logs on and can continue to run even after all users have logged off.

    Windows Services are ideal for software that must start automatically when the computer boots.

    A Windows Service is conceptually similar to a
    UNIX daemon.

  2. How do I manage a Windows Service?

    You can manage Windows Services using the Windows Services control panel applet. To start the applet, either:

    • Choose Start > Control Panel > Administrative Tools > Services; or
    • Run «services.msc» from Start > Run…

    The applet lists the Windows Services installed on your computer:

    Windows Services Control Panel Applet

    Double-click an entry to reveal its specific properties. Here’s the «Schedule» service (which operates the Windows Task Scheduler):

    Task Scheduler Windows Service Properties

    You can start, stop, pause or resume the service as appropriate.
    You can also change the settings, such as the startup type (Automatic or Manual) or the log on account (on the Log On tab), etc.

  3. Where are Windows Services stored/located?

    Services are stored in the
    Windows Registry
    — a hierarchical key-value database that’s an integral part of the operating system.
    You can access the registry using the Registry Editor (started by running the regedit command).

    In the Registry Editor, you will find services under this key:

    \HKEY_LOCAL_MACHINE\SYSTEM\CurrentControlSet\Services

    And each service will reside in a sub-key with its name.

    For example, here are the settings for the Print Spooler service (which is named «Spooler»):

    Regedit: Spooler Service Key

  4. How do I find the name of a Windows Service?

    This 50-second video shows how to find the name of a Windows Service:

    You can find the name of your service using the Windows Services control panel applet. To start the applet, either:

    • Choose Start > Control Panel > Administrative Tools > Services; or
    • Run «services.msc» from Start > Run…

    The window that comes up lists all the Windows Services installed on your PC:

    Windows Services Control Panel Applet (Windows Server 2012)

    Find the service you’re interested in and double-click the entry to open its specific properties.
    The service’s name will be shown near the top of the Properties window.
    Here we can see that the name of the Print Spooler Windows Service is actually «Spooler»:

    Windows Services Control Panel Applet Properties (Windows Server 2012)

  5. Where can I find the logs for a Windows Service?

    Much like a regular application, a Windows Service can write its logs anywhere. Or it can choose not to write logs at all!

    However, the convention is for services is to report errors, warnings and pertinent information to the Windows Event Logs.
    You can inspect those entries using the
    Windows Event Viewer.

    To find the messages reported by a particular service:

    1. Start the Event Viewer (from the Control Panel, or by running eventvwr.msc)

    2. Navigate to the Windows Logs > Application section (on the left)

    3. In the center panel, look for entries where the Source is the name of your service

    For example, here is a message from the Volume Shadow Copy (VSS) service:

    VSS service log message

  6. How do I start/stop a Windows Service from the command line?

    You can use the NET command to start and stop any Windows Service from a DOS prompt.

    To start a service named «MyService», you would execute:

    NET START MyService

    To stop the same service, run:

    NET STOP MyService

    Be sure to enclose the service name in quotes if it contains spaces.

    Note that only users with administrative privileges will be able to run the NET command.

  7. How do I disable a Windows Service from the command line?

    To disable a service, use the
    SC command.

    Run it like this:

    SC config <Service-Name> start= disabled

    where <Service-Name> is the name of the service.
    Be sure to enclose the name in quotes if it contains a space!

    For example, to disable the Bluetooth Support Service (whose name is «bthserv»), run:

    SC config bthserv start= disabled

    Note that space after the «start=» is important. The command will fail if you omit it.

    Also note that disabling a service will not stop it.
    Issue a NET STOP, either before or after disabling, to shut down the service.

    Note: If you’re not comfortable working from the command prompt, this short video shows how to disable a Windows Service using the Services GUI application:

  8. How do I remove/delete a Windows Service?

    You can delete a service with the
    SC command.
    Use it like this to remove a service called «MyService»:

    SC delete MyService

    Enclose the service name in quotes if it contains spaces.

    Beware: You can do serious damage to your operating system if you delete a critical service. Proceed with caution!

  9. How do I prevent a Windows Service from running?

    Most services are set to start automatically when Windows boots. These will show up with a Startup type of Automatic (or Automatic (Delayed Start))
    in the Services application:

    Windows Services Control Panel: Startup Type

    If starting at boot is not acceptable, you can change the Startup type to one of the following:

    • Manual — The service should only start on demand, when explicitly requested to do so by a user (or by an application).
      This is the appropriate choice when you want to start and stop the service yourself.
    • Disabled — The service cannot be started by any user or program. Choose this option to totally disallow the service from running.
      But be sure not to disable any important Windows Services!

    Of course, deleting a service
    is another way to prevent it from running. But that’s only recommended if you know what you’re doing and can take full responsibility for the consequences!

  10. How do I start (or stop) my Windows Service at a particular time?

    Use the
    Windows Task Scheduler
    to create a scheduled task running the
    NET command
    to start/stop the service at a time of your choosing.

    For example, suppose you have a backup that runs every Saturday from 8-10 PM and you wish to stop your service during that period.
    You would create two scheduled tasks — one to stop the service at 8 and another to start it at 10.

    The task to stop the service would run this command:

    NET STOP «service-name»

    The task to start it up again would execute:

    NET START «service-name»

    In both cases, «service-name» is the name of your service as shown in the Control Panel Services application.

    Follow this tutorial to create a scheduled task.

    September 2022: Our new (and completely free) Service Scheduler utility
    will help you start, stop or restart your service whenever you like.

    Simply choose your service, select the operation and set your time — that’s it:

    Service Scheduler

  11. How do I grant an account the «Log on as a service» right?

    If you want to run a Windows Service in a user account — by specifying the account on the service’s Log on tab —
    you should make sure that the account has the «Log on as a service» right. If not, the service will fail to start with a
    cryptic error like this:

    To ensure that your user/account has the «Log on as a service» security policy enabled:

    1. Run «secpol.msc» to start the Local Security Policy application.

    2. In the left panel, navigate to Local Policies > User Rights Assignment.

    3. You’ll see the list of policies on the right sorted by name.
      Scroll down to find Log on as a service and double-click the entry to open its properties:

      Local Security Policy: Log on as a service

    4. In the Log on as a service Properties window, click the Add User or Group button and enter your user account.

      We added Mike, who’s an administrator on our machine:

      Local Security Policy: Add log on as a service

    5. Click OK to save your changes. You can close the Local Security Policy application as well.

    For domain accounts, update the Group Policy too

    Do you want your service to run in a domain account? Then you should grant the «Log on as a service» right in the
    Group Policy application as well.
    If not, you’ll encounter the
    login failed
    error sometime in the future — after the group policy overwrites the local policy.

    Follow the step-by-step instructions in this article
    to update the group policy.

  12. How can I grant a user the right to start/stop/restart a service?

    Every Windows Service has an
    Access Control List (ACL)
    recording who’s allowed to start, stop or restart it.
    Here are three ways to manipulate a service’s ACL to grant or deny specific rights:


    1. Use Service Security Editor

      a free point-and-click GUI tool for adjusting any service’s rights. Simply select the service, identify the user, and specify the operations that he is allowed to perform.

    2. Use the SC command line tool, as described in
      this tutorial.
      However working with SC can be very complicated, involving the composition of lengthy, hand-crafted command lines. It’s not recommended for the faint-hearted!

    3. Use the SubInACL command line utility, available for
      download from Microsoft
      and
      documented in Method 3 on this Windows Support page.
      It’s easier to use than SC but still requires careful attention.

      For example, if you have a user called «MikeJones» in the «SANFRAN» domain that you want to start and stop the «Print Spooler» service, you would run:

      SubInACL.exe /service Spooler /GRANT=SANFRAN\MikeJones=TO

  13. How do I add a dependency to a service?

    The SC command can set the dependencies on a given service. Use it like this:

    SC CONFIG <service-name> depend= <service-1>[/<service-2>/…/<service-N>]

    where <service-name> is the
    name of the service
    you wish to change, and <service-1> to <service-N> are the names of the dependent services.
    Note: The space after «depend=» is required, so don’t forget it.

    For example, to add the Windows Firewall as a dependency of the Google Update Service (so that the firewall is always running when updating Google’s software), you would:

    1. Open services.msc and find the service name of the Google Update Service. It’s «gupdate».

      Google Update Service Properties

    2. Switch to the Dependencies tab and make a note of the services already there. Find their names. There is only one, the Remote Procedure Call service, named «RpcLocator».
      This is necessary because we don’t want to lose the existing dependencies.

      Google Update Service Dependencies

    3. Find the name of the Windows Firewall service. It’s «MpsSvc».

      Windows Firewall Service Properties

    4. Use the SC command to update the dependencies of the Google Update Service to include the Windows Firewall service. The command line is:

      SC CONFIG gupdate depend= RpcLocator/MpsSvc

      Be sure to run it from an elevated command prompt:

      Run SC to Set Dependencies

    5. Open the Google Update Service in services.msc and confirm that the dependencies have been updated:

      Google Update Service Dependencies - Updated

  14. How do I set the description of a service?

    You can change a service’s description using the
    SC command. Call it like this:

    SC DESCRIPTION [service-name] [new-description]

    For example, to update the description of the
    Apache Windows Service (named «Apache2.4»), run:

    SC DESCRIPTION Apache2.4 «An excellent open-source HTTP web server»

    Administrative privileges are required to make this change so be sure to run the command from an elevated prompt.

  15. How do I set the executable of a service?

    While it may be tempting to fire up regedit.exe and directly modify the registry keys recording the service under HKEY_LOCAL_MACHINE\System\CurrentControlSet\Services,
    it’s safer to use the
    SC command
    to change the executable invoked by the service.

    To set the executable for a service named «MyService», you would run:

    SC CONFIG MyService binPath= «<The full path to your executable>»

    Note that the oddly placed space separating binPath= from the executable’s path is actually required. Don’t eliminate it!

    And be sure to enclose the path in quotes if it contains a space.

  16. How do I export a list of the Windows Services installed on my server?

    There are a couple of options for exporting your services:

    Option #1: Export to Text or CSV from the Services application

    1. Start the services application (from the Control Panel or by running «services.msc»);

    2. Select Export List from the Action menu;

    3. Specify a file name (and choose Text or CSV format) for the exported services.

    The report will include the following values for each service: Name, Description, Status, Startup Type, Log On As.
    Here’s what a CSV export looks like in Excel:

    Services.msc: CSV export

    Option #2: Export to XML with Windows Service Auditor

    1. Download Windows Service Auditor (it’s free);

    2. Start Windows Service Auditor;

    3. Select Export (XML) from the All Services menu;

    4. Specify a file name for the exported services.

    The file will be in XML format, with a detailed record per service (including dependencies, recovery/failure options, triggers and more):

    Windows Service Auditor: Export services to XML

  17. Can a Windows Service access a mapped drive?

    Yes, but not without employing the proper configuration and doing some extra work.

    A mapped drive exists only in the account in which the mapping was created. Thus the LocalSystem account, the default for all window services, will not «see» any drives mapped into a regular, interactive user account.

    Configuring your service to run in a specific user’s account (via the
    Log On
    setting) has the potential to overcome the problem, but unfortunately persistent network connections are not restored by the service’s non-interactive login.
    To access the drive by letter, your service must explicitly map the network drive by either:

    1. Running the
      NET USE command (something like «NET USE W: \\server\folder» — no password should be necessary), or

    2. Calling the
      WNetAddConnection2 API function if you can modify the code.

    Note that a service can access the drive’s underlying UNC path («\\server\folder») without having to perform the steps above. Consider having your service work with the UNC path instead of the drive letter if you can.

  18. When should I use a scheduled task instead of a Windows Service?

    Using a scheduled task to run your application or batch file may be superior to a Windows Service when:

    1. You want to run at a few, fixed times each day, week or month.

      For example, a batch file that periodically deletes the contents of a temporary folder would be perfect as a scheduled task.
      Services are better suited for running 24/7.

    2. You want to run whenever a user logs in, potentially bypassing the UAC prompt.

      A Windows Service doesn’t provide that capability.

    3. You don’t need error reporting when your application or batch file fails to start.

      Errors from a Windows Service are reported to the Windows Event Log. Scheduled tasks aren’t as good at capturing and reporting errors.

    4. You don’t need to start or stop your application manually.

      Services are easily started and stopped from the services control panel (or from the command line), but there is no such «console» to manage the ad-hoc execution of a scheduled task.

    5. You don’t need to start or stop your task from a remote machine.

      There is no equivalent of «SC \\Server START» and «SC \\Server START STOP» for a scheduled task.

    6. You don’t care about automatically restarting (or taking more elaborate actions) when your application crashes.

      The Task Scheduler doesn’t offer any of the recovery options available to Windows Services.

    In summary, a scheduled task is often better for periodic, maintenance-type chores that don’t demand sophisticated control.

  19. Can I use SC to install my executable to run as a Windows Service?

    Yes, SC will happily install any exe file as a service. However, the executable will only start if it
    is a «true» Windows Service
    — one explicitly constructed to interface with the Windows Service
    Control Manager (SCM).

    Regular, non-service executables will fail with
    error 1053
    when you try to start them from the Services Control Panel.

  20. How can my Windows Service access an ODBC connection?

    If you want your service to access a user-specific ODBC data source (a «user DSN»), set the
    user’s account on the service’s Log On tab:

    Windows Services Control Panel: Log On tab

  21. Are Windows Services available on UNIX/Linux?

    No. Windows Services can only exist on Windows operating systems.

    UNIX implements long running daemons in a very different way.

  22. What is an elevated/administrative command prompt? How do I start one?

    The command prompt is a Windows application that accepts textual commands to control your computer.
    It’s typically used by administrators and other technical users who are comfortable typing instructions instead of manipulating graphical applications.

    You can start the command prompt by running CMD.EXE. Its distinctive window looks like this:

    Windows Command Prompt

    An elevated command prompt is a command prompt started with administrative rights.

    With full rights, an elevated command prompt can run many administrative tasks, such as installing software, updating system files and manipulating Windows Services.
    A normal («unelevated») command prompt cannot perform those privileged operations.

    How to start an elevated command prompt

    1. Click the Start button.

    2. Type cmd.

    3. After a few seconds, an entry for the command prompt (or cmd) should appear in the list of results. Right-click that entry and select Run as administrator:

    4. Windows may prompt you to confirm that you want to run as an administrator. Click Yes to proceed:

      Confirm run as administrator

    The elevated command prompt window will appear on your desktop.

  23. My service is stuck in the «Stop Pending» (or «Start Pending») state. How do I stop it?

    This short video shows you how to forcibly stop a stuck service:

    A pending state usually means one of two things. Either:

    • the service is working normally and is just taking a long time to complete a necessary operation, or
    • the service has hung and is not interacting normally with the Windows Services Control Manager.

    If you’ve waited long enough to rule out the first situation, then we have the second, and the only way to stop the service
    is to reboot the machine or end its underlying process.
    To terminate the process:

    1. Find the process identifier (PID) of the Service’s process using the SC command. For a Service named MyService, run:

      sc queryex MyService

      (Be sure to enclose the service name in quotes if it contains spaces.)

      Here’s the result for the UI0Detect Service:

      Using SC to query Service information

      Make a note of the number on the PID line (4388 in the screenshot above).

    2. Run the taskkill command to forcibly terminate the process. For PID 4338, use:

      taskkill /F /T /PID 4388

      You should see a SUCCESS message if all went well:

      Using Taskkill to terminate a process

      If you get «Access Denied», please ensure that you have the necessary administrative privileges by running the Command Prompt as an Administrator.
      (Darn UAC!)

  24. My Windows Service fails to start (or stops working unexpectedly). How do I figure out what’s wrong?

    Most Windows Services report information, warnings and errors to the Windows Event Logs, so start there.
    You can review those messages using the
    Windows Event Viewer
    Control panel application.

    Windows Services will place their messages in the Windows Logs > Application section (on the left hand side). The Source column in the central window contains the name of the service reporting the event.
    Here’s an information event reported by the Avira AntiVir service:

    Event Viewer: Windows Service Information Message

    When a Service encounters a problem and cannot create a log entry, the Service Control Manager (SCM)
    will write an entry in the Windows Logs > System section.
    For example, here is the SCM telling us why the ActiveBooks service failed to start:

    Event Viewer: System log - logon error

    Hopefully the Event Log messages will shed some light on what is going wrong.

  25. My application works when I run it normally but it fails when started from a Windows Service. What is the problem?

    You probably need to specify an account that can run the application normally on the service’s Log On tab:

    Windows Services Control Panel: Log On tab

    By default, Windows runs your service in the LocalSystem account which may be very different from the account that you log in to.
    Your application will encounter trouble if it:

    • Uses a printer or a network drive and LocalSystem doesn’t have sufficient rights to use those devices;
    • Has never been installed in the LocalSystem account and so cannot find its settings there;
    • Needs to access registry values or environment variables in your «normal» account.

    Specifying your normal account on the Log On tab should solve those kind of problems.

  26. Why doesn’t my Windows Service start automatically after a reboot?

    There can be many reasons why a service doesn’t start automatically as expected.
    Check the Windows Event Log
    to see if you can find out what happened as the OS booted up.

    The most common problems include:

    1. The service has the wrong password. Update the password on the service’s
      Log On tab
      and you should be good to go.

    2. A dependent service fails to start. Determine why the dependent service is failing and resolve the issue. Or if that doesn’t work, try to
      remove the dependency — as long that won’t compromise your system.

    3. The service logs on as a domain user and it’s starting before Active Directory is ready. Set your service’s Startup type to
      Automatic (Delayed Start) to give AD time to spin up and log you into the account you’ve specified.

    4. A required resource is unavailable at boot.
      For example, if your service uses a database but the database is not yet fully initialized when your service starts, the service may quickly shut down.
      Check your service’s log files for errors and add dependencies on any other critical services that are needed for support. Setting your service to start
      Automatic (Delayed Start) to give other components more time to start up
      in advance may also resolve the issue.

    5. The service is missing its executable or important DLLs.
      Check that the service’s executable is present and that all necessary DLLs and other files are in place. Use the excellent
      Dependency Walker utility
      to identify missing components, and keep mind that re-running your service’s installer may help by restoring missing files.

  27. The Stop button is greyed out. How do I stop the service?

    The Stop button is unavailable when the service is busy and unable to accept a request to stop.
    If the service is off doing its work, simply waiting some time for it to complete its pending tasks may resolve the situation.
    As they say, patience is a virtue.

    However, if you’ve waited a while and the problem persists, your service may be stuck.
    You can try to forcibly
    terminate the service’s underlying executable using TASKKILL
    (or via the Task Manager), but this may not be a viable option when the process
    is hosting many services (like Microsoft’s svchost). In that second situation a reboot
    may be your only recourse.

  28. My service is disabled. How do I start it?

    You cannot start a disabled service. Not with NET START, SC START or even via the Services application.

    To start the service, you must «un-disable» it first. That is, you must set its Startup type to Manual, Automatic or Automatic (Delayed). That is best done via the
    Services application (services.msc):

    Set Service Startup Type

    You should be able to start the service once you’ve made that change.

    Note that you can also re-enable your service from the command line using the
    SC command.
    Run:

    SC config <Service-Name> start= demand

    where <Service-Name> is the name of the service.

    Replace «demand» with «auto» to have Windows start the service automatically at boot (instead of manually, on demand).

  29. What changed in Windows Server 2008?

    Nothing. No new features were introduced in the original release of Windows Server 2008.
    There were a few changes for Server 2008 R2 though.

  30. What changed in Windows Vista (2006)?

    Microsoft made significant adjustments to Windows Services in Vista. The main changes are:

    • Session 0 is now «isolated» and no user can log in there to interact with the GUI from a Service. This change — effected primarily for security concerns — makes it
      much more difficult to work with GUI-based Windows Services. The situation is discussed in the
      «Can a Windows Service have a GUI?» entry below.

    • In an attempt to reduce resource contention as the computer boots, services that should be started at boot now have the option of being delayed and starting shortly after boot.
      In practice, this means delaying service startup by 1-2 minutes — quite appropriate for some services.

      The new setting is available in the Startup type field — Automatic (Delayed Start):

      Windows Services Control Panel: Startup Type

    The complete technical details are available in
    this article from Microsoft Developer’s Network.

  31. What changed in Windows 7 and Windows Server 2008 R2 (2009)?

    The adjustments made in 2009 were highly technical and not very visible to end users. Only the following is of note:

    • Services can be automatically started or stopped in response to one or more Trigger events. Trigger events include:

      • A specific device (e.g. memory stick) arrives or is present when the system starts
      • A given port is opened or closed
      • A machine or user policy changes
      • The first IP address becomes available or the last IP address becomes unavailable

      Microsoft doesn’t provide a GUI for managing triggers so you must use the
      SC command
      (or the free
      Service Trigger Editor).

    The complete technical details are available in
    this article from Microsoft Developer’s Network.

  32. What changed in Windows 8 and Windows Server 2012?

    Not much. The few,
    highly technical adjustments
    were entirely «under the hood»:

    • A service can retrieve information on how it was started
    • Services can be notified when a user initiates a reboot
    • Three new
      service triggers
      were introduced, but they are merely placeholders awaiting definition from Microsoft

    There were no user interface changes.

  33. What is Session 0 Isolation?

    A Session (also known as a Logon Session) is created whenever a user logs in to Windows. Each session has a numeric identifier,
    called a Session ID.

    Windows creates a single session when your PC boots and all the Windows Services (and many other administrative processes) will run in that session.
    Since the ID of that session is 0, it’s been nicknamed Session 0.

    On legacy versions of Windows (NT, 2000, XP and Server 2003), the first user to log into the physical PC is automatically
    placed into the already created Session 0.
    An RDP/Terminal Services user can log in to Session 0 by specifying a special flag when opening the connection (/admin).
    And once in Session 0, a user can see and interact with the graphical elements of any program running there, including those created by Windows Services.
    In this way, Microsoft (perhaps inadvertently?) allowed users to freely interact with Windows Services that choose to display a user interface.

    Ultimately, Microsoft realized that allowing users to interact with Windows Services could lead to security problems.
    Indeed, a virus installing itself as
    a service running from a high privilege account could
    easily wreak havoc on a user’s desktop.

    Microsoft’s solution is to prohibit users from logging in to Session 0.
    Now, the first user creates Session 1, the second Session 2, etc., and there is simply no way to access Session 0 via login.
    This policy — introduced in Windows Vista in 2006 — is known as Session 0 Isolation. It’s described in great detail in
    this technical document from Microsoft.

    Session 0 Isolation is enforced in all current versions of Windows.

  34. How do I switch to Session 0 from the Command Line?

    Unfortunately switching to Session 0 is not possible in Windows 10/11 or Server 2019/2022 and later.
    That’s because Microsoft removed all access to Session 0
    in Windows 10 Version 1803 (April 2018).

    In earlier versions of Windows, you can switch to Session 0 from the command line by running:

    rundll32.exe winsta.dll,WinStationSwitchToServicesSession

    Save one of these files to your desktop to easily access Session 0 on demand:

    • Batch file to switch to session 0
    • Shortcut to switch to session 0

    Note that the Interactive Services Detection service (UI0Detect) must be running for switching to work.

  35. Why doesn’t «Allow service to interact with desktop» work on Windows 11/10 or Server 2025/2022/2019/2016?

    In older versions of Windows (NT, 2000, XP and Server 2003), services are allowed to show their windows and tray icons on the desktop
    of the user logged on to the PC. This ability was enabled by checking the
    Allow service to interact with desktop
    option in the service’s Log On properties:

    Windows Services Control Panel: Startup Type

    Although that setting still exists on Windows 11/10 or Server 2025/2022/2019/2016, it no longer has the desired effect.
    That’s because Microsoft’s security-centric Session 0 Isolation
    modifications ensure that no user can log on to Session 0 — the desktop where the windows created by a service are displayed.

    So while checking the Allow service to interact with desktop box still enables the service’s windows to be displayed in Session 0,
    since no one can log in to Session 0 to see the service’s windows, the setting has been effectively marginalized.

  36. How can I start my non-service application in Session 0?

    Sometimes it makes sense to launch an application on the isolated Session 0.
    For example, does the application work properly when launched in the context of a Windows Service?

    Microsoft’s advanced «process-launcher» utility,
    PsExec,
    will start any program in Session 0. Use it like this:

    psexec -i 0 -s <executable>

    where:

    <executable> is the full path to the program to run,
    -i 0 indicates to start the process interactively in Session 0, and
    -s runs the process in the system account. (Optional — omit it to run the process with your own credentials.)

    For example, this line will start the command prompt in the system account in Session 0:

    psexec -i 0 -s C:\Windows\System32\cmd.exe

  37. What does it mean to start my service Automatic (Delayed Start)?

    Automatic Delayed Start

    Services configured to start Automatic will be immediately kicked off by Windows as the machine boots up. In contrast, those set
    to Automatic (Delayed Start) will be held back from that first wave and will start
    2 minutes after the last Automatic service is launched.

    The setting is most useful in two respects:

    1. It can alleviate the «mad rush» at boot, when all services try to start simultaneously. By designating non-critical services
      for a delayed start, the really important services can secure a larger slice of the machine’s precious resources and become available
      sooner.

    2. It can delay a service from starting until other critical supporting services are operational. For example, without the delay it’s
      possible for a service to start before the network is fully initialized, leading to very strange problems.

  38. How do I adjust when «Automatic (Delayed start)» services start?

    By default, services designated as «Automatic (Delayed start)» start 2 minutes after the last «Automatic» service is launched.
    That delay can be adjusted for all services by changing (or adding) the AutoStartDelay (DWORD/REG_DWORD) value in the registry:

    HKLM\SYSTEM\CurrentControlSet\Control\AutoStartDelay

    The value is in milliseconds.

    For example, this screenshot shows us setting a 10 minute (600000 millisecond) delay:

    Set the AutoStartDelay registry value

    Please keep in mind that this setting applies to all delay-start services. Use it with caution!

  39. What are «Trigger Start Services»?

    Instead of starting automatically at boot or manually (on demand), a service can be configured to start (or stop)
    in response to specific operating system events.
    A service starting from an event is called a Trigger Start Service.

    Trigger Start Services were introduced in Windows 7 and Server 2008 R2 (in 2009).
    They were created to improve efficiency and speed up the boot process after Microsoft realized that many of the 100+ services
    set to start automatically at boot and run 24/7 in the background didn’t really need to be active all the time.
    The trigger mechanism was put in place to encourage services to remain dormant until needed.

    Looking at the
    Services application
    on our Windows Server 2019 machine, there are more than 60 Trigger Start Services installed.
    Each says Automatic (Trigger Start) or Manual (Trigger Start) in the Startup Type column. Here are a few:

    Trigger Start Services

    Strangely, you won’t see any mention of a trigger when you examine a Trigger Start Service’s properties.
    The Startup type simply says «Automatic» or «Manual» and there are no trigger settings to be found anywhere (as seen with the DNS Client service):

    DNS Client service: Properties

    Use
    Service Trigger Editor
    to examine and manage Trigger Start Services.
    Our free utility shows you what events start or stop the service, allow you to add other triggering events, and much more.

    Here’s Service Trigger Editor working with the DNS Client service:

    Service Trigger Editor

  40. Windows Service Error 5: Access is denied

    Error 5 denotes a lack of permissions. Your Windows account doesn’t have the rights necessary to work with the service.

    Windows will usually inform you where your account falls short. For example, you may not be able to start the service:

    Error 5: Access denied starting service

    Or you may not be able to open the service:

    In any case, your only recourse is to seek extra rights for your account.
    Your systems administrator (or our free
    Service Security Editor
    utility) should be able to help.

  41. Windows Service Error 1053: The service did not respond to the start or control request in a timely fashion

    Windows Service Error 1053

    This error comes up about 30 seconds after an attempt to start the service,
    because the service fails to report to the Windows Service Control
    Manager (SCM) that it’s started. You’re probably facing one of the following problems:

    1. The application being launched by the service is not a true Windows Service.
      Only an executable specifically constructed to interact with the SCM can
      signal that it’s started and is running properly. A non-service application — such as a
      batch file or program you normally launch from a desktop icon — will not
      send the required signal and eventually the SCM will give up waiting and declare that the service failed
      to start.

      If you’re unable (or unwilling) to modify your application’s code to make it a true Windows Service, you can
      use a «wrapper» to start your application as a service.
      Microsoft’s Srvany will do the basic job for free but
      more robust commercial alternatives are also available.

    2. Your Windows Service application is taking too long to start and report back to the SCM.
      If you have access to the code, restructure the application logic to move expensive operations (such as accessing a database, web site or
      other remote resource) outside of the startup sequence
      (OnStart()
      in C# programs).

    3. Your Windows Service application is getting hung during startup and never tells the SCM that it’s started.
      If this is your own code, it’s time to debug! Either attach the debugger, or sprinkle your startup
      code with print statements to see where your application is going astray. Watch out for calls to
      MessageBox()
      and other blocking functions!

  42. Windows Service Error 1061: The service cannot accept control messages at this time

    Windows Service Error 1061

    This mysterious message comes up when a service is unable to perform the operation you attempted.
    Essentially, your request arrived at a «bad time», when the service is unable to fulfill it.

    At any given time, the operations a service can perform depend on its current state — what it’s doing.
    For example, a running service may accept the Stop command but not the Pause or Resume commands.

    To determine what is allowed, Windows asks a service the following question: What operations can you currently perform?
    The service responds with a list of what it can do.

    You encounter Error 1061 when you try to perform an action that’s not on the list of allowed operations.

  43. Windows Service Error 1067: The process terminated unexpectedly

    This error occurs when the process created by the service exits quickly, without notifying
    the Windows Service Control Manager (SCM). It can happen for a variety of reasons, including:

    1. There is a configuration problem preventing the service application from starting properly. Check
      that configuration files are in the expected locations with valid contents, and that startup options reflect reality.

    2. The process being launched by the service is missing a required component (DLL, library, or other file).
      Re-installing the service may help here, but watch for dependencies as well.
      For example, a C# service will fail with 1067 when the underlying .NET installation is corrupt and
      should be re-installed.

    If you remain in the dark after considering the above, examine the
    Windows Event Logs.
    Sometimes a failing service will leave an important clue there before it dies.

  44. Windows Service Error 1068: The dependency service or group failed to start

    Windows Service Error 1068

    Apparently your service relies on other services to support its work, and one of those services is unable to start properly.
    You can identify the dependent services in the Services Control panel:

    Windows Service Dependencies

    Rule out the ones already running; try to start each of the others in turn and identify the culprit.

  45. Windows Service Error 1069: The service did not start due to a logon failure

    Windows Service Error 1069

    This error happens when your service is configured to run in a specific user account but that
    account’s password was recently changed.
    The fix is simple; edit your service in
    services.msc
    and specify the new password on the service’s Log On tab:

    Windows Services Control Panel: Log On tab

  46. Windows Service Error 1072: The specified service has been marked for deletion

    This error happens when your service has been uninstalled but Windows was unable to remove all its associated files because of a conflict.

    Usually it’s caused by having the service open in a service-aware program, like the
    Services Control Panel,
    the Windows Event Viewer,
    or even the Windows Task Manager.
    Closing all those applications may be enough to have the service fully removed, but if that doesn’t work a reboot should do the trick.

  47. What is Srvany?

    Srvany is a utility developed by Microsoft that can start almost any regular, non-service application as a Windows Service.

    Since a Windows Service must be specially constructed to interface with the operating system
    (to allow Windows to start, stop or pause it on demand),
    a regular application without this interface will not function properly as a Service.
    To solve the problem, Microsoft developed Srvany — an «adapter» (or «wrapper») that can accept the Windows Service
    commands and translate those into actions that a regular executable can understand.

    Like any good adapter, Srvany is installed between Windows and the application and handles all interaction between them.
    For example, when Windows says «Start the service», Srvany intercepts the request
    and starts the application as if you had double-clicked on it yourself.

    Srvany was developed in the late 1990’s for Windows NT and remains mostly unchanged to this day. It’s available as part of the
    Windows Server 2003 Resource Kit Tools package.

  48. What is Instsrv?

    Instsrv is a Microsoft-developed utility used to install a Srvany Service.
    It doesn’t take part in the actual running of an application as a service — it just helps with the installation.

  49. Where can I download Srvany and Instsrv?

  50. How do I use Srvany to run my application as a service?

  51. Is there a new version of Srvany for Windows Server 2008? For Windows 7?

    No. Srvany and Instsrv were last released with Windows Server 2003 and no modifications have been made for
    Windows 7, Vista, Server 2008 or Server 2008 R2.

    Note that these tools will work fine on Windows 2008 and Windows 7, but their lack of knowledge of recent developments in Windows Services
    (Session Zero isolation, Service Triggers, etc.) can sometimes present problems. Please be cautions in a production environment!

  52. Is Srvany supported on Windows Server 2008? Windows 7?

    No. While Srvany.exe runs fine on Windows Server 2008/R2, Srvany (and the rest of the
    Windows Server 2003 Resource Kit Tools)
    are only supported on Windows Server 2003 and Windows XP. And even then, the official documentation accompanying the resource kit cautions:

    The SOFTWARE supplied in the Windows Resource Kit Tools is not supported under any Microsoft standard support
    program or service.

  53. Is Srvany supported on Windows Server 2012? Windows 8/8.1?

    No. While Srvany.exe runs fine on Windows Server 2012 (and its R2 variant), Srvany (and the rest of the
    Windows Server 2003 Resource Kit Tools)
    are only supported on Windows Server 2003 and Windows XP. And even then, the official documentation accompanying the resource kit cautions:

    The SOFTWARE supplied in the Windows Resource Kit Tools is not supported under any Microsoft
    standard support program or service.

  54. Is Srvany supported on Windows 10? Windows Server 2019?

    No. While Srvany.exe runs fine on Windows 10 and Server 2019, Srvany (and the rest of the
    Windows Server 2003 Resource Kit Tools)
    are only supported on Windows Server 2003 and Windows XP. And even then, the official documentation accompanying the resource kit cautions:

    The SOFTWARE supplied in the Windows Resource Kit Tools is not supported under any Microsoft
    standard support program or service.

  55. Is Srvany supported on 64-bit Windows?

    No. Even though the 32-bit executable runs fine on 64-bit versions of Windows, Srvany (and the rest of the
    Windows Server 2003 Resource Kit Tools)
    are not officially supported on 64-bit platforms. There is no 64-bit version of Srvany.exe.

  56. Will Srvany close my application when I stop the service?

    Yes, but somewhat abruptly.

    Instead of sending the usual WM_CLOSE or WM_QUIT messages to gracefully shut down the application, Srvany will
    forcibly terminate it. This can be quite disruptive, as highlighted in the
    old Srvany documentation (Srvany.wri, included with the original Windows NT 4.0 resource kit):

    «WARNING: When the service is stopped, it terminates the application via the
    WIN32 TerminateProcess() API:
    this is a drastic way to end an application. For example, it would not allow the application to prompt the
    user to save changes. Therefore, it’s recommended to close the application BEFORE stopping the service.»

  57. How do I remove a Srvany service?

    A service created with Srvany is much like any other and you can
    remove it using the SC command.

    The service can also be removed using the Instsrv utility. Run it like this:

    Instsrv MyService remove

  58. If my program crashes, will Srvany start it again?

    Unfortunately, no. Srvany doesn’t monitor your application in any way and will not run a new copy if it fails.

    Indeed, Srvany may continue to run even after your application exits! You can’t rely
    on the service’s status to tell you if your application is up or not.

  59. Can I use Srvany to run multiple applications on a single server?

    Yes, you can install as many Srvany-created services as you like — each with its own unique name of course!
    Even though each service will reference the same Srvany.exe file, each service will run entirely independently
    and can be managed as such.

  60. Why can’t my application access mapped drives when run with Srvany?

    That’s not a «Srvany thing» — by default, Windows Services do not have access to mapped drive letters.
    UNC paths (which look like «\\Server\Path») should be fully accessible, but if using them is not an option
    this answer discusses some ways to make mapped drives available in the context of a
    Windows Service.

  61. Can a Windows Service have a GUI? Should a Windows Service have a GUI?

    Can it? Yes.

    Should it? No.

    But things are never that black and white…

    First, realize that the Windows Services architecture doesn’t impose any GUI-related restrictions on a service.
    Services are free to create windows, tray icons, alert boxes or any other GUI elements, just like conventional windows applications can.
    The key question is this: When a service creates a window, where will it be shown?

    By default, the GUI elements from a Service appear in Session 0 — the session/desktop created by Windows when your PC boots.
    A user logging in to Session 0 can see the windows from a Service and interact with them normally. Interactive services «just work» there.

    On Windows 2000, XP and Server 2003, the first non-remote user to log in to the PC was placed in Session 0.
    If you walked up to the keyboard and mouse and logged in, you would almost surely end up in Session 0.
    Remote users could log in to Session 0 by starting the Remote Desktop application with the «/admin» flag.
    For those users, interactive services worked as expected and many Windows programs were architected to take advantage of that.

    However, Microsoft changed the playing field for interactive services in Windows Vista (2007).
    Session 0 has been «isolated», and no user can log in there.
    (This was done mainly for security concerns — a virus infecting a service could
    force itself onto any user’s desktop,
    which
    the folks at Redmond recognized as a security risk.) The upshot is that the windows from a Service will no longer
    show up on any user’s desktop
    , effectively dealing a death blow the entire notion of interactive services.

    Realizing that it would be difficult to do away with interactive services by decree however, Microsoft made several concessions
    to keep interactive services on life support. The Interactive Services Detection Service (ISDS) was introduced to alert a
    user whenever a service shows a window or message box on Session 0. After flashing a few times on the task bar, the window it displays looks like this:

    Interactive Services Detection Dialog

    Clicking on the View the message button initiates a gut wrenching transition from the normal desktop to the very strange looking world of
    Session 0 where the Service’s windows are running (Notepad.exe in this case):

    Session 0 Desktop

    Despite the austere appearance, you can interact normally with your service’s windows in Session 0. And when you’re done,
    clicking on the Return now button will magically transport you back you to your regular desktop.

    It’s easy to see that most users would be inconvenienced by always having to perform such an awkward
    switch to Session 0 to interact with an application. This effectively limits the attractiveness of
    an interactive service and any sane computer professional will certainly recommend against constructing
    one today.

    Note: Unfortunately switching to Session 0 is no longer possible in Windows 10/11 or Server 2019/2022 and later.
    That’s because Microsoft removed all access to Session 0
    in Windows 10 Version 1803 (April 2018).

  62. Can a Windows Service start a GUI application?

    Yes, a service can definitely launch a GUI application.

    However, that application will run in Session 0 — the background desktop where services reside.
    You won’t see the application on your desktop.

  63. Why won’t the Interactive Service Detection service start on Windows 8 and Windows Server 2012?

    Attempting to start the Interactive Service Detection (UI0Detect) service on Windows 8 and Windows Server 2012 can fail with the incomprehensible
    «Error 1: Incorrect function» message:

    UI0Detect fails to start - Error 1: Incorrect function

    This is because Microsoft has disabled interactive services in these new operating systems!

    Fortunately, it’s easy to re-enable interactive services by editing the registry:

    1. Start the registry editor («regedit.exe»)
    2. Navigate to HKEY_LOCAL_MACHINE\SYSTEM\CurrentControlSet\Control\Windows on the left side
    3. On the right, double-click the NoInteractiveServices entry and change its value from 1 to 0
    4. Click OK to record your change
    5. Close the registry editor

    Enable Interactive Services with the NoInteractiveServices registry value

    The Interactive Service Detection service should start properly after this change.

  64. How do I disable/suppress the Interactive Services Detection Dialog?

    There are three ways to prevent the
    Interactive Services Detection Dialog from alerting you of a GUI application running in Session 0.
    All involve stopping the Interactive Services Detection (ISD) service, which runs in the background and summons the ISD dialog
    whenever it detects activity in Session 0:

    1. Stop the Interactive Services Detection Service

      Simply stopping the service will cause the dialog to disappear. This may not be a permanent fix though;
      the dialog may return if someone else (or another application) restarts the service.

      To stop the service, run «services.msc», right-click on the Interactive Services Detection entry in the list and select Stop from the menu:

      Stop the Interactive Services Detection Service

    2. Disable the Interactive Services Detection Service

      By changing the service’s startup type to Disabled, you will ensure that no person (or application) can start the service.
      The dialog will never be shown.

      To disable the service, run «services.msc», double-click on the Interactive Services Detection entry in the list and
      change the Startup type to Disabled:

      Disable the Interactive Services Detection Service

    3. Set the NoInteractiveServices registry key

      When it starts, The ISD service checks the NoInteractiveServices registry key. If the value is 1, the service will refuse to start,
      and you will never see the ISD dialog.

      Follow these instructions to set the NoInteractiveServices registry key
      — just set the DWORD value to 1 instead of 0.

    Note that the Interactive Services Detection service also provides the ability to switch to Session 0 to view your Session 0 desktop.
    Switching to Session 0 won’t be available when the ISD service is not running!

  65. Why can’t I switch to Session 0 on Windows 10?

    Unfortunately access to Session 0 has been removed in Windows 10 and Server 2019. And it’s not coming back!

    Note that services and applications continue to run as normal in Session 0 — you just can’t see them.

    This article digs into the technical details.

  66. My question has not been answered here. Can you please help?

Понравилась статья? Поделить с друзьями:
0 0 голоса
Рейтинг статьи
Подписаться
Уведомить о
guest

0 комментариев
Старые
Новые Популярные
Межтекстовые Отзывы
Посмотреть все комментарии
  • Digital microscope driver windows 10
  • Windows 10 минимальная сборка x64
  • Apache web server windows install
  • 20h1 windows 10 дата
  • Mt65xx android phone driver windows 10