
Вы все еще не знаете, как лучше организовать передачу файлов по сети на компьютеры под управлением Windows? Тогда вам сюда!
Background Intelligent Transfer Service (BITS) – служба ОС Windows, которая может передавать файлы в фоновом режиме. Она используется, в основном, для Windows Update.
Какой же интерес BITS представляет для разработчиков?
1. Возможность закачки файлов в фоновом режиме, незаметно для пользователя
2. Высокий уровень отказоустойчивости. Если сетевой кабель перерубят, или комп выпадет в «синий экран», то BITS докачает файлы, как только это станет возможно.
3. Intelligent сказано не зря. Если пользователь в данный момент ничего не качает и комп простаивает, BITS воспользуется освободившимися ресурсами. Эту фичу можно использовать, назначая различные приоритеты закачек.
Работать с BITS можно через специальный API
В своем проекте я использовал удобную, вполне рабочую «обертку» для .NET. Так же существует еще одна.
Ключевым объектом BITS является Job (не надо дословного перевода, назовем это «закачкой»).
Жизненный цикл «закачки» следующий:
1. Создание Job. Указываем название, описание, тип (Upload\Download) и приоритет
2. Добавление файлов. Job может содержать несколько файлов, если выбран тип Download.
3. Подписываемся на события закачки, если необходимо отслеживать прогресс в реальном времени.
4. Запуск закачки. Далее BITS все делает сам.
Важной особенностью BITS является то, что создать закачку может только пользователь, совершивший вход в систему, либо системная учетная запись. Тем, кто собирается использовать BITS, советую не забывать об этом.
Я сознательно не привожу примеров кода, они есть здесь и здесь.
Для дополнительного ознакомления есть замечательная статья на английском.
Background Intelligent Transfer Service (BITS) is a system component in Microsoft Windows operating system that facilitates asynchronous, prioritized, and throttled transfer of files between machines using idle network bandwidth. It also plays a role in the download of files from a peer. This BITS Service is essential for Windows Updates to work properly. If the service is disabled, then any applications that depend on BITS, such as Windows Update or MSN Explorer, will be unable to automatically download programs and other information.
Background Intelligent Transfer Service BITS first introduced on Windows 2000 which allows the transfer of files between server and client. Recent versions of Microsoft Update, Windows Update, Microsoft Systems Management Server and Windows Server Update Services use Background Intelligent Transfer Service to deliver the application updates to clients.
Post Contents :-
- 1 How BITS service works
- 2 Background Intelligent Transfer Service
- 3 Determining the Version of BITS on a Computer
- 3.1 How To Start / Restart BITS service?
- 3.2 How To Stop BITS Service?
- 3.3 Start / Stop BITS using Command prompt
How BITS service works
There are three types of transfer jobs performed by the Background Intelligent Transfer Service (BITS). A download job downloads files to the client, an upload job uploads a file to the server, and an upload-reply job uploads a file to the server and receives a reply file from the server application.
- Asynchronously transfer files in the foreground or background.
- Preserve the responsiveness of other network applications.
- Automatically resume file transfers after network disconnects and computer restarts.
Microsoft first introduced Background Intelligent Transfer Service on Windows 2000
Next Microsoft Upgraded BITS version 1.0 in Windows XP in 2001.
Then Version 1.2 arrived in mid-2002 to add the Automatic Updates service to Windows 2000.
With Windows Server 2003 Microsoft updates BITS Version 1.5 late 2003 and brought command-line support, more upload features, and security improvements.
BITS Version 2.0, released in mid-2004 as an update for multiple OS deployments, added more download features, bandwidth throttling and support for Server Message Block (SMB).
Released in mid-2007, BITS version 2.5 added support for IPv6 and custom HTTP headers, and better HTTP security.
With Windows Vista and Windows Server 2008, Microsoft included BITS version 3.0 with peer caching, notifications, temporary file access, HTTP redirect handling, additional Group Policy controls, and event logging.
In mid-2009 Microsoft included BITS version 4.0 with Windows 7 and Windows Server 2008 R2, brought token-based security, standalone file server features, refined bandwidth throttling, and revised peer caching.
BITS 5.0, included with Windows 10 in mid-2016, added improvements to background copy jobs and support for older background copy jobs, and the ability to use BITS through APIs and PowerShell cmd lets.
With Windows 10 creator update Version 1703, Microsoft upgraded BITS version 10.1 with refined download and notification features.
Determining the Version of BITS on a Computer
To determine the version of BITS on the client computer, check the version of QMgr.dll. To find the version number of the DLL:
- Locate QMgr.dll in %windir%\System32.
- Right-click QMgr.dll and click Properties.
- Click the Version tab.
- Note the version number.
You can also use the following PowerShell code to determine the version of the .dll on your system:
get-item "C:\Windows\System32\qmgr.dll" | Select-Object -ExpandProperty VersionInfo
If the DLL also exists in %windir%\System32\Bits, repeat the previous steps. BITS uses the DLL with the higher version number.
How To Start / Restart BITS service?
On a Windows computer, Background Intelligent Transfer Service is set to start automatically at startup. But due to some Reason, if the Service is not started, you may face different problems while checking and install Windows updates. Because you need to manually check and start the BITS service.
To do this Press Windows + R key, type services.msc and hit the enter key to open Windows services. Now scroll down look for Background Intelligent Transfer Service. If this service is Running simply Right-click on it and select Restart. This will Restart the BITS service and fix if the service is stuck due to any reason.
Or if the Service is not started then simply double-click on it. On new popup under the general tab, change the startup type to Automatic and start the service next to the service status as shown image below.
How To Stop BITS Service?
If due to some Reason BITS service get stuck not respond you may face High system Resource usage problem. Such as 100% CPU usage, High Disk or memory usage etc. And while troubleshooting these problems, we need to Stop the BITs service to fix the issue. Also, Most of the users suggest on the Microsoft Forum, Reddit Disable the BITS service to fix High CPU usage problem.
To Disable BITS service Again open Windows services by press Windows + R, type services.msc and hit the enter key. Double click on BITS service, change the startup type to disable and stop the service if it’s running.
Start / Stop BITS using Command prompt
Also, you can use the windows command prompt to Start / Stop BITS service. To do this open the Command prompt as administrator. Then first use command sc bits query to Check The service is running or not. If everything is OK, You will see “STATE: 2 RUNNING” in the outputs. You may find “SATE: 1 STOP_PENDING“.
Then you can use command net start bits to Start the BITs service. And You can use command net stop bits to Stop the service.
Background Intelligent Transfer Service (BITS) on Windows 10 is a vital component. It is responsible for facilitating asynchronous, arranged, and controlled transmission of files between machines without affecting the network. It does this by logically handling throttling and prioritization.
In addition to this, BITS also help download Windows update files from Microsoft servers. Yet this intelligent service has some glitches, it stops working, pauses Windows Update, and other services.
Hence, if you face problems while installing Windows 10, the reason could be that service host background intelligent transfer service might have stopped working.
To resolve this, we will explain three ways.
3 Ways to Resolve Background Intelligent Transfer Service
Here are the three ways to resolve Background Intelligent Transfer Service not working on Windows 10.
Short on Time? Fastest Solution to Fix BITS on Windows 10
Here it is. We recommend using a system optimization utility that automatically runs a scan of the disk and runs DISM, SFC. Not only that, it should be capable of fixing common Windows 10 errors. And that tool is called Advanced System Optimizer.
Priced at $39.95, this Windows optimization tool is best in what it does. Using it, you can update drivers, fix invalid registry entries, clean system junk, recover deleted files, and do a lot more. To use it, follow the steps below:
1. Download and install Advanced System Optimizer
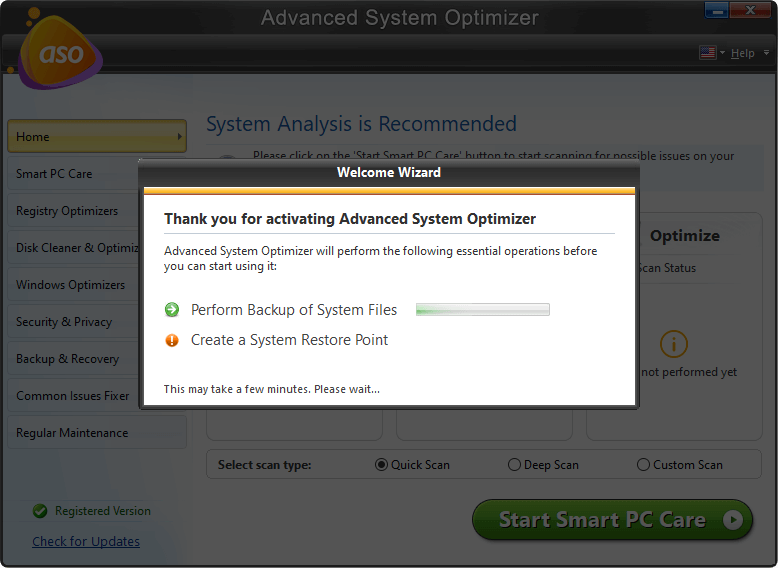
2. Launch it.
3. Click Start Scan, wait for the scan to finish.
4. Hit Optimize. This will clean Windows-related errors that were not allowing Background Intelligent Transfer Service to run.
In addition to this, click Disk Cleaners & Optimizer from the left pane. Now click Disk Tools.
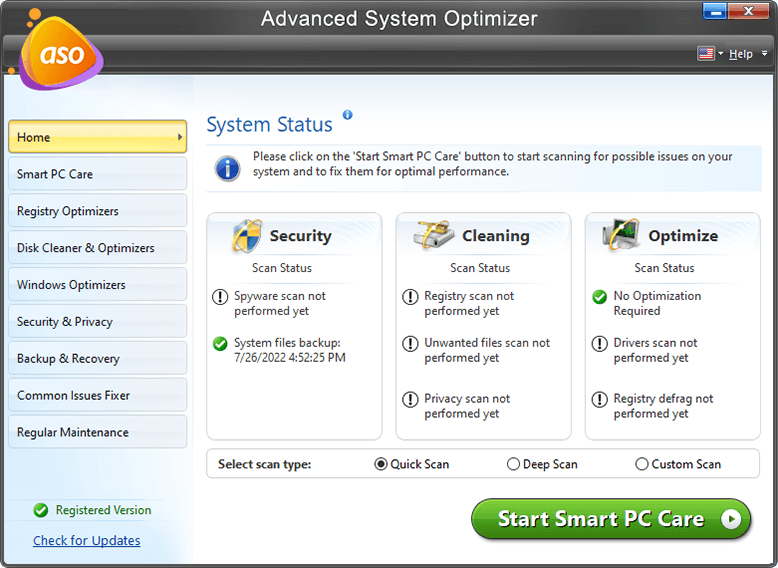
To run the scan, click Start Scan. Now, wait for the scan to finish. This will automatically run the SFC command and will fix errors stopping BITS from running.
However, if you want to give manual steps a try follow the troubleshooting steps provided below.
Manual Steps to Fix Background Intelligent Transfer Service
Method 1 – Fixing BITS via Background Intelligent Transfer ServiceTroubleshooter
To fix issues related to Background Intelligent Transfer Service, follow the steps below:
1. Type Control Panel in the Windows search bar
2. Make sure the View by is selected to Large icons
3. Here, look for the Troubleshooting option and click it

4. Next, click Hardware and Sound.
5. Here, select and click the Background Intelligent Transfer Service.

Additional Tip
A quick tip: If you are unable to locate the option, it seems you have not changed the view by category to Large. In addition to this, for your convenience click here & download the troubleshooter for Windows 10.
6. Click Advanced.

7. Checkmark Apply repairs automatically.

8. Now, click the Next button > View detailed information

9. Evaluate the details > Next > Close.
The troubleshooter will detect and fix the problem that might be stopping the Background Intelligent Transfer Service to function correctly.
Method 2 – Fixing BITS Background Intelligent Transfer Service via SFC and DISM
Even after running the troubleshooter, if you are still facing the Background Intelligent Transfer Service problem, you need to run SFC and DISM command.
To run DISM and SFC, follow the steps below:
1. Type Command Prompt; when the search result comes up, click Run as administrator option from the right pane.
Now type the following command dism /Online /Cleanup-Image /RestoreHealth and press Enter.
This will scan and repair system file corruption.

Afterward, type SFC /scannow and press Enter.

Wait for the scan to complete. Once DISM completes the scan it will repair system files while the SFC tool will fix Windows 10 installation issues.
Method 3 – Fixing BITS problems via Windows Update
If the above methods didn’t work for you, try updating Windows 10. To do so, follow the steps below:
Before you download updates manually, you need to know whether you are using a 32- or 64-bit machine.
To do so, follow the steps below:
1. Launch Windows Settings > System > About.
2. Here check the System Type information under the Device specifications.
3. This will tell whether you need 32-bit or 64-bit updates.
Steps to download the latest update
To download the Windows update manually, follow the steps below:
1. Head to Microsoft Update Catalog
2. Look for the Windows update, click the Download button based on the bit you are using.
3. Click the .msu link.
Once done, follow the steps to install updates.
1. Type Command Prompt in Windows search bar > Run as administrator option.
2. Enter wusa C:\FOLDER-PATH\UPDATE-NAME.msu /quiet /norestart command and press Enter.

Note: Change the path with the location where you saved the update file. Once done, press Enter to run the command.
After the command is run, restart your system. The BITS problem should now be fixed.
This is all. Using this guide, we hope you can fix the BITS on Windows. We recommend using Advanced System Optimizer and automatic Windows cleaning and optimization tool that knows how to fix all common Windows errors.
About BITS and downloading and uploading files
Programs nowadays often need to download files and data from the internet – maybe they need new content, new configurations, or the latest updates. The Windows Background Intelligent Transfer Service (BITS) is an easy way for programs to ask Windows to download files from or upload files to a remote HTTP or SMB file server. BITS will handle problems like network outages, expensive networks (when your user is on a cell plan and is roaming), and more.
In this blog post I’ll show how you can easily use BITS from a C# or other .NET language program. To use BITS from C++ using its native COM interface, see the GitHub sample at https://github.com/Microsoft/Windows-classic-samples/tree/master/Samples/BacgroundIntelligenceTransferServicePolicy. Your program can create new downloads from and uploads to HTTP web servers and SMB file servers. Your program can also monitor BITS downloads and uploads. If your program runs as admin, you can monitor all the BITS traffic on a machine. If you run just as a user, you can only monitor your own BITS traffic.
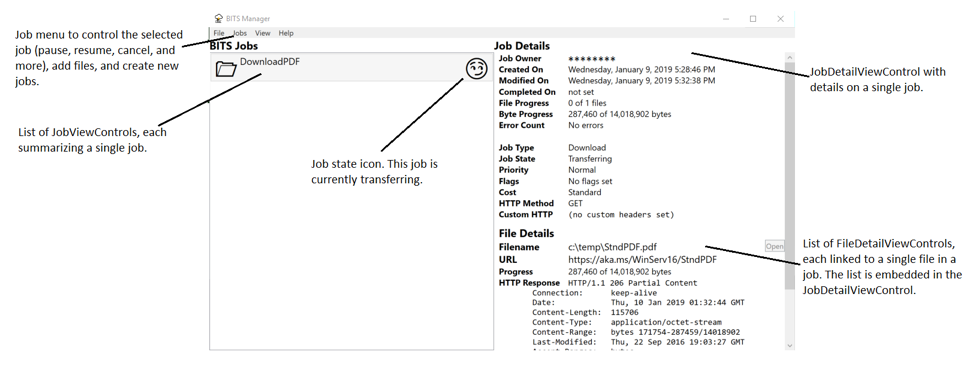
The companion program from this blog post, the BITS Manager program, is available both as source code on GitHub at https://github.com/Microsoft/BITS-Manager and as a ready-to-run executable at https://github.com/Microsoft/BITS-Manager/releases.
What all can BITS do?
The most common use of BITS is to download files from the internet. But dig beneath the covers and you’ll find that the “Intelligent” in BITS is well earned!
BITS is careful about the user’s experience
Many downloads (and uploads) need to make forward progress, but also want to be nice to the user and not interfere with the user’s other work. BITS works to make sure that downloads and uploads don’t happen on costed networks and that the background downloads and uploads don’t hurt the user’s foreground experience. BITS does this by looking at both the computer’s available network bandwidth and information about the local network. For uploads BITS will enable LEDBAT (when available). LEDBAT is a new congestion control algorithm that’s built into newer versions of Windows and Windows Server. You can also set different priorities for your transfers so that the more important downloads and uploads happen first.
BITS gives you control over transfer operations. You can specify what your cost requirements are to enable transfers on expensive (roaming) networks and the priority of each download or upload. You can set a transfer to be a foreground priority transfer and have the transfer happen right away or set your transfer to be a low priority transfer and be extra nice to your user. See https://docs.microsoft.com/en-us/windows/desktop/Bits/best-practices-when-using-bits for BITS best practices.
BITS can be managed by an IT department
An enterprise IT department might have a preference about how much bandwidth to allocate to background transfers at different times of the day or might want to control how long a transfer is allowed to take. BITS has rich Group Policy and MDM policies for just these scenarios. See https://docs.microsoft.com/en-us/windows/client-management/mdm/policy-csp-bits for more details on controlling BITS with MDM and https://docs.microsoft.com/en-us/windows/desktop/Bits/group-policies for the available Group Policies.
Quick start: download a file from the web
To download a file from the web using the BITS Manager sample program, select JobsàQuick File Download. The file download dialog pops up:
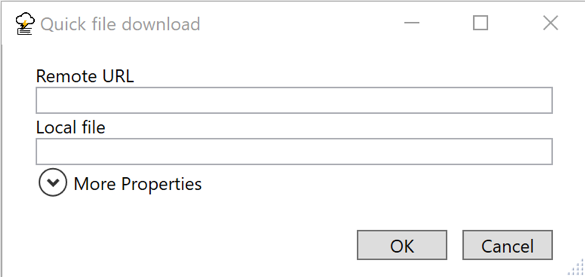
Type in a URL to download. The Local file field will be automatically updated with a potential download filename taken from the segments portion of the URL. When you tap OK, a BITS job will be created, the remote URL and local file will be added to the job, and the job will be resumed. The job will then automatically download as appropriate and will be switched to a final state at the end.
To have your program download a file with BITS, you need to create a BITS manager, create a job, add the URL and the local file names, and then resume the job. Then you need to wait until the file is done transferring and then complete the job. These steps are shown in this snippet.
In addition to this code, a version 1.5 BITSReference DLL has been added to the C# project’s references, and a using directive added to the C# file.
Sample Code
[code lang=”csharp”]
private BITS.IBackgroundCopyJob DownloadFile(string URL, string filename)
{
// The _mgr value is set like this: _mgr = new BITS.BackgroundCopyManager1_5();
if (_mgr == null)
{
return null;
}
BITS.GUID jobGuid;
BITS.IBackgroundCopyJob job;
_mgr.CreateJob(«Quick download», BITS.BG_JOB_TYPE.BG_JOB_TYPE_DOWNLOAD,
out jobGuid, out job);
try
{
job.AddFile(URL, filename);
}
catch (System.Runtime.InteropServices.COMException ex)
{
MessageBox.Show(
String.Format(Properties.Resources.ErrorBitsException,
ex.HResult,
ex.Message),
Properties.Resources.ErrorTitle
);
job.Cancel();
return job;
}
catch (System.UnauthorizedAccessException)
{
MessageBox.Show(Properties.Resources.ErrorUnauthorizedAccessMessage,
Properties.Resources.ErrorUnauthorizedAccessTitle);
job.Cancel();
return job;
}
catch (System.ArgumentException ex)
{
MessageBox.Show(
String.Format(Properties.Resources.ErrorMessage, ex.Message),
Properties.Resources.ErrorTitle
);
job.Cancel();
return job;
}
try
{
SetJobProperties(job); // Set job properties as needed
job.SetNotifyFlags(
(UInt32)BitsNotifyFlags.JOB_TRANSFERRED
+ (UInt32)BitsNotifyFlags.JOB_ERROR);
job.SetNotifyInterface(this);
// Will call JobTransferred, JobError, JobModification based on notify flags
job.Resume();
}
catch (System.Runtime.InteropServices.COMException ex)
{
MessageBox.Show(
String.Format(
Properties.Resources.ErrorBitsException,
ex.HResult,
ex.Message),
Properties.Resources.ErrorTitle
);
job.Cancel();
}
// Unless there was an error, the job is now running. We can exit
// and it will continue automatically.
return job; // Return the job that was created
}
public void JobTransferred(BITS.IBackgroundCopyJob pJob)
{
pJob.Complete();
}
public void JobError(BITS.IBackgroundCopyJob pJob, BITS.IBackgroundCopyError pError)
{
pJob.Cancel();
}
public void JobModification(BITS.IBackgroundCopyJob pJob, uint dwReserved)
{
// JobModification has to exist to satisfy the interface. But unless
// the call to SetNotifyInterface includes the BG_NOTIFY_JOB_MODIFICATION flag,
// this method won’t be called.
}
[/code]
You have to resume the job at the start because all jobs start off suspended, and you have to complete the job so that BITS removes it from its internal database of jobs. The full life cycle of a BITS job is explained at https://docs.microsoft.com/en-us/windows/desktop/Bits/life-cycle-of-a-bits-job.
Using BITS from C#
Connecting COM-oriented BITS and .NET
In this sample, the .NET code uses .NET wrappers for the BITS COM interfaces. The wrappers are in the generated BITSReference DLL files. The BITSReference DLL files are created using the MIDL and TLBIMP tools on the BITS IDL (Interface Definition Language) files. The IDL files, MIDL and TLBIMP are all part of the Windows SDK. The steps are fully defined in the BITS documentation at https://docs.microsoft.com/en-us/windows/desktop/Bits/bits-dot-net.
The automatically defined wrapper classes can be recreated at any time so that you can easily make use of the latest updates to the BITS APIs without depending on a third-party wrapper library.
The sample uses several different versions of the BITSReference DLL files. As the numbers increase, more features are available. The 1_5 version is suitable for running on Windows 7 SP1; the 5_0 version is usable in all versions of Windows 10.
If you don’t want to build your own reference DLL file, you can use the ones that were used to build the sample. They are copied over when you install the sample program and will be in the same directory as the sample EXE.
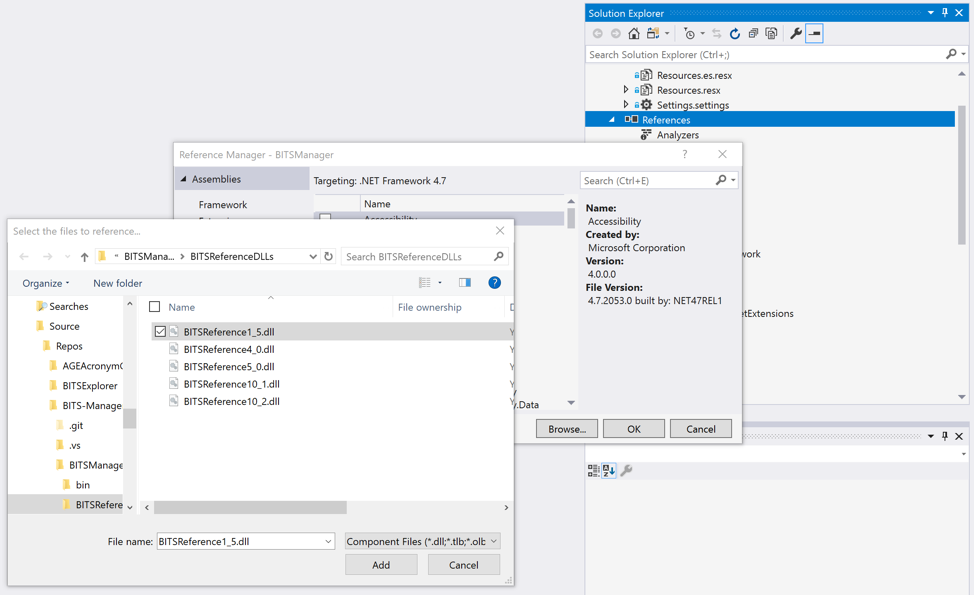
Add the BITSReference DLLs as references
In Visual Studio 2017, in the Solution Explorer:
- Right-click References and click “Add Reference …”
- In the Reference Manager dialog that pops up, click the “Browse…” button on the bottom-right of the dialog.
- In the “Select the files to reference…” file picker that pops up, navigate to the DLL (BITSReference1_5.dll) and click “Add.” The file picker dialog will close.
- In the “Reference Manager” dialog box, the DLL should be added to the list of possible references and will be checked. Click OK to add the reference.
Keep adding until you’ve added all the reference DLLs that you’ll be using.
Add using directives
In your code it’s best to add a set of using directives to your C# file. Once you do this, switching to a new version of BITS becomes much easier. The sample has four different using directives for different versions of BITS. BITS 1.5 is usable even on Windows 7 machines and has many of the basic BITS features, so that’s a good starting point for your code. The BITS What’s New documentation at https://docs.microsoft.com/en-us/windows/desktop/Bits/what-s-new contains a list of the changes to BITS. In the BITS Manager sample program, BITS4 is used for the HTTP options, BITS5 is used for job options like Dynamic and cost flags, and BITS10_2 is used for the custom HTTP verb setting.
[code lang=”csharp”]
// Set up the BITS namespaces
using BITS = BITSReference1_5;
using BITS4 = BITSReference4_0;
using BITS5 = BITSReference5_0;
using BITS10_2 = BITSReference10_2;
[/code]
Make a BITS IBackgroundCopyManager
The BITS IBackgroundCopyManager interface is the universal entry point into all the BITS classes like the BITS jobs and files. In the sample BITS Manager program, a single _mgr object is created when the main window loads in MainWindow.xaml.cs.
[code lang=”csharp”]
_mgr = new BITS.BackgroundCopyManager1_5();
[/code]
The _mgr object type is an IBackgroundCopyManager interface; that interface is implemented by the BackgroundCopyManager1_5 class. Each of the different BITS reference DLL versions have classes whose name includes a version number. For example, the BITS 10.2 reference DLL calls the class BackgroundCopyManager10_2. Only the class names are changed; the interface names are the same.
Create a job and add a file to a job
Create a new BITS job using the IBackgroundCopyManager interface and the CreateJob() method. The CreateJob() method takes in a string of the job name (it doesn’t have to be unique) and returns a filled-in BITS Job GUID as the unique identifier and a filled in IBackgroundCopyJob object. All versions of the manager will make the original BITS 1.0 version of the job. If you need a new version of the job object, see the section on “Using newer BITS features” (hint: it’s just a cast).
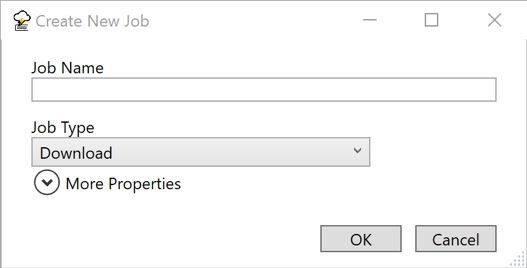
In the sample code, jobs are created in the MainWindow.xaml.cs file in the OnMenuCreateNewJob() method (it’s called when you use the New Job menu entry) and in the QuickFileDownloadWindow.xaml.cs file. Since we’ve already seen the quick file download code earlier, here’s the code that’s called when you use the “New Job” menu:
[code lang=”csharp”]
BITS.GUID jobId;
BITS.IBackgroundCopyJob job;
_mgr.CreateJob(jobName, jobType, out jobId, out job);
try
{
dlg.SetJobProperties(job);
}
catch (System.Runtime.InteropServices.COMException ex)
{
// No need to cancel; the job will show up in the job list and
// will be selected. The user should deal with it as they see fit.
MessageBox.Show(
String.Format(Properties.Resources.ErrorBitsException,
ex.HResult,
ex.Message),
Properties.Resources.ErrorTitle
);
}
RefreshJobList();
[/code]
In the code, the dlg variable is a CreateNewJobWindow dialog that pops up a window that lets you enter in the job name and job properties. Once a job is created (with _mgr.CreateJob), the dialog has a SetJobProperties method to fill in the job property values. You must specify in the code that jobId and job are both out parameters.
Jobs are always created without any files and in a suspended state.
BITS jobs are always on a per-account basis; this means that when a single user has several programs that all use BITS, all of the jobs from all of the programs will be displayed. If you need to write a program that makes some BITS jobs and sometime later modifies them (for example, to complete them), you should keep track of the job GUID values.
To add a file to a job, call Job.AddFile(remoteUri, localFile) where the remoteUri is a string with the remote filename, and the localFile is a string with the local file. To start a transfer, call job.Resume(). BITS will then decide when it’s appropriate to start the job.
Enumerating Jobs and Files
The BITS interfaces to enumerate (list) jobs and files can be tricky the first time you use them. The key is that you first make an enumerator object and then you keep calling Next() on it until you don’t get a job or file out. The example makes an enumerator for just the user’s BITS jobs; the complete code is below. The _mgr object is an instance of the IBackgroundCopyManager interface.
[code lang=”csharp”]
BITS.IEnumBackgroundCopyJobs jobsEnum = null;
uint njobFetched = 0;
BITS.IBackgroundCopyJob job = null;
_mgr.EnumJobs(0, out jobsEnum); // The 0 means get just the user’s jobs
do
{
jobsEnum.Next(1, out job, ref njobFetched);
if (njobFetched > 0)
{
// Do something with the job
}
}
while (njobFetched > 0);
[/code]
Listing files is very similar but uses a job’s EnumFiles() to get the enumerator. The EnumFiles() method just takes in the IBackgroundCopyFile object; there aren’t any additional settings.
Be notified when a job is modified or completed
BITS has several ways to let you know when a job is modified or complete. The easiest notification mechanism is to call Job.SetNotifyInterface(IBackgroundCopyCallback callback). The callback object needs to implement the IBackgroundCopyCallback interface; that interface has three methods that you will need to implement.
You must first declare that your class implements the callback:
[code lang=”csharp”]
public partial class QuickFileDownloadWindow : Window, BITS.IBackgroundCopyCallback
[/code]
After you make the job, call SetNotifyFlags and SetNotifyInterface:
[code lang=”csharp”]
job.SetNotifyFlags(
(UInt32)BitsNotifyFlags.JOB_TRANSFERRED
+ (UInt32)BitsNotifyFlags.JOB_ERROR);
job.SetNotifyInterface(this);
// Will call JobTransferred, JobError, JobModification based on the notify flags
[/code]
You will also need to implement the callback. The JobTransferred and JobError callbacks are set up to call the job.Complete and job.Cancel methods to move the job into a final state.
[code lang=”csharp”]
public void JobTransferred(BITS.IBackgroundCopyJob pJob)
{
pJob.Complete();
}
public void JobError(BITS.IBackgroundCopyJob pJob, BITS.IBackgroundCopyError pError)
{
pJob.Cancel();
}
public void JobModification(BITS.IBackgroundCopyJob pJob, uint dwReserved)
{
// JobModification has to exist to satisfy the interface. But unless
// the call to SetNotifyInterface includes the BG_NOTIFY_JOB_MODIFICATION flag,
// this method won’t be called.
}
[/code]
In the sample code, the QuickFileDownloadWindow.xaml.cs file demonstrates how to use the IBackgroundCopyCallback interface. The UI of the sample code is updated by the main polling loop but could have been updated by the callbacks.
You can also register a command line for BITS to execute when the file is transferred. This lets you re-run your program after the transfer is complete. See the BITS IBackgroundCopyJob2::SetNotifyCmdLine() method for more information.
Use a downloaded file
Once you’ve got a file downloaded, the next thing you’ll want to do is use it. The IBackgroundCopyFile’s GetLocalName(string) method is how you get the path of the downloaded file. Before you can use it, the job must be in the ACKNOWLEDGED final state. If the job is in the CANCELLED final state, the result file won’t exist. Alternately, if you set the job as a high performance job (using the IBackgroundCopyJob5.SetProperty() method), the file will be available while it’s being downloaded, or you can access the temporary file by looking at the result from a call to the file’s GetTemporaryName() method. In all cases, if BITS isn’t done with the file, you must open it with a file share Write flag.
In the sample code, the FileDetailViewControl.xaml.cs OnOpenFile() method gets the local name of the file and then uses the .NET System.Diagnostics.Process.Start() method to have the operating system open the file with the appropriate program.
[code lang=”csharp”]
string Filename;
_file.GetLocalName(out Filename);
try
{
System.Diagnostics.Process.Start(Filename);
}
catch (System.ComponentModel.Win32Exception ex)
{
MessageBox.Show(String.Format(Properties.Resources.ErrorMessage, ex.Message),
Properties.Resources.ErrorTitle);
}
[/code]
Using newer BITS features
You’ll find that you often have a BITS 1.0 version of an object and need a more recent one to use more recent BITS features.
For example, when you make a job object with the IBackgroundCopyManager.CreateJob() method, the resulting job is always a version 1.0 job. To make a newer version, use a .NET cast to convert from an older type object to a newer type object. The cast will automatically call a COM QueryInterface as appropriate.
In this example, there’s a BITS IBackgroundCopyJob object named “job”, and we want to convert it to an IBackgroundCopyJob5 object named “job5″ so that we can call the BITS 5.0 GetProperty method. We just cast to the IBackgroundCopyJob5 type like this:
[code lang=”csharp”]
var job5 = job as BITS5.IBackgroundCopyJob5;
[/code]
The job5 variable will be initialized by .NET by using the correct QueryInterface. It’s important to note that .NET doesn’t know about the real relationship between the BITS interfaces. If you ask for the wrong kind of interface, .NET will try to make it for you and fail, and set job5 to null.
Try it out yourself today!
There are plenty more features of BITS for you to use. Complete details are in the docs.microsoft.com documentation. The BITS Manager sample is available as a downloadable executable in the releases link on GitHub. The complete source code is also available including the BITSReferenceDLL files that it uses. Help for using the BITS Manager and to explain the source code organization is in the BITS-Manager GitHub Wiki.
If you prefer coding in C or C++, the documentation will point you to the existing samples.
Good luck, and happy Background File Transfers!
Transfers files in the background using idle network bandwidth. If the service is disabled, then any applications that depend on BITS, such as Windows Update or MSN Explorer, will be unable to automatically download programs and other information.
This service also exists in Windows 11, 8, Vista and XP.
Startup Type
| Windows 10 version | Home | Pro | Education | Enterprise |
|---|---|---|---|---|
| 1507 | Automatic | Automatic | Automatic | Automatic |
| 1511 | Automatic | Automatic | Automatic | Automatic |
| 1607 | Automatic | Automatic | Automatic | Automatic |
| 1703 | Automatic | Automatic | Automatic | Automatic |
| 1709 | Automatic | Automatic | Automatic | Automatic |
| 1803 | Automatic | Automatic | Automatic | Automatic |
| 1809 | Automatic | Automatic | Automatic | Automatic |
| 1903 | Automatic | Automatic | Automatic | Automatic |
| 1909 | Automatic | Automatic | Automatic | Automatic |
| 2004 | Automatic | Automatic | Automatic | Automatic |
| 20H2 | Automatic | Automatic | Automatic | Automatic |
| 21H1 | Automatic | Automatic | Automatic | Automatic |
| 21H2 | Automatic | Automatic | Automatic | Automatic |
| 22H2 | Automatic | Automatic | Automatic | Automatic |
Default Properties
| Display name: | Background Intelligent Transfer Service |
| Service name: | BITS |
| Type: | share |
| Path: | %WinDir%\System32\svchost.exe -k netsvcs -p |
| File: | %WinDir%\System32\qmgr.dll |
| Error control: | normal |
| Object: | LocalSystem |
| Privileges: |
|
Default Behavior
The Background Intelligent Transfer Service is running as LocalSystem in a shared process of svchost.exe. Other services might run in the same process. If Background Intelligent Transfer Service fails to start, the error is logged. Windows 10 startup proceeds, but a message box is displayed informing you that the BITS service has failed to start.
Dependencies
Background Intelligent Transfer Service is unable to start, if the Remote Procedure Call (RPC) service is stopped or disabled.
Restore Default Startup Type of Background Intelligent Transfer Service
Automated Restore
1. Select your Windows 10 edition and release, and then click on the Download button below.
2. Save the RestoreBackgroundIntelligentTransferServiceWindows10.bat file to any folder on your hard drive.
3. Right-click the downloaded batch file and select Run as administrator.
4. Restart the computer to save changes.
Note. Make sure that the qmgr.dll file exists in the %WinDir%\System32 folder. If this file is missing you can try to restore it from your Windows 10 installation media.
Yea, though I walk through the valley of the shadow of death, I will fear no evil: for thou art with me; thy rod and thy staff they comfort me.