
This article explains how to enable Windows search service on Windows server. The Windows Search service allows clients that are compatible with the search service to perform fast file searches on a server.
When you install the Windows Search service on a server, you can use the Windows File Explorer to quickly search for files and file contents. The Windows Search service must be running to enable quick searching.
The search service is also available for Windows 10 and Windows 11 users. This service provides content indexing, property caching, and search results for files, e-mail, and other content.

On Windows 10/11, if you’re using Microsoft Visio to lookup for newly installed stencils, the Windows Search service should be running. Otherwise, you’ll encounter the error “Visio cannot provide fast search results because Windows Search is not running or is not configured properly for Visio. Please contact your system administrator.”
Also Read: Install Windows Server 2022 Core: A Step-by-Step Guide
What is Windows Search Service?
The Windows Search Service (WSS) can search files and documents for useful information. Indexing can be quite CPU-intensive, depending on the number of files on your system, but Microsoft has ensured that the service will throttle or even pause indexing if it may negatively impact the user experience. By using indexing, users will experience faster file-server searches. For more information, read the article by Microsoft on Windows Search Overview.
Ways to install Windows Search on Server
There are two ways to install the Windows Search service on Windows server:
- Using the Add Roles and features wizard
- Using PowerShell
We’ll cover both the above methods in this article.
Also Read: Patch Server Core Installation with latest Windows Updates
Steps to enable Windows Search Service on Windows Server
Here are the steps that you need to follow to install the Windows Search service on Windows Server 2022.
Log in to the Windows Server and launch the Server Manager. Click Manage and select Add Roles and Features.

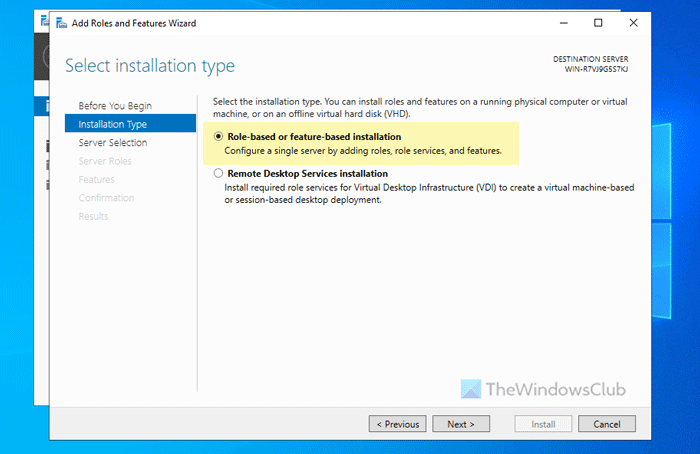
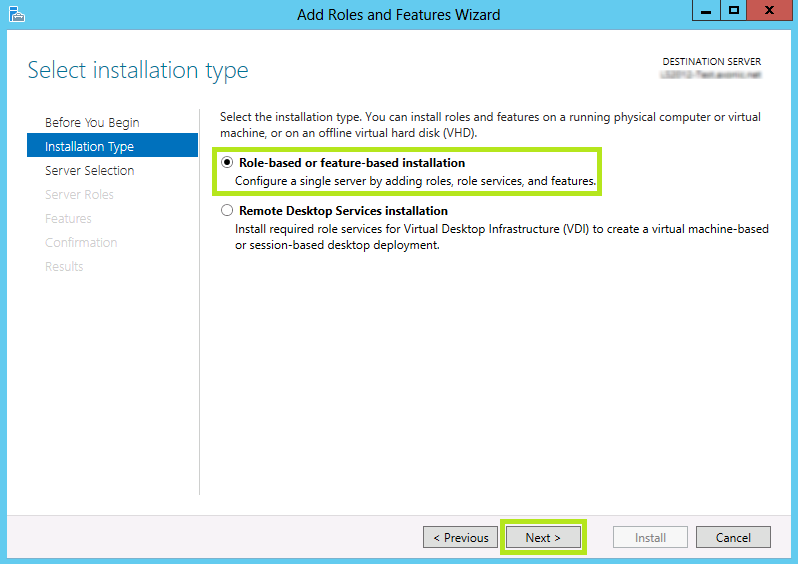
On the Installation Type page, select Role based or feature-based installation option and click Next.

Select the destination server on which you want to install the Windows Search service. If this is a local server, click Next.

On the Server Roles page, click Next. On the Features page, select the Windows Search Service checkbox and click Next.

On the Confirmation page, click Install.

The Windows Search service installation is now complete. You don’t have to restart the server after installing the Windows Search service. Close the Add Roles and Features Wizard.

Fix Windows Search is disabled in Windows Server 2016
By default, the Windows Search service is set to Disabled in Windows Server 2016. That’s because the indexing of the volumes can cause problems in certain scenarios, including
- Cluster Shared Volumes (CSV)
- Running Remote Desktop Session Host (RDSH) with multiple simultaneous sessions.
If you need the search functionality on Windows Server 2016 from the start menu, you can re-enable the Windows search service using the following steps:
- Press Windows + R to open the Run box.
- Type services.msc, and then press Enter.
- Right-click Windows Search, and then select Properties.
- Change the startup type to Automatic (Delayed Start).
- Select Apply, and then select Start.
- Select OK, and then close the Services console.
After making the above changes, you may want to restart the Server once. Now the Windows Search service starts along with other services.

Install Windows Search Service using PowerShell
Using PowerShell is probably the quickest way to install the Windows Search service on a server. Launch the PowerShell as administrator. Run the following PowerShell command to install the Windows Search service on Windows Server.
Install-WindowsFeature Search-Service

Install Windows Search Service on Server 2008 R2
On older versions of Windows Server, such as 2008 R2, the procedure for installing the search service slightly varies. To enable the Windows Search service in Windows Server 2008 R2, follow these steps:
- Launch the Server Manager and click Roles in the left navigation pane.
- Click Add Roles in the Roles Summary pane.
- On the Server Roles page, select the File Services role, and then click Next.
- On the Role Services page, select the Windows Search Service role service, and then click Next.
- On the Confirmation page, verify that Windows Search Service is listed, and then click Install.
Restart Windows Search Service on Windows Server
Recently, one of our customers reported that the search service was taking up a lot of CPU resources on their server. This can happen when you have a large volume of files to index or your search operation involves searching too many files.
On a Windows server, if you notice that Windows Search is not functioning properly, you can try restarting the service using the following steps:
If you need the search functionality on Windows Server 2016 from the start menu, you can re-enable the Windows search service using the following steps:
- Press Windows + R to open the Run box.
- Type services.msc, and then press Enter.
- Right-click Windows Search service and select Restart.
- Close the Services console.

Still Need Help?
If you need further assistance on the above article or want to discuss other technical issues, check out some of these options.
Download Windows Speedup Tool to fix errors and make PC run faster
If you want to enable or disable Windows Search service in Windows Server, this step-by-step guide will help you do that. You can turn on or off the Windows Search service in Windows Server 2025/2022 with the help of Server Manager and PowerShell.
To enable the Windows Search service in Windows Server using Server Manager, follow these steps:
- Open the Server Manager.
- Choose Manage > Add Roles and Features.
- Select Role-based or feature-based installation and click Next.
- Tick the Windows Search Service checkbox and click Next.
- Click the Install button.
To get started, you need to open the Server Manager first. Then, click on Manage > Add Roles and Features.

Next, select the server from the server pool and choose the Role-based or feature-based installation option.
Then, tick the Windows Search Service checkbox and click Next.

Finally, confirm the installation by clicking the Install button.

Once done, you will be able to use the Windows Search Service on your Windows Server.
Disable Windows Search Service in Windows Server using Server Manager
To disable Windows Search Service in Windows Server using Server Manager, follow these steps:
- Open the Server Manager.
- Choose Manage > Remove Roles and Features.
- Select a server from the server pool.
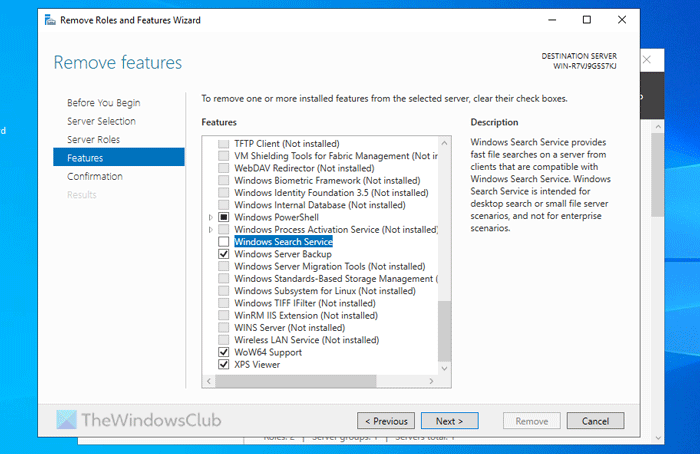
- Clear the Windows Search Service checkbox.
- Click the Remove button.
- Let it be finished.
First, open the Server Manager and click on Manage > Remove Roles and Features.
Next, choose the server from the server pool and click on Next. Then, clear the Windows Search Service checkbox and click the Remove button.
Let the process be finished.
How to enable Windows Search Service in Windows Server using PowerShell
To enable the Windows Search service in Windows Server using PowerShell, follow these steps:
- Search for PowerShell in the Taskbar search box.
- Right-click on the individual search result.
- Select Run as administrator.
- Enter this command:
Install-WindowsFeature Search-Service
To know more about these steps, keep reading.
First, you need to open PowerShell with administrator privileges. To do that, search for PowerShell in the Taskbar search box, right-click on the individual search result, and select the Run as administrator option.
Then, enter this command:
Install-WindowsFeature Search-Service
Once done, Windows Search Service will be installed.
Read: How to get Extended Security Updates (ESU) for Windows Server
Why is my Windows Search disabled?
By default, the Windows Search service is disabled on Windows Server. However, you can enable it using Server Manager or PowerShell. Following that, you need to open the Services panel, double-click on the Windows Search service, choose the Automatic (Delayed Start) option, and click the Start button. Finally, click on Apply and OK.
How to fix Windows Search service not running?
If the Windows Search service is not running on Windows Server, you should restart the service once. Double-click on the Windows Search service in the Services panel and click on the Stop and Start buttons accordingly. Alternatively, you can right-click on the service and choose the Restart option.
Read: How to set up and use Remote Assistance in Windows Server.
When he is not writing about Microsoft Windows or Office, Sudip likes to work with Photoshop. He has managed the front end and back end of many websites over the years. He is currently pursuing his Bachelor’s degree.

Need a more powerful search software for your Windows Server? Learn more here…
Windows Search Server vs. Search Service
The Windows Search Protocol allows communication with a server that hosts a Windows Search Service. The Windows Search Service can issue queries and it also allows an administrator to manage an indexing server. The indexing process runs within the LocalSystem account and constantly runs for all users. This allows Windows Search to:
- Maintain an index that can be shared among all of the users.
- Maintain security restrictions and access to content.
- Process remote queries from computers on the network.
Don’t confuse the Windows Search Service with Microsoft Search Server Express. Microsoft Search Server Express is a free enterprise-class search server, which enables high performance searches of corporate data across multiple systems. Search Server Express has a similar appearance to a Windows SharePoint Services site. The main difference between Windows Search and Search Server Express is that Windows Search can search on a desktop and a server, where Search Server Express can only search on the server.
Windows Search Service on Windows Server 2008
If you are already using a Windows Server based computer, and are currently using Windows Server 2008 then you should know that the Windows Search Service might not be installed by default. You can install and configure the Windows Search Service manually, but it takes some time, patience, and a bit of knowledge to get it done. Here are the steps that you will need to follow:
- Click Start > All Programs > Administrative Tools and then Server Manager
- You will see a console tree in Server Manager, right click on Roles and then choose Add Roles.
- When the Add Roles Wizard opens, click Next.
- Add the Windows Search Service.
- You will need to choose the Volumes with shared folders to be indexed.
- Now you can finish & close the wizard. This should have the search service up and running.
Enable Windows Search Service on Windows Server 2012
While the steps are similar to enabling the search service on previous server versions, there are enough differences to write up the steps you need to follow to enable the Windows search service on Windows Server 2012. Here’s what you need to do:
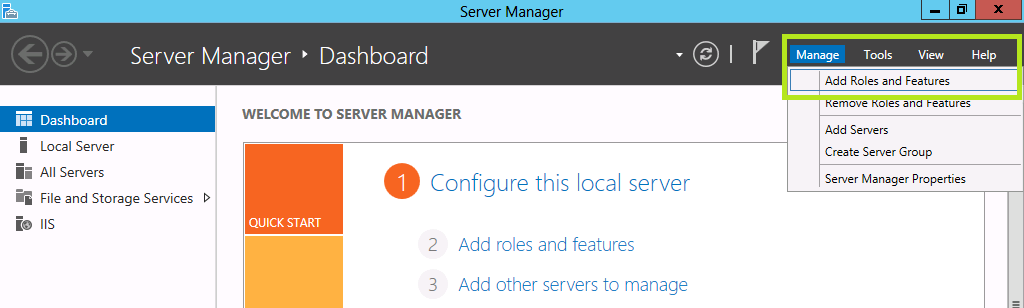
Open the Server Manager tool, then click Manage.
Go to Add Roles and Features to open the Add Roles and Features Wizard window.
Click Next to open the wizard to the Installation type page.
Select Role based or feature based installation option, and click Next.
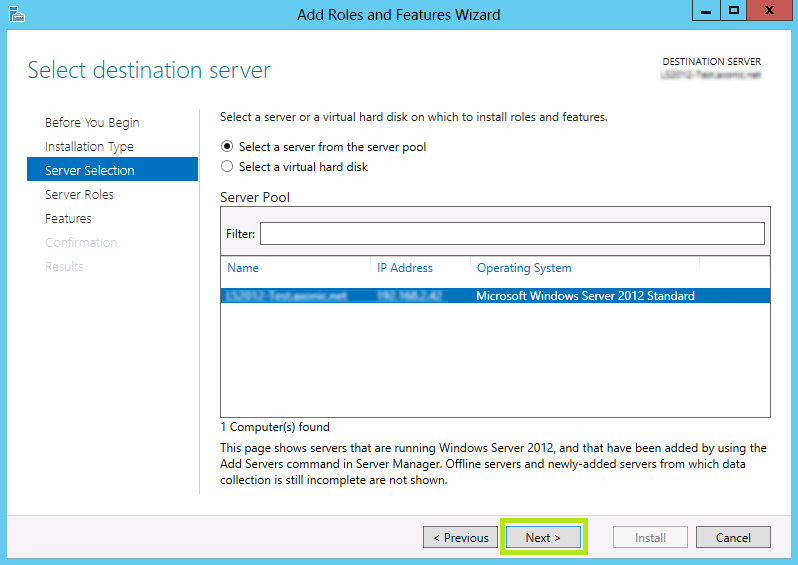
Now you are on the server selection page. Select the server you want the service installed on. If you only have one server, it will automatically select it. Click Next.
Now you are in the Server Roles page. Just click Next, because you are installing a feature, not a role.
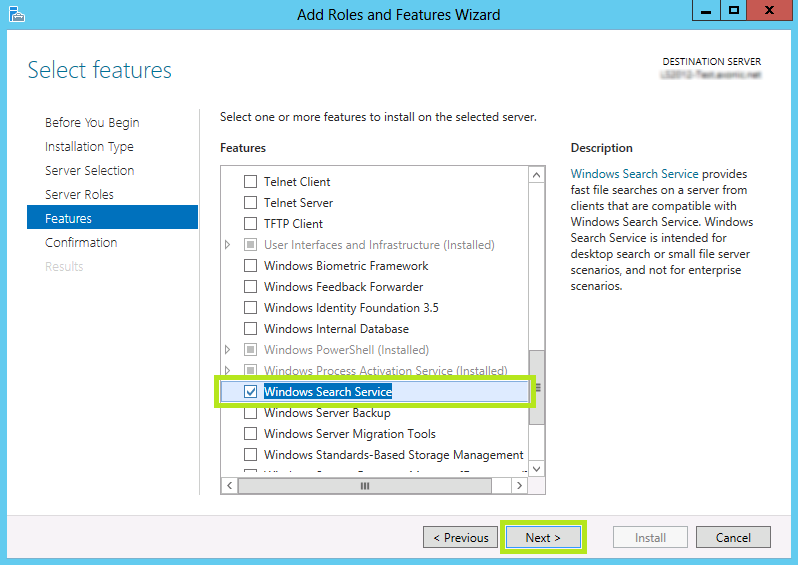
This will open the Features page, here is where you can choose Windows Search Service (make sure the check box is checked) click Next.
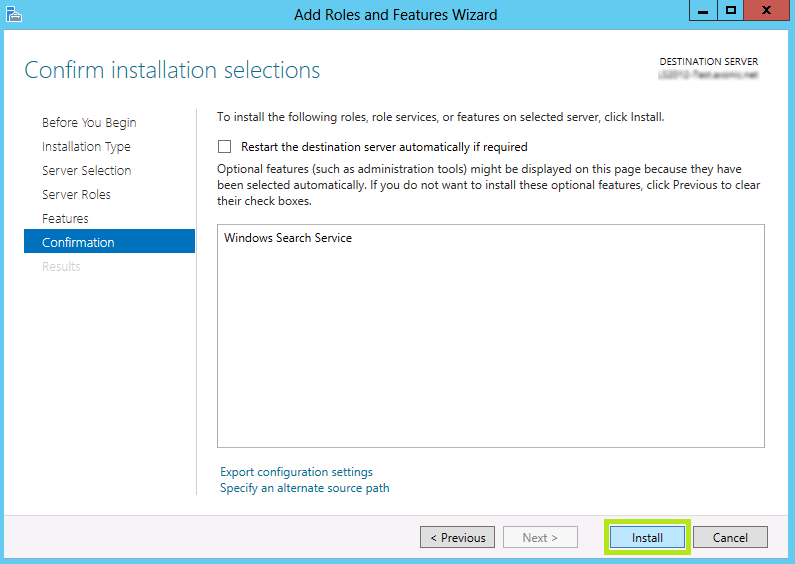
You are now in the confirmation page. To confirm the selection, just click Install. Please note that it will take some time to install the Windows Search Service.
The installation should now be complete.
Adding a New Location to be Indexed
A common problem that users on a network face is that when they try to add a network drive to their Library, an error message suddenly pops up that says “this network location can’t be included because it is not indexed”. There’s no need to worry though, this problem is easy to solve. The following steps require Windows Server 2008 or higher, and will work directly with Windows 7, 8, and 10 Libraries.
When the Windows Search Server is enabled, the server generates an index which is then stored on a Network Share. The clients that have this share mounted can use the search index to find the files they need.
The first step is to create a Shared Folder to host the search index. This can easily be done by going to the Server Manager > File and Storage Services > Shares and setting the appropriate User and File permissions.
Next you should enable Windows Search Service from your server. See the steps outlined above to do so on Windows Server 2008 and 2012.
With Windows Search Service installed and the shared folder created, you will then need to add that shared folder to the index. On the server, go to Control Panel > Indexing Options then click Modify to add the folder or even an entire drive to the index.
Now you will be able to add the network share to the library without the error message appearing.
Windows Server 2019 users find that when searching in RDS, the search indexing on the terminal server do not work while searching in remote desktop and in Outlook.
Symptom
Windows Server 2019 users reported that searching in Remote Desktop on the Terminal Server and searching in Outlook doesn’t showing any search results. The status “Indexing is not running” is displayed in the indexing options.

After checking the search indexing service “services.msc”, it is shown that Windows Search is running on the RDS Server 2019. When trying to Rebuild the index under Advanced “Rebuild”, the indexing remains unsuccessful even after this action.
Cause
Starting with Windows Server 2019, Microsoft has made changes to the Windows Search service. The per-user search index is now enabled by default. This search indexing also applies to RDS and Windows Server 2022.
That’s why, as an administrator, you won’t see any locations under Indexing Options > Change > Show all locations.
Administrators can disable the setting and restore the older indexing method for Windows Server and RDS by using the EnablePerUserCatalog registry key:
HKEY_LOCAL_MACHINE\SOFTWARE\Microsoft\Windows Search
DWORD EnablePerUserCatalog 0
Solution: Search Indexing for RDS server
The traditional indexing option “per user search indexing” is restored with the following action.
To do this, open a command prompt on the windows server as an administrator and execute the following command to add the registry DRWOD key EnablePerUserCatalog with the value 0.
REG ADD "HKLM\SOFTWARE\Microsoft\Windows Search" /v "EnablePerUserCatalog" /t REG_DWORD /d "0" /fNow restart the “Windows Search” service or Reboot the Windows Server.
Now all locations are displayed (such as Outlook and/or OneNote). In addition, the number of indexed items should increase significantly.

Note: In Indexing Options > Advanced, the locations of the index can be specified and Rebuild if necessary.
Windows Search Indexing in Server 2019, 2022 using Multi-Session
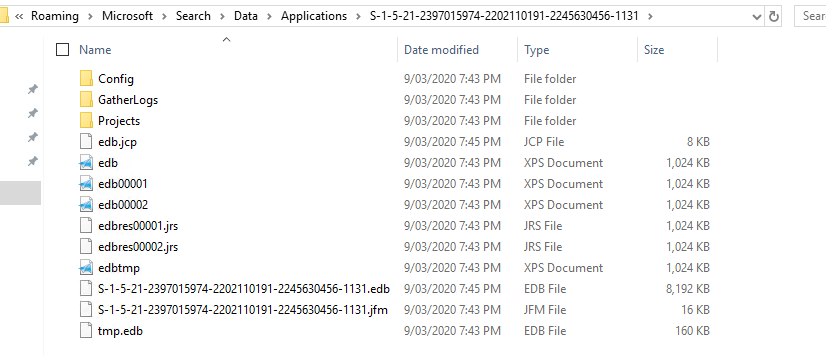
Now, the default Windows Search service is able to roam all Windows Search index data on a per-user basis. The most significant change of per-user search indexing is that the Windows Search index is now stored per user in the user profile, under the following path:
C:\Users\%Username%\AppData\Roaming\Microsoft\Search\Data\Applications{UserSID}{UserSID}.edbOn each login, the Windows Search process creates a new instance of the search database for the user based on the existing EDB. If no EDB file exists, a new one is created by the Operating System.
Enable Windows Search Service on RDS Server
Log in to the Windows Server 2019 or 2022 and launch the Server Manager. Click Manage and select Add Roles and Features. Select Role based or feature-based installation option and click Next, walk through until the Features page, select the Windows Search Service checkbox and click Next. On the Confirmation page, click Install.
Now the windows search service just needs to be started, this is done from services.msc, open windows search properties, select startup type Automatic (Delayed Start), then click the Start button.

Install Windows Search Service in PowerShell
Using PowerShell is probably the quickest way to install the Windows Search service on a server. Launch the PowerShell as administrator. Run the following PowerShell command to install the Windows Search service on Windows Server.
Install-WindowsFeature Search-ServiceOpen Windows Indexing Options
To access the indexing options, enter “indexing” in the search field.
Alternatively, you can press the key combination Windows-Logo+R.
A new “Run” window will then open. Type the command control srchadmin.dll and select OK.

Windows Search Indexing
Indexing is the process of looking at files, email messages, and other content on your PC and RDS Server and cataloging their information, such as the words and metadata in them. When you search your Computer after indexing, it looks at an index of terms to find results faster.
When you first run indexing, it can take up to a couple hours to complete. After that, indexing will run in the background on your PC or RDS Server as you use it, only re-indexing updated data.
Note. if you are considering using single user search roaming or multi-user search roaming, follow this Microsoft article.
in Blog / Citrix / Containers / FSLogix / Outlook / Search / UPM / Windows

Windows Search challenges in Server 2019 and Windows 10 Multi Session
- Intro
- First Logon for the user
- User Logoff
- Restarting the search service
- Summary
Intro
As always in our industry, small changes in one platform can result in significant impact across what is “standard practice” in many other areas. This week’s lucky contender is Windows Search.
Update 25/10/2021: There is a new update from Microsoft available stating the fix as follows:
Addresses an issue that causes searchindexer.exe to keep handles to the per user search database in the path below after you sign out:
C:\Users\username\AppData\Roaming\Microsoft\Search\Data\Applications\{SID}
As a result, searchindexer.exe stops working and duplicate profile names are created.
Windows Search in both Windows Server 2019 and Windows 10 Multi-Session has changed how it operates, introducing the concept of per-user search natively into the Search Service. This is fundamentally different from previous versions (namely Windows Server 2016 etc) and changes how we need to think about search roaming with supporting technologies such as FSLogix Containers and Citrix UPM.
The biggest change is that the Windows Search index is now stored per user in the user profile, specifically
C:\Users\%Username%\AppData\Roaming\Microsoft\Search\Data\Applications\{UserSID}\{UserSID}.edb
On each login, the Windows Search process creates a new instance of the search database for the user based on the existing EDB. If no EDB file exists, a new one is created by the Operating System.
There are two components associated with the Search functionality split into individual processes:
- SearchIndexer.exe: This process runs under the
NT AUTHORITY\SYSTEMaccount and accesses the index database for each user (profile based) - SearchProtocolHost.exe: an instance of this process runs per user and is a child process of SearchIndexer.exe. This process handles amongst other things, the indexing of the Outlook OST file, not the searching of the index file, but the actual index creation of it making content available to search. Searching should be operational with or without this process running. When new items need to be indexed, the process will run, once finished, it will stop
The impacts here, should you have dealt with FSLogix or Citrix UPM Search roaming should start to become obvious when you think about how these solutions tackle the Search side of things (they rip out a component of the index and store them within a container). The long and short of it is as follows:
- For FSLogix environments, you must NOT enable search roaming within the FSLogix GPO. Specifically, you want SearchRoam set to 0 in the registry. This needs to be reversed in your master image should you have enabled it previously, in fact, given the what we know of Search challenges and the attempted hooks into it, I would be tempted to suggest that should you have enabled search roaming in either Windows Server 2019 or Windows 10 multi-session previously, then revert the setting, reinstall Microsoft Office and make sure that the event logs are clear from a Windows Search perspective
- For Citrix UPM environments, the following article has been released which is quite confusing. TLDR, the key it’s discussing should not be set to anything other than 0, and ideally shouldn’t exist as a whole in Windows Server 2019. Citrix UPM configurations will need to cater for the new location of the Search Index, however, the OST container can stay in place and do its thing. I haven’t had time to test, but I would assume that the new search location in the user profile is an ideal candidate for the UPM container feature
Unfortunately, Windows Search is an ongoing challenge and there is a fair number of customers who are experiencing issues with the native multi-user search capability in both Windows 10 Multi-Session and Windows Server 2019. Some are experiencing repeated crashing of the service others are finding that search index files are not released on logoff resulting in locked files and corrupt indexes.
In the below walkthrough, I will try and outline what happens with Windows Search in Server 2019, and where things fall apart, along with a temporary resolution which may help until the problems are properly addressed by Microsoft.
First of all, an outline of the environment I am using to demonstrate the situation
- Windows Server 2019 Datacenter, latest rollup at the time of writing
- FSLogix release 2.9.7237.48865
- Profile and Office Container configured
- Microsoft Office 365 ProPlus, x64, Semi-Annual channel
- No PVS or MCS provisioning
Secondly, below is an outline of some of the event log entries we will be referring to:
| ID | Detail | |
|---|---|---|
| 5 | Windows Search Service has created default configuration for new user KINDO\JKindon5 |
|
| 2 | SearchIndexer (4400,P,98) {S-1-5-21-2397015974-2202110191-2245630456-1134}: The database engine (10.00.17763.0000) is starting a new instance (3) |
|
| 102 | SearchIndexer (4400,P,98) {S-1-5-21-2397015974-2202110191-2245630456-1134}: The database engine (10.00.17763.0000) is starting a new instance (3) |
|
| 105 | SearchIndexer (4400,D,0) S-1-5-21-2397015974-2202110191-2245630456-1134: The database engine started a new instance (3). (Time=0 seconds) |
|
| 637 | SearchIndexer (4400,D,35) S-1-5-21-2397015974-2202110191-2245630456-1134: New flush map file C:\Users\JKindon5\AppData\Roaming\Microsoft\Search\Data\Applications\{S-1-5-21-2397015974-2202110191-2245630456-1134}\{S-1-5-21-2397015974-2202110191-2245630456-1134}.jfm will be created to enable persisted lost flush detection |
|
| 325 | SearchIndexer (4400,D,35) {S-1-5-21-2397015974-2202110191-2245630456-1134}: The database engine created a new database (6, C:\Users\JKindon5\AppData\Roaming\Microsoft\Search\Data\Applications\{S-1-5-21-2397015974-2202110191-2245630456-1134}\{S-1-5-21-2397015974-2202110191-2245630456-1134}.edb). (Time=0 seconds) |
|
| 103 | SearchIndexer (6672,T,97) {S-1-5-21-2397015974-2202110191-2245630456-1134}: The database engine stopped the instance (3) |
|
| 2 | Unable to remove Windows Search Service indexed data for user ‘KINDO\JKindon5’ in response to user profile deletion. Error code 0x80004002 | |
| 482 | SearchIndexer (3768,D,0) S-1-5-21-2397015974-2202110191-2245630456-1134: An attempt to write to the file C:\Users\JKindon5\AppData\Roaming\Microsoft\Search\Data\Applications\S-1-5-21-2397015974-2202110191-2245630456-1134\S-1-5-21-2397015974-2202110191-2245630456-1134.jfm at offset 0 (0x0000000000000000) for 8192 (0x00002000) bytes failed after 0.000 seconds with system error 21 (0x00000015): “The device is not ready.”. The write operation will fail with error -1022 (0xfffffc02). If this error persists then the file may be damaged and may need to be restored from a previous backup |
|
| 492 | SearchIndexer (9200,D,0) S-1-5-21-2397015974-2202110191-2245630456-1134: The logfile sequence in C:\Users\JKindon5\AppData\Roaming\Microsoft\Search\Data\Applications\S-1-5-21-2397015974-2202110191-2245630456-1134\ has been halted due to a fatal error. No further updates are possible for the databases that use this logfile sequence. Please correct the problem and restart or restore from backup |
|
| 439 | SearchIndexer (3768,T,97) S-1-5-21-2397015974-2202110191-2245630456-1134: Unable to write a shadowed header for file |
C:\Users\JKindon5\AppData\Roaming\Microsoft\Search\Data\Applications\S-1-5-21-2397015974-2202110191-2245630456-1134\S-1-5-21-2397015974-2202110191-2245630456-1134.edb. Error -1022 |
| 104 | SearchIndexer (3768,T,97) S-1-5-21-2397015974-2202110191-2245630456-1134: The database engine stopped the instance (2) with error (-1022) |
|
| 103 | SearchIndexer (3768,T,97) Windows: The database engine stopped the instance (0) | |
| 300 | SearchIndexer (10076,R,98) S-1-5-21-2397015974-2202110191-2245630456-1134: The database engine is initiating recovery steps. |
|
| 301 | SearchIndexer (10076,R,98) S-1-5-21-2397015974-2202110191-2245630456-1134: The database engine has finished replaying logfile C:\Users\JKindon5\AppData\Roaming\Microsoft\Search\Data\Applications\S-1-5-21-2397015974-2202110191-2245630456-1134\edb.jtx |
|
| 302 | SearchIndexer (10076,U,98) S-1-5-21-2397015974-2202110191-2245630456-1134: The database engine has successfully completed recovery steps |
|
| 326 | SearchIndexer (9808,D,50) S-1-5-21-2397015974-2202110191-2245630456-1104: The database engine attached a database (2, C:\Users\JKindon\AppData\Roaming\Microsoft\Search\Data\Applications\S-1-5-21-2397015974-2202110191-2245630456-1104\S-1-5-21-2397015974-2202110191-2245630456-1104.edb). (Time=0 seconds) |
My findings here are an aggregation of existing posts, as well as feedback from colleagues in the World of EUC slack channel. Testing has been validated in my own environments.
First Logon for the user
On the first logon for a new user, the following event logs entries will occur, basically detecting a new user without an index, creating a new database, configuring and leveraging the new instance as below:
Event ID 5: Windows Search Service has created the default configuration for new user Kindo\JKindon5

Event ID 102: SearchIndexer (4400,P,98) {S-1-5-21-2397015974-2202110191-2245630456-1134}: The database engine (10.00.17763.0000) is starting a new instance (3)

Event ID 105: SearchIndexer (4400,D,0) S-1-5-21-2397015974-2202110191-2245630456-1134: The database engine started a new instance (3). (Time=0 seconds)

Event ID 637: SearchIndexer (4400,D,35) S-1-5-21-2397015974-2202110191-2245630456-1134: New flush map file C:\Users\JKindon5\AppData\Roaming\Microsoft\Search\Data\Applications\{S-1-5-21-2397015974-2202110191-2245630456-1134}\{S-1-5-21-2397015974-2202110191-2245630456-1134}.jfm will be created to enable persisted lost flush detection

Event ID 325: SearchIndexer (4400,D,35) {S-1-5-21-2397015974-2202110191-2245630456-1134}: The database engine created a new database (6, C:\Users\JKindon5\AppData\Roaming\Microsoft\Search\Data\Applications\{S-1-5-21-2397015974-2202110191-2245630456-1134}\{S-1-5-21-2397015974-2202110191-2245630456-1134}.edb`). (Time=0 seconds)

In summary, in a healthy operational state, for a new user, the following event log patterns will occur on logon:
- 5 = Search Creates a default configuration
- 102 = Search Indexer creates a new instance for the user
- 105 = Search Indexer starts the new instance for the user
- 637 = New flush map file created for the user
- 325 = Search Indexer creates the new database
User Logoff
When the user logs off for the first time, the following event entry is logged:
Event ID 103: Event 103: SearchIndexer (6672,T,97) {S-1-5-21-2397015974-2202110191-2245630456-1134}: The database engine stopped the instance (3)

And this is where things go pear-shaped, you will most probably find the 103 entry is quickly followed by this one:
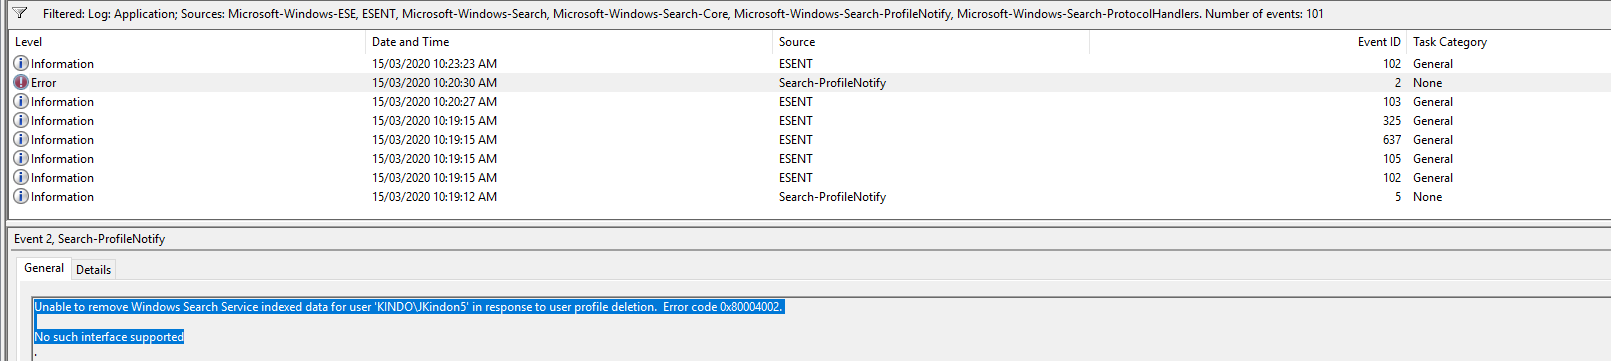
Event ID 2: Unable to remove Windows Search Service indexed data for user KINDO\JKindon5 in response to user profile deletion. Error code 0x80004002
In this state, when the user next connects, they are going to be hit with a problem. What we are looking for, is a happy combination of the following events when the user logs on for the second time:
- 102 = Search Indexer creates a new instance for the user
- 105 = Search Indexer starts the new instance for the user
- 326 = Search Indexer attaches an existing database
What we end up with though due to the above event ID 2 on Logoff, is the following:
Event ID 482: SearchIndexer (3768,D,0) S-1-5-21-2397015974-2202110191-2245630456-1134: An attempt to write to the file C:\Users\JKindon5\AppData\Roaming\Microsoft\Search\Data\Applications\S-1-5-21-2397015974-2202110191-2245630456-1134\S-1-5-21-2397015974-2202110191-2245630456-1134.jfm at offset 0 (0x0000000000000000) for 8192 (0x00002000) bytes failed after 0.000 seconds with system error 21 (0x00000015): The device is not ready. The write operation will fail with error -1022 (0xfffffc02). If this error persists then the file may be damaged and may need to be restored from a previous backup.
The root cause of this is due to the following handles still being kept open by the SearchIndexer.exe process

These files are held open; however, the physical files have gone (detached) and thus we loop.

If the user was to log back on at this point, we will experience some problematic symptoms and events:
Outlook indexing will present as below:
And no files in the %AppData%\Microsoft\Search\Data\Applications\{UserSID}` directories will be touched
Restarting the search service
If we restart the Windows Search Service, a few things happen:
All existing handles are closed for SearchIndexer operations, both for any logged off users in a fail state, and for any other user on the Server, and the following event logs are written
| ID | Detail |
|---|---|
| 439 | SearchIndexer (3768,T,97) S-1-5-21-2397015974-2202110191-2245630456-1134: Unable to write a shadowed header for file C:\Users\JKindon5\AppData\Roaming\Microsoft\Search\Data\Applications\S-1-5-21-2397015974-2202110191-2245630456-1134\S-1-5-21-2397015974-2202110191-2245630456-1134.edb. Error -1022. |
| 104 | SearchIndexer (3768,T,97) S-1-5-21-2397015974-2202110191-2245630456-1134: The database engine stopped the instance (2) with error (-1022) |
| 103 | SearchIndexer (3768,T,97) Windows: The database engine stopped the instance (0) |
| 102,105,326 | (happy combination representing success) |
| 300 | SearchIndexer (10076,R,98) S-1-5-21-2397015974-2202110191-2245630456-1134: The database engine is initiating recovery steps |
| 301 | SearchIndexer (10076,R,98) S-1-5-21-2397015974-2202110191-2245630456-1134: The database engine has finished replaying logfile |
| 302 | SearchIndexer (10076,U,98) S-1-5-21-2397015974-2202110191-2245630456-1134: The database engine has successfully completed recovery steps |
| 105,326 | (Search index is OK again) |
Outlook indexing is now OK
Along with successful alterations to the %AppData%\Microsoft\Search\Data\Applications\{UserSID}` directories.
Fixed it would seem. So, logically here, we know that the resolution is to restart the Windows Search Service based on the failure Event, which is represented by Event ID 2. Specifically:
- Event Log: Application
- Event Level: Error
- Event Source: Search-ProfileNotify
- Event ID: 2
- Event Data: Unable to remove Windows Search Service indexed data for user
KINDO\JKindon5in response to user profile deletion. Error code 0x80004002
By implementing a scheduled task with the above Event ID as the trigger, and a simple configuration of PowerShell to restart the search service as the action:
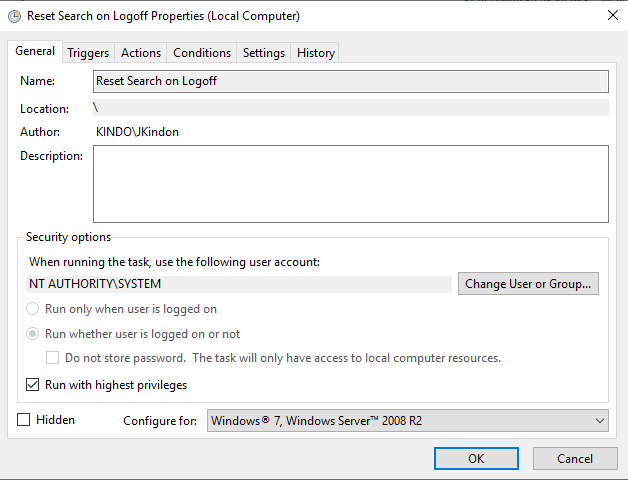
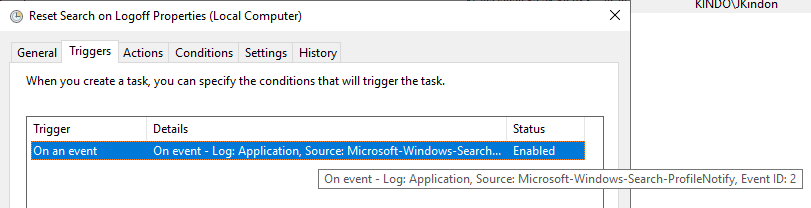
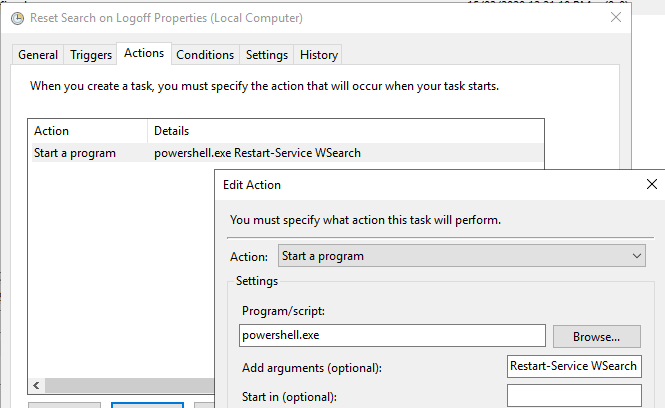
We can successfully clear the errors on log-off, release the files, and ensure that when the user logs back in, their index is good to go. The process will now look like the below when a user logs off:
| ID | Detail |
|---|---|
| 103 | for the user logging off |
| 2 | This triggers the restart of the service, which also triggers an Event ID: 103 for all other users on the Server |
| 102, 105, 326 | for all remaining user accounts on the server |
Based on testing so far, this process does not hurt user experience, inclusive of existing Outlook sessions with existing search indexes, however, your mileage will vary, and this is at the end of the day, simply a workaround for a problem that needs to be fixed.
Summary
There are multiple streams of issues associated with native multi-user search currently, a running an interesting stream is located here on the Microsoft forums which pointed to the end resolution of a scheduled restart of the Search Service on the specific Event ID trigger, however, there have been multiple discussions around the World of EUC slack channel with people willing to test and share results – namely Kasper Johansen, Mike Streetz, Dennis Mohrmann