
Если нужно настроить регулярную (по определенному расписанию) перезагрузку или выключение Windows компьютера (сервера), проще всего создать задание в планировщике задач.
Содержание:
- Задание планировщика для автоматической перезагрузки (выключения) Windows
- Перезагрузка (выключение) Windows компьютеров с помощью групповых политик
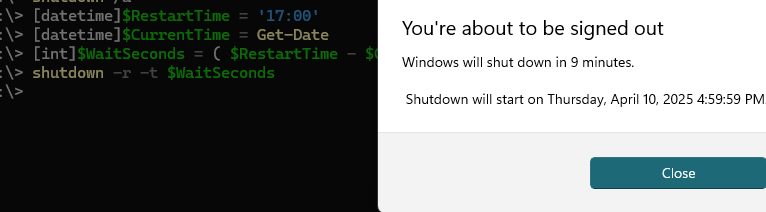
Чтобы разово перезагрузить компьютер в определенное время, можно создать задание отложенной перезагрузки с помощью PowerShell скрипта:
 [datetime]$RestartTime = '17:00'
[datetime]$CurrentTime = Get-Date
[int]$WaitSeconds = ( $RestartTime - $CurrentTime ).TotalSeconds
shutdown -r -t $WaitSeconds
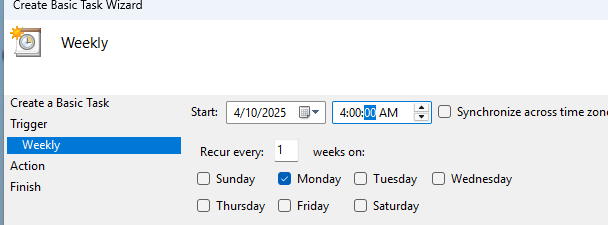
Но чаще всего используются запланированные задания перезагрузки. Например, вам нужно создать задание, которое будет автоматически перезагружать сервер каждый понедельник в 04:00 утра.
Задание планировщика для автоматической перезагрузки (выключения) Windows
Откройте консоль Task Scheduler (
taskschd.msc
) и запустите мастер создания задания: Action -> Create Basic Task.
Задайте имя задания: RebootMonday
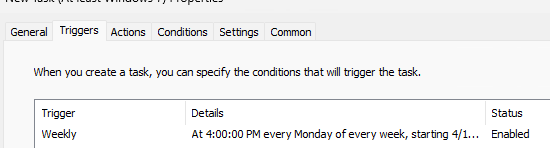
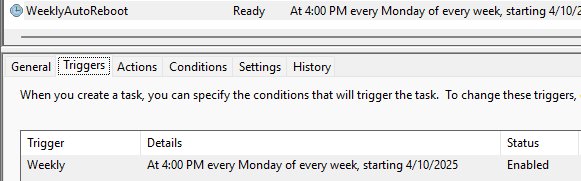
Настройие расписание запуска задания. В нашем примере это еженедельное задание (Weekly), которое запускается каждый понедельник.
Выберите Start a program. Будем запускать встроенную команду shutdown.exe для перезагрузки с параметрами:
Program:
%SYSTEMROOT%\System32\shutdown.exe
Add arguments (optional):
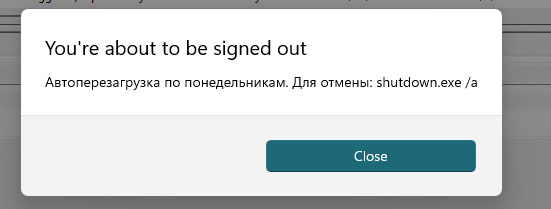
/r /f /t 120 /d p:0:0 /c "Автоперезагрузка по понедельникам. Для отмены: shutdown.exe /a"
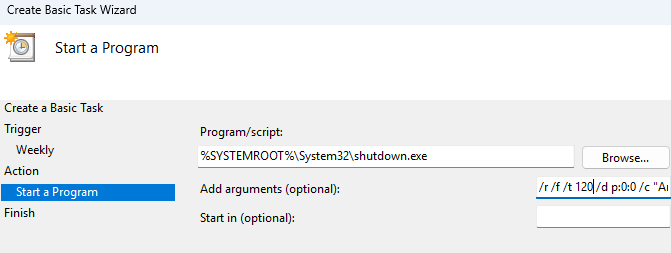
-
/r
— перезагрузка -
/f
– принудительно завершить все приложения -
/t 120
– таймаут перед перезагрузкой -
/d p:0:0
— добавить в Event Viewer плановую причину перезагрузки: Other (planned) -
/с
– вывести информационное сообщение пользователям компьютера перед перезарузкой
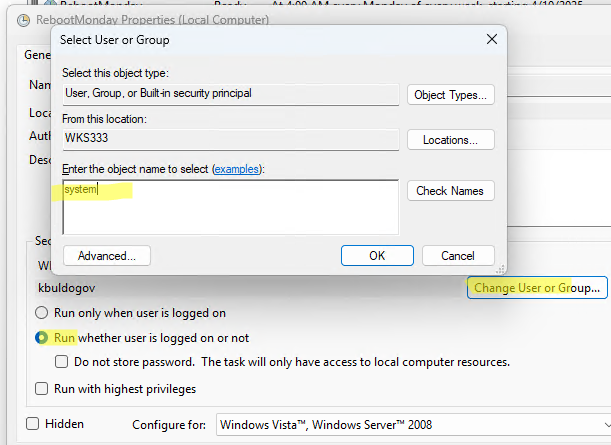
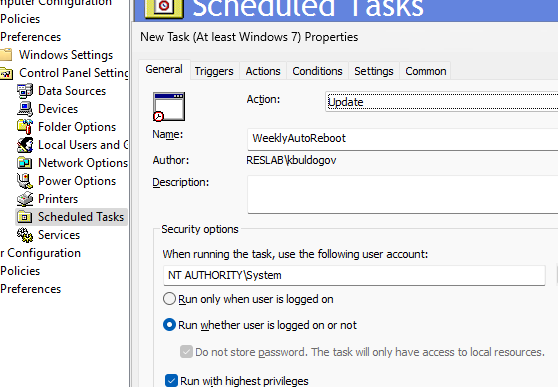
Чтобы задание запускалось автоматически, независимо от наличия активной сессий пользователя на компьютере:
- Откройте свойства задания в консоли Task Scheduler
- Выберите опцию Run whether user is logged or not
- Нажмите кнопку Change User or Group и укажите System

- Теперь задание будет запускаться от имени NT AUTHORITY\SYSTEM.
- Проверьте, что задание включено.
Теперь данный компьютер будет автоматически перезагружаться в запланированное время, выводя уведомление перед рестартом.
С помощью PowerShell можно быстро создать такое задание планировщика с командой перезагрузки:
$taskName = "WeeklyAutoReboot"
$taskDescription = "Automatically reboots the server every Monday at 04:00 AM"
$action = New-ScheduledTaskAction -Execute "shutdown.exe" -Argument "/r /f /t 120 /d p:0:0 /c `"Автоперезагрузка по понедельникам. Для отмены: shutdown.exe /a`""
$trigger = New-ScheduledTaskTrigger -Weekly -DaysOfWeek Monday -At 4:00am
$principal = New-ScheduledTaskPrincipal -UserId "SYSTEM" -RunLevel Highest
Register-ScheduledTask -TaskName $taskName -Action $action -Trigger $trigger -Principal $principal
Перезагрузка (выключение) Windows компьютеров с помощью групповых политик
Если нужно настроить выключение (перезагрузку) по расписанию нескольких компьютеров в домене AD, такое задание планировщика можно создать с помощью групповых политик.
- Откройте консоль управления доменными GPO (
gpmc.msc
), создайте новую GPO и назначьте ее на OU с компьютерами, которые нужно перезагружать/выключать по расписанию. - Отредактируйте новую GPO и перейдите в раздел Computer Configuration -> Preferences -> Control Panel Settings -> Scheduled Tasks;
- Создайте новое задание: New -> Scheduled task (At least Windows 7);
- Задайте имя задания и запуск от имени SYSTEM (как описано выше)

- На вкладке Triggers добавьте расписание для задания

- На вкладке Actions добавьте запуск команды shutdown.exe с параметрами

- Сохраните задание
- Обновите настройки GPO на клиенте, и проверьте что в планировщике задания появилось задание запланированной перезагрузки Windows.


Если нужно привязать задание автоматической перезагрузки/выключения компьютера к завершению другого задания (например, перезагрузиться после успешного окончания бэкапа), см. пример реализации в статье Как запустить задание планировщика Windows после завершения другого задания?
This Windows Server 2022 Tutorial covers how to Schedule Automatic Shutdown in Windows Server 2022. Task Scheduler is a job scheduler in Microsoft Windows, Task Scheduler is used to Schedule Automatic Shutdown in Windows Server 2022. Windows Server is a group of server operating systems developed by Microsoft. A server operating system is a type of operating system that is designed to run on a server.
Related Tutorials
Install Windows Server 2022
Demo environment
Computer Name: server1.test.com
Operating System: Windows Server 2022 Datacenter
IP Address: 192.168.0.3
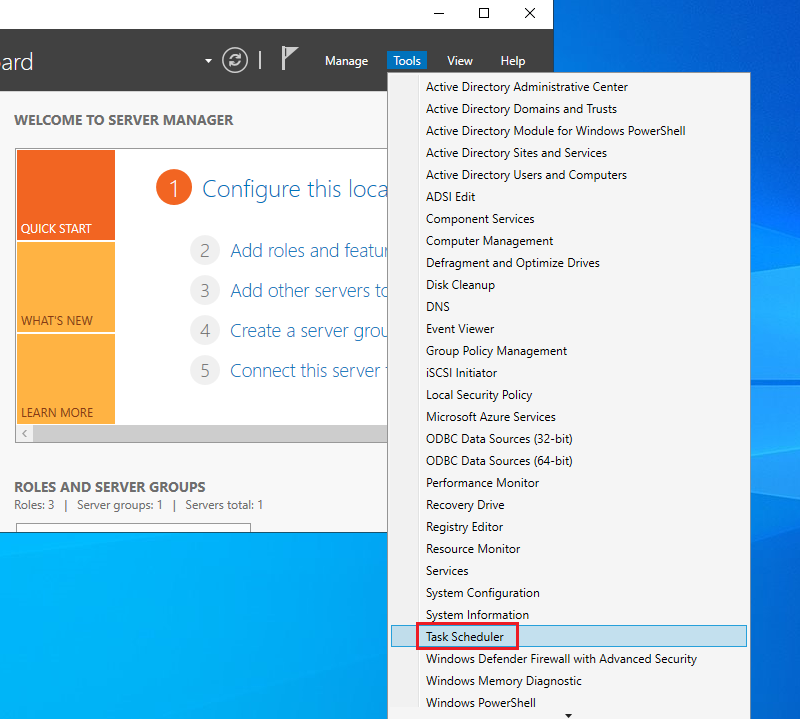
1. Open the Server Manager dashboard, click tools, and select Task Scheduler.
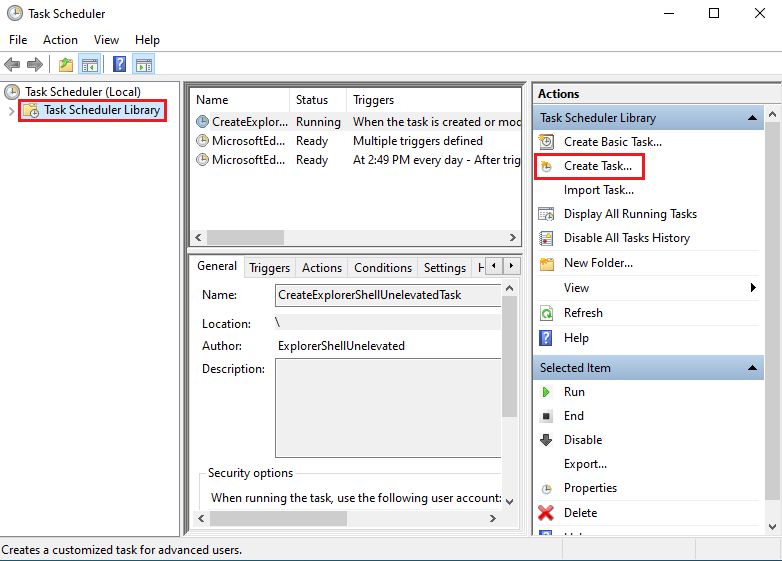
2. Select Task Scheduler Library and click Create Task.
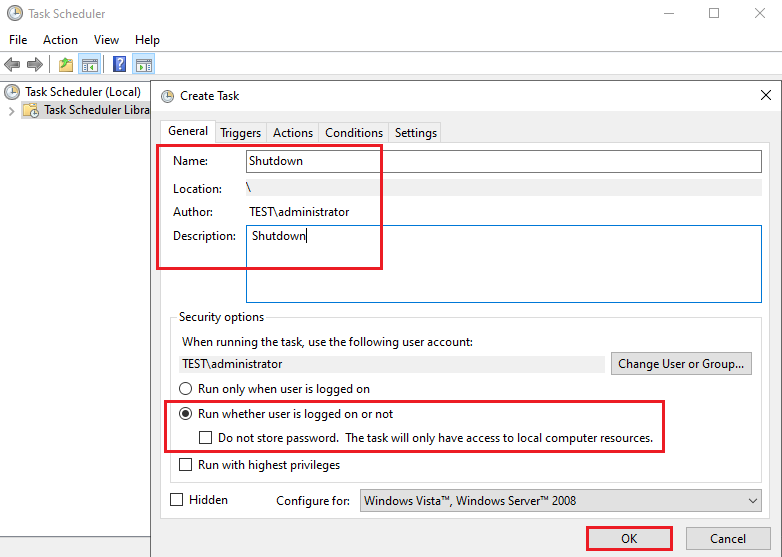
3. In the General section, Enter Name, Discerption, and enable, run whether the user is logged on or not, and click OK.
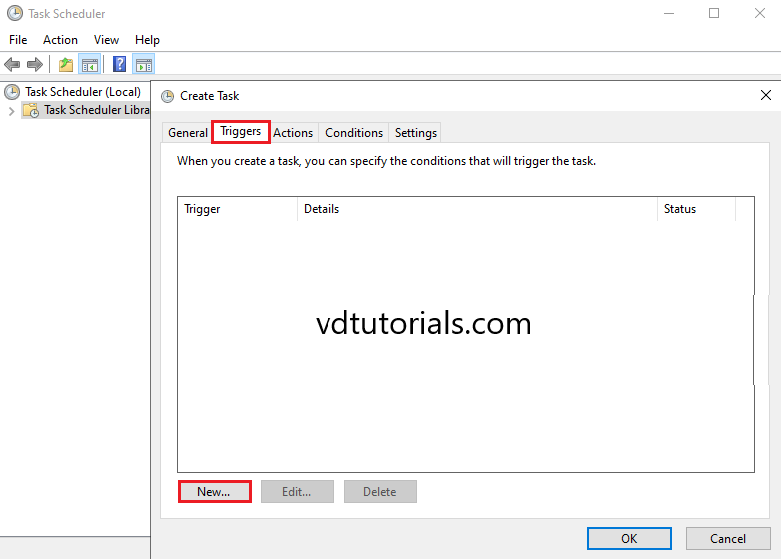
4. In the Triggers section, Click New for crate new Trigger.
5. Configure Trigger and click OK. In this tutorial, we configure Daily 6 pm.
6. In the Action section, click New.
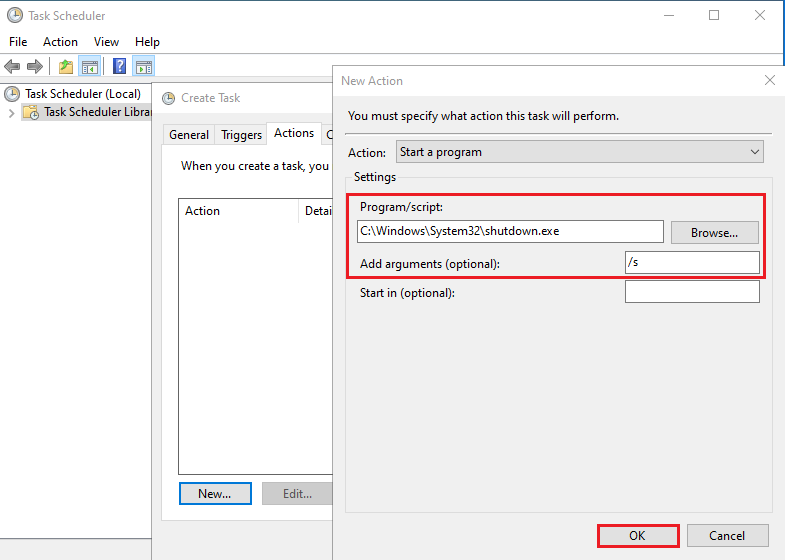
7. Click Browse to Browse the program.
8. Select Shutdown.
- Program/Script path: C:\Windows\System32\shutdown.exe
9. Add arguments /s and click OK.
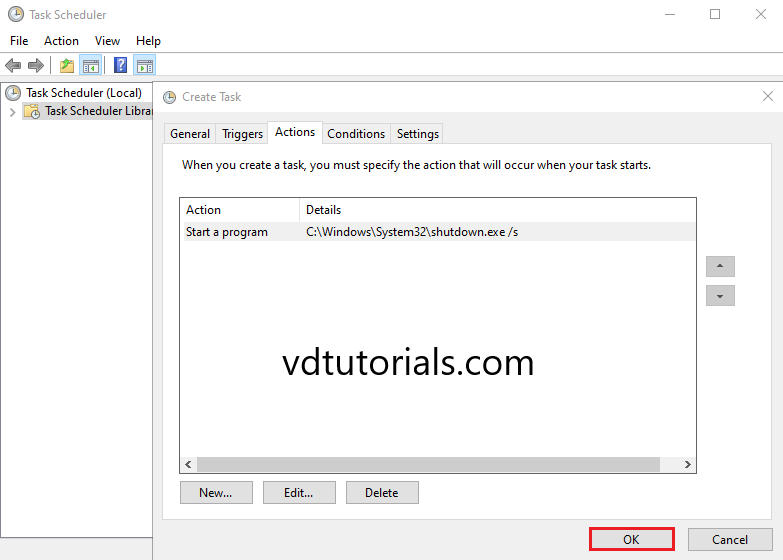
10. Click OK.
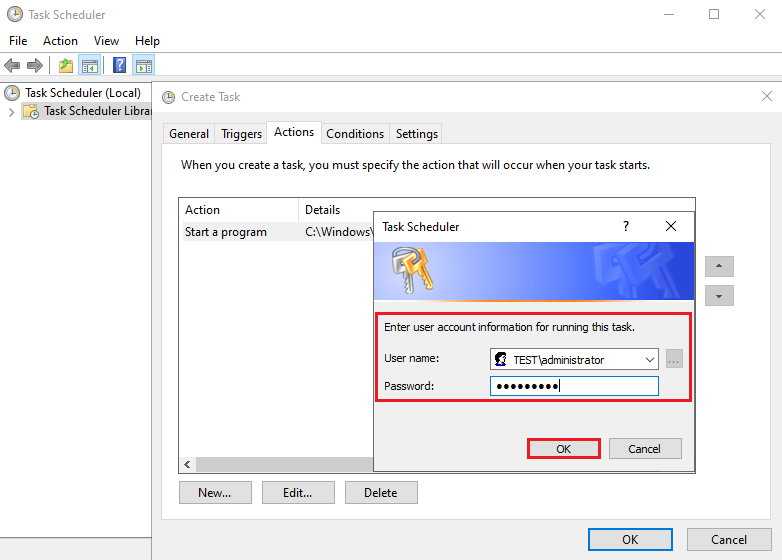
11. Enter the User Information running for this task and click OK.
Automatic Shutdown Task has been configured
Windows Server 2022 Tutorials
Today, I ma going to show you how to use task schedule to schedule auto shutdown or reboot server.
1.Login to Server and open Server Manager.
2.On the Server Manager, Click Tools and select Task Schedule.

3.On the Task Schedule, Select Task Schedule Library.
4.Right-click Task Schedule Library, select Create Basic Task.

5.On the Create Basic Task page, type Auto Shutdown in the Name filed, click Next.

6.On the Task Trigger page, select when do you want the Task to start, in my case is One time, click Next.

7.On the One Time page, select the start date and time, click Next.

8.On the Action page, select Start a program, click Next.

9.On the Start a Program page, type C:\Windows\SysWOW64\shutdown in Program/script filed, type -s -t 20 in Add arguments (optional) field, Here -s is for Shutdown, “-t” is for Timing and after that the seconds are given, if you would like to do reboot server not shutdown, you just need to change -s to -r, click Next.

10.On the Summary page, click Finish.

Hope you enjoy this post.
Cary Sun
Twitter: @SifuSun
Web Site: carysun.com
Blog Site: checkyourlogs.net
Blog Site: gooddealmart.com
Прочитано: 1 723
Ранее я уже Вас знакомил с планировщиком заданий в серверной операционной системе. Опираясь на уже изложенный материал, я покажу, как создать работоспособные задания по выключению сервера.
Запускаем командную строку с правами Администратора. Ваша консоль должна быть приведена к виду:

Далее, чтобы Удалить все задания или конкретное:
Schtasks /delete /TN * /F
Schtasks /delete /TN “shutdown” /F
, параметры /TN “<ваше_название_задания>”.
Исходное имя сервера: W2008R2X64, в Вашем случаем другое, узнать его можно, введя в командной строке:
Echo %computername%
Далее, где
Keiz – учётная запись от имени которой будет запущено задание (В локальных Администраторах)
Aa1234567 – пароль от этой учетной записи
Теперь собственно:
Выключить сервер Windows Server 2008 R2 SP1 Standard в указанное время:
schtasks.exe /create /S W2008R2X64 /RU keiz /RP Aa1234567 /SC ONCE /TN shutdown /TR "%systemroot%\system32\shutdown.exe /s /c "shutdown" /d p:0:0" /ST 12:05 /RL HIGHEST
, ключ /RL HIGHEST – выполнить задание с наивысшими привилегиями
См. скриншот для пояснения:

Выключить сервер Windows Server 2008 R2 SP1 Standard в указанный день и в указанное время:
schtasks.exe /create /S W2008R2X64 /RU keiz /RP Aa1234567 /SC ONCE /TN shutdown /TR "%systemroot%\system32\shutdown.exe /s /c "shutdown" /d p:0:0" /SD 15/09/2012 /ST 12:05 /RL HIGHEST
Данный пример был реальной задачей поставленной у меня. Но я заморочился и сделал всё в командной строке, так хоть и долго когда разбираешься, но теперь я точно знаю, как работает планировщик в серверной части Windows. На этом. Всё удачи!!!
Despite the common belief, the practice of programming a system reboot or shutdown of a client or server machine isn’t necessarily a bad thing: in some limited scenario planning a regular shutdown or reboot of the operating system could be a decent workaround to securely put the machine in a desired state — for example, to make it ready for a VM-based backup or for installing a planned update. Depending on the situation, it could even be acceptable to setup a recurrent period — once a week, for example — to issue a system reboot.
The ideal interval, needless to say, might vary a lot depending on the features performed by our server, its service availability expectactions and other variables in play: if the server performs its activities only during daytime can probably be restarted every night without major issue, while a web server that serves sites or services troughout the world should be restarted only in exceptional circumstances. It’s also worth noting that you can often get the same benefits by recycling the Application Pools or other resource-heavy processes, as we’ll see in a short while.
Setting up our machines to reboot at regular intervals could also be useful to ensure that the system will be able to get back on track in case of a planned reboot — such as those issued by system updates or due to unforeseen situations — service interruption, power failure, hardware failure and other more or less serious events that could always happen. Since the ability to recover after those unexpected events is the fundamental premise of any Disaster Recovery procedure, setting a reboot at regular intervals might also be a not-so-terrible way to periodically test our system against these kind of threats.
To set up an automatic system restart, open the Control Panel (if you do not know how to do on Windows 10, read here) and open the Task Scheduler in the following way, depending on your version of Windows:
- Windows 2000/XP, Windows Server 2003 and previous versions/builds: select the Task Scheduler (or Scheduled Tasks) icon.
- Windows Vista, Windows 7/8/8.1/10, Windows Server 2008 and newer versions: open the Administrative Tools folder, then select the Task Scheduler icon.
Once the Task Scheduler window is open, create a new task using the Create Task action in the following way:

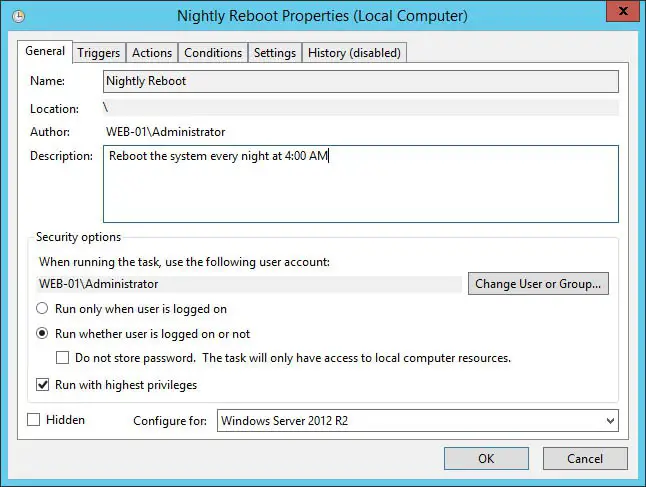
A modal window will be opened: use the General tab to setup a name and a description to the new task. Other than that, it can be useful to properly setup the following options:
- Run whether user is logged on or not, to ensure that the task will be executed even if there are no logged-in users.
- Run with highest privileges, to make sure that the task will be executed with administrator rights — this is required for issuing a system hutdown or a reboot.
For further info regarding the other options, check out this MS TechNet article.
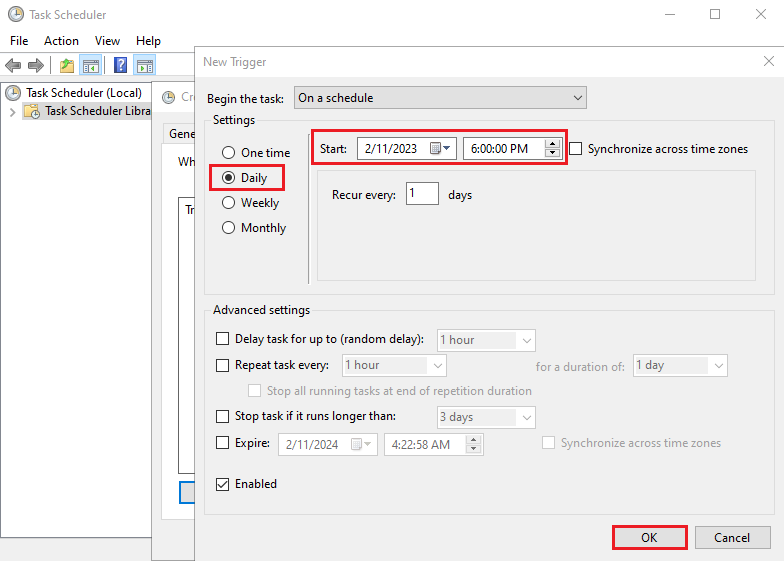
Once done, move to the Trigger tab and click on the New button to create an execution trigger — which is, the event that will make the system run the task itself. A New Trigger modal window will then be opened, which you can use to setup such event. The most common trigger to setup here is a time-based trigger, which can be set by selecting the On a schedule option on the Begin the task dropdown list:
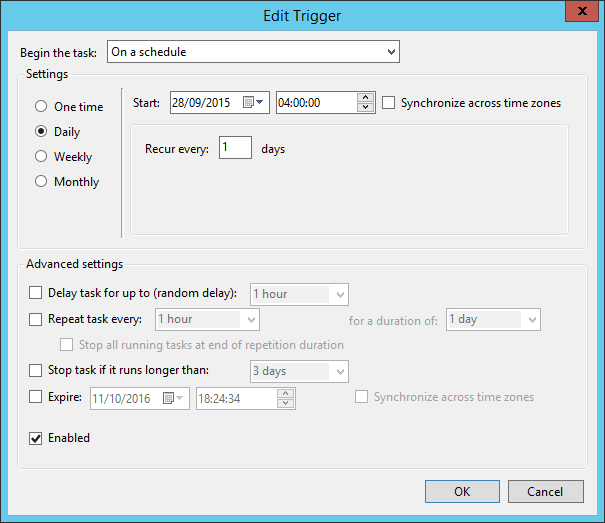
For further info regarding triggers, take a look at this MS TechNet page.
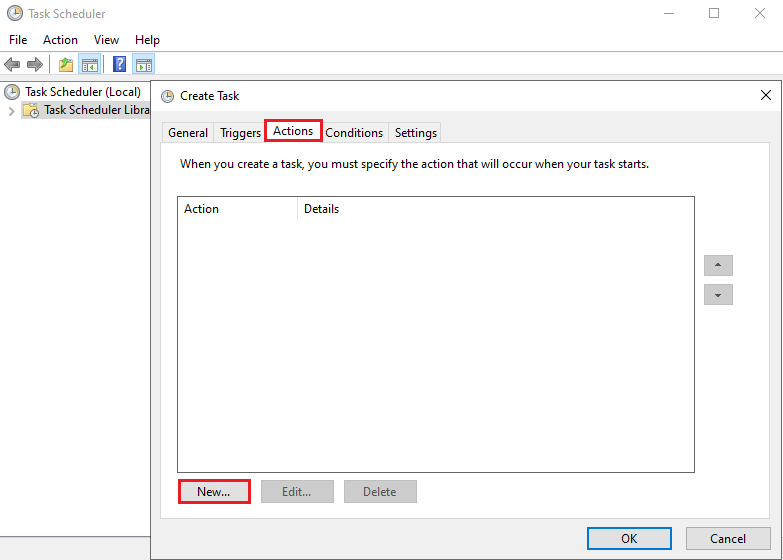
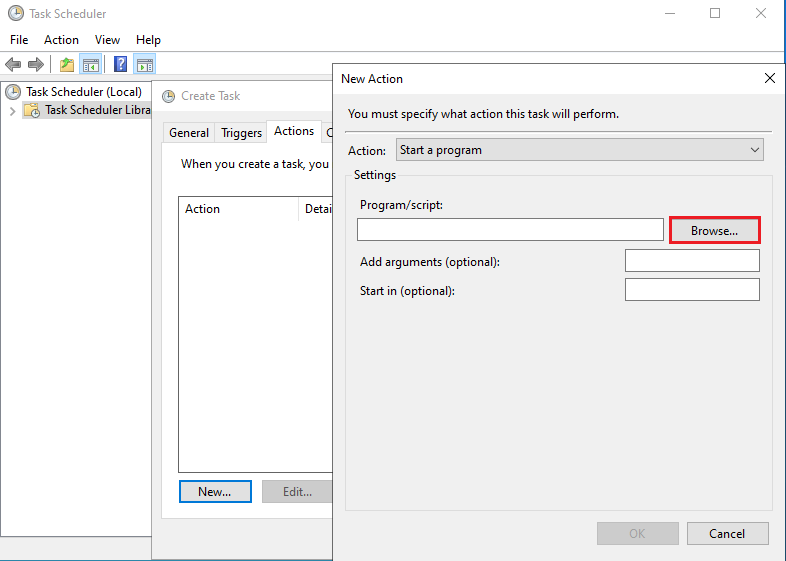
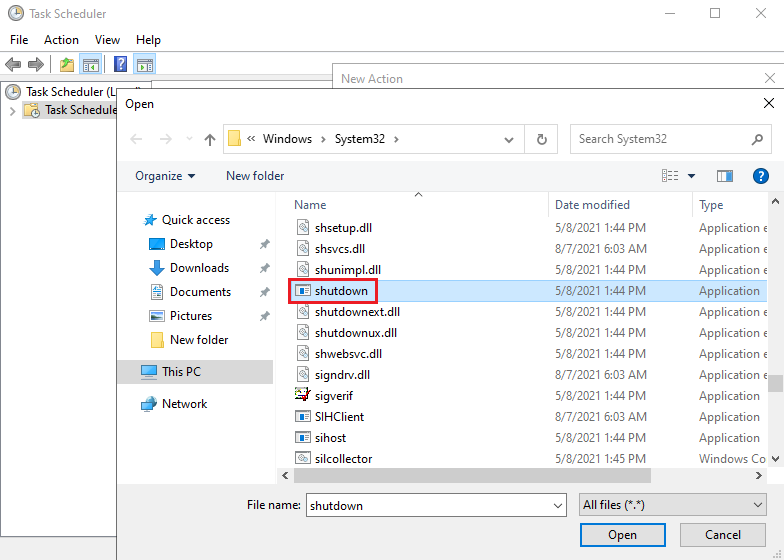
Once done, move to the Actions tab and click to the New button to setup the command to execute whenever the trigger fires.
Setup an automatic Shutdown (without reboot)
|
%SystemRoot%\system32\shutdown.exe —s —f —t 10 |
Setup an automatic Reboot
|
%SystemRoot%\system32\shutdown.exe —r —f —t 10 |
Here’s a brief explanation of the parameters used above:
-s : setup the automatic shutdown of the system without a reboot. Alternative to the -r option (see below).
-r : setup the automatic reboot of the system: this option is required to ensure that your system will actually restart. Alternative to the -s option (see above).
-f : ensure that all the processes, services and user sessions will be forcefully closed before performing the shutdown or reboot: this is a required option to ensure the shutdown even there are active processes that cannot be terminated in a graceful way; be sure to only use it if you don’t have active user sessions and/or running processes that performs critical tasks (such as backup jobs, anti-malware scans and the likes), as they will most likely be killed before completion.
-t : setup a timeout before executing the shutdown or reboot (in seconds): the default is 20 (20 seconds), but can be changed by adding a number right after it, separated by a space: for example, -t 50 for 50 seconds. This option is great to use because it will also show a warning popup to logged-in users (if there are any) when the shutdown/reboot time occurs, allowing them to close their tasks and log out.
For a detailed explanation of all the shutdown.exe options and parameters, you can take a look at this official MS TechNet doc.
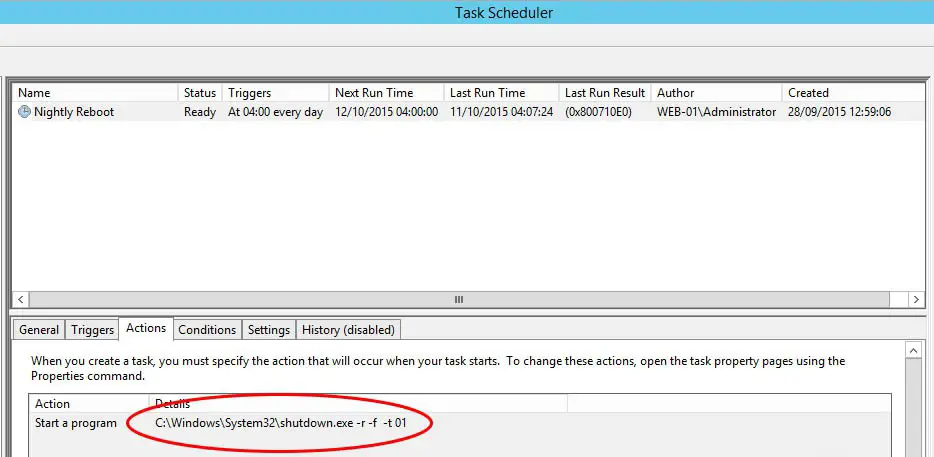
As soon as you define the Action, your planned activity should be ready: take a few seconds to check all the settings once again, then click OK to create the task. If you asked to run the task with elevated privileges the system will ask you to enter the credentials of the Administrator account (or the account with administrative privileges you have chosen in the General tab): once done, the result of your work will appear, summarized in a single line, within the Task Scheduler main panel:
A good thing to do before closing everything is to run the task immediately to prove it works (right mouse button -> Run): alternatively, you can just wait for it to occur automatically at the time you have set and then check the Last Run Time / Last Run Result parameters to determine the outcome.
Conclusion
That’s it for now: I hope that this small tutorial will help other System Administrator looking for a way to setup an automatic shutdown and/or reboot on Windows. In case you need to do the same on Linux machines, check up this post!