В этой статье мы рассмотрим процесс развертывания виртуальной машины с Windows на гипервизоре Proxmox VE. Подробно рассмотрим базовые рекомендации и best practices по оптимальным параметрам ВМ, установке, и запуску гостевой Windows Server в виртуальной машине Proxmox.
Содержание:
- Создаем виртуальную машину для Windows Server на Proxmox
- Установка гостевой Windows Server в ВМ Proxmox
Подготовительные шаги:
- СкачайтеISO образ с драйверами VirtIO для гостевой Windows (virtio-win.iso)
- Получите установочный ISO образ с Windows (в нашем примере это Windows Server 2025)
Подключитесь к веб интерфейсу Proxmox (
https://proxmox-ip:8006
), и загрузите ISO образы в локальное хранилище. Перейдите в раздел ISO images —> нажмите Upload и укажите путь к ISO файлу на диске.
По умолчанию для хранения ISO образов в Proxmox используется директория /var/lib/vz/templates/iso
Создаем виртуальную машину для Windows Server на Proxmox
Создадим на хосте Proxmox виртуальную машину для установки Windows Server.
- Щелкните по хосту Proxmox и выберите Create VM
- На вкладке General укажите осмысленное имя и ID виртуальной машины (предлагаемый ID можно оставить по умолчанию, либо вручную задать в нем другой номер, например последний октет IP адреса ВМ).
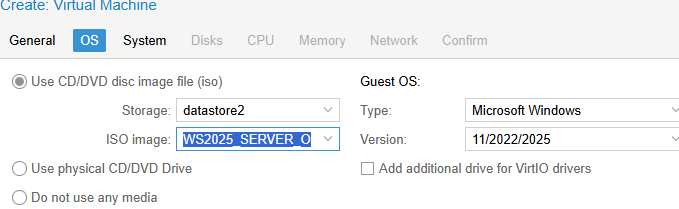
- На вкладке OS выберите тип гостевой ОС (Microsoft Windows 11/2022/2025) и установочный ISO образ с Windows, который вы загрузили в хранилище

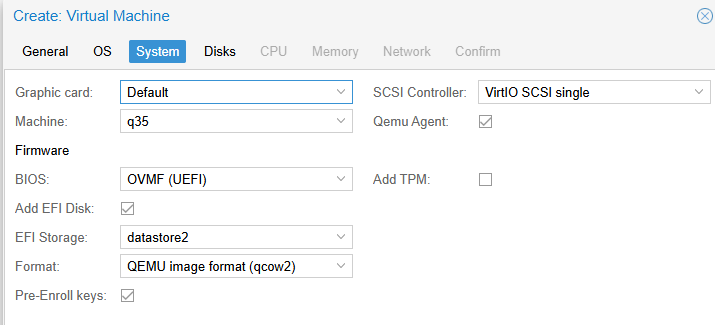
- На вкладке System выберите следующие настройки:
Firmware: OVMF (UEFI) – рекомендуемый тип платформы для современных версий Windows. Для старых систем можно использовать SeaBIOS
Add EFI Disk: включить
Выберите хранилище, где будет хранится EFI диск. Тип диска оставить по-умолчанию (qcow2)
Pre-Enroll keys: включить (прописывает стандартные ключи Microsoft Secure Boot)
Тип контроллера: VirtIO SCSI single
Qemu Agent: включить
TPM: включите, если нужна поддержка виртуального TPM в виртуальной машине (для Windows 11 TPM 2.0 является обязательным требованием)
- На вкладке Disks добавляем диск типа SCSI вместо IDE (SCSI протокол производительнее и быстрее, чем IDE или SATA). Выберите размер диска (для Windows не менее 40 Гб)
- В качестве типа диска доступны RAW (минимум возможностей, но лучшая производительность), VMDK (совместимость с VMware) или QCOW2 (расширенный формат с поддержкой снапшотов). Формат qcow2 используется по умолчанию (оставляем его).
- Включаем параметр Discard для более эффективного использования места на диске (работает по аналогии с TRIM в SSD, очищая реально удаленные данные, освобождая место). В качестве типа кэширования выберете Write Back (повышает производительность). Если кэш отключен (Default (no cache)), этот режим безопаснее с точки зрения потери несохраненных данных на диске при отключении ВМ, но медленнее. Режим Write through оптимален в случае высокой нагрузки на чтение

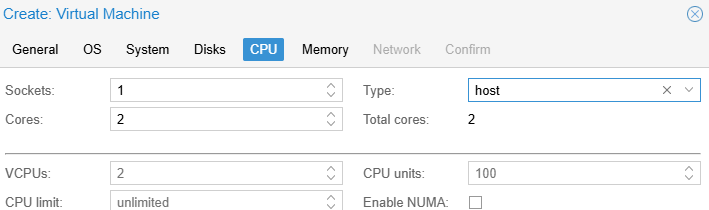
- На вкладке CPU укажите сколько ядер (cores) выделить для ВМ (не менее 2 ядер типа host для Windows). Для производительных ВМ с Windows можно дополнительно добавлять CPU сокеты и включить поддержку NUMA.
Тип CPU host позволяет ВМ получать доступ ко всем возможностях физического CPU, исключая эмуляцию. В том числе в таком режиме в гостевой Windows может работать вложенная виртуализация. Это позволит запускать Hyper-V и подсистемы Linux (WSL) внутри виртуальной машины.

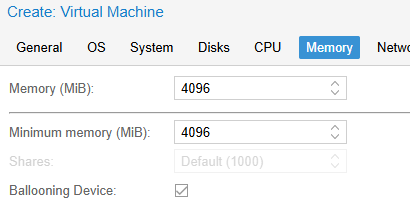
- На вкладке Memory укажите, сколько оперативной памяти выделить для ВМ. Рекомендуется не менее 4096 Мб для Windows. С помощью опции Minimum memory можно зарезервировать оперативную память под ВМ. Режим ballooning позволяет гипервизору изымать неиспользуемую память у ВМ при высокой нагрузке (более 80%) на RAM хоста.
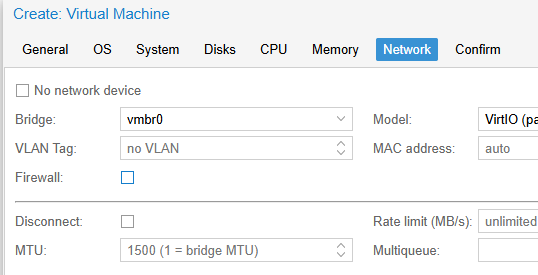
- На вкладке Network выбираем модель виртуальной сетевой карты VirtIO (paravirtualized) вместо Intel E1000. Выберите сетевой мост, через который ваша ВМ будет выходить наружу (в этом примере vmbr0 подключен к физическому сетевому интерфейсу сервера Proxmox).
- Отключите опцию Firewall, если вы не хотите, чтобы правила файервола Proxmox применялись к ВМ. В этом случае подразумевается, что будет использоваться встроенный Windows Defender Firewall в гостевой ОС виртуальной машины.
- На следующей вкладке проверяем результирующие настройки и создаем ВМ, нажав Finish.

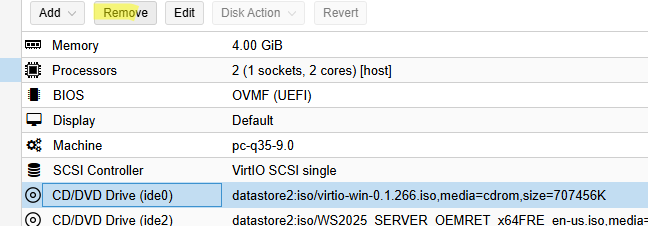
После того, как ВМ создана, нужно добавить в ее настройках дополнительный виртуальны CD/DVD привод. Выберите ВМ -> вкладка Hardware -> Add -> CD/DVD drive.
Смонтируйте в виртуальный привод ISO образ с драйверами VirtIO. Все готово к установке гостевой Windows в виртуальную машину Proxmox.
Установка гостевой Windows Server в ВМ Proxmox
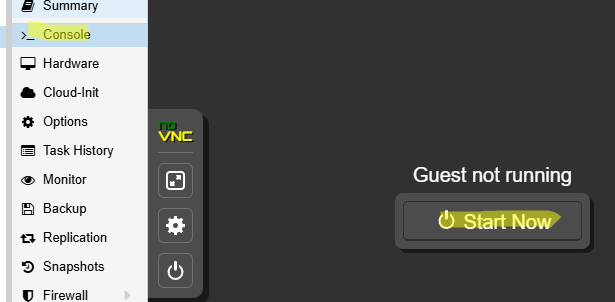
В параметрах ВМ перейдите на вкладку Console и запустите ВМ (Start Now).
Нажимаем любую кнопку, чтобы начать установку Windows. Далее запускается стандартный мастер установки Windows, где нужно будет выбрать языковые настройки, редакцию Windows Server и и т.д.
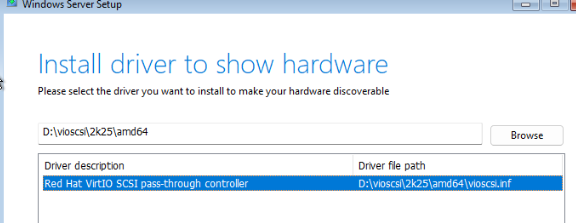
В окне, где нужно выбрать диск для установки ОС, вы обнаружите, что установщик Windows не увидел ваш виртуальный жесткий диск. Дело в том, что в образе Windows отсутствуют драйвера для VirtIO SCSI контроллера.
Чтобы загрузить драйвер в режиме WinPE, нажмите кнопку Load Driver.
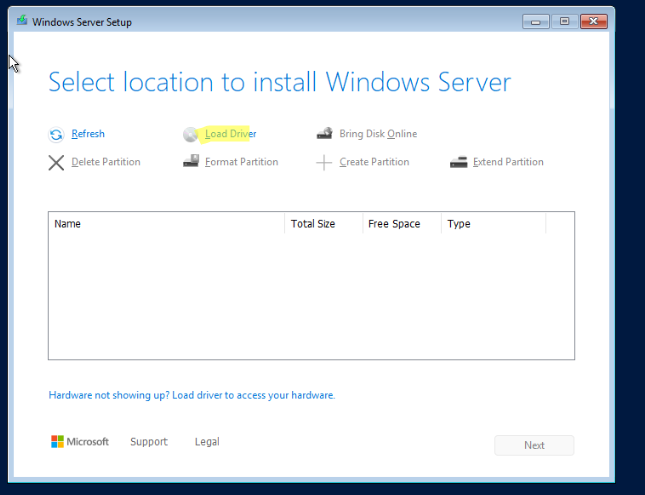
Укажите папку с драйвером Red Hat VirtIO SCSI pass-throught controller на смонтированном ISO образе с драйверами VirtIO: d:\vioscsi\2k25\amd64. Установите драйвер.
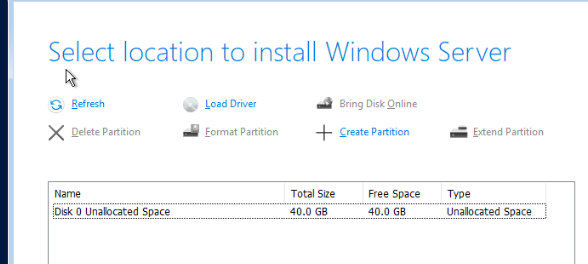
Установщик Windows должен увидеть неразмеченный локальный диск. Выберите его и продолжите установку.
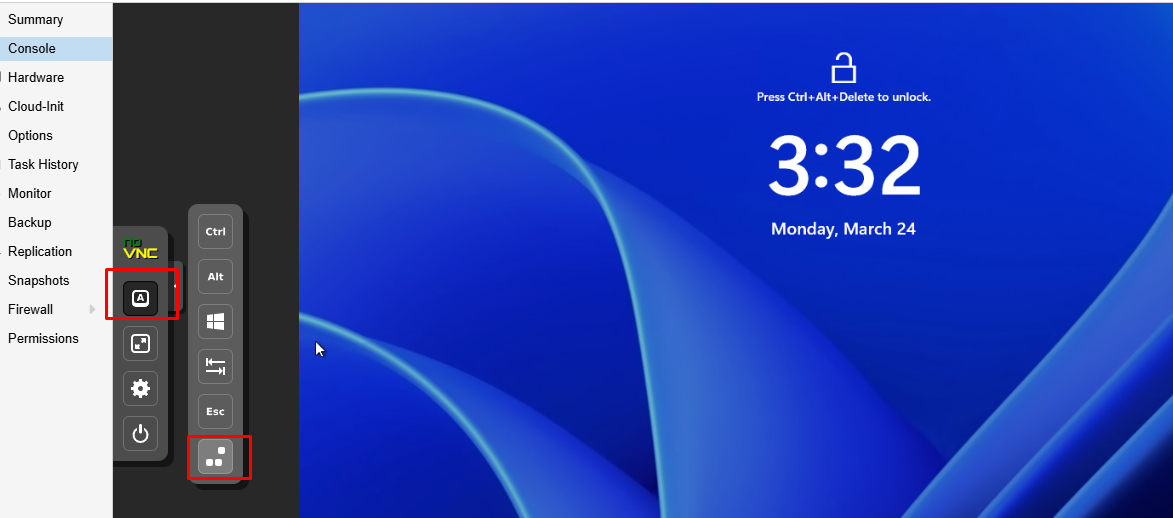
После завершения установки Windows, логинимся в гостевую ОС через консоль Proxmox. Чтобы отправить в консоль сочетание
Ctrl+Alt+Del
для ввода учетной записи Windows, выберите в левой панели Show Extra Keys и отправьте нужную комбинацию клавиш.
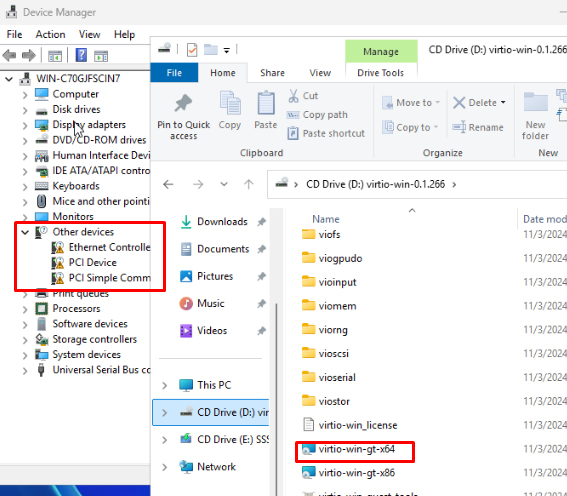
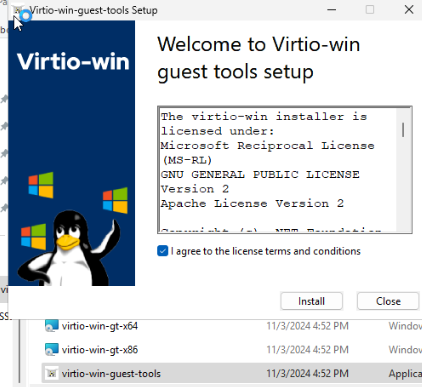
Запустите диспетчер устройств Windows. Как вы видите отсутствует ряд драйверов, которые нужно установить с диска с драйверами VirtIO. Запустите установщик virtio-win-gt-x64.msi с диска и установите с настройками по-умолчанию.
Затем установите гостевой агент Qemu, запустив virtio-win-guest-tools.exe.
Проверим, что служба агента запущена в Windows:
Get-Service QEMU-GA
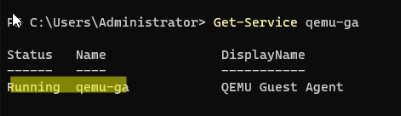
После установки гостевых средств интеграции QEMU в консоли Proxmox на вкладке Summary виртуальной машины будет отображаться информация об IP адресе, полученном из гостевой ОС.
Проверить наличие агента Qemu в ВМ можно из консоли хоста Proxmox:
qm agent <vmid> ping
После завершения установки, удалите из виртуального оборудования ВМ диск с драйверами VirtIO.
Осталось завершить настройку Windows в гостевой машине: задать имя компьютера, статический IP (если применимо), время и часовой пояс, включить RDP, установить обновления Windows, добавить необходимые службы и роли и т.д.
In this guide, you will learn to Enable HyperV on Windows Server 2025 and Create a Virtual Machine in Hyper-V Manager. Hyper-V is Microsoft’s native hypervisor included in Windows Server 2025, designed to create and manage virtual machines (VMs) on x86-64 systems. Its primary purpose is to enable virtualization, allowing multiple operating systems to run concurrently on a single physical server.
You can now proceed to the guide steps below on the Orcacore website to Install Hyper-V on Windows Server 2025 and Create a Test Virtual Machine in it.
Table of Contents
Install and Configure Hyper-V on Windows Server 2025
To complete the Hyper-V setup on Windows Server 2025, log in to your Windows Server and follow the steps below.
Note: Also, you can check for the Video Tutorial of Hyper-V Setup on Windows Server 2025:
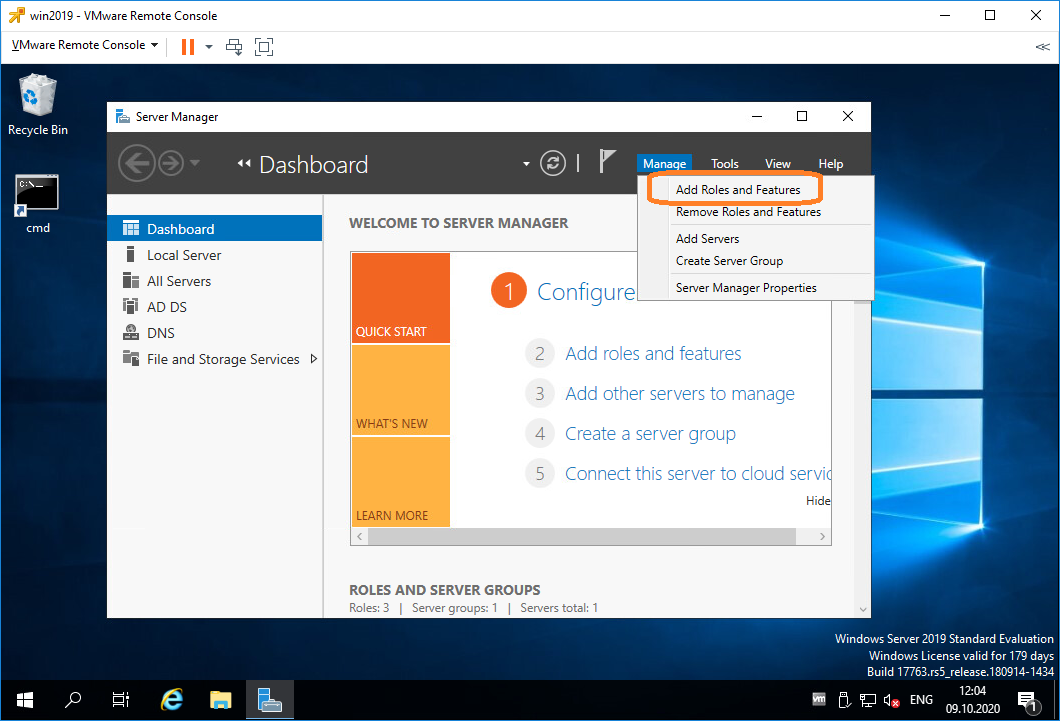
1. Enable HyperV on Windows Server 2025
To enable HyperV on Windows Server 2025, you must open the Server Manager and click on Add Roles and Features.

In the Installation Type section, click on Role-based or feature-based installation and click Next.

Then, you must select the Destination Server. Here we Select a server from the server pool and click Next.

In the Server Roles section, find the Hyper-V option and click on it. This will open a window where you must add Hyper-V features.

Then, you will see that the Hyper-V option has been selected. Click Next to continue.

In the Features section, you can add more features to the selected server. You can keep the default option and click Next.

Next, read the Hyper-V information and click Next.

Then, you can create Virtual Switches. You can select a network adapter for remote access or you can keep it by default and click Next.

In the Virtual Machine Migration, you can click Next to keep the default settings or adjust your configuration and click Next.

Now you can set locations for storing Virtual Hard Disk files and VM config files. You can keep the default settings and click Next.

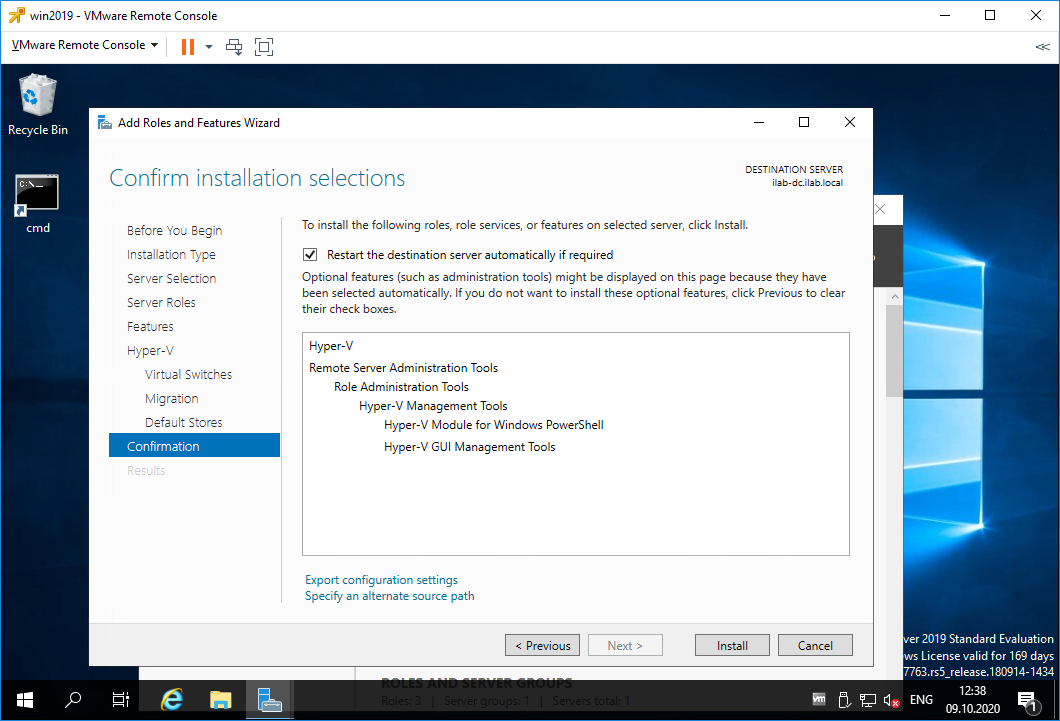
Finally, verify your Hyper-V settings on Windows Server 2025 and click Install.

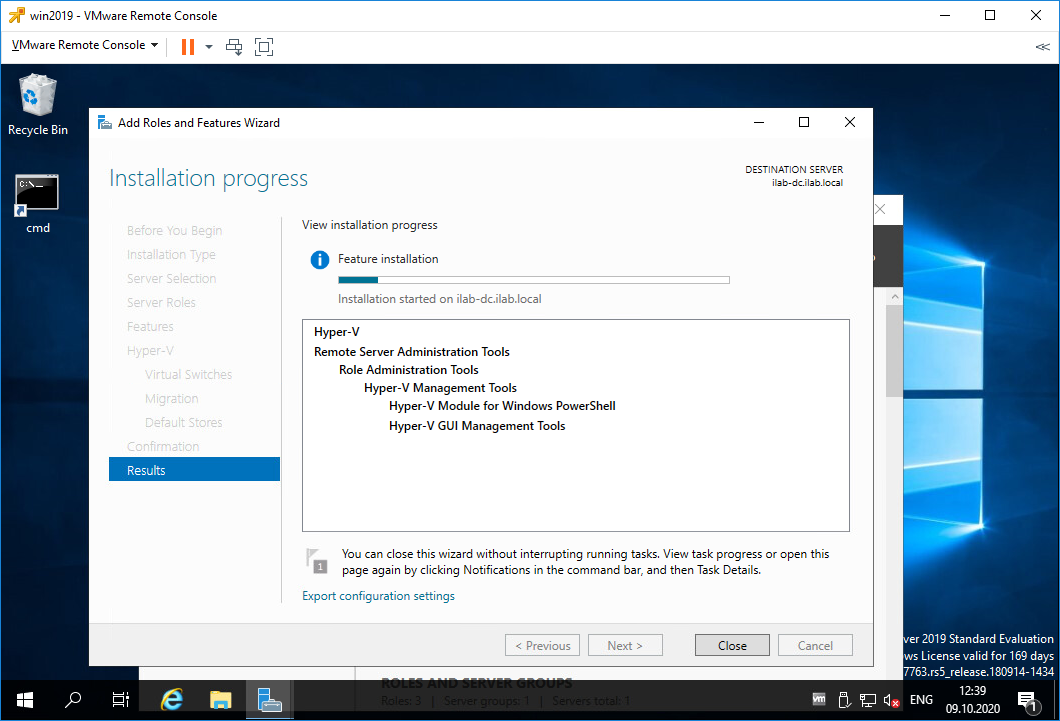
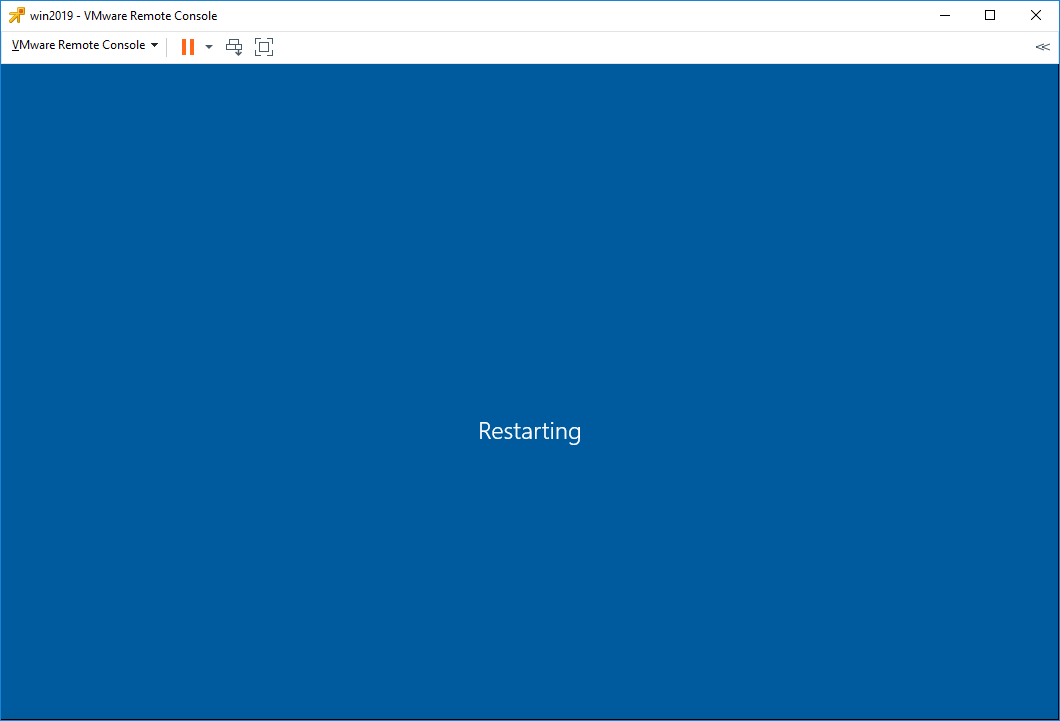
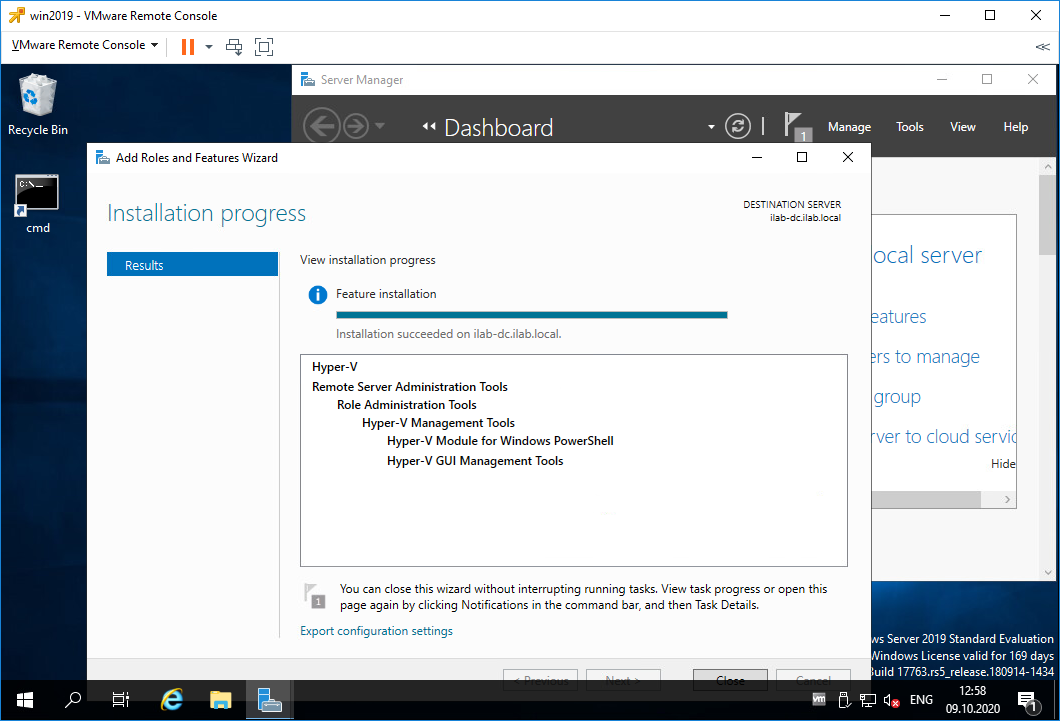
Wait until your installation is completed, then, you must restart your system.

2. Create a Virtual Machine with Hyper-V Manager
At this point, from your server manager, click on Tools and open Hyper-V Manager on Windows Server 2025 to add a new virtual machine.

Then, select your server, from the right-side panel, click on New, and select Virtual Machine.

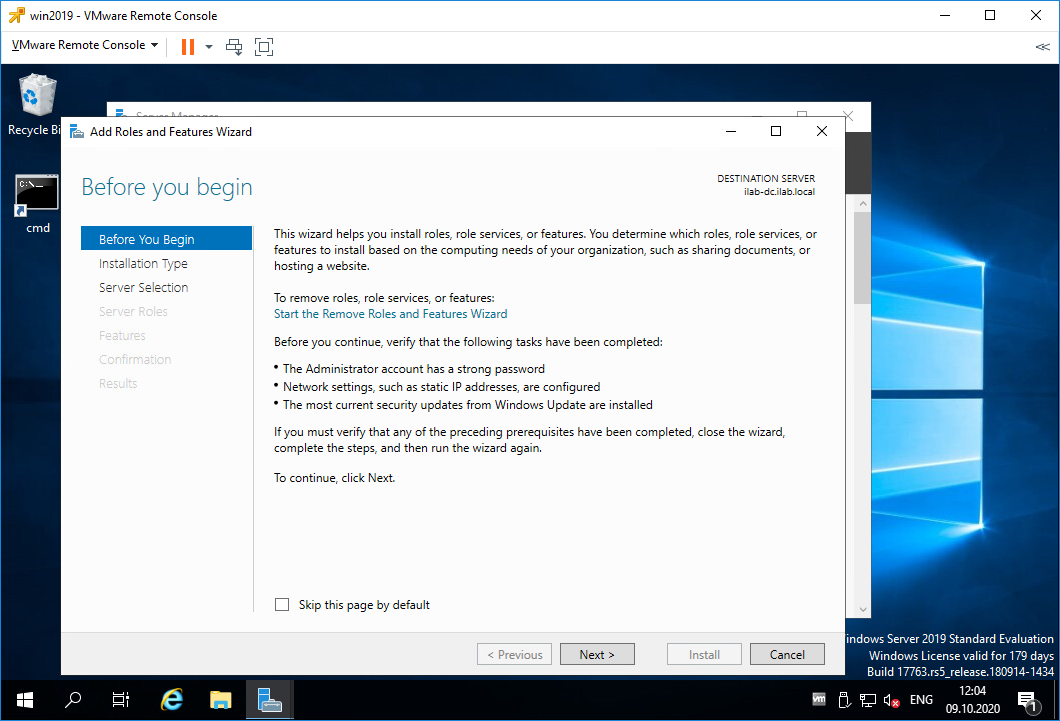
Read the Before Begin information and click Next.

Now you need to choose a name for your Virtual Machine and if you want to store it in another location, be sure you have enough space. Click Next to continue.

At this point, you need to choose the Generation of your virtual machine. Here we choose Generation 2 which requires a supported 64-bit operating system. Click Next to continue.

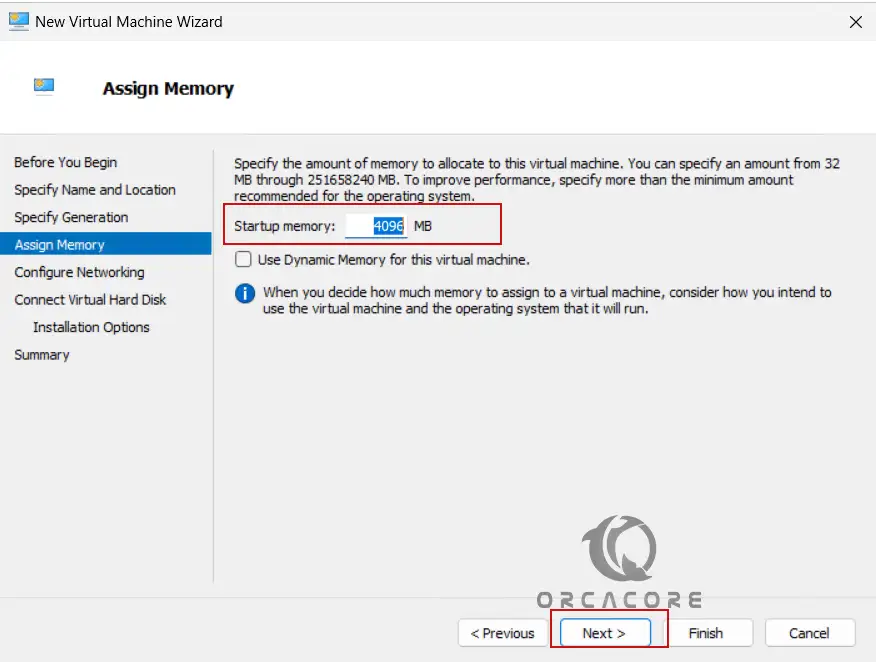
Then, you must specify the memory to allocate to your virtual machine. Then, click Next.
Because we don’t configure a virtual switch for the virtual machine’s network connection, it remains disconnected. Click Next to continue.

Now you must create a virtual hard disk, select a location, and specify the size for it. Then, click Next to continue.

At this point, you can select your Installation option. You can use a bootable CD/DVD, ISO File, or Floppy disk. Or you can install your operating system later. Click Next to continue.

Complete your Virtual Machine setup by clicking on Finish.

Now you must see that your VM has been created. Because we choose to install the operating system later, here we want to show you how to add the OS with an ISO file.
3. Add an ISO File to an Existing Virtual Machine in Hyper-V
To add the ISO file, you must click on your virtual machine settings.

In the left panel, expand IDE Controller 1 or SCSI Controller (depending on the VM generation). Select DVD Drive and click Add.

From there, you can add your ISO File for your OS installation. Then, click on Apply and OK.
Finally, you can easily manage your Virtual Machine in Hyper-V on Windows Server 2025.

That’s it, you are done with the Hyper-V setup on Windows Server 2025.
Conclusion
Installing Hyper-V on Windows Server 2025 is a straightforward process using Server Manager. Once installed, you can create and manage virtual machines efficiently. Hope you enjoy it.
Please subscribe to us on Facebook, YouTube, and X.
You may also like to read the following articles:
Create a Virtual Machine with VirtualBox in Windows
Create a virtual machine in VMware Workstation 17 pro
Install Visual Studio on Windows Server 2025
Install Wireshark on Windows Server 2025
FAQs
What are the system requirements for Hyper-V Windows Server 2025?
1. A 64-bit processor with SLAT (Second Level Address Translation) support.
2. Minimum 4GB RAM (more is recommended for multiple VMs).
3. Windows Server 2025 Standard or Datacenter Edition.
How do I check if my system supports Hyper-V?
You can use the command below from PowerShell:systeminfo | findstr "Hyper-V"If Hyper-V requirements are enabled, your system can support Hyper-V.
What’s the difference between Generation 1 and Generation 2 VMs?
Gen 1: Supports older OS versions, and BIOS boot.
Gen 2: Supports modern OS, UEFI boot, Secure Boot, and better performance.
Время на прочтение4 мин
Количество просмотров14K
В этой статье я расскажу о создании образа ВМ с Windows Server, его развертывании и создании тестовой среды для работы с Windows Server.
Я часто создаю ВМ с Windows для тестирования различных технологий. Со временем я частично автоматизировал этот процесс и хочу об этом расказать. Эта статья может быть интересна начинающим Windows администраторам. Затронуты будут следующие темы:
- Установка и базовая настройка Hyper-V в Windows 10
- Создание образа виртуальной машины
- Создание виртуальной машины из образа на базе разностного диска
Для работы тестовой среды я использую домашний компьютер со следующими характеристиками:
- Intel Core i5-3570K
- 32 GB RAM
- SSD 128GB — System
- SSD 512GB — Hyper-V
- 2x1Gbps NIC
- ОС Microsoft Windows 10 Enterprise
При одновременной работе нескольких виртуальных машин большая нагрузка идет на диски. Поэтому я рекомендую размешать диски виртуальных машин на SSD. Наличие производительной дисковой системы в первую очередь будет влиять на отклик виртуальной машины. По ссылке можно ознакомить с полными требованиями для
установки Hyper-V в Windows 10
. Отмечу следующее, вы не сможете установить Hyper-V на Windows 10 Домашняя. Также обязательно наличие процессора с поддержкой виртуализации.
Установка и базовая настройка Hyper-V в Windows 10
Запутите консоль PowerShell от имени администратора. В дальнейшем все команды PowerShell требуется выполнять в консоли с правами администратора.
Выполните следующую команду.
Enable-WindowsOptionalFeature -Online -FeatureName Microsoft-Hyper-V -All
Перезагрузите компьютер.
Для доступа виртуальной машины к сети требуется создать коммутатор Hyper-V и подключить к нему адаптер виртуальной машины. Код на PowerShell:
— выводит список сетевых адаптеров в системе
— переименовывает адаптеры для удобства
— создает виртуальный коммутатор Hyper-V

Почему скриншоты, где Ctrl-C + Ctrl-V
Код приводится для примера. И я считаю, что лучше один раз набрать код самому. Что поможет его быстрее запомнить.
Если у вас только один сетевой адаптер, используйте следующую команду для создания виртуального коммутатора
New-VMSwitch -Name VMSW01 -NetAdapterName 'Ethernet' -MinimumBandwidthMode Weight -AllowManagementOS $true
— AllowManagementOS $true — автоматически создаст виртуальный сетевой адапетр хоста и подключит его к новому коммутатору. При создании на виртуальный адаптер хоста будут перенесены параметры конфигруации физического адаптера, к которому подключается виртуальный коммутатор.
Также настроим расположение файлов конфигруций и жестких дисков для новых виртуальных машин на нашем гипервизоре. В примере задается путь «F:\Hyper-V\».

На это базовая настройка Hyper-V завершена и можно приступать к созданию виртуальных машин.
Создание образа виртуальной машины
Сначала создадим виртуальную машину WindowsSvr2012R2.
— $pathvm каталог для хранения конфигурации ВМ
— $pathvhd каталог для хранения виртуального жесткого диска
— $vmname имя виртуальной машины
— New-VHD создать новый виртуальный жесткий диск
— New-VM создать новую виртуальную машину
— Set-VMMemory задать параметры памяти
— Add-VMDvdDrive подключить образ в формате ISO к виртуальной машине (подключить установочный образ необходимой вам ОС)
— Set-VMFirmware выбрать подключенный образ первым загрузочным устройством
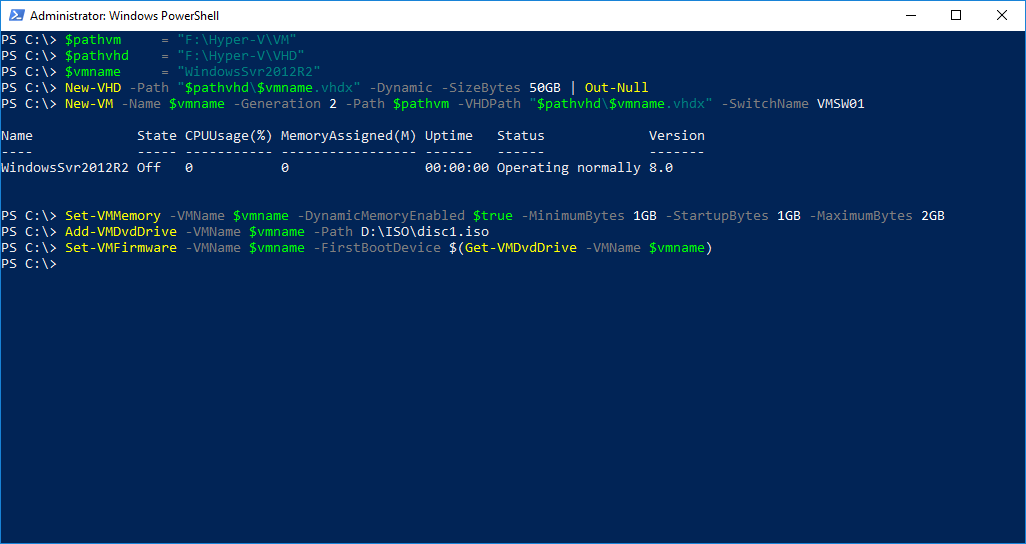
Теперь запускаем виртуальную машину WindowsSvr2012R2
Start-VM WindowsSvr2012R2
Теперь необходимо подготовить образ. Для этого необходимо выполнить:
— Установить ОС
— Установить обновления ОС
— Установить необходимые программы и утилиты
Теперь все готово к подготовке образа к развертыванию. В командной строке виртуальноый машины необходимо выполнить команду Sysprep. Она подготовит образ к дальнейшему развертыванию.
c:\windows\system32\Sysprep /generalize /oobe /mode:vm /shutdown
После окончания работы Sysprep виртуальная машина выключится и у нас будет готовый vhdx файл для дальнейшего развертывания. Если теперь сразу включить вм, она загрузится на этапе OOBE процесса установки Windows. И после принятия лицензионного соглашения и настройки региональных параметров будет готова к работе.
Создание виртуальной машины из образа на базе разностного диска
Для экономии свободного места на диске при создании новой виртуальной машины можно использовать разностный виртуальный диск. При создании разностного диска необходимо определить диск «родитель». Данные диска родителя будут доступны на разностном диске, но все изменения, которые вносятся на разностный диск будут сохранены в отдельном файле. Таким образом подготовив диск с образом ОС и используя его в качестве родительского диска, мы можем быстро развертывать новые виртуальные машины.

Важное о работе с разностным диском:
— размер разностного диска не может превышать размер диска родителя
— важно сохранять неизменным диск родитель, его изменение приведет к поломке всех разностных дисков для которых он был родителем
— используя Hyper-V Manager можно объеденить диск потомок и диск родитель. При этом можно выбрать, будет ли создан новый диск содержащий данные с родителя и потомка. Или данные диска потомка будут перенесены на диск родитель.
— диск потомок может выступать родителем для нового разностного диска
— я рекомендую использовать ВМ с разсностынми дисками только для целей тестирования
Для создания виртуальной машины с разностным диском можно использовать следующий код.

— $pathvm каталог для хранения конфигурации ВМ
— $pathvhd каталог для хранения виртуального жесткого диска
— $parentvhd задаем диск родитель
— $vmname имя виртуальной машины
— New-VHD создаем разностный диск
— New-VM создать новую виртуальную машину и подключить разностный диск
— Set-VMMemory задать параметры памяти
Таким образом можно быстро развернуть тестовую среду с идентичными виртуальными машинами.
На сервере Windows Server 2019 потребовалось запустить виртуальную машину посредством Hyper-V. Установим роль Hyper-V на сервер Windows Server 2019 и создадим какую-нибудь виртуальную машину.
Я буду все действия выполнять на свежем сервере Windows Server 2019 Standard Evaluation. Сервер развёрнут на гипервизоре VMware ESXi. Да-да, я понимаю, что на виртуалке поднимать систему виртуализации не самая здравая идея, но всё это в тестовых целях.
Установка роли Hyper-V на сервере Windows Server 2019
Открываем Server Manager. Manage > Add Roles and Features
Открывается мастер установки ролей. Попадаем в раздел Before You Begin.
Это информационная страница, Next.
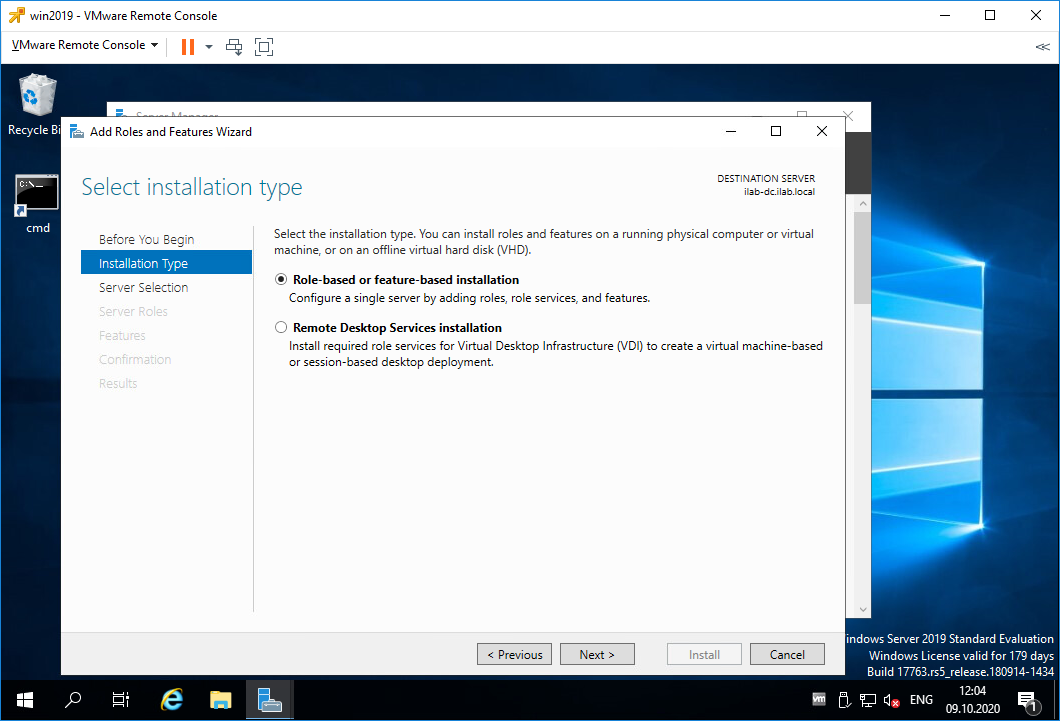
Попадаем в раздел Installation Type. Здесь нужно выбрать тип установку. Выбираем «Role-based or feature-based installation». Next.
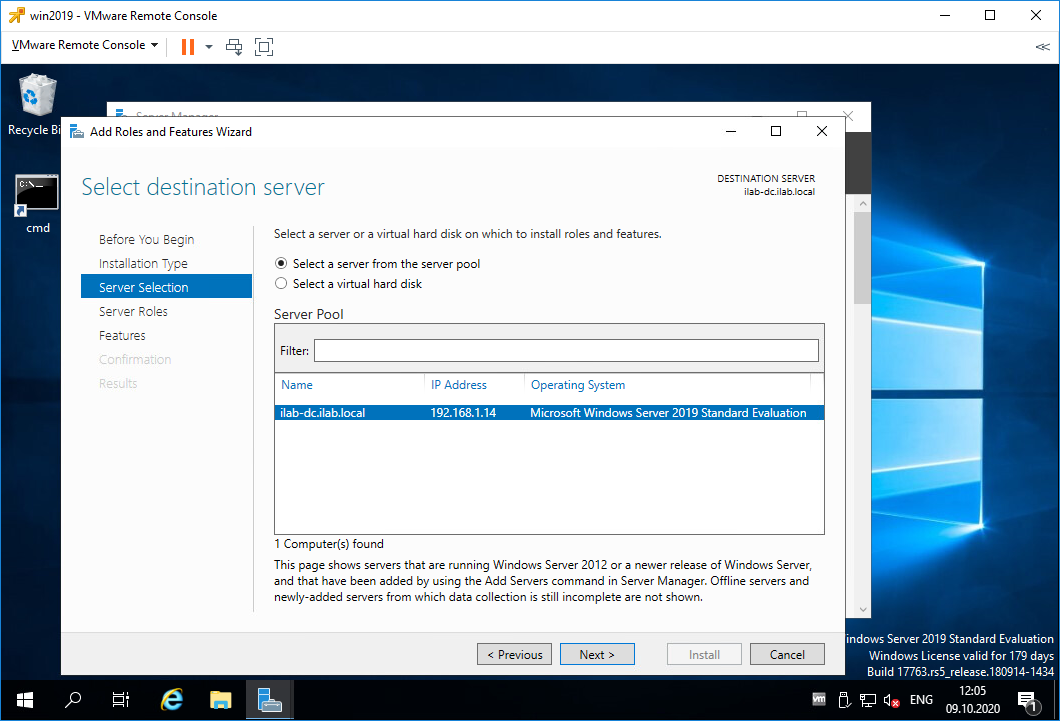
Попадаем в раздел Server Selection. Здесь нужно выбрать сервер, на который будем устанавливать роль. Я выбираю текущий сервер. Next.
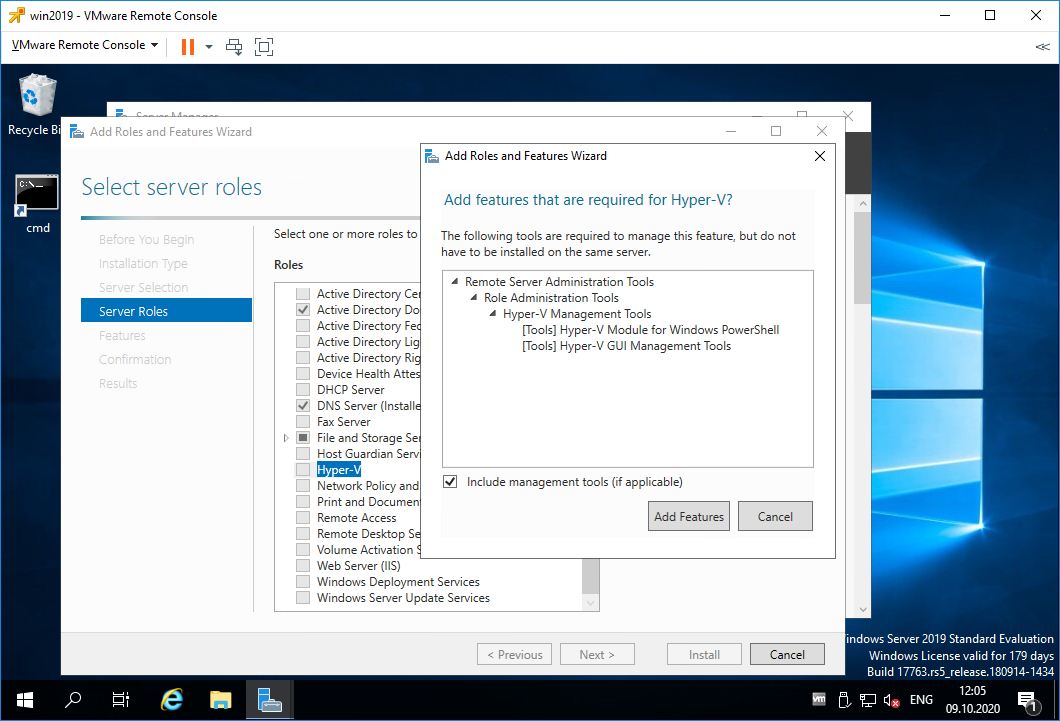
Попадаем в раздел Server Roles. Находим роль Hyper-V, выделяем галкой. Нам предлагают установить фичи, которые необходимы для работы Hyper-V, соглашаемся. Add Features.
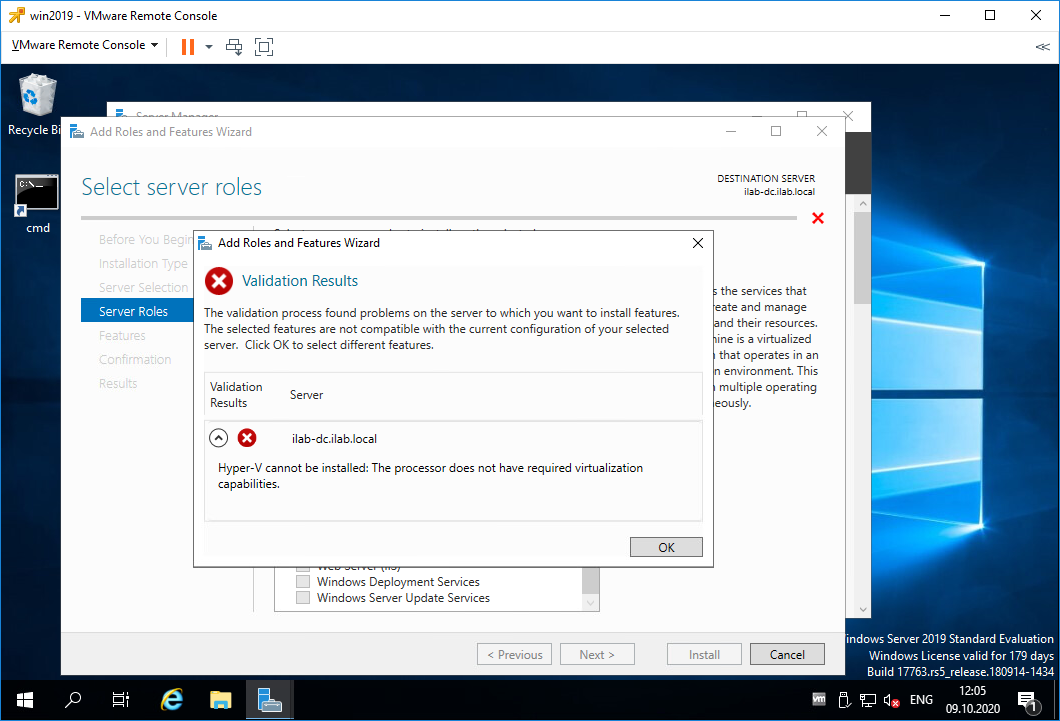
Облом. Я словил ошибку:
Hyper-V cannot be installed: The processor does not have required virtualization.
Для роли Hyper-V требуется процессор, поддерживающий функции виртуализации. Поддержка аппаратной виртуализации может быть отключена в BIOS, в этом случае нужно перезагрузить сервер и в BIOS включить поддержку виртуализации. Это могут быть опции:
- Intel — Intel Virtualization Technology
- AMD — SVM Mode
У меня сервер аппаратный на базе VMware, я выключаю его и перехожу к настройкам виртуальной машины.
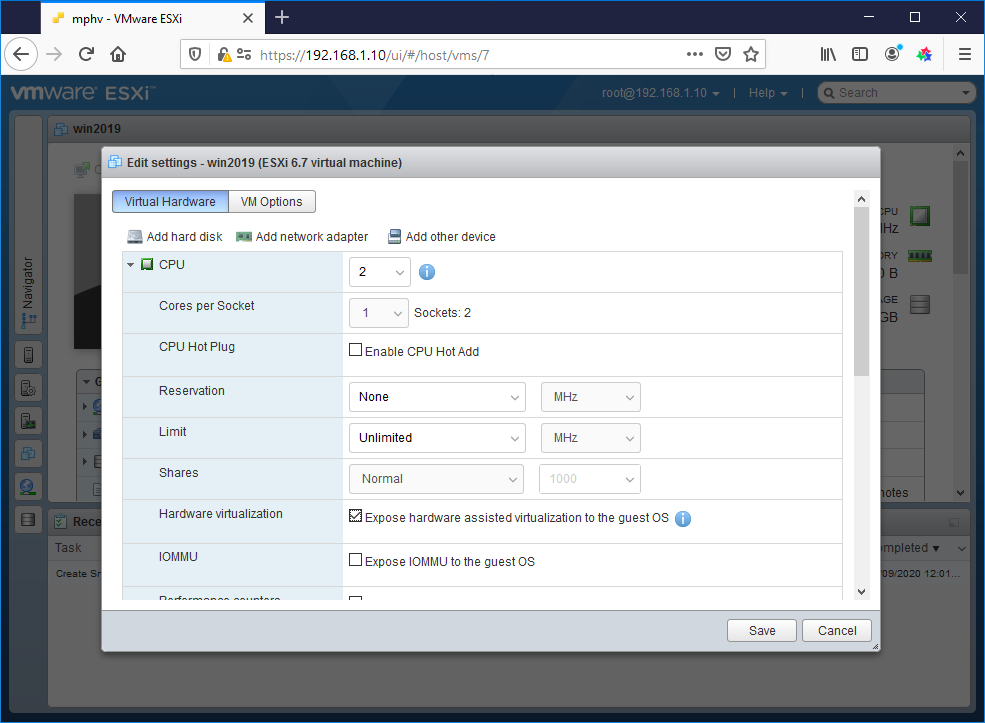
В настройках CPU включаю галку «Expose hardware assisted virtualization to the guest OS».
Включаю сервер. Снова проходим ту же процедуру. Открываем Server Manager. Manage > Add Roles and Features. Выбираем «Role-based or feature-based installation». Находим роль Hyper-V, выделяем галкой. Нам предлагают установить фичи, которые необходимы для работы Hyper-V, соглашаемся. Add Features.
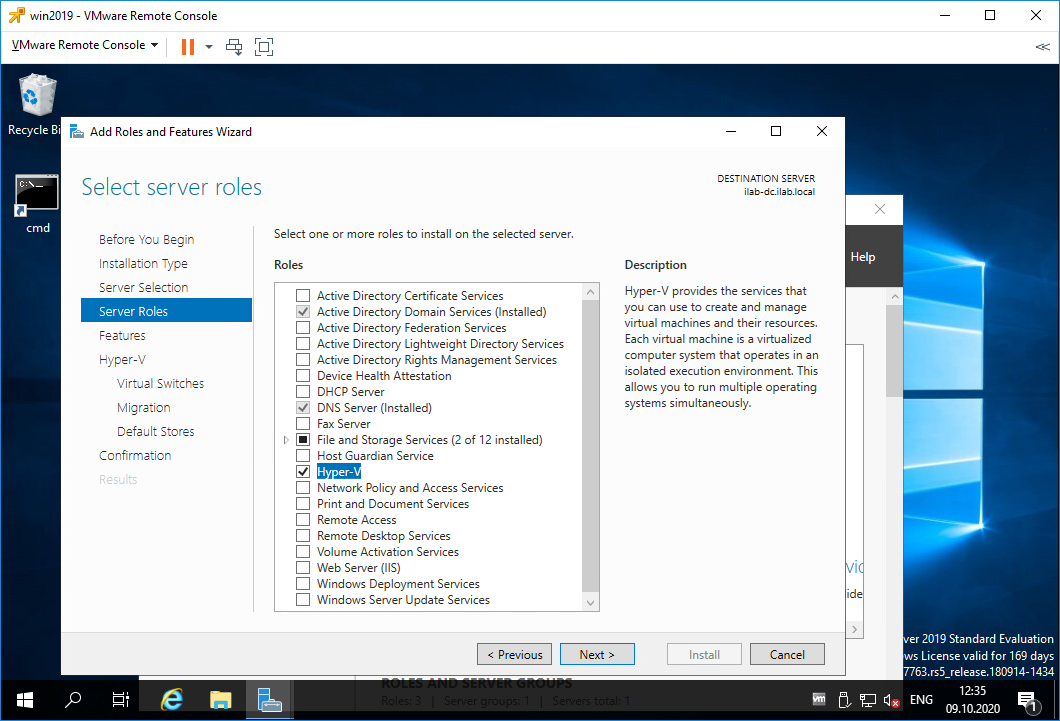
В этот раз всё проходит успешно. Next.
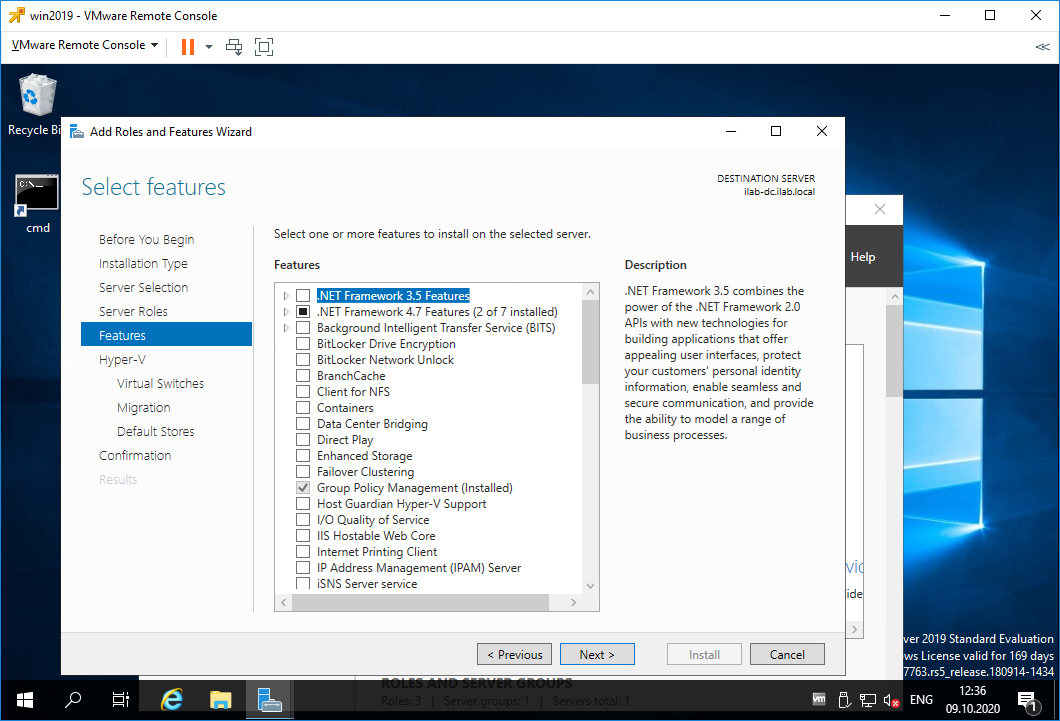
Попадаем в раздел Features, здесь нам ничего не нужно. Next.
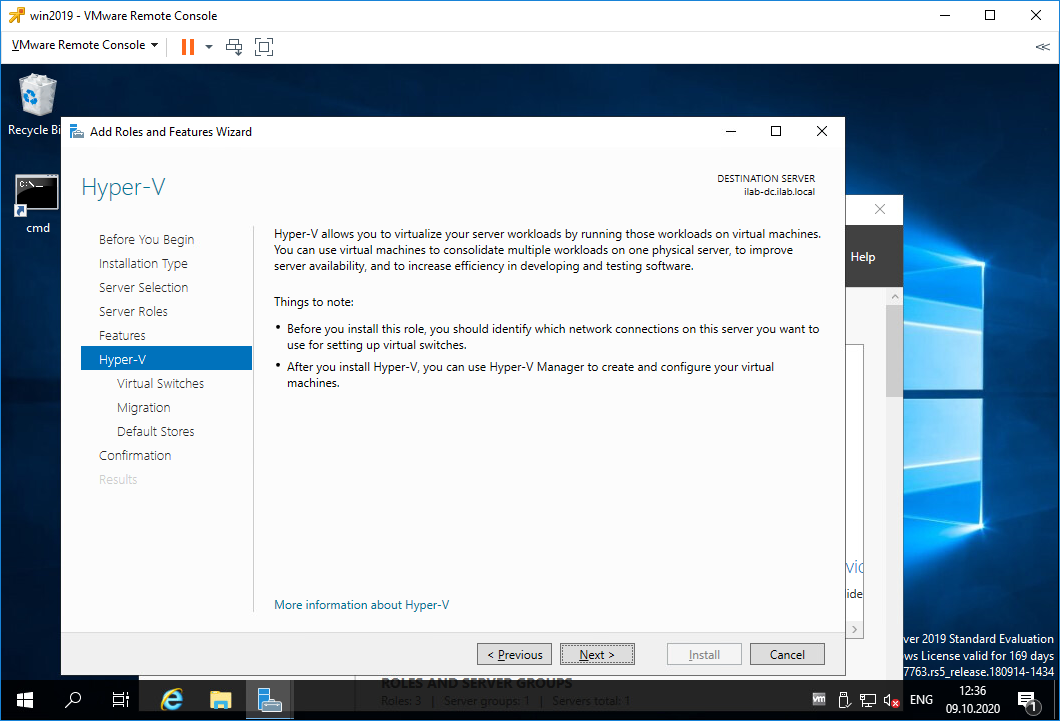
Попадаем в раздел Hyper-V. Здесь рассказывается для чего используется Hyper-V. Кроме того, на этой странице есть важная информация.
- Перед установкой роли Hyper-V следует решить, какую сетевую карту сервера вы будете подключать к виртуальному коммутатору.
- После установки роли Hyper-V для управления виртуальными машинами используйте Hyper-V Manager.
Next.
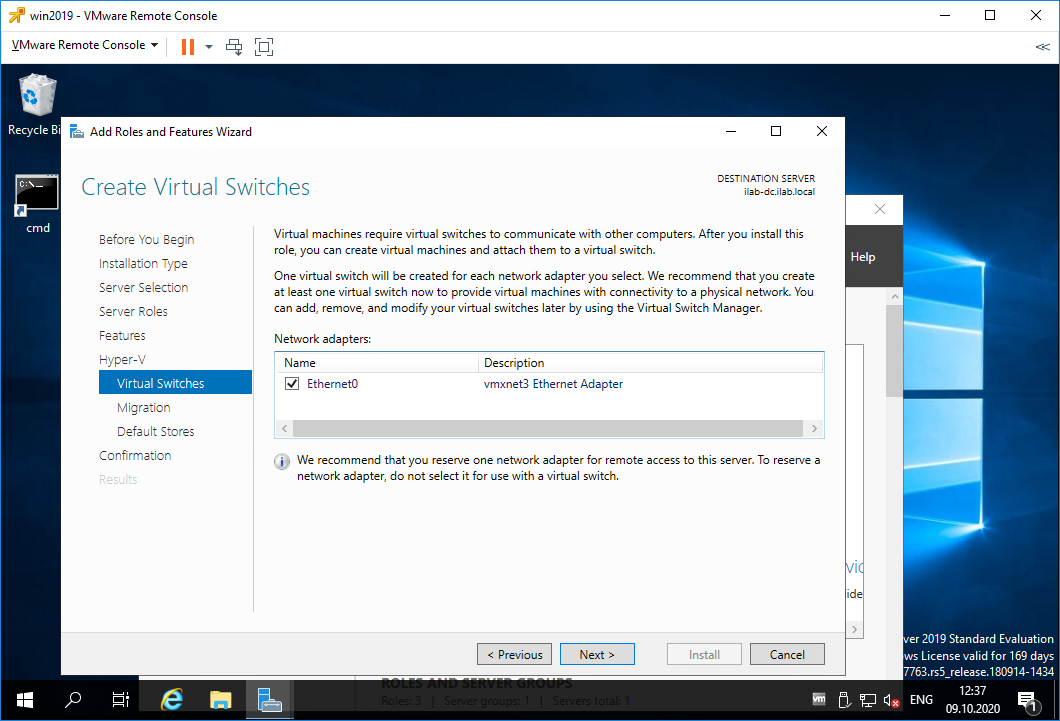
Попадаем в раздел Virtual Switches. Для работы виртуальных машин требуется связать виртуальный коммутатор в сетевой картой сервера, если вы хотите выпустить виртуальный машины в сеть. У меня выбор не очень большой, выделяю единственную сетевую карту. Next.
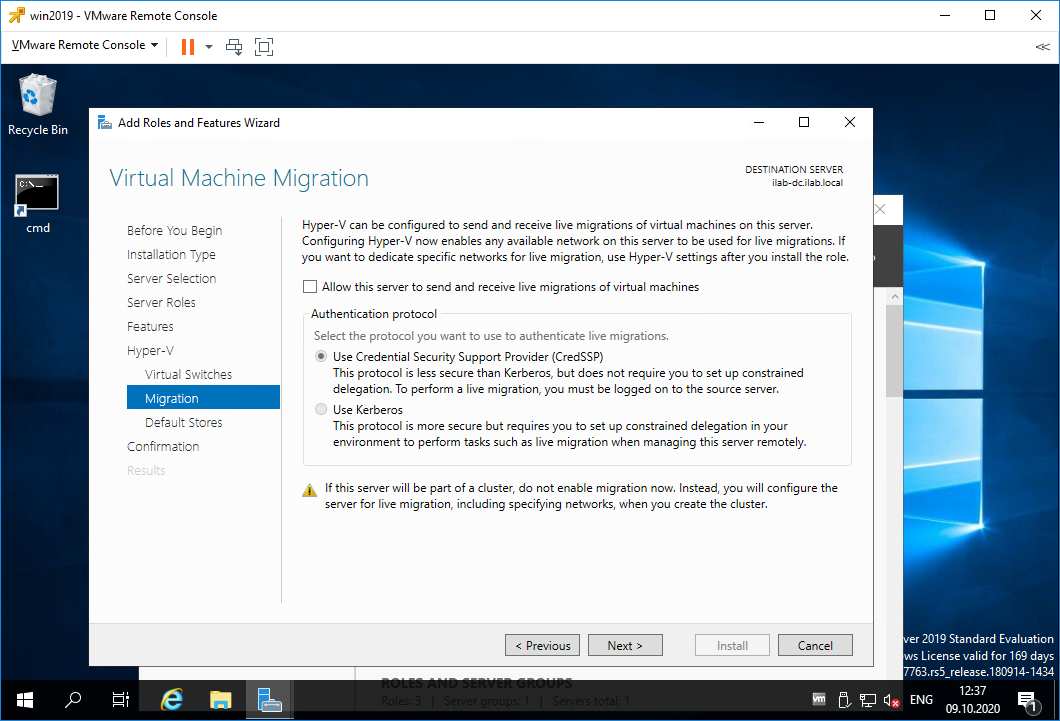
Попадаем в раздел Migration. Здесь настраивается миграция виртуальных машин. У меня будет один сервер с Hyper-V, поэтому никаких миграций не предусмотрено. Next.
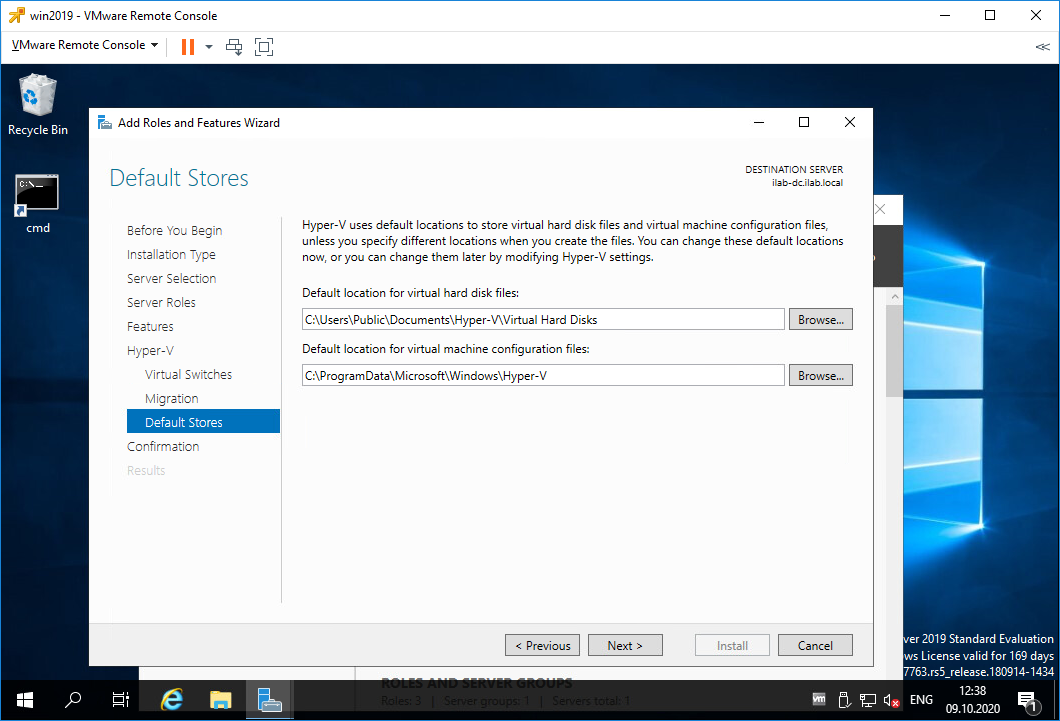
Попадаем в раздел Default Stores. Здесь можно настроить папки по умолчанию для хранения виртуальных дисков и файлов настроек виртуальных машин. Next.
Попадаем в раздел Confirmation. Проверяем что у нас будет установлено. Здесь же ставим галку, чтобы сервер при необходимости перезагрузился. Install.
Начинается процесс установки роли Hyper-V.
Сервер перезагружается.

После перезагрузки роль продолжает устанавливаться.
Установка роли Hyper-V успешно завершена. Close.
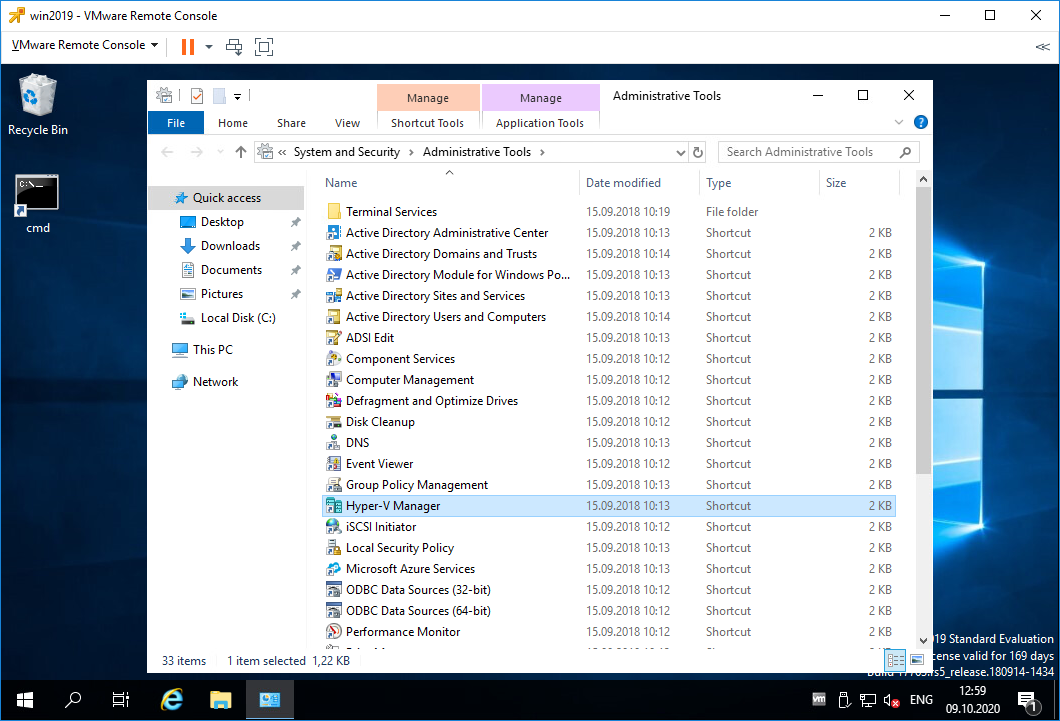
В Administrative Tools появляется Hyper-V Manager.
Настройка виртуального коммутатора Hyper-V
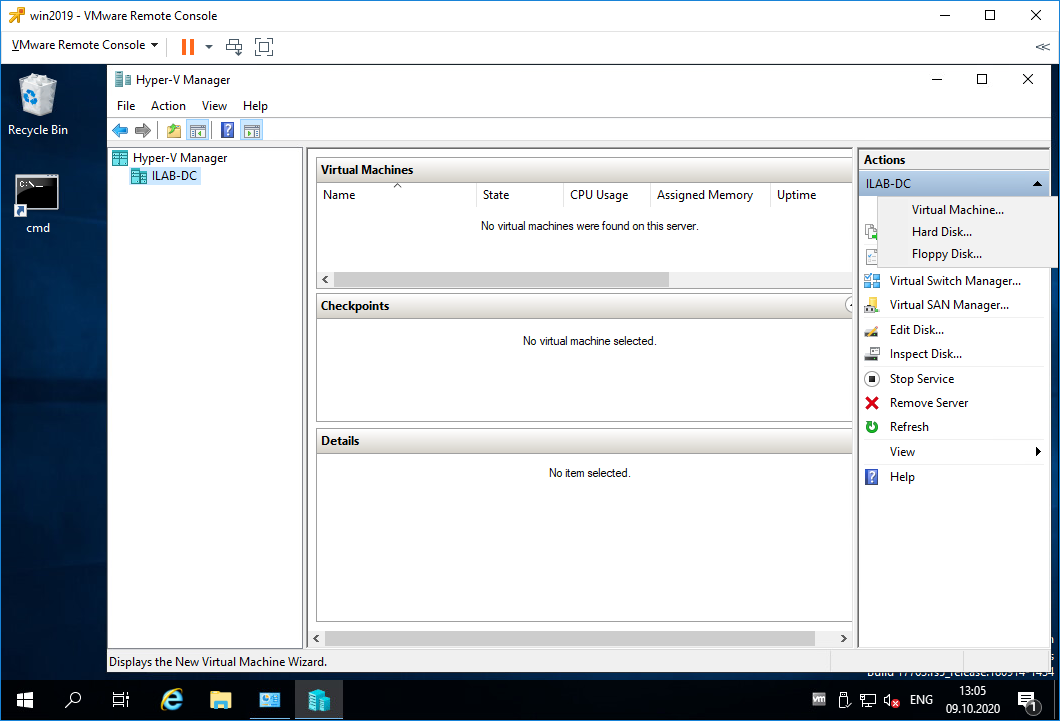
Запускаем Hyper-V Manager.
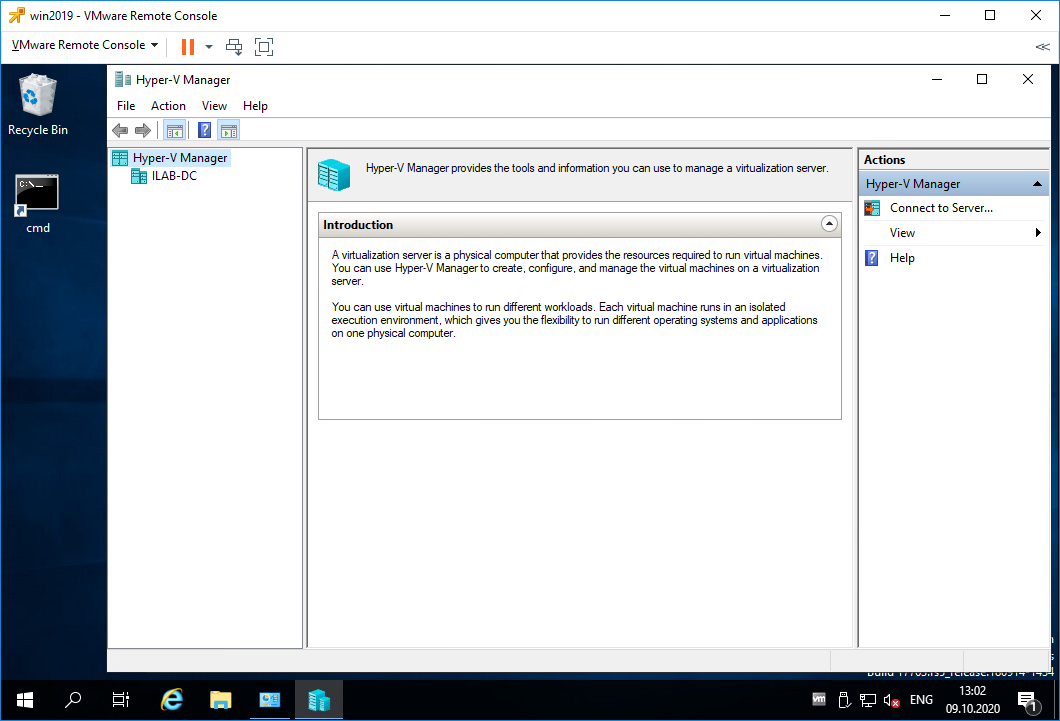
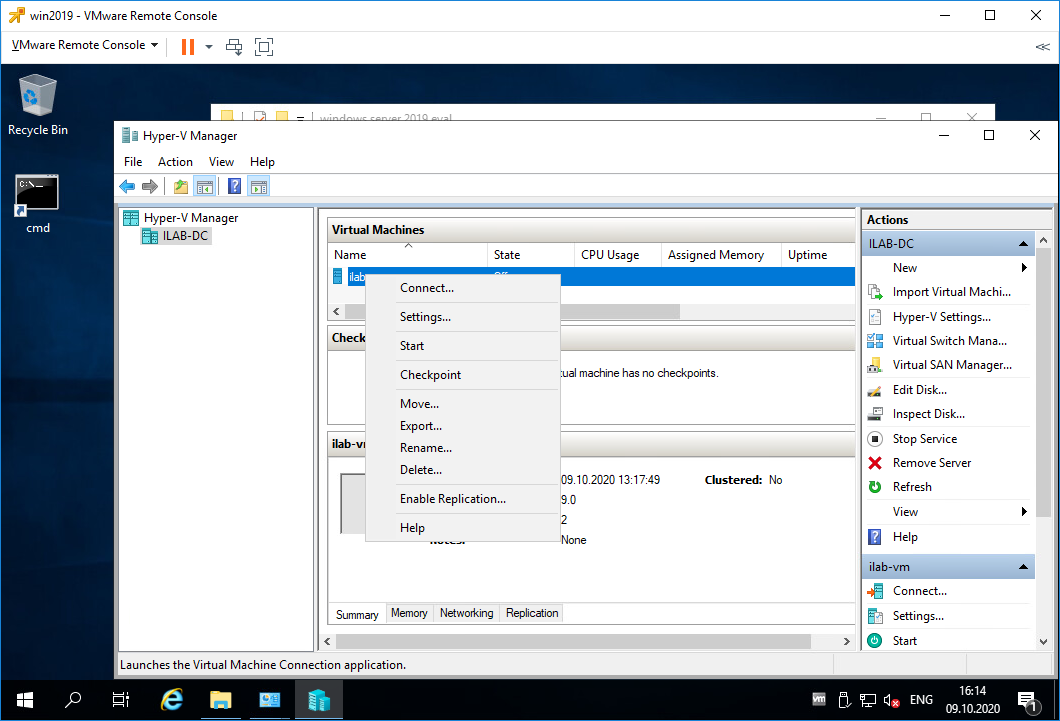
В списках серверов Hyper-V есть текущий сервер ILAB-DC. Нажимаем на него.
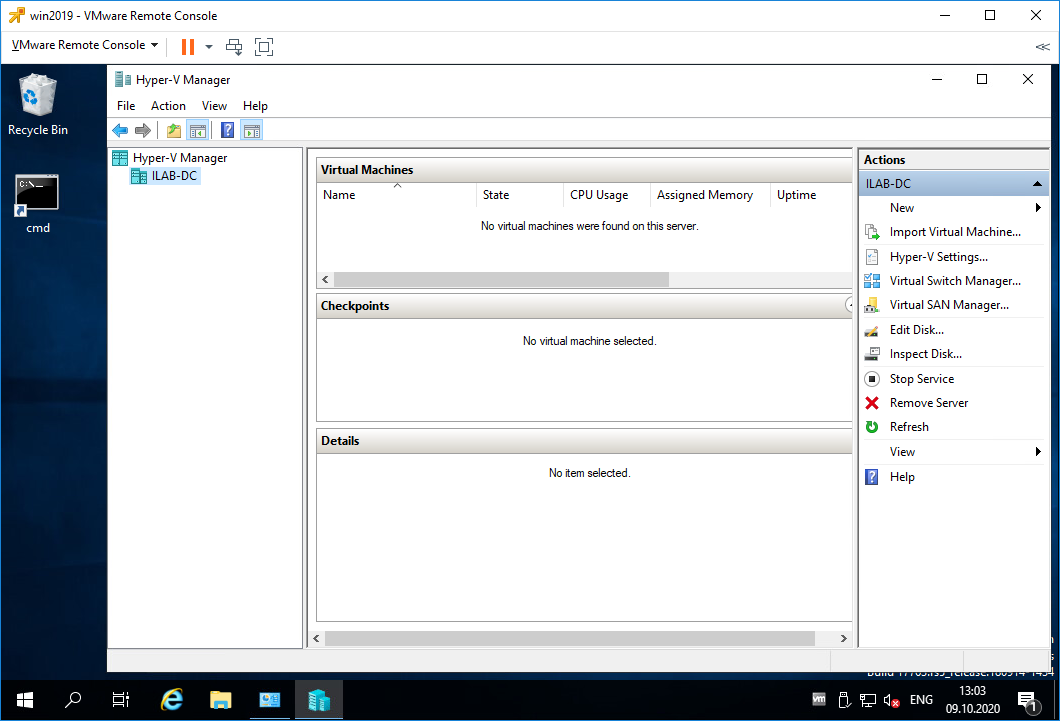
Список виртуальных машин пуст. Перед созданием новой виртуалки нужно настроить виртуальный коммутатор. По идее он уже должен быть настроен, т.к. мы при установке роли Hyper-V ставили галку для привязки виртуального коммутатора к физическому сетевому адаптеру. Но проверить не помешает, были случаи, когда виртуальный коммутатор на привязывался к физическому адаптеру. Такое случается, когда роль Hyper-V устанавливается несколько раз. В этом случае зайдите в настройки физического адаптера и снимите галку со всего где есть слово «Hyper-V», после этого физический адаптер можно снова привязать к виртуальному коммутатору из оснастки Hyper-V Manager.
Нажимаем Virtual Switch Manager…
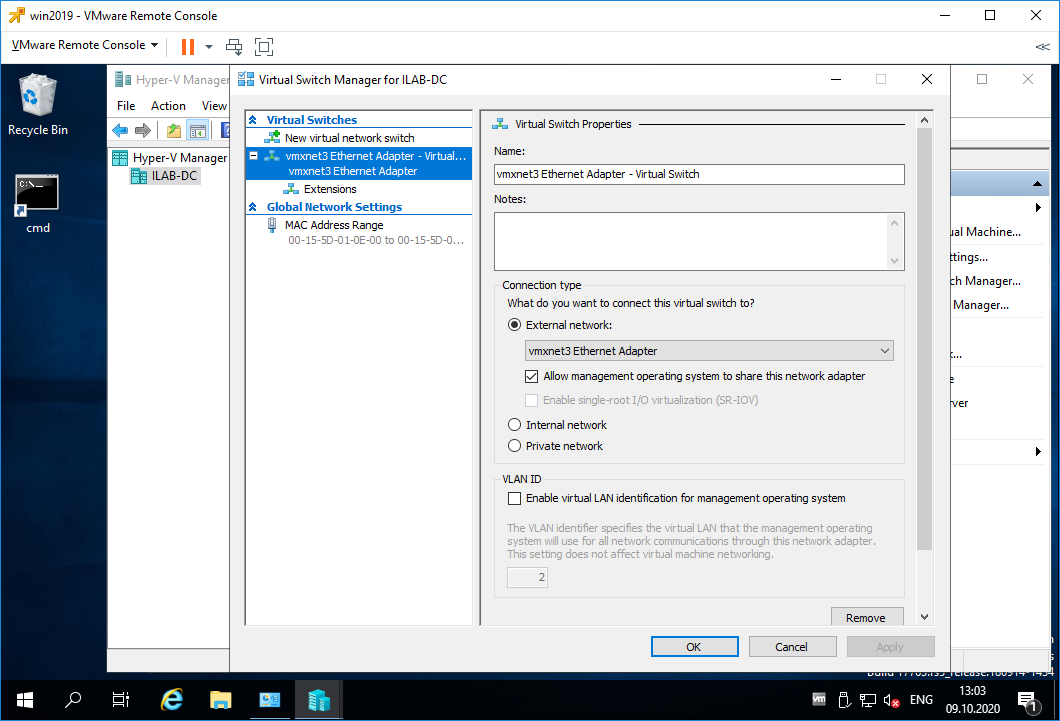
У меня один виртуальный коммутатор «vmxnet3 Ethernet Adapter — Virtual Switch». Виртуальный коммутатор может работать в трёх режимах:
- External network
Предоставляет виртуальным машинам доступ к физической сети для взаимодействия с серверами и клиентами во внешней сети. Позволяет виртуальным машинам на одном сервере Hyper-V взаимодействовать друг с другом.- Allow management operating system to share this network adapter (Разрешить управляющей операционной системе предоставлять общий доступ к этому сетевому адаптеру)
Выберите этот параметр, если вы хотите разрешить узлу Hyper-V совместно использовать виртуальный коммутатор и сетевую карту или группу сетевых адаптеров с виртуальной машиной. Если этот параметр включен, узел может использовать любые параметры, настроенные для виртуального коммутатора, такие как параметры качества обслуживания (QoS), параметры безопасности или другие функции виртуального коммутатора Hyper-V. - Enable single-root I/O virtualization (SR-IOV) (Включить виртуализацию SR-IOV)
Выберите этот параметр, только если вы хотите разрешить трафику виртуальной машины обходить коммутатор виртуальной машины и перейти непосредственно к физическому сетевому адаптеру. Сетевой адаптер должен поддерживать SR-IOV.
- Allow management operating system to share this network adapter (Разрешить управляющей операционной системе предоставлять общий доступ к этому сетевому адаптеру)
- Internal network
Разрешает обмен данными между виртуальными машинами на одном сервере Hyper-V, а также между виртуальными машинами и сервером Hyper-V. - Private network
Разрешает обмен данными только между виртуальными машинами на одном сервере Hyper-V. Частная сеть изолирована от всего внешнего сетевого трафика на сервере Hyper-V. Этот тип сети полезен, если необходимо создать изолированную сетевую среду, например изолированный тестовый домен.
SR-IOV (Single Root Input/Output Virtualization, виртуализация ввода-вывода с единым корнем) — технология виртуализации устройств, позволяющая предоставить виртуальным машинам прямой доступ к части аппаратных возможностей устройства.
При необходимости можно включить поддержку VLAN.
Настраиваю виртуальный коммутатор, вернее, ничего не меняю, меня устраивают текущие настройки. OK.
Создание виртуальной машины в Hyper-V
Пришло время создать первую виртуальную машину. Открываем Hyper-V Manager.
New > Virtual Machine…
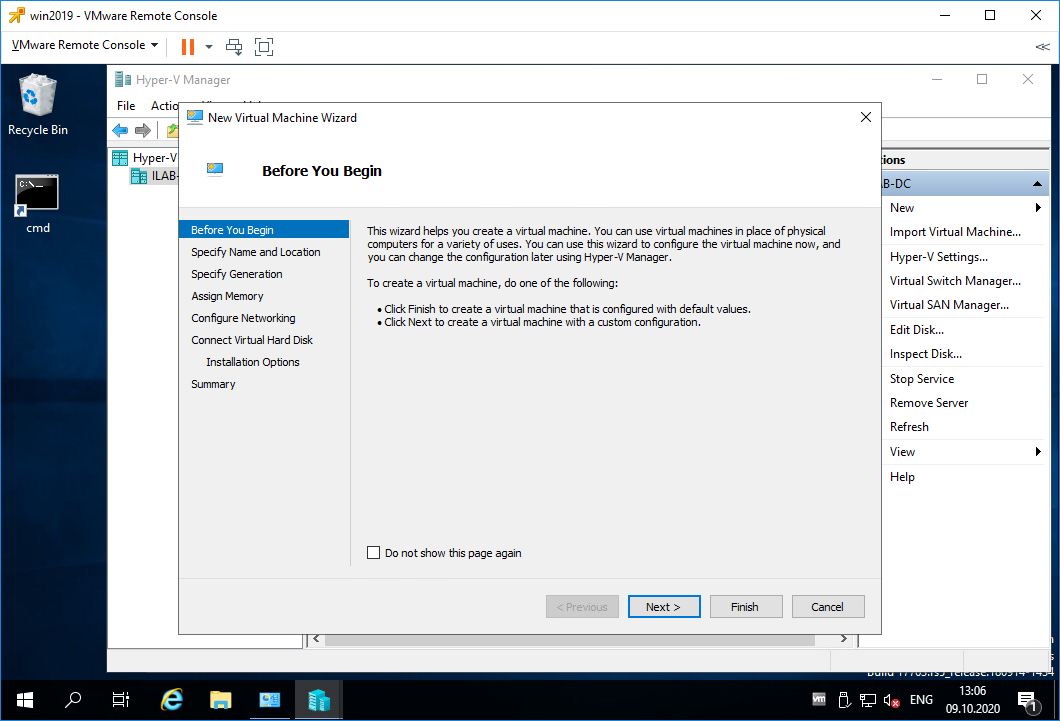
Открывается мастер создания виртуальных машин. Попадаем в раздел Before You Begin. Здесь нет ничего интересного. Next.
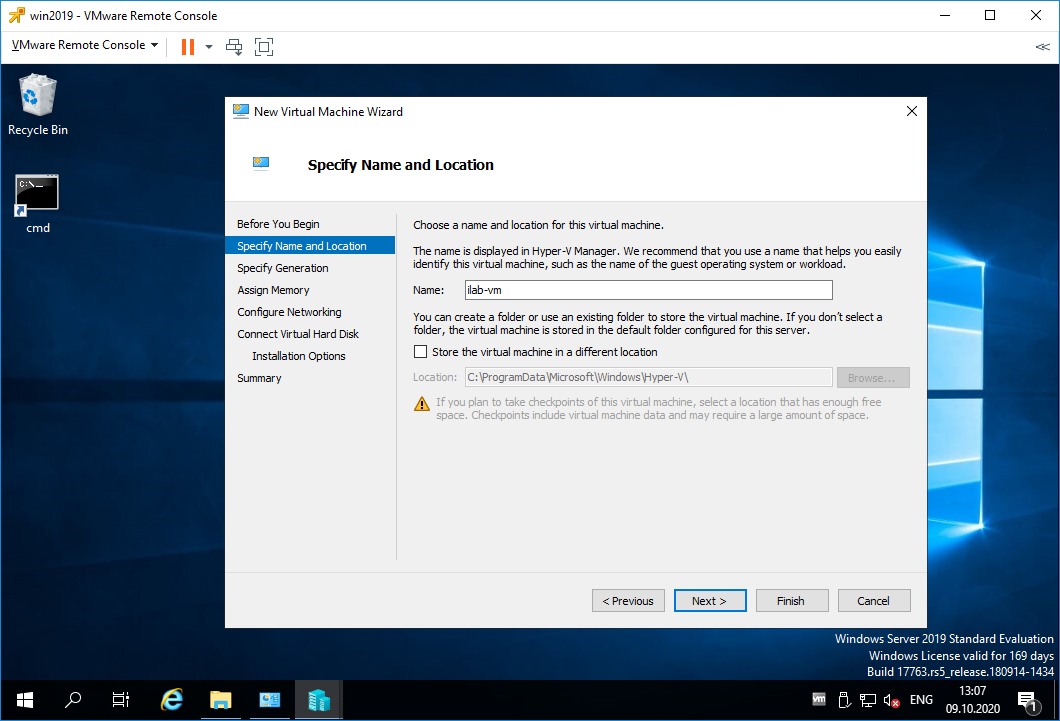
Попадаем в раздел Specify Name and Location. Указываем имя виртуалки. При необходимости можно изменить папку, в которой будут храниться файлы виртуалки. Next.
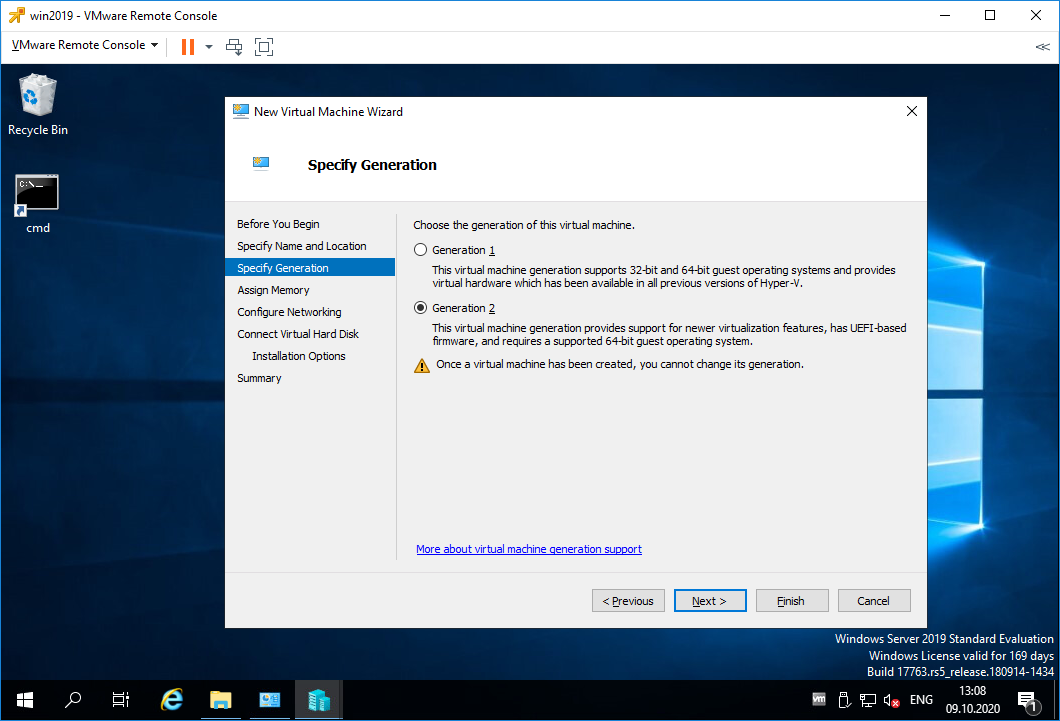
Попадаем в раздел Specify Generation. Выбор поколения зависит от того, какую операционную систему на виртуальной машине вы хотите установить, и метод загрузки, который вы хотите использовать для развертывания виртуальной машины. Виртуальные машины поколения 1 поддерживают большинство гостевых операционных систем. Виртуальные машины поколения 2 поддерживают большинство 64-разрядных версий Windows, Linux и FreeBSD. Рекомендуется выбрать поколение 2 за исключением случаев когда:
- Виртуальный жесткий диск, с которого требуется выполнить загрузку, не совместим с UEFI.
- Поколение 2 не поддерживает операционную систему, которую нужно запустить на виртуальной машине.
- Поколение 2 не поддерживает метод загрузки, который вы хотите использовать.
Next.
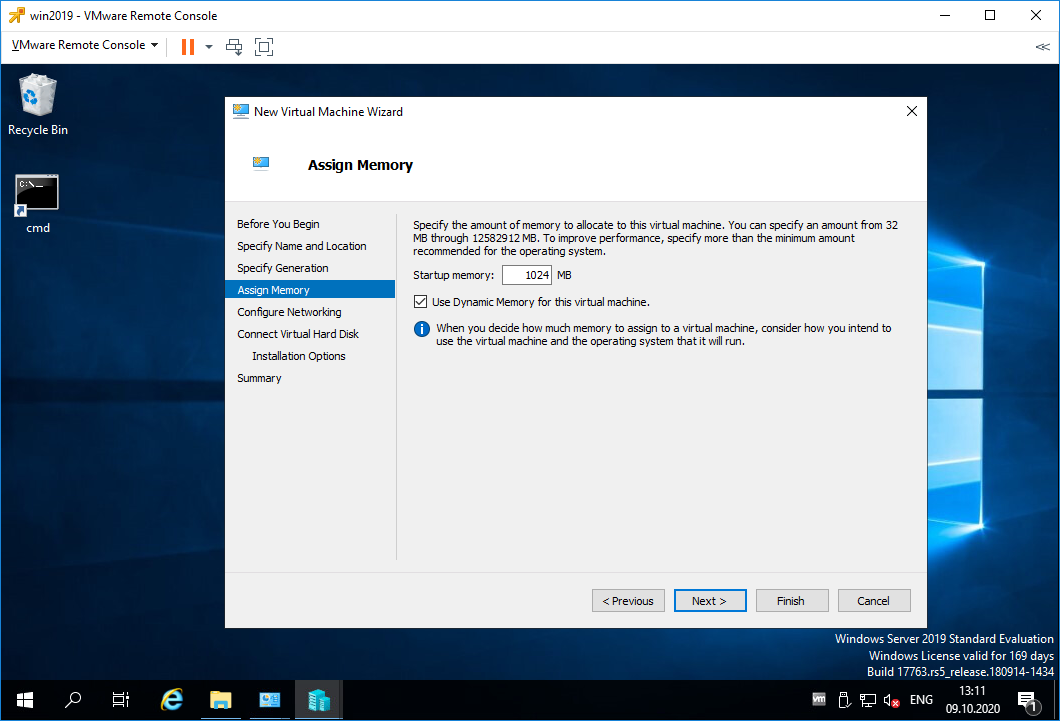
Попадаем в раздел Assign Memory. Выделяем память для виртуалки. Динамическая память забирается у сервера, как ни странно, динамически, т.е. сколько нужно, столько и забирается. Если галку не поставить, то вся выбранная память серверу будет недоступна. Next.
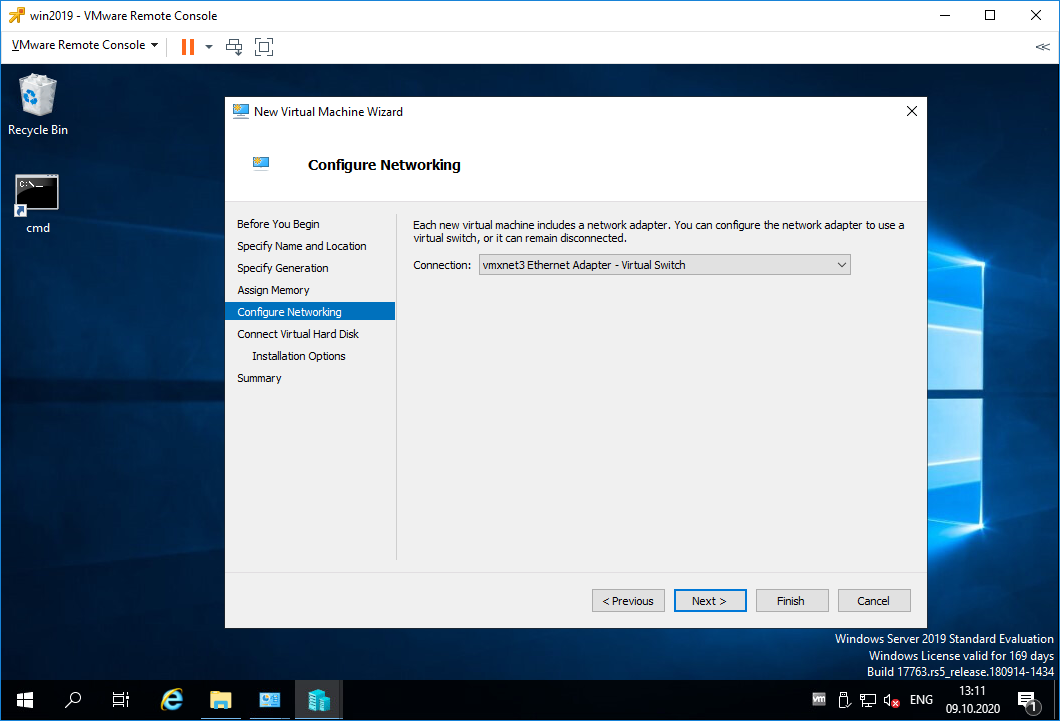
Попадаем в раздел Configure Networking. Выбираем виртуальный коммутатор. У меня он один. Next.
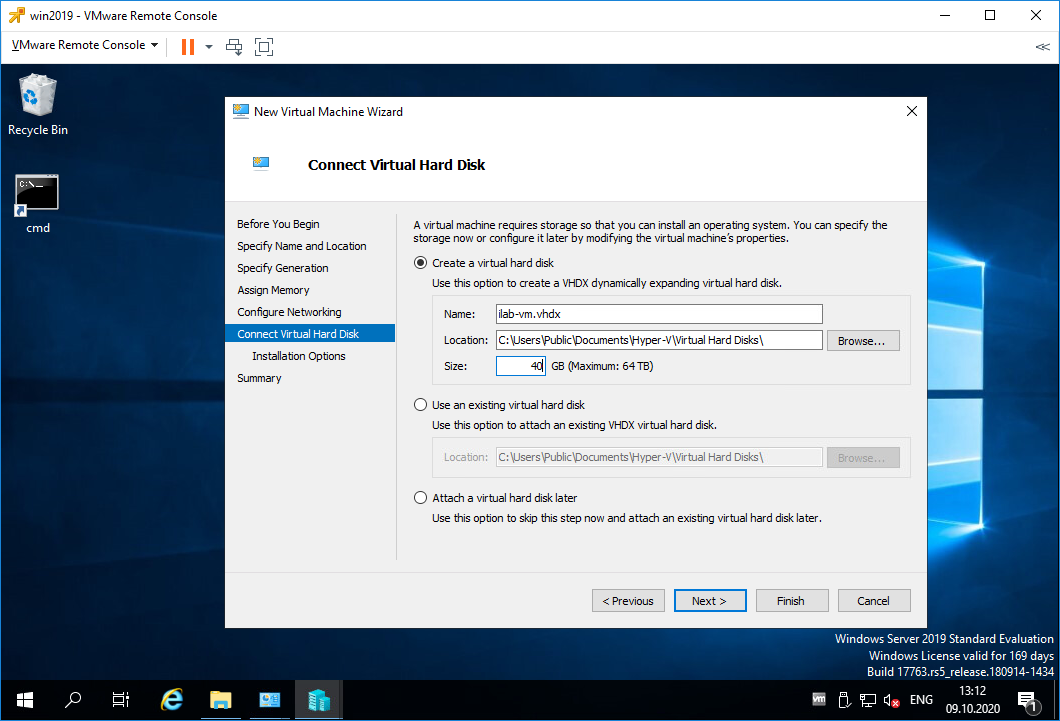
Попадаем в раздел Connect Virtual Hard Disk. Здесь создаём жёсткий диск, можно выбрать папку для его хранения. Можно подключить существующий жёсткий диск. Можно не подключать жёсткий диск. Я создаю новый диск объёмом 40 ГБ. Next.
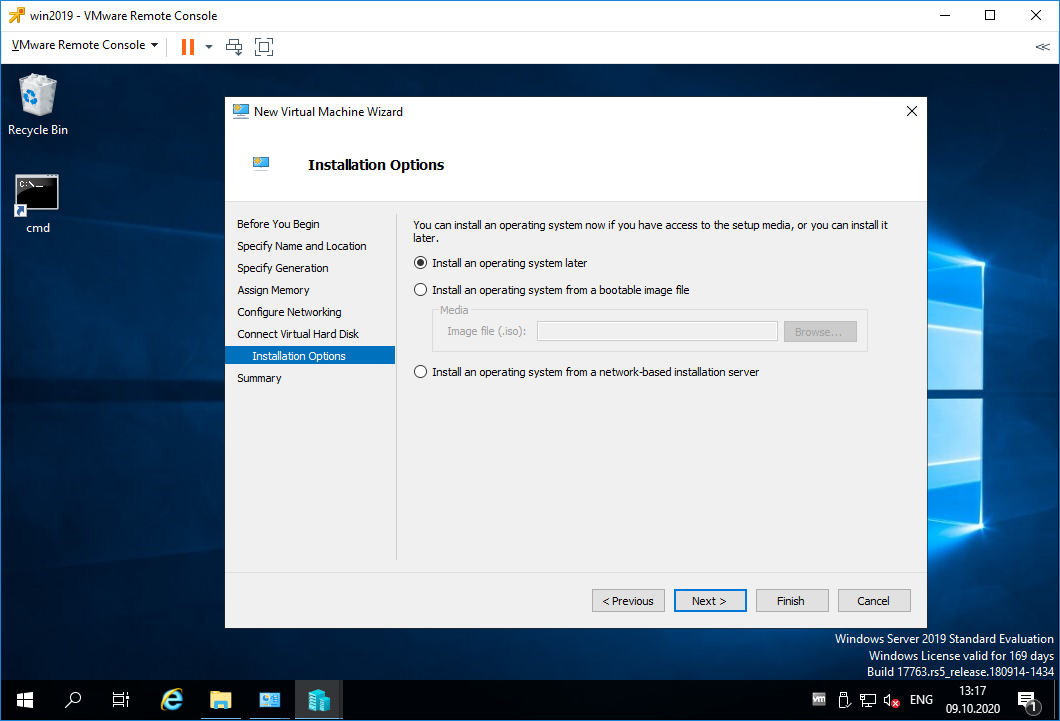
Попадаем в раздел Installation Options. Здесь можно примонтировать образ установочного диска, я сделаю это позже. Next.
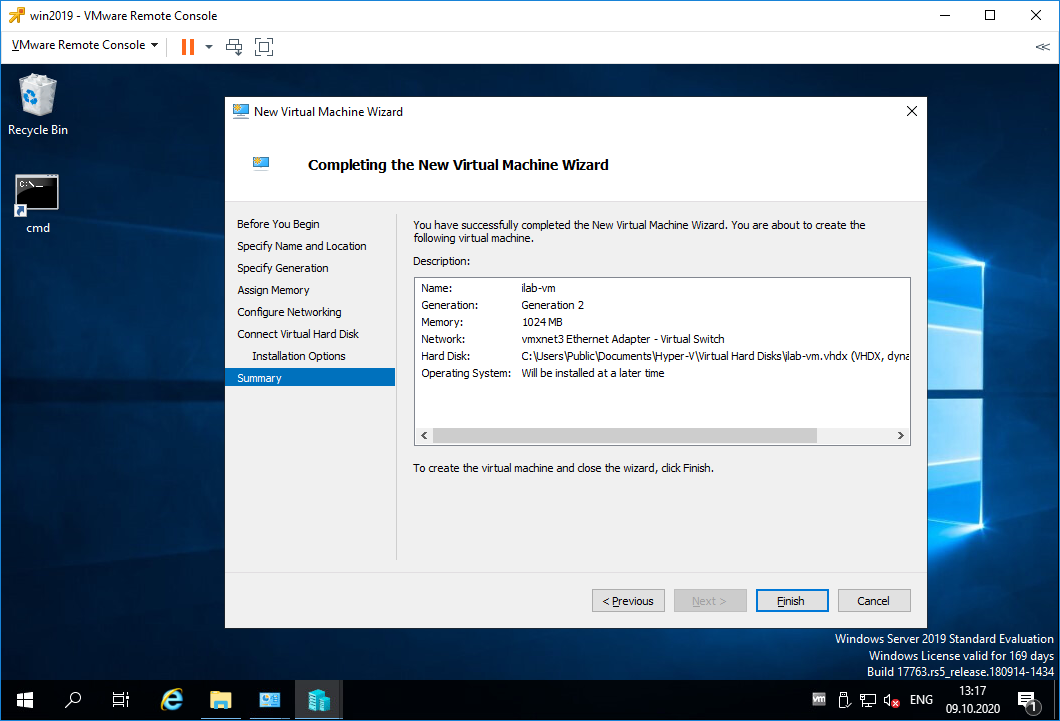
Попадаем в раздел Summary. Проверяем параметры. Finish.
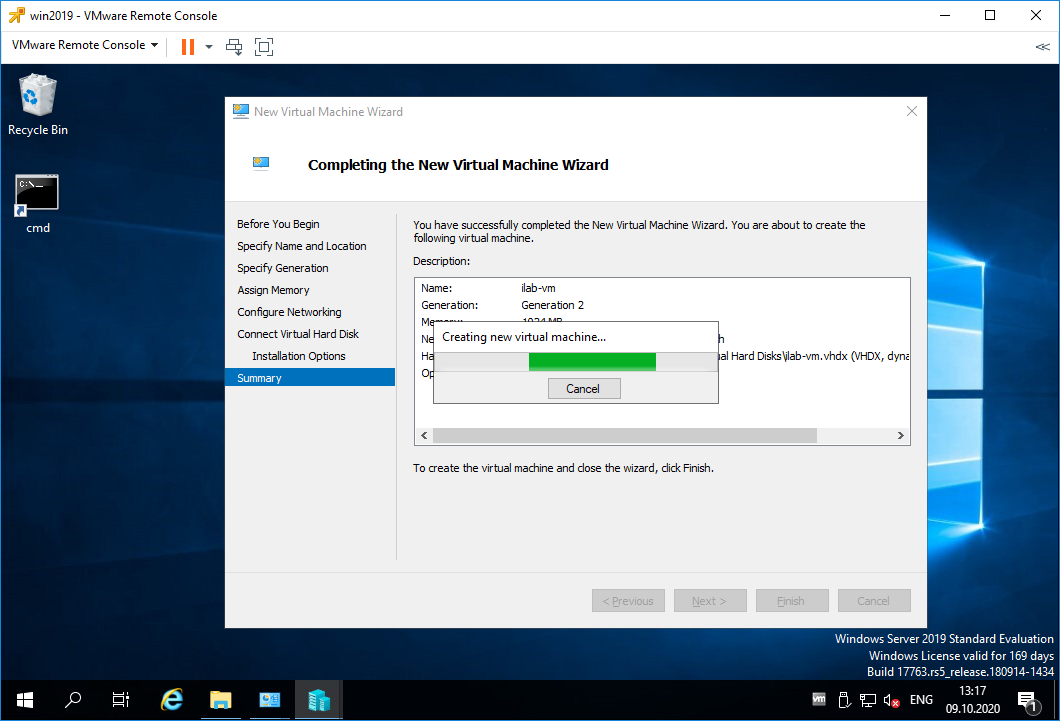
Начинается процесс создания виртуальной машины.
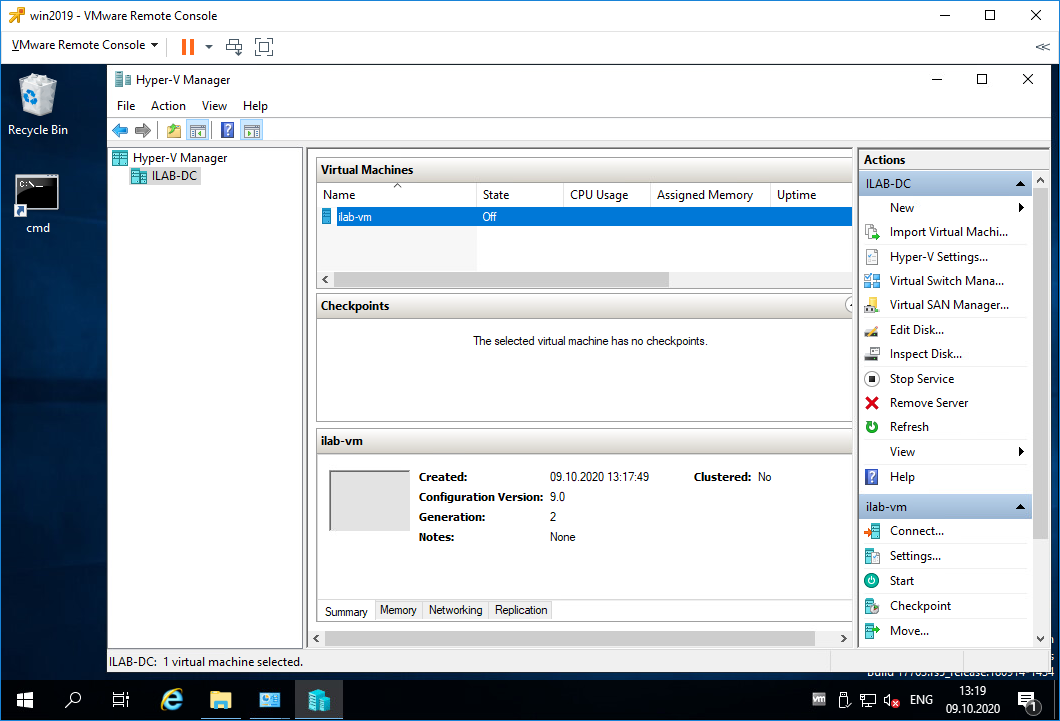
Виртуальная машина создана, она выключена (State = Off).
Установка операционной системы на виртуальную машину Hyper-V
Теперь примонтируем ISO образ к виртуальной машине и попробуем начать процесс установки операционной системы.
Выделяем виртуалку, нажимаем Settings.

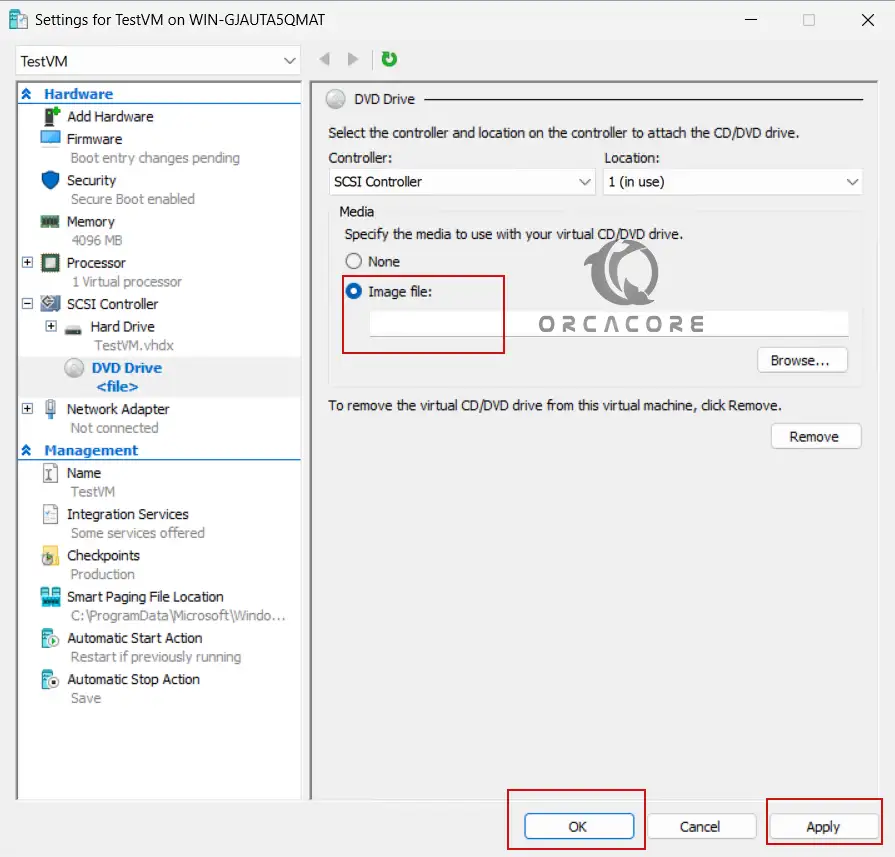
Переходим в раздел SCSI Controller. Видим, что в нём находится только жёсткий диск. Справа выбираем DVD Drive, Add.
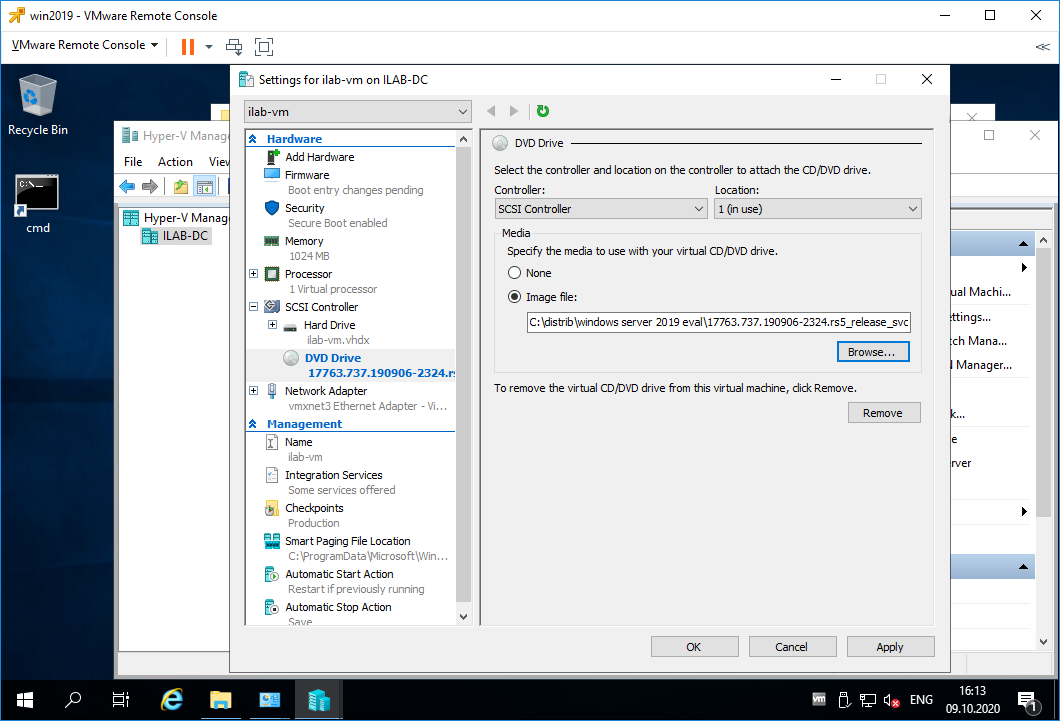
У виртуальной машины появляется виртуальный DVD Drive. Выбираем Image file, выбираем ISO образ для установки операционной системы. Apply.
Правой кнопкой на виртуалку, Connect.
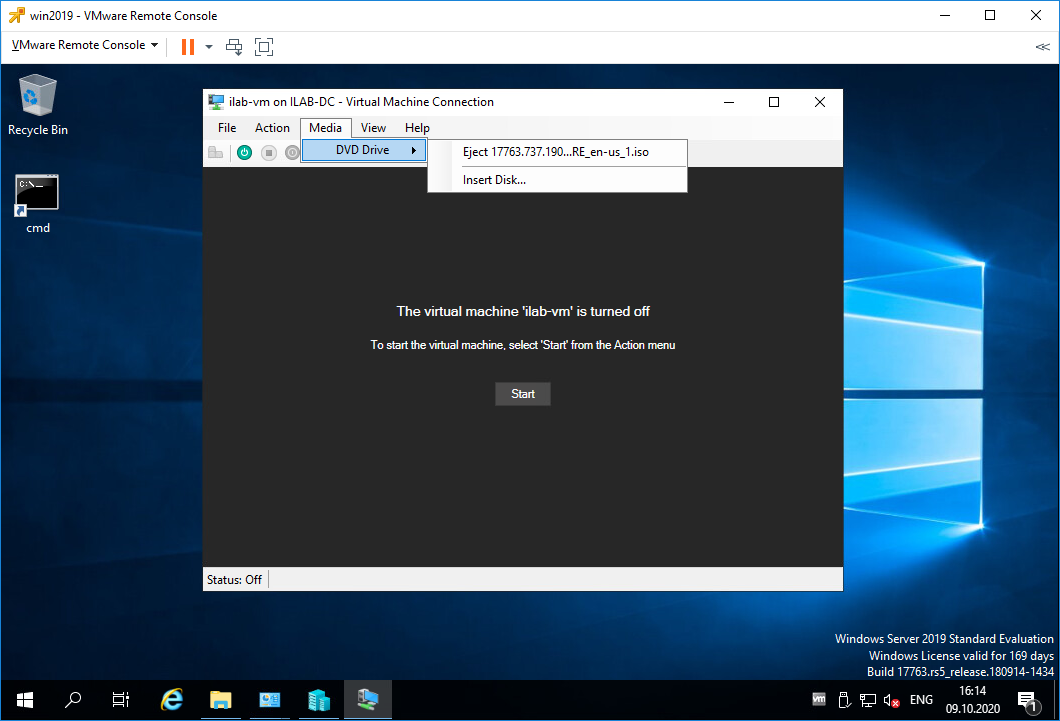
Открывается консоль виртуалки. ISO образ можно также вставить/извлечь в меню Mediz > DVD Drive. Включаем виртуалку, Start.
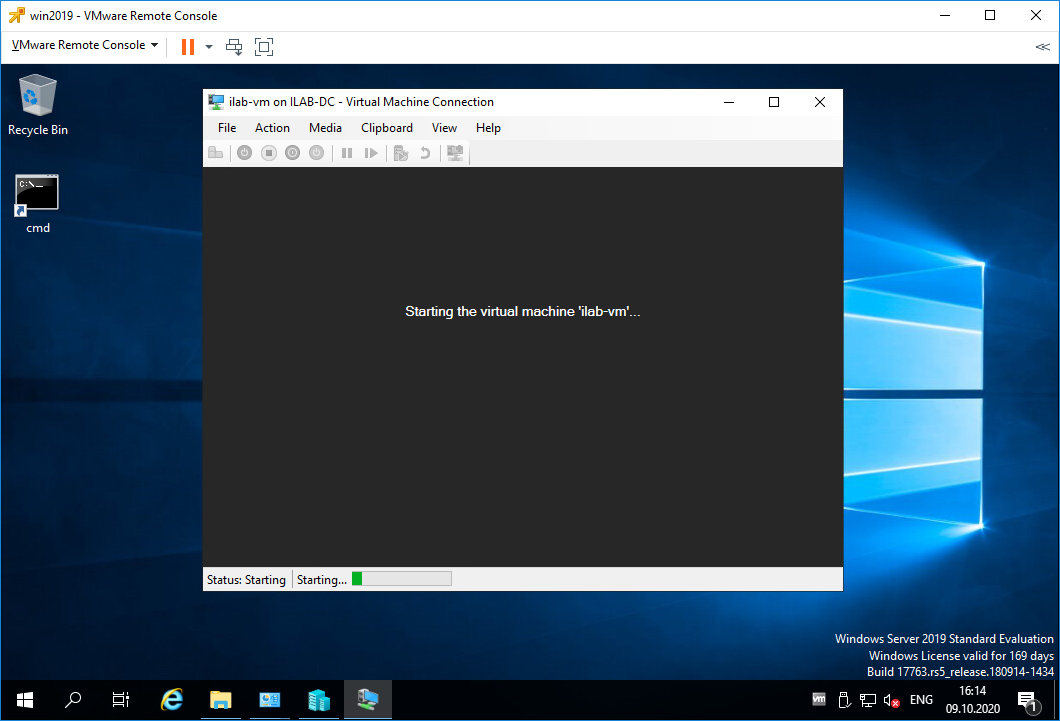
Виртуальная машина включается.
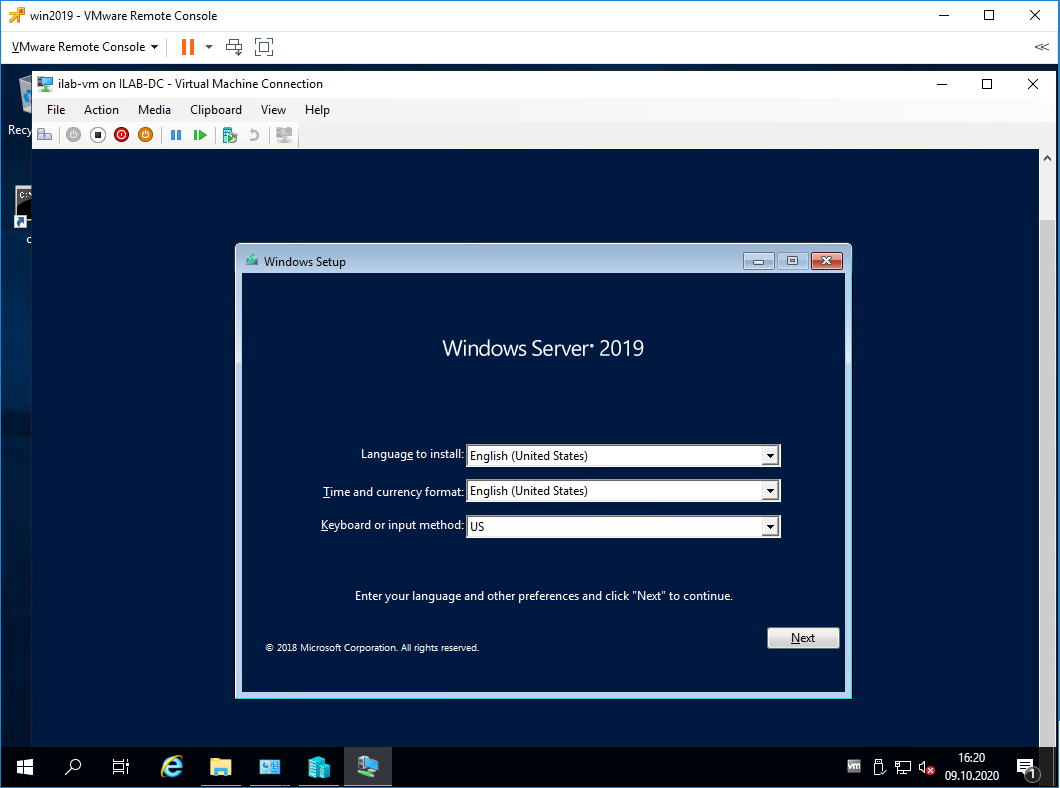
Загружается ISO образ и мы можем установить операционную систему, дальше вы справитесь.
Заключение
Мы с вами на сервере Windows Server 2019 установили роль Hyper-V, настроили виртуальный коммутатор и создали первую виртуальную машину. Подключили виртуальный дисковод и загрузились с установочного ISO образа операционной системы.
Добро пожаловать в волшебный мир виртуализации Hyper-V.
In a previous post I’ve covered the process of setting up a Windows Server 2019 VM in VirtualBox. So I’ve figured that I should add one to cover the creation of a Windows Server 2022 VM in VirtualBox as well.
Prerequisites
- Oracle VirtualBox – I’m currently using version 6.1.40
- Windows Server 2022 evaluation ISO
- Sufficient drive space – In my example I’ll be creating two dynamically allocated virtual disks (C drive – 50GB, D drive – 40GB)
The host, aka my PC, is running Windows 11 build 22621.963, but the process is the same on Windows 10.
Creating the VM in VirtualBox
This time, I’ll cover both the GUI way of creating the VM as well as the PowerShell steps in a single post.
If you want to go straight to the PowerShell steps click here.
Via the GUI
I create a new, blank VM.

Once the “Create Virtual Machine” window opens, I switch to “Expert Mode” so that I can configure the RAM and system drive in one go.

Afterwards, I specify the name of the VM, the directory in which its base folder should reside, the OS type and version. Since VirtualBox 6.1.40 doesn’t have “Windows Server 2022” as a version, I’ll pick “Windows Server 2019” instead.
I’ll also set the machine’s RAM to 8GB and opt to create a virtual hard disk now, and press “Create”.

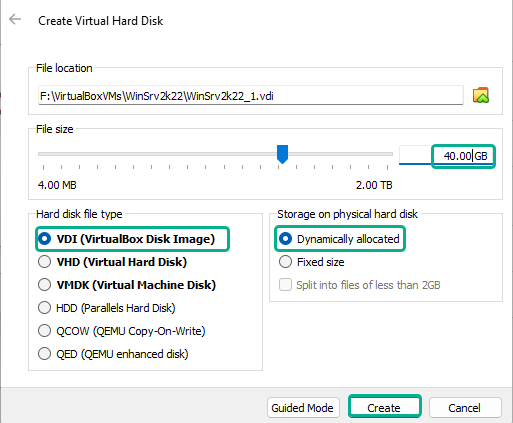
In the “Create Virtual Hard Disk” window I just go with the defaults:
- File size – 50GB
- Hard disk file type – VDI
- Storage on physical disk – Dynamically allocated
And I click on “Create”.

At this point the VM is created, but there are a few more things I like to set up before I start installing the OS.
So right click on the VM and go to “Settings”

In the “Processor” tab of the “System” section, I set the number of CPUs to 4.

Now to add a second virtual disk drive – this will be the 40GB D drive.
I go into the “Storage” section, increase the SATA controller’s port count from 2 to 3 (as per VirtualBox recommendations) and press the “add hard disk” button.

In the “Hard Disk Creator” window I press the “Create” button.

Once the windows switches to expert mode, I set the size to 40GB, validate the file location matches with the VM’s base directory and leave the defaults selected for hard disk file type and storage on physical hard disk, and then click on “Create”.
Now, in the “Hard Disk Selector” window I select the newly created virtual hard disk and then click on “Choose”.

While I’m in the “Storage” section, I’ll also attach the Windows Server 2022 Evaluation ISO by selecting the optical drive, expanding the disk drop-down menu and clicking on “Choose a disk file…”.
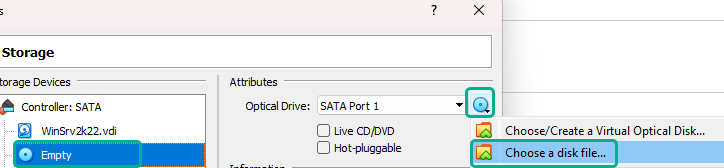
This opens up a file explorer window in which I navigate to where the “Windows_SERVER_2022_EVAL_x64FRE_en-us.iso” file resides so that I can attach it to the VM’s optical drive.

Afterwards, I navigate to the Network section set the network as bridged so the VM is accessible from the rest of the LAN.

At this point I can click “Ok” in the settings window so that the changes are saved.
I then start the VM.

And proceed with the OS installation process.
Via PowerShell
I open PowerShell and, to make things easier, append VirtualBox’s installation directory to the PATH environment variable.
|
$Env:Path += «;C:\Program Files\Oracle\VirtualBox\» |
Since VirtualBox 6.1.40 doesn’t have “Windows Server 2022” as a version, I’ll search for the OS ID for Windows Server 2019 instead.
|
VBoxManage list ostypes | Select-String -Pattern «Windows» | Select-String -Pattern «2019» -Raw |

I then use that OS ID to create and register an empty VM.
|
VBoxManage createvm —name WinSrv2k22 —ostype Windows2019_64 —register |
Take note of the location of the VM’s settings file location since that directory will also be the VM’s base directory.

Afterwards add CPU cores, RAM, and VRAM. Set the graphics controller, and set the network type as bridged as well as specifying the name of the host’s NIC that will be used.
|
VBoxManage modifyvm WinSrv2k22 —cpus 4 —memory 8192 —vram 128 ` —graphicscontroller vboxsvga —nic1 bridged ` —bridgeadapter1 «Intel(R) Ethernet Controller I225-V» |
Add a SATA storage controller, specify the controller’s chipset, port count, and set it as boot-able.
|
VBoxManage storagectl WinSrv2k22 —name «SATA» —add sata ` —controller IntelAHCI —portcount 3 —bootable on |
Create the virtual disk file that will eventually become the C drive.
|
VBoxManage createhd —filename F:\VirtualBoxVMs\WinSrv2k22\WinSrv2k22.vdi ` —size 51200 —variant Standard |
Add a second virtual disk file (optional).
|
VBoxManage createhd —filename F:\VirtualBoxVMs\WinSrv2k22\WinSrv2k22_1.vdi ` —size 40960 —variant Standard |
Attach the two disks to the storage controller.
|
VBoxManage storageattach WinSrv2k22 —storagectl «SATA» —port 0 ` —device 0 —type hdd —medium F:\VirtualBoxVMs\WinSrv2k22\WinSrv2k22.vdi |
|
VBoxManage storageattach WinSrv2k22 —storagectl «SATA» —port 1 ` —device 0 —type hdd —medium F:\VirtualBoxVMs\WinSrv2k22\WinSrv2k22_1.vdi |
Now, I can attache the Windows Server 2019 Evaluation ISO.
|
VBoxManage storageattach WinSrv2k22 —storagectl «SATA» —port 2 —device 0 ` —type dvddrive ` —medium C:\Users\Vlad\Downloads\Windows_SERVER_2022_EVAL_x64FRE_en-us.iso |
And start the VM in order to proceed with the OS install process.
|
VBoxManage startvm WinSrv2k22 |
Installing Windows Server 2022 on the empty VirtualBox VM
Once the VM boots, I can select the language and regional settings and click on “Next”

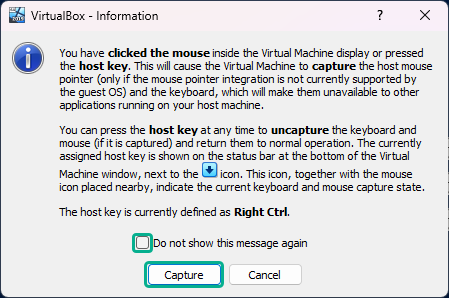
If this pops up, just check the “do not show this message again” box and click on “Capture”. Just remember to press right Ctrl whenever you want to move the mouse outside the VM window.
In the next prompt click “Install Now”

For this VM, I opt to install the Windows Server 2022 Standard Evaluation (Desktop Experience) version.

In the next window I read and accept the software license terms, and proceed with the installation process.
For installation type I click on “Custom”, because there’s really no previous version of the OS to upgrade from.

I then proceed with the partition configuration part.
First, I select the drive (Drive 0) that’s going to end up being the system drive, click on “New” and then “Apply” in order to create a new partition.

Click “Ok” on the prompt informing me about the creation of additional system partitions.
I then repeat the same steps for the second drive (Drive 1).
And now I select the partition (Drive 0 Partition 2) on which the OS should be installed and click on “Next” to begin the installation.

After the install process finishes, the VM reboots and a prompt to “press any key to boot from CD/DVD” appears, I just wait for the prompt to time-out since I want to boot directly in Windows.
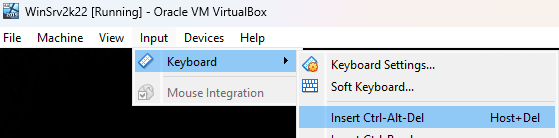
Once the OS boots up, it asks to set up a password for the Administrator account.

I type a password, confirm it and press “Finish”.
At the logon screen I send the Ctrl+Alt+Del input to the VM. This can also be done with the right Ctrl+Del keys.