
Updates for Windows Server 2022
Windows Server 2022 is the latest release in our Long-Term Servicing Channel (LTSC). It builds on Windows Server 2019, our fastest adopted Windows Server ever. This release includes advanced multi-layer security, hybrid capabilities with Azure, and a flexible platform to modernize applications with containers.
On the left side of this page, you’ll find a list of all the updates released for this version of Windows Server. You can also find more information about releases and any known issues. Installing the most recent update ensures that you also get any previous updates you might have missed, including any important security fixes.
For more information about the update and how to get it, see:
-
Getting started with Windows Server 2022
-
Windows Server 2022 release information
Current status of Windows Server 2022
For the most up-to-date information about known issues for Windows and Windows Server, please go to the Windows release health dashboard.
Known issues
Microsoft is not currently aware of any issues with this update.
Notes and messages
None.
Troubleshooting
If you have questions or need help activating or troubleshooting Windows, see our help topics below:
-
Install, upgrade, or migrate to Windows Server 2022
Related info
-
Windows Server 2022 release information
-
What’s new in Windows Server 2022
Need more help?
Want more options?
Explore subscription benefits, browse training courses, learn how to secure your device, and more.
Если из внутренней (корпоративной) сети доступ в интернет осуществляется через прокси-сервер, то для обновлений ОС Windows требуется разрешить доступ к серверам обновлений. Если обновления загружаются с локального сервера WSUS, то для данного сервера требуется разрешить доступ к этим же серверам обновления, чтобы он их мог загрузить оттуда.
Официальный список серверов обновлений можно найти на http://technet.microsoft.com/en-us/library/cc708605(WS.10).aspx. На момент написания статьи это:
http://windowsupdate.microsoft.com
http://*.windowsupdate.microsoft.com
https://*.windowsupdate.microsoft.com
http://*.update.microsoft.com
https://*.update.microsoft.com
http://*.windowsupdate.com
http://download.windowsupdate.com
http://download.microsoft.com
http://*.download.windowsupdate.com
http://wustat.windows.com
http://ntservicepack.microsoft.com
При установке WSUS также требуется разрешить доступ, иначе получите следующую ошибку:
Имя журнала: Setup
Источник: Microsoft-Windows-ServerManager
Дата: 16.09.2012 13:44:01
Код события: 1616
Категория задачи:Отсутствует
Уровень: Ошибка
Ключевые слова:
Пользователь: K43\SCCMadmin
Компьютер: sccm.k43.guap.ru
Описание:
Установка не выполнена.
Роли:
Службы Windows Server Update Services
Ошибка: Обновление не найдено. Возможно, возникли проблемы с сетевым подключением. <a href="WSUS.chm::/html/54a9eb1f-5dd1-42d8-ad00-dae55d7b9463.htm">Щелкните здесь, чтобы получить дополнительные сведения.</a>
Xml события:
<Event xmlns="http://schemas.microsoft.com/win/2004/08/events/event">
<System>
<Provider Name="Microsoft-Windows-ServerManager" Guid="{8C474092-13E4-430E-9F06-5B60A529BF38}" />
<EventID>1616</EventID>
<Version>0</Version>
<Level>2</Level>
<Task>0</Task>
<Opcode>0</Opcode>
<Keywords>0x4000000000000000</Keywords>
<TimeCreated SystemTime="2012-09-16T09:44:01.849273700Z" />
<EventRecordID>74</EventRecordID>
<Correlation />
<Execution ProcessID="352" ThreadID="3960" />
<Channel>Setup</Channel>
<Computer>sccm.k43.guap.ru</Computer>
<Security UserID="S-1-5-21-1731676258-2830123626-2066783540-4616" />
</System>
<UserData>
<EventXML xmlns:auto-ns3="http://schemas.microsoft.com/win/2004/08/events" xmlns="Event_NS">
<message>
Роли:
Службы Windows Server Update Services
Ошибка: Обновление не найдено. Возможно, возникли проблемы с сетевым подключением. <a href="WSUS.chm::/html/54a9eb1f-5dd1-42d8-ad00-dae55d7b9463.htm">Щелкните здесь, чтобы получить дополнительные сведения.</a>
</message>
<identifiers>21</identifiers>
</EventXML>
</UserData>
</Event>
In today’s digital age, keeping your computer system up to date with the latest software updates is essential. These updates not only enhance the performance and security of your system but also ensure that you have access to the latest features and functionalities. Windows Server 2016, the popular operating system for servers, regularly releases updates to address bugs, improve system stability, and fix security vulnerabilities. Therefore, it is crucial to keep track of the installed updates on your Windows Server 2016 to ensure that your system is running smoothly. In this blog post, we will explore different methods to check the installed updates on Windows Server 2016 and discuss some additional tips to help you manage your system effectively.
Video Tutorial:
Checking the installed updates on your Windows Server 2016 is vital for several reasons. Here are a few:
1. Security: Keeping your server up to date with the latest security patches is crucial to protect your system from potential threats and vulnerabilities. Regularly checking the installed updates ensures that you have the latest security fixes and patches installed.
2. Performance: Updates often include performance improvements and bug fixes that can enhance the overall performance of your server. By checking the installed updates, you can identify any performance-related issues and ensure your system is running optimally.
3. Compatibility: Software updates may also include compatibility enhancements, ensuring that your server is compatible with the latest applications and technologies. By checking the installed updates, you can ensure that your server is compatible with the latest software releases.
Now that we understand the importance of checking installed updates on Windows Server 2016 let’s explore different methods to accomplish this task.
Method 1: Using the Control Panel
Checking installed updates on Windows Server 2016 can be easily done through the Control Panel. Follow the steps below to see the installed updates on your server:
1. Open the Control Panel by clicking on the Start menu and selecting “Control Panel.”
2. In the Control Panel, click on “Programs” or “Programs and Features,” depending on your Control Panel view.
3. In the Programs window, click on “View installed updates” located on the left side of the window.
4. A list of all the installed updates on your Windows Server 2016 will be displayed. You can browse through the list to see the update names, installation dates, and other relevant details.
| Pros | Cons |
|---|---|
| 1. Easy and straightforward process to check installed updates. | 1. Limited information provided about the updates in terms of their functionality. |
Method 2: Using Windows PowerShell
Windows PowerShell is a powerful command-line shell and scripting language that can be used to manage and automate various tasks in Windows Server 2016, including checking installed updates. Here’s how you can use Windows PowerShell to check the installed updates:
1. Open Windows PowerShell by pressing “Win + X” on your keyboard and selecting “Windows PowerShell” or “Windows PowerShell (Admin)” from the menu.
2. In the PowerShell window, type the following command and press Enter:
Get-WmiObject -Class "Win32_QuickFixEngineering"
3. A list of installed updates along with their names, installation dates, and other details will be displayed in the PowerShell window.
| Pros | Cons |
|---|---|
| 1. Provides detailed information about the installed updates. | 1. Requires basic knowledge of Windows PowerShell commands. |
| 2. Offers more advanced filtering and sorting options compared to the Control Panel method. | 2. May be less user-friendly for those unfamiliar with Windows PowerShell. |
Method 3: Using the Windows Update Catalog
The Windows Update Catalog is an online repository where you can find and download updates for various Microsoft products, including Windows Server 2016. Here’s how you can use the Windows Update Catalog to check the installed updates:
1. Open a web browser and navigate to the Windows Update Catalog website (https://www.catalog.update.microsoft.com/Home.aspx).
2. In the search box, enter your Windows Server 2016 version (e.g., “Windows Server 2016 Standard”).
3. Click on the “Search” button to view the available updates for your Windows Server 2016 version.
4. Scroll through the list of updates to find the installed updates. You can identify the installed updates by comparing their version numbers with those displayed in the Control Panel or PowerShell methods.
| Pros | Cons |
|---|---|
| 1. Provides access to a comprehensive list of updates. | 1. Requires manual comparison of version numbers to identify installed updates. |
| 2. Allows you to download updates directly from the website if needed. | 2. May be time-consuming to navigate and search for specific updates. |
Method 4: Using Windows Update PowerShell Module
Windows Server 2016 includes a Windows Update PowerShell module that allows you to manage Windows updates using PowerShell commands. Here’s how you can use the Windows Update PowerShell module to check the installed updates:
1. Open Windows PowerShell as an administrator by pressing “Win + X” on your keyboard and selecting “Windows PowerShell (Admin)” from the menu.
2. In the PowerShell window, type the following command and press Enter to install the Windows Update PowerShell module if it’s not already installed:
Install-Module -Name PSWindowsUpdate
3. After the module is installed, import it by typing the following command and pressing Enter:
Import-Module -Name PSWindowsUpdate
4. To check for installed updates, type the following command and press Enter:
Get-WUInstall -KBArticleID "*" | Where-Object {$_.Installed -eq $true}
5. The PowerShell window will display a list of installed updates along with their KB article IDs, installation dates, and other details.
| Pros | Cons |
|---|---|
| 1. Allows you to manage Windows updates using PowerShell commands. | 1. Requires installation of the PSWindowsUpdate module if not already available. |
| 2. Provides detailed information about the installed updates. | 2. Requires basic knowledge of Windows PowerShell commands. |
What to Do If You Can’t Check Installed Updates on Windows Server 2016
If you are unable to check the installed updates on your Windows Server 2016 using the methods mentioned above, here are a few possible fixes:
1. Restart the Server: Sometimes, a simple restart can resolve temporary system glitches and allow you to check the installed updates. Try restarting your Windows Server 2016 and then attempt to check the installed updates again.
2. Update Windows: If you are unable to check the installed updates due to outdated Windows or missing system files, consider updating your Windows Server 2016 to the latest version. Updates often include bug fixes and improvements that can address the issue at hand.
3. Check Windows Update Service: Ensure that the Windows Update service is running on your server. To do this, open the Services console (press “Win + R,” type “services.msc,” and press Enter), locate the “Windows Update” service, and verify that its status is set to “Running.”
4. Use Windows Update Troubleshooter: Windows Server 2016 includes a built-in troubleshooter to diagnose and fix common Windows Update-related problems. Run the Windows Update troubleshooter by going to Settings > Update & Security > Troubleshoot > Windows Update > Run the troubleshooter.
Bonus Tips
Here are three bonus tips to help you better manage the updates on your Windows Server 2016:
1. Schedule Automatic Updates: To ensure that your Windows Server 2016 stays up to date, consider configuring automatic updates. You can schedule the server to automatically download and install updates at a convenient time, minimizing manual intervention.
2. Enable WSUS for Centralized Update Management: Windows Server Update Services (WSUS) is a Microsoft tool that allows you to centrally manage the distribution of updates within your network. By configuring a WSUS server, you can have better control over the update management process, ensuring consistency across multiple servers.
3. Maintain a Testing Environment: Before applying updates to your production environment, consider setting up a testing environment to evaluate the impact of updates on your applications and services. This can help identify any compatibility issues or system behavior changes before rolling out updates to your production servers.
5 FAQs
Q1: How often should I check for updates on Windows Server 2016?
A: It is recommended to check for updates on a regular basis, preferably monthly. Microsoft releases security updates on the second Tuesday of each month, commonly known as “Patch Tuesday.”
Q2: Can I roll back installed updates on Windows Server 2016?
A: Yes, you can uninstall or roll back installed updates on Windows Server 2016. In the Control Panel, go to “Programs” or “Programs and Features,” click on “View installed updates,” and select the update you want to uninstall. Follow the on-screen instructions to remove the update.
Q3: Are all updates necessary, or can I selectively install them?
A: While security updates are crucial for maintaining the security of your system, some updates may not be necessary for your specific environment. You can selectively install updates based on your requirements, but critical security updates should never be ignored.
Q4: Can I download updates manually and install them on Windows Server 2016?
A: Yes, you can manually download and install updates from the Windows Update Catalog or other trusted sources. However, it is generally recommended to use the built-in Windows Update feature or a centralized update management solution for easier management.
Q5: What should I do if an update fails to install on Windows Server 2016?
A: If an update fails to install on Windows Server 2016, try restarting the server and running the update again. If the issue persists, check for any error messages or error codes provided during the installation process. You can search for the specific error message or code online for troubleshooting steps or contact Microsoft support for assistance.
Final Thoughts
Regularly checking the installed updates on your Windows Server 2016 is crucial for maintaining the security, performance, and compatibility of your system. By using the Control Panel, Windows PowerShell, Windows Update Catalog, or the Windows Update PowerShell module, you can easily check the installed updates and ensure that your server is up to date. Additionally, following the bonus tips and troubleshooting steps provided in this blog post will help you effectively manage and maintain your Windows Server 2016 updates. Remember to schedule regular checks for updates and stay informed about the latest security patches and enhancements released by Microsoft.{“@context”:”https://schema.org”,”@type”:”FAQPage”,”mainEntity”:[{“@type”:”Question”,”name”:” How often should I check for updates on Windows Server 2016?”,”acceptedAnswer”:{“@type”:”Answer”,”text”:” It is recommended to check for updates on a regular basis, preferably monthly. Microsoft releases security updates on the second Tuesday of each month, commonly known as “Patch Tuesday.””}},{“@type”:”Question”,”name”:” Can I roll back installed updates on Windows Server 2016?”,”acceptedAnswer”:{“@type”:”Answer”,”text”:” Yes, you can uninstall or roll back installed updates on Windows Server 2016. In the Control Panel, go to “Programs” or “Programs and Features,” click on “View installed updates,” and select the update you want to uninstall. Follow the on-screen instructions to remove the update.”}},{“@type”:”Question”,”name”:” Are all updates necessary, or can I selectively install them?”,”acceptedAnswer”:{“@type”:”Answer”,”text”:” While security updates are crucial for maintaining the security of your system, some updates may not be necessary for your specific environment. You can selectively install updates based on your requirements, but critical security updates should never be ignored.”}},{“@type”:”Question”,”name”:” Can I download updates manually and install them on Windows Server 2016?”,”acceptedAnswer”:{“@type”:”Answer”,”text”:” Yes, you can manually download and install updates from the Windows Update Catalog or other trusted sources. However, it is generally recommended to use the built-in Windows Update feature or a centralized update management solution for easier management.”}},{“@type”:”Question”,”name”:” What should I do if an update fails to install on Windows Server 2016?”,”acceptedAnswer”:{“@type”:”Answer”,”text”:” If an update fails to install on Windows Server 2016, try restarting the server and running the update again. If the issue persists, check for any error messages or error codes provided during the installation process. You can search for the specific error message or code online for troubleshooting steps or contact Microsoft support for assistance.”}}]}
Though the purpose of Windows updates is to enhance the system performance, speed and security, sometimes that can create an issue too. It is very important to identify which updates were installed recently if you face issues with Windows OS or applications on your computer.
When you manage the server administration, you must take extra care while installing Windows updates. Some updates may cause problems with the installed applications or client-server setup. This guide explains where and how to view the installed updates/patches on your Windows 10/11 PC and Windows 2012 R2 (and the latest servers).
Checking the installed Windows update is not a tough task, but you may miss or confuse the place you must check since each interface on every Windows Operating System is different.
It can be checked in the control panel. That will show the details of updates with its KB number and date of installation.
1. To go to the ‘Windows Update’ settings, type ‘Update’ in the search. This will take you to the settings app on Windows 10 or 11. Click on ‘Windows Update settings’ as below.
2) On the next screen, click Advanced options to see the history of installed updates.

3) Click on ‘View your update history.’

Here it will show the installed updates on your Windows 10 desktop or laptop computer.

Few Drawbacks in this Method
- Unfortunately, this will not show all the updates on your computer. It shows the recent success or failure updates only.
- You can’t directly uninstall a specific update from this settings app; you have to click on ‘Uninstall updates, ’ which will take you to classic control panel settings.
Best Way to Check Installed Updates/Patches on Windows 10/11/2012 R2/2016/2019
Go to the classic (we call it ‘normal’) control panel and click on ‘Programs and Features’.

Here you can view the installed updates on the server or client Operating System with the installation date. It is easy to select individual installed updates and uninstall them (if you think that particular update is causing the issue on your computer or server).
View Windows Update Patches History in Command Prompt and PowerShell
We can use a few commands to check the Windows patch history in Windows client and Server Operating Systems. It is an ideal way to use when you connect a remote computer/server or in a Windows server core installation.
Open command prompt or Powershell and enter the below command to see the installed patches and hotfixes with the installation date in table format.
wmic qfe list full /format:table

If your computer has plenty of updates and you need to find the specific update, use the KB number in the below command.
wmic qfe | find “5007401”
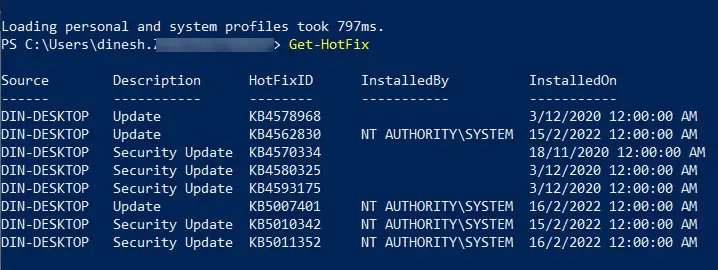
Here is a similar PowerShell command:
Get-Hotfix
You can find more about each update and its implication by searching on Google or Microsoft websites for the particular KB number.
How to Remove a Windows Update from CLI?
It is possible to uninstall a particular Windows update/patch from the command prompt or PowerShell if you have administrative access.
Use one of the commands to find the installed updates and correct KB numbers, then execute the below command.
wusa /uninstall /kb:5010342
/quiet
/norestart
Those are additional keys you can use to uninstall without notifying the user and not restarting the computer or server.

We hope this guide will be useful for finding out the installed Windows updates on Windows 10/11, 2012 R2 and any server Operating Systems.
Вы когда-нибудь задумывались, с помощью чего формируется список установленных обновлений Windows? А через какое API его достать? Ответы на эти и другие возникающие вопросы я постараюсь дать в своём небольшом исследовании.

Предыстория или с чего всё началось.
В нашей компании каждый год проходит конференция молодых специалистов, где каждый участник может решить проблему какого-либо отдела (список тем заранее предлагается).
Раньше на каждое «ТО» с помощью WSUS подтягивались все выпущенные обновления и распространялись на все машины. Также периодически выходили ТСБ (технические сервисные бюллетени), в которых указывалось, что требуется установить необходимые обновления в виде изолированных пакетов. В итоге у нас накапливаются обновления, которые в WSUS отследить нельзя, а можно было увидеть только через панель управления в разделе «Установленные обновления».
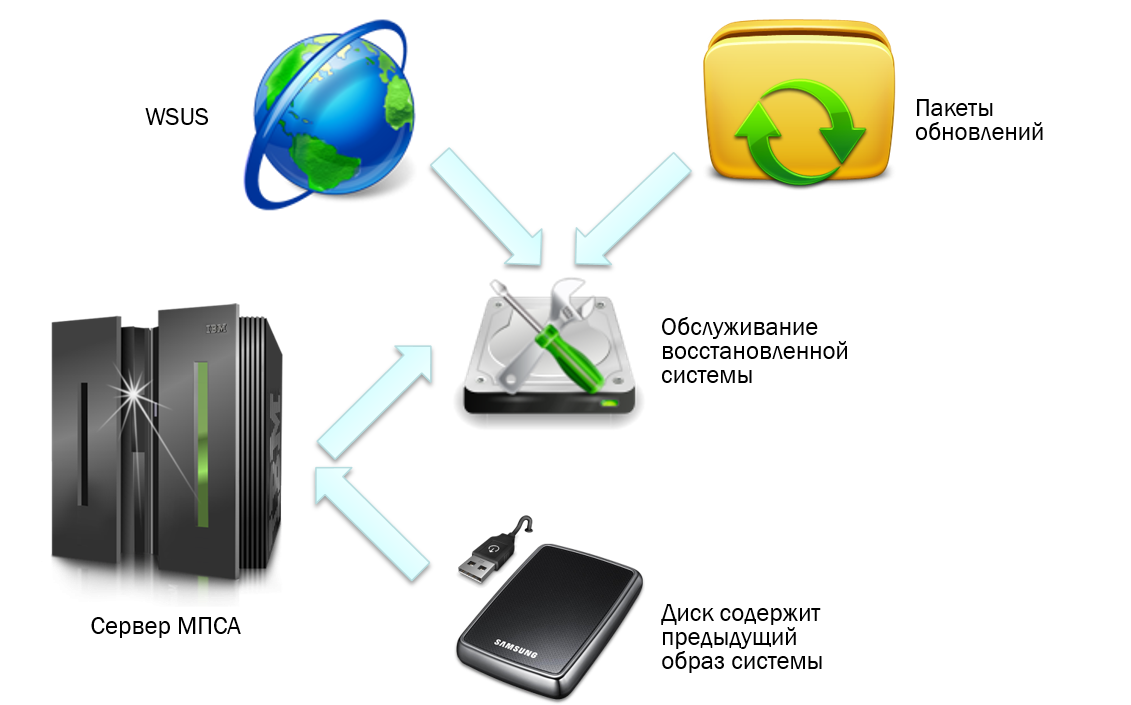
Бывают ситуации, когда АРМ или сервер «падает» и приходится его восстанавливать из образа, созданного некоторое время назад. При восстановлении из образа есть вероятность того, что мы можем потерять нужные нам обновления (которые пришли в виде изолированных пакетов), которые устанавливались до падения машины. Объяснил максимально подробно насколько мог, потому что уточнения будут уже коммерческой тайной.
Вот поэтому и возникла идея создать программу, которая бы могла извлечь этот список обновлений (желательно удаленно по локальной сети), записать в файл/базу, сравнить текущий перечень с неким шаблоном и выдать сообщение на SCADA систему через один из протоколов — SNMP, OPC.
Как вы могли догадаться из названия статьи, уже на выборе метода получения списка у меня возникла непростая задача. Я, как обычно, решил поискать нужное в поисковике, задал вопросы на профильных ресурсах (раз, два, на английском stackoverflow почему-то не понравился мой вопрос и его пришлось удалить), но все ответы не давали нужного результата. Поэтому пришлось разбираться самому, о чем и пойдет речь далее.
Консольные команды
Начнем с простого и воспользуемся тем, что предлагает нам Windows без использования сторонних средств. Это можно сделать с помощью следующих команд:
- wmic qfe list
- systeminfo
- dism /online /get-packages
- через PowerShell:
- Get-HotFix
- Get-SilWindowsUpdate (доступно только в серверных редакциях)
- Get-WmiObject -Class win32_quickfixengineering — через доступ к WMI классу win32_quickfixengineering (о WMI чуть позже)
Получить список через графический интерфейс можно через стандартный пункт Панели управления «Установка/удаление программ», но скопировать оттуда мы ничего не можем. Каждый инструмент панели управления представлен файлом .cpl в папке Windows\System. Файлы .cpl в системную папку Windows автоматически загружаются при запуске панели управления. За пункт Программы отвечает файл Appwiz.cpl. Его анализ ни к чему не привел.
Вывод консольной команды можно перенаправить в файл и дальше начать его парсить, но это неправильно, плюс вызов программы (по правилам СБ не пройдет) и об удаленном получении списка речь не идёт. Поэтому предлагаю вам просто вызвать команды, сравнить количество обновлений в каждом списке, со списком через Панель управления и продолжить наше расследование дальше.
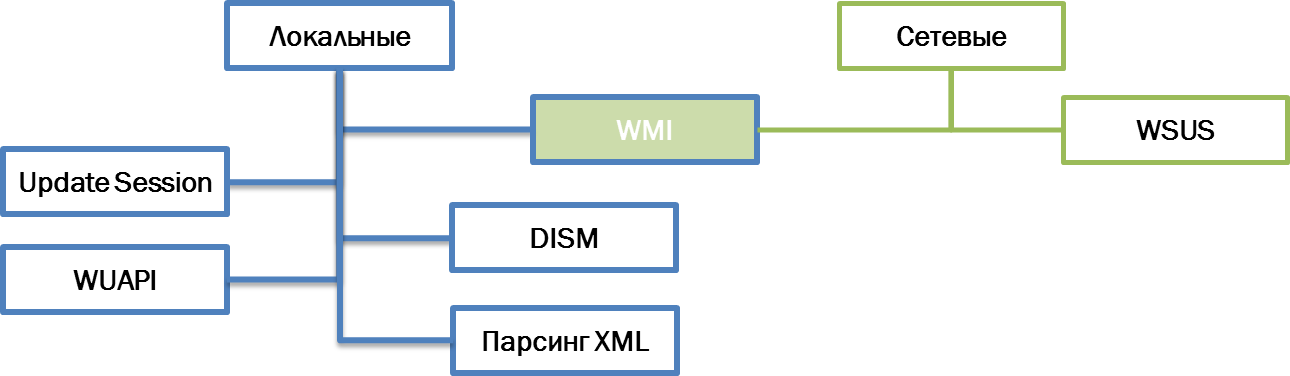
Формально все методы получения списка обновлений можно разделить на две группы: локальные и сетевые.
Все методы проверялись на чистых образах систем (Windows 7, 8, Server 2012 R2) с интегрированными обновлениями, после каждого обновления через Центр обновления с официальных серверов Microsoft проводилась дополнительная проверка. Остановимся на каждом из них подробнее.
WUA
WUApi (Windows Update Agent API) — использование API агента обновления Windows. Самый явный вариант, название которого говорит само за себя. Использовать для этого будем библиотеку Wuapi.dll.
Примечание: далее для своего удобства все результаты я буду вставлять в List. Это, возможно, не рационально, но тогда мне это казалось хорошей идеей.
Пример реализации
using WUApiLib;

public static List<string> listUpdateHistory()
{
	//WUApi
	List<string> result = new List<string>(200);

	try
	{
		UpdateSession uSession = new UpdateSession();
		IUpdateSearcher uSearcher = uSession.CreateUpdateSearcher();
		uSearcher.Online = false;
		ISearchResult sResult = uSearcher.Search("IsInstalled=1 And IsHidden=0");

		string sw = "Количество обновлений через WUApi: " + sResult.Updates.Count;
		result.Add(sw);
		foreach (WUApiLib.IUpdate update in sResult.Updates)
		{
			result.Add(update.Title);
		}
	}

	catch (Exception ex)
	{
		result.Add("Что-то пошло не так: " + ex.Message);
	}

	return result;
}
Есть и вторая вариация этого метода: Update Session — получение информации с помощью подключения к сессии обновления Windows Update Agent (в данном случае работаем не напрямую с библиотекой).
Пример реализации
public static List<string> Sessionlist(string pc)
{
	List<string> result = new List<string>(50); //не забудь изменить количество

	object sess = null;
	object search = null;
	object coll = null;

	try
	{
		sess = Activator.CreateInstance(Type.GetTypeFromProgID("Microsoft.Update.Session", pc));
		search = (sess as dynamic).CreateUpdateSearcher();

		int n = (search as dynamic).GetTotalHistoryCount();
		int kol = 0;
		//coll = (search as dynamic).QueryHistory(1, n);
		coll = (search as dynamic).QueryHistory(0, n);

		result.Add("Количество через Update.Session: " + n);
		foreach (dynamic item in coll as dynamic)
		{
			if (item.Operation == 1) result.Add(item.Title);
			kol++;
			//Console.WriteLine("Количество: " + kol);
		}
		result.Add("Количество в цикле: " + kol);
	}
	catch (Exception ex)
	{
		result.Add("Что-то пошло не так: " + ex.Message);
	}
	finally
	{
		if (sess != null) Marshal.ReleaseComObject(sess);
		if (search != null) Marshal.ReleaseComObject(search);
		if (coll != null) Marshal.ReleaseComObject(coll);
	}

	return result;
}
Microsoft подсказывает об удаленном использовании API.
Главный минусы этих двух методов — не позволяют найти исправления KB, которые не распространяются через Центр обновления Windows. Можно увидеть только то, что прошло через сам агент обновления, то есть данный вариант нас не устраивает.
DISM
Система обслуживания образов развертывания и управления ими (Deployment Image Servicing and Management) — это средство командной строки, которое может использоваться для обслуживания образа Windows или для подготовки образа среды предустановки Windows (Windows PE). Является заменой диспетчера пакетов (Pkgmgr.exe), PEimg и Intlcfg.
Данная утилита используется для интеграции обновлений, сервис паков в образ системы. Обновления Windows представляют собой отдельные модули, которые могут быть представлены в нескольких вариантах:
- .cab-файлы (Cabinet) — архивы. Предназначены для распространения и установки при помощи модулей Центра обновлений Windows в автоматизированном режиме;
- .msu-файлы (Microsoft Update Standalone Package) — исполняемые файлы. Предназначены для распространения и установки самими пользователями в ручном режиме через каталог обновлений Microsoft. Фактически представляют собой упакованный набор, состоящий из .cab-, .xml, .txt-файлов.
Ранее упомянутая команда dism /online /get-packages отображает основную информацию обо всех пакетах в wim образе/текущей системе. Microsoft позаботилась о нас и предоставляет NuGet packages для удобного использования API.
Пример реализации
using Microsoft.Dism;

public static List<string> DISMlist()
{
	List<string> result = new List<string>(220);

	try
	{
		DismApi.Initialize(DismLogLevel.LogErrors);
		var dismsession = DismApi.OpenOnlineSession();
		var listupdate = DismApi.GetPackages(dismsession);

		int ab = listupdate.Count;
		//Console.WriteLine("Количество обновлений через DISM: " + ab);
		string sw = "Количество обновлений через DISM: " + ab;
		result.Add(sw);

		foreach (DismPackage feature in listupdate)
		{
			result.Add(feature.PackageName);
			//result.Add($"[Имя пакета] {feature.PackageName}");
			//result.Add($"[Дата установки] {feature.InstallTime}");
			//result.Add($"[Тип обновления] {feature.ReleaseType}");
		}
	}

	catch (Exception ex)
	{
		result.Add("Что-то пошло не так: " + ex.Message);
	}

	return result;
}
Количество обновлений совпадало с количеством из списка Панели управления до первого апдейта через центр управления — после него количество обновлений стало меньше (было 214, стало 209), хотя по логике они должны были увеличиться. Примеры вывода До обновления, После обновления.
С чем это связано я могу только предполагать — возможно, какие-то обновления замещали предыдущие, следовательно, и количество стало меньше.
Чуть позже я наткнулся на утилиту от китайцев DISM++, которая основана не на DISM API или DISM Core API, но имеющиеся в ней библиотеки не имеют нужных мне открытых методов, поэтому я забросил эту идею и продолжил поиски дальше.
WSUS
Windows Server Update Services (WSUS) — сервер обновлений операционных систем и продуктов Microsoft. Сервер обновлений синхронизируется с сайтом Microsoft, скачивая обновления, которые могут быть распространены внутри корпоративной локальной сети. Опять же специальный инструмент, предназначенный для работы с обновлениями.
Распространяется только на серверных редакциях ОС Windows, поэтому был развернут следующий стенд:
- основная система – Windows Server 2016;
- а через систему виртуализации Hyper-V были развернуты две клиентские ОС:
- Windows 8.1
- Windows 7
Все системы соединены в единую виртуальную локальную сеть, но
без выхода в сеть Интернет
.
Немного советов
Чтобы не выделять раздел жесткого диска для новой системы я пользуюсь WinNTSetup и устанавливаю систему в VHD диски — загрузчик, начиная с Windows 7 (редакций Professional/Ultimate), прекрасно справляется с загрузкой с образа диска. Полученные таким образом диски можно спокойно использовать и в Hyper-V — убиваете сразу двоих зайцев. Не забудьте только сделать заранее копию хранилища BCD через команду bcdedit /export e:\bcd_backup.bcd.
Настраивать AD для рассылки обновлений я не захотел, поэтому просто прописал в групповых политиках путь к WSUS серверу:
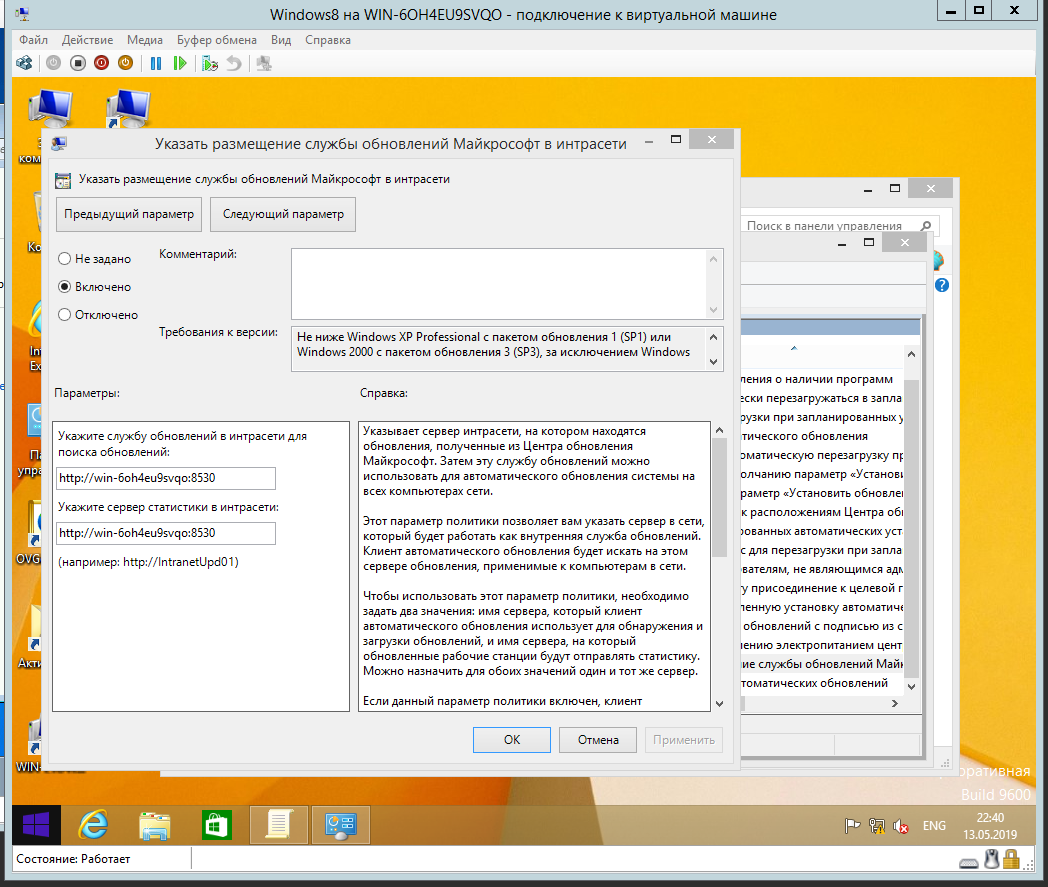
Обязательно уделите внимание на порт, я из-за опечатки (8350 вместо 8530) не мог получить обновления на клиентских машинах, хотя сделано было всё верно. Так же названия пунктов в групповых политиках на Windows 7 и Windows 8 различаются.
Для получения отчета средствами WSUS необходимо дополнительно установить пакет — система уведомит вас об этом.
А теперь немного кода
//не забудьте добавить ссылку на библиотеку
using Microsoft.UpdateServices.Administration;

public static List<string> GetWSUSlist(params string[] list)
{
	List<string> result = new List<string>(200); //не забудь изменить количество

	string namehost = list[0]; //имя Пк, на котором будем искать string  = "example1";
	string servername = list[1]; //имя сервера string  = "WIN-E1U41FA6E55";
	string Username = list[2];
	string Password = list[3];

	try
	{

		ComputerTargetScope scope = new ComputerTargetScope();
		IUpdateServer server = AdminProxy.GetUpdateServer(servername, false, 8530);
		ComputerTargetCollection targets = server.GetComputerTargets(scope);
		// Search
		targets = server.SearchComputerTargets(namehost);

		// To get only on server FindTarget method
		IComputerTarget target = FindTarget(targets, namehost);
		result.Add("Имя ПК: " + target.FullDomainName);

		IUpdateSummary summary = target.GetUpdateInstallationSummary();
		UpdateScope _updateScope = new UpdateScope();
		// See in UpdateInstallationStates all other properties criteria

		//_updateScope.IncludedInstallationStates = UpdateInstallationStates.Downloaded;
		UpdateInstallationInfoCollection updatesInfo = target.GetUpdateInstallationInfoPerUpdate(_updateScope);

		int updateCount = updatesInfo.Count;

		result.Add("Кол -во найденных обновлений - " + updateCount);

		foreach (IUpdateInstallationInfo updateInfo in updatesInfo)
		{
			result.Add(updateInfo.GetUpdate().Title);
		}

	}

	catch (Exception ex)
	{
		result.Add("Что-то пошло не так: " + ex.Message);
	}

	return result;
}


public static IComputerTarget FindTarget(ComputerTargetCollection coll, string computername)
{
	foreach (IComputerTarget target in coll)
	{
		if (target.FullDomainName.Contains(computername.ToLower()))
			return target;
	}
	return null;
}
Так как интернета нет, то ситуация с обновлениями выходит как на скриншоте ниже:
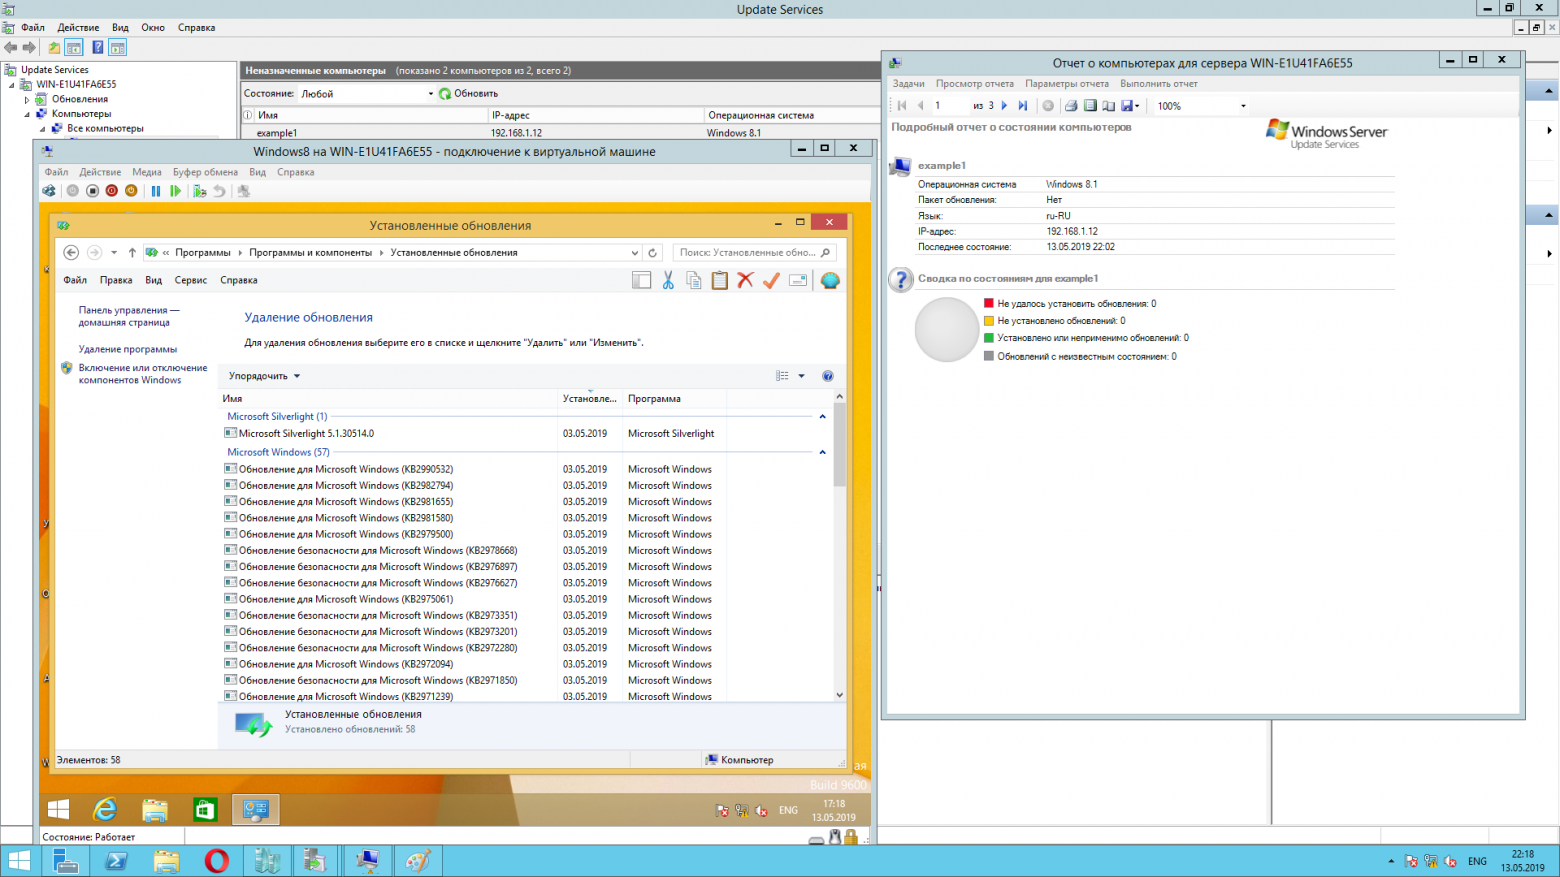
Поведение похоже на WUApi — если обновления не прошли через них, то они не знают об этом. Поэтому данный метод снова не подходит.
WMI
Windows Management Instrumentation (WMI) в дословном переводе — инструментарий управления Windows.
WMI — реализованный корпорацией Майкрософт стандарт управления предприятием
через Интернет
для централизованного администрирования и слежения за работой различных частей компьютерной инфраструктуры под управлением платформы Windows. WMI является открытой унифицированной системой интерфейсов доступа к любым параметрам операционной системы, устройствам и приложениям, которые функционируют в ней.
Данный метод позволяет получить данные как с локальной машины, так и удаленно в пределах локальной сети. Для обращения к объектам WMI используется специфический язык запросов WMI Query Language (WQL), который является одной из разновидностей SQL. Получать список мы будем через WMI класс win32_quickfixengineering.
Пример реализации
using System.Management;

public static List<string> GetWMIlist(params string[] list)
{
List<string> result = new List<string>(200); //не забудь изменить количество

ManagementScope Scope;

string ComputerName = list[0];
string Username = list[1];
string Password = list[2];

int kol = 0;

if (!ComputerName.Equals("localhost", StringComparison.OrdinalIgnoreCase))
{
	//     Возвращает или задает полномочия, которые используются для проверки подлинности
	//     указанного пользователя.
	ConnectionOptions Conn = new ConnectionOptions();
	Conn.Username = Username;
	Conn.Password = Password;
	//Если значение свойства начинается со строки «NTLMDOMAIN:» аутентификация NTLM будет использоваться, и свойство должно содержать доменное имя NTLM.
	Conn.Authority = "ntlmdomain:DOMAIN";
	Scope = new ManagementScope(String.Format("\\\\{0}\\root\\CIMV2", ComputerName), Conn);
}
else
	Scope = new ManagementScope(String.Format("\\\\{0}\\root\\CIMV2", ComputerName), null);

try
{
	Scope.Connect();
	ObjectQuery Query = new ObjectQuery("SELECT * FROM Win32_QuickFixEngineering");
	ManagementObjectSearcher Searcher = new ManagementObjectSearcher(Scope, Query);

	foreach (ManagementObject WmiObject in Searcher.Get())
	{
		result.Add(WmiObject["HotFixID"].ToString());
		//Console.WriteLine("{0,-35} {1,-40}", "HotFixID", WmiObject["HotFixID"]);// String
		//result.Add();
		/*result.Add("{0,-17} {1}", "Тип обновления: ", WmiObject["Description"]);
		result.Add("{0,-17} {1}", "Ссылка: ", WmiObject["Caption"]);
		result.Add("{0,-17} {1}", "Дата установки: ", WmiObject["InstalledOn"]);*/
		kol++;
	}
	result.Add("Количество равно " + kol);
}

catch (Exception ex)
{
	result.Add("Что-то пошло не так: " + ex.Message);
}

return result;
}
Количественно всё совпадает (даже после обновлений), поэтому было решено использовать этот метод. Для программного создания WMI запросов советую использовать следующую утилиту — WMI Delphi Code Creator. Благодаря ей я немного по другому взглянул на свой код и решил использовать заготовку из этой программы.
XML
Полученные данные методом WMI меня не остановили, и я решился на „поверхностный реверс-инжиниринг“. Воспользуемся утилитой Process Monitor из сборника программ Sysinternals Suite для выявления файлов и ветвей реестра, которые используются при вызове выше перечисленных консольных команд и обращению к пункту „Установленные обновления“ через Панель управления.
Моё внимание привлек файл wuindex.xml, расположенный в папке C:\Windows\servicing\Packages\. Для его анализа была написана следующая программа:
Пример консольного приложения
using System;
using System.Collections.Generic;
using System.Linq;
using System.Text;
using System.Threading.Tasks;
using System.Xml;
using System.Text.RegularExpressions;
using System.IO;

namespace XMLviewer
{
    class Program
    {
        static void Main(string[] args)
        {
            string writePath = AppDomain.CurrentDomain.BaseDirectory + "XML Обновлений " + Environment.MachineName + ".txt";
            if (!File.Exists(writePath))
            {
                Console.WriteLine("Создаю пустой txt файл");
            }
            else
            {
                Console.WriteLine("Файл XML Обновлений.txt существует, он будет перезаписан");
                File.Delete(writePath);
            }

            //регулярное выражение для поиска по маске KB
            Regex regex = new Regex(@"KB[0-9]{6,7}");
            //Regex(@"(\w{2}\d{6,7}) ?");

            //SortedSet не поддерживает повторяющиеся элементы, поэтому повторяющиеся элементы мы "группируем" ещё на стадии добавления
            SortedSet<string> spisok = new SortedSet<string>();

            XmlDocument xDoc = new XmlDocument();
            string path = "C:\\Windows\\servicing\\Packages\\wuindex.xml"; //путь до нашего xml
            xDoc.Load(path);

            int kol = 0; //кол-во компонентов
            int total = 0; //кол-во дочерних элементов в xml
            int total2 = 0; //кол-во полученных обновлений

            XmlNodeList name = xDoc.GetElementsByTagName("Mappings");
            foreach (XmlNode xnode in name)
            {
                //Console.WriteLine(xnode.Name);
                kol++;
                XmlNode attr = xnode.Attributes.GetNamedItem("UpdateId");
                //Console.WriteLine(attr.Value);

                foreach (XmlNode childnode in xnode.ChildNodes)
                {
                    XmlNode childattr = childnode.Attributes.GetNamedItem("Package");
                    total++;
                    //Console.WriteLine(childattr.Value);

                    MatchCollection matches = regex.Matches(childattr.Value);
                    if (matches.Count > 0)
                    {
                        foreach (Match match in matches)
                            //Console.WriteLine(match.Value);
                            spisok.Add(match.Value);
                    }
                    else
                    {
                        //Console.WriteLine("Совпадений не найдено");
                    }
                }

            }

            try
            {
                StreamWriter sw = new StreamWriter(writePath);
                foreach (string element in spisok)
                {
                    //Console.WriteLine(element);
                    sw.WriteLine(element);
                    total2++;
                }
                sw.Close();
            }
            catch (Exception ex)
            {
                Console.WriteLine("Ошибка: " + ex.Message);
            }

            //Console.WriteLine("\n");
            Console.WriteLine("Количество пакетов: " +kol);

            Console.WriteLine("Количество дочерних элементов в xml: " + total);

            Console.WriteLine("Количество KB обновлений: " + total2);

            Console.WriteLine("Нажмите любую клавишу для выхода.");
            Console.Read();
        }
    }
}
К сожалению, данный файл встречается не на всех системах и принцип его генерирования и обновления остался для меня загадкой. Поэтому снова данный метод нам не подходит.
CBS
Вот мы подошли к тому, с чем связаны все эти методы. Продолжая анализ логов Process Monitor я выявил следующие папки и файлы.
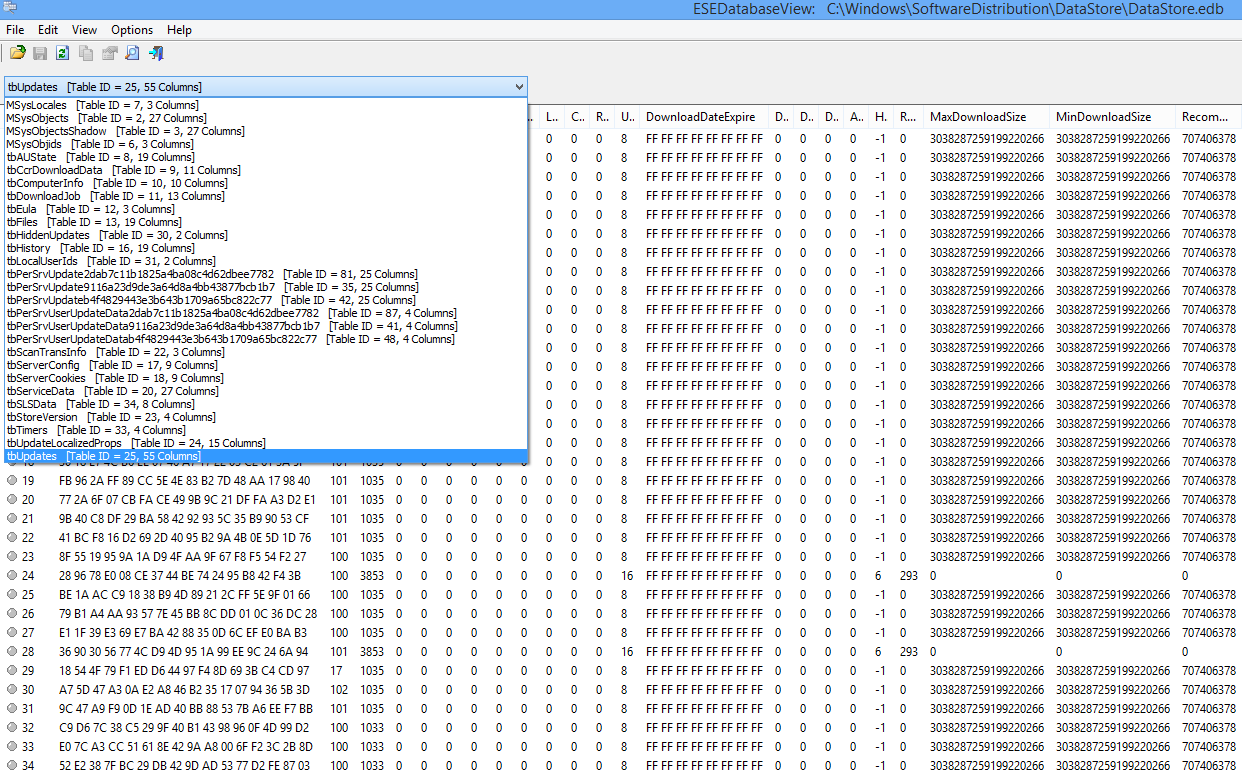
Файл DataStore.edb, расположенный в папке C:\Windows\SoftwareDistribution\DataStore. Это база данных, в которой содержится история всех обновлений установленной версии Windows, включая те обновления, которые только стоят в очереди.
Для анализа файла DataStore.edb использовалась программа ESEDatabaseView. В БД существует таблица tbUpdates, содержимое которой трудно интерпретировать.
После мое внимание привлек процесс TiWorker.exe, который вызывался каждый раз при открытии пункта в Панели управления. Он „ходил“ по многим папкам, одна из которых вывела меня на верный путь.
C:\Windows\SoftwareDistribution — это папка, используемая службой обновления Windows для загрузки обновлений на компьютер с последующей их установкой, а также хранит сведения обо всех ранее установленных обновлениях.
Папка WinSxS, расположенная по адресу C:\Windows\winsxs. Это служебная папка операционной системы Windows служащая для хранения ранее установленных версий системных компонентов. Благодаря ее наличию существует возможность отката к более старой версии обновления в случае необходимости.
C:\Windows\servicing — основная составляющая всей системы, имя которой Component-Based Servicing (CBS).
CBS — обслуживание на основе компонентов, составляющая Windows, интегрированная с службой Windows Update. В противоположность обслуживанию на основе файлов File-Based Servicing (FBS) (для ОС, предшествующих Windows Vista), в котором файлы обновлялись прямо в системных директориях, в CBS появилась целая иерархия директорий и целое семейство (стек) модулей/библиотек обслуживания.
CbsApi.dll — основная библиотека поддержки технологии CBS. Не имеет открытых методов, поэтому напрямую использовать её я не смог. Microsoft использует TrustedInstaller.exe и TiWorker.exe для доступа к методам данной библиотеки и уже через эти процессы выводит нужные нам данные. Записи ведутся в C:\Windows\Logs\CBS\CBS.log.
На момент создания прототипа программы (на скриншотах можете увидеть май 2019) русскоязычной информации о CBS не было, но в конце августа нашлась очень хорошая статья в блоге — http://datadump.ru/component-based-servicing. Очень интересная статья, которая подтвердила мой опыт и собрала в себе нужную информацию. И ещё по теме: http://www.outsidethebox.ms/17988/
Вывод
Microsoft слишком усложнила тривиальную задачу по получению списка обновлений и сделала этот процесс не совсем явным. Всё это сделано для безопасности, но не для простоты использования. Соглашусь с автором статьи — в получении обновлений стали отсутствовать предсказуемость и прозрачность.
В результате исследования была написана следующая программа, демонстрацию работы которой можно увидеть в данном видео:
В планах дописать:
- сравнение списка необходимых обновлений с полученным;
- передать результат по протоколу SNMP/OPC (если у кого есть опыт поделитесь в комментариях);
- организовать установку недостающих „офлайн“ обновлений из указанной папки.
Если вы знаете ещё методы получения списка не только обновлений, но и дополнительных компонентов (Adobe Flash, Acrobat Reader и т.д.) или у вас есть другие интересные предложения, напишите об этом в комментариях или в личные сообщения — буду рад любой обратной связи. И поучаствуйте в опросе к данной статье — так я буду знать, будет ли интересен мой опыт аудитории Habrahabr.
Только зарегистрированные пользователи могут участвовать в опросе. Войдите, пожалуйста.
Продолжить тему о том, как всем этим управлять через SNMP/OPC?
11.85% Нет, не интересно16
17.04% Бессмысленное занятие, займись лучше другим23
Проголосовали 135 пользователей. Воздержались 50 пользователей.
Только зарегистрированные пользователи могут участвовать в опросе. Войдите, пожалуйста.
И пользуясь случаем ещё один опрос: рассказать про ЕГИССО — что это какое, как мучаются люди и что люди разрабатывают, чтобы с этим работать?
78.4% Интересно прочитать про ужасы от Пенсионного фонда (Да)98
21.6% Спасение утопающих — дело рук самих утопающих (Нет)27
Проголосовали 125 пользователей. Воздержались 44 пользователя.