С помощью встроенного пакета OpenSSH для Windows вы можете легко настроить безопасную передачу файлов между клиентом и серверов Windows по защищенному протоколу передачи файлов SFTP (Secure FTP). В этой статье мы покажем, как установить и настроить установить SFTP сервер в Windows 10/11 или Windows Server 2022/2019/2016/2012R2 с помощью встроенных средств (Win32-OpenSSH).
Содержание:
- Установка OpenSSH в Windows
- Настройка SFTP сервера на базе OpenSSH в Windows
- Подключение к SFTP серверу с помощью PowerShell и WinSCP
- Настройка SFTP аутентификации по ключам
Протокол SFTP (Secure File Transfer Protocol , Secure FTP или SSH FTP) это расширение протокола SSH, являющимся стандартом мира UNIX/Linux систем. Хотя с точки зрения пользователей он похож на FTP, но на самом деле это абсолютно другой протокол, не имеющий с FTP ничего общего. Данные между клиентом и сервером передаются по порту 22 через SSH туннель.
Основные преимущества протокола SFTP:
- Передача файлов и команд происходит внутри защищенной SSH-сессии;
- Для передачи файлов и команд используется одно соединение;
- Поддерживаются символические ссылки, доступны функций прерывания, возобновления передачи, удаления файла и другие;
- Обычно на каналах, где FTP работает медленно или с перебоями, SFTP-соединение работает более надежно и быстро;
- Возможность аутентификации с помощью SSH ключей.
Не нужно путать протоколы SFTP и FTPS. FTPS – это по сути обычный FTP с SSL сертификатом, а SFTP – это передача FTP данных и команд внутри SSH сессии.
В современные версии Windows по-умолчанию встроен порт OpenSSH для win32 (Win32-OpenSSH). Вы можете использовать его для организации защищенного SFTP сервера вместо таких сторониих продуктов как Core FTP, FileZilla, CYGWIN, OpenSSH, FTP Shell, IPSwitch и пр.
Установка OpenSSH в Windows
Пакет OpenSSH уже включен в операционную систему в современных билдах Windows 10 (начиная с 1803), Windows 11, Windows Server 2022/2019 в виде Feature on Demand (как и RSAT).
В этих версиях Windows вы можете установить сервер OpenSSH с помощью PowerShell:
Add-WindowsCapability -Online -Name OpenSSH.Server*
Или с помощью DISM:
dism /Online /Add-Capability /CapabilityName:OpenSSH.Server~~~~0.0.1.0
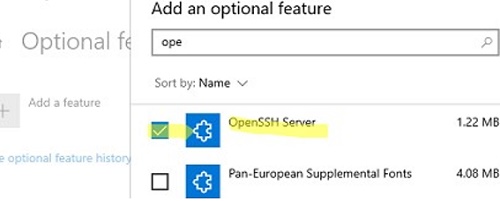
Также можно установить OpenSSH из графического интерфейса Windows 10 (Settings -> Apps -> Optional Features -> Add a feature -> Open SSH Server -> Install).
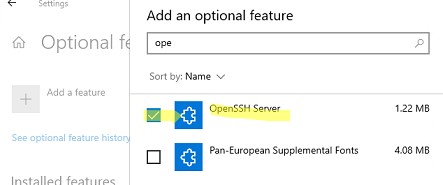
Чтобы проверить, установлен ли пакет:
Get-WindowsCapability -Online | ? Name -like 'OpenSSH*'
Исполняемые файлы OpenSSH находятся в каталоге:
C:\windows\system32\OpenSSH\
Конфигурационный файл sshd_config находится в каталоге C:\ProgramData\ssh (каталог создается после первого запуска службы).
Лог — c:\windows\system32\OpenSSH\logs\sshd.log
Файл authorized_keys и ключи хранятся в каталоге %USERPROFILE%\.ssh\.
В предыдущих версиях Windows 10, в Windows 8.1 или в Windows Server 2016/2012 R2 вам придется скачать Win32-OpenSSH для Windows с GitHub и установить вручную (https://github.com/PowerShell/Win32-OpenSSH/releases). Нам нужна версия для 64 битной версии Windows: OpenSSH-Win64.zip (4,15 Мб).
- Распакуйте содержимое архива в целевой каталог, к примеру:
C:\OpenSSH-Win - Запустите командную строку PowerShell с правами администратора и перейдите в каталог OpenSSH:
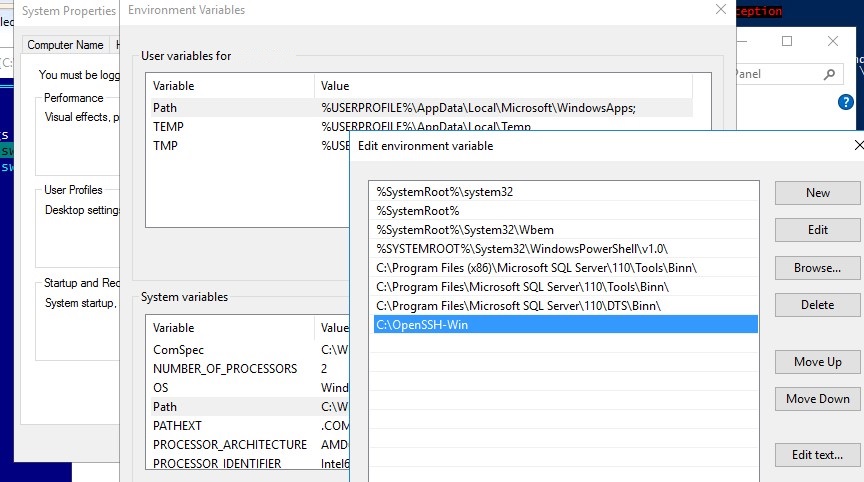
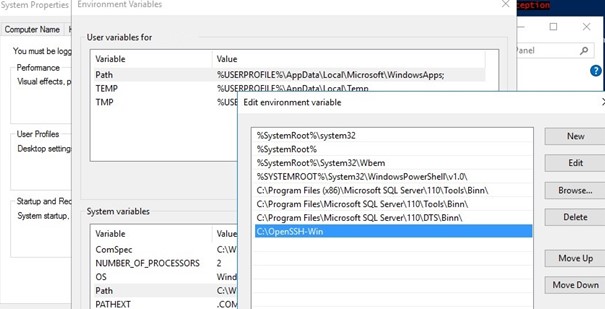
cd C:\OpenSSH-Win - Добавьте путь к каталогу OpenSSH в переменную окружения Path;
- Установите сервер OpenSSH:
.\install-sshd.ps1
должно появиться зеленое сообщение “sshd and ssh-agent services successfully installed”).
Настройка SFTP сервера на базе OpenSSH в Windows
Теперь вам нужно настроить OpenSSH для режима SFTP.
Включите автозапуск для службы SSHD и запустите ее с помощью следующих PowerShell команд управления службами:
Set-Service -Name sshd -StartupType ‘Automatic’
Start-Service sshd
С помошью PowerShell отройте в брандмауэре Windows порт TCP 22 для входящего трафика на SSH сервер:
New-NetFirewallRule -Protocol TCP -LocalPort 22 -Direction Inbound -Action Allow -DisplayName SSH
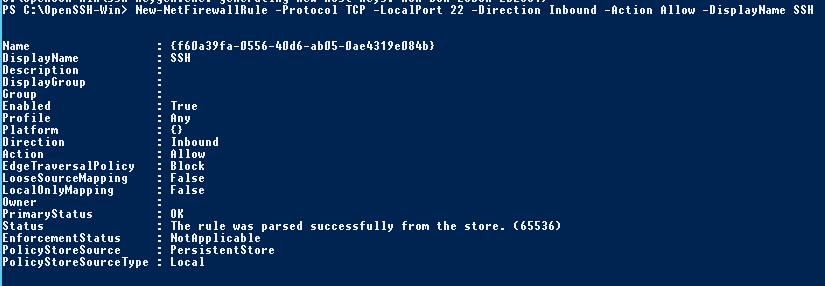
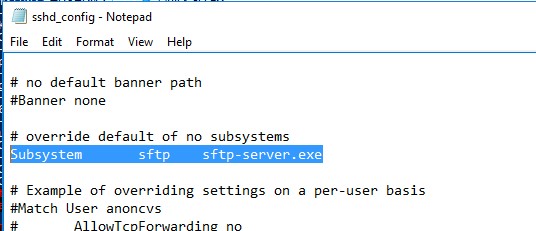
Откройте в любом текстовом редакторе конфигурационный файл «C:\ProgramData\SSH\sshd_config», найдите и проверьте значение директивы Subsystem sftp. Здесь должен быть указан файл sftp-server.exe.
Рассмотрим полезные директивы в конфигурационном файле sshd_config:
# разрешить подключение к OpenSSH только для пользователей из этой группы
AllowGroups corp\admingroup
# включить аутентификацию по паролю (нельзя использовать ключи SSH)
AuthenticationMethods password
ForceCommand internal-sftp
#каталог для SFTP пользователей (по умолчанию пользователь подключается в каталог со своим профилем в папке C:\users\username)
ChrootDirectory C:\SFTPRoot
#Для каждого пользователя можно индивидуальную chrootdirectory:
Match User user1
ChrootDirectory c:\SFTPRoot\user1
ForceCommand internal-sftp
X11Forwarding no
 AllowTcpForwarding no
Match User user2
ChrootDirectory c:\SFTPRoot\user2
ForceCommand internal-sftp
X11Forwarding no
AllowTcpForwarding no
Подключение к SFTP серверу с помощью PowerShell и WinSCP
Теперь вы может подключиться к вашему SSH серверу на Windows по протоколу SFTP. Ниже мы покажем, как подключиться к SFTP серверу с помощью бесплатного клиента клиент WinSCP, консоли PowerShell и встроенной утилиты sftp.exe.
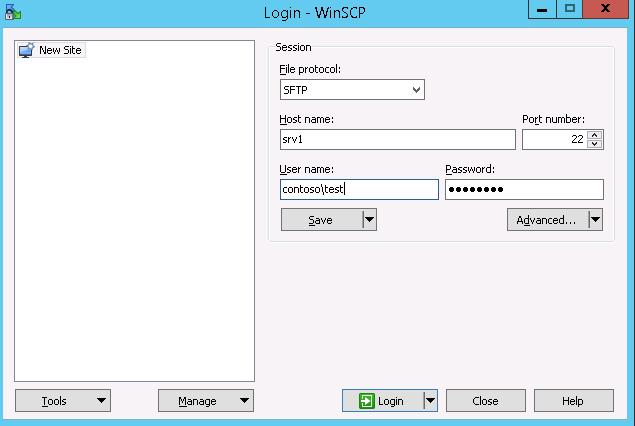
В окне настройки подключения выберите протокол передачи файлов SFTP, укажите имя сервера и данные учетной записи Windows (в формате
user@domain
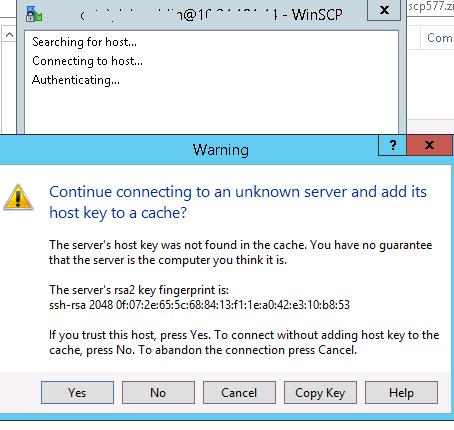
для доменных пользователей), под которой осуществляется подключение (возможно также настроить авторизацию по ключам). При первом подключении появится окно с предупреждением о том, что ключ хоста отсутствует в локальном кеше.
При первом подключении появится окно с предупреждением о том, что ключ хоста отсутствует в локальном кеше.
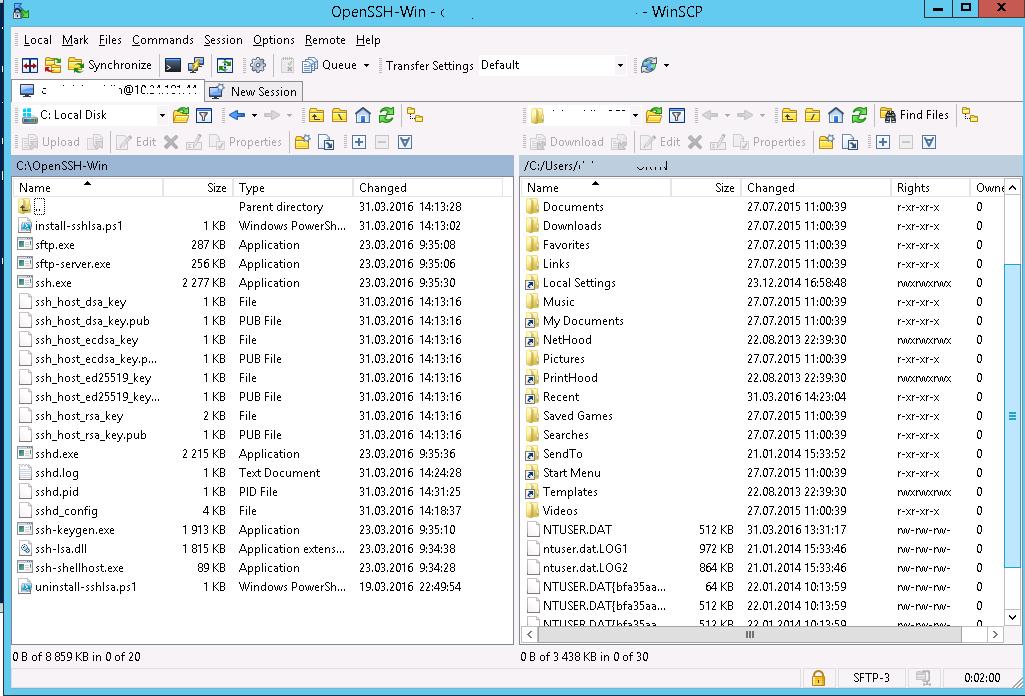
Если все настроено правильно, клиент должен подключиться к SFTP серверу и отобразить список файлов в домашнем каталоге пользователя (по умолчанию каталог с профилем пользователя).
С помощью привычного интерфейса файлового менеджера можно безопасно копировать файлы между сервером и клиентом по защищённому протоколу SFTP.
Для подключения к SFTP серверу из PowerShell можно использовать модуль Posh-SSH. Вы можете скачать установить модуль из PowerShell Gallery или офлайн:
Install-Module -Name Posh-SSH

Для подключения к SFTP серверу с помощью пароля, нужно получить имя пользователя и пароль через Get-Credential:
$usrCreds= Get-Credential
Теперь можно подключиться к вашем SFTPS серверу:
$SFTPSession = New-SFTPSession -ComputerName 192.168.13.200 -Credential $usrCreds
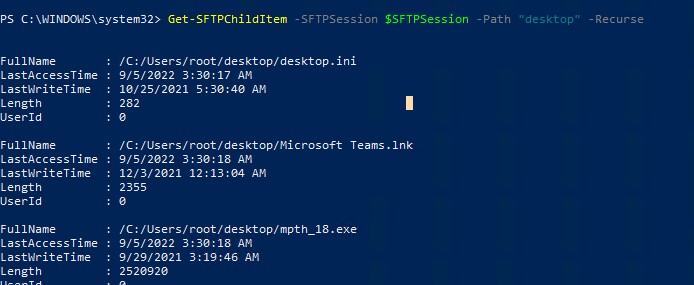
Теперь вы можете вывести список файлов в удаленном каталоге на SFTP сервере. В этом примере я получу список файлов на рабочем столе пользователя (профиль пользователя в этом случае будет являться корнем)
Get-SFTPChildItem -SFTPSession $SFTPSession -Path "desktop" –Recurse
Чтобы скачать файл с удаленного SFTP сервера:
Get-SFTPItem -SessionId $SFTPSession.SessionId -Path "desktop/OpenVPNScript.log" -Destination c:\temp
Чтобы закачать файл с вашего компьютера на удаленный SFTP хост:
Set-SFTPItem -SessionId $SFTPSession.SessionId -Path C:\Temp\mytestfile.log -Destination “desktop”

Завершить SFTP сессию:
Remove-SFTPSession -SFTPSession $SFTPSession
В Windows вы можете использоваться встроенную утилиту sftp.exe (устанавливается вместе с клиентом OpenSSH) для подключения к SFTP серверу.
Подключиться к sftp серверу:
sftp [email protected]
Подключиться с помощью ssh ключа:
sftp -i .ssh/id_rsa [email protected]
Вывести список файлов в удаленном каталоге:
pwd
Скачать файл с SFTP в локальный каталог на ваш компьютер:
get file-test1.txt
Загрузить файл с вашего компьютера на SFTP сервер:
put file-test2.txt
Закрыть сессию:
exit

Настройка SFTP аутентификации по ключам
Вы можете настроить SFTP аутентификацию по ключам. В этом случае при подключении к SFTP серверу вам не нужно будет указывать пароль пользователя.
Подробно настройка SSH аутентификации по ключам описана в этой статье.
Для этого нужно:
- Создать на вашем компьютере (SFTP клиент) ключи для пользователя, под которым вы будете подключаться к серверу:
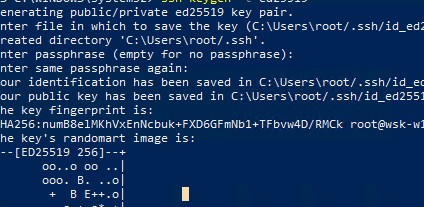
ssh-keygen -t ed25519 - Утилита сгенерирует два файла
id_ed25519
(закрытый ключ для клиента) и
id_ed25519.pub
(открытый ключ для сервера); - Теперь нужно добавить ваш SSH ключ на сервер. Скопируйте файл id_ed25519.pub(или id_rsa.pub в зависимости от типа ключа) в каталог .ssh профиля пользователя, под которым вы будете подключаться к SFTP серверу. Переименуйте файл в authorized_keys (например для пользователя alex путь будет выглядеть так:
C:\Users\alex\.ssh\authorized_keys
)
Теперь вы можете использоваться файл id_ed25519 для аутентификации на SFTP сервере в настройках WinSCP (настройки подключения Advanced -> to SSH > Authentication page -> Private key file).
Если вы хотите задать SSH ключ при подключении к SFTP из PowerShell, используйте такую команду:
New-SFTPSession -ComputerName 192.168.13.200 -Credential user1 -KeyFile C:\Users\alex\.ssh\id_ed25519" -Verbose
Setup SFTP server and SFTP client in Windows using OpenSSH server and WinSCP
sftp_setup
Table of Contents
- In this post we will try to setup an SFTP server using OpenSSH server and setup FTP client using WinSCP
Setup SFTP server using OpenSSH zip file in any Windows version
Setup SFTP server in newer versions of windows
- Click windows button and search for “manage optional features”
- Click on “add a feature” and search for OpenSSH server and install it
- Now Open SSH server and OpenSSH Authentication agent services should be installed in the
services.mscwindow - You ca right click and change the start up type of both the services as automatic if you want the services to start upon system start up
- Create the appropriate firewall policy to expose the SFTP port 22 to local or remote systems if required
- Now SFTP server accepts connections using username and password authentication
Downsides of password based authentication in SFTP
- OS user credentials of the server operating system are to be shared with the SFTP client which is not desirable
- OS user password is to be changed to change the password of SFTP client
- OS user password will be transmitted over the network
Benefits of using public key based authentication in SFTP
- This type of authentication is more robust and secure
- SFTP client need not know the OS user password
- Multiple clients can use different private keys for a single OS user
- Private key can be changed easily from time to time without changing the user’s OS password
- Access of SFTP client can be easily revoked by just removing the client’s public key from the authenticated list, without locking out or modifying the OS user account
Setup public key based authentication in windows
Step 1 — Create a public and private key pair
- Public and private keys can be generated using one of the below methods
- The public key will be added to a text file in the SFTP server
- The private key will be used by the client to get authenticated and establish a session with the SFTP server
Method 1 (Preferred) — Using ssh-keygen.exe
ssh-keygen.execan be found inside the program files folder likeC:\Program Files\OpenSSH- Open a command window in that folder and run ssh-keygen.exe. Press enter till the execution is complete as shown in the image below
- During the key generation process, password protection can be set to private key by entering a passphrase as shown in the above image. This ensures additional protection in case the private key is in wrong hands
- The public key will be saved as
C:\Users\<username>\.ssh\id_rsa.puband private key will be saved asC:\Users\<username>\.ssh\id_rsa
Method 2 — Using puttygen.exe
- Download puttygen.exe from https://www.puttygen.com/download-putty#Download_PuTTY_073_for_Windows
- Run puttygen.exe, make sure the settings are as shown in the below image and click Generate button. Move the cursor over the blank area to generate randomness. Then the key generation process will be completed
- Before clicking the Generate button, Key passphrase can be entered if we desire to password protect the generated private key
- Click on the save public key and save private key buttons to save the public and private keys into files like
pblic_keyandprv_key.ppk

Step 2 — Place the public key in the SFTP server
- In the SFTP server, use a text editor like notepad and open the
authorized_keysfile located atC:\Users\<username>\.ssh\authorized_keys. If the file is not present, create a new file at this location. - Copy the text in the public key file (like
id_rsa.pub) generated in the previous step and paste the text inside theauthorized_keysfile in a new line.* In this way, multiple public keys can be added one below the other in this text file so that they can be authenticated by the SFTP server
- Also note that
authorized_keysfile should not have any extension like .txt, .docx etc.
Step 3 — Change the access control list (ACL) of the authorized_keys file in SFTP server
- The access control list (ACL) of
authorized_keysfile should be configured such that onlyAdministratorsandSystemusers should have the access to this file - To achieve this, open a command prompt as administrator and run the following command
icacls.exe "C:\Users\<username>\.ssh\authorized_keys" /inheritance:r /grant "Administrators:F" /grant "SYSTEM:F"

* You can verify the access control list of the authorized_keys file by right click on file->properties->security tab as shown in the below image
Step 4 — Edit the sshd_config file of the SFTP server to configure public key based authentication
sshd_configfile is located atC:\ProgramData\sshfolder of the SFTP server- Open it with a text editor like Notepad or VS code
- Modify the
sshd_configfile to make sure the following lines are present in the file.
PubkeyAuthentication yes
AuthorizedKeysFile .ssh/authorized_keys
PasswordAuthentication no
PermitEmptyPasswords no
Subsystem sftp internal-sftp
Match User <username>
	X11Forwarding no
	AllowTcpForwarding no
	PermitTTY no
	ForceCommand internal-sftp
	PasswordAuthentication no
Replace <username> with the OS username
- Comment out the lines at the end with a
#as shown below
#Match Group administrators
# AuthorizedKeysFile __PROGRAMDATA__/ssh/administrators_authorized_keys
Restrict user to a folder (also called folder jailing)
- Using
ChrootDirectoryin sshd_config file, we can restrict the SFTP user to a particular folder. The user cannot navigate to any of the parent folders of the specified folder - This is also called folder jailing. This adds extra security to the SFTP server
- To achieve folder jailing edit the
sshd_configfile located in theC:\ProgramData\sshfolder of SFTP server as shown below
Match User <username>
	ChrootDirectory ~/Pictures/Screenshots
	X11Forwarding no
	AllowTcpForwarding no
	PermitTTY no
	ForceCommand internal-sftp
	PasswordAuthentication no
- Due to
ChrootDirectoryused in sshd_config file, the SFTP user cannot navigate to any of the parent folders ofC:\Users\Nagasudhir\Pictures\Screenshots
Setup SFTP client in windows using WinSCP
- Download WinSCP at https://winscp.net/eng/download.php
- Run the downloaded executable file and complete the installation
- Open WinSCP app
- Click on New Session button in the top left menu
- Set protocol as SFTP, port as 21, hostname as localhost, enter username. Password is not required for public key based authentication.
- For logging in with public key based authentication, click on the “Advanced” button, then a pop window opens. In the left pane, select “Authentication” menu under the SSH section. Browse for the private key file (
id_rsafile). After uploading the file, click OK button* Finally click login. Now WinSCP is connected to SFTP server
- We can copy,paste,rename,delete the SFTP server files just like file explorer
Video
The video for this post can be found here
References
- OpenSSH SFTP server installation guide — https://winscp.net/eng/docs/guide_windows_openssh_server
- OpenSSH SFTP server official installation guide — https://docs.microsoft.com/en-us/windows-server/administration/openssh/openssh_install_firstuse
- WinSCP — https://winscp.net/eng/download.php
Table of Contents
- Windows SFTP client apps
- Command-line clients
- SFTP plugins for popular apps
- Map SFTP server as a network drive
Windows SFTP client apps
Specialized applications from connecting to SFTP.
| Name | Note |
|---|---|
| Bitvise SSH Client | SSH tunneling, SSH terminal emulation and SFTP client. Commercial. |
| FileDrop | An SFTP client designed for Desktop drag and drop and fast switching between remote connections and fast upload. |
| Filezilla Client | Free and open source FTP, FTP/SSL and SFTP GUI client (beware of adware) |
| FlashFXP | SFTP/FTP client for Windows. Commercial. Not updated since 2017. |
| GoAnywhere SFTP client for MFT | SFTP client from creators of GoAnywhere MFT server. Commercial. |
| SmartFTP | FTP (File Transfer Protocol), FTPS, SFTP, WebDAV, S3, Google Drive, OneDrive, SSH, Terminal client. Commercial. |
| Tectia SSH Client | SFTP/SSH client from the creators of the SSH protocol. Commercial. |
| VanDyke SecureFX | SFTP/FTP/SCP client for Windows, Mac and Linux. Commercial. |
| Win SCP | Free and open source SFTP GUI client. Despite its name it’s not limited to SCP, but works with SFTP and FTP/SSL too. |
| WS_FTP | FTP and SFTP client |
SFTP plugins for popular apps
| Name | Note |
|---|---|
| Chrome sFTP Client | sFTP Client for Google Chrome / Chrome OS. |
| SFTP plugin for Total Commander | Official plugin from the creators of Total Commander. Free. |
Command-line clients
Use those if you want to access SFTP from a script or if you simply prefer command line over GUI.
| Name | Note |
|---|---|
| Bitvise Command-Line SFTP Client | Advanced command-line SFTP client for Windows. Commercial. |
| OpenSSH | OpenSSH’s ‘ssh’ command is available on most Un*x systems. Free and open source. Windows port is included in CygWin. |
| Push SFTP | An open-source command line client that has a full set of SFTP commands, with fast upload. |
| PuTTY PSFTP | PuTTY SFTP tool for those who are not afraid of command line. Available for Windows and Un*x-like systems. Free and open source. |
Map SFTP server as a network drive
Do you want to use a SFTP connection as a Windows mapped drive? Assign it a drive letter and use it from any application?
Try one of those:
| Name | Note |
|---|---|
| ExpandDrive | SFTP, FTP, DropBox, GoogleDrive, OneDrive and few others. Commercial. Windows and Mac. |
| NetDrive | SFTP, FTP, DropBox, GoogleDrive, OneDrive and few others. Commercial. Reverts to a limited free version when the trial is over. Windows. |
| SFTP NET Drive | SFTP. Commercial. Free for personal use. Windows. |
| SSHFS for Linux | Enables you to mount a remote folder on Linux over SSH. FUSE-based, free and open source. Part of most Linux distros. |
| SSHFS for OS X | SSH File System for MAC OS X based on FUSE for OS X. Free and open source. |
| Web Drive | SFTP, FTP, DropBox, GoogleDrive, OneDrive and few others. File system level locking symantics. Synchronization mode and network drive mode. Commercial. Windows, Mac, iOS and Android. |
| win-sshfs | Maps remote SFTP drive and make it available to all applications. Open source, last updated in 2012. Works on Windows 7, newer OS versions are not supported. Several forks exists. |
| WinSshFS 4every1 edition | Fork of win-sshfs which works on Win10. Free and open source. |
| WinSshFS FiSSH edition | Fork of win-sshfs focused on UI changes. Free and open source. |
You can use the built-in OpenSSH package in Windows to easily enable secure file transfers between the client and Windows server using the SFTP (Secure FTP) protocol. In this article, we will show how to install and configure an SFTP server on Windows 10 or Windows Server 2022/2019/2016/2012R2.
Contents:
- How to Install OpenSSH on Windows?
- How to Configure SFTP Server on Windows Using OpenSSH?
- Connecting to SFTP Server Using WinSCP or PowerShell
- Configuring SFTP Public Key Authentication
SFTP (Secure File Transfer Protocol, Secure FTP, or SSH FTP) is the extension of SSH protocol, which is the standard in the world of UNIX/Linux systems. From the user’s point of view, it is similar to FTP, but in fact, it is a completely different protocol, having nothing in common with FTP. Data between the client and the server is transmitted on port 22 through an SSH tunnel (TCP port 22).
The main advantages of SFTP:
- Files and commands are transferred within a secure SSH session;
- One connection is used to send both files and commands;
- Symbolic links, interrupt/resume the transfer, file delete functions, etc. are supported;
- SFTP connection is much faster and more reliable on WAN links where FTP is slow or intermittent;
- Possibility to authenticate using SSH keys.
Do not confuse SFTP and FTPS protocols. FTPS is essentially just a simple FTP with an SSL certificate, and SFTP is the protocol to transfer the FTP data and commands inside the SSH session.
The win32 port of OpenSSH (Win32-OpenSSH) is built into all modern versions of Windows by default. You can use it to configure a secure SFTP server instead of using third-party products like Core FTP, FileZilla, CYGWIN, FTP Shell, IPSwitch, etc.
How to Install OpenSSH on Windows?
The OpenSSH package is a part of the operating system in modern builds of Windows 10 (starting from 1803), Windows 11, and Windows Server 2022/2019 as a Feature on Demand (like RSAT).
On these versions of Windows, you can install the OpenSSH server using PowerShell:
Add-WindowsCapability -Online -Name OpenSSH.Server*
Or using DISM:
dism /Online /Add-Capability /CapabilityName:OpenSSH.Server~~~~0.0.1.0
Also, you can install OpenSSH server from Windows 10 GUI (Settings -> Apps -> Optional Features -> Add a feature -> Open SSH Server -> Install).
To check if a package is installed:
Get-WindowsCapability -Online | ? Name -like 'OpenSSH*'
- OpenSSH executables are located in the directory:
c:\windows\system32\OpenSSH\; - The sshd_config configuration file is located in
C:\ProgramData\ssh(this directory is created after the first start of the sshd service); - Log file:
c:\windows\system32\OpenSSH\logs\sshd.log; - The authorized_keys file and keys are stored in a directory:
%USERPROFILE%\.ssh\.
On the previous earlier builds of Windows 10, Windows 8.1, and on Windows Server 2016/2012 R2, you will have to download Win32-OpenSSH for Windows from GitHub and install it manually (https://github.com/PowerShell/Win32-OpenSSH/releases). We need a version for Windows x64: OpenSSH-Win64.zip (4,15 MB).
- Extract the archive to the target folder: C:\OpenSSH-Win;
- Open an elevated PowerShell prompt and switch to the OpenSSH folder:
Cd C:\OpenSSH-Win - Add the path to the OpenSSH directory to the Path environment variable (System Properties -> Advanced tab -> Environment Variables -> Select and edit the Path system variable -> Add the path to the OpenSSH folder);
- Install the OpenSSH server:
.\install-sshd.ps1(a green message should appear “sshd and ssh-agent services successfully installed”);If running PowerShell scripts on your computer is blocked by your PowerShell Execution Policy, you can run the script with this command:
powershell.exe -ExecutionPolicy Bypass -File install-sshd.ps1
How to Configure SFTP Server on Windows Using OpenSSH?
Now you need to configure OpenSSH on Windows for SFTP mode.
Enable autostart for the SSHD service and start it using the following PowerShell commands:
Set-Service -Name sshd -StartupType 'Automatic'
Start-Service sshd
Use the PowerShell to open TCP port 22 in the Windows Firewall for incoming SSH traffic:
New-NetFirewallRule -Protocol TCP -LocalPort 22 -Direction Inbound -Action Allow -DisplayName SSH

Note. The previous command won’t work in old desktop Windows versions. In this case, another command is used: netsh advfirewall firewall add rule name='SSH Port' dir=in action=allow protocol=TCP localport=22
Open the SSHD configuration file (C:\ProgramData\SSH\sshd_config) in any text editor. Find and check the value of the Subsystem sftp directive. The sftp-server.exe file should be specified here.
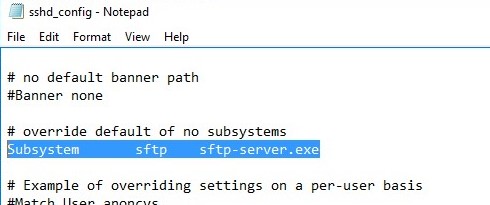
You can additionally configure the following parameters in the sshd_config configuration file:
# only allow users in this domain group to connect to OpenSSH
AllowGroups corp\sftp_users
# enable password authentication (SSH keys cannot be used)
AuthenticationMethods password
#default (chrooot) directory for SFTP users  (by default, the user connects to the directory with his profile in the C:\users\username folder)
ChrootDirectory C:\SFTP
ForceCommand internal-sftp
#You can set an individual chrootdirectory for each user:
Match User abrown
ChrootDirectory c:\SFTP\abrown
ForceCommand internal-sftp
X11Forwarding no
AllowTcpForwarding no

Match User jsmith
ChrootDirectory c:\SFTP\jsmith
ForceCommand internal-sftp
X11Forwarding no
AllowTcpForwarding no
Connecting to SFTP Server Using WinSCP or PowerShell
Now you can connect to your Windows SSH server using the SFTP protocol. Next, we’ll show you how to connect to an SFTP server using the free WinSCP client, the PowerShell console, and the built-in sftp.exe tool.
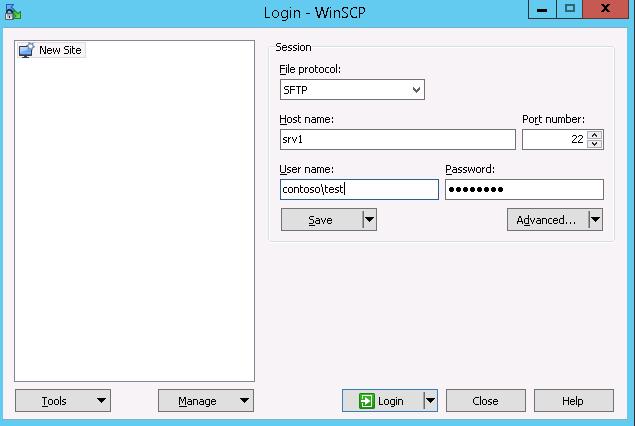
In the connection configuration window, select the SFTP as the file transfer protocol, specify the server name and the credentials of the Windows account (use the user@domain format for domain users), which is used for connection (it is also possible to configure public key authentication).
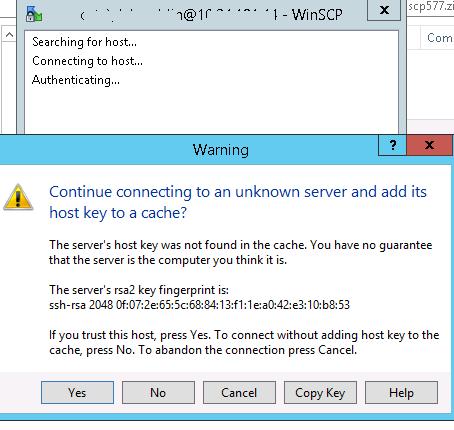
When you try to connect for the first time, the following notification of the host key not found in the local cache appears.
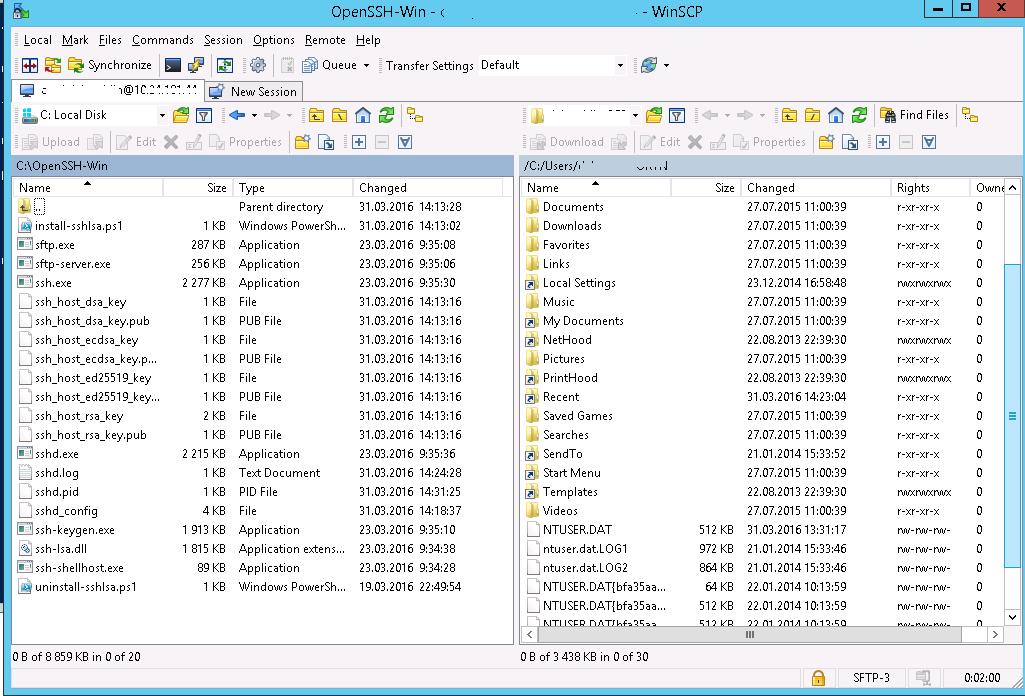
If everything is configured correctly, a client should connect to the SFTP server and display the list of files in the user’s home chroot directory (by default, it is the user’s profile directory).
Using the familiar file manager interface (like Total Commander), you can copy files between the server and the client using the secure SFTP protocol.
You can use the Posh-SSH module to connect to an SFTP server from PowerShell. You can download and install the module from the PowerShell Gallery or offline:
Install-Module -Name Posh-SSH

To connect to the SFTP server using a password, you need to get the username and password via Get-Credential:
$usrCreds= Get-Credential
You can use the PowerShell module SecretManagement to securely retrieve a saved password from a Windows Credential Manager or external vault (KeePass, HashiCorp Vault, Azure Key Vault, Bitwarden, etc.).
Now you can connect to your SFTP server:
$SFTPSession = New-SFTPSession -ComputerName 192.168.3.20 -Credential $usrCreds
Now you can list the files in the remote directory on the SFTP server. In this example, I will get a list of files on the user’s Desktop (the user’s profile will be the root user folder/chroot in this case)
Get-SFTPChildItem -SFTPSession $SFTPSession -Path "desktop" –Recurse

Download a file from a remote SFTP server:
Get-SFTPItem -SessionId $SFTPSession.SessionId -Path "desktop/OpenVPNScript.log" -Destination c:\PS
To upload a file from your computer to a remote SFTP host:
Set-SFTPItem -SessionId $SFTPSession.SessionId -Path C:\PS\mytestfile.log -Destination "desktop"
Close the SFTP session:
Remove-SFTPSession -SFTPSession $SFTPSession
On Windows, you can use the built-in sftp.exe console command (installed with the OpenSSH client) to connect to an SFTP server.
Connect to sftp server:
sftp [email protected]
Connect using ssh private key:
sftp -i .ssh/id_rsa [email protected]
List files in a remote directory:
pwd
Download the file from SFTP to a local directory on your computer:
get download_this_file_from_sftp.txt
Upload a file from your computer to an SFTP server:
put file_to_uplodad.txt
Close session:
exit
Configuring SFTP Public Key Authentication
You can enable SFTP key-based authentication in Windows. In this case, you can authenticate to the SFTP server without entering a password.
- Create SSH keys on your computer (SFTP client) for the user under which you will connect to the server:
ssh-keygen -t ed25519 - The ssh-keygen tool will generate two files id_ed25519 (private key for the client computer) and id_ed25519.pub (public key for the SFTP server);
- Now you need to add your SSH key to the Windows server (SFTP host). Copy the file id_ed25519.pub (or id_rsa.pub depending on the key type) to the .ssh directory of the user profile under which you will connect to the SFTP. Rename the file to authorized_keys (for example, the following key file is used for the user
max1:C:\Users\max1\.ssh\authorized_keys)
Now you can use the id_ed25519 file to authenticate on the SFTP server. You can set your key in the WinSCP settings (Advanced -> to SSH connection settings > Authentication page -> Private key file).
If you want to use an SSH key when connecting to SFTP from PowerShell, use the following command:
New-SFTPSession -ComputerName 192.168.3.20 -Credential remoteuser1 -KeyFile C:\Users\max1\.ssh\id_ed25519" -Verbose
Welcome, Dev, to a comprehensive guide on setting up SFTP on Windows Server. In this article, we will walk you through the process of installing, configuring, and securing SFTP on Windows Server. With this guide, you can easily transfer files over a secure connection and keep your data safe from prying eyes. So, let’s get started!
Understanding SFTP
SFTP (Secure File Transfer Protocol) is a secure way of transferring files between a client and a server over the internet. It uses SSH (Secure Shell) protocol to provide a secure connection and encrypts all data transmitted between the client and server. Unlike FTP (File Transfer Protocol), which operates on two separate and insecure channels, SFTP works on a single, secure channel.
SFTP is commonly used by businesses to transfer sensitive or confidential data, such as financial information, medical records, or personal data. By using SFTP, you can ensure the safety and integrity of your data, and comply with regulations and laws that require secure file transfer.
How SFTP Works
When you initiate an SFTP session, the client sends a request to the server to establish a secure connection. The server responds by sending its public key, and the client uses this key to encrypt a session key that will be used for the remainder of the session. Once the session key has been established, all data transmitted between the client and server is encrypted using this key.
SFTP supports two modes of operation: interactive and batch mode. In interactive mode, the user interacts with the SFTP client through a command-line interface or a graphical user interface (GUI). In batch mode, the SFTP client runs a script that automates the transfer of files.
Benefits of SFTP
SFTP offers several benefits over other file transfer protocols, such as FTP and HTTP:
- Security: SFTP encrypts all data transmitted between the client and server, protecting your data from interception and tampering.
- Integrity: SFTP ensures that data is transferred without errors or corruption, thanks to its built-in error-checking mechanisms.
- Authentication: SFTP uses public key cryptography to authenticate the client and server, ensuring that only authorized parties can access the data.
- Reliability: SFTP can resume interrupted file transfers, making it more reliable than other protocols that require you to restart the transfer from scratch.
Installing SFTP on Windows Server
Before you can use SFTP on Windows Server, you need to install an SFTP server software. There are several free and commercial SFTP server software available for Windows Server, such as:
|
Product Name |
Price |
Description |
|---|---|---|
|
OpenSSH for Windows |
Free |
A free implementation of SSH and SFTP for Windows |
|
Cerberus FTP Server |
$89.00 and up |
A commercial SFTP server with advanced features and security |
|
Core FTP Server |
$49.95 and up |
A commercial SFTP server with a user-friendly interface |
Installing OpenSSH for Windows
In this guide, we will use OpenSSH for Windows, which is a free and open-source implementation of SSH and SFTP for Windows. Here’s how to install and configure OpenSSH for Windows:
Step 1: Download OpenSSH for Windows
You can download the latest version of OpenSSH for Windows from the official website:
https://github.com/PowerShell/Win32-OpenSSH/releases
Choose the appropriate version for your system, and download the ZIP file.
Step 2: Extract OpenSSH for Windows
Extract the contents of the ZIP file to a folder on your Windows Server machine.
Step 3: Install OpenSSH for Windows
Open a PowerShell window as an administrator, and navigate to the folder where you extracted OpenSSH for Windows. Run the following command to install OpenSSH for Windows:
powershell.exe -ExecutionPolicy Bypass -File install-sshd.ps1This will install OpenSSH for Windows as a Windows service.
Step 4: Configure OpenSSH for Windows
Next, we need to configure OpenSSH for Windows to enable SFTP and set up a user account. To do this, we’ll use the sshd_config file, which is located in the C:\ProgramData\ssh folder.
Open the sshd_config file in a text editor, and make the following changes:
- Uncomment the line that starts with “# Subsystem sftp”
- Set the value of “Subsystem sftp” to “sftp-server.exe”
- Uncomment the line that starts with “# Match Group administrators”
- Add the following line after the “Match Group administrators” line:
ForceCommand internal-sftp
Save the sshd_config file and close the text editor.
Step 5: Set Up a User Account
Next, we need to create a user account that can access SFTP on Windows Server. To do this, we’ll use the Windows command prompt.
Open a command prompt window as an administrator, and run the following commands:
net user sftpuser [password] /add /passwordchg:noicacls C:\inetpub\ftproot /grant "sftpuser:(OI)(CI)F"Replace [password] with a strong password for the sftpuser account. This will create a new user account called “sftpuser” and grant it full access to the C:\inetpub\ftproot folder, which is the default folder for SFTP on Windows Server.
Step 6: Start OpenSSH Server
Finally, we need to start the OpenSSH server to enable SFTP on Windows Server. To do this, open a PowerShell window as an administrator, and run the following command:
Start-Service sshdThis will start the OpenSSH server, and enable SFTP on Windows Server.
Connecting to SFTP on Windows Server
Now that you’ve installed and configured SFTP on Windows Server, you can connect to it using an SFTP client. There are several SFTP clients available for Windows, such as:
|
Product Name |
Price |
Description |
|---|---|---|
|
FileZilla |
Free |
A free and open-source SFTP client with a user-friendly interface |
|
WinSCP |
Free |
A popular SFTP client with advanced features and scripting |
|
Cyberduck |
Free |
An SFTP client with a modern and intuitive interface |
Connecting with FileZilla
In this guide, we will use FileZilla, which is a free and open-source SFTP client with a user-friendly interface. Here’s how to connect to SFTP on Windows Server using FileZilla:
Step 1: Download and Install FileZilla
You can download the latest version of FileZilla from the official website:
https://filezilla-project.org/download.php?type=client
Choose the appropriate version for your system, and install FileZilla on your local machine.
Step 2: Open FileZilla and Enter Connection Details
Open FileZilla, and enter the following connection details:
- Host: the IP address or hostname of the Windows Server machine
- Protocol: SFTP
- Port: 22 (or the port you specified in sshd_config file)
- Username: sftpuser (or the username you created in Step 5)
- Password: [the password you set for sftpuser in Step 5]
Click “Quickconnect” to connect to the SFTP server on Windows Server.
Step 3: Transfer Files
You can now transfer files between your local machine and the SFTP server on Windows Server. Simply drag and drop files between the two windows, or use the File menu to upload or download files.
Securing SFTP on Windows Server
While SFTP is inherently secure, there are several additional steps you can take to further secure SFTP on Windows Server:
- Use strong passwords: Always use strong, complex passwords for user accounts, and avoid using default or common passwords.
- Limit access: Grant access to SFTP only to authorized users and groups, and restrict access to sensitive data.
- Encrypt data at rest: Use encryption to protect sensitive data stored on the server, such as backups or archives.
- Enable logging: Enable logging in OpenSSH server to keep track of user activity and detect suspicious behavior.
- Regularly update software: Keep the SFTP server software and operating system up to date with the latest security patches and updates.
FAQ
Q1. Can I use SFTP on Windows Server for automated file transfers?
A1. Yes, you can use SFTP on Windows Server in batch mode to automate file transfers. Simply create a script that uses an SFTP client to connect to the server and transfer files.
Q2. Can I use SFTP on Windows Server with Active Directory?
A2. Yes, you can integrate SFTP on Windows Server with Active Directory to enable centralized user management and authentication.
Q3. Can I use SFTP on Windows Server to transfer large files?
A3. Yes, SFTP on Windows Server can handle large files, and can resume interrupted transfers.
Q4. Is SFTP on Windows Server compliant with regulations and standards?
A4. Yes, SFTP on Windows Server is compliant with various regulations and standards, such as HIPAA, PCI DSS, and GDPR.
Q5. Can I use SFTP on Windows Server for secure remote access?
A5. No, SFTP on Windows Server is not designed for remote access or remote desktop. For remote access, you can use Remote Desktop Protocol (RDP) or a VPN.
Conclusion
Congratulations, Dev, you have now learned how to set up and use SFTP on Windows Server. With this knowledge, you can securely transfer files between your clients and server, and keep your data safe from unauthorized access. Remember to regularly update and secure your SFTP server to ensure maximum security and compliance. If you have any questions or comments, feel free to leave them below.

