
The correct date, time, and time zone are one of the first settings a Windows Server should have. In today’s article, we’ll see how we can change time, date, and time zone through the graphical environment, command line and Powershell.
Set time, date, and time zone settings from the graphical interface
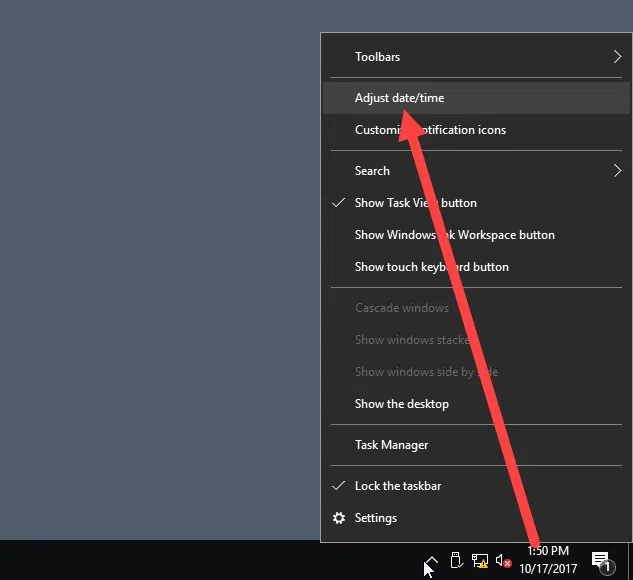
The process is very simple. Right-click the time field in the lower right corner and then click the Adjust date/time option.
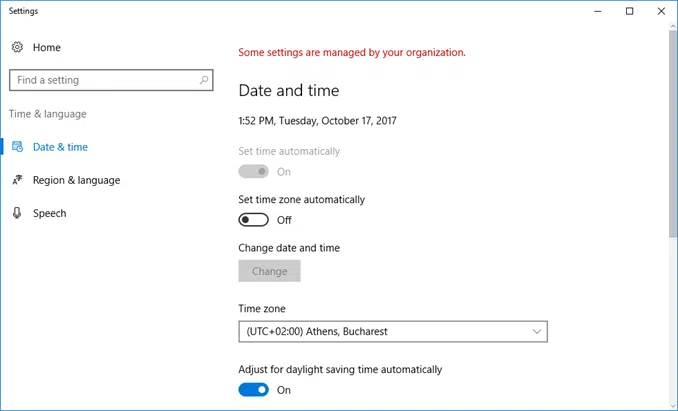
In the settings window, you can change the time, date, and time zones of each Windows Server. I do not think there is a need for further guidance as it is a simple process.
Alternatively, you can open the time and date settings window by clicking on the corresponding field in the Local Server section of the Server Manager.
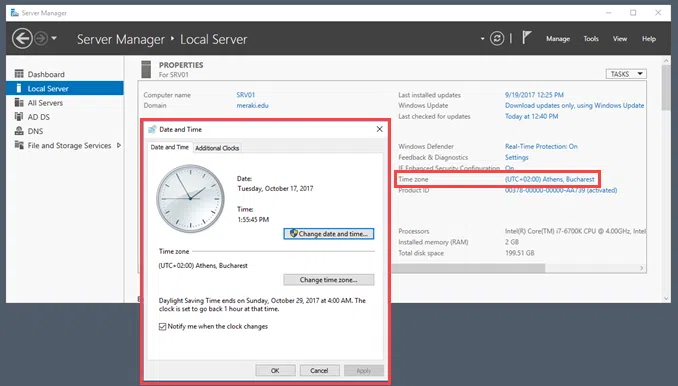
As you will see, in this case, opens the “old” management window through which you can set the time, date and time zone.
Set time, date, and time zone settings on command prompt
By typing the following command will open the time and date setting window, even in a Server Core installation.
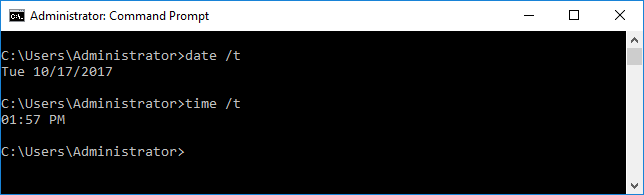
To display the current date and time, enter the following commands.
To set time and date, you can use the corresponding Time and Date commands at the command line.
In Windows Server 2012 have been added the Timezone Utility (tzutil) tool that allows us to display and set a time zone through the Windows command line.
First, open the command line with administrator privileges and make sure you are in the System32 folder.
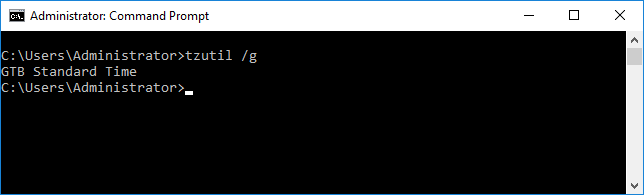
To display the current Windows Server Time Zone, type the following command.
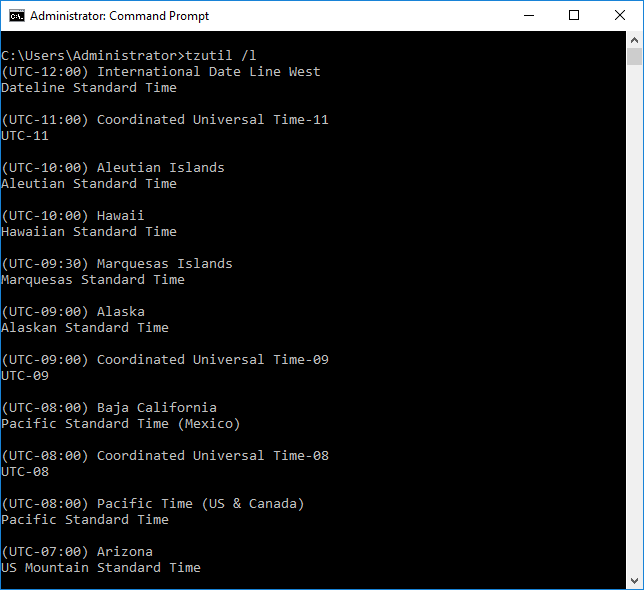
To display all available time zones, type the following command.
To change the current time zone in Windows Server, type the following command, between the doubles, enter the time zone as it appears in the list of the previous command. For example, for the Greek time zone type:
tzutil /s "GTB Standard Time"
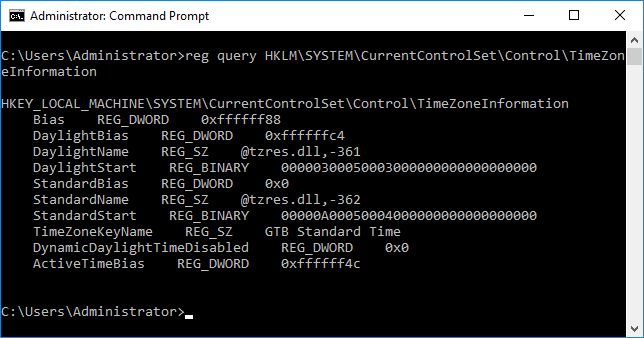
To confirm that the time zone has changed, you can see the corresponding registry entry by using the following command from within the same command-line window.
reg query HKLM\SYSTEM\CurrentControlSet\Control\TimeZoneInformation
[pro_ad_display_adzone id=”1683″]
Set time, date and time zone settings on Powershell
To view the current date and time, type the following command.

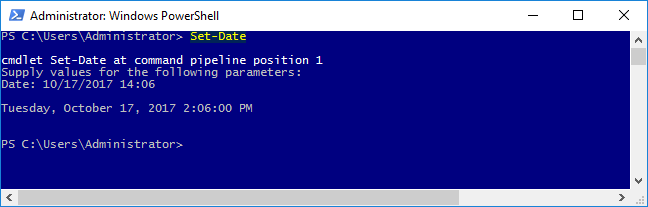
To set the time and date through Powershell the process is very easy. Use the following command as an example by changing the date and time values.
Set-Date -Date "06/06/2017 14:45"
Alternatively, you can simply type the Set-Date command and promptly you will be prompted to enter the server’s date and time.
To view the current time zone through Powershell, type the following command.
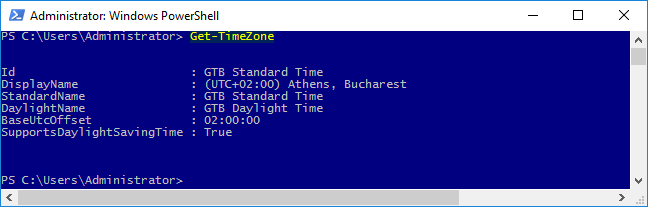
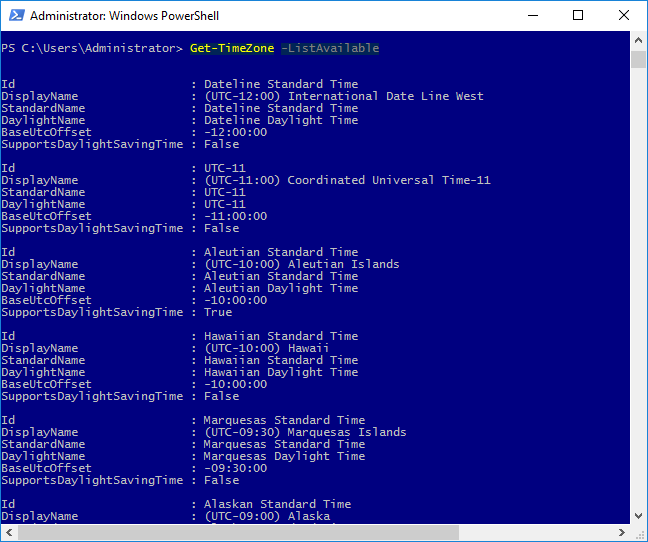
Before changing the time zone, you will need to know the right name. Type the following command to see all available time zones in Windows Server.
Get-TimeZone -ListAvailable
To change the time zone, use the following command along with the corresponding time zone of your server.
Set-TimeZone -Name "GTB Standard Time"
This is aimed to be complete steps for configuring the time service (NTP) for Windows Sever 2016. This is especially useful should you want to setup your own Active Directory Domain Controller (ADDC).
0. Networking Check
Ensure you can reach the NTP server. Assuming you are using 0.pool.ntp.org :
ping 0.pool.ntp.org1. Set the Time Zone
By default, windows just assume a time zone and show you the system clock. However, the default time zone is not necessary correct.
1.1. Check the Current Timezone
tzutil /g
1.2 (Optional) Query Available Time Zone
tzutil /l
1.3 (Optional) Set Time Zone
tzutil /s "E. Australia Standard Time"
2. Set the w32time service
2.1 Configure NTP Service
w32tm /config /manualpeerlist:"0.pool.ntp.org 1.pool.ntp.org" /syncfromflags:manual /reliable:no /update
2.2 Confirm that NTP Configuration
List the peers
w32tm /query /peers
The result looks like:
#Peers 3
Peer: 1.pool.ntp.org
State: Active
Time Remaining: 123.4567890s
Mode: 1 (Symmetric Active)
...
List the time source
w32tm /query /source
The result looks like:
1.pool.ntp.org
2.3 Resync
w32tm /resync
The result looks like:
Sending resync command to local computer
The command completed successfully.
2.4 Indicate that NTP service is now reliable
w32tm /config /reliable:yes /update
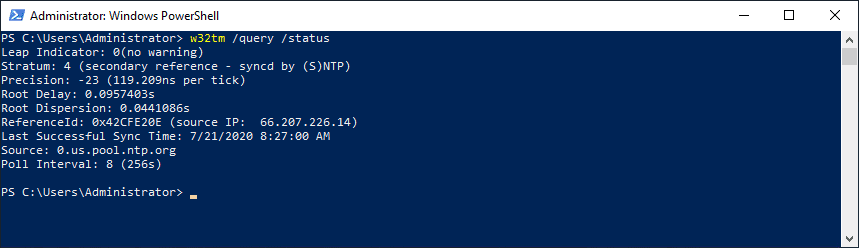
2.5 Confirm status
w32tm /query /status
The result should looks like:
Leap Indicator: 0(no warning)
...
This should be it.
Home » OS’s » Windows » Set NTP Server Windows 2016 or Windows 2019
There is no question about it, having accurate time in your environment set in critical infrastructure systems is a must. Many business-critical applications and infrastructure systems rely on accurate time synchronized between them to ensure the system functions as expected. Time skew can cause all kinds of weirdness when it is misconfigured or out of sync between different servers/systems. This is especially true in a Windows Server Active Directory domain. Having accurate time between a client computer and domain controllers is essential. Let’s take a look at how to set ntp server Windows 2016 or Windows 2019 to see how this can be easily carried out.
What is NTP?
Wen it comes to synchronizing time in most enviornments, Network Time Protocol (NTP) is the protocol that is used to ensure accurate time across your environent. In most environments, NTP servers, special time servers, are configured that provide an external time source for which your internal servers can synchronize with.
There are several widely known NTP IP addresses on the Internet that provide reliable time sources for your network. The NTP.org servers are one such set of time servers that provide an NTP source for configuration.
There are a few NTP values to be aware of:
- NTP Server – This is a specialized server that is able to detremine the precise time from an external timing reference such as GPS and passes these precise time values on to your network
- Offset – This is the difference in time between the external time server and the time on a local client computer. The larger the offset, the more inaccurate the timing source is.
- Delay – This is the value of the round-trip time (latency) of the timing message between the client to the server and back again.
How Time is synchronized in a Windows Server domain
In a Windows domain, Microsoft has default configuration in place that takes care of a good portion of the NTP configuration. Starting with Windows 2000 Server, Windows clients are configured as NTP Clients. When configured as an NTP client, Windows computers only attempt to contact the domain controller for NTP synchronization or a manually specified NTP server.
Microsoft has made the domain controller the default in a Windows domain since it makes sense that clients already have a secure channel established with DCs for other types of communications. Additionally, accurate and synchronized time between domain controllers and clients is especially important for all kinds of things such as logins, group policy synchronization and other tasks/operations.
The order of operations or hierarchy in a Windows domain is as follows:
- Domain members attempt to synchronize time with any domain controller located in the domain
- Domain controllers synchronize with a more authoritative domain controller
- The first domain controller that is installed in the environment is automatically configured to be a reliable time source.
- Other than the first domain controller installed, the PDC emulator (if role has been moved from the first DC installed) generally holds the position of best time source.
An important point to consider and that comes into play when thinking about why we set ntp server in Windows 2016 or Windows 2019 is the authoritative domain controller must have a reliable source to synchronize with as well. This is generally an external time server outside of the domain hierarchy.
Now that we know how the domain hierarchy for time is configured, how is the external time source configured on your domain controller that is configured as the reliable source of time?
Configuring Windows Time Service with W32tm.exe
When it comes to Windows Server environments like Windows Server 2016 or Windows Server 2019, there is a special Windows service that controls the time synchronization of your Windows hosts. This is the Windows Time Service.
Microsoft provides a command line tool to interact with the Windows Time Service called W32tm.exe. This has been included in Windows operating systems since Windows XP/Windows 2003 and later. It can be used to configure Windows Time service parameters as well as diagnose time service problems. This is generally the tool of choice when it comes to configuring, monitoring, and administering Windows Time.
Using the W32tm.exe utility is fairly straightforward. It can be used from a normal command prompt as well as from a PowerShell prompt. There are several command parameters included that allow not only configuring the NTP servers you want to query, but also parameters that allow viewing the low level registry configuration as well as the synchronization status.
You can read the official Microsoft KB on the Windows Time service and the W32tm.exe utility here:
- https://docs.microsoft.com/en-us/windows-server/networking/windows-time-service/windows-time-service-tools-and-settings
However, there are a few commands I would like to show you for the purposes of configuring your Domain controller that is to be the reliable time source (PDC Emulator) for your domain.
The first command is the command line entry to specify your NTP servers, which in this case I am using the NTP.org servers to set as the source of my NTP synchronization.
w32tm /config /syncfromflags:manual /manualpeerlist:"0.us.pool.ntp.org 1.us.pool.ntp.org 2.us.pool.ntp.org 3.us.pool.ntp.org" /update

Stop-Service w32time
Start-Service w32time
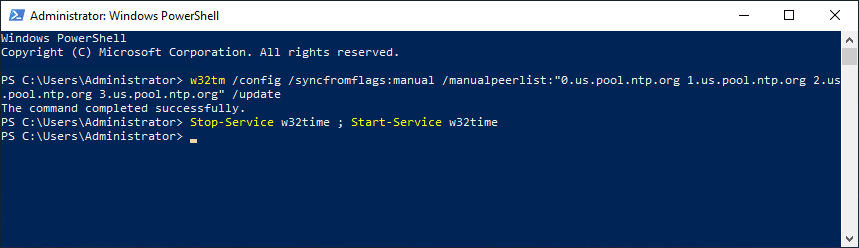
If you want to view the status of the NTP synchronization on your server after you have configured the values and restarted the w32time service, you can use the following command:
w32tm /query /status
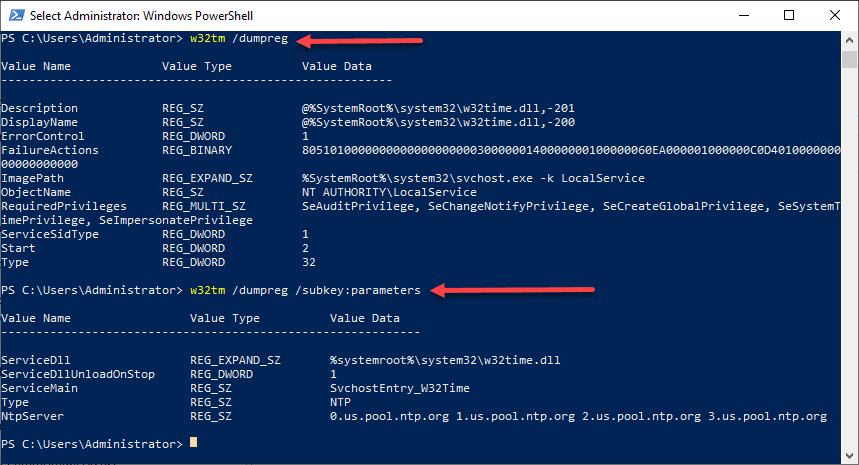
You can also check the values configured in your registry key hkey local machine system currentcontrolset services w32time config using the commands below. You can drill into the configuration parameters using the /dumpreg /subkey command.
w32tm /dumpreg

w32tm /dumpreg /subkey:parameters
Final Thoughts
As shown, you can easily set NTP Server Windows 2016 or Windows 2019 using the w32tm command utility that allows interacting with the time service in Windows Server.
In a Windows domain, you want to configure your authoritative time source domain controller, which by default is the PDC Emulator, to pull time information from an authoritative source like NTP.org or some other reliable NTP time server.
After configuring the time source, the other domain controllers will synchronize with this server and then the Windows clients joined to the domain will synchronize with the domain controllers that have the corrected time from the authoritative server.
Brandon Lee is the Senior Writer, Engineer and owner at Virtualizationhowto.com, and a 7-time VMware vExpert, with over two decades of experience in Information Technology. Having worked for numerous Fortune 500 companies as well as in various industries, He has extensive experience in various IT segments and is a strong advocate for open source technologies. Brandon holds many industry certifications, loves the outdoors and spending time with family. Also, he goes through the effort of testing and troubleshooting issues, so you don’t have to.
Продолжение статьи о настройке и управлении NTP сервера в Windows Server
Все ОС Windows начиная с Windows 2000 имеют службу времени W32Time. Данная служба предназначена для синхронизации системного времени в границах организации. Служба W32Time ответственна за работу и клиентской и серверной части службы времени, при этом один и тот же компьютер может быть одновременно и клиентом и сервером NTP (Network Time Protocol).
По умолчанию служба времени в Windows сконфигурирована следующим образом:
• При установке операционной системы Windows запускает клиента NTP и синхронизируется с внешним источником времени;
• При добавлении компьютера в домен тип синхронизации меняется. Все клиентские компьютеры и рядовые сервера в домене используют для синхронизации времени контроллер домена, проверяющий их подлинность;
• При повышении рядового сервера до контроллера домена на нем запускается NTP-сервер, который в качестве источника времени использует контроллер с ролью PDC-эмулятор;
• PDC-эмулятор, расположенный в корневом домене леса, является основным сервером времени для всей организации. При этом сам он также синхронизируется с внешним источником времени.
Такая схема работает в большинстве случаев и не требует вмешательства. Однако структура сервиса времени в Windows может и не следовать доменной иерархии, и надежным источником времени можно назначить любой компьютер. В качестве примера я опишу настройку NTP-сервера в Windows Server 2008 R2, хотя со времен Windows 2000 процедура не особо изменилась.
Запуск NTP сервера
Сразу отмечу, что служба времени в Windows Server (начиная с 2000 и заканчивая 2012) не имеет графического интерфейса и настраивается либо из командной строки, либо путем прямой правки системного реестра. Лично мне ближе второй способ, поэтому идем в реестр.
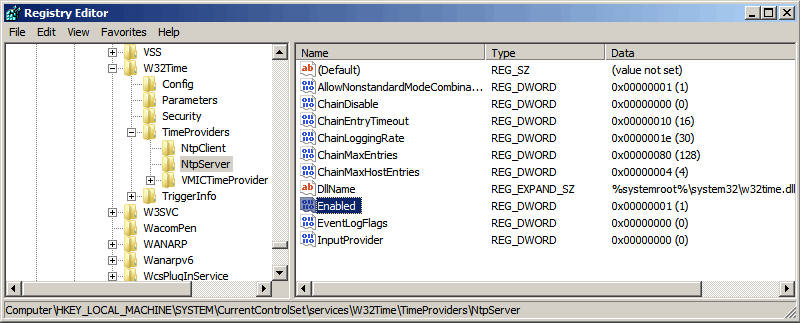
Итак, первым делом нам надо запустить сервер NTP. Открываем ветку реестра
HKLM\System\CurrentControlSet\services\W32Time\TimeProviders\NtpServer.
Здесь для включения сервера NTP параметру Enabled надо установить значение 1.
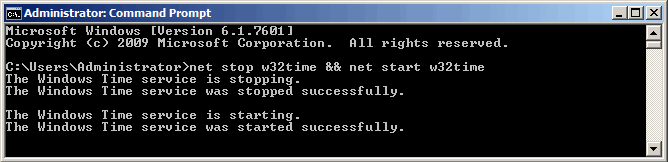
Далее перезапускаем службу времени командой net stop w32time && net start w32time
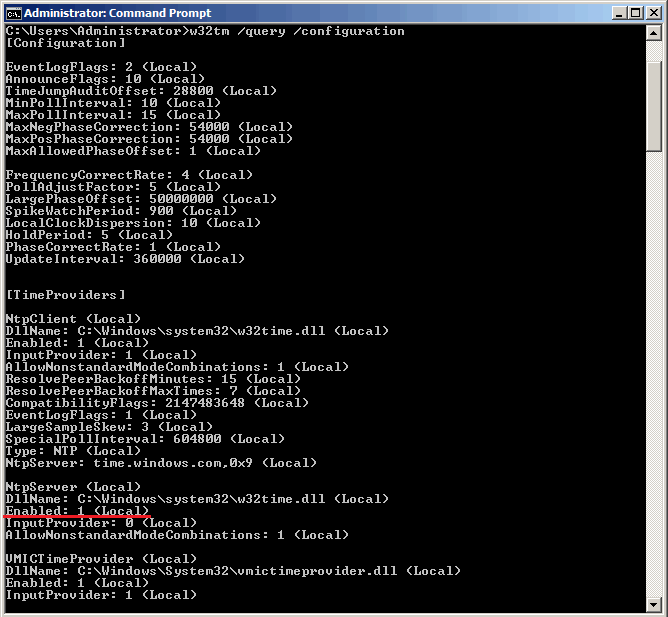
После перезапуска службы NTP сервер уже активен и может обслуживать клиентов. Убеждаемся в этом можно с помощью команды w32tm /query /configuration. Эта команда выводит полный список параметров службы. Если раздел NtpServer содержит строку Enabled :1 , то все в порядке, сервер времени работает.
Для того, чтобы NTP-сервер мог обслуживать клиентов, не забудьте на межсетевом экране (брандмауэре) открыть UDP порт 123 для входящего и исходящего трафика.
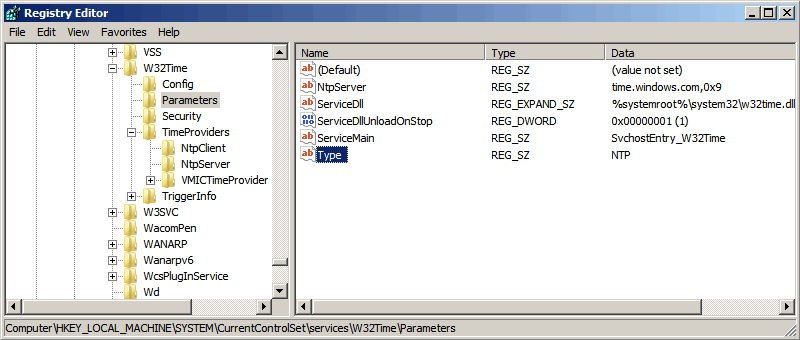
Основные настройки NTP сервера
NTP сервер включили, теперь надо его настроить. Открываем ветку реестраHKLM\System\CurrentControlSet\services\W32Time\Parameters. Здесь в первую очередь нас интересует параметр Type, который задает тип синхронизации. Он может принимать следующие значения:
NoSync — NTP-сервер не синхронизируется с каким либо внешним источником времени. Используются часы, встроенные в микросхему CMOS самого сервера;
NTP — NTP-сервер синхронизируется с внешними серверами времени, которые указаны в параметре реестра NtpServer;
NT5DS — NTP-сервер производит синхронизацию согласно доменной иерархии;
AllSync — NTP-сервер использует для синхронизации все доступные источники.
Значение по умолчанию для компьютера, входящего в домен — NT5DS, для отдельно стоящего компьютера — NTP.
И параметр NtpServer, в котором указываются NTP-сервера, с которыми будет синхронизировать время данный сервер. По умолчанию в этом параметре прописан NTP-сервер Microsoft (time.windows.com, 0x1), при необходимости можно добавить еще несколько NTP-серверов, введя их DNS имена или IP адреса через пробел. Список доступных серверов времени можно посмотреть например здесь.
В конце каждого имени можно добавлять флаг (напр. ,0x1) который определяет режим для синхронизации с сервером времени. Допускаются следующие значения:
0x1 – SpecialInterval, использование специального интервала опроса ;
0x2 – режим UseAsFallbackOnly;
0x4 – SymmetricActive, симметричный активный режим;
0x8 – Client, отправка запроса в клиентском режиме.
При использовании флага SpecialInterval, необходимо установленное значение интервала в ключе SpecialPollInterval. При значении флага UseAsFallbackOnly службе времени сообщается, что данный сервер будет использоваться как резервный и перед синхронизацией с ним будут выполнятся обращения к другим серверам списка. Симметричный активный режим используется NTP-серверами по умолчанию, а клиентский режим можно задействовать в случае проблем с синхронизацией. Microsoft рекомендует ставить везде параметр = 0x1.
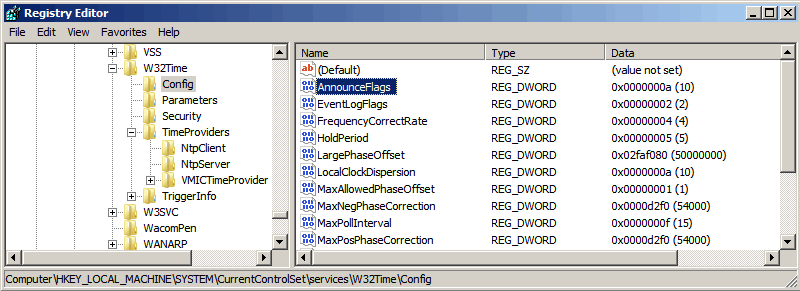
Важный параметр AnnounceFlags находится в разделе реестра HKLM\System\CurrentControlSet\services\W32Time\Config. Он отвечает за то, как о себе заявляет NTP-сервер и может принимать следующие значения:
0x0 (Not a time server) — сервер не объявляет себя через NetLogon, как источник времени. Он может отвечать на NTP запросы, но соседи не смогут распознать его, как источник времени;
0x1 (Always time server) — сервер будет всегда объявлять о себе вне зависимости от статуса;
0x2 (Automatic time server) — сервер будет объявлять о себе только, если он получает надежное время от другого соседа (NTP или NT5DS);
0x4 (Always reliable time server) — сервер будет всегда заявлять себя, как надежный источник времени;
0x8 (Automatic reliable time server) — контроллер домена автоматически объявляется надежным если он PDC-эмулятор корневого домена леса. Этот флаг позволяет главному PDC леса заявить о себе как об авторизованном источнике времени для всего леса даже при отсутствии связи с вышестоящими NTP-серверами. Ни один другой контроллер или рядовой сервер (имеющие по умолчанию флаг 0x2) не может заявить о себе, как надежном источнике времени, если он не может найти источник времени для себя.
Значение AnnounceFlags составляет сумму составляющих его флагов, например:
10=2+8 — NTP-сервер заявляет о себе как о надежном источнике времени при условии, что сам получает время из надежного источника либо является PDC корневого домена. Флаг 10 задается по умолчанию как для членов домена, так и для отдельно стоящих серверов.
5=1+4 — NTP-сервер всегда заявляет о себе как о надежном источнике времени. Например, чтобы заявить рядовой сервер (не домен-контроллер) как надежный источник времени, нужен флаг 5.
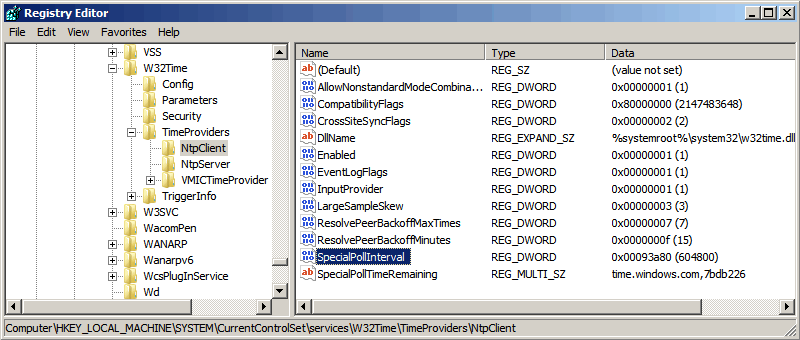
Ну и настроим интервал между обновлениями. За него отвечает уже упоминавшийся выше ключ SpecialPollInterval,находящийся в ветке реестра HKLM\System\CurrentControlSet\services\W32Time\TimeProviders\NtpClient. Он задается в секундах и по умолчанию его значение равно 604800, что составляет 1 неделю. Это очень много, поэтому стоит уменьшить значение SpecialPollInterval до разумного значения, скажем до 1 часа (3600).
Команды управления службой времени W32Time:
w32tm /config /update — обновить конфигурацию сервиса.
w32tm /monitor – узнать, насколько системное время данного компьютера отличается от времени на контроллере домена или других компьютерах. Например: w32tm /monitor /computers:time.nist.gov
w32tm /resync – принудительная синхронизация с используемым сервером времени.
w32tm /stripchart– показывает разницу во времени между текущим и удаленным компьютером, причем может выводить результат в графическом виде. Например, команда w32tm /stripchart /computer:time.nist.gov /samples:5 /dataonly произведет 5 сравнений с указанным источником и выведет результат в текстовом виде.
w32tm /config – команда используемая для настройки службы NTP. С ее помощью можно задать список используемых серверов времени, тип синхронизации и многое другое. Например, переопределить значения по умолчанию и настроить синхронизацию времени с внешним источником, можно командой w32tm /config /syncfromflags:manual /manualpeerlist:time.nist.gov /update
w32tm /query — показывает текущие настройки службы. Например команда w32tm /query /source покажет текущий источник времени, а w32tm /query /configuration выведет все параметры службы.
w32tm /unregister — удаляет службу времени с компьютера
w32tm /register – регистрирует службу времени на ПК, создается заново вся ветка параметров в реестре.
источник
Maintaining accurate time on your server is critical largely because many services and IT applications rely on accurate time settings to function as expected. These include logging services, monitoring and auditing applications, and database replication to mention a few.
Time skew in servers, and any client systems for that matter, is undesirable and usually causes conflict in time-critical applications. To maintain accurate time settings on your server and across the network by extension, it’s preferred to install and enable a NTP server on your server.

What is an NTP server?
NTP, short for Network Time Protocol, is a protocol that synchronizes time across network devices. It listens on UDP port 123 and always ensures that time inconsistencies across the server and client systems are mitigated and that client systems are always in sync with the server.
NTP server refers to a network device or a service that fetches time from an external time source and syncs the time across the network using the NTP protocol. This guide will focus on installing NTP service on Windows server 2019.
How Does NTP Work ?
Being a protocol, NTP requires a client-server architecture. The NTP client residing on a Windows PC, for example, initiates a time request exchange with the NTP server.
A time-stamp data exchange happens between the server and client and this helps in adjusting the clock on client’s systems to the highest degree of accuracy to match the time on the NTP server. In this guide, we will walk you through the installation and configuration of NTP server on Windows Server 2019.

There are several ways of setting up NTP server and we will look at each in turn.
In Windows Server environments, there is a special Windows time service that handles time synchronization between the server and the client systems. This is known as Windows Time service. PowerShell provides a command-line tool known as w32tm.exe and comes included in all versions of Windows from Windows XP and Windows Server 2008 to the latest versions of each OS.
Using the w32tm.exe utility, you can configure your Windows system to sync with online time servers. Usually, this is the tool of choice when setting up and monitoring time on your Windows Server system.
Using the command-line utility is quite straightforward.
For example, to set the Server to point to 2 different time servers, namely 0.us.pool.ntp.org and 1.us.pool.ntp.org , launch PowerShell as the Administrator and run the command below
w32tm /config /syncfromflags:manual /manualpeerlist:”0.us.pool.ntp.org 1.us.pool.ntp.org” /update
Then restart Windows Time service using the commands:
Stop-Service w32time
Start-Service w32time
Here’s a snippet of the commands.

You can thereafter confirm the values of NTP servers configured in the registry by running this command:
w32tm /dumpreg /subkey:parameters

Configure NTP Server on Windows Server 2019 using Registry editor
The second method of installing and configuring the NTP server is using the registry editor. If you are not a fan of the Windows PowerShell, then this will truly come in handy.
To get started, open the registry editor. Press ‘Windows key + R’ and type ‘regedit’ and hit ENTER. The windows registry will be launched as shown below.

Next, head over to the path shown below
Computer\HKEY_LOCAL_MACHINE\SYSTEM\CurrentControlSet\Services\W32Time\TimeProviders\NtpServer
On the right pane. Be sure to find & double-click the file labelled ‘Enabled’ in the diagram shown below.

Next, In the ‘value data’ text field, set the value to ‘1’ and click the ‘Ok’ button.

Next, head over to the path:
Computer\HKEY_LOCAL_MACHINE\SYSTEM\CurrentControlSet\Services\W32Time\Config
In the right pane, double click the ‘Announce Flags’ file.

Double-click the file and in the Value data text field, type the value ‘5’ and click ‘OK’.

For the changes to come into effect, you need to reboot the NTP server by heading to the services Window. To achieve this, press ‘Windows key + R’ and type ‘services.msc’. Scroll and find ‘Windows Time’, right-click on it and select the ‘Restart’ option.

Useful w32tm commands
Once you have set up your NTP server, you can use the following commands to verify various aspects of the server:
To check the status of the NTP server, run the command:
w32tm /query /status

To reveal the current NTP pool being used to sync time with execute:
w32tm /query /source

You can also display a list of NTP time servers along with their configuration status as shown.
w32tm /query /peers

To display NTP server configuration settings, run the command:
w32tm /query /source
This shows quite a wealth of information.

Final Take
We cannot stress enough how important it is to maintain accurate time and date settings on your server. As you have seen, setting up an NTP server on your Windows server instance is quite easy and straight forward.
Once you have configured the NTP service on your server, other domain controllers in your environment will sync with this server and the Windows clients in the domain will sync with the domain controllers. Hopefully, you can now install and configure NTP on Windows Server 2019.