
Все способы:
- Вариант 1: Установка Windows без интернета
- Смена обоев
- Вариант 2: Сторонние программы
- Вопросы и ответы: 0
Вариант 1: Установка Windows без интернета
Не лучший вариант, поскольку предполагает либо переустановку, либо когда инсталляция операционной системы на свой компьютер только планируется пользователем. Суть его заключается в том, чтобы выполнить установку Windows 10 без подключения к интернету. Для этого достаточно физически отключить сетевой кабель от ПК и выбрать на известном этапе настройки локальную учетную запись.
При первом входе в установленную и не подключенную к сети систему настройки персонализации должны оставаться доступными, и как раз этим окном можно воспользоваться для настройки интерфейса Windows. После подключения компьютера к Интернету настройки персонализации будут заблокированы. К сожалению, этот способ работает не во всех сборках, более того, в некоторых последних сборках Windows 10 действуют ограничения на установку без подключения к сети.
Читайте также: Параметры «Персонализации» в ОС Windows 10
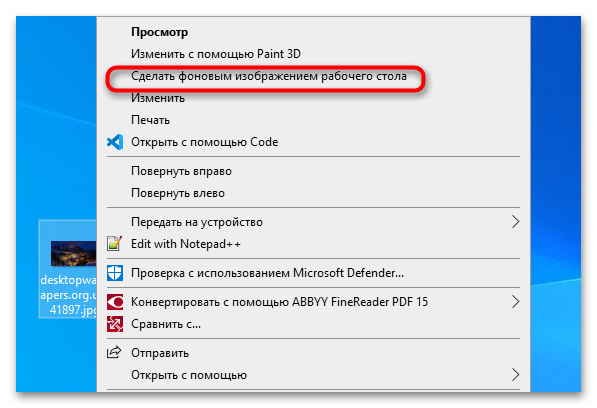
Смена обоев
Проще всего в неактивированной Windows 10 с заменой обоев. Чтобы установить на рабочий стол новое изображение, достаточно кликнуть по нему правой кнопкой мыши и выбрать в контекстном меню опцию «Сделать фоновым изображением рабочего стола».
Вариант 2: Сторонние программы
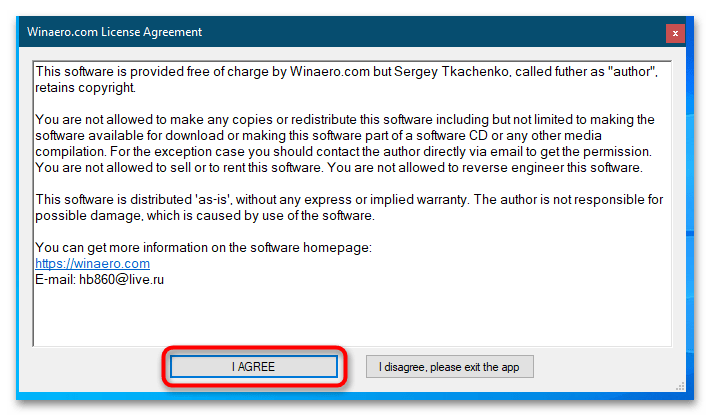
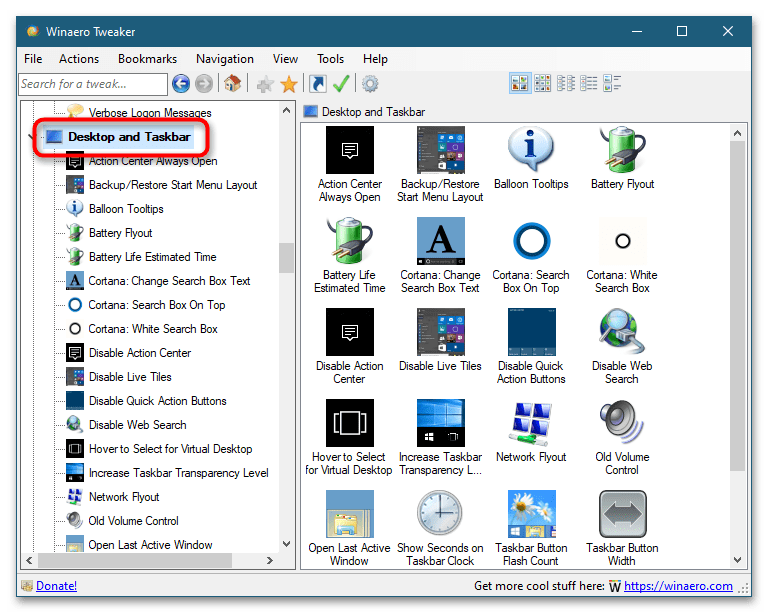
Чтобы обойти ограничения на персонализацию интерфейса Windows 10, можно воспользоваться специальными утилитами, например Winaero Tweaker. Этот бесплатный инструмент позволяет изменять отвечающие за персонализацию параметры реестра из графического интерфейса.
Скачать Winaero Tweaker с официального сайта
- Скачайте утилиту с сайта разработчика и установите. При первом запуске Winaero Tweaker предложит принять лицензионное соглашение, нажмите кнопку «I Agree».
- Выберите на левой панели рабочего окна утилиты нужную опцию и примените ее. Приложение содержит множество настроек, причем далеко не все из них отвечают за изменение внешнего вида Windows 10. Содержатся настройки персонализации в следующих разделах:
| Раздел | Описание |
|---|---|
| «Appearance» | Здесь можно включить цветные заголовки окон, изменить цвет заголовка активного и неактивного окна, активировать темную тему оформления |
| «Advanced Appearance» | Здесь собраны твики, позволяющие изменять размер системных шрифтов, размеры полосок прокрутки и границ окон |
| «Desktop and Taskbar» | Настройки этого раздела позволяют экспериментировать с внешним видом и функциональностью «Панели задач» |
В Winaero Tweaker нет русского языка, поэтому у начинающих пользователей при работе с программой могут возникнуть затруднения. Также перед внесением любых изменений в системы с помощью данного инструмента желательно создать точку восстановления на тот случай, если результаты твиков окажутся неудовлетворительными.
Наша группа в TelegramПолезные советы и помощь
Are you looking to change the look of your Windows 11 desktop, but you don’t have a Windows Activation?
Well, there are easy hacks to do that, but most users struggle to apply that. Maybe they are unsure how to do it or afraid of breaking the system. Whatever the reason, this comprehensive guide will show you how to change themes in Windows 10/11 and switch to dark mode without activating Windows. We’ll walk you through each step so that you can customize Windows desktop the way you want it.
To fix various Windows 10/11 problems, we recommend Outbyte PC Repair:
This software will repair common computer errors, protect you from file loss, malware damage, hardware failure, and optimise your computer for peak performance. In three simple steps, you can resolve PC issues and remove virus damage:
- Download Outbyte PC Repair Software
- Click Start Scan to detect Windows 10/11 issues that may be causing PC issues.
- Click Repair All to fix issues with your computer’s security and performance.
This month, Outbyte has been downloaded by 23,167 readers.
Before moving further to apply the hacks for enabling the personalization on an unactivated Windows OS, let us discuss what’s the issue and the process to apply the fix.
When you install Windows 10 or 11 on your PC or laptop, it asks for the license key during installation. However, if you don’t have a genuine Windows license key, Windows allows you to skip this step and continue with the installation.
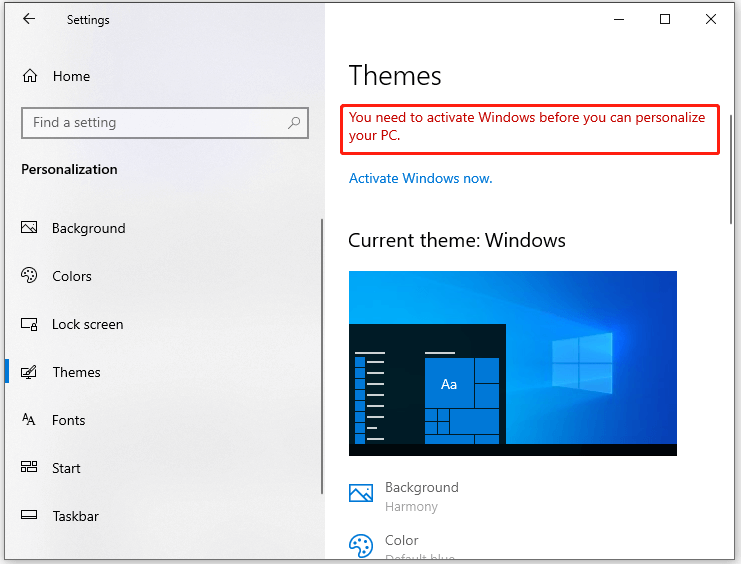
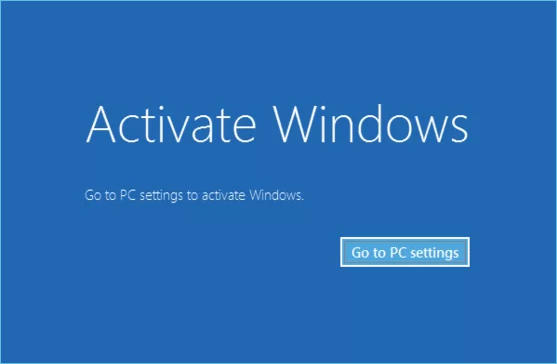
Although Windows will be installed without activation, you will be restricted from accessing some features, including personalization. When you try to customize any personalization settings on Windows, such as changing the background, you will get the You need to activate Windows before you can personalize your PC error message.

All the personalization options will be grayed out, and you won’t be able to configure them.
On an activated Windows 10/11 OS, you can simply change the theme either by accessing Windows settings or by downloading “.deskthemepack” from third-party sources or Microsoft repository. After downloading, just double-click on the .deskthemepack, and the theme will be installed.
However, this method won’t work on unactivated Windows OS. You need to make changes in Group Policy Editor or the Registry Editor.
Change Windows 10/11 Theme Without Activating Windows using Group Policy Editor
If you are using the Pro version of Windows 10 or 11, you can easily configure the theme settings to let you change the theme without activating Windows. Here are the steps for that:
-
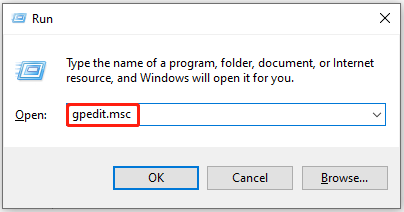
On the Windows search bar, type gpedit and click on Edit group policy to launch the Local Group Policy Editor.

-
Local Group Policy Editor will be launched.

-
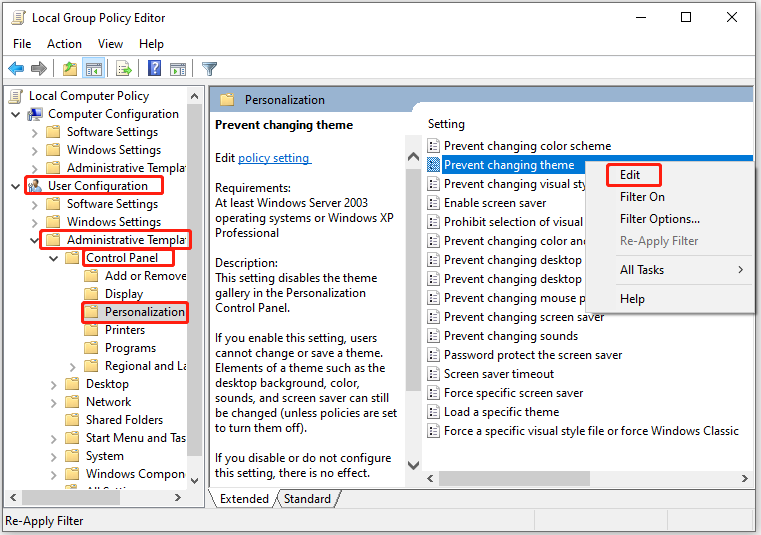
Navigate to the following path: User Configuration > Administrative Templates > Control Panel > Personalization.
-
On the right side, under Personalization, double-click on Prevent changing theme.

-
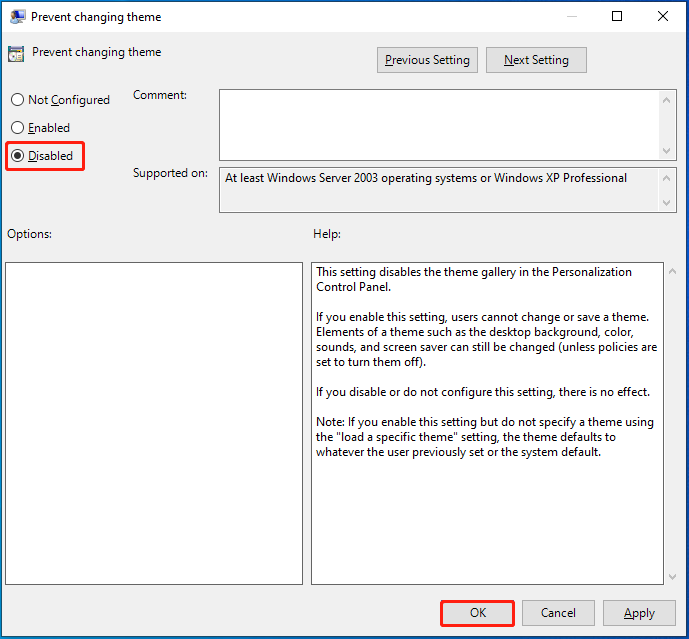
Next, click on the Disabled option and choose Apply & OK to disable Prevent changing the theme.


After applying the above steps, close the Group Policy Editor and restart your system. You will now be able to change the theme on your Windows 10/11 system without activating it.
Change Windows 10/11 Theme Without Activating Windows using Registry Editor
If you are working on Windows 10/11 Home edition, you won’t have access to Group Policy Editor.
Don’t worry; you can still change the theme on your system without activating Windows by applying a simple Registry hack.
Here are the instructions for that:
- On the Windows search bar, type Registry Editor and click on its icon to launch it.

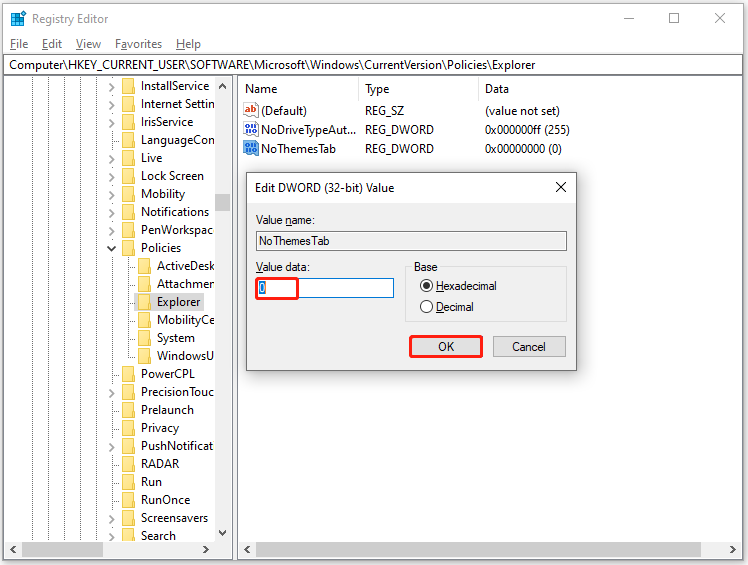
- Copy & paste or navigate to the following path on the Registry editor window: HKEY_CURRENT_USER\SOFTWARE\Microsoft\Windows\CurrentVersion\Policies\Explorer

- Right-click on the Explorer and select New -> DWORD (32-bit) Value.

- Name the value as NoThemesTab.

- Double click on the NoThemesTab and ensure that the Value data is set to 0.


That’s it. Restart your system to make the changes effective.
Apply the Theme on Unactivated Windows System
After modifying the Group Policy Editor or Registry Editor to configure the Windows theme settings to allow you to change the theme, it is time to download and apply the theme you like.
- Navigate to the Microsoft Desktop Theme catalog.
- Switch to the Windows version you want a theme for and expand the category of choice to download the theme.

- Click on the theme of your choice to download it.

- After the download is completed, click on it to install.


How to Switch Dark Mode without Activation in Windows 10/11?
One of the popular options in the Windows 10/11 personalization is to switch to Light or Dark Mode. By default, Windows is configured as the Light mode, and you can switch to the Dark mode pretty easily from Personalization settings. However, if your Windows is not activated, you won’t be able to switch between light and dark modes from the Settings.
If you want to switch to dark mode without activation in Windows 10/11, you can do that using a registry hack. Follow these steps:
- On the Windows search bar, type Registry Editor and click on its icon to launch it.
- Copy & paste or navigate to the following path on the Registry editor window: HKEY_CURRENT_USER\Software\Microsoft\Windows\CurrentVersion\Themes\Personalize

- To switch the App mode to dark, look for the AppsUseLightTheme DWORD and double-click to open it.

- Set the Value data to 0 to enable the dark mode on apps.

- Now, to switch the system theme to dark mode, look for the SystemUsesLightTheme DWORD and double-click to open it.

- Set the Value data to 0 to enable the dark mode on Windows.


That’s it. If you want to switch back to the light mode, modify the Value data of both the DWORDs to 1.
Final Words
Windows personalization is a great way to make your system look attractive and different. But if you are using the unlicensed Windows version, it becomes difficult to provide a different look to your system. In this post, we have explained how to change the theme and apply other personalization without activating the Windows using Group Policy Editor or Registry Editor. Hopefully, by following the detailed instructions in the post, you are able to customize your PC with ease.
I am using the unlicensed Windows version. Can I still use themes?
You can change the theme on your system without activating Windows by applying a simple Registry hack, as mentioned in this post.
How do I switch between light and dark modes without activation in Windows?
You can switch to dark mode without activation in Windows by following the steps mentioned in this post. Just make sure that you set the Value data of both DWORDs to 0 when making changes.
Can I use personalization without activating Windows?
Yes, you can change the theme and other personalization settings without activating Windows. However, some features might be restricted, i.e., you might not be able to change the wallpaper or lock screen.
How do I activate Windows?
You can purchase a valid product key from Microsoft and enter it into your system to activate Windows. Once activated, you will have access to all features of the Operating System.
Peter is an Electrical Engineer whose primary interest is tinkering with his computer. He is passionate about Windows 10 Platform and enjoys writing tips and tutorials about it.
-
Home
-
News
- 2 Methods to Change Themes in Windows 11/10 Without Activation
By Amy | Follow |
Last Updated
Generally speaking, you are not allowed to personalize the computer if you don’t activate Windows 10/11. To be specific, you can’t change theme without activation in Windows 11/10. How to break that limit? Here, MiniTool Partition Wizard offers some methods to change themes in Windows 11/10 without activation.
About Changing Windows Themes
If you want to make Windows 10 look like Windows 7/macOS, you can download and install a Windows 7/macOS theme on the computer. It means that you need to change the current theme. It is easy to switch the theme, but things are different if your Windows is not activated yet.
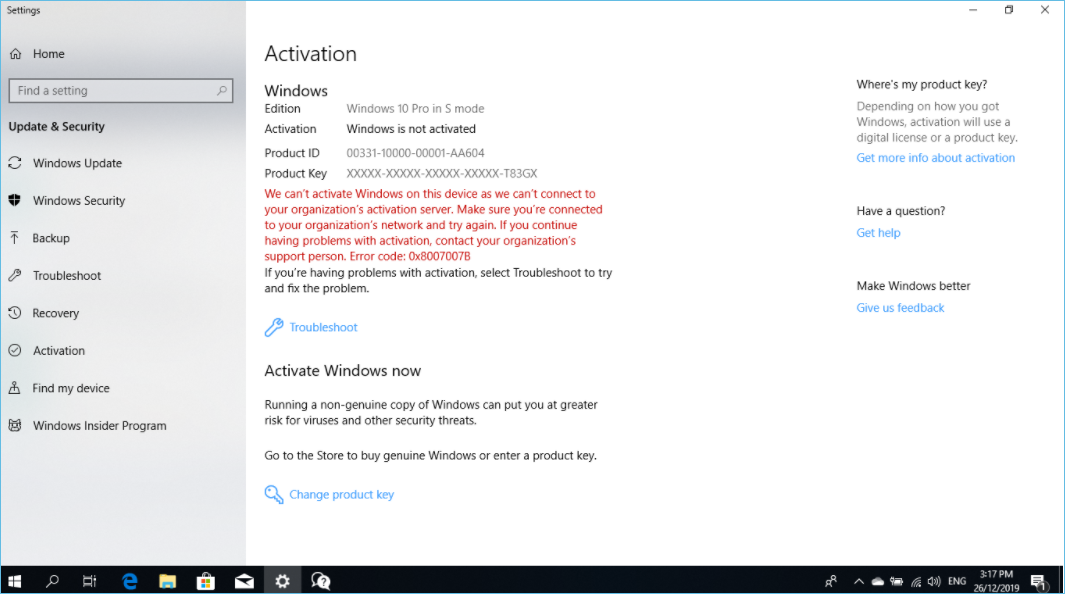
On the Settings app of a not activated computer, you will see the message “You need to activate Windows before you can personalize your PC” and the greyed “Use Custom Theme” option. This can stop you from changing the theme.
By default, you can’t change themes in Windows 11/10 without activation. Fortunately, there’s a workaround for the problem. This post offers you two methods to change Windows 10 theme without activating Windows. Based on your preference, select a way to finish the operation.
Method 1: Use Registry Editor
How to change themes in Windows 11/10 without activation? Well, tweaking Registry Editor is an available way to change theme without activation in Windows 11/10. Here’s a step-by-step tutorial for you.
Tips:
Before you edit Registry Editor, you’d better back up Registry or make a Windows backup in case anything goes wrong. MiniTool Partition Wizard, a piece of PC cloning software, allows you to clone OS from HDD to SSD with ease. You can get it to clone Windows/hard drives/partitions and perform other operations on storage devices.
MiniTool Partition Wizard DemoClick to Download100%Clean & Safe
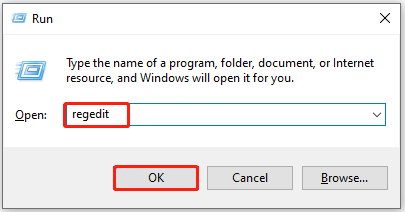
Step 1: Right-click on the Windows icon and then choose Run.
Step 2: In the Run window, type regedit and click OK to open Registry Editor.
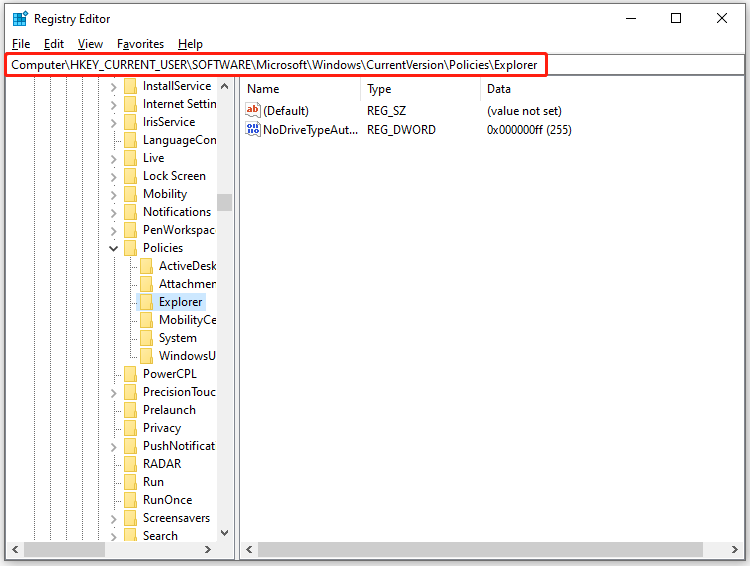
Step 3: In the Registry Editor window, navigate to Explorer by following the path below.
Computer\HKEY_CURRENT_USER\SOFTWARE\Microsoft\Windows\CurrentVersion\Policies\Explorer
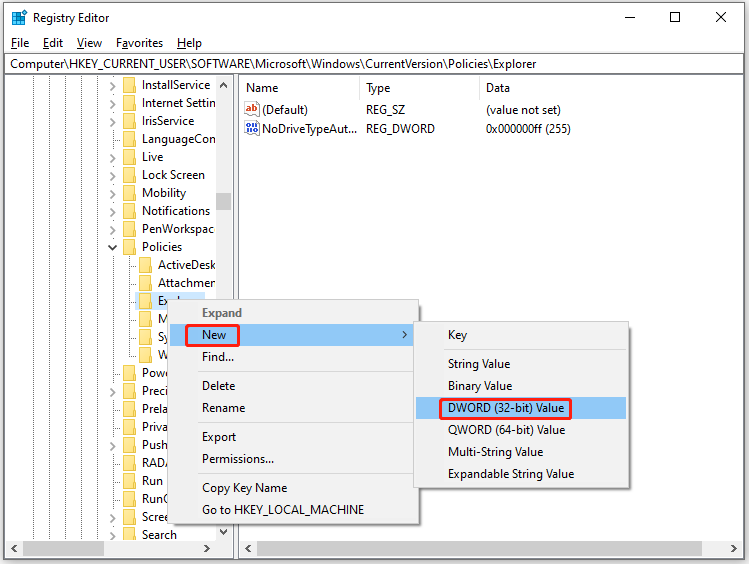
Step 4: Right-click Explorer and choose New > DWORD (32-bit) Value. Then click on the created value, press F2, and type NoThemesTab.
Step 5: Right-click the NoThemesTab value and choose Modify.
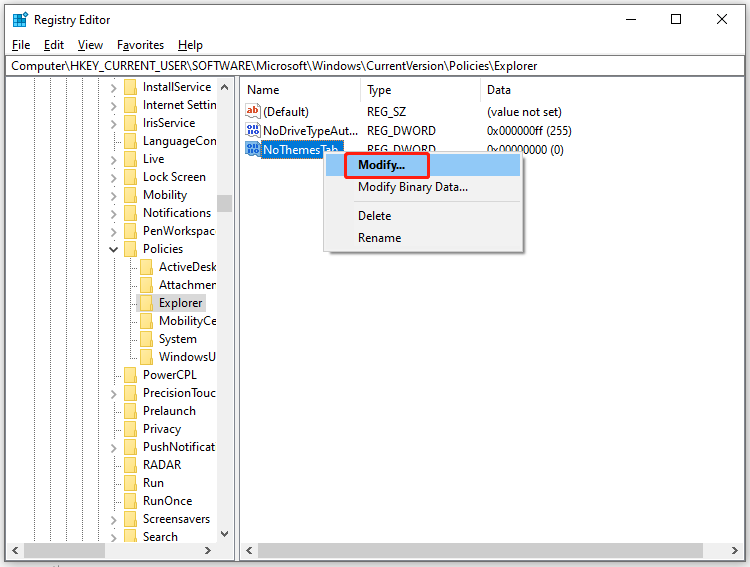
Step 6: Set the value data of NoThemesTab as 0 and click OK to save changes.
Method 2: Use Local Group Policy Editor
If you run the Windows 10/11 Pro edition, you can change themes in Windows 11/10 without activation through Local Group Policy Editor. The detailed steps are shown as follows.
Step 1: Open the Run window, type gpedit.msc, and then press Enter.
Step 2: In the left pane of the Local Group Policy Editor window, find and click User Configuration > Administrative Templates > Control Panel > Personalization. Then double-click Prevent changing theme on the right side of the window and click Edit.
Step 3: In the pop-up window, tick the Disabled option and click OK to save changes.
After you disable “prevent changing theme”, change theme without activation in Windows 11/10 by following these steps.
Step 1: Open Settings by pressing the Windows and I keys.
Step 2: Go to Personalization and choose Themes.
Step 3: Click Get more themes in the Microsoft Store link under the Change theme section.
Step 4: Look for a desired theme in the Microsoft Store and download it.
Step 5: After downloading the theme, double-click the .themepack file to apply the theme on your computer.
This post collects 2 methods to change themes in Windows 11/10 without activation. According to your demands, simply pick one way to change Windows 10 theme without activating Windows.
About The Author
Position: Columnist
Having writing articles about computer tech for a long time, I am rather experienced especially on the aspect of computer optimization, PC enhancement, as well as tech terms explanation. The habit of looking through tech forums makes me a great computer issues collector. And then, many articles related to these issues are released, which benefit plenty of users. Professional, effective, and innovative are always the pursuit of an editing worker.
| Workable Solutions | Step-by-step Troubleshooting |
|---|---|
| 1. Activate Windows with CMD | Run it as administrator > Type the command > Press enter to activate your Windows 10/11…Full steps |
| 2. Activate Windows with Product Key | Go to your systems settings > Right-click on «My PC» > Click on properties…Full steps |
| 3. Check Windows Activation Status | Click on the start button and click on settings > Go to «Update and security»…Full steps |
| 4. Can I use unactivated Windows |
Pros of using Windows Without Activation…Full steps Cons of using Windows Without Activation…Full steps |
No matter which Windows OS you install, its activation is essential. An activated version of Windows lets you explore all its features without any issues. Further, to complete your purchase, it is also necessary to activate your Windows.
Now, how to activate Windows? Well, there are many methods. One simple and hassle-free way is to use the Command Prompt. Do not worry! we will guide you through all the steps of activating your Windows through CMD. So, let us get started!
To help ordinary users get the most straightforward way to activate Windows to a full version, below is a time-limited offer for a Windows 10 license key that makes the Windows activation just a click.
How to Activate Windows 10/11 with CMD
You can use this method to activate your Windows 10/11 for free. This method comes in handy if no other method is working for you. Here are the steps you need to follow to activate your Windows using Command Prompt (CMD).
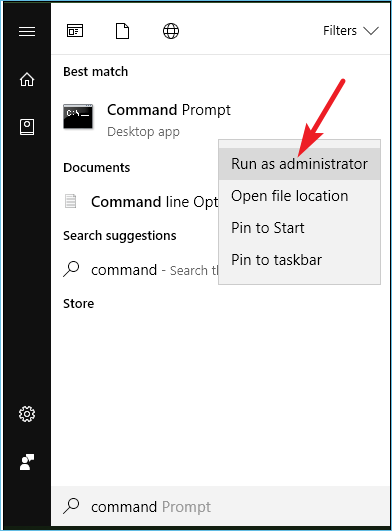
Step 1. You have to open the command prompt on your system first. Then, click and start and type «CMD». Now, run it as administrator.
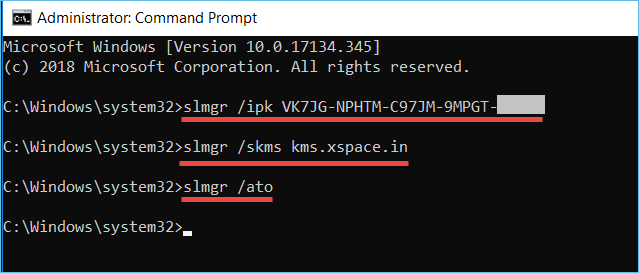
Step 2. Type the following command.
- slmgr /ipk
- slmgr /skms kms.xspace.in
- Slmgr /ato
Now press enter. This command will activate your Windows 10/11. In case of any troubleshooting, you can take help from Windows repair services.
Activate Windows 10/11 with Product Key
Using Command Prompt is a freeway. But you do not necessarily have to rely on this method to activate your Windows 10 or 11. You can also use the Windows product key to activate your Windows OS.
It seems quite simple, but it does require some steps to follow. So, for your ease, we have explained the whole process in various steps.
Step 1. To activate your window using the product key, you need to go to your systems settings. To right-click on «My PC» and then click on properties.
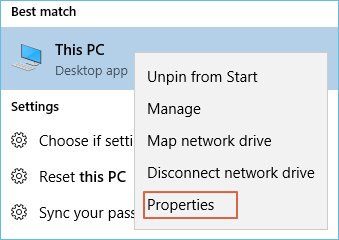
Step 2. A new window will open where it will display the system’s properties. On the right bottom of the window, you’ll see a status indicating whether the Windows has been activated. Click on it to proceed further.
Step 3. Upon clicking on this icon, the system would ask you to enter a product key. Enter your 25-character long product key. Enter that and click on activate.
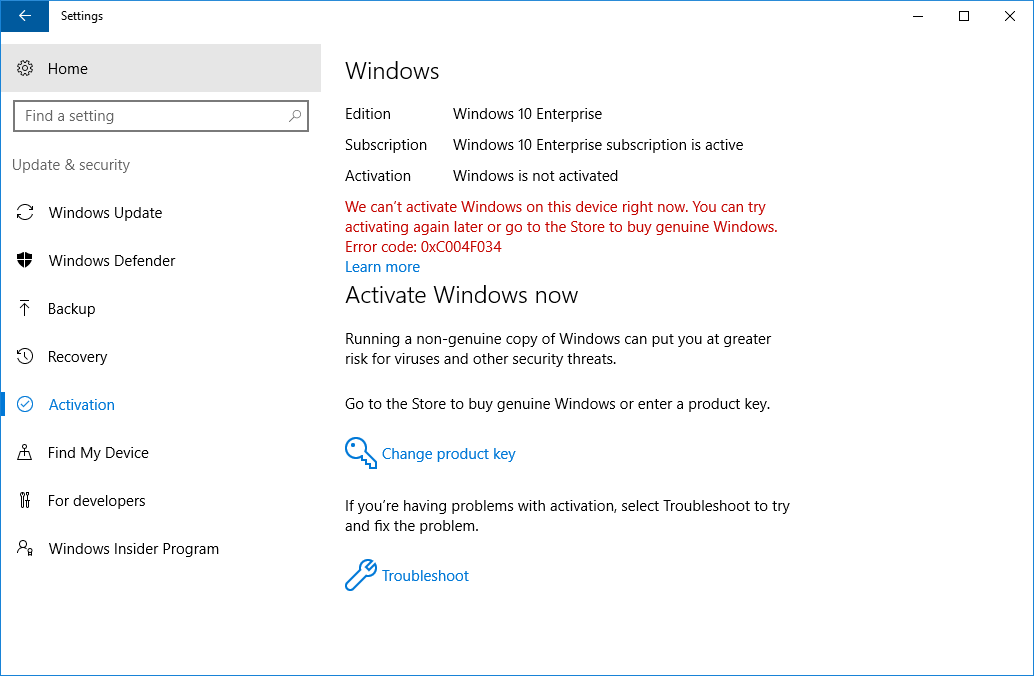
How to Check Windows Activation Status
If you want to verify whether your Windows OS is activated, you can follow a simple process. Below, we have broken down the whole process into steps for your ease.
Step 1. Click on the start button and click on settings.
Step 2. Go to «Update and security». Under this menu, you have to click on «Activation». Here, your Windows activation status will be displayed.
Can I Use Windows without Activation
The straight answer is yes, and you can use Windows without activation. But it is a risk. So here are some pros and cons of using Windows OS without activation.
Pros of using Windows Without Activation
1. It Doesn’t Affect Your PC’s Performance
Some people think that if they have an inactive copy of Windows on their computer, it will affect its performance. But this is not true! In fact, you may not even notice any difference.
So why bother activating Windows? In reality, there are many benefits to doing so. For one, you’ll have access to all the latest updates and features that Microsoft releases. Additionally, you’ll be able to personalize your copy of Windows with custom themes and settings.
Overall, whether or not you activate your copy of Windows is up to you. Just know that it won’t impact your computer’s performance either way.
2. You Can Try A Certain Windows OS
For instance, you want to try Windows 11, and you can install it without activating it. Similarly, you can use a Windows OS without activation for some days. However, it would give you an idea of the overall features of that particular OS.
If you wish to continue with that version, you can activate it as we mentioned.
Cons of using Windows Without Activation
Here are some cons of using Windows without activation.
1. You Keep On Getting Reminders
If you don’t activate Windows 10, you’ll see a watermark on your desktop. This is Microsoft’s way of reminding you that you need to pay for the copy of Windows 10 that you’re using. The watermark will also include the build number of the operating system, so if you see it, you’ll know that your Windows is not activated.
2. Personalization will be limited
Another consequence of not activating Windows 10 is that you won’t be able to personalize your PC as much as possible if it were activated. For example, you won’t be able to change your wallpaper or lock screen, and you’ll see a message on your personalization settings page that says, «Your organization manages some settings.»
Conclusion
So, now you know how to activate Windows 10/11 using various methods. We have listed activating Windows OS through CMD and the product key. You can choose the way that feels convenient to you.
However, you can also use an inactivated Windows copy. However, it is recommended to activate it using any of the above methods.
To keep your data backed up, it is recommended to use a reliable third-party tool such as EaseUS Todo Backup Free. It is one easy-to-use tool and lets you create backups of the system files for free. You can download it to try its convenient features.
FAQ on Activate Windows 10/11 Using CMD
1. Is activating Windows with cmd safe?
Using the command prompt to activate Windows is safe. However, cmd is not the necessary to activate Windows, and you can also use other tools, like the Product Key.
2. Can I activate Windows through cmd?
Of course, you can use the command prompt to activate Windows for free. Follow the steps: Open the command prompt on your system, type CMD, and run it as administrator. Then, type the command below:
slmgr /ipk
slmgr /skms kms.xspace.in
Slmgr /ato
and then press the Enter key to activate your Windows.
By default, when either Windows 10 or 11 is not activated, you are not allowed to make any personalization to it. If you open the Personalization tab in the Settings app, you will notice that some options have been grayed out, and an intimation stating the following:
You need to activate Windows before you can personalize your PC.

On the personalization page, the following items cannot be personalized without activating Windows:
- Change Windows theme
- Change Desktop background
- Apply Accent colors
- Enable Dark Mode (Light theme is applied by default)
- Touch keyboard
- Change Fonts
However, the following items can be personalized even when Windows is not activated:
- Lock screen
- Start Menu
- Taskbar
That said, there is a workaround you can perform that allows you to change your computer’s theme to any custom theme without having to activate the operating system. This post discusses 2 methods you can adopt to bypass this issue and then apply a custom third-party theme. Of course, the theme will need to be downloaded separately.
Note: This does not allow you to change anything else, nor can you apply other Windows themes preinstalled in the OS. You can only apply downloaded themes from .themepack packages.
Table of Contents
How to Change Theme Without Windows 11/10 Activation
-
If you are not yet looking to activate the Windows operating system, but want to change its themes, you need to perform the following tasks:
- Disable the operating system from blocking you from changing the theme.
- Apply the new theme from a third party .themepack package.
There are 2 methods to unblock Windows from preventing you from changing the themes. Pick the one that suits your preferences.
-
Using Group Policy Editor
Follow the given steps below to allow the OS to change the theme without activating it:
Note: The Home editions of Windows do not come with the Group Policy Editor preinstalled. Learn how to install it on Windows 11 or Windows 10.
-
Open the Group Policy Editor by typing in gpedit.msc in the Run Command box.

Open Group Policy Editor -
Now navigate to the following using the left pane:
User Configuration >> Administrative Templates >> Control Panel >> Personalization
-
Here, double-click on the policy “Prevent changing theme” in the right pane to open its properties.

Double-click the policy -
From the Properties window, select the Disabled radio button, then click Apply and Ok.
Select Disabled -
Now click Editor and launch the Command Prompt with administrative rights.
-
Run the following cmdlet to implement the changes.
gpupdate /force
Run cmdlet in elevated Command Prompt
You should now be able to change the themes on your Windows computer. Refer to the guide given below to download and apply a custom theme.
However, if you want to revert the settings to their default state in the future, simply return to the “Prevent changing theme” policy and select the Not Configured option.
-
-
Using Windows Registry Editor
Another method to allow the OS to change your theme without activating Windows is by manually making changes to the Windows Registry. Here is how:
Note: Misconfiguration of critical values in the system’s registry could be fatal for your operating system. Therefore, we insist that you create a system restore point before proceeding forward with the process.
-
Open the Windows Registry Editor by typing in regedit in the Run Command box.
Open Registry Editor -
Now paste the following into the address bar at the top for quick navigation:
Computer\HKEY_CURRENT_USER\SOFTWARE\Microsoft\Windows\CurrentVersion\Policies
Enter for quick navigation -
Here, right-click on the Policies key in the left pane, expand New, then click Key.
Create new Key Name this new Key “Explorer.”
-
Now right-click the Explorer key from the left pane, expand New, then click DWORD (32-bit) Value.
Create new DWORD Name this new DWORD “NoThemesTab.”
-
Leave the default value of the DWORD (which is 0) and restart the computer for the changes to take effect.
Once the computer reboots, you can now proceed to apply any custom theme downloaded from the internet.
However, if you wish to revert these changes in the future, simply delete the DWORD created in step 4 above and restart the PC.
Delete the DWORD -


How to Apply Custom Windows Themes
Once you are done with the steps above, you can now apply custom themes to your PC without having to activate the OS.
All you need to do is download the theme package which will have the extension “.themepack.” Once downloaded, apply the theme by double-clicking it.

Listed below are the websites we recommend for downloading custom theme packs:
- Microsoft Desktop Themes
- Themepack (third-party)
- Windows Themepack (third-party)
Closing Words
Personalizing your PC does not affect its performance, but you can still get it done while waiting for your Windows product license. It makes your PC more fun to use, especially if you are a gamer, or obsessed with a digital character.