
Эта большая инструкция посвящена особенностям установки, настройки и эксплуатации фермы терминальных серверов на базе роли Remote Desktop Services (RDS) в Windows Server. Статья поможет вам развернуть службы удаленных столов на Windows Server 2022, 2019 и 2016 в домене Active Directory.
Содержание:
- Компоненты Remote Desktop Services в Windows Server 2022/2016/2016/2012R2
- Создаем новую конфигурацию Remote Desktop Services в Windows Server
- Создаем коллекции Remote Desktop Services в Windows Server
- Публикация RemoteApp в Remote Desktop Services
- Настройка фермы Remote Desktop services с помощью PowerShell
Компоненты Remote Desktop Services в Windows Server 2022/2016/2016/2012R2
В состав роли RDS в Windows Server входя следующие компоненты:
- Remote Desktop Session Host (RDSH) – узлы сеансов RDS. Основные рабочие лошадки фермы RDS, на которых работают приложения пользователей;
- Remote Desktop Connection Broker (RDCB) – посредник RDS подключений. Используется для управления фермой RDS, распределения нагрузки, обеспечивает переподключение пользователей к своим сеансам, хранит коллекции RDS и опубликованные приложения RemoteApps;
- Remote Desktop Gateway (RDGW) – обеспечивает безопасный доступ к сервисам RDS из Интернета;
- RD Web Access (RDWA) – веб интерфейс для доступа к рабочим столам, программам RemoteApp;
- Remote Desktop Licensing (RD Licensing) — служба лицензирования, управляет RDS лицензиями (CAL) пользователей.
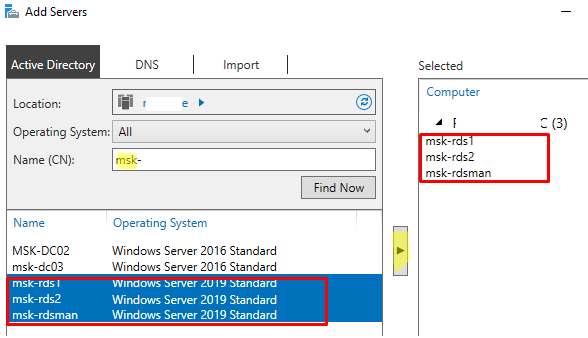
В нашем небольшом стенде будут всего три сервера со следующим распределением ролей
-
msk-rds1.winitpro.ru
— RDSH -
msk-rds2.winitpro.ru
– RDSH -
msk-rdsman.winitpro.ru
– RDSH, RDWA, RDCB, RD License
Предварительные требования, которые нужно выполнить перед созданием RDS фермы:
- Установите одинаковую версию Windows Server на все сервера, настроить их, и добавить в один домен AD;
- Откройте консоль ADUC (
dsa.msc
) и переместите все хосты с ролью RDSH в одну OU в AD. Так будет удобнее применять единые настройки через GPO; - Создайте в домене группу для RDSH серверов (например,
msk-rdsh
) и добавьте в нее все хосты; - Если вы хотите использовать диски User Profile Disk (UPD) для хранения профилей пользователей RDS (или перемещаемые профили), нужно создать на файловом сервере сетевой каталог, в котором они будут хранится (желательно расположить этот каталог на отказоустойчивом файловом кластере Windows Server). Предоставьте права Full Control на этот сетевой каталог для группы
msk-rdsh
.
Создаем новую конфигурацию Remote Desktop Services в Windows Server
Рассмотрим, как создать и настроить RDS конфигурацию с помощью графического интерфейса Server Manager.
Откройте Server Manager и добавьте все планируемые RDS сервера в консоль. Щелкните All Server -> Add servers.
Теперь в меню Server Manager выберите Add Roles and Features -> Remote Desktop Services installation -> Standard deployment –> Session-based deployment.
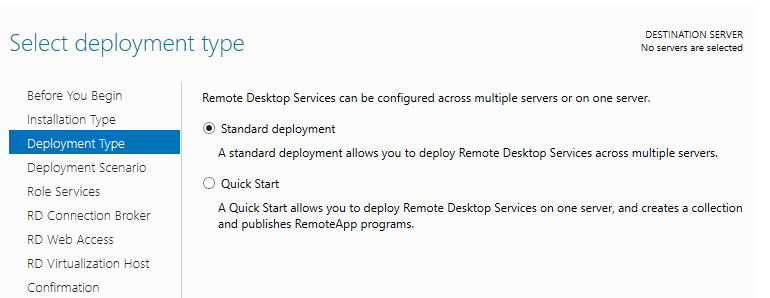
Режим Quick Start используется для развертывания всех компонентов RDS на одном сервере. В RDS ферме минимум может быть один сервер, который совмещает все роли RDS (RD Session Host, RD Web Access и RD Connection broker). Но такая конфигурация не обеспечивает отказоустойчивость и балансировку нагрузки в службах удаленных рабочей столов Windows Server.
Далее нужно указать, как вы хотите распределить роли RDS по вашим серверам. В мастере построения фермы RDS нужно выбрать сервера для соответствующих ролей. В моем случае я хочу построить такую конфигурацию:
- RD Connection Broker –
msk-rdsman - RD Web Access —
msk-rdsman - RD Session hosts —
msk-rdsman, msk-rds1, msk-rds2
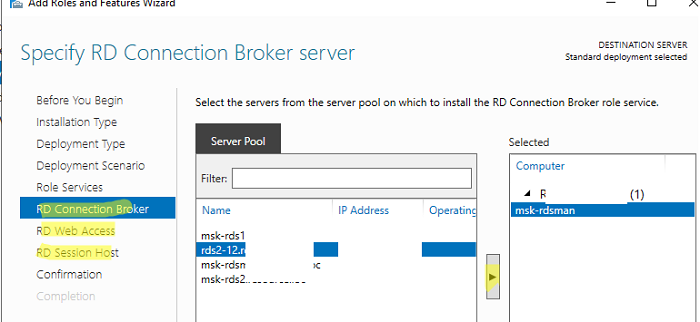
Вы можете распределить RDS роли по серверам в любой другой конфигурации.
Поставьте галку Restart destination server automatically if required и нажмите кнопку Deploy. Дождитесь установки ролей RDS на всех серверах.
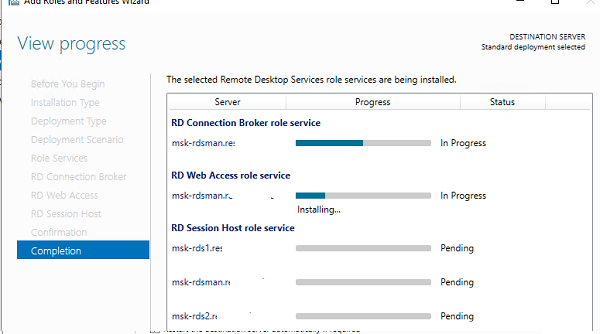
Итак, ваша ферма RDS создана.
Следующий этап установка и настройка сервера лицензирования RDS. Вы можете установить роль RD Licensing на один из серверов в вашей ферме или использовать существующий в домене сервер лицензирования RDS. Подробная инструкция по установке, настройке и активации роли RD Licensing доступа по ссылке.
Для управления вашим развертыванием RDS нужно перейти в раздел Server Manager -> Remote Desktop Services. На вкладке Overview показана текущая конфигурация RDS фермы.
Чтобы изменить настройки RDS фермы выберите Tasks -> Edit Deployment Properties в разделе Deployment Overview.
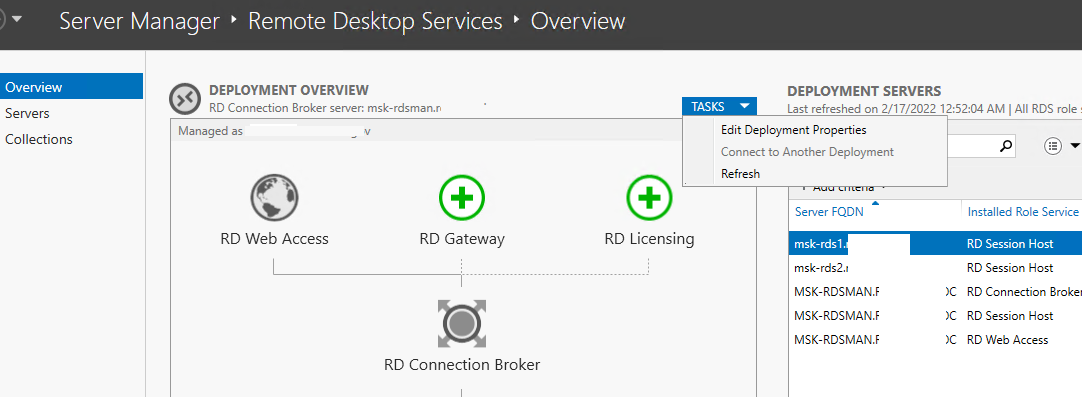
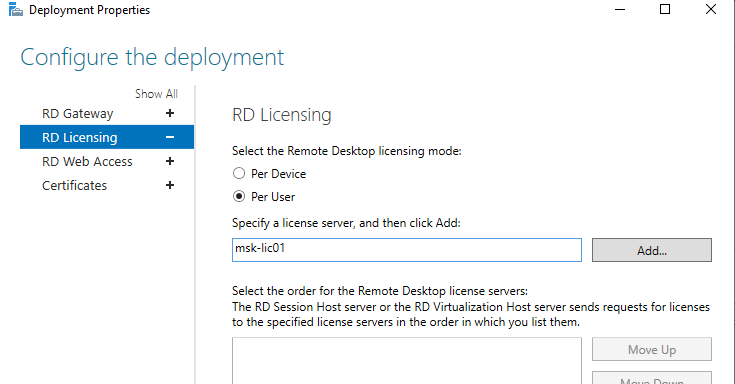
Здесь можно изменить:
- Параметры RD Gateway;
- Адрес сервер сервера лицензирования и тип пользовательских лицензий RDS CAL (per user/per device);
- Посмотреть URL адреса RD Web Access;
- Добавить SSL сертификаты для служб RDS (в инструкции мы пропустим этот пункт).
Для построения отказоустойчивой фермы Remote Desktop Services нужно обеспечить высокую доступность роли RD Connection Broker. Это достигается за счет запуска нескольких экземпляров RDCB (Active/Active) на разных серверах с общей базой данных SQL, в которой хранится конфигурация брокера подключений. Для обеспечения высокой доступности SQL базы RDCB ее можно размесить в группе высокой доступности SQL Server Always On. Ранее мы публиковали подробный гайд по настройке RDS Connection Broker с высокой доступностью.
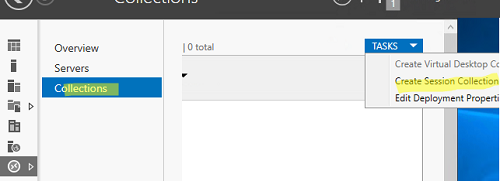
Создаем коллекции Remote Desktop Services в Windows Server
Следующий этап настройки – создание коллекций сеансов RDS. Коллекции Remote Desktop позволяют разделить хосты в ферме RDSH на отдельные группы или создать разный набор настроек и доступных приложений Remote App для разных групп пользователей.
Перейдите в раздел Collections, выберите Edit -> Create Session Collection.
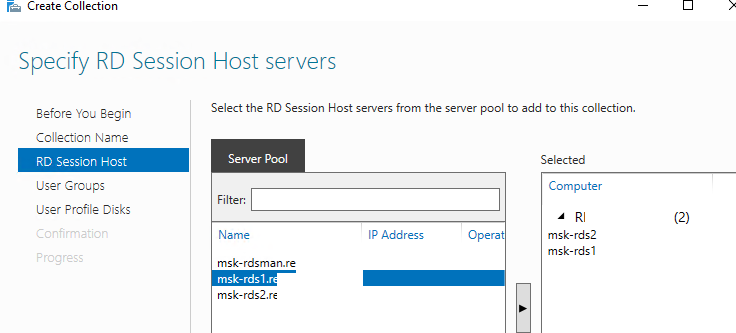
Здесь нужно задать:
- Имя коллекции RDS:
rds-Msk-Managers - Выберите какие хосты RDSH будут обслуживать пользователей коллекции (один RDSH хост может находиться в одной коллекций; не рекомендуется объединять в одну коллекцию сервера с разными версиями Windows Server);

- На вкладке User Groups указываются группы пользователей, которым разрешено подключаться к коллекции. Уберите из групп Domain users и добавьте вашу группу (msk-Managers);
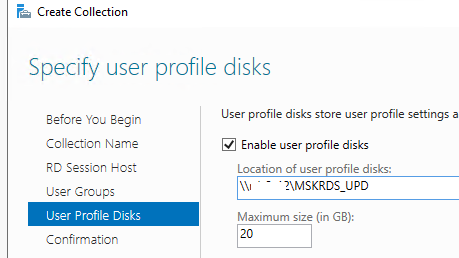
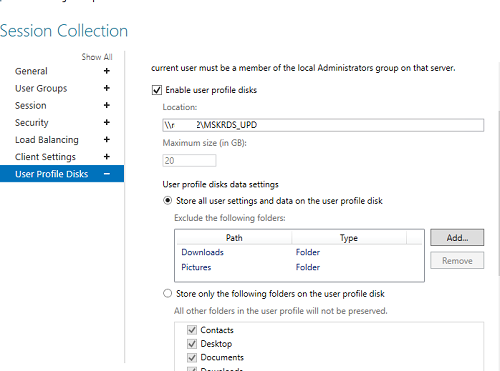
- На вкладке User Profile Disk нужно указать, хотите ли вы использовать формат UPD для хранения профилей пользователей (Enable user profile disks). В поле Location of user profile disks укажите UNC путь к сетевому каталогу(например,
\\msk-fs01\mskrds_upd
), в котором будут хранится профили пользователей в форматер UPD виртуальных дисков (в этом случае при входе на любой сервер коллекции RDS, пользователь будет всегда загружать свой профиль) и максимальный размер диска (20 Гб по умолчанию);
- Нажмите Create чтобы создать новую RDS коллекцию;
- Убедитесь, что в указанном каталоге создался UPD файл с шаблоном профиля пользователя UVHD-template.vhdx.
Чтобы задать параметры коллекции RDS, выберите ее и нажмите Tasks -> Edit Properties.
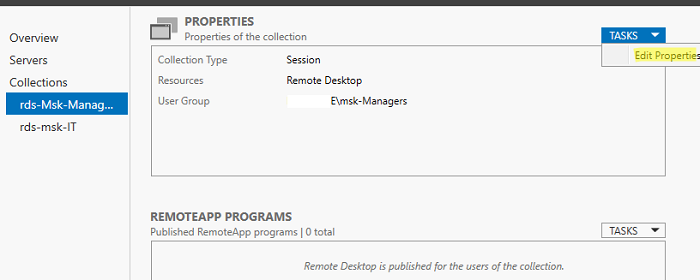
Здесь можно изменить базовые параметры коллекции (имя, описание, группы доступа) и ряд других важных настроек.
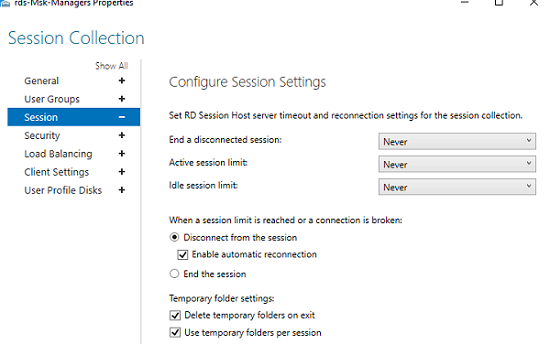
В разделе Session можно задать параметры переподключения/ автоматического отключения простаивающих RDP сессий (подробнее рассматривалось в статье Настройка таймаутов для RDP сессий).
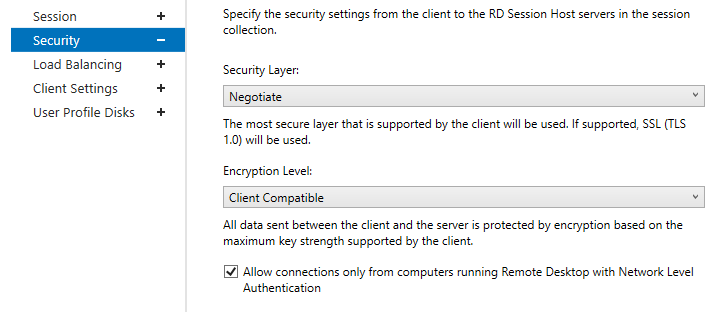
На вкладке Security можно выбрать настройки безопасности (Negotiate, RDP Security level или SSL/TLS) и шифрования (Low, High, Client compatible или FIPS compliant) для сессий RDP. Здесь также можно включить/отключить Network Level Authentication для RDP.
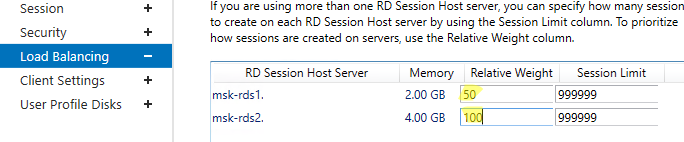
В секции Load Balancing можно изменить веса (
Relative Weight
) RDSH хостов в вашей ферме. Если характеристики серверов (RAM, CPU) в коллекции сильно отличаются, нужно задать меньший вес для менее производительных серверов. В этом случае RDCB будет распределять сессии пользователей по серверам в зависимости от их веса.
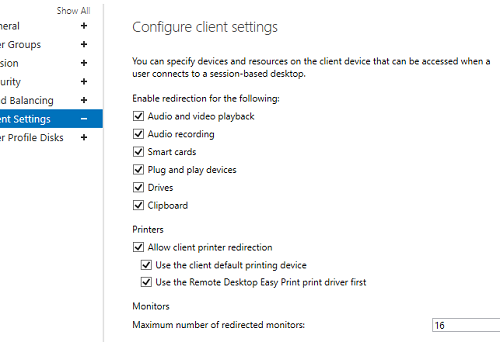
На вкладке Client Settings можно указать, какие устройства пользователям разрешено пробрасывать в RDP сессию. Например, вы можете разрешить/запретить пробрасывать с локального компьютера пользователя в RDS сеанс принтера, сетевые диски, аудио устройства, буфер обмена.
В разделе User Profile Disks можно более тонко настроить параметры UPD профилей пользователей. Можно исключить из синхронизации определенные папки или файлы. Это позволит уменьшить размер профиля UPD в сетевом каталоге и увеличить скорость загрузки профиля (не забывайте, что он загружается по сети из сетевой папки при входе пользователя).
Настройка и эксплуатация UPD обычно гораздо проще, чем использование перемещаемых профилей или folder redirection. Один UPD профиль не может использоваться в разных коллекциях RDS.
Для уменьшения размера UPD диска пользователя можно использовать стандартный PowerShell командлет
Resize-VHD
, используемый для изменения размеров виртуальных VHDX дисков Hyper-V.
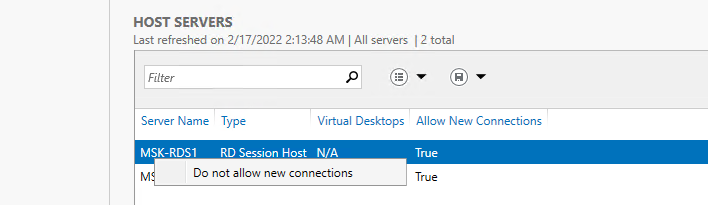
В секции HOST SERVERS коллекции RDS можно перевести любой сервер фермы в режим обслуживания RDSH (Drain Mode). Для этого щелкните по нему и выберите Do not allow new connection. В результате Connection Broker не будет отправлять новые подключения пользователей на этот сервер. В таком режиме вы можете спокойно установить обновления Windows или обновлять на сервере приложения, не затрагивая пользователей.
Здесь же можно добавить/удалить RDS Host из коллекции.
Если RDSH хост вышел из строя и не доступен, его можно корректно удалить из фермы Remote Desktop Services по этой инструкции.
Публикация RemoteApp в Remote Desktop Services
RemoteApps – это опубликованные для пользователей приложения на RDS серверах. Благодаря RemoteApp можно использовать приложения, установленные на терминальном RDSH сервере так, как будто оно запущено непосредственно на компьютере пользователя. Пользователь не видит всего рабочего стола Windows Server RDS и работает только с теми программами, которые опубликовал для него администратор. На компьютере пользователя будет отображаться только окно запущенной на RDS программы.
Если вы не создаете RemoteApp, пользователи будут работать непосредственно на собственных рабочих столах на Windows Server. Поэтому не забудьте скопировать все необходимые пользователю ярлыки приложений в папку C:\Users\Public\Desktop. Файлы из этой папки будут отображаться на рабочем столе всех пользователей. Если вы устанавливаете на RDSH пакет MS Office 365, обратите внимание что Office нужно разворачивать в режиме SharedComputerLicensing.
RemoteApp приложения создаются в настройках коллекций RDS. Выберите пункт Tasks -> Publish RemoteApp Programs в секции REMOTEAPP PROGRAMS.
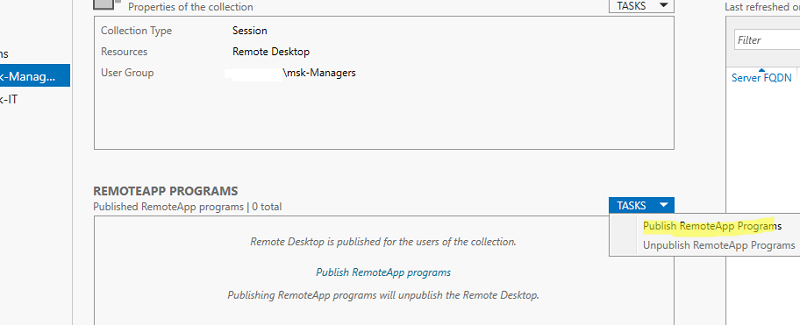
Windows отобразит все приложения, установленные на текущем сервере. Можете выбрать одно из них. Если вашего приложения нет в списке, но оно установлено на других хостах RDS, нажмите кнопку Add и укажите полный путь к исполняемому файлу приложения (exe, bat, cmd и т.д.).
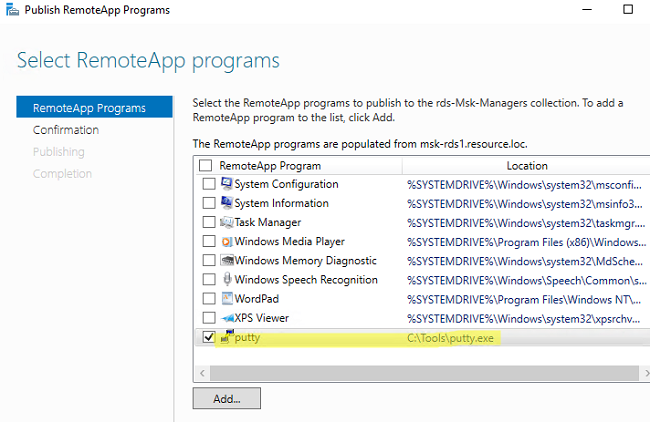
Опубликуйте приложение RemoteApp.
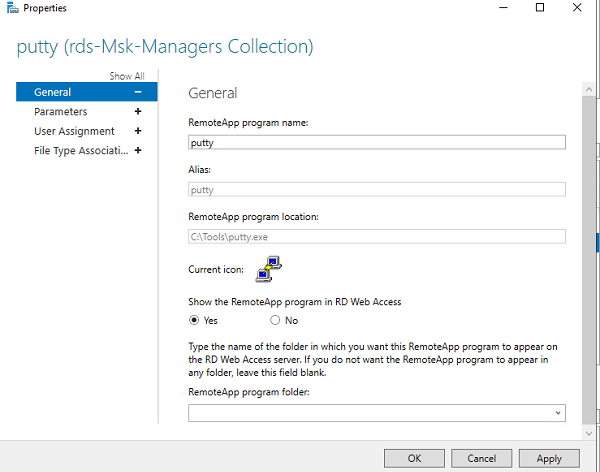
Затем в настройках RemoteApp можно указать дополнительные параметры приложения.
- Нужно ли показывать опубликованное RemoteApp приложение в веб интерфейсе RD Web Access;
- Задать параметры запуска (аргументы) приложения (Command-line Parameters -> Always use the following command-line parameters);
- На вкладке User Assignment можно дополнительно ограничить каким группам пользователей разрешено запускать приложение.
Если вы хотите изменить иконку опубликованного RemoteApp, нужно открыть следующую папку на сервере с ролью RDS Connection Broker:
C:\Windows\RemotePackages\CPubFarms\rds-Msk-Managers\CPubRemoteApps
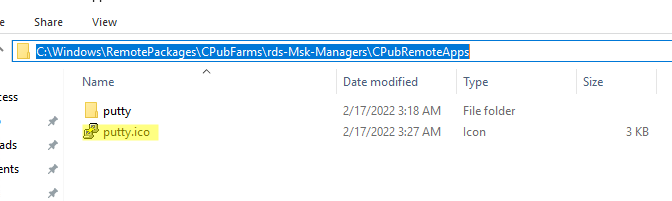
Замените иконку приложения другим ico файлом.
Теперь пользователь может запустить RemoteApp приложение из RD Web Access (
https://msk-rdsman.wintpro.ru/RDWeb
) или с помощью специального RDP файла.
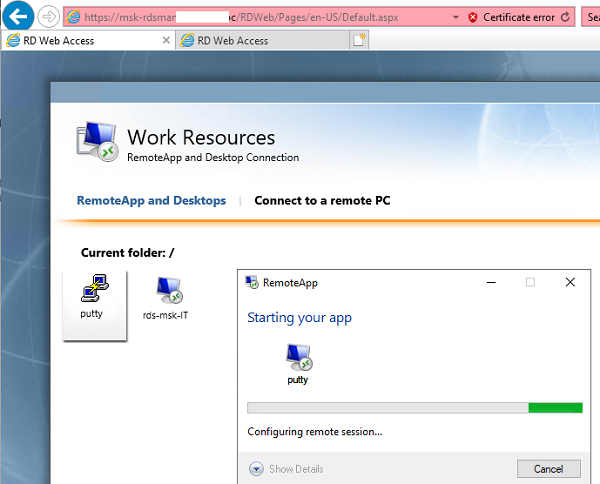
Для запуска опубликованного приложения RemoteApp, нужно добавить в RDP файл такие строки:
remoteapplicationmode:i:1
remoteapplicationname:s:putty
remoteapplicationprogram:s:"C:\Tools\putty.exe"
disableremoteappcapscheck:i:1
alternate shell:s:rdpinit.exe
Несколько полезных мелочей для удобной эксплуатации фермы RDS:
- Для роли RDWeb можно настроить поддержку HTML5, это позволит пользователям подключаться к RDS серверам из любого браузера и ОС даже без клиента RDP;
- На веб сервере RD Web Access можно опубликовать ссылку на смену истекшего пароля пользователя (по умолчанию при включенном NLA вы не сможете аутентифицироваться на RDSH с истекшим паролем пользователя Active Directory);
- Инструкция для пользователей по смене пароля в RDP сессии;
- Администратор может использовать теневые подключения RD Session Shadow для подключения/просмотра рабочего стола сеанса пользователя на сервере RDS;
- Чтобы быстро найти, на каких RDS серверах есть сессии определенного пользователя, можно использовать PowerShell:
Import-Module RemoteDesktop
Get-RDUserSession -ConnectionBroker msk-rdsman.winitpro.ru | where {$_.UserName -eq "a.ivanov"} | Select HostServer - Вы можете использовать PowerShell скрипты для просмотра и анализа логов RDP подключений пользователей к серверам RDS;
- Для дополнительной защиты можно настроить двухфакторную аутентификацию (2FA) пользователей на RDS серверах Windows с помощью сторонних средств.
Настройка фермы Remote Desktop services с помощью PowerShell
Если вы четко представляете себе концепцию RDS фермы, вы можете быстро разворачивать RDS конфигурацию с помощью PowerShell.
Следующие PowerShell команды для создания RDS фермы лучше запускать с другого на другом сервера, т.к. управляемые RDS хосты придется перезагружать.
Задайте имена серверов в вашей ферме RDS. В этом примере я установлю роли RDCB и RDS Licensing на отдельный сервер (в дальнейшем рекомендуется настроить отказоустойчивую конфигурацию RDCB).
$RDSH1 = "msk-rds1.winitpro.ru"
$RDSH2 = "msk-rds2.winitpro.ru"
$RDSCB = "msk-rdcb.winitpro.ru"
$RDSGW = "msk-rdsgw.winitpro.ru"
Import-Module RemoteDesktop
Установите RDS роли на сервера:
Add-WindowsFeature –ComputerName $RDSH1, $RDSH2 -Name RDS-RD-Server –IncludeManagementTools
Add-WindowsFeature –ComputerName $RDSCB -Name RDS-Connection-Broker -IncludeManagementTools
Add-WindowsFeature –ComputerName $RDSGW -Name RDS-Web-Access, RDS-Gateway –IncludeManagementTools
Перезагрузите все хосты:
Restart-Computer -ComputerName $RDSH1,$RDSH2,$RDSCB,$RDSGW
Создайте новый инстанс RDSessionDeployment:
New-RDSessionDeployment -ConnectionBroker $RDSCB -SessionHost $RDSH1,$RDSH2 –Verbose
Добавить в ферму сервера RDWA и RDGW:
Add-RDServer -Server $RDSGW -Role RDS-WEB-ACCESS -ConnectionBroker $RDSCB
Add-RDServer -Server $RDSGW -Role RDS-GATEWAY -ConnectionBroker $RDSCB -GatewayExternalFqdn "rds.winitpro.ru"
Текущее распределение RDS ролей по серверам фермы можно вывести так:
Get-RDServer -ConnectionBroker $RDSGW
Установка роли лицензирования RDS:
Add-WindowsFeature –ComputerName $RDSCB -Name RDS-Licensing, RDS-Licensing-UI
Задайте режим лицензирования PerUser:
Invoke-Command -ComputerName $RDSCB -ScriptBlock {Set-RDLicenseConfiguration -Mode PerUser -LicenseServer $RDSCB -ConnectionBroker $RDSCB}
Add-RDServer -Server $RDSCB -Role RDS-LICENSING -ConnectionBroker $RDSCB
Добавить сервер лицензирования в доменную группу с помощью Add-ADGroupMember:
Add-ADGroupMember "Terminal Server License Servers" -Members "msk-rdcb$"
Если у вас есть сертификат для RDS можно его добавить в конфигурацию фермы (можно использовать бесплатный SSL сертификат Let’s Encrypt для вашего RDS хоста):
Path = "C:\ps\RDSCert.pfx"
$Password = ConvertTo-SecureString -String "CertPAssddr0w11-" -AsPlainText -Force
Set-RDCertificate -Role RDGateway -ImportPath $Path -Password $Password -ConnectionBroker $RDSCB -Force
Set-RDCertificate -Role RDWebAccess -ImportPath $Path -Password $Password -ConnectionBroker $RDSCB -Force
Set-RDCertificate -Role RDPublishing -ImportPath $Path -Password $Password -ConnectionBroker $RDSCB -Force
Set-RDCertificate -Role RDRedirector -ImportPath $Path -Password $Password -ConnectionBroker $RDSCB -Force
Информацию об установленных SSL сертификатах можно получить так:
Get-RDCertificate
Теперь можно создать коллекции RDS:
$CollectionName = "DEVdept"
New-RDSessionCollection –CollectionName $CollectionName –SessionHost $RDSH1,$RDSH2 –ConnectionBroker $RDSCB –CollectionDescription “Develovers”
Разрешить доступ к RDS серверам для групп:
$UserGroup =@("WINITPRO\msk-developers","WINITPRO\msk_devops")
Set-RDSessionCollectionConfiguration -CollectionName $CollectionName -UserGroup $UserGroup
Опубликовать приложение RemoteAPP:
New-RDRemoteapp -Alias GoogleChrome -DisplayName GoogleChrome -FilePath "C:\Program Files (x86)\Google\Chrome\Application\chrome.exe" -ShowInWebAccess 1 -CollectionName $CollectionName -ConnectionBroker $RDSCB
В статье мы рассмотрели, как установить и настроить ферму Remote Desktop Services на базе Windows Server 2019/2022 с помощью графического интерфейса Server Manager и с помощью PowerShell. За рамками статьи осталось более подробное описание ролей RD Web Access и RD Gateway. Мы рассмотрим настройку этих ролей отдельно в следующих статьях.
Why Enable Remote Desktop on Windows Server 2022?
Remote Desktop Protocol (RDP)
is a powerful tool for accessing Windows servers from remote locations. It allows administrators to perform system maintenance, deploy applications, and troubleshoot issues without physical access to the server. By default, Remote Desktop is disabled on Windows Server 2022 for security purposes, necessitating deliberate configuration to enable and secure the feature.
RDP also simplifies collaboration by enabling IT teams to work on the same server environment simultaneously. Additionally, businesses with distributed workforces depend on RDP for efficient access to centralized systems, boosting productivity while reducing infrastructure costs.
Methods to Enable Remote Desktop
There are several ways to enable Remote Desktop in Windows Server 2022, each tailored to different administrative preferences. This section explores three primary methods: the GUI, PowerShell, and Remote Desktop Services (RDS). These approaches ensure flexibility in configuration while maintaining high standards of precision and security.
Enabling Remote Desktop via the Server Manager (GUI)
Step 1: Launch Server Manager
The Server Manager is the default interface for managing Windows Server roles and features.
Open it by:
-
Clicking the Start Menu and selecting Server Manager.
-
Alternatively, use the Windows + R key combination, type ServerManager, and press Enter.
Step 2: Access Local Server Settings
Once in Server Manager:
-
Navigate to the Local Server tab in the left-hand menu.
-
Locate the «Remote Desktop» status, which typically shows «Disabled.»
Step 3: Enable Remote Desktop
-
Click on «Disabled» to open the System Properties window in the Remote tab.
-
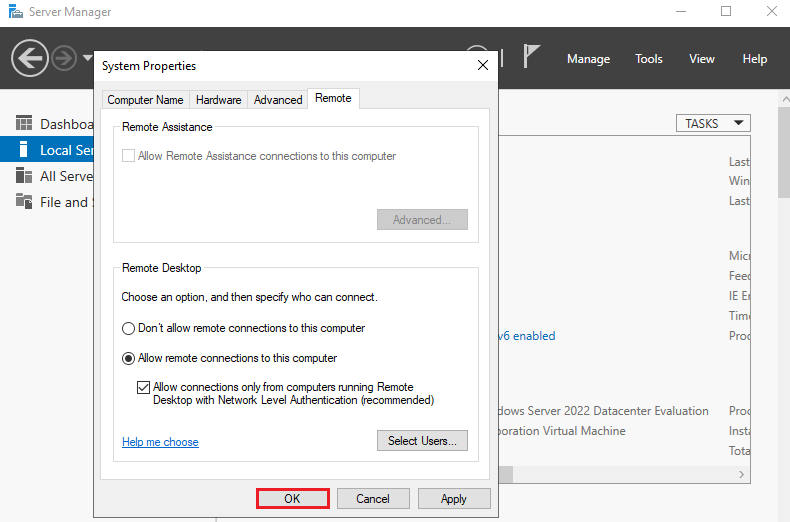
Select Allow remote connections to this computer.
-
For enhanced security, check the box for Network Level Authentication (NLA), requiring users to authenticate before accessing the server.
Step 4: Configure Firewall Rules
-
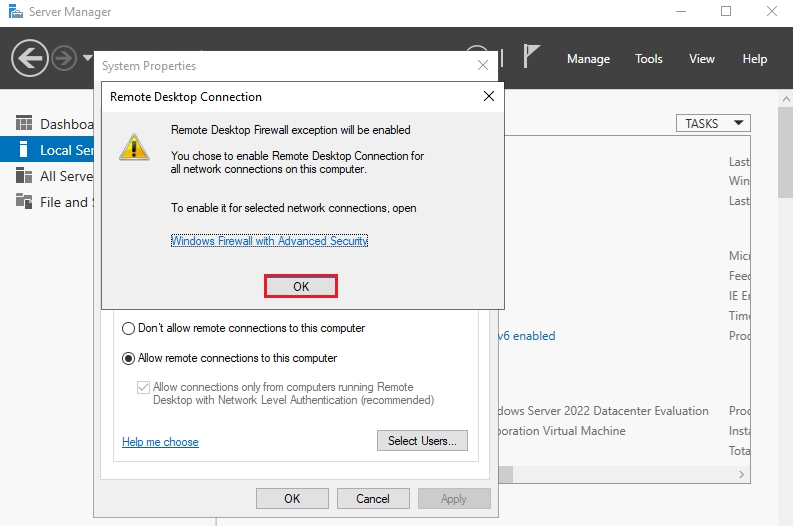
A prompt will appear to enable the firewall rules for Remote Desktop.
Click OK. -
Verify the rules in the Windows Defender Firewall settings to ensure port 3389 is open.
Step 5: Add Authorized Users
-
By default, only administrators can connect. Click Select Users… to add non-administrator accounts.
-
Use the Add Users or Groups dialog to specify usernames or groups.
Enabling Remote Desktop via PowerShell
Step 1: Open PowerShell as Administrator
-
Use the Start Menu to search for PowerShell.
-
Right-click and select Run as Administrator.
Step 2: Enable Remote Desktop via Registry
-
Run the following command to modify the registry key controlling RDP access:
-
Set-ItemProperty -Path ‘HKLM:\System\CurrentControlSet\Control\Terminal Server’ -Name «fDenyTSConnections» -Value 0
Step 3: Open the Necessary Firewall Port
-
Allow RDP traffic through the firewall with:
-
Enable-NetFirewallRule -DisplayGroup «Remote Desktop»
Step 4: Test Connectivity
-
Use PowerShell’s built-in networking tools to verify:
- Test-NetConnection -ComputerName -Port 3389
Installing and Configuring Remote Desktop Services (RDS)
Step 1: Add the RDS Role
-
Open Server Manager and select Add roles and features.
-
Proceed through the wizard, selecting Remote Desktop Services.
Step 2: Configure RDS Licensing
-
During the role setup, specify the licensing mode: Per User or Per Device.
-
Add a valid license key if required.
Step 3: Publish Applications or Desktops
-
Use the Remote Desktop Connection Broker to deploy remote apps or virtual desktops.
-
Ensure users have appropriate permissions to access published resources.
Securing Remote Desktop Access
While enabling
Remote Desktop Protocol (RDP)
on Windows Server 2022 provides convenience, it can also introduce potential security vulnerabilities. Cyber threats like brute-force attacks, unauthorized access, and ransomware often target unsecured RDP setups. This section outlines best practices to secure your RDP configuration and protect your server environment.
Enable Network Level Authentication (NLA)
Network Level Authentication (NLA) is a security feature that requires users to authenticate before a remote session is established.
Why Enable NLA?
-
It minimizes exposure by ensuring only authorized users can connect to the server.
-
NLA reduces the risk of brute-force attacks by blocking unauthenticated users from consuming server resources.
How to Enable NLA
-
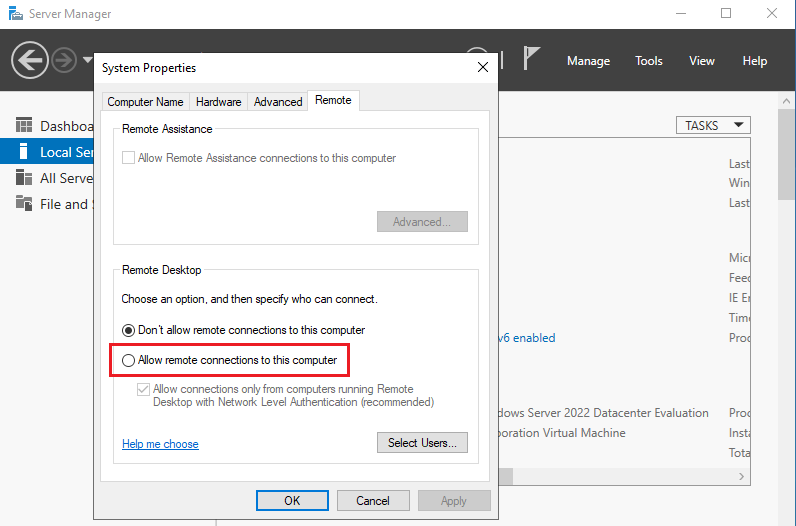
In the System Properties window under the Remote tab, check the box for Allow connections only from computers running Remote Desktop with Network Level Authentication.
- Ensure client devices support NLA to avoid compatibility issues.
Restrict User Access
Limiting who can access the server via RDP is a critical step in securing your environment.
Best Practices for User Restrictions
-
Remove Default Accounts: Disable or rename the default Administrator account to make it harder for attackers to guess credentials.
-
Use the Remote Desktop Users Group: Add specific users or groups to the Remote Desktop Users group.
Avoid granting remote access to unnecessary accounts. -
Audit User Permissions: Regularly review which accounts have RDP access and remove outdated or unauthorized entries.
Enforce Strong Password Policies
Passwords are the first line of defense against unauthorized access. Weak passwords can compromise even the most secure systems.
Key Elements of a Strong Password Policy
-
Length and Complexity: Require passwords to be at least 12 characters long, including uppercase letters, lowercase letters, numbers, and special characters.
-
Expiration Policies: Configure policies to force password changes every 60–90 days.
-
Account Lockout Settings: Implement account lockout after a certain number of failed login attempts to deter brute-force attacks.
How to Configure Policies
-
Use Local Security Policy or Group Policy to enforce password rules:
-
Navigate to Computer Configuration > Windows Settings > Security Settings > Account Policies > Password Policy.
-
Adjust settings such as minimum password length, complexity requirements, and expiration duration.
-
Restrict IP Addresses
Restricting RDP access to known IP ranges limits potential attack vectors.
How to Restrict IPs
-
Open Windows Defender Firewall with Advanced Security.
-
Create an Inbound Rule for RDP (
port 3389
):
-
Specify the rule applies only to traffic from trusted IP ranges.
-
Block all other inbound traffic to RDP.
-
Benefits of IP Restrictions
-
Drastically reduces exposure to attacks from unknown sources.
-
Provides an additional layer of security, especially when combined with VPNs.
Implement Two-Factor Authentication (2FA)
Two-Factor Authentication adds an extra layer of protection by requiring users to verify their identity with something they know (password) and something they have (e.g., a mobile app or hardware token).
Setting Up 2FA for RDP
-
Use third-party solutions such as DUO Security or Authy to integrate 2FA with Windows Server.
-
Alternatively, configure Microsoft Authenticator with Azure Active Directory for seamless integration.
Why Use 2FA?
-
Even if a password is compromised, 2FA prevents unauthorized access.
-
It significantly enhances security without compromising user convenience.
Testing and Using Remote Desktop
After successfully enabling
Remote Desktop Protocol (RDP)
on your Windows Server 2022, the next critical step is testing the setup. This ensures connectivity and verifies that the configuration works as expected. Additionally, understanding how to access the server from various devices—regardless of the operating system—is essential for a seamless user experience.
Testing Connectivity
Testing the connection ensures the RDP service is active and accessible over the network.
Step 1: Use the Built-in Remote Desktop Connection Tool
On a Windows machine:
-
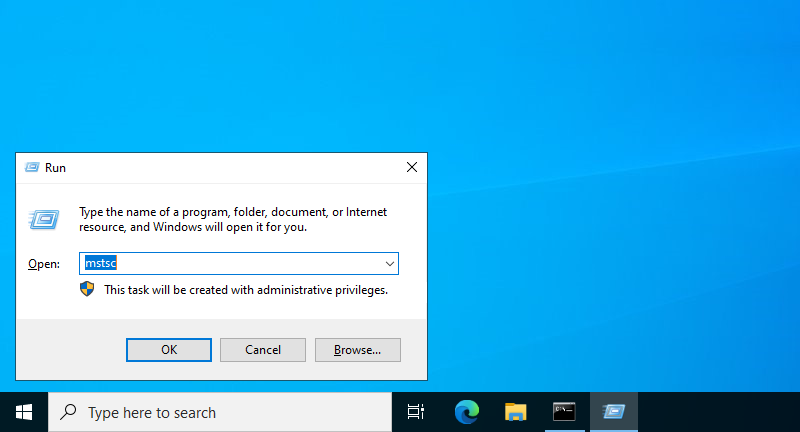
Open the Remote Desktop Connection tool by pressing Windows + R, typing mstsc, and pressing Enter.
-
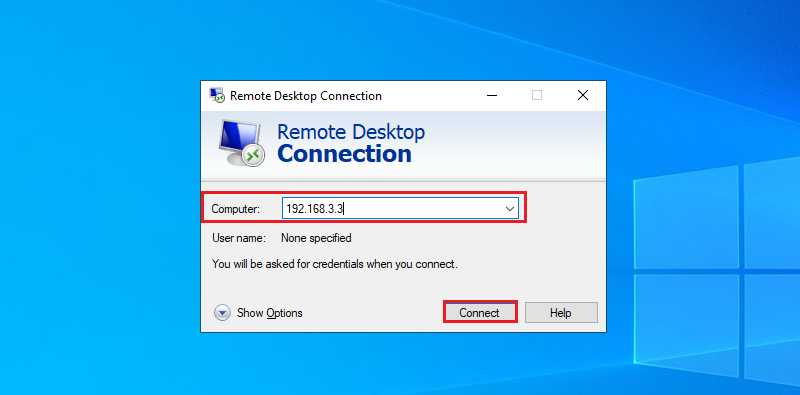
Enter the server’s IP address or hostname in the Computer field.
Step 2: Authenticate
-
Input the username and password of an account authorized for remote access.
-
If using Network Level Authentication (NLA), ensure the credentials match the required security level.
Step 3: Test the Connection
-
Click Connect and verify that the remote desktop session initializes without errors.
-
Troubleshoot connectivity issues by checking the firewall, network configurations, or server status.
Accessing from Different Platforms
Once the connection has been tested on Windows, explore methods for accessing the server from other operating systems.
Windows: Remote Desktop Connection
Windows includes a built-in Remote Desktop client:
-
Launch the Remote Desktop Connection tool.
-
Input the IP address or hostname of the server and authenticate.
macOS: Microsoft Remote Desktop
-
Download Microsoft Remote Desktop from the App Store.
-
Add a new PC by entering the server details.
-
Configure optional settings such as display resolution and session preferences for an optimized experience.
Linux
:
RDP Clients like Remmina
Linux users can connect using RDP clients such as Remmina:
-
Install Remmina via your package manager (e.g., sudo apt install remmina for Debian-based distributions).
-
Add a new connection and select RDP as the protocol.
-
Provide the server’s IP address, username, and password to initiate the connection.
Mobile Devices
Accessing the server from mobile devices ensures flexibility and availability:
iOS:
-
Download the Microsoft Remote Desktop app from the App Store.
-
Configure a connection by providing the server’s details and credentials.
Android:
-
Install the Microsoft Remote Desktop app from Google Play.
-
Add a connection, enter the server’s IP address, and authenticate to begin remote access.
Troubleshooting Common Issues
Connectivity Errors
-
Check that
port 3389
is open in the firewall.
-
Confirm the server is accessible via a ping test from the client device.
Authentication Failures
-
Verify the username and password are correct.
-
Ensure the user account is listed in the Remote Desktop Users group.
Session Performance
-
Reduce display resolution or disable resource-intensive features (e.g., visual effects) to improve performance on low-bandwidth connections.
Explore Advanced Remote Access with TSplus
For IT professionals seeking advanced solutions,
TSplus Remote Access
offers unparalleled functionality. From enabling multiple concurrent connections to seamless application publishing and enhanced security features, TSplus is designed to meet the demands of modern IT environments.
Streamline your remote desktop management today by visiting
TSplus
.
Conclusion
Enabling Remote Desktop on Windows Server 2022 is a critical skill for IT administrators, ensuring efficient remote management and collaboration. This guide has walked you through multiple methods to enable RDP, secure it, and optimize its usage for professional environments. With robust configurations and security practices, Remote Desktop can transform server management by providing accessibility and efficiency.
TSplus Remote Access Free Trial
Ultimate Citrix/RDS alternative for desktop/app access.Secure, cost-effective,on-permise/cloud
This Windows Server 2022 Tutorial covers how to Enable Remote Desktop Protocol (RDP) on Windows Server 2022. Remote Desktop Protocol is a proprietary protocol developed by Microsoft that allows a user can connect to another computer.
Table of Contents
- Enable Remote Desktop to connect to the Server from other Computers
- Connect to Remote Desktop session from Client OS.
Server Demo environment
- Computer Name: server1
- Operating System: Windows Server 2022 Datacenter
- IP Address: 192.168.3.3
Enable Remote Desktop to connect to the Server from other Computers
The default port number of Remote Desktop Protocol (RDP) is 3389, Remote desktop service is disabled by default. To enable Remote Desktop in Windows Server 2022, you need to log in with a local administrator account to make the changes.
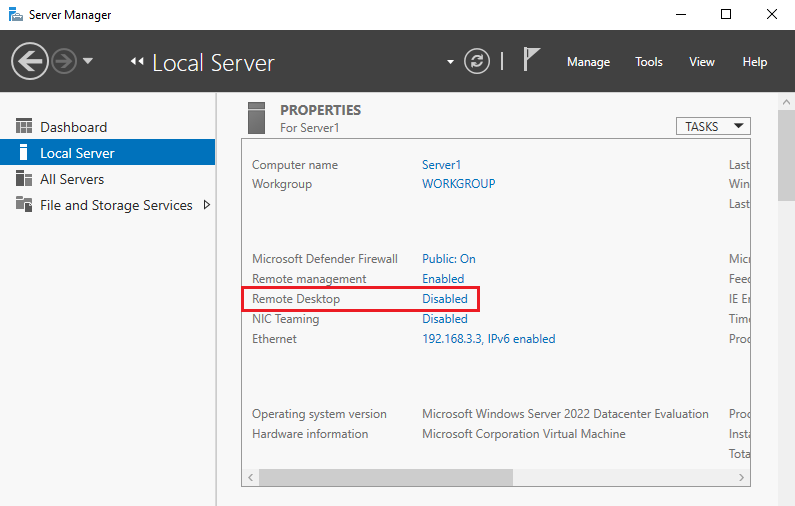
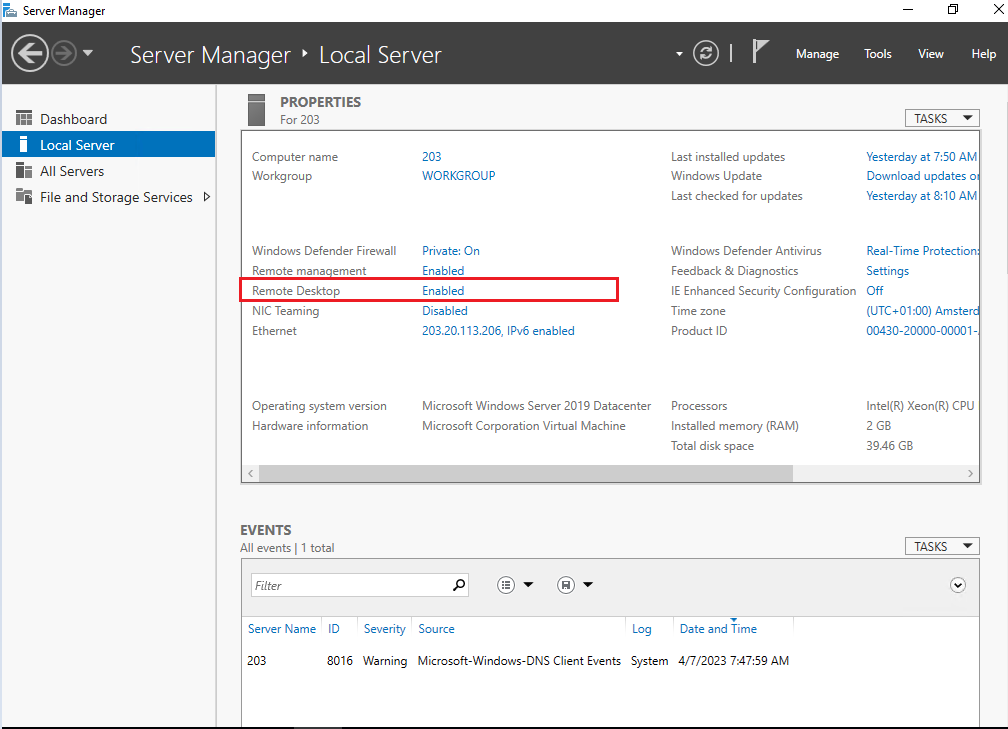
1. Open Server Manager, click on Local Server and Click on Disabled for Remote Desktop section.
2. Select Allow remote connections to this computer.
3. The message that Firewall exception for Remote desktop is enabled, Click on OK.
4. Ensure the option Allow connections only from computers running Remote Desktop with Network Level Authentication is enabled and click OK.
Connect to Remote Desktop session from Client OS.
Make sure the client and the server are on the same network.
Client Demo environment
- Computer Name: server2
- Operating System: Windows Server 2022 Datacenter
- IP Address: 192.168.3.4
5. Right-click the Windows icon and open run and input mstsc and Click OK
6. Enter the Hostname or IP address you’d like to connect to. In this tutorial, we use the IP address for connecting.
- Computer: 192.168.3.3
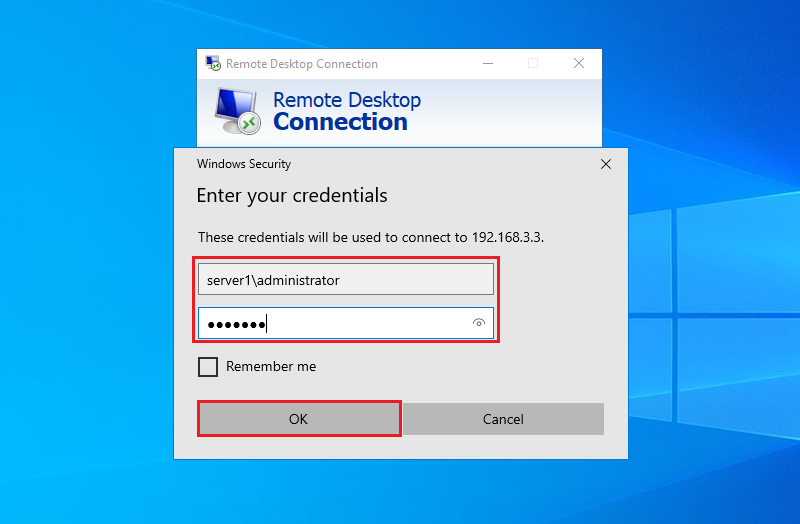
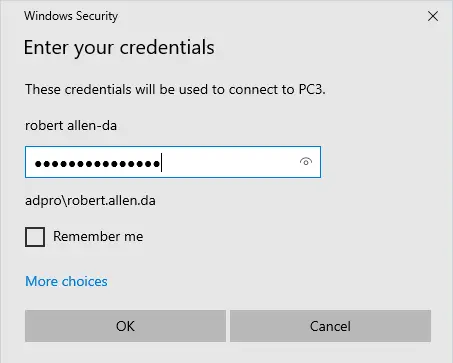
7. Enter the Username and Password of the remote server and click OK.
- User Name: server1\administrator
- Password: *******
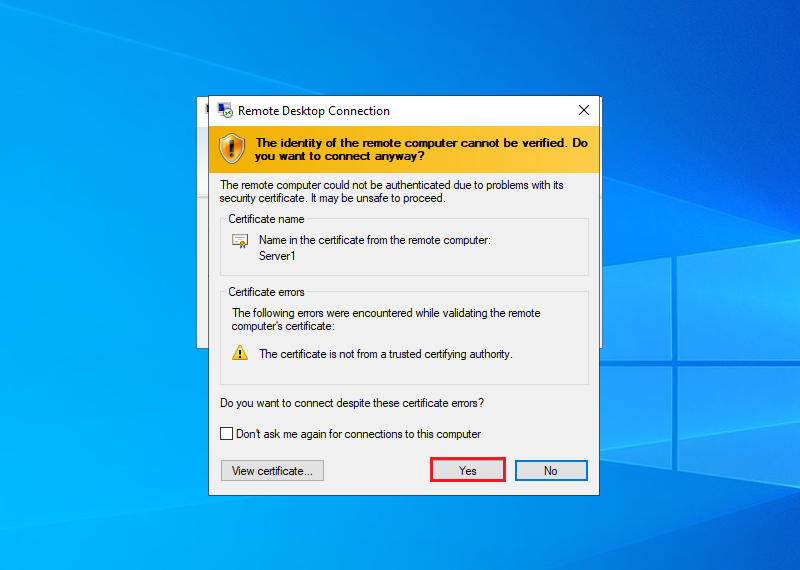
8. Click Yes.
In this guide, you will learn how to enable Remote Desktop on Windows 10, 11, and Windows Server. I’ll also show you on to enable RDP using PowerShell and group policy.
Tip: Use a remote desktop connection manager to manage multiple remote desktop connections. You can organize your desktops and servers into groups for easy access.
Table of contents
- Enable Remote Desktop on Windows 10
- Enable Remote Desktop on Windows 11
- Enable Remote Desktop on Windows Server
- PowerShell Enable Remote Desktop
- Group Policy Configuration to allow RDP
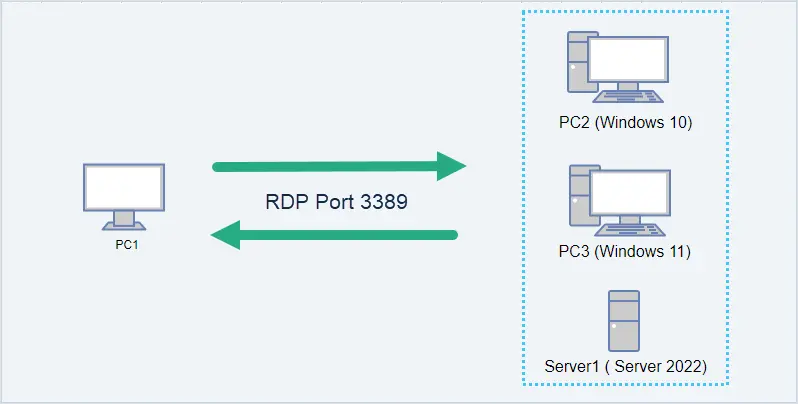
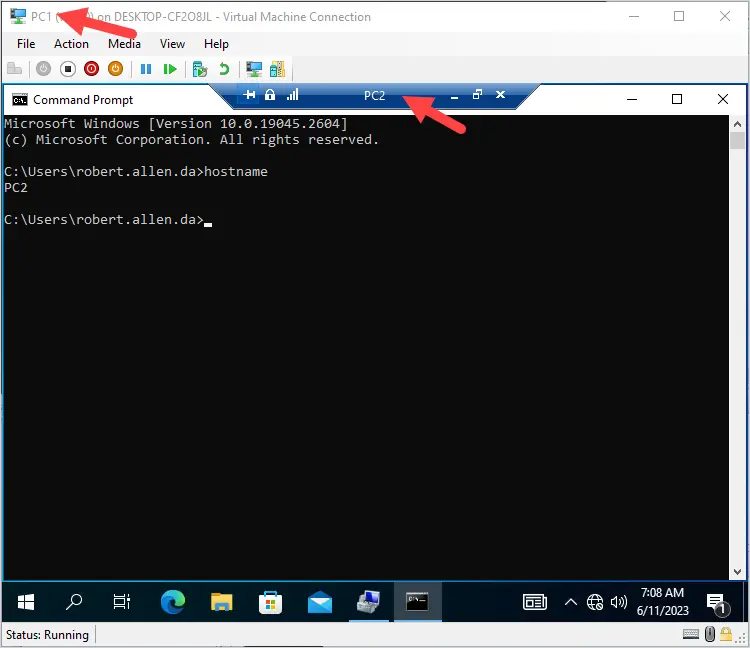
In the diagram below, my admin workstation is PC1. I’m going to enable RDP on PC2, PC3, and Server1 so that I can remotely connect to them. RDP uses port TCP 3389. You can change the RDP listening port by modifying the registry.
In this example, I’m going to enable remote desktop on PC2 that is running windows 10.
Step 1. Enable Remote Desktop
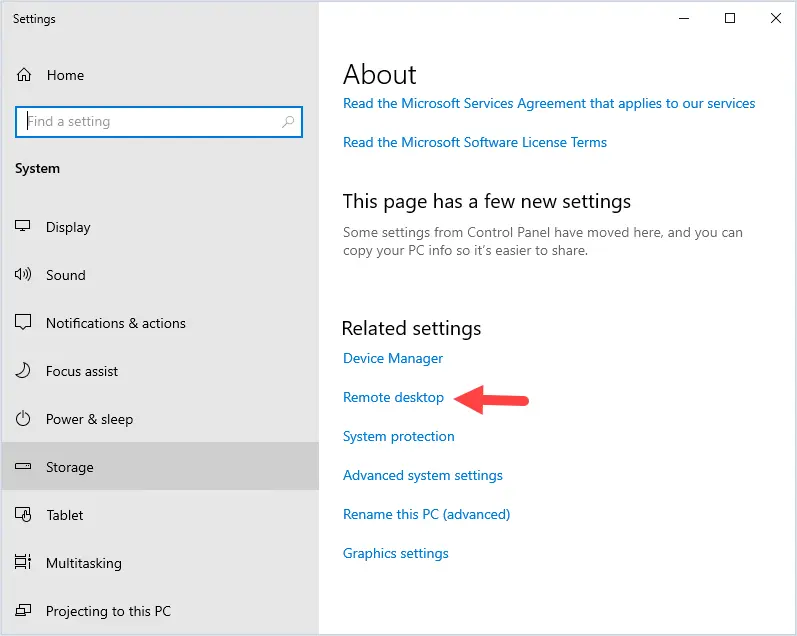
Right click the start menu and select system.
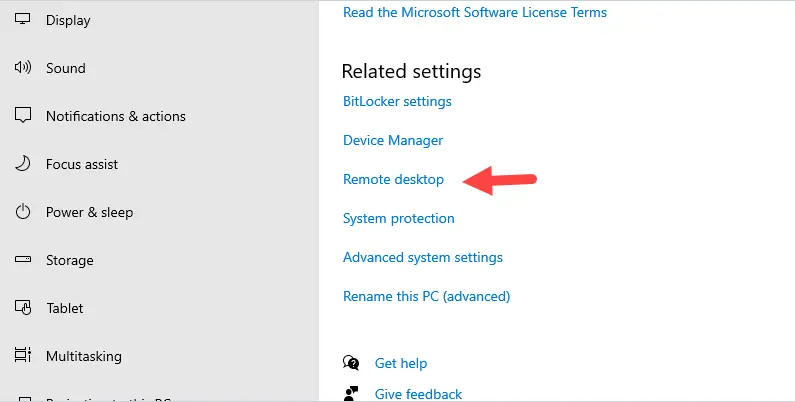
Under related settings click on Remote desktop.
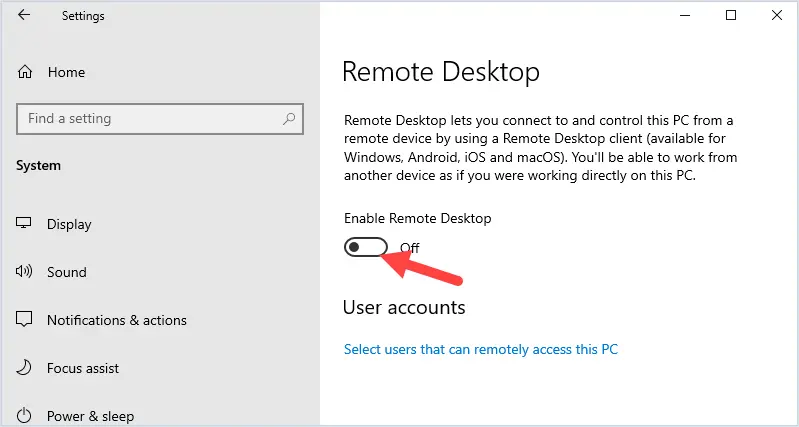
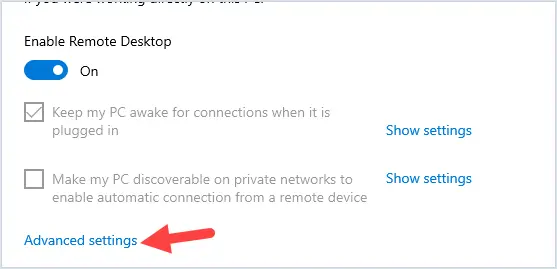
Click the slider button to enable remote desktop.
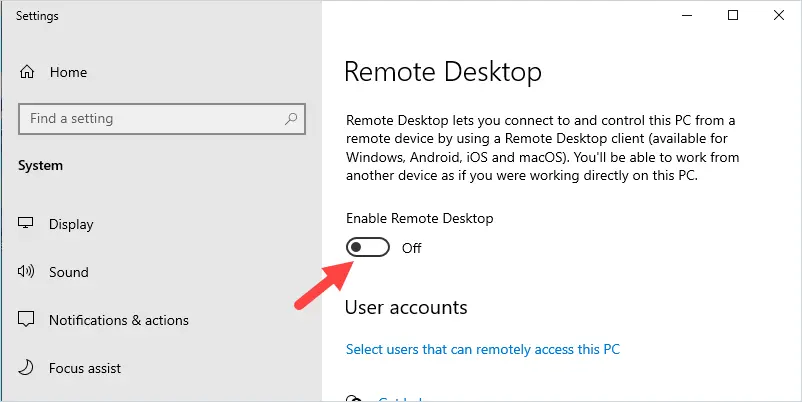
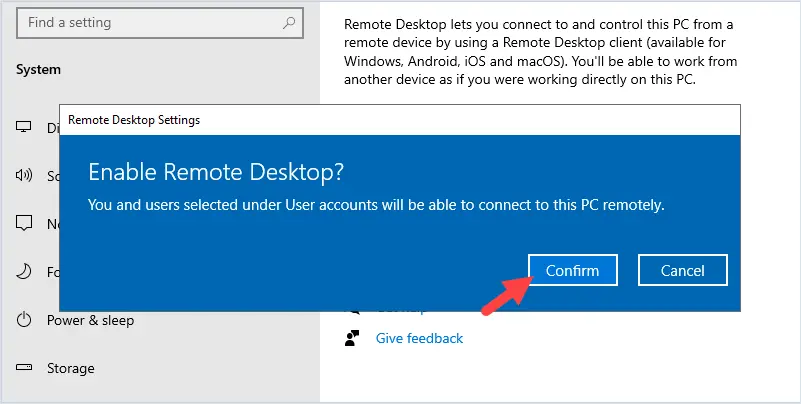
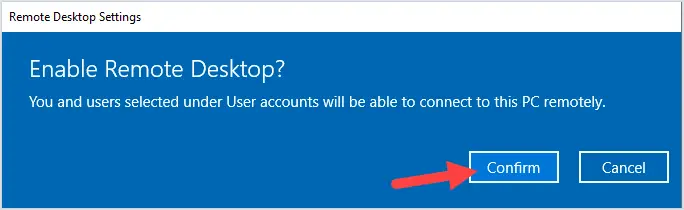
You will get a popup to confirm that you want to enable Remote desktop. Click confirm.
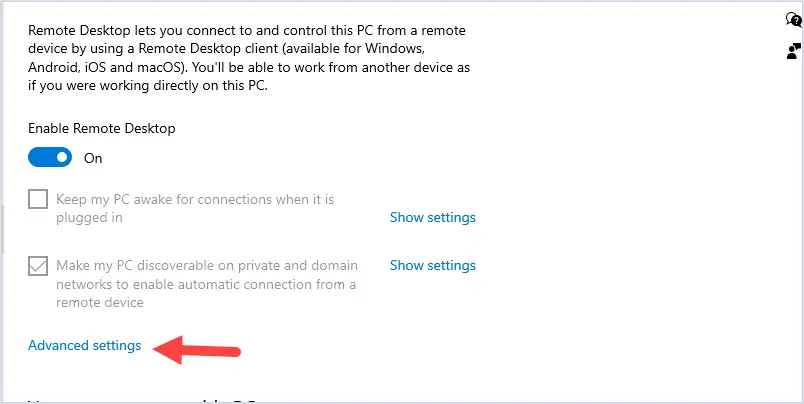
Next, Click on Advanced Settings.
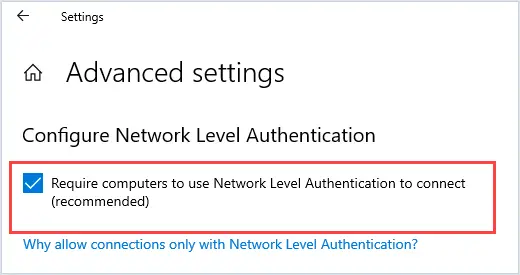
Make sure “Require computers to use Network Level Authentication to connect” is selected.
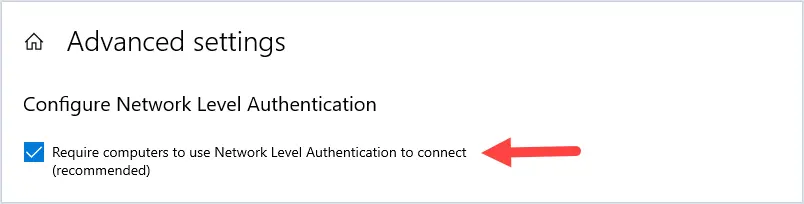
This setting will force the user to authenticate before it will start a remote desktop session. This setting will enable a layer of security and prevent unauthorized remote connections.
Step 2. Select Users Accounts
The next step is to ensure only specific accounts can use RDP.
By default, only members of the local administrators group will be allowed to connect using remote desktop.
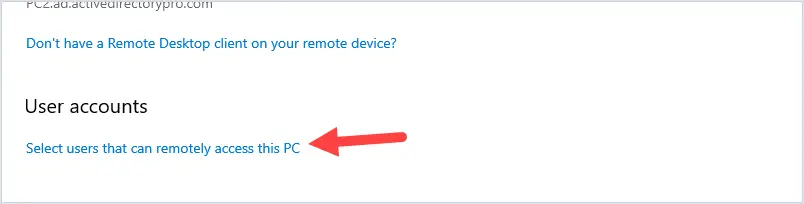
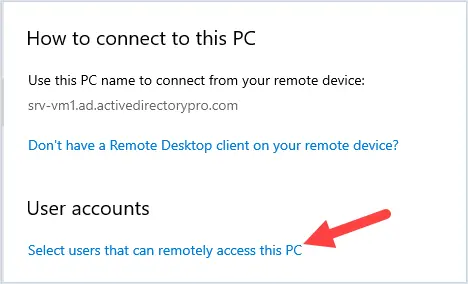
To add or remove user accounts click on “select users that can remotely access this PC”.
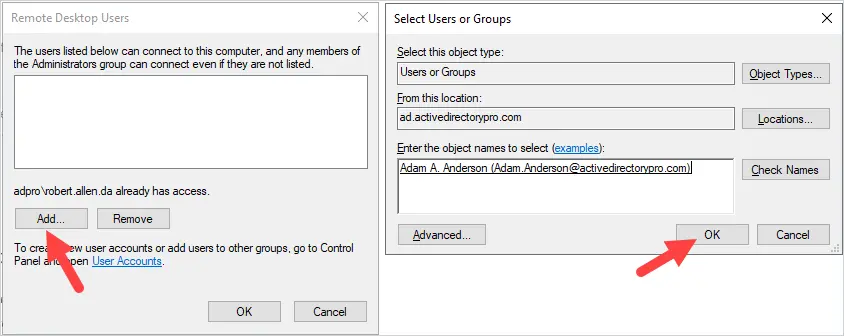
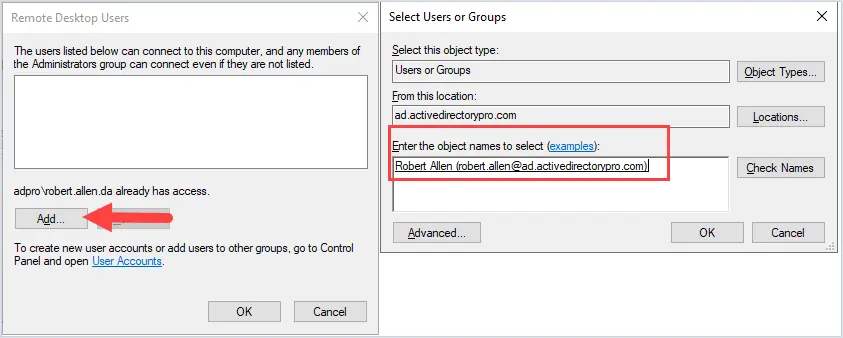
To add a user click the Add button and search for the username.
In this example, I’m going to add a user Adam A. Anderson.
Tip. I recommend creating a domain group to allow RDP access. This will make it easier to manage and audit RDP access.
That was the last step, remote desktop is now enabled.
Let’s test the connection.
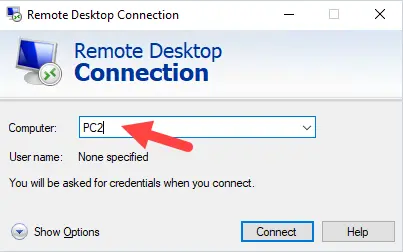
From PC1 I open Remote Desktop Connection and enter PC2.
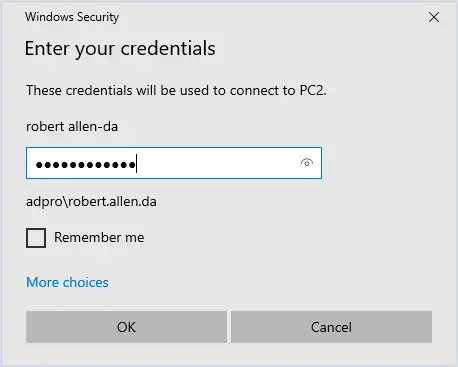
I am prompted to enter credentials.
Success!
I now have a remote desktop connection to PC2.
In the screenshot below you can see I’m connected via console to PC1 and I have a remote desktop connection open to PC2.
Damware Mini Remote Control
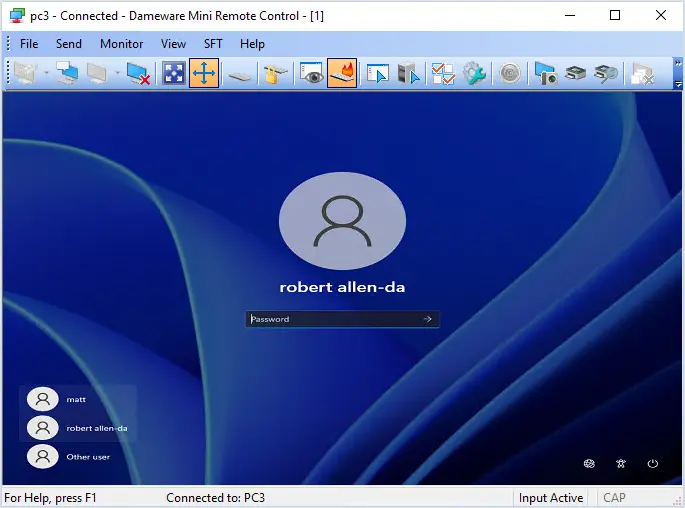
Multiple monitor support. Reboot and wake sleeping computers remotely.
Remote access to Windows, Linux, and Mac OS X operating systems. In session chat, remote screenshot, file transfer, and more.
Download 14 Day Free Trial
Enable Remote Desktop on Windows 11
In this example, I’ll enable remote desktop on my Windows 11 computer (PC3).
Step 1. Enable Remote Desktop
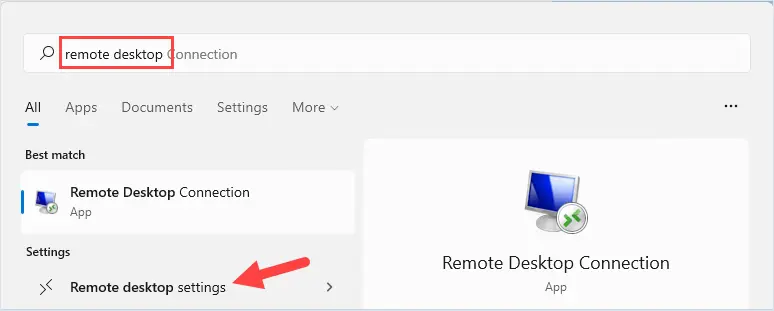
Click on search.

Enter “remote desktop” and click on “Remote desktop settings”
Click the slider to enable remote desktop. You will get a popup to confirm.
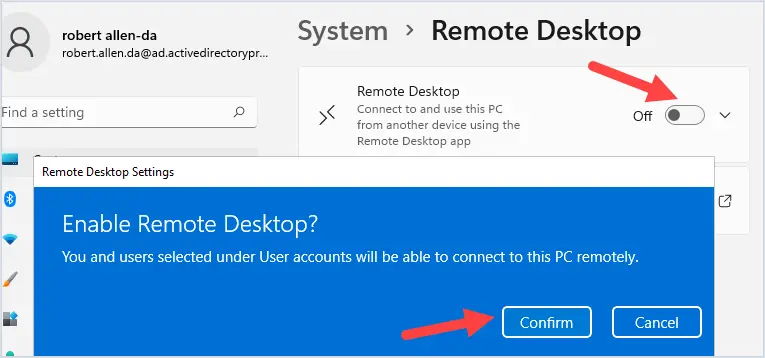
Click the down arrow and verify “Require devices to use Network Level Authentication to connect” is enabled.
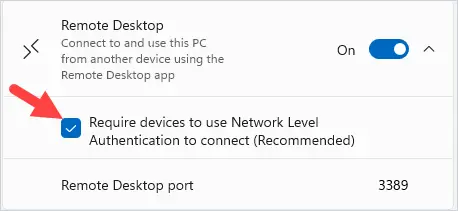
Remote Desktop is now enabled. In the next step, you will select which users are allowed to use remote desktop.
Step 2. Remote Desktop Users
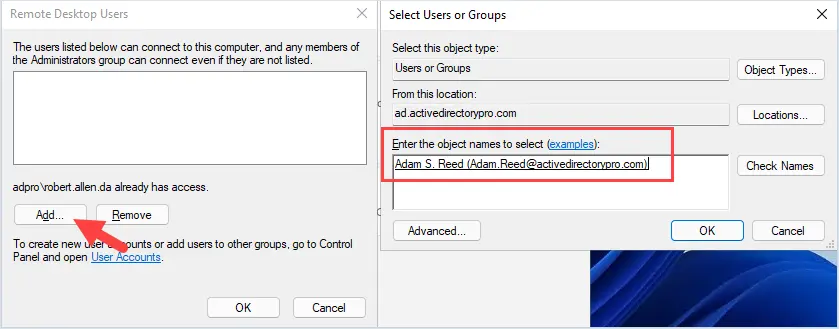
By default, only members of the local administrators group can use remote desktop. To add additional users follow these steps.
Click on “Remote Desktop users”
Click on add and search or enter a user to add. In this example, I’ll add the user adam.reed.
Now I’ll test if remote desktop is working.
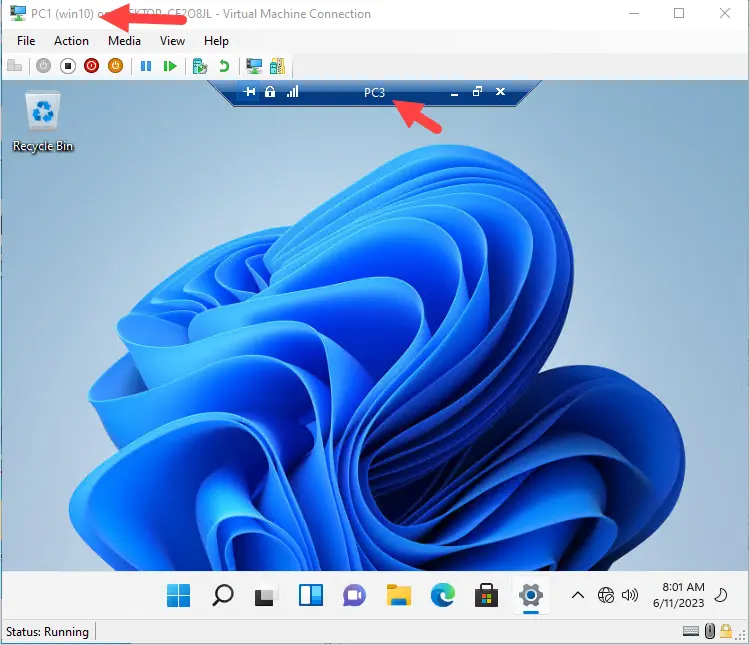
From my workstation PC1 I’ll create a remote desktop connection to PC3 (windows 11).
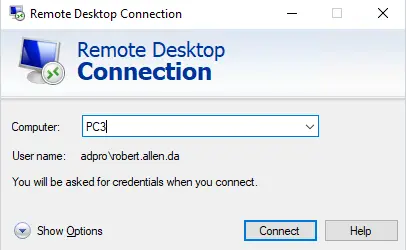
Enter the password to connect.
The connection is good!
You can see in the screenshot below I’m on the console of PC1 and I have a remote desktop connection to PC3 that is running Windows 11.
Enable Remote Desktop on Windows Server
In this example, I’ll enable remote desktop on Windows Server 2022.
Step 1. Enable Remote Desktop.
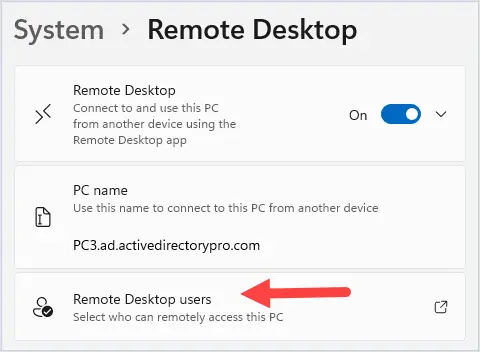
Right click the start menu and select System.
On the settings screen under related settings click on “Remote desktop”.
Click the slider button to enable remote desktop.
You will get a popup to confirm that you want to enable Remote desktop. Click confirm.
Click on Advanced settings.
Make sure “Require computers to use Network level Authentication to connect” is enabled.
Remote desktop is now enabled, the next step is to select users that can remotely access the PC.
Step 2. Select User accounts
By default, only members of the local administrators group will be allowed to connect using remote desktop.
To add additional users click on click on “select users that can remotely access this pc”.
Next, click add then enter or search for users to add. In this example, I’ll add the user robert.allen. Click ok.
Now I’ll test if remote desktop is working on my Windows 2022 server.
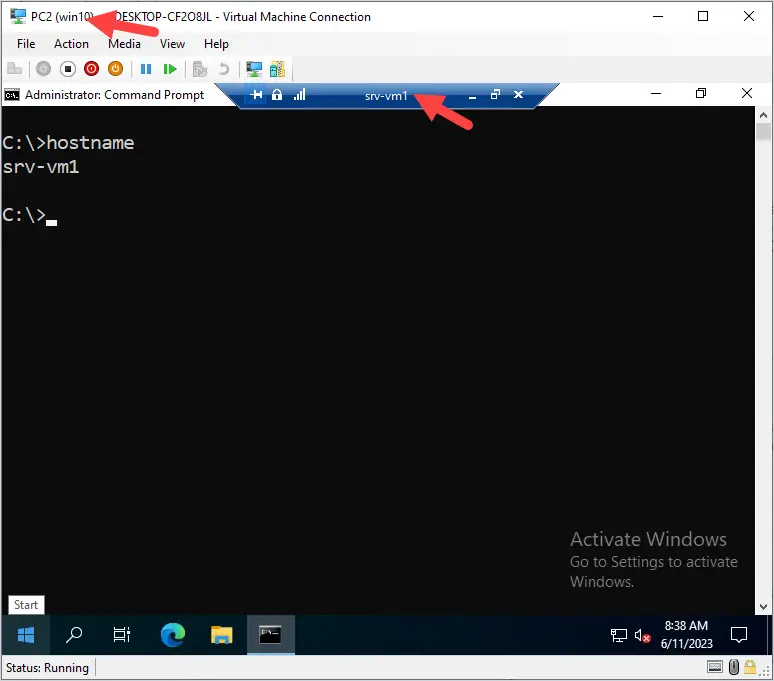
From my workstation (pc2) I open the remote desktop connection client and enter srv-vm1and click connect. Enter my username and password and click ok.
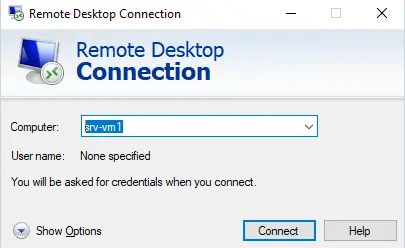
Awesome, it works!
I’ve established a remote session to my Windows 2022 server from my Windows 10 computer.
PowerShell Enable Remote Desktop
To enable Remote Desktop using PowerShell use the command below. This will enable RDP on the local computer.
Set-ItemProperty -Path 'HKLM:\System\CurrentControlSet\Control\Terminal Server' -name "fDenyTSConnections" -value 0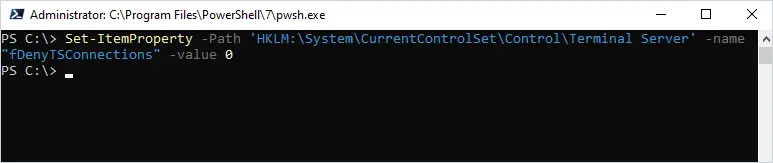
You can use the below PowerShell command to check if remote desktop is enabled.
if ((Get-ItemProperty "hklm:\System\CurrentControlSet\Control\Terminal Server").fDenyTSConnections -eq 0) { write-host "RDP is Enabled" } else { write-host "RDP is NOT enabled" }
To enable remote desktop remotely you can use the invoke-command. This requires PS remoting to be enabled, check out my article on inoke-command examples for more details.
In this example, I’ll enable remote desktop on the remote computer PC2.
invoke-command -ComputerName pc2 -scriptblock {Set-ItemProperty -Path 'HKLM:\System\CurrentControlSet\Control\Terminal Server' -name "fDenyTSConnections" -value 0} 
Group Policy Configuration to allow RDP
If you need to enable and manage the remote desktop settings on multiple computers then you should use Group Policy or intune.
Follow the steps below to create a new GPO.
Step 1. Create a new GPO
Open the group policy management console and right click the OU or root domain to create a new GPO.
In this example, I’m going to create a new GPO on my ADPPRO Computers OU, this OU has all my client computers.
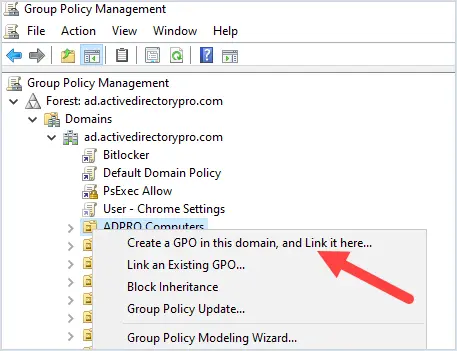
Give the GPO a name.
Edit the GPO and browse to the following policy setting.
Computer Configuration -> Policies -> Administrative Templates -> Windows Components -> Remote Desktop Services -> Remote Desktop Session Host -> Connections;
Enable the policy setting -> Allow users to connect remotely by using Remote Desktop Services
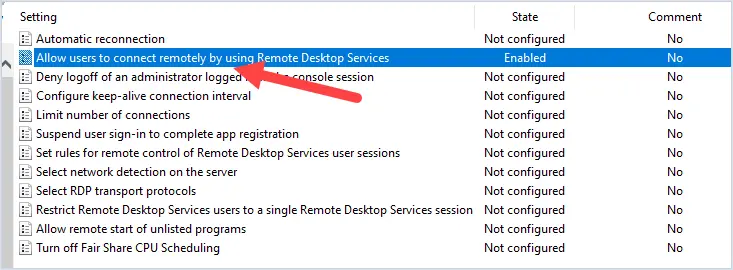
That is the only policy setting that needs to be enabled to allow remote desktop
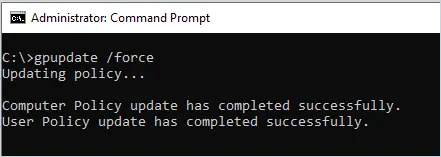
Step 2. Update Computer GPO
The GPO policies will auto refresh on remote computers every 90 minutes.
To manually update GPO on a computer run the gpupdate command.
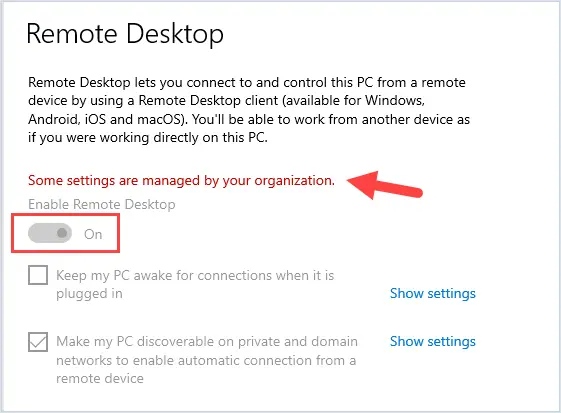
When remote desktop is managed with group policy the settings will be greyed out. This will allow you to have consistent settings across all your computers. It will also prevent users or the helpdesk from modifying the settings.
That’s a wrap.
I just showed you several ways to enable remote desktop on Windows computers. If you are using Active Directory with domain joined computers then enabling RDP via group policy is the best option.
Related Articles
- 5 Best Remote Desktop Connection Managers
Estimated reading: 3 minutes
998 views
RDP (Remote Desktop Protocol) is the protocol that allows a user to connect to a Windows Server through a graphical interface over any network.
In fact, there are several ways to enable Remote Desktop on Windows Server 2019 and 2022. So you can choose one of them that is suitable for you to enable RDP on Server 2019. After RDP is enabled, you can access the remote server from your local device
Method 1. Enable Server 2019 RDP from Server Manager
- Step 1. Click on the Start button and you can see Server Manager.

- Step 2. Click on “Local Server” on the left in Server Manager window. We can see that Remote Desktop is “Disabled”.

- Step 3. Click on the “Disabled” text to open the “System Properties” window, and then locate on the “Remote” tab.

NOTE: The System Properties window can also be accessed from Control Panel option by clicking on System and then on Remote settings in the left panel or from the Windows command prompt by executing the below command.
SystemPropertiesRemote


- Step 4. Tick “Allow remote connections to this computer” in the “Remote Desktop” tab.

- Step 5. You’ll receive a warning message after the above step, click on “OK”

Now, Remote Desktop may still show as “Disabled”; you can refresh or press Control + F5 to refresh to “Enabled”.
Method 2: Using the Command Prompt
- Step 1. Search cmd in the search box to open Command Prompt.
- Step 2.In the Command Prompt window, type the following command and press the enter key: net start termservice

Method 3. Allow Remote Desktop on Win Server 2019 from Powershell
If you can’t enable RDP from Server Manager, you can try to enable Remote Desktop in Windows Server 2019 with Powershell.
- Step 1. Search “PowerShell” in the Search box and then select Run as Administrator.

- Step 2. The registry value that enables/disables Remote Desktop can be modified using the Set-ItemProperty cmdlet
Set-ItemProperty -Path 'HKLM:\System\CurrentControlSet\Control\Terminal Server' -name "fDenyTSConnections" -value 0
- Step 3. Once this is completed, the
Enable-NetFirewallRulecmdlet can be used to set the Windows firewall to allow remote desktop connections.
Enable-NetFirewallRule -DisplayGroup "Remote Desktop"Note:With this method if you want to disable Remote Desktop connection you can change the value 0 to 1
Set-ItemProperty -Path 'HKLM:\System\CurrentControlSet\Control\Terminal Server' -name "fDenyTSConnections" -value 1
Method 4. Using Windows Firewall
- Step1: Press Start and enter firewall.cpl in the text box and press the enter key.
- Step 2.On the Windows Defender Firewall page, click on the Allow an app or feature through the Windows Defender Firewall option.

- Step 3. Click on the Change settings button. Scroll down and tick the Remote Desktop and Remote Desktop (WebSocket) option in the list.

Method 5.Using Group Policy
In addition, Remote Desktop can also be enabled by using Group Policy.
- Step 1. Press Start and enter “gpedit.msc” to open Group Policy .
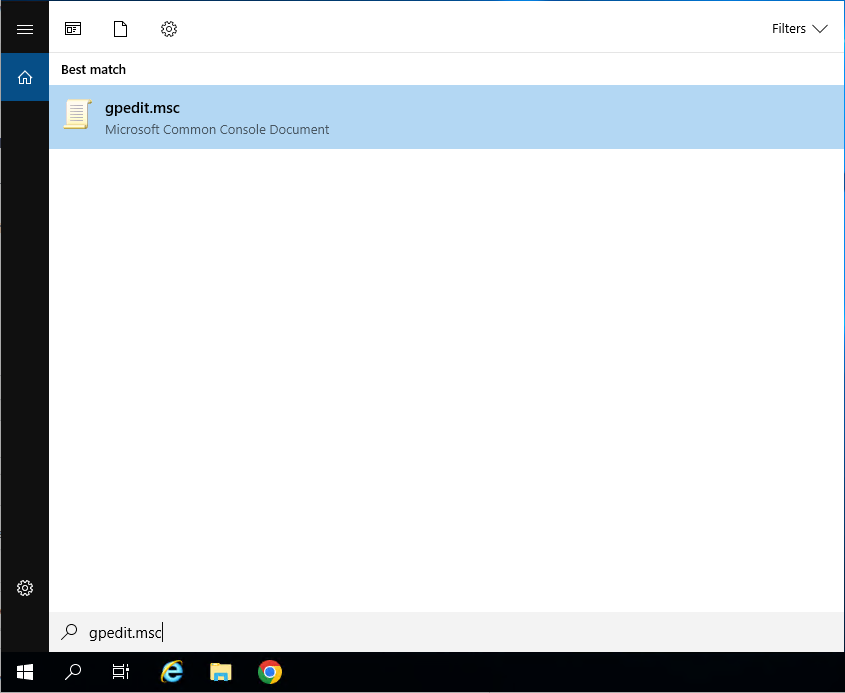
- Step 2. Navigation:
Computer Configuration -> Administrative Templates -> Windows Components -> Remote Desktop Services -> Remote Desktop Session Host\Connections
- Step 3. In the right pane, double click on “ Allow users to connect remotely by using Remote Desktop Services.”

- Step 4. Select “Enabled” and click on “OK”.

There you have it. Once you’ve completed these steps, you’ll be able to use Remote Desktop on Windows Server. You can now enjoy wider connectivity and access to your files, data, and apps.
