
From Wikipedia, the free encyclopedia
| Other names | Terminal Services |
|---|---|
| Developer(s) | Microsoft |
| Operating system | Microsoft Windows |
| Service name | TermService |
| Type | Remote desktop software |
| Website | docs |
Remote Desktop Services (RDS), known as Terminal Services in Windows Server 2008 and earlier,[1] is one of the components of Microsoft Windows that allow a user to initiate and control an interactive session[2] on a remote computer or virtual machine over a network connection.
RDS is Microsoft’s implementation of thin client architecture, where Windows software, and the entire desktop of the computer running RDS, are made accessible to any remote client machine that supports Remote Desktop Protocol (RDP). User interfaces are displayed from the server onto the client system and input from the client system is transmitted to the server — where software execution takes place.[3] This is in contrast to application streaming systems, like Microsoft App-V, in which computer programs are streamed to the client on-demand and executed on the client machine.
RDS was first released in 1998 as Terminal Server in Windows NT 4.0 Terminal Server Edition, a stand-alone edition of Windows NT 4.0 Server that allowed users to log in remotely. Starting with Windows 2000, it was integrated under the name of Terminal Services as an optional component in the server editions of the Windows NT family of operating systems,[4] receiving updates and improvements with each version of Windows.[5] Terminal Services were then renamed to Remote Desktop Services with Windows Server 2008 R2[6] in 2009.
RemoteFX was added to RDS as part of Windows Server 2008 R2 Service Pack 1.
Windows includes four client components that use RDS:
- Quick Assist (Windows 10 and later) and Windows Remote Assistance (Windows XP through Windows 8.1)
- Remote Desktop Connection (RDC)
- Fast user switching
- Windows Subsystem for Linux (via MSRDC)
The first two are individual utilities that allow a user to operate an interactive session on a remote computer over the network. In case of Remote Assistance, the remote user needs to receive an invitation and the control is cooperative. In case of RDC, however, the remote user opens a new session on the remote computer and has every power granted by its user account’s rights and restrictions.[3][7][8] Fast User Switching allows users to switch between user accounts on the local computer without quitting software and logging out. Fast User Switching is part of Winlogon and uses RDS to accomplish its switching feature.[9][10] Third-party developers have also created client software for RDS. For example, rdesktop supports Unix platforms.
Although RDS is shipped with most editions of all versions of Windows NT since Windows 2000,[4] its functionality differs in each version. Windows XP Home Edition does not accept any RDC connections at all, reserving RDS for Fast User Switching and Remote Assistance only. Other client versions of Windows only allow a maximum of one remote user to connect to the system at the cost of the user who has logged onto the console being disconnected. Windows Server allows two users to connect at the same time. This licensing scheme, called «Remote Desktop for Administration», facilitates administration of unattended or headless computers. Only by acquiring additional licenses (in addition to that of Windows) can a computer running Windows Server service multiple remote users at one time and achieve virtual desktop infrastructure.[6][9]
For an organization, RDS allows the IT department to install applications on a central server instead of multiple computers.[11] Remote users can log on and use those applications over the network. Such centralization can make maintenance and troubleshooting easier. RDS and Windows authentication systems prevent unauthorized users from accessing apps or data.
Microsoft has a long-standing agreement with Citrix to facilitate sharing of technologies and patent licensing between Microsoft Terminal Services and Citrix XenApp (formerly Citrix MetaFrame and Citrix Presentation Server). In this arrangement, Citrix has access to key source code for the Windows platform, enabling its developers to improve the security and performance of the Terminal Services platform. In late December 2004 the two companies announced a five-year renewal of this arrangement to cover Windows Vista.[12]
The key server component of RDS is Terminal Server (termdd.sys), which listens on TCP port 3389. When a Remote Desktop Protocol (RDP) client connects to this port, it is tagged with a unique SessionID and associated with a freshly spawned console session (Session 0, keyboard, mouse and character mode UI only). The login subsystem (winlogon.exe) and the GDI graphics subsystem is then initiated, which handles the job of authenticating the user and presenting the GUI. These executables are loaded in a new session, rather than the console session. When creating the new session, the graphics and keyboard/mouse device drivers are replaced with RDP-specific drivers: RdpDD.sys and RdpWD.sys. The RdpDD.sys is the device driver and it captures the UI rendering calls into a format that is transmittable over RDP. RdpWD.sys acts as keyboard and mouse driver; it receives keyboard and mouse input over the TCP connection and presents them as keyboard or mouse inputs. It also allows creation of virtual channels, which allow other devices, such as disc, audio, printers, and COM ports to be redirected, i.e., the channels act as replacement for these devices. The channels connect to the client over the TCP connection; as the channels are accessed for data, the client is informed of the request, which is then transferred over the TCP connection to the application. This entire procedure is done by the terminal server and the client, with the RDP mediating the correct transfer, and is entirely transparent to the applications.[13] RDP communications are encrypted using 128-bit RC4 encryption. From Windows Server 2003 onwards, it can use a FIPS 140 compliant encryption scheme, or encrypt communications using the Transport Layer Security standard.[3][14]
Once a client initiates a connection and is informed of a successful invocation of the terminal services stack at the server, it loads up the device as well as the keyboard/mouse drivers. The UI data received over RDP is decoded and rendered as UI, whereas the keyboard and mouse inputs to the Window hosting the UI is intercepted by the drivers, and transmitted over RDP to the server. It also creates the other virtual channels and sets up the redirection. RDP communication can be encrypted; using either low, medium or high encryption. With low encryption, user input (outgoing data) is encrypted using a weak (40-bit RC4) cipher. With medium encryption, UI packets (incoming data) are encrypted using this weak cipher as well. The setting «High encryption (Non-export)» uses 128-bit RC4 encryption and «High encryption (Export)» uses 40-bit RC4 encryption.[15] When setting the Security Layer to ‘SSL (TLS 1.0)’, Transport Layer Security up to version 1.2 is available.[16]
Terminal Server is the server component of Terminal services. It handles the job of authenticating clients, as well as making the applications available remotely. It is also entrusted with the job of restricting the clients according to the level of access they have. The Terminal Server respects the configured software restriction policies, so as to restrict the availability of certain software to only a certain group of users. The remote session information is stored in specialized directories, called Session Directory which is stored at the server. Session directories are used to store state information about a session, and can be used to resume interrupted sessions. The terminal server also has to manage these directories. Terminal Servers can be used in a cluster as well.[3]
In Windows Server 2008, it has been significantly overhauled. While logging in, if the user logged on to the local system using a Windows Server Domain account, the credentials from the same sign-on can be used to authenticate the remote session. However, this requires Windows Server 2008 to be the terminal server OS, while the client OS is limited to Windows Server 2008, Windows Vista and Windows 7. In addition, the terminal server may be configured to allow connection to individual programs, rather than the entire desktop, by means of a feature named RemoteApp. Terminal Services Web Access (TS Web Access) makes a RemoteApp session invocable from the web browser. It includes the TS Web Access Web Part control which maintains the list of RemoteApps deployed on the server and keeps the list up to date. Terminal Server can also integrate with Windows System Resource Manager to throttle resource usage of remote applications.[5]
Terminal Server is managed by the Terminal Server Manager Microsoft Management Console snap-in. It can be used to configure the sign in requirements, as well as to enforce a single instance of remote session. It can also be configured by using Group Policy or Windows Management Instrumentation. It is, however, not available in client versions of Windows OS, where the server is pre-configured to allow only one session and enforce the rights of the user account on the remote session, without any customization.[3]
Remote Desktop Gateway
[edit]
The Remote Desktop Gateway service component, also known as RD Gateway, can tunnel the RDP session using a HTTPS channel.[17] This increases the security of RDS by encapsulating the session with Transport Layer Security (TLS).[18] This also allows the option to use Internet Explorer as the RDP client. The official MS RDP client for macOS supports RD Gateway as of version 8. This is also available for iOS and Android.
This feature was introduced in the Windows Server 2008 and Windows Home Server products.
In October 2021, Thincast, the main contributor of the FreeRDP project, published the first Remote Desktop Gateway solution running natively on Linux.[19]
- Remote Desktop Gateway
- Enables authorized users to connect to virtual desktops, Remote-App programs, and session-based desktops over a private network or the Internet.
- Remote Desktop Connection Broker Role
- Allows users to reconnect to their existing virtual desktop, RemoteApp programs, and session-based desktops. It enables even load distribution across RD Session Host servers in a session collection or across pooled virtual desktops in a pooled virtual desktop collection, and provides access to virtual desktops in a virtual desktop collection.
- Remote Desktop Session Host
- Enables a server to host RemoteApp programs as session-based desktops. Users can connect to RD Session Host servers in a session collection to run programs, save files, and use resources on those servers. Users can access Remote Desktop Session Host server by using the Remote Desktop Connection client or by using RemoteApp programs.
- Remote Desktop Virtualization Host
- Enables users to connect to virtual desktops by using RemoteApp and Desktop Connection.
- Remote Desktop Web Access
- Enables users to access RemoteApp and Desktop Connection through the Start Menu or through a web browser. RemoteApp and Desktop Connection provides users with a customized view of RemoteApp programs, session-based desktops, and virtual desktops.
- Remote Desktop Licensing
- Enables a server to manage RDS client access licenses (RDS CALs) that are required for each device or user to connect to a Remote Desktop Session Host server. RDS CALs are managed using the Remote Desktop Licensing Manager application.[20]
RemoteApp (or TS RemoteApp) is a special mode of RDS, available in Windows Server 2008 R2 and later, where remote session configuration is integrated into the client operating system. The RDP 6.1 client ships with Windows XP SP3, KB952155 for Windows XP SP2 users,[21] Windows Vista SP1 and Windows Server 2008. The UI for the RemoteApp is rendered in a window over the local desktop, and is managed like any other window for local applications. The end result of this is that remote applications behave largely like local applications. The task of establishing the remote session, as well as redirecting local resources to the remote application, is transparent to the end user.[22] Multiple applications can be started in a single RemoteApp session, each with their own windows.[23]
A RemoteApp can be packaged either as a .rdp file or distributed via an .msi Windows Installer package. When packaged as an .rdp file (which contains the address of the RemoteApp server, authentication schemes to be used, and other settings), a RemoteApp can be launched by double clicking the file. It will invoke the Remote Desktop Connection client, which will connect to the server and render the UI. The RemoteApp can also be packaged in a Windows Installer database, installing which can register the RemoteApp in the Start menu as well as create shortcuts to launch it. A RemoteApp can also be registered as handler for file types or URIs. Opening a file registered with RemoteApp will first invoke Remote Desktop Connection, which will connect to the terminal server and then open the file. Any application which can be accessed over Remote Desktop can be served as a RemoteApp.[22][24]
Windows 7 includes built-in support for RemoteApp publishing, but it has to be enabled manually in registry, since there is no RemoteApp management console in client versions of Microsoft Windows.[25]
Windows Desktop Sharing
[edit]
In Windows Vista onwards, Terminal Services also includes a multi-party desktop sharing capability known as Windows Desktop Sharing. Unlike Terminal Services, which creates a new user session for every RDP connection, Windows Desktop Sharing can host the remote session in the context of the currently logged in user without creating a new session, and make the Desktop, or a subset of it, available over RDP.[26] Windows Desktop Sharing can be used to share the entire desktop, a specific region, or a particular application.[27] Windows Desktop Sharing can also be used to share multi-monitor desktops. When sharing applications individually (rather than the entire desktop), the windows are managed (whether they are minimized or maximized) independently at the server and the client side.[27]
The functionality is only provided via a public API, which can be used by any application to provide screen sharing functionality. Windows Desktop Sharing API exposes two objects: RDPSession for the sharing session and RDPViewer for the viewer. Multiple viewer objects can be instantiated for one Session object. A viewer can either be a passive viewer, who is just able to watch the application like a screencast, or an interactive viewer, who is able to interact in real time with the remote application.[26] The RDPSession object contains all the shared applications, represented as Application objects, each with Window objects representing their on-screen windows. Per-application filters capture the application Windows and package them as Window objects.[28] A viewer must authenticate itself before it can connect to a sharing session. This is done by generating an Invitation using the RDPSession. It contains an authentication ticket and password. The object is serialized and sent to the viewers, who need to present the Invitation when connecting.[26][28]
Windows Desktop Sharing API is used by Windows Meeting Space and Windows Remote Assistance for providing application sharing functionality among network peers.[27]
Network Level Authentication
[edit]
Network Level Authentication (NLA) is a feature of RDP Server or Remote Desktop Connection (RDP Client) that requires the connecting user to authenticate themselves before a session is established with the server.
Originally, if a user opened an RDP (remote desktop) session to a server it would load the login screen from the server for the user. This would use up resources on the server, and was a potential area for denial of service attacks as well as remote code execution attacks (see BlueKeep). Network Level Authentication delegates the user’s credentials from the client through a client-side Security Support Provider and prompts the user to authenticate before establishing a session on the server.
Network Level Authentication was introduced in RDP 6.0 and supported initially in Windows Vista. It uses the new Security Support Provider, CredSSP, which is available through SSPI in Windows Vista. With Windows XP Service Pack 3, CredSSP was introduced on that platform and the included RDP 6.1 Client supports NLA; however CredSSP must be enabled in the registry first.[29][30]
The advantages of Network Level Authentication are:
- It requires fewer remote computer resources initially, by preventing the initiation of a full remote desktop connection until the user is authenticated, reducing the risk of denial-of-service attacks.
- It allows NT Single sign-on (SSO) to extend to RDP Services.
- It can help mitigate Remote Desktop vulnerabilities that can only be exploited prior to authentication. [31]
- No support for other credential providers
- To use Network Level Authentication in Remote Desktop Services, the client must be running Windows XP SP3 or later, and the host must be running Windows Vista or later [32] or Windows Server 2008 or later.
- Support for RDP Servers requiring Network Level Authentication needs to be configured via registry keys for use on Windows XP SP3.
- Not possible to change password via CredSSP. This is a problem when «User must change password at next logon» is enabled or if an account’s password expires.
- Requires «Access this computer from the network» privilege, which may be restricted for other reasons.
- The IP addresses of the clients trying to log in will not be stored in the security audit logs, making it harder to block brute force or dictionary attacks by means of a firewall.
- Smart card authentication from one domain to another using a remote desktop gateway is not supported with NLA enabled on the end client.
Remote Desktop Connection is a primary client for Remote Desktop Services. RDC presents the desktop interface (or application GUI) of the remote system, as if it were accessed locally.[33] Microsoft Remote Desktop was created in 2012 by Microsoft as a client with a touch-friendly interface. Additionally, several non-Microsoft clients exist.
- BlueKeep (security vulnerability)
- Windows MultiPoint Server
- Microsoft NetMeeting, a discontinued Microsoft product also provides Shared-desktop feature, in the similar time-frame of Windows NT Terminal Services Edition
- Virtual Network Computing
- ^ «Windows Remote Desktop Services spotlight». Retrieved 2010-11-18.
- ^ QuinnRadich (19 August 2020). «Remote Desktop Sessions — Win32 apps». docs.microsoft.com. Retrieved 2022-07-09.
- ^ a b c d e «Technical Overview of Terminal Services in Windows Server 2003». Microsoft. Archived from the original on 2003-01-26. Retrieved 2007-07-23.
- ^ a b «Remote Desktop Connection». PC World. IDG. 17 August 2011.
- ^ a b «Whats new in Terminal Services in Windows Server 2008». Retrieved 2007-07-23.
- ^ a b Russel, Charlie; Zacker, Craig (2009). «4: Remote Desktop Services and VDI: Centralizing Desktop and Application Management» (PDF). Introducing Windows Server 2008 R2. Redmond, WA: Microsoft Press. Archived from the original (PDF) on 29 August 2017. Retrieved 11 January 2014.
- ^
«How to change the listening port for Remote Desktop». Retrieved 2010-11-18. - ^
«Frequently Asked Questions about Remote Desktop». Microsoft. Retrieved 2007-07-23. - ^ a b
Russinovich, Mark; Solomon, David A.; Ionescu, Alex (2012). Windows Internals (6th ed.). Redmond, WA: Microsoft Press. pp. 20–21. ISBN 978-0-7356-4873-9. - ^
«Architecture of Fast User Switching». Support. Microsoft. 15 January 2006. Retrieved 11 January 2014. - ^ «Remote Services». Log me in 123.
- ^ «Citrix and Microsoft Sign Technology Collaboration and Licensing Agreement». Citrix. 2004-12-21. Archived from the original on 2011-07-05. Retrieved 2012-04-13.
- ^
«How Terminal Services Works». Microsoft. 2003-03-28. Retrieved 2007-07-23. - ^ «Configuring authentication and encryption: Terminal Services». 8 October 2009.
- ^ «Connection Configuration in Terminal Server». Support (5.0 ed.). Microsoft. 22 June 2014.
- ^ «Incorrect TLS is displayed — Windows Server». 5 June 2024.
- ^ «Terminal Services Gateway (TS Gateway)». Microsoft TechNet. Retrieved 2009-09-10.
- ^ «Remote Desktop Protocol». Microsoft Developer Network (MSDN). Retrieved 2009-09-10.
- ^ «RD Gateway Documentation». Thincast. Retrieved 2021-10-17.
- ^ TechNet: Remote Desktop Licensing
- ^ «Description of the Remote Desktop Connection 6.1 client update for Terminal Services in Windows XP Service Pack 2». Retrieved 2010-11-18.
- ^ a b «Terminal Services RemoteApp (TS RemoteApp)». Retrieved 2007-07-23.
- ^ «Terminal Services RemoteApp Session Termination Logic». Retrieved 2007-10-02.
- ^ «Create a RemoteApp and use it on another computer». GitHub. 2024-01-11. Retrieved 2025-05-08.
- ^ «How to enable RemoteApp (via RDP 7.0) within VirtualBox or VMWare running Windows 7, Vista SP1+ or Windows XP SP3». Retrieved 2010-11-18.
- ^ a b c «Windows Desktop Sharing». Retrieved 2007-10-11.
- ^ a b c «Windows Desktop Sharing API». Retrieved 2007-10-11.
- ^ a b «About Windows Desktop Sharing». Retrieved 2007-10-11.
- ^ «Description of the Credential Security Support Provider (CredSSP) in Windows XP Service Pack 3». Archived from the original on 2017-09-18.
- ^ «Description of the Remote Desktop Connection 6.1 client update for Terminal Services». Microsoft. 2011-09-23. Retrieved 2020-05-07.
- ^ Simon Pope (2019-05-14). «Prevent a worm by updating Remote Desktop Services (CVE-2019-0708)». Microsoft Security Response Center. Retrieved 2020-05-07.
- ^ «Configure Network Level Authentication for Remote Desktop Services Connections». Microsoft TechNet. 2009-11-17. Retrieved 2020-05-07.
- ^ «Technical Overview of Terminal Services in Windows Server 2003». Microsoft. Archived from the original on 2003-01-26. Retrieved 2007-07-23.
- Welcome to Remote Desktop Services
- «Configure Network Level Authentication for Remote Desktop Services Connections». Microsoft TechNet. 17 November 2009.
- «What types of Remote Desktop connections should I allow?». Microsoft Corporation. Archived from the original on 2016-06-08.
RDP (Remote Desktop Protocol) – это протокол или технический стандарт, который применяется для организации удалённой работы пользователя с сервером.
Клиенты существуют практически для всех версий Windows (включая Windows CE, Phone и Mobile), Linux, FreeBSD, Mac OS X, iOS, Android, Symbian.
В этой статье мы предлагаем вам рассмотреть RDP windows server через призму облачного сервера от SIM-Networks. Мы покажем, как легко подключиться к удаленному серверу, проведем вас через каждый шаг.
Подготовительный этап
Чтобы начать работу с RDP, вам потребуется сервер или облачное решение с предустановленной операционной системой Windows. Каждая ОС имеет свои минимальные требования к вычислительным мощностям. С учетом того, что RDP часто используется для рабочих задач, важно, чтобы сервер соответствовал этим требованиям. Наши облачные серверы обеспечивают достаточные вычислительные ресурсы для эффективной работы и автоматическое резервное копирование данных.
В этой инструкции установку службы удаленных рабочих столов мы реализуем с помощью облака SIM-Networks с процессором Intel Xeon с 4 ядрами, 16 ГБ оперативной памяти и хранилищем 100 Гб (пакет Marin).
Для доступа к вашему облачному серверу вы получите по электронной почте уникальный логин и пароль. Эти учетные данные необходимы для подключения к облачной панели управления.
Чтобы подключится к вашему облачному серверу, просто перейдите на нашу веб-платформу и введите предоставленные учетные данные.
Для тех, кто предпочитает визуальное руководство, мы также предлагаем видеоинструкцию по подключению к облачному серверу по RDP.
Установка роли RDP на сервер Windows происходит в два этапа: вначале устанавливается служба удаленных рабочих столов, после этого определяем сервер лицензирования.
1. Установка службы удаленных рабочих столов
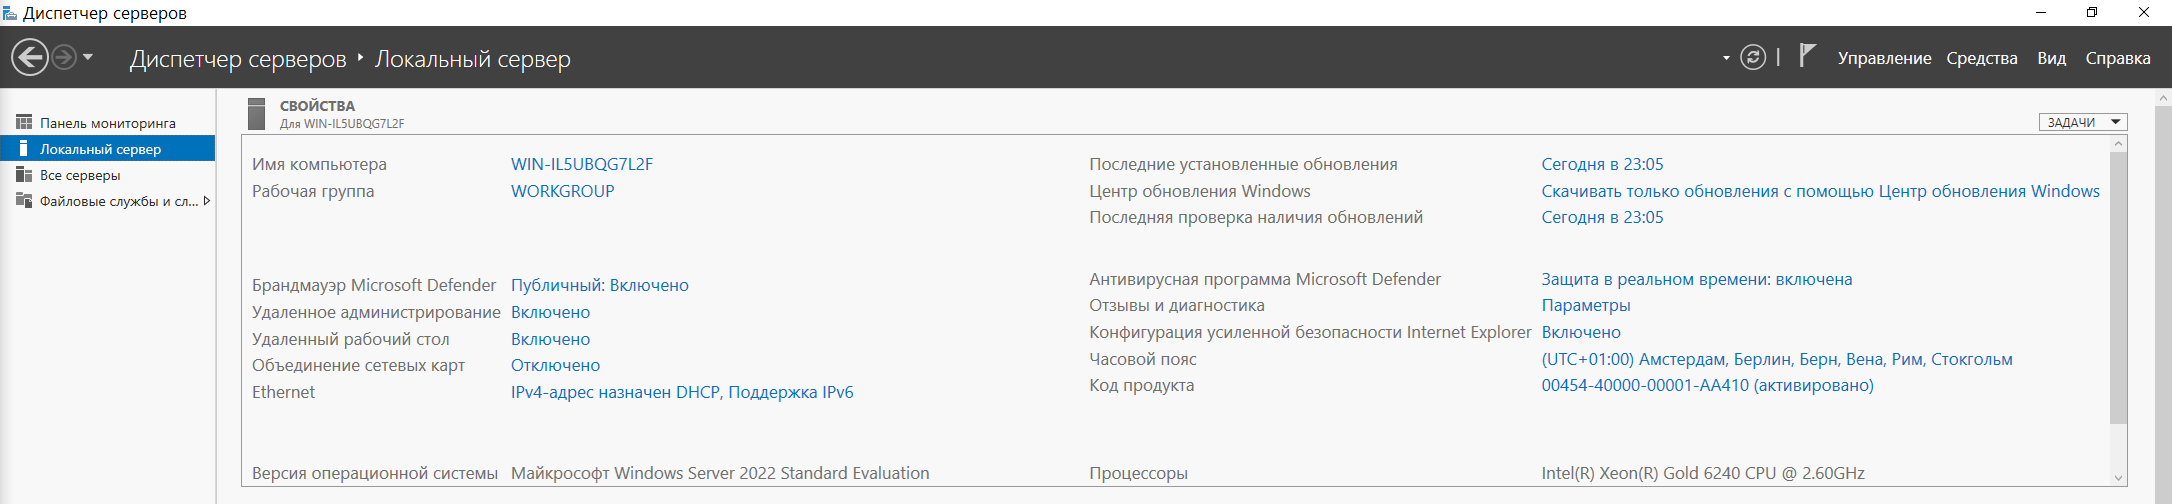
Перед началом настроек необходимо установить имя самого сервера:
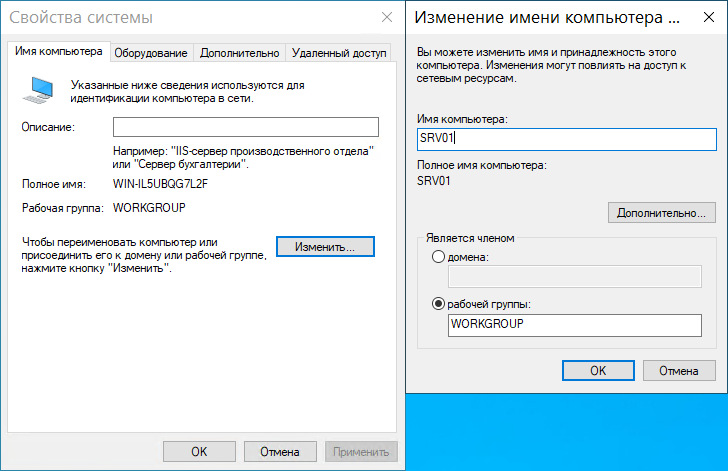
Пуск → Диспетчер серверов → Локальный сервер → Выполнить нажатие на текущее имя компьютера для его изменения.
Попав после этого на страницу Свойства системы нажимаем кнопку Изменить, после чего переходим на страницу изменения имени компьютера. Указываем желаемое имя, жмем ОК. В результате получаем системное сообщение о том, что для применения новой настройки понадобится перезагрузка. Перезагрузку можно выполнить как сразу, так и позже самостоятельно.
После перезагрузки сервера мы можем приступить непосредственно к установке службы каталогов Active Directory:
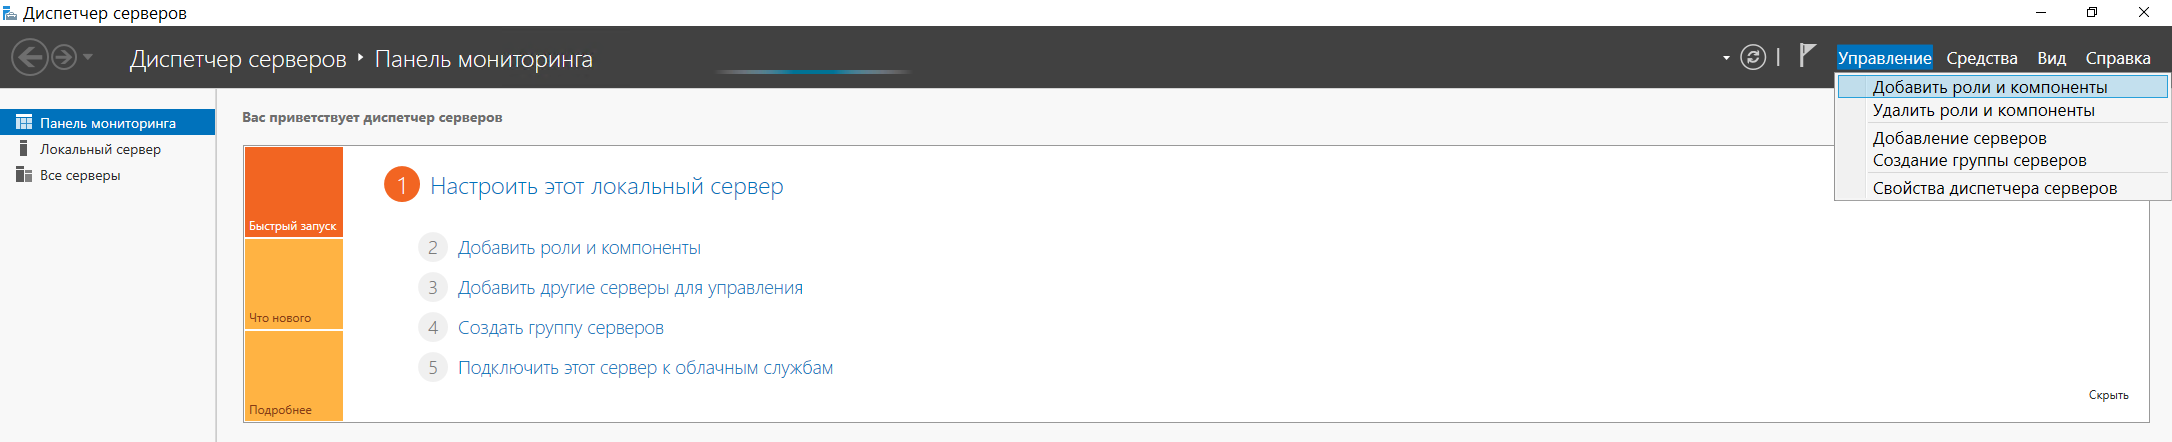
Пуск → Диспетчер сервервов → Добавить роли и компоненты:

В открывшемся диалоговом окне выберем пункт Установка ролей и компонентов:
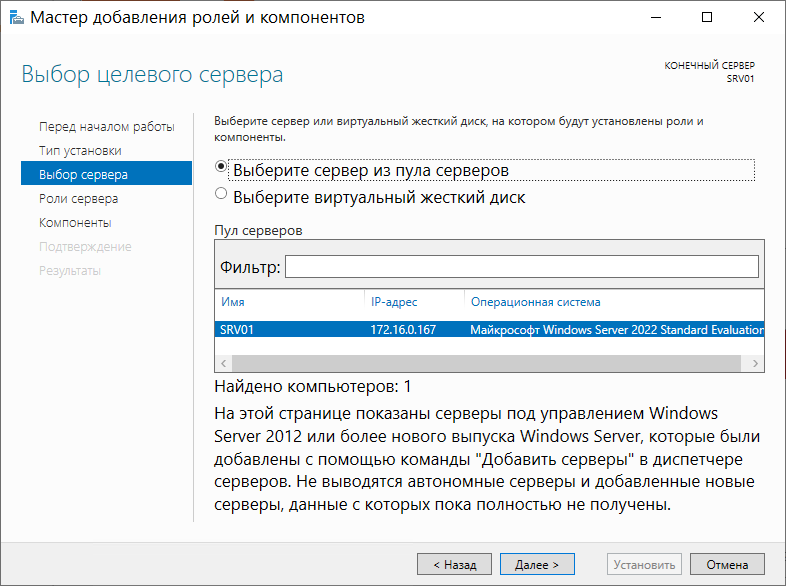
Далее необходимо выбрать сервер, на который мы будем производить установку роли AD. Из списка Пул серверов выбираем наш сервер SRV01 и жмем Далее:
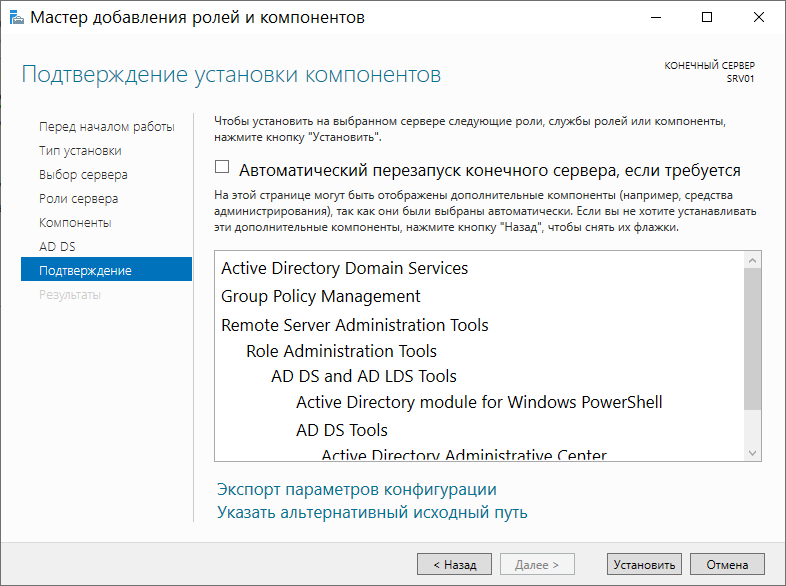
Затем появится список доступных ролей для установки на наш сервер. В данном случае нас интересует роль с названием Доменные службы Active Directory. Отметив этот пункт, мы откроем список всех необходимых компонентов, которые будут установлены для базового функционирования роли AD. Также во время выбора ролей для установки можно установить роль DNS-сервера. Во всех оставшихся диалоговых окнах жмем кнопку Далее. На самом последнем этапе жмем Установить для установления роли:
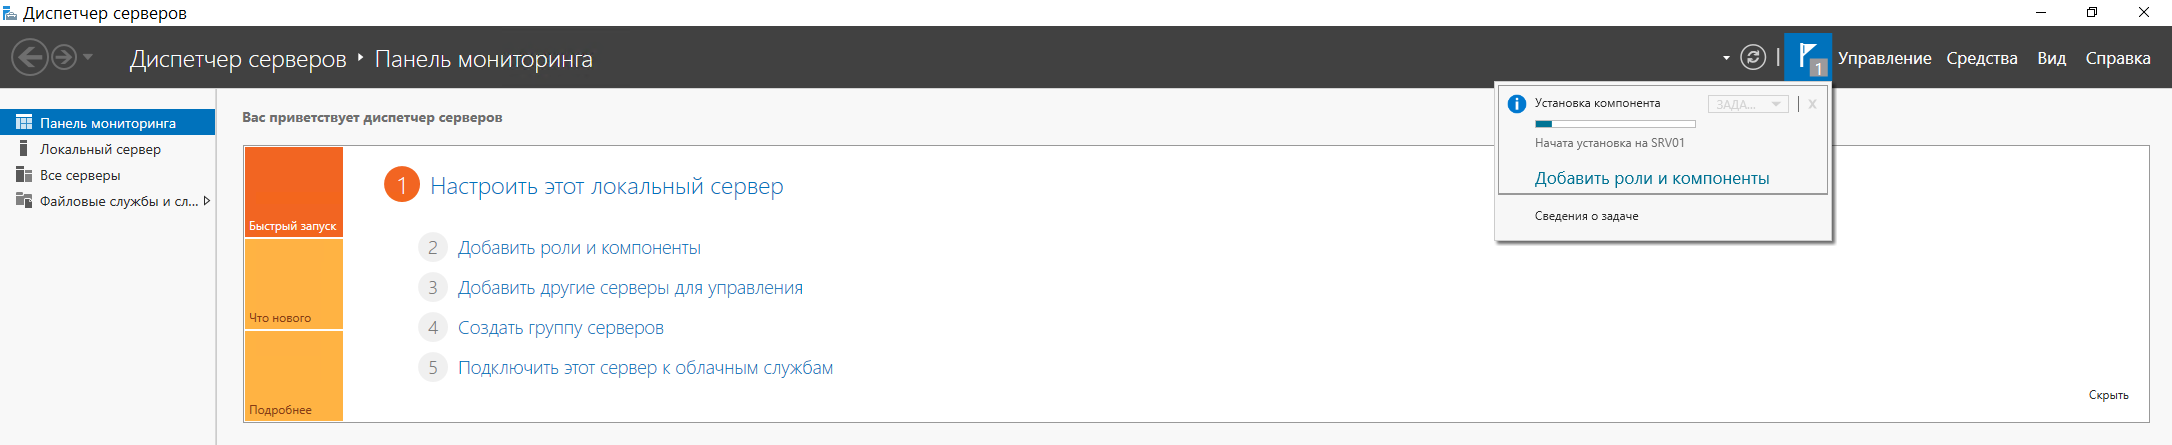
По завершении установки перейдем снова в пункт меню Пуск → Диспетчер серверов → Добавить роли и компоненты. Как и на изображении ниже, после установления новой роли появится иконка в виде желтого треугольника:
Повышаем роль сервера до уровня контроллера домена, нажав одноименную кнопку.
Затем, после выбора пункта Добавить новый лес, указываем название нашего домена и жмем Далее:
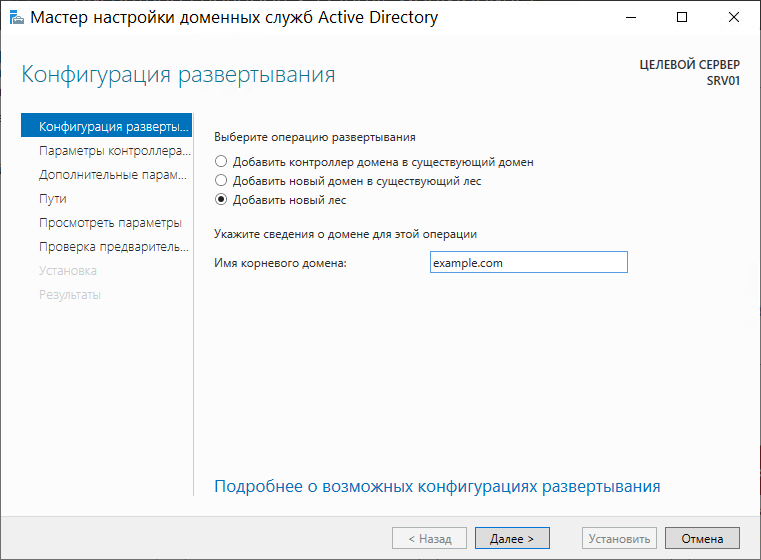
Совместимость работы леса и корневого домена оставляем Windows Server 2012 R2.
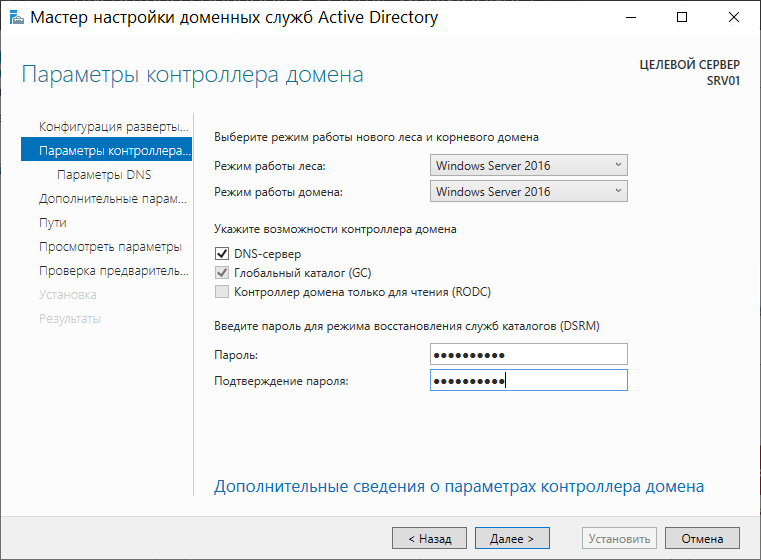
Отмечаем пункты DNS-сервер и Глобальный каталог (GC).
Устанавливаем пароль для восстановления служб каталогов, если в будущем возникнет такая необходимость:
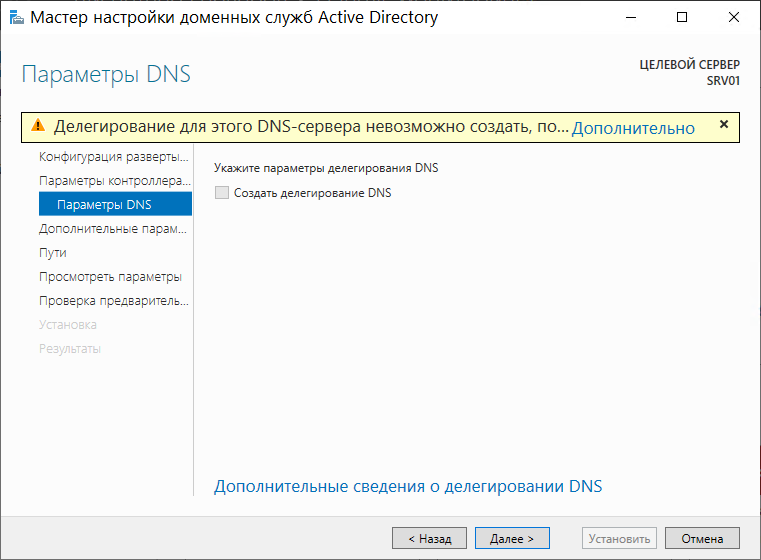
На следующей вкладке мы получим предупреждение о том, что невозможно выполнить делегирование для этого DNS-сервера, игнорируем сообщение и переходим к следующему окну:
На следующей вкладке NetBIOS имя оставляем без изменений:

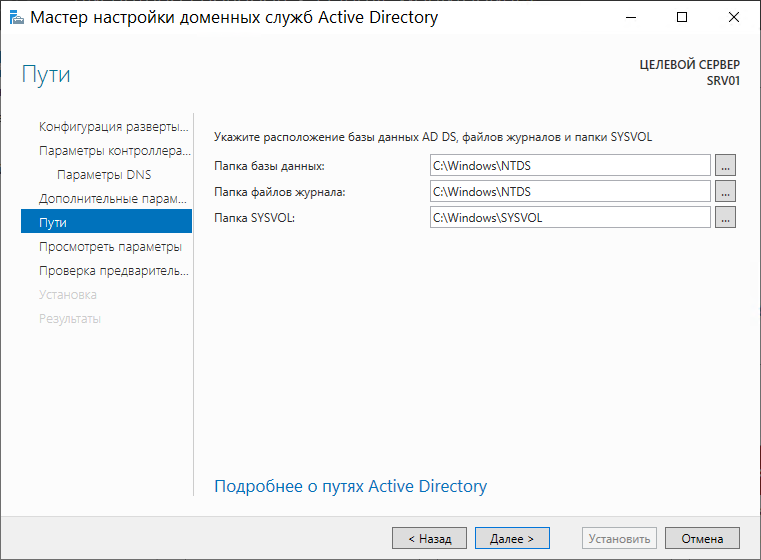
На следующем этапе будут отображены пути к файлам базы, оставляем их также без изменений:
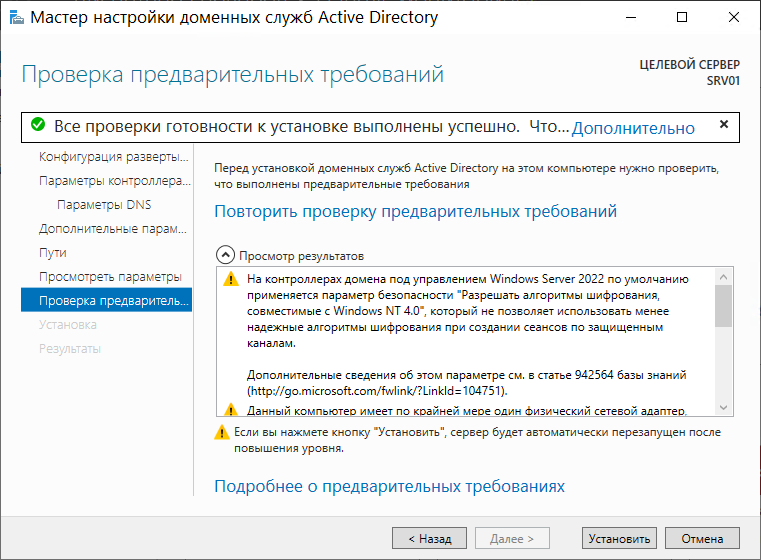
Нажав Далее мы перейдем к списку суммарных настроек, после этого можно переходить непосредственно к этапу самой установки. Буду выполнены автоматические проверки на корректность установленных параметров и настроек, после чего кнопка Установить станет доступной:
По завершении установки сервер будет перезагружен.
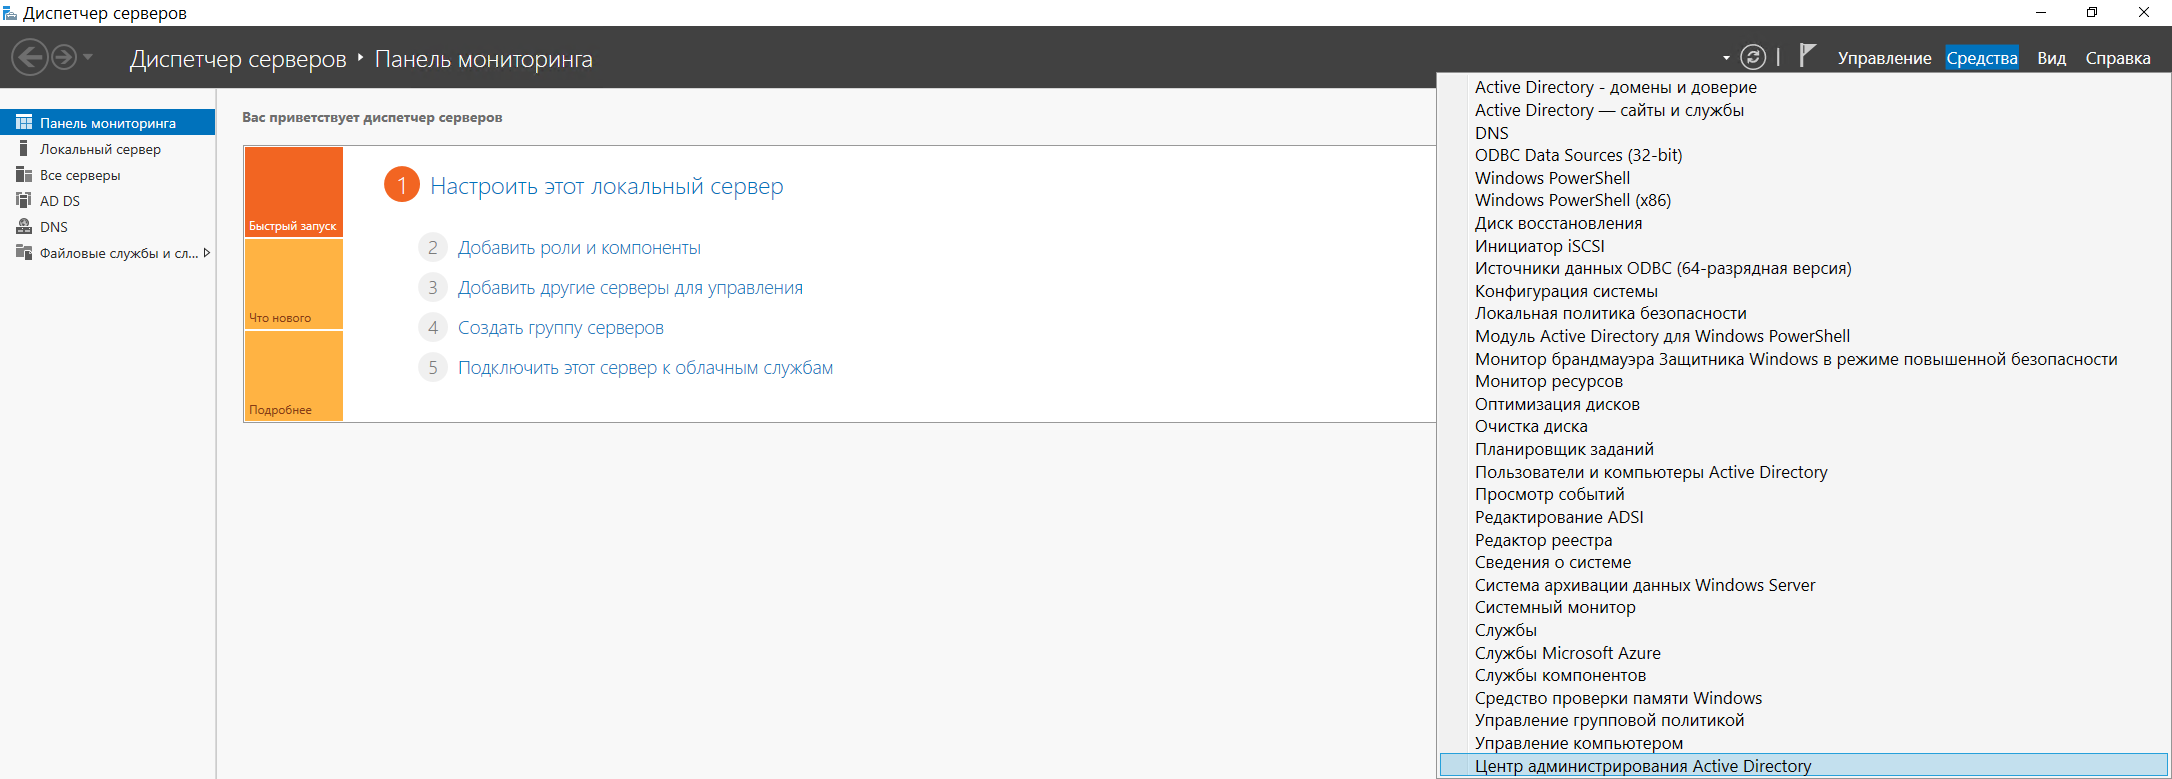
Централизованное управление пользователями, группами, их редактированием, добавлением и удалением теперь можно выполнять через оснастку Центр администрирования Active Directory в меню Диспетчера серверов, с вкладки Средства:
2. Определение сервера лицензирования для службы удаленных рабочих столов
Приступим к установке терминального сервера:
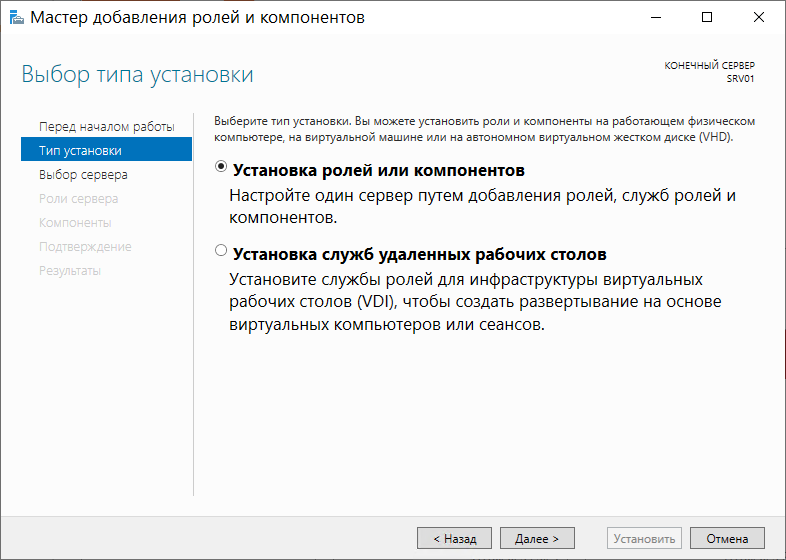
Пуск → Диспетчер серверов → Добавить роли и компоненты. Оставляем на следующем диалоговом окне выбранный пункт Установка ролей и компонентов и переходим далее:

Выбираем в диалоговом окне пункт Выбор целевого сервера и жмем Далее:

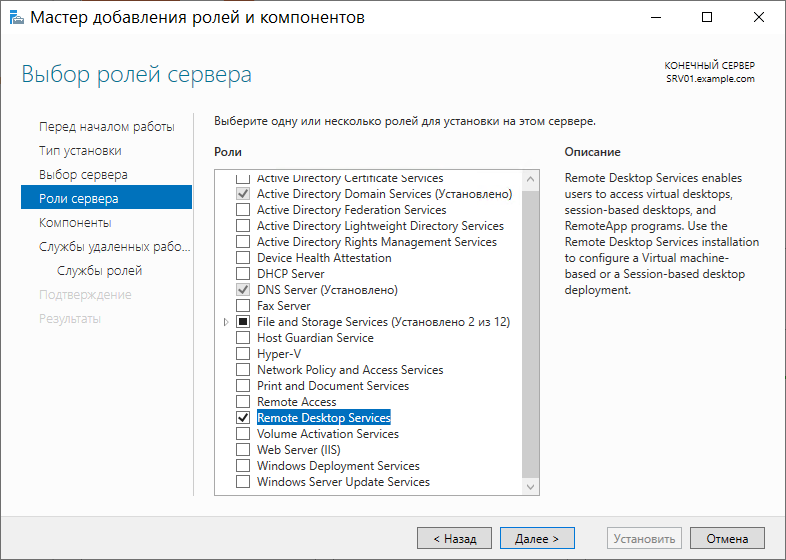
Переходим к выбору конкретной роли для сервера, которую хотим установить. В данном случае – Службы удаленных рабочих столов:
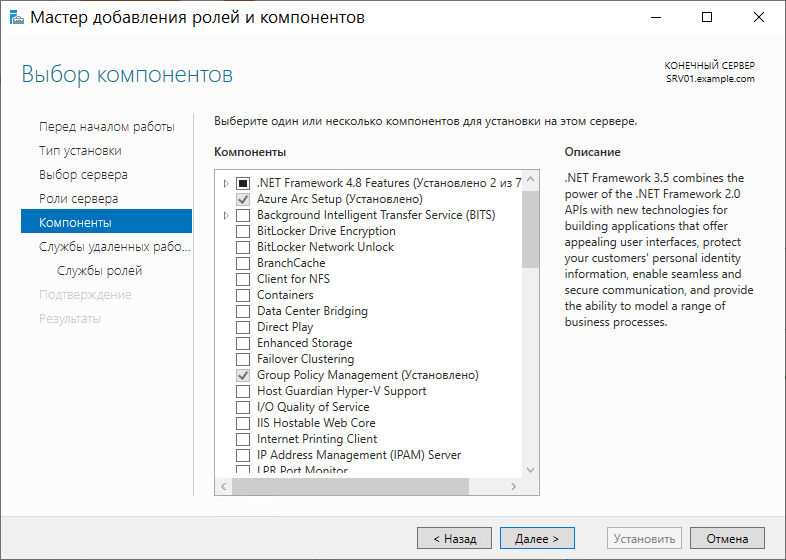
Переходим к следующему окну Компоненты. Оставляем всё как есть, без изменений, и переходим далее:
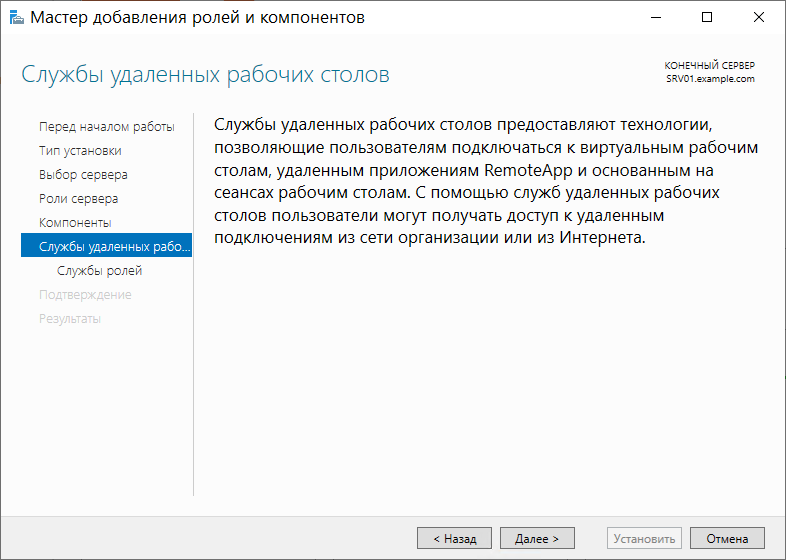
Ознакомимся с описанием службы удаленных рабочих столов и нажимаем Далее:
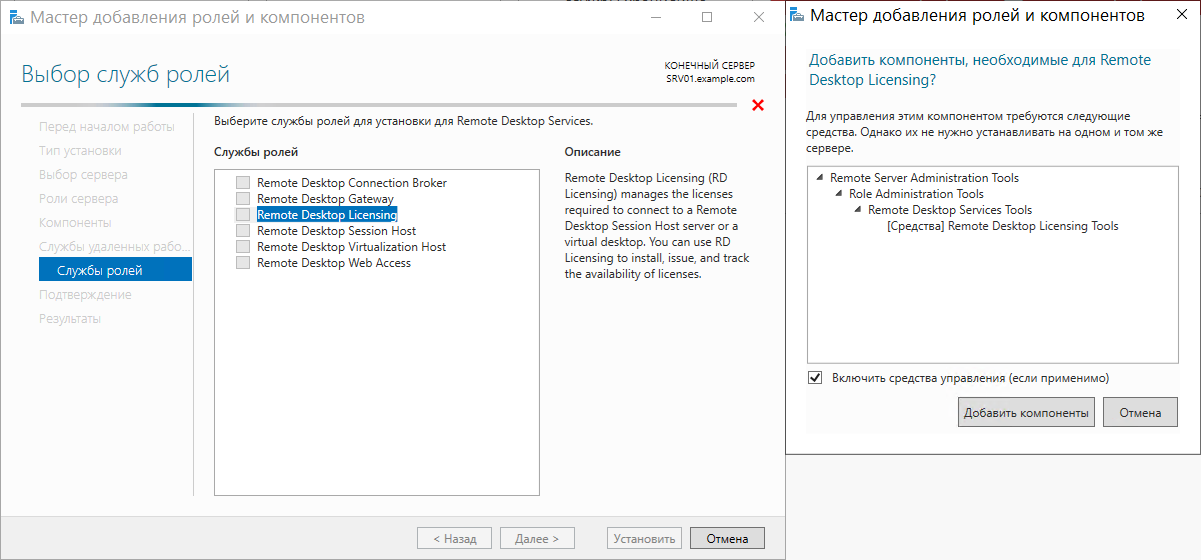
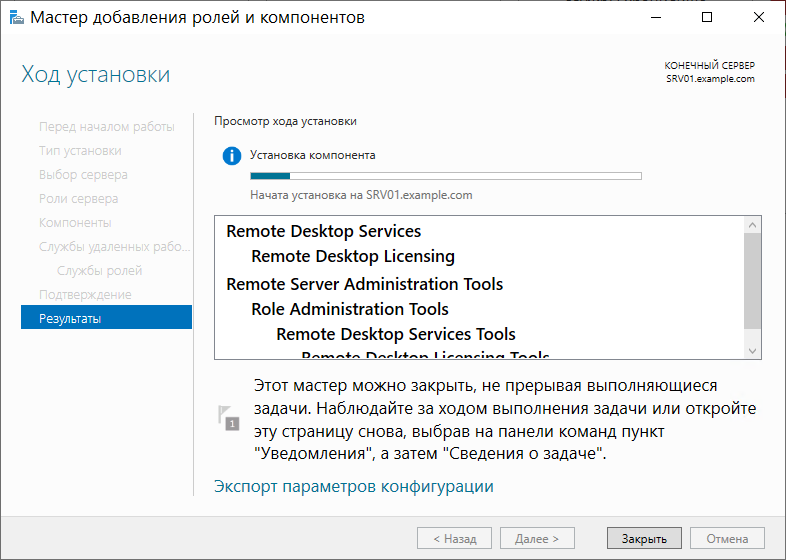
Теперь необходимо выбрать устанавливаемые службы ролей. Нам необходима роль Лицензирование удаленных рабочих столов. Отмечаем соответствующий пункт, в открывшемся дочернем окне подтверждаем добавление компонентов этой роли, переходим к этапу установки и ждем ее успешного завершения.
После установки потребуется перезагрузка сервера:
Для установки лицензий понадобится задать режим лицензирования для терминального сервера.
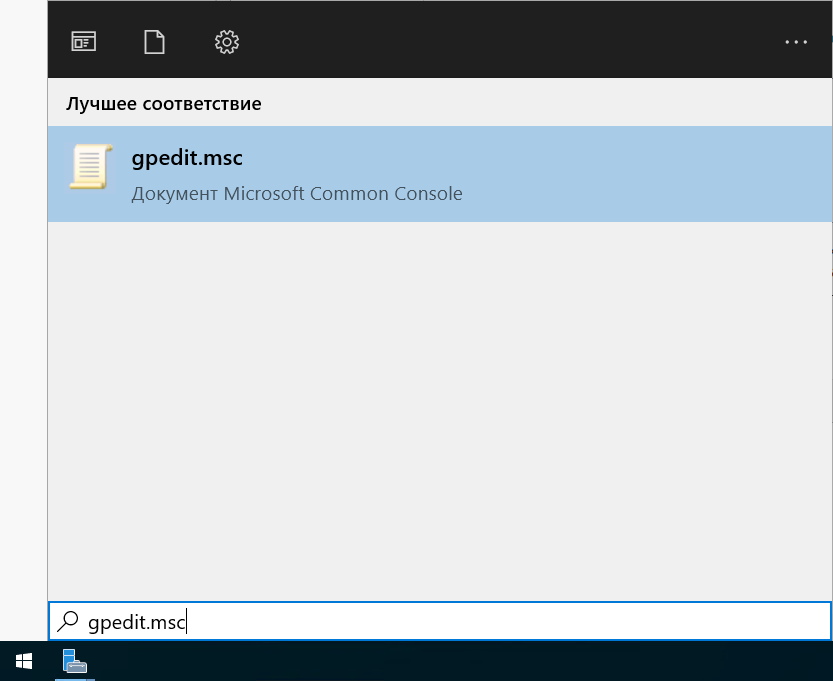
В Windows Server 2012 это выполняется через панель управления групповыми политиками. Откроем командную строку и пропишем команду gpedit.msc:
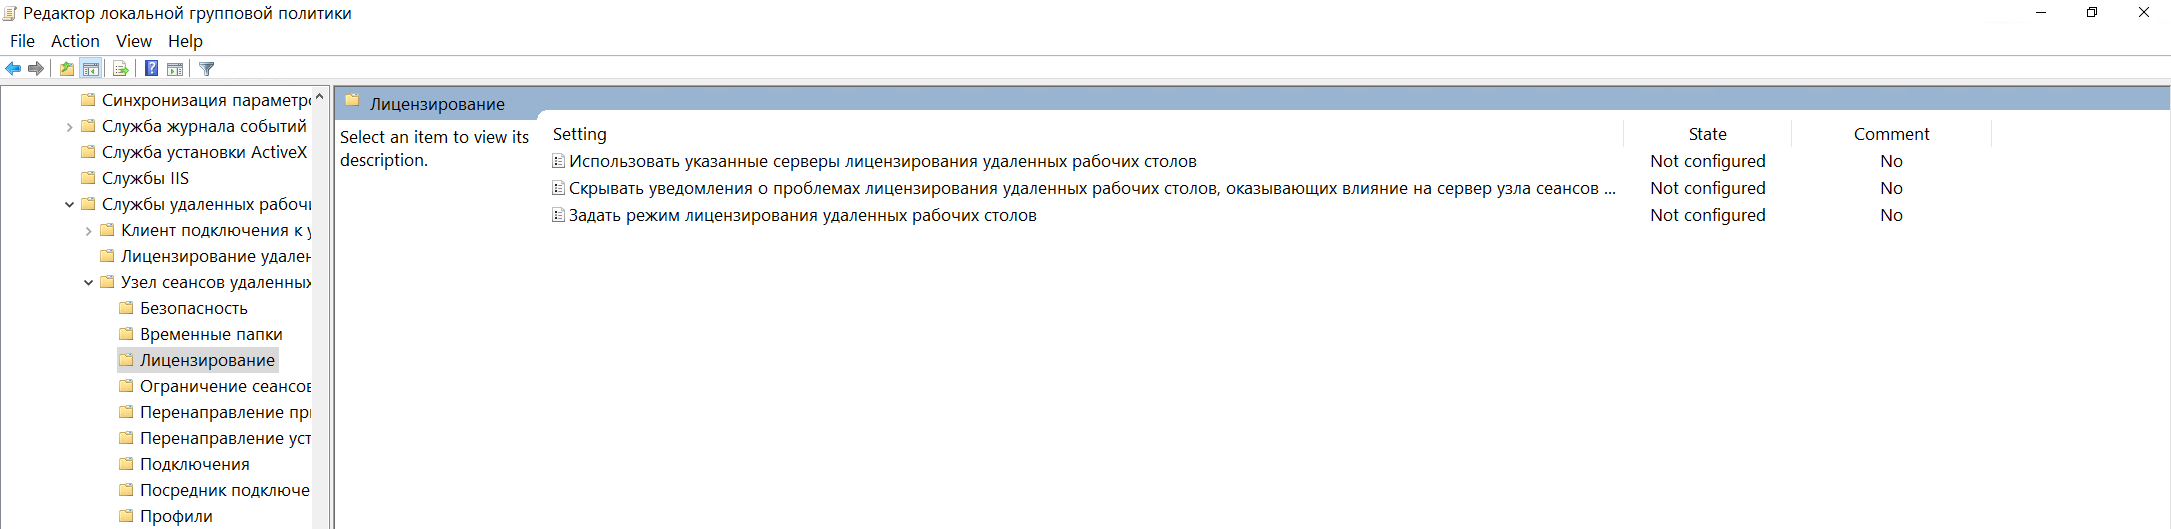
По этой команде откроется редактор групповых политик. Переходим по пути:
Конфигурация компьютера → Административные шаблоны → Компоненты Windows → Службы удаленных рабочих столов → Узел сеансов удаленных рабочих столов → Лицензирование
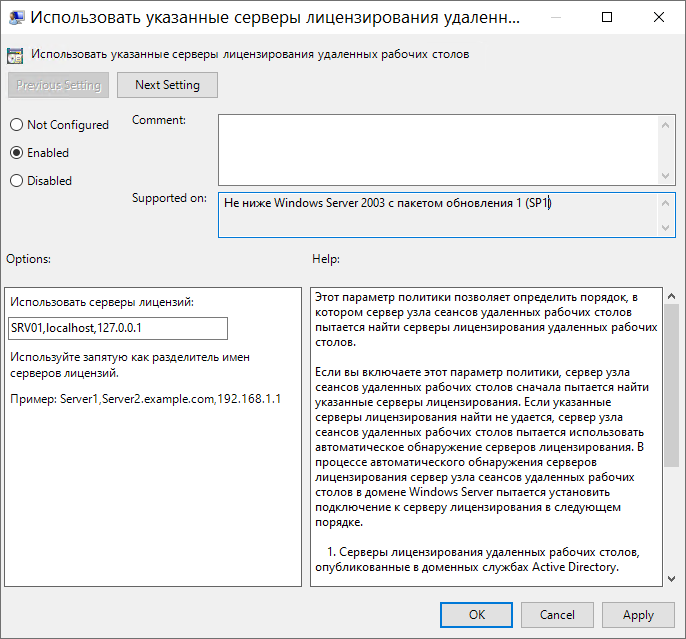
Тут нас интересуют два параметра: Использовать указанные серверы лицензирования удаленных рабочих столов и Задать режим лицензирования удаленных рабочих столов:
Откроем для редактирования первый параметр и укажем сервер лицензирования. Поскольку он располагается на нашем сервере, то указываем имя нашего сервера (SRV01) или наш IP-адрес и меняем состояние политики на Включено:
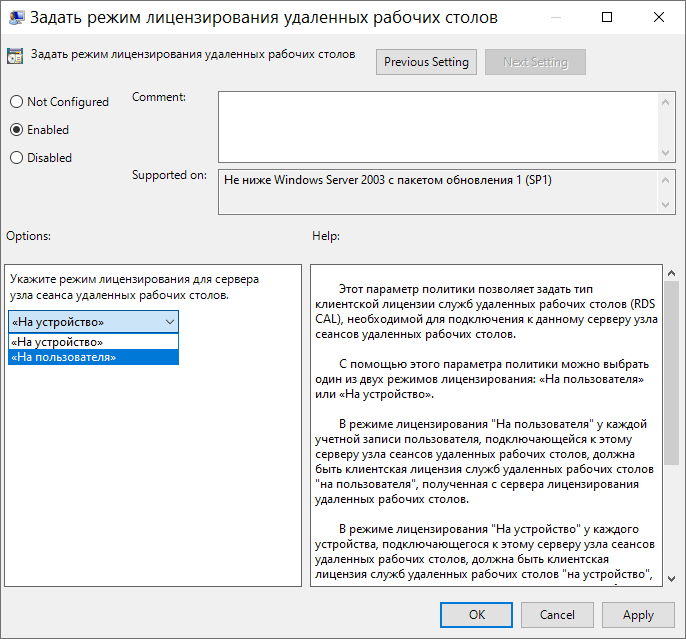
Меняем второй параметр групповой политики. Нам необходимо выбрать, каким образом будет происходить процедура лицензирования. Есть два варианта: На устройство, либо На пользователя.
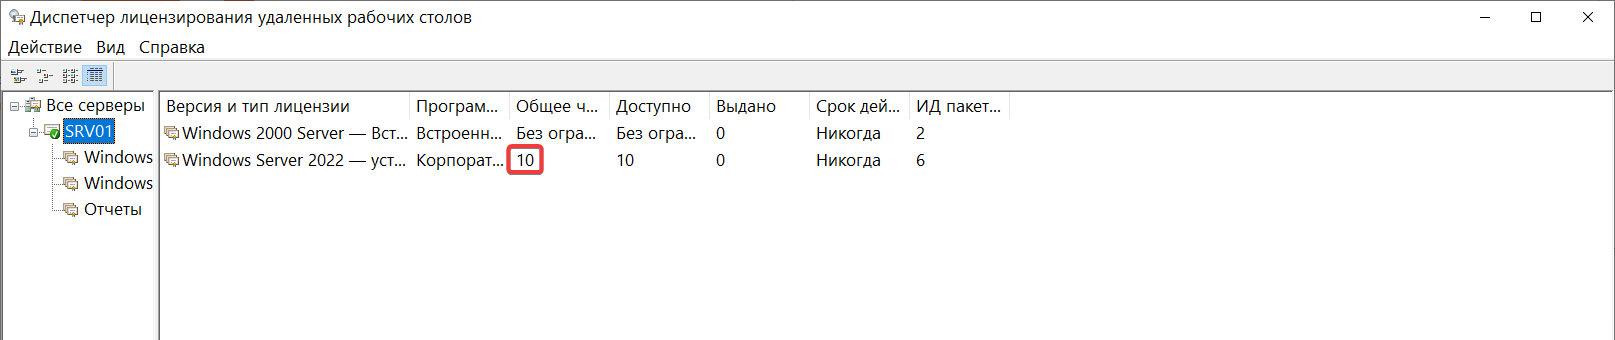
При 5 лицензиях и режиме На устройство можно создать неограниченное число пользователей на сервере, которые смогут подключаться через удаленный рабочий стол только с 5 компьютеров, на которых установлены эти лицензии. Если выбрать режим На пользователя, то зайти на сервер смогут только 5 выбранных пользователей, независимо от того, с какого устройства они выполняют подключение. В нашем примере мы выбираем вариант лицензирования На пользователя.
Вернемся в оснастку Средство диагностики лицензирования удаленных рабочих столов и видим ошибку, говорящую о том, что сервер лицензирования указан, но не включен:
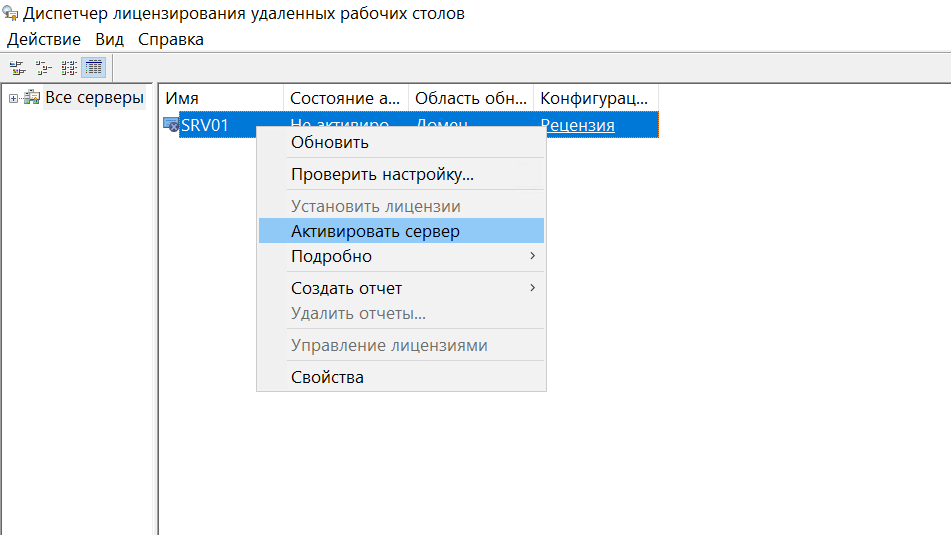
Исправим эту ошибку, активировав сервер лицензирования. Перейдем в Диспетчер лицензирования удаленных рабочих столов:

Видим, что статус нашего сервера лицензирования – Не активирован.
Чтобы активировать его, жмем правой кнопкой мыши, и в появившемся контекстном меню выбираем пункт Активировать сервер. После чего откроется мастер активации сервера:
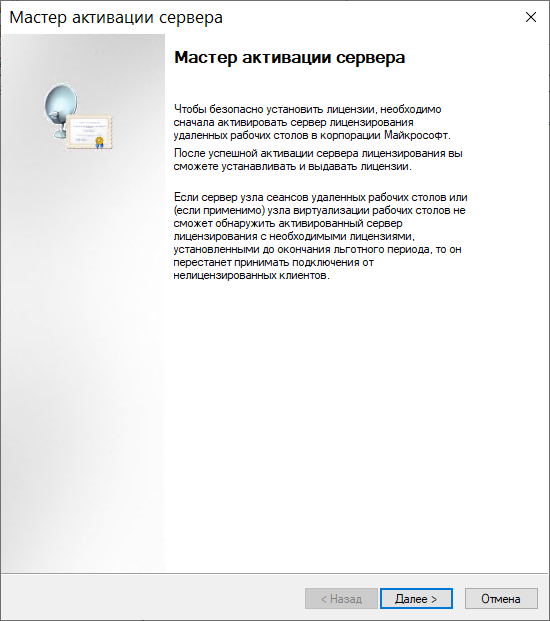
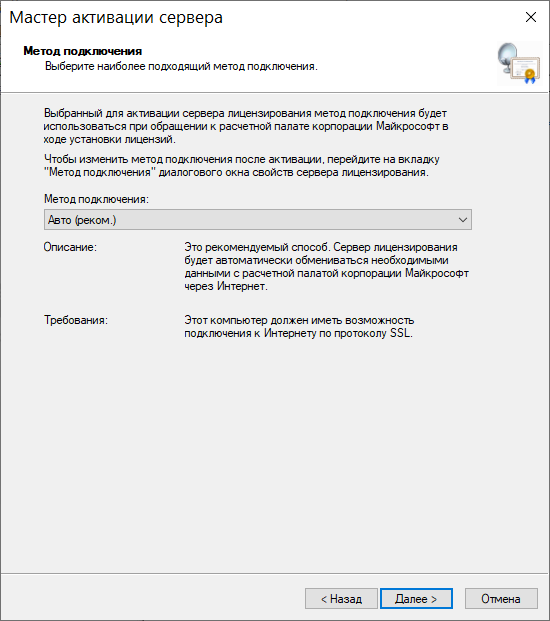
Жмем Далее и переходим к следующему пункту выбора метода подключения, оставляем пункт Авто:
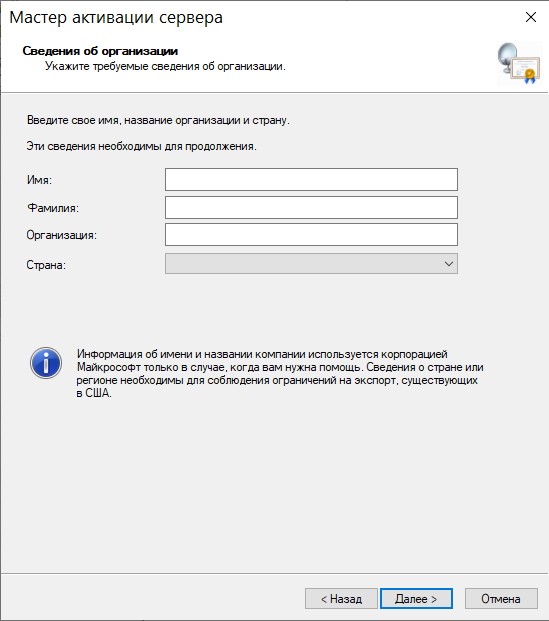
Далее потребуется ввести сведения для организации, где все поля обязательны для заполнения.
А также дополнительные сведения об организации, которые являются необязательными:
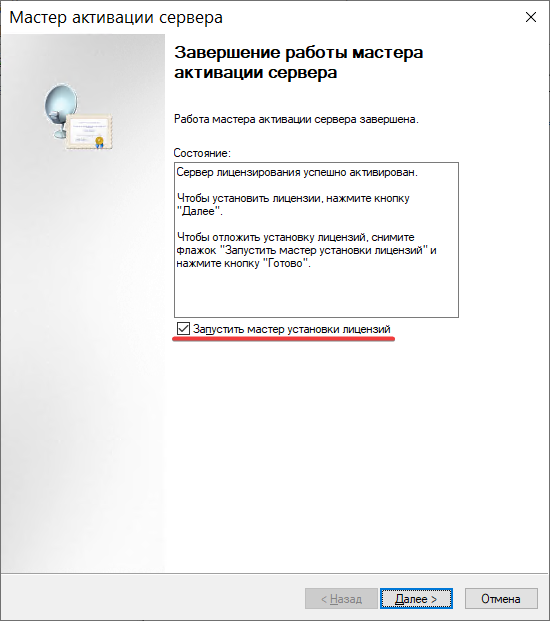
Затем появится сообщение о активации сервера лицензирования. Осталось выполнить установку лицензий на сервер. Оставим включенным пункт Запустить мастер установки лицензий в финальном окне активации сервера лицензирования:
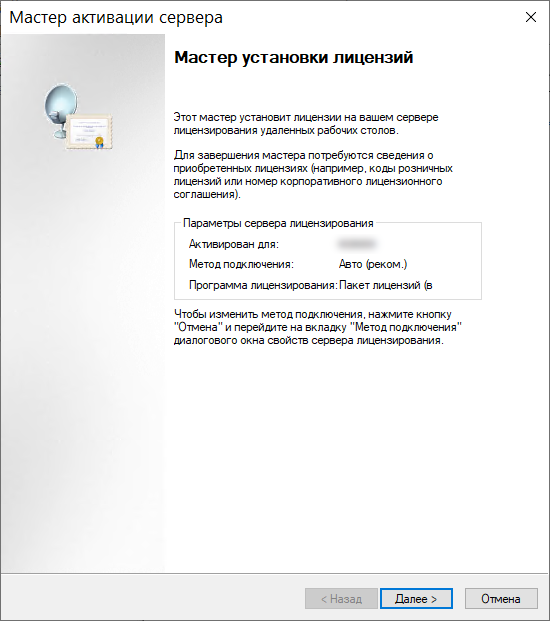
3. Установка лицензий на сервере лицензий Remote Desktop
Запустится мастер установки лицензий:
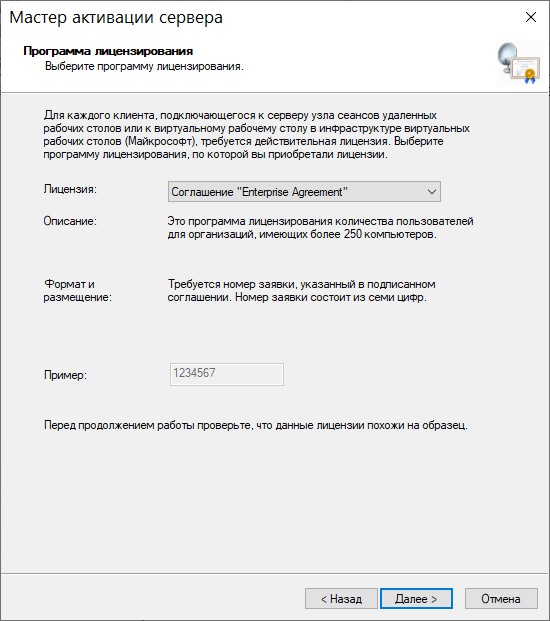
Нам необходимо в следующем окне выбрать программу, на основе которой получены наши лицензии. В примере рассматривается тип Соглашение «Enterprise Agreement»:
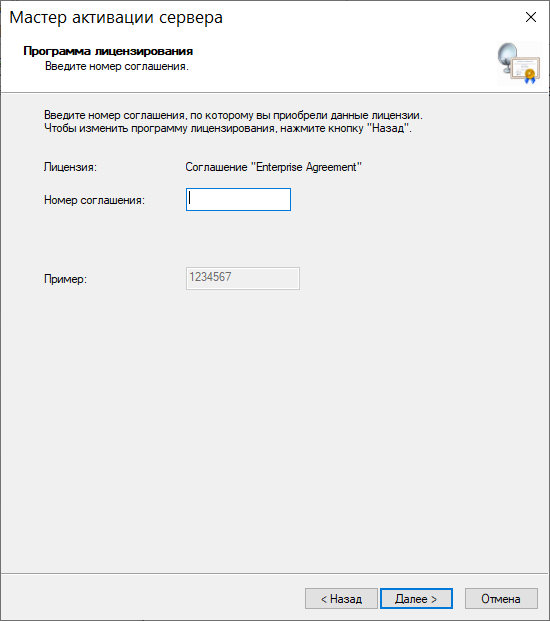
Переходим к следующему окну и вводим номер нашего соглашения:
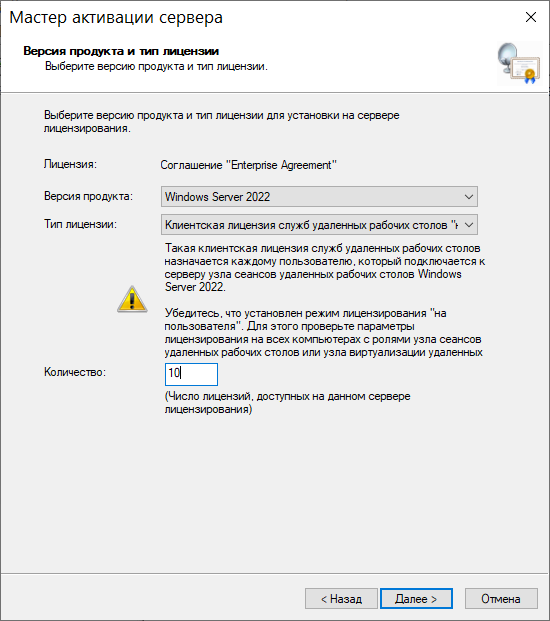
Указываем версию продукта, тип лицензии и количество лицензий в соответствии с нашей программой лицензирования:
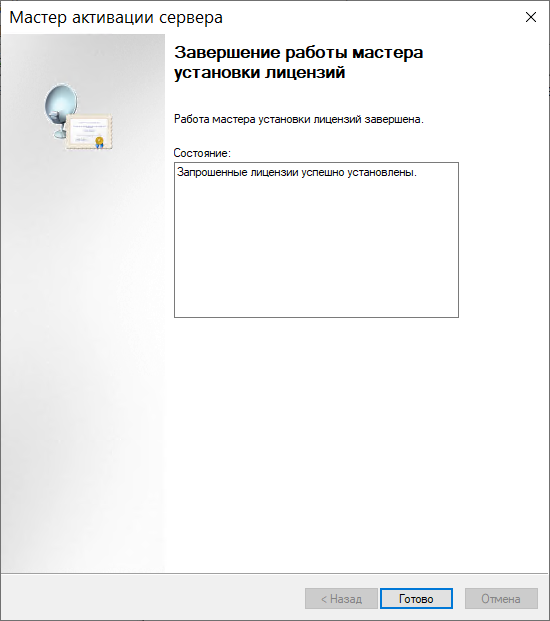
Дождемся, пока мастер установки активирует лицензии:
Убедимся, что сервер лицензирования работает, и проверим число установленных лицензий в диспетчере лицензирования:
После этого можно выполнять многопользовательское подключение клиентов, например, через встроенный в Windows клиент Подключение к удаленному рабочему столу. Также необходимо заметить, что пользователь, которому нужен доступ к подключению через удаленный рабочий стол, должен состоять в группе Пользователи удаленного рабочего стола.
Эта статья была полезной?
Также читайте
Previous
Next
Представьте: вы сидите с ноутбуком под пальмой, а на экране — рабочий стол из офиса. Благодаря RDP (Remote Desktop Protocol) вы можете подключаться к ��воему компьютеру из любой точки мира — быстро, удобно и безопасно. В этой статье рассказываем, как настроить удалённый доступ, на какие ошибки обратить внимание и как всё сделать правильно с первого раза.
RDP − это проприетарный протокол, разработанный компанией Microsoft, который позволяет через графический интерфейс подключаться к удалённому компьютеру или серверу, работающему на Windows. Данный протокол обеспечивает передачу изображения и звука с одной стороны и управление при помощи сигналов, генерируемых клавиатурой и мышью, с другой. Ключевая задача RDP − поддержка доступа к файлам, каталогам и другим подключённым устройствам, типа принтеров и флеш-накопителей, со стороны обеих рабочих станций, связанных с помощью данного протокола.
Выглядит это следующим образом: пользователь на своём компьютере в определённом приложении указывает адрес удалённой машины, вводит соответствующий логин и пароль, после чего получает на своём мониторе экран удалённого компьютера и управляет им своими мышью и клавиатурой. При этом подключиться к любому компьютеру таким образом вряд ли получится. Подобного рода подключение должно быть разрешено со стороны удалённого узла при помощи определённых настроек.
Как мы уже упомянули выше, RDP является разработкой Microsoft и обеспечивает доступ к удалённым компьютерам, работающим, естественно, на Windows. Нюансы настройки могут отличаться в разных версиях WIndows, но в целом она идентична во всех релизах. Давайте разберём, как можно это сделать на примере сервера, который работает на Windows Server 2022.
Итак, во-первых, машина, которой вы хотите управлять, должна быть доступна по сети с компьютера, предназначенного для управления удалённым узлом. Связность между рассматриваемыми машинами будет достигнута, если сервер и ваш компьютер будут находиться в одной локальной вычислительной сети, например, в пределах сети офиса или предприятия, или если удалённая рабочая станция будет доступна через интернет, имея при этом собственный «белый» IP-адрес.
Для проверки доступности удалённого узла, как правило, используют утилиту ping. Чтобы воспользоваться ей, узнайте IP-адрес сервера или компьютера, к которому вы планируете подключиться, затем на своей рабочей станции нажмите комбинацию клавиш Win-R, введите в открывшееся окошко cmd, нажмите Ok и в командной строке запустите команду ping IP-address. Здесь вместо IP-address необходимо указать IP-адрес удалённой машины. Если она доступна, то вывод команды должен выглядеть примерно как на скриншоте ниже.
Теперь перейдём к нашему серверу, к которому мы хотим подключиться по RDP. На его рабочем столе нажмите комбинацию клавиш Win-X и вы попадёте в так называемое «Меню опытного пользователя» («Power User Menu»), где кликните в пункт «Система». В открывшемся окне «Параметры» выберите пункт «Удалённый рабочий стол» и переведите переключатель «Включить удалённый рабочий стол» в положение «Вкл». В принципе, на этом − всё, можно переходить к компьютеру, с которого мы будем подключаться к удалённому рабочему столу.
В Windows-системах есть встроенное клиентское приложение для подключения к удалённому рабочему столу. Чтобы запустить его, нажмите WIn-R, в открывшейся строке введите mstsc и нажмите Enter. Далее в окне подключения укажите IP-адрес удалённой машины, нажмите «Подключить», затем введите имя и пароль пользователя, и в итоге перед вами откроется рабочий стол вашего сервера.
При этом если кликнуть по стрелочке, раскрывающей дополнительные параметры подключения («Show Options»), можно сделать управление удалённым компьютером более комфортным. Например, во вкладке «Локальные ресурсы» вы можете настроить совместное использование буфера обмена как на локальной, так и на удалённой машине. Там же можно сделать так, чтобы ваш локальный диск отображался среди доступных файловых ресурсов удалённой рабочей станции. Это удобно при необходимости копировать что-либо с локального компьютера на удалённый и наоборот.
При подключении к удалённому рабочему столу могут возникнуть ошибки, мешающие осуществить данный процесс. Например, если учётная запись, с помощью которой вы пытаетесь соединиться с удалённым рабочим столом, не имеет прав для подобного рода подключений, система не допустит входа под именем этого пользователя.
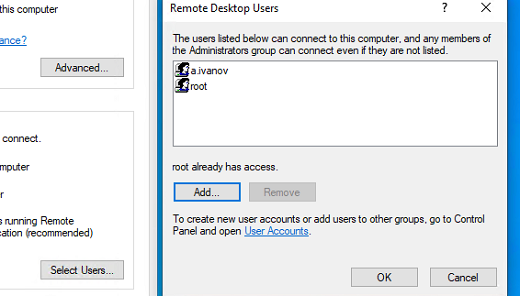
Чтобы это исправить, вернитесь к удалённому серверу, при помощи Win-X перейдите в пункт «Система» и в разделе «Удалённый рабочий стол» кликните «Выберите пользователей, которые могут получить удалённый доступ к этому компьютеру».
Там добавьте в список пользователей учётную запись, с помощью которой вы планируете подключаться к удалённому серверу.
Ещё одной распространённой ошибкой, когда соединение с удалённым узлом никак не может произойти, является отсутствие разрешения на подключение со стороны брандмауэра − межсетевого экрана, защищающего доступ по сети от нежелательных подключений.
В этом случае снова вернитесь к серверу, нажмите Win-X, введите firewall.cpl и кликните ОК. Далее, войдите в «Дополнительные параметры», затем − в «Правила для входящих подключений» и создайте, или найдите и активируйте правила для удалённого рабочего стола.
Таким образом, вы перенесёте подключение по RDP из разряда «нежелательного» в разряд «возможно осуществимого» с точки зрения брандмауэра.
Итак, у вас есть доступ к рабочему столу удалённого компьютера. Как можно это использовать?
Во-первых, вы контролируете удалённую машину, в вашем распоряжении полноценный доступ к графическому интерфейсу Windows. Вы управляете его файлами, папками и приложениями. При наличии полномочий администратора вы контролируете удалённую систему практически полностью. Во-вторых, если удалённый компьютер работает под управлением серверной операционной системы, вы можете осуществлять несколько сеансов RDP одновременно. Ещё у вас есть возможность осуществлять обмен файлами между локальной и удалённой машиной через общий буфер обмена или проброс дисков.
В-третьих, в состав RDP входит ряд механизмов, направленных на защиту данных и предотвращение несанкционированного доступа к удалённой системе. Протокол шифрует весь передаваемый трафик, проверяет подлинность пользователя ещё до установления сессии. Применяя политику безопасности, администратор сервера, в частности, того, на примере которого мы рассматривали настройку подключения, может централизованно настраивать параметры доступа различных пользователей к системе.
Всеми данными преимуществами обладают виртуальные выделенные серверы, работающие на Windows, что позволяет использовать их в качестве узлов, доступ к которым осуществляется именно по RDP. И у этого есть определённые предпосылки, основная из которых это то, что такой сервер доступен в любое время и из любой точки мира, где есть интернет. Поскольку RDP по умолчанию встроен в Windows, и не требует сторонних клиентов, то организация доступа с Windows-компьютера выглядит просто − достаточно IP-адреса удалённого сервера и логина с паролем для подключения к нему. В личном кабинете хостинга RUVDS эти данные находятся на начальной вкладке страницы параметров виртуального сервера.
Более того, на Windows-серверах RUVDS доступ по RDP открыт изначально. Чтобы начать им пользоваться, нужно заказать VPS с любым релизом Windows-системы, и этого будет достаточно.
RDP заслуженно признаётся легкодоступным способом управления компьютером на расстоянии. Применение протокола позволяет организовать на удалённом узле централизованный ресурс для совместного использования в качестве, например, файлового сервера или сервера 1С. Главное при этом − грамотно организовать доступ. Всем удачи!
Протокол Remote Desktop Protocol (RDP) позволяет удаленно подключиться к рабочему столу компьютера с Windows и работать с ним, как будто это ваш локальный компьютер. По умолчанию RDP доступ в Windows запрещен. В этой статье, мы покажем, как включить и настроить RDP доступ в Windows 10 и Windows Server 2016/2019.
Содержание:
- Включаем удаленный рабочий стол в Windows 10
- Как включить RDP доступ с помощью PowerShell?
- RDP доступ к Windows Server 2016/2019
- Включение RDP с групповых политик в домене Active Direcrtory
- Как удаленно включить RDP на компьютере Windows?
Включаем удаленный рабочий стол в Windows 10
Самый простой способ включить RDP доступ в Windows – воспользоваться графическим интерфейсом.
Откройте свойства системы через панель управления, или выполнив команду SystemPropertiesRemote.
Перейдите на вкладку Remote Settings (Удаленный доступ), включите опцию Allow remote connection to this computer (Разрешить удалённые подключения к этому компьютеру).
В целях безопасности желательно разрешить подключение только с клиентов RDP с поддержкой протокола NLA (Allow connections only from computers running Remote Desktop with Network Level Authentication/ Разрешить подключение только с компьютеров, на которых работает удаленный рабочий стол с проверкой подлинности на уровне сети).

Сохраните изменения, нажав ОК.
По умолчанию право на подключение к компьютеру через RDP есть только у членов группы локальных администраторов. Если вам нужно разрешить RDP доступ другим пользователям, нажмите кнопку Select Users.
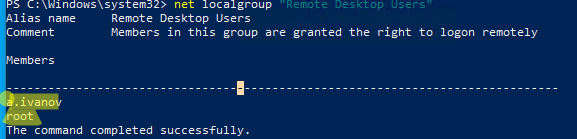
Все пользователи, которых вы укажете здесь будет добавлены в локальную группу Remote Desktop Users. Вы можете в командной строке вывести список пользователей в этой группе:
net localgroup "Remote Desktop Users"
или
net localgroup “Пользователи удаленного рабочего стола”
Чтобы добавить нового пользователя в группу доступа RDP, выполните:
net localgroup "Remote Desktop Users" /add publicuser
В русской версии Windows измените название группы на “Пользователи удаленного рабочего стола”.
В новых билдах Windows 10 классическая панель для включения RDP доступа теперь спрятана и Microsoft рекомендует пользоваться новой панелью Setting.
- Перейдите в Settings -> System —> Remote Desktop;
- Включите опцию Enable Remote Desktop;

- Подтвердите включение RDP на компьютере.
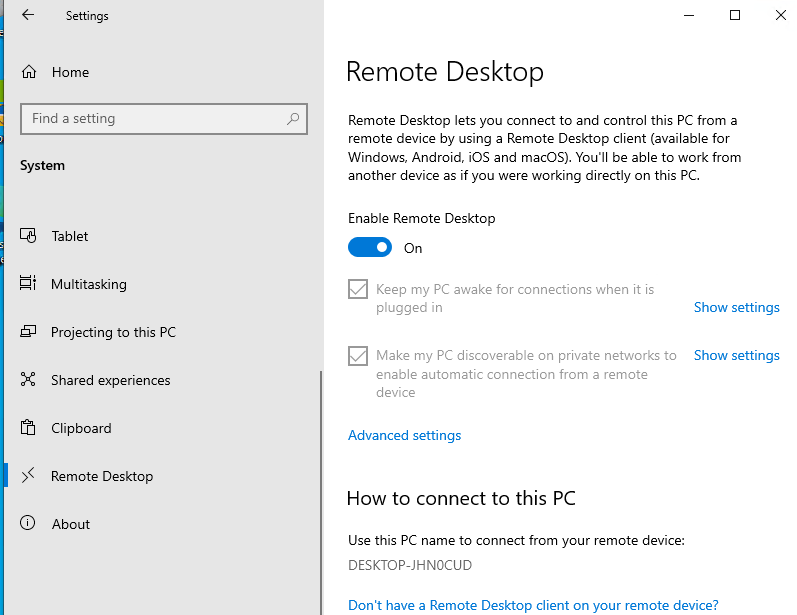
Обратите внимание, что вы не можете включить RDP доступ к редакции Windows 10 Home. RDP сервер работает только на Windows 10 Pro и Enterprise. Впрочем, есть обходное решение.
Обратите внимание, что по умолчанию при включении Remote Desktop, включаются две опции:
- Keep my PC awake for connection when it is plugged in ;
- Make my PC discoverable on private networks to enable automatic connection from a remote device
На жмите на ссылку “Advanced settings”. Здесь можно включить использование протокола “Network Level Authentication” для RDP подключений (рекомендуется).
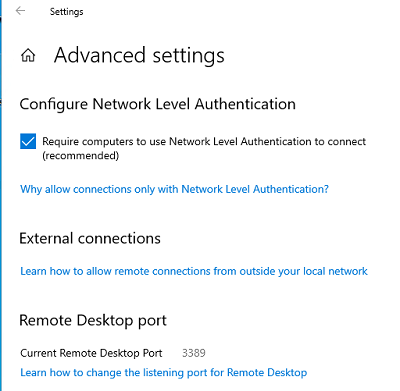
Если на компьютере включен Windows Defender Firewall (брандмауэр), то нужно проверить, что в нем разрешены входящие RDP подключения. По умолчанию для RDP подключений используется порт TCP
3389
, а в последних билдах Windows также используется
UDP 3389
( см. статью про кейс с черным экраном вместо рабочего стола при RDP доступе).
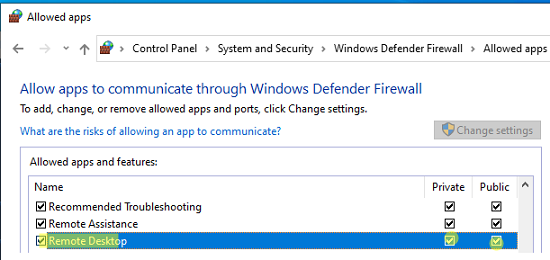
Перейдите в панель управления и выберите элемент Windows Defender Firewall. Откройте список стандартных правил брандмауэра Windows, щелкнув в левом столбце по ссылке Allow an app or feature through Windows Firewall.
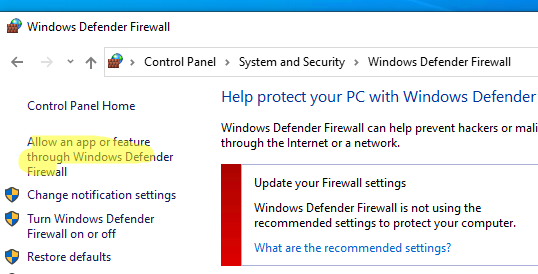
Проверьте, что правило Remote Desktop включено для профиля Private (домашняя или рабочая сеть) и, если необходимо, для профиля Public (общедоступные сети).
Подробнее про типы сетей и профили брандмауэра Windows здесь.
Если нужно, вы можете дополнительно ограничить длительность RDP сессий с помощью GPO.
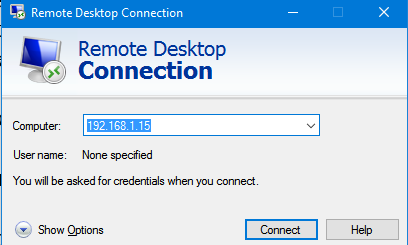
Теперь к данному компьютеру можно подключится с помощью RDP клиента. Встроенный RDP клиент Windows –
mstsc.exe
. Он сохраняет всю историю RDP подключений с компьютера. Поддерживается копирование файлов между локальным и удаленным компьютером прямо через буфер обмена RDP.
Также вы можете использовать менеджеры RDP подключений, такие как RDCMan или mRemoteNG, или альтернативные клиенты.
Для удобства пользователей пароль для RDP подключения можно сохранить в Windows Credential Manager.
Как включить RDP доступ с помощью PowerShell?
Вы можете включить RDP доступ в Windows с помощью пары PowerShell команд. Это гораздо быстрее:
- Запустите консоль PowerShell.exe с правами администратора;
- Включите RDP доступ в реестре с помощью командлета Set-ItemProperty:
Set-ItemProperty -Path 'HKLM:\System\CurrentControlSet\Control\Terminal Server' -name "fDenyTSConnections" -value 0Чтобы закрыть RDP доступ, измените значение fDenyTSConnections на 1.
- Разрешите RDP подключения к компьютеру в Windows Defender Firewall. Для этого включите предустановленное правило :
Enable-NetFirewallRule -DisplayGroup "Remote Desktop"
- Если нужно добавить пользователя в группу в локальную группу RDP доступа, выполните:
Add-LocalGroupMember -Group "Remote Desktop Users" -Member 'a.petrov'

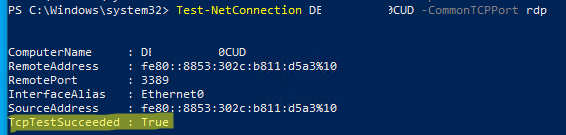
Чтобы проверить, что на компьютере открыт RDP порт, воспользуйтесь командлетом Test-NetConnection:
Test-NetConnection -ComputerName deskcomp323 -CommonTCPPort rdp
RDP доступ к Windows Server 2016/2019
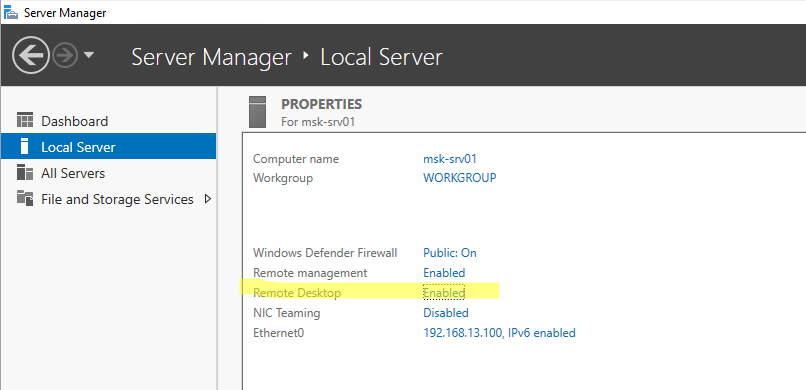
В отличии от десктопной редакции Windows 10, в Windows Server по умолчанию поддерживается два одновременных RDP подключения. Эти подключения используются администраторами для управления сервером.
Включается RDP в Windows Server аналогично. Через SystemPropertiesRemote, через Server Manager или командами PowerShell, рассмотренными выше.
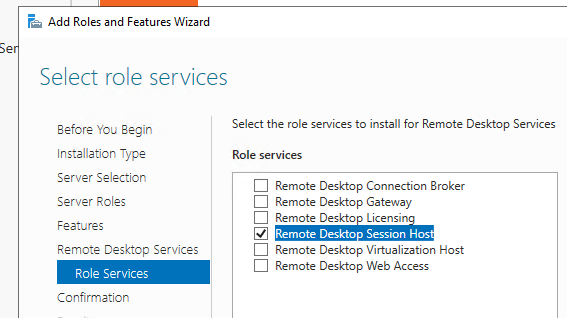
Вы можете использовать Windows Server в качестве терминального сервера. В этом случае множество пользователей могут одновременно подключаться к собственному рабочему столу на сервере. Для этого нужно установить и настроить на сервере роль Remote Desktop Session Host. Это требует приобретения специальных RDS лицензии (CAL). Подробнее о RDS лицензировании здесь.
Для дополнительно защиты RDP сессий можно использовать SSL/TLS сертификаты.
Включение RDP с групповых политик в домене Active Direcrtory
Если вам нужно включить RDP доступ сразу на большом количестве компьютеров, можно воспользоваться групповыми политиками (GPO). Мы подразумеваем, что все компьютеры включены в домен Windows.
- Запустите консоль управления доменными GPO
gpmc.msc
; - Создайте новую (или отредактируйте уже существующую) групповую политику и привяжите ее к целевой OU с компьютерами или серверами;
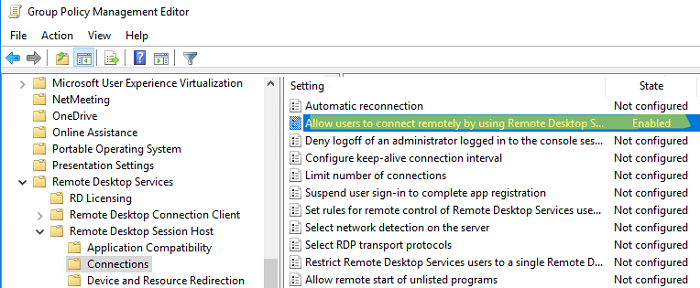
- Переключитесь в режим редактирования политики и перейдите в секцию GPO Computer Configuration -> Administrative Templates -> Windows Components -> Remote Desktop Services -> Remote Desktop Session Host -> Connections;
- Найдите и включите политику Allow Users to connect remotely by using Remote Desktop Services, установив ее в Enable;
- Обновите параметры групповых политик на клиентах;
- После применения данной политики вы сможете подключится ко всем компьютерам по RDP (политика применится как к десктопным клиентам с Windows 10, так и к Windows Server). Если нужно, вы можете более тонко нацелить политики на компьютеры с помощью WMI фильтров GPO.
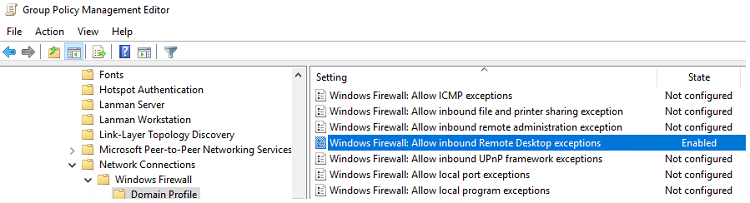
- Если на компьютерах включен Windows Defender Firewall, нужно в этой же GPO разрешить RDP-трафик для доменного профиля. Для этого нужно активировать правило Windows Firewall: Allow inbound Remote Desktop Exceptions (находится в разделе Computer Configuration -> Administrative Templates -> Network -> Network Connections -> Windows Firewall -> Domain Profile).
Подробнее о настройке правил брандмаура Windows через GPO рассказано здесь.
Как удаленно включить RDP на компьютере Windows?
Также вы можете удаленно включить RDP на любом компьютере Windows. Для этого у вас должен быть удаленный доступ к этому компьютеру (через PowerShell или WMI) и ваша учетная запись состоять в группе локальных администраторов на этом компьютере.
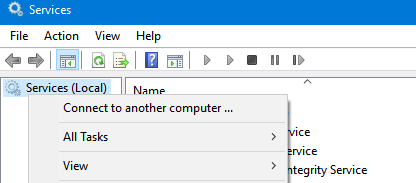
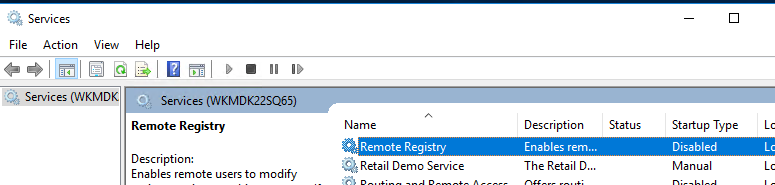
Вы можете удаленно включить RDP через реестр. Для этого на удаленном компьютере должна быть включена служба Remote Registry (по умолчанию она отключена). Чтобы запустить службу:
- Запустите консоль управления службами (
services.msc
); - Выберите Connect to another computer и укажите имя удаленного компьютера;
- Найдите в списке службу Remote Registry, измените тип запуска на Manual (ручной) и затем запустите службу – Start.
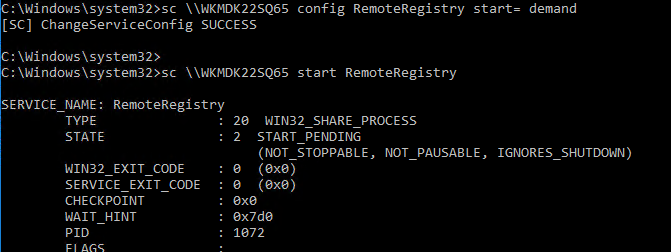
Тоже самое можно выполнить удаленно из командной строки с помощью встроенной утилиты
sc
(позволяет создавать, управлять или удалять службы Windows):
sc \\WKMDK22SQ65 config RemoteRegistry start= demand
sc \\WKMDK22SQ65 start RemoteRegistry
Затем на локальном компьютере
- Запустите редактор реестра
regedit.exe - Выберите в меню Файл пункт Connect Network Registry (Подключить сетевой реестр)
- Укажите имя или IP адрес удаленного компьютера, на котором нужно включить службу RDP;
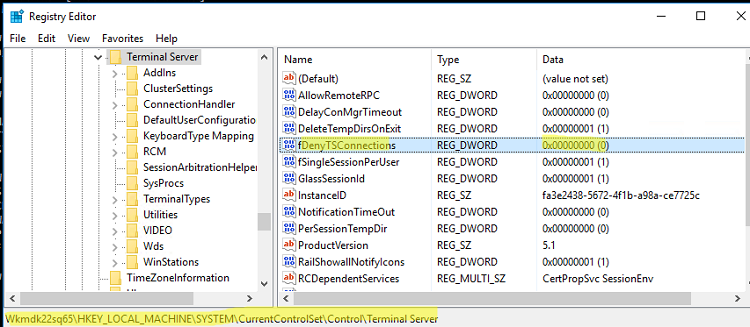
- Перейдите в раздел
HKEY_LOCAL_MACHINE\SYSTEM\CurrentControlSet\Control\Terminal Server
; - Найдите параметр fDenyTSConnections (тип REG_DWORD). Если данный ключ отсутствует – создайте его. Измените его значение на 0, чтобы включить RDP.
Для отключения RDP доступа нужно изменить значение fDenyTSConnections на 1.
Сразу после этого без перезагрузки удаленный компьютер должен стать доступным по RDP.
Но гораздо быстрее можно включить RDP в реестре удаленого компьютера через командную строку:
REG ADD "\\WKMDK22SQ65\HKLM\SYSTEM\CurrentControlSet\Control\Terminal Server" /v fDenyTSConnections /t REG_DWORD /d 0 /f
Если на удаленном компьютере настроен PowerShell remoting, вы можете выполнить на нем удаленную команду через Invoke-Command:
Invoke-Command -Computername WKMDK22SQ65 -ScriptBlock {Set-ItemProperty -Path "HKLM:\System\CurrentControlSet\Control\Terminal Server" -Name "fDenyTSConnections" –Value 0}
Если в Windows установлен OpenSSH сервер, вы можете подключиться к нему любым ssh клиентом и внести изменения в реестр в локальной ssh сессии.
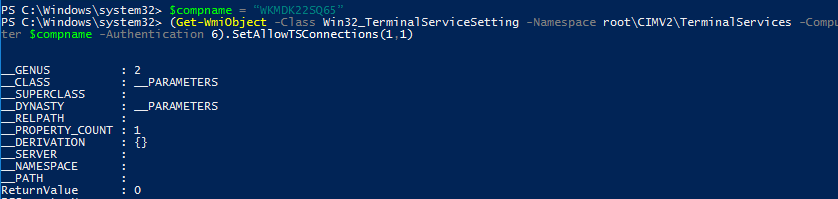
Также вы можете подключиться к удаленному компьютеру и включить RDP через WMI:
$compname = “WKMDK22SQ65”
(Get-WmiObject -Class Win32_TerminalServiceSetting -Namespace root\CIMV2\TerminalServices -Computer $compname -Authentication 6).SetAllowTSConnections(1,1)
If you’re working on a Windows Server network and need to do some work remotely, chances are you’ll want to connect over the Remote Desktop Protocol (RDP). The problem is that most people don’t know how to relate well with others.
RDP or Remote Desktop Protocol is a very popular protocol used in the Windows network to connect to another computer with the given user credentials. It’s a good choice if you want to connect from one Windows device to another on the same local network (over Ethernet or Wi-Fi) but cannot access other computers just because of firewall, NAT, router and so on.
If you are looking for how to connect to a Windows server With RDP then this article will teach you how to connect to a Windows server with RDP and provide additional information about the remote desktop protocol.
Remote Desktop Protocol (RDP) is a protocol developed by Microsoft that allows users to access and control a remote computer over a network connection. RDP is a powerful tool for businesses and IT professionals who need to remotely manage servers, troubleshoot issues, and provide technical support to end-users.
In this blog post, we will explore what RDP is, how it works, its benefits and How to connect to a Windows server With RDP?
What is RDP?
RDP is a protocol that enables remote access to a computer over a network connection. It was first introduced by Microsoft in 1996 as part of the Windows NT 4.0 Terminal Server Edition. Since then, RDP has become an essential tool for businesses and IT professionals who need to manage remote servers, workstations, and virtual desktops.
RDP stands for Remote Desktop Protocol. It allows you to connect to a remote computer on your local network, or anywhere else in the world, and control that computer. You can use RDP to do everything that you would normally do with a mouse and keyboard — move around windows, switch workspaces, open files and folders, delete files, etc. The only difference is that you don’t need an actual physical keyboard and mouse to do these things — just a monitor and some other pieces of hardware that are attached to the remote computer.
How does RDP work?
RDP works by transmitting graphical information from the remote computer to the local computer over a network connection. When you connect to a remote computer using RDP, you are essentially creating a virtual session on that computer. The computer can then be controlled remotely just as you were in front of it.
RDP uses the Remote Desktop Services (RDS) role in Windows Server to enable remote connections. When RDP is enabled on a computer, it listens on a specific port (default port 3389) for incoming connection requests. Once a connection request is received, the RDP server sends back an encrypted connection handshake to the client, and a secure connection is established. Implementing rdp monitoring tools can enhance security by providing insights into session activities and identifying potential issues promptly
Benefits of RDP
RDP offers several benefits for businesses and IT professionals, including:
Remote management
RDP enables remote management of servers, workstations, and virtual desktops from anywhere with an internet connection.
Centralized control
RDP allows IT professionals to manage multiple remote computers from a single location, making it easier to monitor and maintain systems.
Enhanced security
RDP uses encryption to secure remote connections, ensuring that sensitive data is not intercepted or compromised during transit.
Improved productivity
RDP enables end-users to work remotely, which can lead to increased productivity and flexibility.
Cost-effective
RDP eliminates the need for on-site IT personnel or physical access to remote systems, saving businesses time and money.
Before we begin, it’s essential to note that RDP is only available for Windows operating systems. To connect to a Windows server using RDP, you will need the following:
- A computer running a Windows operating system.
- An active internet connection.
- The IP address or hostname of the Windows server you wish to connect to.
- A username and password with administrative privileges on the server.
Connecting to the Server with RDP
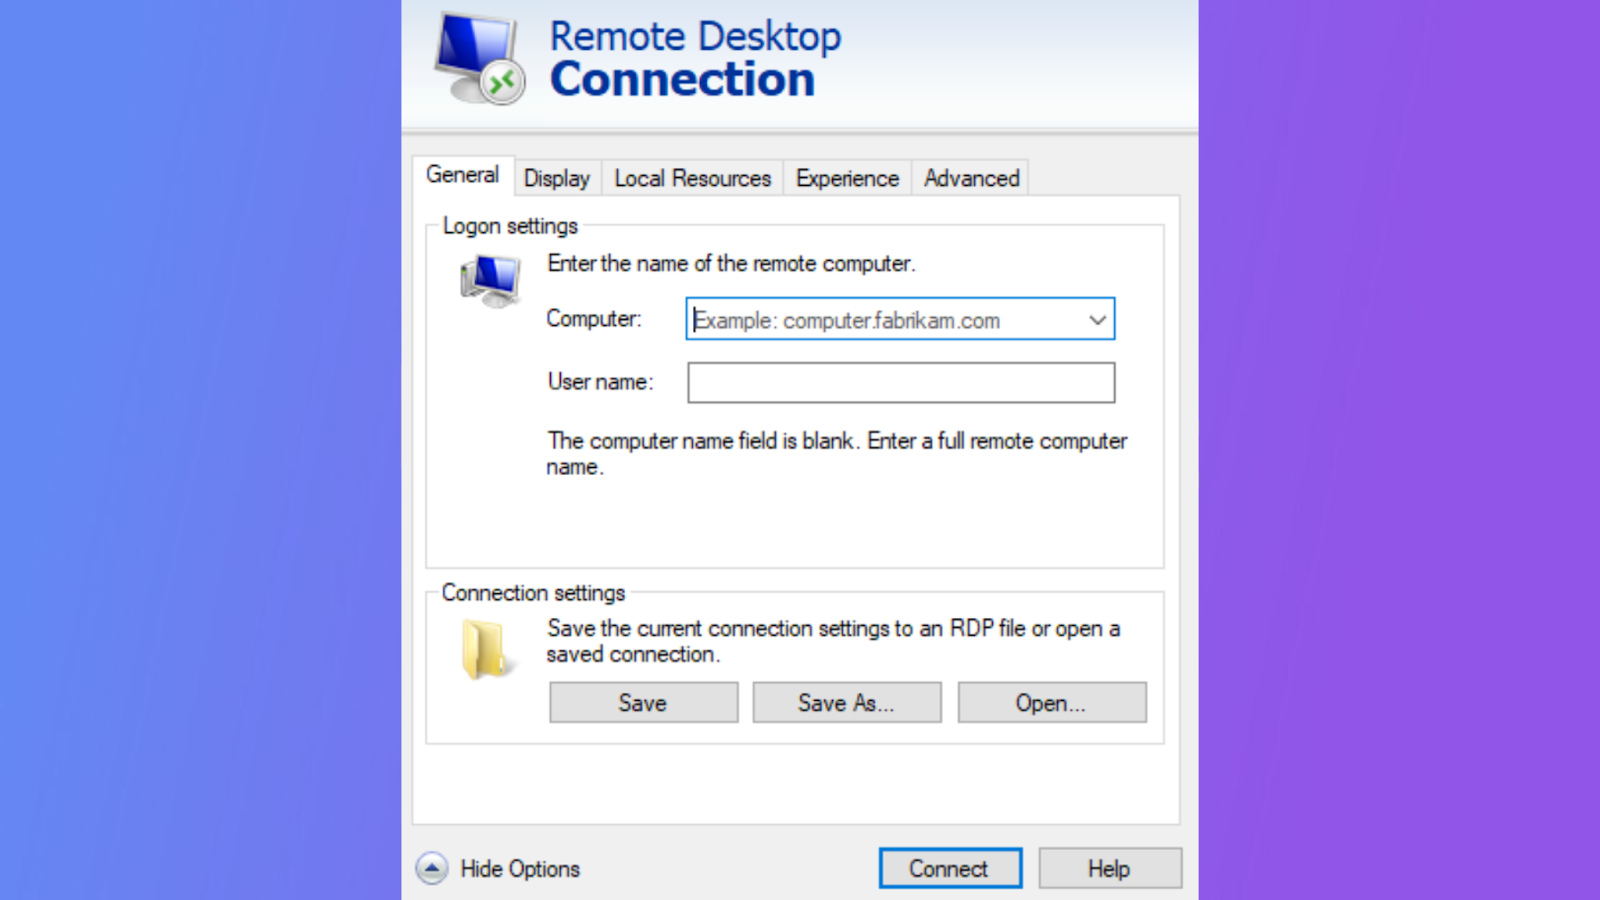
These are the steps to connect to a Windows Server using Remote Desktop Protocol (RDP):
- Open the “Start” menu and type “Remote Desktop Connection” in the search box.
- Click on the “Remote Desktop Connection” app to open it.
- In the “Computer” field, type the IP address or hostname of the server you want to connect to.
- Click the “Show Options” button to expand the options menu.
- Enter your username and password for the server.
- If you want to save your login credentials, click on the “Save As” button to save your settings to an RDP file.
- Click the “Connect” button to establish a connection to the server.
Once the connection is established, you will be able to control the server remotely using your local keyboard, mouse, and display. When you are finished, you can simply close the RDP window to disconnect from the server.
Configuring RDP Settings
Once connected to the server, you can configure RDP settings to optimize your experience. The following are some of the configuration options:
Display Settings

You can change the resolution and color depth of the remote session to match your preferences or the requirements of the application you’re using.
Local Resources

You can configure RDP to allow access to your local resources, such as printers, drives, and clipboard.
Experience
You can configure RDP to optimize performance based on your network connection, such as adjusting the desktop background and font smoothing settings.
Security
You can configure RDP to use a higher level of encryption for secure connections.
Disconnecting from the Server
Once you’re done with your remote session, it’s essential to disconnect from the server properly to avoid any issues. Here are the steps to follow:
- Click the “X” button in the upper right-hand corner of the Remote Desktop window to close the connection.
- Alternatively, you can click the Start button on the remote desktop and select “Log Off” or “Sign Out” to end the session.
Ensure that you’ve saved any work and closed any applications on the remote server before disconnecting.
Conclusion
In conclusion, Remote Desktop Protocol (RDP) is a powerful tool that allows users to remotely access and control a computer over a network connection. RDP is widely used by businesses and IT professionals for remote management, troubleshooting, and technical support. Its benefits, including enhanced security, centralized control, and improved productivity, make it a valuable tool for businesses of all sizes and industries.