
В предыдущей заметке была рассмотрена процедура установки и настройки RADIUS сервера в составе роли Network Policy and Access Services в Windows Server 2008 R2 для использования аутентификации и авторизации на контроллерах APC Web/SNMP Management card. В случае с коммутаторами Cisco на стороне настроек сервера RADIUS всё делается по аналогии, за исключением некоторых моментов. Рассмотрим эти моменты и проведём настройку коммутатора на примере модели Catalyst WS-C2950-24.

Этап #1. Создание групп доступа в домене
Начнём с того что в нашем примере создадим в домене две локальных группы безопасности.

В первую группу включим пользователей которым нужно предоставить полный административный доступ на управление коммутаторами, во вторую соответственно, — доступ только на чтение текущей конфигурации и состояния устройств. При этом, стоит помнить, что для пользователей, которые будут включаться в эти группы должно быть установлено разрешение в домене, дающее право удалённого доступа (значение настройки Network Access Permission на закладке Dial-In свойств учетной записи пользователя)
Этап #2. Добавление клиентов на сервер RADIUS
На сервере RADIUS в консоли Network Policy Server создадим для нашего коммутатора запись о клиенте, указав его имя или IP-адрес и ключ (Shared secret). Для этого в дереве консоли NPS развернём раздел RADIUS Clients and Servers и на элементе RADIUS Clients откроем контекстное меню и выберем пункт New и заполним соответствующие поля

Значение поля Friendly name может отличаться от DNS имени. Оно потребуется нам в дальнейшем для идентификации конкретного сетевого устройства при создании политик доступа – Remote Access Policy. Опираясь на это имя мы сможем задавать например маску по которой будут обрабатываться определённой политикой доступа несколько разных RADIUS клиентов.
Этап #3. Создание политик доступа на сервере RADIUS
С помощью политик доступа NPS мы произведём связку созданных ранее записей о коммутаторах-клиентах RADIUS и доменных групп безопасности, определяющих уровень доступа к этим коммутаторам. То есть в нашем случае будет создано две политики доступа — с полными правами и только для чтения.
Итак, создадим первую политику, определяющую полный административный доступ к коммутатору. В дереве консоли NPS в разделе Policies > Network Policies откроем контекстное меню и выберем пункт New. В открывшемся мастере создания политики введём название создаваемой политики (пусть например оно будет созвучно с группой доступа) и выберем тип соединения Unspecified
На следующем шаге Specify conditions нам нужно добавить условия при которых будет применяться данная политика RADIUS. Добавим два условия, – чтобы пользователь, проходящий авторизацию, входил в определенную доменную группу безопасности, и устройство, к которому осуществляется доступ, имело определённое имя «Friendly name». Через кнопку Add добавим условия по типам Windows Group и Client Friendly Name.
Здесь важно понимать, что для условия с Windows Group использование встроенных групп безопасности таких как, например, Domain Admins не является хорошей практикой с точки зрения безопасности.
Для условия Client Friendly Name в качестве значения можно использовать как конкретные «Friendly name» устройств так и их маску, например в нашем случае политика будет применяться ко всем клиентам RADIUS у которых в свойствах атрибута «Friendly name» указано значение начинающееся с “KOM-AD01-SW”
В итоге, в нашем случае, список условий будет выглядеть так:

На следующем шаге Specify Access Permission укажем, что данная политика является политикой, разрешающей доступ – Access granted

На следующем шаге Configure Authentication Methods отключим все методы аутентификации и включим метод Unencrypted authentication (PAP, SPAP), так как коммутатор в нашем случае поддерживает только этот метод:

При этом мы получим предупреждение о том, что выбранный метод является не безопасным и для того, чтобы оставить выбор в силе, нужно нажать – No.

На следующем шаге настройки дополнительных ограничений Configure Constraints можно ничего не изменять и перейти к шагу конфигурационных настроек Configure Settings, где в разделе настроек стандартных атрибутов RADIUS удалим имеющиеся по умолчанию там два атрибута и добавим новый по кнопке Add.

В открывшемся окне выбора стандартных атрибутов, выберем Service-Type и нажмём Add.

Переключатель значения атрибута Attribute value установим в положение Others и из выпадающего списка выберем значение Login

В итоге список стандартных атрибутов RADIUS в нашем случае будет иметь только одну позицию:

Теперь переключимся на закладку Vendor Specific и вызовем диалог добавления атрибута по кнопке Add

В открывшемся списке выберем тип атрибута Vendor-Specific (RADIUS Standard) и вызовем диалог добавления атрибута по кнопке Add

В окне информации об атрибутах для добавления нового атрибута нажмём Add

В окне добавления атрибута из ниспадающего списка выберем вендора оборудования к которому мы настраиваем доступ, в нашем случае это Cisco , укажем что атрибут соответствует стандартам RADIUS RFC и нажмём кнопку Configure Attribute чтобы настроить значение атрибута

В открывшемся окне конфигурации значения атрибута введём значение номера атрибута – 1, тип значения строковой – String и само значение:
shell:priv-lvl=15
Это значение будет означать что авторизованному пользователю данной политикой нужно предоставить максимальный 15 уровень административного доступа на коммутаторе Cisco

В итоге список специфичных атрибутов в нашем случае будет иметь только одну позицию:

После этого перейдём на шаг завершения создания новой политики доступа, получив сводную информацию о заданных нами настройках.

По аналогии создаём вторую политику для организации доступа на чтение и при её создании, как и в первом случае, в качестве стандартного параметра RADIUS выбираем Service-Type равный значению Login , а вот значение специфического атрибута уже просто не создаём вообще.

При создании и планировании политик обратите внимание на то что имеет значение их порядок. Политики обрабатываются сверху вниз, и когда получается, что все условия в очередной политике соблюдены, их дальнейшая обработка прекращается. То есть с точки зрения безопасности и разрешения конфликтов между политиками правильней будет располагать политики в порядке возрастания административных полномочий.
Этап #4. Настройка коммутатора Cisco
Перейдём к настройке коммутатора. Так как мы собираемся использовать доменные учетные записи для аутентификации и авторизации, стоит уделить особое внимание вопросу безопасности и для коммуникаций с коммутатором вместо протокола Telnet использовать по возможности SSH. Входим в режим конфигурирования и включаем использование SSHv2 последовательностью команд:
configure terminal
crypto key generate rsa modulus 1024
ip ssh version 2

При выполнении команды генерации RSA-ключей мы можем получить сообщение о необходимости сконфигурировать параметр конфигурации domain-name:
% Please define a domain-name first.
В таком случае нужно выполнить соответствующую настройку:
KOM-AD01-SW003(config)# ip domain-name mydom.holding.com
Затем настраиваем AAA аутентификацию и авторизацию таким образом, чтобы приоритетно использовалась RADIUS аутентификация, а в случае если RADIUS сервер окажется недоступен, – использовалась локальная аутентификация на базе встроенных учетных записей устройства.
aaa new-model
aaa authentication login default group radius local
aaa authorization exec default group radius if-authenticated

Затем вводим информацию о сервере RADIUS и ключ (Shared secret), который в ранее был прописан для этого устройства на самом сервере RADIUS:
radius-server host 10.160.160.160 key RjRh5adkj63D
service password-encryption
Для того чтобы сделать использование SSH обязательным и отключить Telnet при удалённом доступе выполним команды:
line vty 5 15
transport input ssh

На этом минимальная настройка коммутатора закончена и можно испытать новый механизм аутентификации и авторизации в действии.
Источники информации:
- Aaron Walrath Blog — Install Windows 2008 R2 NPS for RADIUS Authentication for Cisco Router Logins
- Aaron Walrath Blog — RADIUS Authentication for Cisco Router Logins
- Youritguy’s Blog — AAA RADIUS authentication with Windows Server 2008
- Daryl Hunter Blog — Cisco IOS-fu #7 — Cisco + RADIUS + Windows Server 2008 NPS
RADIUS Configuration with Cisco 200/300 Series Managed Switches and Windows Server 2008
Objective
Remote Authorization Dial-in User Service (RADIUS) offers a robust way of authentication of users to allow access to a network service. Therefore, RADIUS servers offers a centralized access control, where the server administrator decides if a specific segment is authenticated or not using RADIUS. This article explains the general steps to establish RADIUS in a client/server environment, where the client is represented by the Cisco 200/300 Series Managed Switch and the server is running a Windows Server 2008 with RADIUS enabled.
Applicable Devices
- Cisco 200/300 Series Managed Switches
Step-by-Step Procedure
The configuration takes place in two parts. First we have to set the switch as a RADIUS client, then we have to set the server properly for RADIUS.
Setting RADIUS on the switch
Step 1. In the SG200/300 Series configuration utility, choose Security > RADIUS. The RADIUS page opens:
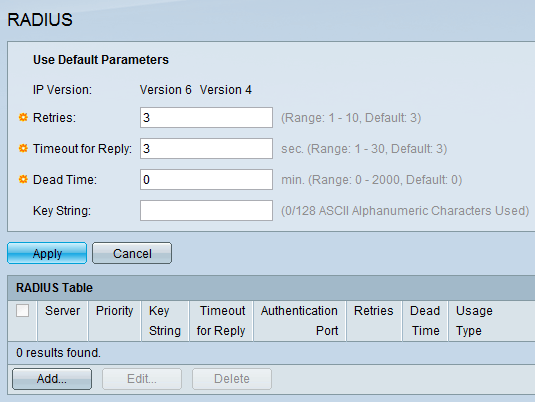
Step 2. Enter the default RADIUS settings.
- IP Version — Displays the supported IP version.
- Retries — In this field, enter the number of transmitted requests that are sent to the RADIUS server before a failure occurs.
- Timeout for Reply — In this field, enter the time, in seconds, the switch waits for an answer from the RADIUS server before it tries a query again.
- Dead Time — In this field, enter the time in minutes the switch waits before bypassing the RADIUS server.
- Key String — In this field, enter the default string used for authentication and encryption between the switch and the RADIUS server. The key must match the one configured at the RADIUS server.
Step 3. Click Apply to update the running configuration of the switch with the RADIUS settings.
Step 4. You need to add the RADIUS server to the switch. Click Add. The Add RADIUS Server page opens in a new window:
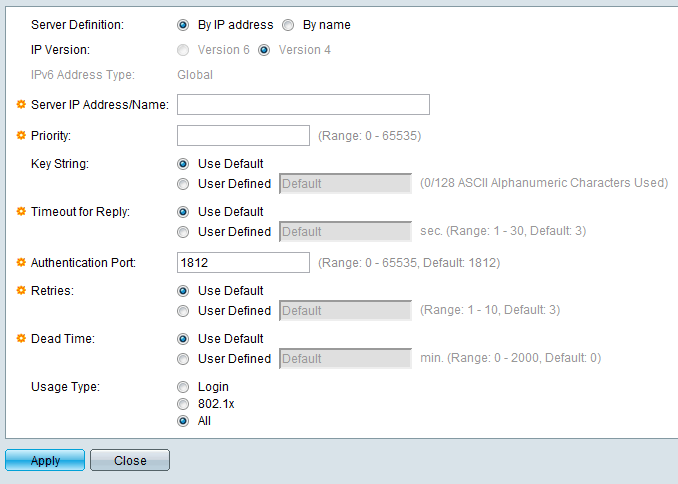
Step 5. Enter The values in the fields for the server. If you want to use the default values, select Use Default in the desired field.
- Server Definition — In this field, you specify how to connect to the server, either by IP address, or by the server name.
- IP Version — If the server is going to be identified by IP address, then select IPv4 or IPv6 address.
- IPv6 Address Type — This field display the type Global of the IPv6 address.
- Server IP Address/Name — In this field, enter the IP address or the domain name of the RADIUS server.
- Priority — In this field, enter the priority of the server. If more than one server is configured, the switch will attemp to connect to each server according to this priority value.
- Key String — In this field, enter the default string used for authentication and encryption between the switch and the RADIUS server. The key mmust match the one configured at the RADIUS server.
- Timeout for Reply — In this field, enter the time, in seconds, the switch waits for an answer from the RADIUS server before it tries a query again.
- Authentication Port — In this field, enter the UDP port number set for the RADIUS server for authentication requests.
- Retries — In this field, enter the number of transmitted requests that are sent to the RADIUS server before a failure occurs.
- Dead Time — In this field, enter the time in minutes the switch waits before bypassing the RADIUS server.
- Usage Type — In this field, enter the authentication type of the RADIUS server. There are three options:
— Login — RADIUS server authenticates users that wants to administer the switch.
— 802.1X — RADIUS server is used for 802.1X authentication.
— All — RADIUS server is used for Login and 802.1X authentications.
Step 6. Click Apply to add the server definition to the running configuration of the switch.
Configuring Windows Server 2008 for RADIUS
Step 1. In the Windows Server 2008 machine, choose Start > Administrative tools > Network Policy Server. The Network Policy Server window opens:
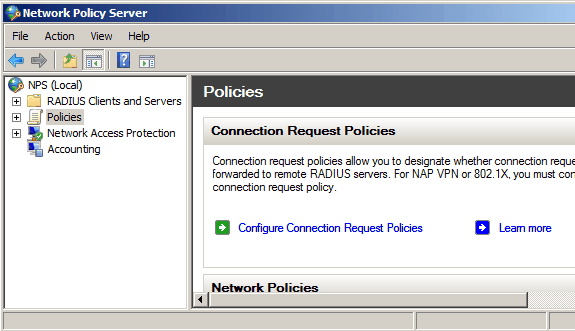
Step 2. To enable the RADIUS server for a specific segment of the network, you need to create a new network policy. To create a new Network Policy, choose Policies > Network Policy, then right click and select New. The New Network Policy windows opens:
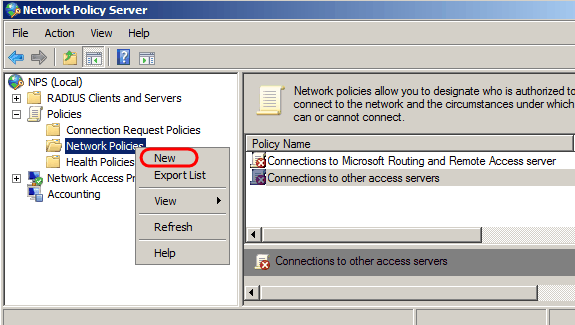
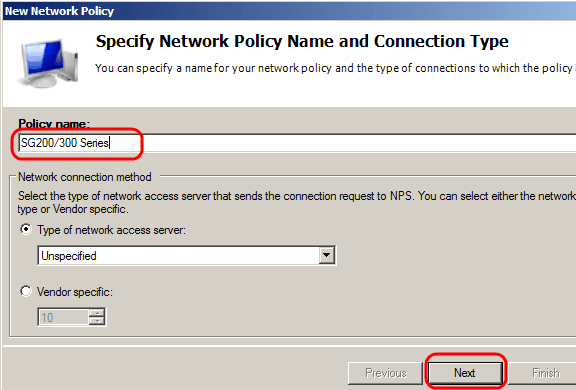
Step 3. In the Policy Name field, enter the name for the new policy. Click Next.
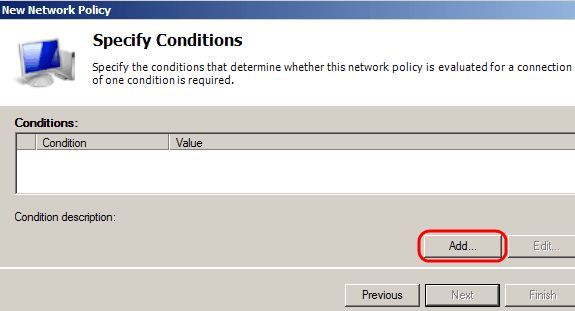
Step 4. You need to specify the conditions of this policy. There are two conditions needed: to which segment of users the RADIUS server is going to be implemented, and the method used to connect to this segment. Click Add to add these conditions.
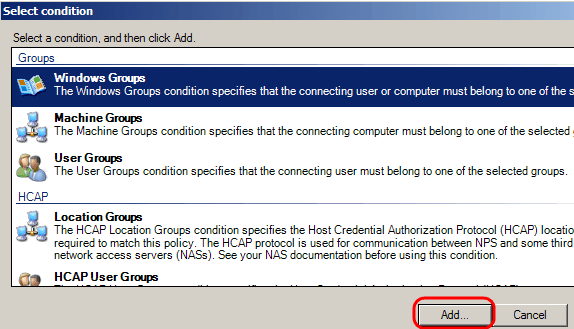
Step 5. Under Groups, there are three options: Windows Groups, Machine Groups, and User Groups. choose the group according to the setting of the network and click Add. A new window opens according to the group selected, click Add Groups.
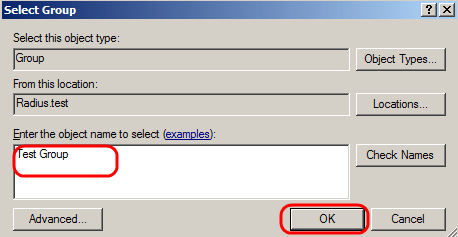
Step 6. Select the object type, the location, and enter the name of the object. Click Ok, then click Ok. Click Add to add the next condition.
Step 7. Under RADIUS Client, select choose IPv4 Address as the method to connect the server to the RADIUS clients, which in this case, will be the switch IP address. Click Add.
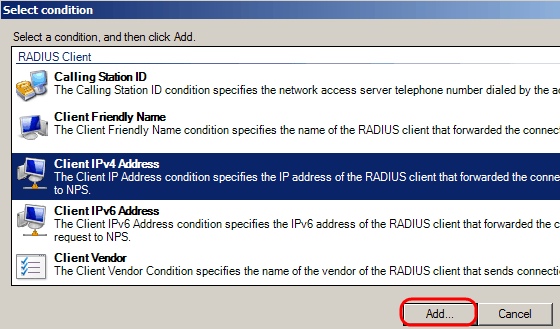
Step 8. Enter the corresponding IP address, then click Ok. A list with the added conditions is showed, click Next.
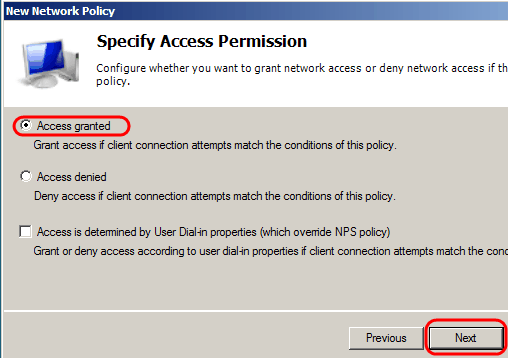
Step 9. In the Specify Access Permission page, select Access Granted. Click Next.
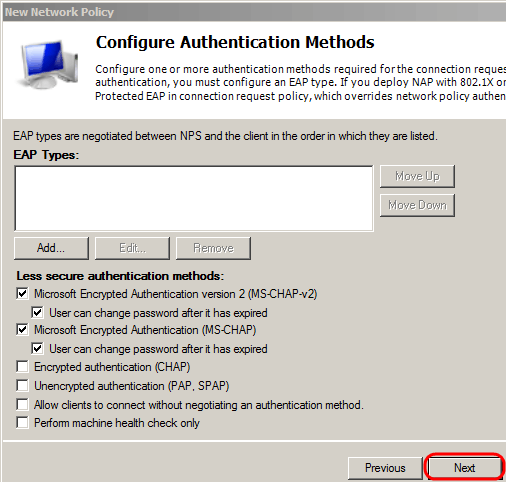
Step 10. In the authentication page, set the authentication method that best fit your network. Click Next.
Step 11. In the Configure Constraints window, use the default values. Click Next.
Step 12. In the Configure Settings page, under RADIUS Attributes, click Vendor Specific, then click Add.
Note: The rest of the settings In this page are set to their default values. You only need to take care of the Vendor Specific settings.
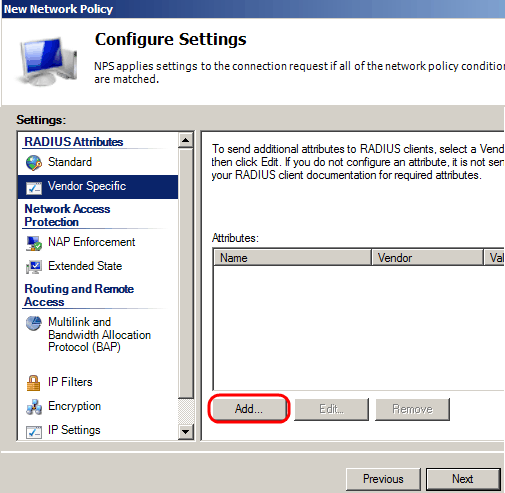
Under Vendor, Select Cisco. Click Add. The Attribute Information window opens.
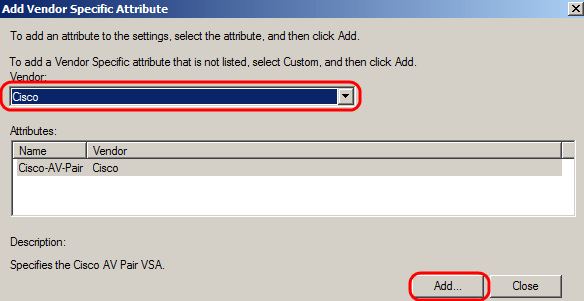
In the Attribute Information window, click Add and enter the value shell:priv-lvl:15. Click Ok.
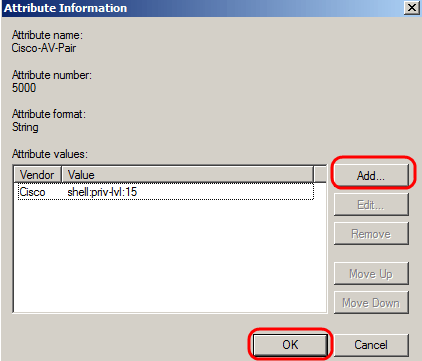
Note:This is the value assigned by Cisco in order for the RADIUS server to grant access to the web-based switch configuration utility.
Click Ok to close the Attribute Information window, then click Close to close the Add Vendor Specific Attribute window. Click Next.
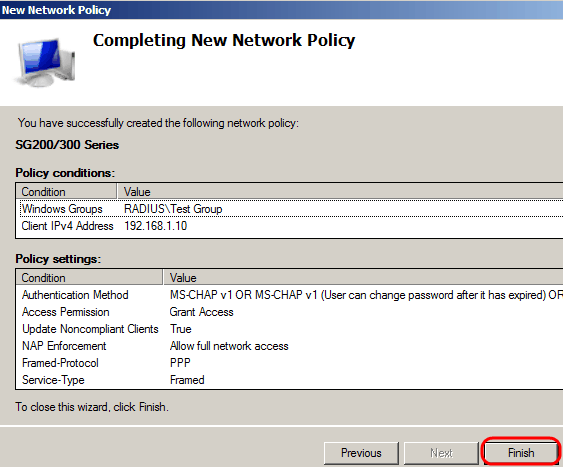
Step 13. A summary of the settings for this policy is showed, click Finish. The network policy is created.
Revision History
| Revision | Publish Date | Comments |
|---|---|---|
|
1.0 |
11-Dec-2018 |
Initial Release |
Contents
- 1 I. Introduction
- 2 II. Install the NPS role
- 3 III. Set up a client
- 4 Iv. Set up a policy
- 5 V. Set up equipment
I. Introduction
NPS, or Network Policy server, is one of the roles available since Windows 2008 server. It is the replacement for IAS (Internet Authentication Service) available on Windows 2003 Server. Since Windows Server 2008, this role has changed very little, which will allow you to apply it if you are on an earlier version of Windows Server. NPS relies on RADIUS (Remote AuthenticationDial-In User Service) a client-server protocol to centralize authentication data, allowing the connection to be connected under certain conditions.
In this tuto we’ll see how to install the NPS role, then we’ll set up a client (a switch) and a policy.
II. Install the NPS role
As with any new feature to install via the graphical interface, you start by accessing the Server Manager and then the Manage – Add Roles and Features tab
Click On Next until you choose the feature:


- Select “Network Policy and Access Services“

- Click Next to the last screen of the installation assistant, then “Install“


- Once installed, always in the Server Manager, go to Tools and then “Network Policy Server“
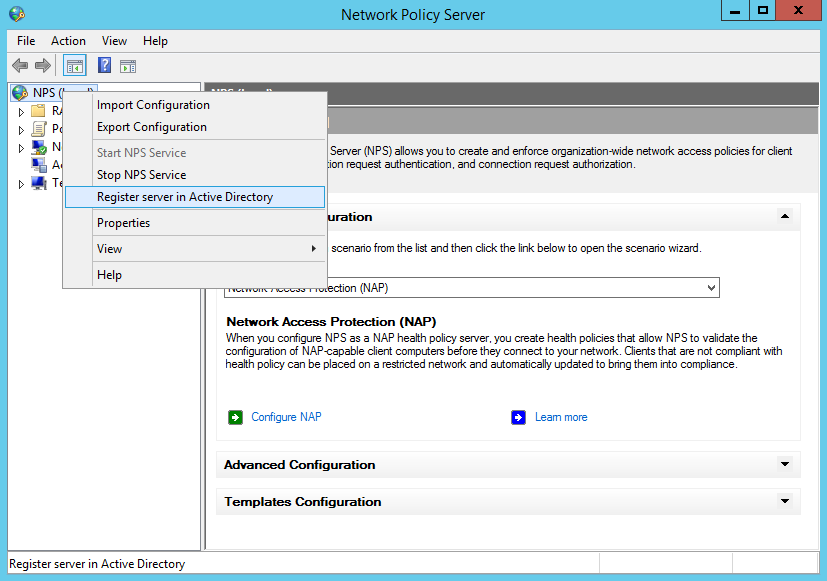
- Once launched, select “Register server in Active Directory“
Your server is now installed. Everything is ready to set up the first customers!
III. Set up a client
Now let’s move on to setting up a customer.
From a Windows perspective, a customer is a team that will connect to the NPS server to authenticate the user under certain conditions.
To add a new customer to do this:
- Click right on RADIUS Customers and then New:
- Learn more as requested below:
- 1: The name (to identify the equipment)
- 2: IP address or DNS name
- 3: The shared key that will be informed on the switch side also

- “Advanced” tab: Specify the Vendor name by choosing “Cisco”

- Once the setup is complete, you’ll be able to find your new customer in the list

Iv. Set up a policy
There is still one more step for the equipment to connect to the RADIUS server: the authentication policy!
- To set up a new policy, you have to go to the Network Policies section and then click right and select New
- Enter the policy name and leave the settings as below:

- Select a connection condition: here I chose to allow the connection to members of a certain group

- Select authentication methods as below

- In terms of attributes, you can delete “Framed-protocol,” and set “Service-type” to “Login”

- Then you’ll need to add a Vendor Specific Attribute. Click on “Add” and select: Cisco-AV-Pair. You will then need to provide information about the desired value: shell:priv-lvl-15. This setting specifies what privilege the user is assigned after he has authenticated (15 being the highest level, 1 the lowest).

- Finally, a summary of the various parameters provided:

V. Set up equipment
Finally, we’ll see how to set up an equipment to authenticate users via the radius server.
First, you need to define a local user that will be used if the radius server is not accessible:
|
Press RETURN to get started. Router1# <span class=»cmd»>enable</span> Router1# <span class=»cmd»>config terminal</span> Enter configuration commands, one per line. End with CNTL/Z. Router1(config)<span class=«cmd»>#username LOCALUSER private 15 secret s%$)çy545Yz'(t@ergert$-ù’t%$</span> Router1(config)# |
Then we can activate a new AAA model and set up the RADIUS server
|
Router1(config)<span class=«cmd»>#username LOCALUSER private 15 secret s%$)çy545Yz'(t@ergert$-ù’t%$</span> Router1(config)<span class=«cmd»>#aaa group server radius RADIUS-SERVERS</span> Router1(config—sg—radius)<span class=«cmd»>#server-private RADIUSIPSERVER at the th-port 1812 acct-port 1813 key (‘-%-à—«(‘efhgf'»»</span> Router1(config)<span class=«cmd»>#aaa authentication login default group RADIUS-SERVERS local</span> Router1(config)<span class=«cmd»>#aaa authorization exec default group RADIUS-SERVERS local if-authenticated</span> Router1(config)<span class=«cmd»>#aaa console authorization</span> |
That’s all!
It’s up to you! 🙂
Image source on the front page
Hi ! I’m Maxime. Founder and independant author of vDays.net. I have worked in service IT since 6 years ago, after a 5 years’ internship. Via this blog, I would like share and discuss with you on new technologies, especially on virtualization and VMware. If you want to know more about me, check out my “about me” page or follow me on Twitter and LinkedIn
RADIUS (Remote Authentication in Dial-In User Service) is a network protocol that provides centralized management of authentication, authorization, and accounting (AAA), and designed to exchange of information between a central platform and client devices. RADIUS server can communicate with a central server for example, Active Directory domain controller) to authenticate remote dial-in clients and authorize them to access specific network services or resources.
The Network Policy Server (NPS) role implements the RADIUS server function in the Windows environment and allows you to authenticate remote clients against Active Directory. In this article, we’ll show how to configure a RADIUS server on Windows Server 2022/2019/2016, and how to configure RADIUS authentication on Cisco and MikroTic network devices (RADIUS clients) under AD user accounts.
Installing Network Policy Server (RADIUS) on Windows Server
Windows Server with the NPS (RADIUS) role forwards connecting user authentication requests to Active Directory domain controller, which performs user authentication. Therefore, the presence of an on-premises Active Directory is a mandatory requirement before the start of an NPS deployment.
Now you can to install the RADIUS server role on your Windows Server 2022/2019/2016. Open the Server Manager console, run the Add Roles and Features wizard > select the Network Policy and Access Services role.
Note. Also, you can install NPS role and management tools from an elevated PowerShell console:
Install-WindowsFeature NPAS –IncludeManagementTools
Check if the NPAS role is installed on your Windows Server host:
Get-WindowsFeature -Name NPAS

After the role installation is completed, open the Network Policy Server (nps.msc) in the Tools menu.

Right-click on a root node of the NPS console and click Register server in Active Directory.
Confirm the new NPS server registration in Active Directory.

Also, you can register your NPS server in Active Directory with a command:
netsh ras add registeredserver
The AD machine account on the NPS server is given permission to read the properties Active Directory user accounts to authenticate users. Your NPS host computer account will be added to the built-in domain group RAS and IAS Servers.
Next, create a new security group in the Active Directory domain (for example, RemoteCiscoUsers) and add all users who will be allowed to authenticate on Cisco routers and switches to this group.

The next step is to add the Radius client. Radius client is the device from which your server can receive authentication requests. This could be a Cisco router, switch, Wi-Fi access point, etc.
Expand the RADIUS Clients and Servers > RADIUS Clients, select New.
On the Settings tab, fill the fields Friendly name, client Address (you can specify IP address or DNS name), and Shared Secret + Confirm shared password (you will use this password in the configuration of the Cisco switch/router).
Note. The shared secret password is rarely used in large corporate networks due to the problems with the distribution of shared secrets. It is recommended to use certificates instead of shared passwords. If you have a corporate Certification Authority (CA) deployed to implement PKI infrastructure, you can request a *.p12 certificate for the Radius/NPS server. Just import the certificate to the personal certification store of the Local Machine.

In the Advanced tab, select Vendor name – Cisco.

You can use the PowerShell command instead of the NPS GUI to add a new RADIUS client. In this case, you can use the New-NpsRadiusClient PowerShell cmdlet:
New-NpsRadiusClient –Address "192.168.31.1" –Name "cisco2960" –SharedSecret "Zb+kp^JUy]v\ePb-h.Q*d=weya2AY?hn+npRRp[/J7d"
Note. On Windows Server Datacenter edition you can add RADIUS clients to NPS by IP address range. This allows to add a large number of RADIUS clients (such as wireless access points) rather than adding them individually. You can specify the IP range using the format 10.1.0.0/22.
By default, NPS uses the following UDP ports to send and receive RADIUS traffic: 1812, 1813, 1645, and 1646. When you install the NPS role on Windows Server, rules for these ports are automatically created and enabled in Windows Defender Firewall. You can list these Windows Firewall rules using PowerShell:
Get-NetFirewallRule -DisplayGroup "Network Policy Server"
If your RADIUS client is located in a DMZ network or an external security perimeter, you must create the appropriate firewall rules on your network firewall.
Configure NPS Policies on the RADIUS Server
NPS policies allow you to authenticate remote users and grant them access permissions configured in the NPS role. NPS access policies allow you to associate the RADIUS client to the domain security group that determines the user privileges on CISCO devices.
There are two types of policy on a RADIUS server:
- Connection request policies — determine which RADIUS servers should authenticate and authorize connection requests received from RADIUS clients;
- Network policies — allow you to specify who is authorized to connect to your network and a list of assigned privileges.
In our case, we will use only the NPS Network policies. Expand the Policies > Network Policies branch and select New:
Specify the Policy name, the type of network access server should remain unchanged (Unspecified).

In the Specify conditions step, you need to add the conditions under which this RADIUS policy will be applied. Let’s add two conditions — the authorized user must be a member of a specific domain security group, and the device you want to access has a specific name. Use the Add option to create a new condition by selecting the Windows Group type (add the RemoteCiscoUsers group) and specifying the Client Friendly Name (Cisco_*).
Note. The Client Friendly Name field may differ from the DNS name of your device. We will need it in the further steps to identify a specific network device when creating a Remote Access Policy. For example, you can use this name to specify a mask through which several different RADIUS clients are processed by a single access policy.

On the next screen, select Access Granted.

My Cisco switch only supports Unencrypted authentication methods (PAP, SPAP), so I’ve disabled all other options.

Skip the next configuration Constraints step.
In the Configure Settings section, go to the RADIUS Attributes > Standard section. Delete the existing attributes there and click the Add button.
Select Access type > All, then Service-Type > Add. Specify Others = Login.

Now add a new attribute in the RADIUS Attributes > Vendor Specific section. Under Vendor, select Cisco, and click Add. Here you need to add information about the attribute. Click Add and specify the following value:
shell: priv-lvl = 15
This value means that the user authorized by this policy will be granted a maximum (15) administrative access privileges on the Cisco device.

The last screen displays all selected NPS policy settings. Click Finish.

If you have created several network policies in the NPS console, please note that they are processed from top to bottom, so the order of the policies is important. Further processing will stop if all conditions in the next policy are met. You can change the priority of policies in the NPS console using the Processing Order value.

By default, all AD accounts can be used to authenticate using RADIUS. You can check this using the Active Directory Users and Computers snap-in (dsa.msc). Open any user properties, go to the Dial-In tab, and check that the Control access through NPS Network Policy option in enabled in the Network Access Permission section.

Configuring RADIUS Authentication on Cisco Devices
Once you have created the NFS policy, you can proceed to configure your Cisco routers or switches for authentication on the newly installed RADUIS server.
As it is insecure to send unencrypted user credentials over the network, you should disable the Telnet protocol on your Cisco devices. To disable Telnet and enable SSH, use the following commands in Configuration Mode on the Cisco device:
configure terminal

crypto key generate rsa modulus 1024

ip ssh version 2
You should create a local user on your Cisco device to avoid losing access to it if the RADIUS server or AD is unavailable. Create a local user with the following command:
username cisco_local password $UPerrP@ssw0rd
To make the use of SSH mandatory and disable remote access using Telnet, execute the following commands:
line vty 5 15

transport input ssh
Below is an example of the configuration for authorizing a Radius server for the Cisco Catalyst Switch:
aaa new-model

aaa authentication login default group radius local

aaa authorization exec default group radius if-authenticated

radius-server host 192.168.1.16 key Sfs34e#sf

#Specify your RADIUS server IP address and key for encryption (the shared secret that we specified on the RADIUS server)

service password-encryption

# Enable password encryption
If you have several Radius servers, add them to the group:
aaa group server radius radius_srv_group

server 192.168.1.16

server 192.168.101.16
This completes the minimum switch configuration and you can try to check Radius authentication on your Cisco device.
How to Enable MikroTik (RouterOS) User Authentication via RADIUS
In this part, we will show you how to configure RADIUS authentication for VPN user connections on a MikroTik router (RouterOS based).
Open the Network Policy Server console (nps.msc) and create a new Radius client.
Select New RADIUS Client and configure the following settings:
- Enable this RADIUS Client;
- Friendly Name — enter the name of your MikroTik router;
- Address — specific the IP address of the MikroTik router;
- Specify your Pre-shared secret key.
Create a new Network Policy with the following settings:
- User Groups — specify the name of the domain user group that is allowed to authenticate on your MikroTik router;
- Authentication Type — MS-CHAPv2;
- Tunnel Type — Point-to-Point Tunneling Protocol (PPTP);
- Access Permissions — Access granted;
- In the Configure Authentication Methods window, leave only MS-CHAPv2 and allow users to change expired passwords (User can change password after it has expired option);
- Multilink and Bandwidth Allocation Protocol (BAP) – Do not allow Multilink connections;
- In the Standard section, remove Service-Type – Framed and leave only Framed-Protocol PPP;
- Encryptions — leave only the strongest encryption (MPP 128-bit) method.

Once you have created a new policy, open the Network Policy Server settings.
Leave only the following UDP ports for the RADIUS server communications:
- Authentication — 1812;
- Accounting — 1813.

Check if these UDP ports are open in Microsoft Defender Firewall Rules. If not, open them manually.
Now you need to configure the connection settings for Windows Server RADIUS in the MikroTik configuration (we assume that PPP VPN Server is already configured on RouterOS).
Check in the PPTP server settings that only mschap2 is allowed to use for authentication.
Now we need to configure the connection to Radius NPS server. Select New Radius Server and specify the following options:
- Service: ppp;
- Address: IP address of the RADIUS server;
- Secret: pre-shared key that you specified in the network policy settings;
- Src/ Address: MikroTik IP address from which traffic will be sent to NPS;
- Authentication Port: 1812;
- Accounting Port: 1813.
Add appropriate access rules to MikroTik Firewall.
Then go to Secrets > PPP Authentication and Accounting and enable the Use Radius option.
It remains to configure a PPTP VPN connection to your MikroTik VPN on users’ computers. Users can use their Active Directory account credentials to authenticate against Mikrotik (accounts must be added to the AD group that you have specified when creating the MiktoTik Network Policy on NPS).
How to View the NPS/RADIUS Event Logs on Windows?
To enable NPS Server Radius Authentication logging, you need to enable the Network Policy Server audit policy via the local Group Policy Editor (gpedit.msc). Go to Computer Configuration > Policies > Windows Settings > Security Settings > Advanced Audit Policy Configuration > Audit Policies > Logon/Logoff > Audit Network Policy Server and check the option to audit both success and failure logon attempts.
Now you can open the Event Viewer console (eventvwr.msc), go to the Windows Logs > Security, and filter the event by the Event ID 6272.
Network Policy Server granted access to a user.

If the user has entered an incorrect password or is not authorized to log on through the RADIUS Client, Event ID 6272 is displayed:
Network Policy Server denied access to a user.
If the user has entered an incorrect user name and password, an event will be displayed in the Event Viewer:
Authentication failed due to a user credentials mismatch
If the user is not a member of the correct security group, or if Network Access Permission= Deny is set in the AD user properties on the Dial-in tab, the following event will occur:
The Network Access Permission setting in the dial-in properties of the user account in Active Directory is set to Deny access to the use
If a user enters an incorrect password multiple times, their account will be locked out in accordance with your Account Lockout Policy in AD.
Event ID: 6279
Network Policy Server locked the user account due to repeated failed authentication attempts.
If you need to find all NPS authorizations events for the specific user (Richard.Doe in this example), use the next PowerShell script:
$Query = @"

<QueryList>

<Query Id="0" Path="Security">

<Select Path="Security">

*[EventData[Data[@Name='SubjectUserName'] and (Data=theitbros\richard.doe')]] and

*[System[(EventID='6272')]]

</Select>

</Query>

</QueryList>

"@

$events = Get-WinEvent -FilterXML $Query

$ipaddr = @{ label="IP"; Expression={$_.properties[9].value} }

$events | select $ipaddr | group "IP" | format-table Count, Name -autosize
Configuring Cisco devices to authenticate management users via RADIUS is a great way to maintain a centralized user management base. Traditionally this has been done using the Cisco Access Control Server (ACS) which of course is fairly expensive and is typically out of the price range for most small & medium sized businesses.
If you are like most businesses you may already have an Active Directory infrastructure deployed and thus you already have the necessary software and licenses required to setup a basic RADIUS server using Network Policy Server (NPS) which can be used to authenticate network administrators on your Cisco IOS equipment for management purposes. The main benefit you get from RADIUS authentication is a centralized management console for user authentication and the ability to control which users have access to the Cisco CLI. So look at it this way; if your company hires or fires an employee than whatever changes are applied in Active Directory will take affect immediately. Such as disabling a user account in AD would result in failed authentication attempts for that username when attempting to log into a Cisco device. Also if you have a new employee, you can easily give their username access to Cisco network devices just by adding them into a Security Group in active directory.
This blog will discuss and demonstrate the configuration of Network Policy Server which is included with Windows Server 2008 and greater however will blog concentrate on Windows Server 2008 R2.
Active Directory Configuration
First there are a few small task you must complete in Active Directory. You must create two Security Distribution Groups called Network Engineers and Network Support Technicians
Network Engineers will have level 15 privileges and thus have full read/write permissions to the Cisco Command Line interface after successfully authenticating to Cisco routers and Switches.
Network Support Technicians however will only have Read Only privileges.
Next you will need to assign users to these groups. For the purposes of this blog I have created two users, John Doe and John Smith.
John Doe (Username: jdoe) is a Network Engineer and John Smith (Username: jsmith) is a Network Support Technician. These users will be used to verify the configuration and operational status of NPS.
Once you have completed the basic Active Directory configuration you can move on to the NPS config. Please note that the Security Groups can be named whatever you like.
Windows Network Policy Server Configuration
Prior to configuring NPS it must first be installed and authorized in Active Directory. To install NPS add the “Network Policy and Access Services” role to your server.
After you have authorized NPS in Active Directory you’re ready to add the first RADIUS Client. To add the client you must expan the RADIUS Clients and Servers line and right click on RADIUS Clients and click “NEW”.
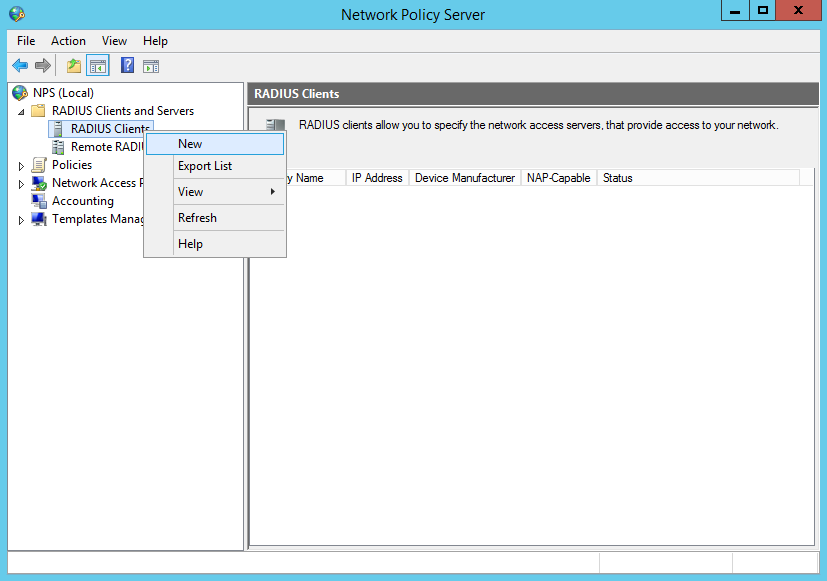
You’ll be prompted to enter the Friendly Name and Address, IP address and Shared Secret. Enter this information as required. For this blog we’re using R1 which had the IP address of 172.16.22.215 and the secret of CISCO as shown below;
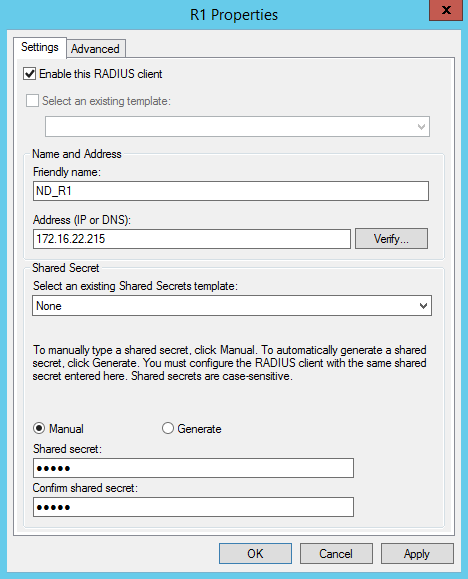
Note that ND_ is used as a prefix to the device friendly name, this will be used later in the configuration of the NPS Policy which can identify network devices.
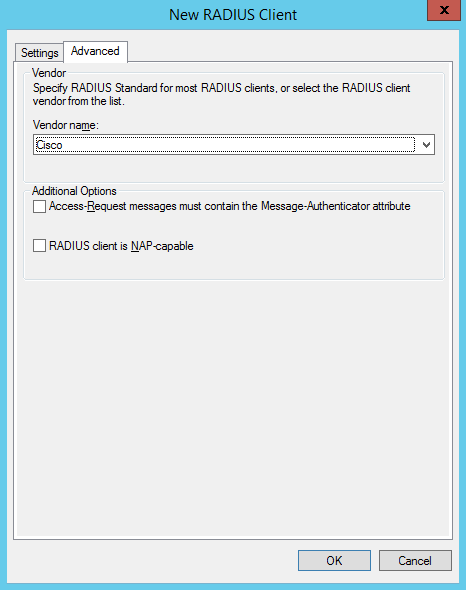
Next, click the Advanced Tab across the type and select “Cisco” as the vendor name from the drop down list and click ok;
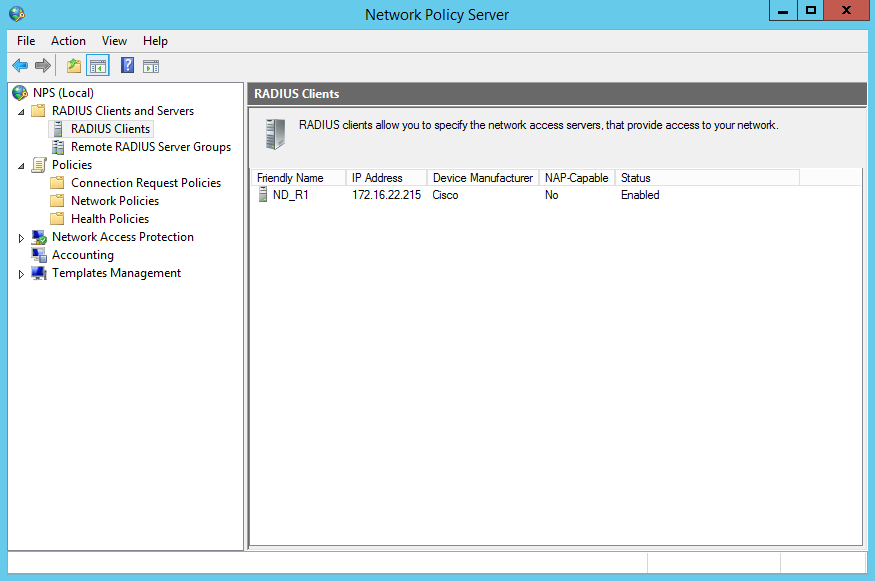
If you added the client correctly you should see the client friendly name, IP address and other information listed in the RADIUS Clients section;
Now you’re ready to configure the network policy which will authenticate users in the specific active directory groups and grant them access.
to create a new policy you need to expand the Policies item in the left list and right click on “Network Policies” and click NEW.
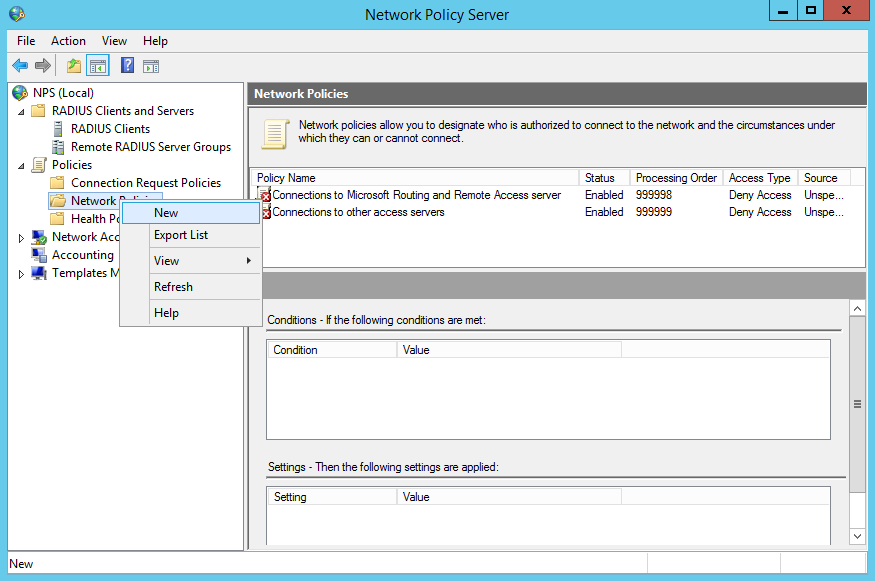
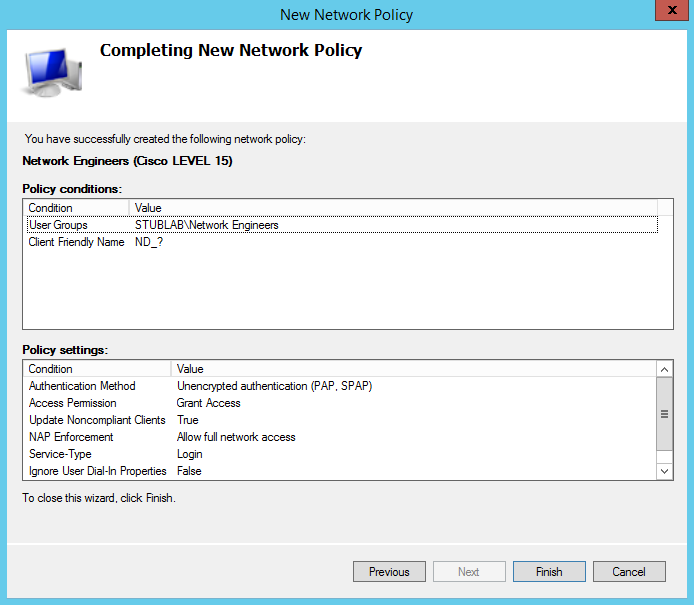
You must enter a name for the policy, in this case we’re going to use “Network Engineers (Cisco LEVEL 15)”

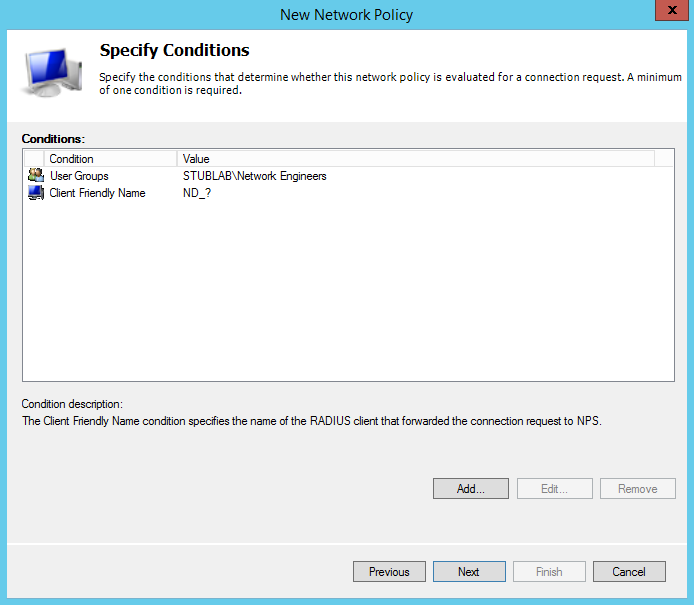
After you have provided a policy name you must than configure the conditions which are required to match in order to successfully authenticate. You will need to create two conditions;
Configure a User Group to match the Network Engineers security group and the Client Friendly Name to match “ND_?” which denotes the device authenticating has a friendly name starting with ND_
Once you’ve successfully added these conditions you should see the following;
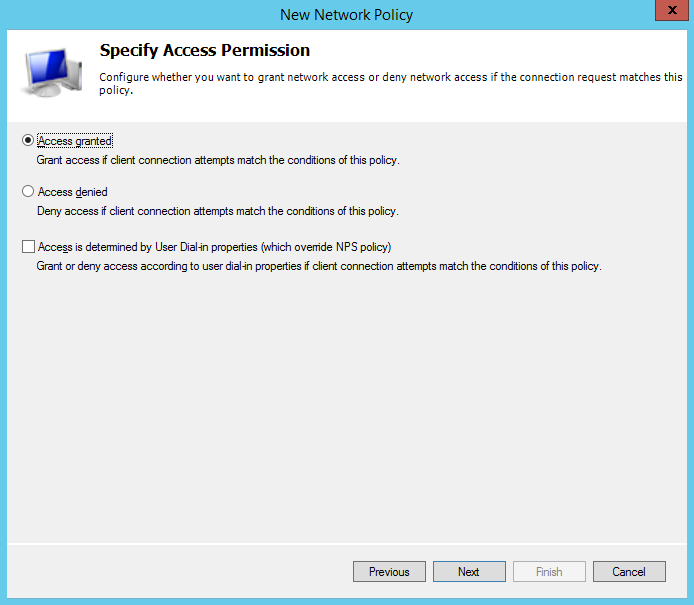
Click next and you’ll be prompted to specify the access permission, leave this as the default “Access Granted” and click next.
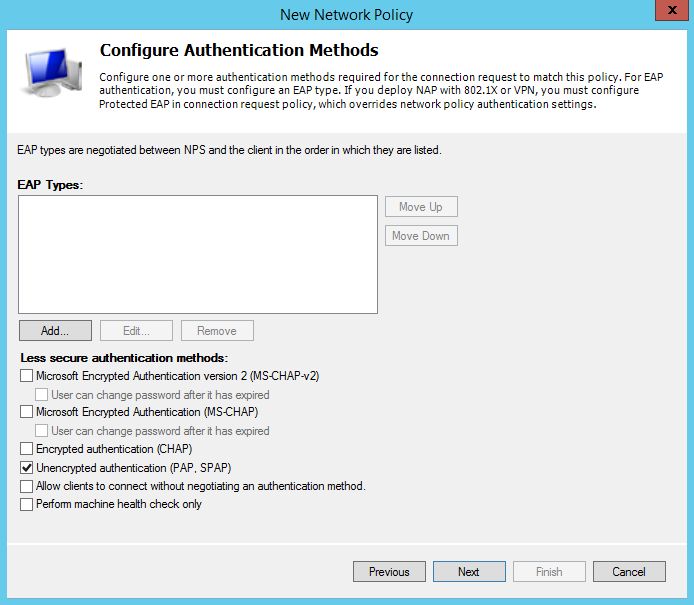
Cisco only supports the “Unencrypted authentication (PAP, SPAP) methods. Uncheck everything and check “Unencrypted authentication (PAP, SPAP) as shown below and click next;
After configuring the Authentication Methods you will be prompted to configure the Constraits, you can skip this section and just click next.
When prompted to configure settings, remove the Framed-Protocol and edit the Service-Type and set it to “Login” which is under “Others” as shown below;

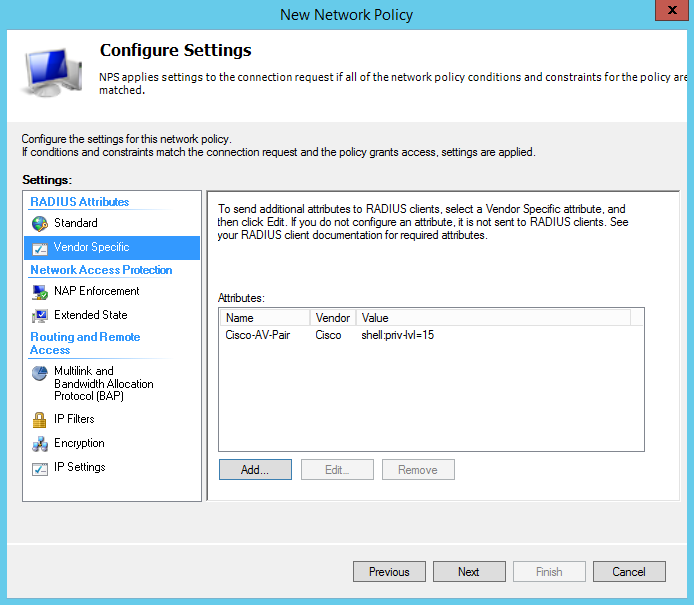
Next you will need to add a Vendor Specific Attribute by clicking on “Vendor Specific” under the left side settings and clicking the Add… button
Scroll down the list and select “Cisco-AV-Pair” and click add. You will be prompted to add the Attribute Information, here you will click Add… and set the attribute value as shell:priv-lvl=15
This specifies which privilege level is returned to the authenticating user/device after successful authentication. For Network Engineers this would be shell:priv-lvl=15 and the Network Support Technicians would use shell:priv-lvl=1
When added successfully you should see the following;
After you click next you will be presented a summary of the new network policy that you just created as shown below;
Click finish and you’re ready co configure the Cisco Routers and Switches to authenticate to the NPS Radius Server. Please note that you will need to create another policy for the Network Support Technicians and any other privilege levels you wish to use.
Cisco IOS AAA Configuration
The very first thing we need to do prior to configuring AAA is to setup a local user account so that when the RADIUS server has failed, you have the ability to still log into the device. This is done using the username command as demonstrated below;
R1 con0 is now available

Press RETURN to get started.

R1>enable
R1#config terminal
Enter configuration commands, one per line.  End with CNTL/Z.
R1(config)#username NORAD priv 15 secret R@du3F@1led
R1(config)#
Now we can enable AAA new model and configure the radius server group and default authentication list as demonstrated below;
R1(config)#username NORAD priv 15 secret R@du3F@1led
R1(config)#aaa group server radius NPS_RADIUS_SERVERS
R1(config-sg-radius)#server-private 172.16.22.228 auth-port 1812 acct-port 1813 key CISCO
R1(config)#aaa authentication login default group NPS_RADIUS_SERVERS local
R1(config)#aaa authorization exec default group NPS_RADIUS_SERVERS local if-authenticated
R1(config)#aaa authorization console
INFO: Users will ONLY authenticate to the RADIUS servers if the RADIUS server is alive when defining the default aaa authentication list using group NPS_RADIUS_SERVERS followed by local. If you are attempting to log into the device using a local account and the Radius servers are accessable than it will reject the authentication unless the local account used to log in also exist in Active Directory and are member(s) of the Network Engineers or Network Support Technicians security group.
And that’s it for the basic Cisco IOS AAA config. You can however get into some more advanced configurations by using AAA list and applying a radius authentication list to the VTY lines and local authentication only to the console line.
Verification
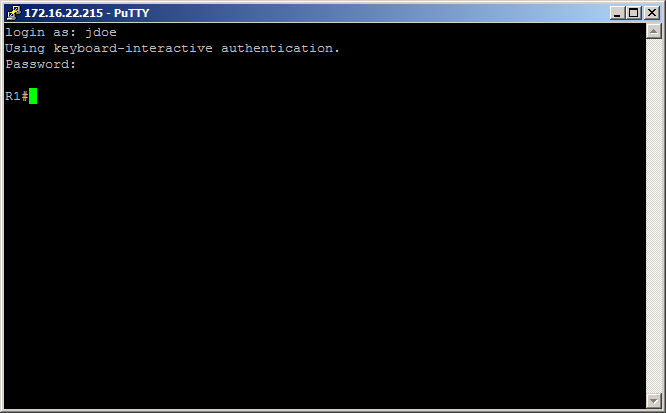
Now for the fun part, verification. If you completed all the steps correctly you should be able to log in using the jdoe username and be automatically placed into privilged mode as demonstrated below;
And also if you configured the second policy for Network Support Technicians, you should be able to authenticate as jsmith and be placed into user mode as shown below;

If you have any questions or suggestions please comment 🙂
Comments are closed.
Comments are closed.