
Hello! Windows Server is a system focused on the business sector. In addition, Microsoft developed it as a safe, functional, and practical system. However, it is also susceptible to failure. Such as errors in drivers, services, or parameters of both the system itself and other components. To solve this type of failure, the Redmond company has incorporated the Safe Mode. With this mode, the system will start in a basic state. In other words, it will only make use of a limited set of files and drivers. Consequently, it will be much easier to rule out bugs and problems. So by being able to enter the system using this mode, we can then reverse any changes responsible for the malfunction. For that reason, it is important to know how to use this function. So let’s see, how to start in safe mode in Windows Server 2019/2016.
How to start in safe mode from the system.
Before we go any further, it is important to clarify that the safe mode has two options:
- Safe mode: load basic controllers.
- Safe mode with network functions. Includes network drivers and services needed to access the Internet and other computers on the local network.
In order to set up the safe mode, it is necessary to start the system in the advanced mode. If you are running the system, then you have a couple of options to start in advanced mode:
- Press the Shift key and the off button at the same time. Once there, click on restart.
- Press the Win+I combination to enter the Windows Settings. Then follow the path: Update & Security> Recovery. Once there, click on Restart Now.

How to start in safe mode, using a Windows Server 2019/2016 installation media.
For this method, it is necessary to have some means of installing Windows Server. Either a DVD or a USB boot. Then, you have to start the process as if you were going to install the system. On the welcome screen, click on Next.

Please click on Repair computer.

A window with several options will be displayed immediately. Please click on Troubleshoot.

Then select Command Prompt:

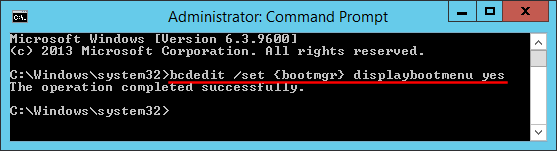
This will cause the CMD to be deployed. Please run this command:
bcdedit /set {bootmgr} displaybootmenu yes

This is a command line tool to manage the data associated with the boot configuration of the system.
Once this line is executed, we will execute the following:
bcdedit /set {bootmgr} timeout 15

After executing this command, execute the Exit command to exit the console. And back to the previous menu, turn off the system.

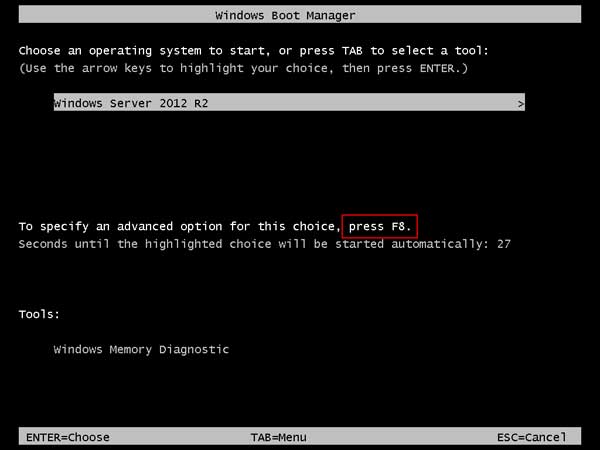
When you reboot the system, you will see the boot manager. Please select Windows Server. Then, press F8 to enter advanced start options.

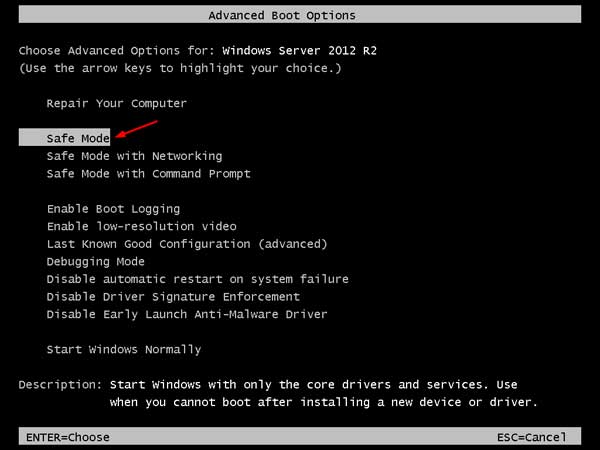
Then, just click on Safe Mode to start the system.

Eventually, the system will boot into Safe Mode.

Conclusion
Ultimately we have seen how to start in Safe Mode in Windows Server 2019/2016. This mode allows you to start the system with a minimum of drivers and files. This allows for troubleshooting. In addition, these instructions are common to both versions. I hope you find them useful in managing your servers. Before saying goodbye, I invite you to see our post about VMware on Windows 10. See you!
— Advertisement —
Everything Linux, A.I, IT News, DataOps, Open Source and more delivered right to you.
Subscribe
«The best Linux newsletter on the web»
July 24, 2016 updated by
Leave a reply »
How can I get into Safe Mode on the new Windows operating systems such as Windows 8, Windows 10 and Server 2012? Starting from Windows 8, the system boots very quickly and the time to press F8 key to access Safe Mode is smaller than 200 milliseconds, so it’s almost impossible to enter into the Safe Mode by pressing F8 during boot time.
In this tutorial we’ll show you 3 workable ways to boot Windows Server 2012 into Safe Mode. The methods should also work with Windows 10 and Windows 8/8.1.
Method 1: Boot Windows Server 2012 into Safe Mode Using Command Prompt
- Press the Windows key + X to open the WinX menu, select “Command Prompt (Admin)” from the list.
- In order to make Windows display the Windows Boot Manager, type the following command at the Command Prompt and press Enter. You will get a confirmation stating that The operation completed successfully.
bcdedit /set {bootmgr} displaybootmenu yes
If you want to stop displaying the Windows Boot Manager later, run this command instead:
bcdedit /set {bootmgr} displaybootmenu no - Now restart your computer and you’ll see the Windows Boot Manager screen. Just press F8 to bring up the Advanced Boot Options.

- Select Safe Mode and press Enter. This will open Windows Server 2012 in Safe Mode.
Method 2: Boot Windows Server 2012 into Safe Mode Using System Configuration
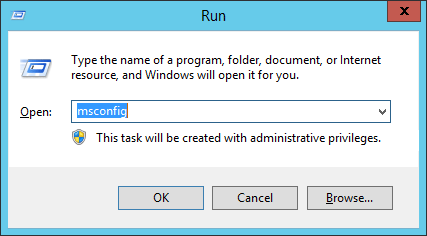
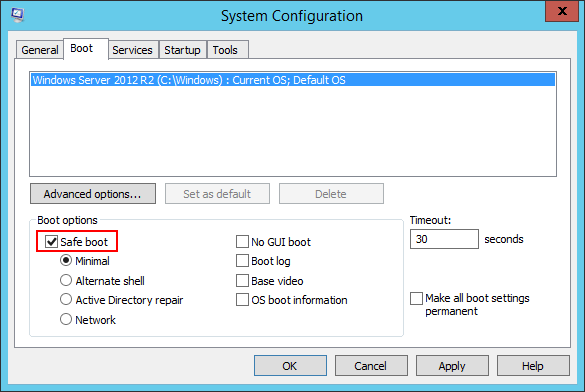
- Press the Windows key + R to open the Run box. Type msconfig and press Enter.

- Now the System Configuration dialog box will be opened. Under the Boot tab, check the Safe boot option and click OK.

- Reboot your computer and it will boot directly into Safe Mode automatically. If you wan to stop Windows from booting into Safe Mode next time, you need to open the System Configuration utility (msconfig) again and uncheck the Safe boot option.
Method 3: Boot Windows Server 2012 into Safe Mode Using Settings App
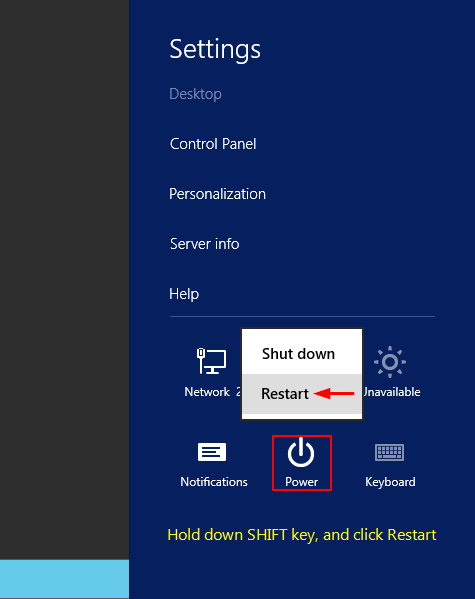
- To get started, you need to open the Settings panel. This can be done by hovering your mouse to the top right-hand corner of the screen, or press the Windows key + I on your keyboard.
- Hold down the SHIFT key on your keyboard, and then click on Power icon and select Restart.

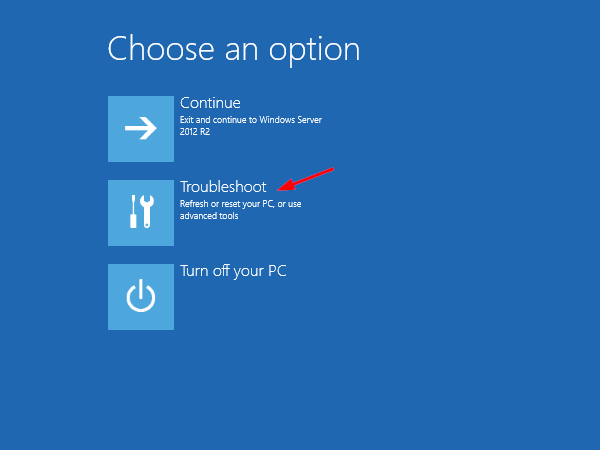
- You will need to click on the Troubleshoot option.
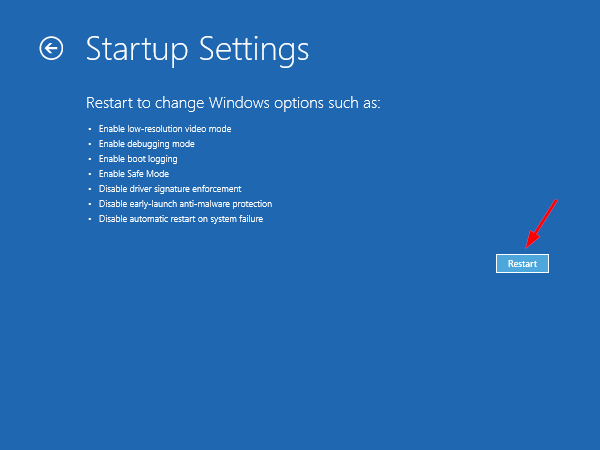
- Click Startup Settings.
- Click Restart.
- The computer will boot automatically to the Advanced Boot Options screen. From there you can select Safe Mode to start Windows Server 2012 in Safe Mode.

- Previous Post: How to Change Windows 10 Login Background to Solid Color
- Next Post: How to Fix “Task Manager is Disabled or Greyed out” in Windows 10
How to Boot Windows Server 2019 in Safe Mode?
Direct Answer:
To boot Windows Server 2019 in safe mode, follow these steps:
- Restart your server: Restart your Windows Server 2019 machine.
- Press F8: As the server is booting, press and hold the F8 key. This will bring up the «Advanced Options» menu.
- Select «Safe Mode»: Use the arrow keys to navigate to «Safe Mode» and press Enter.
Why Boot in Safe Mode?
Booting your Windows Server 2019 in safe mode can be useful in a variety of situations, such as:
- Troubleshooting issues: Safe mode can help you troubleshoot system-wide issues, such as corrupted drivers or faulty hardware, by disabling all non-essential drivers and services.
- Recovering from malware: Safe mode can help you remove malware by preventing it from executing and loading.
- Loading minimal services: Safe mode loads a minimal set of services, which can be useful for testing or troubleshooting specific issues.
Booting in Safe Mode: A Step-by-Step Guide
Here’s a step-by-step guide on how to boot your Windows Server 2019 in safe mode:
Step 1: Restart your server
Restart your Windows Server 2019 machine. This will bring up the «Windows Server 2019» logo, followed by the «Advanced Options» menu.
Step 2: Press F8
As the server is booting, press and hold the F8 key. This will bring up the «Advanced Options» menu, which will display a list of available options, including:
- Safe Mode
- Safe Mode with Networking
- Safe Mode with a Command Prompt
- Repair Your Computer
- Resume
Step 3: Select «Safe Mode»
Use the arrow keys to navigate to «Safe Mode» and press Enter. You can also use the «Tab» key to navigate between options, and the «Spacebar» to select an option.
Booting in Safe Mode: What to Expect
When you boot your Windows Server 2019 in safe mode, you’ll notice the following:
- Minimal services: Only essential services will be loaded, including the following:
- Windows Process Activation Service (Wnaspi): Handles processes related to Windows.
- Windows Update Service: Handles updates and patching.
- Print Spooler Service: Handles printing.
- Windows Management Instrumentation (WMI) Service: Provides information and management for system resources.
- Limited functionality: Most devices and hardware will not be loaded, except for essential devices like the keyboard and mouse.
- No network connectivity: Network connectivity will not be available.
- Graphics: The system will use the standard VGA driver, which may result in a low-resolution display.
Tips and Considerations
- Useful for troubleshooting: Booting in safe mode can help you troubleshoot system-wide issues, such as corrupted drivers or faulty hardware.
- Useful for malware removal: Safe mode can help you remove malware by preventing it from executing and loading.
- Useful for testing: Safe mode can be used to test specific drivers or services without having to restart the entire system.
Conclusion
Booting your Windows Server 2019 in safe mode can be a useful troubleshooting tool for a variety of issues. By following the steps outlined above, you can quickly and easily boot your server in safe mode and get to the root of the problem. Remember to use safe mode sparingly, as it can disrupt normal system functionality.
Your friends have asked us these questions — Check out the answers!
UPDATED: March 2018
If you have worked on Windows 8 or newer, you will know that Microsoft has removed the F8 boot functionality. They did this to decrease boot times. What is odd is that they applied this logic to servers; I would not have. Regardless the F8 Safe Mode functionality is not truly removed, it is just turned off.
To turn F8 boot on in Server 2012 you need to get to an elevated CMD prompt. If your server is functional that is easy. If your server won’t boot (hence the need for F8) then you can boot off of a Windows Server install DVD and select REPAIR YOUR COMPUTER option, the Troubleshooting, then Command Prompt.
Once you have a Command Prompt (as an administrator) open enter the following commands which are self explanatory:
- bcdedit /set {bootmgr} displaybootmenu yes
- bcdedit /set {bootmgr} timeout 10
Reboot your machine and enjoy pressing F8 and getting back into SAFE MODE or LAST KNOWN GOOD to work out your problem.
This will also work on Windows 8 and Windows 10.
Note that the BCDEDIT commands do NOT work from PowerShell. They NEED to be run from CMD.EXE :
Thanks to a number of blogs including THIS one.
Thanks

Introduction
In this article, you will learn how to boot windows server into safe mode.
Safe Mode is an unique Windows boot-up mode that can be used to restart the computer once a major problem has occurred that interferes with normal Windows functions and activities. Safe Mode enables users to debug and find the root cause of a fault.
In safe mode, an operating system has reduced functionality; however, the process of isolating problems is facilitated by the fact that many non-essential components, such as sound, are disabled. An installation that will only boot into safe mode typically has a significant issue, such as disc corruption or the installation of software with improper configuration, which prevents the operating system from successfully booting into its normal operating mode and allowing the user to use the computer as intended.
A user is normally granted access to utility and diagnostic programs when operating in safe mode. This enables the user to investigate and resolve issues that prevent the operating system from functioning normally. The functionality of the system is not meant to be used while in safe mode, and user access to features is severely restricted.
You have to login into your window server.
Step 1. On the right side of the window, search cmd and click on Command Prompt.

Step 2. Now run the msconfig command.
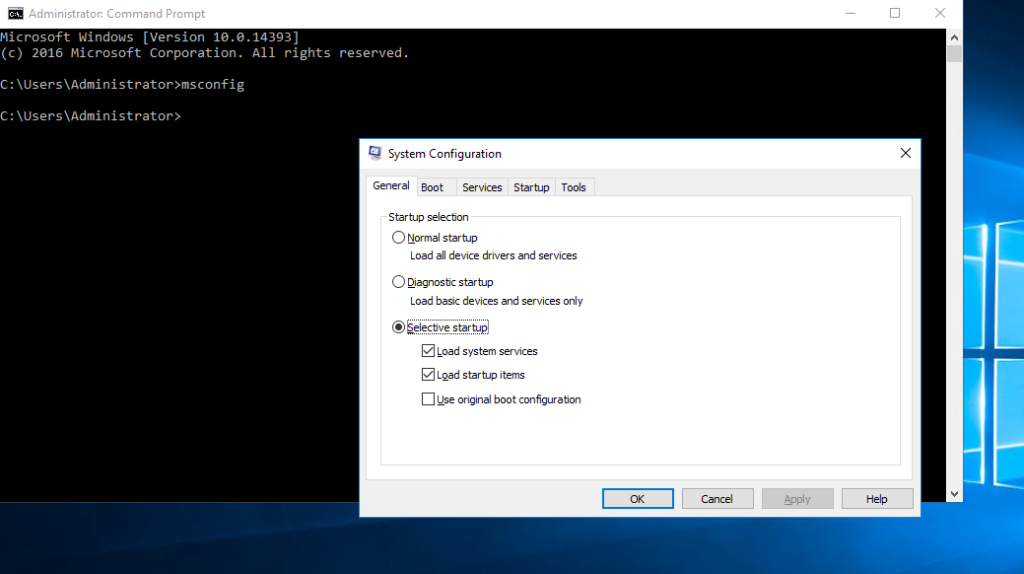
Step 3. Now click Left on the boot option, which is next to the general.
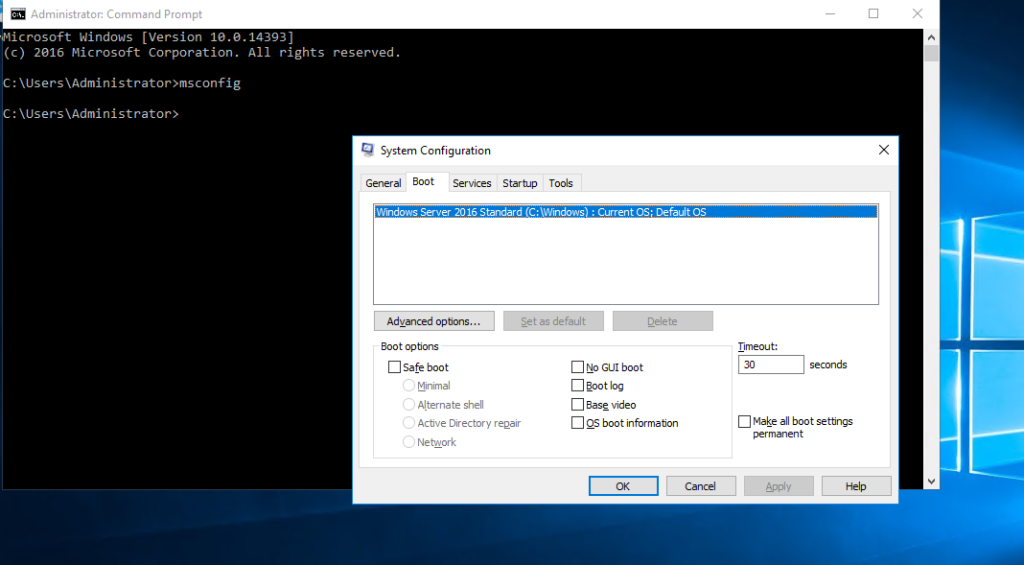
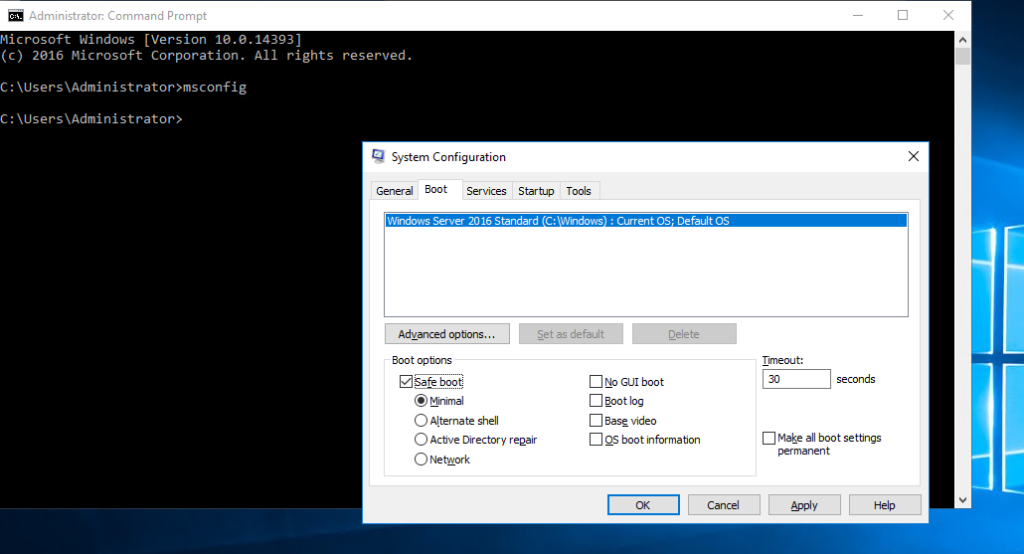
Step 4. Go to the Boot menu, and then choose “Safe boot” from the list of “Boot settings.”
Step 5. After pressing OK, the below screenshot will show on your screen. Select the Restart option to apply the changes.
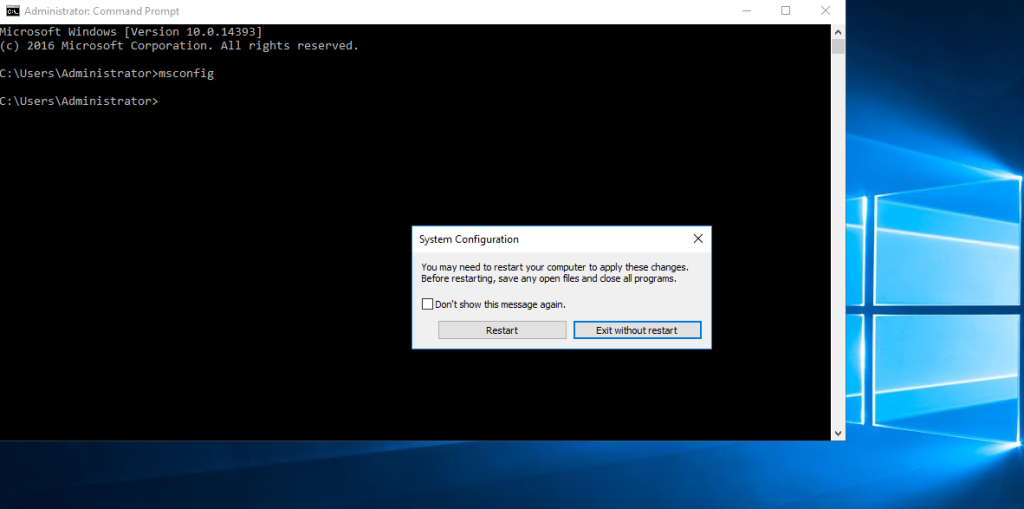
Step 7. After selecting Restart, you have to log into your server again and you will see a black screen on your server. That means your server is now in safe mode.

Conclusion
Hopefully, you have learned how to boot windows server into safe mode.
Also read: How to Install OpenSSH on Windows Server
Thank You 🙂