
The error (Event ID 7024) on the Event Viewer is: The Routing and Remote Access service terminated with the following service- specific error: The system cannot find the file specified.
Full
Answer
What is the event ID for the routing and remote access service?
Event ID: 7024 The Routing and Remote Access service terminated with service-specific error 31 (0x1F). Event ID: 7024 The Routing and Remote Access service terminated with service-specific error 20205 (0x4EED).
What platforms are affected by the 7024 routing and remote access error?
Platforms affected: Windows Server 2008 R2, Server 2008, Server 2003 R2, Server 2003, Server 2000 (both 32-bit and 64-bit installs are affected). Event ID: 7024 The Routing and Remote Access service terminated with service-specific error 2 (0x2). Event ID: 7024 The Routing and Remote Access service terminated with service-specific error 31 (0x1F).
What is the error code for the routing and remote access service?
The Routing and Remote Access service terminated with service-specific error 2 (0x2). the old error was ( the Routing and Remote Access service terminated with service-specific error 31 (0x1F) ). I realize this is probably too late for you, but I had this problem, and was able to solve it.
Which platforms are affected by Windows Server 2008 R2 (R2) error 7024?
Platforms affected: Windows Server 2008 R2, Server 2008, Server 2003 R2, Server 2003, Server 2000 (both 32-bit and 64-bit installs are affected). Event ID: 7024 The Routing and Remote Access service terminated with service-specific error 2 (0x2).
How do I fix error 7024?
To resolve this issue, first review the service-specific error code that the Service Control Manager encountered when trying to stop the service, and then review the Event logs for other related events that have been logged by the Service Control Manager (SCM) Eventlog Provider.
What is Eventid 35?
Event ID — 35 The time service is now synchronizing the system time with the time source %1. Event Information. According to Microsoft : Cause : This event is logged when the time service is now synchronizing the system time with the time source.
Where is PACRequestorEnforcement?
PACRequestorEnforcement Registry Key You can configure the behaviour of the patch by applying the DWORD registry key PACRequestorEnforcement at HKEY_LOCAL_MACHINE\System\CurrentControlSet\Services\Kdc on your domain controllers.
What is Krbtgt account?
KRBTGT is an account used for Microsoft’s implementation of Kerberos, the default Microsoft Windows authentication protocol.
Question
Okay we have some serious problem here with starting the Routing and Remote acces service on Windows 2008 SBS server,
All replies
Whatever else, please put back the IPv6. Contrary to what you may find when searching for fixes, deleting/removing IPv6 is NOT recommended, and in fact may break more things. See the blog post on issues after disabling IPv6 which also address the proper steps for disabling IPv6 if it’s necessary.
What is Service Control Manager error?
This event is generated when the Service Control Manager cannot properly terminate a service. The name of the service and the error generated by it are displayed in the event.
How to open Event Viewer?
Open Event Viewer by clicking the Start button, Control Panel, and Administration Tools, then double-clicking Event Viewer. Note: For Windows Vista, use the Classic View display option in Control Panel to see the Administration Tools. Click Event Viewer (Local), then Windows Logs and System.
Where is the source of events in SCM?
In the details pane, click on the Source column to view the events sorted by the entity that logged that event. For events logged by the SCM, the source is the Service Control Manager Eventlog Provider.
Popular Posts:
What is Error 7024?
Error 7024 is a kind of Runtime error that is found in the Microsoft Windows operating systems. The file can be found for Quicken. Quicken Error 7024 has a popularity rating of 1 / 10.
Errors
This tutorial contains information on Error 7024 or otherwise known as Quicken Error 7024. Errors such as Quicken Error 7024 indicate your machine has faulty hardware or software that should be fixed when possible. Below is information on how to repair Error 7024 and get your computer back to normal.
Signs of Error 7024:
- When your computer freezes or locks up at random.
- When your computer crashes when you are running Quicken.
- If Quicken Error 7024 pops up and causes a program to shutdown or your computer to crash.
- Your computer is running slow, taking a long time to boot up, and you suspect Error 7024 by Quicken is the cause.
What Causes Runtime Errors Like Error 7024?
There are several causes of runtime errors like Quicken Error 7024, such as viruses, out of date drivers, missing files or folders, incomplete or poor installation, and registry errors. They can also occur due to an issue with the computer’s memory, which may often be due to a hardware problem. In some cases there was an issue installing Quicken and an error occurred.
How to Fix Quicken Error 7024
Follow the step by step instructions below to fix the Error 7024 problem. We recommend you do each in order. If you wish to skip these steps because they are too time consuming or you are not a computer expert, see our easier solution below.
Step 1 — Uninstall and Reinstall Quicken
If the Quicken Error 7024 is a result of using Quicken, you may want to try reinstalling it and see if the problem is fixed. Please follow these steps:
Windows XP
- Click “Start Menu”.
- Click “Control Panel”.
- Select the “Add or Remove” program icon.
- Find the Error 7024 associated program.
- Click the Change/Remove button on the right side.
- The uninstaller pop up will give you instructions. Click “okay” or “next” or “yes” until it is complete.
- Reinstall the software.
Windows 7 and Windows Vista
- Click “Start Menu”.
- Click “Control Panel”.
- Click “Uninstall a Program” which is under the “Programs” header.
- Find the Error 7024 associated program.
- Right click on it and select “Uninstall”.
- The uninstaller pop up will give you instructions. Click “okay” or “next” or “yes” until it is complete.
- Reinstall the software and run the program.
Windows 8, 8.1, and 10
- Click “Start Menu”.
- Click “Programs and Features”.
- Find the software that is linked to **insert file name**.
- Click Uninstall/Change.
- The uninstaller will pop up and give you instructions. Click “okay” and “next” until it is complete.
- Restart your computer.
- Reinstall the software and run the program.
Step 2 — Remove Registry Entry related to Error 7024
WARNING: Do NOT edit the Windows Registry unless you absolutely know what you are doing. You may end up causing more trouble than you start with. Proceed at your OWN RISK.
- Create a backup of registry files.
- Click “Start”.
- Type regedit, select it, and grant permission in order to proceed.
- Click HKEY LOCAL MACHINE>>SOFTWARE>>Microsoft>>Windows>>Current Version>>Uninstall.
- Find the Quicken Error 7024 software from the list you wish to uninstall.
- Select the software and double click the UninstallString icon on the right side.
- Copy the highlighted text.
- Exit and go to the search field.
- Paste the data.
- Select Okay in order to uninstall the program.
- Reinstall the software.
Step 3 – Ensure Junk Isn’t Causing Quicken Error 7024
Any space that isn’t regularly cleaned out tends to accumulate junk. Your personal computer is no exception. Constant web browsing, installation of applications, and even browser thumbnail caches slow down your device and in the absence of adequate memory, can also trigger a Quicken Error 7024 error.
So how do you get around this problem?
- You can either use the Disk Cleanup Tool that comes baked into your Windows operating system.
- Or you can use a more specialized hard drive clean up solution that does a thorough job and flushes the most stubborn temporary files from your system.
Both solutions may take several minutes to complete the processing of your system data if you haven’t conducted a clean up in a while.
The browser caches are almost a lost cause because they tend to fill up quite rapidly, thanks to our constantly connected and on the go lifestyle.
Here’s how you can run the Window’s Disk Cleanup Tool, without performance issues or surprises.
- For Windows XP and Windows 7, the program can be ran from “Start” and from the “Command Prompt”.
- Click “Start”, go to All Programs > Accessories > System Tools, click Disk Cleanup. Next choose the type of files you wish to remove, click OK, followed by “Delete Files”.
- Open up the Command Prompt, type “c:\windows\cleanmgr.exe /d” for XP and “cleanmgr” for Windows 7. Finish by pressing “Enter”.
- For Windows 8 and Windows 8.1, the Disk Cleanup Tool can be accessed directly from “Settings”. Click “Control Panel” and then “Administrative Tools”. You can select the drive that you want to run the clean up on. Select the files you want to get rid of and then click “OK” and “Delete Files”.
- For Windows 10, the process is simplified further. Type Disk Cleanup directly in the search bar and press “Enter”. Choose the drive and then the files that you wish to wipe. Click “OK”, followed by “Delete Files”.
The progressive ease with which the Cleanup Tool can be used points to the growing importance of regularly deleting temporary files and its place in preventing Quicken Error 7024.
PRO TIP:
Remember to run the Disk Cleanup as an administrator.
Step 4 – Fix Infections and Eliminate Malware in Your PC
How do you gauge if your system is infected with a malware and virus?
Well, for one, you may find certain applications misbehaving.
And you may also see the occurrence of Error 7024.
Infections and malware are the result of:
- Browsing the Internet using open or unencrypted public Wi-Fi connections
- Downloading applications from unknown and untrustworthy sources
- Intentional planting of viruses in your home and office networks
But thankfully, their impact can be contained.
- Enter “safe mode” by pressing the F8 key repeatedly when your device is restarting. Choose “Safe Mode with Networking” from the Advanced Boot Options menu.
- Back up all the data in your device to a secure location. This is preferably a storage unit that is not connected to your existing network.
- Leave program files as is. They are where the infection generally spreads from and may have been compromised.
- Run a thorough full-system scan or check of an on-demand scanner. If you already have an antivirus or anti-malware program installed, let it do the heavy lifting.
- Restart your computer once the process has run its course.
- Lastly, change all your passwords and update your drivers and operating system.
PRO TIP: Are you annoyed by the frequent updates to your antivirus program? Don’t be! These regular updates add new virus signatures to your software database for exponentially better protection.
Step 5 – Return to the Past to Eliminate Error 7024
The steps outlined up until this point in the tutorial should have fixed Quicken Error 7024 error. But the process of tracking what has caused an error is a series of educated guesses. So in case the situation persists, move to Step 5.
Windows devices give users the ability to travel back in time and restore system settings to an uncorrupted, error free state.
This can be done through the convenient “System Restore” program. The best part of the process is the fact that using System Restore doesn’t affect your personal data. There is no need to take backups of new songs and pictures in your hard drive.
- Open “Control Panel” and click on “System & Security”.
- Choose the option “System”.
- To the left of the modal, click on “System Protection”.
- The System Properties window should pop-up. You’ll be able to see the option “System Restore”. Click on it.
- Go with “Recommended restore” for the path of least hassles and surprises.
- Choose a system restore point (by date) that will guarantee taking your device back to the time when Error 7024 hasn’t been triggered yet.
- Tap “Next” and wrap up by clicking “Finish”.
If you’re using Windows 7 OS, you can reach “System Restore” by following the path Start > All Programs > Accessories > System Tools.
Step 6 — Error 7024 Caused by Outdated Drivers
Updating a driver is not as common as updating your operating system or an application used to run front-end interface tasks.
Drivers are software snippets in charge of the different hardware units that keep your device functional.
So when you detect an Quicken Error 7024 error, updating your drivers may be a good bet. But it is time consuming and shouldn’t be viewed as a quick fix.
Here’s the step-by-step process you can go through to update drivers for Windows 8, Windows 8.1 and Windows 10.
- Check the site of your hardware maker for the latest versions of all the drivers you need. Download and extract them. We strongly advice going with original drivers. In most cases, they are available for free on the vendor website. Installing an incompatible driver causes more problems than it can ever fix.
- Open “Device Manager” from the Control Panel.
- Go through the various hardware component groupings and choose the ones you would like to update.
- On Windows 10 and Windows 8, right-click on the icon of the hardware you would like to update and click “Update Driver”.
- On Windows 7 and Vista, you right-click the hardware icon, choose “Properties”, navigate to the Driver panel, and then click “Update Driver”.
- Next you can let your device automatically search for the most compatible drivers, or you can choose to update the drivers from the versions you have on your hard drive. If you have an installer disk, then the latter should be your preferred course of action. The former may often get the driver selection incorrect.
- You may need to navigate a host of warnings from the Windows OS as you finalize the driver update. These include “Windows can’t verify that the driver is compatible” and “Windows can’t verify the publisher of this driver”. If you know that you have the right one in line, click “Yes”.
- Restart the system and hopefully the Quicken Error 7024 error should have been fixed.
Step 7 – Call the Windows System File Checker into Action
By now the Quicken Error 7024 plaguing your device should have been fixed. But if you haven’t resolved the issue yet, you can explore the Windows File Checker option.
With the Windows File Checker, you can audit all the system files your device needs to operate, locate missing ones, and restore them.
Sound familiar? It is almost like “System Restore”, but not quite. The System Restore essentially takes you back in time to a supposedly perfect set up of system files. The File Checker is more exhaustive.
It identifies what is amiss and fills the gaps.
- First and foremost, open up an elevated command prompt.
- Next, if you are using Windows 8, 8.1 or 10, enter “DISM.exe /Online /Cleanup-image /Restorehealth” into the window and press Enter.
- The process of running the Deployment Image Servicing and Management (DISM) tool may take several minutes.
- Once it completes, type the following command into the prompt “sfc /scannow”.
- Your device will now go through all protected files and if it detects an anomaly, it will replace the compromised version with a cached version that resides at %WinDir%\System32\dllcache.
Step 8 – Is your RAM Corrupted? Find Out.
Is it possible? Can the memory sticks of your device trigger Error 7024?
It is unlikely – because the RAM chips have no moving parts and consume little power. But at this stage, if all else has failed, diagnosing your RAM may be a good move.
You can use the Windows Memory Diagnostics Tool to get the job done. Users who are on a Linux or Mac and are experiencing crashes can use memtest86.
- Open up your device and go straight to the “Control Panel”.
- Click on “Administrative Tools”.
- Choose “Windows Memory Diagnostic”.
- What this built-in option does is it burns an ISO image of your RAM and boots the computer from this image.
- The process takes a while to complete. Once it is done, the “Status” field at the bottom of the screen populates with the result of the diagnosis. If there are no issues with your RAM/memory, you’ll see “No problems have been detected”.
One drawback of the Windows Memory Diagnostic tool pertains to the number of passes it runs and the RAM segments it checks.
Memtest86 methodically goes over all the segments of your memory – irrespective of whether it is occupied or not.
But the Windows alternative only checks the occupied memory segments and may be ineffective in gauging the cause of the Quicken Error 7024 error.
Step 9 – Is your Hard Drive Corrupted? Find Out.
Your RAM or working memory isn’t the only culprit that may precipitate an Quicken Error 7024 error. The hard drive of your device also warrants close inspection.
The symptoms of hard drive error and corruption span:
- Frequent crashes and the Blue Screen of Death (BSoD).
- Performance issues like excessively slow responses.
- Errors like Error 7024.
Hard drives are definitely robust, but they don’t last forever.
There are three things that you can do to diagnose the health of your permanent memory.
- It is possible that your device may have a hard time reading your drive. This can be the cause of an Quicken Error 7024 error. You should eliminate this possibility by connecting your drive to another device and checking for the recurrence of the issue. If nothing happens, your drive health is okay.
- Collect S.M.A.R.T data by using the WMIC (Windows Management Instrumentation Command-line) in the command prompt. To do this, simply type “wmic” into the command prompt and press Enter. Next follow it up with “diskdrive get status”. The S.M.A.R.T status reading is a reliable indicator of the longevity of your drive.
- Fix what’s corrupt. Let’s assume you do find that all isn’t well with your hard drive. Before you invest in an expensive replacement, using Check Disk or chkdsk is worth a shot.
- Open the command prompt. Make sure you are in Admin mode.
- Type “chkdsk C: /F /X /R” and press “Enter”. “C” here is the drive letter and “R” recovers data, if possible, from the bad sectors.
- Allow the system to restart if the prompt shows up.
- And you should be done.
These steps can lead to the resolution you’re seeking. Otherwise the Quicken Error 7024 may appear again. If it does, move to Step 10.
Step 10 – Update Windows OS
Like the software applications you use to render specific tasks on your device, the Operating System also requires periodic updates.
Yes, we’ve all heard the troubling stories.
Devices often develop problems post unfinished updates that do not go through. But these OS updates include important security patches. Not having them applied to your system leaves it vulnerable to viruses and malware.
And may also trigger Error 7024.
So here’s how Windows 7, Windows 8, Windows 8.1 and Windows 10 users can check for the latest updates and push them through:
- Click the “Start” button on the lower left-hand corner of your device.
- Type “Updates” in the search bar. There should be a “Windows Update” or “Check for Updates” option, based on the OS version you’re using.
- Click it. The system will let you know if any updates are available.
- You have the convenience of choosing the components of the update you’d like to push through. Always prioritize the security updates.
- Click “OK” followed by “Install Updates”.
Step 11 – Refresh the OS to Eliminate Persistent Quicken Error 7024 Error
“Windows Refresh” is a lifesaver.
For those of you who are still with us and nothing has worked to eliminate the Error 7024, until recently, a fresh install of Windows would have been the only option.
Not anymore.
The Windows Refresh is similar to reinstalling your Windows OS, but without touching your personal data. That’s hours of backup time saved in a jiffy.
Through the Refresh, all your system files become good as new. The only minor annoyance is the fact that any custom apps you’ve installed are gone and the system applications you had uninstalled are back.
Still, it is the best bet as the final step of this process.
- Enter the “Settings” of your PC and click on “Change Settings”.
- Click “Update and recovery” and then choose “Recovery”.
- Select “Keep my files”. This removes apps and settings, but lets your personal files live on.
- You’ll get some warning messages about the apps that will be uninstalled. If you’ve gone through a recent OS upgrade, the Refresh process makes it so that you can’t go back to your previous OS version – if you should ever feel the need to do it.
- Click the “Refresh” button.
Are you using an older version of Windows that doesn’t come with the power to “Refresh”?
Maybe it is time to start from scratch.
- Enter your BIOS set-up.
- This is where you need to change your computer’s boot order. Make it so that the boot happens not from the existing system files, but from the CD/DVD Drive.
- Place the original Windows disk in the CD/DVD drive.
- Turn on or restart the device.
- Choose where you’d like the system files to be installed.
- Your PC will restart several times as the process runs its course.
FAQ’s
Should I Restore My Computer to Fix Runtime Errors Like Error 7024?
Restoring your computer to an earlier version may solve the problem, depending on what’s causing the runtime error. For example, if it’s due to a hardware issue then restoring your computer to an earlier date may not solve the problem. However, if it’s because of a newly installed program, then restoring to a date before the corrupt program was installed may do the trick.
Do I Need to Reinstall Windows Because of Runtime Errors?
Usually no. The errors can typically be fixed by diagnosing and solving the problem yourself or using a specialized software to do the work for you. When these fails, however, reinstalling may be an option to try as a last resort. Make sure you follow the instructions and properly backup all data before doing so.
How Can I Keep My Computer Running Fast and Error Free?
Make sure the hardware is not dated and works well. Use an antivirus software to keep viruses at bay and ensure the OS is carefully installed. Do not delete Windows files and always install all your programs properly. You should also ensure that there is enough hard drive space and memory to support all your programs. Running out of space or memory can cause the computer to slow down, also often leading to multiple errors.
Start Download Now
Author:
Curtis Hansen has been using, fiddling with, and repairing computers ever since he was a little kid. He contributes to this website to help others solve their computer issues without having to buy a new one.
Event ID: 7024 The SQL Server (MSSQLSERVER) service terminated with the following service-specific error: The data is invalid
This error can occur due to several reasons, including:
-
Corrupted system files or registry keys related to the MSSQLSERVER service.
-
Database corruption or inconsistency.
-
Incompatible database version.
-
Insufficient privileges for the MSSQLSERVER service.
-
An incorrect configuration or setting related to the MSSQLSERVER service.
-
An outdated or incompatible driver related to the MSSQLSERVER service.
-
A conflict with other applications or services running on the same server.
Troubleshooting
1). Please restart the SQL Server services, you can follow these steps:
-
From the search bar, please look for “Services”
-
Navigate to the «Services» and click “OK” or hit “Enter” on your keyboard.
-
Search for the SQL Server service corresponding to your database name.
-
Right-click on the SQL Server service.
-
Select «Restart» from the context menu that appears.
This should initiate the restart of the SQL Server service, allowing you to resume normal database operations.
Note: Please refer to this link on “How to Restart SQL Services”
2). Please run DBUpgrade for the Webgility Unify Enterprise software, you can follow these steps:
-
Open «File Explorer.»
-
Navigate to the «Local Disk C» drive.
-
Search for the Webgility folder.
-
Open the «UnifyEnterprise» folder.
-
Right-click on the «UnifyDBUpgrade» executable file.
-
Select «Open» from the context menu that appears.
This should initiate the database update process. Please wait for the prompt indicating that the database has been successfully updated before proceeding further.
Note: Please refer to this link on “How to Run DBUgrade”
3). If you have an antivirus program installed on the computer where you are using the Webgility Scheduler, you may need to add an exception for the scheduler to prevent the antivirus program from interfering with its operation. Here are the steps you can follow to add an exception to the Webgility Scheduler:
-
Open the antivirus program on your computer.
-
Look for the settings or configuration menu.
-
Navigate to the section that deals with exclusions or exceptions.
-
Add an exclusion for the Webgility Scheduler, which is the unifyscheduler.exe file.
-
Save the changes and close the antivirus program.
By adding an exception for the Webgility Scheduler in your antivirus program, you can ensure that the scheduler can run without being blocked by the antivirus software.
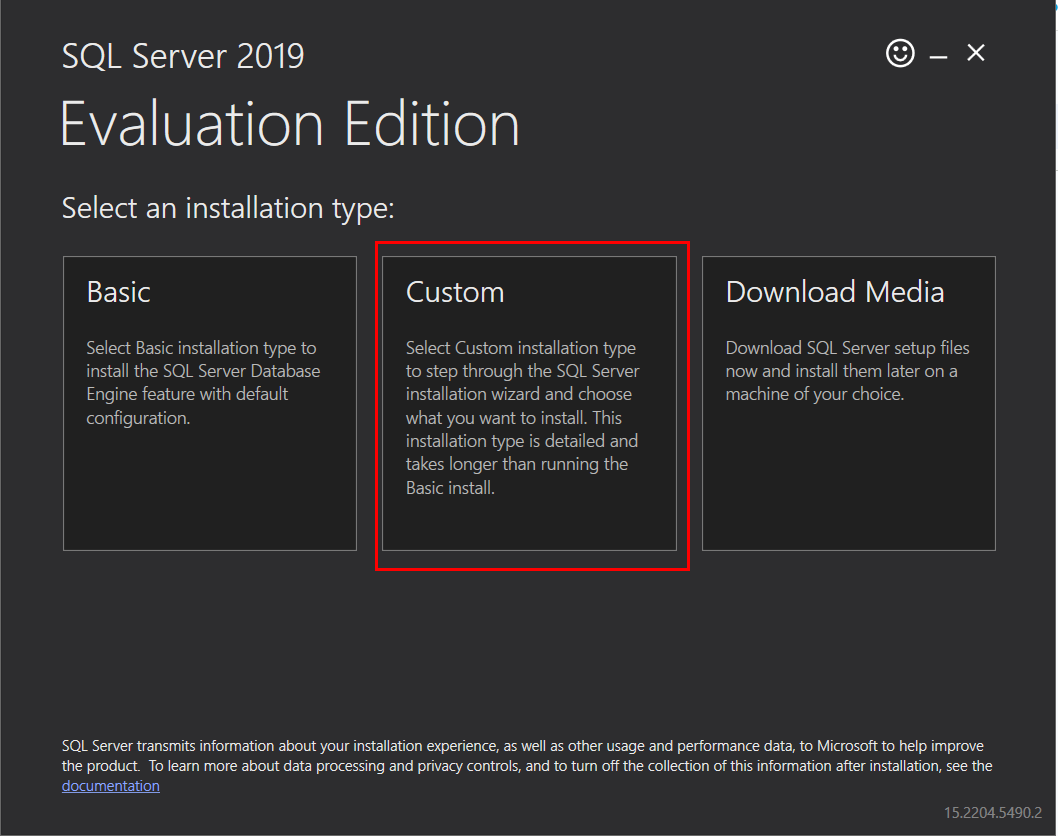
4. To install the most recent version of SQL Server, which is SQL Server 2019 (since 2022 is still in the testing phase), follow the below-mentioned link to download SQL Server. Although the linked help article explains how to download SQL Server 2016, the process is similar to SQL Server 2019. Make sure to choose the «Custom» edition when installing SQL Server 2019.
How to Manually Install SQL 2016 for Webgility Desktop
Please free to let us know if the issue still persists.
На чтение3 мин
Опубликовано
Обновлено
Ошибка 7024 встречается в операционной системе Microsoft Windows и связана с Service Control Manager (Службами Windows). Эта ошибка указывает на проблемы, связанные с запуском или остановкой службы. Она может возникать по различным причинам, таким как поврежденные файлы службы, несовместимость с другими программами или ошибки в реестре системы.
Ошибки Service Control Manager могут приводить к серьезным проблемам и затруднять нормальное функционирование системы. Если вы столкнулись с ошибкой 7024, то важно решить проблему как можно скорее. В этой статье мы рассмотрим некоторые распространенные причины возникновения ошибки 7024 и предложим несколько решений.
Одной из частых причин возникновения ошибки 7024 является повреждение или отсутствие файлов службы. Это может произойти в результате вирусной атаки, неполной установки программного обеспечения или других причин. Кроме того, несовместимость с другими программами или конфликты между службами также могут вызвать ошибку 7024.
Если у вас возникла ошибка 7024, вы можете попробовать несколько решений. Первым шагом рекомендуется выполнить проверку на наличие вирусов, использовать системные утилиты для восстановления поврежденных файлов службы и обновить или переустановить программное обеспечение, связанное с проблемной службой. Если эти действия не помогут, вы можете обратиться за помощью к специалистам или использовать специализированные программы для исправления ошибок.
4 ошибка Microsoft Windows Service Control Manager
Ошибка 4 Microsoft Windows Service Control Manager может возникать по разным причинам и требует немедленного вмешательства для ее устранения. Данная ошибка указывает на проблемы в работе службы или драйвера Windows.
Вот некоторые из наиболее распространенных причин и решений для ошибки 4 Microsoft Windows Service Control Manager:
- Проблемы с драйверами. Проверьте, что все драйвера на вашем компьютере установлены и обновлены до последних версий. Устаревшие или поврежденные драйверы могут вызывать ошибки 4 Service Control Manager. Если обновление драйверов не помогает, может потребоваться переустановка операционной системы.
- Конфликты между службами. Иногда службы в Windows могут конфликтовать друг с другом, вызывая ошибку 4 Service Control Manager. Попробуйте отключить лишние службы, чтобы определить, какая из них вызывает ошибку. Если известно, что определенная служба вызывает проблемы, попробуйте удалить ее или обновить до последней версии.
- Вирусы и вредоносное программное обеспечение. Возможно, в компьютере есть вирус или другое вредоносное программное обеспечение, которое вызывает ошибку 4 Service Control Manager. Проведите полное сканирование системы с помощью антивирусной программы и удалите все обнаруженные угрозы.
- Ошибки в реестре системы. Некоторые ошибки в реестре системы могут вызывать ошибку 4 Service Control Manager. Восстановление реестра или использование специальных программ для исправления ошибок может помочь устранить проблему.
В случае ошибки 4 Microsoft Windows Service Control Manager рекомендуется принять все необходимые меры для ее устранения. Если не можете самостоятельно решить проблему, обратитесь к специалисту или службе поддержки Microsoft.
Причины и решения
Ошибки 7024 в Service Control Manager (SCM) могут быть вызваны различными причинами. Наиболее распространенные причины включают следующее:
1. Неправильно настроенные службы: Ошибка 7024 может возникать из-за неправильно настроенных служб в вашей системе. Это может включать неправильные пути к файлам служб, неправильно указанные параметры запуска и другие проблемы, которые мешают службам успешно запускаться.
2. Конфликтующие службы: Возникновение ошибки 7024 может быть вызвано наличием конфликтующих служб в вашей системе. Несовместимые службы могут конкурировать друг с другом и вызывать сбои в работе SCM.
3. Поврежденные или отсутствующие файлы: Если в вашей системе отсутствуют или повреждены необходимые файлы, это может привести к ошибке 7024 в SCM. Это может быть вызвано неправильным обновлением системы, вредоносным программным обеспечением или другими факторами, которые могут повредить файлы системы.
4. Проблемы с реестром: Повреждения или ошибки в реестре Windows могут быть еще одной причиной ошибки 7024 в SCM. Реестр является центральным хранилищем настроек и информации о службах, и любые проблемы с реестром могут привести к сбоям в работе SCM.
Для решения ошибки 7024 в Microsoft Windows Service Control Manager можно предпринять следующие действия:
1. Перезапустите компьютер: Попробуйте перезапустить компьютер и проверьте, исчезла ли ошибка. В некоторых случаях простой перезапуск может решить проблему.
2. Проверьте настройки служб: Проверьте настройки служб, которые вызывают ошибку 7024. Убедитесь, что указаны правильные пути к файлам и настройки запуска служб.
3. Устраните конфликты служб: Если у вас есть конфликтующие службы, попробуйте выяснить, какая служба вызывает проблему, и затем измените настройки или отключите конфликтующую службу.
4. Восстановите поврежденные файлы: Если проблема вызвана поврежденными или отсутствующими файлами, попробуйте восстановить их с помощью инструментов Windows или восстановления системы.
5. Исправьте проблемы с реестром: Если причина ошибки 7024 связана с реестром, используйте инструменты реестра Windows для исправления поврежденных записей или ошибок.
Если ни одно из вышеперечисленных решений не помогло решить проблему, рекомендуется обратиться к специалисту или технической поддержке Microsoft для получения дополнительной помощи.