
Третья, заключительная статья о DHCP. В завершение темы я расскажу о том, как обеспечить отказоустойчивую работы DHCP-сервера с помощью технологии DHCP failover.
Но сначала немного истории.
До выхода Windows Server 2012 единственным способом обеспечить отказоустойчивость DHCP-сервера была так называемая схема 80\20. Суть этой схемы заключается в том, что для обслуживания одной области используются два DHCP-сервера. Область делится между ними в пропорции 80\20, соответственно основному серверу отдается 80%, а резервному 20% имеющихся IP-адресов. В нормальном режиме работы область обслуживается основным сервером, а при выходе из его строя резервный берет на себя нагрузку и выдает клиентам адреса из оставшихся 20%, тем самым поддерживая работу сети.
Данный способ вполне рабочий и используется до сих пор, но у него есть некоторые недостатки:
• При разделении области имеющиеся адреса используются не самым оптимальным образом;
• Клиенты не могут продлить аренду с имеющимся адресом;
• Проблемы при использовании резервирования.
Примечание. Резервирование (DHCP reservation) — настройка DHCP-сервера, при которой к MAC-адресу клиента привязывается постоянный IP-адрес. Это гарантирует, что клиент всегда будет получать в аренду один и тот же адрес. Резервирование настраивается на конкретном сервере и при его недоступности клиент не сможет получить зарезервированный за ним адрес.
Недостатки конечно некритичные, но доставляющие много неудобств. Видимо поэтому в Windows Server 2012 была добавлена новая фича под названием DHCP failover, предназначенная для обеспечения высокой доступности DHCP-серверов. DHCP failover позволяет обеспечить высокую доступность службы DHCP и не имеет недостатков, описанных выше. При использовании DHCP failover два DHCP-сервера реплицируют между собой текущие настройки и данные об аренде, что позволяет одному серверу обслуживать всех клиентов (выдавать новые адреса, продлевать аренду и т.п.) в том случае, когда другой недоступен.
DHCP failover может работать в двух режимах.
Режим балансировки (Load balance)
В этом режиме область делится на две части в определенной пропорции и обслуживается обоими серверами одновременно. При получении запроса каждый сервер вычисляет хэш MAC-адреса клиента в соответствии с алгоритмом, описанным в RFC 3074. MAC-адреса хэшируются в диапазоне от 1 до 256, балансировка происходит по следующему принципу: если нагрузка распределена в пропорции 50\50 и если при вычислении хэша получено значение от 1 до 128, то отвечает первый сервер, если же от 129 до 256 — то отвечает второй. При изменении коэффициента распределения нагрузки распределение хэш-блоков между серверами изменяется в той же пропорции. Такой подход гарантирует, что за одного конкретного клиента отвечает только один сервер.
Если же один из серверов перестает отвечать, то второй забирает всю область и продолжает обслуживать как своих клиентов, так и клиентов партнера.
Режим горячей замены (Hot Standby)
В таком режиме область обслуживается одним сервером (основным). В отличие от режима балансировки в режиме горячего резерва сервера не вычисляют хэш MAC-адреса клиента. Основной сервер отвечает на все запросы клиентов, резервный в нормальном состоянии не отвечает вообще. Только когда основной сервер становится недоступным, резервный переходит в состояние потери партнера (PARTNER_DOWN) и начинает отвечать на запросы клиентов. Когда основной сервер возвращается в строй, резервный переходит в режим ожидания и перестает обслуживать клиентов.
Обратите внимание, что термин основной\резервный относится к конкретной DHCP-области. К примеру DHCP-сервер может являться основным для одной области и резервным для другой.
От теории перейдем к практике. Для создания отказоустойчивой конфигурации возьмем 2 сервера — SRV1 и SRV2, находящихся в одной подсети. На SRV1 создаем область (Scope) и полностью настраиваем ее, на SRV2 только устанавливаем роль DHCP, никаких настроек не производим. После этого приступаем к настройке DHCP failover.
Настройка DHCP failover
Для начала настроим режим балансировки (Load balance). Для этого заходим на сервер SRV1 и открываем оснастку DHCP. Выбираем область, кликаем на ней правой клавишей и в контекстном меню отмечаем пункт «Configure Failover».

Запускается мастер настройки. В первом окне мастера выбираем области, для которых будет настраиваться отказоустойчивость. Впрочем, в нашем случае выбора нет, поскольку область всего одна.

Добавляем сервер-партнер, на котором будет находится второй экземпляр области.

На следующем этапе выбирается режим работы и основные настройки.
В качестве имени для создаваемых доверительных отношений (Relationship Name) по умолчанию используются имена серверов, но в принципе можно указывать что угодно. Режим работы (Mode) выбираем балансировку (Load balance) и в поле «Load Balance Percentage» указываем в процентах пропорции, в которых будет разделена область между двумя серверами. По умолчанию нагрузка делится в соотношении 50\50, но мы сделаем по привычной схеме 80\20, т.е. 80% обслуживает основной сервер и 20% резервный.
Теперь два очень важных параметра, на которых надо обратить внимание:
• State Switchover Interval — интервал времени, по истечении которого партнер считается недоступным (PARTNER_DOWN). Если не задавать этот параметр, то при падении партнера автоматического переключения не произойдет и переключатся придется вручную;
• Maximum Client Lead Time — очень интересный параметр, определяющий срок продления аренды в случае падения основного сервера. Когда клиент пытается продлить аренду, полученную на основном сервере, то резервный сервер продлевает ее не на срок аренды, указанный в свойствах области, а на время, указанное в данном параметре. И так пока основной сервер не восстановит работу. Также этот параметр определяет, сколько времени сервер будет ждать возвращения партнера из состояния PARTNER_DOWN прежде чем забрать контроль над всей областью. А еще этот параметр определяет время перехода в нормальное состояние при возвращении партнера.
Примечание. Параметры State Switchover Interva и Maximum Client Lead Time определяют скорость срабатывания failover-а. Каждый из партнеров обслуживает свой диапазон адресов до того момента, пока один из серверов не перейдет в состояние PARTNER_DOWN и не пройдет время, указанное в параметре Maximum Client Lead Time. Только после этого ″оставшийся в живых″ сервер возьмет на себя контроль над всей областью.
Сервера должны безопасно общаться друг с другом. Для этого включаем параметр «Enable Message Authentication» и в поле «Shared Secret» задаем кодовое слово, которое сервера будет использоваться для связи.

В заключение проверяем настройки, подтверждаем создание failover-а

и ждем завершения процесса.

Посмотреть настройки и текущее состояние партнеров можно в свойствах области, на вкладке «Failover».
То же самое можно сделать с помощью PowerShell. Создаем доверительные отношения:
Add-DhcpServerv4Failover -ComputerName srv1.test.local -Name ″srv1-srv2″ -PartnerServer srv2.test.local -ScopeId 10.0.0.0 -LoadBalancePercent 80 -MaxClientLeadTime 00:10:00 -AutoStateTransition $true -StateSwitchInterval 00:10:00 -SharedSecret ″12345678″ -Force
Проверяем результат:
Get-DhcpServerv4Failover -Name ″srv1-srv2″ | fl

Теперь сменим конфигурацию, сначала отключив failover. Для этого в оснастке DHCP кликаем на область и выбираем пункт меню «Deconfigure Failover».

Затем подтверждаем удаление доверительных отношений,

еще раз подтверждаем удаление

и ждем завершения. При удалении на сервере-партнере будут удалены все области, для которых был настроен failover.

Для удаления с помощью PowerShell достаточно выполнить одну команду:
Remove-DhcpServerv4Failover -Name ″srv1-srv2″ -Force

Теперь настроим DHCP failover в режиме Hot standby. Для этого опять запускаем мастер на SRV1 и выбираем сервер-партнер. Обратите внимание, что если между серверами ранее уже были настроены доверительные отношения, то их можно использовать повторно.

Выбираем режим Hot standby и производим настройки. Для режима Hot standby они несколько отличаются:
• Role of Partner Server — серверы делятся на основной (Active) и резервный (Standby) и надо выбрать роль для сервера-партнера. Если мы выбираем Standby, то текущий сервер соответственно становится Active, и наоборот.
• Addresses reserved for standby server — еще один важный параметр, задающий процент адресов, выделенный для резервного сервера. Суть этого параметра в том, что после выхода из строя основного сервера и перехода в состояние PARTNER_DOWN должно пройти время, заданное в параметре Maximum Client Lead Time. Только после этого резервный сервер забирает контроль над над всем диапазоном IP-адресов. В промежутке между этими двумя событиями резервный сервер может обслуживать клиентов, выдавая им адреса из данного резерва. Если этот параметр установить в ноль, то резервный сервер не сможет выдавать адреса до тех пор, пока не захватит всю область.

Дальше все так же — проверяем настройки, подтверждаем их

и ждем завершения.

То же из консоли PowerShell:
Add-DhcpServerv4Failover -ComputerName srv1.test.local -Name ″srv1-srv2″ -PartnerServer srv2.test.local -ScopeId 10.0.0.0 -ReservePercent 10 -MaxClientLeadTime 00:10:00 -AutoStateTransition $true -StateSwitchInterval 00:10:00 -SharedSecret ″12345678″ -Force

Изменить настройки и режим работы DHCP failover можно ″на лету″, не удаляя текущую конфигурацию. Для этого в оснастке управления надо выбрать раздел IPv4 (или IPv6, если failover настраивался для этого протокола), кликнуть правой клавишей мыши и выбрать пункт «Properties».

Затем перейти на вкладку «Failover», выбрать доверительные отношения и нажать «Edit».
В открывшемся окне мы можем поменять абсолютно любые настройки и даже изменить режим работы failover-а, например перейти с Load Balance на Hot Standby.
А теперь с помощью PowerShell вернемся обратно к режиму балансировки, попутно изменив интервалы MaxClientLeadTime и StateSwitchInterval:
Set-DhcpServerv4Failover -Name ″srv1-srv2″ -Mode LoadBalance -LoadBalancePercent 80 -MaxClientLeadTime 00:02:00 -StateSwitchInterval 00:02:00 -Force

Тестирование работы DHCP failover
В завершение давайте протестируем работу DHCP failover. На предыдущем шаге мы уменьшили до 2 минут временные интервалы, отвечающие за переключение. Также для ускорения процесса в свойствах области уменьшим время аренды до 10 минут.
Теперь зайдем в свойства DHCP failover и проверим состояние серверов-партнеров.
Запомним полученные настройки на клиенте. Как видите, клиент имеет адрес 10.0.0.20, полученный с сервера 10.0.0.1 (SRV1).

Теперь погасим сервис DHCP на SRV1 и перейдем на SRV2. Здесь откроем оснастку DHCP и перейдем в настройки доверительных отношений. Как видите, после потери связи с партнером здесь стала активна кнопка ″Change to partner down″. С помощью этой кнопки можно перевести сервер в состояние PARTNER_DOWN, не дожидаясь пока истечет State Switcover Interval.
Еще раз проверяем состояние серверов. Резервный сервер перешел в состояние Partner down и готов к захвату контроля над областью.
Ждем 2 минуты и еще раз проверяем настройки на клиенте. Как можно увидеть, IP-адрес не изменился, при этом в качестве DHCP-сервера указан уже 10.0.0.2 (SRV2). Т.е. клиент успешно продлил на SRV2 аренду адреса, полученного от SRV1.

Возвращаем SRV1 в строй, ждем пока клиент обновит аренду и еще раз проверяем его настройки. Как видите, IP-адрес не изменился, а адрес DHCP-сервера опять SRV1.

Вот так и работает DHCP-failover.
As a solution to DHCP failure, the DHCP Failover was first introduced in Windows Server 2012 for the high availability of DHCP service. The DHCP high availability is a super important topic in DHCP Server setup and configuration. If the DHCP server fails to lease IP addresses to the clients, the whole network fails. Among other solutions to this issue, DHCP Failover is preferred and the most used. The way it works is that we have two DHCP servers working together. If one fails, we have the second one that provides the service. This article covers a step-by-step guide on how to configure DHCP Failover in Windows Server 2022. Before that, it covers a brief overview of the DHCP Failover configuration modes. This overview is required to distinguish between DHCP Failover configuration modes and which one to choose.
Before this configuration, you need to have DHCP installed and configured. You also need to have a DHCP scope. For those two topics, read the below articles.
- Install And Configure DHCP In Windows Server 2022 Using Server Manager.
- Create And Configure A DHCP Scope In Windows Server 2022.
- Install And Configure DHCP In Windows Server 2022 Using PowerShell.
DHCP Failover Configuration Modes
As mentioned above, two DHCP servers are involved with the DHCP Failover configuration. They work together to make the DHCP service highly available. To define how they should work together, we have two options: the Load Balance mode and the Hot Standby mode. We must go for the one that best suits our needs in accordance with the environment.
1. Load Balance Mode
Using the Load Balance mode, both the DHCP servers concurrently lease IP addresses to the clients. Also referred to it as Active/Active. That means both DHCP servers are active at the same time. They share the DHCP scope with one another, and each one leases IP addresses to a specific number of clients in the network. The number of clients each should serve is defined manually in percentage while we configure DHCP Failover. What happens when one fails? The other one takes the responsibility and leases IP addresses to all the clients.
2. Hot Standby Mode
Using this mode, only one of the DHCP servers is leasing IP addresses to the clients at a time. The primary one leases IPs to the clients. The secondary one is in the Standby mode and updates itself with a replication of the records from the primary server. The secondary one steps in and serves the clients only when the primary server crashes for any reason. This mode is also referred to as Active/Passive. That means only one is active at a time.
Step by Step DHCP Failover Configuration in Server 2022
Now that we are familiar with the DHCP Failover configuration modes, it is time to dive into the steps and practically configure the DHCP Failover on our DHCP Server.
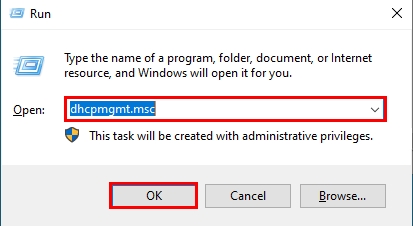
1. Open DHCP Manager console. To do so, open the Run dialogue box using Windows Key + R keys on your keyboard and run dhcpmgmt.msc. You may also access the DHCP console by navigating through Server Manager > Tools > DHCP.
2. On the DHCP console, right-click on IPv4 under your domain and choose Configure Failover option from the list.
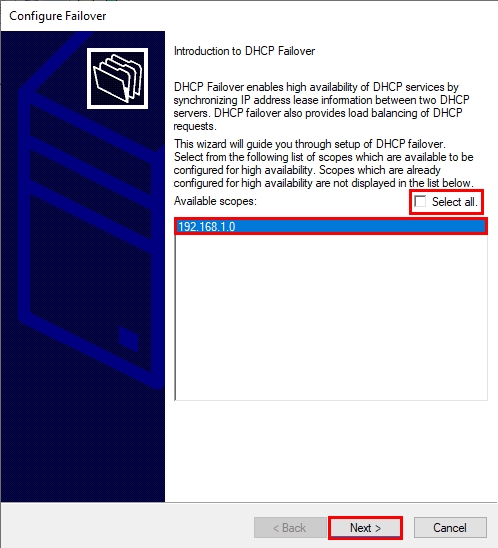
3. Remove the check for the Select all check box, and select the DHCP scope(s) from the list. Then, click on Next to continue.
4. Now, choose the partner server using the Partner Server box and Add Server button. You can type the name or IP address of the partner server in the Partner Server box or browse for it using the Add Server button. Click on the Next button once set.
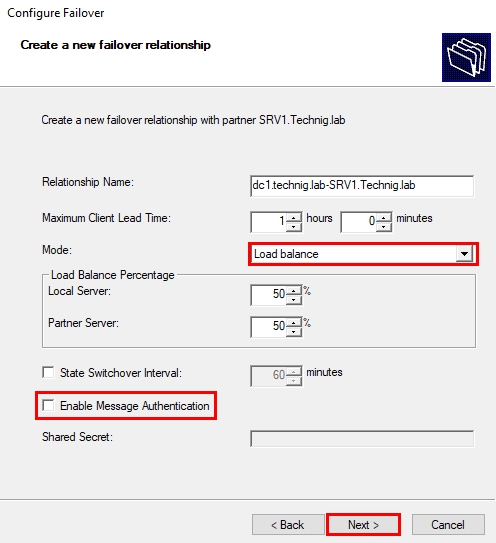
5. The last step is to specify the DHCP Failover mode. You can use one of the Load Balance, or Hot Standby modes discussed earlier. You can set the properties for each one here on this page. Remove the Check for Enable Message Authentication check box if you do not use this authentication. Or, set it if you use it. Then, click on Next. Click on Finish on the next window and close the window using the Close button.
That is all the steps we require to Configure DHCP Failover on Windows Server 2022. Just five easy steps to accomplish it. If you switch to the partner server and go to the DHCP console, you will notice the DHCP scope(s) from your primary DHCP Server are replicated into it. Let’s verify it in a separate section.
Verify DHCP Failover Configuration
To verify if the DHCP Failover configuration works correctly, we have to check the partner server and see if the DHCP scope(s) that we chose are replicated. We have two ways to access the partner server’s DHCP console. One is to go to that server and navigate all the way to the DHCP Manager console. The second way is to access it remotely from the DHCP console. Let’s access it remotely and verify our DHCP Failover configuration through the steps below.
1. On the DHCP console, right-click on DHCP at the top and select Add Server option.
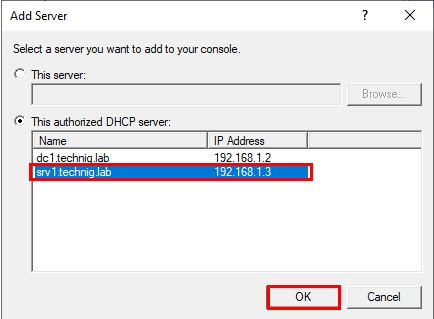
2. On the Add Server screen, select the target DHCP Server to access it. If the target DHCP Server is not already in the list, use the first option and the Browse button to find it. When you added the target server, click on OK.
3. Now that the Partner DHCP Server is added to the console, expand it, and you can see that the scope(s) that you chose in the DHCP Failover configuration are replicated and are present in both the servers.
4. One more thing. If you right-click on the DHCP scope(s) configured in DHCP Failover, you will notice the options to Deconfigure Failover, Replicate Scope, and Replicate Relationship.
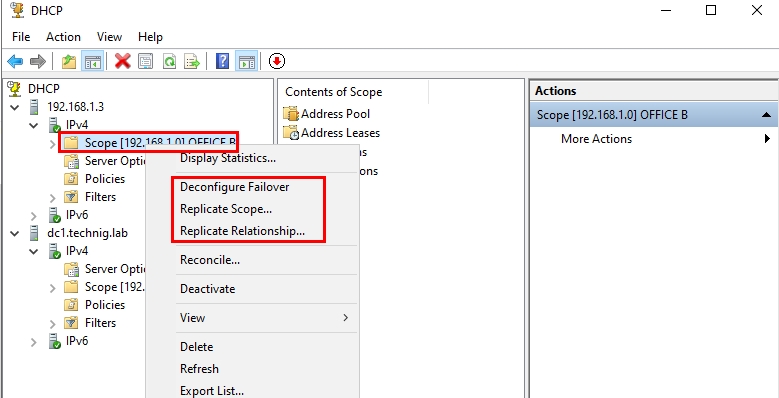
By observing the replicated scope(s) and deconfiguration options for Failover, we can verify that our DHCP Failover configuration is correctly configured.
Conclusion
In a step by step approach, we covered how to configure a DHCP Failover in Windows Server 2022. We started with an overview of DHCP Failover configuration modes’ concepts. Then, we walked through the steps to practically configure the DHCP Failover. Finally, we remotely accessed our partner DHCP Server and verified the DHCP Failover configuration on it.
As always, I hope this article could be helpful to you. And, if there is any further question and thoughts you might want to share, let us know in the comment section.
The role of the Dynamic Host Configuration Protocol, or DHCP, server is a simple yet critical one. DHCP provides the IP address configuration to workstations, laptops, phones and tablets connected to an organization’s network. It may even provide IP address settings for some VMs, servers and network printers.
Examples of IP address settings include the following:
- IP address and corresponding subnet mask;
- default gateway, such as a router; and
- name resolution server IP addresses, such as DNS.
Many other configurations are possible, but these are the standard options.
The settings provided by DHCP are critical. The router address enables clients to communicate outside their local network. Name resolution converts easy-to-remember hostnames to difficult-to-remember IP addresses, enabling easier file sharing, web browsing, email communications and access to just about every other network service.
Initially, if the DHCP server fails, clients with existing leases maintain their addresses. By default, Windows leases are not renewed for eight days following the initial lease. That should give network admins sufficient time to fix the DHCP server. New clients, however, will not be able to lease addresses.
DHCP is essential, so how can network admins better protect it from going down?
The importance of DHCP failover
DHCP services are critical enough to warrant fault tolerance. Before Windows Server 2012, such fault tolerance was relatively cumbersome to implement and maintain. The more recent Windows Server versions, however, include a straightforward way to manage DHCP redundancy.
These settings are not just for fault tolerance, but can also provide load balancing for large networks where the DHCP servers support many transient clients on multiple subnets. For some administrators, the ability to load balance DHCP services may be just as critical as high availability.
Define redundancy requirements
For larger DHCP implementations involving many clients, scopes, subnets and servers, be sure to develop a plan. Know which scopes benefit from DHCP failover; it may not be necessary to configure this feature for all of them. For example, lab and classroom scopes may not need this option.
DHCP failover requirements
The requirements for Windows-based DHCP failover are no different from a standard Windows DHCP deployment. Both servers must have the DHCP Server role installed, and an enterprise administrator must authorize the servers in Active Directory (AD).
To begin the process, create a new scope, or choose an existing one. If you create a new scope, walk through the configuration wizard to define the values for the scope name, IP address range, subnet mask, default gateway name resolution and lease duration.
Once the initial scope is created, you can configure failover or load-balancing options.
Note that either or both DHCP servers can be VMs. They just need the appropriate network membership.
Steps to configure DHCP failover
First, select a Windows Server system as the second DHCP server. Install the DHCP Server role on this device.
Next, return to the original DHCP server, right-click the scope you wish to configure for failover and select Configure Failover. The wizard walks you through the remaining settings. The DHCP service must also be running on both systems.
Here are the detailed steps.
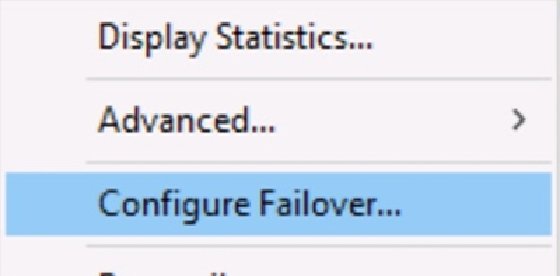
Step 1. Select Configure Failover
Right-click the selected DHCP scope, and select Configure Failover from the context menu.
Step 2. Specify the partner server
In the Specify the partner server to use for failover box, type the server name, or use the Add Server button to browse to it in AD.
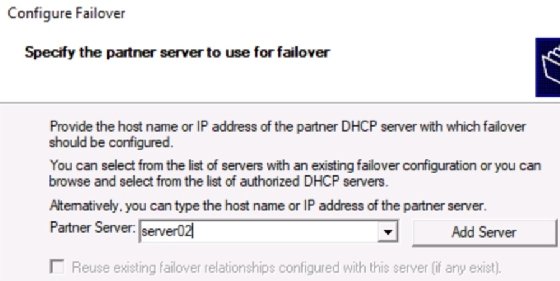
The wizard validates the configuration of the partner server.
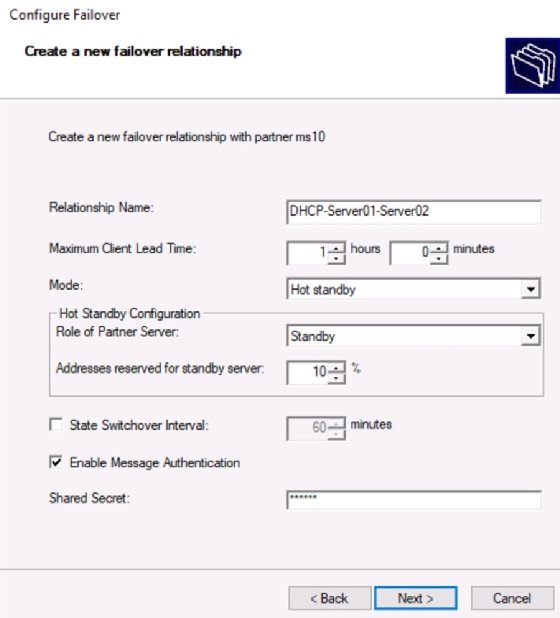
Step 3. Create new failover relationship
Fill in the following values to configure a failover partnership (I have set some example values):
Relationship Name: DHCP-Server01-Server02
Mode: Hot standby
Enable Message Authentication: Check the box
Shared secret: abc123
For the Hot Standby Configuration mode, fill in the following values:
Mode: Hot standby
Hot Standby Configuration
Role of Partner Server: Standby
Addresses reserved for standby server: 10%
Step 4. Select Finish to complete configuration
The wizard displays a settings summary. Select Finish to complete the configuration.
Switch to the second DHCP server. In the DHCP console, note the scope has been replicated.
DHCP load-balancing configuration
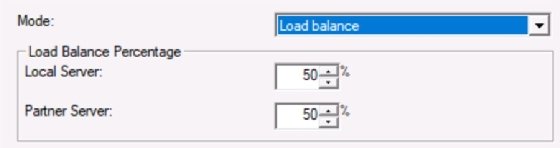
The load-balancing settings are nearly the same. When configuring a load-balancing mode, instead of Hot standby in the Mode pulldown menu, select Load balance. Then, configure the following settings:
Mode for Load balance:
Load Balance Percentage
Local Server: 50%
Partner Server: 50%
The other settings remain the same as with failover mode. Define the appropriate load-balancing ratio. In the example, I set 50% of the addresses for each server.
Manage DHCP failover
Recall that DHCP logs information in Event Viewer. It also generates text-based logs at C:\Windows\System32\DHCP. These detailed logs display lease generation attempts and provide invaluable information on DHCP functionality. Be sure to check these logs if you suspect any DHCP-related issues.
The DHCP console displays current lease information in the Address Leases node. If you’ve configured your DHCP servers in load-balancing mode, use this node to see which server provided IP configurations to the various clients.
Test the configuration
Testing is a key part of disaster recovery planning, and DHCP failover is no different. Consider disabling one of your DHCP servers to ensure client devices can still lease IP address configurations within your mean time to recovery window.
Wrap up
DHCP servers provide essential information to client computers, and Windows Server offers a simple configuration that supports either fault tolerance or load balancing. Take the time to consider the DHCP scopes on your servers and identify those that will benefit from redundancy. Then, follow these steps to add to the reliability and performance of your AD environment.
Сегодня будет практическая задача на тему, как настроить резервирование возможности присвоения устройствами в доменной сети сетевого IP—адреса от сервиса DHCP который поднят на домен контроллере. Предыстория: есть одна серверная и по воле случая в ней оказалось, что на системе виртуализации два домен контроллера и когда понадобилось по команде выключить доступ к ней, то у всего предприятия пропала возможность хоть как-то работать: нет работают принтера, рабочие станции, PDA клиенты. А все потому что устройства остались без IP-адреса.
В виду этого я решил, что нужен в другой серверной еще один домен контроллер с ролью DNS и DHCP, а между главным (srv-dc01) и еще одним (srv-dc03) настроить для роли DHCP Failover, но прежде чем это делать на боевом, все обкатываем на тестовом.
Шаг №1: Итак есть два домен контроллера на базе OS: Windows Server 2012 R2 Std и домен polygon.local
srv-dc01.polygon.local = 10.90.90.3srv-dc02.polygon.local = 10.90.90.4
Шаг №2: Основной домен контроллер srv-dc01.polygon.local, на нем поднята роль DНCP и настроена область выделения IP-адресов:
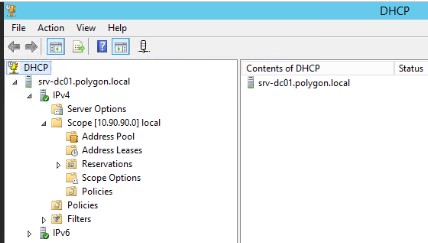
Шаг №3: На втором домен контроллере srv-dc02.polygon.local также стоит роль DHCP то область обслуживания не настроена:

Шаг №4: Переходим вот к такой вот настройке:
на srv-dc01.polygon.local авторизуюсь как Domain Admin и запускаю оснастку DHCP, затем через правый клик мышью на Scope [10.90.90.0] local выбираю Configure Failover…
Мне отображаются сети, которые я могу настроить:
нажимаю Next
Указываю какой сервер будет партнером
Partner Server: нажимаю Add Server и еще Browse нахожу srv-dc02Reuse existing failover relationships configured with this server (if any exist): галочку снимаю если хочу настройки выполнить с нуля
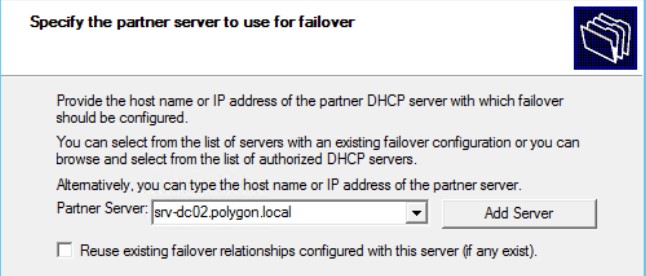
и нажимаю Next
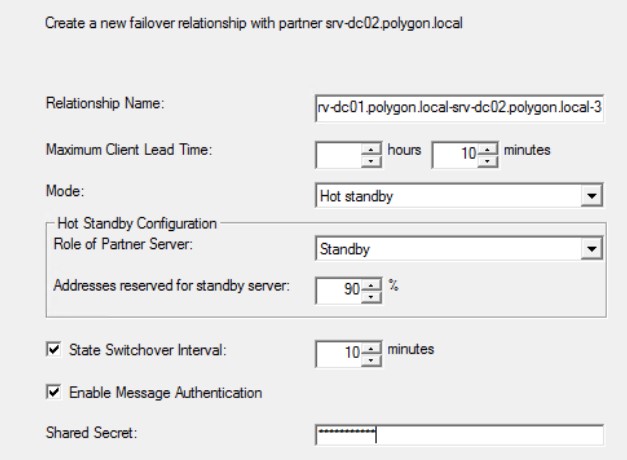
Настраиваю работу Failover
Relationship Name: srv-dc01.polygon.local-srv-dc02.polygon.local-1Maximum Client Lead Time: 1 hoursMode: Hot standbyRole of Partner Server: StandbyAddresses reserved for standby server: 5%State Switchover Interval: 5 minutes (Отмечаю галочкой)Enable Message Authentication: отмечаю галочкойShared Secret: Aa1234567aA
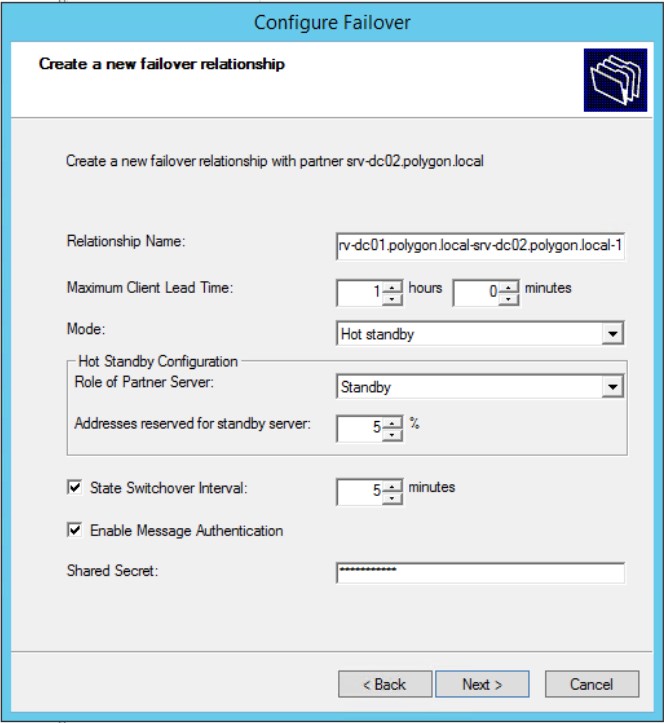
и нажимаю Next, Finish.
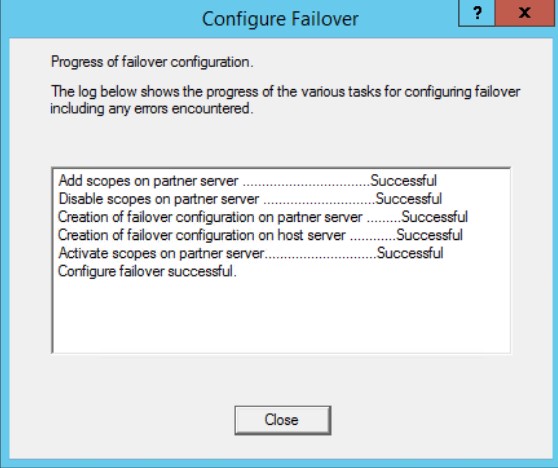
Процесс создания Failover завершается без ошибок
Шаг №5: Проверим работу, допустим связь с srv-dc01 пропала:
а ничего не изменилось вроде как, перезагрузил систему Windows 10 Pro и через команду ipconfig /all отобразил все параметры и уже сейчас значится что DHCP-сервер — это 10.90.90.4, т.е. srv-dc02
Шаг №6: Смотрим информацию по Failover на srv-dc02
Logon on srv-dc02
оснастка DHCP — через правый клик мышью на Scope [10.90.90.0] local открываю Properties, перехожу на вкладку Failover и вижу
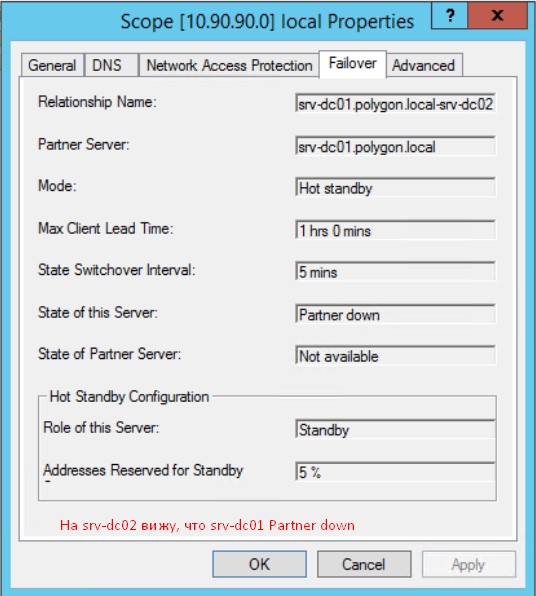
и сейчас активен srv-dc02.
На заметку: Думаю если устройств домена много, то есть смысл зарезервировать на 5% на 90% адресов + Addresses reserved for standby server — еще один важный параметр, задающий процент адресов, выделенный для резервного сервера. Суть этого параметра в том, что после выхода из строя основного сервера и перехода в состояние PARTNER_DOWN должно пройти время, заданное в параметре Maximum Client Lead Time. Только после этого резервный сервер забирает контроль над над всем диапазоном IP-адресов. В промежутке между этими двумя событиями резервный сервер может обслуживать клиентов, выдавая им адреса из данного резерва. Если этот параметр установить в ноль, то резервный сервер не сможет выдавать адреса до тех пор, пока не захватит всю область.
Шаг №7: Когда доступ к srv-dc01 возвращается, то через несколько минут если также открыть свойства области вкладка Failover видно
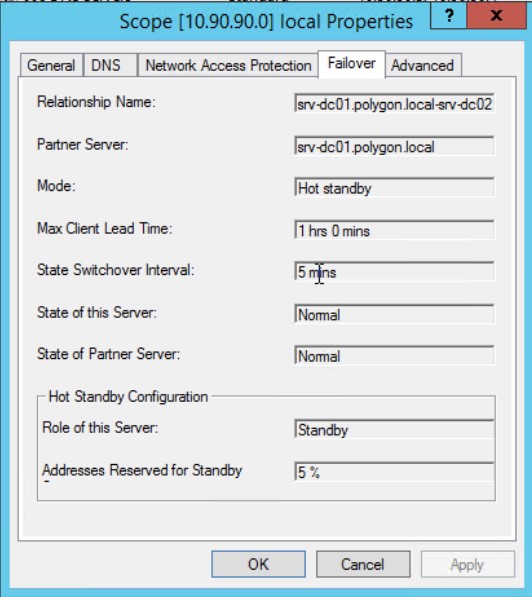
Сервис вернулся к нормальному состоянию, а рабочая станция пока также работает через srv-dc02, если она перезагрузится, то настройки IP получит уже от srv-dc01, т.к. он главный.
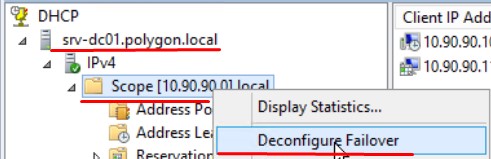
Шаг №8: Если нужно изменить что-то в настройках Failover для Scope, нужно с того который главный через правый клик по Scope [10.90.90.0] local выбрать "Deconfigure Failover"
Затем подтвердить свои действия
This action will remove the selected scopes from the associated failover relationships. The selected scopes will also be deleted from the partner server. Click OK to continue or Cancel to abort.
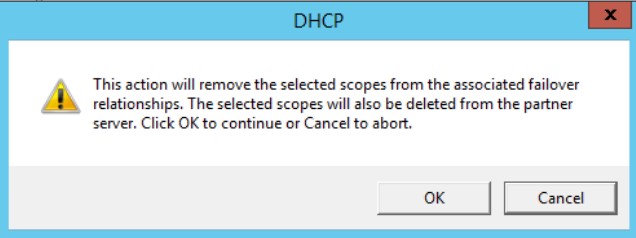
Нажимаю ОК
This action will remove all the scopes which are part of failover relationship.
The failover relationship can be deleted after the action.
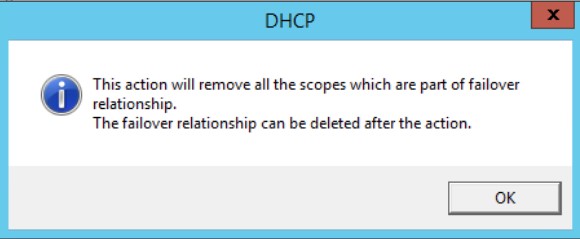
Нажимаю ОК
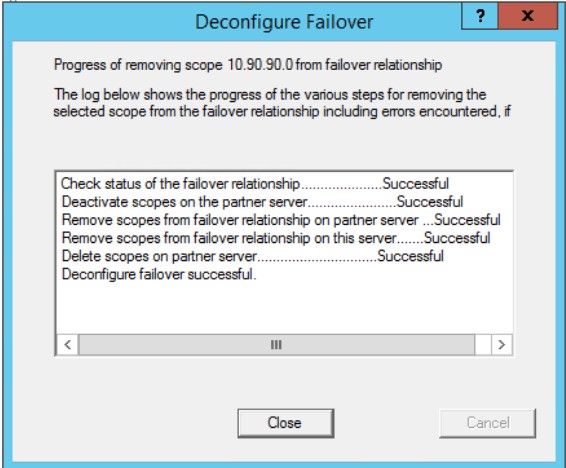
Progress of removing scope 10.90.90.0 from failover relationship.
The log below shows the progress of the various steps for removing the selected scope from the failover relationship including errors encountered, of
Check status of the failover relationship… Successful
Deactivate scopes on the partner server… Successful
Remove scopes from failover relationship on the partner server… Successful
Remove scopes from failover relationship on this server… Successful
Delete scopes on partner server… Successful
Deconfigure failover successful.
что в свою очередь на srv-dc02 удаляет записи которые прилетели с srv-dc01
После успешного расконфигурирования заново запускаем процесс настройки "Configure Failover…" но уже с другими параметрами синхронизации, как и сказал выше увеличиваем в процентном соотношении резервирование IP-адресов.
На заметку: Советую на главное srv-dc01 выполнять периодически резервное копирование базы DHCP
Win + X -> Command Prompt(Admin)
C:\Windows\system32>if not exist c:\backup mkdir c:\backup
C:\Windows\system32>netsh dhcp server export c:\backup\dhcpexport.txt all
C:\Windows\system32>net stop "dhcp server"
C:\Windows\system32>copy /Y %systemroot%\system32\dhcp\dhcp.mdb c:\backup
C:\Windows\system32>net start "dhcp server"
Итого: с учетом сложившейся ситуации этот вариант резервирования DHCP в принципе имеет место быть, пусть будет как заметка, ее я уже применил к боевому использованию (srv-dc01 OS:Window Server 2012 R2) - (srv-dc03 OS:Windows Server 2016), наблюдаем.
На этом пока все, с уважением автор блога Олло Александр aka ekzorchik.
Introduction
In this article, we will show you how to configure DHCP failover in Windows Server 2022. DHCP failover allows you to have two DHCP servers that share the same IP address range and scope. If one DHCP server goes down, the other DHCP server will take over and provide IP addresses to clients. This is a great way to provide redundancy for your DHCP server.
Prerequisites
- Two DHCP servers that are configured with the same IP address range and scope
Configuring DHCP Failover
- Log in to the first DHCP server.
- Open the DHCP console.
- Right-click on the DHCP server and select Add/Remove Failover Partner.
- Enter the IP address of the second DHCP server and click OK.
- Right-click on the DHCP server and select Properties.
- Click on the Failover tab.
- Select the Enable DHCP Failover checkbox.
- Select the Load Balance option and click Configure.
- Select the Percentage of clients option and enter the percentage of clients that will be serviced by each DHCP server. For example, if you enter 50, then 50% of clients will be serviced by the first DHCP server and 50% will be serviced by the second DHCP server. Click OK.
- Select the Maximum Client Lead Time option and enter the maximum amount of time that a client can lease an IP address. For example, if you enter 8, then the client can lease the IP address for up to 8 days. Click OK.
- Click OK to close the DHCP server properties.
You have now configured DHCP failover on the first DHCP server.
Testing DHCP Failover
To test DHCP failover, you will need to disable the DHCP server on the first DHCP server. To do this, follow these steps:
- Log in to the first DHCP server.
- Open the DHCP console.
- Right-click on the DHCP server and select Properties.
- Click on the General tab.
- Uncheck the Enable DHCP server checkbox.
- Click OK to close the DHCP server properties.
The first DHCP server is now disabled. The second DHCP server should now be providing IP addresses to clients.
Conclusion
In this article, we showed you how to configure DHCP failover in Windows Server 2022. DHCP failover is a great way to provide redundancy for your DHCP server. We hope you found this article to be helpful.
Configuring DHCP Failover in Windows Server 2022
In this article, we will continue our series on configuring DHCP failover in Windows Server 2022. In the previous article, we configured a failover relationship between two DHCP servers. In this article, we will discuss how to configure DHCP failover for failover clusters.
DHCP failover for failover clusters is a new feature in Windows Server 2022. It allows you to configure a DHCP server cluster and have the DHCP server services automatically fail over to another node in the cluster if the active node fails.
To configure DHCP failover for failover clusters, you will need to first create a failover cluster. For more information on how to create a failover cluster, see the following article:
https://docs.microsoft.com/en-us/windows-server/failover-clustering/failover-clustering-overview
Once you have created a failover cluster, you will need to add the DHCP server role to the cluster. For more information on how to add the DHCP server role to a failover cluster, see the following article:
https://docs.microsoft.com/en-us/windows-server/networking/technologies/dhcp/dhcp-failover-clusters
After you have added the DHCP server role to the failover cluster, you will need to configure the failover relationship between the two DHCP servers. For more information on how to configure the failover relationship, see the following article:
https://docs.microsoft.com/en-us/windows-server/networking/technologies/dhcp/dhcp-failover-clusters#configure-the-failover-relationship
Once you have configured the failover relationship, you will need to configure the DHCP server cluster. For more information on how to configure the DHCP server cluster, see the following article:
https://docs.microsoft.com/en-us/windows-server/networking/technologies/dhcp/dhcp-failover-clusters#configure-the-dhcp-server-cluster
After you have configured the DHCP server cluster, you will need to configure the DHCP scope. For more information on how to configure the DHCP scope, see the following article:
https://docs.microsoft.com/en-us/windows-server/networking/technologies/dhcp/dhcp-failover-clusters#configure-the-dhcp-scope
Once you have configured the DHCP scope, you will need to configure the failover settings for the scope. For more information on how to configure the failover settings for the scope, see the following article:
https://docs.microsoft.com/en-us/windows-server/networking/technologies/dhcp/dhcp-failover-clusters#configure-failover-settings-for-the-scope
After you have configured the failover settings for the scope, you will need to activate the scope. For more information on how to activate the scope, see the following article:
https://docs.microsoft.com/en-us/windows-server/networking/technologies/dhcp/dhcp-failover-clusters#activate-the-scope
Once you have activated the scope, you will need to configure the DHCP server options. For more information on how to configure the DHCP server options, see the following article:
https://docs.microsoft.com/en-us/windows-server/networking/technologies/dhcp/dhcp-failover-clusters#configure-dhcp-server-options
After you have configured the DHCP server options, you will need to configure the DHCP client. For more information on how to configure the DHCP client, see the following article:
https://docs.microsoft.com/en-us/windows-server/networking/technologies/dhcp/dhcp-failover-clusters#configure-the-dhcp-client
Once you have configured the DHCP client, you will need to test the failover. For more information on how to test the failover, see the following article:
https://docs.microsoft.com/en-us/windows-server/networking/technologies/dhcp/dhcp-failover-clusters#test-the-failover
After you have tested the failover, you will need to verify the failover. For more information on how to verify the failover, see the following article:
https://docs.microsoft.com/en-us/windows-server/networking/technologies/dhcp/dhcp-failover-clusters#verify-the-failover
If you have any questions about configuring DHCP failover for failover clusters, please post them in the comments section below.