
Windows · September 28, 2024
In the realm of server management, ensuring robust security is paramount. One of the critical components of server security is the Local Security Policy, which governs the security settings and permissions on a server. This article delves into the importance of Local Security Policy settings, how to configure them, and best practices for maintaining a secure server environment.
Understanding Local Security Policy
The Local Security Policy is a set of rules and configurations that dictate how security is managed on a local machine. It is particularly important for servers, as they often handle sensitive data and are exposed to various threats. The Local Security Policy can be accessed through the Local Security Policy management console in Windows Server environments, allowing administrators to define security settings for user accounts, password policies, audit policies, and more.
Key Components of Local Security Policy
- User Rights Assignment: This section defines what actions users can perform on the server. For example, you can specify who can log on locally, access the server over the network, or shut down the system.
- Password Policies: Password policies dictate the complexity and expiration of user passwords. Strong password policies help mitigate unauthorized access.
- Audit Policies: Audit policies allow administrators to track user activities and system events. This is crucial for identifying potential security breaches.
- Security Options: This section includes various settings that affect the overall security posture of the server, such as account lockout policies and user account control settings.
Configuring Local Security Policy Settings
To configure Local Security Policy settings, follow these steps:
- Open the Local Security Policy Management Console: Press
Windows + R, typesecpol.msc, and hitEnter. - Navigate to Security Settings: In the console, expand
Local Policiesto access the various components mentioned above. - Modify User Rights Assignment: Click on
User Rights Assignmentand double-click on any policy to modify it. For example, to restrict local logon, remove users from theLog on locallypolicy. - Set Password Policies: Under
Account Policies, you can set rules for password length, complexity, and expiration. - Implement Audit Policies: Navigate to
Audit Policyand enable auditing for events such as logon attempts and account management.
Best Practices for Local Security Policy Settings
Implementing Local Security Policy settings is not just about configuration; it also involves adhering to best practices to ensure ongoing security:
- Regularly Review Policies: Security policies should be reviewed periodically to adapt to new threats and organizational changes.
- Limit User Privileges: Follow the principle of least privilege by granting users only the permissions they need to perform their tasks.
- Enable Auditing: Regularly check audit logs to identify any suspicious activities or unauthorized access attempts.
- Use Strong Passwords: Enforce strong password policies to reduce the risk of unauthorized access.
- Backup Security Settings: Regularly back up your Local Security Policy settings to ensure you can restore them in case of a failure or breach.
Conclusion
Local Security Policy settings are a fundamental aspect of server security management. By understanding and configuring these settings effectively, administrators can significantly enhance the security posture of their servers. Regular reviews and adherence to best practices will further ensure that the server remains secure against evolving threats. For those looking to implement robust security measures in their server environments, exploring options like USA VPS Hosting can provide additional layers of security and management capabilities.
The Gist Of IT
This section shows the work flow in condensed form. If you prefer a more detailled explanation skip to the next section.
# Export the current system configuration.
secedit /export /cfg hisecws.inf /areas USER_RIGHTS
# Edit hisecws.inf as required.
notepad hisecws.inf
# Import the changed configuration into the system.
secedit /configure /db hisecws.sdb /overwrite /cfg hisecws.inf /areas USER_RIGHTS /log hisecws.logCode language: PHP (php)
In Detail
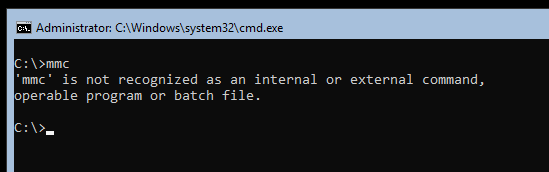
If you needed to edit the local Security Policy Settings on Windows Server Core you may have noticed that the Microsoft Management Console (MMC) is not available on Server Core.
You may know that installing the Server Core App Compatibility Feature on Demand (FOD) adds the MMC (including a bunch of other basic features) back to Server Core. But unfortunately, although you can now open the MMC and add the Local Computer Policy snap-in (gpedit.msc), the Security Settings section is still unavailable.
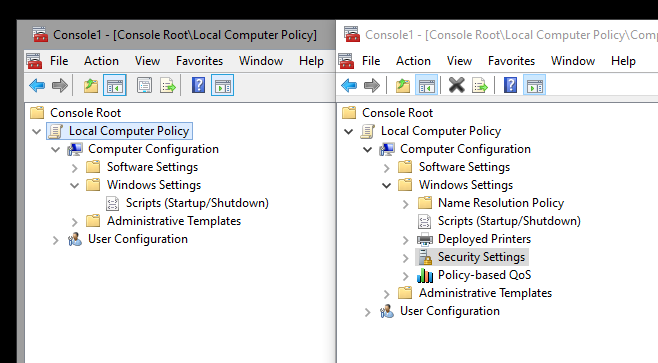
Left: Core-Edition, Right: Desktop-Edition
This means you need to use secedit.exe to edit the local security policy settings. This can be a bit daunting if you’re new to Windows Server Core. With the help of an example, I would like to show you how it works. In our example, we want to grant a domain account the privilege to log on as a service. On the Desktop edition, you would add the account as shown below.
First, we need to find the constant of the privilege we want to assign. We can look this up in the Security Policy Settings Reference (User Rights Assignment / Log On As A Service). There it says, the constant is SeServiceLogonRight.
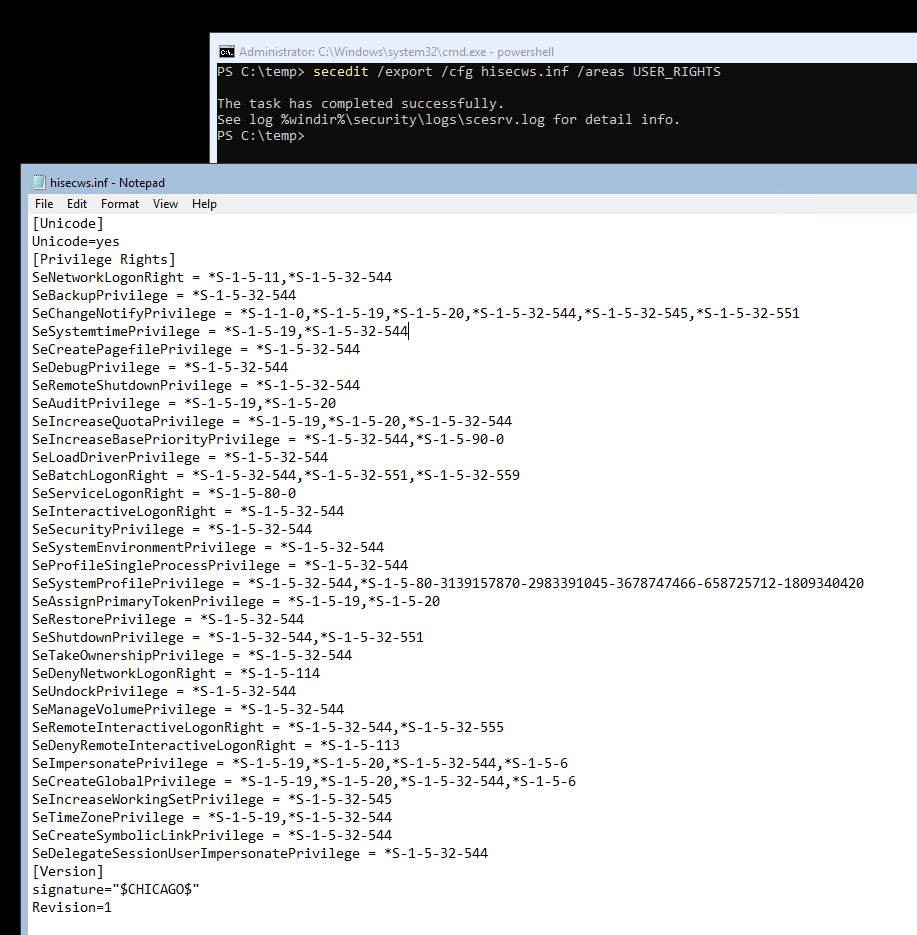
After we identified the constant, create a new temporary working directory, then export the current security settings with: secedit /export /cfg hisecws.inf. We can scope the command to export only the user rights assignments: secedit /export /cfg hisecws.inf /areas USER_RIGHTS. If we inspect the export, we should see something similar to this.
It is a good idea to keep a backup of this file until you verified that your applied changes work as expected. We would revert the changes simply by applying this configuration in the same way we would apply the new configuration, which I will explain next.
In this exported configuration file, each privilege is applied to one or more SIDs, separated by commas. Privileges that are currently not applied to any SID are not listed in the file. Find the line that starts with SeServiceLogonRight and append the SID you want to grant privilege to. Remember to prepend the SID with an asterisk. You may also remove any other privileges that should remain untouched to prevent unintentional changes. The final file would look similar to this:
[Unicode]
Unicode=yes

[Privilege Rights]
SeServiceLogonRight = *S-1-5-80-0,*S-1-5-21-1004336348-1177238915-682003330-55472

[Version]
signature="$CHICAGO$"
Revision=1
Code language: JavaScript (javascript)
Before we apply this configuration, we want to validate it: secedit /validate hisecws.inf. It is important to mention that this validates only the configuration file structure, not the values.
To finally apply the new configuration run this command: secedit /configure /db hisecws.sdb /overwrite /cfg hisecws.inf /areas USER_RIGHTS /log hisecws.log. This imports the configuration into a new database file before applying the database configuration to the system settings. This is a mandatory step as it is not possible to apply a configuration file directly to the system settings. The /overwrite parameter forces secedit to purge any data from the database file, if it already exists in the local folder. Unless you are configuring advanced scenarios, I recommend to overwrite it to not import unintended changes. We also scoped the import to the user rights assignments, although this was not strictly necessary as the imported configuration only contained one setting anyway.
When done check the log files for abnormalities, then restart your system. (Restarting the system is not always required, but getting into this would be out of scope for this article.) After you confirmed that the configuration changes work as expected, you may remove all files that you created during the change.
Hello! Microsoft has increased the security of Windows systems with different measures. Indeed, these actions are focused on protecting data and services. One of these configurations is the configuration of security policies. Since these are rules that manage the security settings of the computer. Consequently, these policies allow managing various aspects such as: assigning groups for users, defining resource permissions for users, among others. So let’s see how to import or export Local Security Policy in Windows 10/Server 2019.
How to export security policies. Graphic mode
It is likely that at some point you will modify some element of the security policies. In such a case the most recommendable thing is to export the configuration. This way, you will not have to restore them manually. Since it would be enough with importing them to return to the original state. So first press the Win+R combination and run the following command:
secpol.msc
The local security policy console is immediately displayed. Once there, please right-click on Security Settings. Finally, select the Export Policy option:

By default, Windows 10 will store this file in the following path: C:\Users\coolr\Documents\Security\Templates. However, you can choose a different location. Please assign the name and save the backup.

How to import local security policy. Graphic mode
To import the security policies, we must go back to the local policy manager. With this in mind, repeat the process from the previous point. Once there, right click on Security Settings and then on Import Policy.

Then go to the file location and press open to start the process. Finally, restart the computer to complete the task

How to export the local security policy. Command Prompt Mode
The first thing you have to do is open a command prompt and use the following syntax:
secedit.exe /export /cfg X:\file.inf
Please remember to replace the letter X with the path where you will be saving the file. And of course, assign the name to the file. In my case, the command was like this:
secedit.exe /export /cfg E:\bck.inf

How to import security policy with CMD
To import the security policy, please use the following syntax:
secedit.exe /configure /db %windir%\security\local.sdb /cfg X:file.inf
Once again, modify the parameters as in the previous section. In my case it is:
secedit.exe /configure /db %windir%\security\local.sdb /cfg E:bck.inf

Finally, we have seen how to import or export Local Security Policy in Windows 10/Server 2019. Consequently, we will be able to restore these policies at any time. Or simply export it to another computer. This is all for the moment, before saying goodbye I invite you to see our post on how to check the status of the domain controller in Windows Server. See you later!
— Advertisement —
Everything Linux, A.I, IT News, DataOps, Open Source and more delivered right to you.
Subscribe
«The best Linux newsletter on the web»
Since last week I am working on a project for setting up a Shared FTP Server for a Shared Web Server based on Windows Server 2008 R2 platform. I have already published an article to Install IIS on Windows Server 2008. While writing an article on how to install and configure a shared FTP Server, I came across a few challenges and solutions which I thought is better to discuss in a separate post, so, here we go.
When I read details about FTP authentication in Microsoft FTP 7.5, I came to know about FTP User Isolation concept using which we can provide access to the folder created with the same name as a Windows Local User account.
Create Windows Local User Account
Create Local User using GUI:
- Press Windows Key + R. In the Run window type lusrmgr.msc and press enter.
- Right click on Users and then click New User.
- User name: Enter username i.e. client1
- Full name: Enter full name of the user. This is optional.
- Description: A short description about this user.
- Password: Enter password for the user.
- Confirm Password: Re-enter password.
- Deselect User must change password at next logon
- Select Password never expires.
- Click Create button to create the user account.
Create Local User using CLI:
- Launch Command Prompt as an Administrator (Start >> All Programs >> Accessories. Right click Command Prompt and then click Run as administrator).
- At Command Prompt type net user /ADD client1 * /expires:never. Replace client1 with the actual username you want to create. Now press Enter key. Type a password when prompted for and then retype the password to confirm.
Create Local Group
In Microsoft Windows when we create a local user it is by default added to Users group and by default members of Users group are allowed to logon locally on the system and those users also appear on logon screen. To create more secure environment for shared hosting server (shared FTP/Webserver) we should deny all FTP Users from logging locally on server system. To accomplish this we should create a local group i.e. FTPUsers and add all FTP Users to this group. This can be done by following below steps.
Create Local Group using GUI
- Press Windows Key + R. In the Run window type lusrmgr.msc and press enter.
- Right click on Groups and then click New Group...
- Group name: Enter Group Name i.e. FTPUsers
- Description: Type a short description for this group. This is optional.
- Add members to this group by clicking Add button and then selecting local users that will belong to this group. I added client1 and client2 to this group.
- Click Create button to create the group.
Create Local Group using CLI
- Launch Command Prompt as an Administrator (Start >> All Programs >> Accessories. Right click Command Prompt and then click Run as administrator).
- At Command Prompt type net localgroup FTPUsers /add. Replace FTPUsers with the actual Group name you wish to create. Press enter key.
Adding Local Users to Local Group
- Launch Command Prompt as an Administrator (Start >> All Programs >> Accessories. Right click Command Prompt and then click Run as administrator).
- Type net localgroup FTPUsers client1 client2 /add at Command Prompt and then press enter key to add client1 and client2 local users to FTPUsers group.
- Type net localgroup Users client1 client2 /delete and press enter key to delete local users client1 and client2 from local group Users.
Denying FTPUsers to Logon locally on Server
Once we delete user accounts from Users group those user will not be visible on the Windows logon screen, this is because by default only members of Administrators, Backup Operators and Users groups are allowed to logon locally. However to confirm this do as per below steps:
Check who is allowed to Logon locally
- Press Windows Key + R. In the Run window type secpol.msc and press enter.
- In the Local Security Policy window go to Local Policies >> User Right Assignment
- Find Allow logon locally, and there must be only Administrators, Backup Operators and Users group are listed.
Add FTPUsers group to Deny log on locally list by following steps. This needs to be done to strengthen security against a mis-configuration between two settings Allow logon locally and Deny log on locally. Since Deny logon locally supersedes Allow logon locally settings, it will prevent users from logging on locally if they are also in Allow logon locally list. This will help if we created a new local user account and forget to remove from Users group, however since it is in FTPUsers group those users will not be allowed to log on locally on the server machine.
Deny FTPUsers to logon locally (more restrictive)
- Press Windows Key + R. In the Run window type secpol.msc and press enter.
- In the Local Security Policy window go to Local Policies >> User Right Assignment
- Find Deny log on locally. It may be blank initially. Add FTPUsers group here.
Denying FTPUsers to Logon through Remote Desktop Services
We must deny FTPUsers group from logging on through Remote Desktop Services even though by default only Administrators and Remote Desktop Users groups are allowed to log on through Remote Desktop Services because a more restrictive settings alway helps against a silly mis-configuration.
Checking who is allowed to Logon through Remote Desktop Services
- Press Windows Key + R. In the Run window type secpol.msc and press enter.
- In the Local Security Policy window go to Local Policies >> User Right Assignment
- Find Allow logon through Remote Desktop Services and there must be only Administrators, Remote Desktop Users groups are listed.
For adding FTPUsers to Deny log on through Remote Desktop Services list follow below steps. Doing more restrictive settings always help against mis-configurations.
Deny FTPUsers to logon through Remote Desktop Services (more restrictive)
- Press Windows Key + R. In the Run window type secpol.msc and press enter.
- In the Local Security Policy window go to Local Policies >> User Right Assignment
- Find Deny logon through Remote Desktop Services. It may be blank initially. Add FTPUsers group here.
Windows 10: Enable local security policy for a local account with Windows server 2022
Discus and support Enable local security policy for a local account with Windows server 2022 in Windows 10 Software and Apps to solve the problem; We have a Windows system with OS Windows 2022 server. This system is part of a domain. We created a local account which is a member of local…
Discussion in ‘Windows 10 Software and Apps’ started by catherine leray, May 19, 2022.
-
Enable local security policy for a local account with Windows server 2022
We have a Windows system with OS Windows 2022 server. This system is part of a domain. We created a local account which is a member of local Administrators. We are trying to enable some local security policies for the local account, but these policies are «greyed out» in the SECPOL.msc Does anyone know how to fix this issue ?We are not facing this issue with Windows 2019.

-
Local Security Policy on Windows 10?Local Security Policysหายคับ
-
Local Security Policy on Windows 10?
Hi,
To help you with your concern regarding the Local Security Policy, kindly follow the steps below:
- Press the Windows button
- Search for Administrative tools
- Double-click the Local Security Policy
Please let us know how it goes for us to assist you further.
-
Enable local security policy for a local account with Windows server 2022
Local Security Policy Missing??????????????????????????
Hi, I wanted to install the SQL Server 2014 software on my laptop but the installation failed due to an account privilege error. I search online for the solution and they mention accessing the Local Security Policy to change the setting or whatever. So when
I tried to search for the local security policy I couldn’t find it on my laptop, the account I am using is an admin account. I tried to search secpol.msc and even click Run to open it but windows couldn’t find it. I kind of need the SQL Server 2014 software
for my project.

Enable local security policy for a local account with Windows server 2022
-
Enable local security policy for a local account with Windows server 2022 — Similar Threads — Enable local security
-
Device Local security policy
in Windows 10 Gaming
Device Local security policy: Hello,Im looking to make some changes to my devices password policy.But when i try and make changes to the anything under the password & account lockout policy, all the fields arent editable.Ive looked to see if the same issue is prevalent on other users, but i found thats… -
Device Local security policy
in Windows 10 Software and Apps
Device Local security policy: Hello,Im looking to make some changes to my devices password policy.But when i try and make changes to the anything under the password & account lockout policy, all the fields arent editable.Ive looked to see if the same issue is prevalent on other users, but i found thats… -
Device Local security policy
in Windows 10 Customization
Device Local security policy: Hello,Im looking to make some changes to my devices password policy.But when i try and make changes to the anything under the password & account lockout policy, all the fields arent editable.Ive looked to see if the same issue is prevalent on other users, but i found thats… -
Enable local security policy for a local account with Windows server 2022
in Windows 10 Gaming
Enable local security policy for a local account with Windows server 2022: We have a Windows system with OS Windows 2022 server. This system is part of a domain. We created a local account which is a member of local Administrators. We are trying to enable some local security policies for the local account, but these policies are «greyed out» in the… -
Local Security Policy
in Windows 10 Gaming
Local Security Policy: I have decided to take a go at Windows Pro. I’m running Windows 11 Pro; the experience has been very enjoyable. I was wondering though, if anyone knew of a «standard» local security policy and group policy? Maybe like a best-practices for security? I generally tear through… -
Local Security Policy
in Windows 10 Software and Apps
Local Security Policy: I have decided to take a go at Windows Pro. I’m running Windows 11 Pro; the experience has been very enjoyable. I was wondering though, if anyone knew of a «standard» local security policy and group policy? Maybe like a best-practices for security? I generally tear through… -
local security policies
in Windows 10 Gaming
local security policies: i am unable to find local policies . i have tried gpedit.msc or secpol.msc but an error message occures every time . what do i do ?https://answers.microsoft.com/en-us/windows/forum/all/local-security-policies/a1fcf504-90ad-4780-a8c1-8afd19e7e6e0
-
Local security policy
in Windows 10 Customization
Local security policy: I am having trouble accessing my Local security policy settings, I am logged in as the administrator the secpol.msc command does not work and cannot be found by the OS. Is this feature disabled on windows 10 home? and if so why?… -
Local Security Policy Editor NOT FOUND
in Windows 10 Support
Local Security Policy Editor NOT FOUND: I searched the TenForun AND my PC but found nowhere any indication of SecPol.msc.I have a W10 Home, is that the reason?
Where can I download it, please?(Explorer keep asking network password on home network)
Thanks!
Alain111678