Windows server история входов

При расследовании различных инцидентов администратору необходимо получить информацию кто и когда заходил на определенный компьютер Windows. Историю входов пользователя в доменной сети можно получить из журналов контроллеров домена. Но иногда проще получить информацию непосредсвенно из логов компьютера. В этой статье мы покажем, как получить и проанализировать историю входа пользователей на компьютер/сервер Windows. Такая статистика поможет вам ответить на вопрос “Как в Windows проверить кто и когда использовал этот компьютере”.

Содержание:

  • Настройка политики аудита входа пользователей в Windows
  • Поиск событий входа пользователей в журнале событий Windows
  • Анализ событий входа пользователей в Windows с помощью PowerShell

Настройка политики аудита входа пользователей в Windows

Сначала нужно включить политик аудита входа пользователей. На отдельностоящем компьютере для настройки параметров локальной групповой политики используется оснастка gpedit.msc. Если вы хотите включить политику для компьютеров в домене Active Directorty, нужно использовать редактор доменных GPO (
gpmc.msc
).

  1. Запустите консоль GPMC, создайте новую GPO и назначьте ее на Organizational Units (OU) с компьютерами и / или серверами, для которых вы хотите включить политику аудита событий входа;
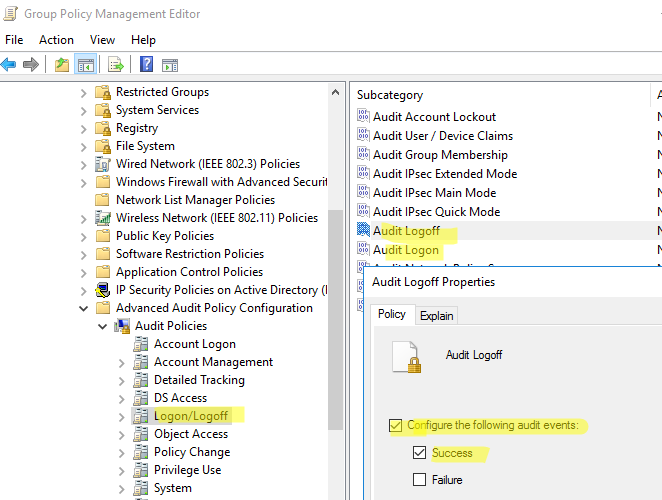
  2. Откройте объект GPO и перейдите в раздел Computer Configuration -> Policies -> Windows Settings -> Security Settings –> Advanced Audit Policy Configuration -> Audit Policies -> Logon/Logoff;
  3. Включите две политики аудита Audit Logon и Audit Logoff. Это позволит отслеживать как события входа, так и события выхода пользователей. Если вы хотите отслеживать только успешные события входа, включите в настройках политик только опцию Success;
    груповая политика - аудит событий входа на компьютеры windows

  4. Закройте редактор GPO и обновите настройки политик на клиентах.

Поиск событий входа пользователей в журнале событий Windows

После того как вы включили политики аудита входа, при каждом входе пользователя в Windows в журнале Event Viewer будет появляться запись о входе. Посмотрим, как она выглядит.

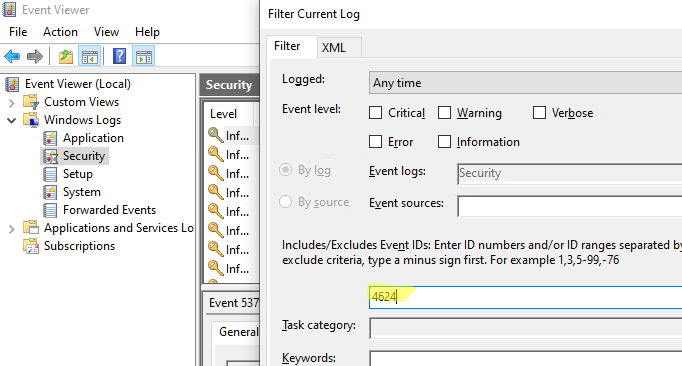
  1. Откройте оснастку Event Viewer (
    eventvwr.msc
    );
  2. Разверните секцию Windows Logs и выберите журнал Security;
  3. Щелкните по нему правой клавишей и выберите пункт Filter Current Log;
  4. В поле укажите ID события 4624 и нажмите OK;
    фильтр событий event viewer

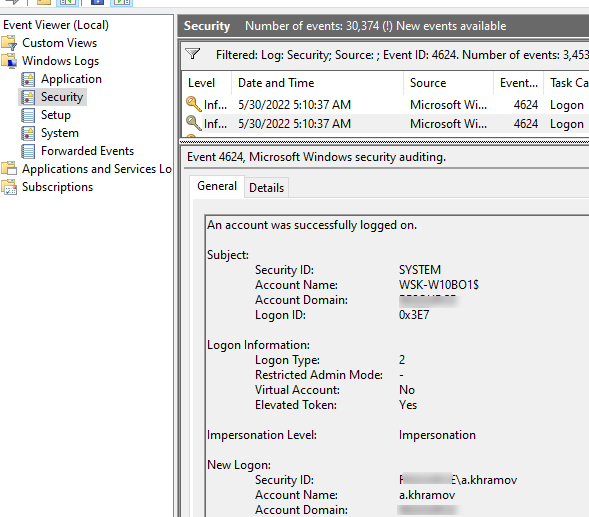
  5. В окне события останутся только события входа пользователей, системных служб с описанием
    An account was successfully logged on
    ;
  6. В описании события указано имя и домен пользователя, вошедшего в систему:
    New Logon:
    Security ID: WINITPRO\a.khramov
    Account Name: a.khramov
    Account Domain: WINITPRO

событие eventid 4626 - локальный вход пользователя в windows

Ниже перечислены другие полезные EventID:

Event ID Описание
4624 A successful account logon event
4625 An account failed to log on
4648 A logon was attempted using explicit credentials
4634 An account was logged off
4647 User initiated logoff

Если полистать журнал событий, можно заметить, что в нем присутствуют не только события входа пользователей на компьютер. Здесь также будут события сетевого доступа к этому компьютеру (при открытии по сети общих файлов или печати на сетевых принтерах), запуске различных служб и заданий планировщика и т.д. Т.е. очень много лишний событий, которые не относятся ко входу локального пользователя. Чтобы выбрать только события интерактивного входа пользователя на консоль компьютера, нужно дополнительно сделать выборку по значению параметра Logon Type. В таблице ниже перечислены коды Logon Type.

Код Logon Type Описание
0 System
2 Interactive
3 Network
4 Batch
5 Service
6 Proxy
7 Unlock
8 NetworkCleartext
9 NewCredentials
10 RemoteInteractive
11 CachedInteractive
12 CachedRemoteInteractive
13 CachedUnlock

При удаленном подключении к рабочему столу компьютера по RDP, в журнале событий появится записи с Logon Type 10 или 3. Подробнее об анализе RDP логов в Windows.

В соответствии с этой таблицей событие локального входа пользователя на компьютер должно содержать Logon Type: 2.

Для фильтрации события входа по содержать Logon Type лучше использовать PowerShell.

Анализ событий входа пользователей в Windows с помощью PowerShell

Допустим, наша задача получить информацию о том, какие пользователи входили на этот компьютер за последнее время. Нам интересует именно события интерактивного входа (через консоль) с
LogonType =2
. Для выбора события из журналов Event Viewer мы воспользуемся командлетом Get-WinEvent.

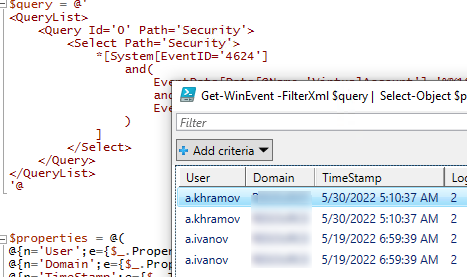
Следующий PowerShell скрипт выведет история входа пользователей на текущий компьютер и представит ее в виде графической таблицы Out-GridView.

$query = @'
<QueryList>
<Query Id='0' Path='Security'>
<Select Path='Security'>
*[System[EventID='4624']
and(
EventData[Data[@Name='VirtualAccount']='%%1843']
and
EventData[Data[@Name='LogonType']='2']
)
]
</Select>
</Query>
</QueryList>
'@
$properties = @(
@{n='User';e={$_.Properties[5].Value}},
@{n='Domain';e={$_.Properties[6].Value}},
@{n='TimeStamp';e={$_.TimeCreated}}
@{n='LogonType';e={$_.Properties[8].Value}}
)
Get-WinEvent -FilterXml $query | Select-Object $properties|Out-GridView

poweshell скрипт для получения списка пользователей, которые входили на этот компьтер

Если нужно выбрать события входа за последние несколько дней, можно добавить pipe с таким условием:

|Where-Object {$_.TimeStamp -gt '5/10/22'}

Командлет Get-WinEvent позволяет получить информацию с удаленных компьютеров. Например, чтобы получить историю входов с двух компьютеров, выполните следующий скрипт:

'msk-comp1', 'msk-comp2' |
ForEach-Object {
Get-WinEvent -ComputerName $_ -FilterXml $query | Select-Object $properties
}

Если протокол RPC закрыт между компьютерами, вы можете получить данные с удаленных компьютеров с помощью PowerShell Remoting командлета Invoke-Command:

Invoke-Command -ComputerName 'msk-comp1', 'msk-comp2' {Get-WinEvent -FilterXml $query | Select-Object $properties}

Есть несколько различных инструментов получения информации о времени логина пользователя в домен. Время последней успешной аутентификации пользователя в домене можно получить из атрибута lastLogon (обновляется только на контроллере домена, на котором выполнена проверка учетных данных пользователя) или lastLogonTimpestamp (реплицируется между DC в домене, но по умолчанию только через 14 дней). Вы можете получить значение этого атрибута пользователя в редакторе атрибутов AD или командлетом Get-ADUser. Однако иногда нужно получить историю активности (входов) пользователя в домене за большой период времени.

Вы можете получить информацию об успешных входах (аутентфикации) пользователя в домене из журналов контроллеров домена. В этой статье мы покажем, как отслеживать историю входов пользователя в домен с помощью PowerShell.. Т.е. можно получить полную историю активности пользователя в домене, время начала работы и компьютеры, с которых работает пользователь.

Содержание:

  • Политика аудита входа пользователя в домен
  • PowerShell: истории сетевых входов пользователя в домен
  • Получаем информацию об активности пользователя в домене по событиям Kerberos

Политика аудита входа пользователя в домен

Чтобы в журналах контроллеров домена отображалась информация об успешном/неуспешном входе в систему, нужно включить политику аудита событий входа пользователей.

  1. Запустите редактор доменных GPO – GPMC.msc;
  2. Откройте настройки Default Domain Policy и перейдите в раздел Computer Configuration -> Policies -> Windows Settings -> Security Settings –> Advanced Audit Policy Configuration -> Audit Policies -> Logon/Logoff;
    Advanced Audit Policy Configuration - data-lazy-src=

  • Включите две политики аудита (Audit Logon и Audit Other Logon/Logoff Events). Чтобы в журналах Security на DC и компьютерах регистрировались как успешные, так и неуспешные политики входа, выберите в настройках политика аудита опции Success и Failure
    включить политки аудита входа в домен Audit Logon

  • Сохраните изменения в GPO и обновите настройки политик на контроллерах домена командой: gpupdate /force (или подождите 90 минут, без учета репликации между DC).
  • Теперь при входе пользователя на любой компьютер домена Active Directory в журнале контроллера домена, который выполняет аутентификацию пользователя, появляется событие с Event ID 4624 (An account was successfully logged on). В описании этого события указана учетная запись, которая успешно аутентифицировалась (Account name), имя (Workstation name) или IP адрес (Source Network Address) компьютера, с которого выполнен вход.

    Также в поле Logon Type указан тип входа в систему. Нас интересуют следующие коды

    • Logon Type 10 – Remote Interactive logon – вход через службы RDP, теневое подключение или Remote Assistance (на DC такое событие может быть при входе администратора, или другого пользователя, которому предоставлены права входа на DC) Это событие используется при анализе событий входа пользователей по RDP.
    • Logon Type 3 –  Network logon сетевой вход (происходит при аутентфикации пользователя на DC, подключения к сетевой папке, принтеру или службе IIS)

    Event ID 4624 An account was successfully logged on

    Также можно отслеживать событие выдачи билета Kerberos при аутентификации пользователя. Event ID 4768A Kerberos authentication ticket (TGT) was requested. Для этого нужно включить аудит событий в политики Account Logon –> Audit Kerberos Authentication Service -> Success и Failure.

    включить политику аудита Audit Kerberos Authentication Service

    В событии 4768 также указана учетная запись пользователя (Account Name или User ID), который получил билет Kerberos (аутентифицировался) и имя (IP адрес) компьютера.

    4768 - A Kerberos authentication ticket (TGT) was requested

    PowerShell: истории сетевых входов пользователя в домен

    С помощью командлета PowerShell Get-Eventlog можно получить все события из журнала контроллера домена, отфильтровать их по нужному коду (EventID) и вывести данные о времени, когда пользователь аутентифицировался в домене, и компьютере, с которого выполнен вход. Т.к. в домене может быть несколько контроллеров домена и нужно получить история входов пользователя с каждого из них, нужно воспользоваться командлетом Get-ADDomainController (из модуля AD для Windows PowerShell). Данный командлет позволяет получить список всех DC в домене.

    Следующий PowerShell скрипт позволяет получить все события входа пользователя в домен AD со всех контроллеров домена. На выходе вы получаете таблицу с историей входа пользователя и компьютеров, с которых аутентифицировался пользователь.

    # имя пользователя, историю входов которого нужно получить
    $checkuser='*ivanov*'
    # получаем информацию об истории входов пользователя за последних 2 дня, можете изменить
    $startDate = (get-date).AddDays(-2)
    $DCs = Get-ADDomainController -Filter *
    foreach ($DC in $DCs){
    $logonevents = Get-Eventlog -LogName Security -InstanceID 4624 -after $startDate -ComputerName $dc.HostName
    foreach ($event in $logonevents){
    if (($event.ReplacementStrings[5] -notlike '*$') -and ($event.ReplacementStrings[5] -like $checkuser)) {
    # Remote (Logon Type 10)
    if ($event.ReplacementStrings[8] -eq 10){
    write-host "Type 10: Remote Logon`tDate: "$event.TimeGenerated "`tStatus: Success`tUser: "$event.ReplacementStrings[5] "`tWorkstation: "$event.ReplacementStrings[11] "`tIP Address: "$event.ReplacementStrings[18] "`tDC Name: " $dc.Name
    }
    # Network(Logon Type 3)
    if ($event.ReplacementStrings[8] -eq 3){
    write-host "Type 3: Network Logon`tDate: "$event.TimeGenerated "`tStatus: Success`tUser: "$event.ReplacementStrings[5] "`tWorkstation: "$event.ReplacementStrings[11] "`tIP Address: "$event.ReplacementStrings[18] "`tDC Name: " $dc.Name
    }
    }
    }
    }

    poweshell - история входов пользователя в домен

    Получаем информацию об активности пользователя в домене по событиям Kerberos

    Также вы можете получить историю аутентификации пользователя в домене по по событию выдачи билета Kerberos (TGT Request — EventID 4768). В этом случае в итоговых данных будет содержаться меньшее количество событий (исключены сетевые входы, обращения к папкам на DC во время получения политик и выполнения логон-скриптов). Следующий PowerShell скрипт выведет информацию о всех входах пользователей за последние 24 часа:

    $alluserhistory = @()
    $startDate = (get-date).AddDays(-2)
    $DCs = Get-ADDomainController -Filter *
    foreach ($DC in $DCs){
    $logonevents = Get-Eventlog -LogName Security -InstanceID 4768 -after $startDate -ComputerName $dc.HostName
    foreach ($event in $logonevents){
    if ($event.ReplacementStrings[0] -notlike '*$') {
    $userhistory = New-Object PSObject -Property @{
    UserName = $event.ReplacementStrings[0]
    IPAddress = $event.ReplacementStrings[9]
    Date = $event.TimeGenerated
    DC = $dc.Name
    }
    $alluserhistory += $userhistory
    }
    }
    }
    $alluserhistory

    powershell скрипт 4768 - история аутентфикации пользователей по выдаче билетом kerberos

    Обратите, что в этом случае вы не увидите события входов пользователей, которые аутентифицировались с клиентов или приложений, которые используют NTLM вместо Kerberos.

    Как узнать кто подключался на тот или иной сервер по RDP. 

    С помощью логов которые пишет ОС Windows, можно получить информацию о том с каких IP и какие пользователи подключались к виртуальному серверу,  и когда они это делали. 

    Приведенная ниже инструкция может быть использована также на десктопных версиях Windows.

    Рассмотрим некоторые наиболее распространенные коды связанные со временем запуска и завершения работы сервера.

    1149:  Присутствие данного кода говорить об успешной аутентификации пользователя на сервере. (Remote Desktop Services: User authentication succeeded) 
    21: данный код говорить об успешном входе в систему, то-есть пользователь увидел окно рабочего стола.  (Remote Desktop Services: Session logon succeeded)
    24: это событие говорить об успешном отключении от RDP (Remote Desktop Services: Session has been disconnected)
    25: говорит об переподключении к RDP сессии. (Remote Desktop Services: Session reconnection succeeded) 
    23: пользователь нажал Logoff  и вышел из системы (Remote Desktop Services: Session logoff succeeded )
    39: пользователь лично отключился от RDP сессии (не просто закрыл RDP окно). Или его отключил другой пользователь или администратор.

    Как просмотреть данные события?

    Нажмите Win+R и введите eventvwr

    В левой части панели откройте «Журналы Windows => Система»

    В колонке Event ID мы увидим список событий, произошедших во время работы Windows. Журнал событий можно сортировать по идентификатору события.

    Для того что бы отсортировать нужные нам события, с правой стороны, выберем «Фильтр текущего журнала»

    Теперь введите нужные нам события, через запятую, 1149,39,25,24,23,21 и нажмите Ок.
     

    Теперь мы можем наблюдать журнал событий с завершением работы нашего сервера VPS.

    Данные ивенты, можно посмотреть в разных разделах. Например:

    EventId 1149,4624,4625 — фильтруем  в Windows Logs => Security

    EventId 25,24,21,39 — фильтруем  в Applications and Services Logs -> Microsoft -> Windows -> TerminalServices-LocalSessionManager -> Operational

    EventId 23 — Applications and Services Logs -> Microsoft -> Windows -> TerminalServices-LocalSessionManager -> Operationa

    Теперь вы можете самостоятельно проверить по кто и когда заходил по RDP на Ваш сервер.

    The following article will help How to Check User Login History in Windows Server Operating System on Windows Server 2019. Below mentioned procedure is same for windows server2012r2 ,2016,2022.

    In a real-time environment, as a Windows Administrator, you must know which users are connected to your server when connected to your server. How many times do they work on your server? As a windows server administrator, you must know when a user disconnects from your server.

    Check Login History Windows

    The log file is a computer-generated data file containing information on the usage patterns, activities, and operations of an operating system, application, server, client, or other device and is the most commonly used data source for monitoring networks. A log file can provide analysts with insight into the causes of slow queries, errors causing transactions to take longer, or bugs affecting website or application performance.

    Event logs can be generated by the windows operating system when hardware or software activity occurs.

    An audit of “logon events” records logons on the PCs that are targeted by the policy, and those results appear in the Security Log.
    ‘Account Logon’ Events track the logins to the domain, and only domain controllers show the results in the Security Log.

    Event Log Categories and Types:

    1. System Log: In the Windows system event log are events related to the system and its components. For example, if the boot-start driver does not load, a system-level event is logged.
    2. Application Log: The application event log records events related to applications or software installed on Windows computers, such as the problem starting Microsoft Word, or Excel.
    3. Security Logs: Containing security events are gathered through Windows auditing, which records events related to system security. Examples include failed and valid user logins, file deletions, creation, etc.
    4. Setup: Windows setup logs contain information about events that occur during the installation process.
    5. Success Audit: In the security log, a successful login will be recorded as a success audit event.
    6. Failure Audit: Provides information about failed audited security access, such as an inability to access a network drive.

    Procedure to enable auditing of user Logon/Logoff events

    Step1:

    Create a logon script with the following content on the required domain/organizational unit (OU)/user account. Open a notepad copy the below command and save the file as a .bat file (Windows Batch file). In my example I have saved as userlogin.bat

    Echo %computername% %username% %date% %time% >>\\LAB\logdata\userlogin.txt

    LAB\logdata → share folder location

    Step2:

    Create a logoff script with the following content on the required domain/organizational unit (OU)/user account. Open a notepad copy the below command and save it as a .bat file (Windows Batch file). In my example I have saved as userlogoff.bat

    Echo %computername% %username% %date% %time% >>\\LAB\logdata\userlogoff.txt

    OR

    echo %date%,%time%,%computername%,%username%,%sessionname%,%logonserver%

    Copy both (Step1 & Step2) batch files into the log data folder on your machine.

    batch file's location

                                                                                  batch file’s location

    Step3:

    Now share the log data folder by clicking on properties → Sharing → Advanced Sharing → enable check box at share the folder option → click on Permission → select authenticated users

    Now go to the security tab → Edit → Add → authenticated users ⇒ full control.

    It’s time to check the log data → properties → Sharing → Network Path.

    Network Path

                                   Network Path of the file.

    Configuring Login/Logout scripts using GPO

    In a Microsoft environment, Group Policy allows you to centralize configuration settings and manage operating systems, computer settings, and user settings. Group Policy is divided into two parts: local Group Policy on individual workstations and Active Directory Group Policy. By using Group Policy, enable auditing at the domain level

    Step1: Go to start menu type gpmc.msc in the search bar.

    Open GPO and select your domain → create a GPO on that domain and link it.

    Group Policy editor

    Group Policy editor settings

    Login and Logoff users

    Step2: Navigate New Group Policy as shown above.

    Edit → User Configuration → Windows Settings → Scripts (Logon/Logoff) → Logon → properties → click on Add →select network path location →select batch file.

    Location_login_logoff

                                                                                               Location_login_logoff

    By default, Windows will automatically update the Group Policy settings every 90 minutes or server reboots. If you want to apply the policy immediately, you can force a policy update by using the below-mentioned command.

    1. GPupdate: Used for specifically applying policies that have changed. For instance, if you update the policy to Restrict Software Installations, then this command will only apply that one policy.
    2. GPUpdate /force: By running this command, all group policy settings will be reapplied. For example, if you have 5 group policies, all 5 will be updated
    gpupdate /force

    Now login to the client machine, stay for 2-3mints and log off from it.

    Again, login into the server machine and check the log data folder. you can find a text files with name of userlogin.txt and userlogoff.txt

    conclusion:

    How to Check User Login History in window operating system. Userlogin.txt contains the user’s login information and Userlogoff.txt contains the user’s logoff information in text format. In this blog is written deploy software using Group Policy Object (GPO).

    Thanks for your time, if you have any questions about How to Check User Login History in Windows Server, please leave a comment.

    Login events play a crucial role in maintaining the security of a Windows Server. They provide valuable information about who accessed the server, when they accessed it, and whether any suspicious activity occurred. By reviewing login events, you can identify potential security threats, ensure that user accounts are being used appropriately, and maintain a secure server environment. 

    In this blog post, we will guide you through the steps of enabling logon event auditing, viewing and filtering login events, and interpreting and taking action on login events. By following these steps, you can strengthen your server’s security and protect your organization from cyber threats.

    Enable Logon Event Auditing

    Enabling logon event auditing is the first step in reviewing login events in a Windows Server. Windows Server includes a built-in feature called Event Auditing, which records security-related events, such as logon events, in a log file. However, by default, Windows Server does not audit logon events, so you need to enable it manually.

    To enable logon event auditing, follow these simple steps:

    1. Open the Local Group Policy Editor by typing “gpedit.msc” in the search bar and pressing Enter.
    1. Navigate to Computer Configuration > Windows Settings > Security Settings > Local Policies > Audit Policy.
    1. Double-click the Audit logon events policy.
    2.  Click OK after Selecting the Success and Failure check boxes.
    1. Close the Local Group Policy Editor.

    Once you have enabled logon event auditing, Windows Server will start recording logon events in the Security log. You can access the Security log through the Windows Event Viewer. With this feature enabled, you can now review login events and identify potential security threats on your server.

    Windows Event Viewer

    The Windows Event Viewer is a powerful tool that enables you to view and manage event logs on your Windows Server. It is a built-in feature and can be accessed through the Control Panel or the Start menu.

    To access the Windows Event Viewer, follow these simple steps:

    1. Click on the Start menu. In the search bar, type “Event Viewer”.
    2. In the search results, click on “Event Viewer”.
    1. Expand the “Windows Logs” folder.
    2. Click on the “Security” log.

    By following these steps, you can access the Security log, which contains important information about login events on your Windows Server. The Windows Event Viewer provides an easy-to-use interface for reviewing login events, enabling you to quickly identify any suspicious activity and take action to prevent potential security threats.

    Viewing Logon Events

    Once you have enabled logon event auditing and accessed the Security log in the Windows Event Viewer, you can start reviewing the logon events that have been recorded. By default, the Security log displays all events, not just logon events. To filter the log and show only logon events, you need to follow these steps:

    1. In the Security log, click on the “Filter Current Log” button in the “Actions” pane on the right-hand side of the screen.
    1. In the “Filter Current Log” dialog box, click on the “Event sources” drop-down list, and choose “”.
    2. Select both the “Audit Success” and “Audit Failure” checkboxes in the “Keywords” field
    3. In the “User” field, enter the name of the user whose logon events you want to view, or leave it blank to view all users.
    4. Click “OK” to apply the filter.

    Once you have applied the filter, the Security log will display only logon events that match your criteria. This makes it easier to review and analyze login activity on your Windows Server and identify any potential security threats. By regularly reviewing logon events and filtering the Security log, you can stay on top of your server’s security and prevent unauthorized access to your system.

    Filter Only Logon Events

    To filter the Security log to show only successful or failed logon events, you can use the Event IDs that are associated with these events. The Event ID for a successful logon event is 4624, and the Event ID for a failed logon event is 4625. Here are the steps to filter the log and view only successful logon events:

    1. Open the Security log in the Windows Event Viewer.
    2. Click the “Filter Current Log” button in the “Actions” pane on the right-hand side of the screen.
    3. Choose “Microsoft Windows security auditing” from the “Event sources” drop-down list in the “Filter Current Log” dialog box.
    4. In the “Keywords” field, select the “Audit Success” check box.
    5. In the “Event IDs” field, enter 4624.
    6. In the “User” field, enter the name of the user whose logon events you want to view, or leave it blank to view all users.
    7. Click “OK” to apply the filter.

    To filter the log and view only failed logon events, follow the same steps as above, but in step 4, select the “Audit Failure” check box, and in step 5, enter 4625 in the “Event IDs” field. By filtering the log to show only successful or failed logon events, you can quickly identify any suspicious activity and take appropriate action.

    Interpreting and Taking Action on Login Events

    After filtering the log to show only the logon events that you want to investigate, you can interpret and take action on the information provided in the event log. There are several key pieces of information that are important to review when analyzing logon events:

    • Event ID: The Event ID indicates whether the logon event was successful or failed. As noted earlier, Event ID 4624 is for a successful logon event, and Event ID 4625 is for a failed logon event.
    • Date and Time: The date and time of the logon event can help you identify when the event occurred and whether it coincides with any other events or activities.
    • User Account: The user account associated with the logon event can help you identify who accessed the server. This information can be used to determine whether the logon event is expected or not.
    • Logon Type: The logon type indicates how the user logged on to the server. There are various logon types, such as interactive, remote, and service logons.
    • Source Network Address: The source network address helps you identify where the user was when they accessed the server. This information can be used to determine whether the logon event is suspicious or not.

    If you find a suspicious logon event, it’s essential to take immediate action. Depending on the severity of the event, you may need to disable the associated user account, change passwords, or investigate further. Additionally, it’s always a good idea to review your security policies and procedures to ensure that you’re taking all necessary precautions to prevent similar events in the future.

    Conclusion

    Monitoring login events in a Windows Server is crucial for maintaining a secure and protected server environment. By enabling logon event auditing, accessing the Security log in the Windows Event Viewer, filtering the log to show only logon events, and understanding and responding to the important information provided by these events, you can quickly identify potential security threats and take appropriate action. Additionally, it is important to regularly review and update your security policies and procedures to ensure that you are employing the best practices to safeguard your sensitive data and prevent cyberattacks.

    Понравилась статья? Поделить с друзьями:
    0 0 голоса
    Рейтинг статьи
    Подписаться
    Уведомить о
    guest

    0 комментариев
    Старые
    Новые Популярные
    Межтекстовые Отзывы
    Посмотреть все комментарии
  • Плохо работает интернет на компьютере windows 10
  • Как запустить точку восстановления windows 10 через биос
  • Лучший бесплатный сканер для windows 10
  • Viber для windows не устанавливается
  • Как завершить сеанс другого пользователя windows