
Публичное облако на базе VMware с управлением через vCloud Director
Чтобы разрешить тот или иной порт в брандмауэре Windows Server:
- В меню «Пуск» выберите «Служебные — Windows» — «Панель управления»

- Далее выберите «Система и безопасность» — «Брандмауэр защитника Windows».
- В меню слева выберите пункт «Дополнительные параметры».
- В меню слева кликните «Правила для входящих подключений» и в блоке «Действия» справа кликните «Создать правило…».
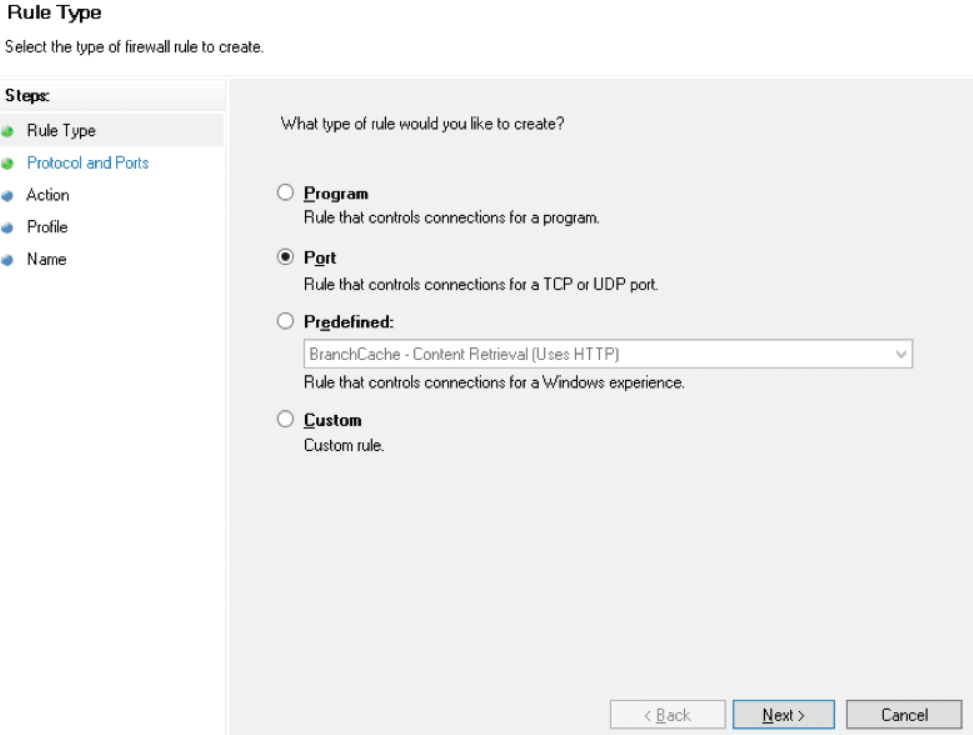
- Выберите «Для порта» и кликните «Далее».
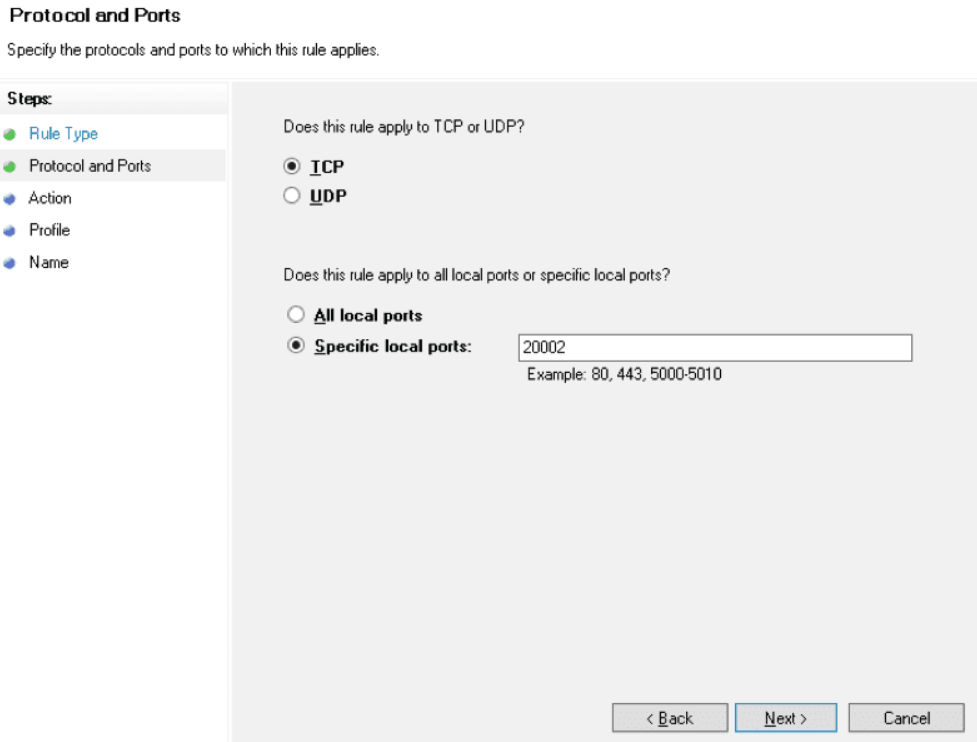
- Укажите нужный протокол и порт (порты). Здесь можно ввести:
-
- один конкретный порт;
- несколько портов через запятую (1540,1541);
- диапазон портов через дефис (1560-1591);
- Нажмите «Далее», затем снова «Далее».
- Выберите, для каких профилей применять созданное правило, и снова нажмите «Далее».
- Введите имя и описание правила и кликните «Готово».
Была ли статья полезна?
Ваша оценка очень важна
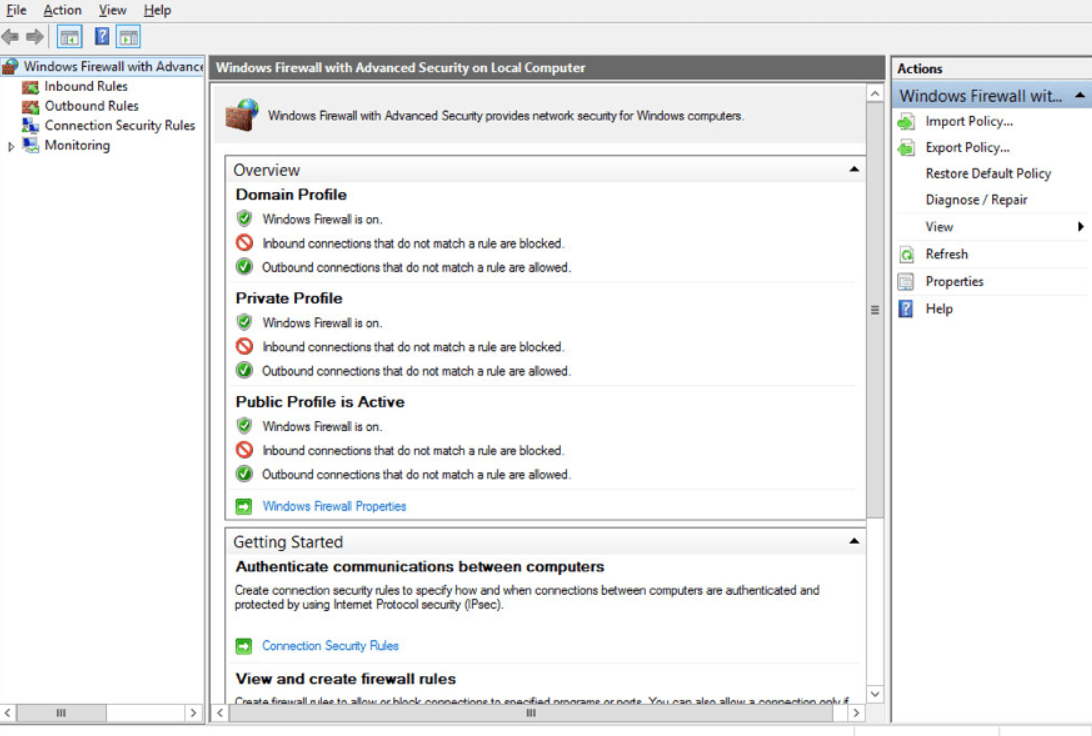
All recent versions of Windows include the Windows Firewall utility. A firewall includes options for opening and closing ports, as well as allowing and disabling specific programs and services.
Computer resources can be protected from unauthorized access by firewalls on networks and servers. Incoming or even outgoing traffic is checked for by the firewall systems and in accordance with the rules configured, decisions are made about them.
Windows Firewall cannot access the port if it isn’t explicitly allowed. TCP/IP ports are reserved for applications whenever they want to access the network, which means anyone else cannot use them.

Also Read: How to Change RDP Port in Windows Server?
In Windows Server 2008/2012 R2/2016 and Windows Server 2019, there are three ways to open ports.
- MMC
- The command line (netsh)
- PowerShell commands (For 2012R2 and 2016 only)
So, you can open ports on Windows Server by following the instructions in the following article.
Open Ports via MMC
- Here first of all you have to log in using an admin account.
- Then you have to click on:
Start > Administrative Tools > Windows Firewall with Advanced Security
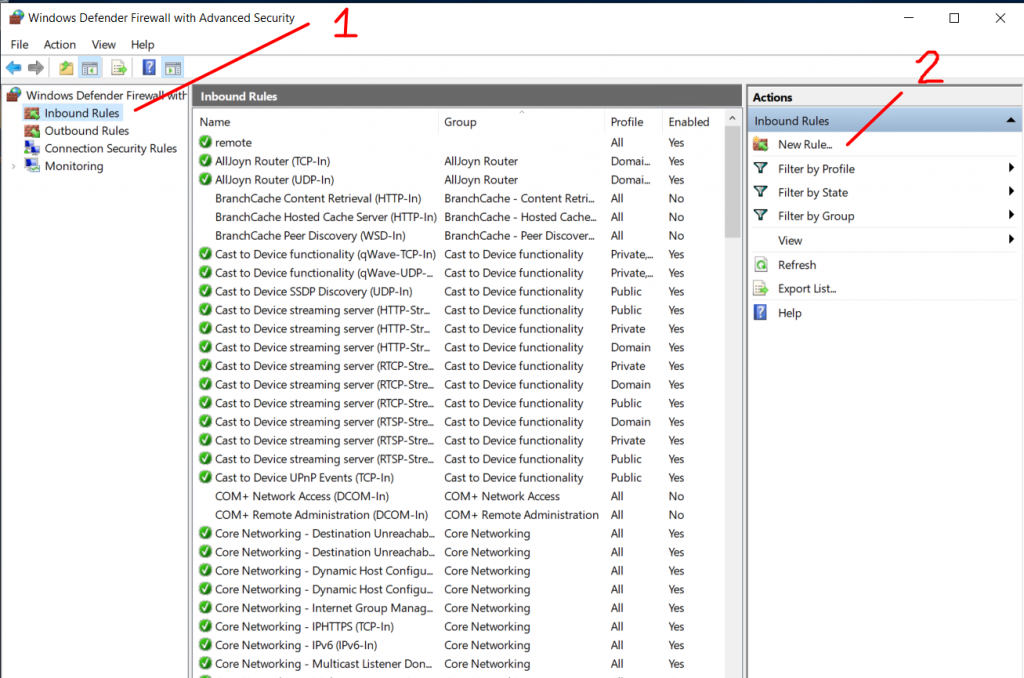
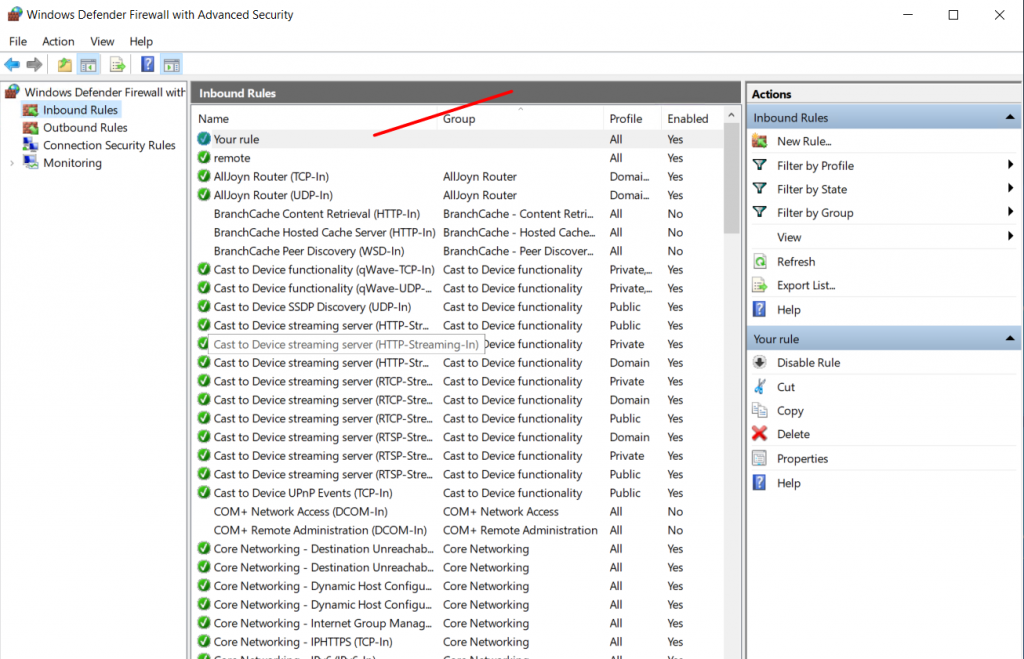
- Now you have to click on the Inbound Rules on the left of the MMC.
- Then click on the New Rule on the Right of the MMC.
- Now here you will get five steps to open a port and accept incoming connections:-
- Rule Type
- Protocol and Ports
- Action
- Profile
- Name
- Suppose for example the servers with Parallels RAS Publishing Agents will need to open TCP port 20002.
- Now under the Rule Type section, you have to select “Port” and then click on the “Next” button.
- Then under the Protocol and Ports section, you have to select the “TCP” as the type of protocol.
- After that, you have to type “20002” in the “Specific local ports” input field.
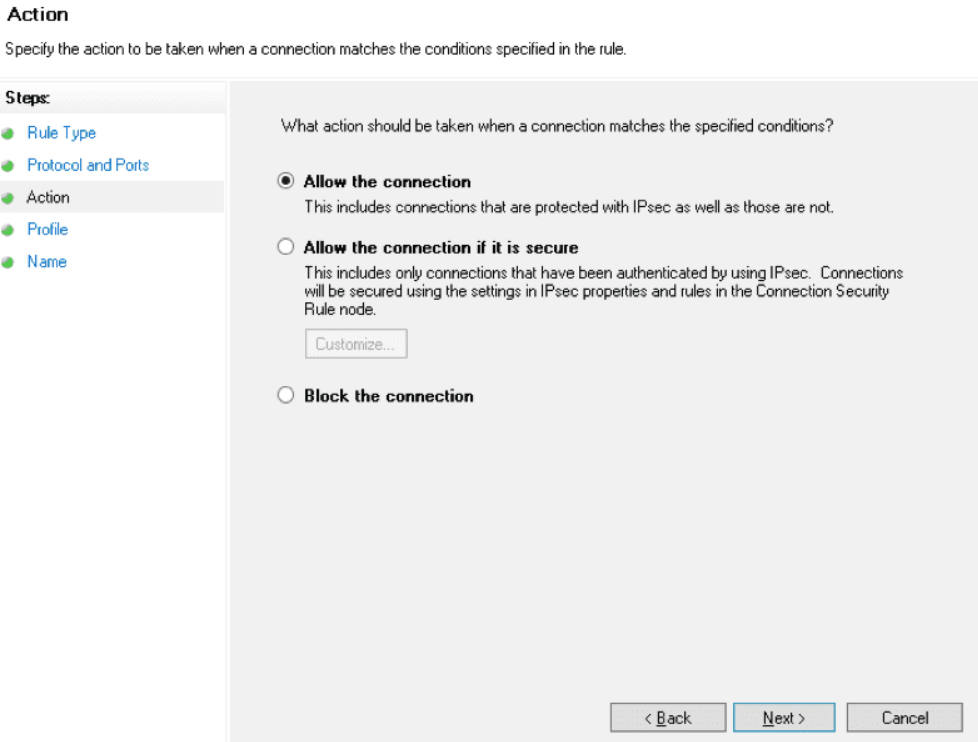
- Next, you have to head to the Action section in which you have to select “Allow the Connection“ and then you have to click on the “Next” button.
- Now under the Profile section, you have to select all three options and click on the “Next” button.

(NOTE: Here at this point if you wish to limit the connection to a particular profile then you can simply select the profiles that are appropriate to your setup.)
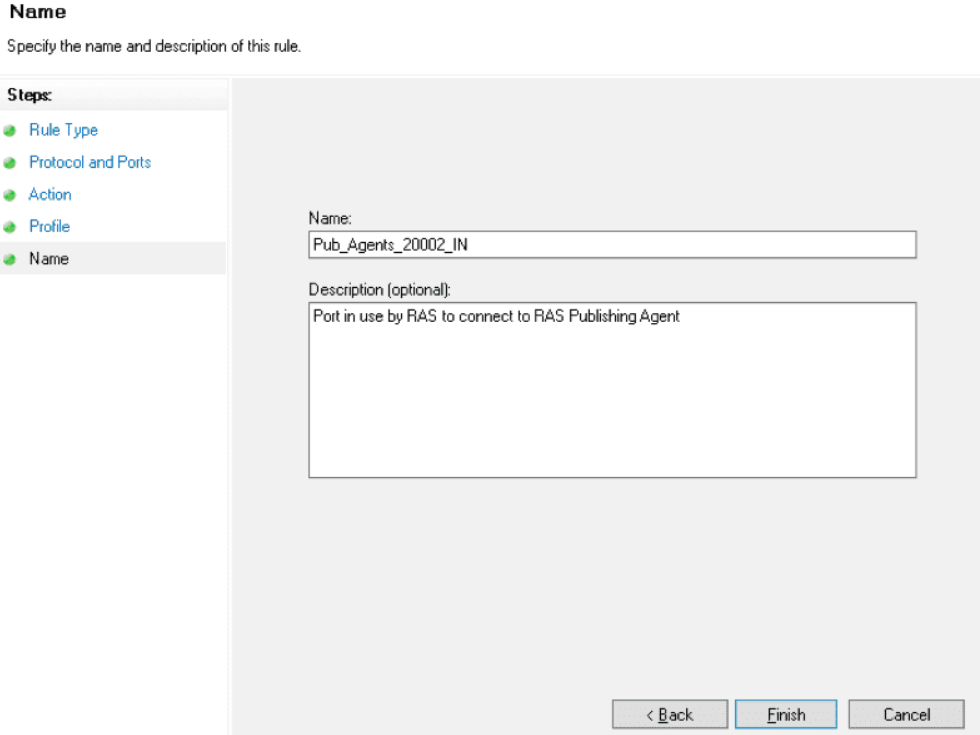
- After that, now you have to enter a “Name” for this rule under the Name section, and then click on the “Finish” button when you are done.
- That’s it, now you are done.
Open Ports through command line (netsh)
- First of all, using an administrator account you have to login to the server.
- Then you have to open and run the Command Prompt as Administrator.
- For the Publishing Agents role on the servers, open the TCP port 20002 with the following command.

- That’s it, now you are done.
Open Ports through PowerShell commands
- First of all, using an admin account you have to Log in.
- Then you have to run the Windows PowerShell as Administrator.
- You need to open the TCP port 20002 on the publishing agents server using the following command.

- That’s it, now you are done.
Once all is done, now immediately after creating this rule, the firewall rule will allow traffic to (or from) your server. While if you want to open a port for both sending and receiving, you need to repeat the process as an Outbound rule.
Ports play a very important role in any computer system. In computer networks, ports are used to connect computers and other devices to one another. When you open a port, you are allowing specific types of information to go in and out of your computer.
For example, if you want to host a website, you need to open port 80 to allow web traffic to go in and out. This blog is all about how to open ports on a Windows server and we hope that you liked it.
FAQs
What is a firewall and how does it work?
A firewall is a security system that is used to protect computer resources from unauthorized access. It checks incoming and outgoing traffic on a network or server, and according to the configured rules, decides whether to allow or block traffic.
How do I open ports on Windows Server?
There are three ways to open ports on Windows Server 2008/2012 R2/2016 and Windows Server 2019: using MMC, command line (netsh), or PowerShell commands. To open a port using MMC, you need to log in as an admin, click on Start > Administrative Tools > Windows Firewall with Advanced Security, click on Inbound Rules, then click on New Rule, and follow the five steps to open a port and accept incoming connections.
What is a TCP/IP port and why do applications need them?
TCP/IP ports are reserved for applications when they want to access the network, which means that no one else can use them. Ports are used to connect computers and other devices to one another. When you open a port, you are allowing specific types of information to go in and out of your computer.
What is the difference between Inbound and Outbound rules when opening a port?
Inbound rules control traffic coming into the server, while outbound rules control traffic going out of the server. If you want to open a port for both sending and receiving, you need to repeat the process as an outbound rule.
Why is it important to open ports on a Windows server?
Opening ports on a Windows server is important because it allows specific types of information to go in and out of your computer. For example, if you want to host a website, you need to open port 80 to allow web traffic to go in and out. By opening ports, you can ensure that the applications and services you want to use can communicate properly.
Hello! One of the protection mechanisms of the server is the implementation of the Firewall. Although there are third party options, Microsoft offers a Firewall integrated into the operating system. It is very efficient and highly configurable. Additionally, it can allow or block connections or redirect connection requests. Also, by customizing the rules it is possible to allow only authorized communications. On the other hand, port management is vital within the Firewall. Since they allow communication between the server and the external network. In fact, the vast majority of attacks are carried out through these ports. For this reason, the Firewall blocks most of the ports. However, it is occasionally necessary for an app to have access to one. In this case, the administrator must authorize the program’s access to the required port. So let’s see how to open a firewall port in Windows Server 2019/2016.
How to open the firewall port using the advanced settings.
In the first place it is necessary to enter the Control Panel and follow the next path:
- System and security
- Windows Defender Firewall
- Advanced Settings

The advanced settings of the Windows Firewall are immediately displayed. There are the entry and exit rules plus the security rules for connections. Finally, there are the firewall supervision options.

Clicking on the input rules will display the pre-configured Windows Server rules. As the name implies, they are related to incoming network connections and packets. Also, some rules are not activated by default. Therefore, you just need to double-click on them and then enable them.

Creating a new rule in the Windows Server Firewall.
By right-clicking on inboud rules, you can create a new rule.

There are several options for the creation of the rule. However, you should only select Port. Press Next to continue

Now it’s time to set your connection preferences:
- TCP: It is a connection-oriented protocol. In other words, its function is to create connections with the aim of sending data flow.
- UDP: It is a non connection-oriented protocol. Consequently, its development is based on the exchange of data grams.
On the other hand, it is possible to enable all ports for connection. This is obviously an unsecured option. Or you can configure specific ports.

Now it is time to determine what action the new rule will take:
- Allow connection through the port.
- Allow connection if secure. That is, allow data to be transmitted only if the connection is authenticated through Ipsec.
- Block connection through the port.

Please select the option corresponding to Allow connection and press Next. Now it is time to determine which profiles the new rule will be applied to.

Finally, you can assign a name and description to the new rule. This way it is easier to locate it later.

Back to the previous screen, you can see the new rule created.

Ultimately we have seen how to open a firewall port in Windows Server 2019/2016. In addition, the tutorial also serves to block a specific port. This way, the administrator can increase the functionality of the Firewall. All right, that’s it for now. Greetings!
— Advertisement —
Everything Linux, A.I, IT News, DataOps, Open Source and more delivered right to you.
Subscribe
«The best Linux newsletter on the web»
Welcome to our Support Center
How to Open/Allow Ports in Windows Server Firewall: Complete Tutorial
Introduction
Opening and allowing specific ports through the Windows Server firewall is an essential task for network administrators and server managers. Whether you’re hosting web applications, databases, remote desktop services, or other network-dependent services, properly configuring port access is crucial for functionality while maintaining security.
This tutorial explains how to open a port in Windows Server (using Windows Firewall).
Prerequisites
Before proceeding with this tutorial, ensure you have
- Windows Server (2016, 2019, or 2022)
- Administrator access to the server
- Basic understanding of networking concepts and port functionality
- Knowledge of which specific ports need to be opened for your services
- A backup of your current firewall settings (recommended)
Method 1: Using Windows Firewall with Advanced Security (GUI)
The Windows Firewall with Advanced Security provides a graphical interface for managing firewall rules, including port access.
Step 1: Open Windows Firewall with Advanced Security
- Click on the Start button
- Type “Windows Firewall” in the search box
- Select “Windows Defender Firewall with Advanced Security” from the results
- Alternatively, you can open it through Server Manager → Tools → Windows Defender Firewall with Advanced Security

Step 2: Create a New Inbound Rule
- In the left pane, click on Inbound Rules
- In the right pane (Actions), click on New Rule…
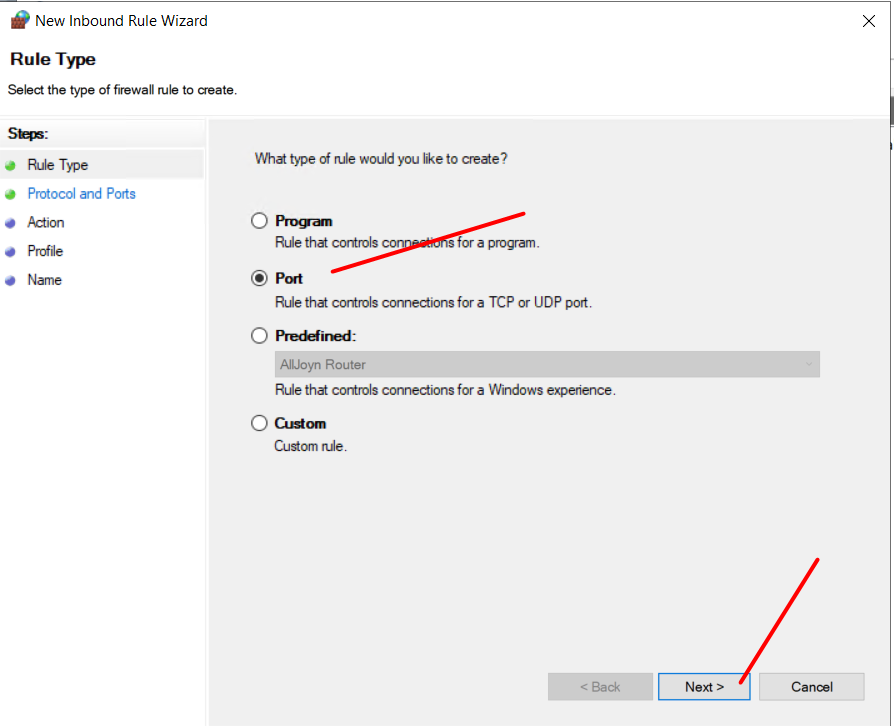
- In the New Inbound Rule Wizard, select Port and click Next

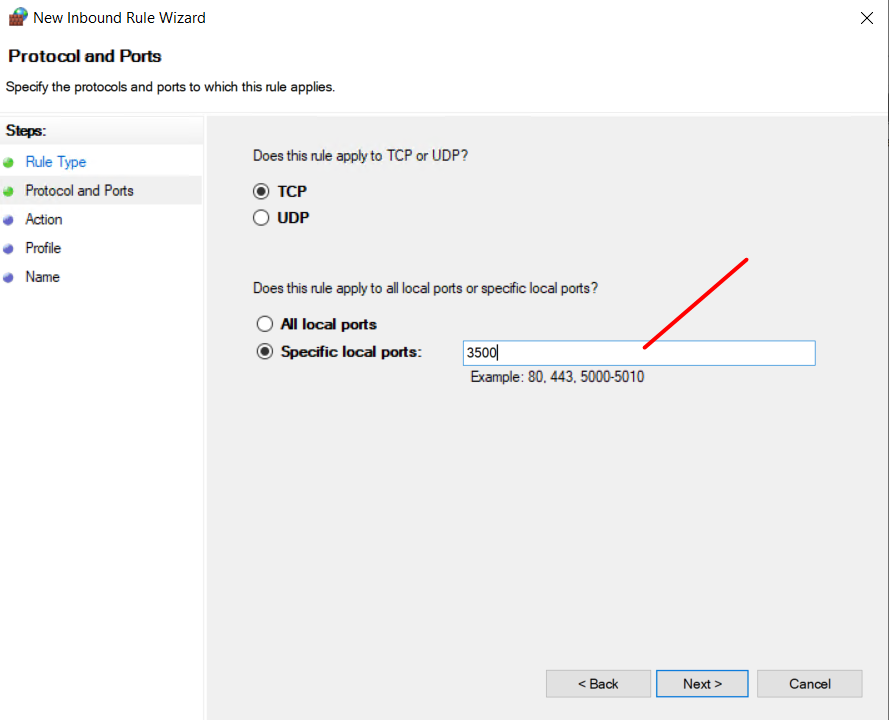
Step 3: Specify the Port Details
- Select either TCP or UDP based on your requirements
- Choose Specific local ports and enter the port number(s)
- For a single port, simply enter the number (e.g., 8080)
- For multiple ports, separate them with commas (e.g., 80, 443)
- For a range of ports, use a hyphen (e.g., 5000-5010)
- Click Next to continue

Step 4: Specify the Action
Select the appropriate action:
- Allow the connection: All connections that match these criteria will be permitted
- Allow the connection if it is secure: Only secure connections will be allowed
-
- Block the connection: All connections that match these criteria will be rejected
For this tutorial, select Allow the connection and click Next

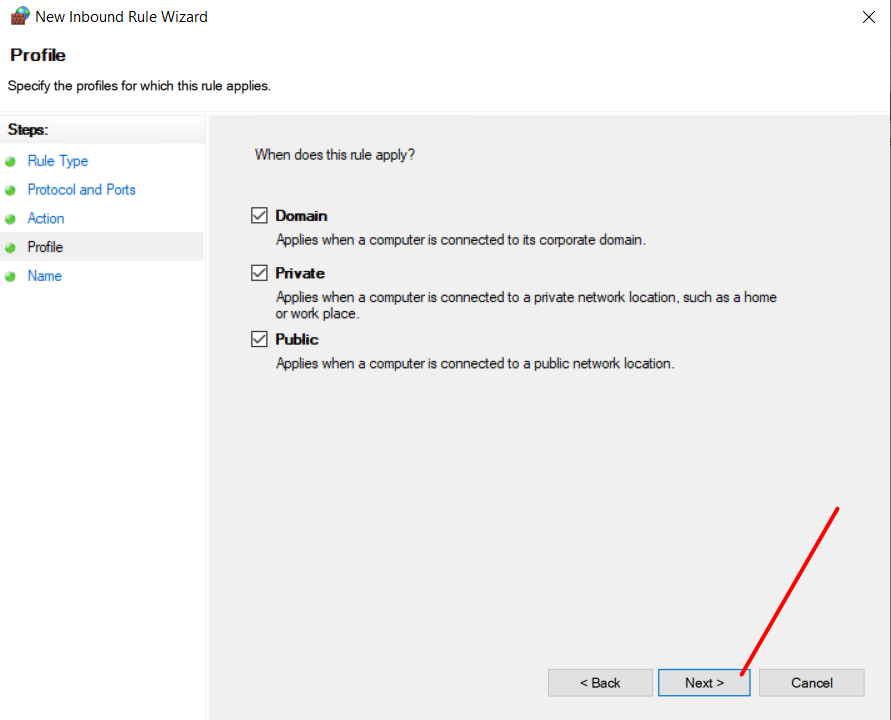
Step 5: Specify When the Rule Applies
1. Select the network location types where this rule should apply:
- Domain: Networks identified as domain networks
- Private: Networks identified as private (e.g., home or work networks)
-
- Public: Networks identified as public (e.g., coffee shops, airports)
2. Select the appropriate options based on your network environment
3. It’s generally recommended to be more restrictive, especially for public networks
4. Click Next to continue

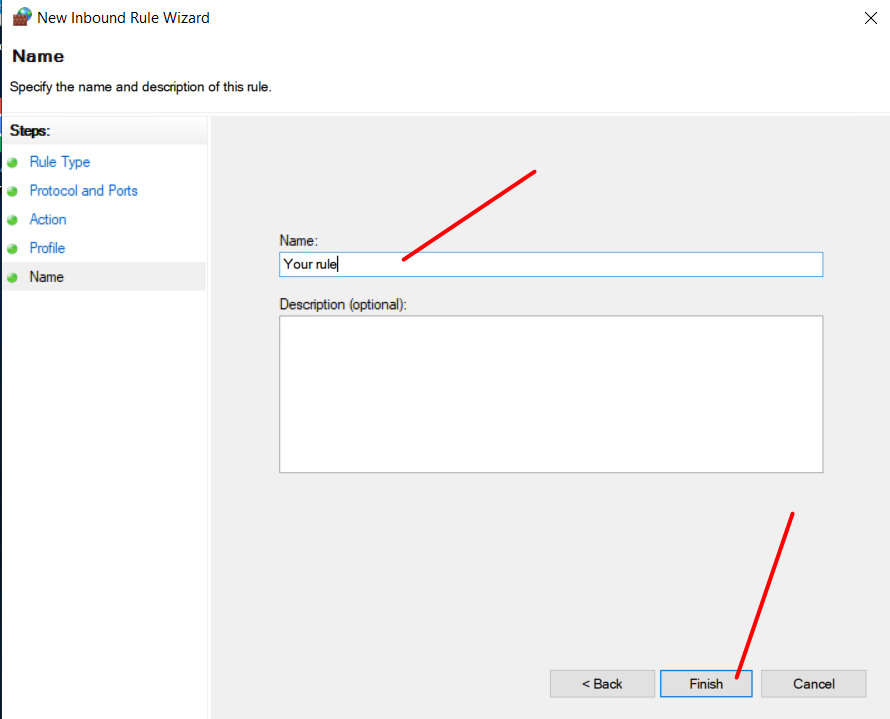
Step 6: Name and Describe the Rule
- Enter a name for the rule (e.g., “Allow JAVA Traffic”)
- Optionally, enter a description to document the purpose of the rule
- Click Finish to create and enable the rule

Method 2: Using Command Prompt (netsh)
The netsh command-line tool provides another method to configure the Windows Firewall.
Step 1: Open Command Prompt as Administrator
- Click on the Start button
- Type “cmd“
- Right-click on Command Prompt and select Run as Administrator
Step 2: Create a Firewall Rule with netsh
To add a basic firewall rule:
cmd
netsh advfirewall firewall add rule name=»Allow Port 8080″ dir=in action=allow protocol=TCP localport=8080
Step 3: Create More Specific Rules with netsh
For a more specific rule:
cmd
netsh advfirewall firewall add rule name=»Allow JAVA Port» dir=in action=allow protocol=TCP localport=8080 profile=domain,private remoteip=192.168.1.0/24
This command creates a rule that:
- Allows inbound TCP traffic on port 8080 (Custom Java Port)
- Only applies to Domain and Private networks
- Only allows connections from the 192.168.1.0/24 subnet
Step 4: Verify the Rules with netsh
To show all inbound rules:
cmd
netsh advfirewall firewall show rule name=all dir=in
cmd
netsh advfirewall firewall show rule name=»Allow JAVA Port 8080″
Best Practices for Managing Ports in Windows Server
1. Use the Principle of Least Privilege
Only open ports that are absolutely necessary for your services to function. Each open port is a potential entry point for attacks.
2. Document All Firewall Rules
Maintain detailed documentation of all firewall rules, including:
- Port number and protocol
- Purpose of the rule
- Date implemented
- Who implemented it
- Any expiration date if temporary
3. Regularly Audit Your Firewall Rules
Schedule regular reviews of your firewall rules to identify and remove any unnecessary or outdated rules.
powershell
Get-NetFirewallRule | Export-Csv -Path C:\FirewallRules_$(Get-Date -Format «yyyyMMdd»).csv -NoTypeInformation
4. Use Specific IP Restrictions When Possible
Whenever possible, restrict access to specific IP addresses or subnets rather than allowing traffic from any source.
powershell
New-NetFirewallRule -DisplayName «Allow JAVA Port from Support» `
-Direction Inbound `
-Protocol TCP `
-LocalPort 8080 `
-Action Allow `
-RemoteAddress 192.168.10.0/24
5. Implement Port Monitoring
Set up monitoring to detect unusual traffic patterns on your open ports, which could indicate a security breach.
Troubleshooting Common Port Issues
Issue 1: Service Is Not Accessible Despite Open Port
- Verify the service is actually running on the server
- Confirm the service is bound to the correct IP address and port
- Check for any local firewall software that might be blocking the connection
- Use netstat -ano to verify the service is listening on the expected port
- Test local connectivity using telnet localhost [port]
Issue 2: Rule Exists But Port Is Still Blocked
- Check if multiple conflicting rules exist (a block rule might be overriding an allow rule)
- Verify the rule is enabled
- Ensure the rule applies to the current network profile (Domain/Private/Public)
- Check if Windows Defender or other security software is blocking the connection
- Temporarily disable the firewall to test if it’s the source of the blocking:
powershell
# Disable firewall (for testing only)
Set-NetFirewallProfile -Profile Domain,Public,Private -Enabled False
powershell
# Don’t forget to re-enable it after testing
Set-NetFirewallProfile -Profile Domain,Public,Private -Enabled True
Issue 3: Port Configuration Works Locally But Not Remotely
- Check for intermediate firewalls, routers, or proxy servers
- Verify Network Address Translation (NAT) is properly configured if applicable
- Use a port scanning tool from the remote location to check if the port is reachable
- Test with a simple telnet connection from the remote location
Common Ports and Their Functions
Here’s a quick reference of commonly used ports that you might need to open:
| Port | Protocol | Service | Description |
|---|---|---|---|
| 20, 21 | TCP | FTP | File Transfer Protocol |
| 22 | TCP | SSH | Secure Shell |
| 23 | TCP | Telnet | Remote login service (insecure) |
| 25 | TCP | SMTP | Simple Mail Transfer Protocol |
| 53 | TCP/UDP | DNS | Domain Name System |
| 80 | TCP | HTTP | Hypertext Transfer Protocol |
| 443 | TCP | HTTPS | HTTP Secure |
| 389 | TCP/UDP | LDAP | Lightweight Directory Access Protocol |
| 636 | TCP | LDAPS | LDAP over SSL |
| 1433 | TCP | SQL Server | Microsoft SQL Server database |
| 3306 | TCP | MySQL | MySQL database |
| 3389 | TCP | RDP | Remote Desktop Protocol |
| 5985 | TCP | WinRM | Windows Remote Management (HTTP) |
| 5986 | TCP | WinRM | Windows Remote Management (HTTPS) |
| 8080 | TCP | HTTP Alternate | Alternate HTTP port, often used for web proxies |
Conclusion
By properly configuring your Windows Server firewall, you ensure that legitimate traffic can reach your services while blocking potential security threats, maintaining both functionality and security for your server environment.
HostingHome Tip: For security, restrict open ports to only necessary services & use IP whitelisting where possible.
Need help? Contact HostingHome Support for expert server security assistance! 🚀
Introduction
Firewall represents one of mechanisms which provides protection for the Windows Server. Despite the fact that there exists a variety of third party solutions, Microsoft has implemented the Firewall into its operating system.
How to open the specific port using the advanced settings.
1. Click Start > Administrative Tools > Windows Firewall with Advanced Security
2. Click on “Inbound Rules” on the left of the MMC, then on “New Rule”
3. There are several options for the creation of the rule. To open a specific port, you should only select “Port”. Press “Next” to continue
4. In the “Protocol and Ports” section – select “TCP” as the type of protocol and type “your port″ in the “Specific local ports” input field:
5. In the “Action” section, select the option “Allow connection” and press “Next”.

6. In the “Profile” section, select all three options and click “Next”
7. In the “Name” section – you can enter a name and description to the new rule
8. Back to the previous screen, you can see the new rule created.
9. Finally, we have a new rule to open a desired firewall port in Windows Server 2019/2012