
Installing the Cluster is easy now days. But just this I post a little blog on how to do this, In my blog stats it shows that the 2012 post is still very active , so time for an update to Windows Server 2019. in the creation there isn’t much changed, it gets only easier. but If you still not in PowerShell you got more clicks to do an less Coffee. And Windows Admin Center is also a great addition to manage a cluster. This blog post is also usable in Azure Only you need to add Storagespacesdirect and a CSV file share.
Just install a bare metal (VM) windows Server 2019 and do a domain join and the fun can start.
Installing the Cluster Feature in powershell
Install-WindowsFeature –Name Failover-Clustering –IncludeManagementTools
#Create cluster validation report
Test-Cluster -Node MVP19-01,MVP19-02
#Create new Cluster
New-Cluster -Name MVP1911-27 -Node MVP19-01,MVP19-02 -NoStorage -StaticAddress «10.255.255.45»
#place witness file on USB device from my router
Set-ClusterQuorum -FileShareWitness \\SERVER\SHARE -Credential $(Get-Credential)
Now that the basic cluster is ready we start with the HA share

File share witness enhancements We enabled the use of a file share witness in the following scenarios:
- Absent or extremely poor Internet access because of a remote location, preventing the use of a cloud witness.
- Lack of shared drives for a disk witness. This could be a Storage Spaces Direct hyperconverged configuration, a SQL Server Always On Availability Groups (AG), or an * Exchange Database Availability Group (DAG), none of which use shared disks.
- Lack of a domain controller connection due to the cluster being behind a DMZ.
-
A workgroup or cross-domain cluster for which there is no Active Directory cluster name object (CNO). Find out more about these enhancements in the following post in Server & Management Blogs: Failover Cluster File Share Witness and DFS.
We now also explicitly block the use of a DFS Namespaces share as a location. Adding a file share witness to a DFS share can cause stability issues for your cluster, and this configuration has never been supported. We added logic to detect if a share uses DFS Namespaces, and if DFS Namespaces is detected, Failover Cluster Manager blocks creation of the witness and displays an error message about not being supported.
that’s it the cluster is created, we can start with the File server
Next is installation of the file server role

A restart is needed! After the restart we can build the cluster with the HA file share
$servers = («MVP19-01», «MVP19-02»)
foreach ($server in $servers) {Install-WindowsFeature -Name file-services -ComputerName $server}
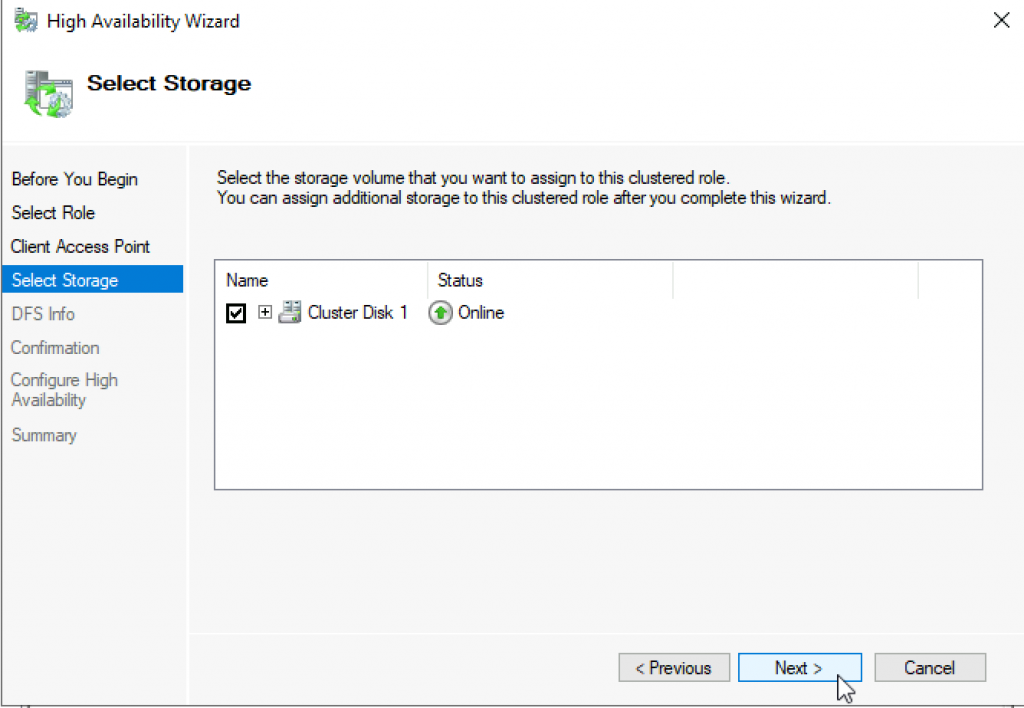
Now that the File Server Role is added we can add the Disk. Or use a disk that you already added before.
First we need to add a disk this can be done in the Failover Cluster manager or with PowerShell

Get-ClusterAvailableDisk | Add-ClusterDisk

The Roles are there and the Disk is added

Next step is adding the File server Role to the Cluster and add the HA File Share.
In this case I have a fail over disk and I use the File Server for general use.


So when adding the Disk it is not showing the disk. This is The disk is added to the cluster but the disk isn’t formatted!
Keep in mind that formating the cluster disk while it is online is not possible. You need to set the disk in maintenance mode else the format will fail.


So after the disk format we will see the Disk appear and can be added to the File server

After this the File server is up and running. As you can see the setup is screen intense, building this with PowerShell is a lot faster.
Powershell
add-ClusterFileServerRole -Storage «Cluster Disk 1» -Name MyFiles
New-SmbShare -Name «Data» -Path «J:\Data» -EncryptData $True
Quick steps with powershell and even the share is created and encrypted

Next step is adding the file share.

go for the Quick setup


Pick the disk and select the folder with the data on the disk, if there is no data then create a folder that will hold the data later.

as you can see the UNC path from the File Server.


As you can see the settings can be adjusted for you needs and also set the right access, and keep in mind this needs to be don on the Cluster Level!

All Done

So creating a File Server and 2 file shares is Click intensive if you don’t use PowerShell.
But What about Windows Admin Center ? yes that would be an option also except here you can’t create a cluster role.


You can create a new role but no file server /share etc.
But when the share is created and running like now you can use Windows Admin Center for migration the data to the file share.

But more and more options are coming in Windows Admin Center below are some links that you can use to add your request to the UserVoice
https://docs.microsoft.com/en-us/windows-server/manage/windows-admin-center/use/manage-failover-clusters
More Coming
Failover cluster management in Windows Admin Center is actively under development and new features will be added in the near future. You can view the status and vote for features in UserVoice:
Feature Request
Show more clustered disk info
Support additional cluster actions
Support converged clusters running Hyper-V and Scale-Out File Server on different clusters
View CSV block cache
See all or propose new feature
+++++++++++++++
Follow Me on Twitter @ClusterMVP
Follow My blog https://robertsmit.wordpress.com
Linkedin Profile Robert Smit MVP Linkedin profile
Google : Robert Smit MVP profile
Robert Smit is Senior Technical Evangelist and is a current Microsoft MVP in Clustering as of 2009.
Robert has over 20 years experience in IT with experience in the educational, health-care and finance industries.
Robert’s past IT experience in the trenches of IT gives him the knowledge and insight that allows him to communicate effectively with IT professionals
who are trying to address real concerns around business continuity, disaster recovery and regulatory compliance issues. Robert holds the following certifications:
MCT — Microsoft Certified Trainer, MCTS — Windows Server Virtualization, MCSE, MCSA and MCPS. He is an active participant in the Microsoft newsgroup community and is currently focused on Hyper-V, Failover Clustering, SQL Server, Azure and all things related to Cloud Computing and Infrastructure Optimalization.
Follow Robert on Twitter @ClusterMVP
Or follow his blog https://robertsmit.wordpress.com
Linkedin Profile Http://nl.linkedin.com/in/robertsmit
Robert is also capable of transferring his knowledge to others which is a rare feature in the field of IT. He makes a point of not only solving issues but also of giving on the job training of his colleagues.
A customer says » Robert has been a big influence on our technical staff and I have to come to know him as a brilliant specialist concerning Microsoft Products. He was Capable with his in-depth knowledge of Microsoft products to troubleshoot problems and develop our infrastructure to a higher level. I would certainly hire him again in the future. »
Details of the Recommendation: «I have been coordinating with Robert implementing a very complex system. Although he was primarily a Microsoft infrastructure specialist; he was able to understand and debug .Net based complext Windows applications and websites. His input to improve performance of applications proved very helpful for the success of our project
View all posts by Robert Smit [MVP]
В Windows Server 2012 появилась возможность наряду с классическим файловым кластером создавать так называемый Scale-Out File Server – файловый кластер, который работает в режиме Active-Active. Все узлы кластера в этом режиме способны обрабатывать запросы SMB-клиентов к общим папкам (файловым шарам), расположенным на томах CSV (Cluster Shared Volumes). Эта технология носит название SMB Scale-Out и в сочетании с технологией прозрачной отработки отказа (SMB Transparent Failover) позволяет выстраивать горизонтально масштабируемые отказоустойчивые файловые хранилища для различных серверных приложений.
Расширения CSV в Windows Server 2012
Функционирование файлового кластера в режиме Active-Active подразумевает возможность одновременного доступа на «чтение-запись» к общему кластерному тому со всех узлов кластера. Последнее возможно благодаря технологии Cluster Shared Volumes (CSV), впервые появившейся в Windows Server 2008 R2. Напомню, что при использовании CSV для каждого CSV-тома, по-прежнему, один из узлов кластера назначается в качестве «владельца», отвечающего за все операции с метаданными, как то: создание, удаление, переименование файла и пр. Если, например, запрос на создание файла поступил на узел кластера, не являющийся «владельцем» тома, то данный узел перенаправляет запрос по сети «владельцу», который и выполняет операцию.
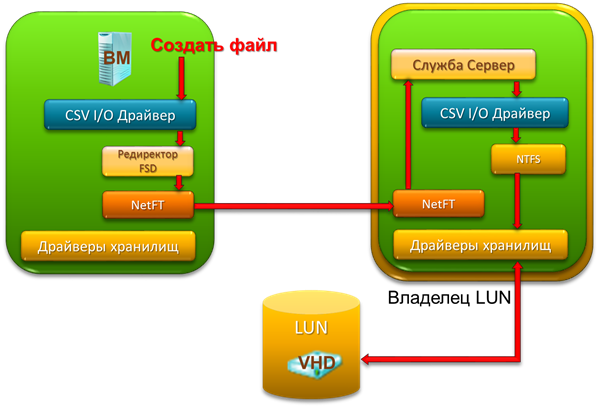
Если же речь идет об операции «чтения-записи» файла, то такой запрос реализует тот узел кластера, который данный запрос получил, вне зависимости от того, является ли он «владельцем» тома, или нет.

В случае отказа/сбоя текущего «владельца», назначается новый «владелец» из числа работоспособных узлов. При необходимости администратор может в любой момент передать владение нужному узлу с помощью консоли Failover Cluster Manager или командлета PowerShell.
Описанная функциональность в Windows Server 2008 R2 была доступна только для роли Hyper-V, который мог располагать на CSV-томах VHD-файлы. Иными словами, создать на CSV-томе шару и подключиться к ней через кластер было невозможно. Этого ограничения более нет в Windows Server 2012. Как следствие, в кластере можно сконфигурировать один или несколько томов CSV, затем поднять роль Scale-Out File Server и в рамках этой роли создать на CSV-томах нужное количество файловых шар с признаком continuous availability. В результате получим файловый кластер с набором шар, доступ к которым возможен с любого узла кластера (Active-Active) и для которых поддерживается прозрачная отработка отказа (Transparent Failover).
Каковы требования для работы SMB Scale-Out?
Для использования технологии SMB Scale-Out должны выполняться следующие требования:
- Отказоустойчивый файловый кластер под управлением Windows Server 2012 с минимум двумя узлами.
- Одна или несколько общих папок с признаком continuous availability, созданных на CSV-томе.
- Клиент под управлением Windows Server 2012 или Windows 8, то есть клиент с поддержкой SMB 3.0. Вообще говоря, подключиться к кластеру и соответствующим шарам смогут и клиенты SMB 2.0, но последние не смогут воспользоваться механизмом прозрачной отработки отказа.
Настройка SMB Scale-Out
Прежде всего необходимо создать Failover Cluster и на каждом его узле развернуть роль File Server. На этих шагах подробно останавливаться не буду, они не претерпели каких-либо принципиальных изменений в Windows Server 2012.
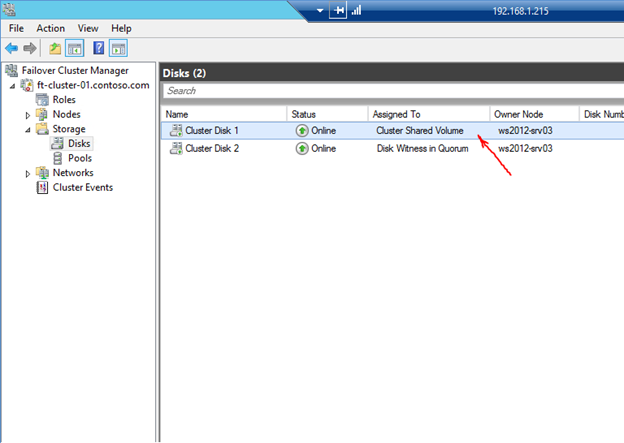
Теперь необходимо как минимум одно доступное хранилище сконфигурировать в виде CSV-тома.
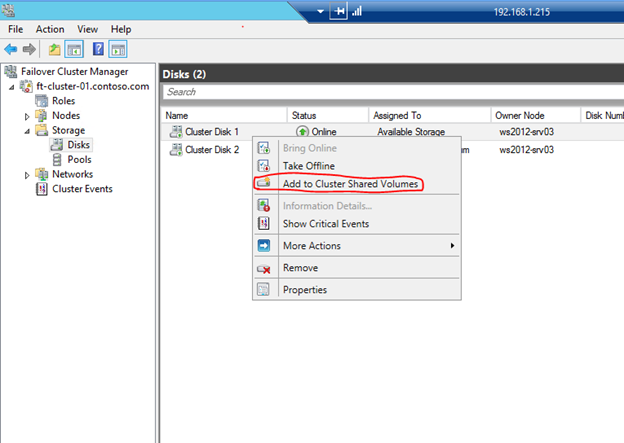
Выбранный том помечается соответствующим признаком.
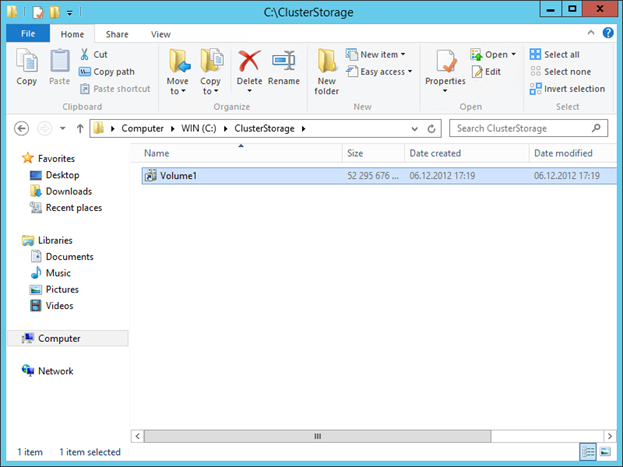
Физически этот том монтируется в папку ClusterStorage на диске C:
Теперь все готово для создания файлового кластера Scale-Out File Server. Запускаем мастер, выбрав пункт “Configure Role…”.

Выбираем роль File Server.
На следующем экране указываем, что хотим создать именно Scale-Out File Server.

Указываем имя, по которому к файловому кластеру будут обращаться клиенты.
В отличие от классического файлового кластера это все настройки, которые необходимо задать, поэтому нажимаем “Next”
и на экране “Summary” проверяем, что все в порядке.
В консоли Failover Cluster Manager также можно убедиться в том, что создан нужный нам тип файлового кластера.

Остается создать файловые шары с признаком continuous availability. Здесь я по шагам описывал этот процесс.
В каких сценариях разумно использовать SMB Scale-Out?
При использовании SMB Scale-Out необходимо помнить, что изменениями метаданных тома CSV управляет только один узел кластера, тот самый «владелец». Отсюда понятно, что рассмотренный вид файлового кластера едва ли подходит в тех случаях, когда пользователи или приложения генерирую большой объем изменений метаданных (создают, удаляют, переименовывают большое количество файлов). Напротив, такие приложения как Hyper-V или SQL Server, которые сравнительно редко меняют метаданные тома, при этом по долгу удерживают свои файлы в открытом состоянии, производя большое количество операций чтения-записи этих файлов, представляют собой идеальных кандидатов для использования совместно с SMB Scale-Out.
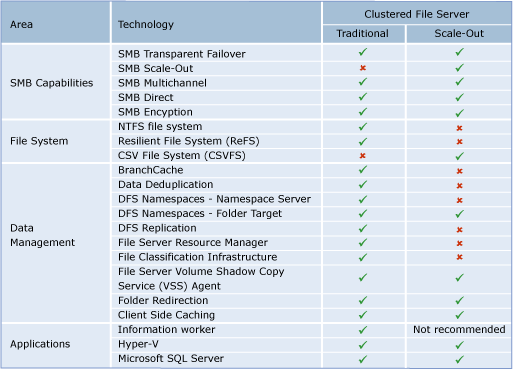
В силу специфики SMB Scale-Out совместима не со всеми технологиями и службами Windows Server 2012. Таблица ниже, заимствованная с портала TechNet, поможет принять более взвешенное решение при выборе типа кластера.
Итак, SMB Scale-Out предоставляет возможность создания масштабируемого отказоустойчивого файлового хранилища. В отличие от традиционного кластера нагрузочная способность такого кластера не ограничивается мощностью одного узла. То факт, что хранилище является файловым, значительно упрощает задачи администрирования такого ресурса. Прозрачная отработка отказа позволяет применять подобные кластеры в качестве хранилища для различных серверных приложений, использующих SMB. Наконец, SMB Multichannel или же встроенная в Windows Server 2012 технология NIC Teaming (о которой пойдет речь в одном из ближайших постов) обеспечат отказоустойчивость на уровне сетевого канала связи.
Надеюсь, материал был полезен.
Спасибо!
If a Windows file server fails, it shouldn’t take the whole organization down with it.
A Windows file server fills a critical infrastructure role as the central storage area for data the users and applications need to function. A file server without the added safety of high availability tempts fate if an outage puts files and application data offline until repairs can be made.
One way to avoid downtime is to create a Windows Server 2019 file server cluster.
Editor’s note: This article is tailored for Microsoft’s latest server operating system. The servers should be domain joined. A separate server is required to host a cluster shared volume for the file servers in the cluster.
Create an iSCSI Target
The first step is to create a cluster shared volume that will act as shared storage for the file servers within the cluster.
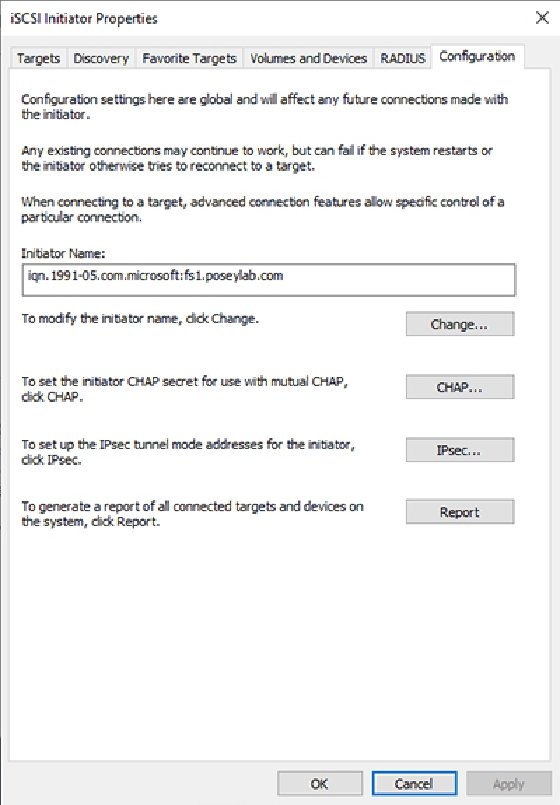
Log onto each of the file servers and launch the iSCSI Initiator, which is found in the Server Manager’s Tools menu. When prompted to start the iSCSI Service, choose Yes.
Next, go to the Configuration tab in the iSCSI Initiator Properties and record the initiator’s name. Do this for each file server.
Set up the iSCSI Target Server
Next, install the iSCSI Target Server onto the server that will host the cluster shared volume.
Open Server Manager and launch the Add Roles and Features Wizard and check the iSCSI Target Server checkbox.
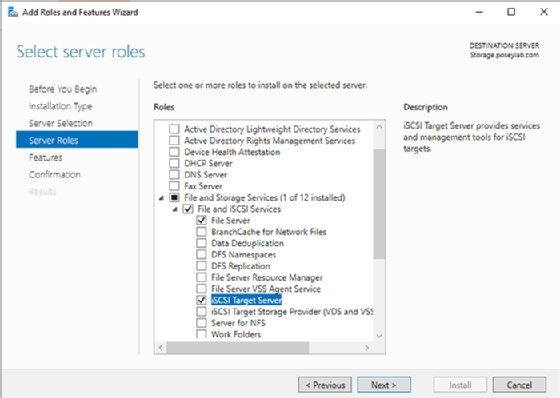
After the installation process completes, click on File and Storage Services, followed by iSCSI.
Next, choose the New iSCSI Virtual Disk option from the Task menu to launch the iSCSI Virtual Disk Wizard. Specify the location to create the iSCSI virtual disk and give the virtual disk a name.
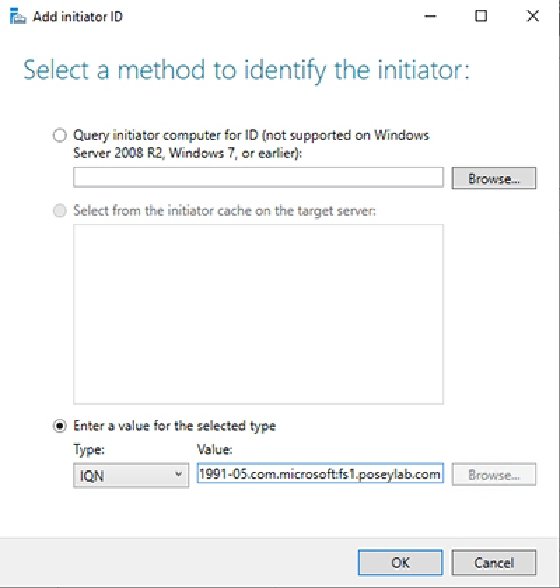
Next, add the access servers. To complete this step, click the Add button and type the initiator name into the Value field. Repeat this step for each initiator.
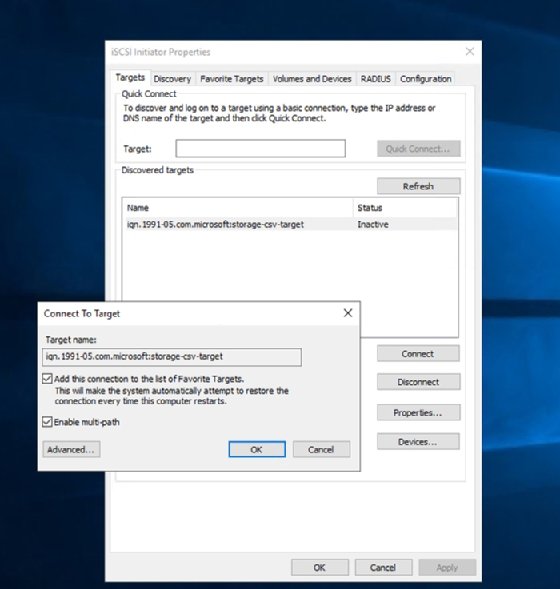
Go back to each file server, open the iSCSI Initiator and go to the Discovery tab. Click the Discover Portal button and enter the iSCSI Target’s IP address.
Next, select the Targets tab to see the iSCSI Target listed in the Discovered targets list. Select the target and click the Connect button. When the Connect To Target dialog box appears, select the Enable multi-path checkbox. Click OK and then repeat this procedure for each file server.
Next, open the Disk Management Console (diskmgmt.msc) on one of the cluster nodes to bring the disk online and create a volume.
Create the Windows Server 2019 file server cluster
With the cluster-shared volume attached, the next step is to create the failover cluster. First, install the Failover Clustering feature on each file server. After this installation process, launch the Failover Cluster Manager from Server Manager’s Tools menu.
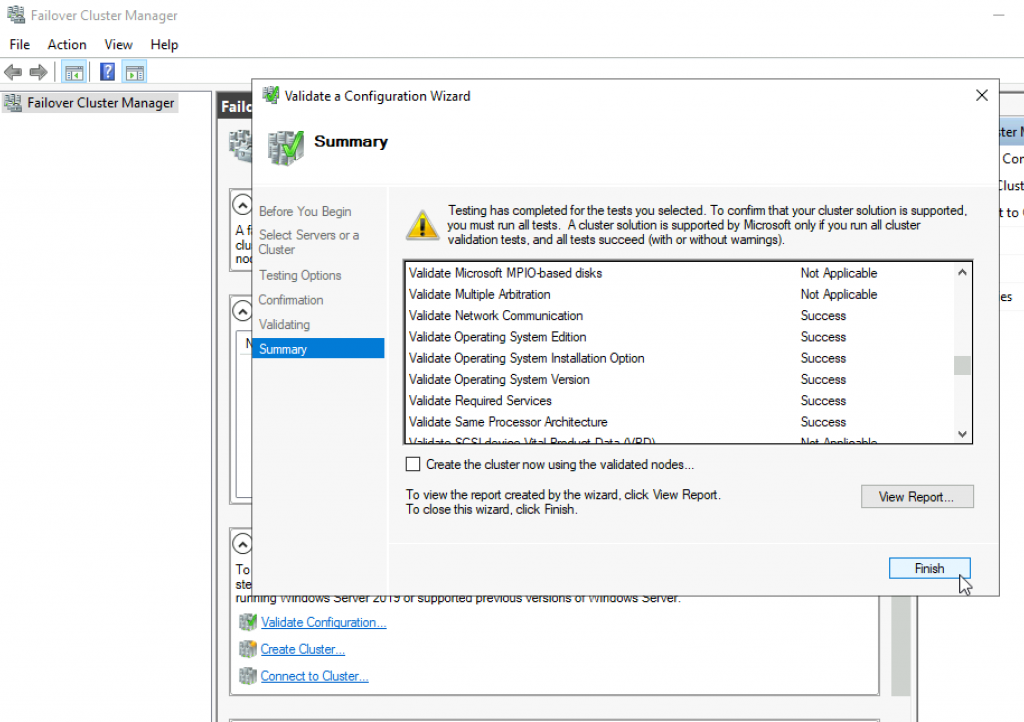
Next, run a validation test to check the hardware and software settings for issues. Click the Validate Configuration option and supply the Validate a Configuration Wizard with the names of the file servers.
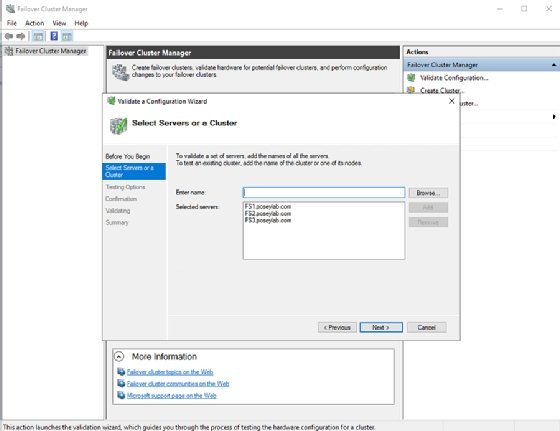
Run all the validation tests. It’s normal to get some warnings, but the tests should not return any errors.
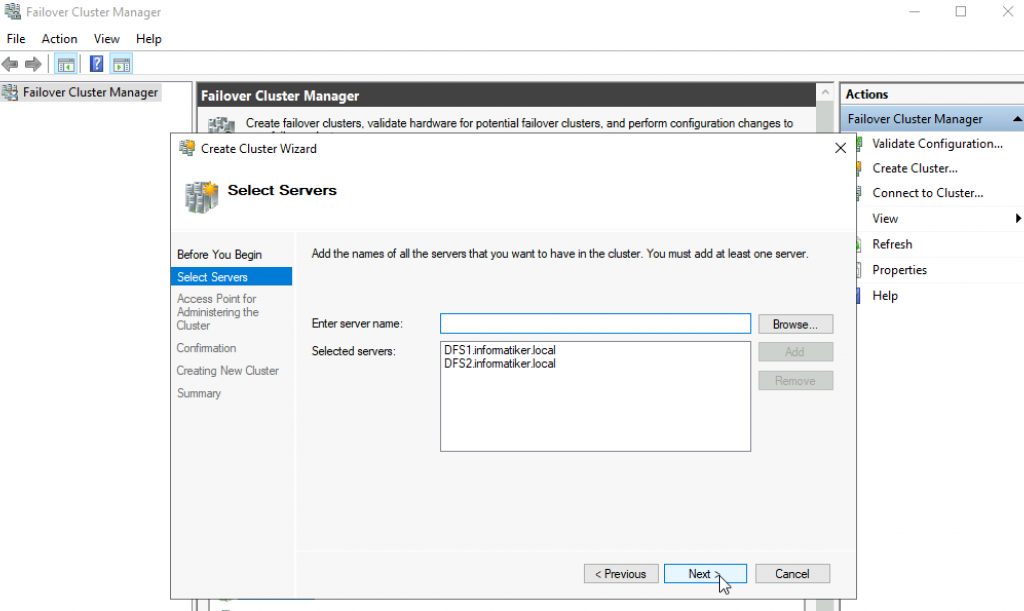
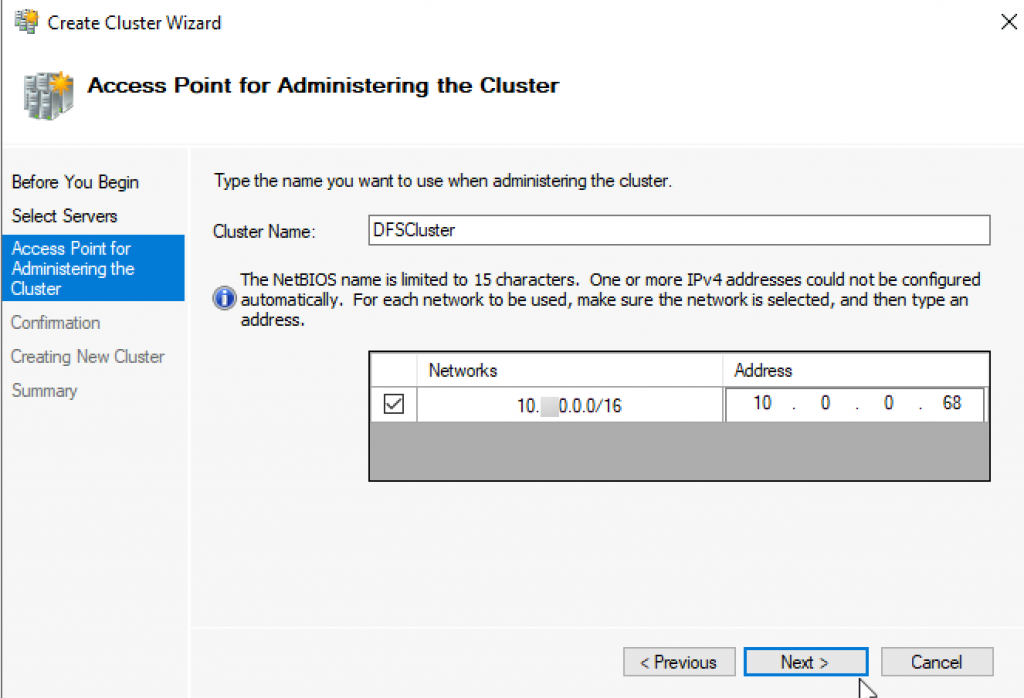
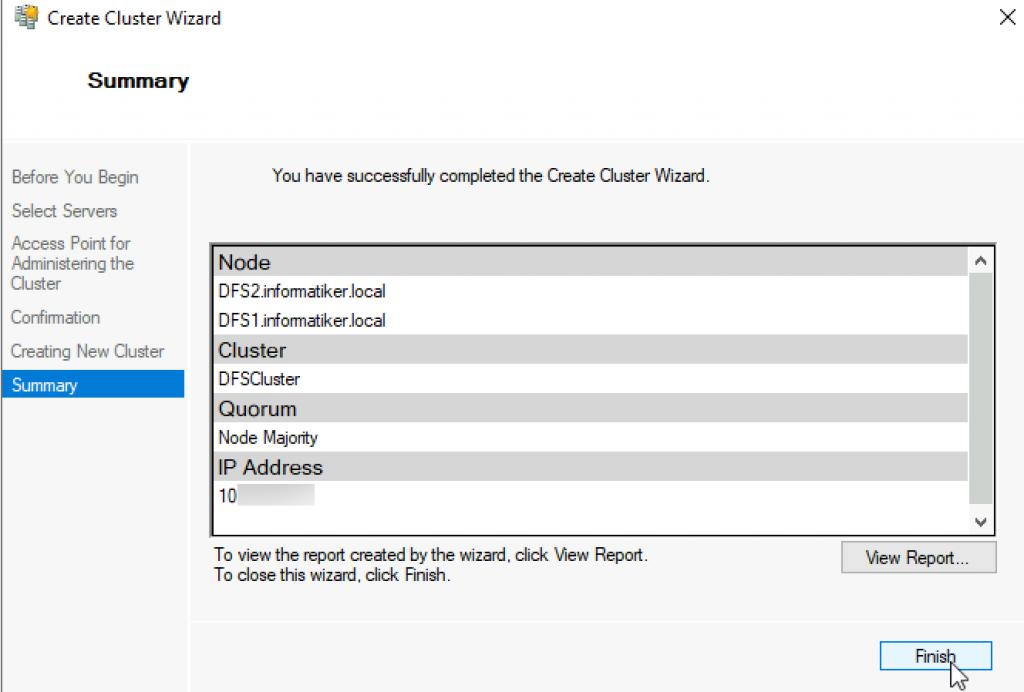
Next, click on Create Cluster to launch the wizard. Provide the names of the file servers and the name for the Windows Server 2019 file server cluster. When complete, the cluster should be listed in the Failover Cluster Manager.
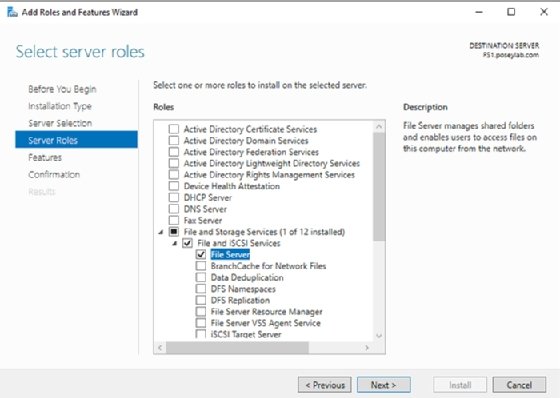
Set up the File Server role
Next, install the File Server role onto each cluster node through the Server Manager Add Roles and Features Wizard.
The last step is to make the File Server role highly available.
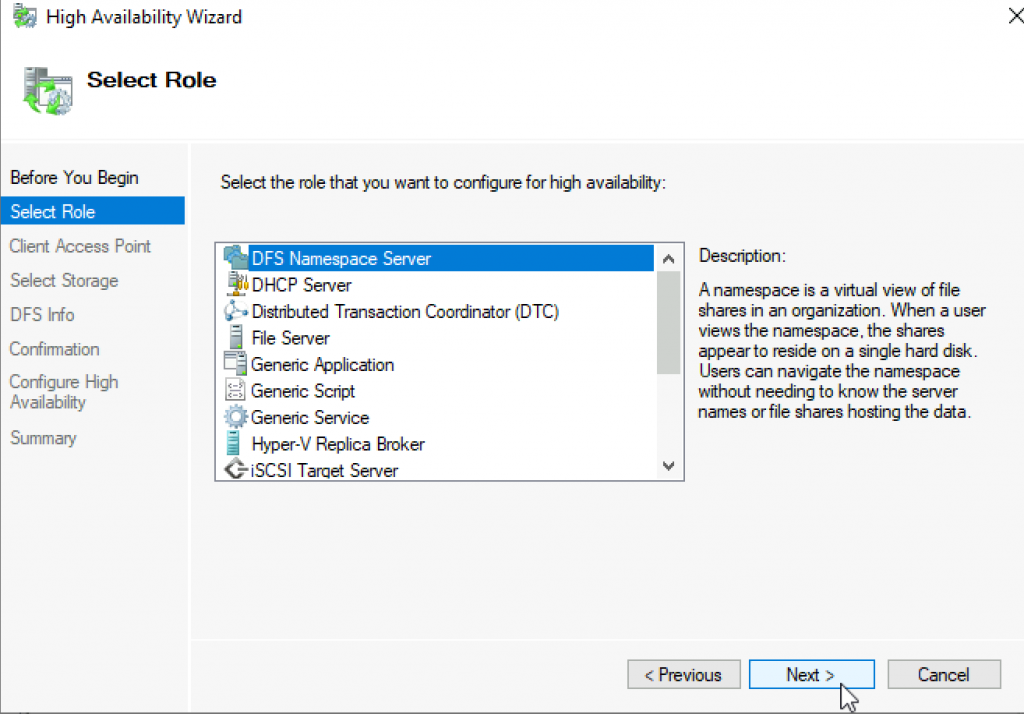
Go back to the Failover Cluster Manager, expand the cluster and select the Roles container. Click the Configure Role link found in the Actions pane to launch the High Availability Wizard. Choose the File Server option from the list of roles.
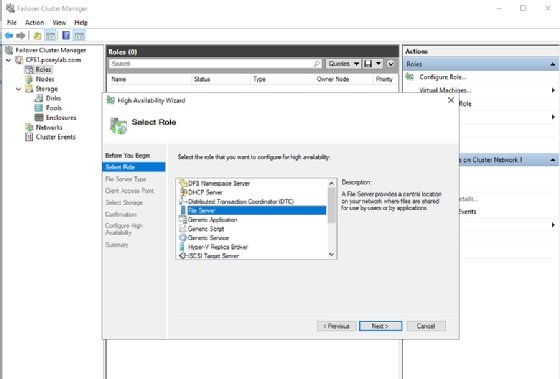
One section of the High Availability Wizard requires the selection of a file server type; choose general purpose file server, rather than scale-out file server, which is not ideal for heavy metadata operations, such as opening and closing files.
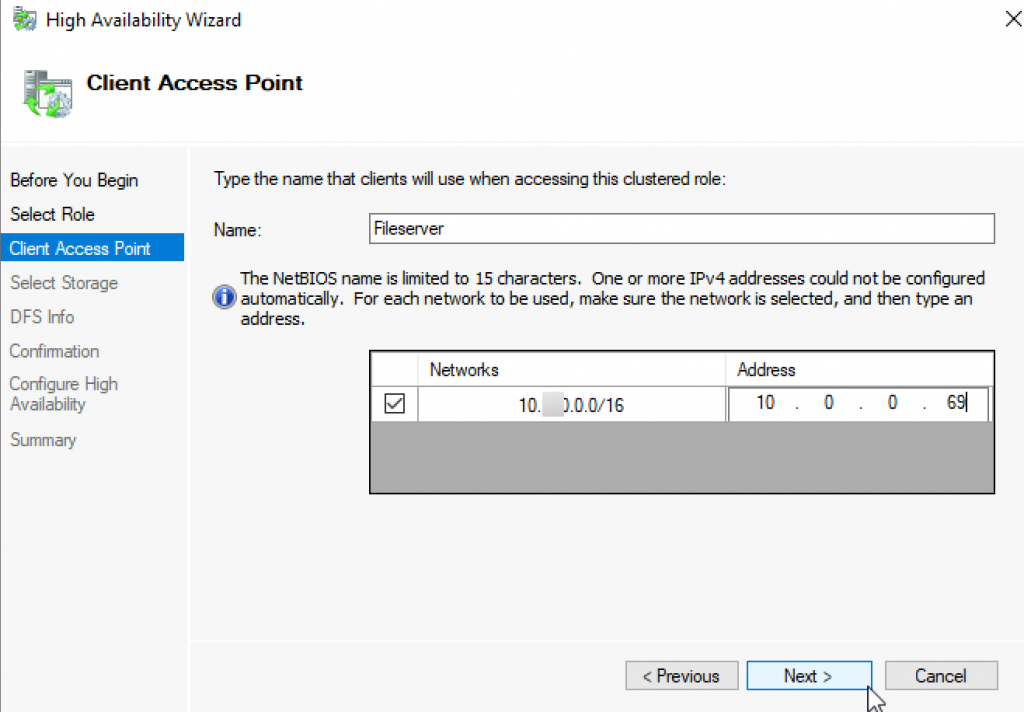
Assign a name for the client access point and associate the File Server role with the iSCSI volume created earlier.
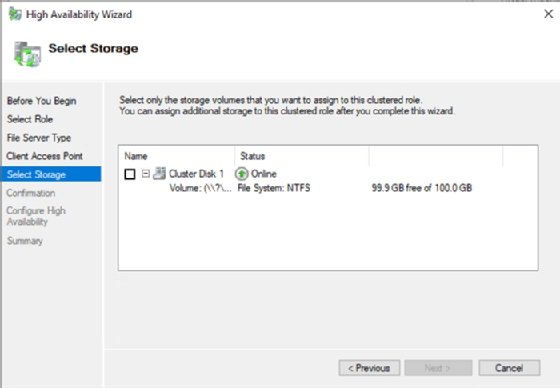
When complete, the File Server role will be highly available.
Although cloud services are widespread today, file share is something every environment still needs. In this article I will cover creating highly available file share (DFS)
Before we begin
I already covered DFS in single server scenario, in my Server Basics series, you can find article here
More or less every company needs some kind of network file share. In time, that part of network will get to be more important. To have highly available and redundant file server is a must, in every serious environment.
It will also make your life easier, since you will publish your network file shares via Namespaces under one name and one IP address. So, if one of the servers fails behind that namespace, your users will still be able to access file share.
I will not be covering every detail of other processes (like cluster feature install for example) besides details of DFS cluster creation. I will point you to other articles on my blog which cover some things you may be missing.
There are also some important things to consider before you deploy DFS – go to the bottom of the article to check that out.
Prerequisites
Domain
All of this is done in domain – i have setup domain named informatiker.local
Environment has two domain controllers named DC1 and DC2.
I created one group named IT, which we will assign to the shared folders for access.
ISCSI Target server
For this scenario we will also need disk that is network attached – ISCSI will be perfect. You can bring up ISCSI target on Windows Server – I already wrote about that here
It doesn’t make sense to make file server redundant while leaving ISCSI Target server as a single point of failure.
On my blog I also written – “Create ISCSI Target cluster on Windows Server 2019”
Beneath that ISCSI Target cluster is Storage Spaces Direct cluster. You can check out on my blog article named “Create two node Storage Spaces Direct (S2D) inside VMs. On top of that you can build ISCSI Target cluster.
My environment has two VMs in ISCSI Target cluster named Storage1 and Storage2. Both machines are part of the domain.
I created
I created one shared disk which is 10GB in size and I will attach that drive to DFS1 and DFS2 machine. This drive will serve as Namespace cluster disk which has to be shared between cluster nodes.
File Share servers (DFS)
Ok, main part of this article are two VMs that will hold file shares (DFS)
I named these two machines DFS1 and DFS2. Both machines are part of the domain.
Networking
Both machines have two NICS
DFS1 – 10.0.0.66 , heartbeat 191.168.0.66
DFS2 – 10.0.0.67, heartbeat 192.168.0.67
“Heartbeat” network will serve only for cluster purposes, and besides IP address and subnet mask, no other details are entered.
Besides that, make sure you uncheck “Register this connection’s addresses in DNS” and “Disable NetBIOS over TCP/IP” in properties on Heartbeat network adapter (only on NIC that will serve as Heartbeat network). Check out my article “Create Failover Cluster in Windows Server 2019” if you need more details on that.
We will need two additional names and IPs which we will use during cluster .
First name and IP are for DFS cluster
DFSCluster – 10.0.0.68
And IP and name for our fileshare namespace
Fileserver – 10.0.0.69
ISCSI
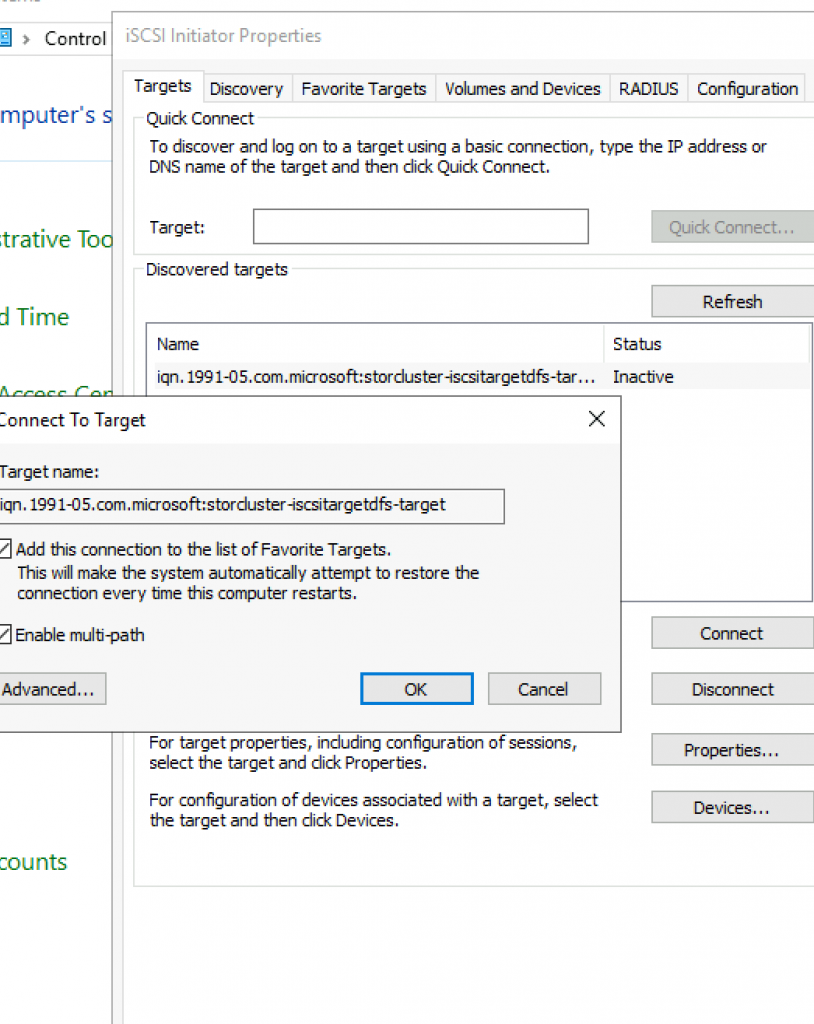
On both DFS1 and DFS2 machines enable ISCSI initiator and install MPIO
Add support for ISCSI devices on MPIO
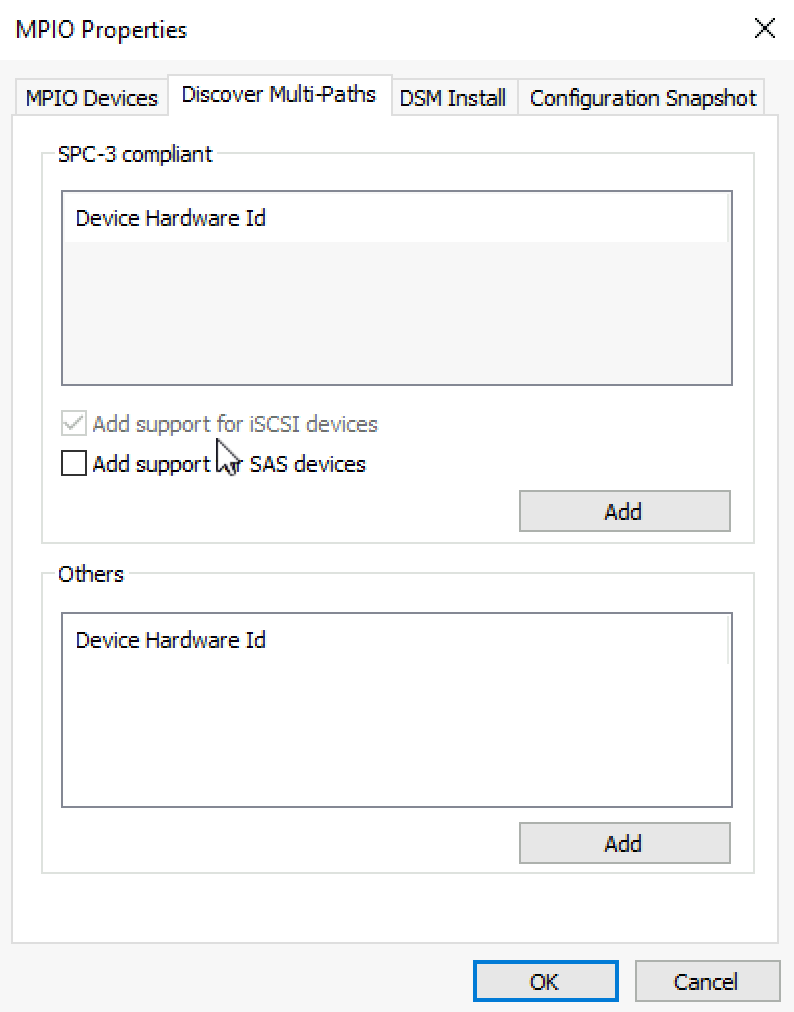
Connect ISCSI Target you created earlier to both DFS1 nd DFS2 ISCSI Initiators. Make sure you enable multi-path!!! Do this on both nodes.
After I was connected to the ISCSI drive I immediately formatted it and gave it name. It is currently attached to DFS2 machine. So, this is done on only one node.
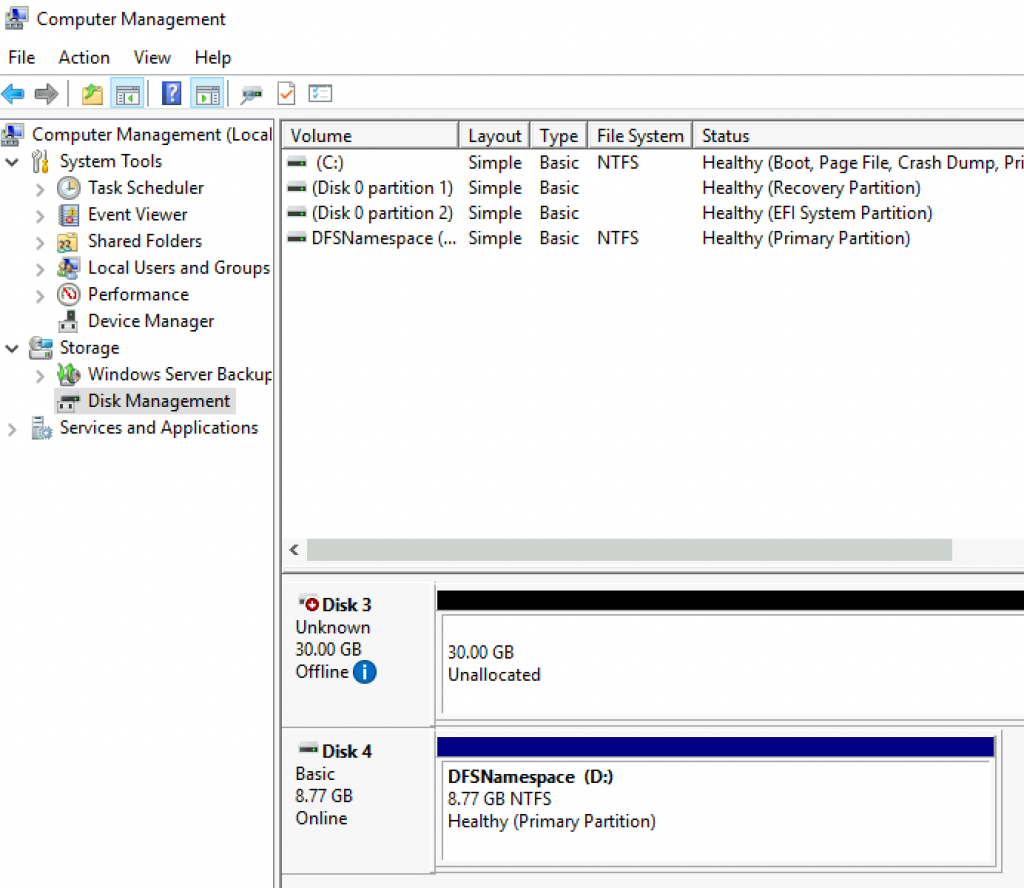
Disks
I will also add local drives to both DFS1 and DFS2 machines. I will add one disk with drive letter E and both disks are 30GB in size. It is important that drives on both nodes (DFS1 and DFS2) are in same size.
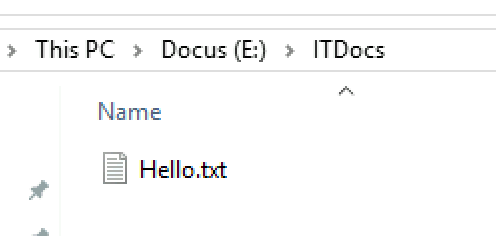
I also created folder named ITDocs in root of the E drive – E:\ITDocs on bot nodes.
Folder and disk mapping has to be exact on both nodes.
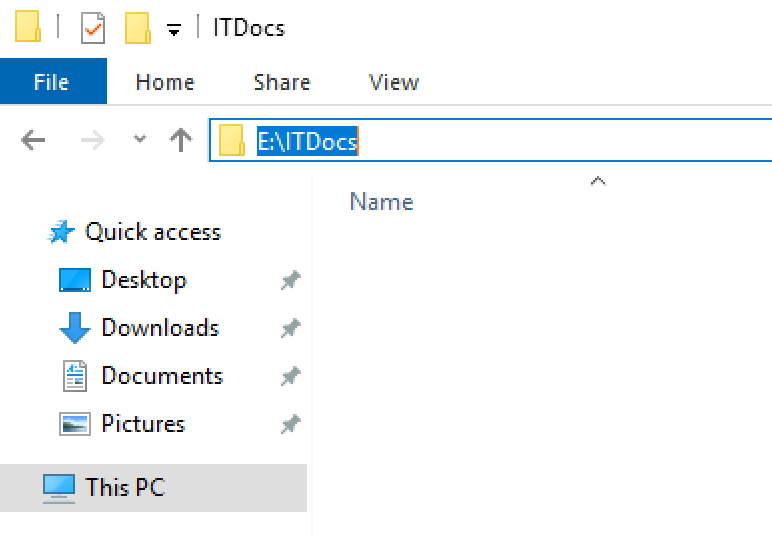
Additionally, ONLY on DFS1 node, inside ITDocs folder I created one file named Hello.txt.
That way we will see if that file replicates to DFS2 after we are done with DFS cluster.
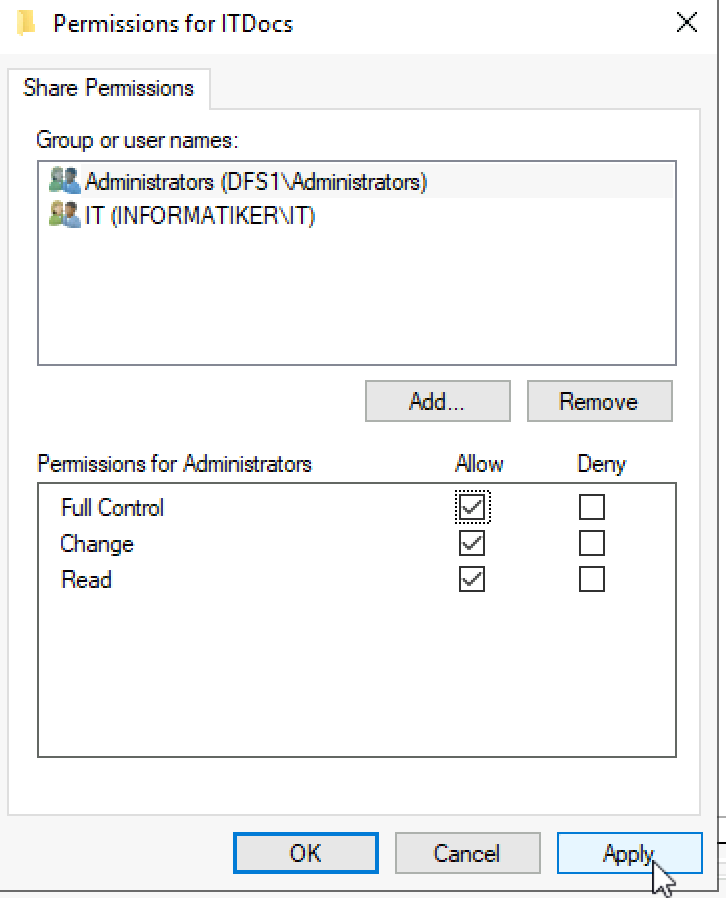
I will also make ITDocs folder on both DFS1 and DFS2 Shared.
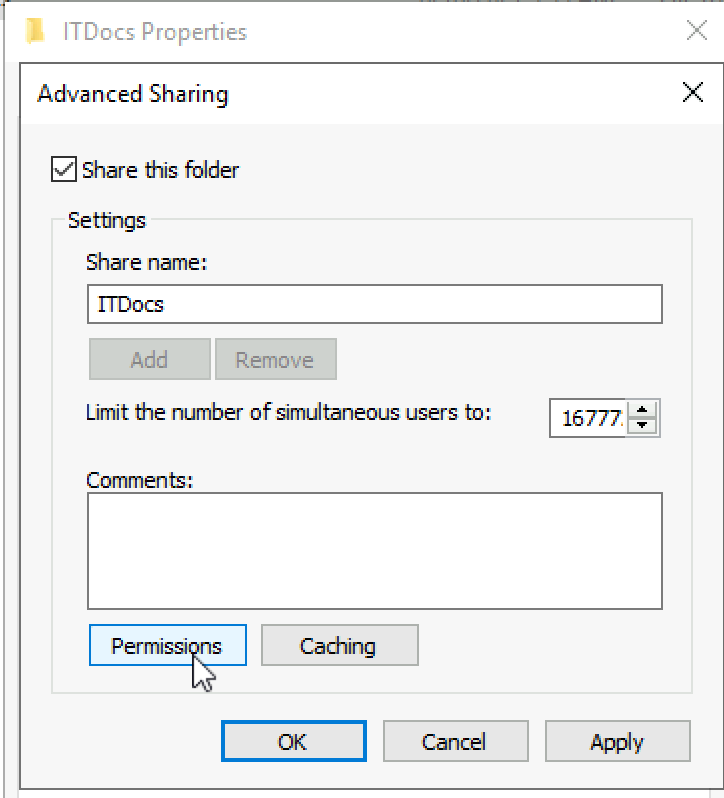
!!!Only for a test drive, you can select Everyone – DO NOT LEAVE THIS IN PRODUCTION, MAP YOUR SHARES to GROUPS OR USERS FROM AD. You can use Everyone only in this test scenario just to see if everything works.
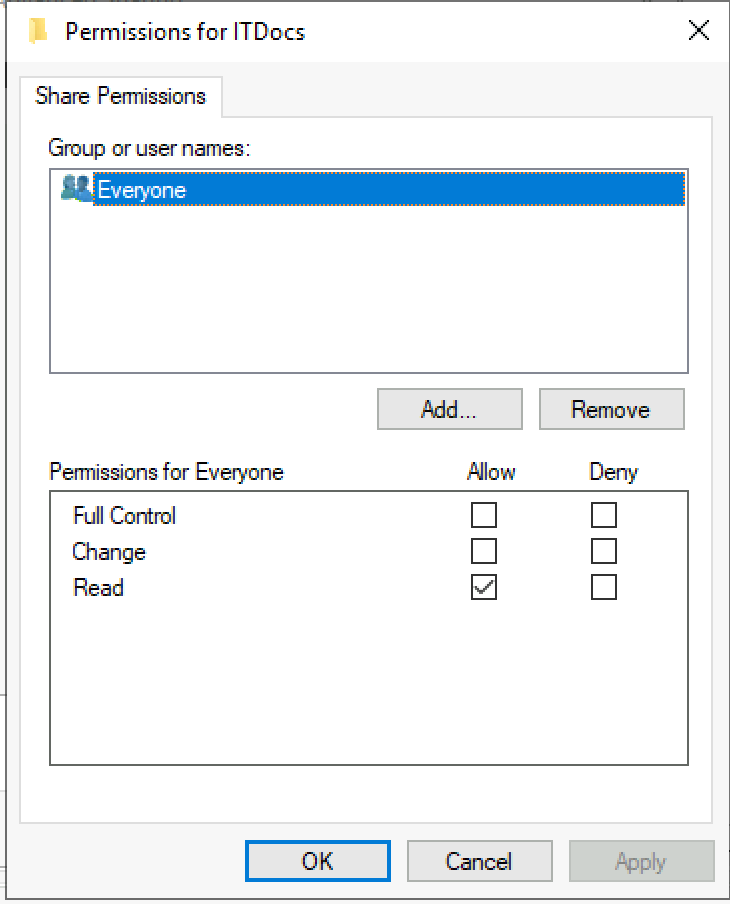
I will give permissions to the share as follows – to Administrators group from local computer (DFS1 and DFS2) and IT group which I created and which will have rights to this folder.
You can manage permissions better when you get more comfortable with DFS – only thing to remember now is to add local administrators group to file share, of DFS Namespaces will not be able to see the share. This can be resolved by modifying permissions on DFS Namespace and fine tuning them to your needs, but for a start this will do.
Roles and Features
On both DFS1 and DFS2 we need to install Failover Clustering feature and DFS Namespaces and DFS Repication Roles.
First I will be installing Failover Clustering feature on both servers.
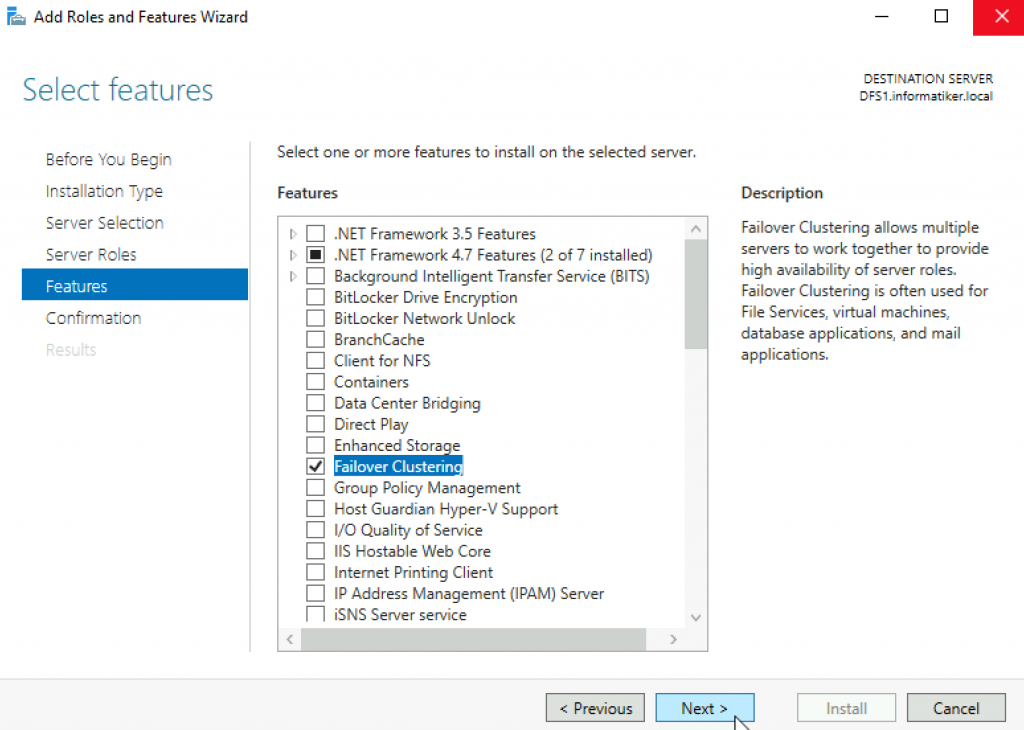
Reboot after Failover Clustering Feature install.
After that I will be installing DFS Namespaces and DFS Repication Roles on both servers.
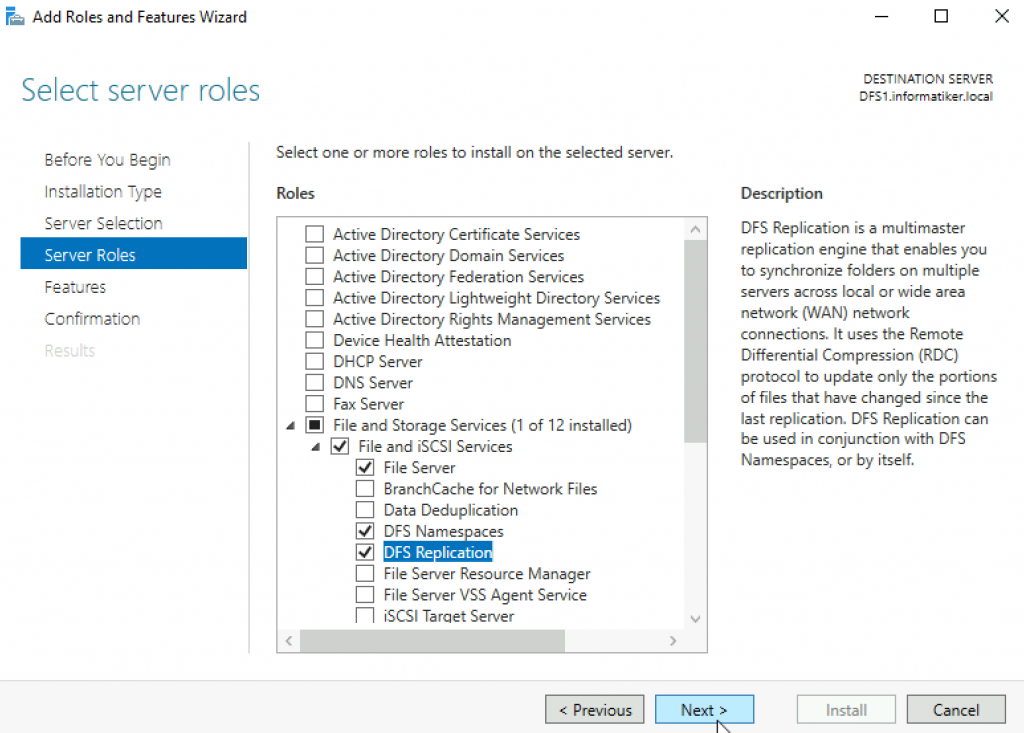
I also rebooted after installing these roles.
Ok, now we have all the prerequisites met for these machines. Let’s get to work.
Creating DFS Cluster
First step will be creating cluster between DFS1 and DFS2 machines. As I already mentioned, I will not be going step by step through this process, if you are not familiar with the procedure follow my article named – “Create Failover Cluster in Windows Server 2019”
I will highlight only some details here.
I will start process from Failover Cluster Manager on DFS1
I will first Validate Configuration. It is ok to have a few warnings.
After that I will start a process of creating cluster.
In next step we will define cluster name and IP. I will name my cluster DFSCluster and give it IP 10.0.0.68
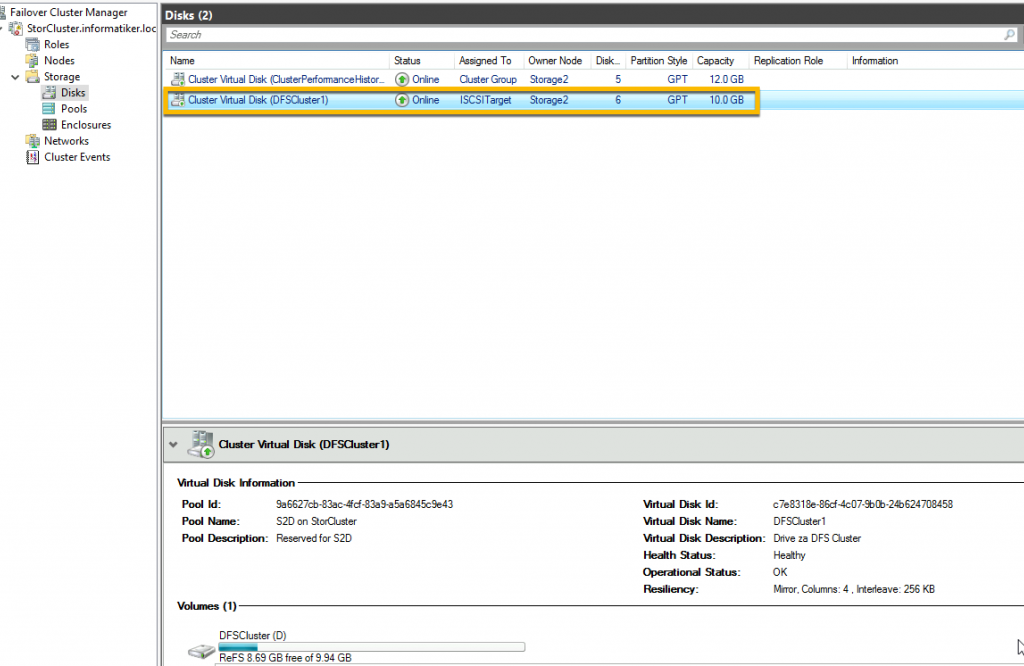
In the next step I will also select to “Add all eligible storage to the cluster”
In the end we created cluster
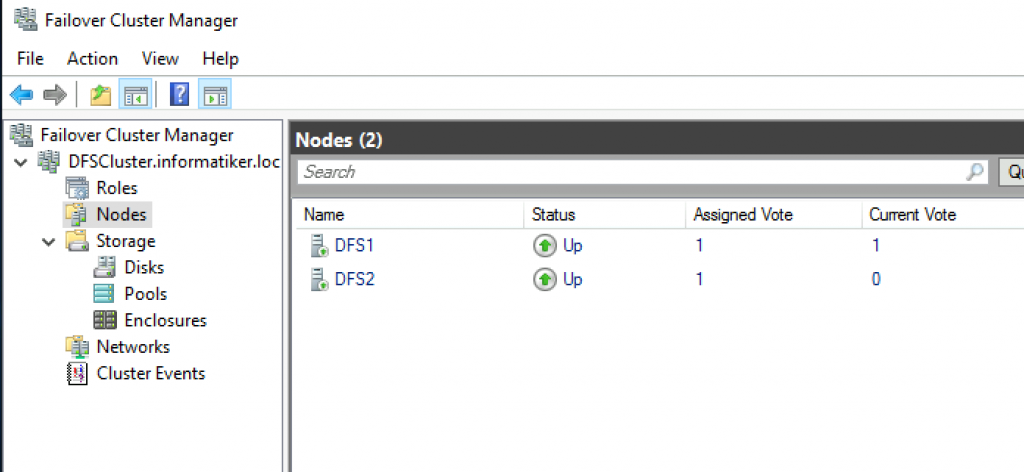
Now let’s check Cluster Manager to see how it went.
Couple of things to check – Nodes. Ok, both servers are up and listed
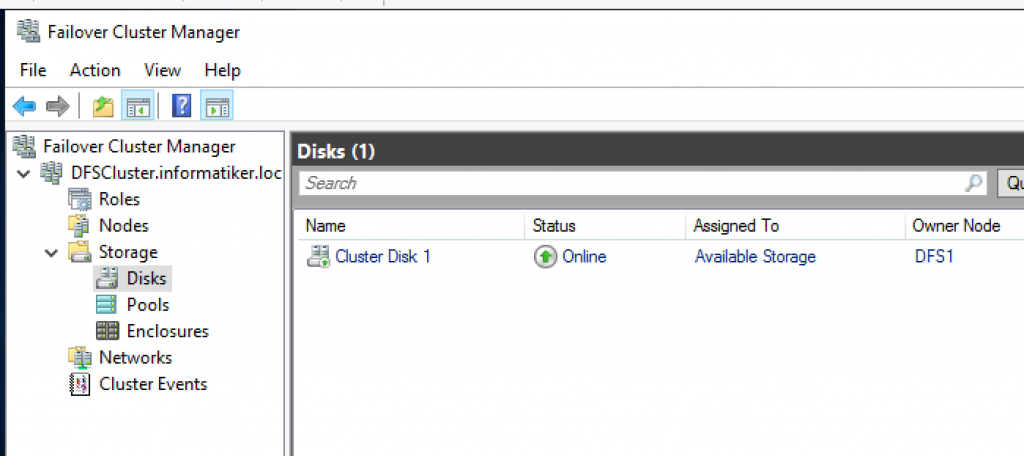
Storage | Disks
Our ISCSI disk is added
Networks – both disks are up and running
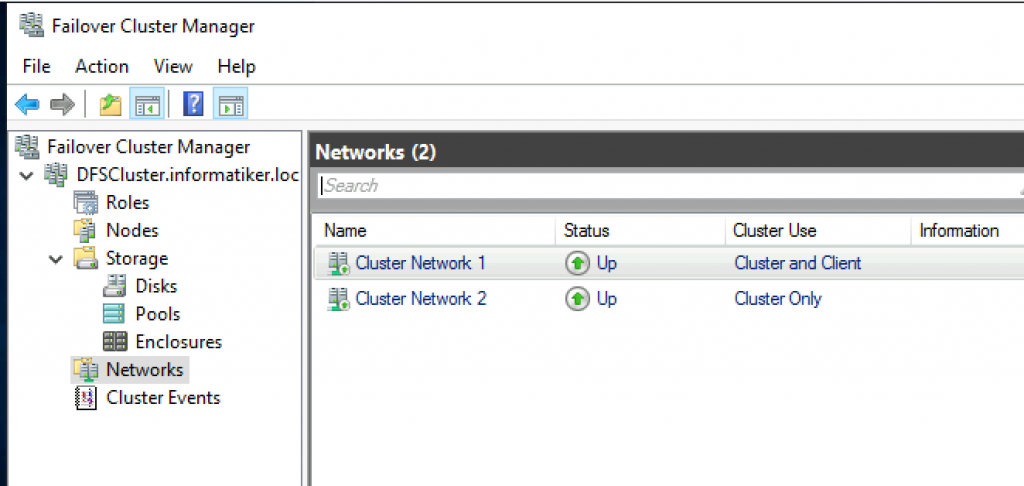
Ok, so our cluster is nicely prepared.
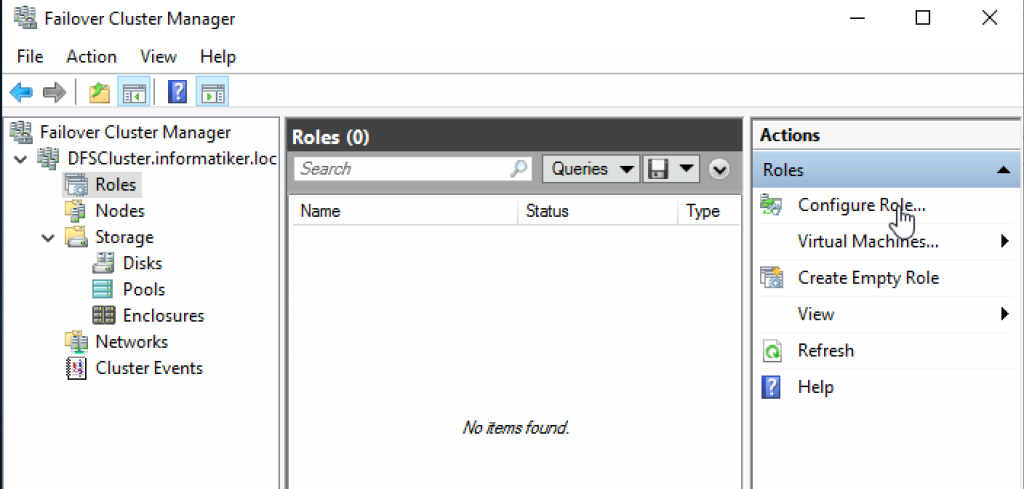
Adding DFS Namespace Server cluster role
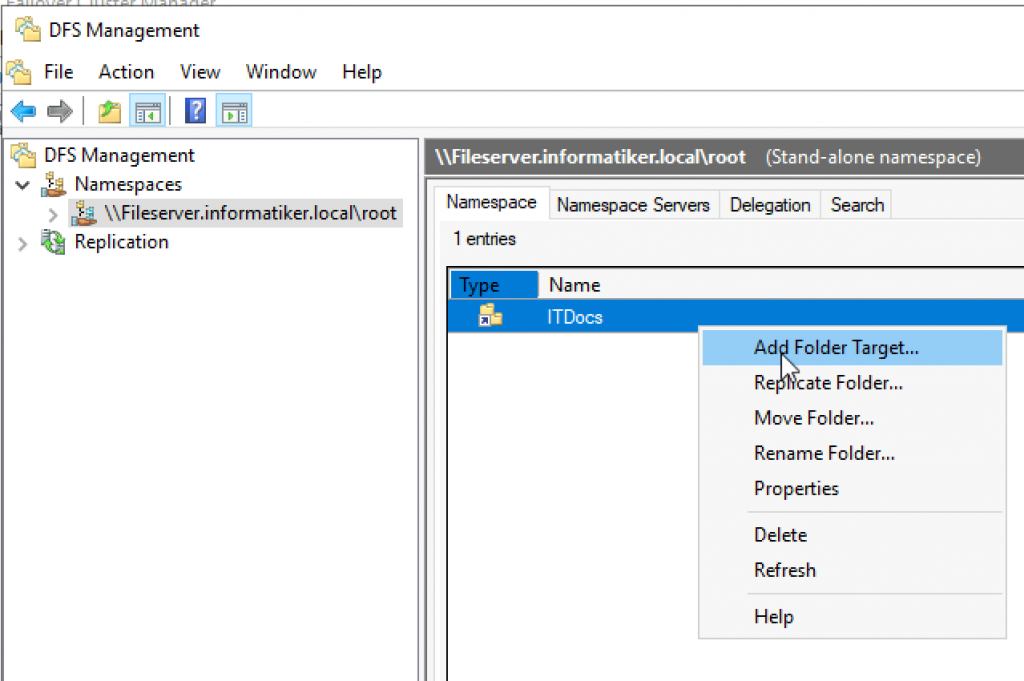
This one we will go step by step,because now in our Failover Cluster Manager we will add DFS Namespace Server Role.
I will do this from DFS1.
Configure Role
Next
Select DFS Namespace Server | Next
I will give it name Fileserver and IP 10.0.0.69
For storage I will add available ISCSI disk | Next
I will name Namespace – root | Next
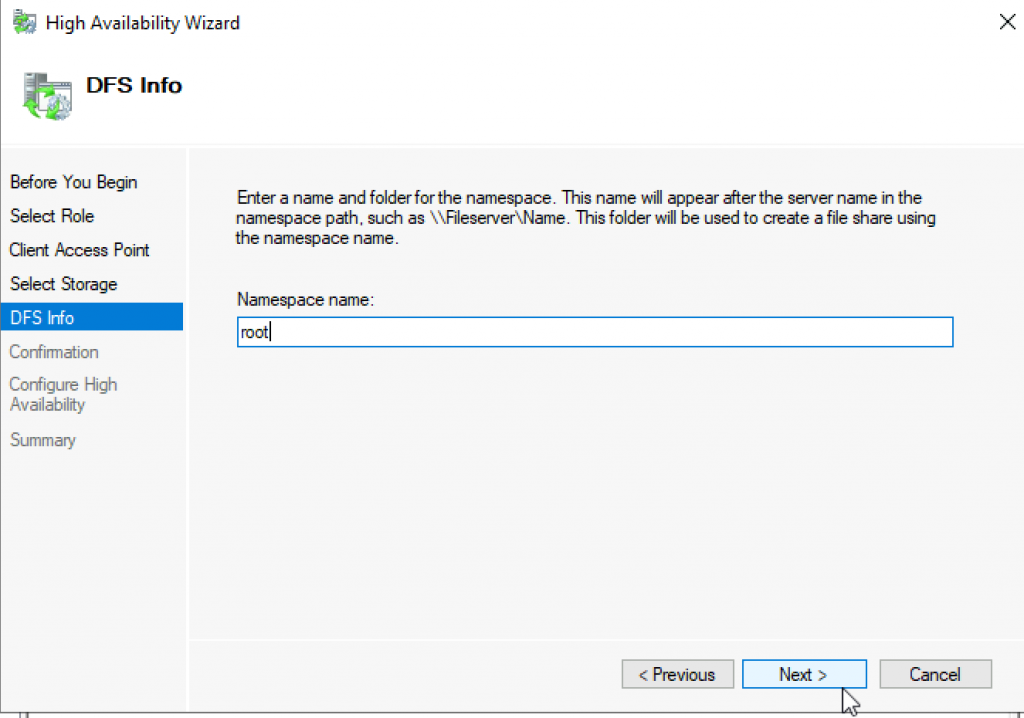
Review all the info | Next
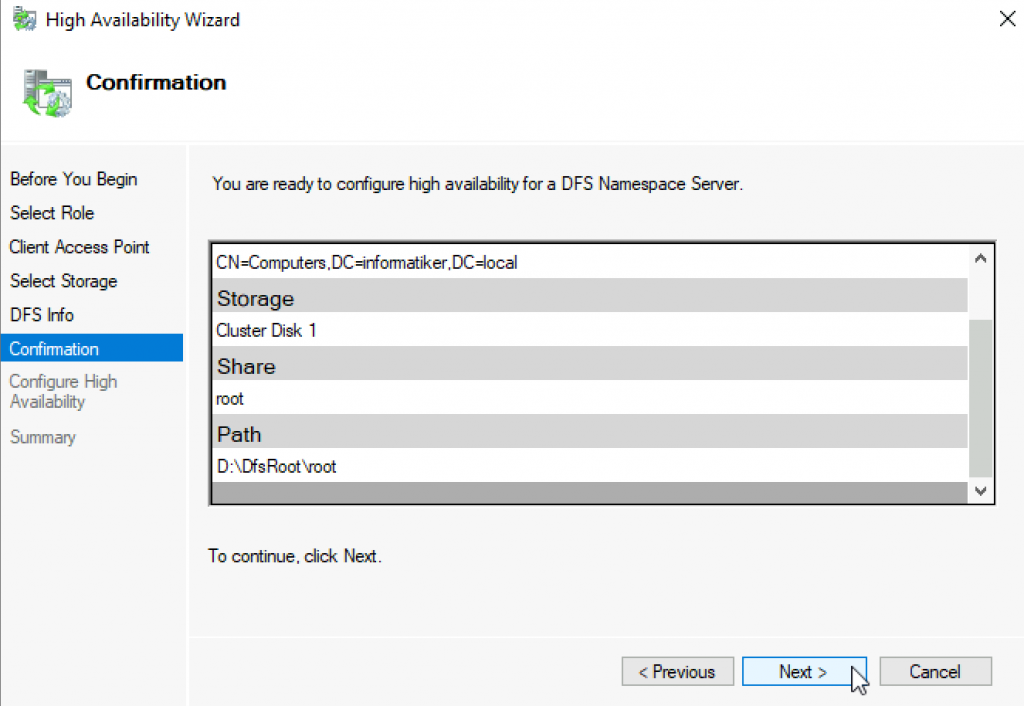
Configure High Availability screen run by fast, we finished at the summary screen | Finish
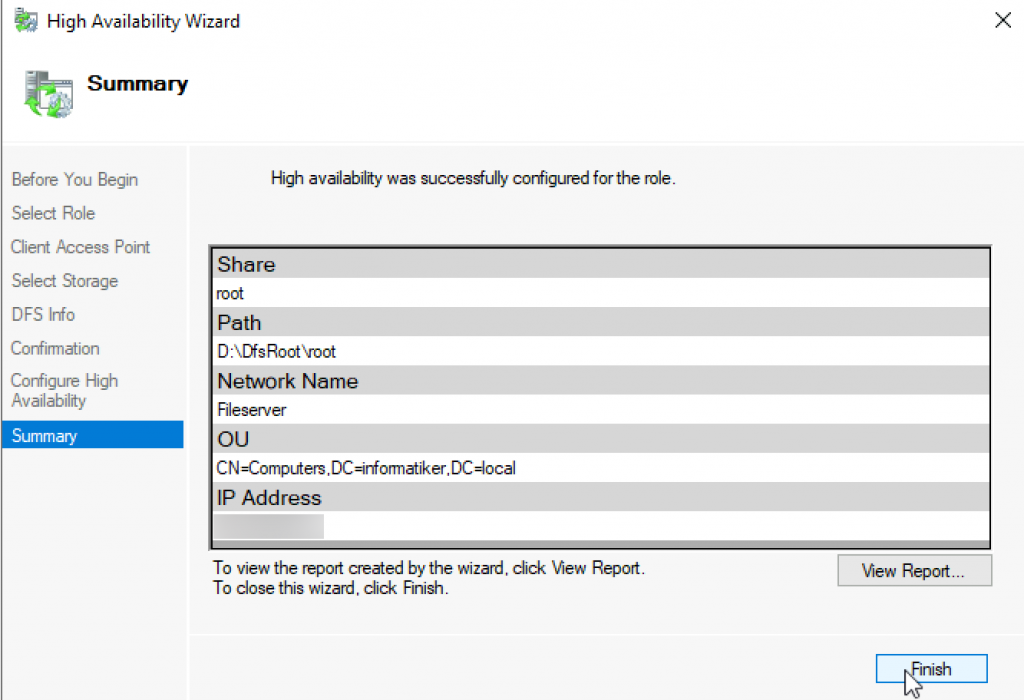
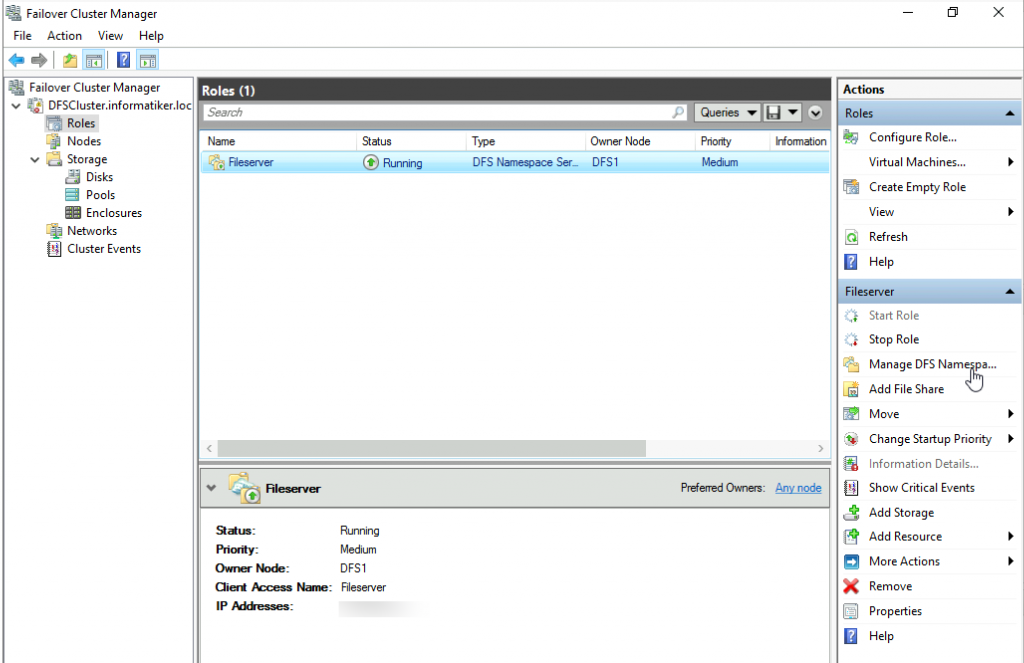
We will now click on Manage DFS Namespace after we selected our newly created role in Failover Cluster Manager
DFS Management / Adding Folder / Creating Replication
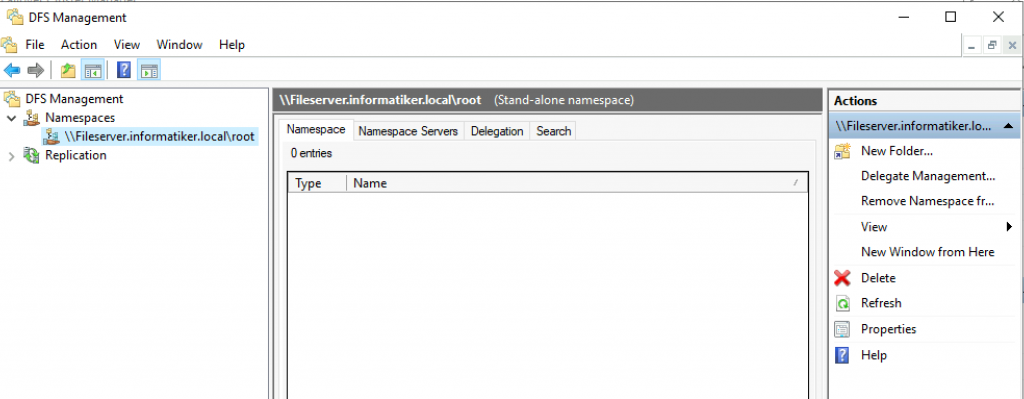
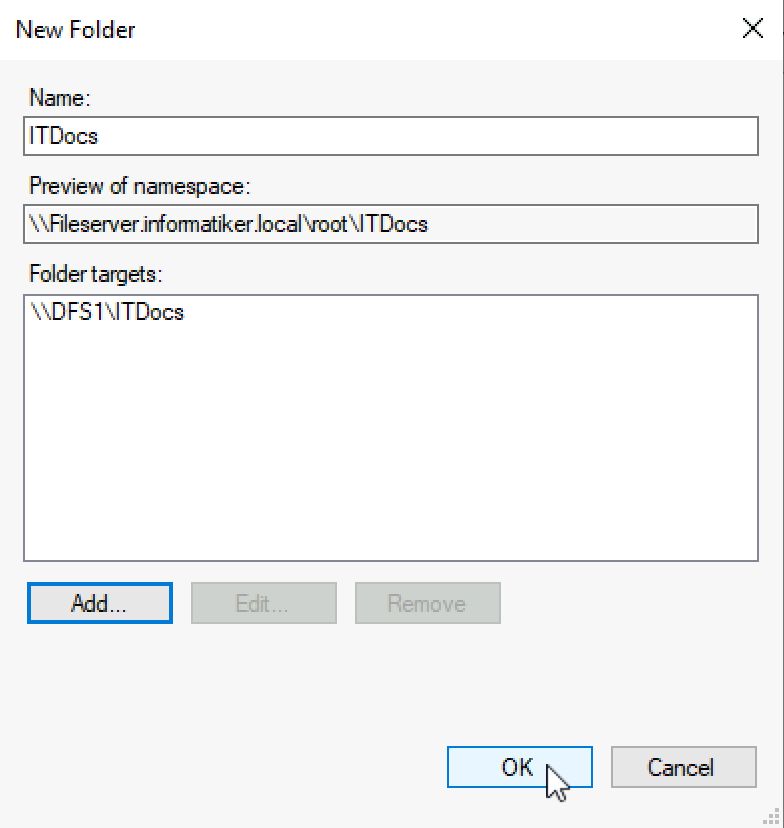
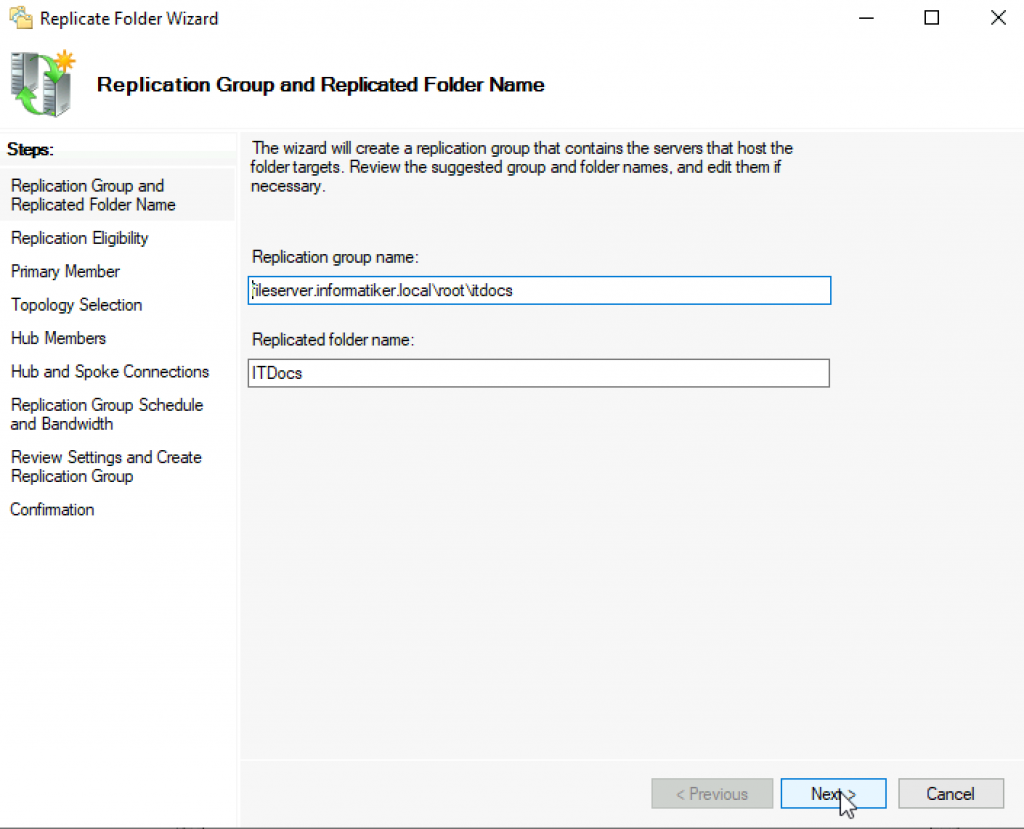
New window will open – DFS Management – in which we can see Namespaces and Replication sections in the far left part of the screen. If we expand Namespaces we can see that there is a Namespace named – \\fileserver.informatiker.local\root
That is also a file path for future file server. We will now add folder ITDocs from local E drive on DFS1 server to this namespace. Then we will tell it to replicate to DFS1 and that same folder. Remember, folder ITDocs on DFS2 is empty, and same folder on DFS1 holds one file. Let’s go one step at the time.
Right click on created Namespace and select New Folder
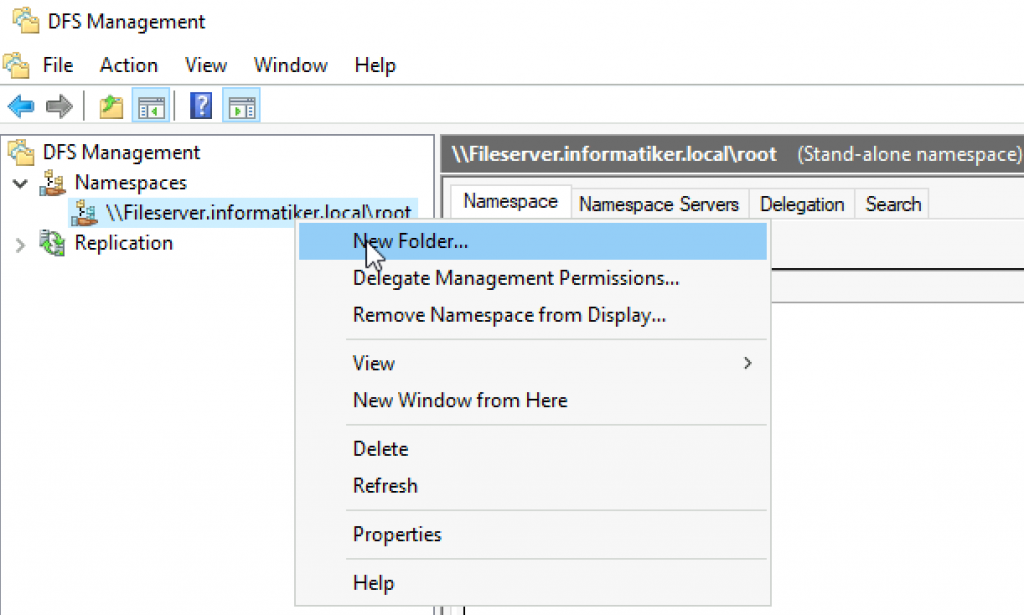
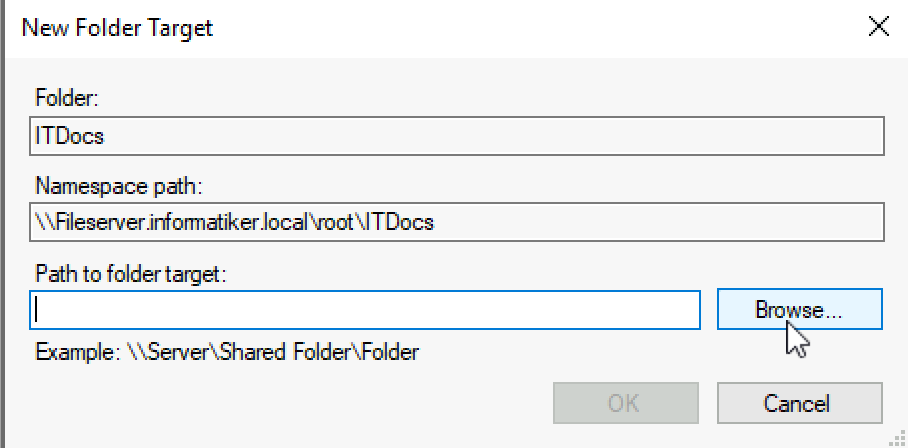
New window will be opened. I’ll name the New Folder – ITDocs and click on Add button.
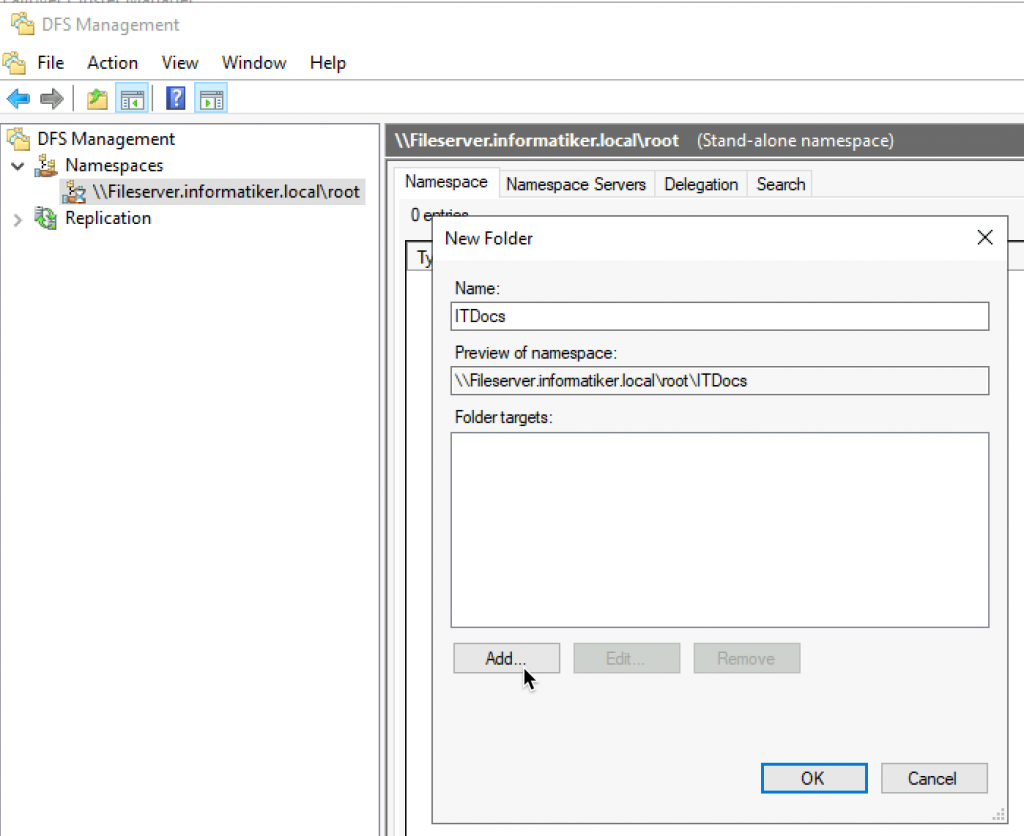
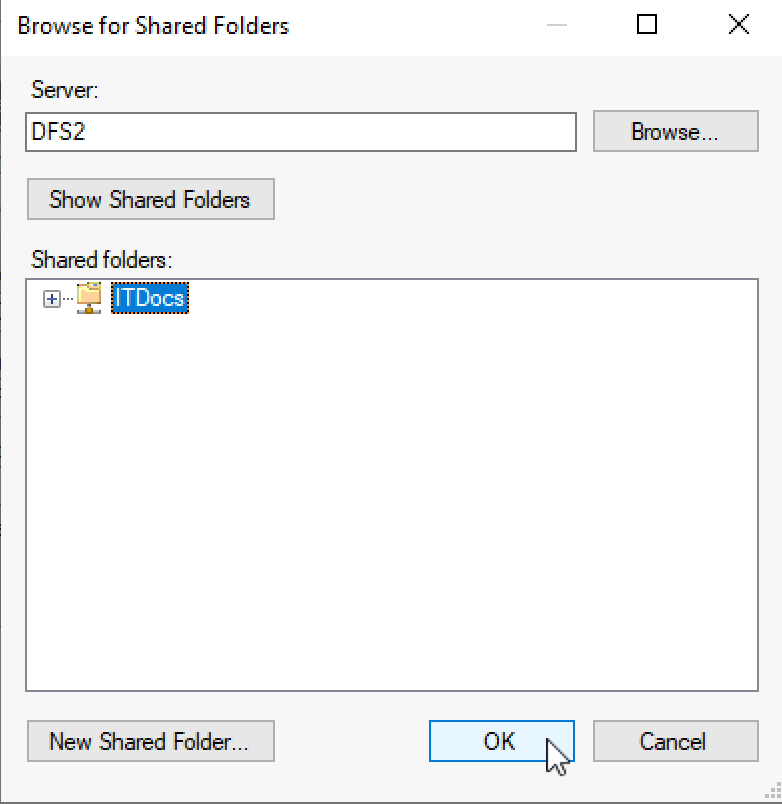
Click on Browse
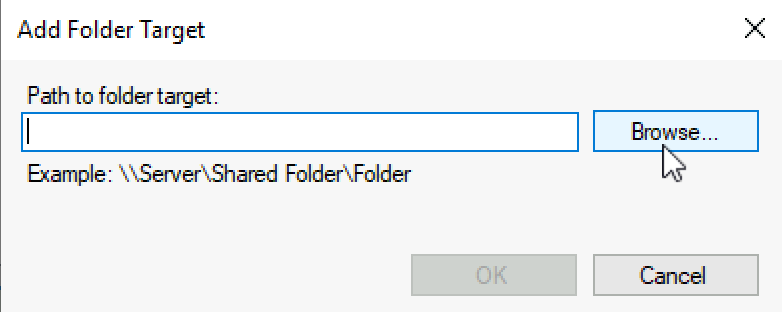
Our ITDocs Fileshare on DFS1 server is visible (remember local administrators group for file share to see it here. Use everyone only for a test). OK
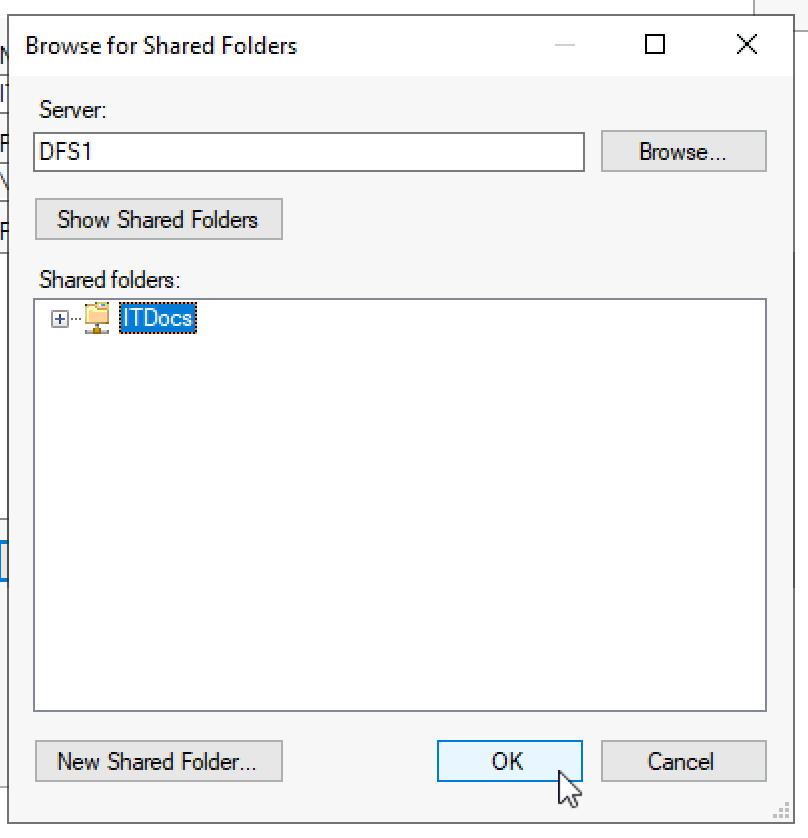
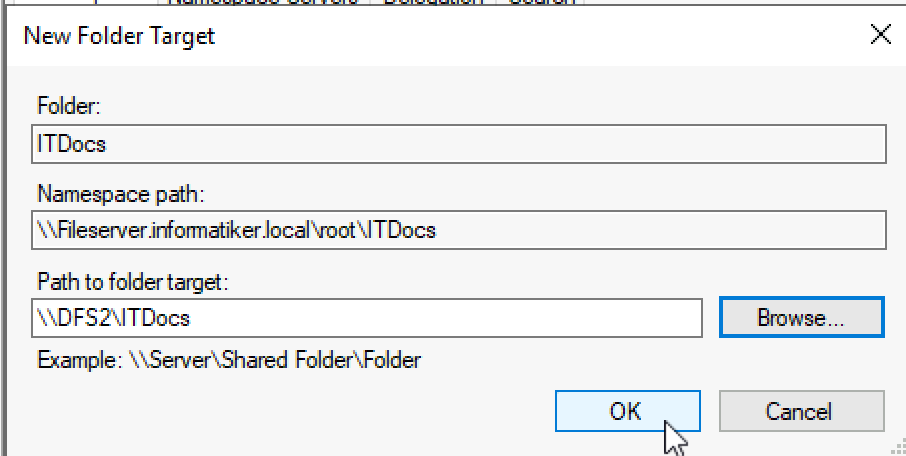
OK
Ok, we are done with adding new folder
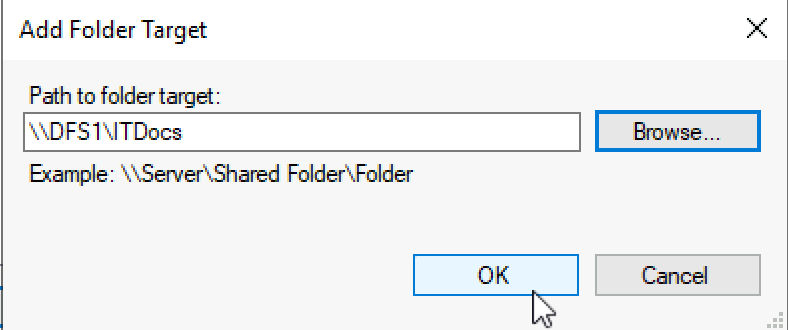
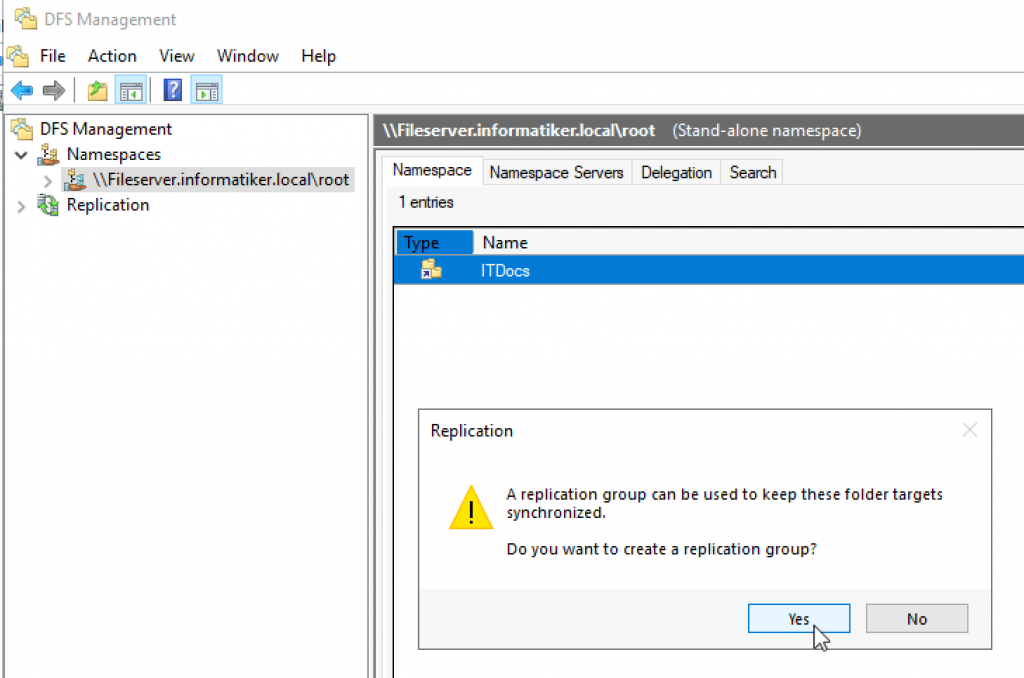
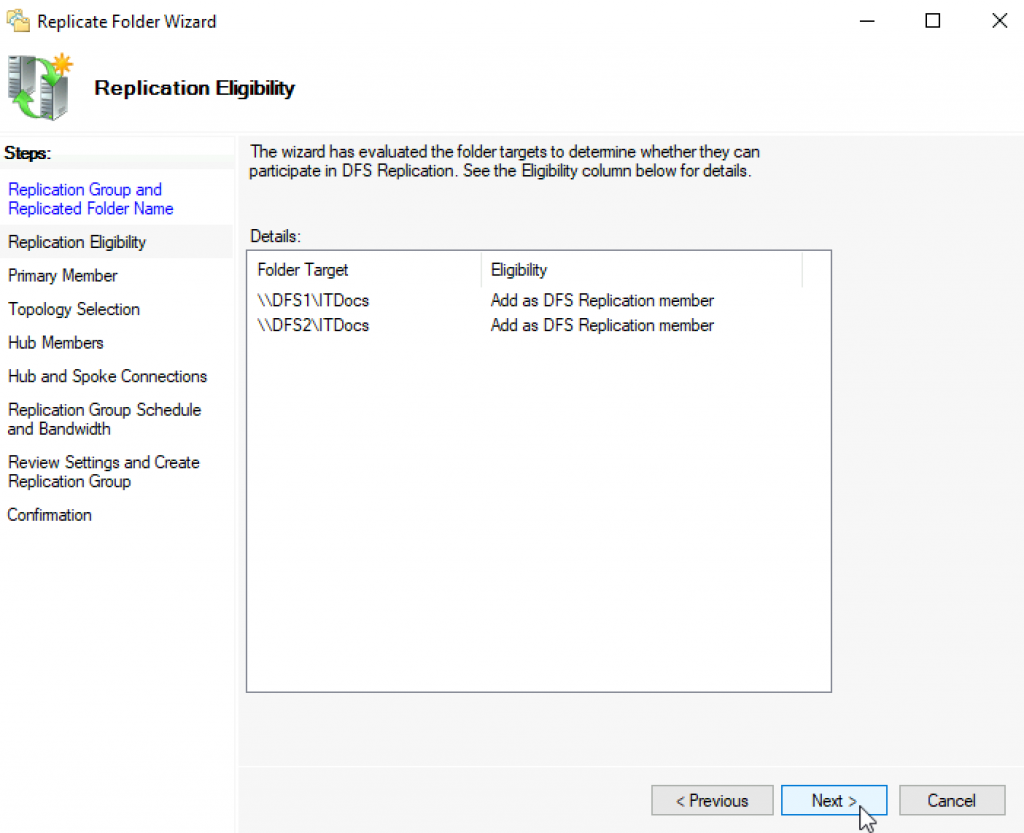
Now we can see new folder under our namespace – we will right click on created folder and select “Add Folder Target…”
Browse
We will now select DFS2 server and same folder
Ok
You will then be asked to create Replication group – select Yes
New wizard will appear – on first screen I left everything as is – Next
Everything is correct, I want these two folders to replicate (ITDocs on DFS1 and DFS2)
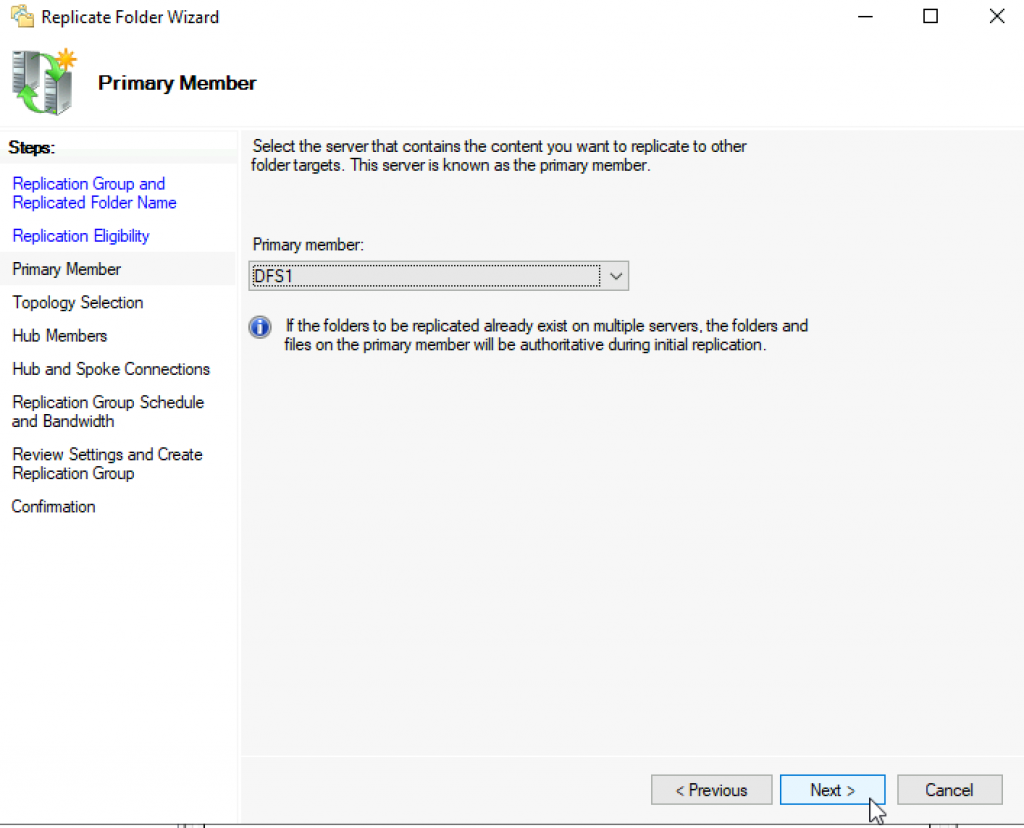
I don’t have preference for primary member, so I will select DFS1 | Next
Not a lot to select from – Full Mesh
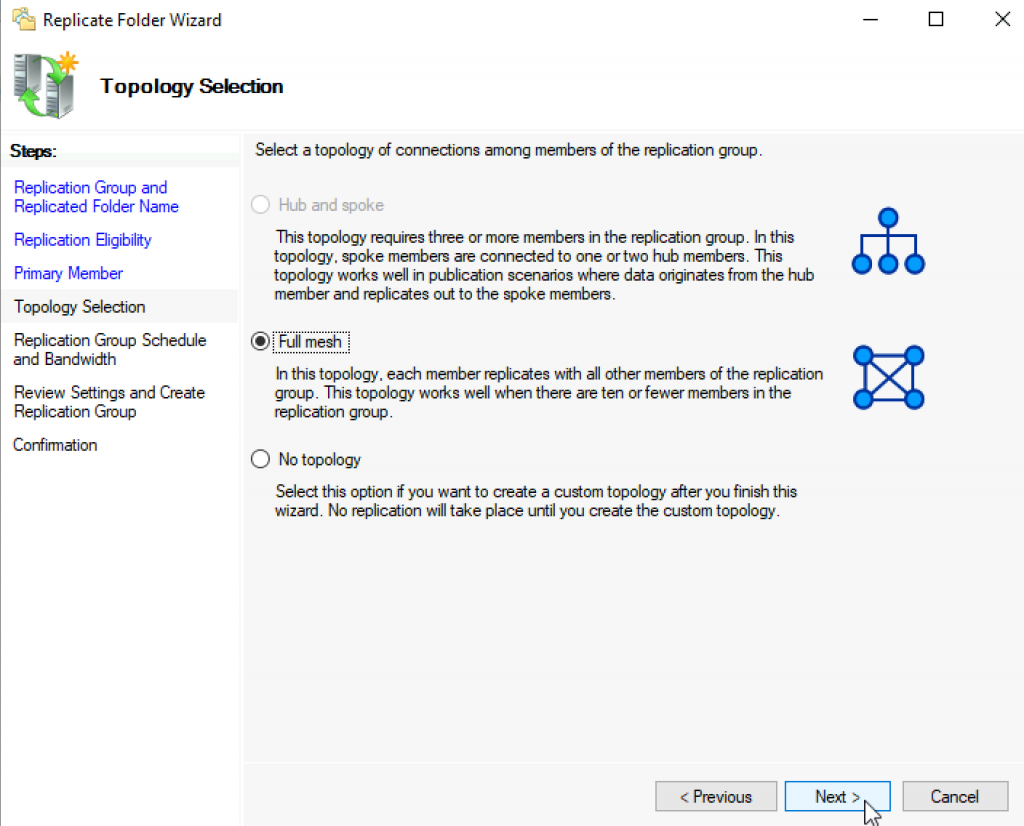
If bandwidth is an issue, you can configure that here | Next
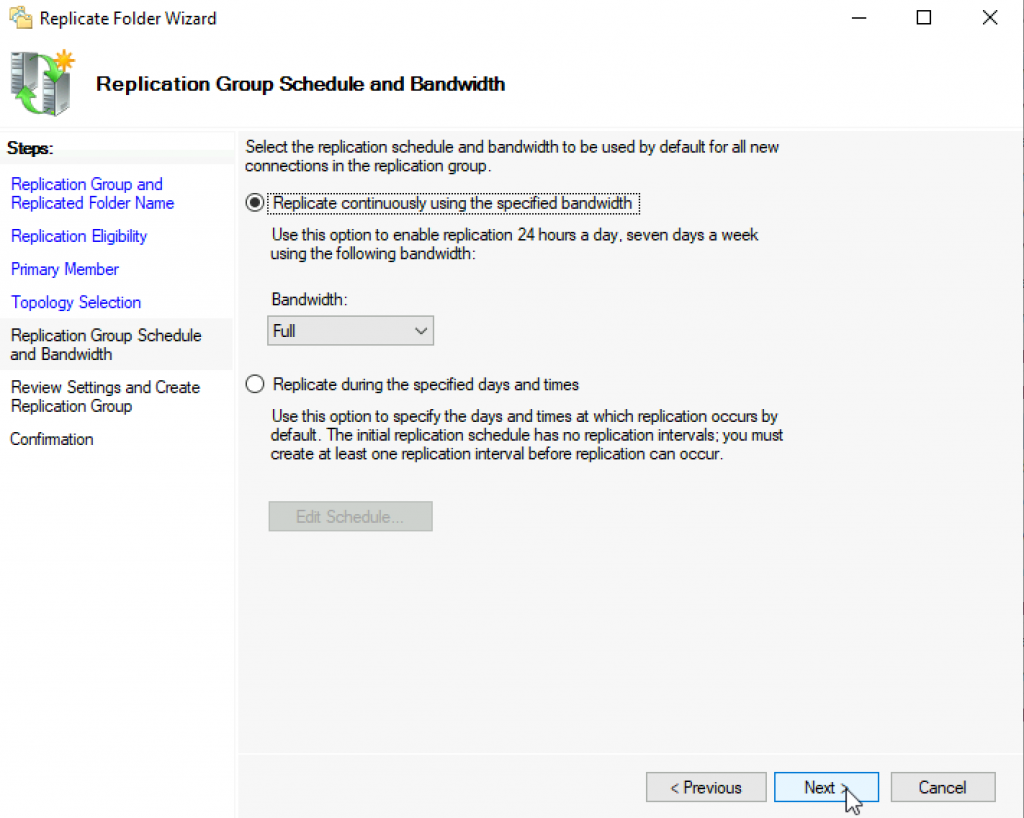
Create

Huge success
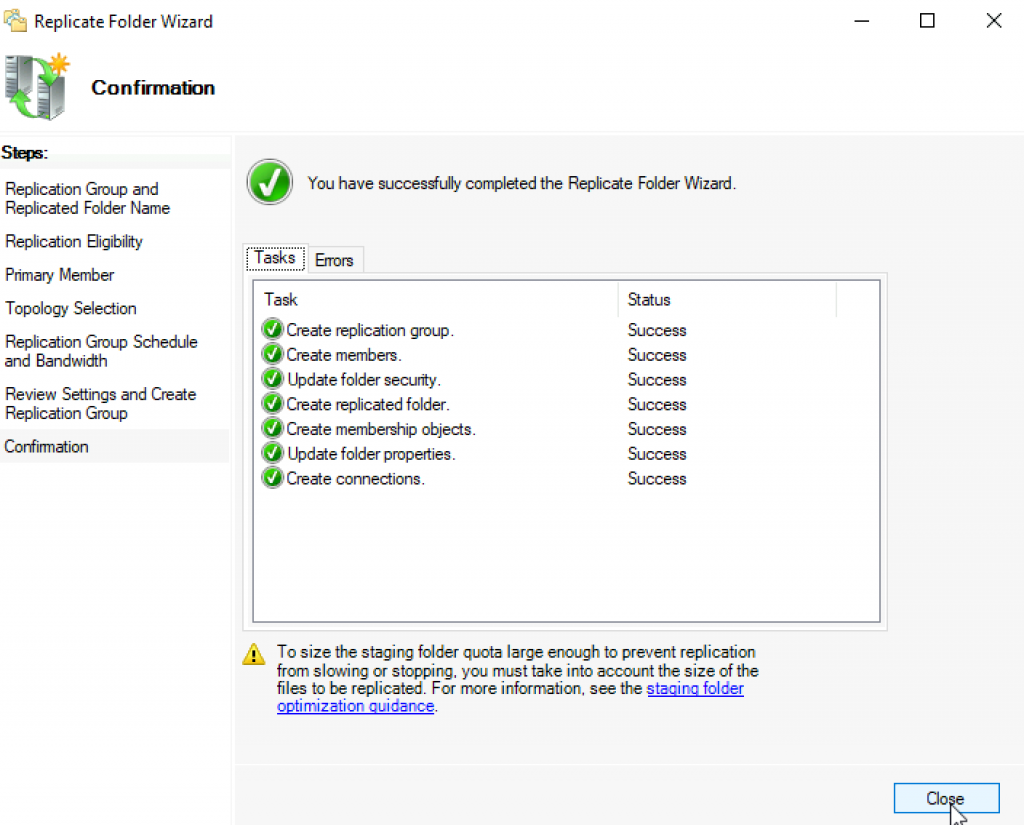
OK

Now, we have a replication configured also
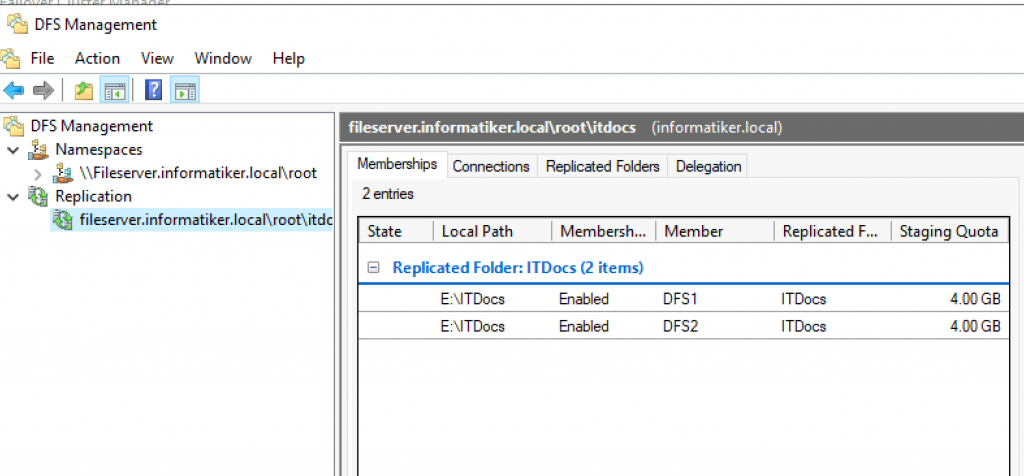
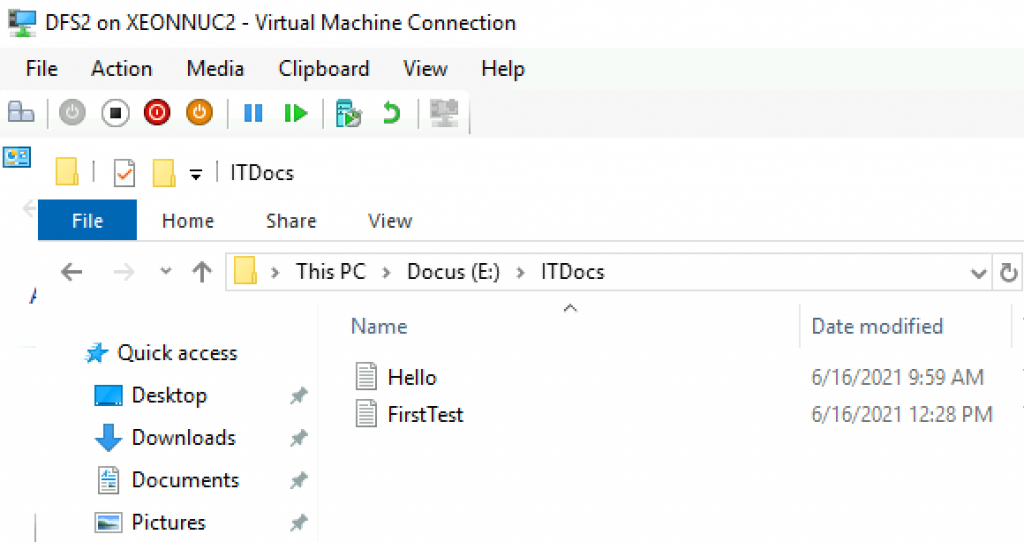
Remember I created Hello.txt inside ITDocs folder on DFS1 only. ITDocs folder on DFS2 is empty.

It also created everything on DFS2. On DFS2 I created FirstTest file, which was immediately replicated to DFS1
Ok, so we done a little bit of testing at the end of the configuration.
That is more or less it, we now have a working file replication.
If we visit from client computer, we will access now file share from \\fileserver\root\ITDocs
So, no \\DFS1 or \\DFS2 but Fileserver – that way if DFS1 or DFS2 is down, your users will always be able to access file share, as long as one node behind fileserver namespace is up.
I also created file named Second Test on my client machine – it replicated to both DFS1 and DFS2
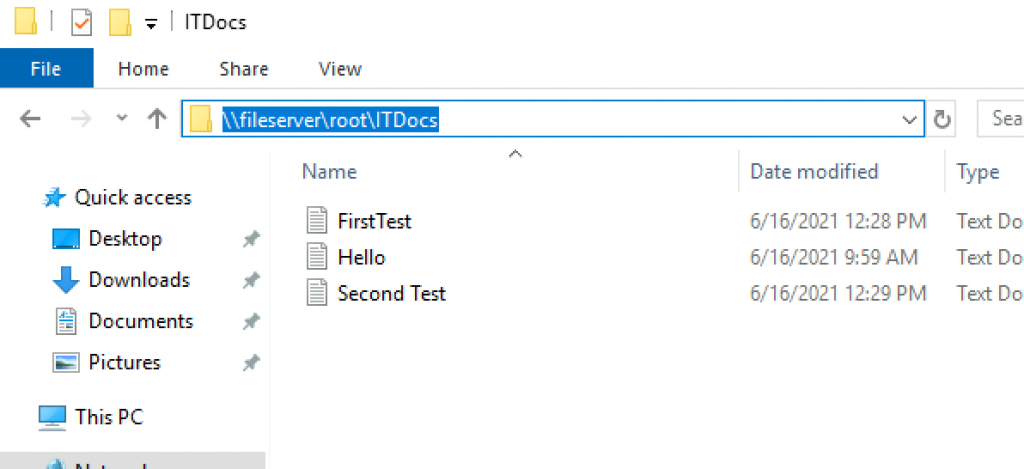
I would also like to know to which DFS server is my client connected for files, to DFS1 o DFS2.
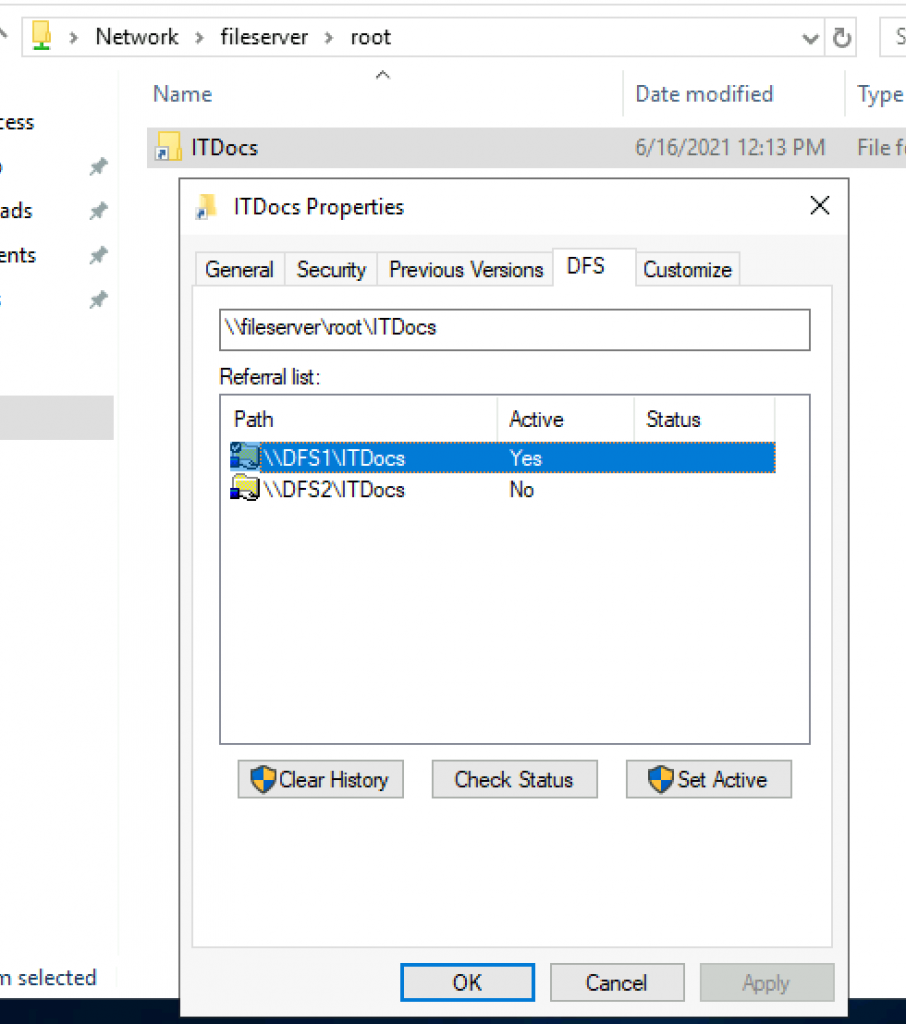
On client machine go to \\fileserver\root and right click on ITDocs folder
Select DFS tab – I’m currently connected to DFS1 server.
Ok, our setup and testing is done – everything works!
Things to consider / Conclusion
Few important things/limitations to consider before you put this into production
Large number of files
If you have large file share – a tens or hundreds of GBs – most important is that you start from one node and initially replicate to other ones. Don’t try to do initial Replications with files/folders scattered on multiple servers – consolidate all on one server, and then replicate that to other (empty folders). Otherwise you are risking DFS malfunction at the start.
Again, if you have large file shares with enormous file changes everyday – maybe DFS is not solution for you – depending on your environment, it may be too slow for your needs and not replicate everything in time and in the end you finish with conflicts.
File conflicts
This one can be fatal if you have multiple people working on same files at the same time.
Why?
From example above – you can see that my Client is connected to DFS1 node and working on files on DFS1
If I have another user, he/she may be connected to DFS2. Both of them will then be able to open same file (without read-only lock if we are talking word, excel) and edit same file at the same time.
The last one who closes and saves will overwrite changes from the other one. So, work will be lost if two people have same file opened, but system selected to connect them to different node of the DFS.
This is huge issue
It also won’t respond well if you start some changes (on same set of files/folders) on one node, and then impatiently apply some more changes on the second node to the same set of files/folders. Things will mess up.
Special characters/ Long folder and file names
Can also be issue, I had extreme cases where files would not be replicated because special characters or because of a book written in name of the file.
DFS is not a backup – file deleted or edited on one node – will be deleted edited on second/third node… I hope that is clear enough.
Permissions
Be specific with your permissions and add them according to the needs, do not just let everyone read/write/edit everyhing.
These are some of the issues you need to be cautious about with DFS, it can be fiddly, but it also can be useful if you know how to utilize it. Huge plus is that you are able to propagate your file shares through the network under universal name, and not dependent on the single server. That way if something happens to one node of the DFS, people will be able to work without noticing downtime.
Disclaimer
Skip to content
Scale Out File Server Implementation in Windows Server 2019
There have been many new advancements in Windows Server technologies in the past few Windows Server releases. Many of these have improved upon the core features of Windows Server, including the resiliency and high-availability features it offers. One of the newer features found in Windows Server is Scale-Out File Server (SOFS).
Scale-Out File Server is a great feature that provides highly available file-based storage that can be used for a number of different use cases.
Protect Your Data with BDRSuite
Table of Contents
- What is Scale-Out File Server?
- Benefits provided by Scale-Out File Server
- How Scale-Out File Server Works
- New Scale-Out File Server Features in Windows Server 2019
- Configuring Scale-Out File Server in Windows Server 2019
- Storing Virtual Machines in an SOFS File Share
- Windows Admin Center
- When To Use And When not To Use A Scale-Out File Server
- Concluding Thoughts
In this post, we will take a deeper look at Scale-Out File Server.
- What is it?
- How does it work and how is it configured?
- What improvements have been made with SOFS in Windows Server 2019?
These and other topics will be discussed.
What is Scale-Out File Server?
Windows Server Failover Clustering has been a good general clustering technology for hosting access to files and folders. However, as new technologies came along such as virtualization (Hyper-V) that required more robust features such as the ability to handle open files, general file-server clustering came up a bit short.

In the case of virtual disks backing guest operating systems housed on Hyper-V hosts, there was a need for a more robust and capable clustering technology. Virtual disk files are a great example of resources on which you want to have even greater redundancy and resiliency. Scale-Out File Server (SOFS) was designed to provide resiliency to resources such as backing Hyper-V virtual machines.
With Scale-Out File Server, you can effectively satisfy the requirement of continuous availability as opposed to high-availability. In other words, you want the resource housed on the Scale-Out File Server to be available no matter what, even when you have a failure.
Scale-Out File Server (SOFS) provides a robust infrastructure platform on which to support highly-available virtual machines running in a Hyper-V environment. SOFS provides the underlying storage to Hyper-V with the capability to have multiple nodes online in an active-active configuration with persistent connections between the nodes.
The tremendous benefit to this is if a server providing storage to the Hyper-V environment goes down, the others immediately take over providing storage for the virtual disk files. This does not involve a cutover or migration process to get the data to the other servers. With SOFS backing Hyper-V storage, the virtual machines are able to stay online after a failed storage server with the backing of Scale-Out File Server.
Benefits provided by Scale-Out File Server
What are the benefits you gain by using Scale-Out File Server (SOFS)? These include the following:
- File shares are active-active – This means that all cluster nodes can accept and serve SMB client requests. A tremendous benefit of the active-active topology of the SOFS cluster Is failovers are transparent to alternate cluster nodes that assume the file share. This means if you have a Hyper-V cluster using SOFS, the VM stays online during a failover
- Increased bandwidth and performance – The bandwidth and by extension the amount of performance you get out of your SOFS backed file shares are linear to the number of nodes that are added to the cluster. In a traditional file cluster, the total bandwidth is no longer constrained to the bandwidth of a single cluster node. You can increase bandwidth by simply adding hosts to the cluster
- CHKDSK does not require downtime – CHKDSK general requires having exclusive access to the file system. However, the Cluster Shared Volume aspect of SOFS eliminates the downtime by no longer needing the offline phase. The Cluster Shared Volume File System (CSVFS) can use CHKDSK without impacting applications with open handles on the file system
- CSV Cache – Cluster Shared Volume cache is read-cache introduced in Windows Server 2012 that significantly improves performance in certain scenarios like VDI infrastructures
- Easier management – Management has been simplified. You need not create multiple clustered file servers, with separate cluster disks and then develop placement policies. Now you can create the SOFS and then add the CSVs and file shares
- Automatic Rebalancing of the Scale-Out File Server clients – With Windows Server 2012 R2 automatic rebalancing improves the scalability and manageability for SOFS. SMB connections are tracked per file share and then clients are redirected to the cluster node with the best access to the volume used by the file share. This helps to improve efficiency
How Scale-Out File Server Works
Scale-Out File Server allows creating shares that allow the same folder or file to be shared from multiple cluster nodes. If setup to use SOFS and SMB 3.0, the VMs housed therein can be accessed with a simple UNC pathname.
SMB 3.0 manages the load-balancing of the solution as well as the redundancy and management of the network for fault tolerance. These technologies allow the solution to be an active/active solution so performance is linear to the number of servers backing the SOFS share name.
As already mentioned, continuous availability is afforded by SOFS and ensures the integrity of your data by using synchronous writes. It allows you to have up to 8 nodes backing the SOFS share.
Prerequisites
There isn’t a long list of prerequisites for implementing Scale-Out File Server. However, the following are ones to note.
- Windows Server Failover Cluster compatible storage
- File Server Role installed on your SOFS hosts
- SMB 3.0 (Must be Windows Server 2012 or higher so SMB 3.0 is available)
- Active Directory infrastructure
- If you are using pre-Windows Server 2019 version of Windows Server, loopback configurations are not supported. This means housing Hyper-V and the SOFS file server on the same server
Architecture Overview
Below, a simple view of Hyper-V accessing a SOFS file share hosted between two SOFS nodes.
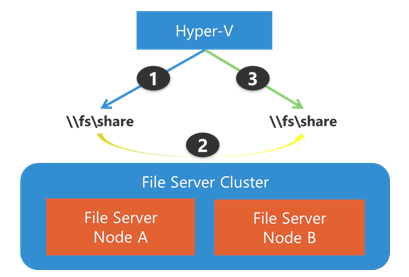
Simple overview of Hyper-V connected to SOFS (image courtesy of Microsoft)
Another view of an extended configuration of Hyper-V connected to SOFS.
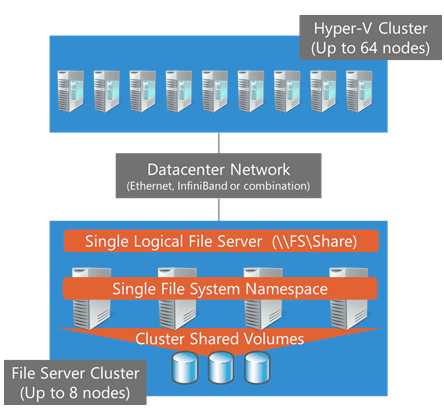
Multiple Hyper-V nodes connected to SOFS (Image courtesy of Microsoft)
New Scale-Out File Server Features in Windows Server 2019
Windows Server 2019 has brought about many enhancements to Scale-Out File Server. These make SOFS in Windows Server 2019 the most resilient and performant SOFS version to date. What enhancements are found in Windows Server 2019 SOFS?
Traditionally, SOFS is heavily reliant on DNS round robin for the connections coming inbound to cluster nodes. This can result in a few inefficient operations. For instance, if a connection is routed to a failover cluster node that is not the owner of a Cluster Shared Volume (CSV), data is redirected over the network to another node before returning to the client. The SMB Witness service detects the lack of direct I/O and moves the connection to a coordinator node (CSV owner) which can lead to delays in returning data.
Windows Server 2019 provides a much more efficient behavior when it comes to returning data. The SMB Server service determines if direct I/O on the volume is possible. If it is, it passes the connection on. If it isn’t (redirected I/O) it will move the connection to the coordinator before I/O begins. There is a limitation in which clients/Server connections can use this new functionality. Currently, it is limited to Windows Server 2019 and Windows 10 Fall 2017 clients.
A new SOFS role in Windows Server 2019 is called the Infrastructure File Server. When created, the Infrastructure File Server creates a single namespace share automatically for the CSV drive. In hyper-converged configurations, the Infrastructure SOFS role allows SMB clients such as a Hyper-V host to communicate with Continuous Available (CA) to the Infrastructure SOFS SMB server.
Another enhancement in Windows Server 2019 with the SMB Loopback where SMB can now work properly with SMB local loopback to itself. This was not supported previously. hyper-converged SMB loopback CA is achieved via Virtual Machines accessing their virtual disk (VHDx) files where the owning VM identity is forwarded between the client and server.
Cluster Sets are able to take advantage of this where the path to the VHD/VHDX is placed as a single namespace share which means the path can be utilized regardless of whether the path is local or remote.
With Windows Server 2016, Hyper-V compute hosts have to be granted permission to access the VHD/VHDX files on the SOFS share. However, with Windows Server 2019, a new capability called Identity Tunneling has been introduced to allow permissions to be serialized and tunneled through to the server. This greatly reduces the complexity of the permissions for accessing the SOFS share for each Hyper-V host.
Let’s take a look at configuring Scale-Out File Server in a Windows Server 2019 Hyper-V cluster.
Configuring Scale-Out File Server in Windows Server 2019
The process to configure the Scale-Out File Server is found in the Failover Cluster Manager. Currently, Windows Admin Center does not contain the ability to manage SOFS as detailed here, however, it most likely will be added as a functional feature in an upcoming release. We will look at what you can currently see regarding SOFS in Windows Admin Center below.
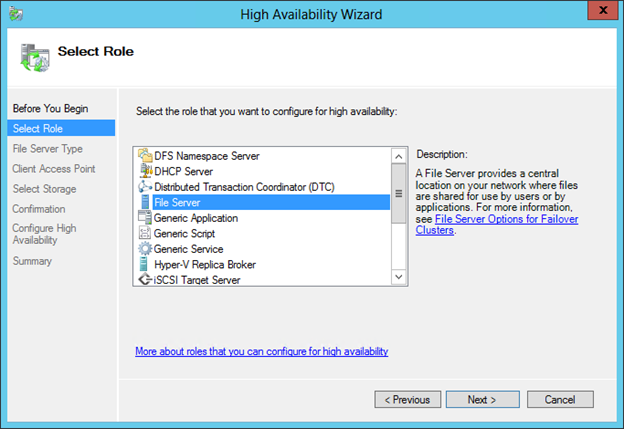
To get started configuring Scale-Out File Server in Failover Cluster Manager, right-click Roles and select Configure Role. This will launch the High Availability Wizard where you select role you want to add as a clustered role. Select File Server. For our walkthrough, we are configuring SOFS for the purpose of backing Hyper-V VMs.
Keep in mind, this will not automatically add the Windows Role (File Server) to your Windows Failover cluster hosts. You will need to add the underlying Windows Role to your hosts before running the High Availability Wizard for your cluster.
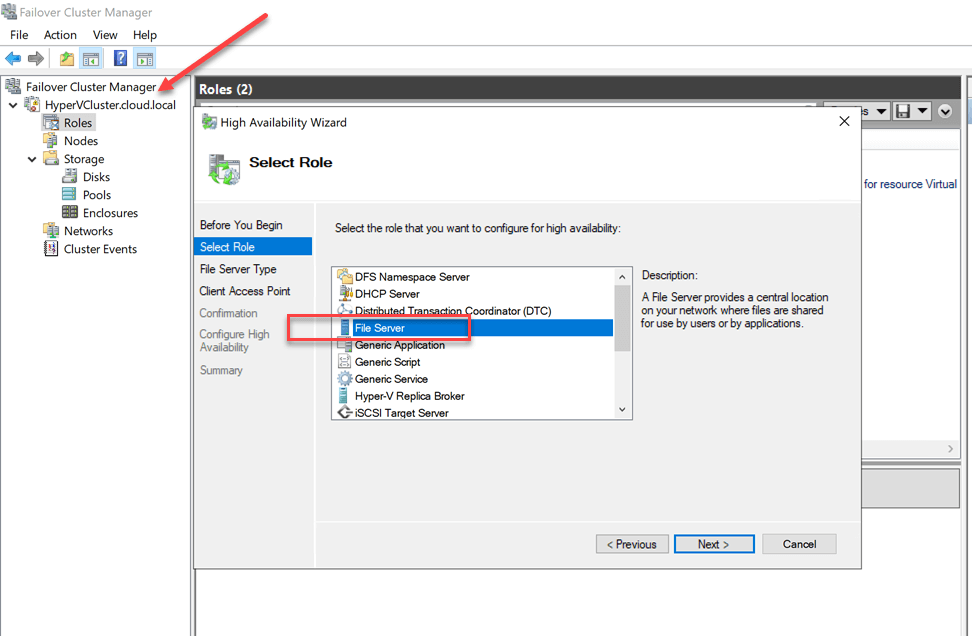
Beginning the Select Role wizard
After selecting the File Server role, you will need to choose the File Server Type. The options for your File Server configuration are:
- File Server for general use
- Scale-Out File Server for application data
We are interested in the second option which is Scale-Out File Server for application data. As per the description notes, you will want to use this option to provide storage for server applications or virtual machines that leave files open for extended periods of time. Scale-Out File Server client connections are distributed across nodes in the cluster for better throughput. This option supports the SMB protocol. It does not support the NFS protocol, DFS Replication, or File Server Resource Manager.
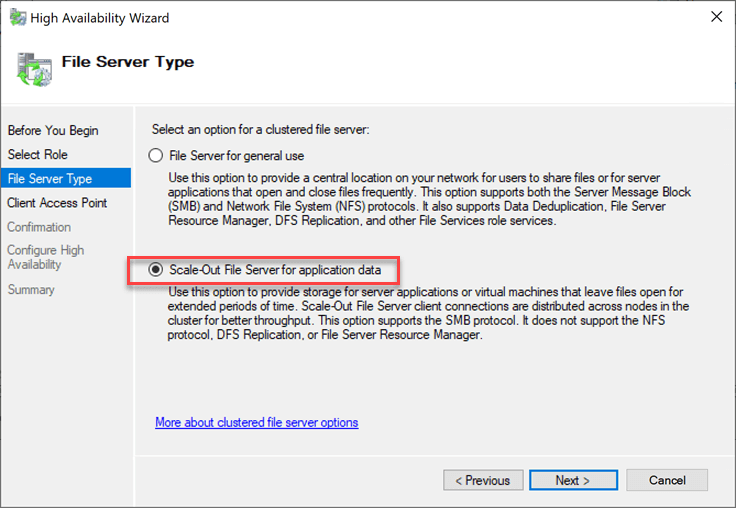
Choosing Scale-Out File Server for application data
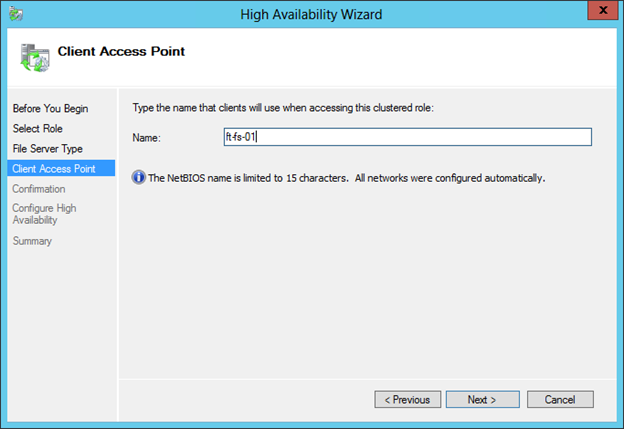
After choosing the SOFS file server option, you will choose a name for what is referred to as the Client Access Point. This will be reflected in the cluster resource as well as the SOFS file share.
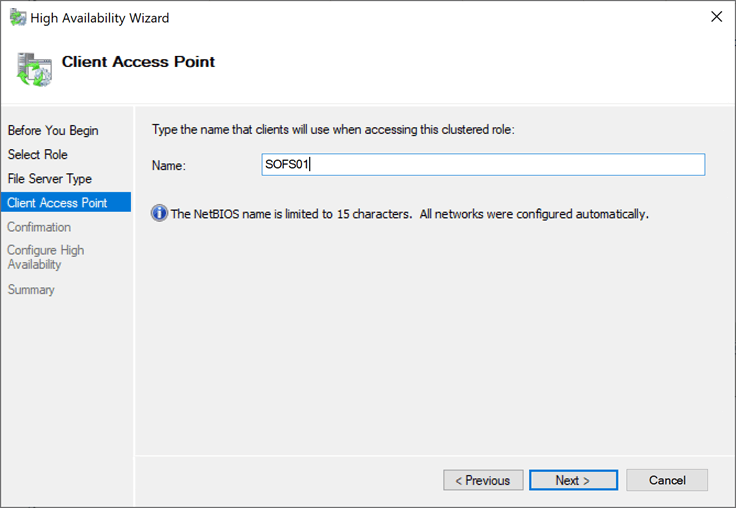
Configuring the Client Access Point
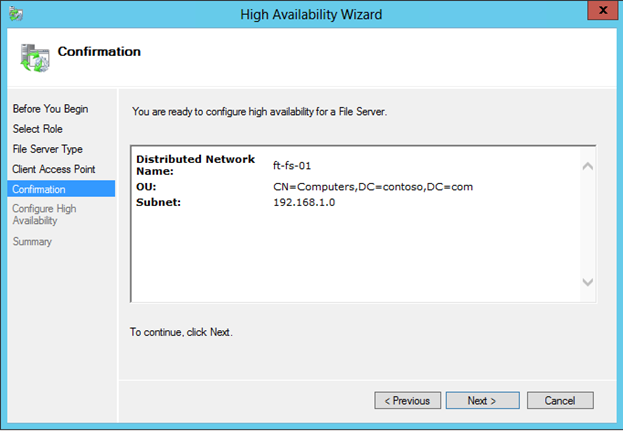
Confirming the options configured in the High Availability Wizard with the Scale-Out File Server configuration.

Confirming the addition of the Scale-Out File server clustered role
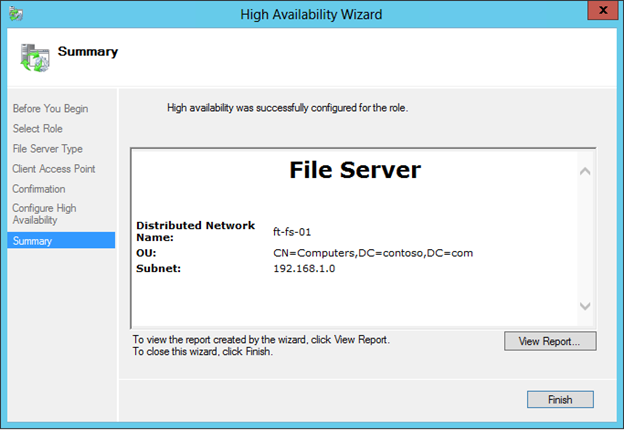
The summary screen will detail the options configured.
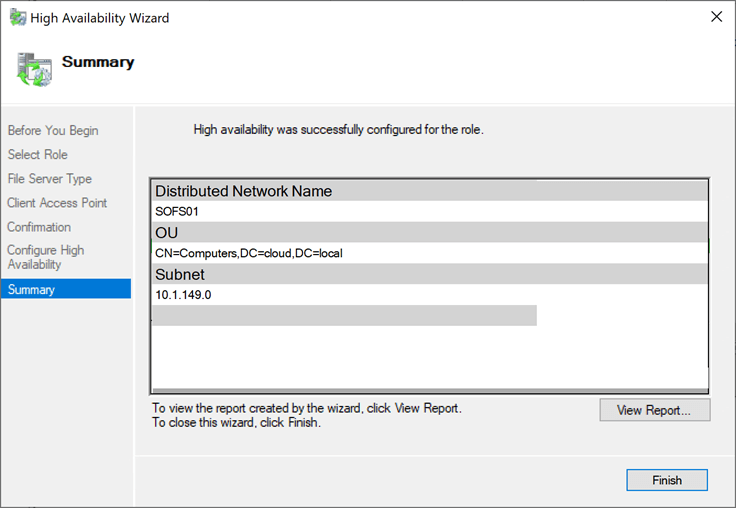
SOFS is successfully configured as a clustered role
Adding an IP Address Resource to the SOFS Role
Adding an IP Address Resource to the SOFS Role is a straightforward process. Simply right-click on the SOFS role name in Failover Cluster Manager, choose Add Resource > More Resources > IP Address.
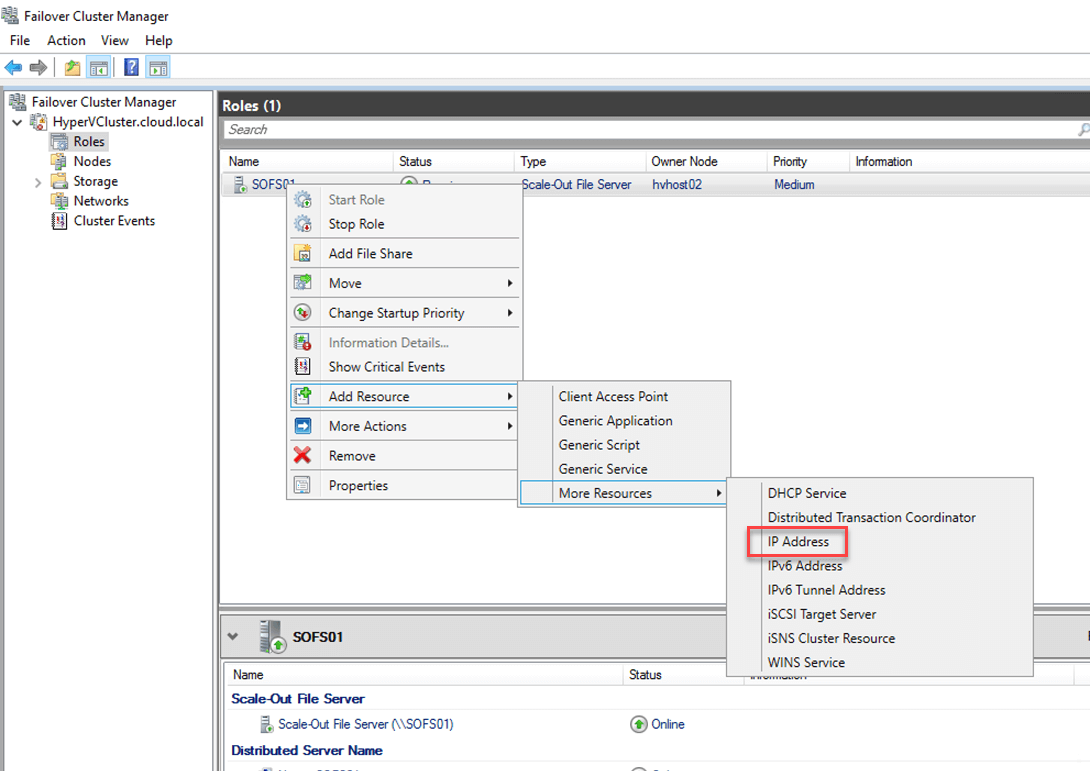
Adding an IP Address resource to the Scale-Out File Server
There are a couple of additional steps to get the IP Address resource for the SOFS role configured. First, you need to actually assign the IP Address you want to use as well as the Network associated with the IP Address.
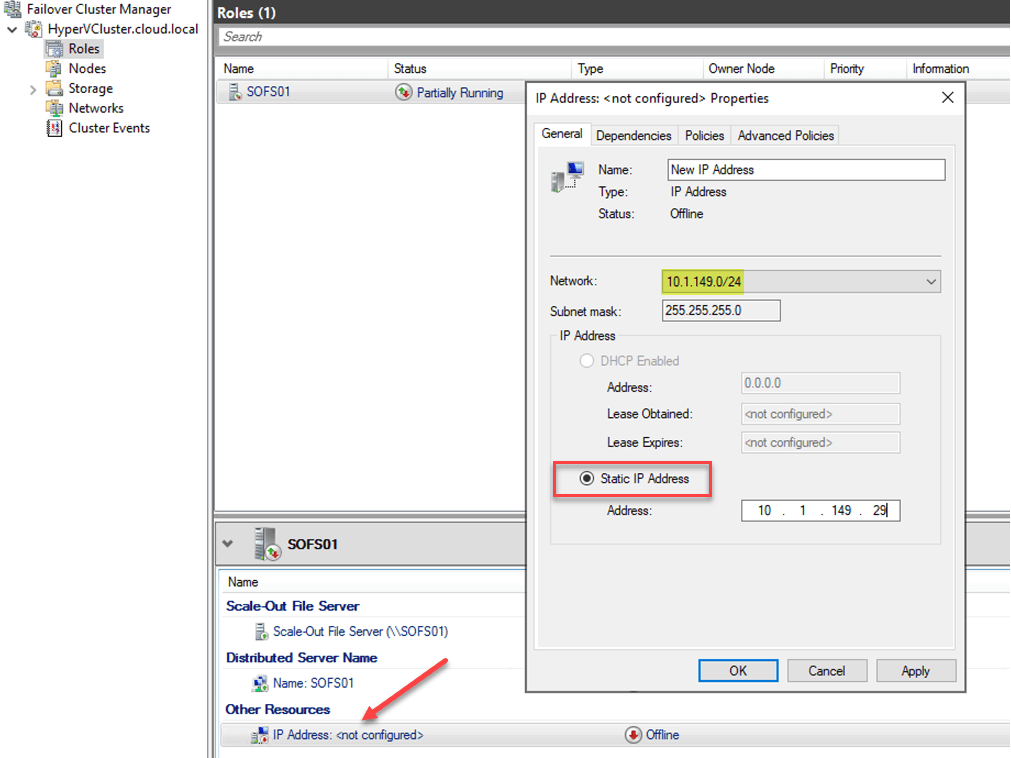
Configuring the IP Address and Network for the new IP Address resource
After you configure the IP Address resource for the SOFS role along with the network it belongs to, you will need to Bring Online the IP Address resource. Simply right-click the IP Address and choose Bring Online.
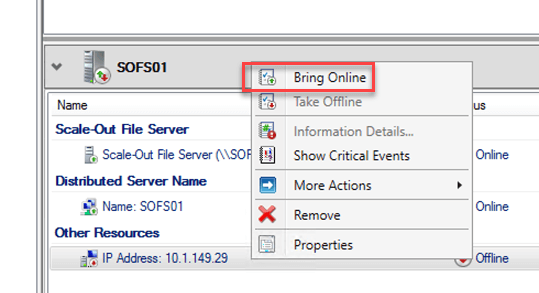
Bringing the SOFS IP Address resource online after configuration
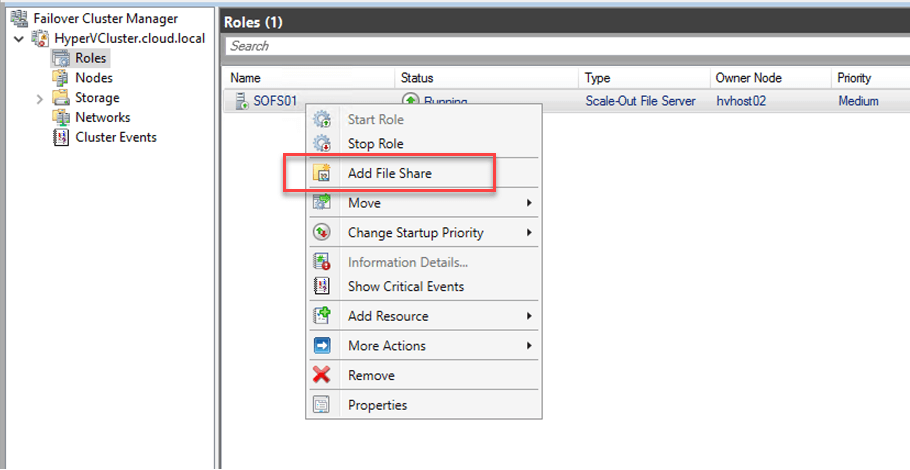
Adding a File Share to Scale-Out File Server
After you have configured the SOFS role as well as added the IP Address resource, you need to configure the File Share that will be made continuously available. To do this, right-click your Scale-Out File Server role name in Failover Cluster Manager and choose Add File Share.
Beginning to Add File Share to the Scale-Out File Server
This launches the New File Share wizard. The first part of the configuration for the Scale-Out File Server share is to select the profile for this share. The options include:
- SMB Share – Quick
- SMB Share – Advanced
- SMB Share – Applications
- NFS Share – Quick
- NFS Share – Advanced
For use with Hyper-V and database applications, here we are selecting SMB Share – Applications. This profile creates the SMB file share with settings appropriate for Hyper-V and database applications.

Selecting a file share profile for creating the new SOFS file share
Select the server and path for this share.
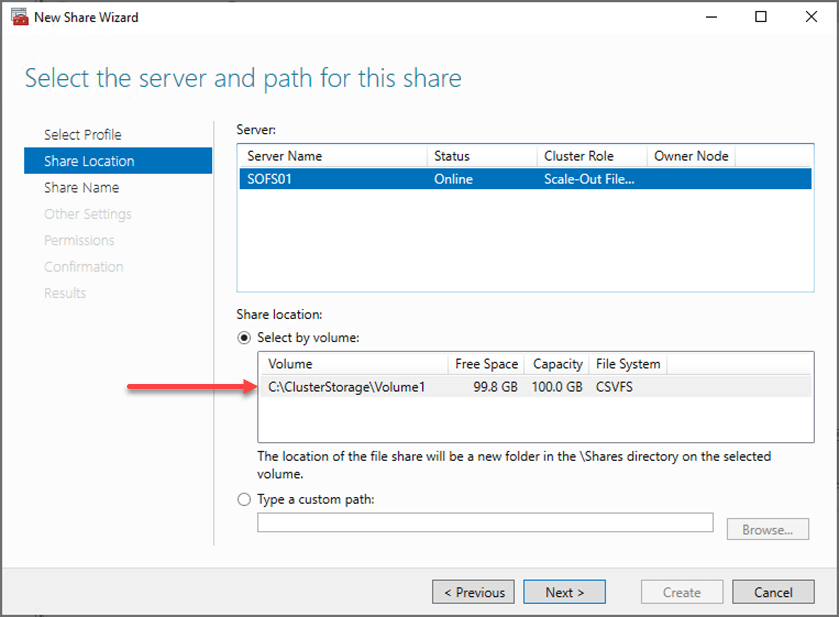
Select the server and path for the SOFS file share
Next, you need to specify the share name. The share name you choose is reflected in the remote path to share.
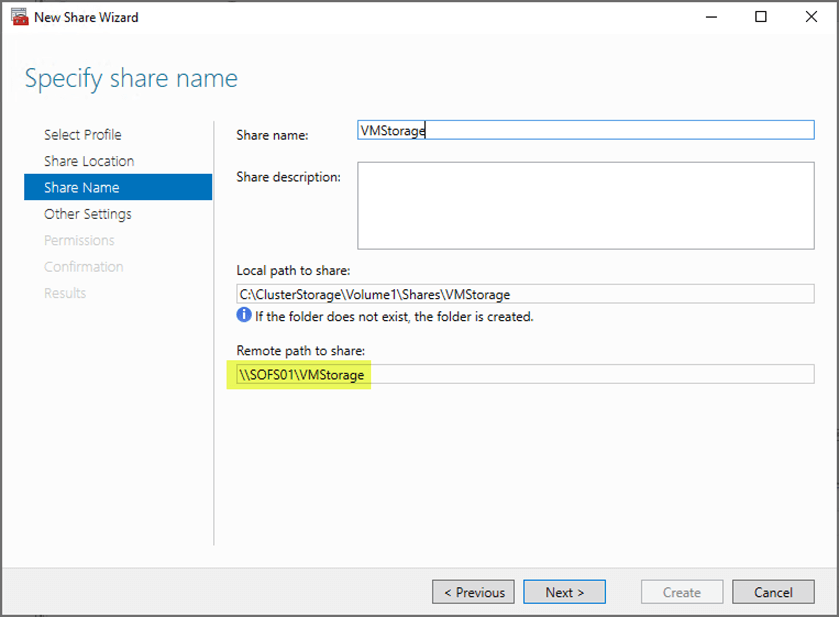
Specifying the share name for the SOFS file share
On the Configure share settings screen, you will see a number of configuration settings related to share configuration. By default, the SMB Share – Applications will have the Enable continuous availability selected. This allows continuous availability features to track file operations on a highly available file share so that clients can failover to another node of the cluster without interruption.
As mentioned earlier, this means virtual machines can continue operating without interruption despite a host failure in the Scale-Out File Server storage nodes. As you will see below, there are many other options that can be selected as well, including encrypt data access.
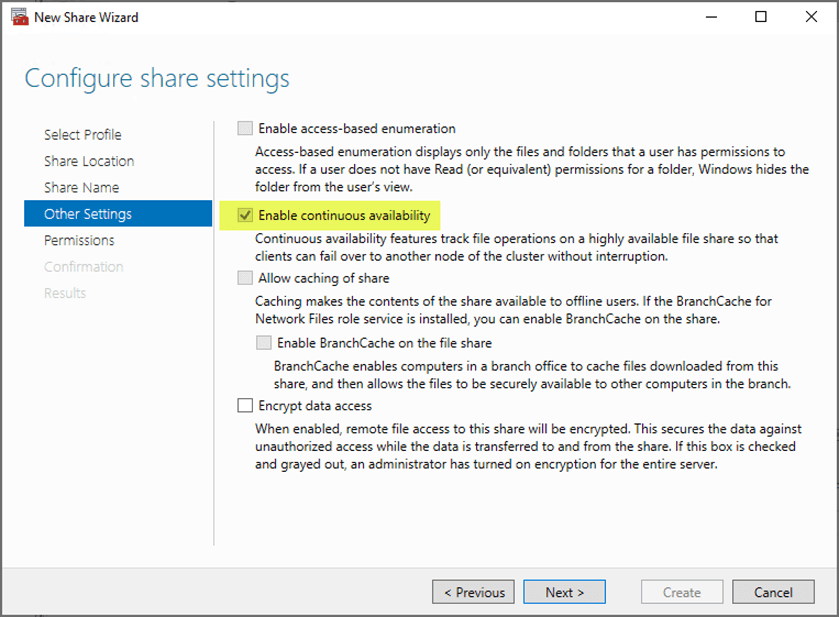
Enabling continuous availability for the new SOFS file share
Next you can specify permissions to control access to your SOFS share.
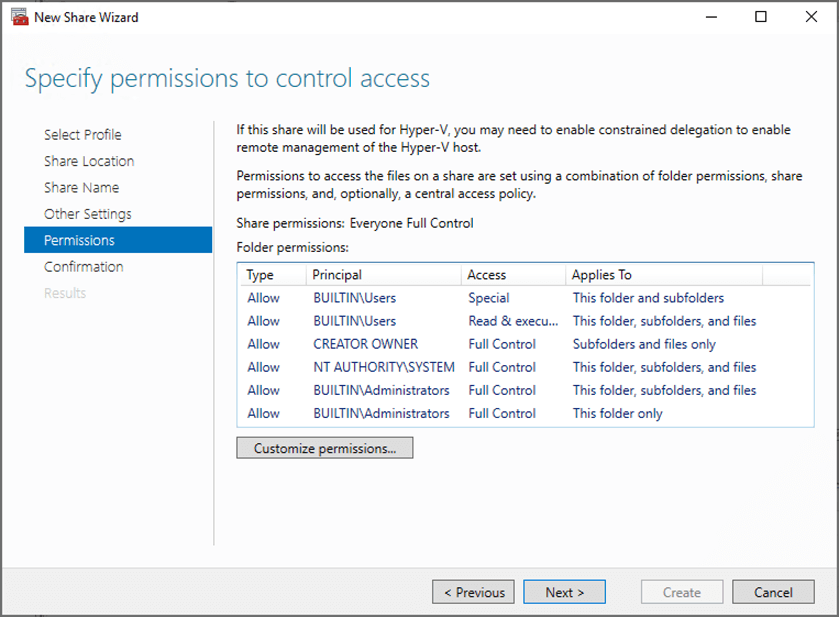
Configuring permissions to control access
Lastly, confirm the selections made in the New Share Wizard.

Confirm selections for creating the SOFS file share
The new share wizard completes with the SOFS file share created successfully.
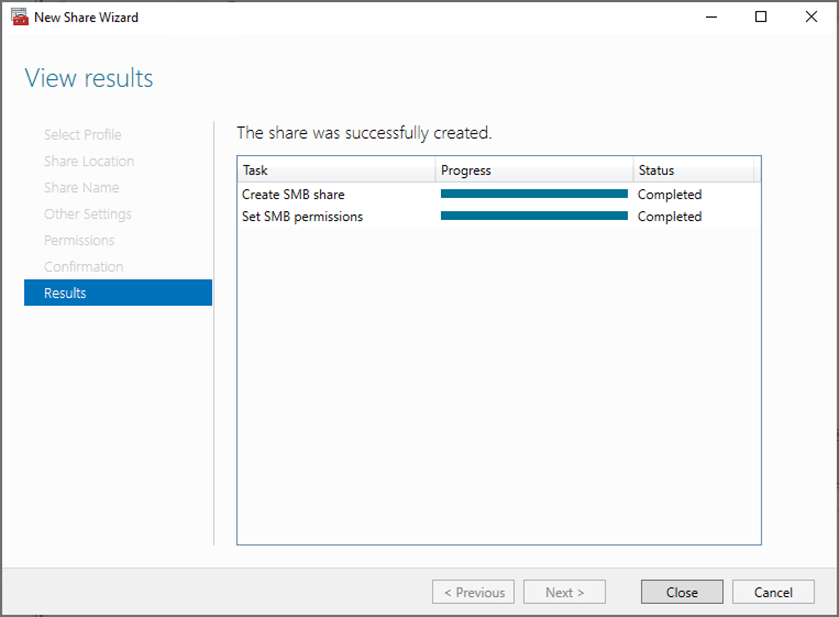
SOFS share created successfully
Now, in Failover Cluster Manager, you can look at your SOFS resource Shares tab and see the new file share created and listed.
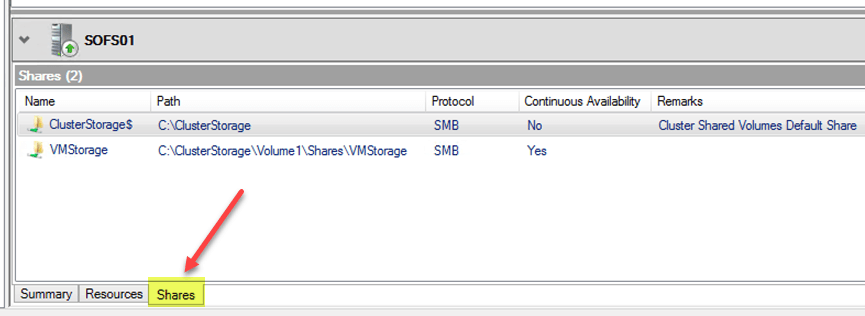
Confirming SOFS shares in Failover Cluster Manager
Storing Virtual Machines in an SOFS File Share
When creating a new Hyper-V virtual machine, you can store the virtual machine on an SOFS file share simply by specifying the file share in the Location box in the Specify Name and Location step of the New Virtual Machine Wizard. This is in the form of a UNC path.
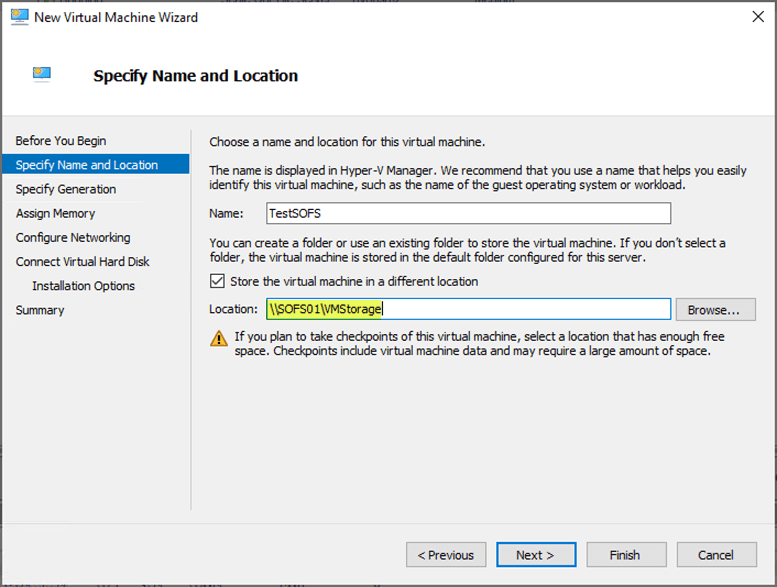
Creating a new virtual machine using the SOFS file share location
As you can see, after specifying the UNC path for the SOFS share in the Location, you will see the full path created for your individual virtual machine on the SOFS share.

Location of virtual machine disks reflected in the New Virtual Machine Wizard
Windows Admin Center
We had touched on this a bit earlier. What about the Windows Admin Center configuration? At this point, Windows Admin Center does not allow the configuration of SOFS that is needed. However, you can view your cluster roles as well as the details of your SOFS role inside of Windows Admin Center.
Like many other Windows technologies, Microsoft is no doubt working on getting SOFS configuration as well as many other configuration tools inside of Windows Admin Center. It will only be a matter of time before you will be able to fully configure SOFS inside of Windows Admin Center.
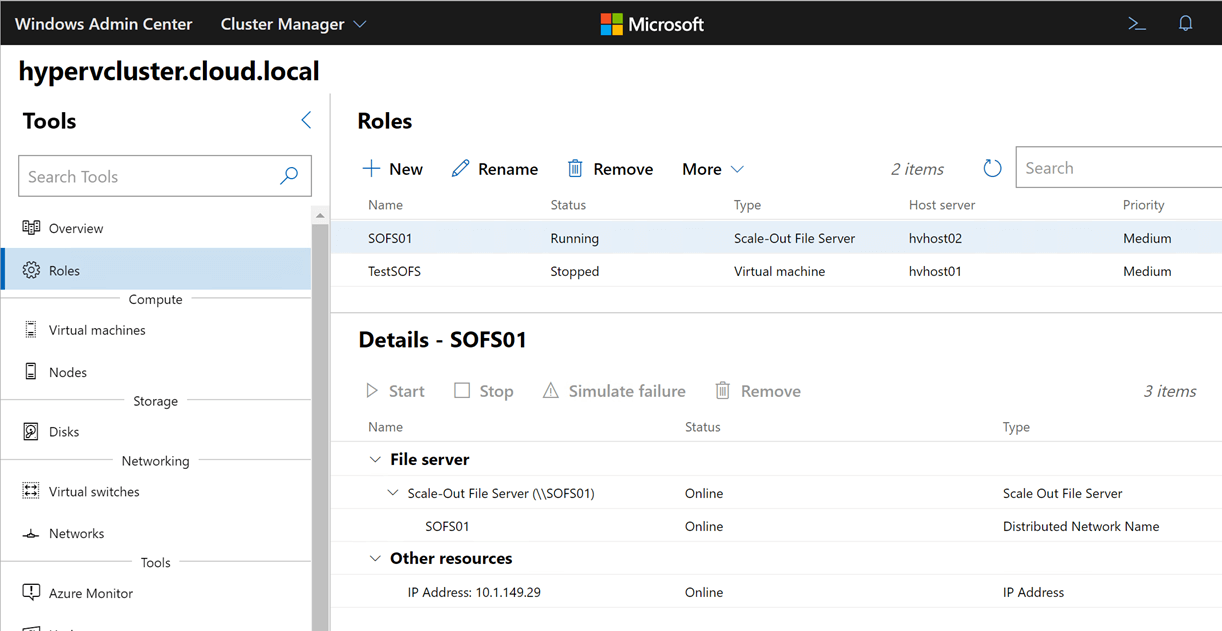
Viewing your SOFS role information inside of Windows Admin Center
When To Use And When not To Use A Scale-Out File Server
Scale-Out File Server is extremely powerful and can satisfy many use cases. What are some typical use cases where SOFS is a good fit, and also where might it not be a good choice for a backend storage technology? Let’s consider this topic.
So, when is a good use case for Scale-Out File Server? Well, the screen in the High Availability Wizard gives the clue to where SOFS fits best – application data. This includes Hyper-V and SQL Server.
SOFS adds the ability to have active-active, highly available storage via SMB 3.0. With SOFS, the server synchronously writes through to the disk for data integrity which provides resiliency in the event of a host failure. If you were to “pull the plug” on your SOFS server, it helps to ensure that your files will be consistent.
With Hyper-V and SQL workloads, the file operations are not very metadata intensive. This means the extra overhead of the synchronous writes that comes with Scale-Out File Server does not really impact the performance of your Hyper-V or SQL workloads.
This helps to highlight when you would not want to use the Scale-Out File Server. In typical end-user environments where there are a tremendous number of file operations including the normal “file opens, file deletes, editing”, and so on. According to Microsoft, this can lead to frequent VDL extension which can mean quite a bit of disk operation overhead, via SMB operations.
As we already know, continuous availability (CA) requires that data write-through to the disk to ensure integrity in the event of a host failure backing SOFS. These synchronous file writes mean there is an impact on write performance. A large VHDX or SQL Server database file also experiences the overhead on file creation time, however, generally, the space for these types of applications is preallocated so disk I/O is comparatively much lower for these.
Another important thing to note is, you can’t use DFS replication to replicate a library share hosted on a scale-out file share.
Concluding Thoughts
Scale-Out File Server provides a really great way to have active-active storage high-availability along with resiliency without expensive storage hardware. Performance scales along with the number of nodes that are added to the SOFS-backing servers. Creating a SOFS infrastructure configuration is easily achieved with only a few clicks in the Failover Cluster Manager with Windows Admin Center functionality soon to come.
As discussed, SOFS is not for every workload. It is best suited for Hyper-V and SQL application data. General file I/O as is the case with normal file opens, edits, deletes and such as is experienced with general-purpose end user file activity is not well-suited for the synchronous write overhead of SOFS. With these types of workloads you will most likely want to house these on traditional file server infrastructure.
Related Posts:
BDRSuite v5.3 New Feature Update: Centralized File Server Backup
Azure File Storage vs Azure Blob Storage
Amazon FSx for Windows File server: An Overview
Configuring Storage Spaces Direct and Resilient File System (ReFS)
Follow our Twitter and Facebook feeds for new releases, updates, insightful posts and more.
Try BDRSuite for Free!
Schedule a live demo with one of our product experts
Start your full-featured 30-day free trial
Explore detailed pricing, editions & features