
В современных версиях Windows и Windows Server вы можете увеличить размер любого раздела за счет неиспользуемого (неразмеченного) места на диске без остановки компьютера/сервера и без потери данных. В этой статье мы покажем, как в Windows расширить раздел на диске с помощью графической оснастки Disk Management, утилиты diskpart и команд PowerShell
Windows позволит расширить базовый том, если:
- Свободное неразмеченное место доступно есть на том же самом физическом (виртуальном диске);
- Раздел отформатирован в файловой системе NTFS или ReFS;
- Сразу после раздела (справа), который вы хотите расширить, и между вашим томом есть пустое (неразмеченное) место;
- На дисках с таблицей разделов MBR нельзя создать тома более 2 Тб. Для больших дисков (более 2 Тб) используйте таблицу разделов GPT (можно сконвертировать MBR в GPT без потери данных);
Содержание:
- Расширить раздел в Windows с помощью оснастки Disk Management
- Увеличить раздел в Windows из командной строки
Расширить раздел в Windows с помощью оснастки Disk Management
Проще всего расширить том в Windows с помощью MMC консоли управления дисками (Disk Management);
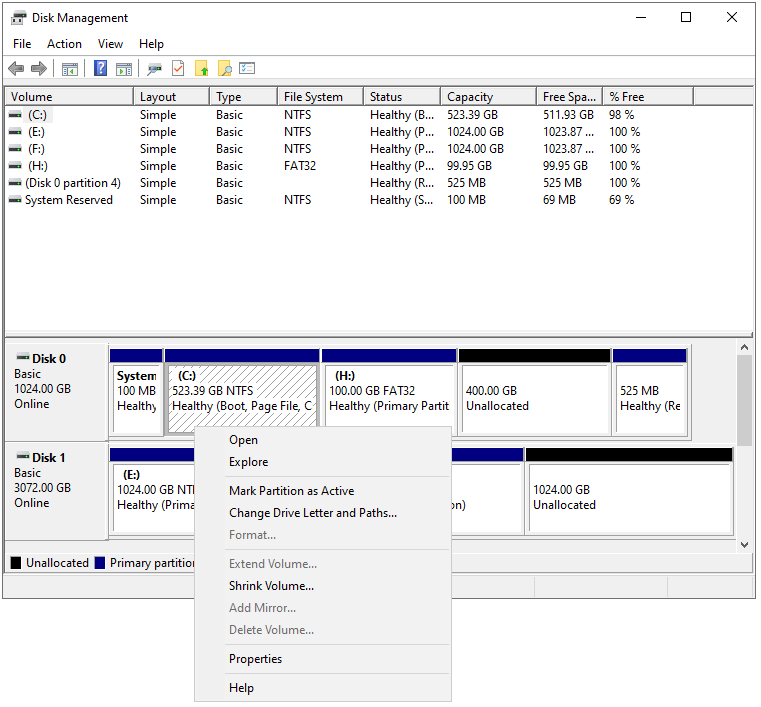
- Откройте консоль управления дисками
diskmgmt.msc
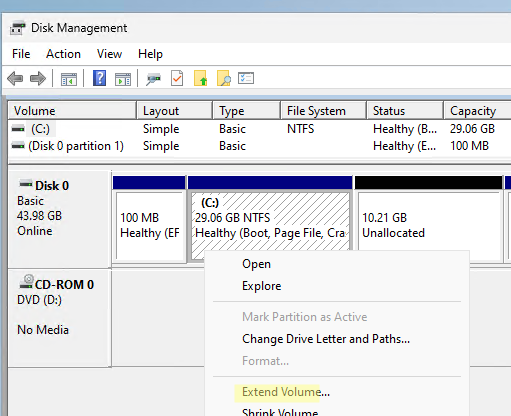
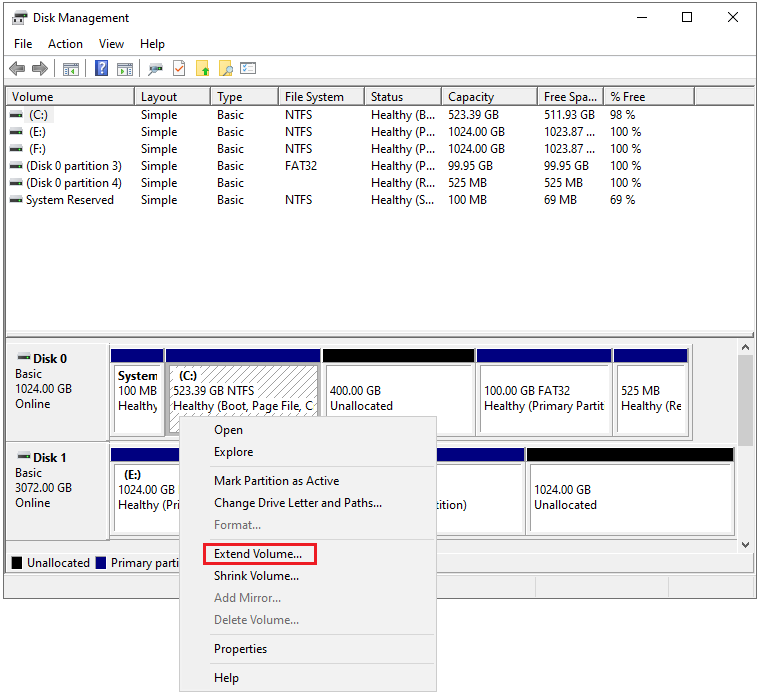
с правами администратора. Обновите информацию о томах с помощью меню Action -> Rescan disk (если вы недавно расширили диск вашей виртуальной в гипервизоре и не видите добавленное место); - Щелкните правой кнопкой по разделу, который нужно увеличить. В моем примере это логический том, которому назначена буква диска С:\).
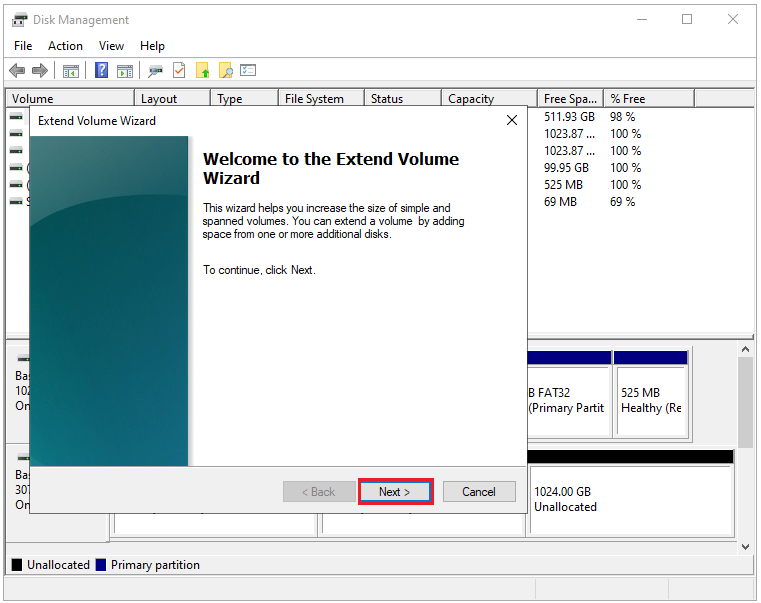
- Выберите пункт Extend Volume;

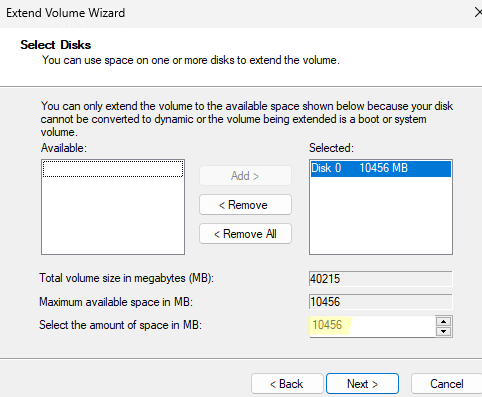
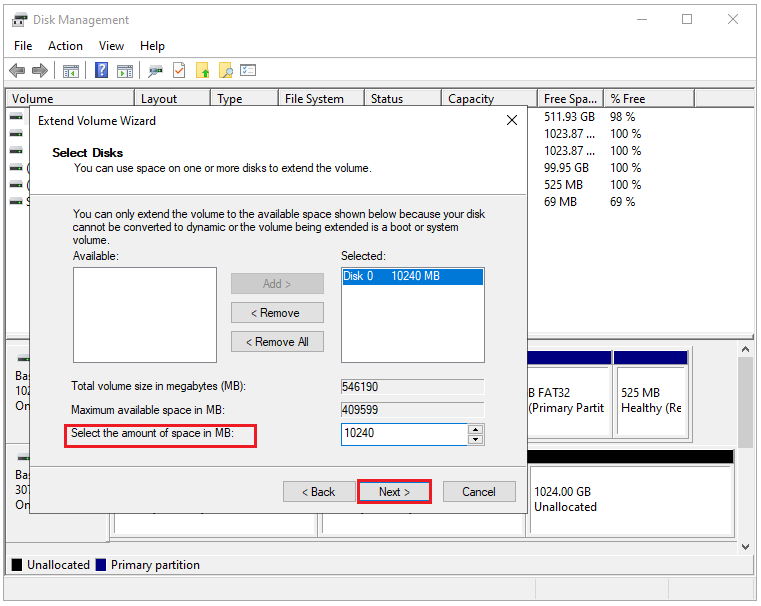
- В поле Maximum available space in MB указано на сколько вы можете расширить текущий раздел. Укажите в поле Select the amount of space in MB количество МБ, которое нужно добавить к разделу за счет неразмеченного пространства (
Unallocated
). В этом примере я добавлю к системному тому все свободное место;
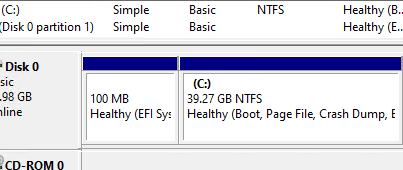
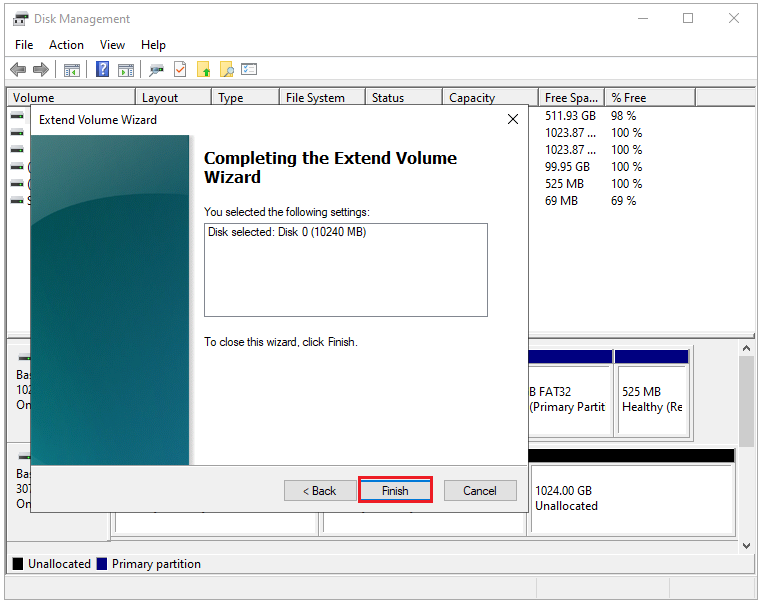
- Нажмите Next -> Finish и проверьте, что вы расширили диск C.
На скриншоте ниже видно, что между вашим диском C и неразмеченное областью есть том восстановления Windows Recovery Environment. Обратите внимание, что опция Extend Volume для диска неактивна.
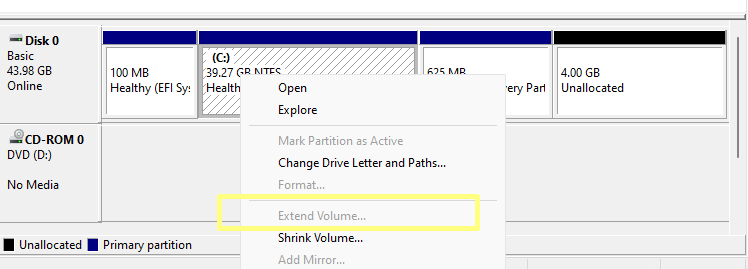
Это означает, что вы не сможете расширить ваш диск C:, пока не удалите или не переместите раздел Recovery в конец диска. Как это сделать описано в статье Не активен пункт Расширить том в Windows.
Увеличить раздел в Windows из командной строки
Если вам нужно увеличить размер раздела из командной строки, вы можете использовать консольную утилиту diskpart или командлеты PowerShell для управления дисками и разделами из встроенного модуля Storage. Ниже мы покажем команды для увеличения размера диска на хосте с Windows Server Core или Microsoft Hyper-V Server (без графического интерфейса).
Выполните команду:
Diskpart
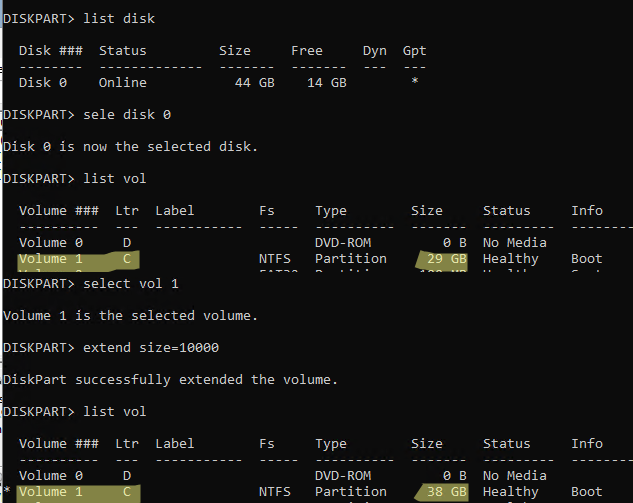
Вывейте список дисков:
DISKPART -> list disk
Выберите диск:
DISKPART -> select disk 0
Выведите разделы:
DISKPART -> list vol
Выберите раздел, который нужно расширить:
DISKPART -> select volume 3
Чтобы увеличить раздел, используется оператор:
EXTEND [SIZE=] [DISK=] [NOERR]
Например, чтобы увеличить текущий раздел на 10 Гб:
DISKPART -> extend size=10000
Можно добавить к тому все доступное свободно место:
DISKPART -> extend
Проверьте, что раздел был расширен:
DISKPART -> list vol
Закройте diskpart:
DISKPART -> exit
Также вы можете расширить диск с помощью PowerShell.
Обновите информацию о дисках:
"rescan" | diskpart
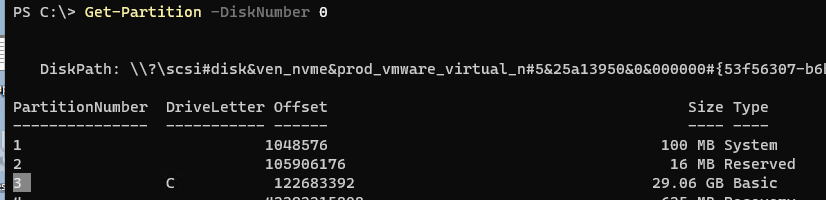
Выведите информацию о текущий размерах разделов на диске 0:
Get-Partition -DiskNumber 0
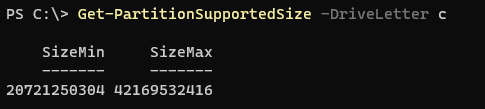
С помощью следующей команды вы получите минимальный размер вашего логического диска (SizeMin, это фактический размер данных на диске) и максимальный размер диска, до которого его можно расширить (SizeMax):
Get-PartitionSupportedSize -DriveLetter C
Чтобы увеличить диск, нужно указать его новый размер:
Resize-Partition -DriveLetter C -Size 42169532416
Если вам нужно увеличить диск за счет всего доступного места, используйте команды:
size = (Get-PartitionSupportedSize -DiskNumber 0 -PartitionNumber 3)
Resize-Partition -DiskNumber 0 -PartitionNumber 3 -Size $size.SizeMax

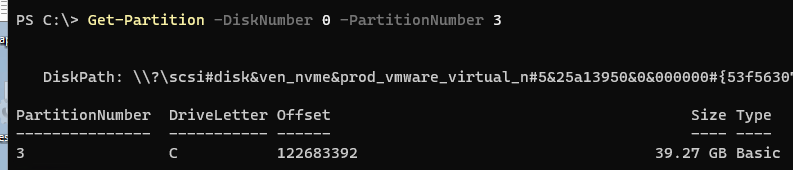
Проверьте, что ваш раздел бы увеличен:
Get-Partition -DiskNumber 0 -PartitionNumber 3
Windows XP и Windows Server 2003 не поддерживают онлайн расширение системного тома C:. Для увеличения системного раздела без перезагрузки можно воспользоваться утилитой Dell ExtPart. Скачать утилиту ExtPart можно здесь (40 Кб). [.alert]
Have you ever seen a low disk space warning on your C drive? This message indicates that your C drive is nearing its capacity. This article from Partition Magic will guide you on how to extend C drive partition in Windows Server 2016/2019/2022.
Generally, the default C drive on Windows Server stores all system information, operating systems, applications, and files you download from the Internet. Although it has a certain amount of storage space, if you keep putting files on the C drive, the space on the C drive will soon fill up. So, what should you do?
Some people choose to free up some space on the C drive by deleting files, but they still receive a message that the C drive is full every once in a while. When a drive is running low on space, it is best to increase the space on the drive by extending the partition size.
The following will introduce you to how to increase system partition in Windows Server. One is to use the Disk Management tool that comes with the computer, and the other is to use the third-party software MiniTool Partition Wizard. Let’s get started.
How to Extend C Drive Partition in Windows Server 2016/2019/2022
Here, you can discover three effective methods to increase C drive partition in Windows Server 2016/2019/2022. Select the method that best fits your situation to safely increase system partition in Windows Server.
Extend C Drive Partition in Windows Server with Disk Management
If there is adjacent unallocated space behind the C drive, you can extend it in Disk Management. If there is no adjacent unallocated space behind the C drive, the Extend Volume option is grayed out. In this case, I recommend you use MiniTool Partition Wizard to extend it. Here are the detailed steps:
Step 1: Right-click the Start icon and choose Disk Management to open.
Step 2: Right-click the C drive and select Extend Volume.
Step 3: Click Next in the Extend Volume Wizard.
Step 4: You can enter the amount of space you want to extend the C drive partition in the text box next to Select the amount of space in MB and click Next.
Step 5: Click Finish, and you can see that the unallocated space adjacent to the C drive has been added to the C drive.
Extend C Drive Partition in Windows Server with MiniTool Partition Wizard
If your situation is as shown in the figure below, there is no adjacent unallocated space behind the C drive in Disk Management, and the Expand Volume button will be gray and unclickable. Based on this, we recommend that you use third-party software — MiniTool Partition Wizard.
MiniTool Partition Wizard provides the Extend Partition feature, which allows you to use the space of other partitions or non-adjacent areas to extend the partition. The Move/ Resize Partition also allows you to adjust the location of partitions on the disk to achieve the purpose of expansion.
MiniTool Partition Wizard is free disk partitioning software specially designed to manage partitions and disk usage. With its various powerful features, it can handle all kinds of disk and partition jobs, such as convert MBR to GPT, hard drive data recovery, hard drive clone, etc.
MiniTool Partition Wizard FreeClick to Download100%Clean & Safe
Here we will tell you how to extend C drive partition in Windows Server 2016/2019/2022:
Use Extend Partition Feature of MiniTool Partition Wizard
Use the Extend Partition feature to extend your drive regardless of whether it has adjacent unallocated space.
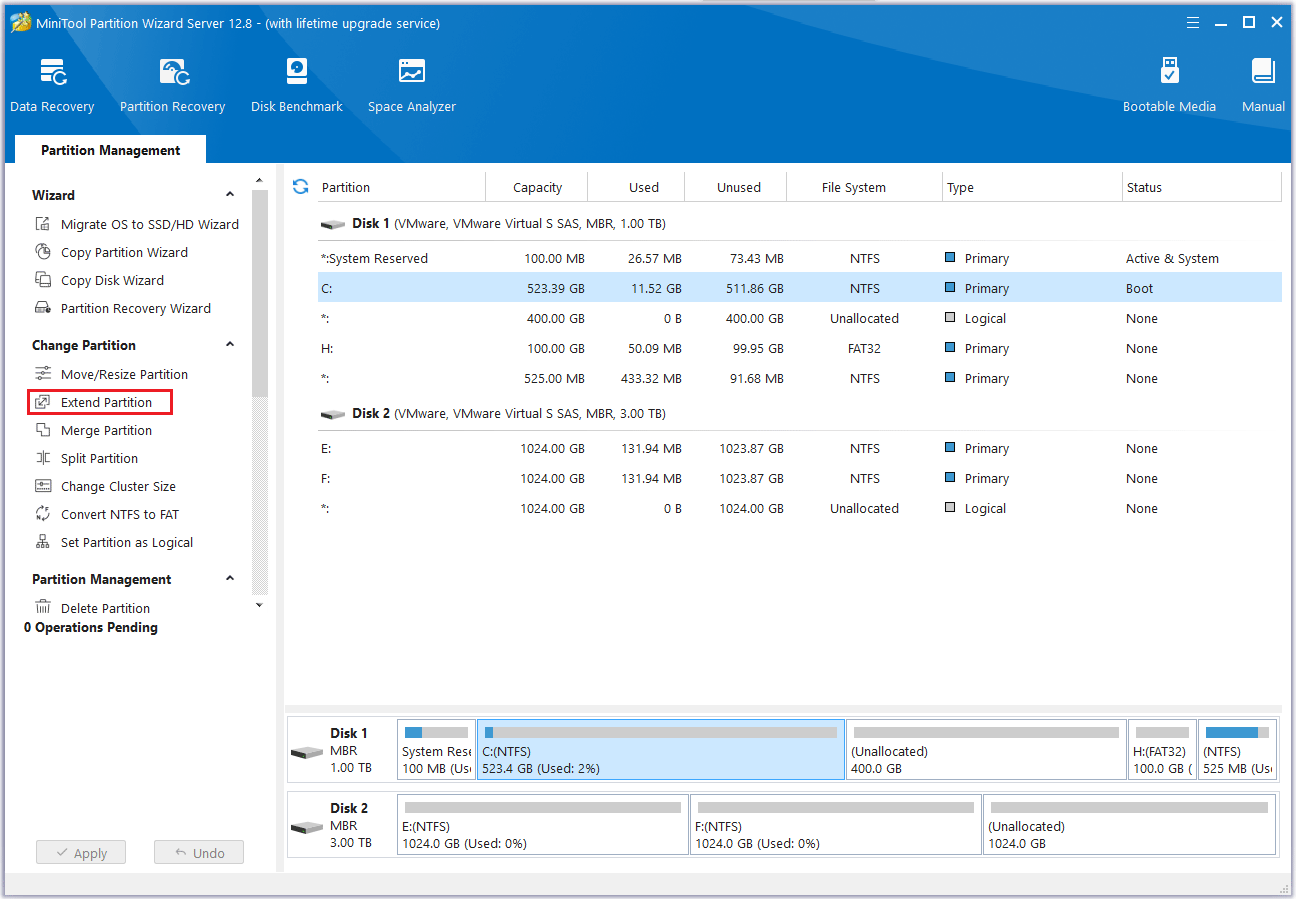
Step 1: Launch MiniTool Partition Wizard to get the general disk partition map.
Step 2: Select the C drive you want to extend and choose Extend Partition from the left operation panel.
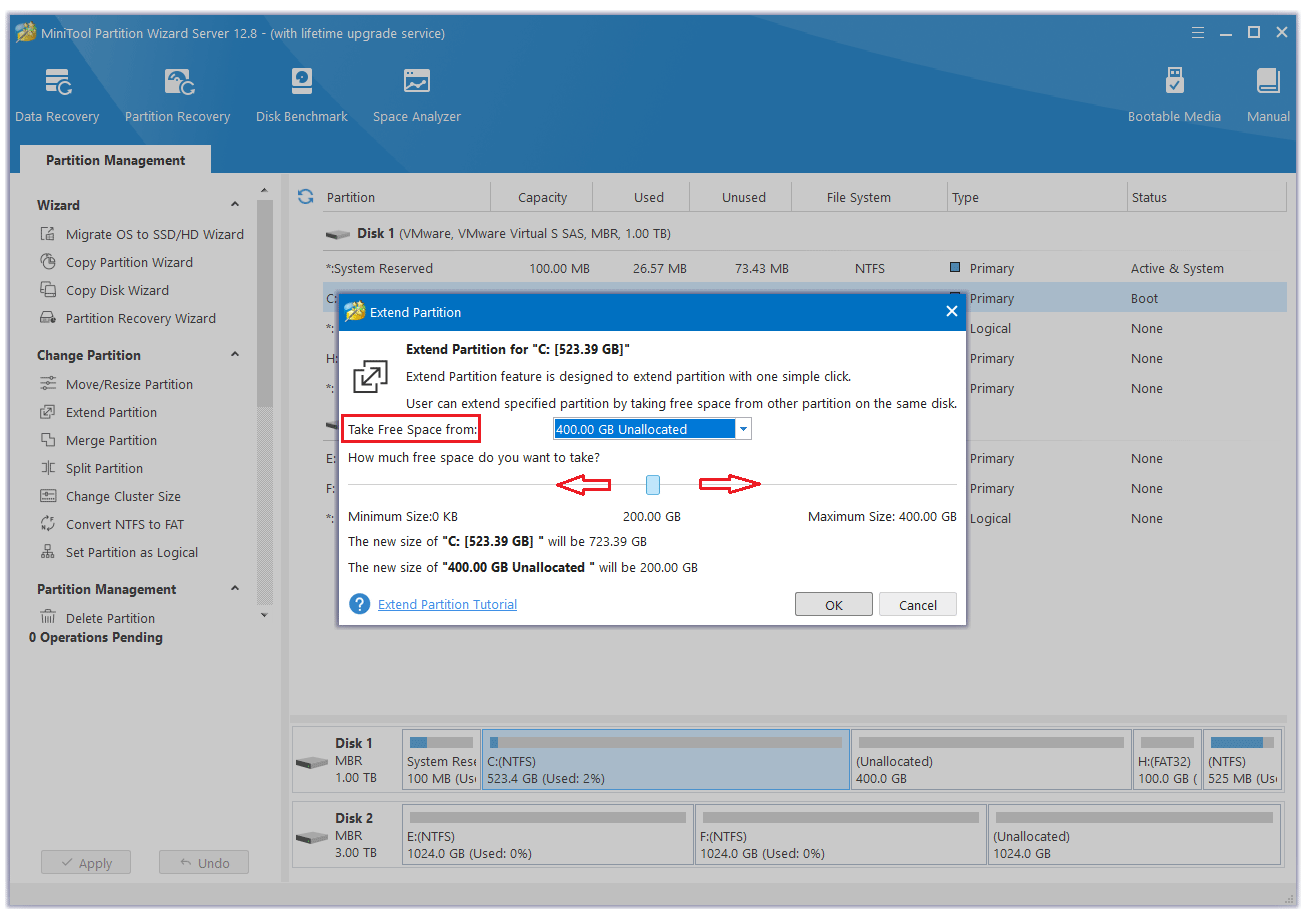
Step 3: Select a partition or unallocated space from the drop-down list to extend the C drive partition and drag the sliding handle leftwards or rightwards to decide how much of the available space it takes up. Then click OK to continue.
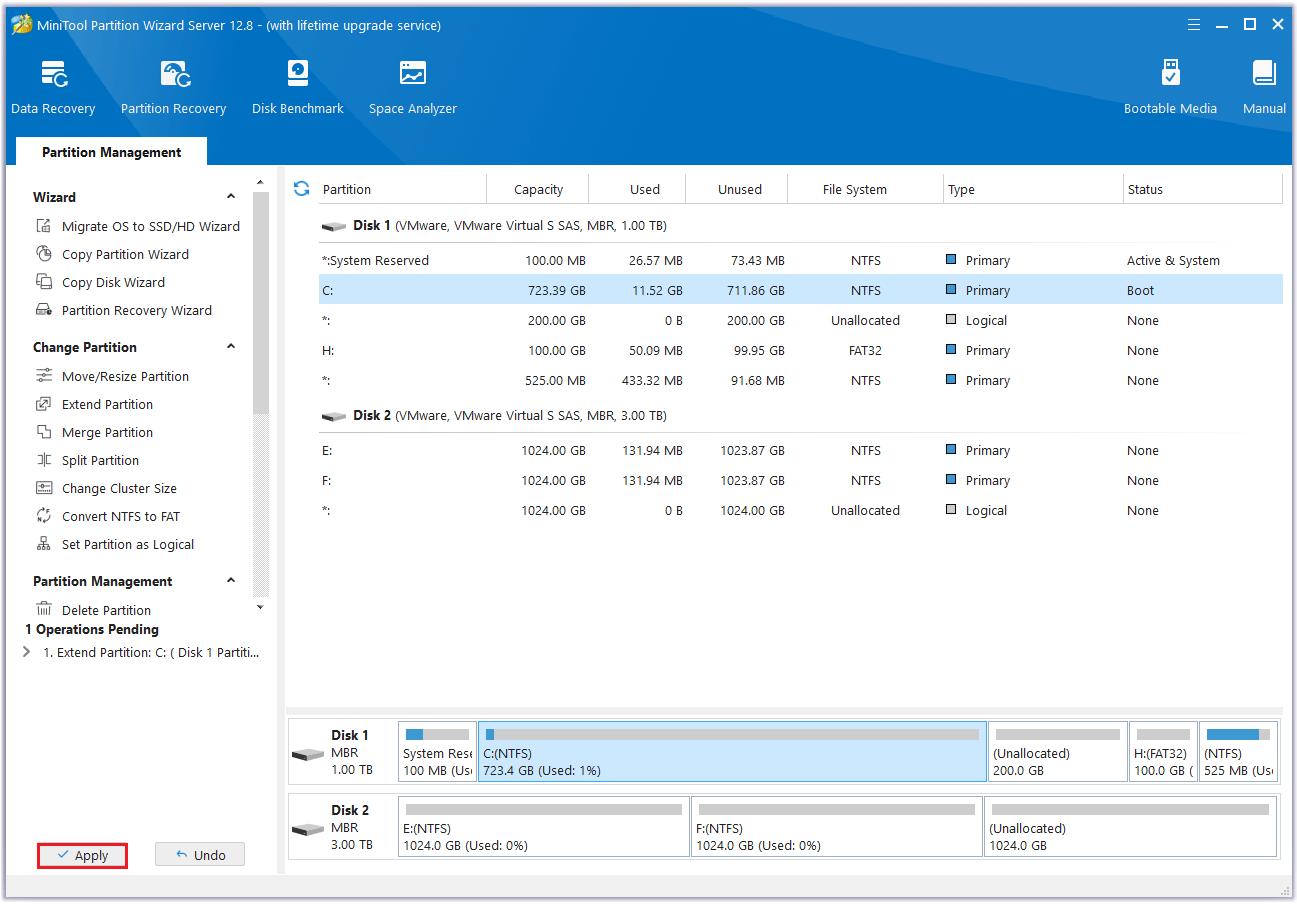
Step 4: In the main interface, you can preview the changes of the C drive and click Apply to save all changes. You can also check whether the C drive is extended through Disk Management.
Use Move/Resize Partition Feature of MiniTool Partition Wizard
In addition to the Extend Partition feature, you can also use the Move/Resize Partition feature to extend C drive partition in Windows Server. Here’s how to do it:
Step 1: Launch MiniTool Partition Wizard and go to the main interface. Select the C drive and choose Move/Resize Partition on the left side. You can also right-click the C drive to be extended and select Move/Resize to increase the disk partition size.
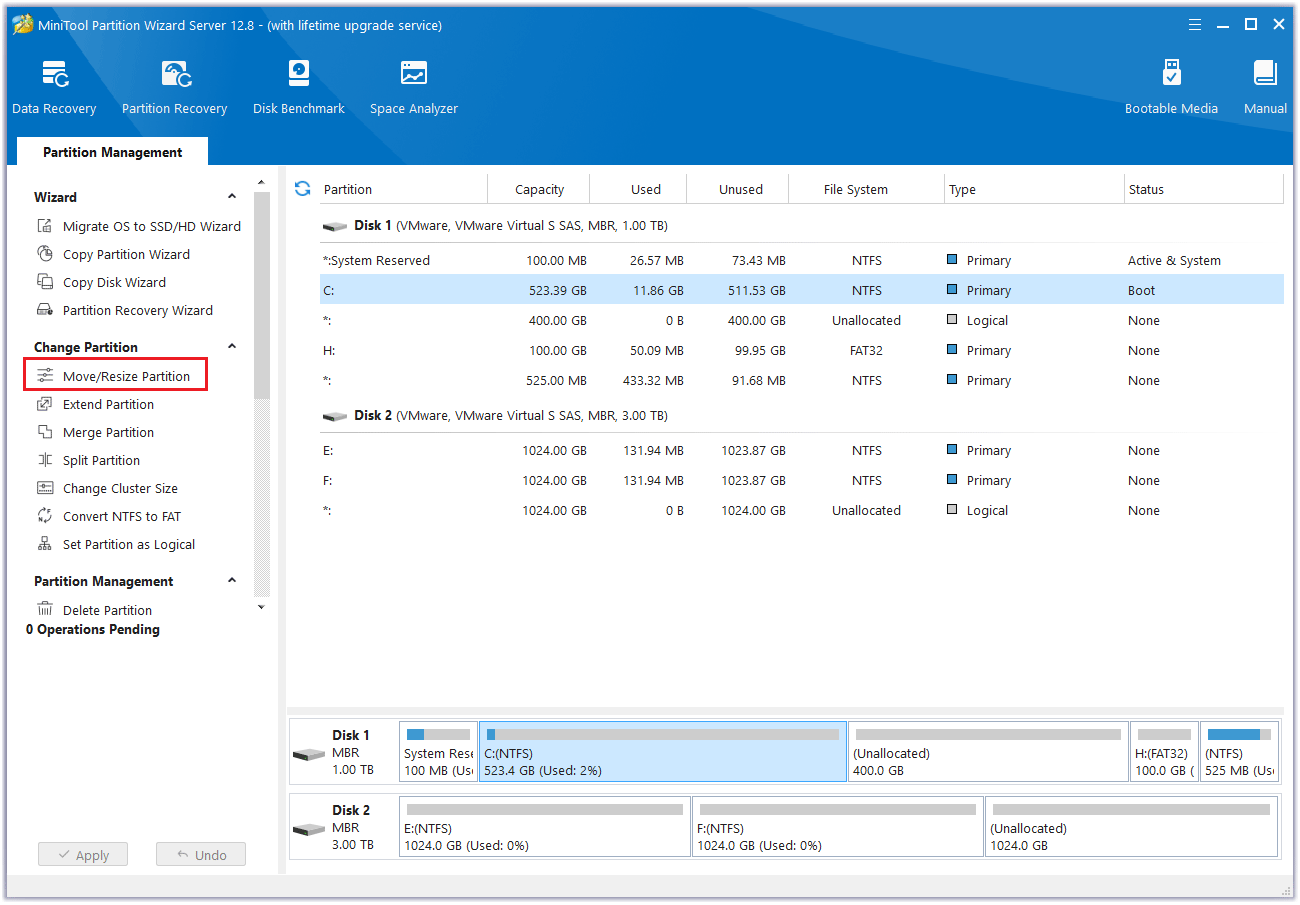
Step 2: Move the arrow to the right to occupy the unallocated space. “Using Enhanced Data Protecting Mode” is checked by default here, which protects your data in the event of a sudden power outage. Then select OK.
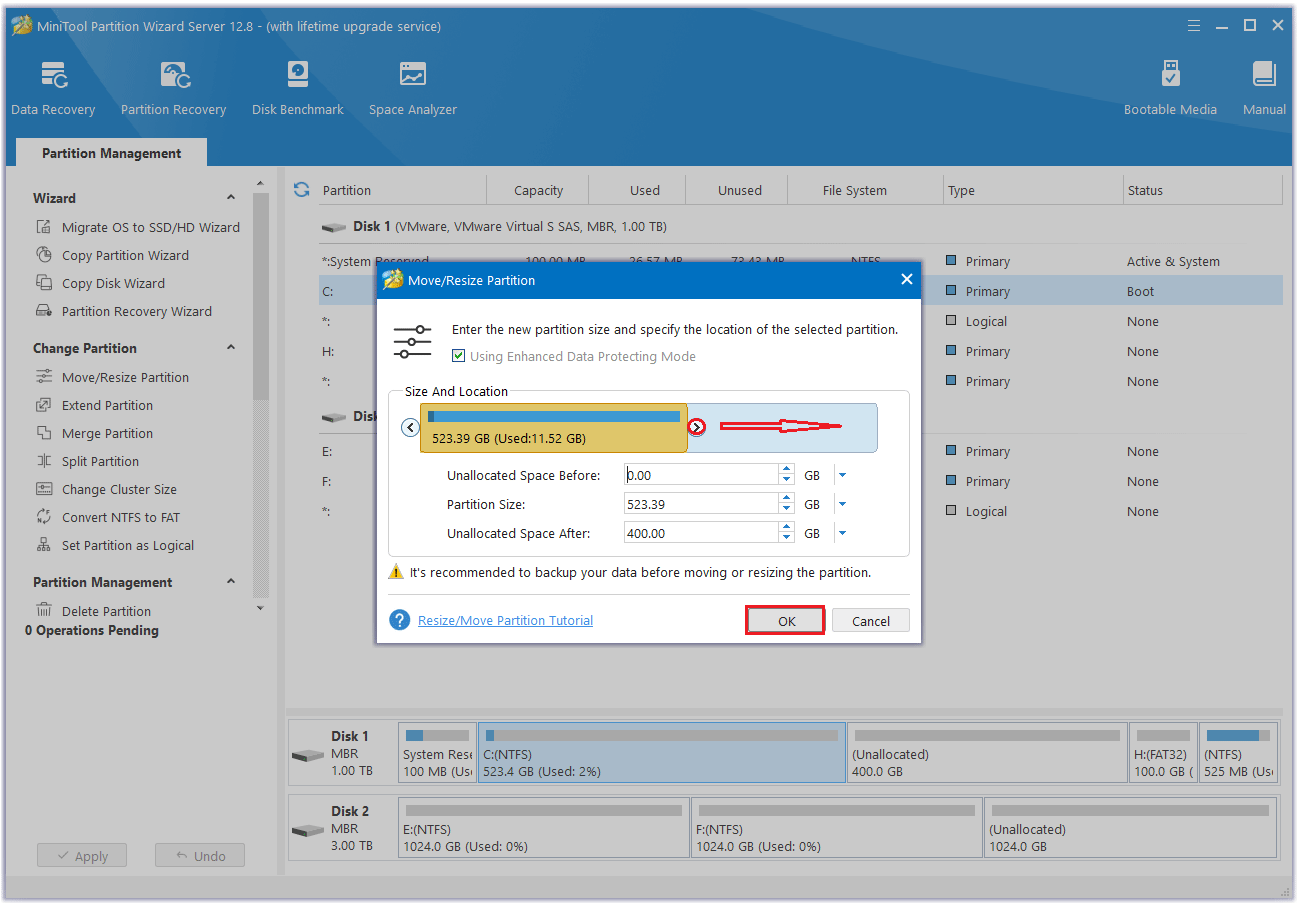
Step 3: Finally, click Apply and the disk partition expansion will be completed.
I’m struggling to add more disk partitions to my Windows Server. This article presents three methods for extending C drive partition in Windows Server 2016/2019/2022, which is helpful.Click to Tweet
Bottom Line
Here are 3 methods to extend C drive partition in Windows Server. Keep in mind that there isn’t always unallocated space adjacent to the C drive. The most effective way to increase system partition in Windows Server is to use MiniTool Partition Wizard. Its user-friendly interface and straightforward steps make it easy to resolve space shortages.
If you have any questions or suggestions while using MiniTool Partition Wizard, you can contact us via [email protected] to get a quick reply.
Last updated on April 22, 2024
Each system comes with a built-in partition. However, with the current system size, it is quite enough. Still, no matter how much storage you have, the installed applications, cache memory, and temporary files take up the overall space. These files fill up the available space quickly. You might not notice it, or even know about it. But it does take up space on your computer. You save data within the specified capacity. Some versions of Windows come with an additional partition called the Windows Recovery Partition.
In most cases, the partition size is large enough to accommodate the data. If you need to store a lot of data, you will undoubtedly need more space. To handle the data within the available storage capacity effectively, you need to increase the partition size.
American English: Hey, how’s it going today?
Chinese: 嘿,你今天过得怎么样?
In real-life applications, translation involves taking into account the context, cultural differences, and maintaining the original intent and tone of the source material.
Next up, we’ve got the translations into American English:
| Solution Feasibility | Step-by-Step Troubleshooting |
|---|---|
| Solution 1: Extend Server Partition with Partition Master | To kick off the extension, first locate the target partition and select «Resize/Move»…Full Steps |
| Solution 2: Extend Windows Server Partition in Disk Management | Step 1: Type diskmgmt.msc into the search bar to get started…Full Steps |
Extending partitions not only helps with better organization of your data, but it also can assist with space allocation. By being able to assign space accurately, you can maximize your storage capacity.
When it comes to allocating space to partitions, it seems like a straightforward job. However, that’s not always the case. Sometimes, due to a minor limitation, the Extend Volume button might gray out, thus making a simple task more difficult.
Can I expand the server partition?
«I have a partition in my system that crashes when I attempt to add more data to it. The Windows server is running out of disk space, showing ‘low disk space’ warnings. I tried transferring the data in smaller chunks, assuming that it was too large to move all at once, but that also failed. Is there a solution to this problem? How can I store my data with the available space?»
In this article, we will create an extended partition on Windows and explore the tools and methods to resolve such issues. We will also recommend a quick-fix tool that you can use even if you’re a first-timer. By the end of this article, you’ll determine which option is best for extending your Windows server partition. So, let’s dive in and walk through the process step by step.
Video Tutorial: Two Ways to Extend a Server Partition
This video shows you two ways to help yourself expand your server partition. You can follow along with the video or use the detailed instructions below.
If you need a step-by-step guide, the process and methods are outlined below. You can start from here.
Option 1. (Easiest) Use a partition master tool to extend the server partition
In this case, you need to take specific actions to extend the partition. We recommend using software that is both easy to use and can accomplish the task promptly. For instance, you can utilize the Partition Master tool to create a partition with appropriately allocated space. This software is designed to help you make the most of your disk capacity. It will allocate space correctly to maximize the utilization of available disk space. Additionally, it can recover operations if interrupted during the expansion process.
Please provide the English text that needs to be translated into Chinese.
Here are some notable features of Partition Master tools that make them more desirable:
- Partitions can be easily resized, extended, split, created, formatted, deleted, hidden, and wiped.
- Prevents data loss.
- Migrates the operating system.
- Distributes hard disk space to eliminate the issue of low disk space.
- Supports converting NTFS to FAT32, or vice versa.
- Modifies partition labels for better data organization.
- Combines smaller partitions into larger ones to address disk space shortages.
- Completely safe and reliable.
You can download the tool Partition Master from its official website, which can allocate space precisely.
Step 1: Locate the target partition.
Load the partition manager and find the target partition, then choose “Resize/Move”.
Select the partition to extend

Step 2: Extend the Target Partition
Drag the partition panel right or left to add unallocated space to the current partition, and then click “OK” to confirm.

Extra option: Get space from another drive
If there isn’t enough unallocated space, right-click a large partition with enough room and select “Allocate Space.”
Then, in the “Allocate space to” section, select the partition you want to extend.
Select another disk to allocate space from

Step 3: Perform the operation — Extend the logical partition
Drag the partition with the target bootable OS to the unallocated space, and then click “OK”.

Click the Run Task button, and then click Apply to save all changes.
Option 2: Extend a Windows Server partition in Disk Management
Now that we have identified the problem, we will look at how to extend a Windows Server partition using the native tools.
Here’s how to extend a Windows Server partition using Disk Management:
Step 1: Type diskmgmt.msc in the search box, then click OK to open Disk Management.
Open «Disk Management»
Step 2: Check if there is unallocated space next to the target partition.
- • If it is, go to step 3 and continue.
• If it isn’t, right-click an adjacent partition with enough free space, and select Shrink Volume to create unallocated space.

Step 3: Right-click on the disk with unallocated space, and then choose «Extend Volume».
Step 4: The Extend Volume Wizard will open. Click the «Next» button.
Step 5: The window will show the amount of disk space available for extension. Click Next.

Step 6: Click «Finish». The disk partition will be extended according to your specifications.
With these steps, you can partition a Windows Server the default way.
In short
In conclusion, we have discussed the reasons for low disk space and how to resolve this issue. You can choose the solution that best suits your needs. You can opt for the default disk management solution, which is Disk Management. It’s quite handy, though it may not work as expected sometimes due to disabled options. We recommend using the Partition Master tool. This tool is error-free and user-friendly, making it easy to allocate storage space with its intuitive interface. You can download the trial version to give it a try yourself.
24/7 Technical Chat
Free Consultation
Многие администраторы серверов сталкивались с проблемой, C: диск переполняется и изменился на красный. Что вы будете делать в этой ситуации, пересоздавать все разделы и восстанавливать все из резервной копии? Никто не хочет так делать. Это критическая проблема, когда диск C заполнен, поэтому вам лучше исправить это как можно быстрее.
Самый быстрый и простой способ решить эту проблему — расширение C: диск за счет уменьшения другого объема.
Обзор:
- Преимущества расширения раздела Windows 2012
- 3 способа расширить раздел в Windows Server 2012
- Способ 1 — Расширение тома с помощью Diskpart
- Способ 2 — увеличить объем с помощью управления дисками
- Способ 3 — Расширить раздел безопасным программным обеспечением
Преимущества расширения раздела для Server 2012
Когда диск C заполняется, вы можете увеличить место на диске C без потери программ и данных. Сократите том данных, чтобы освободить свободное место, а затем перенесите на диск C. Таким образом, вы можете решить эту проблему быстро и легко. Операционная система, программа и все остальное остаются такими же, как и прежде. Это стоит очень много времени, если вы заново создаете раздел, восстанавливаете все из резервной копии и проверяете данные. Для расширения раздела в Server 2012 R2 есть 3 вида инструментов. В этой статье я расскажу, как расширить том в Windows Server 2012 R2 с помощью этих инструментов шаг за шагом.
3 метода увеличения громкости на сервере Windows 2012
Для расширения раздела в Windows Server 2012 r2 существует 3 вида инструментов: diskpart, Disk Management и программное обеспечение для разделов диска.
- Diskpart был добавлен из Server 2003. Он работает из командной строки и может выполнять базовые и расширенные операции по управлению разделами, такие как сжатие и расширение тома. Однако для многих пользователей компьютеров командная строка неудобна в использовании.
- Начиная с Windows Server 2008, Microsoft добавила новые функции «Сжать том» и «Расширить том» в Disk Management с графическим интерфейсом. Однако, как и в случае с diskpart, Disk Management имеет много ограничений при изменении размера разделов. Вы столкнетесь со многими проблемами при расширении раздела на сервере Windows.
- Программное обеспечение для разбиения диска гораздо мощнее собственных инструментов. Однако существует потенциальный риск повреждения системы/раздела при использовании ненадежного программного обеспечения. Поэтому лучше заранее сделать резервную копию и запустить самое безопасное программное обеспечение для разбиения.
Способ 1 — расширить раздел Server 2012 с помощью Diskpart cmd
- Press Windows и R , чтобы открыть Run, напишите CMD и нажмите Enter.
- Тип Diskpart в окне командной строки.
- Тип Список дисковнажмите Enter, а затем введите список разделов, (Эта операция предназначена для просмотра существующих дисков и разделов.
- Тип выберите диск 0, то выберите раздел 1 (Выберите том диска для работы, обычно это должен быть диск 0 и раздел 1)
- Тип увеличить размер = XX (XX — это объем пространства, 1024 МБ = 1 ГБ, если вы не укажете размер, команда расширит раздел на все доступное пространство.)
Примечание: этот метод работает только тогда, когда вы удалять примыкающий раздел справа, чтобы расширить раздел слева. Например: до расширение диска C в Server 2012, необходимо заранее удалить непрерывный раздел D.
Способ 2 — расширить том Server 2012 с помощью управления дисками
Как я уже сказал выше, Disk Management и diskpart работают по-разному, но у них одинаковые ограничения. Перед расширением раздела вам также необходимо удалить смежный раздел справа. Кроме того, 2 раздела должны быть одинаковыми первичными или логическими. Если вы не хотите удалять раздел или если ваша структура разделов не соответствует требованиям, перейдите к следующему разделу.
Как увеличить том в Windows Server 2012 R2 с помощью управления дисками:
- Переместите все файлы в смежном разделе справа (например, D:) в другое место.
- Нажмите одновременно клавиши Windows + X и нажмите «Управление дисками» в списке.
- Щелкните правой кнопкой мыши раздел справа (например, D:) и выберите «Удалить том».
- Щелкните правой кнопкой мыши раздел слева (например, C:) и выберите «Расширить том». Следите за мастером.
Способ 3 — расширить раздел в Server 2012 r2 безопасным программным обеспечением
С помощью программного обеспечения для разделов сервера вы можете сжать диск D и создать нераспределенное пространство слева. Таким образом, диск C можно легко расширить, не удаляя никаких разделов. Операционная система, программы и все остальное остаются такими же, как и прежде. Однако, как я уже сказал выше, существует потенциальный риск повреждения системы и разделов из-за ненадежного программного обеспечения. Вам лучше заранее сделать резервную копию сервера и запустить безопасный инструмент.
Лучше, чем другие программы, NIUBI Partition Editor имеет уникальную технологию 1-Second Rollback. Если он обнаруживает какую-либо ошибку при изменении размера разделов, он автоматически возвращает сервер в исходное состояние в мгновение ока. Чтобы избежать ошибки, он разработан для работы в виртуальном режиме. Он перечисляет все операции как ожидающие предварительного просмотра, и реальные разделы диска не будут изменены, пока не будет нажата кнопка «Применить» для подтверждения. Кроме того, он может клонировать раздел диска в Windows без прерывания работы сервера. Еще одним важным преимуществом является то, что он намного быстрее. Специальный алгоритм перемещения файлов NIUBI помогает сжимать, перемещать и копировать разделы на 30% — 300% быстрее. Это очень полезно для экономии времени.
Как расширить раздел в Windows Server 2012 R2 без потери данных:
Шаг 1: Скачать NIUBI Partition Editor, щелкните правой кнопкой мыши D: диск и выберите «Изменить размер / переместить объем».
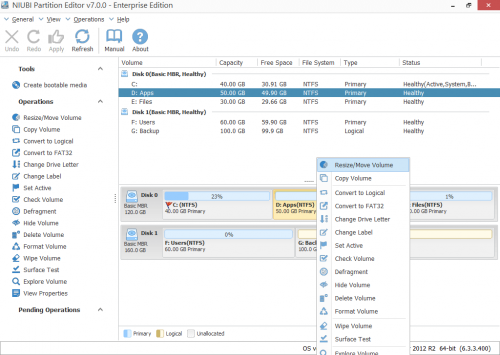
Шаг 2: Во всплывающем окне перетащите оставил граница правота чтобы уменьшить этот раздел и создать нераспределенное пространство слева.

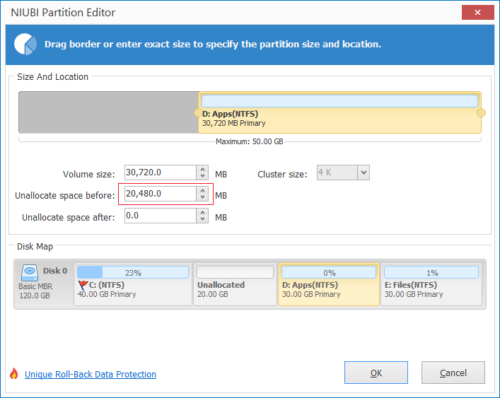
Нажмите OK и возвращаемся к главному окну, в виртуальном режиме создается нераспределенное пространство объемом 20 ГБ, а в левом нижнем углу отображается список ожидающих выполнения операций.
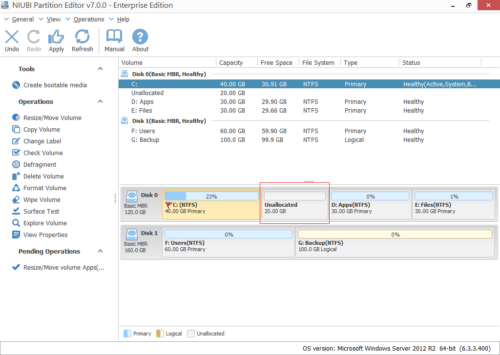
Шаг 3: Щелкните правой кнопкой мыши C привод и снова выберите «Изменить размер/Переместить том». В всплывающем окне перетащите правую сдвиньте границу вправо, чтобы объединить это нераспределенное пространство.

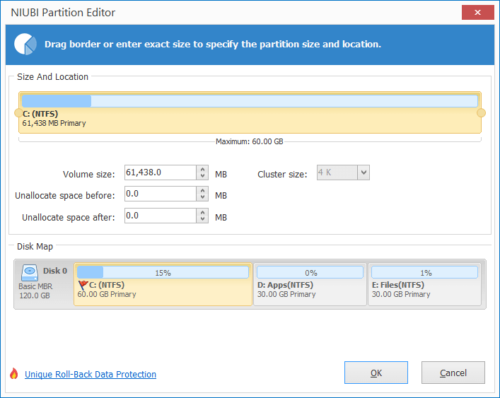
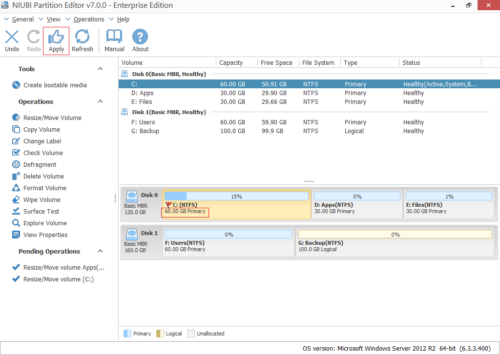
Шаг 4: Нажмите OK и обратно в главное окно. Диск C увеличен до 60 ГБ в виртуальном режиме. Нажимать Применить вступить в силу, готово!
Чтобы сжимать, расширять и перемещать разделы, вам просто нужно перетащить их на карту диска. Поддерживаются внутренние и съемные SSD/HDD, все типы аппаратных RAID-массивов, виртуальные машины VMware/Hyper-V, USB-накопители и карты памяти.
Видеоруководство по расширению громкости на Server 2012 R2
Помимо расширения раздела в Windows Server 2012/2016/2019/2022/2025 и предыдущих версиях Server 2003/2008 (R2), NIUBI Partition Editor поможет вам сделать много других операций управления разделами диска.
Подробнее Скачать