
Summary
Adding a new hard drive to Windows server 2008/2012/2016/2019/2022 including r2 can offer you more disk space to save data and enable the operation system run better, you can find the best solutions here.
Table of Contents
- Adding a New Hard Drive without RAID Array
- Adding a New Hard Drive with RAID on Windows Server 2008/2012/2016/2019/2022
- FAQs
- How do I add a new hard disk in Windows Server 2016
- How do I add a new hard drive in SQL Server
- Background
- Why Add New Hard Drive to Server 2008/2012 r2?
Part1. Adding a New Hard Drive without RAID Array
Adding a new hard drive without RAID array means you cannot add space into the partitions. So it is good you have some backup before beginning the process and be sure of the partitions you want to create before the process.
Note: IM-Magic Partition Resizer Server offers disk backup, OS migration, redistributing disk space without rebuilding RAID or losing data, convert disk gpt/dynamic etc.
Video1: Adding a new disk to Windows Server
Video2: Adding a new disk to Linux Server
To add a disk physically to a machine, you may follow these steps.
- To begin, make sure you have shut down your server totally then initiate the process by going to the settings.
- From settings, go to storage. There you are taken to the storage configuration.
- Go to the SATA controller and highlight it.
- Then click on the plus sign in front of it which stands for “Add New Drive”.
- A dialogue box will come asking you choose whether to create a new hard disk or choose an existing one. Choose the former and proceed.
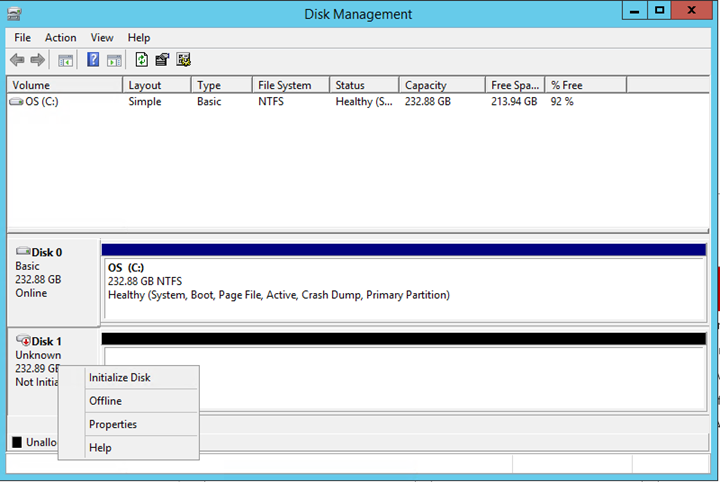
Then boot up your server to detect the newly installed hard drive. You will not initially see the new hard drive as a volume. That you can do by going to your disk management initiating the process.
Note: Initializing a disk will erase all data on the disk, so make sure you have backed up any important data before proceeding.
| Disk Management | Partition Resizer* | |
| Initialize Disk | ||
| Convert GPT | ||
| Move Partition/Unallocated Space | NO | |
| Extend NTFS C drive | YES when right unallocated space is available | |
| Extend FAT32 C Drive | NO | |
| Clone Disk | NO | |
| Migrate OS Disk to Larger HDD/SSD | NO | |
| Price | FREE | Download Win 11-7 (100% Free) Download Win Server (Free Demo) |
*IM-Magic Partition Resizer which can help move the new added unallocated space to any drive on your computer without losing data, without rebuilding RAID.
How to initialize a new disk in Disk Management?
To initialize a new disk in Disk Management, follow these steps:
Note: IM-Magic Partition Resizer can also help initialize a new disk for data storage. What’s more, it offers redistributing disk space from disk to disk if you build disks with RAID.
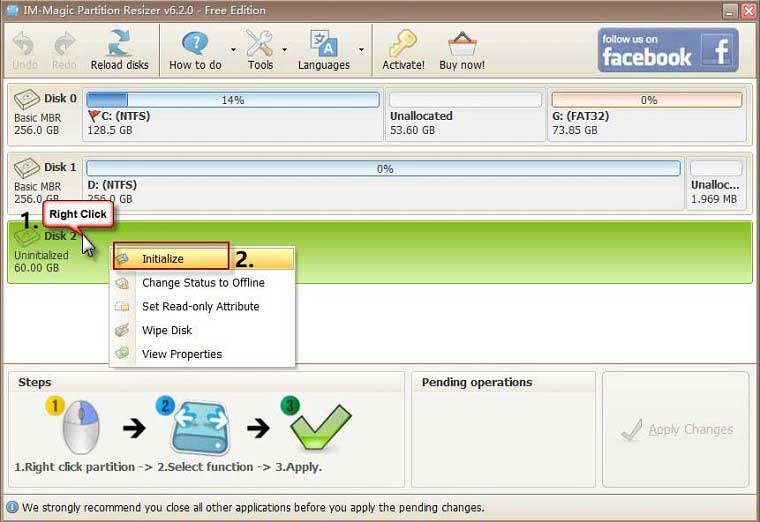
Initialize Disk with IM-Magic Partition Resizer
Adding a new disk with IM-Magic Partition Resizer is easy since it only needs a few clicks.
Part2. Adding a New Drive to Server 2008/2012/2016/2019/2022 with RAID
Adding a new hard drive to the server with RAID ensures you have created multiple mirror copies of your files in multiple locations in case of a sudden system failure in the process of trying to install a new hard drive. Follow the same step as in above to install the hard drive.
Remember, always shut down your server before beginning the process as your server will not detect the installed new drive when it is done otherwise.
Video: how to add new disk to RAID 5, 6, 10
- Backup, power off, add disk to server physically to a right disk socket
- Initialize the new disk under Disk Management or with a third party software
- Add the new disk to RAID array
- Redistribute the new disk space with IM-Magic Partition Resizer without losing data or rebuilding RAID
Redistribute Disk Space with IM-Magic Partition Resizer
Step1: First you need to download IM-Magic Partition Resizer Server and install it on your computer, run the program.
Step2: Right click the unallocated space, choose to create partition or move its space by moving the in-between partitions, add it to any volume you like.
Video — how to add unallocated space to a partition
FAQs
1. How do I add a new hard disk in Windows Server 2016?
To add a new hard disk in Windows Server 2016, follow these steps:
- Open the Server Manager.
- Select «File and Storage Services» from the left-hand pane.
- Click on «Disks».
- Click «Add Disk» and select the new hard disk you want to add.
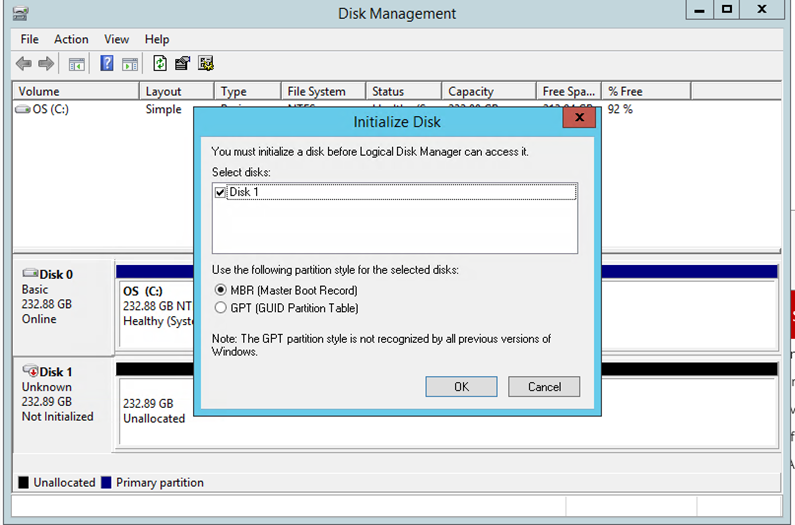
- Initialize the disk by right-clicking on it and selecting «Initialize Disk».
- Choose the partition style (MBR or GPT) based on your needs.
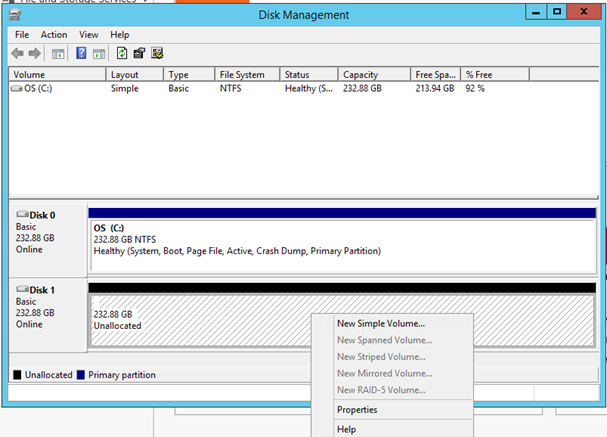
- Once initialized, create a new volume by right-clicking on the unallocated space and selecting «New Simple Volume».
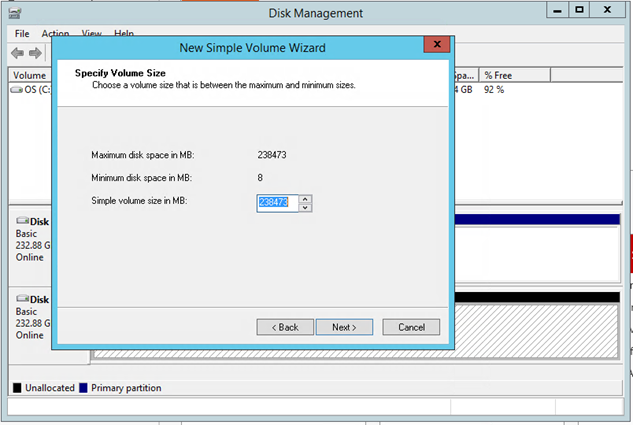
- Follow the wizard to assign a drive letter and format the disk.
Or you may add the new space to other partitions after building it into a RAID volume, and redistribute the free space to any volume using IM-Magic Partition Resizer.
2. How do I add a new hard drive in SQL Server?
To add a new hard drive to SQL Server, you need to ensure the drive is recognized by the operating system first. Then, follow these steps:
- Open SQL Server Management Studio (SSMS).
- Connect to your SQL Server instance.
- Right-click on the «Databases» node and select «New Database» if you’re creating a new database.
- In the «Database Properties» window, go to the «Files» page.
- Click «Add» to create a new database file.
- Specify the logical name, file type, and the new path on your added hard drive.
- Set the file size, growth settings, and click «OK» to save changes.
Background
One very important thing you should note is that whenever you are using Servers, you should be able to add new hard drives on them so you can have more space to store data for yourself and your clients. For this reason, knowing how to install a new hard drive on your server is quite important.
What is the need of using Windows server 2008/2012/2016/2019/2022 without being able to store data for multiple users? You could have a 2 terabytes single hard drive. However big you may think that is, it will soon max out. You have to be careful when dealing with Windows servers. While you can easily fix things when things go wrong on a desktop computer, you could lose everything on a windows server. You should have a backup on an external hard drive before anything at all.
Why Add New Hard Drive to Windows Server 2008/2012 r2?
There is a single and very important reason for adding a new hard drive to Windows Server 2008/2012 r2. The reason simply is; you need more space as you are currently low on where to store new data files. Nothing worries a computer user more than having nowhere to store data. It could be so heart-wrenching. You do not want to be on that spot. We are in an age where our consumption and need to store data is growing at an alarming rate. A single drive can just never be enough.
Данная инструкция пошагово описывает добавление еще одного накопителя (SATA, SAS, SSD) к виртуальному Windows-серверу на платформе Xelent.
Добавление диска в панели управления сервером
Первым делом нужно добавить диск в панели управления сервером:
- Убедитесь, что сервер выключен (рис. 1).
- Перейдите в раздел Настройки, Диски (рис. 2)
- Нажмите кнопку Добавить
- Выберите тип накопителя и его размер (рис. 3). Конфигуратор сразу же сообщит стоимость накопителя в месяц.
- Включите флажок Изменение подтверждаю и нажмите кнопку Изменить.
- Дождитесь завершения процесса добавления диска и включите сервер.

Рис. 1. Сервер выключен

Рис. 2. Список дополнительных дисков пуст

Рис. 3. Добавление диска
Инициализация нового диска в Windows Server
После входа по RDP на виртуальный сервер запустите оснастку Управление компьютером. Выполните следующие действия:
- Перейдите в раздел Управление дисками (рис. 4). Вы увидите два диска — Диск 0 и Диск 1 — это и есть накопитель, добавленный ранее.
- Щелкните правой кнопкой мыши на нераспределенной области второго диска и выберите команду Создать простой том.
- В открывшемся окне мастера создания простого тома нажмите кнопку Далее.
- Введите размер раздела (рис. 5). Если вы хотите создать один раздел на весь диск, просто нажмите кнопку Далее.
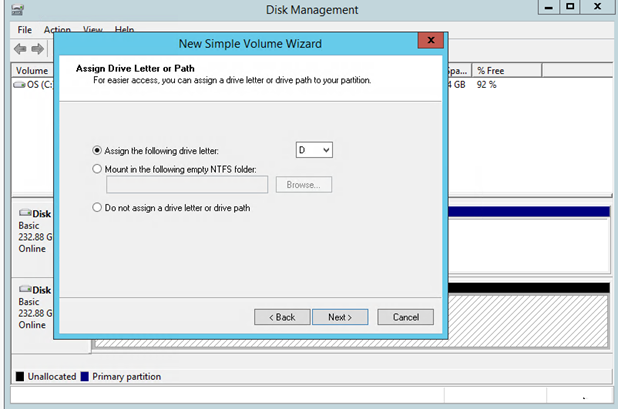
- Выберите букву диска (рис. 6).
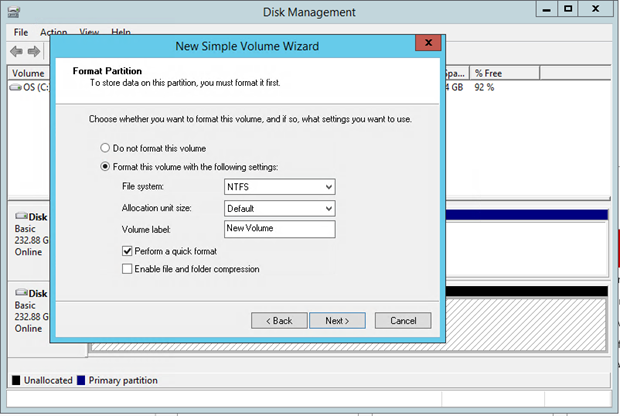
- На странице выбора файловой системы оставьте все как есть — NTFS и нажмите кнопку Далее.
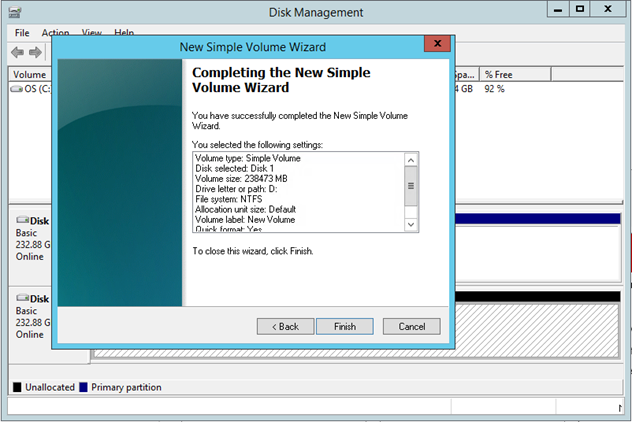
- На последней странице мастера нажмите кнопку Готово.

Рис. 4. Управление дисками

Рис. 5. Размер тома

Рис. 6. Выбор буквы диска

Рис. 7. Выбор файловой системы

Рис. 8. Нажмите кнопку Готово
Появится окно форматирования тома. Просто нажмите кнопку Начать и дождитесь завершения форматирования.
Рис. 9. Форматирование диска
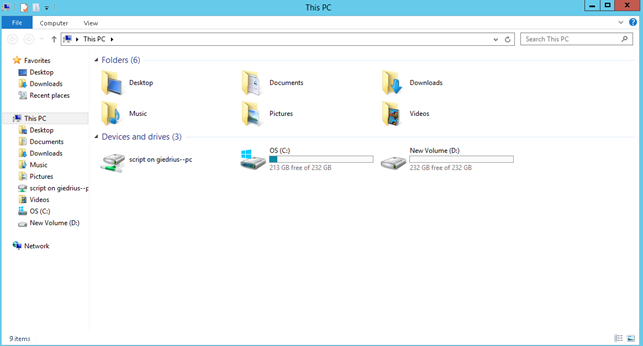
После этого в Проводнике у вас появится новый диск: ваш диск готов к использованию.

Рис. 10. Диск готов к использованию
Last Updated :
21 Mar, 2022
A virtual disk is a file on the host system and appears to be a physical disk drive to the guest operating system. So, if you need some additional space in your virtual machine, and to solve this problem, you can attach a virtual disk to it of the desired size. In this article, we would learn practically how to attach a Virtual Disk.
Steps to attach a Virtual Disk
Step 1: Open the settings of your virtual machine. The VM on which you want to attach the additional Virtual Disk.

Step 2: Go to —> Storage —> Click on controller —> Select add hard disk. Add Hard disk button would e available when you’ll select controller: SATA and then the rightmost icon on it, i.e. of adding a Virtual hard disk.

Step 3: Click on Create. We need to create a virtual disk and attach it. A wizard for creating a virtual disk would appear.

Step 4: Select the type of disk and click Next. Select the type of disk you want to specify.

Step 5: Select the type of allocation on the physical disk and click Next. Select dynamically allocated so that they are faster to create and can grow to larger sizes.

Step 6: Provide the location, name, and size of the disk and click on the Create button.

Step 7: Select the disk created and click on Choose button.

A Virtual hard disk would be attached to the existing storage.

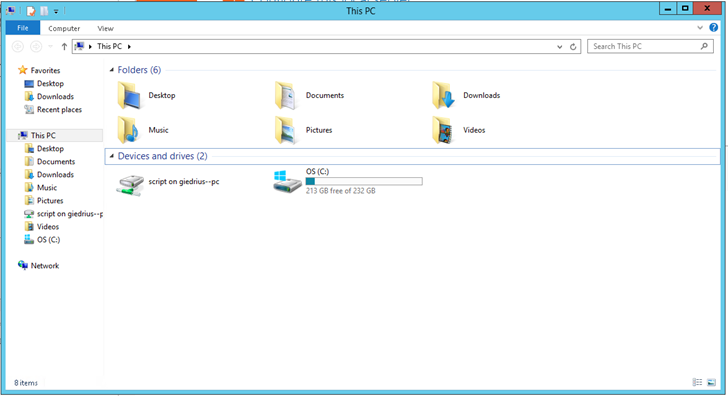
If you order a windows server OS with extra drives and don’t see your extra drives (fig 1.) in the server follow the steps below:
1. Right click on the windows logo at the bottom left of the screen and select disk manager:
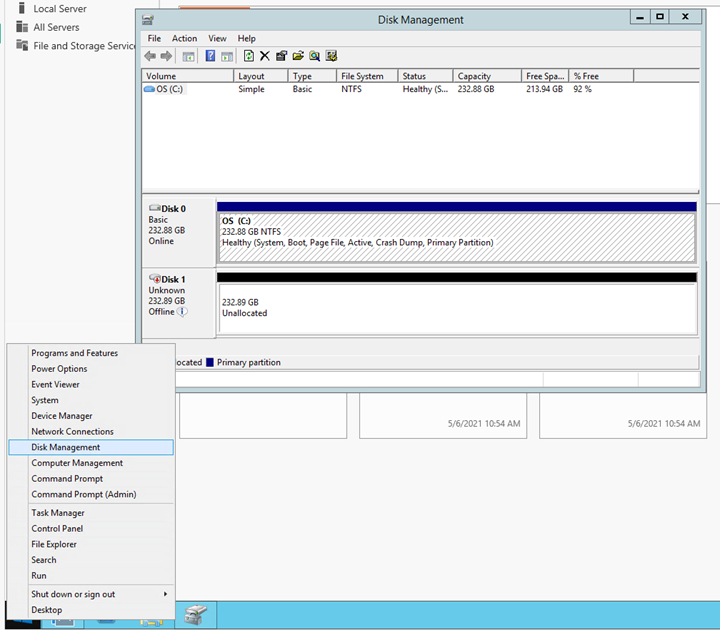
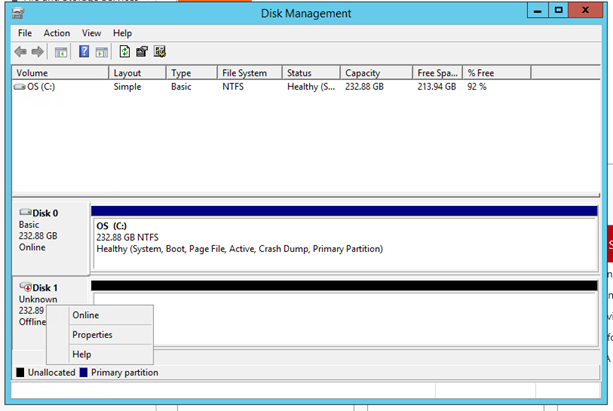
2. You will see the second drive or how many drives you have added to the server in an offline condition. Right click on the drive and press Online button:
3. The disk will then be not initialized. Right click on the drive and press Initialize Disk button:
4. Select the partition table for your drive default is MBR for bigger than 2TB drives it will be GPT:
5. You can now add a new volume for the drive. See the pictures below:

6. After all of these steps you should see a similar picture and your other drives in the server.
-
Войти с email
Добавление нового диска в Windows Server 2012
- Справочник /
-
Работа с облачными серверами /
- Добавление нового диска в Windows Server 2012
Назад
Чтобы добавить новый диск в опер. систему Windows Server 2012 необходимо выполнить следующие действия:
- Войти в систему с правами администратора
- Нажать правой кнопкой мыши на иконку «Windows» в нижнем левом углу экрана и выбрать «Управление дисками»
- В нижней половине консоли управления Вы увидите количество и объёмы подключенных дисков к системе.
В самой левой колонке свойств диска можно увидеть порядковый номер диска, структура разделов и его подключение.
Необходимо найти новый подключенный диск (как правило он самый нижний) и нажать правой кнопкой мыши на крайний левый столбец диска, выбрать пункт «В сети» и диск поменяет статус на «Не проинициализирован». Ещё раз нажать правой кнопкой мыши на крайний левый столбец диска, выбрать пункт «Инициализировать диск», в выпадающем окне оставить пункт «Основная загрузочная запись» и нажать ОК, после этого диск станет доступен для опер. системы.
4)Необходимо разметить диск файловой системой.
Выбрать область диска с пометкой «Не распределена» и нажать правой клавишей мыши, выбрать «Создать простой том», в выпадающем окне нажать «Далее», выбрать область разметки (как правило максимальный) и нажать «Далее», назначить букву диска и нажать «Далее», выбрать файловую систему (как правило NTFS) и нажать «Далее», проверить параметры и для завершения нажать «Готово»
После этих действий новый логический диск появится в опер.системе и им можно пользоваться.
Was this article helpful?
Dislike0
Like0
Views: 959