
Introduction
In today’s digital world, managing who gets access to what on a network is more important than ever. Whether you’re running a business, a school, or just trying to keep your home network safe, controlling website access can help protect users from malicious sites, distractions like social media, or other unwanted content.
One of the best ways to do this? Using a DNS Server on Windows Server 2025. It’s an effective, centralized solution that gives you control over what can and can’t be accessed on your network.
In this guide, we’ll break down why DNS-based website blocking is so useful, how to set it up step by step, and the best practices to follow. Plus, we’ll explore some alternative methods and explain why DNS filtering is often the best choice.
Why Block Certain Websites?
Blocking websites on a network isn’t just about restricting access—it serves several important purposes, from security to productivity and even bandwidth management. Let’s break it down:
Why Block Websites?
🔹 Security Protection:
Cyber threats are everywhere. Blocking access to phishing sites, malware-infected domains, and hacking platforms helps keep your network safe from cyberattacks and data breaches.
🔹 Productivity Management
In workplaces, unrestricted internet access can lead to distractions. Blocking sites like social media, streaming platforms, and gaming websites helps employees stay focused and improves efficiency.
🔹 Parental Controls
For home networks, parents can use website blocking to ensure children don’t access inappropriate or harmful content, giving them more control over internet usage.
🔹 Bandwidth Management
Certain websites, like video streaming and large file-sharing platforms, consume a lot of bandwidth, slowing down the internet for everyone else. Blocking these can help maintain a smooth and fast network.
Why Use a DNS Server for Blocking?
There are different ways to block websites—firewalls, browser extensions, or device-level restrictions. However, a DNS Server offers centralized control, meaning:It applies to all devices on the network (no need to configure each one separately).It works at the network level, making it harder for users to bypass.It’s scalable, meaning you can apply rules to a large number of users easily.In the next steps, we’ll dive into how to set up website blocking using a DNS Server on Windows Server 2025.
Websites Using a DNS Server in W
Step 1: Install DNS Server Role.
Open Server Manager → Click Manage → Add Roles and Features.
Choose Role-based or feature-based installation → Click Next. Select your server → Click Next. Check DNS Server → Click Next. Confirm installation → Click Install. Wait for installation to complete. As we already installed the DNS, we will proceed to the next step.
Step 2: Create a New DNS Zone for Website Blocking
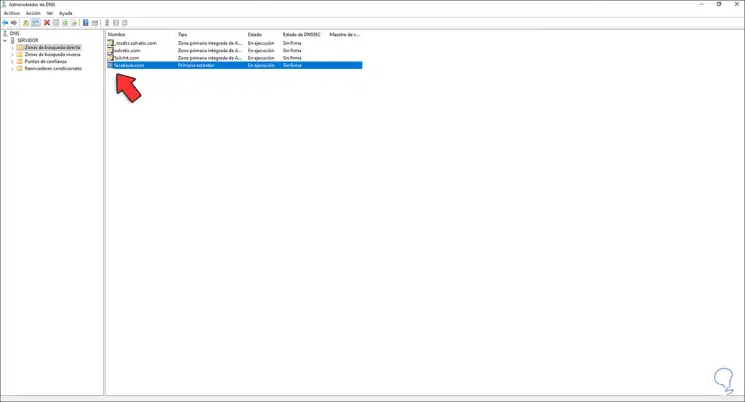
Open DNS Manager. Type this command (dnsmgmt.msc) in the run command to open DNS.

Right-click on Forward Lookup Zones → Click New Zone and click next.
Select Primary Zone → Click Next.

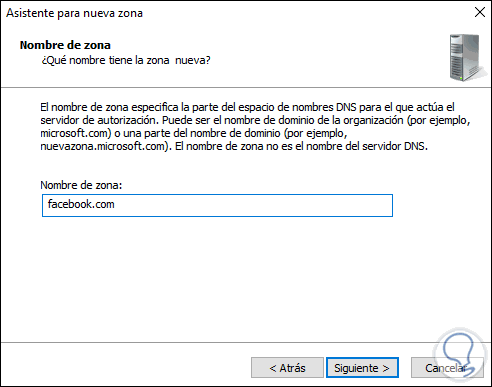
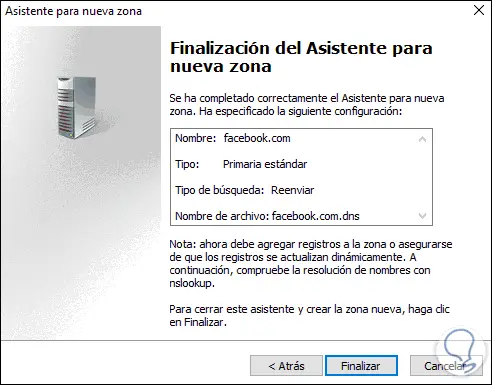
Name the zone using the domain of the website you want to block (e.g., facebook.com).
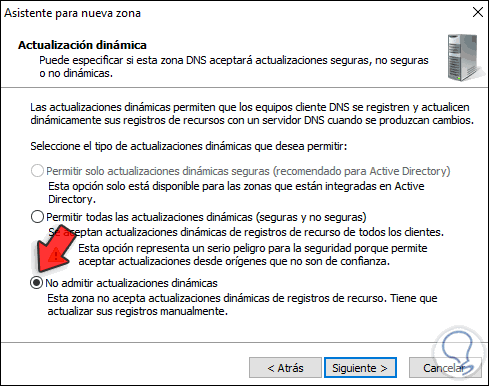
Select Do not allow dynamic updates → Click Finish.
When Do not allow dynamic updates is enabled in a Windows DNS server, it prevents clients or other servers from dynamically adding, changing, or deleting DNS records in the zone. This option is particularly important when blocking a specific website, as it ensures that only authorized administrators can modify or add records. With this setting enabled, no device or server can automatically update DNS records without explicit permission or manual configuration, effectively safeguarding the DNS records from unauthorized changes.

Step 3: Create a Wildcard Record to Redirect Requests
Inside the new facebook.com zone, right-click → Click New Host (A or AAAA).
Leave the Name field blank (for wildcard blocking).
Enter 127.0.0.1 in the IP Address field (or redirect to a custom error page).
Click Add Host → Click Done.

Step 4: Test the Website Block
On a client PC, open Command Prompt (cmd.exe).Type: nslookup facebook.com → Press Enter.If the result shows 127.0.0.1, the DNS block is working.Try to open Facebook in a browser – It should fail to load.
Step 5: Apply Group Policy to Enforce DNS Usage
Open Group Policy Management (gpmc.msc). Navigate to Computer Configuration → Administrative Templates → Network → DNS Client.
Double-click Specify DNS Servers. Enable the policy and set the IP address of the DNS Server.
Click Apply → OK.
Run gpupdate /force to apply the policy.
The command gpupdate /force is used in Windows to manually update Group Policy settings on a computer. Group Policy is a feature that allows administrators to control various system and user settings across a network. Normally, the gpupdate command refreshes the Group Policy settings on a local machine, applying only the policies that have changed since the last update. However, when the /force flag is added, it forces a complete refresh of all Group Policy settings, even if they haven’t changed. This ensures that both User Configuration and Computer Configuration policies are reapplied, regardless of whether they were altered. While Group Policy settings are usually updated automatically at regular intervals (typically every 90 minutes), running gpupdate /force applies the settings immediately, without waiting for the next automatic update cycle.
Conclusion
Using a DNS Server to block websites in Windows Server 2025 is an efficient, scalable, and network-wide solution. This method ensures security, productivity, and bandwidth optimization with minimal administrative overhead.
By following this step-by-step tutorial, you can successfully implement DNS-based web filtering for your organization or home network. If you found this guide helpful, feel free to explore more Windows Server tutorials and leave a comment with your thoughts!
-
Design
Рассмотрим несколько способов, которые помогут вам запретить доступ к отдельным сайтам, URL и IP адресам в Windows без использования сторонних программ. Обычно блокировку сайтов наиболее эффективно настраивать на уровне сетевого шлюза (роутер, маршрутизатор, Wi-Fi точка доступа, через которую вы выходите в Интернет), или с помощью стороннего ПО (фильтры контента, DNS фильтры и т.д.). В нашем случае мы попробуем заблокировать определенный сайт с помощью встроенных средств Windows 10 и автоматизации PowerShell.
Содержание:
- Блокировка сайтов в Windows с помощью файла hosts
- Блокировка сайтов через DNS
- Блокируем IP адрес сайта в брандмауэре Windows
- PowerShell: правила блокировки сайтов по имени и IP адресу в брандмауэре Windows
Блокировка сайтов в Windows с помощью файла hosts
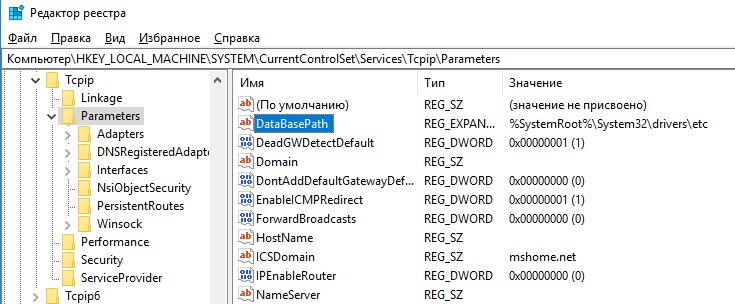
Самый известный способ заблокировать определенный сайт в Windows – отредактировать файл hosts. Обычно файл находится в каталоге %windir%\system32\drivers\etc\. Обратите внимание, что у файла hosts нет расширения.
Путь к каталогу с файлом hosts задается в параметре DataBasePath в ветке реестра HKEY_LOCAL_MACHINE\SYSTEM\CurrentControlSet\Services\Tcpip\Parameters. По-умолчанию это %SystemRoot%\System32\drivers\etc.
Файл hosts используется для ручного назначения соответствий между IP адресами и DNS именами. При выполнении разрешении имен файл hosts имеет приоритет над DNS серверами, указанными в настройках сетевых подключений,
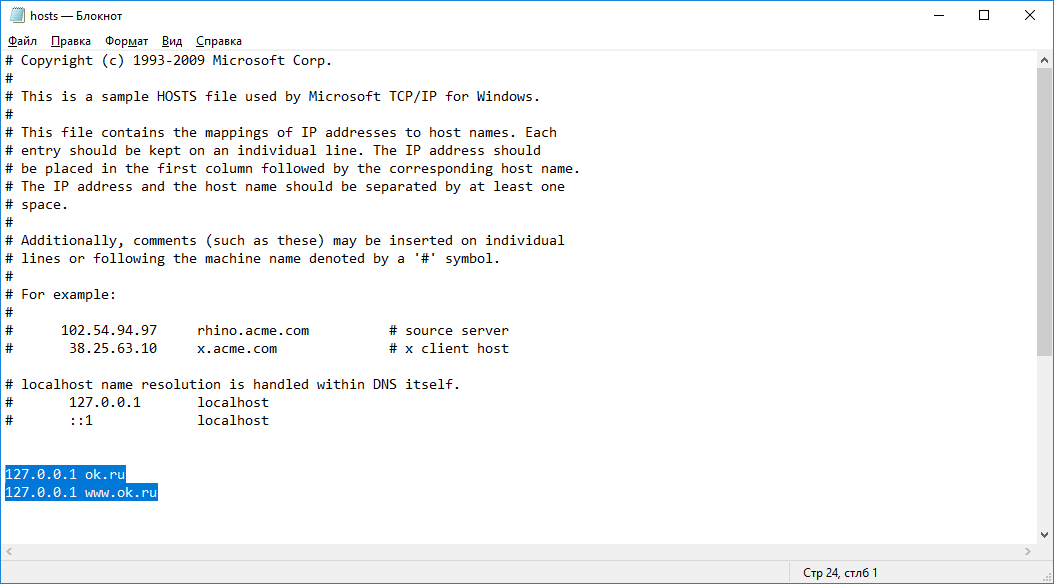
Чтобы заблокировать определенный сайт (например, ok.ru), откройте на редактирование файл hosts (с правами администратора) и добавьте в него строки вида:
127.0.0.1 ok.ru
127.0.0.1 www.ok.ru
Сохраните файл и перезагрузите компьютер (или очистите DNS кэш командой:
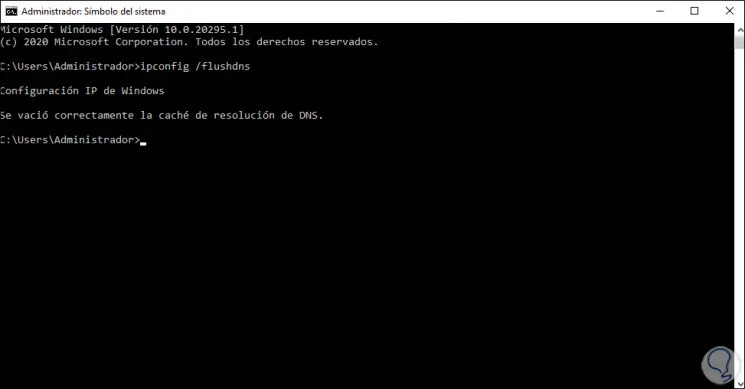
ipconfig /flushdns
).
После этого при попытке открыть сайт ok.ru в любом браузере будет появляется сообщение “Страница не найдена” / “Страница не доступна”.
Вы можете добавлять новые строки с URL сайтов в файл hosts с помощью такого bat файла:
@echo off
set hostspath=%windir%\System32\drivers\etc\hosts
echo 127.0.0.1 www.facebook.com >> %hostspath%
echo 127.0.0.1 facebook.com >> %hostspath%
exit
Либо можно воспользоваться следующими PowerShell функциями для автоматизации блокировки (разблокировки) определенных сайтов в списке запрещенных доменов в файле hosts.
Function BlockSiteHosts ( [Parameter(Mandatory=$true)]$Url) {
$hosts = 'C:\Windows\System32\drivers\etc\hosts'
$is_blocked = Get-Content -Path $hosts |
Select-String -Pattern ([regex]::Escape($Url))
If(-not $is_blocked) {
$hoststr="127.0.0.1 ” + $Url
Add-Content -Path $hosts -Value $hoststr
}
}
Function UnBlockSiteHosts ( [Parameter(Mandatory=$true)]$Url) {
$hosts = 'C:\Windows\System32\drivers\etc\hosts'
$is_blocked = Get-Content -Path $hosts |
Select-String -Pattern ([regex]::Escape($Url))
If($is_blocked) {
$newhosts = Get-Content -Path $hosts |
 Where-Object {
$_ -notmatch ([regex]::Escape($Url))
}
Set-Content -Path $hosts -Value $newhosts
}
}

Теперь чтобы добавить определенный сайт в заблокированные достаточно выполнить функцию:
BlockSiteHosts ("vk.com")
Чтобы разблокировать сайт запустите:
UnBlockSiteHosts ("vk.com")
Блокировка сайтов через DNS
Если ваши клиенты пользуются одним DNS сервером, вы можете аналогичным образом заблокировать определенный сайты с помощью создания DNS записи в этом DNS, указывающей на 127.0.0.1 (или что-то в таком роде). По такому принципу, кстати, работают большинство коммерческих контент фильтров DNS (OpenDNS, SkyDNS, Яндекс.DNS и т.д.).
Блокируем IP адрес сайта в брандмауэре Windows
Также вы можете заблокировать определенные сайты с помощью встроенного Windows Firewall. Главный недостаток такого метода – вы не сможете использовать имя домена или сайта в правиле блокировке. Брандмауэр Windows в качестве источника/назначения позволяет указать только IP адрес или подсеть.
Сначала нужно определить IP адрес сайта, который вы хотите заблокировать. Проше всего это сделать командой nslookup.
nslookup ok.ru
Как вы видите в результатах команды присутствует несколько IP адресов, которые назначены сайту. Вам нужно заблокировать их все.
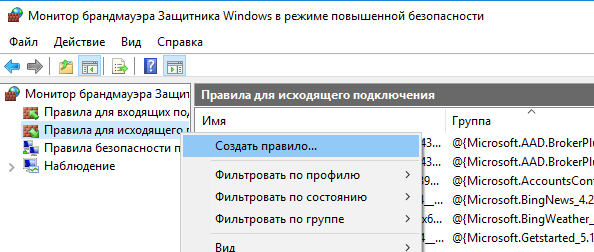
Теперь нужно запустить панель настройки Windows Firewall (Панель управления \Все элементы панели управления\Брандмауэр Защитника Windows\Дополнительные параметры или firewall.cpl).
В секции “Правила для исходящих подключений” создайте новое правило со следующими параметрами:
- Тип правила: Настраиваемые;
- Программа: Все программы;
- Тип протокола: Любой;
- Область: в секции “Укажите удаленные IP адреса, к которым применяется данное правило” выберите пункт “Указанные IP адреса” -> Добавить. В открывшемся окне укажите IP адреса, IP подсети или диапазон IP адресов сайтов, которые нужно заблокировать.
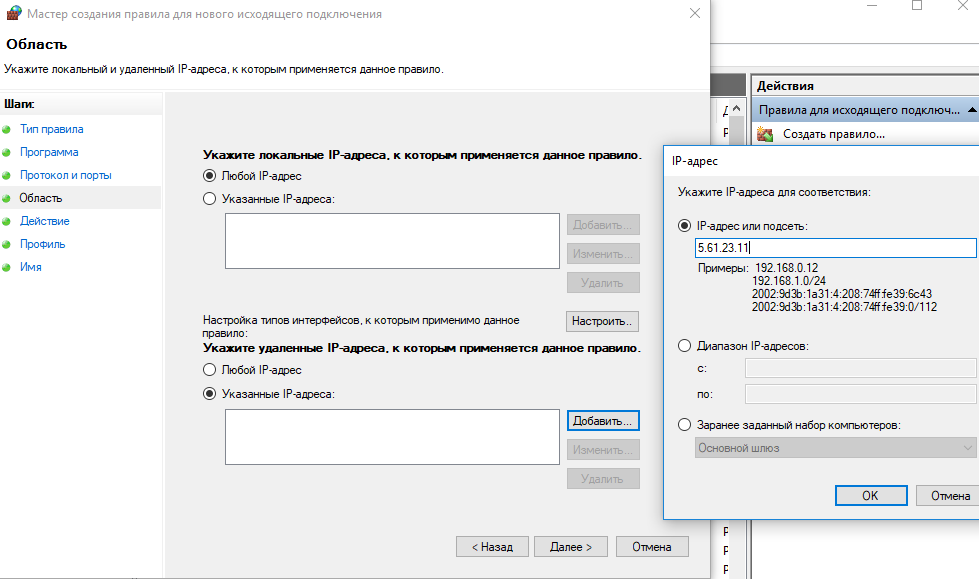
Нажмите OK-> Далее -> Действие: “Блокировать подключение”.
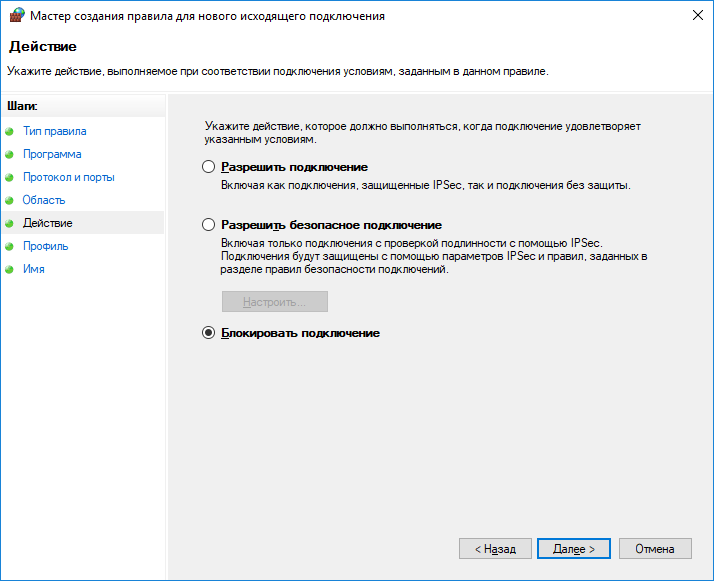
В окне со списком профилей брандмауэра, к которым применяется это правило оставьте все опции. Осталось указать имя правила и сохранить его.
После этого Брандмауэр Защитника Windows будет блокировать все соединения с данным сайтом. В браузере при подключении к заблокированному сайту будет появляться ошибка:
Unable to connect
или
Доступ в Интернет закрыт
Возможно, подключение заблокирована брандмауэром или антивирусным ПО.
ERR_NETWORK_ACCESS_DENIED
В домене AD вы можете распространить на компьютеры пользователей политику блокирующую сайт с помощью GPO. Но еще раз скажем, это нецелесообразно. Фильтровать сайты правильнее на шлюзе доступа в Интернет.
PowerShell: правила блокировки сайтов по имени и IP адресу в брандмауэре Windows
Вы также можете с помощью PowerShell создать правило брандмауэра, блокирующее исходящие подключения к определенному сайту:
New-NetFirewallRule -DisplayName "Block Site" -Direction Outbound –LocalPort Any -Protocol Any -Action Block -RemoteAddress 217.20.147.1, 217.20.141.0/26
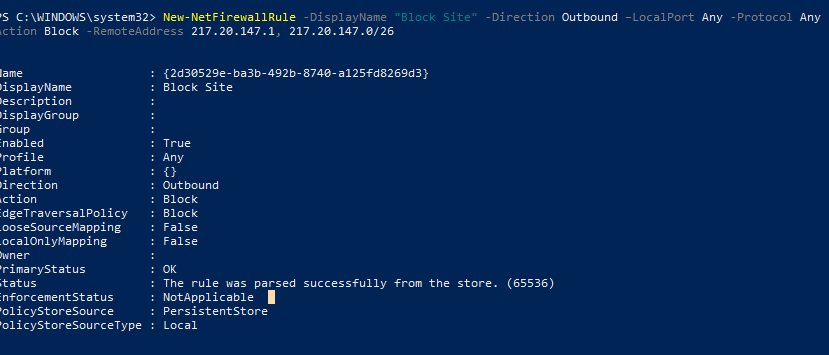
Строка “ The rule was parsed successfully from the store” говорит о том, что правило новое правило брандмауэра успешно применено. Вы можете найти его в графическом интерфейсе Windows Firewall.

Чтобы не резолвить имя сайта в IP адреса вручную можно использовать PowerShell командлет Resolve-DnsName для получения IP адресов сайтов.
Resolve-DnsName "ok.ru"| Select-Object -ExpandProperty IPAddress

Таким образом мы можем преобразовать имя домена в IP адреса и сразу добавить запрещающее правило для блокирования доступа к сайту:
$IPAddress = Resolve-DnsName "ok.ru"| Select-Object -ExpandProperty IPAddressNew-NetFirewallRule -DisplayName "Block Site" -Direction Outbound –LocalPort Any -Protocol Any -Action Block -RemoteAddress $IPAddress
Получается, что теперь вы можете добавить запрещающее правило в Windows Firewall сразу для нескольких сайтов:
$SitesToBlock = “lenta.ru”,”mail.ru”,”facebook.com”
$IPAddress = $SitesToBlock | Resolve-DnsName -NoHostsFile | Select-Object -ExpandProperty IPAddress
New-NetFirewallRule -DisplayName "Block Web Sites" -Direction Outbound –LocalPort Any -Protocol Any -Action Block -RemoteAddress $IPAddress
У командлета Resolve-DnsName я добавил параметр –NoHostsFile, чтобы не использовать при проверке файл hosts.
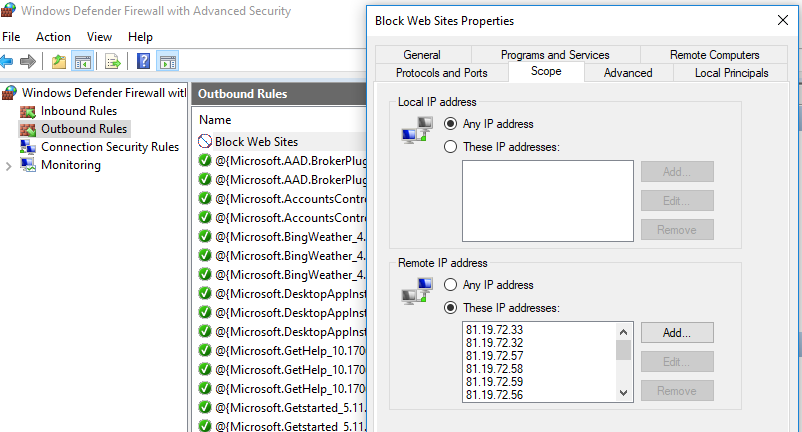
Проверим, что блокирующее правило для исходящего появилось в консоли.
Эта статья прежде всего разминка для ума. В корпоративной сети для ограничения доступа к сайтам нужно использовать фильтрацию на уровне шлюза доступа в интернет или прокси-сервере. Блокировка доступа на уровне хостов не столь эффективна.
Как заблокировать доступ к сайтам с определенным доменом?
Добрый день.
Нужно заблокировать доступ с компьютеров к сайтам с определенным доменом, напр., .com
Есть:
Локальная сеть с Windows Server 2012R2, все компьютеры участники домена (на всех ПК стоит Windows 10)
Нет:
Доступа к роутеру
Возможно кто-то подскажет ПО или настройки
Спасибо
-
Вопрос задан
-
3660 просмотров
Если машины в домене, то:
1. Поднимем днс на сервере
2. Заставляем машины ходить за днс на сервер
3. Резолвитм нужные домены в 127.0.0.1
Хотя DNS-сервер и не предназначен для фильтрации URL, технически это сделать можно: надо в зонах прямого просмотра создать новую основную зону с именем нужного интернет домена и внутри нее добавить запись типа А с IP-адресом 127.0.0.1.
Если админские права есть, то самое простое решение — то, что предложил Dmitry Tallmange Главное, чтобы все тачки использовали серверный DNS, а не сторонний, не провайдерский или еще какой-нибудь.
Пригласить эксперта
Войдите, чтобы написать ответ
-
Показать ещё
Загружается…
Минуточку внимания
Internet access is something that practically 100% of the users in an organization have, but in many cases access is made to sites that are not authorized or that affect the productivity of the person..
Social networking sites, gaming sites, alcohol sites, weapons sites, etc., are sites that can usually cause an addiction to the user, affecting their working time. To mitigate this, Windows Server 2022 gives us the opportunity to block these types of pages through the server’s DNS.
We know that the DNS (Domain Name System — Domain Name System) is responsible for accessing the sites we visit and there it converts the IP addresses into the domain name and vice versa, in this way, by creating this block the page in question It will not be opened on the server or on the domain computers..
Let’s see how to block web pages in Windows Server 2022 but the process applies to Windows Server 2019.
To stay up to date, remember to subscribe to our YouTube channel! SUBSCRIBE
How to block web pages in Windows Server 2022
Step 1
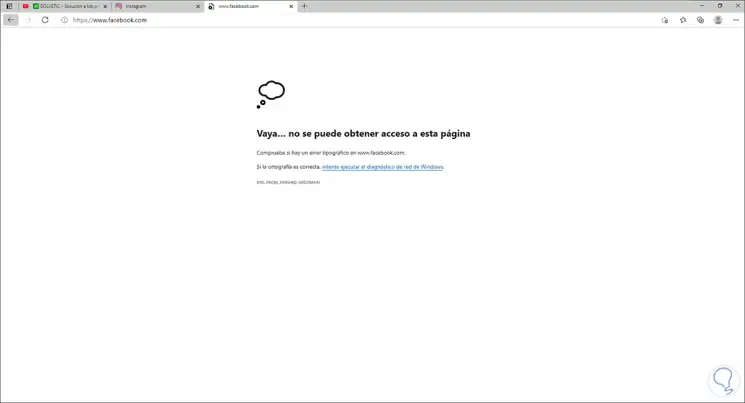
The first thing is to check that it is possible to access these websites. In this case we tried Facebook and Instagram.
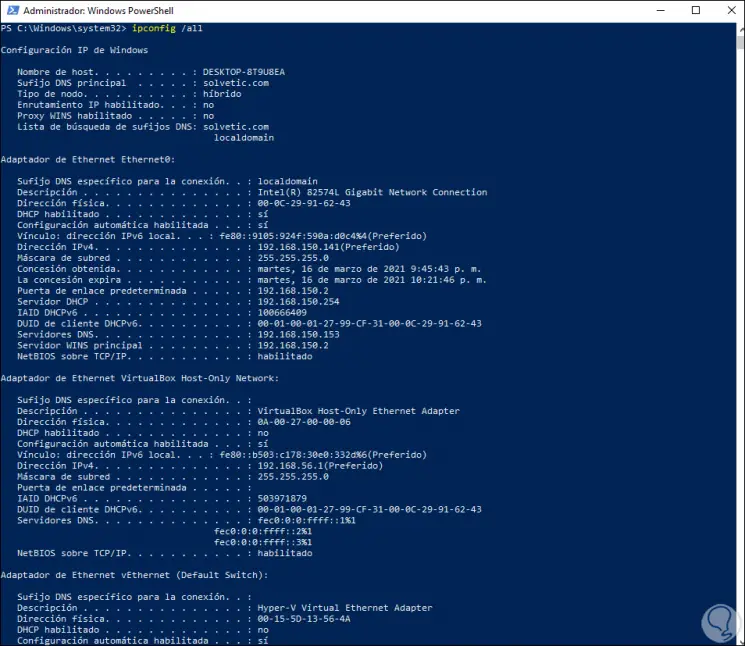
Either on the server or on the client computers we execute «ipconfig / all» in CMD or PowerShell to see the IP (of the server) which acts as DNS:
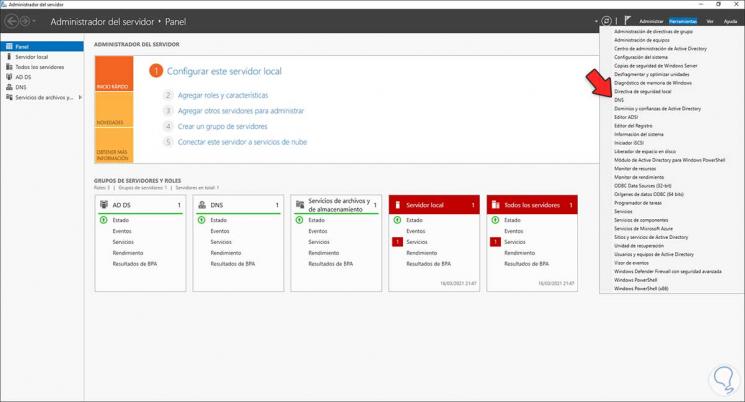
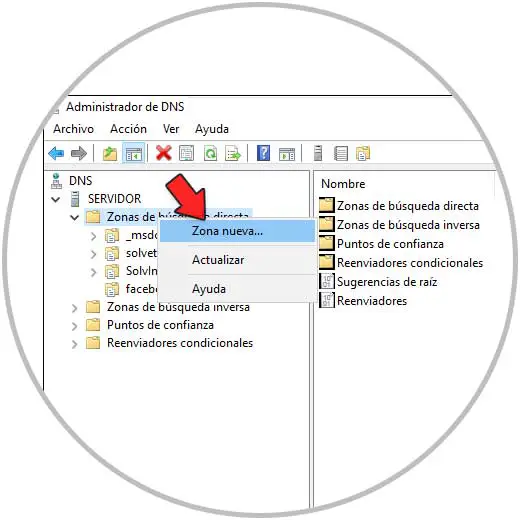
In the Server Manager we go to «Tools — DNS»:
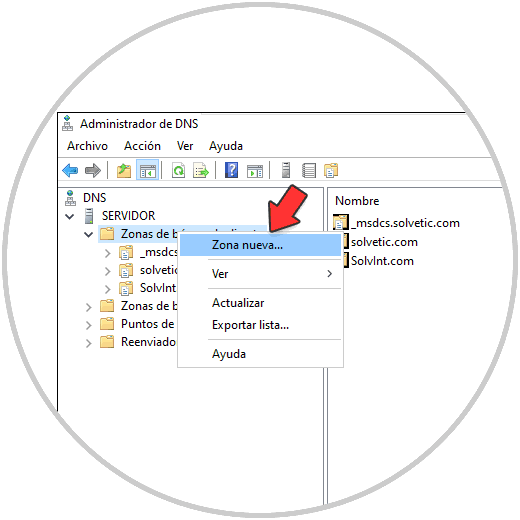
In the DNS console we right click on «Direct search zones» and there we select «New zone»:
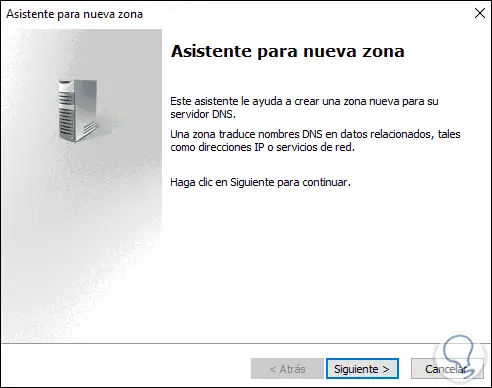
The following wizard will be displayed:
Step 6
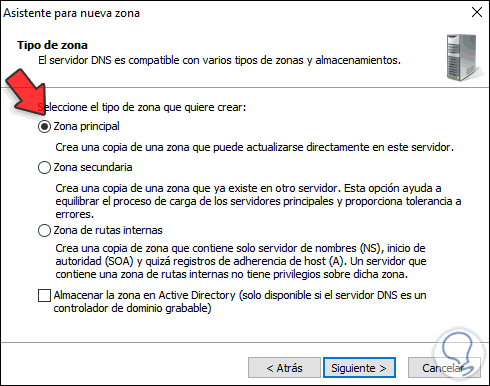
We click on Next and there we select «Main zone» and deactivate the «Store the zone in Active Directory» box:

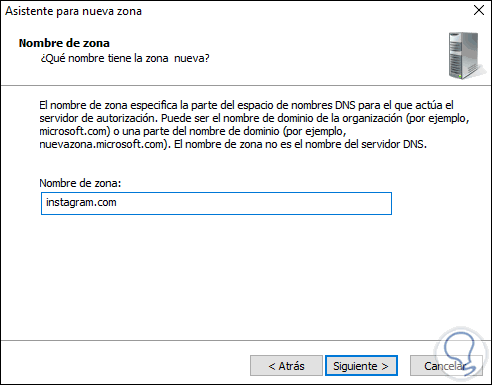
We click on Next and enter the name of the area which will be the name of the website (for better administration):
Click on Next and we will see that a local file will be created with the assigned name:

Step 9
In the next window we activate the box «Do not admit dynamic updates»:
We click Next to see a summary of the area to create. Click Finish to complete the process:
Step 11
Now we validate that the created zone points to the DNS server:
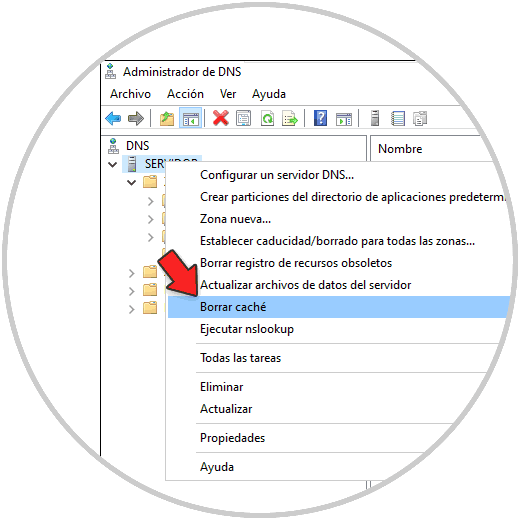
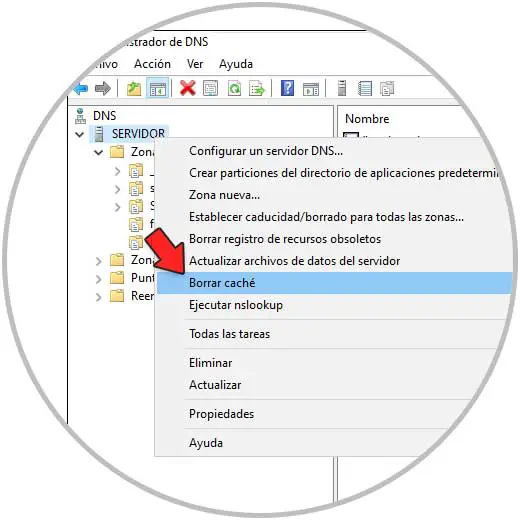
We right click on the server
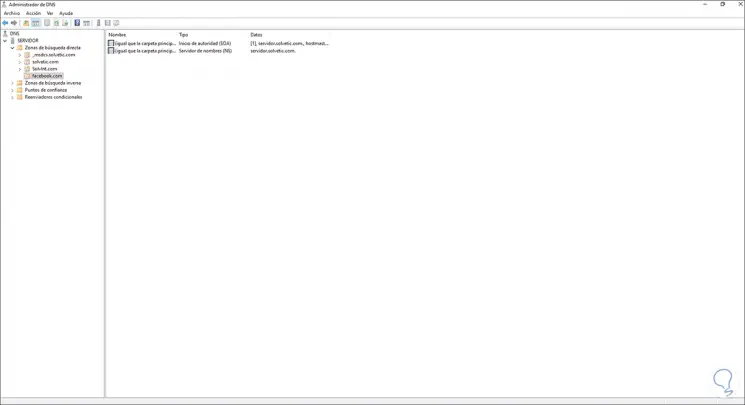
In the options displayed we select «Clear cache»:
Step 14
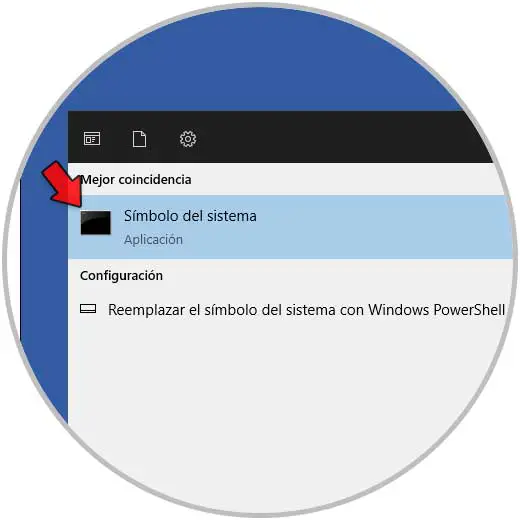
You can also access the command prompt from Start:
In the console we execute «ipconfig / flushdns»:
Step 16
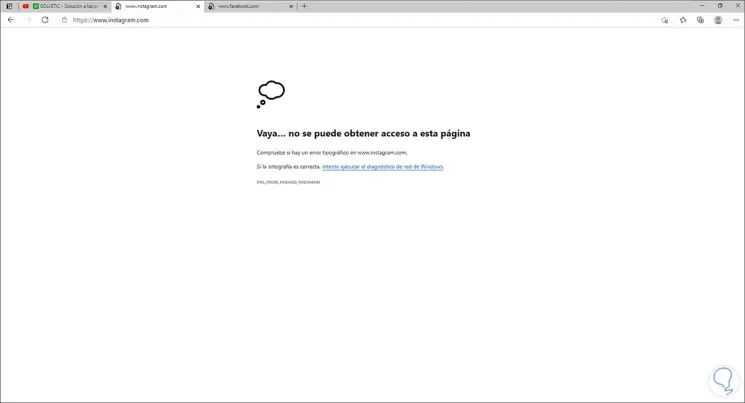
When accessing the page we will see that it is not possible to access it. This in the case of Facebook.
Step 17
Let’s try Instagram now, go to the DNS console, right click on «Direct search zones» and select «New zone»:
Step 18
We select «Main zone» and uncheck the box «Store the zone in Active Directory»:
Step 19
Click Next to enter the name of the zone:
Step 20
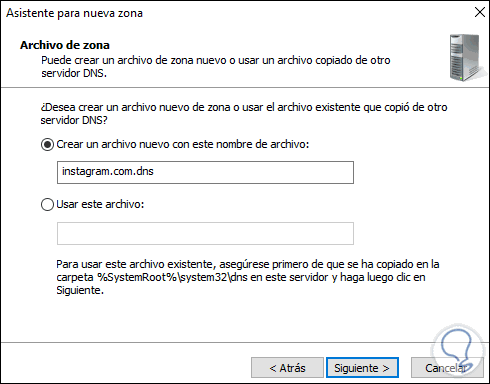
Click Next and we will see the name of the file to create:
Step 21
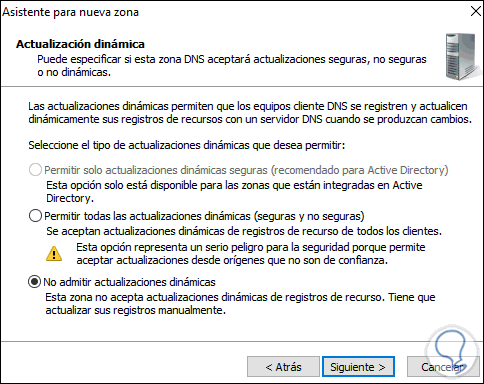
In the next window we activate the box «Do not admit dynamic updates»:
Step 22
Click Next to see the zone summary. We click Finish to complete the process.

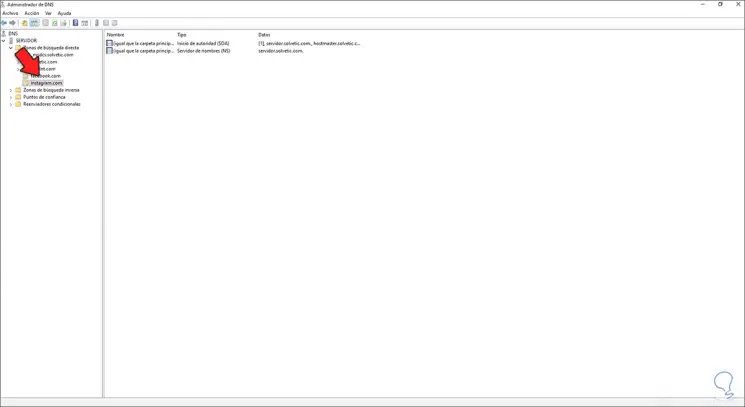
Step 23
We validate that the created zone points to the Windows Server 2022 DNS server.
Step 24
Now we are going to empty the cache so that the process is updated, for this we right click on the server and select the option «Clear cache»:
Step 25
When updating the page we will see that it is not possible to open it:
To replicate this on the client computers of the domain, we must execute «gpupdate / force» on each of them.
This has been the process to block access to websites from Windows Server 2022..