
Внедряя протокол IPv6 на своем предприятии, я столкнулся с тем, что для установки и настройки необходимых служб принцип Next-Next-Next не работает, а документации на русском не нашел вообще.
Эта статья пошагово расскажет на примере моей инфраструктуры о том, как развернуть IPv6 на предприятии используя стандартные службы DNS и DHCP операционной системы Windows Server 2008 / 2008 R2.
- Адресация IPv6
- Установка и настройка DNS
- Установка и настройка DHCPv6
- Маршрутизация IPv6
- Полезные ссылки
Адресация IPv6
Как известно, в IPv4 стандартизированы диапазоны «серых» адресов для локальных сетей (10.0.0.0/8, 172.16.0.0/12, 192.168.0.0/16), аналогично и в IPv6 для локальных адресов принят диапазон fc00:/7.
Рассмотрим следующую схему адресации IPv6, которая принята для локальных сетей на платформе Windows Server:
- префикс сети (адрес сети в терминологии IPv4):
fc00:a:b:c::/64, где a, b, c — выбирайте на ваше усмотрение из диапазона 0000-ffff, например fc00:10:18:1::/64 - адрес хоста в сети
fc00:a:b:c:v:x:y:z, где v, x, y ,z определяют адрес хоста, напримерfc00:10:18:1:feab:01cc:65de:180a— такой адрес может назначить DHCP-серверfc00:10:18:1::10— настроенный вручную более читабельный адрес, например для сервера, который нужно будет указывать руками (:: означает пропуск группы нулей, может использоваться однократно в адресе).
На картинке показан пример настроек сервера, на котором далее будет настроена служба DHCPv6.

Как работает IPv6 совместно с IPv4
IPv6 замечательно работает совместно с уже развернутой инфраструктурой IPv4 следующим образом:
- На Windows Server 2008 / 2008 R2 разворачиваются службы DNS и DHCP, поддерживающие IPv6.
- Клиенты, поддерживающие IPv6 (Windows Vista, Windows 7), получают настройки от DHCP и регистрируют свои имена в DNS.
- Далее при обращении к узлам по DNS-имени в первую очередь идет попытка получить их адреса IPv6 (тип записи AAAA), в случае их отсутствия — IPv4 (тип записи A).
- Клиенты, не поддерживающие IPv6 (Windows Server 2003, Windows XP) продолжают пользоваться старым протоколом IPv4 как раньше.
При выборе префикса создаваемой сети IPv6 рекомендую схитрить: если в этой же физической сети располагается IPv4 сеть 10.18.1.0/24, то можно выбрать префикс fc00:10:18:1::/64 для сети IPv6.
Установка и настройка DNS
Так как адреса IPv6 еще менее человечны, чем в IPv4, то их применение без DNS можно оправдать только с точки зрения садомазохизма. Поэтому в первую очередь необходимо развернуть DNS сервер, поддерживающий IPv6 адреса. Такая поддержка есть в службе DNS начиная с Windows Server 2008.
Все, что нужно сделать — это сконфигурировать статические IPv6 адреса (например fc00:10:18:1::1) на DNS серверах, включить динамическое обновление записей клиентами (в окружении Active Directory — безопасное) и передать эти настройки клиентам локальной сети через DHCP, о чем рассказывается далее.
Установка и настройка DHCPv6
Протокол IPv6 менее приспособлен для ручных настроек, в отличии от IPv4, поэтому предполагает автоматическое конфигурирование параметров узлов сети через DHCP версии 6. Поддержка DHCPv6 появилась начиная с Windows Server 2008 и является частью стандартной роли DHCP сервера.
Перед установкой DHCP-сервера необходимо сконфигурировать статические адреса IPv6 для сетевых адаптеров, с которых сервер DHCPv6 будет обслуживать своих клиентов. Например, fc00:10:18:1::10.
Теперь можно перейти к установке стандартной роли DHCP. Первая опция, относящаяся к IPv6 называется DHCPv6 Stateless Mode. Её нужно включить, тогда на следующей странице у вас запросят адреса IPv6 DNS серверов и DNS-имя родительского домена.
Если DHCPv6 сервер был установлен с отключенным DHCPv6 Stateless Mode, то включить его можно выполнив команду:
netsh int ipv6 set interface InterfaceName other=en
и установив опции сервера DHCPv6:
- 00023 DNS Recursive Name Server IPv6 Address ;mdash; адреса IPv6 DNS серверов
- 00024 Domain Search List ;mdash; DNS-имя родительского домена
Теперь нужно создать область, в которой DHCPv6 серверу предстоит выдавать адреса своим клиентам. Особенностью DHCPv6 в Windows Server является то, что можно создать область только для адресов с длиной префикса сети равной 64, например fc00:10:18:1::/64.
На следующей странице предлагается указать область исключений, из которой DHCPv6 сервер не будет выдавать адреса. Так как адреса сервер выдает не по порядку, а псевдослучайным образом (по хитрому алгоритму, основанному на MAC адресе сетевого интерфейса), то область исключений должка включать IPv6 адреса серверов, которые был сконфигурированы вручную (DNS и DHCPv6 сервера). Пример области исключений: 0:0:0:1-0:0:0:99.
Казалось бы, осталось только активировать диапазон и авторизовать DHCPv6 сервер в Active Directory. Вскоре сервер начнет выдавать клиентам IPv6 адреса и настройки DNS. Но здесь начинается самое интересное: хоть клиенты эти настойки исправно получают, общаться между собой они не могут. Причем сие печальное поведение на момент написания этой статьи в официальной документации явно не отражено.
Чтобы исправить ситуацию, вызываем на клиенте
route print
и видим, что клиент не имеет маршрута в сеть fc00:10:18:1::/64.
Вызываем на сервере
netsh int ipv6 show route
и среди прочего видим:
| Publish | Type | Met | Prefix | Idx | Gateway/Interface Name |
|---|---|---|---|---|---|
| No | Manual | 256 | fc00:10:18:1::/64 | 10 | Local |
Из этого следует, что маршрут в сеть fc00:10:18:1::/64 на сервере DHCPv6 существует, но не опубликован. Для того, чтобы этот маршрут выдавался клиентам, необходимо включить на сервере объявление маршрутов командой
netsh int ipv6 set interface Local adv=en man=en other=en
и опубликовать маршрут командой
netsh int ipv6 add route fc00:10:18:1::/64 Local publish=yes
где fc00:10:18:1::/64 — ваш префикс IPv6, Local — имя или индекс сетевого интерфейса DHCPv6 сервера.
Маршрутизация IPv6
Встроенная роль Routing and Remote Access начиная с Windows Server 2008 поддерживает маршрутизацию IPv6, однако для того, чтобы она полноценно заработала, необходимо выполнить следующие, не очевидные вещи.
1. В свойствах сервера Routing and Remote Access на вкладке IPv6 включить Enable IPv6 Forwarding и Enable Default Route Advertisement.
2. На сервере-маршрутизаторе IPv6 должно быть как минимум две сетевых карты.
Local (fc00:10:18:1::10/64 в моих примерах), смотрящая в локальную сеть, для которой мы на предыдущих шагах настраивали раздачу IPv6 адресов, префикса сети и других параметров по DHCP.
External (например fc00:10:18:2::10/64), которая по идее должна смотреть в другую сеть (у нас маршрутизатор все-таки), но может смотреть и в ту же, что и Local.
3. Для того, чтобы IPv6 клиенты в сети могли использовать наш маршрутизатор, он должен объявить себя как маршрут по умолчанию (Default Route Advertisement, как шлюз по умолчанию в терминах IPv4).
Для этого в Windows Server 2008 нужно выполнить команду
netsh int ipv6 add route ::/0 External fc00:10:18:2::180 publish=yes
где fc00:10:18:2::180 — адрес следующего маршрутизатора по умолчанию (next-hop), находящегося в сети External. Не важно, существует он реально или нет. Для объявления маршрута по умолчанию в сеть Local на текущем маршрутизаторе next-hop должен быть указан.
Для Windows Server 2008 R2 всё проще, достаточно выполнить команду
netsh int ipv6 set Local advertisedefaultroute=enabled
для объявления маршрутизатора в сети Local как Default Route.
Полезные ссылки
- DHCPv6 — Understanding of address configuration in automatic mode and installation of DHCPv6 Server
- The Cable Guy / The DHCPv6 Protocol
- Кабельщик / Протокол DHCPv6
- IPv6 address — Wikipedia
- IPv6 на TechNet
- Introducing IPv6 on Your Network — материал TechNet из раздела WS2003
- IP Version 6 — скудный материал TechNet из раздела WS2008
(QuickPacket supports IPv6! Get a server from us with promo code PACKETS for 15% off your first invoice)
Internet Protocol version 6 (IPv6) is the latest version of the Internet Protocol (IP) intended to replace IPv4, which still carries more than 96% of the world’s Internet traffic as of May 2014. This article discusses how you can adapt and configure IPv6 in your Windows machines.
The 128 bits of an IPv6 address are represented in 8 groups of 16 bits each. Each group is written as 4 hexadecimal digits and the groups are separated by colons (:).
Example
2001:0db8:0000:0000:0000:ff00:0042:8329
An IPv6 address may be abbreviated to shorter notations by using the following rules where possible:
- One or more leading zeroes from any group of hexadecimal digits are removed.
- Consecutive sections of zeroes are replaced with a double colon (::), which can only be used once in an address, as multiple uses would render the address indeterminate. RFC 5952 (http://tools.ietf.org/html/rfc5952) recommends that a double colon must not be used to denote an omitted single section of zeroes.
See below for applications of these rules:
Initial address                        2001:0db8:0000:0000:0000:ff00:0042:8329
After removing all leading zeroes          2001:db8:0:0:0:ff00:42:8329
After omitting consecutive sections of zeroes   2001:db8::ff00:42:8329
The loopback address “0000:0000:0000:0000:0000:0000:0000:0001†may be abbreviated to “::1†by using both rules.
As an IPv6 address may have more than one representation, the Internet Engineering Task Force (IETF) has issued a proposed standard for representing them as text.
Â
IPv6 Address Scopes
 The following points cover the scopes of an IPv6 address.
Global Unicast address.  IPv6’s Global Unicast address is equivalent to an IPv4 Public address. Its scope is the entire IPv6 Internet, so it is globally routable and reachable on the IPv6 Internet. To enable greater efficiency in the routing architecture, Unicast addresses are designed to be aggregated.
- Global Routing Prefix (part of the Public Routing Topology—along with 001 prefix)
- Subnet ID (Site Topology)
- Interface ID
Link-local address. An IPv6 Unicast Link-local address is similar to the IPv4 APIPA address used by machines running Microsoft® Windows®. It enables hosts on the same subnet to communicate with each other. It is always automatically configured even without all other unicast addresses.
- FE80::/64 prefix
- Single subnet, router-less configuration
- Used for some Neighbor-discovery process
- Compared to routable addresses, link-local addresses are ambiguous so Zone IDs are used to identify specific interfaces
Example
fe80::2b0:d0ff:fee9:4143%3
- Windows Vista and above display the IPv6 Zone ID of local addresses in the ipconfig output
 Unique Local/Site-local address (ULA). Site-local addresses provide a private addressing alternative to global addresses for intranet traffic. It can be reused to address multiple sites within an organization as a site local address prefix can be duplicated.
- RFC 4193 define this unique local address
- Equivalent to IPv4 Private address
- FD00::/8 prefix
- Replacement for site-local addresses
- Global scope; no Zone ID required
IMPORTANT: The IPv6 addressing architecture requires all subnets using Globally Unique addresses and ULAs to always have 64-bit prefix lengths. Any subnet prefix length other than 64-bit breaks many features of IPv6.
Â
 Prerequisites
 Decide whether you will use public IPv6 addresses that are globally aggregatable or if you will use a private address space. In using public IPv6 addresses, you would need to get an IPv6 address prefix from your ISP. If your ISP does not support IPv6 yet, you can get an address prefix from a tunnel broker.
If you want to use private IPv6 addresses, use locally unique addresses. Do note however that most operating systems and applications still support site-local addresses, which are officially deprecated. This means that you need to get a unique prefix. There are already a growing number of sites that generate locally unique address prefixes like SixXS or Unique Local IPv6 Generator. You can use private addresses in the interim to immediately provide IPv6 connectivity in your intranet then move on to public IPv6 addresses later.
Do not forget to check if your Microsoft product supports IPv6. Go here to read Microsoft’s official list.
Â
 Auto-configuration in Windows
 IPv6 can configure itself even without the use of DHCP. It is installed and enabled by default in the following Microsoft products:
- Windows Server 2012
- Windows Server 2008 R2
- Windows Server 2008
- Windows 8
- Windows 7
- Windows Vista
IPv6 for Windows is also designed to auto-configure itself. It automatically sets up link-local addresses for communication between nodes on a link. Moreover, if there is an Intra-Site Automatic Tunnel Addressing Protocol (ISATAP) router or an IPv6 router on the host’s subnet, the host uses received router advertisements to automatically configure additional addresses, a default router, and other setup parameters.
 Note that IPv6 is not installed in Windows XP and Windows Server 2003 systems.
Â
Configuration in IPv6-ready Network Systems
 For Windows 8 and Server 2012, if you already have an unconfigured but IPv6-ready network infrastructure, you can still use IPv6 and configure IPv6 addresses in these situations:
- For home users with public IP addresses, Windows will try to establish a connection using the IPv6 transition technology Teredo. Teredo will work only if the Windows machine is not joined to a domain and has UDP access to the Internet, with no firewall-blocking packets.
- If Teredo fails for home users with public IP addresses, Windows will use another IPv6 transition technology named 6to4, which requires only a publicly routable IP address.
- Windows can resolve the name of your network using ISATAP through DNS or name broadcasts. In this situation, Windows will assume that the host is an ISATAP server capable of accepting IPv6 packets encapsulated in IPv4 packets. It will then deliver these packets to IPv6 hosts, encapsulate the replies, and send those replies back. ISATAP works in domain-joined, non-domain-joined, and non-routable IP address environments.
Â
Manual Configuration
 You can manually configure IPv6 addresses and other parameters in Windows by using the following tools:
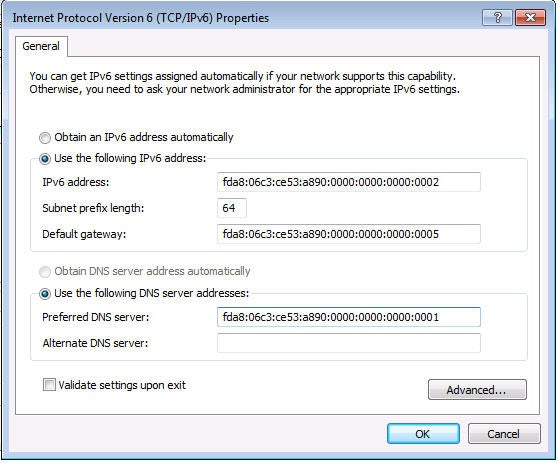
- Properties of TCP/IPv6 component
You can configure basic IPv6 settings through the properties of the TCP/IPv6 component.
The following instructions are to statically address Windows 2008 and Windows 2008 R2 servers:
-
- Log on to the server with administrator rights.
- Go to Start > Network > Network and Sharing Center > Change Adapter Setting.
- Right-click on the Local Area Connection of the network adapter and choose “I want to set IPv6.†Click on Properties.
- Pick TCP/IPv6 and click on Properties.
- Click “Use the following IPv6 address†and in the IPv6 address field, type the IP address you want to use.
Example
fda8:06c3:ce53:a890:0000:0000:0000:0001
6. Press the Tab key and the subnet prefix length will automatically populate with 64.
7. Press the Tab key again and in the Default Gateway field, type the IP address you want to use for your gateway.
              Example
fda8:06c3:ce53:a890:0000:0000:0000:0005
8. In the Preferred DNS Server field, type the IP address of your DNS server
Example
if your IP address sits on your DNS server: fda8:06c3:ce53:a890:0000:0000:0000:0001
9. Click OK. Close to save and exit.
- Windows PowerShell
In Windows Server 2012 and Windows 8, you can configure IPv6 addresses, default gateways, and DNS servers at the Windows PowerShell command prompt. You can use the following PowerShell cmdlets:
-
- Set-NetIPAddress
- Set-NetIPInterface
- Set-NetIPv6Protocol
- Set-NetNeighbor
- Set-NetRouteWindows
Configuring Addresses
To configure IPv6 addresses, you can use the New-NetIPAddress cmdlet.
      Example
To configure the IPv6 Unicast address 2001:db8:290c:1291::1 on the interface named “Wired Ethernet Connection,†use the following command:
New-NetIPAddress –InterfaceAlias «Wired Ethernet Connection» –IPAddress 2001:db8:290c:1291::1
Â
Adding Default Gateways
To configure a default gateway, you can use the New-NetRoute Windows PowerShell cmdlet.
Example
To add a default route that uses the interface named “Wired Ethernet Connection†with a next-hop address of fe80::2aa:ff:fe9a:21b8, use the following command:
New-NetRoute –DestinationPrefix ::/0 –InterfaceAlias «Wired Ethernet Connection» –NextHop fe80::2aa:ff:fe9a:21b8
Â
Adding DNS Servers
To configure the IPv6 addresses of DNS servers, you can use the Set-DnsClientServerAddress Windows PowerShell cmdlet.
Example
To add a DNS server with the IPv6 address 2001:db8:99:4acd::8 that uses the interface named “Wired Ethernet Connection,†use the following command:
Set-DnsClientServerAddress -InterfaceAlias «Wired Ethernet Connection» -ServerAddresses 2001:db8:99:4acd::8
 Use these Windows PowerShell commands to display information about the IPv6 configuration of a computer:
-
- Get-NetIPInterface -AddressFamily IPv6
- Get-NetIPAddress -AddressFamily IPv6
- Get-NetRoute -AddressFamily IPv6
- Get-NetNeighbor -AddressFamily IPv6
- Netsh.exe tool
You can configure IPv6 settings from the interface of IPv6 context of the Netsh.exe tool. You can also configure IPv6 addresses, default gateways, and DNS servers at the command line by using commands in the «netsh interface ipv6» context.
Configuring IPv6 addresses
Use the «netsh interface ipv6 add address» command with the following syntax:
netsh interface ipv6 add address [interface=]InterfaceNameorIndex[address=]IPv6Address[/PrefixLength] [[type=]unicast|anycast] [[validlifetime=]Time|infinite] [[preferredlifetime=]Time|infinite] [[store=]active|persistent]
Example
To configure with infinite valid and preferred lifetimes the IPv6 unicast address 2001:db8:290c:1291::1 on the interface named “Local Area Connection†and make the address persistent, use the following command:
netsh interface ipv6 add address «Local Area Connection» 2001:db8:290c:1291::1
Â
Adding Default Gateways
Use the «netsh interface ipv6 add route» command and add a default route (::/0) with the following syntax:
netsh interface ipv6 add route [prefix=]::/0 [interface=]InterfaceNameorIndex [[nexthop=]IPv6Address] [[siteprefixlength=]Length] [[metric=]MetricValue] [[publish=]no|yes|immortal] [[validlifetime=]Time|infinite] [[preferredlifetime=]Time|infinite] [[store=]active|persistent]
Example
To add a default route that uses the interface named “Local Area Connection†with a next-hop address of fe80::2aa:ff:fe9a:21b8, use the following command:
netsh interface ipv6 add route ::/0 «Local Area Connection» fe80::2aa:ff:fe9a:21b8
Â
Adding DNS Servers
To configure the IPv6 addresses of DNS servers, use the «netsh interface ipv6 add dnsserver» command with the following syntax:
netsh interface ipv6 add dnsserver [name=]InterfaceName[[address=]IPv6Address] [[index=]PreferenceValue]
By default, the DNS server is added to the end of the list of DNS servers. If an index is specified, the DNS server is placed in that position in the list and the other DNS servers are moved down the list.
Example
To add a DNS server with the IPv6 address 2001:db8:99:4acd::8 that uses the interface named “Local Area Connection,†use the following command:
netsh interface ipv6 add dnsserver «Local Area Connection» 2001:db8:99:4acd::8
You can obtain IPv6 configuration information with the following commands in the «netsh interface ipv6» context of the Netsh tool:
-
- netsh interface ipv6 show address
- netsh interface ipv6 show interface
- netsh interface ipv6 show route
- netsh interface ipv6 show neighbors
Note that you can also view IPv6 addresses and routes using the Ipconfig.exe and Route.exe tools (i.e. ipconfig and route print -6 commands).
Â
Disabling IPv6
Though you cannot remove IPv6 support from Windows Vista to Server 2012 R2, you can disable it. You can also just unbind IPv6 from the physical adapters. This will mean however, that IPv6 will still be running and can still be used to connect to IPv6 sites over IPv4. Read the Microsoft Support article «How to disable IP version 6 or its specific components in Windows» for more details.
Â
Connectivity Testing and Troubleshooting
Windows includes the following IPv6-enabled command-line tools that you can use for network troubleshooting:
- Ipconfig
- Route
- Ping
- Tracert
- Pathping
- Netstat
To ping an IPv6 address, use the syntax: ping IPv6Address [%ZoneID]. Note that the zone ID is not needed when the destination is a global address.
Example
To send ICMPv6 Echo Request messages to the link-local address fe80::260:97ff:fe02:6ea5 using zone ID 4 (the interface index of an installed Ethernet adapter), use the following command:
ping fe80::260:97ff:fe02:6ea5%4
This ping command includes the -6 flag, which forces Ping to use IPv6. If all is well, you should see a reply, which should be quite fast especially if you have a native IPv6 connection to the Internet. If your echo request does not get a reply, there might be a firewall or networking device blocking ICMPv6 between your Windows system and the target.
Once you know you have connectivity to the Internet using IPv6, be sure to test some IPv6-only websites to verify that everything is working properly.
Example
A DNS lookup for the host ipv6.google.com
> ipv6.google.com
Server:Â [YOUR-DNS_SERVER-IP]
Address:Â <YOUR-DNS_SERVER-IP>
Â
Non-authoritative answer:
Name:Â Â Â ipv6.l.google.com
Address:Â 2607:f8b0:4002:c06::71
Aliases:Â ipv6.google.com
DNS (Domain Name System) is a system that lets you translate domain names into IP addresses and vice versa.
A DNS server is a network service that provides and maintains the operation of DNS. The DNS server is an easy and light service that can run on most machines. If you don’t intend to configure other roles and services on the target machine, the minimum configuration is enough.
How to set up a DNS server:
- Configuring the network adapter for the DNS server
- Installing the DNS Server Role
- Create a forward lookup zone
- Creating a reverse lookup zone
- Create an A record
- Describes the Domain Name System (DNS) features that are new or changed in Windows Server 2016.
Configuring the network adapter on the DNS server
Installing a DNS server requires a domain zone. You need to create a private network in your personal account and connect virtual machines to it.
After the machine is connected to both of the networks, it is important to remember which connection needs to be configured. Usually, a network adapter is setup by default from the very beginning with an access to the Internet. At the same time other additional network adapters have no Internet access until the configuration is performed manually:
By hovering the cursor over the network icon in the system tray, you can find a tooltip with brief information about networks. Following the example above, you can see that the joined network is Network 3.
Perform a series of actions:
- Right-click Start and select Network Connections from the drop-down menu;
- Right-click on the required network adapter and select Properties from the menu;
- Select IPv4 In the Properties window, and click on the Properties button;
- Fill in the appropriate fields with the necessary data:

Here, the machine is assigned as the preferred DNS server, and the alternate is assigned as dns.google [8.8.8.8].
Installing the DNS server role
To add new roles to Windows Server, you use Add Roles and Features Wizard in Server Manager.
On the upper navigation bar of the Server Manager click the Manage menu, and then select Add Roles and Features:
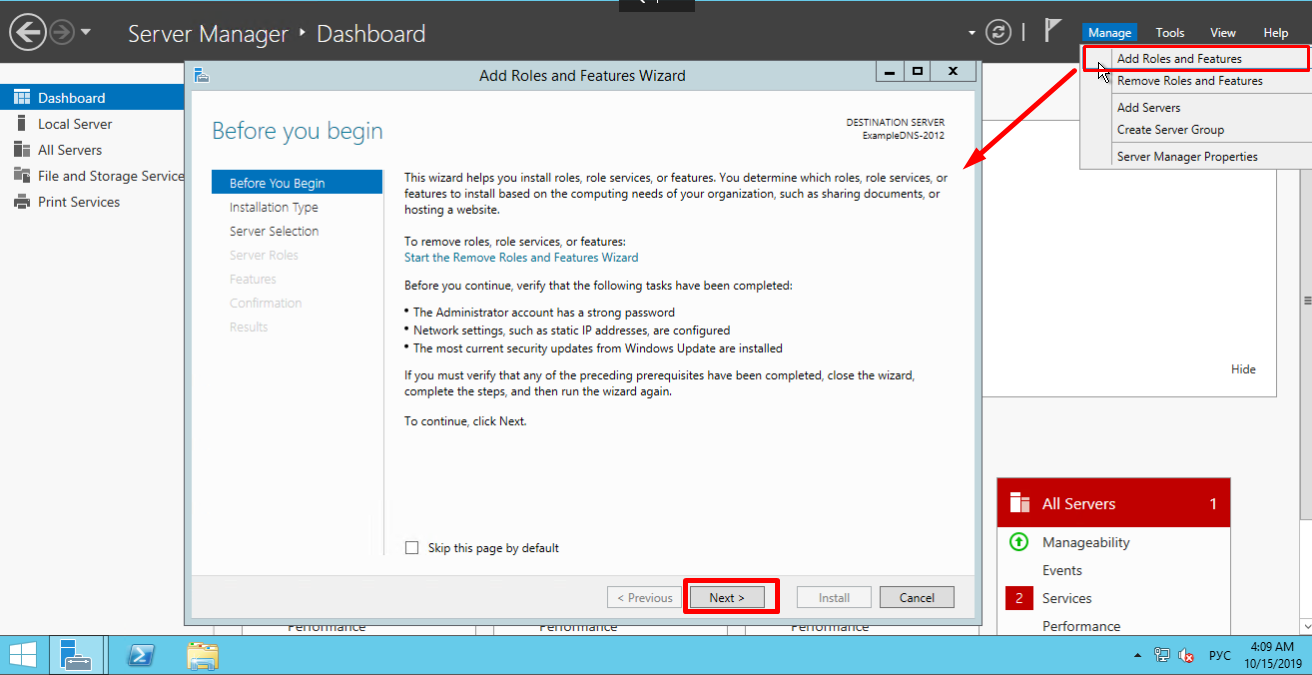
Here, the Wizard recommends you to verify if the following tasks have been completed:
1. The Administrator account has a strong password.
2. Network settings, such as static IP addresses, are configured.
3. The most current security updates from Windows Update are installed.
If you are sure that all the conditions are met, click Next;
Select the Role-based or feature-based installation and click Next:

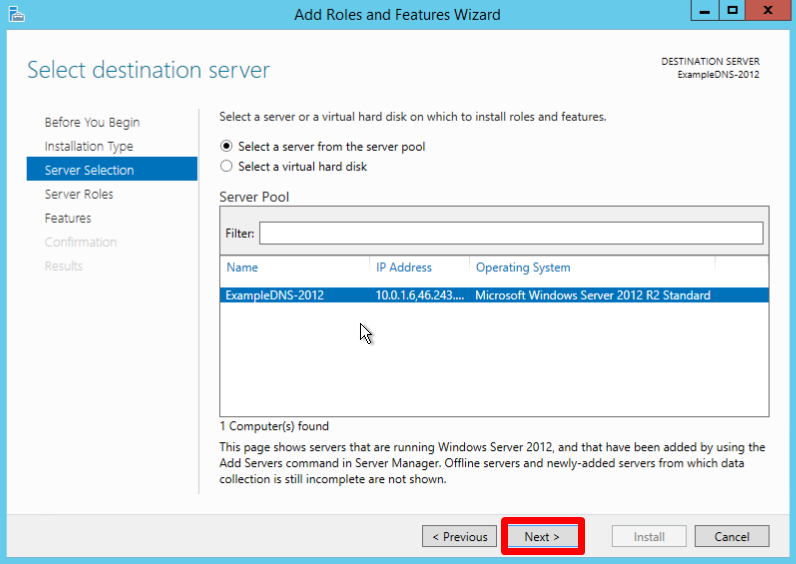
Select a server you want from the server pool and click Next:
Check off the DNS server role and click Next:

Check the list of features to install and confirm by clicking Add Features:

Keep the list of features as is and click Next:

Read the information and click Next:

Check the installation configuration once again and confirm your decision by clicking Install:

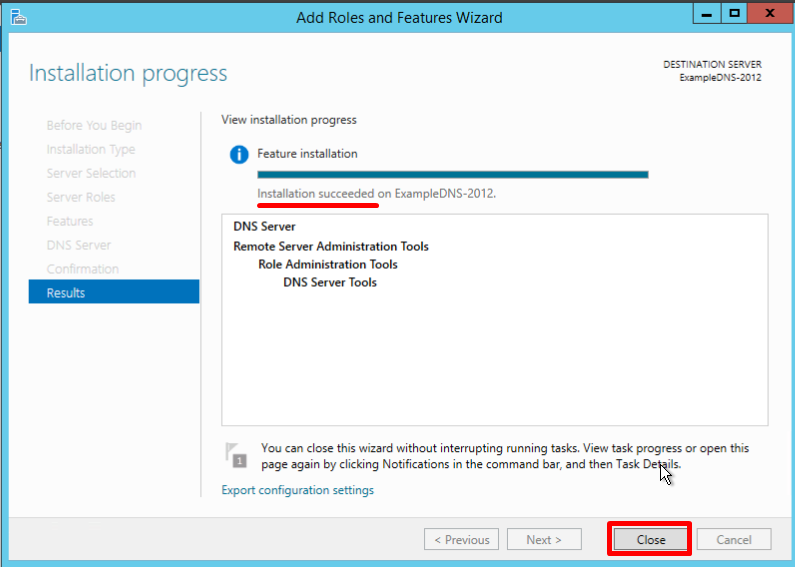
The final confirmation screen lets you know that the installation has been successfully completed, and you can close the installation Wizard:
Creating forward and reverse lookup zones
A domain zone — a set of domain names within a specific domain.
Forward lookup zones resolve names to IP addresses.
Reverse lookup zones resolve IP addresses to names.
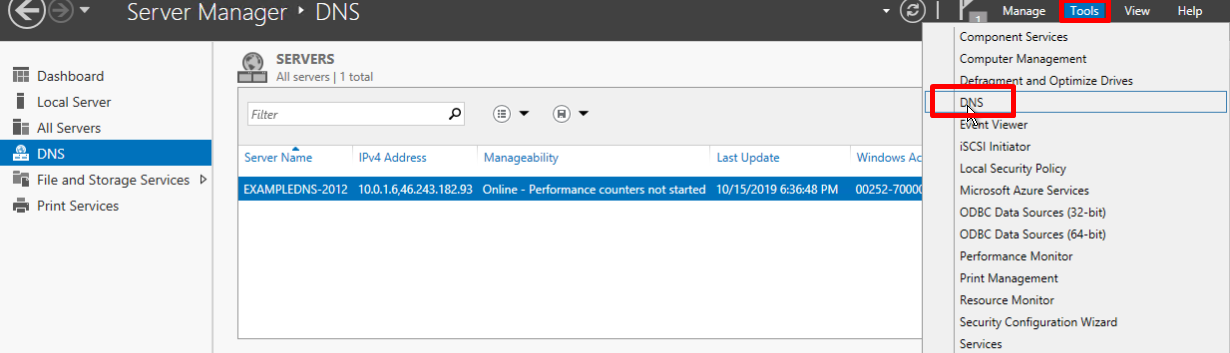
You have to use the DNS Manager to create and manage the zones.
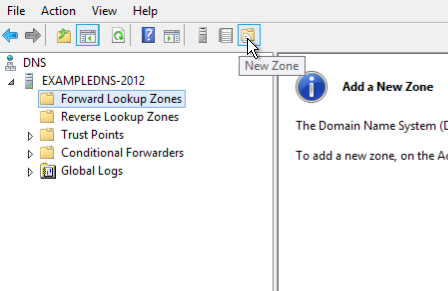
On the upper navigation bar of the Server Manager click the Tools menu and select DNS in the drop-down list:
Creating a forward lookup zone
- Right-click on the Forward Lookup Zones folder, select New Zone. This will open the New Zone Wizard:
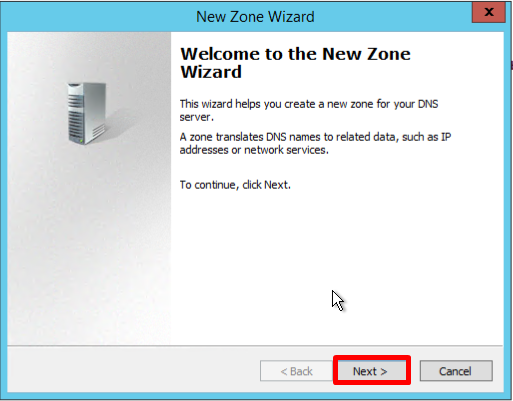
- On the Welcome screen of the Wizard, click Next:
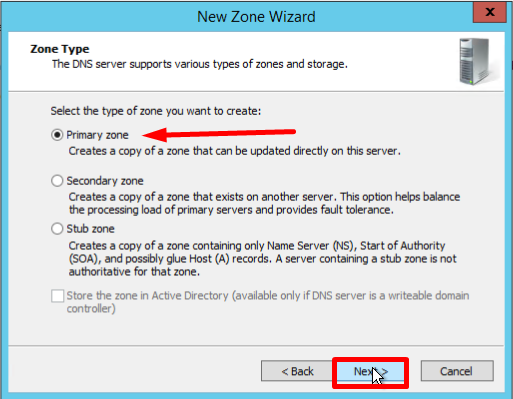
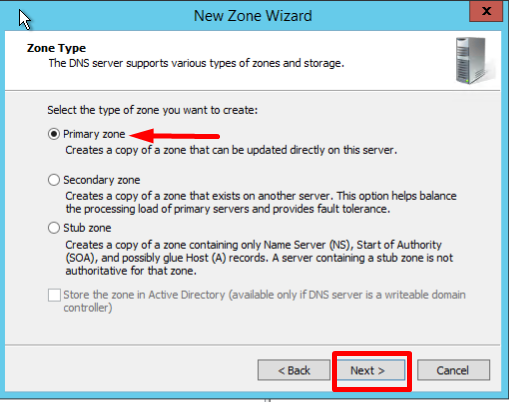
- On the Zone Type screen, Select Primary Zone, and click Next:
- Enter the name, and click Next:

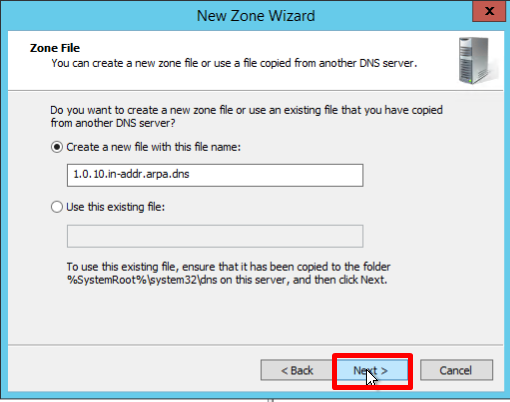
- If necessary, change the name of the future zone file and click Next:

- You must choose whether you want to allow dynamic updates or not. It is not recommended to allow this because of a significant vulnerability. Click Next:

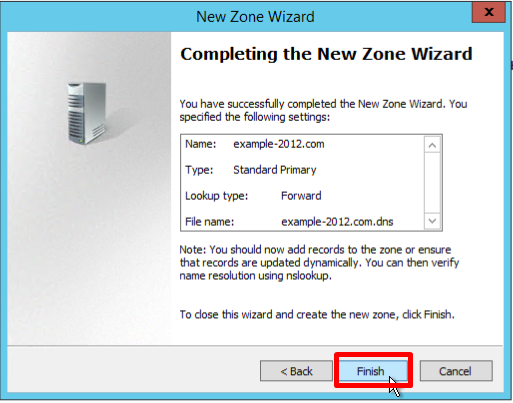
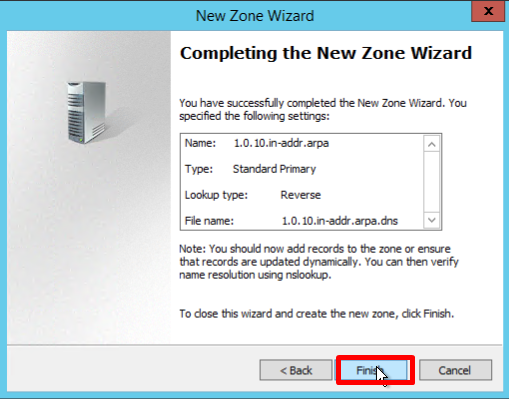
- Verify that the selected settings are correct, click Finish:
Creating a reverse lookup zone
- Open the DNS Manager and right-click on the Reverse Lookup Zones folder, select New Zone. This will open the New Zone Wizard:
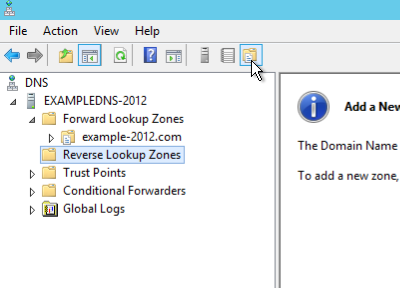
- On the Zone Type screen, Select Primary Zone, and click Next:
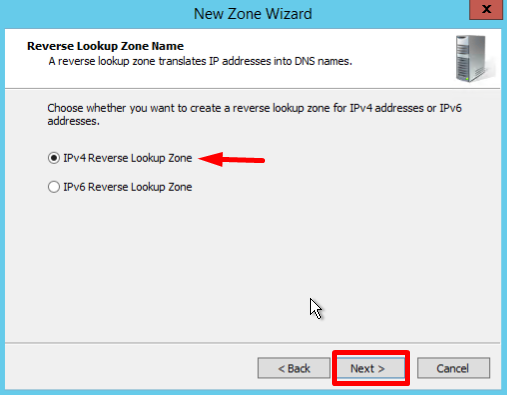
- In the first Reverse Lookup Zone Name page, select IPv4, click Next:
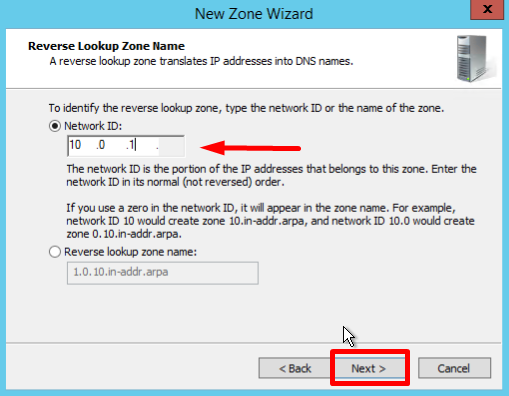
- Type the network ID (the first three octets of the IP address) and click Next:
- If necessary, change the name of the future zone file and click Next:
- You must choose whether you want to allow dynamic updates or not. It is not recommended to allow this because of a significant vulnerability. Click Next:

- Verify that the selected settings are correct, click Finish:
Creating a host (A) record
This section of the guideline is here to mostly check all the steps you performed earlier.
A Resource Record is the unit of information storage and transmission in DNS. RRs are the basic building blocks of host-name and IP information and are used to resolve all DNS queries.
Record A — a record that lets you map hostnames to an IP address of the host.
Record PTR — is the reverse version of an A Record.
- Open the Forward Lookup Zones folder in the DNS Manager and find the zone folder. Right-click on the right part of the DNS Manager and select New Host (a or AAA):

- New Host page opens. In Name, type a name of the host (with no domain, it will use the name of the Zone as a domain) and your IP address. Check off the section «Create associated pointer (PTR) record», to verify if both Forward and Reverse Lookup Zones are operating properly:
If the Name field is blank it uses parent domain name.
- You can also add records for other servers:
- Once you are finished, click Done.
Making sure everything is correct
- Check the changes in the folders of the zones (in the example below you can see 2 records appeared in each of them):


- Open the command line (cmd) or PowerShell and run the nslookup command:
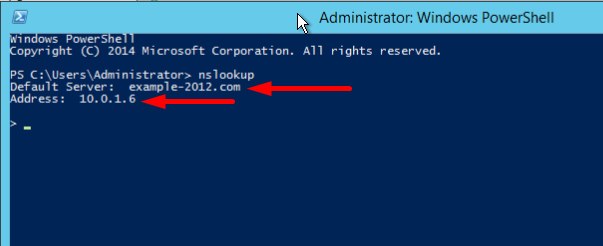
It shows that the default DNS server is example-2012.com with the address 10.0.1.6.
To make sure that the Forward and Reverse Zones are operating properly, you can send two queries:
- To query the domain;
- To query the IP address:
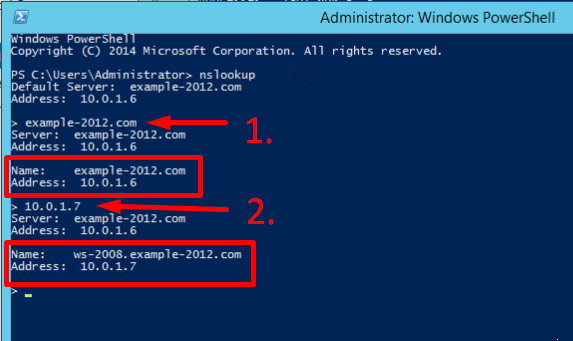
In the example, we have got appropriate responses for both queries.
- There is an option to send a query to an external resource:
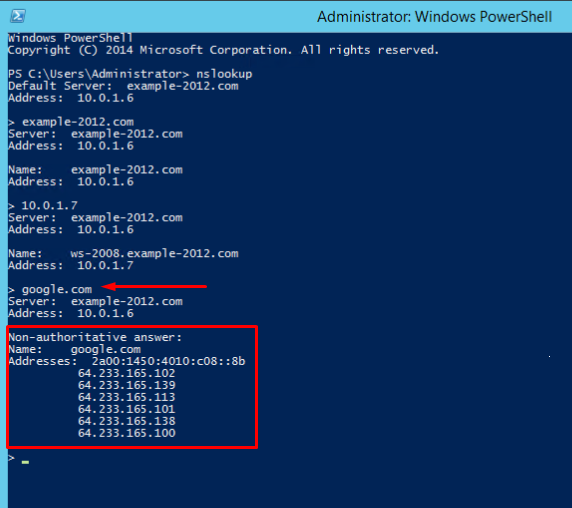
We see a new line here «Non-authoritative answer». This means that our DNS server does not contain domain’s original zone files. Although the information displayed below, received from an authoritative server, it is not itself authoritative in this case.
To compare, all the same queries were made on the server where the forward and reverse zones were not configured:

Here, the machine assigned itself as a default DNS server. The DNS server domain name is displayed as unknown because there are no resource records for the IP address (10.0.1.7). For the same reason, the 2nd query returns an error (Non-existent domain).
Describtion of the Domain Name System (DNS) features which are new or changed in Windows Server 2016.
In Windows Server 2016, DNS Server offers updates in the following areas:
- DNS Server Policies
- Response Rate Limit (RRL)
- DNS Based Named Entity Authentication (DANE)
- Unknown record support
- IPv6 root hints
- Windows PowerShell Support
DNS Server Policies
Now you can use these features:
- DNS Policy for Geo-Location based traffic management
- Intelligent DNS responses based on the time of day, to manage a single DNS server configured for split-brain deployment
- Apply filters on DNS queries, and more.
Specific description of these features:
Application Load Balancing
When you have deployed multiple instances of an application at different locations, you can use DNS policy to balance the traffic load between the different application instances, dynamically allocating the traffic load for the application.
Geo-Location Based Traffic Management.
You can use DNS Policy to allow primary and secondary DNS servers to respond to DNS client queries based on the geographical location of both the client and the resource to which the client is attempting to connect, providing the client with the IP address of the closest resource.
Split Brain DNS
With split-brain DNS, DNS records are split into different Zone Scopes on the same DNS server, and DNS clients receive a response based on whether the clients are internal or external clients. You can configure split-brain DNS for Active Directory integrated zones or for zones on standalone DNS servers.
Filtering
You can configure DNS policy to create query filters that are based on criteria that you supply. Query filters in DNS policy allow you to configure the DNS server to respond in a custom manner based on the DNS query and DNS client that sends the DNS query.
Forensics
You can use DNS policy to redirect malicious DNS clients to a non-existent IP address instead of directing them to the computer they are trying to reach.
Time of day based redirection
You can use DNS policy to distribute application traffic across different geographically distributed instances of an application by using DNS policies that are based on the time of day.
You can also use DNS policies for Active Directory integrated DNS zones.
Response Rate Limiting (RRL)
ТYou can configure RRL settings to control how to respond to requests to a DNS client when your server receives several requests targeting the same client.
By doing this, you can prevent someone from sending a Denial of Service (Dos) attack using your DNS servers.
For instance, a bot net can send requests to your DNS server using the IP address of a third computer as the requestor. Without RRL, your DNS servers might respond to all the requests, flooding the third computer.
When you use RRL, you can configure the following settings:
Responses per second This is the maximum number of times the same response is given to a client within one second.
Errors per second This is the maximum number of times an error response is sent to the same client within one second.
Window This is the number of seconds for which responses to a client are suspended if too many requests are made.
Leak rate This is how frequently the DNS server responds to a query during the time responses are suspended. For instance, if the server suspends responses to a client for 10 seconds, and the leak rate is 5, the server still responds to one query for every 5 queries sent. This allows the legitimate clients to get responses even when the DNS server is applying response rate limiting on their subnet or FQDN.
TC rate This is used to tell the client to try connecting with TCP when responses to the client are suspended. For instance, if the TC rate is 3, and the server suspends responses to a given client, the server issues a request for TCP connection for every 3 queries received. Make sure the value for TC rate is lower than the leak rate, to give the client the option to connect via TCP before leaking responses.
Maximum responses This is the maximum number of responses the server issues to a client while responses are suspended.
Allowlist domains This is a list of domains to be excluded from RRL settings.
Allowlist subnets This is a list of subnets to be excluded from RRL settings.
Allowlist server interfaces This is a list of DNS server interfaces to be excluded from RRL settings.
DNS Based Named Entity Authentication (DANE)
You can use DANE support (RFC 6394 and 6698) to specify to your DNS clients what CA they should expect certificates to be issued from for domains names hosted in your DNS server. This prevents a form of man-in-the-middle attack where someone is able to corrupt a DNS cache and point a DNS name to their own IP address.
Unknown record support
An «Unknown Record» is an RR whose RDATA format is not known to the DNS server. The newly added support for unknown record (RFC 3597) types means that you can add the unsupported record types into the Windows DNS server zones in the binary on-wire format. The Windows caching resolver already has the ability to process unknown record types. Windows DNS server does not do any record specific processing for the unknown records, but sends it back in responses if queries are received for it.
IPv6 root hints
The IPV6 root hints, as published by IANA, have been added to the Windows DNS server. The internet name queries can now use IPv6 root servers for performing name resolutions.
Windows PowerShell support
The following new Windows PowerShell cmdlets and parameters are introduced in Windows Server 2016.
Add-DnsServerRecursionScope — This cmdlet creates a new recursion scope on the DNS server. Recursion scopes are used by DNS policies to specify a list of forwarders to be used in a DNS query.
Remove-DnsServerRecursionScope — This cmdlet removes existing recursion scopes.
Set-DnsServerRecursionScope — This cmdlet changes the settings of an existing recursion scope.
Get-DnsServerRecursionScope — This cmdlet retrieves information about existing recursion scopes.
Add-DnsServerClientSubnet — This cmdlet creates a new DNS client subnet. Subnets are used by DNS policies to identify where a DNS client is located.
Remove-DnsServerClientSubnet — This cmdlet removes existing DNS client subnets.
Set-DnsServerClientSubnet — This cmdlet changes the settings of an existing DNS client subnet.
Get-DnsServerClientSubnet — This cmdlet retrieves information about existing DNS client subnets.
Add-DnsServerQueryResolutionPolicy — This cmdlet creates a new DNS query resolution policy. DNS query resolution policies are used to specify how, or if, a query is responded to, based on different criteria.
Remove-DnsServerQueryResolutionPolicy — This cmdlet removes existing DNS policies.
Set-DnsServerQueryResolutionPolicy — This cmdlet changes the settings of an existing DNS policy.
Get-DnsServerQueryResolutionPolicy — This cmdlet retrieves information about existing DNS policies.
Enable-DnsServerPolicy — This cmdlet enables existing DNS policies.
Disable-DnsServerPolicy — This cmdlet disables existing DNS policies.
Add-DnsServerZoneTransferPolicy — This cmdlet creates a new DNS server zone transfer policy. DNS zone transfer policies specify whether to deny or ignore a zone transfer based on different criteria.
Remove-DnsServerZoneTransferPolicy — This cmdlet removes existing DNS server zone transfer policies.
Set-DnsServerZoneTransferPolicy — This cmdlet changes settings of an existing DNS server zone transfer policy.
Get-DnsServerResponseRateLimiting< — This cmdlet retrieves RRL settings.
Set-DnsServerResponseRateLimiting — This cmdlet changes RRL settigns.
Add-DnsServerResponseRateLimitingExceptionlist — This cmdlet creates an RRL exception list on the DNS server.
Get-DnsServerResponseRateLimitingExceptionlist— This cmdlet retrieves RRL excception lists.
Remove-DnsServerResponseRateLimitingExceptionlist — This cmdlet removes an existing RRL exception list.
Set-DnsServerResponseRateLimitingExceptionlist — This cmdlet changes RRL exception lists.
Add-DnsServerResourceRecord — This cmdlet was updated to support unknown record type.
Get-DnsServerResourceRecord — This cmdlet was updated to support unknown record type.
Remove-DnsServerResourceRecord — This cmdlet was updated to support unknown record type.
Set-DnsServerResourceRecord— This cmdlet was updated to support unknown record type
For more information, see the following Windows Server 2016 Windows PowerShell command reference topics.
Powershell DNS Server
Powershell DNS Client

Technitium Blog Configuring Dns Server For Privacy Security This article describes how to install and configure ip version 6 (ipv6) in a microsoft windows server enterprise edition environment. the current version of ip (which is known as ip version 4 or ipv4) has not been substantially changed since rfc 791 was published in 1981. Configuring ipv6 network settings: assign an ipv6 address to your dns server’s network interface. this may involve obtaining an ipv6 address from your isp or configuring a local ipv6 network. example (bind) listen on v6 { any; }; 2. create aaaa records.
Configuring Dns This quickstart shows you how to install and configure a dns server on windows server. you’ll install the dns server role to host dns zone data, forward dns queries to dns root hint name servers, or optionally to an upstream name server. Provides step by step guidance for how to use the windows registry to disable ipv6 or certain ipv6 components in windows. Learn how to configure ipv6 addresses on your server using various examples. internet protocol version 6 (ipv6) is the latest version of the internet protocol (ip). it is designed to address the long anticipated address exhaustion of its predecessor, ipv4, by using 128 bit addresses instead of 32 bit addresses. Configuring your dns for ipv6 involves updating your dns server settings to support ipv6 addresses. here are some steps to help you configure your dns for ipv6: check ipv6 support: before configuring your dns server for ipv6, you need to ensure that your network infrastructure supports ipv6.
How To Fix Dns Server Not Responding Error 11 Methods Learn how to configure ipv6 addresses on your server using various examples. internet protocol version 6 (ipv6) is the latest version of the internet protocol (ip). it is designed to address the long anticipated address exhaustion of its predecessor, ipv4, by using 128 bit addresses instead of 32 bit addresses. Configuring your dns for ipv6 involves updating your dns server settings to support ipv6 addresses. here are some steps to help you configure your dns for ipv6: check ipv6 support: before configuring your dns server for ipv6, you need to ensure that your network infrastructure supports ipv6. To configure an ipv6 for your windows server you will have to follow the following steps: access your network adapters by pressing win r to open the command prompt. after this type ncpa.cpl into the prompt and press enter. right click your network adapter and open its properties. select internet protocol version 6 (tcp ipv6) and click properties:. Follow below steps to configure ipv6 address and other tcp ip settings (default gateway address and dns server addresses) in windows server 2022 using powershell cmdlets. these configuration cmdlets are very helpful, if you are working in a servercore based machine. By default, if a remote host has both ipv4 and ipv6 addresses, the windows computer will try to connect to it using its ipv6 address. if the dns server or…. In this guide, you will configure ipv6 support on your teraswitch vps. this will allow it to communicate across the internet using the latest standards. before you begin this guide you’ll need the following: to start, you need to locate the ipv6 address that was automatically assigned to your server.
Configuring IPv6 Addresses on Windows 2008 and 2008 R2 Servers, Windows 7 Workstations, and Configuring DNSv6
In this blog post on IPv6, I’m going to cover:
- How to statically address a Windows 2008 / Windows 2008 R2 Server
- How to statically address a Windows 7 Client System
- How to setup DNS for IPv6 on a Windows 2008 R2 Server to do name resolution of IPv6 systems
My last blog post http://www.networkworld.com/community/blog/ipv6-addressing-subnets-private-addresses covered basic terminology on IPv6 addressing, so concepts around subnets, gateways, private (internal) addresses, and how to read a long IPv6 address and understand the address. Now it’s time to roll up your sleeves, take what you’ve learned, and start configuring Windows servers and workstations with IPv6.
I’m going to assume you have your Network / Subnet architecture figured out, if anything just make your network 1 and subnet 1 so (fd00:0000:0001:0001) but you can get more creative than that since you have a quintillion numbers to choose from. And I’m assuming you have some idea of how you will assign device addresses (again out of the 18-quintillion (18 with 18 zeros) possible addresses) for addressing your systems. You could always start your device addressing with 0000:0000:0000:0001, and 0000:0000:0000:0002, and so forth, or you can use an addressing scheme I started using when I was playing with this stuff in the lab a while back that helped me know what type of device I was working with. So I put a 1, 2, or 3 in the first address place to designate a router/networking device, computer, or printer. I put a 1 or a 2 in the second address place to designate a server or workstation. I put a 1, 2, or 3 in the third address place to designate Windows, Mac, or Linux. I put a 1, 2, or 3 in the fourth address place if the device is a desktop, laptop, or tablet. Etc. So if I have a device address 2212:0000:0000:0001 I know that this is a computer, workstation, Windows, laptop. There are variations that include domain attached or not, intended for public access or not, physical or virtual server, even the type of application the server primarily runs like Exchange, SharePoint, Global Catalog, etc. Helped me do my inventory of devices through the IP addresses when I was coming up to speed on IPv6.
In this posting, I’ll cover static addressing of servers and client systems, my next post will cover DHCP dynamic addressing.
For this example, here are the following assumptions:
- I’m going to be using Unique Local Addresses (ie: private IPv6 addressing), thus my prefix starts with fd
- I’m going to use a randomly selected GlobalID (a8:06c3:ce53) and SubnetID (a890) so that all of my devices will start with fda8:06c3:ce53:a890 (again, the only thing that needs to be there is starting off with fd to make this an officially private (ULA) address, after that, the rest of the “numbers” (0-9, a-f) can be anything you want them to be (see my last post on random address generation and subnetting if you’d like more background))
- For simplicity, I’m going to number my devices sequentially, so that the Server will be fda8:06c3:ce53:a890:0000:0000:0000:0001 and the Workstation will be fda8:06c3:ce53:a890:0000:0000:0000:0002 (remember, I can use the truncation method and get rid of extra zeros so it’ll look like fda8:6c3:ce53:a890::1 and fda8:6c3:ce53:a890::2, but I’ll write out the full address so as to not confuse everyone)
- For the Gateway to another Subnet, I’m going to make that simply: fda8:06c3:ce53:a890:0000:0000:0000:0005
- For the DNS address, in my case, the server we’re configuring is the DNS server, so the DNS address is fda8:06c3:ce53:a890:0000:0000:0000:0001
How to statically address a Windows 2008 / Windows 2008 R2 ServerWith the static IP address fda8:06c3:ce53:a890:0000:0000:0000:0001 selected for the server and the gateway fda8:06c3:ce53:a890:0000:0000:0000:0005, to statically address a Windows 2008 R2 server, I will do the following:
1) Logon to the server with administrator rights
2) Click on Start | Network | Network and Sharing Center | Change Adapter Setting
3) Right-click on the Local Area Connection of the network adapter I want to set IPv6 and choose Properties
4) Highlight Internet Protocol Version 6 (TCP/IPv6) and click on Properties
5) Click on “Use the following IPv6 address” and in the IPv6 Address field, type in the IP address you want to use (in my case, I typed in fda8:06c3:ce53:a890:0000:0000:0000:0001)
6) Press the Tab key and it’ll automatically populate the Subnet prefix length to 64
7) Press the Tab key and in the Default Gateway field, type in the IP address you want to use for your Gateway (in my case, I typed in fda8:06c3:ce53:a890:0000:0000:0000:0005)
 For Preferred DNS Server, type in the IP address of your DNS server (which since I’m sitting on my DNS server, I’m going to type in the fda8:06c3:ce53:a890:0000:0000:0000:0001)
The screen will look something like the following:
9) Click OK, OK, Close to save and exit
Running IPConfig /All to see what the configuration looks like, you’ll notice the IPv6 Address, Default Gateway address, and DNS Server address have all been truncated down to the simplified format. In my case, I disabled IPv4 so there is no IPv4 address reporting on this system.

How to statically address a Windows 7 Client SystemFor a Windows 7 client, the configuration process works exactly the same. With the static IP address fda8:06c3:ce53:a890:0000:0000:0000:0002 selected for the workstation and the gateway fda8:06c3:ce53:a890:0000:0000:0000:0005, to statically address a Windows 7 workstation, I will do the following:
1) Logon to the workstation with administrator rights
2) Click on Start | Control Panel | Network and Internet | Network and Sharing Center | Change Adapter Setting
3) Right-click on the Local Area Connection of the network adapter I want to set IPv6 and choose Properties
4) Highlight Internet Protocol Version 6 (TCP/IPv6) and click on Properties
5) Click on “Use the following IPv6 address” and in the IPv6 Address field, type in the IP address you want to use (in my case, I typed in fda8:06c3:ce53:a890:0000:0000:0000:0002)
6) Press the Tab key and it’ll automatically populate the Subnet prefix length to 64
7) Press the Tab key and in the Default Gateway field, type in the IP address you want to use for your Gateway (in my case, I typed in fda8:06c3:ce53:a890:0000:0000:0000:0005)
For Preferred DNS Server, type in the IP address of your DNS server (which is the server I configured above which is fda8:06c3:ce53:a890:0000:0000:0000:0001)
The screen will look something like the following:
9) Click OK, OK, Close to save and exit
Running IPConfig /All to see what the configuration looks like, you’ll notice the IPv6 Address, Default Gateway address, and DNS Server address have all been truncated down to the simplified format. In my case, I disabled IPv4 so there is no IPv4 address reporting on this system.
What you’ll find when you ping from the workstation to the server, just like pinging an IPv4 address (but longer) is:
This is where DNS really helps out in IPv6. You’ll go crazy trying to remember the IPv6 addresses, so you’ll rely more and more on DNS, which I’ll cover now…
How to setup DNS for IPv6 on a Windows 2008 R2 Server to do name resolution of IPv6 systemsAs you probably know, DNS is the name resolution that translates a common server name (ie: AD.companyabc.com) with its IP address (ie: fda8:06c3:ce53:a890:0000:0000:0000:0001). Obviously it is a lot easier to remember the common name than the IPv6 address, thus DNS becomes very valuable in an IPv6 environment.To setup and configure DNS, 2 major things need to be done:
1) You need to configure a Windows 2008 R2 server with an IPv6 address (like we did in the server configuration step above)
2) You need to install the Windows Server DNS role to the server (which quite frankly, if you’ve ever setup DNS in a Windows environment before, there is nothing different (other than manually creating an IPv6 reverse lookup zone). So DNS setup is just simple DNS setup (but on a Windows 2008 R2 server to support IPv6 addressing)
For the first step, build a Windows 2008 R2 server and give it an IPv6 address like you did above. Your DNS server should have a good IPv6 address before your proceed so that your server will be listening properly to the right IPv6 network/subnet for DNS requests, but if you already have DNS, you can still just update the IPv6 address and DNS will now start working properly for IPv6.
For the second step of making it a DNS server, do the following:
1) Logon to the server with administrator rights
2) Click on Start | Administrative Tools | Server Manager
3) Click to highlight Roles, then click on Add Roles
4) For the Before you Begin, click Next
5) Select DNS Server (so it is checkmarked), click Next
6) For the Introduction to DNS Server, click Next
7) Click Install
This will install DNS on the Server
Once DNS is installed on the system, to configure it as a DNS server (assuming it is part of an Active Directory domain), do the following:
1) Click on Start | Administrative Tools | DNS
2) Highlight the computer name and choose Action | Configure a DNS Server
3) Click Next, then choose either forward lookup zone, forward and reverse lookup zone, or root hints only
(if in doubt, choose forward lookup zone)
4) Select Yes, create a forward lookup zone now, click Next
5) Select Primary zone (if this is the first DNS server) or Secondary zone (if you already have a DNS server) or select Stub zone (if you know what you are doing and you want a stub zone configure), chose one of the 3 and then click Next
6) Choose IPv4 Reverse Lookup Zone (assuming the server is running both IPv4 and IPv6 (we’ll set the IPv6 lookup zone later), click Next
7) Enter in the IPv4 network address in the NetworkID fields (this is the start of the IPv4 address of your network adapter), click Next
When prompted to create a new Zone file, click Next
9) For forwarders, click on Yes and enter in the DNS address of a public DNS server that you want to resolve non-AD addresses (this would typically be provided to you by your Internet Service Provider as a DNS address of a major public DNS server on the Internet), Click Next
10) Click Finish to continue
With DNS configured on your server, you will begin to see DNS records populated on the server (either from devices (if this is a primary DNS server) or from the other DNS server (if this is a secondary DNS server). To force devices to register to DNS, go to other workstations or servers (that have a proper IPv4 or IPv6 address) and run the command IPConfig /RegisterDNS from a Command Prompt on the system. Go back to the DNS server and refresh your DNS screen to see the devices start showing up.
Note: If you already have DNS working on an AD 2008 R2 server, and you have a proper IPv6 address configured for the server, DNS does not need to be reconfigured or rebuilt. DNS (if it was working for IPv4) will work for IPv6 natively on a Windows 2008 R2 server with IPv6 enabled.
To create an IPv6 Reverse Lookup Zone, since the configuration wizard only allowed you to create either an IPv4 or IPv6 reverse lookup zone, and we chose to create an IPv4 since likely you’ll still be using IPv4 for a while, you have to configure the IPv6 Reverse Lookup Zone manually. To do so, right click on the “Reverse Lookup Zones” in the DNS manager and choose New Zone.
1) Click Next to start the New Zone wizard
2) Choose Primary Zone (assuming this is the first DNS v6 server in your environment), click Next
3) Choose the option “To all DNS servers running on domain controllers in this domain” (or you can alternately choose forest if you have a single forest / single domain simple model), Click Next
4) Select IPv6 Reverse Lookup Zone, click Next
5) Enter in the IPv6 Prefix, which in our case would be fda8:06c3:ce53:a890::/64 (which will create a reverse lookup zone of 0.9.8.a.3.5.e.c.3.c.6.0.8.a.d.f.ipv6.arpa), click Next
6) Assuming this is on Active Directory, choose “Allow only secure dynamic updates”, Click Next
7) Click Finish
That’s it. You now have workstations and servers with YOU IPv6 addressing scheme setup, and you have DNS that is resolving not only your IPv4 names, but also now your IPv6 names.
In my next blog post on IPv6, I will cover:
How to setup DHCP for IPv6 to dynamically issue addresses in your block of IPv6 addresses. This is a little trickier, while the DHCPv6 tool is the same as the normal DHCP IPv4 tool, and the setup of DHCP for IPv6 and all is basically the same, there are a couple quirks that I bet have hung up ANYONE who has ever tried to setup DHCP for IPv6 in a Windows environment, and I bet 99% of the people who tried gave up at that point with DHCP in IPv6. I’ve written about the workarounds to getting DHCPv6 to work the way you would expect it to work. Stay tuned for the next blog post…