
- Logon to the server.
- Click Start, point to All Programs, point to Administrative Tools, and then click DHCP.
- Right click on IPv4 and choose Set Predefined Options….
- click the Add… button in the Predefined options window.
- Enter in the information as shown below, make sure Data type as IP address and checked Array and then click OK.
Use PowerShell to create dynamically assigned ranges of IP addresses using DHCP scopes.
What is a DHCP scope?
Per TechNet, a DHCP scope “is the consecutive range of possible IP addresses that the DHCP server can lease to clients on a subnet. Scopes typically define a single physical subnet on your network to which DHCP services are offered. Scopes are the primary way for the DHCP server to manage distribution and assignment of IP addresses and any related configuration parameters to DHCP clients on the network.”
Let’s say you have three subnets on your local network, 192.168.1.0/24, 192.168.2.0/24, and 192.168.3.0/24. The first subnet, 192.168.1.0/24, is a server and network management subnet where all IPs are statically assigned. For this subnet, you would not need to configure a DHCP scope.
For the other subnets, 192.168.2.0/24 is for your wired clients and 192.168.3.0/24 is for your wireless clients. These clients will connect and disconnect to the network throughout the day and week. For these subnets, you would configure a DHCP scope to handle the automatic assignment of IP address leases to these clients.
Creating a DHCP scope using PowerShell
In our previous post we installed the DHCP Server role and authorized it in our Active Directory domain. Building off of that configuration, we will create the DHCP scopes for 192.168.2.0/24 and 192.168.3.0/24.
For 192.168.2.0/24, here are the requirements for the DHCP scope:
- Assignable addresses should be between 192.168.2.21 and 192.168.2.250.
- The lease duration should be the default of 8 days.
- DHCP clients should be assigned 192.168.2.1 as their default gateway.
- DHCP clients should be assigned 192.168.1.11 as their DNS server.
- A TFTP server, 192.168.1.10, needs to be provided in the event a VoIP phone is connected.
Create the scope
We begin by creating the base IPv4 scope. Note the example below uses a technique called splatting to make the parameter set more readable. We will use the Add-DhcpServerv4Scope cmdlet:
# Create an IPv4 DHCP Server Scope
$HashArgs = @{
    'Name' = '002_WiredClients';
    'Description' = 'Wired Clients';
    'StartRange' = '192.168.2.21';
    'EndRange' = '192.168.2.250';
    'SubnetMask' = '255.255.255.0';
    'State' = 'Active';
}

Add-DhcpServerv4Scope @HashArgsSet DHCP scope options
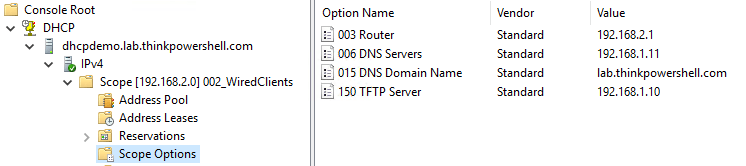
Now that we have created the scope, we can set the DHCP scope options. This includes things like (but are not limited to) the default gateway (aka ‘Router’), DNS servers, a domain name, and more.
Create a new server option
VoIP phones (e.g. a Cisco phone) requires this option be configured in order for the phone to get its configuration. By default, DHCP option 150 (TFTP server) is not available on a Windows DHCP Server. This option definition needs to be created.
# Create option definition for TFTP Server
Add-DhcpServerv4OptionDefinition -OptionId 150 -Type IPv4Address -Name "TFTP Server"
Set DHCP scope options
Now that we have created the scope and defined the additional option for a TFTP server, we can set the options for our scope using Set-DhcpServerv4OptionValue. Note that we use the ScopeId parameter to only set these options for this particular scope. If we were to omit this parameter, the option would be set at the server level, and would inherited by all scopes if they didn’t have the option explicitly set at the scope level.
# Set DHCP scope options
$HashArgs = @{
    'ScopeId' = '192.168.2.0';
    'DnsServer' = '192.168.1.11';
    'DnsDomain' = 'lab.thinkpowershell.com';
    'Router' = '192.168.2.1';
}

Set-DhcpServerv4OptionValue @HashArgs

# Set TFTP option
Set-DhcpServerv4OptionValue -ScopeId 192.168.2.0 -OptionId 150 -Value 192.168.1.10
Create a DHCP Scope with a short lease duration
We have created the DHCP scope for wired clients, and now we want to create the scope for wireless clients. In our scenario, we know that we may see many different wireless clients in a given week, but most clients are only around for a single day at a time. I could expand the address range I allow for clients, but instead I am going to shorten the default lease duration to 1 day, so that addresses are only committed to a client for 24 hours at a time. I can use the LeaseDuration parameter and the format day.hrs:mins:secs to set that requirement.
# Create an IPv4 DHCP Server Scope
$HashArgs = @{
    'Name' = '003_WirelessClients';
    'Description' = 'Wireless Clients';
    'StartRange' = '192.168.3.21';
    'EndRange' = '192.168.3.250';
    'SubnetMask' = '255.255.255.0';
    'LeaseDuration' = '1.00:00:00' #  day.hrs:mins:secs
    'State' = 'Active';
}

Add-DhcpServerv4Scope @HashArgs

# Set DHCP scope options
$HashArgs = @{
    'ScopeId' = '192.168.3.0';
    'DnsServer' = '192.168.1.11';
    'DnsDomain' = 'lab.thinkpowershell.com';
    'Router' = '192.168.3.1';
}

Set-DhcpServerv4OptionValue @HashArgsCopy DHCP scopes from an existing Windows DHCP Server
If you are already using a Windows DHCP server in your environment but are migrating to a new DHCP server, you can use PowerShell to copy the configured scopes from your old server to your new server:
# Copy DHCP scopes from one DHCP server to another
Get-DhcpServerv4Scope -ComputerName OldDhcpServer | Add-DhcpServerv4Scope -ComputerName NewDhcpServer
Next Steps: Creating DHCP Reservations
DHCP is great for being able to avoid statically assigning IP addresses to devices, but how do you take advantage of the dynamic capability of DHCP, while still providing certain types of devices with a consistent, predictable address? In my next post, we will cover creating and migrating DHCP reservations.
Introduction[]
The purpose of this article is to detail the steps required to set up your Microsoft Windows 2012 DHCP server to support Cisco IP Telephones.
Steps[]
- Configure the Predefined options
- Configure the Scope options
- Restart the DHCP Service
Detailed Steps[]
log in to your windows 2012 DHCP server and open the DHCP console
Configure the Predefined options[]
Step 1 Right-click on IPv4 in the and select Set Predefined Options

Step 2 In this pop-up window click Add
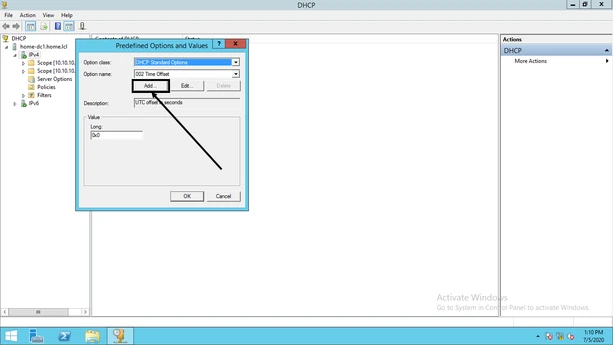
Step 3 Enter the following Information in the Pop-up Window
- Name: Enter a name that makes sense
- Data type: IP Address
- Code: 150
- Description: enter something that makes sense

Step 4 Right-Click on scope options under a scope that will serve IP Phones and select Configure options

Step 5 In the pop-up window scroll down to option 150 Type the name of your CUCM TFTP server into the «Server Name» Box and click resolve if the name is in DNS it will resolve to an IP address, then click add.
Step 5a if your CUCM is not in DNS (moment of silence) then you can add it by entering the IP address into the window and clicking add

Step 6 in the Scope options you should see your new Option 150 in the list of Scope Options

Step 7 Right Click on the Server Name in the DHCP Console and go to All tasks > Restart

Step 8 you should see a screen like below and then be presented with your server up and ready


Для IP-телефонов Cisco адресация может быть назначена вручную или при помощи протокола DHCP. При этом устройствам требуется доступ до TFTP сервера, который содержит файлы конфигурации телефона формата .cnf, при помочи которых телефон связывается с CUCM или CME.
Телефоны скачивают свою конфигурацию с TFTP сервера и когда телефон запускается и у него нет предварительно настроенного IP-адреса и TFTP-сервера, он отправляет запрос с параметром 150 (option 150) на сервер DHCP для получения этой информации.
Опция 150 DHCP является собственностью компании Cisco. Стандартом IEEE, который соответствует этому требованию, является Option 66. Как и Option 150, Option 66 используется для указания имени TFTP-сервера.
Option 66 является открытым стандартом, определенным в RFC 2132, который поддерживает устройства Juniper.
При этом между этими опциями есть разница:
- DHCP Option 150 поддерживает список TFTP-серверов (множество IP-адресов серверов).
- DHCP Option 66 поддерживает только IP-адрес или имя хоста одного сервера TFTP.
Настройка
Конфигурация Juniper DHCP Option 66:
set system services dhcp pool 10.1.1.0/24 boot-file test.cnf // option 67
set system services dhcp pool 10.1.1.0/24 next-server 20.1.1.25 // option 66
Мы можем указать следующий TFTP-сервере как глобально, так и специфично для пула. Если следующий сервер настроен в обоих местах, тогда будет использоваться IP-адрес, указанный в пуле.
Конфигурация Cisco DHCP Option150:
ip dhcp pool vlan 10
network 192.168.10.0 255.255.255.0
default-router 192.168.10.254
option 150 ip 10.10.22.99 10.10.22.100
Тут, как видно, можно сразу настроить несколько IP-адресов.
А если хотите поподробнее узнать про настройку DHCP сервера на оборудовании Cisco, то про это прочитать можно тут, тут и тут.
Windows Server 2012 DHCP Failover feature is really something we should have a long time ago. Before this feature, when we wanted to achieve DHCP service redundancy, we had to have at least two DHCP servers and we had to split each of our scopes into two. For example, if we had a 192.168.0.0/24 scope, we set up one DHCP server to hand out addresses from 192.168.0.1 to 192.168.0.129 and another DHCP server handing out addresses from 192.168.0.129 to 192.168.0.254. This is just an example. And it is an easy one. If had network such as /27 or /21, a math could be a little bit more complicated.
Thankfully, this is over. Now we can have one DHCP server setup correctly for a particular scope, let’s say 192.168.0.0/24, handing out all addresses from 192.168.0.1 to 192.168.0.254, and add another DHCP server that can hand out addresses if primary server fails, or handing out addresses along with the primary server. We can achieve this with only few mouse clicks!
So, here is our scenario…
We have two domain controllers running Windows 2012R2 Server Core with DHCP server role installed. Both DHCP servers are authorized to the domain. Only the DC-CORE-1 is setup with a test scope:

And we can verify that our client received the IP parameters from DC-CORE-1:
Before we create our failover, let’s add some custom DHCP options to our first server. These options are common in many enterprises and will help us later to see how they can cause us problems.
These custom options we will create:
- 150 TFTP Servers
- 161 Wyse FTPServers
- 162 Wyse FTP Starting Path
First option lists TFTP servers for IP phones, for example, and last two are used for VDI environment, or Virtual Desktop Infrastructure. These are just examples. We can have other options as well, such as option that LWAP access points use for finding a wireless LAN controller. Bottom line is we have these options and they can cause problems, as we shall see.
Let’s create option 150…
In the DHCP Manager, expand DC-CORE-1.popravak.local, right click IPv4 and click “Set Predefined Options…“:
Then we click Add and create our TFTP custom option:
Then we add our TFTP servers:
This is just example of creating a custom option. Other options are created in a similar fashion…
Now let’s try setting up our DHCP Failover Cluster.
Right click the scope and click “Configure Failover…“:
Then complete the wizard…
We select scope or scopeS.
Then chose our partner server.
Give a name to this relationship, select if we want active/passive or active/active mode and percentage of IP address distribution. We also give a shared secret to be used for authentication purposes.
Finally, we complete the wizard.
We can see that the failover setup was successful.
Fine. But before we test the failover, let’s add custom attributes into play. For this we will create another scope for IP phones. This scope will use 192.168.0.0/24 address space and each IP phone requires one ore more TFTP server’s IP addresses. So we add previously created option 150.
Now let’s replicate this pool with our partner server.
Whoops!
We can see that now the failover of our pool that uses custom options failed with the error message:
Configure failover failed. Error: 20010. The specified option does not exist.
This will happen with any scope that has one or more custom DHCP attributes. This is what causes our replication to fail:

Because we have to have these attributes, what are we going to do? Well, we have to create the same custom attributes on our partner server and then try to replicate our scope. We don’t need to create scopes on partner server, because they will replicate, but just create the attributes that will be used in particular scope we are trying to replicate. The 150 attribute in this case. So we go through the “Set Predefined Options…” on the partner server. Once we do that, we can try to replicate our IP phones scope.
Now we have a success!
We don’t have the same parameters within the custom attributes we create in our partner scope. For example, IP addresses of TFTP servers don’t have to match those on the primary server. Perhaps types don’t have to match either. Only Code has to match. A setup such as this may or may not make sense, but that’s another story.
Now, let’s shutdown the DHCP service on primary server.

This will simulate the DC-CORE-1 server failure. From the DHCP standpoint of course. Now we renew our IP address. And we can see that we received our IP address from the partner server.

Very nice feature 🙂