
Как вы знаете Server Core в Windows Server 2008 не включает в себя традиционный полный графический интерфейс пользователя (GUI).
Как и в стандартной (полной) установке Windows Server 2008, брандмауэр Windows включен по умолчанию, и большинство сетевых портов сразу после установки блокируются. Однако, поскольку основной задачей севера является предоставление некой услуги (будь то некая служба, файл, или что-то другое, что должно быть доступно по сети), вам необходимо разрешить определенный сетевой трафик на брандмауэре.
Одной из причин для открытия входящего трафика на брандмауэре – необходимость дистанционного управления сервером. Как уже упоминалось в предыдущих статьях, вы можете управлять Server Core с помощью локальной командной строки, дистанционно с помощью обычной MMC оснастки, через WinRM и WinRS, и даже через удаленный рабочий стол (хотя вы все равно получите обычное окно командной строки …)
В большинстве случаев после начальной конфигурации сервера, у Вас возникнет необходимость управления ролями и функциями, установленными на сервере, и вероятно, вы захотите использовать MMC-оснастку Administration tools. Есть три сценария удаленного управления через MMC:
- Роль сервера — когда роль сервера установлена на Вашем сервере, соответствующие порты открываются автоматически, позволяя вам удаленно управлять им. Никаких дополнительных настроек не требуется. Установив необходимые оснастки из Remote Server Administration Tools (RSAT) на вашей полноценной рабочей станции(сервере), вы сможете удаленно управлять сервером с Server Core.
- Сервер член домена — после того как сервер включен в домен, брандмауэр использует преднастроенный доменный профиль, который разрешает удаленное управление. Опять же, никаких дополнительных настроек не требуется.
- Сервер в рабочей группе — это сценарий, в котором потребуется внести изменения в конфигурацию брандмауэра. Если вы просто хотите задействовать все функции удаленного управления, можно использовать следующую команду:
Netsh advfirewall firewall set rule group=“remote administration” new enable=yes
Эта команда разрешает использование большинства методик удаленного управления и разрешает доступ к большинству оснасток MMC. Однако есть оснастки, удаленный доступ к которым настраивается дополнительно:
Диспетчер устройств (Device Manager)
Чтобы разрешить подключаться к диспетчеру устройств, нужно включить параметр политики «Allow remote access to the PnP interface».
Управление дисками (Disk Management)
Для этого на Server Core нужно запустить службы виртуальных дисков (Virtual Disk Service -VDS)
IPSec Management
Вы должны сначала установить удаленное управление для IPSec. Это можно сделать с помощью скрипта scregedit.wsf (он лежит в папке system32):
Cscript scregedit.wsf /im 1
Таким образом, доступ к большинству MMC оснасток удаленного администрирования, включается одним правилом на брандмауэре — Remote Administration firewall rules. Однако зачастую бывает необходимость предоставить доступ только ограниченному числу MMC-оснасток.
В брандмауэре существуют правила не для всех оснасток, в таблице перечислены существующие правила:

Чтобы включить любую из этих групп, нужно набрать команду:
Netsh advfirewall firewall set rule group=“<rule group>” new enable=yes
Где <rule group> — имя из приведенной таблицы.
Вы также можете удаленно включить их из брандмауэра Windows, запущенного в режиме Advanced Security. Для просмотра всех правил, просто сделайте сортировку по столбцу “Enable”:

Здравия всем! Для некоторых задач, к примеру сервер AD DS, хватает установки Windows Server без графического ядра. Для первоначальной настройки я предпочитаю отключать встроенный Firewall.
Заходим в наш сервер. Открывается консоль
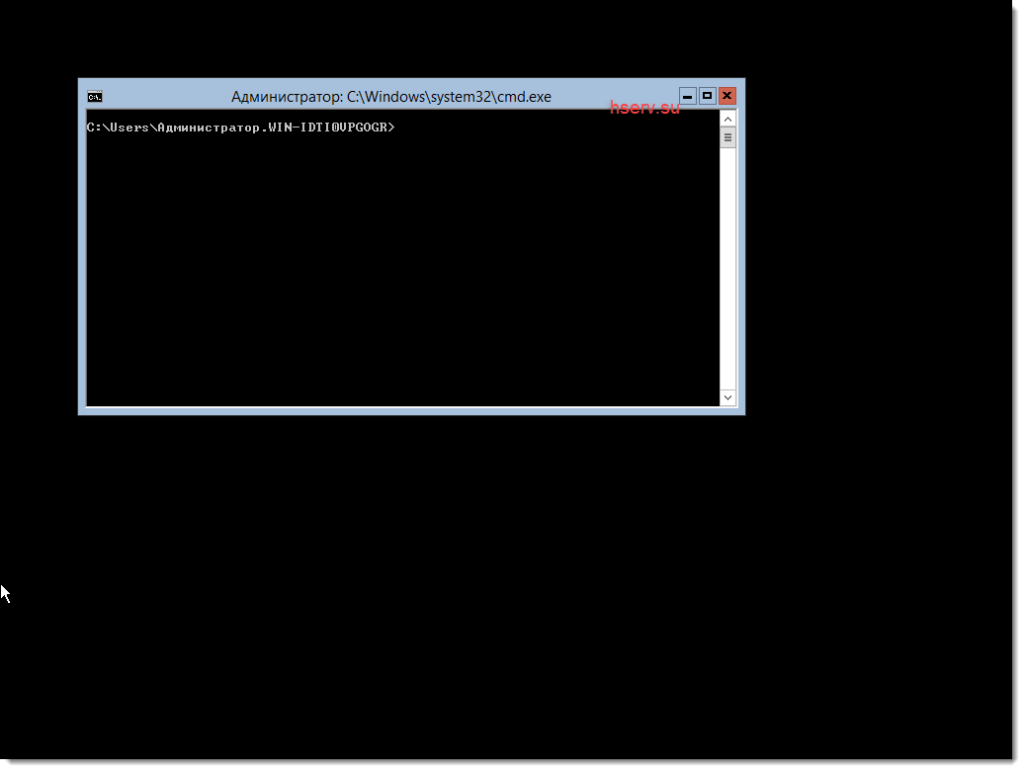
Введем в консоли команду
netsh advfirewall set allprofiles state off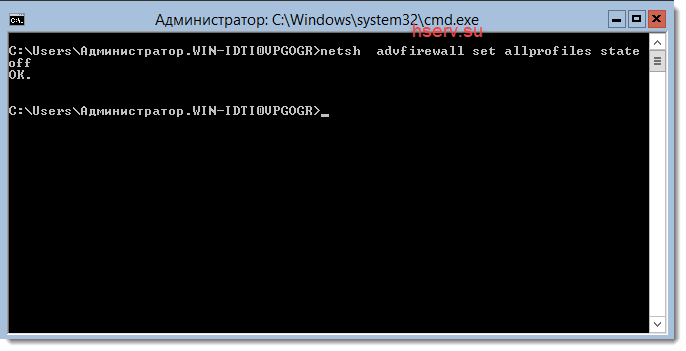
После этого сервер отключит Firewall.
Включение Firewall
Для включение обратная команда
netsh advfirewall set allprofiles state on
Заключение
Как видим из заметки отключаются все профили Firewall. Я не рекомендую оставлять сервер в таком виде в боевом режиме. Я использую этот режим, только для настройки сервера. После настройки сервера, я настраиваю Firewall и включаю его обратно.
Reading Time: 4 minutes
In Server Core installations of Windows Server 2008 the Windows Firewall is enabled by default. This means it’s locked up by default and offers little weakness towards unfriendly administrators and users. When you want to do something with your Server Core box you might want to open up the Windows Firewall a little bit to allow certain types of traffic.
From the console
First let’s look at managing the Windows Firewall from the Console of your Server Core box.
Disabling the firewall
To completely disable the firewall you can use the following commandline command straight from the console of your Server Core box:
netsh firewall set opmode disable
I should point out you should avoid using this command because it eliminates the firewall as a security measure completely, which is a bad thing. Temporarily disabling the firewall might be useful to troubleshoot network connectivity though. The command to enable the firewall after you successfully troubleshooted the problem is:
netsh firewall set opmode enable
Opening up the firewall
There are three ways to open up the Windows Firewall from the console of your Server Core box, without compromising the security of the system all together. You can:
- Enable specific services
- Open specific ports or specific port ranges
- Allow specific programs
To enable service exceptions
The Windows Firewall in a Server Core installation of Windows Server 2008 comes with a couple of default firewall exceptions. You can enable these exception to allow specific types of traffic through the firewall. For example, to allow File and Printer Sharing you can run the following command:
netsh firewall set service fileandprint
If at any point you need help with the set service command just type netsh firewall set service which will show you some help. Extra command line switches may allow you to specify another firewall profile and/or specify a firewall scope. (all, subnet or custom)
To open specific ports
If your situation demands you open up specific ports to allow incoming traffic through your firewall you can add specific port openings in your firewall. You can specify whether the traffic is UDP or TCP, which port number you’d like to open and which name you’d like to give your portopening, like this:
netsh firewall set portopening protocol=TCP | UDP port=PortnumberHere name=AnyNameHere
If at any point you need help with the set service command just type netsh firewall set portopening which will show you some help. Extra command line switches may allow you to specify another firewall profile and/or specify a firewall scope. (all, subnet or custom)
To allow specific programs
Another way to open up the firewall is to allow specific programs to communicate with the outside world. The Windows Firewall will allow any traffic to the executables you specify. Again you can also specify a name for the rule. Use this command to allow specific programs:
netsh firewall set allowedprogram program=FullPathToExecutable name=AnyNameHere
If at any point you need help with the set service command just type netsh firewall set allowedprogram which will show you some help. Extra command line switches may allow you to specify another firewall profile and/or specify a firewall scope (all, subnet or custom)
Using Advanced Firewall commands
Alternatively you can use the spanking new Advanced Firewall, which enables you to control incoming as well as outgoing traffic, allows you to edit the firewall configuration in offline mode, (so you can change the settings, without committing any changes yet) monitor connections and import/export your firewall configuration.
There’s a nice webpage with more information on the Advanced Firewall functionality here. It shows you how to change settings through the commandline and how to change them using Group Policies.
Through Group Policy
Another way to manage the Windows Firewall on your Server Core box is to use Group Policy Objects. You can edit the local group policy of your Server Core box from a remote Windows box, which is useful if you want to set the settings in a graphical user interface for small amounts of Server Core boxes.
Alternatively you may harness the power of Active Directory, to change the settings on loads of Windows Server 2008 (Server Core) boxes automatically and without loads of administrative effort.
The settings for Windows Firewall are located in the WindowsFirewall.admx Administrative Template are located in the Computer Configuration part of the policy. The template includes the following settings for both the Standard Profile and the Domain Profile:
- Allow Authenticated IPSec Bypass
- Allow ICMP exceptions
- Allow inbound file and printer sharing exception
- Allow inbound remote administration exception
- Allow inbound Remote Desktop exceptions
- Allow inbound UPnP framework exceptions
- Allow local port exceptions
- Allow local program exceptions
- Allow logging
- Define inbound port exceptions
- Define inbound program exceptions
- Do not allow exceptions
- Prohibit notifications
- Prohibit unicast response to multicast or broadcast requests
- Protect all network Connections
Concluding
Completely disabling the Windows Firewall is a tempting way to circumvent the security measures in Windows Server 2008. As an alternative this blogpost shows you how to selectively and gradually open up the Windows firewall from the console of your Server Core box. For the faint of heart I included some hints to edit the local group policy.
Enterprise admins will probably already have a Windows Firewall policy in place, which they only have to adapt to manage Windows Server 2008 Server Core boxes.
Further reading
Group Policy Settings Reference Windows Server 2008 Beta 3
Command line firewall configuration
Netsh Command Line Switches And Examples For Windows 2003 And Windows XP
Wonderful Netsh
Networking and firewall
Managing Windows Firewall with Netsh
Improvements to the Windows firewall in Vista
How to configure the new Windows Server 2008 advanced firewall MMC snap-in
Still Very Much Alive and Kicking – netsh
New Networking Features in Windows Server 2008 and Windows Vista
The New Windows Firewall in Windows Vista and Windows Server 2008
Using the Netsh Advfirewall Command-Line Tool
Disclaimer Beta Software
The information on this webpage applies to software from Microsoft that was in testing phase but utilizable by experienced users by the time the webpage was written. This software has not been released for sale, distribution or usage for the general public. The information on this webpage and the beta software are provided «as is» without warranty of any kind, either expressed or implied, including, but not limited to, the implied warranties of merchantability and fitness for a particular purpose.
Introduction
Firewalls are a critical component of securing modern networks with internet access. Without firewalls in place, malicious actors could easily access and infect devices on a network. Properly configured firewalls substantially reduce undesirable communications.
This article explains how to create firewall rules using the Windows Firewall with Advanced Security console and Windows PowerShell on Windows Server 2016 / 2019 / 2022.
What is a Firewall?
A firewall controls the flow of data packets in and out of a network. It acts like a barrier, similar to how a physical firewall prevents the spread of fire between compartments. The firewall allows or blocks connections according to configured firewall rules.
Computers behind a firewall cannot receive data until it passes the filters. This greatly enhances security and reduces unauthorized access risks. Benefits of firewalls:
- Protect devices by blocking undesired traffic
- Notify administrators of connection attempts
- Log activity for monitoring
- Prevent spread of infections
- Reduce hacking risks
How Windows Server 2016 / 2019 / 2022 Firewalls Work
The Windows firewall acts as a barrier between local network devices and external networks. When a connection is attempted to a server, the firewall intercepts the traffic and evaluates it against the defined rules.
Only network packets that match the configured rules are allowed through. For example, a rule could allow TCP traffic on port 80 while blocking other ports. Carefully configured rules optimize security while allowing desired connections.
Windows provides inbound rules to control incoming traffic and outbound rules to filter outgoing traffic. Rules can be tailored for each network profile.
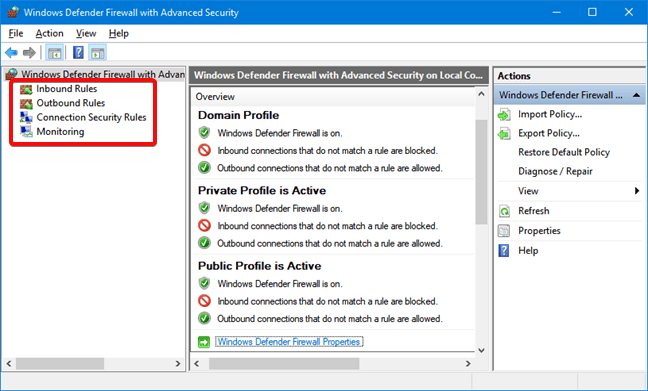
Windows Firewall with Advanced Security
Windows Firewall with Advanced Security provides the management interface for configuring Windows firewall settings. It comes built-in to Windows Server without needing additional licensing or hardware.
There are three default firewall profiles:
- Domain – For corporate networks with detected domain controllers
- Private – For home or office networks behind a gateway device
- Public – For untrusted public networks with internet access
Profiles allow custom rules per network type. You can enable, disable, or configure profiles independently.
Accessing the Firewall Console
To open the Windows Firewall with Advanced Security console:
- Open Server Manager > Tools > Windows Firewall with Advanced Security
- Search for “firewall” in the Start menu and launch the Windows Firewall shortcut
- Run wf.msc in the Run command (Win + R)
The left menu allows configuring inbound rules, outbound rules, connection security, and monitoring.
Configuring Firewall Rules
Firewall rules control whether to allow or block specific network connections. Rules can filter by:
- Program path
- Port and protocol
- Predefined service
- Source/destination IP
- Network interface
- And more…
Follow these steps to create an inbound firewall rule:
1. Open the Firewall console and select Inbound Rules
2. Click New Rule to launch the rule wizard
3. Select the rule type – Program, Port, Predefined, or Custom
4. Choose All Programs or a Program path
5. Choose Action (allow or block) or allow if connection is secured
6. Choose profiles
7. Name the rule and click Finish
Repeat the wizard for outbound rules. Once created, rules can be edited or disabled from the console.
Rules can also be created from PowerShell. For example:
PS C:\Users\Administrator> New-NetFirewallRule -DisplayName "Allow SSH" -Enabled True -Direction Inbound -Action Allow -Protocol TCP -LocalPort 22Monitor active connections under the Monitoring tab.
Conclusion
The Windows Firewall provides a flexible and granular rule-based firewall solution for Windows Server 2016, 2019 and 2022. The advanced interface allows creating detailed rules to filter incoming and outgoing traffic as needed. Monitor activity to verify your rules are working correctly. Careful configuration enhances security while allowing desired connections.
Configure and Manage Windows Firewall for Your Windows Server. In the realm of robust server management, the Windows Firewall emerges as a pivotal apparatus, unwaveringly shielding our Windows Server against diverse potential vulnerabilities, all while facilitating precise regulation of communication streams. As an elemental constituent of the Windows Server operating system, adeptly configuring and proficiently managing the Windows Firewall necessitates a nuanced comprehension of its functionalities. This article undertakes meticulous and exhaustive scrutiny of the multifaceted facets underpinning the configuration and management of the Windows Firewall within our Windows Server environment, furnishing invaluable discernments to fortify our server’s fortifications and fine-tune its operational efficiencies.
Configure and Manage Windows Firewall for Your Windows Server

Windows Firewall is a built-in security feature in the Windows operating system that acts as a barrier between a computer or network and potential threats from the internet or local network. It monitors and controls incoming and outgoing network traffic, helping to protect the system from unauthorized access and malicious activity. The next section of the article tells us more on how to turn off the Windows firewall.
Configuring Windows Firewall Using the GUI
Windows’s built-in graphical user interface (GUI) tools are the quickest way to manage the firewall for home and work users. One example of a GUI tool is the Windows Defender Firewall Control panel.
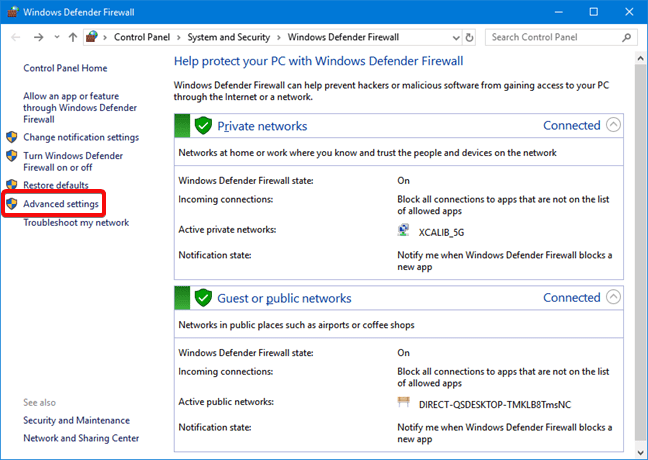
Using the Windows Defender Firewall Control Panel
The Windows Defender Firewall Control Panel, an integral facet of the Windows operating system, empowers users to orchestrate a robust line of defence for their systems. Through this accessible interface, users meticulously govern inbound and outbound traffic, fortifying their network security while maintaining seamless communication integrity. Below are several ways to launch the Windows Defender Firewall Control Panel:
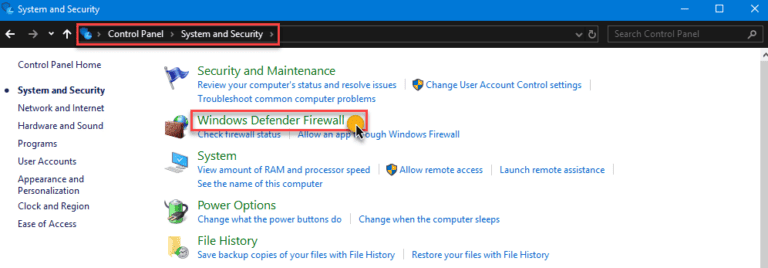
Method 1
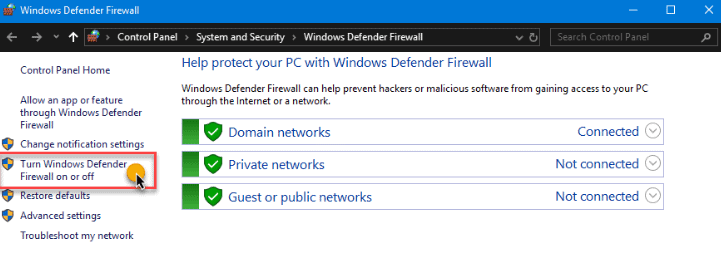
Navigate to Control Panel → System and Security → Windows Defender Firewall.
Method 2
Click on Start and type Windows Defender Firewall. Click on the Windows Defender Firewall link.

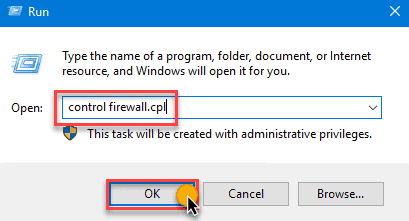
Method 3
Open the Run dialog box, type in firewall.cpl, and click OK.
We should recognize the list of network profiles—Domain, Private, and Guest or public networks in the Windows Defender Firewall Control Panel. Click the Turn Windows Defender on or off link on the left-hand side.
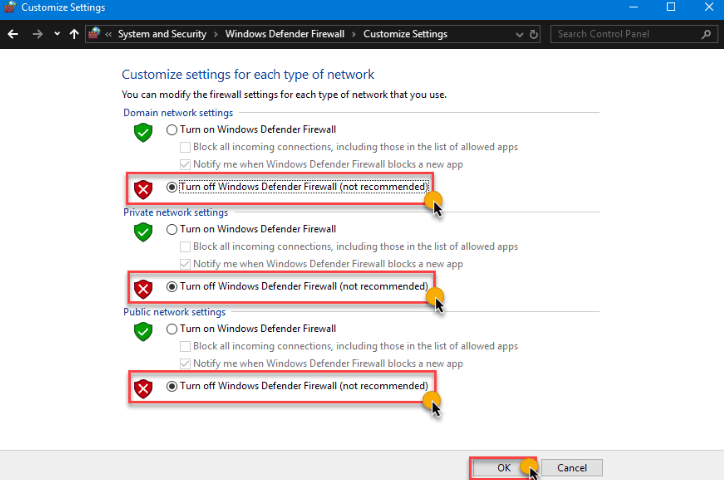
We turn off the Windows firewall for each network profile on the Customize Settings page. The Windows Firewall is disabled on all network profiles in the example below.
Using the Group Policy Management Console
By deploying a group policy object (GPO), systems administrators turn off the Windows Firewall for selected or all computers in the domain. Once deployed, disabling Windows Firewall is automated as the configuration enforces it via policy on all computers in scope.
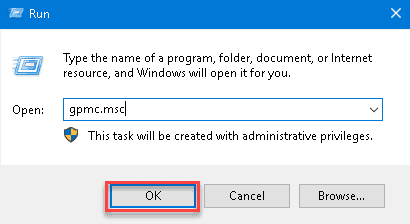
In this case, we are using the Group Policy Management Console (GPMC) on the server to create a GPO. To do so, run the gpmc.msc command in the Run dialog.
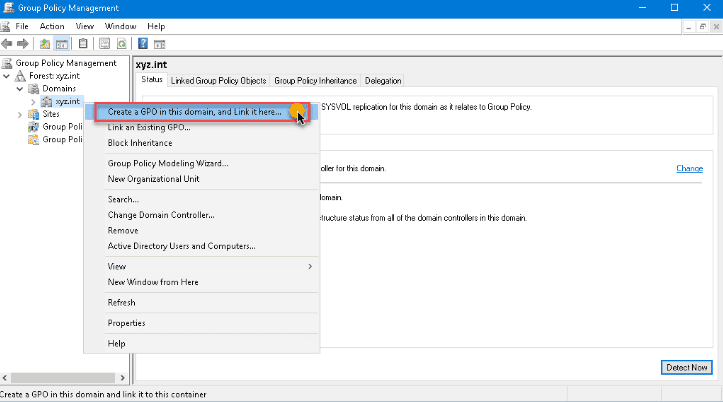
Expand the forest in the Group Policy Management console and select the domain where we create the GPO. Once we have created the GPO in the domain right-click on it, and click Create a GPO in this domain, and Link it here…
The New GPO dialog box pops up. Type a name for the GPO that we create. Right click the new GPO and then select Edit. The GPO opens in the Group Policy Management Editor. Then, expand these folders:
- Computer Configuration
- Policies
- Administrative Templates
- Network
- Network Connections
- Windows Defender
- Firewall
- Domain Profile
Here we see the list of all Windows Firewall profiles that we implement in our domain. For this example, in the settings list on the right pane, double-click on Windows Defender Firewall: Protect all network connections to open its properties.
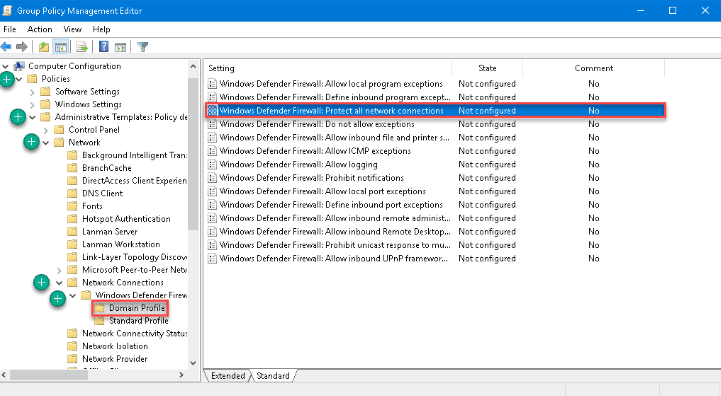
Once the settings property is open, change the value by selecting Disabled, then click OK.

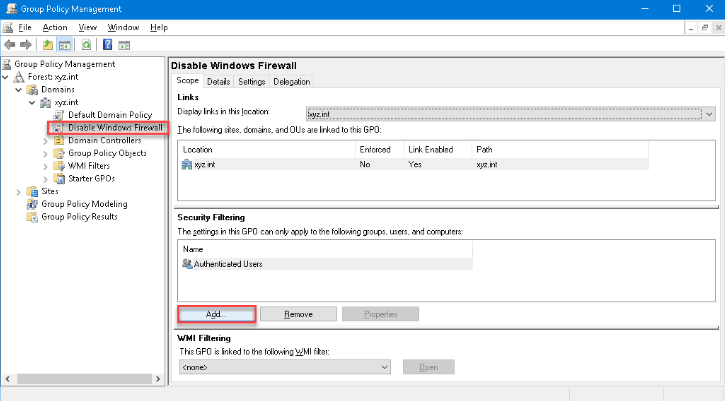
Apply the same option once more to the settings for the Standard Profile. Now that we have created the GPO, we need to deploy the GPO to the domain computers. Select the Disable Windows Firewall GPO in the Group Policy Management to apply the GPO. Then, click the Add button under the Security Filtering section in the Scope tab.
Look for Domain Computers in the Select User, Computer, or Group dialog box, then click OK. Doing so ensures that we apply a GPO to all computers that are members of the Domain Computers group.
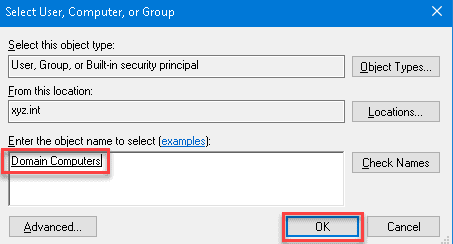
The system turns off the firewall the next time the client computers get the policy update.
Now that the GPO has been created and deployed, we test whether the GPO is working by forcing a policy update. Run the gpupdate /force on the client computer to test the policy update.
Try our Active Directory & Office 365 Reporting & Auditing Tools
Try us out for Free. 100’s of report templates available. Easily customise your own reports on AD, Azure AD & Office 355.
Configuring Windows Firewall Using the CLI
Most, if not all, of Windows GUI functions have command-line equivalents. Using the command line interface (CLI) is sometimes quicker than going to different Windows locations using the GUI options. Additionally, the command-line options enable users to script or automate the task. Here are some examples:
Managing Windows Firewall with the Netsh Command
A legacy but valuable handy utility called netsh is useful to manage network configurations on a computer or, in this case, disable the Windows Firewall. Using netsh advfirewall set, we manage Windows Firewall individually on each location or all network profiles.
- netsh advfirewall set currentprofile state – this command manages the presently active network profile firewall.
- netsh advfirewall set domainprofile state – manages the firewall on the Domain network profile only.
- netsh advfirewall set privateprofile state – manages the firewall on the Private network profile only.
- netsh advfirewall set publicprofile state – this command will only manage the firewall on the Public network profile.
- netsh advfirewall set all profiles state – this command will manage all network profiles simultaneously.
Integrating netsh commands increases the opportunity for exact firewall configuration and management for experienced users seeking granular control, ultimately bolstering the server’s resistance to changing cyber threats.
Using the Set-NetFirewallProfile PowerShell Cmdlet
					Set-NetFirewallProfile -All -Enabled True
Set-NetFirewallProfile -Profile  -Enabled False
The command below turns off the firewall on the Public, Private, and Domain network profiles:
Set-NetFirewallProfile -Profile Domain,Private,Public -Enabled False
Without specifying any profile names, the example below shows how to disable Windows Firewall on all network profiles by using the –All parameter switch.
Managing Windows Firewall Remotely Using PowerShell
When we need to manage firewalls on many computers, it is inefficient to log into each computer and run the commands manually. Especially in a network environment, we disable remotely using PowerShell.
Note: This procedure requires us to enable Windows Remote Management or WinRM on the target computer. In most cases, WinRM is available for domain-joined computers for remote management purposes.
If we plan to disable Windows Firewall on one remote computer at a time, we use the Enter-PsSession cmdlet to issue the commands to the remote computer.
					Enter-PsSession -ComputerName WINSRV01
Set-NetFirewallProfile -All -Enabled False
The above process is good only if we work on a few remote computers. But, if we have many computers where we need to turn them off, we need an approach more adapted to scripting. For that, we use the Invoke-Command cmdlet.
					$computers = @('WINSRV01','WINSRV02')
$computers | ForEach-Object {
	Invoke-Command -ComputerName $_ {
		Set-NetFirewallProfile -All -Enabled False
	}
}
As we see from the above snippet, we store the remote computers’ names in the $computers variable as an array. Then, PowerShell loops through each remote computer to run the Invoke-Command cmdlet and issue the Set-NetFirewallProfile -All -Enabled False command.
Windows Firewall with Advanced Security
The distinction between Windows Firewall and Windows Firewall with Advanced Security lies in their complexity and capabilities. Windows Firewall functions as a primary, user-friendly firewall by regulating incoming and outgoing network traffic using predefined rules, while Windows Firewall with Advanced Security provides advanced users and administrators with a more intricate toolset, enabling highly customized configurations encompassing criteria such as IP addresses, protocols, users, and services, making it particularly suitable for complex network environments.
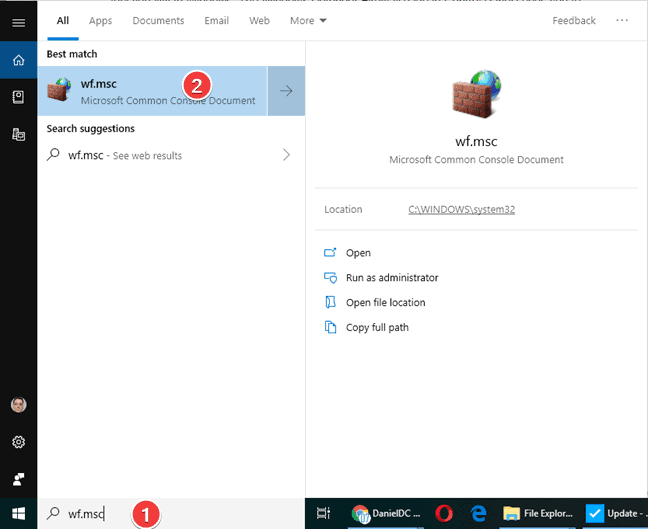
In all three Windows versions, looking for the executable file for Windows Defender Firewall with Advanced Security is the simplest way to launch it. Click or press on the result after typing wf.msc into the Windows search box.
In the Control Panel, we access the Windows Defender Firewall with Advanced Security by clicking System and Security -> Windows Defender Firewall and clicking or tapping Advanced settings.
Within the Windows operating system, a shortcut to access Windows Defender Firewall with Advanced Security is conveniently located in the Start Menu by following this route: Start Menu → Windows Administrative Tools → Windows Defender Firewall with Advanced Security.
Advantages of Windows Firewall with Advanced Security
The tool grants us entry to all functionalities within the Windows Defender Firewall. Here are several advantages of its utilization:
- Diminishes the vulnerability to network-based security breaches. While not a comprehensive security solution, Windows Defender Firewall curtails the likelihood of a triumphant network assault.
- Verifies entry to our device, employing IPsec (Internet Protocol Security) to ensure data integrity and confidentiality.
- Furnishes firewall capabilities sans extra expenditures. As an integral component of Windows, Windows Defender Firewall provides firewall functionality without financial outlay or the need for additional software installation.
Windows Defender Firewall with Advanced Security confers these advantages through its featured mechanisms:
- Inbound and Outbound Rules: These rules enable precise control over incoming and outgoing network traffic, allowing customization based on port numbers, programs, and IP addresses.
- Connection Security Rules: By defining encryption parameters and authentication methods, these rules establish secure communication channels, enhancing network security.
- Monitoring: The firewall offers comprehensive monitoring tools that track events like rule matches and connection attempts, aiding in timely threat detection and response.
Thank you for reading how to Configure and Manage Windows Firewall for Your Windows Server. We shall conclude,
Configure and Manage Windows Firewall for Your Windows Server Conclusion
In conclusion, mastering the configuration and management of the Windows Firewall on our Windows Server is paramount in upholding a secure and optimally performing server environment. The Windows Defender Firewall Control Panel provides an accessible gateway to safeguarding communication integrity and thwarting potential vulnerabilities. Additionally, for those aiming for a heightened degree of control, integrating netsh commands offers an advanced avenue to fine-tune firewall settings, culminating in a comprehensive approach that fortifies our server’s defence against a dynamic digital landscape.
Try InfraSOS for FREE
Try InfraSOS Active Directory, Azure AD & Office 365 Reporting & Auditing Tool
-
Free 15-Days Trial - SaaS AD Reporting & Auditing Solution