
You can run any application in Docker as long as it can be installed and executed unattended, and the base operating system supports the app. Windows Server Core runs in Docker which means you can run pretty much any server or console application in Docker.
TL;DR
Update! For a full walkthrough on Dockerizing Windows apps, check out my book Docker on Windows and my Pluralsight course Modernizing .NET Apps with Docker.
Check out these examples:
- openjdk:windowsservercore — Docker image with the Java runtime on Windows Server Core, by Docker Captain Stefan Scherer
- elasticsearch:nanoserver — Docker image with a Java app on Nano Server
- kibana:windowsservercore — Docker image with a Node.js app on Windows Server Core
- nats:nanoserver — Docker image with a Go app on Nano Server
- nerd-dinner — Docker image with an ASP.NET app on Windows Server Core
- dotnetapp — Docker image with a .NET Core app on Nano Server
The 5 Steps
Lately I’ve been Dockerizing a variety of Windows apps — from legacy .NET 2.0 WebForms apps to Java, .NET Core, Go and Node.js. Packaging Windows apps as Docker images to run in containers is straightforward — here’s the 5-step guide.
1. Choose Your Base Image
Docker images for Windows apps need to be based on microsoft/nanoserver or microsoft/windowsservercore, or on another image based on one of those.
Which you use will depend on the application platform, runtime, and installation requirements. For any of the following you need Windows Server Core:
- .NET Framework apps
- MSI installers for apps or dependencies
- 32-bit runtime support
For anything else, you should be able to use Nano Server. I’ve successfully used Nano Server as the base image for Go, Java and Node.js apps.
Nano Server is preferred because it is so drastically slimmed down. It’s easier to distribute, has a smaller attack surface, starts more quickly, and runs more leanly.
Being slimmed down may have problems though — certain Windows APIs just aren’t present in Nano Server, so while your app may build into a Docker image it may not run correctly. You’ll only find that out by testing, but if you do find problems you can just switch to using Server Core.
Unless you know you need Server Core, you should start with Nano Server. Begin by running an interactive container with
docker run -it --rm microsoft/nanoserver powershelland set up your app manually. If it all works, put the commands you ran into a Dockerfile. If something fails, try again with Server Core.
Derived Images
You don’t have to use a base Windows image for your app. There are a growing number of images on Docker Hub which package app frameworks on top of Windows.
They are a good option if they get you started with the dependencies you need. These all come in Server Core and Nano Server variants:
- microsoft/iis — basic Windows with IIS installed
- microsoft/aspnet — ASP.NET installed on top of IIS
- microsoft/aspnet:3.5 — .NET 3.5 installed and ASP.NET set up
- openjdk — OpenJDK Java runtime installed
- golang — Go runtime and SDK installed
- microsoft/dotnet — .NET runtime and SDK installed.
A note of caution about derived images. When you have a Windows app running in a Docker container, you don’t connect to it and run Windows Update to apply security patches. Instead, you build a new image with the latest patches and replace your running container. To support that, Microsoft release regular updates to the base images on Docker Hub, tagging them with a full version number (10.0.14393.693 is the current version).
Base image updates usually happen monthly, so the latest Windows Server Core and Nano Server images have all the latest security patches applied. If you build your images from the Windows base image, you just need to rebuild to get the latest updates. If you use a derived image, you have a dependency on the image owner to update their image, before you can update yours.
If you use a derived image, make sure it has the same release cadence as the base images. Microsoft’s images are usually updated at the same time as the Windows image, but official images may not be.
Alternatively, use the Dockerfile from a derived image to make your own “golden” image. You’ll have to manage the updates for that image, but you will control the timescales. (And you can send in a PR for the official image if you get there first).
2. Install Dependencies
You’ll need to understand your application’s requirements, so you can set up all the dependencies in the image. Both Nano Server and Windows Server Core have PowerShell set up, so you can install any software you need using PowerShell cmdlets.
Remember that the Dockerfile will be the ultimate source of truth for how to deploy and run your application. It’s worth spending time on your Dockerfile so your Docker image is:
- Repeatable. You should be able to rebuild the image at any time in the future and get exactly the same output. You should specify exact version numbers when you install software in the image.
- Secure. Software installation is completely automated, so you should make sure you trust any packages you install. If you download files as part of your install, you can capture the checksum in the Dockerfile and make sure you verify the file after download.
- Minimal. The Docker image you build for your app should be as small as possible, so it’s fast to distribute and has a small surface area. Don’t install anything more than you need, and clean up any installations as you go.
Adding Windows Features
Windows features can be installed with Add-WindowsFeature. If you want to see what features are available for an image, start an interactive container with docker run -it --rm microsoft/windowsservercore powershell and run Get-WindowsFeature.
On Server Core you’ll see that .NET 4.6 is already installed, so you don’t need to add features to run .NET Framework applications.
.NET is backwards-compatible, so you can use the installed .NET 4.6 to run any .NET application, back to .NET 2.0. In theory .NET 1.x apps can run too. I haven’t tried that.
If you’re running an ASP.NET web app but you want to use the base Windows image and control all your dependencies, you can add the Web Server and ASP.NET features:
RUN Add-WindowsFeature Web-server, NET-Framework-45-ASPNET, Web-Asp-Net45
Downloading Files
There’s a standard pattern for installing dependencies from the Internet — here’s a simple example for downloading Node.js into your Docker image:
ENV NODE_VERSION="6.9.4" `
    NODE_SHA256="d546418b58ee6e9fefe3a2cf17cd735ef0c7ddb51605aaed8807d0833beccbf6"

WORKDIR C:/node

RUN Invoke-WebRequest -OutFile node.exe "https://nodejs.org/dist/v$($env:NODE_VERSION)/win-x64/node.exe" -UseBasicParsing; `
    if ((Get-FileHash node.exe -Algorithm sha256).Hash -ne $env:NODE_SHA256) {exit 1} ;
The version of Node to download and the expected SHA-256 checksum are captured as environment variables with the ENV instruction. That makes it easy to upgrade Node in the future — just change the values in the Dockerfile and rebuild. It also makes it easy to see what version is present in a running container, you can just check the environment variable.
The download and hash check is done in a single RUN instruction, using Invoke-WebRequest to download the file and then Get-FileHash to verify the checksum. If the hashes don’t match, the build fails.
After these instructions run, your image has the Node.js runtime in a known location — C:\node\node.exe. It’s a known version of Node, verified from a trusted download source.
Expanding Archives
For dependencies that come packaged, you’ll need to install them as part of the RUN instruction. Here’s an example for Elasticsearch which downloads and uncompresses a ZIP file:
ENV ES_VERSION="5.2.0" `
    ES_SHA1="243cce802055a06e810fc1939d9f8b22ee68d227" `
    ES_HOME="c:\elasticsearch"

RUN Invoke-WebRequest -outfile elasticsearch.zip "https://artifacts.elastic.co/downloads/elasticsearch/elasticsearch-$($env:ES_VERSION).zip" -UseBasicParsing; `
    if ((Get-FileHash elasticsearch.zip -Algorithm sha1).Hash -ne $env:ES_SHA1) {exit 1} ; `
    Expand-Archive elasticsearch.zip -DestinationPath C:\ ; `
    Move-Item c:/elasticsearch-$($env:ES_VERSION) 'c:\elasticsearch'; `
    Remove-Item elasticsearch.zip
It’s the same pattern as before, capturing the checksum, downloading the file and checking the hash. In this case, if the hash is good the file is uncompressed with Expand-Archive, moved to a known location and the Zip file is deleted.
Don’t be tempted to keep the Zip file in the image, “in case you need it”. You won’t need it — if there’s a problem with the image you’ll build a new one. And it’s important to remove the package in the same RUN command, so the Zip file is downloaded, expanded and deleted in a single image layer.
It may take several iterations to build your image. While you’re working on it, it’s a good idea to store any downloads locally and add them to the image with
COPY. That saves you downloading large files every time. When you have your app working, replace theCOPYwith the proper download-verify-deleteRUNpattern.
Installing MSIs
You can download and run MSIs using the same approach. Be aware that not all MSIs will be built to support unattended installation. A well-built MSI will support command-line switches for any options available in the UI, but that isn’t always the case.
If you can install the app from an MSI you’ll also need to ensure that the install completed before you move on to the next Dockerfile instruction — some MSIs continue to run in the background. This example from Stefan Scherer’s iisnode Dockerfile uses Start-Process ... -Wait to run the MSI:
RUN Write-Host 'Downloading iisnode' ; \
    $MsiFile = $env:Temp + '\iisnode.msi' ; \
    (New-Object Net.WebClient).DownloadFile('https://github.com/tjanczuk/iisnode/releases/download/v0.2.21/iisnode-full-v0.2.21-x64.msi', $MsiFile) ; \
    Write-Host 'Installing iisnode' ; \
    Start-Process msiexec.exe -ArgumentList '/i', $MsiFile, '/quiet', '/norestart' -NoNewWindow -Wait
3. Deploy the Application
Packaging your own app will be a simplified version of step 2. If you already have a build process which generates an unattended-friendly MSI, you can can copy it from the local machine into the image and install it with msiexec:
COPY UpgradeSample-1.0.0.0.msi /

RUN msiexec /i c:\UpgradeSample-1.0.0.0.msi RELEASENAME=2017.02 /qn
This example is from the Modernize ASP.NET Apps — Ops Lab from Docker Labs on GitHub. The MSI supports app configuration with the RELEASENAME option, and it runs unattended with the qn flag.
With MSIs and other packaged deployment options (like Web Deploy) you need to choose between using what you currently have, or changing your build output to something more Docker friendly.
Web Deploy needs an agent installed into the image which adds an unnecessary piece of software. MSIs don’t need an agent, but they’re opaque, so it’s not clear what’s happening when the app gets installed. The Dockerfile isn’t an explicit deployment guide if some of the steps are hidden.
An xcopy deployment approach is better, where you package the application and its dependencies into a folder and copy that folder into the image. Your image will only run a single app, so there won’t be any dependency clashes.
This example copies an ASP.NET Web app folder into the image, and configures it with IIS using PowerShell:
RUN New-Item -Path 'C:\web-app' -Type Directory; `
    New-WebApplication -Name UpgradeSample -Site 'Default Web Site' -PhysicalPath 'C:\web-app'

COPY UpgradeSample.Web /web-app
If you’re looking at changing an existing build process to produce your app package, you should think about building your app in Docker too. Consolidating the build in a multi-stage Dockerfile means you can build your app anywhere without needing to install .NET or Visual Studio.
See Dockerizing .NET Apps with Microsoft’s Build Images on Docker Hub.
4. Configure the Entrypoint
When you run a container from an image, Docker starts the process specified in the CMD or ENTRYPOINT instruction in the Dockerfile.
Modern app frameworks like .NET Core, Node and Go run as console apps — even for Web applications. That’s easy to set up in the Dockerfile. This is how to run the open source Docker Registry — which is a Go application — inside a container:
CMD ["registry", "serve", "config.yml"]
Here registry is the name of the executable, and the other values are passed as options to the exe.
ENTRYPOINTandCMDwork differently and can be used in conjunction. See how CMD and ENTRYPOINT interact to learn how to use them effectively.
Starting a single process is the ideal way to run apps in Docker. The engine monitors the process running in the container, so if it stops Docker can raise an error. If it’s also a console app, then log entries written by the app are collected by Docker and can be viewed with docker logs.
For .NET web apps running in IIS, you need to take a different approach. The actual process serving your app is w3wp.exe, but that’s managed by the IIS Windows service, which is running in the background.
IIS will keep your web app running, but Docker needs a process to start and monitor. In Microsoft’s IIS image they use a tool called ServiceMonitor.exe as the entrypoint. That tool continually checks a Windows service is running, so if IIS does fail the monitor process raises the failure to Docker.
Alternatively, you could run a PowerShell startup script to monitor IIS and add extra functionality — like tailing the IIS log files so they get exposed to Docker.
5. Add a Healthcheck
HEALTHCHECK is one of the most useful instructions in the Dockerfile and you should include one in every app you Dockerize for production. Healthchecks are how you tell Docker if the app inside your container is healthy.
Docker monitors the process running in the container, but that’s just a basic liveness check. The process could be running, but your app could be in a failed state — for a .NET Core app, the dotnet executable may be up but returning 503 to every request. Without a healthcheck, Docker has no way to know the app is failing.
A healthcheck is a script you define in the Dockerfile, which the Docker engine executes inside the container at regular intervals (30 seconds by default, but configurable at the image and container level).
This is a simple healthcheck for a web application, which makes a web request to the local host (remember the healthcheck executes inside the container) and checks for a 200 response status:
HEALTHCHECK CMD powershell -command `
    try { `
     $response = iwr http://localhost:80 -UseBasicParsing; `
     if ($response.StatusCode -eq 200) { return 0} `
     else {return 1}; `
    } catch { return 1 }
Healthcheck commands need to return 0 if the app is healthy, and 1 if not. The check you make inside the healthcheck can be as complex as you like — having a diagnostics endpoint in your app and testing that is a thorough approach.
Make sure your
HEALTHCHECKcommand is stable, and always returns0or1. If the command itself fails, your container may not start.
Any type of app can have a healthcheck. Michael Friis added this simple but very useful check to the Microsoft SQL Server Express image:
HEALTHCHECK CMD ["sqlcmd", "-Q", "select 1"]
The command verifies that the SQL Server database engine is running, and is able to respond to a simple query.
There are additional advantages in having a comprehensive healthcheck. The command runs when the container starts, so if your check exercises the main path in your app, it acts as a warm-up. When the first user request hits, the app is already running warm so there’s no delay in sending the response.
Healthchecks are also very useful if you have expiry-based caching in your app. You can rely on the regular running of the healthcheck to keep your cache up-to date, so you could cache items for 25 seconds, knowing the healthcheck will run every 30 seconds and refresh them.
Summary
Dockerizing Windows apps is straightforward. The Dockerfile syntax is clean and simple, and you only need to learn a handful of instructions to build production-grade Docker images based on Windows Server Core or Nano Server.
Following these steps will get you a functioning Windows app in a Docker image — then you can look to optimizing your Dockerfile.
Most organizations are looking at running containers in their organization. However, much of what you read about containers revolves around Linux containers. However, what if you want to run containers on Windows Server? Windows Server Containers are a great way to run Windows applications with an extremely small footprint. However, since Windows containers require a Windows container host, we need to use a Windows Server container host to install Docker so we can run Docker containers using Windows Docker images. Windows Server 2022 is the latest Windows Server operating system from Microsoft that enables running Docker containers. Let’s look at how to install Docker on Windows Server 2022 and see the steps involved.
Table of contents
- What is Docker Engine and Docker Desktop?
- What are container images?
- Why run Docker containers on Windows Server?
- Windows Server 2022 containers new features
- Server 2022 Core image size reduction
- Longer support cycle for Windows Server 2022 container images
- Virtualized time zone
- Application compatibility
- IPv6 support
- Improved Kubernetes experience
- Solving docker container image kernel limitations
- Windows Server 2022 supports WSL installed
- Windows Server 2022 – Process isolation mode and Hyper-V isolation
- Install Docker on Windows Server 2022
- Install the Windows Server 2022 containers feature
- Install Hyper-V Role in Windows Server 2022
- Install DockerMsftProvider and install Docker
- Pull Windows Container image for Docker
- Run the Windows Docker Image
- Wrapping Up
Check out the video of the process if you would rather see it in video form:
What is Docker Engine and Docker Desktop?
Both the Docker engine and Docker desktop are widely used in the enterprise to run business-critical container image applications. Docker provides the container runtime that allows the container image applications to run on top of the physical host machine.
The process to install Docker Desktop is performed using the Docker Desktop installer and makes getting up and running with Docker containers very easy using the Docker Desktop application.
You can also interact with Docker using the command prompt or a PowerShell session to run Docker command parameters from the command prompt. Both the Docker Desktop and Docker command prompt environments require a Docker installation on your Windows Server host.
What are container images?
A container image is an image of all the requirements it takes to run an application. A container image are much lighter weight than full virtual machine. Virtual machines are full operating system installations
Why run Docker containers on Windows Server?
You may wonder why you would want to run Docker containers on Windows Server containers. One reason is that to run Windows Containers, you need to run Windows containers on Windows Server. This requirement is because containers share the kernel of the container host. So you can’t run Linux Containers on Windows Server and Windows containers on Linux.
Windows Server 2022 containers new features
Windows Server 2022 offers new container features that provide a great way to run Docker containers with the latest features and enhancements when compared to older Windows Server versions, such as Windows Server 2016. What are some of the new Windows Server 2022 container features?
Server 2022 Core image size reduction
The container image size is extremely important. The smaller the container image, the faster, more agile, and easier it is to run the containers. In Windows Server 2022, the Server Core container image RTM layer at GA is 2.76 GB uncompressed. This is a major improvement over Windows Server 2019 which was 3.47 GB uncompressed container size. It represents a 33% smaller footprint.
Longer support cycle for Windows Server 2022 container images
Five years of support and an additional five years of extended support is now offered for all Windows server 2022 containers.
Virtualized time zone
Windows Server 2022 containers support virtualized time zone configuration separate from the host. This virtualized time zone support is included in the instance for each container.
Application compatibility
You can use Group Managed Service Accounts with Windows containers to use Active Directory authentication.
IPv6 support
IPv6 is now supported with Kubernetes in Windows.
Improved Kubernetes experience
Microsoft is continuing to improve the Kubernetes implementation with Windows containers. Windows Server 2022 provides more restrictive subnets and multiple subnets for each Windows worker node.
Solving docker container image kernel limitations
You can solve some of these limitations by running a container host as a virtual machine. Regardless of whether the physical host is running Windows Server or Linux, you can run a hypervisor such as Hyper-V or Linux with Proxmox, XCP-NG, KVM, etc to run virtual machines of either variety.
You can also use nested virtualization if you want to have the capabilities of a Windows hypervisor or Linux hypervisor, regardless of what operating system your physical host is running. However, you must have enabled nested virtualization to benefit from this capability.
Windows Server 2022 supports WSL installed
Now, with Windows Server 2022, you can have WSL installed in a supported way without any hacks to get it to work. This provides another way to work with Linux containers using your Windows Server 2022 host.
Windows Server 2022 – Process isolation mode and Hyper-V isolation
Running containers with Process Isolation mode is the traditional way that containers run. Even though they share the host operating system kernel, each container is isolated through namespace, resource control, and other process isolation technologies.
One of the cool benefits of running Docker container images on Windows Server 2022 with Hyper-V isolation is the added security benefits from the Hyper-V role. The Hyper-V isolation mode offers enhanced security.
In isolation mode, each container runs inside of a highly optimized virtual machine that effectively gets its own kernel. This isolation enables hardware-level isolation between each container and container host.
The process to install Docker on Windows Server 2022 will include the following steps:
- Install the Windows Server 2022 containers feature
- Install Hyper-V in Windows Server 2022
- Install DockerMsftProvider and Docker
- Pull Windows container image for Docker
- Run the Windows Docker image
Install the Windows Server 2022 containers feature
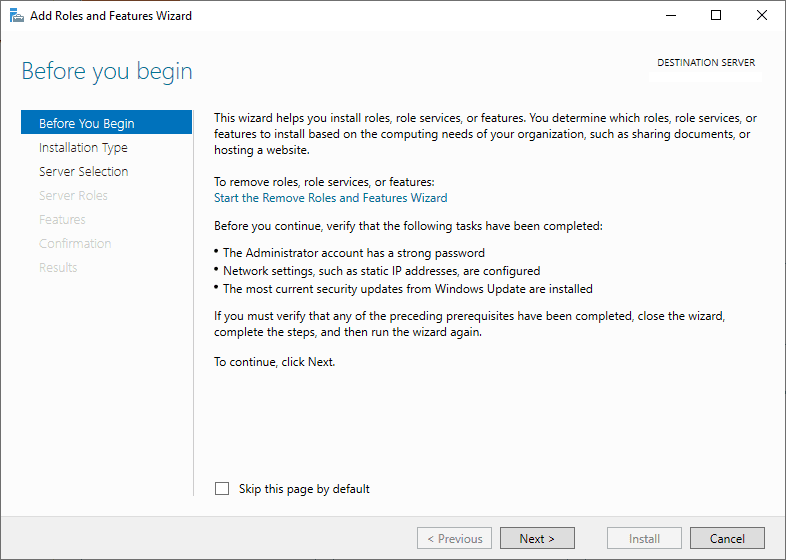
Using the features wizards found in Server Manager, we can install the containers feature in Windows Server 2022 to run containers natively in Windows. The process is fairly straightforward. Run the Add roles and Features Wizard from Windows Server 2022.
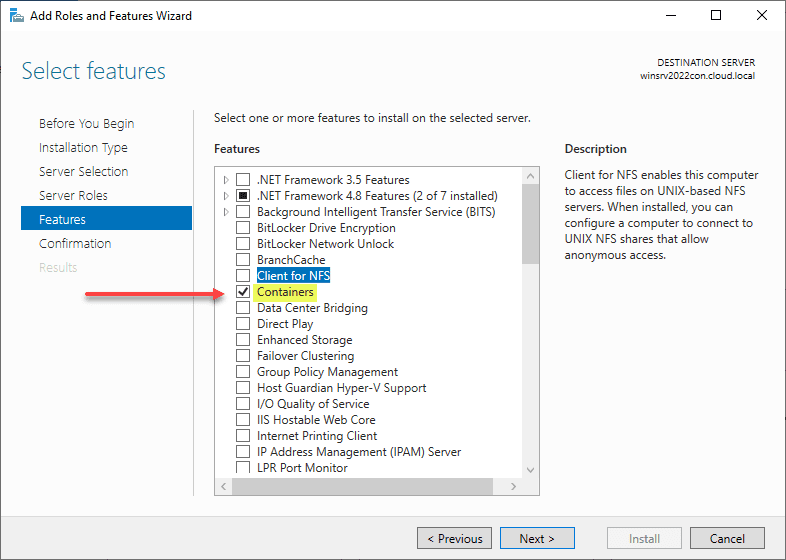
On the Features screen, place a check next to the Containers feature.
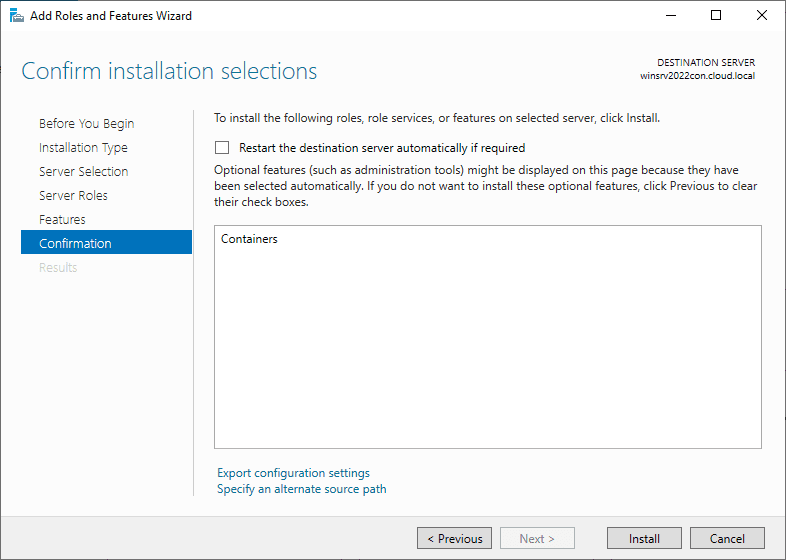
Confirm the installation.
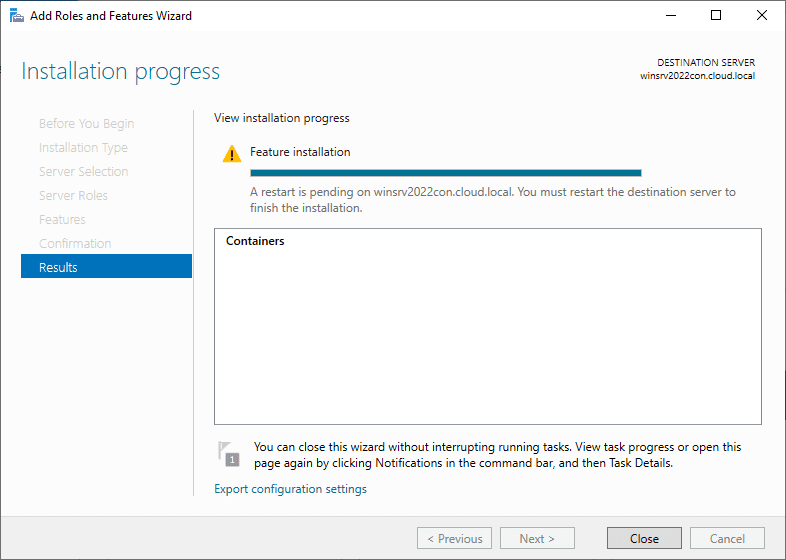
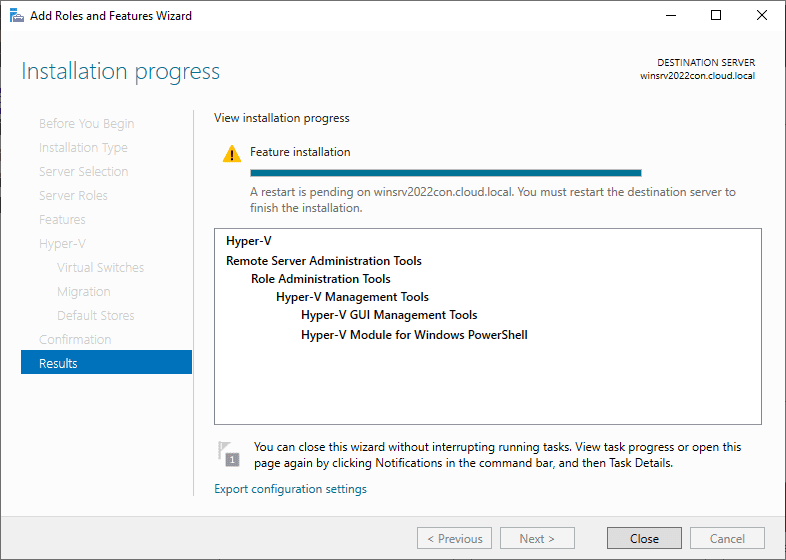
The containers installation is successful. You will be prompted to reboot your Windows Server 2022 host.
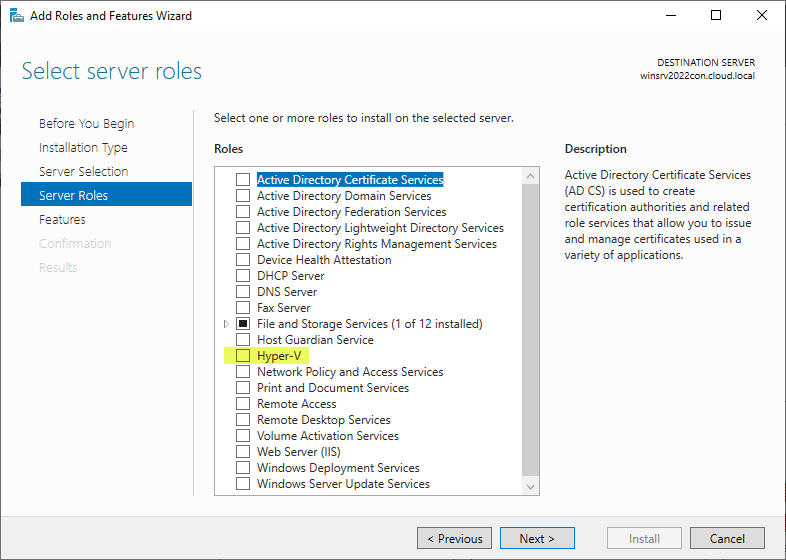
Install Hyper-V Role in Windows Server 2022
Next, for using Hyper-V isolation, we will need to have the Hyper-V role installed. Let’s quickly look at the Hyper-V role installation. On the Server Roles screen in Server Manager, place a check next to the Hyper-V role. Note you can also use the new Windows Admin Center to install roles in your Windows Server 2022 machine.
It will bring up the Add features that are required for Hyper-V.
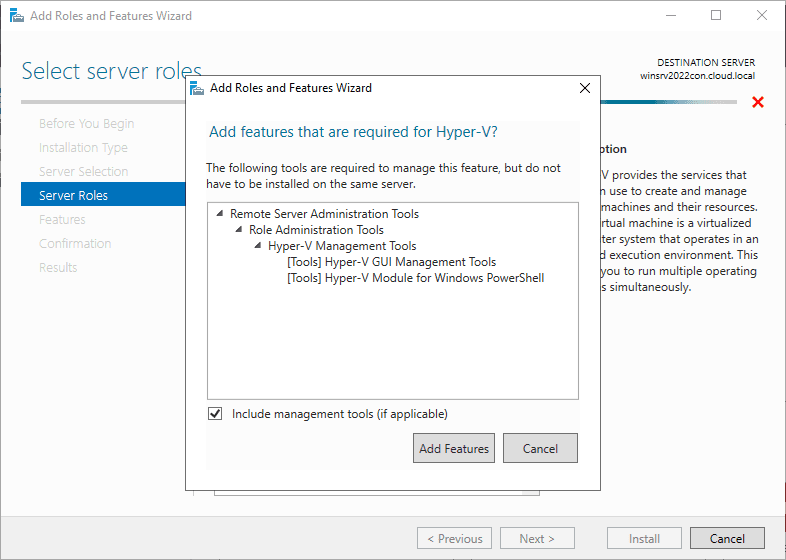
Now we have the check placed next to Hyper-V, click Next.
Next, there will be a few screens of Hyper-V specific configuration.
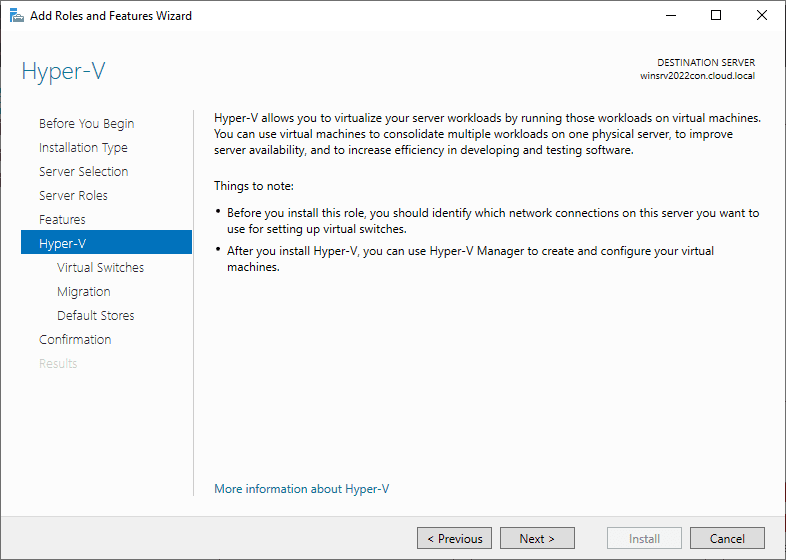
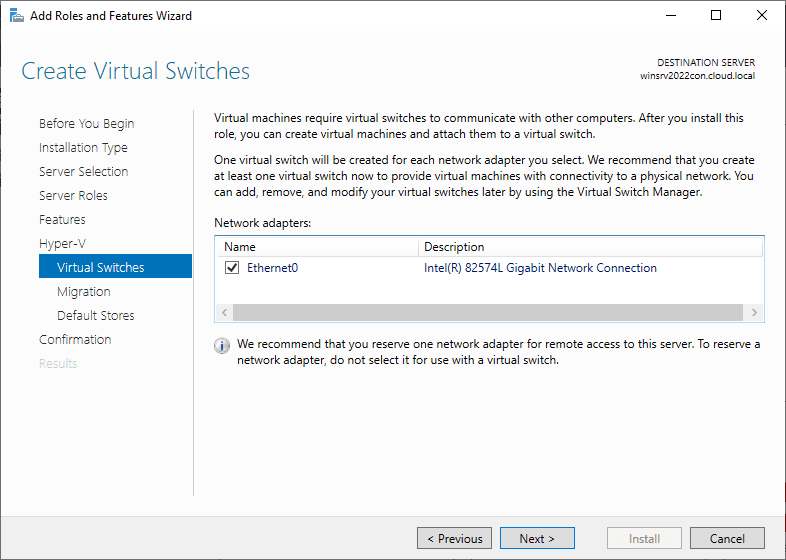
You can go ahead and create the default Hyper-V virtual switch.
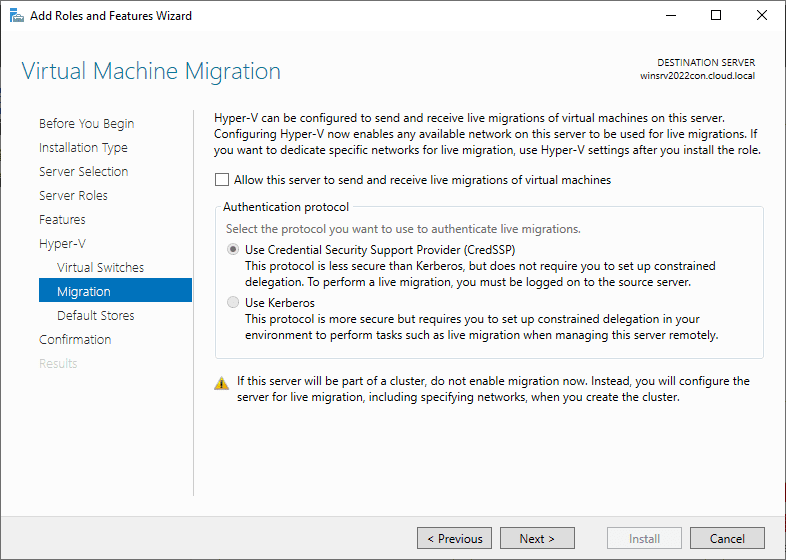
Decide if you want to allow live migration.
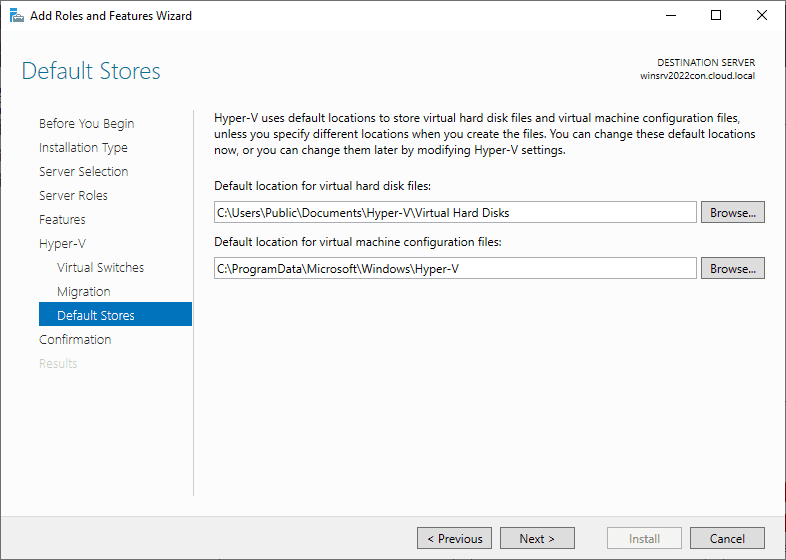
Configure the default storage location for Hyper-V virtual machines. Here, I am accepting the default settings.
Confirm the installation of the Hyper-V role and role features.
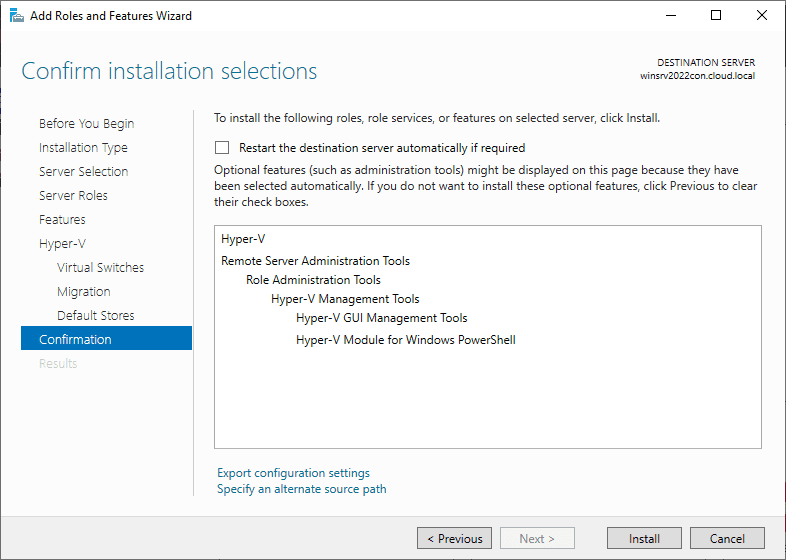
You will be prompted to reboot after the role is successfully installed.
Install DockerMsftProvider and install Docker
***Note*** DockerMsftProvider is now deprecated. However, leaving the below for posterity
Use the command found in the documentation here instead:
Invoke-WebRequest -UseBasicParsing "https://raw.githubusercontent.com/microsoft/Windows-Containers/Main/helpful_tools/Install-DockerCE/install-docker-ce.ps1" -o install-docker-ce.ps1
.\install-docker-ce.ps1
Deprecated steps below:
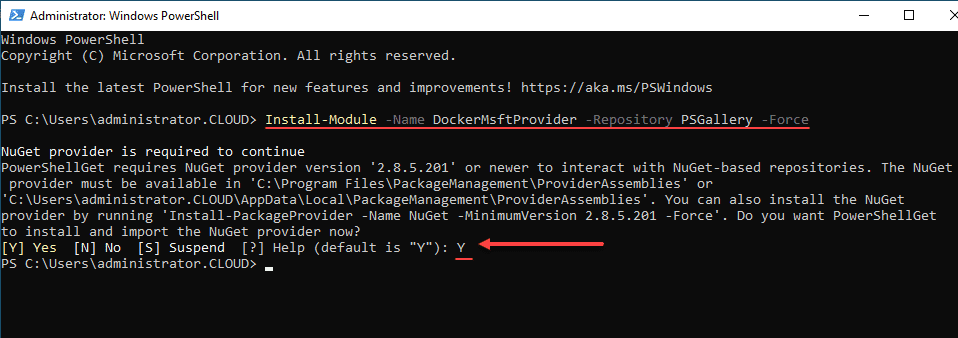
Next, we will install the Docker provider and install Docker itself. We can use just a couple of commands from the Powershell session to install the module and package needed. We need to be in an administrator prompt. The order of operations is we need to first install the Provider and then we can install Docker from the provider.
Install-Module -Name DockerMsftProvider -Repository PSGallery -ForceThis command will prompt you to install the Nuget provider in order to install the module.
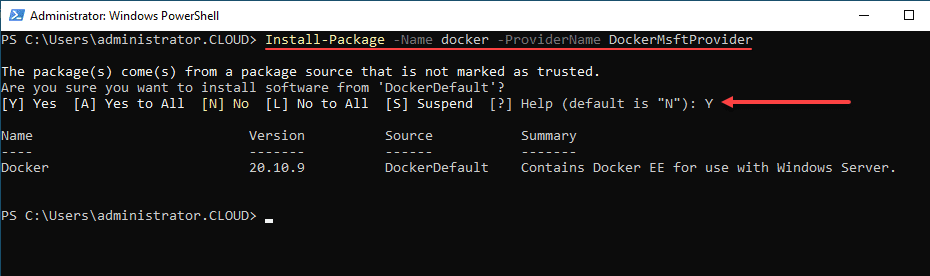
To install Docker, we can use the following command:
Install-Package -Name docker -ProviderName DockerMsftProviderYou will see the message that the package is not marked as trusted. You will need to allow the installation.
Next, we need to restart Windows Server 2022. You can do that from the PowerShell session using the Restart-computer cmdlet.
Pull Windows Container image for Docker
After the Server 2022 host reboots, we can pull the Windows container image in a PowerShell session or Windows Command Prompt:
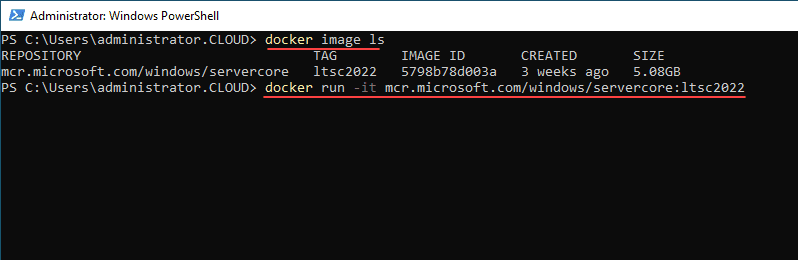
docker pull mcr.microsoft.com/windows/servercore:ltsc2022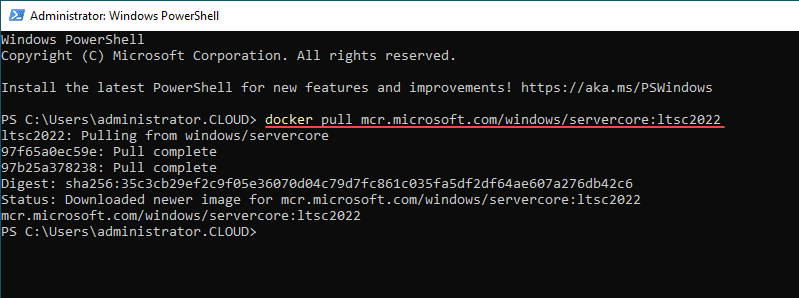
Run the Windows Docker Image
Finally, let’s run the Windows Docker image in Windows Server 2022. This is a simple Docker run command. You can first list out your images using the docker images ls command and then run the container interactively with the following:
Wrapping Up
The process of installing Docker in Windows Server 2022 is straightforward. We just need to install a role and feature and then pull the module and package from the command line. After that, we can successfully pull the latest Docker image for Server Core and then run our container. From this point forward, it is straightforward to run your Docker containers in Windows.
Установка docker
Откройте сеанс PowerShell с повышенными привилегиями и выполните следующие командлеты.
Установите модуль OneGet PowerShell.
PS C:>Install-Module -Name DockerMsftProvider -Repository PSGallery -ForceС помощью OneGet установите последнюю версию Docker.
PS C:>Install-Package -Name docker -ProviderName DockerMsftProvider
После завершения установки перезагрузите компьютер.
PS C:>Restart-Computer -Force
После перезагрузки служба Docker стартует с некоторой задержкой, может показаться что не стартовала, запустить вручную её можно командой:
Поддержка линукс контейнеров
Установите поддержку контейнеров и виртуализации:
PS C:>Enable-WindowsOptionalFeature -Online -FeatureName containers –All
PS C:>Enable-WindowsOptionalFeature -Online -FeatureName Microsoft-Hyper-V –All
Включите поддержку LCOW и эксперементальные опции:
PS C:>
# Set LCOW_SUPPORTED Variable to 1 for enabled
[Environment]::SetEnvironmentVariable("LCOW_SUPPORTED", "1", "Machine")

# Enable Experimental Features in Dockerd daemon.conf
$configfile = @"
{
    "experimental": true
}
"@
$configfile | Out-File -FilePath C:\ProgramData\docker\config\daemon.json -Encoding ascii -Force
Установите ядро Linux:
PS C:>Invoke-WebRequest -Uri "https://github.com/linuxkit/lcow/releases/download
/v4.14.35-v0.3.9/release.zip" -UseBasicParsing -OutFile release.zip
PS C:>Expand-Archive release.zip -DestinationPath "$Env:ProgramFiles\Linux Containers\."
Для проверки можно запустить контейнер с ubuntu: DosCmd
Установка Docker Compose
Перейти по ссылке, во вкладке «Windows Server» выбрать команду установки текущей версии Docker Compose и
запустить её в powershell, на момент написания статьи строка выглядела так:
PS C:>Invoke-WebRequest "https://github.com/docker/compose/releases/download/1.25.5
/docker-compose-Windows-x86_64.exe" -UseBasicParsing -OutFile $Env:ProgramFiles\Docker
\docker-compose.exe
Docker originated on Linux and while most container deployments use that OS, there are times when requirements dictate using Docker on Windows.
Enterprises that want to modernize their legacy Windows applications and run them in containers will need to use Docker on Windows. When you understand how it all works, running Docker on Windows is no more complex than running Docker on Linux. The core application has the same commands and switches, but there are nuances in management. This tutorial will highlight the differences between Docker on Windows and Linux, and show how to run and maintain a Docker container on Windows Server.
Why use Docker containers on Windows Server?
Docker started on Linux because the project developers used that platform. They found it beneficial to use Linux’s native functionality to segment and protect the containers from each other and the OS.
However, sometimes containers need to run on Windows. This often occurs when the application needs to use Windows-only technologies such as ASP.NET or Windows Management Instrumentation. Many major applications that were written in ASP.NET are still in use. Containerization offers a way to manage these ASP.NET programs in a controlled environment. Every container deployed will be identical. An organization can have the ideal situation by deploying known good containers that are not subject to unexpected changes and updates.
There are many benefits to using Docker on Windows. Windows containers are lightweight packages with only the necessary services and application code to shorten deployments from hours to seconds. Updates are streamlined into the container image. If a container image is bad, it does not take long to revert to the previous image. The speed and convenience of containers are not possible with VMs. It’s all about providing a service rather than the VM.
How do Docker containers work on Windows?
Docker’s tight integration with Linux meant that the system resources and APIs that a Windows container would expect don’t exist. Microsoft had to devise a way to run Docker on Windows Server to handle the cornerstone technologies of several Microsoft products, such as Internet Information Services (IIS) and Active Server Pages (ASP).
Four container base images are available to run Docker on Windows: Nano Core, Server Core, Windows and Windows Server. The Docker Hub repository holds Microsoft’s official Windows-based Docker images at this link. These images have no GUI and have varying Windows API sets. The lightest is Nano Server, which is suited for application developers. Server Core is the next largest and suited for Windows Server apps. Windows is the largest and has complete Windows API support. The Windows Server base image also has full Windows API support and is suited for workloads that need server features. This link provides more details on the specifics of each image and which might be a better fit for a particular situation.
Following certain guidelines is recommended for optimal results. While running Linux and Windows containers on the same host is possible, it’s not a good idea or best practice. From an administrator’s standpoint, it is easier to run containers for different OSes on separate servers running their native OS.
Microsoft added Linux functionality to Windows with the Windows Subsystem for Linux, but the company does not recommend it for running Linux containers on Windows Server in production.
What are the requirements to run Docker on Windows Server?
The following are the basic requirements for running Docker containers on Windows Server.
- Windows Server OS. Docker can run on Windows Server 2016, 2019, 2022 and 2025 with the Hyper-V role installed to use Hyper-V isolation.
- Hardware. A Windows container host running from a Hyper-V VM with Hyper-V isolation must use nested virtualization, which requires at least 4 GB RAM.
- Supported Docker container runtime.
How to set up Docker on Windows Server
You can install Docker on Windows in several ways. The easiest method is to use the Microsoft scripts, which do all the heavy lifting for the administrator.
The Microsoft script installs the open source container management tools as a Windows service on a standard Hyper-V VM or physical host. Don’t install Docker Desktop, a tool for developers to deploy containers that is not designed for production workloads.
How to set up Docker on Windows Server
To install Docker on Windows Server 2022, start a PowerShell session with elevated privileges and run the following command to download the Docker install script from the Microsoft repository on GitHub:
Invoke-WebRequest -UseBasicParsing "https://raw.githubusercontent.com/microsoft/Windows-Containers/Main/helpful_tools/Install-DockerCE/install-docker-ce.ps1" -o install-docker-ce.ps1In the same admin PowerShell window, run the script using the following command, which will reboot the host to complete the installation:
.\install-docker-ce.ps1The install script adds Docker as a Windows service and sets up the Docker network. By default, all Docker containers have a separate network that is proxied via the host.
Check the Docker container host by running the hello-world image:
docker run hello-worldIf you see introductory text about Docker, then everything should function properly.
How to install and run a Docker container on Windows
When running Docker on Windows, the administrator can run both Windows and Linux-based images.
The docker.exe basic command line usage options are the same as those for Linux.
To view the running containers, use the docker ps command.
Use the docker run <container name> command to start a container.
Some of the differences between Docker for Windows and Linux are noticeable and important. Windows does not have bash, the Bourne Again Shell. The shell installed in Windows containers is PowerShell. We can run the Server Core image with an interactive shell to demonstrate this.
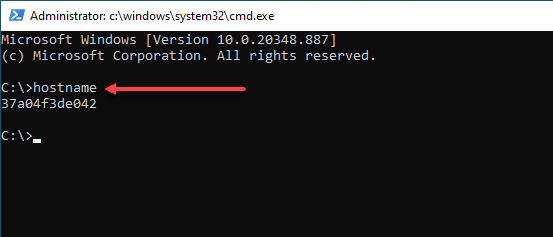
docker run -it mcr.microsoft.com/windows/servercore:ltsc2022 powershellFor new Docker users, exercise caution at this point. After running the command, it might appear they are at the host machine’s command prompt, but they are inside the Docker container. If the administrator uses the hostname command from the command line, it will show the container ID, not the host name. This can be a point of confusion for administrators new to Docker.
Each container has a unique identifier. Docker’s default behavior is to give the docker container the name of the unique identifier, such as 435523445. Running the hostname command will show 435523445. The command line looks identical in both the container and the host. Be careful to make sure you know where you are before executing any critical commands.
Similar to Linux, admins should do nothing besides run and remove containers. This mindset differs from managing VMs, which require more care and feeding. Containers are designed to be disposable. A specific instance might last minutes, hours, days or even weeks. Eventually, you build a new container to replace the old one. Administrators shouldn’t tweak containers because any modifications made in the previous container will be lost.
Taking things further, the administrator can run a base IIS container by using a command. To use this example requires a folder called c:\wwwdata. The following Docker command creates and runs a container named myIISTest from the specific IIS image, exposing the container port 80 to the host’s port 8081, mounting the c:\wwwdata folder inside the container at c:\inetpub\wwwroot. The -ti parameters give the ability to interact with the container with a shell.
docker run -ti -p 8081:80 -v c:\wwwdata:c:\inetpub\wwwroot --name myIISTest mcr.microsoft.com/windows/servercore/iisUse the exit command to stop and exit the container. To ensure a container persists, append a -d parameter to the command line to run it in the background or detached mode. To reuse our previous example:
docker run mcr.microsoft.com/windows/servercore/iis -d -p 8081:80 -v c:\wwwdata:c:\inetpub\wwwroot -name myIISTestBuilding Docker images in Windows works the same as in Linux, but Linux uses the forward slash in paths, while the Windows version of Docker supports both forward and back slashes.
How to manage and troubleshoot Docker on Windows
The hallmark of Docker containers is their disposable nature, but admins need tools to see how containers are performing and whether they need replacing. The Windows Admin Center is a free Microsoft tool available at the following link. It provides a GUI interface for server management.
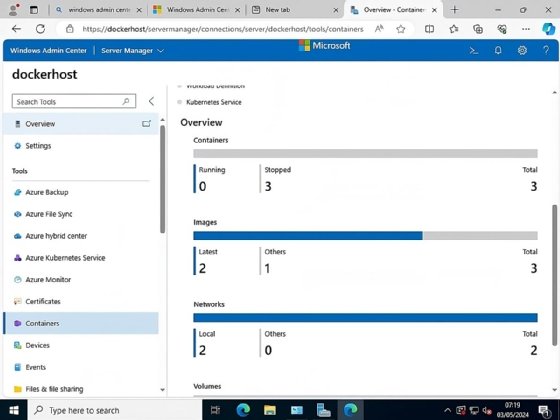
The Windows Admin Center does not work with containers by default, but you can download a containers extension for this functionality. From the Windows Admin Center, go to the Extensions tab and search for containers, then install. The extension gives the most frequently used options for container management.
Windows Admin Center makes it easy to run containers, but it’s important to know how Docker works to understand how to deal with issues.
The built-in diagnostic tools that come with Docker are also available in Docker on Windows. The simple ones include docker ps -a which is the «process status» command with the -a parameter to show all Docker containers on the system, both running and stopped.
If a container gives an exited status and it was not stopped by the administrator, then try the docker logs -tf <container id> command. This displays the time-stamped logs of the container to troubleshoot the issue. Using the > redirect outputs the contents to a file for further analysis.
docker logs -tf my_container_name > output.txtIt’s also useful to find usage statistics from the built-in Docker tools. The docker stats command gives near-real-time information about the running containers, including memory utilization, CPU utilization and disk stats on a per-container basis.
Because Docker is installed as a service, administrators can use the services.msc snap-in in the Remote Server Administration Tools (RSAT) to see the status of the Docker service. If it’s not running, then no Docker containers will function. If the Docker service fails to run or restarts for some reason, the error log in the Windows Event Viewer should provide some clues to the problem.
Stuart Burns is an enterprise Linux administrator at a leading company that specializes in catastrophe and disaster modeling.
- First Part – The basics: the basic principles of how container virtualization is implemented in Windows Server 2016 operating system.
- Second part – Up and Running: creating and managing Windows Server Containers using Docker.
- Third part – Into your Stride Working with Windows Containers and Docker
- Fourth part — Save the Container Data
Overview
In the previous article in this series, Working with Windows Containers and Docker: The Basics, I examined the basics of how container virtualization is being implemented in the Windows Server 2016 operating system. With this basic run-through of Windows Containers out of the way, I can go on to explain how you can work with this new feature in Windows Server 2016.
Introduction
In Part 1 of this series, we learned about Windows Containers Fundamentals and Docker. Containers provide lightweight and Agile virtualization capabilities that developers can use to quickly deploy and update apps in their own development environment. This article will explain how to create and manage Windows Server Containers using Docker. By the end of this step, we will have our Container Host up and running with just one IIS container. That’s pretty cool!
Windows Server 2016 with Containers on Azure
For many Developers and Sysadmins, it makes a lot of sense to deploy services to the Microsoft Azure cloud, but you have the additional option of deploying your Container Host to the Microsoft Azure cloud. One of the advantages of using Azure in this way is that you can deploy a Windows Server 2016 virtual machine with the Containers feature already installed. By doing so, you are then able to experiment with Windows Server Container, with both Server Core and Nano Server Container OS Images installed and ready to use with Docker.
Log in to your Azure portal and create a virtual machine using the Windows Server 2016 Core with Containers image, as shown below:

Docker Commands
How do you set about working with Docker on Windows Server? Before going more into the practical side, we need to get familiar with the essential Docker PowerShell commands. You can run the docker –help command:
|
1 2 3 4 5 6 7 8 9 10 11 12 13 14 15 16 17 18 19 20 21 22 23 24 25 26 27 28 29 30 31 32 33 34 35 36 37 38 39 40 41 42 |
Commands: attach Attach to a running container build Build an image from a Dockerfile commit Create a new image from a container‘s changes cp Copy files/folders between a container and the local filesystem create Create a new container diff Inspect changes on a container’s filesystem events Get real time events from the server exec Run a command in a running container export Export a container‘s filesystem as a tar archive history Show the history of an image images List images import Import the contents from a tarball to create a filesystem image info Display system-wide information inspect Return low-level information on a container, image or task kill Kill one or more running containers load Load an image from a tar archive or STDIN login Log in to a Docker registry. logout Log out from a Docker registry. logs Fetch the logs of a container pause Pause all processes within one or more containers port List port mappings or a specific mapping for the container ps List containers pull Pull an image or a repository from a registry push Push an image or a repository to a registry rename Rename a container restart Restart one or more containers rm Remove one or more containers rmi Remove one or more images run Run a command in a new container save Save one or more images to a tar archive (streamed to STDOUT by default) search Search the Docker Hub for images start Start one or more stopped containers stats Display a live stream of container(s) resource usage statistics stop Stop one or more running containers tag Tag an image into a repository top Display the running processes of a container unpause Unpause all processes within one or more containers update Update configuration of one or more containers version Show the Docker version information wait Block until one or more containers stop, then print their exit codes Run ‘docker COMMAND —help‘ for more information on a command. |
There is enough here for everyday use. We’ll get started by using one of the most common of the Docker commands:
This command shows you which Docker Images are available locally. After installing Windows Containers no Docker Images are, as yet, installed. The first thing you have to do is to pull Windows Server Images from the Docker Hub. You don’t need a Docker Hub Account to perform this task:
|
PS > docker pull <image_name> |
I will describe this command in more detail in the next section. When you have at least one image available, you can start a Windows Container:
|
PS > docker run —–name <Container_Name> <Image_Name> |
It means that a Windows Container called <Container_Name> will be started from the Image called <Image_Name>. When you have more than one container running, it can be useful to get a list of all running containers:
Finally, you will need some information about your containers, such as the IP Address. Use the following to retrieve this information:
Retrieve Images from Docker Hub
In Docker container parlance, the image is the template from which you spawn new containers. We can download some pre-built Docker images from the Docker Hub. At the time this was written, Microsoft has two container images in their gallery: Nano Server and Windows Server Core. Let’s download them both by pulling the images from Docker Hub:
|
PS > docker images REPOSITORY TAG IMAGE ID CREATED SIZE PS > docker pull microsoft/windowsservercore Using default tag: latest latest: Pulling from microsoft/windowsservercore 3889bb8d808b: Downloading [=> ] 102.7 MB/4.07 GB 3430754e4d17: Downloading [=====> ] 102.2 MB/913.1 MB PS > docker pull microsoft/nanoserver […] |
Ok, but how to know the exact name of the image that you need? That’s pretty simple. On Docker Hub, you will notice the following section named “Docker Pull Command” as shown below.
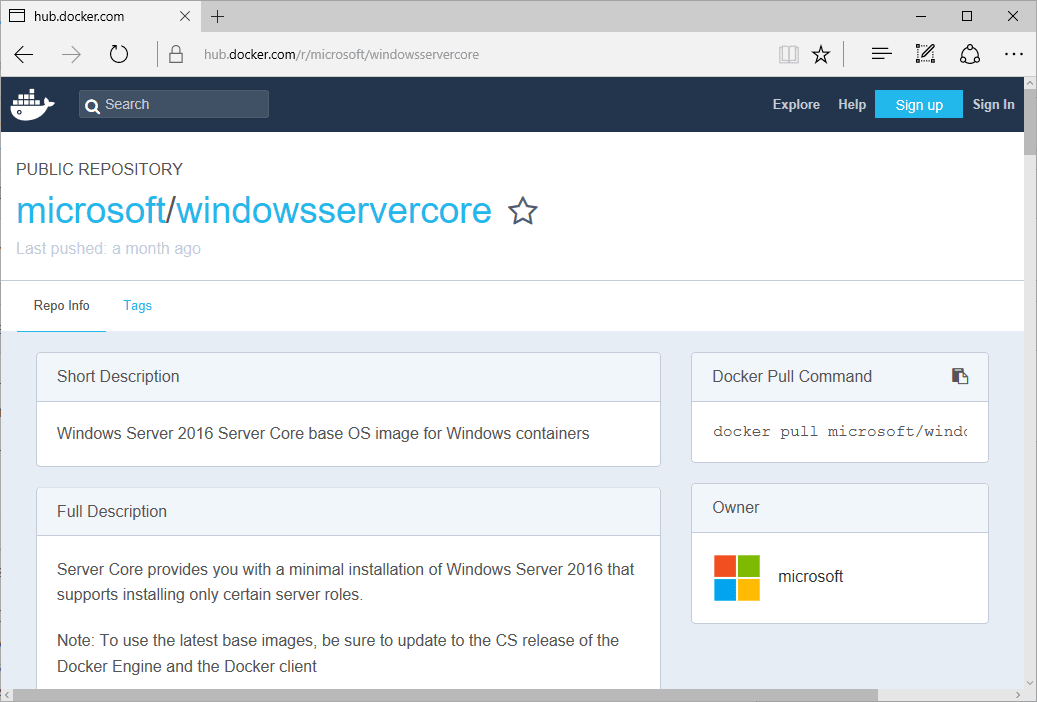
The only necessary step is to copy and paste the command to download the image. Once the image installation process completes (it can take a while, depending on your Internet connection speed), confirm that Windows Server Core image is available locally. Run Docker images to check:
|
PS > docker images REPOSITORY TAG IMAGE ID CREATED SIZE microsoft/windowsservercore latest 4d83c32ad497 6 weeks ago 9.56GB microsoft/nanoserver latest d9bccb9d4cac 6 weeks ago 925MB |
If you have deployed the pre-configured virtual machine in Azure, the two base images are already pulled.
Deploy a new Windows Container
Now we will use the Docker run command to deploy a new container named CoreServerCMD that uses the Windows Server Core image. The -it switch denotes an interactive session, and cmd.exe means that we want to enter the container inside a new cmd.exe console. Be careful, the repository name must be lowercase.
|
PS > docker run -it —name CoreServerCMD microsoft/windowsservercore cmd.exe Microsoft Windows [Version 10.0.14393] (c) 2016 Microsoft Corporation. All rights reserved. C:\>ipconfig Windows IP Configuration Ethernet adapter vEthernet (Container NIC b4dc9191): Connection-specific DNS Suffix . : Link-local IPv6 Address . . . . . : fe80::81ac:61de:7cef:3467%17 IPv4 Address. . . . . . . . . . . : 172.21.149.87 Subnet Mask . . . . . . . . . . . : 255.255.240.0 Default Gateway . . . . . . . . . : 172.21.144.1 |
Basically, the docker run translates the cmd.exe command within the new Server Core-based container. Now, we have a container named CoreServerCMD which is running. We can check with the Docker ps command:
|
PS > docker ps CONTAINER ID IMAGE COMMAND CREATED STATUS NAMES 9e8e23686548 microsoft/windowsservercore «cmd.exe» 5 minutes ago Up 3 minutes CoreServerCMD |
The Docker ps command by default shows only running containers but passing the -a flag to the command will show all containers. You can start and stop containers very simply by running:
|
PS > <a href=«https://docs.docker.com/engine/reference/commandline/stop/»>docker stop</a> CoreServerCMD CoreServerCMD PS > <a href=«https://docs.docker.com/engine/reference/commandline/stop/»>docker st</a>art CoreServerCMD CoreServerCMD |
When you start a Windows Container, take a look at the Task Manager tool and you will notice a new process called “Docker”. When you stop your container, this process will disappear:
OK, the container is up and running but you don’t need to execute the docker run command once again. To re-enter the running container, the docker attach command will do the job:
|
PS > <a href=«https://docs.docker.com/engine/reference/commandline/attach/»>docker attach</a> CoreServerCMD |
Containers have both a name and identifier, and either of them can be used to identify the container to inspect. Inspect is a core Docker instruction (Docker Docs- Docker Inspect) that allows you to get all the information about Container and Image. Below, I inspect my container:
|
1 2 3 4 5 6 7 8 9 10 11 12 13 14 15 16 17 18 19 20 21 22 23 24 25 26 27 28 29 30 31 32 33 34 35 36 37 38 39 40 41 42 43 44 45 |
PS > docker inspect CoreServerCMD [ { «Id»: «9e8e236865487f3f715d2b1d5582512d9f068f97219c01249a497e03afcff94d», «Created»: «2017-02-26T12:20:41.2866341Z», «Path»: «cmd.exe», «Args»: [], «State»: { «Status»: «exited», «Running»: false, «Paused»: false, «Restarting»: false, «OOMKilled»: false, «Dead»: false, «Pid»: 0, «ExitCode»: 9009, «Error»: «», «StartedAt»: «2017-02-26T12:24:24.8655415Z», «FinishedAt»: «2017-02-26T12:32:26.5074121Z» }, «Image»: «sha256:4d83c32ad497f063ae77377afb9285ed3f8a2d2dc52eb53268a7152777b25add», «ResolvConfPath»: «», «HostnamePath»: «», «HostsPath»: «», «LogPath»: «C:\\ProgramData\\docker\\containers\\9e8e236865487f3f715d2b1d5582512d9f068f97219c01249a497e03afcff94d\\9e8e236865487f3f715d2b1d5582512d9f068f97219c01249a497e03afcff94d-json.log», «Name»: «/CoreServerCMD», «RestartCount»: 0, «Driver»: «windowsfilter», «MountLabel»: «», «ProcessLabel»: «», «AppArmorProfile»: «», «ExecIDs»: null, «HostConfig»: { «Binds»: null, «ContainerIDFile»: «», «LogConfig»: { «Type»: «json-file», «Config»: {} }, «NetworkMode»: «default», «PortBindings»: {}, «RestartPolicy»: { «Name»: «no», «MaximumRetryCount»: 0 […] |
The output has been truncated. You can display specific settings using the –f parameter:
|
PS > docker inspect -f ‘{{.Config.Hostname}}’ CoreServerCMD 9e8e23686548 PS > docker inspect -f ‘{{.Config.Image}}’ CoreServerCMD microsoft/windowsservercore PS > docker inspect -f ‘{{.NetworkSettings.IPAddress}}’ CoreServerCMD 172.21.149.87 |
Build your own container image
Docker containers are created by using base images. Basically, an image can contain nothing more than the operating-system fundamentals, or it can contain a full application stack ready for use. So, let’s see an example. You may have a custom website that you want to deploy in a Windows Container. You have two ways to do the job. You can run a Windows Container or just use a Docker file. To run a Windows Container, install and configure the IIS role and finally import your html files: To use a Docker File takes a bit more explaining. Just imagine, for the sake of this example, that you have a folder called “MyWebSite” containing two files:
- Index.html
- Dockerfile
What is a Dockerfile?
Dockerfile is a script, composed of various “commands” also called “instructions” and arguments listed successively to automatically perform actions on a base image in order to create a new one. The Dockerfile greatly helps with deployments by automating and simplifying this process.
Below is the content of my Dockerfile:
|
FROM microsoft/iis MAINTAINER Nicolas PRIGENT RUN mkdir C:\site RUN powershell -NoProfile -Command \ Import-module IISAdministration; \ New-IISSite -Name «Site» -PhysicalPath C:\site -BindingInformation «*:8080:» COPY index.html C:\site EXPOSE 8080 |
My Dockerfile begins with a “FROM” keyword. This keyword defines an image from which the build process starts. In my example, I will use the Microsoft IIS image, then create a folder and finally run some PowerShell commands via the “RUN” keyword. Thanks to this Dockerfile, Docker will create a new container image. A container image is the captured state information of a container that you have created and customized on a container host. Once you have customized a container image for a particular purpose, you can then use it to create new containers from it. It’s something like a “Template” for creating new containers for some specific purpose that you can list with the Docker images command.
Creating a container image
OK, my Dockerfile is ready. Here are the commands I need to run to create my new image:
|
1 2 3 4 5 6 7 8 9 10 11 12 13 14 15 16 17 18 19 20 21 22 23 24 25 |
PS > cd C:\MyWebsite PS C:\MyWebsite> docker build -t myiis . Sending build context to Docker daemon 3.072kB Step 1/6 : FROM microsoft/iis —-> a3dd2dff392b Step 2/6 : MAINTAINER Nicolas PRIGENT —-> Running in 2325e0d1cad2 —-> 5c647612617c Removing intermediate container 2325e0d1cad2 Step 3/6 : RUN mkdir C:\site —-> Running in bec661fdb10c —-> 5173bcee6d03 Removing intermediate container bec661fdb10c Step 4/6 : RUN powershell -NoProfile -Command Import-module IISAdministration; New-IISSite -Name «Site» -PhysicalPath C:\site -BindingInformation «*:8080:» —-> Running in d9abe719e201 —-> 0d84ea9a9af5 Removing intermediate container d9abe719e201 Step 5/6 : COPY index.html C:\site —-> b6b3342f2761 Removing intermediate container 45e11d3a432f Step 6/6 : EXPOSE 8080 —-> Running in 7f8983d773d5 —-> f815a0ab0695 Removing intermediate container 7f8983d773d5 Successfully built f815a0ab0695 |
“myiis” is the repository name and must be lowercase. At the end of my Dockerfile, I expose my website on the 8080 port number. At this step, I can confirm that my container image has been successfully created:
|
PS > docker images REPOSITORY TAG IMAGE ID CREATED SIZE myiis latest 5b4148e14c8f 45 seconds ago 9.82GB microsoft/iis latest a3dd2dff392b 6 weeks ago 9.82GB microsoft/windowsservercore latest 4d83c32ad497 7 weeks ago 9.56GB microsoft/nanoserver latest d9bccb9d4cac 7 weeks ago 925MB |
Now, I just have to use Docker run to create a new container from my new container image:
|
PS > docker run -d -p 8080:8080 —name websitecontainer myiis PS > docker ps CONTAINER ID IMAGE […] STATUS PORTS NAMES a6a41cf3b19c myiis […] Up Less than a second 0.0.0.0:8080->8080/tcp websitecontainer |
That’s cool, my container is up and running. I can get the container IP Address with the following command and go to my website on the following URL: http://172.21.158.179:8080
|
PS > docker inspect -f ‘{{range .NetworkSettings.Networks}}{{.IPAddress}}{{end}}’ a6a41cf3b19c 172.21.158.179 Or PS > docker inspect -f ‘{{range .NetworkSettings.Networks}}{{.IPAddress}}{{end}}’ websitecontainer 172.21.158.179 |
Please be careful; because if you begin with Docker and Windows Containers, you will probably make the following mistake: You will try to get the IP address from the image instead of the container. Ensure you get the container ID from docker ps. if you use the image name, you are asking Docker to show you the IP Address of the image. This, of course, does not make sense, because images do not have IP Addresses.
Push your images to Docker Hub
First, you must create a free Docker account here: https://cloud.docker.com/. Docker Hub lets you store and share your base images. It means that co-workers can use your base image from your repository.
You can create repositories and manually push images using the docker push command. These repositories can be either public or private. You can create one private repository for free, and unlimited public repositories.
Click on Repositories and Create. You must enter a name and an optional description. Next, choose a visibility setting for the repository.
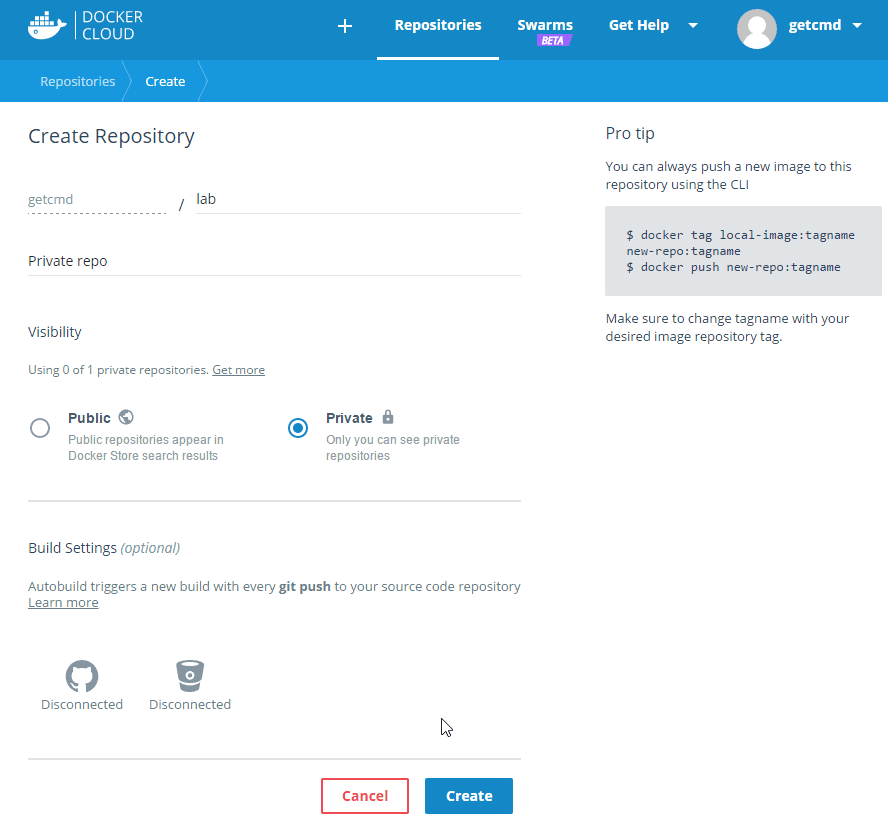
When you need to push an image to Docker Hub, you must use three commands. The first one will tag the image:
|
PS > docker tag f45ecff4c38c getcmd/lab:latest |
- Getcmd is my Docker ID
- Lab is my private repository
- Latest is the tag
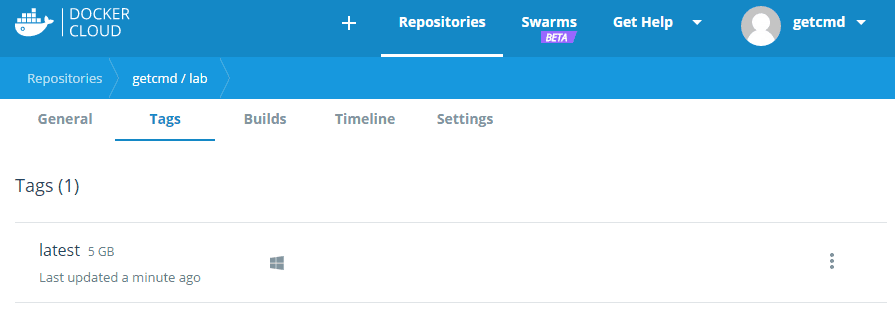
Now run the docker images command to verify that the same image ID now exists in two different repositories.
|
PS > docker images REPOSITORY TAG IMAGE ID CREATED SIZE getcmd/lab latest f45ecff4c38c 2 hours ago 9.89GB myiis latest f45ecff4c38c 2 hours ago 9.89GB |
The second command stores your credentials using the docker login command:
|
PS > docker login Login with your Docker ID to push and pull images from Docker Hub. If you don‘t have a Docker ID, head over to https://hub.docker.com to create one. Username: getcmd Password: Login Succeeded |
Now, you can push the image:
|
PS > docker push getcmd/lab The push refers to a repository [docker.io/getcmd/lab] 0a2abd09b43e: Pushed 68da241f1f36: Pushed 26de02533429: Pushed 12af8be2d3dc: Pushed b54f48930406: Pushed 5b4aace84103: Mounted from microsoft/iis 1f2f3eb32edc: Pushed 0451551dda21: Pushed c28d44287ce5: Skipped foreign layer f358be10862c: Skipped foreign layer latest: digest: sha256:95fa14a4e1af0d8b52ed6dc10c06b6f1085285126ddef2882210dd904de88565 size: 2619 latest: digest: size: 2619 |
Note: You can log out of Docker Hub using docker logout command
Conclusion
In this article we discussed about the Docker commands that allow you to work with Windows containers. We also download Container images from the Docker HUB, and we have created a free Docker account to store our own images. Next, we have seen how to build our container image and create a container from the container image.
Containerization provides you with an open-ended device that can simplify your deployments in many different ways. In the next article, I will explain how to use Hyper-V Containers, how to convert Windows services to run in a Windows Container, and reveal the mysteries of Docker-compose.
I hope that this article has helped you to understand more about Windows Containers.