
В этой статье я постарался собрать в одном месте основные команды cmd и PowerShell, которые полезны при настройке и управлении Windows Server Core. Думаю, этот гайд будет полезен как новичкам, так и опытным системным администраторам, как справочник по базовым командам Server Core.
Содержание:
- Настройка Windows Server Core с помощью SCONFIG
- Основные команды PowerShell для настройки Server Core
- Установка обновлений в Server Core
- Часто используемые команды в Server Core
Напомним, что Server Core это особый режим установки Windows Server без большинства графических инструментов и оболочек. Управление таким сервером выполняется из командной строки или удаленно.
Преимущества Windows Serve Core:
- Меньшие требования к ресурсам;
- Повышенная стабильность, безопасность, требует установки меньшего количества обновлений (за счет меньшего количества кода и используемых компонентов);
- Идеально подходит для использования в качестве сервера для инфраструктурных ролей (контроллер домена Active Directory, DHCP сервер, Hyper-V сервер, файловый сервер и т.д.).
Server Core лицензируется как обычный физический или виртуальный экземпляр Windows Server (в отличии от Hyper-V Server, который полностью бесплатен).
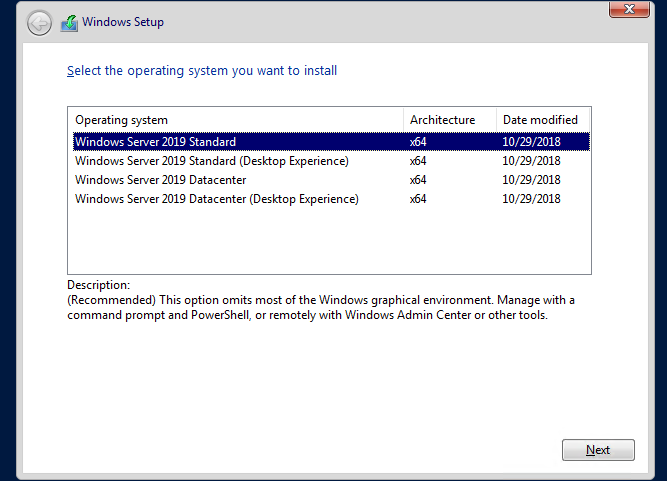
Для установки Windows Server 2016/2019 в режиме Core нужно выбрать обычную установку. Если вы выберите Windows Server (Desktop Experience), будет установлен GUI версия операционной системы (в предыдущих версиях Windows Server она называлась Server with a GUI).
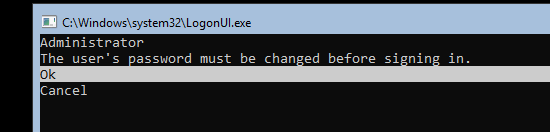
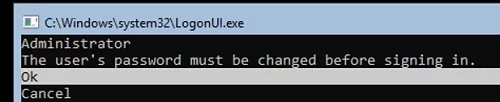
После установки Windows Server Core перед вами появляется командная строка, где нужно задать пароль локального администратора.
При входе на Server Core открывается командная строка (cmd.exe). Чтобы вместо командной строки у вас всегда открывалась консоль PowerShell.exe, нужно внести изменения в реестр. Выполните команды:
Powershell.exe
Set-ItemProperty -Path 'HKLM:\Software\Microsoft\Windows NT\CurrentVersion\WinLogon' -Name Shell -Value 'PowerShell.exe'
И перезагрузите сервер:
Restart-Computer -Force

Если вы случайно закрыли окно командной строки, нажмите сочетание клавиш Ctrl+Alt+Delete, запустите Task Manager -> File -> Run -> выполните
cmd.exe
(или
PowerShell.exe
).
Настройка Windows Server Core с помощью SCONFIG
Для базовой настройки Server Core можно использовать встроенный скрипт sconfig. Просто выполните команду sconfig в консоли. Перед вами появиться меню с несколькими пунктами:
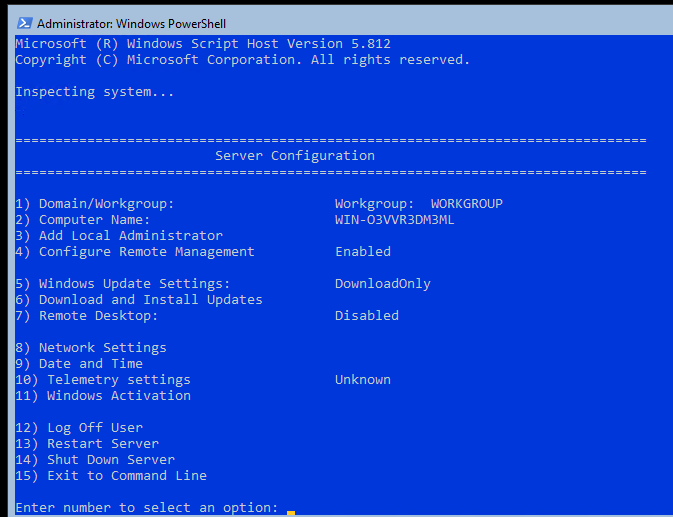
С помощью меню Server Configuration можно настроить:
- Добавить компьютер в домен или рабочую группу;
- Изменить имя компьютера (hostname);
- Добавить локального администратора;
- Разрешить/запретить удаленное управления и ответы на icmp;
- Настроить параметры обновления через Windows Update;
- Установить обновления Windows;
- Включить/отключить RDP;
- Настроить параметры сетевых адаптеров (IP адрес, шлюз, DNS сервера);
- Настроить дату и время;
- Изменить параметры телеметрии;
- Выполнить logoff, перезагрузить или выключить сервер.
Все пункт в меню
sconfig
пронумерованы. Чтобы перейти в определенное меню наберите его номер и Enter.
В некоторых пунктах меню настройки sconfig есть вложенные пункты. Там также, чтобы перейти к определенной настройке, нужно сделать выбор цифры пункта меню.
Не будем подробно рассматривать все пункты настройки sconfig, т.к. там все достаточно просто и очевидно. Однако в большинстве случаев администраторы предпочитают использовать для настройки новых хостов с Server Core различные PowerShell скрипты. Это намного проще и быстрее, особенно при массовых развёртываниях.
Основные команды PowerShell для настройки Server Core
Рассмотрим основные команды PowerShell, которые можно использовать для настройки Server Core.
Узнать информацию о версии Windows Server и версии PowerShell:
Get-ComputerInfo | select WindowsProductName, WindowsVersion, OsHardwareAbstractionLayer
$PSVersionTable

Для перезагрузки Server Core нужно выполнить команду PowerShell :
Restart-Computer
Чтобы выполнить выход из консоли Server Core, наберите:
logoff
Настройка параметров сети
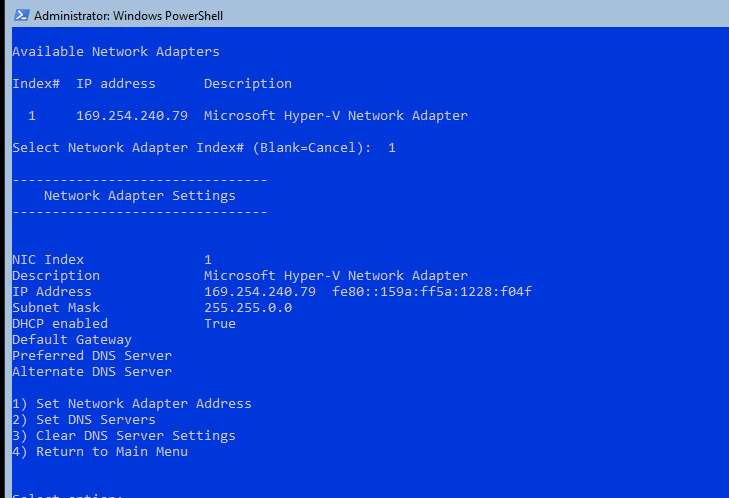
Теперь нужно из PowerShell нужно настроить параметры сети (по умолчанию Windows настроена на получение адреса от DHCP). Выведите список сетевых подключений:
Get-NetIPConfiguration
Теперь укажите индекс интерфейса сетевого адаптера (InterfaceIndex), который нужно изменить и задайте новый IP адрес:
New-NetIPaddress -InterfaceIndex 4 -IPAddress 192.168.13.100 -PrefixLength 24 -DefaultGateway 192.168.13.1
Set-DNSClientServerAddress –InterfaceIndex 4 -ServerAddresses 192.168.13.11,192.168.13.
111
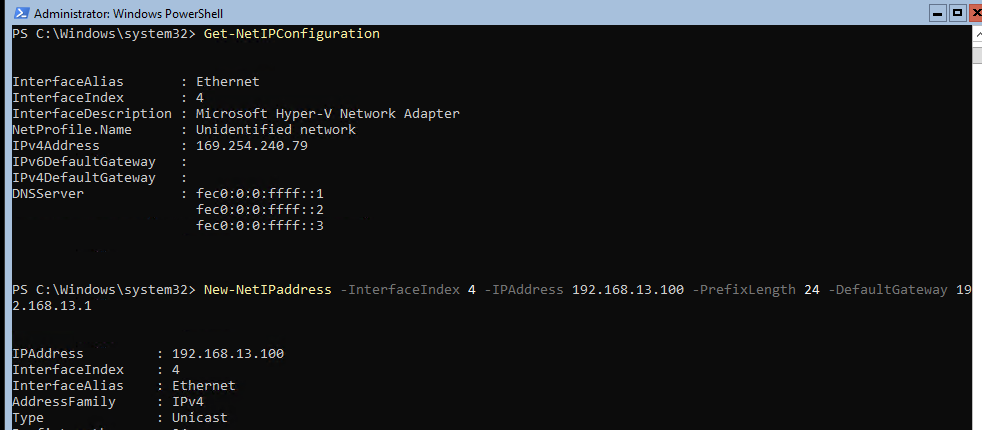
Проверьте текущие настройки:
Get-NetIPConfiguration
Если нужно сбросить IP адрес и вернуться к получению адреса от DHCP, выполните:
Set-DnsClientServerAddress –InterfaceIndex 4 –ResetServerAddresses
Set-NetIPInterface –InterfaceIndex 4 -Dhcp Enabled
Включить/отключить сетевой адаптер:
Disable-NetAdapter -Name “Ethernet0”
Enable-NetAdapter -Name “Ethernet 0”
Включить, отключить, проверить статус поддержки IPv6 для сетевого адаптера:
Disable-NetAdapterBinding -Name "Ethernet0" -ComponentID ms_tcpip6
Enable-NetAdapterBinding -Name "Ethernet0" -ComponentID ms_tcpip6
Get-NetAdapterBinding -ComponentID ms_tcpip6
Настроить winhttp прокси сервер для PowerShell и системных подключений:
netsh Winhttp set proxy <servername>:<port number>
Настройка времени/даты
Вы можете настроить дату, время, часовой пояс с помощью графической утилиты
intl.cpl
или с помощью PowerShell:
Set-Date -Date "09/03/2022 09:00"
Set-TimeZone "Russia Time Zone 3
Задать имя компьютера, добавить в домен, активация
Чтобы изменить имя компьютера:
Rename-Computer -NewName win-srv01 -PassThru

Добавить сервер в домен Active Directory:
Add-Computer -DomainName "corp.winitpro.ru " -Restart
Если нужно добавить дополнительных пользователей в администраторы, можно настроить групповую политику или добавить вручную:
Add-LocalGroupMember -Group "Administrators" -Member "corp\anovikov"
Для активации Windows Server нужно указать ваш ключ:
slmgr.vbs –ipk <productkey>
slmgr.vbs –ato
Или можно активировать хост на KMS сервере (например, для Windows Server 2019):
slmgr /ipk N69G4-B89J2-4G8F4-WWYCC-J464C
slmgr /skms kms-server.winitpro.ru:1688
slmgr /ato
Разрешить удаленный доступ
Разрешить удаленный доступ к Server Core через RDP:
cscript C:\Windows\System32\Scregedit.wsf /ar 0
Разрешить удаленное управление:
Configure-SMRemoting.exe –Enable
Enable-NetFirewallRule -DisplayGroup “Windows Remote Management”
Текущие настройки:
Configure-SMRemoting.exe -Get
Разрешить Win-Rm PowerShell Remoting:
Enable-PSRemoting –force
Сервером с Windows Server можно управлять удаленно c другого сервера (с помощью ServerManager.exe), через браузер с помощью Windows Admin Center (WAC), с любой рабочей станции с помощью инструментов администрирования RSAT, подключаться к нему по RDP, PowerShell Remoting или SSH (в современных версиях Windows есть встроенный SSH сервер).
Настройка Windows Firewall
Информация о настройке Windows Firewall есть в статье по ссылке. Здесь оставлю несколько базовых команд.
Включить Windows Defender Firewall для всех профилей:
Set-NetFirewallProfile -Profile Domain,Public,Private -Enabled True
Изменить тип сети с Public на Private:
Get-NetConnectionProfile | Set-NetConnectionProfile -NetworkCategory Private
Полностью отключить Windows Firewall (не рекомендуется):
Get-NetFirewallProfile | Set-NetFirewallProfile -enabled false
Разрешить подключение через инструменты удаленного управления:
Enable-NetFireWallRule -DisplayName “Windows Management Instrumentation (DCOM-In)”
Enable-NetFireWallRule -DisplayGroup “Remote Event Log Management”
Enable-NetFireWallRule -DisplayGroup “Remote Service Management”
Enable-NetFireWallRule -DisplayGroup “Remote Volume Management”
Enable-NetFireWallRule -DisplayGroup “Remote Scheduled Tasks Management”
Enable-NetFireWallRule -DisplayGroup “Windows Firewall Remote Management”
Enable-NetFirewallRule -DisplayGroup "Remote Administration"
Установка обновлений в Server Core
Для управления параметрами обновлений предпочтительно использовать групповые политики Windows Update, но можно задать параметры и вручную.
Отключить автоматическое обновление:
Set-ItemProperty -Path HKLM:\Software\Policies\Microsoft\Windows\WindowsUpdate\AU -Name AUOptions -Value 1
Автоматически скачивать доступные обновления:
Set-ItemProperty -Path HKLM:\Software\Policies\Microsoft\Windows\WindowsUpdate\AU -Name AUOptions -Value 3
Получить список установленных обновлений:
Get-Hotfix
Или
wmic qfe list
Для ручной установки обновлений Windows можно использовать утилиту wusa:
Wusa update_name.msu /quiet
Также для установки и управления обновлениями из командной строки удобно использовать PowerShell модуль PSWindowsUpdate.
Управление ролями, службами и процессами Windows
Для получения списка всех доступных ролей в Windows Server Core выполните команду PowerShell:
Get-WindowsFeature
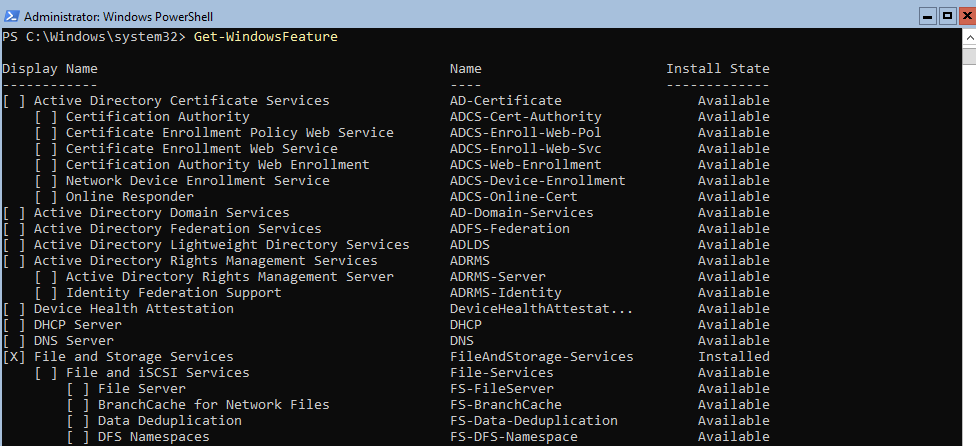
Получить список всех установленных ролей и компонентов в Windows Server(можно быстро понять, для чего используется сервер):
Get-WindowsFeature | Where-Object {$_. installstate -eq "installed"} | ft Name,Installstate
Например, для установки службы DNS воспользуйтесь такой командой:
Install-WindowsFeature DNS -IncludeManagementTools
Список всех служб в Windows:
Get-Service
Список остановленных служб:
Get-Service | Where-Object {$_.status -eq “stopped”}
Перезапустить службу:
Restart-Service -Name spooler
Для управление процессами можно использовать стандартный диспетчер задач (taskmgr.exe) или PowerShell модуль Processes:
Get-Process cmd, proc1* | Select-Object ProcessName, StartTime, MainWindowTitle, Path, Company|ft
Часто используемые команды в Server Core
Ну и наконец, приведу список различных полезных мне команд, которые я периодически использую в Server Core.
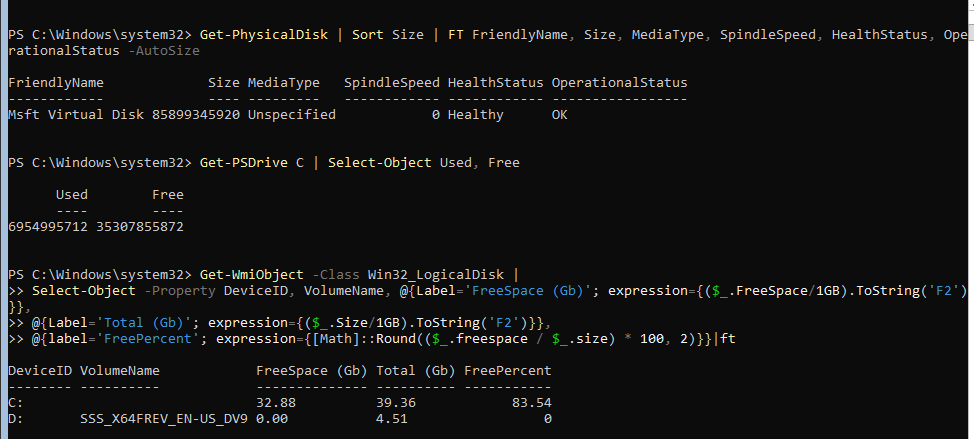
Информация о статусе и здоровье физических дисков (используется стандартный модуль управления дисками Storage):
Get-PhysicalDisk | Sort Size | FT FriendlyName, Size, MediaType, SpindleSpeed, HealthStatus, OperationalStatus -AutoSize
Информация о свободном месте на диске:
Get-WmiObject -Class Win32_LogicalDisk |
Select-Object -Property DeviceID, VolumeName, @{Label='FreeSpace (Gb)'; expression={($_.FreeSpace/1GB).ToString('F2')}},
@{Label='Total (Gb)'; expression={($_.Size/1GB).ToString('F2')}},
@{label='FreePercent'; expression={[Math]::Round(($_.freespace / $_.size) * 100, 2)}}|ft
Информация о времени последних 10 перезагрузок сервера:
Get-EventLog system | where-object {$_.eventid -eq 6006} | select -last 10
Список установленных программ:
Get-ItemProperty HKLM:\Software\Wow6432Node\Microsoft\Windows\CurrentVersion\Uninstall\* | Select-Object DisplayName, DisplayVersion, Publisher, InstallDate | Format-Table –AutoSize
Скачать и распаковать zip файл с внешнего сайта:
Invoke-WebRequest https://contoso/test.zip -outfile test.zip
Expand-Archive -path '.\test.zip' -DestinationPath C:\Users\Administrator\Documents\
Чтобы скопировать все файлы из каталога на удаленный компьютер по сети можно использовать Copy-Item:
$session = New-PSSession -ComputerName remotsnode1
Copy-Item -Path "C:\Logs\*" -ToSession $session -Destination "C:\Logs\" -Recurse -Force
Для установки драйвера можно использовать стандартную утилиту:
Pnputil –i –a c:\distr\hpdp.inf
Также Microsoft предлагает специальный пакет Server Core App Compatibility Feature on Demand (FOD), который позволяет установить в Windows Server 2019 некоторые графические инструменты и консоли (MMC, Eventvwr, Hyper-V Manager, PerfMon, Resmon, Explorer.exe, Device Manager, Powershell ISE). Этот FOD доступен для загрузки в виде ISO при наличии активной подписки. Установка выполняется командой:
Add-WindowsCapability -Online -Name ServerCore.AppCompatibility~~~~0.0.1.0
Установка Server Core App Compatibility Feature on Demand будет использовать дополнительно около 200 Мб оперативной памяти в Server Core.
В этой статье я постарался собрать самые нужные команды, которые нужно постоянно держать под рукой при работе с Windows Server Core. Время от времени я буду обновлять статью и добавлять новые команды, которые покажутся мне нужными для повседневной работы.
The sconfig command is a powerful text based tool for quickly configuring Windows Server Core environments. It simplifies tasks like network setup, domain joining, update management, and more, all without needing a GUI. Ideal for system administrators, sconfig streamlines server management, making it an essential utility for efficient and secure server operations.
When you’re working with Windows Server Core, the sconfig command is your best friend. It’s a powerhouse tool that simplifies the configuration of your Windows Server Core, letting you skip the GUI and get straight to business. Whether you’re a seasoned IT pro or just getting started, this guide will walk you through everything you need to know about the sconfig command. From setup to troubleshooting, we’ve got you covered.
What is the sconfig Command?
The sconfig command is a text based user interface (TUI) tool that comes pre-installed with Windows Server Core. It provides a simple, straightforward way to configure various aspects of your server without needing to rely on a graphical user interface (GUI). This command was designed with efficiency in mind, enabling you to perform essential server configurations quickly.
Why Use sconfig?
You might be wondering, “Why not just use the GUI?” The answer lies in efficiency and resource management. Windows Server Core is a minimalistic version of Windows Server that doesn’t have a GUI, which means fewer resources are consumed, resulting in a more secure and stable environment. The sconfig command allows you to manage this core environment effectively without compromising on functionality.
Advantages of sconfig
- Lightweight: Sconfig consumes minimal system resources compared to GUI tools.
- Fast: Configuration changes can be made quickly and efficiently.
- Remote-friendly: Ideal for managing servers remotely or in environments with limited bandwidth.
- Consistent: Provides a uniform experience across different Windows Server Core versions.
How to Access the sconfig Command?
Accessing the sconfig tool is as easy as pie. Here’s how you do it:
- Log into your Windows Server Core using your preferred method (e.g., Remote Desktop or directly at the console).
- Open the Command Prompt by typing
cmdand pressing Enter. - Simply type
sconfigand hit Enter.
Boom! You’re now inside the sconfig utility.
Understanding the sconfig Menu
The sconfig menu presents a numbered list of options for different configuration tasks. Here’s a breakdown of the main categories:
| Option | Description |
|---|---|
| 1 | Join Domain/Workgroup |
| 2 | Rename Computer |
| 3 | Add Local Administrator |
| 4 | Configure Remote Management |
| 5 | Windows Update Settings |
| 6 | Download and Install Updates |
| 7 | Enable/Disable Remote Desktop |
| 8 | Configure Network Settings |
| 9 | View Disk Information |
| 10 | Configure Windows Firewall |
| 11 | Set Date and Time |
| 12 | Change User Password |
| 13 | Install Roles and Features |
| 14 | Shut Down/Restart |
Initial Server Configuration with sconfig
When you first install Windows Server Core, there are a few things you’ll want to set up immediately. The sconfig command is your one-stop shop for all these initial configurations.
Setting the Computer Name
One of the first things you’ll want to do is set a unique name for your server. Here’s how:
- Open sconfig.
- Select Option 2 (Computer Name).
- Enter your desired name and restart the server when prompted.
Joining a Domain
If your server needs to be part of a domain, sconfig has you covered:
- Open sconfig.
- Select Option 1 (Domain/Workgroup).
- Follow the prompts to join a domain. You’ll need your domain credentials handy.
Configuring Network Settings
A server is only as good as its network connection. Use sconfig to configure your network settings efficiently:
- Open sconfig.
- Select Option 8 (Network Settings).
- Choose the network adapter you want to configure.
- Set the IP address, subnet mask, and default gateway.
Managing Updates with sconfig
Keeping your server updated is crucial for security and performance. The sconfig tool makes it simple to manage updates.
Enabling Automatic Updates
To enable automatic updates:
- Open sconfig.
- Select Option 5 (Windows Update Settings).
- Choose Option A to enable automatic updates.
Manually Checking for Updates
Prefer to manage updates yourself? No problem:
- Open sconfig.
- Select Option 6 (Download and Install Updates).
- The server will search for and install any available updates.
Configuring Remote Management
Remote management is a lifesaver, especially when dealing with a server core installation. Here’s how to set it up with sconfig:
- Open sconfig.
- Select Option 4 (Configure Remote Management).
- Enable Remote Desktop or Windows Remote Management (WinRM).
Enabling Remote Desktop
If you need a GUI-like experience, you can enable Remote Desktop:
- Open sconfig.
- Select Option 7 (Remote Desktop).
- Choose Enable and configure your settings.
Disk Configuration with sconfig
Disk management is another critical task you can handle via sconfig.
Viewing Disk Information
To view details about your disks:
- Open sconfig.
- Select Option 9 (View Disk Information).
- Review the details to ensure everything is as it should be.
Formatting and Partitioning
If you need to format or partition a disk, it’s a bit more hands-on. Here’s a quick overview:
- Open sconfig.
- Use diskpart (a separate command) to manage your disks.
Firewall Configuration Using sconfig.exe
Security is a top priority, and configuring your firewall correctly is a key part of that.
Enabling or Disabling the Firewall
To manage the firewall:
- Open sconfig.
- Select Option 10 (Configure Windows Firewall).
- Enable or disable the firewall as needed.
Creating Firewall Rules
To create more specific firewall rules, you’ll need to use the netsh command. Here’s how:
- Open the Command Prompt from sconfig.
- Use the
netshcommand to add or modify firewall rules.
Configuring Date and Time
Your server’s date and time settings are essential for logging and scheduling tasks. Configure them easily with sconfig:
- Open sconfig.
- Select Option 11 (Date and Time).
- Set the correct time zone and adjust the date and time if necessary.
User Management with sconfig
Managing users and administrators is straightforward with sconfig.
Adding a New User
To add a new user:
- Open sconfig.
- Select Option 3 (Add Local Administrator).
- Follow the prompts to add a new administrator account.
Changing User Passwords
To change a user’s password:
- Open sconfig.
- Select Option 12 (Change User Password).
- Enter the new password for the user.
Server Roles and Features
You can install and manage server roles and features directly through sconfig:
- Open sconfig.
- Select Option 13 (Install Roles and Features).
- Use the
Install-WindowsFeaturePowerShell command to add features.
Uninstalling Server Roles
If you need to remove a role:
- Open sconfig.
- Use the
Uninstall-WindowsFeaturePowerShell command.
Enabling and Disabling Services
Managing services on your Windows Server Core can be easily done via sconfig.
Viewing Running Services
To view running services:
- Open sconfig.
- Use the
Get-ServicePowerShell command.
Stopping or Starting Services
To stop or start a service:
- Open sconfig.
- Use the
Stop-ServiceorStart-ServicePowerShell commands.
Troubleshooting with sconfig
Even with all the right configurations, issues can arise. Here’s how to troubleshoot using sconfig.
Viewing System Logs
To view system logs:
- Open sconfig.
- Use Event Viewer or the
Get-EventLogPowerShell command.
Diagnosing Network Issues
If you’re facing network problems:
- Open sconfig.
- Use
ping,ipconfig, and other networking commands to diagnose the issue.
Backing Up and Restoring
Backing up your server is essential. You can initiate a backup using sconfig.
Creating a Backup
To create a backup:
- Open sconfig.
- Use the
wbadmincommand to start a backup.
Restoring from a Backup
To restore from a backup:
- Open sconfig.
- Use the
wbadmincommand to restore data.
Power Management
Managing your server’s power settings is another task for sconfig.
Shutting Down or Restarting
To shut down or restart your server:
- Open sconfig.
- Select Option 14 (Shut Down or Restart).
Configuring Power Settings
For more advanced power settings, you’ll need to dive into the powercfg command.
Advanced sconfig Techniques
As you become more comfortable with sconfig, you can leverage some advanced techniques to further streamline your server management process.
Automating sconfig Tasks
While sconfig is primarily an interactive tool, you can automate certain tasks using PowerShell scripts. Here’s an example of how to change the computer name using PowerShell:
Change computer name
$newName = “NewServerName”
Rename-Computer -NewName $newName -Force -Restart
Combining sconfig with Other Command Line Tools
Sconfig can be used in conjunction with other command-line tools to create powerful management scripts. For instance, you can use sconfig to configure basic settings and then use PowerShell for more complex tasks.
Advanced sconfig Techniques
As you become more comfortable with sconfig, you can leverage some advanced techniques to further streamline your server management process.
Automating sconfig Tasks
While sconfig is primarily an interactive tool, you can automate certain tasks using PowerShell scripts. Here’s an example of how to change the computer name using PowerShell:
# Change computer name
$newName = "NewServerName"
Rename-Computer -NewName $newName -Force -Restart
Combining sconfig with Other Command Line Tools
Sconfig can be used in conjunction with other command line tools to create powerful management scripts. For instance, you can use sconfig to configure basic settings and then use PowerShell for more complex tasks.
Sconfig vs. Other Configuration Methods
While sconfig is powerful, it’s essential to understand how it compares to other configuration methods available in Windows Server environments.
| Method | Pros | Cons |
|---|---|---|
| Sconfig | Simple interface Low resource usage Remote-friendly |
Limited to basic tasks Text based interface |
| PowerShell | Highly flexible Scriptable Access to advanced features |
Steeper learning curve More complex syntax |
| Server Manager (GUI) | Visual interface Comprehensive toolset |
Requires full GUI installation Higher resource usage |
The Role of sconfig in Modern Server Management
As we progress through 2025, sconfig continues to play a vital role in Windows Server Core management. Its simplicity and efficiency make it an indispensable tool for administrators looking to streamline their workflows and maintain lean server installations.
Integration with Cloud Platforms
Many organizations are adopting hybrid cloud strategies, and sconfig remains relevant in this context. It’s particularly useful for configuring on-premises servers that integrate with cloud services, ensuring consistent management across diverse environments.
Security Considerations
In an era of increasing cyber threats, sconfig’s role in maintaining server security cannot be overstated. By providing quick access to update management and firewall configurations, it helps administrators keep their servers protected against emerging vulnerabilities.
Conclusion
The sconfig command is an indispensable tool for anyone working with Windows Server Core. It provides a comprehensive, user-friendly interface for configuring your server quickly and efficiently. Whether you’re setting up a new server, managing network configurations, or troubleshooting issues, sconfig has you covered. By mastering this tool, you can streamline your workflow and keep your server running smoothly.
FAQs
What is the sconfig command used for?
The sconfig command is used to configure Windows Server Core without a GUI. It simplifies tasks like setting up the network, managing updates, and configuring remote management.
Can I use sconfig on a full installation of Windows Server?
No, the sconfig command is specifically designed for Windows Server Core installations.
How do I access the sconfig tool?
You can access sconfig by opening the Command Prompt on Windows Server Core and typing sconfig.
Is sconfig available in all versions of Windows Server?
sconfig is available in Windows Server Core editions, starting from Windows Server 2008 R2 onwards.
Can I manage server roles using sconfig?
Yes, you can manage server roles and features using sconfig in conjunction with PowerShell commands.
- Author
- Recent Posts
Mk Usmaan is an avid AI enthusiast who studies and writes about the latest developments in artificial intelligence. As an aspiring computer scientist, he is fascinated by neural networks, machine learning, and how AI technology is rapidly evolving.
In this post, we’ll look at all the SConfig options for the Windows server core installation. You can use the Server Configuration Tool (SConfig) to configure and manage a Windows Server.
When you install Windows Server Core, you can use the Server Configuration Tool (SConfig.cmd) to set up and manage different parts of Server Core installations. However, note that you must be a member of the Administrators group to use the tool.
SConfig is the primary way to configure and manage common aspects of the Windows Server operating system, including:

- Network configuration
- Active Directory domain membership
- Installation of Microsoft updates
- Operating system activation
Table of Contents
Launch SConfig on Windows Server Core
SConfig starts automatically with Windows Server 2022 (deployed in the Server Core installation option). To launch SConfig on the server core, login to your Windows server core. Type SConfig and press Enter.

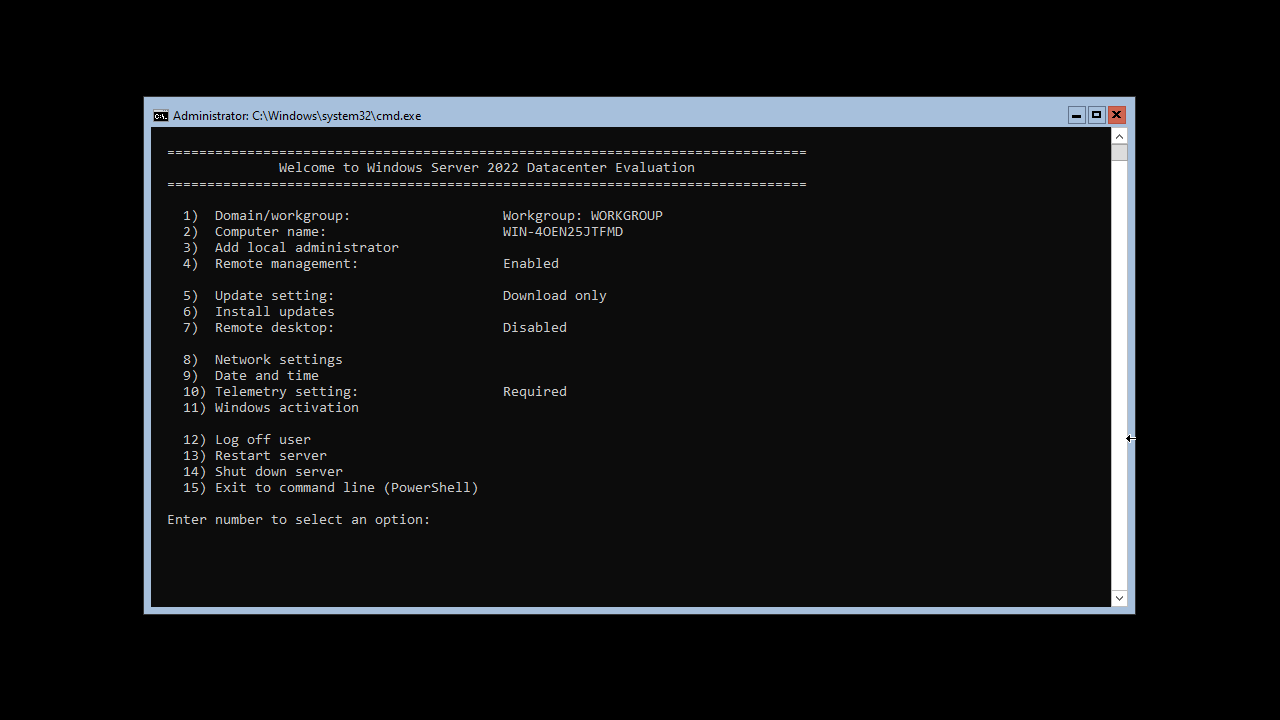
This brings up the Server Configuration Tool. At the time of writing this post, the Server Configuration tool has 15 options displayed on its main menu.

SConfig Options on Windows Server Core
When you start the Server Configuration Tool (SConfig.cmd), you see a list of options or settings. I will cover each of them along with screenshots.
Domain/Workgroup
Using the Domain/Workgroup option, you can join the server to an Active Directory domain or a workgroup. A detailed post on how to add Windows server core to domain is posted here – https://www.prajwaldesai.com/how-to-join-a-windows-server-core-to-domain/
Computer Name
With this option, you can change the server name. You also get the option to change the computer name while you join it to the domain. Most of all, a restart is required when you change the computer name.
Add Local Administrator
To add additional users to the local administrators group, use the Add Local Administrator option. On a domain joined machine, enter the user in the following format: domain\username. On a non-domain joined machine (workgroup machine), enter only the user name. The changes take effect immediately.
Configure Remote Management
Option 4 lets you configure remote management. Note that Configure Remote Management is enabled by default. When you type 4 and press enter you see three options and they are all self-explanatory.
- Enable Remote Management
- Disable Remote Management
- Configure Server Response to Ping

Windows Update Settings
The server can be configured to use Automatic or Manual updates using Windows Update Settings. When Automatic Updates is turned on, the system will check for updates every day at 3:00 AM and install them if there are any. When Manual updates are chosen, the system will not automatically check for updates.

Download and Install Updates
At any time, you can download and install applicable updates from the Download and Install Updates option on the main menu.
The Download Only option will scan for updates, download any that are available, and then notify you in the Action Center that they are ready for installation. This is default option.

Remote Desktop
When you install Windows Server core, by default the Remote Desktop is disabled. However, you can use the option 7 to enable remote desktop.
Type 7 and press Enter. You should see two options.
- Allow only Clients running Remote Desktop with Network Level Authentication
- Allow clients running any version of Remote Desktop
Type either 1 or 2 based on your requirement and press Enter key. On the confirmation box click OK.

Network Settings
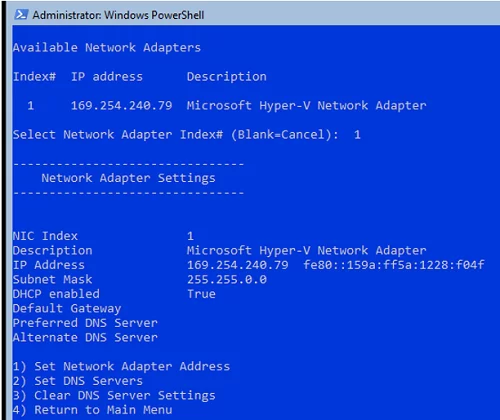
Using Network Settings you can configure the Server IP address. You can select IP assigned by a DHCP Server or you can assign a static IP address manually. This option allows you to configure DNS Server settings for the server as well.
Type 8 and press enter. Select your network adapter, and you will see some more options like :-
- Set Network Adapter Address
- Set DNS Servers
- Clear DNS Server Settings

Date and Time
You can change date and time settings by accessing the Date and Time main menu option. Type 9 and press Enter.

Telemetry Settings
This option lets you configure the data that’s sent to Microsoft. Type 10 and press Enter. Click Yes if you want to change Telemetry Settings.
The available Telemetry options include :-
- Security
- Basic
- Enhanced
- Full

Windows Activation
This option lets you configure Windows Activation. Type 11 and press Enter.
You can perform the following actions.
- Display License Info
- Activate Windows
- Install Product Key

Log Off User
Use this SConfig option to log off from the server.

Restart Server
Use this option to restart your Windows Server. Type 13 and press Enter. Click Yes to restart the server.

Shut Down Server
Use this option to Shut Down the server. Type 14 and press enter. Click Yes to confirm the server shutdown.

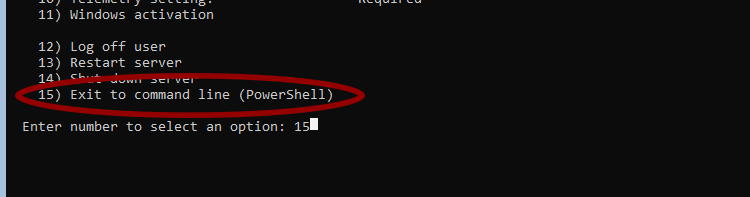
Exit to Command Line
This option lets you exit the Server Configuration Tool and go back to the command line. To return to the Server Configuration Tool, type SConfig.cmd, and then press ENTER.

Still Need Help?
If you need further assistance on the above article or want to discuss other technical issues, check out some of these options.
In this article, I tried to describe basic cmd and PowerShell commands used to configure and manage Windows Server Core. I think this guide will be useful both for beginners and experienced system administrators as a reference to basic Server Core administration commands.
Contents:
- Configure Windows Server Core Using SCONFIG
- Basic PowerShell Commands to Configure Server Core
- Useful Windows Server Core Commands
Server Core is a special Windows Server installation mode without most graphical tools and snap-ins. You can manage the Server Core from the command prompt or remotely (using Windows Admin Center or other tools).
Windows Server Core advantages:
- Lower resource requirements;
- Improved stability and security; fewer updates are required (due to less amount of code and used components);
- Ideally suits for use as an infrastructure role server (Active Directory domain controller, DHCP server, Hyper-V host, SMB file server, etc.).
Server Core is licensed as a common physical or virtual Windows Server instance (unlike Hyper-V Server which is totally free).
To install Windows Server 2016/2019 in the Core mode, you must select a typical installation. If you select Windows Server (Desktop Experience), the GUI version of the operating system will be installed (in previous Windows Server versions it was called a Server with a GUI).
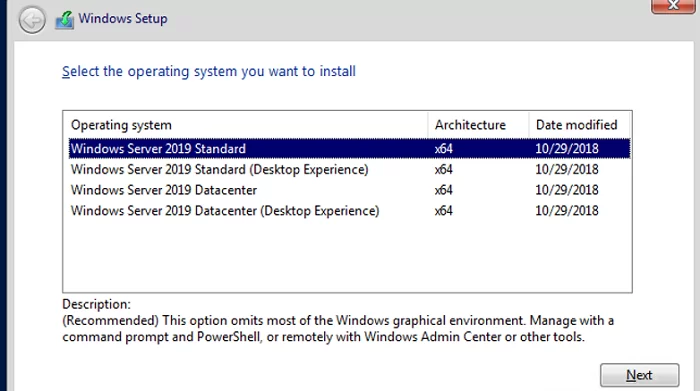
You cannot switch between Full GUI and Core modes in Windows Server 2016/2019 without server reinstallation.
After Windows Server Core installation, you will be prompted to set a local administrator password.
When you log on to Server Core, the command prompt appears (cmd.exe). If you want the PowerShell console to be run instead of it, make some changes to the registry. Run the commands below:
Powershell.exe
 Set-ItemProperty -Path 'HKLM:\Software\Microsoft\Windows NT\CurrentVersion\WinLogon' -Name Shell -Value 'PowerShell.exe'
And restart your server:
Restart-Computer -Force

If you have accidentally closed the command prompt window, press Ctrl+Alt+Delete, open the Task Manager -> File -> Run -> and run cmd.exe (or PowerShell.exe).
Configure Windows Server Core Using SCONFIG
You can use the built-in sconfig script for basic Server Core configuration. Just run the sconfig command in your console. You will see a menu with several items:
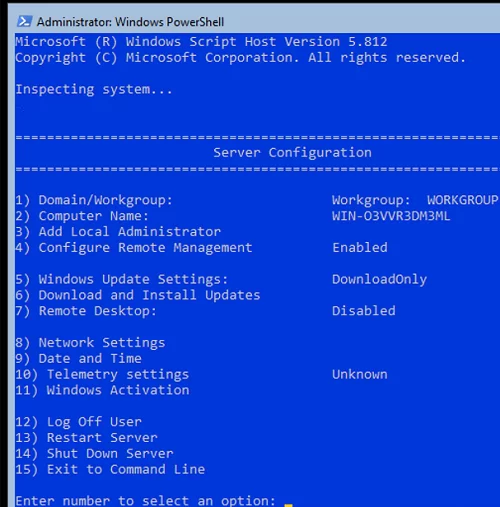
Using the Server Configuration menu, you can do the following:
- Add a computer to a domain or a workgroup
- Change a computer name (hostname)
- Add a local administrator
- Allow/deny remote management and ICMP response
- Configure Windows Update settings
- Install Windows updates
- Enable/disable RDP
- Configure network adapter settings (IP address, gateway, DNS server)
- Set date and time
- Change telemetry settings
- Activate your Windows Server instance
- Log off, restart, or shut down your server
Each item in sconfig has its number. To open the item you want, just type its number and press Enter.
Some sconfig menu items have subitems. To get to a setting, you also need to enter its number.
We will not describe all sconfig settings, since they are easy to understand. However, in most cases, administrators prefer using various PowerShell scripts to configure new hosts running Server Core. It is easier and faster, especially in mass deployment scenarios.
Basic PowerShell Commands to Configure Server Core
Let’s take a look at the basic PowerShell commands that can be used to configure Server Core.
To get information about your Windows Server build and PowerShell version:
Get-ComputerInfo | select WindowsProductName, WindowsVersion, OsHardwareAbstractionLayer
 $PSVersionTable

To restart Server Core, run this PowerShell command:
Restart-Computer
To log off your Server Core console, use the command below:
logoff
Configure Network Settings on the Server Core with PowerShell
Now you need to configure network settings using PowerShell (by default, Windows is configured to receive an IP address from DHCP). Display a list of network adapters:
Get-NetIPConfiguration
Specify an index of your network adapter interface (InterfaceIndex) you want to change and set a new IP address and DNS servers:
New-NetIPaddress -InterfaceIndex 4 -IPAddress 192.168.1.100 -PrefixLength 24 -DefaultGateway 192.168.1.1
 Set-DNSClientServerAddress –InterfaceIndex 4 -ServerAddresses 192.168.1.11,192.168.101.11
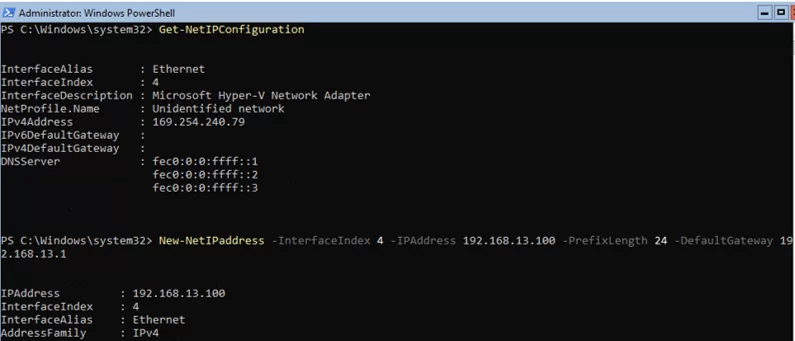
Check the current network settings:
Get-NetIPConfiguration
If you want to reset an IP address and return to getting an IP address from DHCP, run the command below:
Set-DnsClientServerAddress –InterfaceIndex 4 –ResetServerAddresses
 Set-NetIPInterface –InterfaceIndex 4 -Dhcp Enabled
To enable/disable a network adapter:
Disable-NetAdapter -Name “Ethernet0”
 Enable-NetAdapter -Name “Ethernet 0”
To enable, disable, or check the status of IPv6 support for your network adapter:
Disable-NetAdapterBinding -Name "Ethernet0" -ComponentID ms_tcpip6
 Enable-NetAdapterBinding -Name "Ethernet0" -ComponentID ms_tcpip6
 Get-NetAdapterBinding -ComponentID ms_tcpip6
To configure winhttp proxy server for PowerShell or system connections:
netsh Winhttp set proxy <servername>:<port number>
How to Set Date/Time?
You can set a date, time, or time zone using a graphical tool intl.cpl or PowerShell:
Set-Date -Date "07/21/2021 09:00"
 Set-TimeZone "Central Europe Standard Time”
Set Computer Name, Join Domain, and Activate Server Core
To change a computer name (hostname):
Rename-Computer -NewName be-srv01 -PassThru

To add a server to your on-premises Active Directory domain:
Add-Computer -DomainName "corp.woshub.com" -Restart
If you want to add additional users to the local administrators’ group, you can configure a Group Policy or add them manually:
Add-LocalGroupMember -Group "Administrators" -Member "corp\jsmith"
To activate Windows Server, enter your product key:
slmgr.vbs –ipk <productkey>
 slmgr.vbs –ato
Or you may activate your host on a KMS server. For example, to activate Windows Server Core 2019 Standart on a KMS host:
slmgr /ipk N69G4-B89J2-4G8F4-WWYCC-J464C
 slmgr /skms kms.corp.woshub.com:1688
 slmgr /ato
Enabling Remote Administration of Windows Server Core
To allow remote access to Server Core via RDP:
cscript C:\Windows\System32\Scregedit.wsf /ar 0
To allow remote management:
Configure-SMRemoting.exe –Enable
 Enable-NetFirewallRule -DisplayGroup “Windows Remote Management”
To display current Remote Management settings:
Configure-SMRemoting.exe -Get
To allow Win-RM for PowerShell Remoting:
Enable-PSRemoting –force
You can manage a server running Windows Server Core remotely from another server (using ServerManager.exe), through a browser using Windows Admin Center (WAC), or from any workstation using RSAT, you can also connect to it using RDP, PowerShell Remoting, or SSH (current Windows versions have build-in SSH server).
Configuring Windows Firewall on Server Core
You can find information about how to configure Windows Defender Firewall with PowerShell in this article. I will just show some basic commands here.
To enable Windows Defender Firewall for all profiles:
Set-NetFirewallProfile -Profile Domain,Public,Private -Enabled True
To change your network type from Public to Private:
Get-NetConnectionProfile | Set-NetConnectionProfile -NetworkCategory Private
To completely disable Windows Firewall (not recommended):
Get-NetFirewallProfile | Set-NetFirewallProfile -enabled false
To allow connection using remote management tools:
Enable-NetFireWallRule -DisplayName “Windows Management Instrumentation (DCOM-In)”
 Enable-NetFireWallRule -DisplayGroup “Remote Event Log Management”
 Enable-NetFireWallRule -DisplayGroup “Remote Service Management”
 Enable-NetFireWallRule -DisplayGroup “Remote Volume Management”
 Enable-NetFireWallRule -DisplayGroup “Remote Scheduled Tasks Management”
 Enable-NetFireWallRule -DisplayGroup “Windows Firewall Remote Management”
 Enable-NetFirewallRule -DisplayGroup "Remote Administration"
How to Install Updates on Windows Server Core
To manage update options, it is better to use Windows Update Group Policies. However, you can set the update settings manually.
To disable automatic updates:
Set-ItemProperty -Path HKLM:\Software\Policies\Microsoft\Windows\WindowsUpdate\AU -Name AUOptions -Value 1
To automatically download available updates:
Set-ItemProperty -Path HKLM:\Software\Policies\Microsoft\Windows\WindowsUpdate\AU -Name AUOptions -Value 3
To get the list of installed updates:
Get-Hotfix
Or
wmic qfe list
To install Windows updates manually, you can use the wusa tool:
wusa kbnamexxxxx.msu /quiet
To install and manage updates from the command prompt, it is convenient to use the PSWindowsUpdate module for PowerShell.
Managing Windows Core Roles, Services, and Processes
To get a list of all available roles on Windows Server Core, run the following PowerShell command:
Get-WindowsFeature
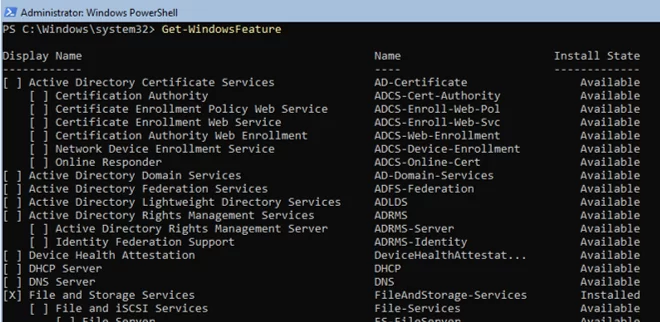
To get a list of all installed roles and features in Windows Server (thus you can quickly understand what the server is used for):
Get-WindowsFeature | Where-Object {$_. installstate -eq "installed"} | ft Name,Installstate
For example, to install the DNS role, run this command:
Install-WindowsFeature DNS -IncludeManagementTools
To get a list of all services in Windows:
Get-Service
To see all stopped services:
Get-Service | Where-Object {$_.status -eq “stopped”}
To restart a service:
Restart-Service -Name spooler
To manage processes, you can use the Task Manager (taskmgr.exe) or the PowerShell:
Get-Process cmd, wuaucl* | Select-Object ProcessName, StartTime, MainWindowTitle, Path, Company|ft
Useful Windows Server Core Commands
Finally, I will show some useful PowerShell commands and scripts I often use to manage Server Core.
Information about the status and health of physical disks (the default Storage disk management module is used):
Get-PhysicalDisk | Sort Size | FT FriendlyName, Size, MediaType, SpindleSpeed, HealthStatus, OperationalStatus -AutoSize
Free disk space information:
Get-WmiObject -Class Win32_LogicalDisk |
 Select-Object -Property DeviceID, VolumeName, @{Label='FreeSpace (Gb)'; expression={($_.FreeSpace/1GB).ToString('F2')}},
 @{Label='Total (Gb)'; expression={($_.Size/1GB).ToString('F2')}},
 @{label='FreePercent'; expression={[Math]::Round(($_.freespace / $_.size) * 100, 2)}}|ft

Information about the last 10 reboots of your server:
Get-EventLog system | where-object {$_.eventid -eq 6006} | select -last 10
A list of installed programs:
Get-ItemProperty HKLM:\Software\Wow6432Node\Microsoft\Windows\CurrentVersion\Uninstall\* | Select-Object DisplayName, DisplayVersion, Publisher, InstallDate | Format-Table –AutoSize
To download and extract a ZIP file from an external website:
Invoke-WebRequest https://servername/file.zip -outfile file.zip
 Expand-Archive -path '.\file.zip' -DestinationPath C:\Users\Administrator\Documents\
To copy all files from a directory to a remote computer over the network, you can use the Copy-Item cmdlet:
$session = New-PSSession -ComputerName be-dc01
 Copy-Item -Path "C:\Logs\*" -ToSession $session -Destination "C:\Logs\" -Recurse -Force
To install the device driver:
Pnputil –i –a c:\install\hpspp\hpdp.inf
Microsoft also offers a special package, Server Core App Compatibility Feature on Demand (FOD), which allows you to install some graphical tools and snap-ins on Windows Core Server 2019 (MMC, Eventvwr, Hyper-V Manager, PerfMon, Resmon, Explorer.exe, Device Manager, Powershell ISE). You can download FOD as an ISO file if your Microsoft subscription is active. You can install it as follows:
Add-WindowsCapability -Online -Name ServerCore.AppCompatibility~~~~0.0.1.0
Server Core App Compatibility Feature on Demand installation will use about 200 MB of additional RAM on your Server Core.
In this article, I tried to collect the most useful commands needed to administer Windows Server Core. From time to time, I will update the article and add new commands if they seem necessary for everyday work.
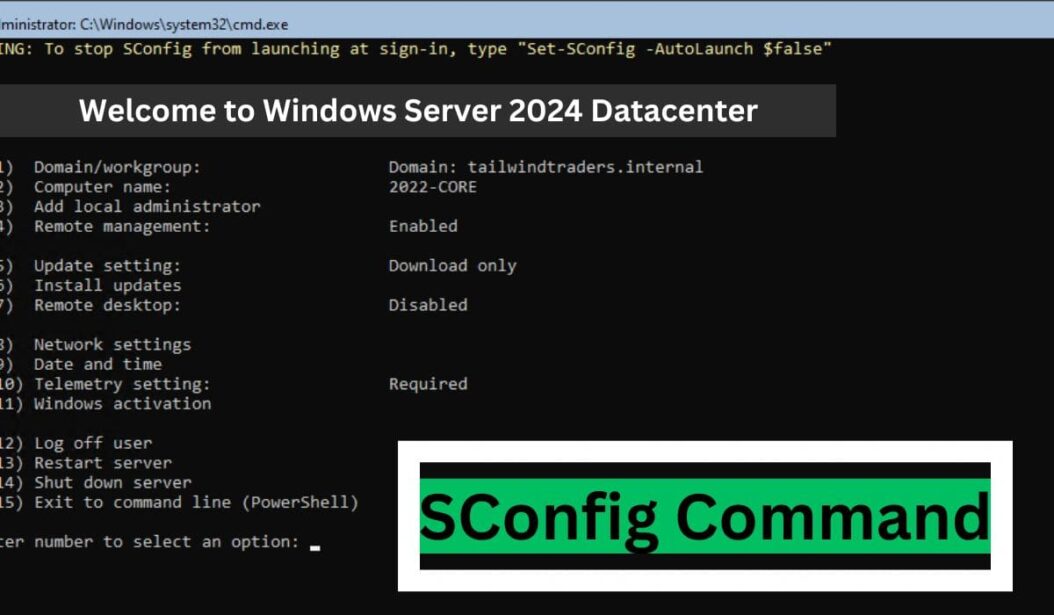
In the Windows Server core, you can open the server configuration utility by entering the sconfig command.
SConfig is the command line version of the Server Manager found on Windows Server Desktop Experience (the GUI version of the Windows Server).
On the Windows Server 2022 Server Core, the SConfig launches automatically after you’ve logged in. However, in Windows Server 2019, you will get the command prompt when you log in to the Server Core.
When you are at the command prompt (PowerShell or CMD), type sconfig and press Enter to open the system configuration utility.
sconfigThe SConfig utility consists of several command-line shortcuts for performing basic administrative tasks. Each task is associated with a number, as shown in the following screenshot.
To perform a task, you will enter the number associated with it. For example, to change the computer name, you will enter the number 2.
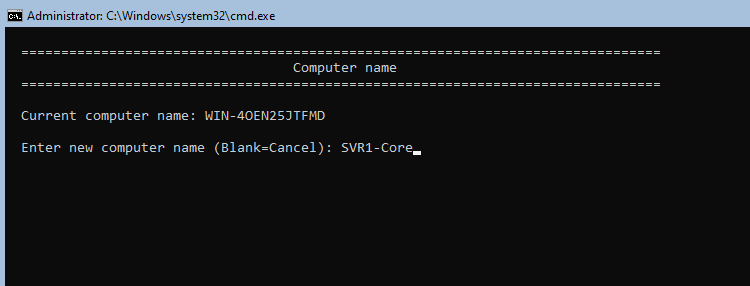
You will get a prompt asking you to enter a new computer name.
Stop SConfig From Launching at Sign-In
If you don’t want to start SConfig automatically, execute the following command at a PowerShell console:
Set-sConfig -AutoLaunch $falseYou now get the PowerShell console at sign-in. To re-enable sconfig, run the following command:
Set-sConfig -AutoLaunch $trueSwitch Between PowerShell and CMD
At the SConfig utility, type 15 and press Enter to get to the command prompt.
How do you know you are in PowerShell or CMD? At the beginning of the prompt, you will see PS when you are in PowerShell.
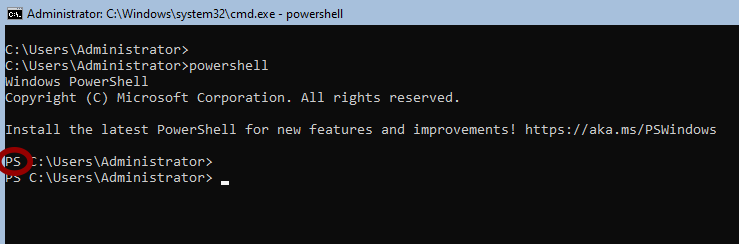
At the PowerShell console, type cmd to launch an old-style command prompt (CMD). To get to the PowerShell from CMD, type powershell and press Enter.