
Asked by: Ms. Hannah Bauer LL.M. | Last update: November 20, 2023
star rating: 4.5/5 (21 ratings)
To open the Administrative Tools folder from the Start screen in Windows Server 2012 R2, Windows Server 2012, Windows 8.1, or Windows 8. On the Start screen, click Administrative Tools. You can also type Administrative Tools on the Start screen, and then click Administrative Tools in the list of results.
How do I open Computer Management in Windows Server?
Tap the File Explorer icon on taskbar, select Desktop, right-click This PC and choose Manage in the context menu. Way 4: Open it by Run. Open Run with Windows+R hotkeys, type compmgmt. msc and tap OK.
How do I access server management?
Do one of the following to open Server Manager if it is not already open. On the Windows taskbar, click the Server Manager button. On the start screen, click Server Manager.
How do I open computer management in core server?
Start an MMC snap-in, such as Computer Management. Right-click the snap-in, and then click Connect to another computer. Type the computer name of the Server Core server, and then click OK. You can now use the MMC snap-in to manage the Server Core server as you would any other PC or server.
How do I open Computer Management as administrator?
Right-click “Computer Management” and choose “Run As Administrator.” If you use a standard Windows account, you’re prompted to allow Windows to run Computer Management as an administrator. Click “Yes” to open the console.
How do I start computer management?
Click the Start button, select All Programs -> Windows Administrative Tools, and then click on the Computer Management shortcut. Right-click on This PC icon on your desktop (or on the left pane of File Explorer), select Manage from the context menu. This will launch Computer Management in Windows 10.
How do you use computer management?
How to Use Computer Management on a Remote Computer Click Start, and then click Control Panel. Right-click Computer Management (Local), and then click Connect to another computer. Click Another Computer, and then type the name of the computer that you want to manage remotely, or click Browse to locate the computer.
What is the command to manage server mode?
Start the server from the Windows command prompt Open the Windows command prompt. Click Start > Programs > Accessories > Command Prompt. Change directories to the RUN folder of your Service Manager installation. For example: Type the following command: sm -httpPort:13080 -httpsPort:13081. Press Enter.
How do I install server Manager?
You can download and install SrvMgr.exe on the following operating systems: Windows Server 2003, Web Edition. Click the Download link to start the download. In the File Download dialog box, select Save this program to disk. Select a location on your computer to save the file, and then click Save.
What roles can be installed on Nano server?
Roles and Features for a Nano Server Role or feature Option System Center Operations Manager agent Installed separately. Data Center Bridging (including DCBQoS) -Package Microsoft-NanoServer-DCB-Package Deploying on a virtual machine -Package Microsoft-NanoServer-Guest-Package.
How do I find my server core?
Find out how many cores your processor has Press Ctrl + Shift + Esc to open Task Manager. Select the Performance tab to see how many cores and logical processors your PC has.
How do I run Control Panel from command line?
Step 1: Tap the Start button to open the Start Menu, input cmd in the search box and click Command Prompt to open it. Step 2: Type control panel in the Command Prompt window and press Enter.
How do I connect MMC to my computer?
Steps To open the MMC on your Windows server, in Windows Explorer, right-click the icon for the local computer and select Manage. On the left panel, select Computer Management. Select Action > Connect to another computer. Type the name of the storage system or click Browse to locate the storage system. Click OK.
Can you run Device Manager as admin?
You can also run Device Manager as an admin by using Run commands. To open the Run window, simultaneously press the Windows and R keys on the keyboard. Once the Run window opens, type “devmgmt. msc” in the field labeled “Open.” Then, press enter to open the Device Manager.
How do I use Device Manager as administrator?
You could try opening Device Manager from the Command Prompt as administrator. Here are the steps: — Click Start and search for Command Prompt. — Then press Enter, and Device Manager should appear as an administrator, since you were using command prompt as administrator.
How do I run Device Manager as a different user?
As for other control panel items like Device manager or Disk manager, You can use the following method to run it as adminitrator: Click start button, tyep in CMD, right click CMD and choose Run as administrator. Type in MMC and then press enter. Click File->Add/Remove Snap-in, then add the item you want to use.
What is Run command in computer?
The Run command on an operating system such as Microsoft Windows and Unix-like systems is used to directly open an application or document whose path is known.
What is Run command in Device Manager?
Device Manager can also be opened using Command Prompt, in any version of Windows, via its run command, devmgmt. msc.
How do I open my computer with Command Prompt?
The quickest way to open a Command Prompt window is through the Power User Menu, which you can access by right-clicking the Windows icon in the bottom-left corner of your screen, or with the keyboard shortcut Windows Key + X. It’ll appear in the menu twice: Command Prompt and Command Prompt (Admin).
What are the four most important things the computer management console allows you do?
8 things you can do with Computer Management in Windows Schedule tasks with Task Scheduler. Check system events with Event Viewer. Verify your network shares with Shared Folders. Manage user accounts with Local Users and Groups. Analyze your system’s performance with Performance Monitor.
How do you define device management?
Device management is the process of managing the implementation, operation and maintenance of a physical and/or virtual device. It is a broad term that includes various administrative tools and processes for the maintenance and upkeep of a computing, network, mobile and/or virtual device.
How do I manage drives in Windows 10?
Way 1: The easiest way to open Disk Management in Windows 10 is from computer Desktop. Right click on Start Menu (or press Windows+X hotkey) and then select «Disk Management».
What is command line server?
The server-command program is a command-line tool. It accepts the commands as arguments and outputs the results of the command on the console (standard-out). For security reasons only users with read access to the server. properties (normally only the Administrators group) have rights to execute the commands.
What are server commands?
Server commands (server-command) Scheduling of online backups and data snapshots. Scheduling user and/or group synchronization tasks. Automating the addition of new users after the accounts are added to the network. Performing account transactions such as adding funds/quota to user accounts.
Консоли управления (Microsoft Management Consoles) были впервые введены в Windows 2000, чтобы дать администраторам инструменты для управления системой, и состояли из сгруппированных сервисных программ и оснасток.
Для ежедневного управления системами Windows Server 2003 я использую консоль «Управление компьютером» (Computer Management Console), при помощи которой можно пользоваться отдельными инструментами, имеющими отношение к определенной системе. Более подробную информацию можете найти на https://www.bitprime.ru.
Доступ к консоли «Управление компьютером» (Computer Management Console)
Чтобы открыть консоль «Управление компьютером» (Computer Management Console) в Windows Server 2003, щелкните правой кнопкой на значке «Мой компьютер» (My Computer) в меню «Старт» (Start) и выберите пункт «Управление» (Manage). Открывшаяся консоль идентифицирует локальную систему, через которую был осуществлен вход. Если щелкнуть правой кнопкой на значке «Компьютер» (Computer Object), расположенном на левой панели (или на пункт меню «Действия» (Action) окна консоли), и выбрать «Подключиться к другому компьютеру» (Connect To Another Computer), то появится окно, в котором можно ввести название другой системы и дистанционно управлять ею посредством консоли. Такой подход помогает существенно сократить время работы с оснастками Службы (Services) и Журналы событий (Event Logs), особенно, если управляемые администратором системы территориально рассредоточены.
Примечание: доступ к оснастке «Управление компьютером» (Computer Management Console) в системах Windows 2000, Windows XP и Windows Vista можно получить, щелкнув правой кнопкой на иконке «Мой компьютер» (My Computer) или Компьютер (Computer) в Windows Vista и выбрав в раскрывшемся меню пункт «Управление» (Manage). Также можно дистанционно подключиться к компьютеру с любой поддерживаемой операционной системе из списка выше. Для этого щелкните правой кнопкой на объекте «Локальный компьютер» (Local Computer) в левой части окна консоли, выберите пункт меню «Подключиться к другому компьютеру» (Connect To Another Computer) и введите в формате NetBIOS имя машины, доступ к управлению которой требуется получить, или ее IP-адрес. Окно консоли перезагрузится и выдаст информацию об удаленной системе.
По умолчанию в консоль «Управление компьютером» (Computer Management Console) включены следующие оснастки:
• Event Viewer (Просмотр событий): отображает список установленных приложений и записываемые в журнал данные Windows.
• Shared Folders (Общие папки): показывает информацию о файлах с открытым доступом, сессиях соединений, а также список общих ресурсов, который можно просматривать, удалять и закрывать к нему доступ.
• Local Users and Groups (Локальные пользователи и группы): отображает список созданных групп и учетных записей пользователей локальной системы, которые можно добавлять, удалять и редактировать.
• Performance Logs and Alerts (Оповещения и журнал производительности): показывает записи о производительности системы.
• Device Manager (Диспетчер устройств): отображает список аппаратных устройств машины, которые можно добавлять, удалять или отключать.
• Removable Storage (Съемные запоминающие устройства): отображает список подключенных съемных запоминающих устройств (CD-ROM, USB, картридеров и т.д.).
• Disk Defragmenter (Дефрагментация диска): позволяет выполнять дефрагментацию.
• Disk Management (Управление дисками): отображает информацию о логических дисках системы, позволяет менять буквы томов, создавать и удалять разделы дисков, конвертировать диски из простых в динамические и выполнять прочие функции.
• Services (Службы): позволяет осуществлять управление системными службами удаленного компьютера.
• WMI Control (Контроль WMI): позволяет осуществлять управление инструментами Windows Management Instrumentation.
Полный список оснасток консоли управления Computer Management Console формируется в зависимости от установленных на Windows Server 2003 системных приложений. К примеру, SQL Server и браузер Internet Explorer добавят в него дополнительные компоненты.
Автор: Derek Schauland
Версия на английском:
techrepublic.com.com
Копирование статьи разрешается только в случае указания явной гиперссылки на веб-сайт winblog.ru, как на источник русскоязычной версии.
Оцените статью: Голосов
In this article we explore how you can view manage open files on Windows Server 2012 and beyond
Updated: November 14, 2024
Managing open files on a Windows Server is crucial for administrators to monitor file access, troubleshoot issues, and ensure the efficient operation of file-sharing services. Whether you’re handling file server workloads or diagnosing performance issues, being able to see which files are open, which users are accessing them, and the operations they are performing can help maintain a stable and secure environment.
Windows Server offers several tools and utilities to manage and view open files, most notably through the Computer Management console, PowerShell, and command-line utilities like Net File. These tools allow administrators to track open files, close them if necessary, and manage access controls for users and groups. They can also assist in troubleshooting locked files or in situations where a user’s session needs to be terminated due to file access issues.
While the core process for managing open files remains relatively consistent across Windows Server versions from 2012 onward, there are some differences in the tools and interfaces provided by each version. For instance, newer versions like Windows Server 2016 and 2019 include enhancements to file-sharing services, security, and performance, but the fundamental techniques for viewing and managing open files, whether using the GUI or command line, remain largely the same.
This guide will cover the tools available across different versions of Windows Server, highlighting key differences and best practices to efficiently manage open files.
Using Computer Management
Using Computer Management is by far the easiest way to view and manage files in Windows Server.
In Windows Server 2012, you can access Computer Management by doing the following:
Right-click on the Start Button and select Computer Management.
Alternatively, you can access computer management in older versions of Windows server by:
Holding down the Windows Key + R. This should open the Run box. Inside, type “compmgmt.msc” and press enter.
Computer Management can also be accessed via command prompt by typing:
“mmc compmgmt.msc”
Once inside Computer Management, you can view open files by going to:
System Tools > Shared Folders > Open Files
This pane will display a list of all open files being accessed on that server in a Windows Server environment. Inside, you’ll see the directory path of the file being accessed, the user’s username, the file’s status, and the number of locks on the file.
Often, staff will open files and then leave for lunch or simply forget that they have files open on their desktop. This can create a problem for anyone else who needs to access that file and make changes.
To close an open file, simply right-click on the file and click Close. This will kill the user’s sessions and make the file available to other users again. Keep in mind, that if you have other file servers, you will need to complete these steps on the file server where the files are being hosted.
Alternatively, you can use the Snap Ins function to add multiple files servers and manage everything centrally.
To do this, add Shared Folders under the “available snaps-ins” section. Next, choose the option for “Another computer” and input the hostname of the fileserver. Finally, you can choose to view open files, shares, sessions, or all three.
Using Resource Monitor
Another way you can view and manage open files in Windows Server is to access the Resource Monitor. Using the Resource Monitor allows you to record file activity if needed but doesn’t allow you to close open files.
You can access the resource monitor by searching for it under the search by in the Start menu. Alternatively, you can launch it by typing “resmon” into the Run box or command prompt.
Once in Resource Monitor, you can view and manage open files by selecting the Disk tab. Here you’ll be able to see what file is open, its disk usage, and the file’s directory path.
Managing Files on a Remote Desktop Server
If you manage a Windows remote desktop server, you can sometimes manage file access through Task Manager. This is useful for users who leave files open in Word or Excel and don’t correctly log off. This method doesn’t provide you with granular control as Computer Management but is quick and convenient if you’re already on the server.
On the remote desktop server right click on the taskbar and select Task Manager. Next, select the User tab. If you suspect a specific user has a file open, choose that user. Often Word or Excel documents will display the username of the person who has the file locked.
Expand the arrow to the left of their name to see a list of all user processes running in their session. For example, if you need to close an open Excel file, you can kill that process in their session to free up the locked file.
Keep in mind that the user may have more than one file open in that application, which could cause them to lose unsaved work. While this method is convenient, it isn’t as reliable or as accurate as Computer Management.
Viewing Files in Command Prompt
Seasoned IT pros will know that you can view files directly inside the command prompt. If you’re a fan of CLI or simply aren’t a fan of the new Windows Server interface, knowing a few simple syntaxes will enable you to view open files and perform simple maintenance tasks.
Click on Start and search for Command Prompt. Next, right-click on Command Prompt and choose “Run as administrator”. If you do not have administrator privileges, this command will not work.
Using the openfiles syntax, we can query for files, see the results, and disconnect files from the command prompt.
To view open shared files, type “openfiles /query”. In addition, you can view a more detailed list of open files by using the following command:
“openfiles /query /fo table /nh”
Make a note of the ID, user, and directory of interest. From here, you can issue commands to close those files. For example, you can disconnect all open files by a particular user by typing:
“openfiles /disconnect /a username”
If you’re looking to close a particular file regardless of the user, you can find the open file ID when you query all open files. Make a note of the open file ID and run the following command to close that file.
“openfiles /disconnect /id XXXXXXX”
The openfiles command is a flexible way to manage files from the command line interface. Although, at the same time, it can take some time to learn the syntax, and it can prove to be a reliable alternative to the Computer Management option
Tools to View and Manage Open Files
There are numerous paid and free tools available to manage and view open files on Windows Server. These tools are designed to add additional functionality beyond the built-in option inside Windows Server.
1. Clover
Clover is an extension for Windows Explorer that makes navigating Windows file management options more straightforward and convenient. This extension adds multi-tab functionality and drop-down menus to Explorer to improve the default GUI of Windows Server.
If you continuously monitor file access, Clover can speed up the process by offering customized tabs, a favorites section, and numerous keyboard shortcuts that allow you to toggle between menus quickly.
Clover is entirely free, making it an excellent option for smaller budget-conscious organizations.
2. Explorer ++
Explorer ++ is a free and open-source add-on that enhances file manager on Windows Server and Windows workstations. The platform is highly customizable and makes viewing details about open files much easier than the default view.
Like Clover, you can tab between browsers and manage multiple folders from a single window. In addition, you can view and manage open files similarly to File Explorer, with the added benefit of bulk file modification and centralized file management.
Explorer ++ is a great way to enhance windows file management for open files for smaller environments. In addition, since the product is open-source, you can verify the code yourself before installing it on your file server.
3. SolarWinds Server & Application Monitor
SolarWinds Server & Application Monitor (SAM) allows administrators to centrally manage applications, files, containers, and hosts across multiple networks. The file activity monitor, in particular, provides a sysadmin to track open files and changes across those files in real-time.
While Windows does a decent job highlighting open files in Computer Management, SAM provides customized templates and visualization to track file performance and open files viable for larger organizations.
SAM also allows you to build automated actions and integrate with ITSM or helpdesk solutions. For example, if you or your staff find yourself repeating tasks regularly, you can leverage the automation features in SAM to streamline that workflow.
SAM is a powerful tool for file management and file server performance monitoring and shines in larger enterprise environments.
Τest-drive SolarWinds Server & Application Monitor (SAM) with a fully functional 30-day free trial.
There are times when a file is open on a windows server and you need to view what user or process has it open. These open files can be locked and prevent users from editing, cause errors when upgrading software, hold up a reboot, and so on.
In this article, I will show you how to quickly view open files on Windows servers and workstations.
Both methods use built in Windows tools and work on most Windows versions (I’ve tested this on Server 2012, 2016, 2019, and Windows 10).
Video Tutorial
If you don’t like videos or want more details then continue reading.
This first method is used to view open files on a shared folder. This is the best way to troubleshoot locked files that users have left open. If you need to see what process has a file open then check out method 2.
Step 1: Right Click the start menu and select Computer Management
Another way to access computer management is to type in compmgmt.msc into the start menu search box.
You will need to open up this console on the computer or server that has the shared folder. For example, I have a server called file1 with a shared folder named HR. To see the open files on this share I will need to open up the computer management console from the file1 server.
Step 2: Click on Shared Folders, then click on open files
I can now see that the user rallen has the HR folder and the file adpro.txt open.
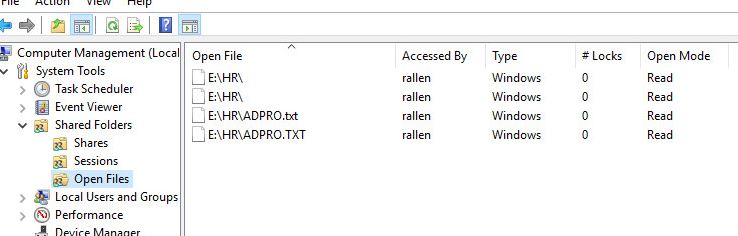
If I needed to I can right click the file and select “Close Open File”. This is something that needs to be done when a file is locked.
That’s it for method 1.
If you need to check who has permission to a file or folder then check out my guide How to view NTFS effective permissions.
Method 2: View open files using PowerShell
In this section, I’ll show you how to use the Get-SMBOpenFile cmdlet to view open files on Windows.
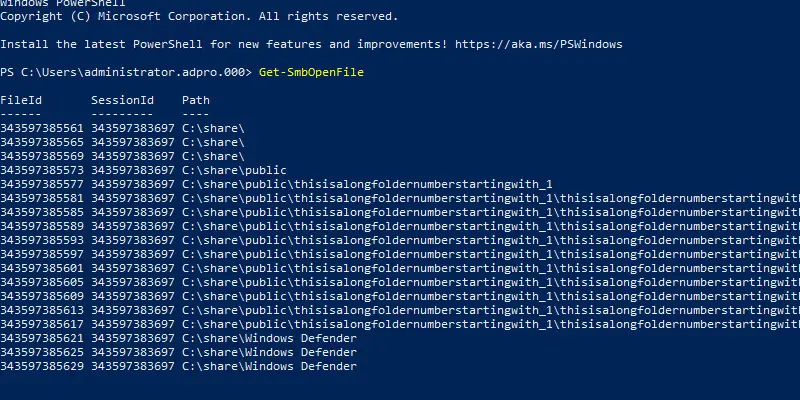
Example 1: Get all open files
get-smbopenfileThe above command will return the FileID, SessionID, and path.
Example 2: Display user and computer
Get-SmbOpenFile | select ClientUserName, ClientComputerNameThe above command displays the user, computer, and file path for the open files.

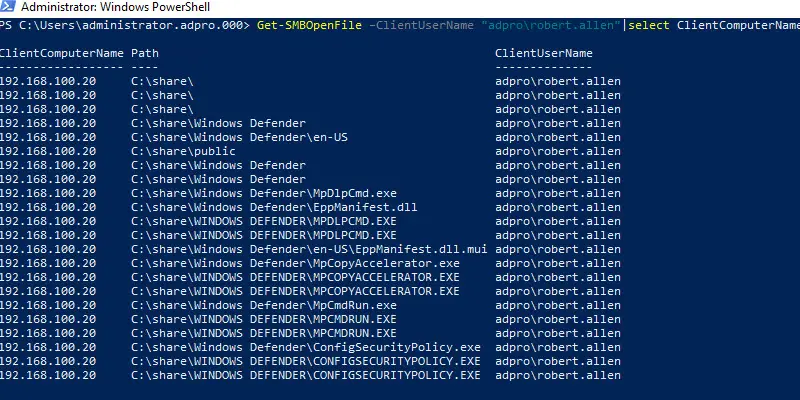
Example 3: Get open files for a specific user
Get-SMBOpenFile –ClientUserName "adpro\robert.allen"|select ClientComputerName,Path,ClientUserNameThe above command will get all open files for the user “robert.allen”
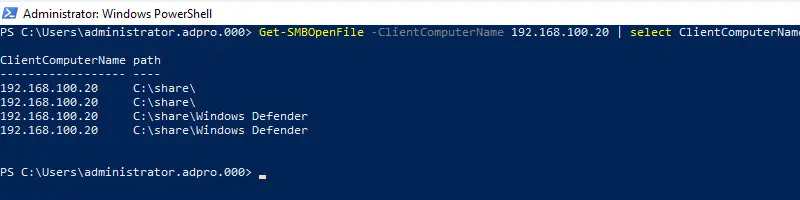
Example 4: Get open files on a specific computer
Get-SMBOpenFile -ClientComputerName 192.168.100.20 | select ClientComputerName, pathIn the above example, I’m getting all open files on the computer with the IP address 192.168.100.20.
Methods 3: View open files using the resource monitor
If you need to see what process has an open file locked then use the resource monitor.
Step 1: Type Resource monitor into the start menu search box
This is the quickest way to access the Resource Monitor.
Another option is to open up the task manager, click the performance tab and then click Open Resource Monitor.
Step 2: Click on the disk tab in the resource monitor
Now that I have the resource monitor open I just need to click on the disk tab.
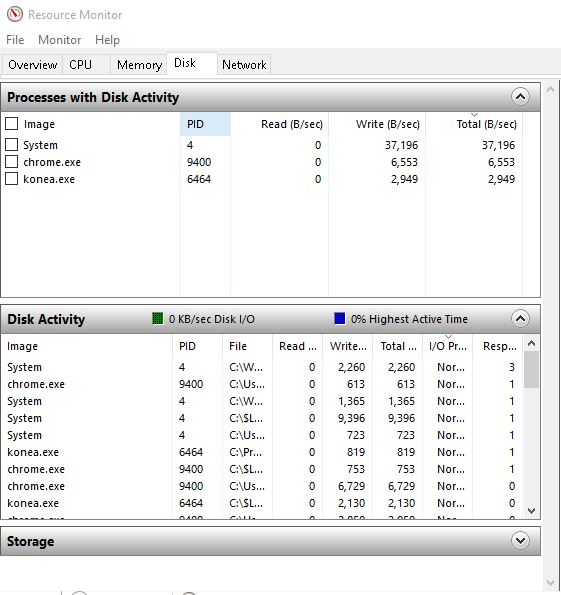
Now I can see all kinds of details about the disk activity such as files open, PID, read and write bytes per second, and more.
You can move the columns around so you can see the full file path.
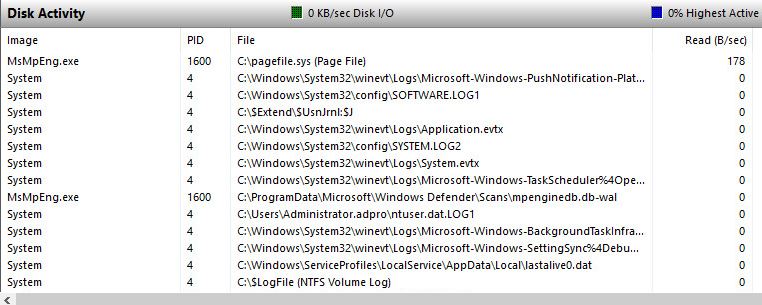
I have a lot of disk activity you go stop the live monitoring so you can view the open file activity.
To stop the live monitoring go to monitor, then select stop monitoring.
If you liked this article, then please subscribe to our YouTube Channel for more Active Directory Tutorials.
В нынешнем году платформе Windows NT исполняется 15 лет: первая ее версия называлась Windows NT Advanced Server 3.1 и была выпущена в 1993-м. И хотя специалисты по маркетингу придумали менять название операционной системы вместе с номером версии и после Windows NT 4.0 выпустили версии Windows 2000, Windows XP, Windows Server 2003, Windows Vista, Windows Home Server, а совсем недавно и Windows Server 2008, все эти названия соответствуют системам на ядре Windows NT. Ядро развивалось вместе с операционной системой, обогащаясь функциональными возможностями, приобретая поддержку новых процессорных архитектур (Itanium, AMD64/EM64T) и отказываясь от поддержки старых (Alpha, MIPS, PowerPC).
Возможности операционной системы и методы управления ими тоже претерпевали значительные изменения. Количество компонентов операционной системы выросло в разы, система приобрела дополнительные языки сценариев Windows Script Host (WSH) и Windows Power Shell (впервые включенный в поставку Windows версии 2008), программный интерфейс управления Windows Management Instrumentation (WMI), инфраструктуру графических интерфейсов управления Microsoft Management Console (MMC), менеджер установки пакетов программ Windows Installer (ранее назывался Microsoft Installer, MSI), средства удаленного доступа к рабочему столу Remote Desktop Protocol (RDP) и командной строке Windows Remote Shell (WinRS). И это далеко не полный список средств управления системой — к нему стоит добавить групповые политики, утилиты командной строки, менеджеры файловых и системных ресурсов и многое другое.
Windows NT 3.1
Для унификации управления богатым выбором компонентов через графический интерфейс начиная с Windows 2000 каждый инструмент управления выполнен в виде оснастки (snap-in) для MMC. В результате получилось более трех десятков оснасток администрирования, которые изначально предназначены для интегрирования в более универсальные инструменты управления с древовидным объединением отдельных оснасток. Примерами таких удачных инструментов можно назвать Управление компьютером (Computer management) из числа штатных средств и ISA Server Management из отдельно поставляемых продуктов Microsoft. Наличие слишком большого количества оснасток в меню Администрирование (Administrative tools) мешает эффективной работе. Большинство этих оснасток пригодны для управления настройками удаленного компьютера, поэтому в Windows Server 2008 они объединены в группу компонентов системы под общим названием Средства удаленного администрирования сервера (Remote Server Administration Tools) и многие из них по умолчанию не устанавливаются и не отображаются в меню.
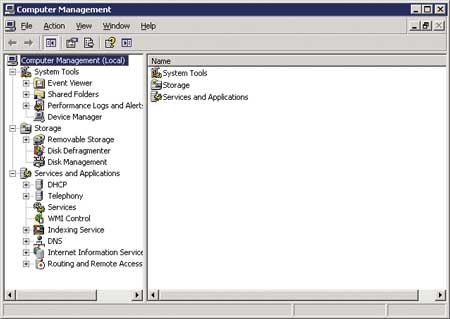
Оснастка Computer Management
Удадчным нововведением Windows Server 2008 является то, что администратору, вероятно, больше не понадобится искать нужную оснастку в меню. Условия для эффективной работы администратора с первых шагов создают два средства. Первое — это окно Задачи начальной настройки (Initial Configuration Tasks, ICT), которое появляется сразу после установки и при каждой загрузке, пока администратор не установит флажок Не показывать это окно при входе в систему (Do not show this window at logon). Данное окно позволяет настроить системные часы, сеть, изменить имя компьютера, установить и настроить обновления, добавить роли (Add Roles) и компоненты (Add Features), включить удаленный рабочий стол (Enable remote desktop) и настроить брандмауэр Windows (Configure Windows Firewall). Кстати, заново запустить закрытое окно ICT можно, введя команду oobe через меню Пуск (Start) или командную строку (oobe — аббревиатура от Out Of Box Experience).
Сразу после закрытия окна ICT запускается новый инструмент управления: Диспетчер сервера (Server Manager). Он же запускается через пункт Управление (Manage) контекстного меню пункта Компьютер (Computer), который находится в меню Пуск (Start) и проводнике Windows. Для тех, кто привык запускать таким образом Управление компьютером (Computer Management), сначала это будет причинять неудобства. Но через некоторое время появляется привычка к новому поведению системы, и дискомфорт пропадает. При необходимости прежний инструмент можно найти через строку поиска меню Пуск (Start) или там же в подменю Администрирование (Administrative tools). К сожалению, механизм поиска русской версии не знает английских названий средств управления, и пользователи, привыкшие к использованию строки поиска английской версии Windows, будут вынуждены набирать вместо firewall — брандмауэр, вместо services — службы и т.п.
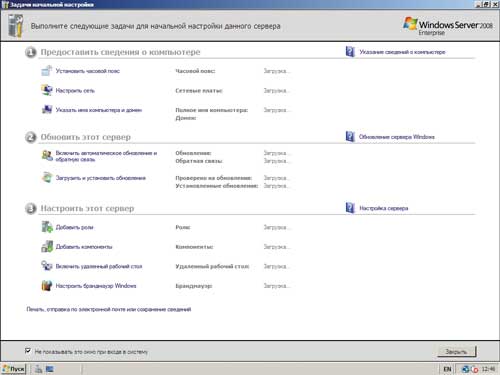
Окно Initial Configuration Tasks и меню «Пуск» с командой oobe
Server Manager позволяет из единого места быстро получить доступ к привычным и новым средствам управления: свойствам системы, сетевым соединениям, добавлению, настройке (соответствующими оснастками) и удалению ролей и компонентов. «Благодаря расширенным возможностям Server Manager нашим клиентам стало гораздо проще администрировать свои веб-сайты», — отмечает Константин Гусев, начальник группы развития сервисов компании .masterhost.
Роли (Roles) и компоненты (Features) заслуживают особого внимания. Ролями в терминах Windows Server 2008 называются основные службы сервера, которые могут быть добавлены после установки. Примеры ролей: DNS-сервер, DHCP-сервер, доменные службы Active Directory, веб-сервер (IIS). Компонентами в Windows Server 2008 называются второстепенные службы и компоненты сервера. Примеры компонентов: сервер Telnet, клиент Telnet, Windows PowerShell, WINS-сервер. Разделение на компоненты и роли условно — это будет видно из дальнейшего рассмотрения утилиты ServerManagerCmd. Добавление компонентов системы по мере необходимости уменьшает «поверхность атаки» — число способов, которыми злоумышленник может попытаться атаковать систему. Этим достигается повышение уровня безопасности системы и сокращение числа обновлений, подлежащих установке, — нет нужды ставить обновления для неустановленных компонентов системы.
Следует также отметить, что Windows Server 2008, как и Windows Vista, при установке операционной системы копирует с дистрибутивного носителя все файлы, которые могут понадобиться при добавлении компонентов системы в будущем. Благодаря этому при добавлении ролей и компонентов не требуется указывать каталог с файлами дистрибутива: все они уже есть на жестком диске.
Сразу после добавления ролей и компонентов в древовидной панели Server Manager появляются соответствующие оснастки, избавляя администратора от необходимости вспоминать их название и искать в меню. Кроме оснасток управления ролями и компонентами в Server Manager присутствует ряд полезных оснасток общего характера: Event Viewer (Журнал событий), Services (Службы), Performance Diagnostics (Диагностика производительности), Disk Management (Управление дисками).
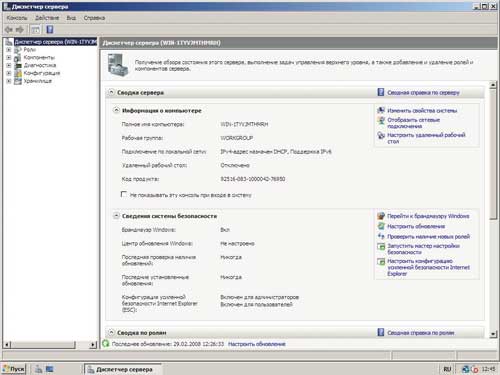
Server Manager Windows 2008
Таким образом, Server Manager, кроме инструментария управления, берет на себя функции надстройки над менеджером пакетов, который позволяет добавлять и удалять компоненты системы, учитывая зависимости между ними. Причем добавлением и удалением можно управлять и из командной строки с помощью команды ServerManagerCmd — в этом случае вычисление и обработка зависимостей происходит полностью автоматически. Так, если вы решили установить роль Сервер приложений (Application Server), то Server Manager предложит, а ServerManagerCmd сразу добавит .Net Framework и Windows Process Activation Service. Правда, если вы решите в будущем удалить роль, то добавленные для ее установки роли и компоненты автоматически удалены не будут.
Выполнить установку компонента из командной строки можно, указав его краткое название (которое имеется в документации в выводе команды ServerManagerCmd -query) или имя XML-файла, в котором в действительном XML будет упоминаться то же краткое название. Предположим, мы решили установить веб-сервер IIS в стандартной комплектации. Для этого нам достаточно выполнить команду:
ServerManagerCMD.exe -install Web-Server
C:\Users\Администратор>servermanagercmd -install Web-Server
…………………………
Начать установку…
[Установка] прошла успешно: [Веб-сервер (IIS)] Средства управления.
[Установка] прошла успешно: [Веб-сервер (IIS)] Веб-сервер.
[Установка] прошла успешно: [Веб-сервер (IIS)] Основные возможности HTTP.
[Установка] прошла успешно: [Веб-сервер (IIS)] Быстродействие.
. . .
<100/100>
Успех : установка прошла успешно.
Для установки веб-сервера в полной комплектации можно использовать команду:
ServerManagerCMD.exe -install Web-Server -allSubFeatures
Ключ -install при желании можно сократить до -i.
При желании мы можем подготовить задание на установку компонентов в виде XML-файла:
<ServerManagerConfiguration Action=»Install» xmlns=»http://schemas.microsoft.com/sdm/Windows/ServerManager/Configuration/2007/1»>
<Feature Id=»Web-Server»/>
</ServerManagerConfiguration>
применить этот файл (пусть его название будет toinstall.xml):
ServerManagerCMD.exe -inputPath toinstall.xml
и проверить результат, запросив список компонентов в наглядном текстовом виде:
C:\Users\Администратор>servermanagercmd -q
…
В итоге получим список компонентов следующего вида:
—— Роли ——
[ ] DHCP-сервер [DHCP]
[ ] DNS-сервер [DNS]
[ ] Hyper-V [Hyper-V]
[ ] Веб-сервер (IIS) [Web-Server]
[ ] Веб-сервер [Web-WebServer]
[ ] Основные возможности HTTP [Web-Common-Http]
[ ] Статическое содержимое [Web-Static-Content]
[ ] Стандартный документ [Web-Default-Doc]
. . .
—— Компоненты ——
[ ] Quality Windows Audio Video Experience [qWave]
[ ] RPC через HTTP-прокси [RPC-over-HTTP-Proxy]
[ ] Windows PowerShell [PowerShell]
[ ] WINS-сервер [WINS-Server]
[ ] Балансировка сетевой нагрузки [NLB]
[ ] Внутренняя база данных Windows [Windows-Internal-DB]
[ ] Возможности .NET Framework 3.0 [NET-Framework]
[ ] .NET Framework 3.0 [NET-Framework-Core]
[ ] Средство просмотра XPS [NET-XPS-Viewer]
[ ] Активация WCF [NET-Win-CFAC]
[ ] Активация через HTTP [NET-HTTP-Activation]
[ ] Не-HTTP активация [NET-Non-HTTP-Activ]
. . .
Можно сохранить этот список компонентов в файл формата XML, пригодный для автоматизированной обработки:
ServerManagerCMD.exe -query installed.xml
Удаление компонентов тоже может быть выполнено указанием названия удаляемого компонента в командной строке или через XML-файл:
C:\Users\Администратор>servermanagercmd -remove Web-Server
……………..
Начать удаление…
[Удаление] прошло успешно: [Веб-сервер (IIS)] Консоль управления IIS.
[Удаление] прошло успешно: [Веб-сервер (IIS)] Стандартный документ.
[Удаление] прошло успешно: [Веб-сервер (IIS)] Статическое содержимое.
[Удаление] прошло успешно: [Веб-сервер (IIS)] Монитор запросов.
. . .
<100/100>
Успех : удаление прошло успешно.
Следует обратить внимание на то, что Server Manager, как отмечалось выше, не удалил компоненты Windows Process Activation, добавленные для установки компонентов Web Server.
Возможность управлять установкой через XML-файл на первый взгляд выглядит излишней, но у нее есть по крайней мере одна очень полезная функция: это позволяет сохранить список установленных компонентов одного сервера и привести набор компонентов другого сервера в соответствие с этим списком (повторить набор ролей и компонентов путем добавления недостающих и удаления лишних).
Задача заключается в том, чтобы получить из выдаваемого по запросу XML-списка установленных компонентов XML-список компонентов, подлежащих установке. Форматы таких списков немного отличаются. Решение этой задачи описано в блоге Windows Server Тревисом Нильсеном (Travis Nielsen), разработчиком из команды Server Manager. Для нужного преобразования XML-документов Тревис предлагает готовое описание на языке XSL, которое используется с помощью утилиты msxsl.exe с сайта Microsoft. Упомянутые ниже файлы на языке XSL Install.xsl и Remove.xsl можно найти в Интернете на странице: http://blogs.technet.com/Windowsserver/archive/2007/08/16/transforming-servermanagercmd-query-xml-to-input-xml.aspx. Их применение будет выглядеть так:
На сервере-прототипе запрашивается список установленных компонентов:
ServerMangerCMD -q Master.xml
С помощью msxsl строятся XML-документы с заданием на установку и удаление компонентов:
msxsl Master.xml install.xsl -o install.xml
msxsl Master.xml remove.xsl -o remove.xml
Полученные задания применяются к серверу, который должен иметь идентичный набор компонентов:
ServerManagerCMD -inputPath install.xml
ServerManagerCMD -inputPath remove.xml
Во всех предыдущих примерах изменения использовались незамедлительно, что не всегда годится: иногда добавление или удаление компонентов влечет за собой требование перезагрузить сервер, причем после появления такого требования Server Manager не позволяет добавлять или удалять компоненты до перезагрузки. Графический интерфейс Server Manager предупреждает о том, что перезагрузка будет нужна заранее, а утилита командной строки ServerManagerCMD этого не делает.
Чтобы проверить, к чему приведет команда установки ролей или компонентов через ServerManagerCMD, можно воспользоваться ключом -whatif, добавляемым к командной строке:
C:\Users\Администратор>servermanagercmd -i GPMC -whatif
…
Примечание: выполняется в режиме ‘WhatIf’.
Указано для установки: [Управление групповой политикой]
После завершения установки может потребоваться перезагрузка этого сервера.
C:\Users\Администратор>servermanagercmd -i Web-Server -whatif
Примечание: выполняется в режиме ‘WhatIf’.
Указано для установки: [Веб-сервер (IIS)] Средства управления
Указано для установки: [Веб-сервер (IIS)] Веб-сервер
Указано для установки: [Веб-сервер (IIS)] Безопасность
. . .
После завершения установки может потребоваться перезагрузка этого сервера.
Тем не менее сообщение о возможной потребности в перезагрузке сервера не означает, что перезагрузка обязательно понадобится.
После команды servermanagercmd -i Web-Server установка завершилась успешно, и мы можем продолжать добавлять компоненты:
C:\Users\Администратор>servermanagercmd -i PowerShell
………………………
Начать установку…
[Установка] прошла успешно: [Windows PowerShell].
<100/100>
Успех : установка прошла успешно.
Иногда Server Manager отказывается выполнять дальнейшие действия по установке и просит перезагрузить компьютер. Таким образом, перед установкой компонентов на сервер, перезагрузка которого в ближайшее время не планируется, следует применять ключ -whatif в командной строке или прислушиваться к предупреждениям графического интерфейса Server Manager.
Еще один полезный совет: перезагружая сервер удаленно, постарайтесь не забыть в его DVD-приводе дистрибутивный диск Windows Server 2008. На некоторых компьютерах при загрузке с него требуется ввести метод загрузки (цифру 1 или 2) и нажать Ввод. Загрузка при этом останавливается в ожидании ввода.
Для работы Server Manager требуется работа управляемого кода .NET Framework, который не входит в состав варианта с установкой только основных компонентов сервера — Windows Server 2008 Core. Поэтому в вариант Core была добавлена утилита oclist, которая не требует управляемого кода и выдает список установленных компонентов. А установка компонентов выполняется с помощью утилит ocsetup и pkgmgr, которые входят в состав всех версий Windows Server 2008 и Windows Vista. Применение ocsetup выполняется так:
start /w ocsetup DHCPServer
Команда start с ключом /w ожидает завершения утилиты, которая работает в фоновом режиме (на экране не отображается). Благодаря посредничеству команды start удается определить момент окончания установки по появлению нового приглашения командной строки. Использование pkgmgr аналогично:
start /w pkgmgr /iu:GPMC;DHCPServer
В отличие от ocsetup, утилита pkgmgr позволяет установить несколько компонентов сразу в систему или ее образ, загрузившись с другого носителя, а также управлять компонентами в автономном (offline) режиме. Удаление компонентов выполняется аналогично, ключами /u и /uu команд ocsetup и pkgmgr соответственно.
Такое разнообразие утилит, вероятно, сложилось исторически: ocsetup заменяет утилиту sysocmgr, которая была в Windows 2000/XP/2003, pkgmgr является менеджером пакетов, фундаментом для остальных утилит. А Server Manager появился позже, и утилита ServerManagerCMD служит для того, чтобы упростить управление компонентами из командной строки.
Таким образом, Server Manager является основным инструментом для управления серверами на платформе Windows Server 2008. Этот инструмент применяется для локального управления полными вариантами Windows Server 2008, а его функциональность управления пакетами может работать как из графической среды, так и из командной строки.
КомпьютерПресс 6’2008