
В Windows Server 2019 и 2022 по умолчанию указан сервер времени time.windows.com. В некоторых средах он недоступен, но точное время нужно, но заменить сервер времени по умолчанию через пользовательский интерфейс затруднительно. Заменить сервер времени можно отредактировав реестр с помощью PowerShell (от имени администратора):
Проверяем текущий сервер:
w32tm /query /source
time.windows.com,0x8
Заменяем на нужный сервер времени:
Set-ItemProperty -Path "HKLM:\SYSTEM\CurrentControlSet\Services\W32Time\Parameters" -Name "NtpServer" -Value "pool.ntp.org,0x8"После перезапустим службу, чтобы изменения вступили в силу и выполним синхронизацию времени:
Restart-Service w32time
w32tm /resync
Отправка команды синхронизации на локальный компьютер
Команда выполнена успешно.
Готово.
Network Time Protocol (NTP) is a highly scalable internet protocol that determines the best time information and synchronizes accurate settings on a computer system. This guide explains how to set the time zone and configure NTP on a Windows Server.
This guide uses Windows Server 2019, but these instructions work on any machine with Server 2016 or later.
Prerequisites
Before you begin:
- Deploy a Vultr Windows Server.
- Connect to the server.
Set the Timezone
- Using the Windows Start Menu, open Server Manager.
- Locate Time zone in the local server properties section.
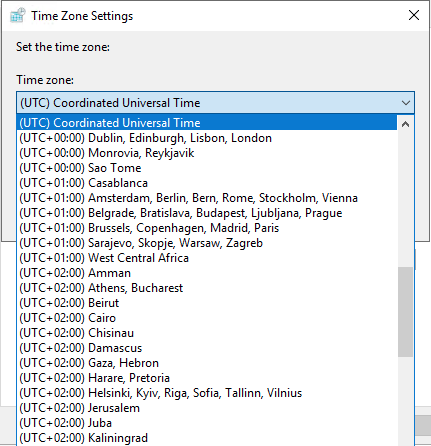
- Click the current timezone, which is UTC Coordinated Universal Timeby default.
- In the Date and Time window, click Change time zone.
- Expand the Time zone drop-down list.
- Select your preferred timezone. It’s recommended to set it to your server location.
- Click OK to save changes.
- Click Apply to load changes on the server.
- Re-open Server Manager, and verify the timezone change.
Optional: Set the Timezone using PowerShell
-
From the start menu, open Windows PowerShell, or open the run dialog (Win key + R), type
powershellin the search bar, and click OK to start PowerShell. -
Run the following command to check the server timezone.
PS > Get-Timezone -
View all available timezones.
PS> Get-Timezone -ListAvailableTo find your target timezone, use the following command to filter by name.
PS> Get-Timezone -ListAvailable | Where-Object {$_.displayname -like "*US*"}> The command above displays all names containing the characters
US. You can use a different string such as London. -
Change your timezone.
PS> Set-Timezone -Name "Central Standard Time"You can also change the timezone by ID.
PS> Set-Timezone -Id "Central Standard Time"
Configure NTP
In addition to setting the timezone, you can also configure Windows to use NTP to synchronize the time.
-
Open the Run dialog window by pressing the Windows key (WIN) + R on your keyboard.
-
In the search bar, enter
regeditand click OK to open Registry Editor. -
Expand the registry navigation tree:
HKEY_LOCAL_MACHINE -> SYSTEM -> CurrentControlSet -> Services
-
Expand W32Time.
-
Click Config.
-
Select AnnounceFlags
-
Enter
5in the Value data field. -
Click OK to save changes.
-
In the left pane, click Parameters.
Optional: Change the NTP Server
By default, Vultr uses the time.constant.com time server, located on our high-speed infrastructure. If you want to use a different time server, you can change the value of the NtpServer parameter by following these steps.
-
Double-click NtpServer
-
Change the value data field to your preferred value. For example, to sync with the United States NTP pool, use:
us.pool.ntp.orgYou can find a list of NTP Pool servers at the official website.
-
Expand TimeProviders.
-
Click NtpServer.
-
Double click Enabled, change the value data from
0to1, and click OK to save changes. -
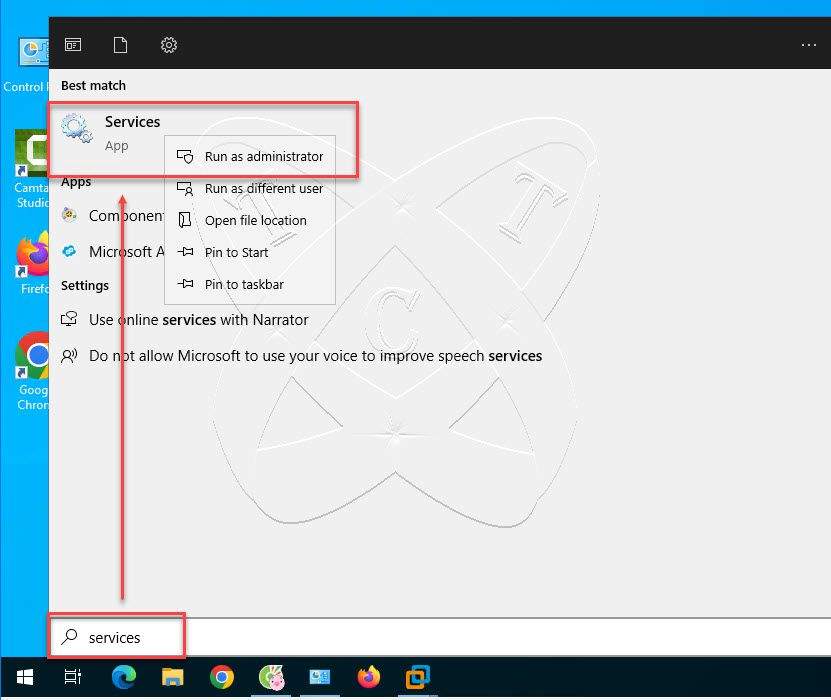
Close the registry editor, open the start menu, and search the keyword
services. -
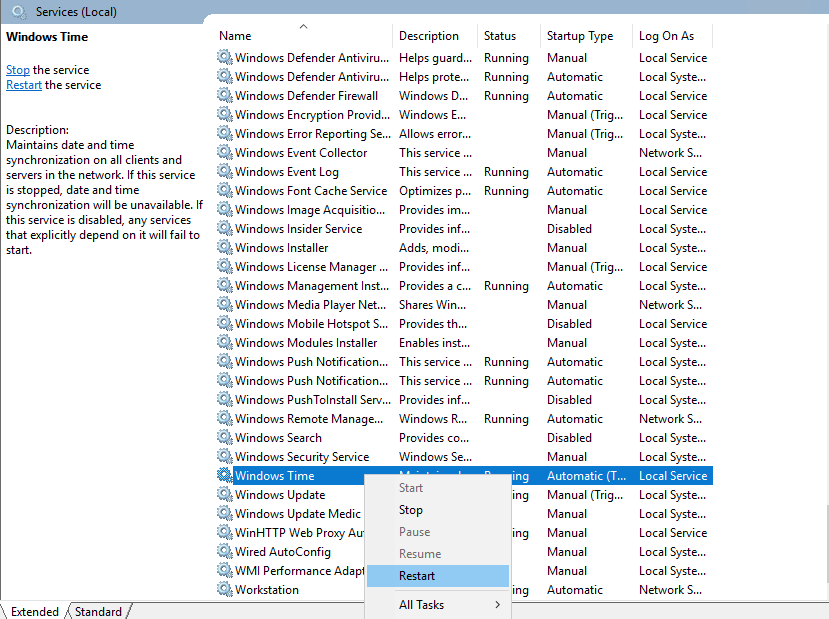
In the services window, scroll through the list, select Windows Time, right-click, and select Restart to apply NTP changes.

Optional: Configure NTP Using PowerShell
If you prefer to use Powershell, you can use the following commands to configure NTP.
-
Open PowerShell with administrative privileges.
-
Check the NTP time synchronization status.
PS> w32tm /query /status -
Enter the following command to set the time AnnounceFlags to
5.PS> Set-ItemProperty -Path "HKLM:\SYSTEM\CurrentControlSet\services\W32Time\Config" -Name "AnnounceFlags" -Value 5 -
(Optional) If you want to use NTP pool servers instead of Vultr’s NTP server, run the following command.
PS> Set-ItemProperty -Path "HKLM:\SYSTEM\CurrentControlSet\Services\w32time\Parameters" -Name "NtpServer" -Value us.pool.ntp.org -
Enable NTP Server.
PS> Set-ItemProperty -Path "HKLM:\SYSTEM\CurrentControlSet\Services\w32time\TimeProviders\NtpServer" -Name "Enabled" -Value 1 -
Restart the Windows Time service.
PS> Restart-Service w32Time -
Test NTP synchronization.
PS> w32tm /resync
Next Steps
You have successfully set the timezone and configured NTP on Windows Server 2019. If you plan to have other machines on a Vultr VPC use your NTP server, allow port 123 in the Windows Server Firewall. For further information, refer to the following guides.
- Official NTP Documentation
- List of database TimeZones
- Configure the Firewall on Windows Server 2019
- Create A Vultr Virtual Private Cloud (VPC)
If you manage an organization’s IT infrastructure, configuring NTP is essential to ensure proper and accurate time synchronization, which enables event logging, network security, and other computer operations. In this post, we will discuss how to configure an NTP Server on a Windows Server.
Network Time Protocol (NTP) is a highly scalable internet protocol that helps determine the most accurate time information and synchronizes the time settings on a computer system.
In order to configure NTP Server on Windows Server, you can use the Windows Registry or PowerShell.
1] Configure the NTP Server using Registry Editor
First, we will see how you can configure the NTP Server with the Registry Editor. We are going to configure the Windows Registry, which is a hierarchical database used to set up your computer’s settings. To do so, you can follow the steps mentioned below.
- Take a backup of your registry.
- Then, we will enable NtpServer using the registry key and configure Win32Time’s AnnounceFlags.
- Next up, we need to restart the NTP Server.
- Finally, we will open the appropriate UDP port in Firewall.
To open the Registry Editor, we can open Run, type “regedit”, and click on Ok. Once the UAC prompts, click on Yes to continue. Now, we will take a backup of the registry that will be used if you want to revert back to the previous state in case something goes wrong. To do so, in Registry Editor, go to File > Import, go to the location where you want to store the import, and save it.

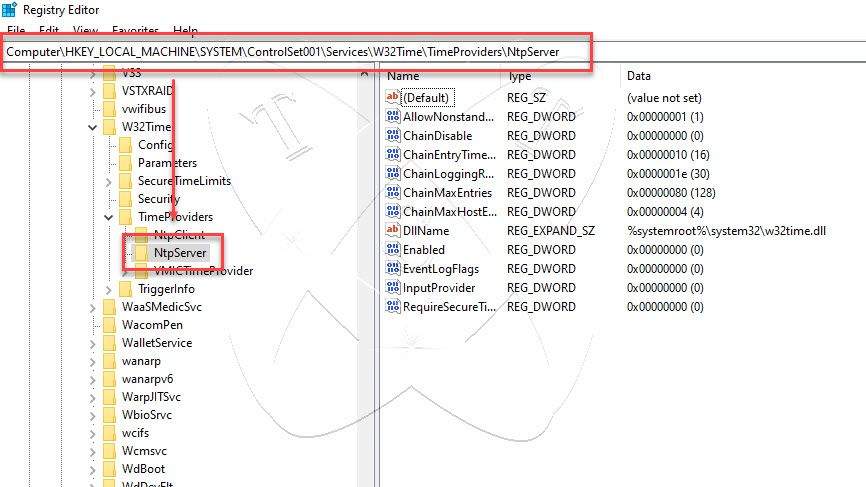
After taking the import, navigate to the following location in the Registry Editor.
Computer\HKEY_LOCAL_MACHINE\SYSTEM\CurrentControlSet\Services\W32Time\TimeProviders\NtpServer
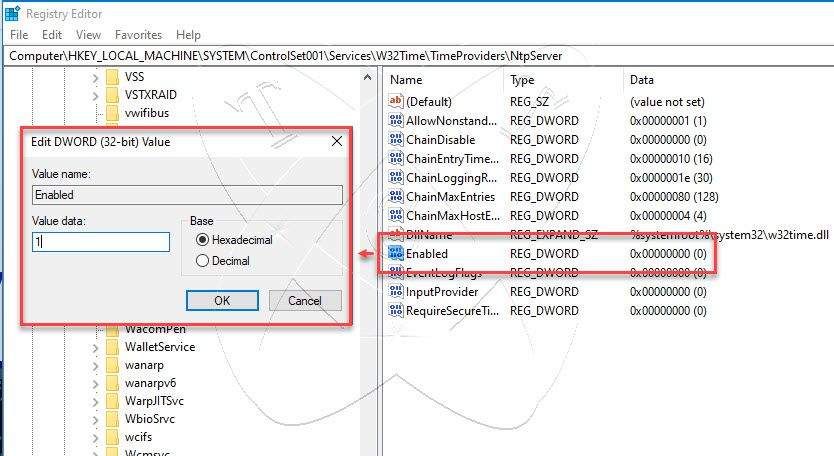
Look for the value called Enabled, double-click on it, and set its Value data to 1. This will enable the NTP protocol on your server.
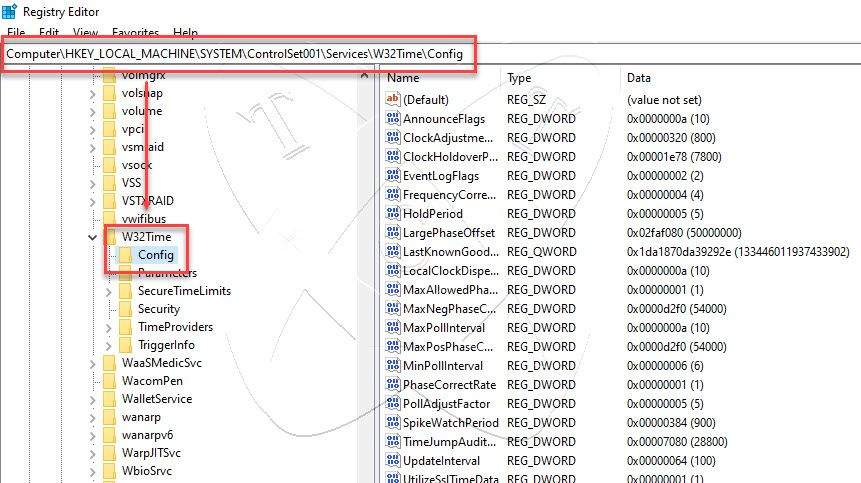
Once done, we need to go to the following location.
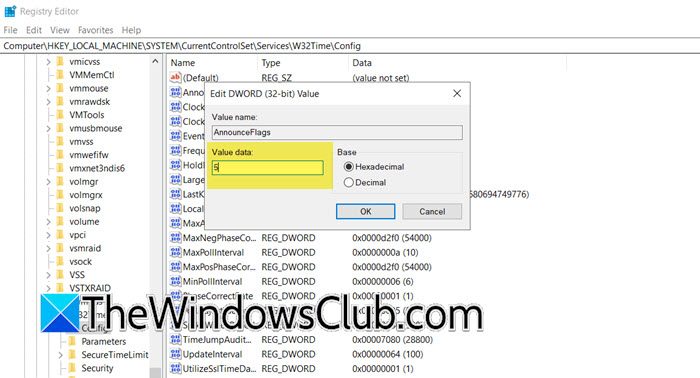
Computer\HKEY_LOCAL_MACHINE\SYSTEM\CurrentControlSet\Services\W32Time\Config
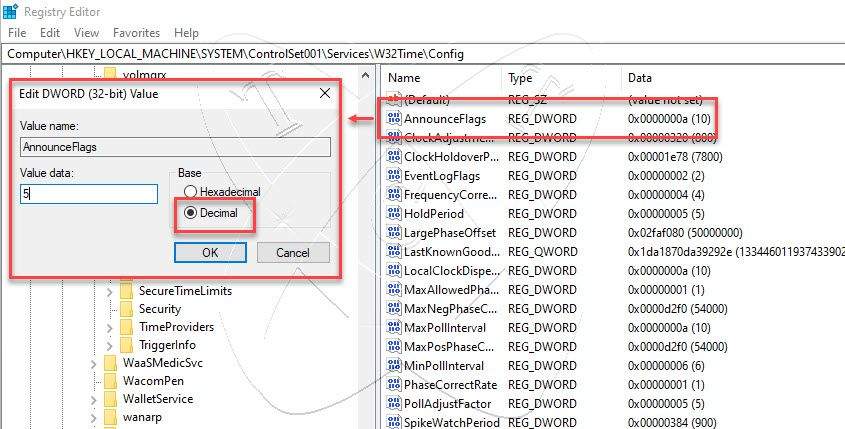
You need to look for AnnounceFlags, double-click on it, and set its Value data to 5.
Next, we need to restart the NTP Server, which can be done just by restarting the Time service. So, hit Win + S, search for Services, and open the utility. Now, scroll down and search for Windows Time service, right-click on it, and select Restart. Wait for the service to restart and we can move to our final step.
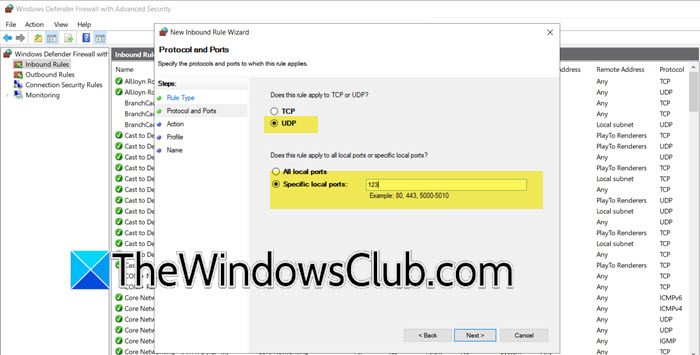
Finally, we are going to open the UDP Port 123 as it is used for the Network Time Protocol (NTP). To do so, you can follow the steps mentioned below.
- Open Run by Win + R, type “wf.msc”, and hit Enter to open the Windows Defender Firewall with Advanced Security utility.
- Click on Inbound Rules > New Rule.
- Select Port and click on Next.
- Next up, you need to select the UDP checkbox and in the Specific local port field, enter 123; click on Next.
- Select Allow the connection and click on Next.
- You need to select the profile where this rule is supposed to be applied; Domain, Private, or Public. Click on Next.
- Give a name of your choice along with the description and click on Next.
This will open the UDP Port 123 which will allow the NTP traffic to pass.
That’s how you can configure an NTP Server on a Windows Server.
2] Configure the NTP Server using PowerShell

The aforementioned method allows you to configure the NTP server using the GUI, but we have a CLI-based method as well. Here, we require you to open PowerShell on your machine and then run the following commands.
- In order to enable the Registry key for NTP Server, you need to run the following command.
Set-ItemProperty -Path "HKLM:\SYSTEM\CurrentControlSet\Services\w32time\TimeProviders\NtpServer" -Name "Enabled" -Value 1
- Next up, we need to make AnnounceFlags value 5 by running the command mentioned below.
Set-ItemProperty -Path "HKLM:\SYSTEM\CurrentControlSet\services\W32Time\Config" -Name "AnnounceFlags" -Value 5
- To restart the Time service, run – Restart-Service w32Time.
- Now, we need to configure the Firewall, for that, run the following commands.
New-NetFirewallRule ` -Name "Allow NTP" ` -DisplayName "NTP Server Port" ` -Description 'Allow NTP Server Port' ` -Profile Any ` -Direction Inbound ` -Action Allow ` -Protocol UDP ` -Program Any ` -LocalAddress Any ` -LocalPort 123
Now, you have configured an NTP Server.
Read: Change Internet Time Update interval in Windows
How to configure NTP server in Windows Server?
To configure the NTP Server in Windows Server, you must enable the related registry key. Also, you need to configure the AnnounceFlags registry value under W32Time. Once done, we need to restart the Time service and configure the UDP port to allow NTP traffic. To do all this, we recommend you follow the steps mentioned above.
Read: NTP client shows incorrect Time on Windows
How do I setup my own NTP server?
On Windows, setting up the NTP Server is actually pretty simple, all you need to do is configure the registry settings, and once that is done, you can reboot the Windows Time service and then configure the UDP port settings, as mentioned in this post above.
Also Read: Add or change Time Server in Windows.
Hello everyone, in this article, we will explore together How to Install and Configure an NTP Server on Windows Server 2012/2016/2019/2022
What is an NTP Server?
NTP (Network Time Protocol) is a network protocol used to synchronize time across computers and devices in a network. NTP ensures that devices in the network operate with the same standard time, which is crucial in various applications, especially in server systems and large networks.
An NTP server is a computer configured to provide accurate time according to the NTP standard for other devices in the network. NTP servers often connect to precise time sources such as atomic clocks or official time servers on the Internet.
Features
Some important features of NTP servers include:
- Accurate Time Synchronization: NTP servers accurately synchronize the time across the network with the standard time.
- Time Dispersion Control: NTP has the ability to adjust time synchronization with low dispersion, helping to reduce latency in data transmission.
- Flexibility: NTP supports multiple levels of time synchronization, from large systems to individual devices.
- Security: New versions of NTP provide security measures to prevent tampering with time information.
NTP servers are commonly deployed in large networks, server systems, and environments where time accuracy is critical. Using NTP helps synchronize time across the network, reducing the likelihood of conflicts and errors due to inconsistencies in system time.
Step 1 – Enable NTP Server
To activate the NTP Server on Windows Server, follow these steps:
Open the Run window by pressing the Windows key + R simultaneously. In the Run dialog, type regedit and press Enter.
The Registry Editor window is open, navigate to the following path:
HKEY_LOCAL_MACHINE\SYSTEM\CurrentControlSet\Services\W32Time\TimeProviders\NtpServer
In the right-hand window, right-click on the value Enabled and select Modify the set the Enabled value to 1 to activate the NTP Server.
Once you have finished setting up, click OK and do not hastily close the Registry Editor window; we will proceed to step 2
Note: Before making changes to the Registry, ensure you have backed up important data and understand the implications of modifying the Registry.
Step 2 – Configure the AnnounceFlags
Before we begin, let’s see what is AnnounceFlag?
In the NTP server configuration on Windows Server, AnnounceFlag is a value that determines whether a server is considered a reliable time server controlled by the entry and announces its synchronized time to other machines in the network. This value specifies how the NTP server shares time information with other devices in the network.
- AnnounceFlag = 0: The server does not announce to any other servers. Time synchronization information is not shared.
- AnnounceFlag = 1: The server only announces to its upstream server. Time information is shared only with the upstream server.
- AnnounceFlag = 2: The server announces to its upstream server and also to other servers in the network. The NTP server shares time information more widely.
- AnnounceFlag = 3: The server announces to all other machines in the network, assuming it is a secondary server and does not retain time information from other servers.
- AnnounceFlag = 4: The server announces to all other machines in the network, assuming it is an authoritative server.
- AnnounceFlag = 5: Often understood as a combination of values 1 and 4. In this case, the NTP server will announce to its upstream server (value 1) and simultaneously assume that it is an authoritative server, announcing to all other machines in the network (value 4)
- AnnounceFlag = 8: The server does not make any announcements and only retains time synchronization information from its upstream server.
To configure AnnounceFlag, navigate to the following path:
Computer\HKEY_LOCAL_MACHINE\SYSTEM\CurrentControlSet\Services\W32Time\Config
In the right-hand window, right-click on AnnounceFlag – choose Modify, and set the value of AnnounceFlag to 5
Once you have finished setting up, click OK and close Registry Editor.
Step 3 – Restart Windows Time Service
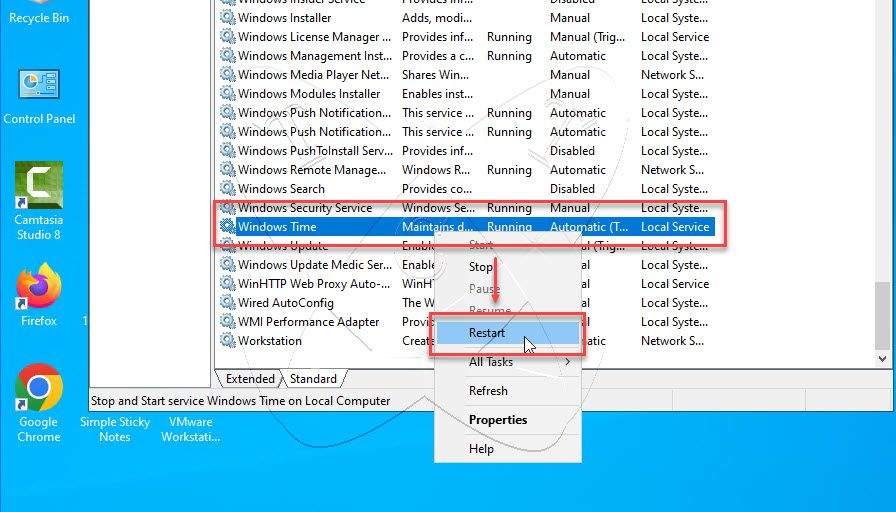
You have now activated your Windows server as an NTP Server. To apply the changes, we need to restart the Windows Time service by pressing the Start button and entering service in the search bar, right-click on service – and select Run as Administrator.
The Services window will appear. Locate and right-click on the Windows Time service, then select Restart
Step 4 – Adjust Firewall
By default, the NTP Server listens on port 123/UDP. If your server has an enabled firewall, open port 123/UDP to permit connections to the NTP Server and attain effective time synchronization
Read more: How to Open Ports in Windows Firewall on Windows
Conclusions
In this article, we have walked through the Installation and Configuration of an NTP Server on Windows Server, a crucial process to ensure accurate time synchronization within a network. By activating the NTP server and opening port 123/UDP on the firewall, we have established an effective environment for time synchronization across devices within the system.
Utilizing the NTP Server on Windows Server not only helps maintain time accuracy but also plays a vital role in ensuring performance and consistency in time-related processes, especially in large network environments and server systems.
Read more
- How to Install and Configure NTP Server on Ubuntu
- How to Install and Configure NTP Client on Windows: ✍️updating
- How to Install and Configure NTP Client on Ubuntu: ✍️ updating
- How to Install and Configure NTP Client on CentOS-based: ✍️ updating
Home » OS’s » Windows » Set NTP Server Windows 2016 or Windows 2019
There is no question about it, having accurate time in your environment set in critical infrastructure systems is a must. Many business-critical applications and infrastructure systems rely on accurate time synchronized between them to ensure the system functions as expected. Time skew can cause all kinds of weirdness when it is misconfigured or out of sync between different servers/systems. This is especially true in a Windows Server Active Directory domain. Having accurate time between a client computer and domain controllers is essential. Let’s take a look at how to set ntp server Windows 2016 or Windows 2019 to see how this can be easily carried out.
What is NTP?
Wen it comes to synchronizing time in most enviornments, Network Time Protocol (NTP) is the protocol that is used to ensure accurate time across your environent. In most environments, NTP servers, special time servers, are configured that provide an external time source for which your internal servers can synchronize with.
There are several widely known NTP IP addresses on the Internet that provide reliable time sources for your network. The NTP.org servers are one such set of time servers that provide an NTP source for configuration.
There are a few NTP values to be aware of:
- NTP Server – This is a specialized server that is able to detremine the precise time from an external timing reference such as GPS and passes these precise time values on to your network
- Offset – This is the difference in time between the external time server and the time on a local client computer. The larger the offset, the more inaccurate the timing source is.
- Delay – This is the value of the round-trip time (latency) of the timing message between the client to the server and back again.
How Time is synchronized in a Windows Server domain
In a Windows domain, Microsoft has default configuration in place that takes care of a good portion of the NTP configuration. Starting with Windows 2000 Server, Windows clients are configured as NTP Clients. When configured as an NTP client, Windows computers only attempt to contact the domain controller for NTP synchronization or a manually specified NTP server.
Microsoft has made the domain controller the default in a Windows domain since it makes sense that clients already have a secure channel established with DCs for other types of communications. Additionally, accurate and synchronized time between domain controllers and clients is especially important for all kinds of things such as logins, group policy synchronization and other tasks/operations.
The order of operations or hierarchy in a Windows domain is as follows:
- Domain members attempt to synchronize time with any domain controller located in the domain
- Domain controllers synchronize with a more authoritative domain controller
- The first domain controller that is installed in the environment is automatically configured to be a reliable time source.
- Other than the first domain controller installed, the PDC emulator (if role has been moved from the first DC installed) generally holds the position of best time source.
An important point to consider and that comes into play when thinking about why we set ntp server in Windows 2016 or Windows 2019 is the authoritative domain controller must have a reliable source to synchronize with as well. This is generally an external time server outside of the domain hierarchy.
Now that we know how the domain hierarchy for time is configured, how is the external time source configured on your domain controller that is configured as the reliable source of time?
Configuring Windows Time Service with W32tm.exe
When it comes to Windows Server environments like Windows Server 2016 or Windows Server 2019, there is a special Windows service that controls the time synchronization of your Windows hosts. This is the Windows Time Service.
Microsoft provides a command line tool to interact with the Windows Time Service called W32tm.exe. This has been included in Windows operating systems since Windows XP/Windows 2003 and later. It can be used to configure Windows Time service parameters as well as diagnose time service problems. This is generally the tool of choice when it comes to configuring, monitoring, and administering Windows Time.
Using the W32tm.exe utility is fairly straightforward. It can be used from a normal command prompt as well as from a PowerShell prompt. There are several command parameters included that allow not only configuring the NTP servers you want to query, but also parameters that allow viewing the low level registry configuration as well as the synchronization status.
You can read the official Microsoft KB on the Windows Time service and the W32tm.exe utility here:
- https://docs.microsoft.com/en-us/windows-server/networking/windows-time-service/windows-time-service-tools-and-settings
However, there are a few commands I would like to show you for the purposes of configuring your Domain controller that is to be the reliable time source (PDC Emulator) for your domain.
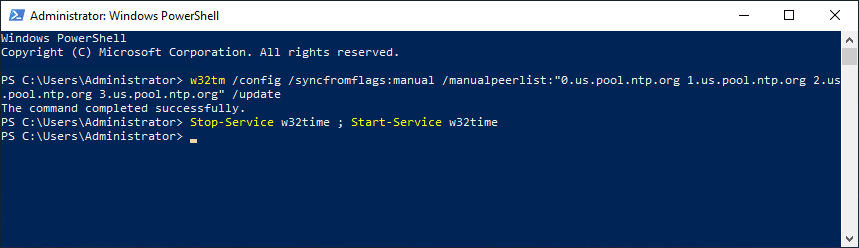
The first command is the command line entry to specify your NTP servers, which in this case I am using the NTP.org servers to set as the source of my NTP synchronization.
w32tm /config /syncfromflags:manual /manualpeerlist:"0.us.pool.ntp.org 1.us.pool.ntp.org 2.us.pool.ntp.org 3.us.pool.ntp.org" /update

Stop-Service w32time
Start-Service w32time
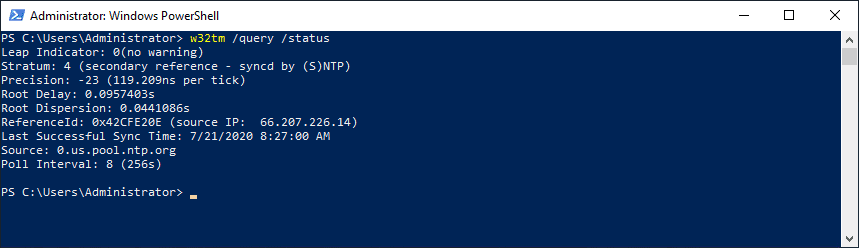
If you want to view the status of the NTP synchronization on your server after you have configured the values and restarted the w32time service, you can use the following command:
w32tm /query /status
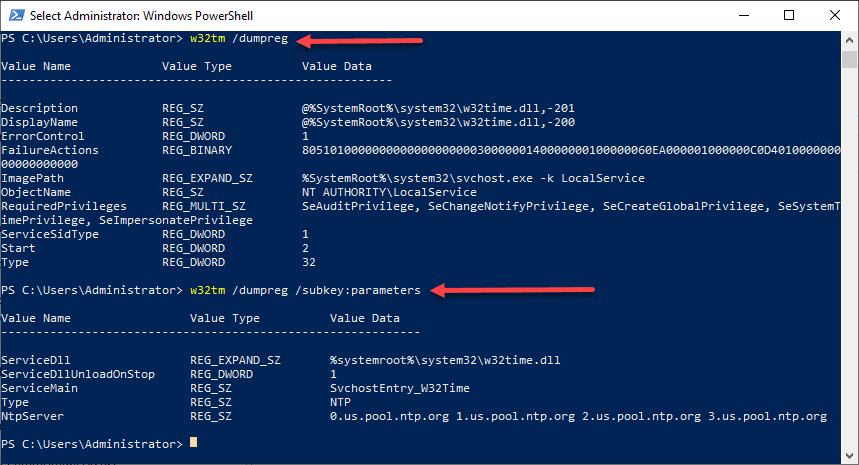
You can also check the values configured in your registry key hkey local machine system currentcontrolset services w32time config using the commands below. You can drill into the configuration parameters using the /dumpreg /subkey command.
w32tm /dumpreg

w32tm /dumpreg /subkey:parameters
Final Thoughts
As shown, you can easily set NTP Server Windows 2016 or Windows 2019 using the w32tm command utility that allows interacting with the time service in Windows Server.
In a Windows domain, you want to configure your authoritative time source domain controller, which by default is the PDC Emulator, to pull time information from an authoritative source like NTP.org or some other reliable NTP time server.
After configuring the time source, the other domain controllers will synchronize with this server and then the Windows clients joined to the domain will synchronize with the domain controllers that have the corrected time from the authoritative server.
Brandon Lee is the Senior Writer, Engineer and owner at Virtualizationhowto.com, and a 7-time VMware vExpert, with over two decades of experience in Information Technology. Having worked for numerous Fortune 500 companies as well as in various industries, He has extensive experience in various IT segments and is a strong advocate for open source technologies. Brandon holds many industry certifications, loves the outdoors and spending time with family. Also, he goes through the effort of testing and troubleshooting issues, so you don’t have to.