
The Windows Server Backup (WSB) service is a crucial component for system administrators and IT professionals who have the critical responsibility of ensuring data integrity, availability, and disaster recovery. System backups are not just a proactive measure but an essential strategy when faced with hardware failures, accidental deletions, or ransomware attacks. In this article, we’ll delve into the nitty-gritty of how to manage the Windows Server Backup service, including starting, stopping, and restarting it as necessary. We’ll also explore the underlying mechanisms, best practices, troubleshooting, and more.
Understanding Windows Server Backup Service
Before jumping into how to manage the Windows Server Backup service, let’s understand what it is and why it’s vital for your Windows Server environment.
WSB is a feature found in Windows Server that allows system administrators to create backup copies of files, applications, and entire systems. It enables you to recover your server from data loss, whether it’s a single file, a volume, or the entire operating system. Its flexibility allows you to schedule backups, choose specific files or entire disks, and even manage backup storage efficiently.
Importance of Backup Services
- Data Recovery: In a world fraught with data security threats, having a reliable backup ensures that your data can be restored to its most recent state.
- Business Continuity: A robust backup strategy is integral to business continuity planning.
- Ease of Compliance: Many organizations are obligated to comply with industry regulations regarding data protection; backups often play a pivotal role in meeting these compliance requirements.
Prerequisites for Windows Server Backup
Before managing the WSB service, ensure that:
- You are logged in as an admin or have administrator privileges.
- Windows Server Backup feature is installed on your server. You can install it via the Server Manager or PowerShell if it’s not already installed.
Starting Windows Server Backup Service
Via Windows Services
-
Accessing Windows Services:
- Press
Windows + Rto open the Run dialog. - Type
services.mscand press Enter. This will launch the Services Management Console.
- Press
-
Locating Windows Server Backup:
- In the list of services, scroll down to find the Windows Server Backup service.
-
Starting the Service:
- Right-click the service and select Start from the context menu.
- You’ll notice the status changes to “Running” once it successfully starts.
Via Command Prompt
If you prefer command-line tools, you can also start the service using the Command Prompt:
-
Open Command Prompt as Administrator.
-
Enter the command:
net start wbengine -
You should see a message confirming that the service has started successfully.
Via PowerShell
PowerShell offers a powerful alternative to manage Windows services, including backup services:
-
Open PowerShell as Administrator.
-
Execute the following command:
Start-Service -Name wbengine -
To confirm that the service is running, use:
Get-Service -Name wbengine
The output will indicate the service status as running.
Scheduling Backups
Once the service is up and running, you may want to consider scheduling automatic backups. You can use Task Scheduler or built-in Windows Server Backup features to set this up.
Stopping Windows Server Backup Service
Stopping the Windows Server Backup service may be necessary for various reasons, such as performing maintenance or troubleshooting issues.
Via Windows Services
- Open the Services Management Console (
services.msc). - Locate and right-click on Windows Server Backup.
- Select Stop from the context menu. The status will change to “Stopped.”
Via Command Prompt
-
Open Command Prompt as Administrator.
-
Run the command:
net stop wbengine -
Confirm the service has stopped by checking its status.
Via PowerShell
-
Access PowerShell as Administrator.
-
Enter the command:
Stop-Service -Name wbengine -
You may further verify its status using:
Get-Service -Name wbengine
Restarting Windows Server Backup Service
At times, after stopping the service, you may need to restart it immediately to re-establish backup capabilities.
Via Windows Services
- Access the Services Management Console.
- Right-click on Windows Server Backup.
- Click on Restart. This action stops and then immediately starts the service.
Via Command Prompt
- Open Command Prompt as Administrator.
-
Execute the following command:
net stop wbengine
net start wbengine
Via PowerShell
- Launch PowerShell as Administrator.
-
Execute:
Restart-Service -Name wbengine
Verifying Windows Server Backup Service Status
After you start, stop or restart the WSB service, it’s essential to verify its status to ensure it’s functioning correctly.
Via Windows Services
After performing the action via Services Management Console, you can directly observe the status on the GUI.
Via Command Prompt
To check the service status, you can use:
sc query wbengineThis command provides detailed status information, including the state of the service.
Via PowerShell
In PowerShell, use the same command as mentioned earlier:
Get-Service -Name wbengineBest Practices for Windows Server Backup
- Regular Backups: Schedule routine backups based on your organization’s data update frequency.
- Test Your Backups: Always perform test restorations to ensure your backups work correctly.
- Monitor Backups: Use event logs and server notifications to stay informed about backup statuses.
- Offsite Storage: Consider storing backups in an offsite location to ensure data safety against physical disasters.
- Use Alerts: Set up alert notifications for backup failures or completions.
- Update Backup Strategies: Regularly review your backup strategies and tools to meet current organizational needs.
Troubleshooting Common Issues
Despite being a robust tool, you might face occasional issues. Here’s how to troubleshoot them.
Service Won’t Start
- Check for Dependencies: Ensure all dependent services are running.
- Review Event Viewer: Look for any errors related to backup in the Event Viewer.
Backup Fails
- Analyze Backup Logs: Check the logs generated by the backup tasks for any error messages.
- Disk Space: Ensure that you have adequate storage space for the backup.
Performance Issues
- Network Bandwidth: If backups are performed over the network, check your network settings.
- Resource Allocation: Make sure the server has sufficient resources (CPU, RAM) to handle backup processes.
Conclusion
Managing the Windows Server Backup service is an essential task that aids in the overall health of your data management strategy. By learning to start, stop, and restart the service, along with adopting best practices for server backup, you will ensure that your data is protected against numerous risks.
With the information provided, you’re equipped to handle the Windows Server Backup service effectively. With regular monitoring, testing, and updating of your strategies, you can maintain a reliable backup system that ensures business continuity and data integrity. Always remember that your backup service is only as good as your backup strategy – invest the time in getting it right, and it will serve you well in times of need.
For Windows Server OS, Microsoft has provided built-in utilities and components for full or partial system backup — Windows Server Backup.
This component allows you to perform scheduled or real-time backups to a local disk or network file storage. Next, we will consider the process of installing the Windows Server Backup component, and also perform a full backup of the entire system to a network storage using the SAMBA/CIFS protocol. In the example, we will use the CloudBox solution from Introserv, which supports a number of popular file transfer protocols and is perfect for storing backups of the system or individual applications. The connection process is relevant for any network storage operating via the SAMBA protocol.
Connecting file storage as a network drive
1. Open Explorer — This PC — Map a network drive …
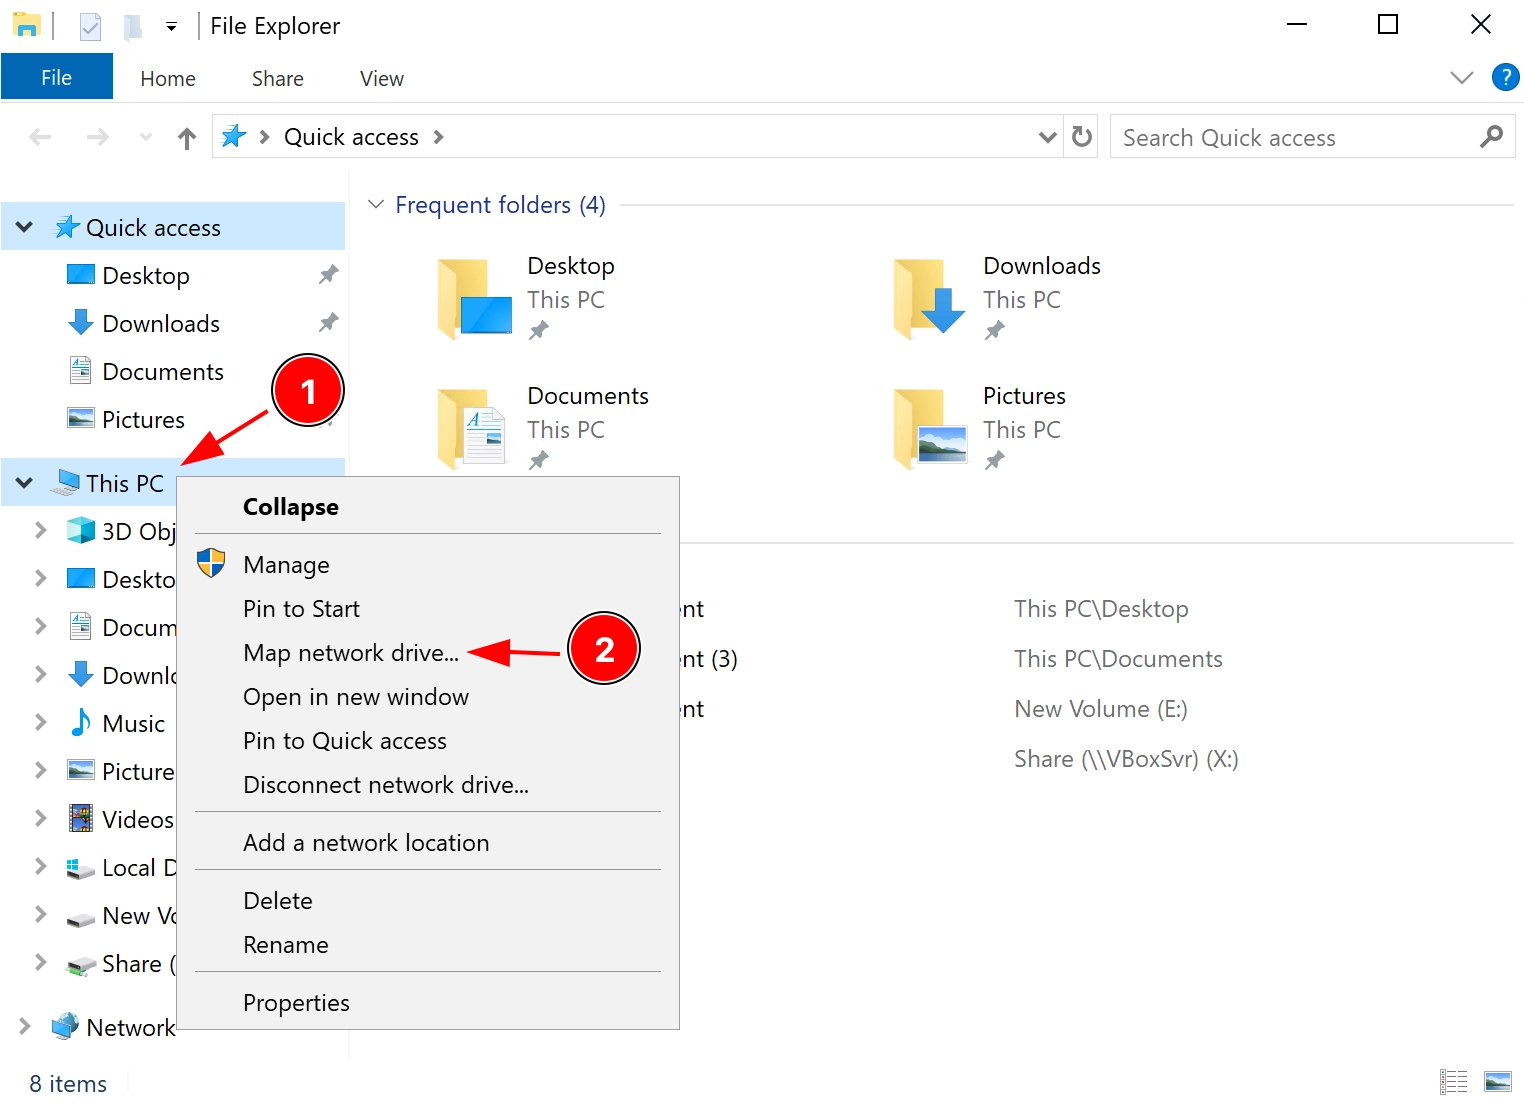
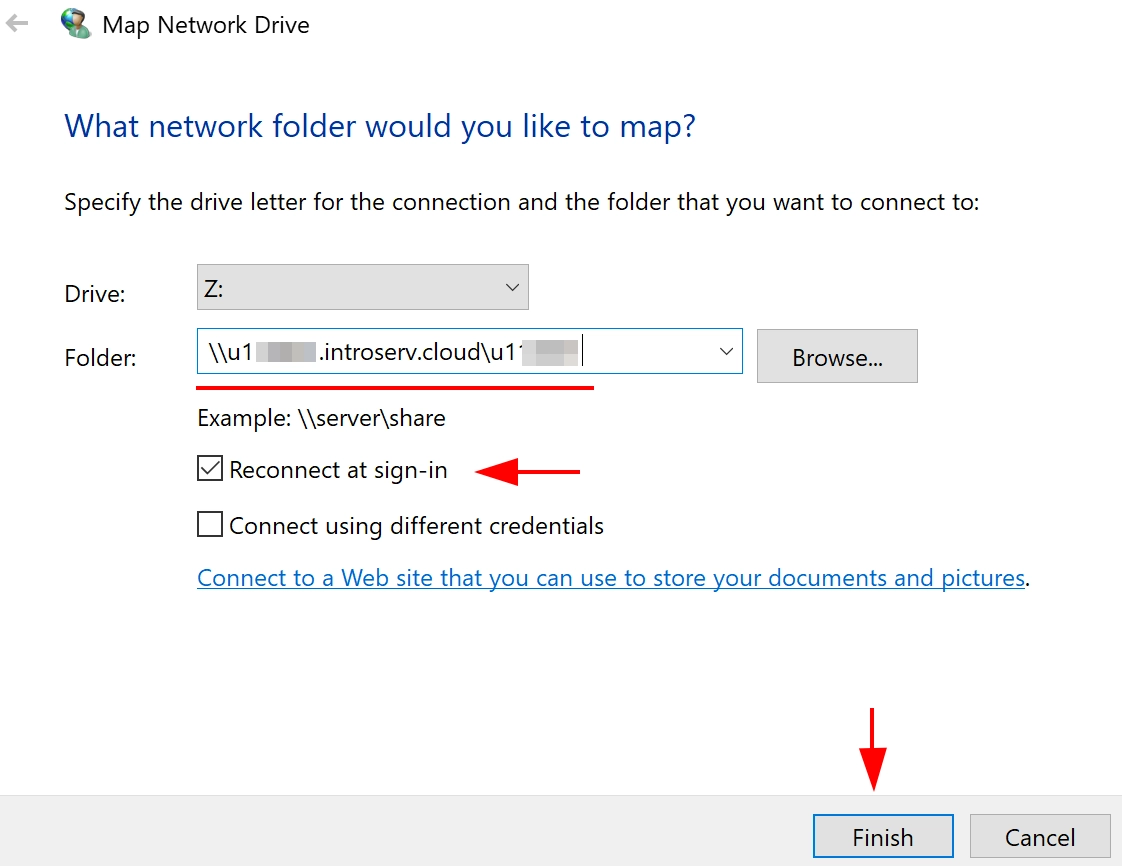
2. Specify the address of the folder in the format \\your_network_share and click the Finish button. If authorization is required to connect your network resource, a login and password entry window will appear. Fill in the form and after that the network drive will be displayed in Windows Explorer.
The network drive can already be used to save your files. It can be specified in the settings of applications that need to be backed up. To back up the entire server, you can use the Windows Server Backup component.
Installing the Windows Server Backup component
The fastest way to install this component is via the PowerShell console
1. Check if the component is installed:
Get-WindowsFeature Windows-Server-Backup
If the component is already installed, you will see the following:

The component is not installed, but is available for installation:

2. If the WSB component is not installed, install it with the command:
Add-Windowsfeature Windows-Server-Backup –Includeallsubfeature

Alternative option to install Windows Server Backup using the graphical interface
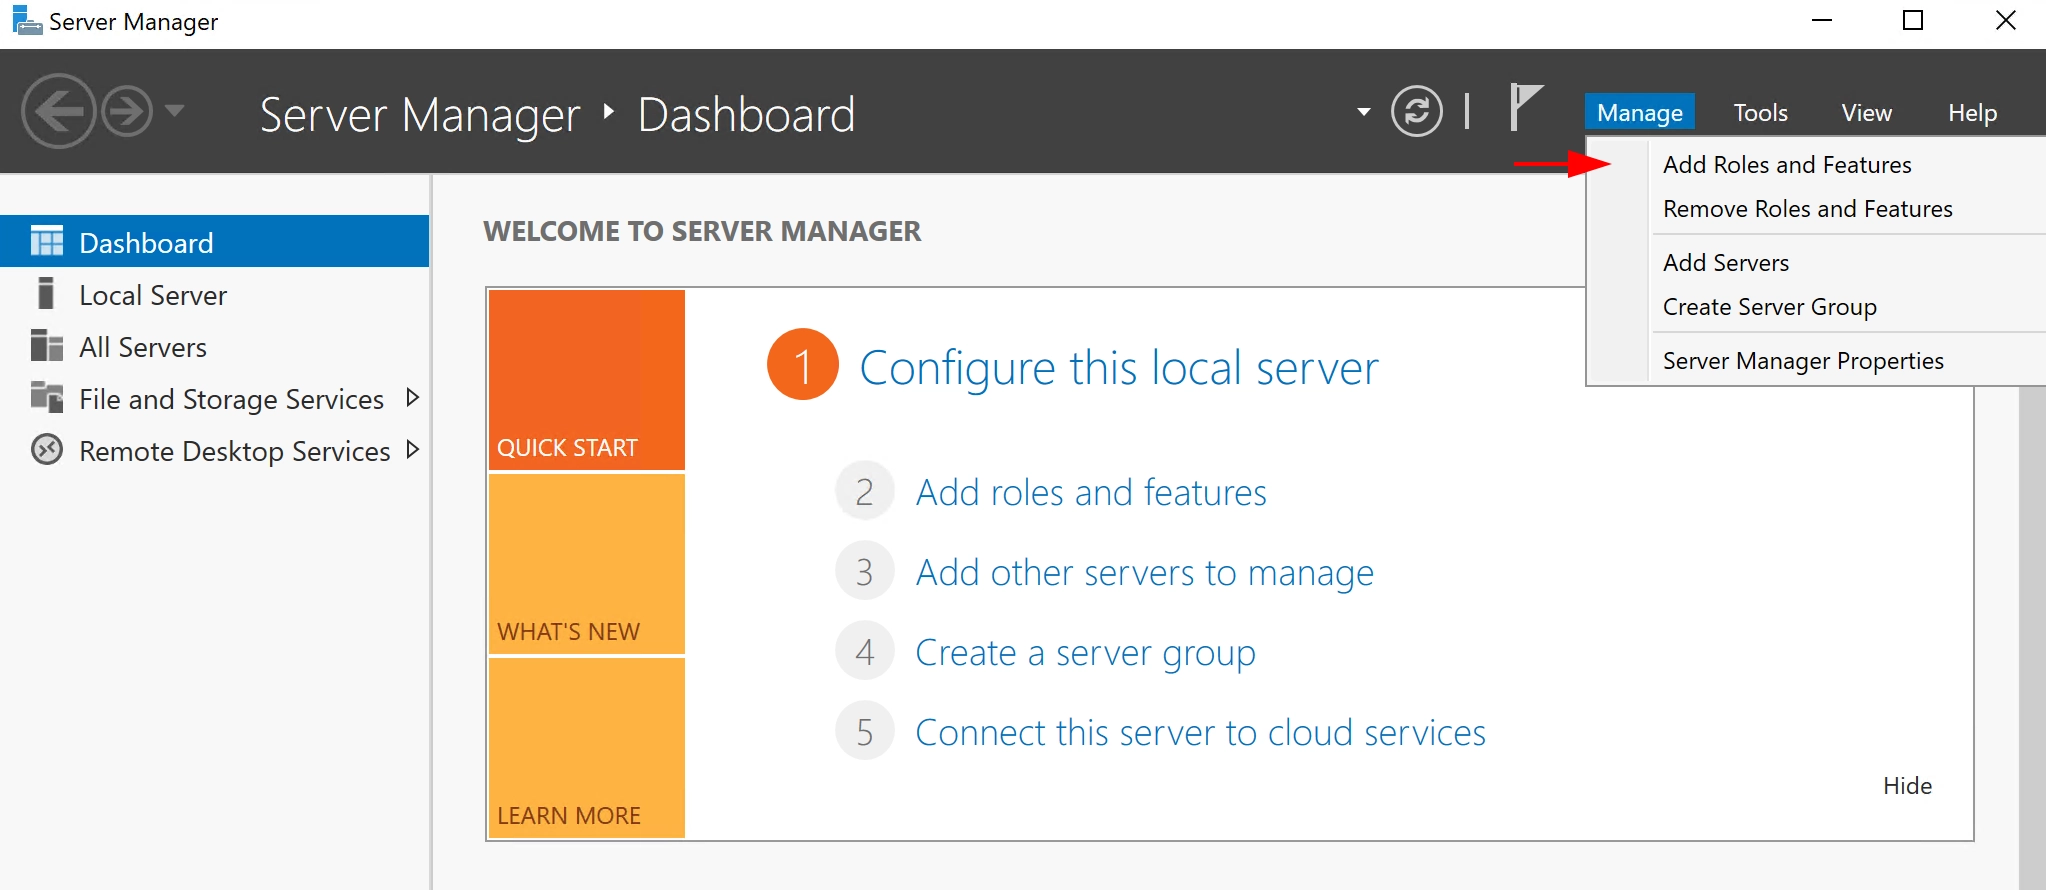
1. Go through the Start button — Server Manager — Manage — Add roles and features
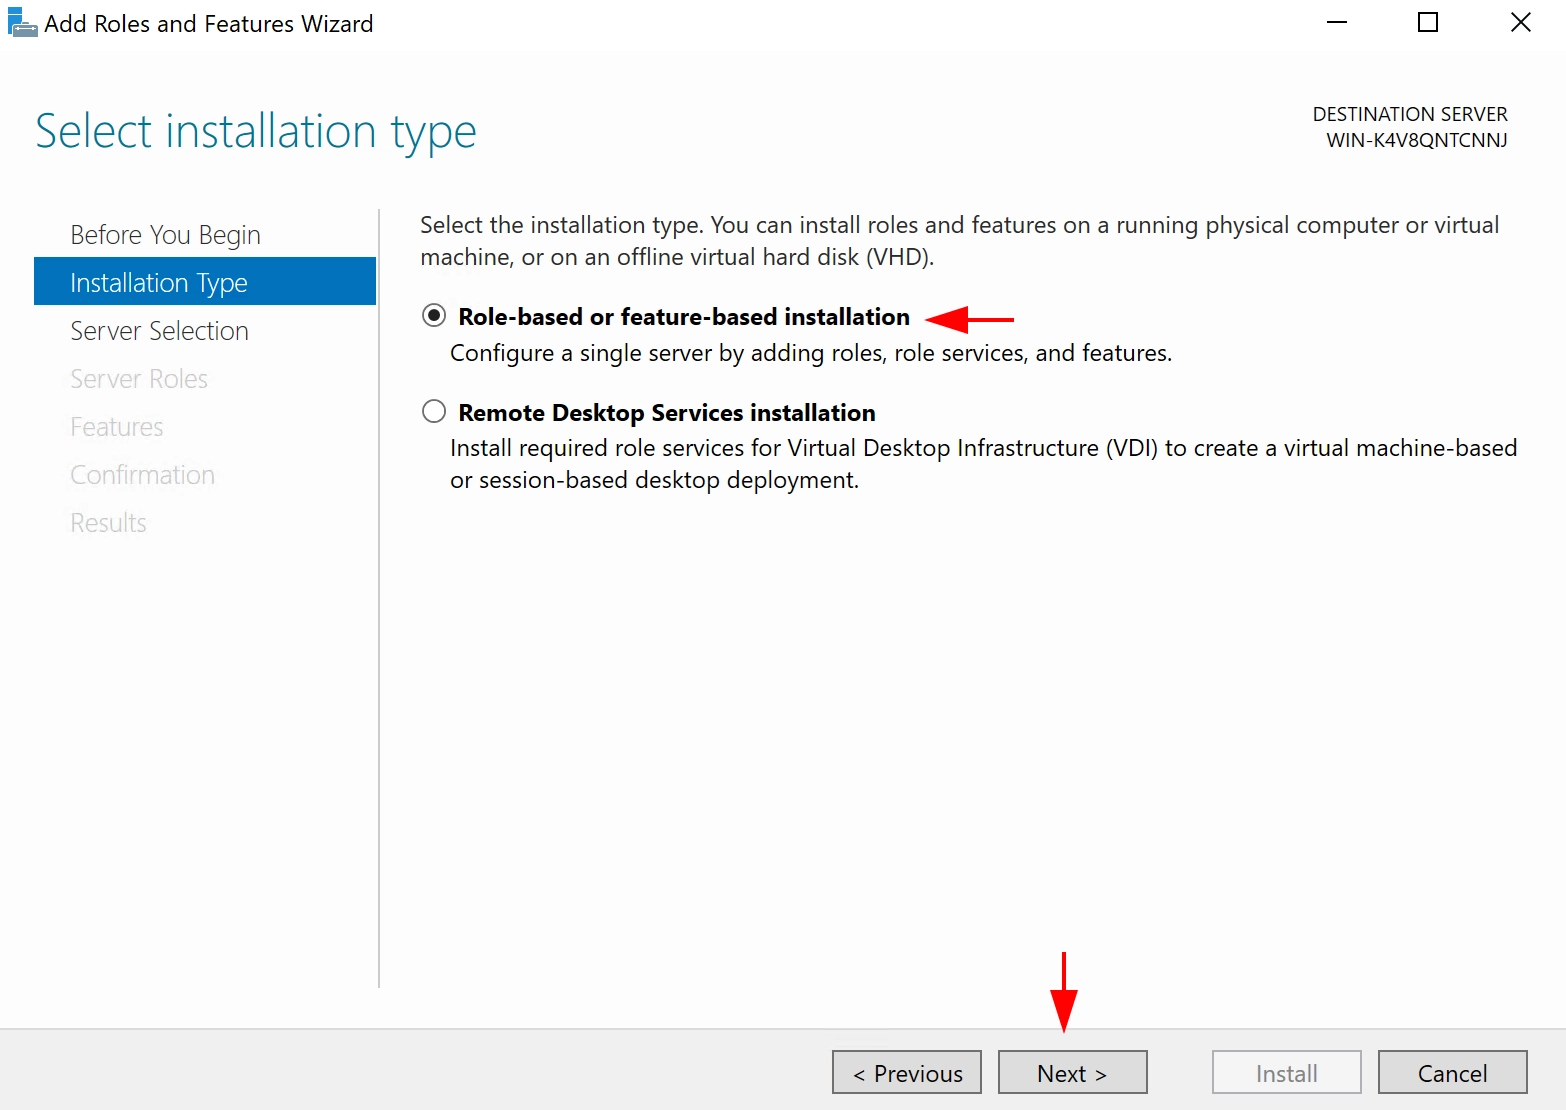
Select the type of installation Role-based or feature-based installation and click Next:
2. At the server selection stage, select the current one and click Next

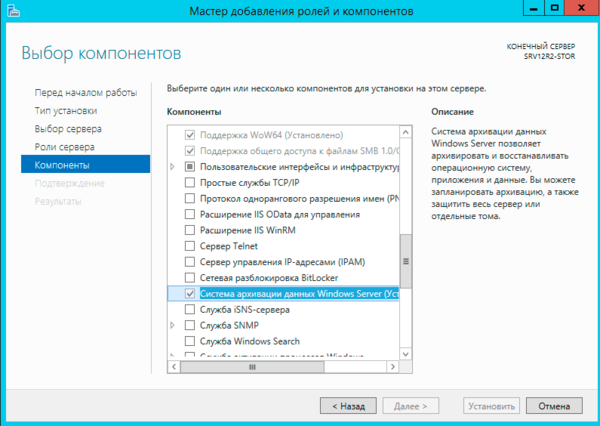
3. Leave the Server Roles as they are and click Next, and in the next window for selecting components, select Windows Server Backup and click Next

4. At the confirmation stage, click Install and wait for the procedure to complete.

Setting up and creating a system backup
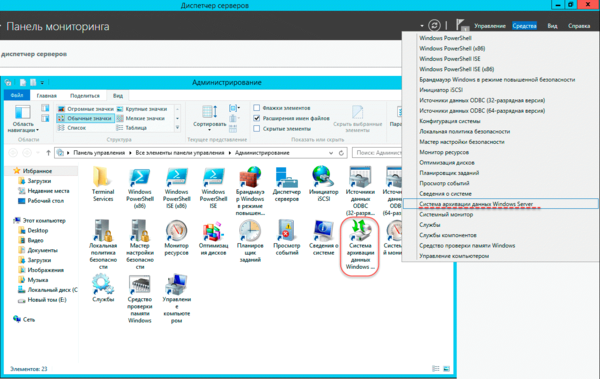
1. Launch the archiving component: Start — Server Manager — Tools — Windows Server Backup
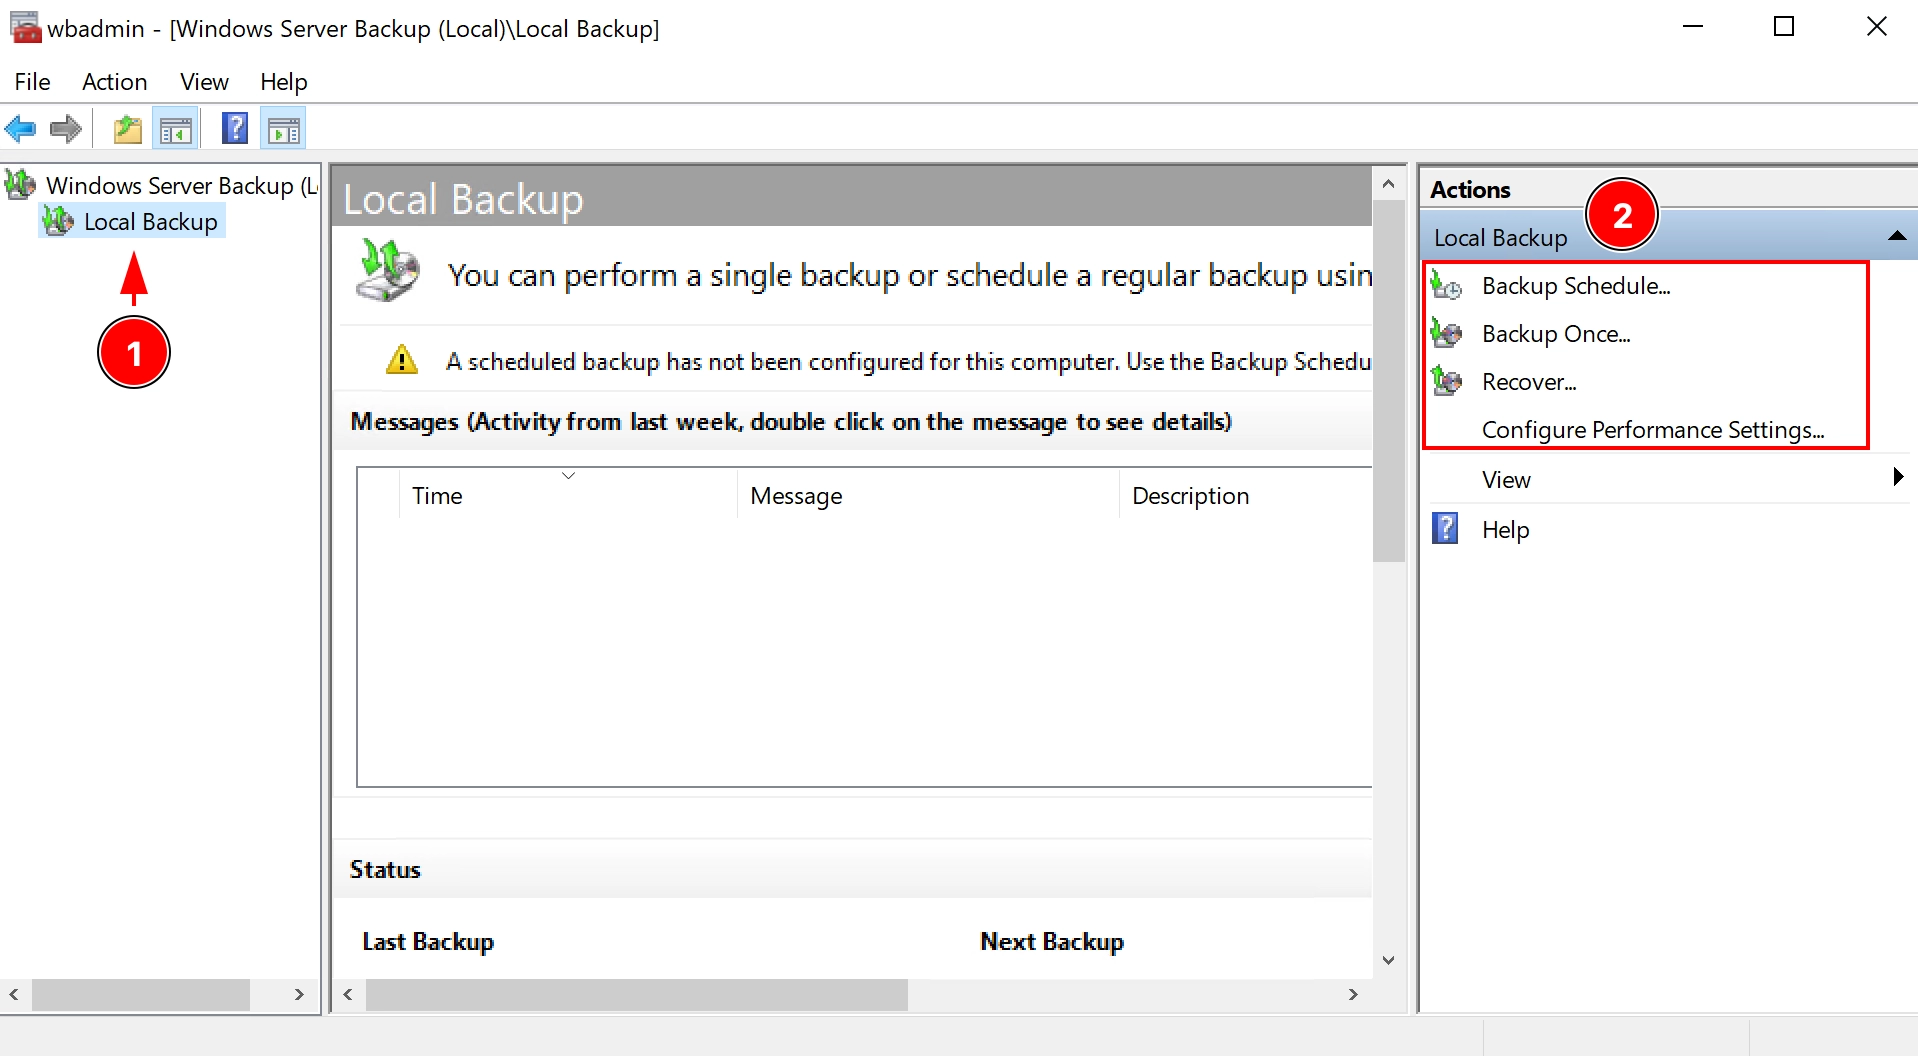
In the Local backup section, we have 2 backup options + Recovery…:
- Backup Schedule
- Backup Once
- Recovery…
The first option is suitable for setting up regular archiving at a specified time every day.
A one-time backup is a single execution of a real-time backup.
One time backup
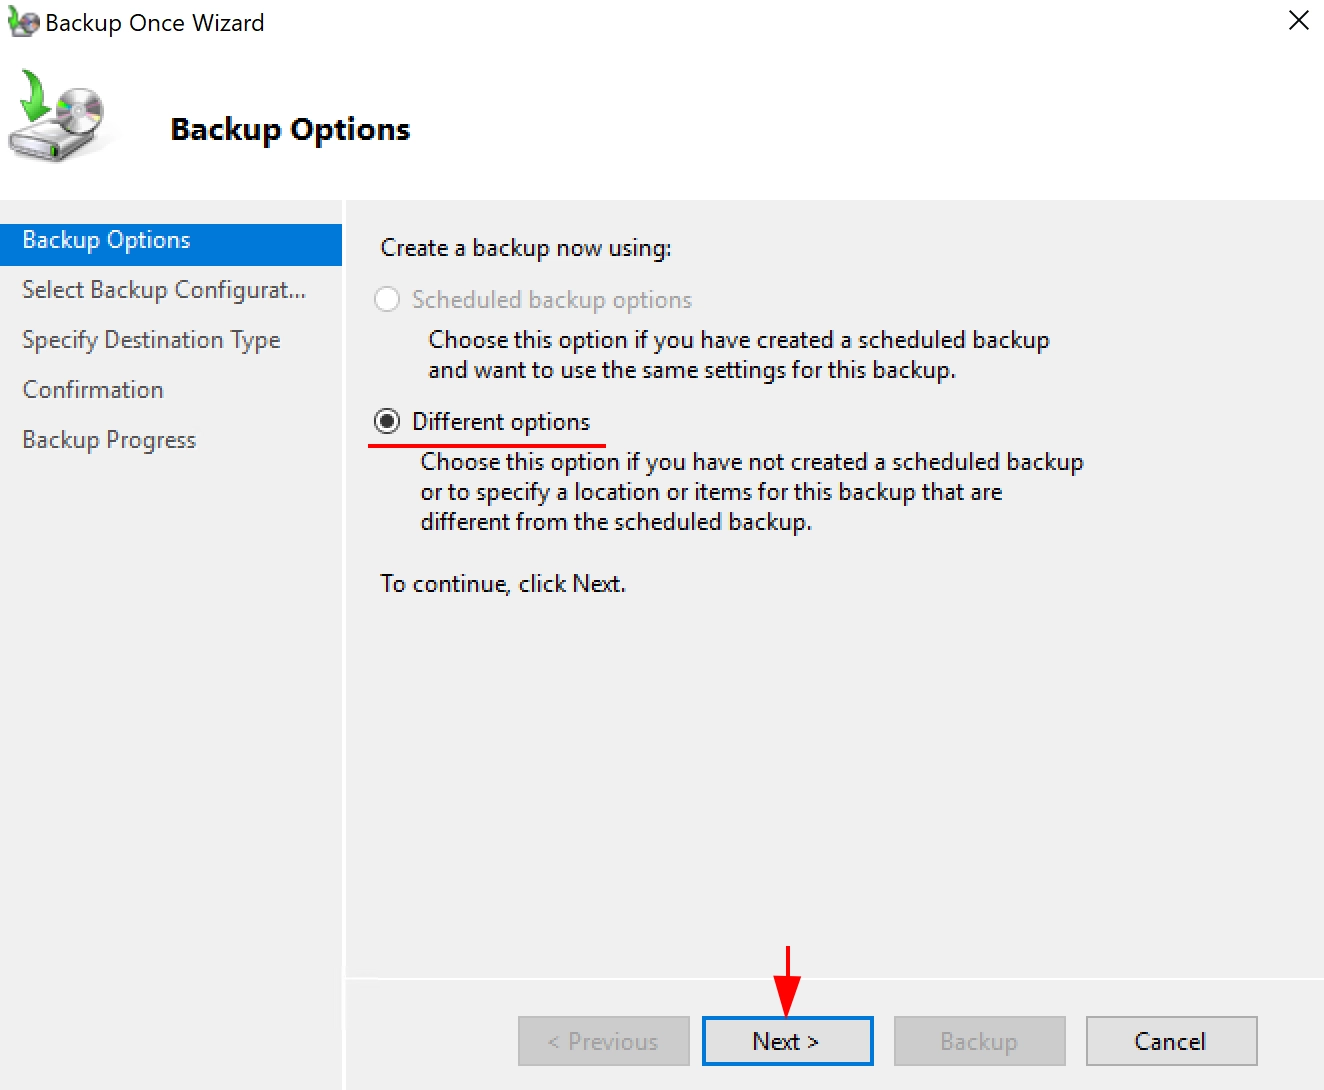
1. Open Backup Once — Backup Options — Different options and click Next
2. In the Backup configuration item, select the appropriate option. Typically, you choose to back up the entire server (Full Server). A Custom option is also available to select individual volumes and directories. We’ll look at an example with the Full server option:
3. Select Destination Type. In our example, we will use the previously mapped network drive. If you select Local disk, you should understand that this disk will be formatted and reserved for backups:

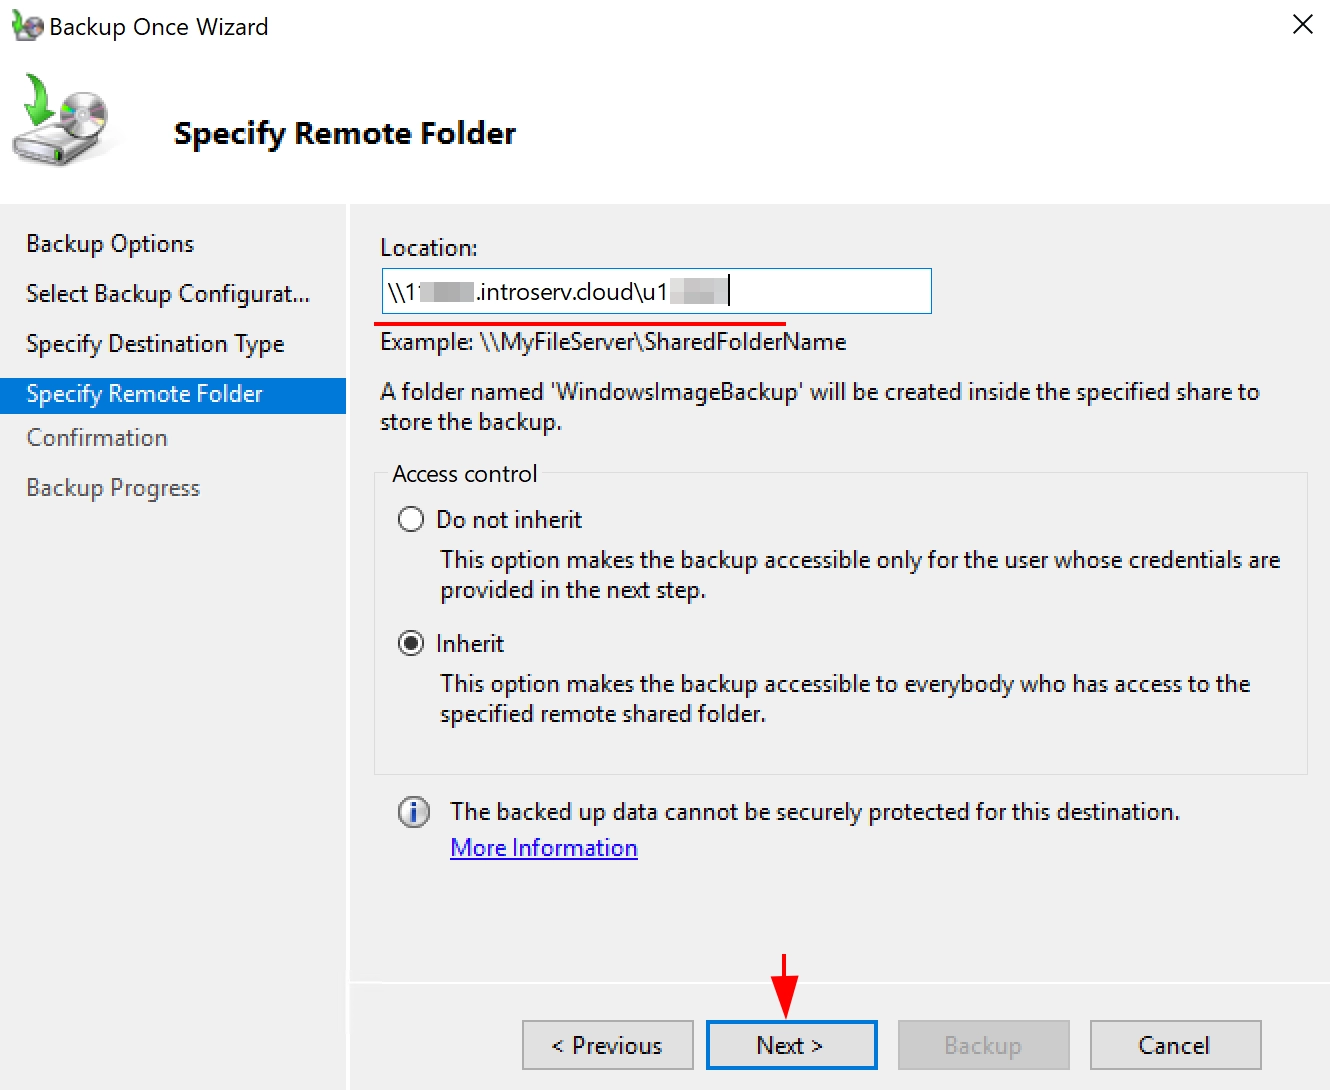
4.Enter the address of your network storage and click Next
5. You are all set to complete the backup. Click the Backup button and wait for the backup to complete:
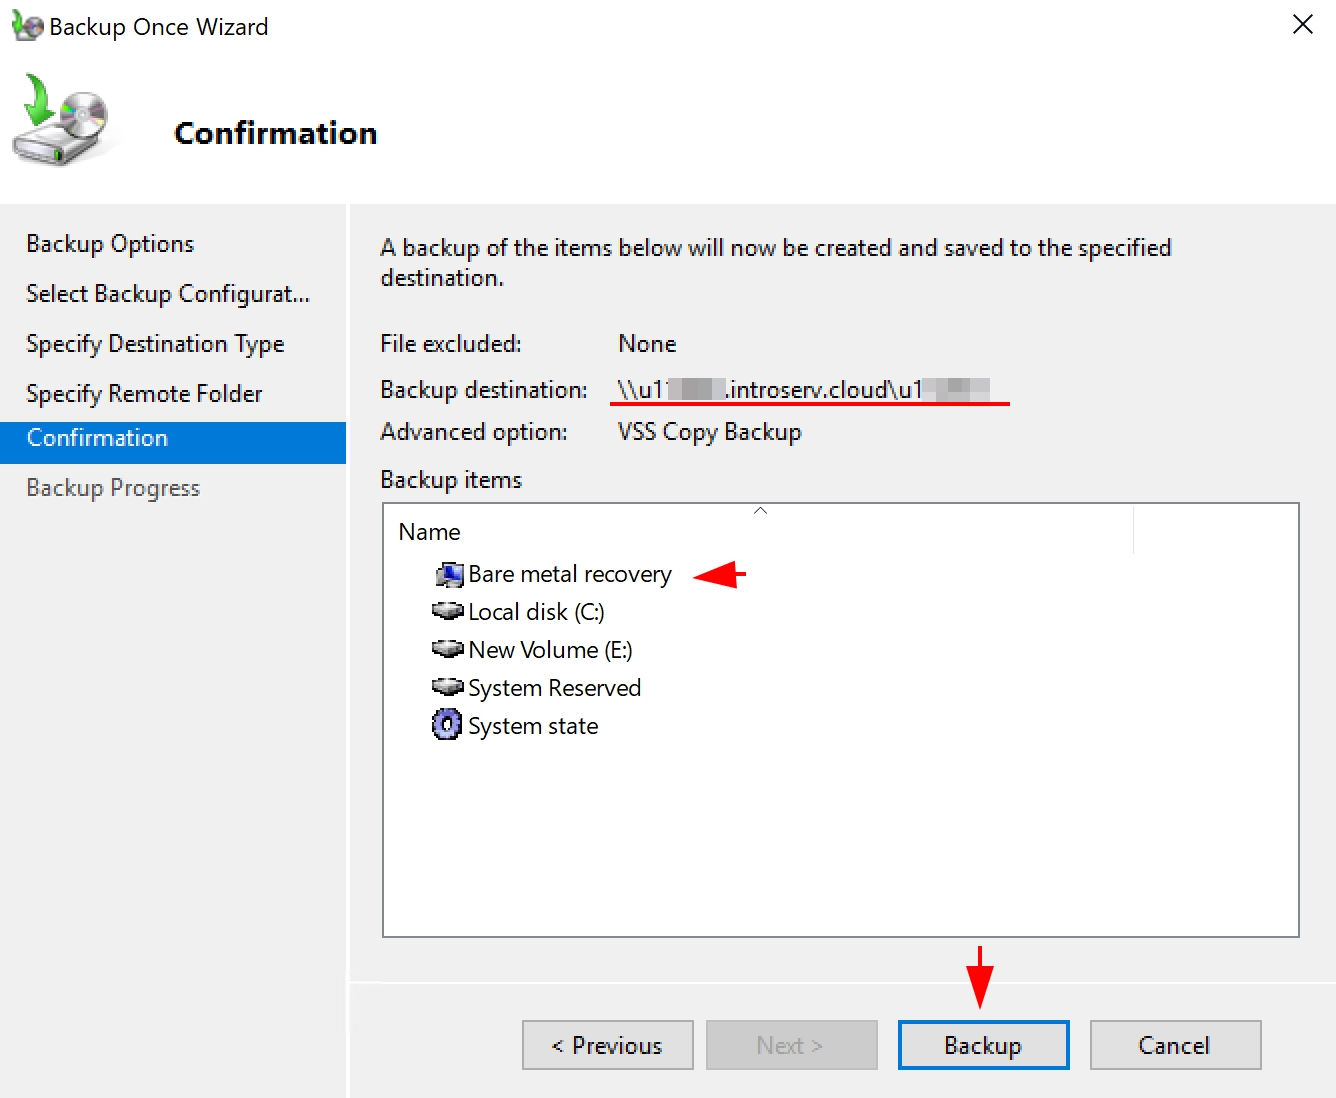
A separate WindowsImageBackup folder will be created on the network storage, all your other files in the storage will be saved and will not be affected by the backup process.
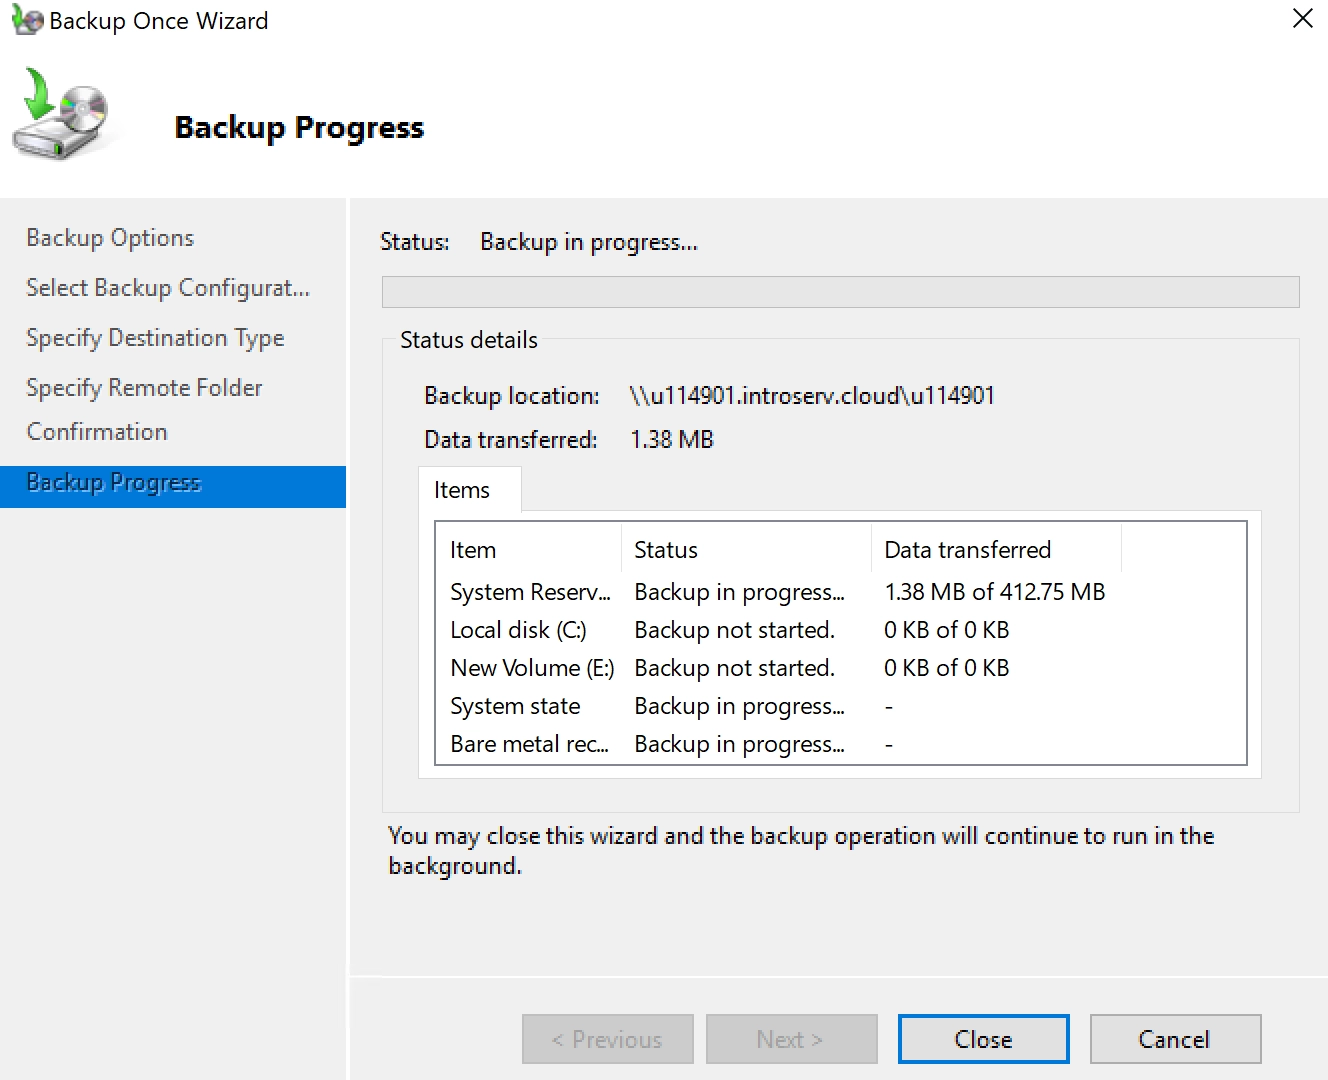
This is how the window in the backup process looks like:
Scheduled Backup of the system is configured in a similar way, the only difference is an additional item in the backup schedule settings. You will need to specify the backup execution time and the multiplicity during the day. The WSB component will create the backup on its own.
Система архивации пришла на смену NTBackup с выходом Windows Server 2008 и на сегодняшний день является вполне зрелым и проверенным продуктом, но многие администраторы до сих пор не используют данную компоненту ОС, отдавая предпочтения альтернативным продуктам. Этому могут быть как объективные причины, так и непонимание принципов работы системы архивации Windows Server. Поэтому мы решили устранить возможные пробелы в знаниях при помощи данной статьи.
Онлайн-курс по устройству компьютерных сетей
На углубленном курсе «Архитектура современных компьютерных сетей» вы с нуля научитесь работать с Wireshark и «под микроскопом» изучите работу сетевых протоколов. На протяжении курса надо будет выполнить более пятидесяти лабораторных работ в Wireshark.
Мы довольно часто задавали знакомым системным администраторам вопрос: какие средства они используют для резервного копирования состояния своих серверов? И сильно удивлялись тому, что многие из них даже не упоминали систему архивации Windows Server. На следующий вопрос: почему они не используют этот инструмент, мы часто получали ответ, что они не понимают, как работает эта система, как управлять резервными копиями и т.д., и т.п. Отчасти причину можно назвать уважительной, когда нет понимания как работает то или иное средство то от его использования лучше отказаться.
А еще лучше разобраться как оно работает и начать применять его на практике. В новой системе архивации многие ожидают увидеть преемника привычного NTBackup, однако Microsoft полностью переработала механизм создания резервных копий и перед нами совершенно иной инструмент. Основным хранилищем резервных копий является диск, который самостоятельно размечается системой архивации и скрыт от пользователя. Также можно использовать уже размеченный том или сетевой ресурс, однако эти способы имеют свои ограничения и сводят на нет все преимущества новой технологии.
Новая система архивации самостоятельно управляет процессом резервного копирования, создавая основную и добавочные копии данных, а также сроком их хранения. Это одно из основных затруднений, которое возникает при использовании нового инструмента. Многие администраторы привыкли явно указывать тип создаваемого архива, их количество и срок хранения, поэтому не находя здесь необходимых опций они делают поспешные и неправильные выводы.
В системе архивации Windows Server вы отдаете в распоряжение службы целый диск, и она организует процесс хранения данных по собственному разумению. Хорошо это или плохо? На наш взгляд — хорошо. Потому что довольно часто встречаются ситуации, когда администратор неверно оценивает размер необходимого для хранения копий дискового пространства или происходит резкий скачок объема архивируемых данных. В этом случае очень велика вероятность получить отказ службы резервного копирования из-за отсутствия свободного места в самый неподходящий момент.
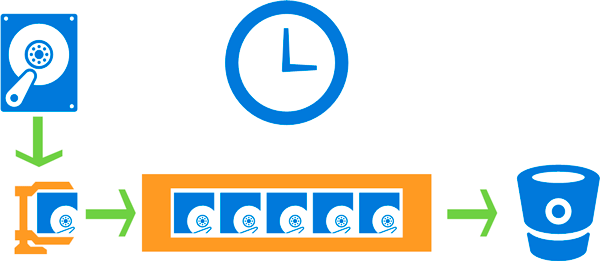
В Windows Server применяется принципиально иной подход. Проще всего провести аналогию с системами видеонаблюдения, когда поток непрерывно пишется на диск и в любой момент времени мы имеем некую продолжительность записи, определяемую объемом диска. Скажем, поставили диск на 500 ГБ — имеем неделю видео, заменили на 1 ТБ — две недели и т.д.
Служба архивации работает аналогичным образом, записывая копии на диск до исчерпания свободного пространства, затем самые старые копии перезаписываются. Таким образом вы всегда будете иметь постоянную глубину резервного копирования, ограниченную только объемом диска, даже резкое увеличение копируемых данных не приведет к негативным последствиям, сократится только количество доступных копий.
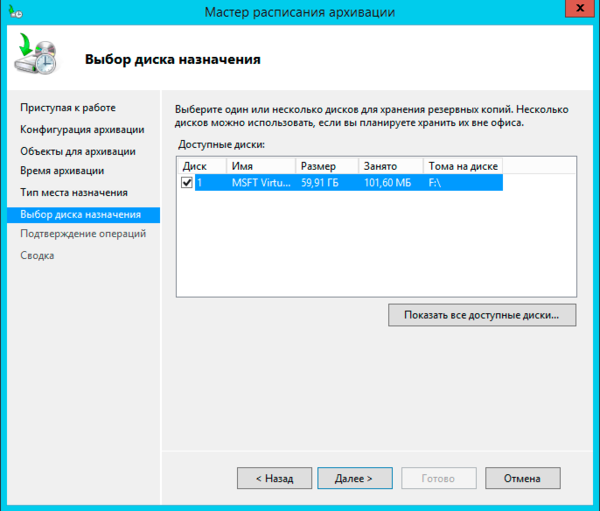
Здесь возникает еще одно затруднение. У многих администраторов слово диск ассоциируется только с физическим жестким диском, после чего сразу возникает масса вопросов: где взять столько дисков, как подключить их к серверам, как обеспечить хранение архивов отдельно от системы и т.д. и т.п. Да и выделять для бекапа рядового сервера даже 500 ГБ диск выглядит несколько расточительно. Поэтому самое время вспомнить о технологии iSCSI, которая позволяет сразу решить весь пласт «проблем».
Действительно, данную технологию сегодня поддерживают все системы, включая даже NAS ценовой категории чуть выше начальной, что позволяет грамотно распорядиться имеющимся дисковым пространством и организовать хранение архивов отдельно от систем. Microsoft рекомендует для хранения двух копий данных иметь в 1,5 раза больше дискового пространства, на наш взгляд данная цифра является несколько завышенной, особенно если вы копируете редко изменяемые данные, например, состояние сервера.
Мы немного забежим вперед и покажем результат архивирования тестового сервера с объемом архивируемых данных размером 29 ГБ:
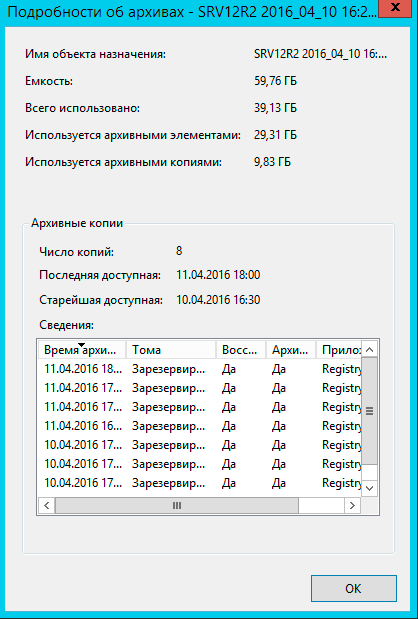
Как видим, восемь копий состояния системы заняли примерно 9 ГБ, что довольно неплохо и общего объема, выделенного нами iSCSI диска в 60 ГБ, хватит примерно на три недели хранения ежедневных копий, что на наш взгляд более чем достаточно.
Для создания резервных копий используется механизм теневого копирования тома (VSS), который позволяет работать с открытыми и системными файлами, не прерывая работы системы и пользователей. Начиная с Windows Server 2012 система архивации позволяет также архивировать запущенные на хосте виртуальные машины Hyper-V и восстанавливать их состояние по отдельности. При использовании на сервере иного ПО использующего возможности теневого копирования система архивации имеет возможность сохранять журнал VSS, что обеспечит корректную работу этих служб при восстановлении.
Отдельно следует коснуться резервного копирования баз данных, если с поддерживающими теневое копирование продуктами, такими как MS SQL Server или Exchange, проблем не возникает, то со сторонними продуктами, например, PostgreSQL могут возникнуть проблемы. Механизм теневого копирования не проверяет логической целостности файлов, просто делая снимок их состояния на определенный момент времени, системы, поддерживающие VSS, умеют обрабатывать этот момент, приводя базу к непротиворечивому состоянию перед моментом создания теневой копии. Для неподдерживаемых систем мы просто получим срез базы на определенное состояние времени, при восстановлении такой базы она будет приведена в непротиворечивое состояние средствами СУБД, проще говоря будут отменены все незавершенные транзакции и может произойти потеря данных.
Исходя из вышесказанного можно сделать вывод, что система архивации Windows хорошо подходит для создания резервных копий системы и пользовательских данных, а также «родных» служб и приложений. Для архивации сложного стороннего ПО лучше использовать средства, предусмотренные производителем данного ПО.
Для того, чтобы начать использовать систему архивации Windows Server сначала нужно установить одноименный компонент, это делается через Мастер добавления ролей и компонентов.
Затем оснастку управления службой можно запустить либо через Средства в Диспетчере серверов, либо через ярлык в Панель управления — Администрирование.
Оснастка абсолютно типична для служб Windows Server и не вызывает каких-либо затруднений при работе с ней.
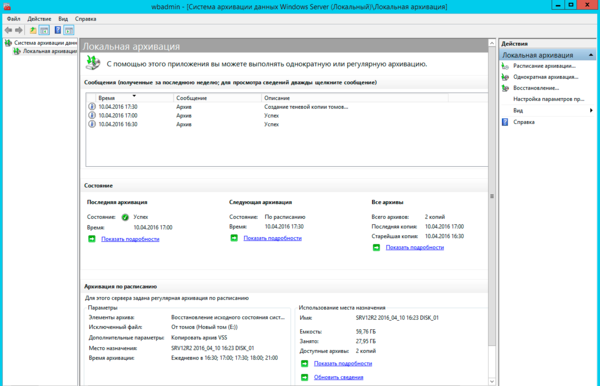
Беглый взгляд на экран сразу позволяет оценить текущие настройки и состояние службы, доступные действия сосредоточены справа. Их немного: Однократная архивация, архивация по расписанию и восстановление. Нас прежде всего интересует расписание, хотя однократная архивация тоже довольно удобный инструмент, который позволяет быстро сделать копию состояния сервера перед какими-нибудь потенциально опасными действиями, чтобы была возможность откатиться на самое их начало.
Нажав на Расписание архивации мы запустим одноименного мастера, который предлагает нам архивировать весь сервер целиком, либо указать объекты для выборочной архивации.
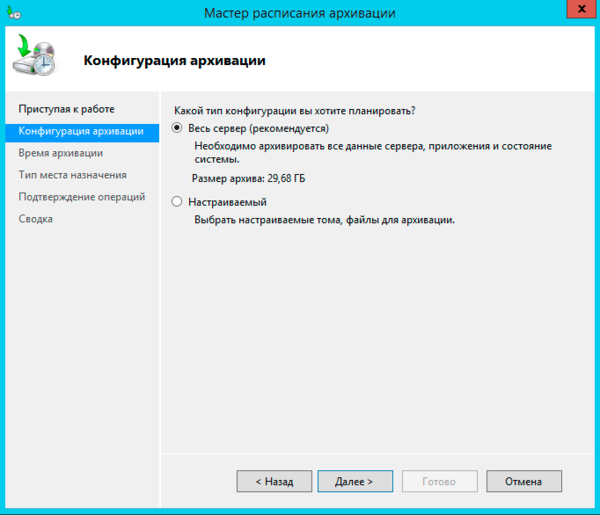
Заархивировать все и сразу мы всегда успеем, поэтому выберем настраиваемый тип архивации. Следующим шагом нам будет предложено выбрать объекты для архивации.
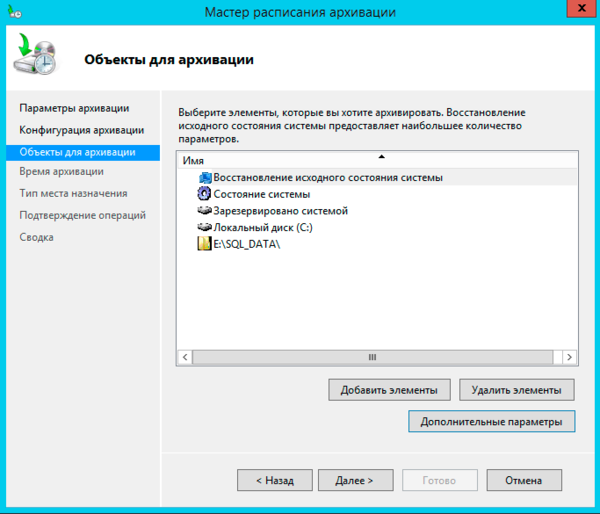
Для их добавления просто нажмите Добавить элементы.
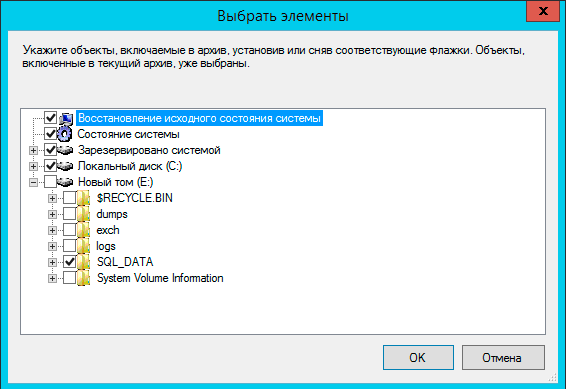
Если выбрать Восстановление исходного состояния системы, то автоматически будут добавлены Состояние системы, системный раздел (диск C:) и служебный раздел с загрузчиком. К этим данным мы в учебных целях добавили папку с базами MS SQL, которые должны представлять некие пользовательские данные.
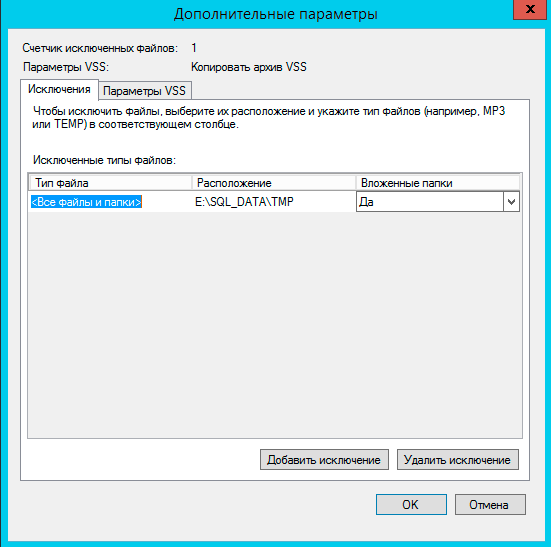
Перед тем как двигаться дальше не забудьте заглянуть в Дополнительные параметры, здесь можно настроить исключения, например, совсем ни к чему копировать временные файлы.
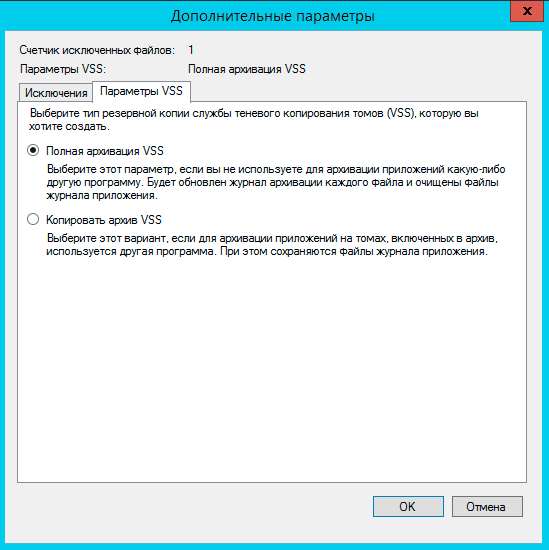
А также задать параметры службы теневого копирования, если у вас есть приложения использующие данную службу, например, MS SQL Server, то следует выбрать настройку Копировать журнал VSS, что обеспечит их нормальное взаимодействие со службой теневого копирования, в том числе и при восстановлении.
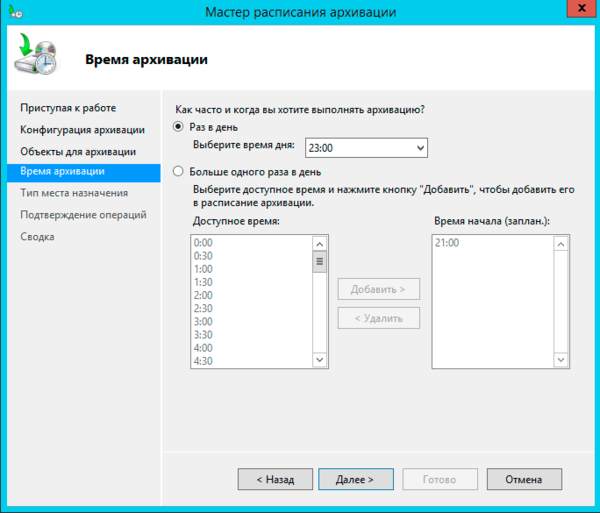
Затем нужно будет создать расписание, задача предельно простая, можно запускать архивацию как один, так и несколько раз в день, минимальный шаг интервала — полчаса.
С расписанием разобрались, теперь самое время определиться с местом хранения архивов. На выбор предлагается три варианта, каждый из них довольно неплохо прокомментирован, что облегчает правильный выбор:
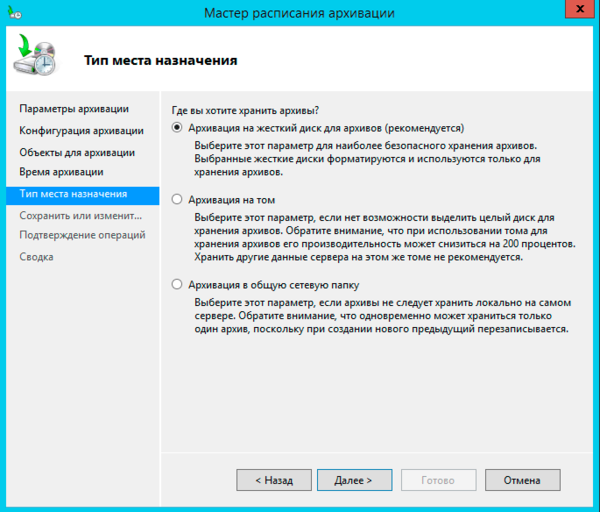
Как мы уже говорили, оптимальным является выделение для архивации целого диска, мы рекомендуем использовать для этой цели iSCSI диски, что позволяет решить сразу две основные задачи: оптимально использовать дисковое пространство и хранить архивы отдельно от системы.
Отдельно стоит остановиться на возможности разместить архив в сетевой папке, несмотря на жесткие ограничения этот способ удобно использовать при однократной архивации, когда нужно быстро создать архив и разместить его вне сервера.
Если вы выбрали диск, то он будет отформатирован и скрыт, это обеспечивает дополнительную защиту от возможных деструктивных воздействий, например, троянов-шифровальщиков.
На последнем шаге следует еще раз убедиться в правильности сделанных настроек и подтвердить их нажатием на кнопку Готово.
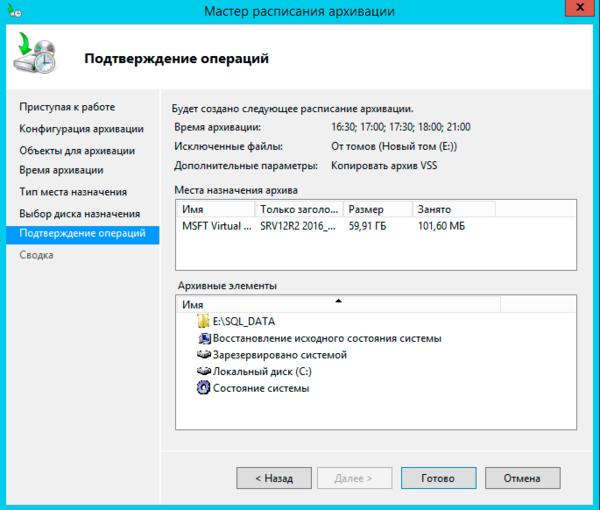
Теперь осталось дождаться указанного времени и убедиться, что процесс архивации был выполнен без сбоев. При создании расписания следует принять во внимание нагрузку на сеть и дисковую подсистему хранилища, что может приводить к снижению их производительности.
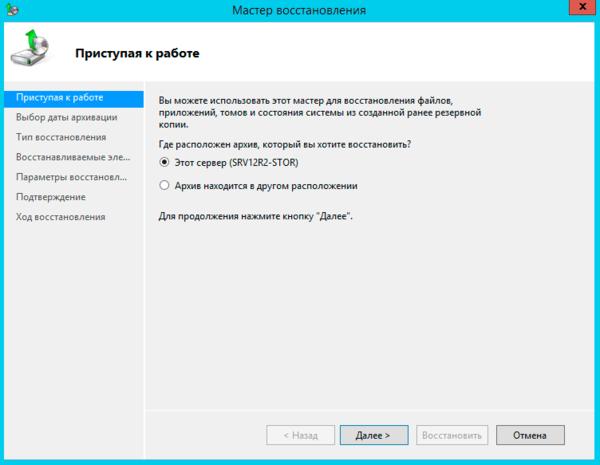
После того, как резервная копия создана будет не лишним проверить возможность восстановления из нее. Для этого выберем в оснастке одноименное действие, при этом будет запущен Мастер восстановления, который первым делом попросит указать расположение архива:
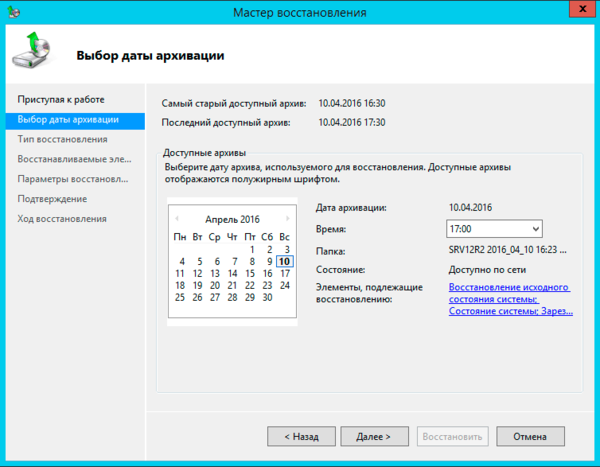
Затем указываем дату и время создания резервной копии на которую мы хотим откатиться, доступные даты подсвечиваются полужирным шрифтом.
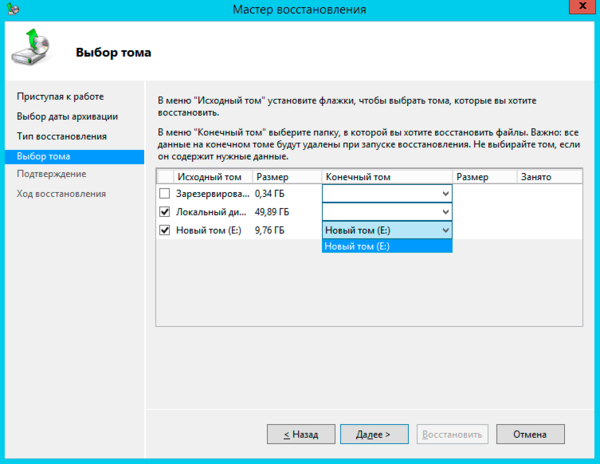
После чего указываем, что именно мы хотим восстановить:
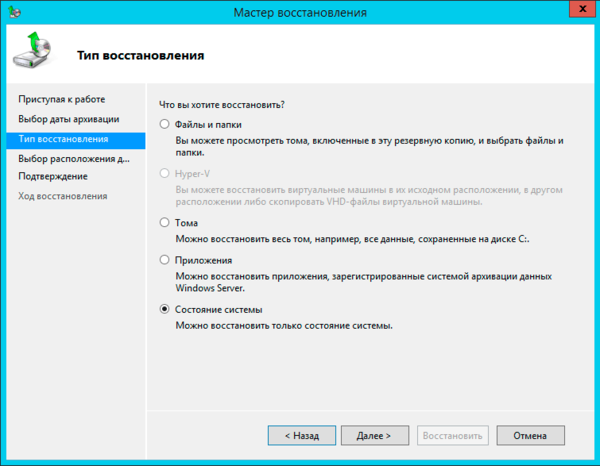
Как видим, это могут быть файлы и папки, виртуальные машины Hyper-V, тома, приложения и состояние системы. Отдельно следует упомянуть о приложениях. Эта функция доступна только для зарегистрированных в системе архивации приложений, которые должны уметь работать с API этой службы и поддерживать VSS. Проще говоря, в этот список попадает ограниченное количество программ, в основном от самой Microsoft, а для стороннего софта данная функция бесполезна.
В тоже время трудно переоценить возможность восстановления состояния системы, которая позволяет выполнить откат состояния ОС, не затрагивая при этом пользовательские данные. Это сильно выручает в ситуациях, когда между внесением изменений в систему и выявлением их негативного эффекта прошло какое-то время.
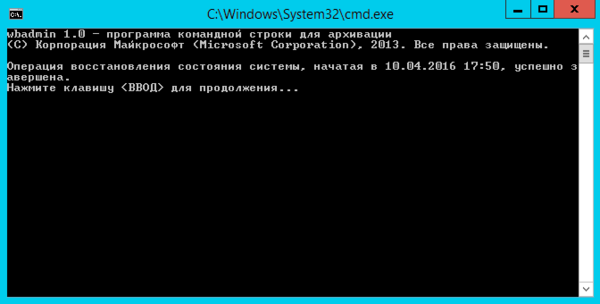
Восстановление состояния системы производится в два этапа каждый из которых завершается перезагрузкой.
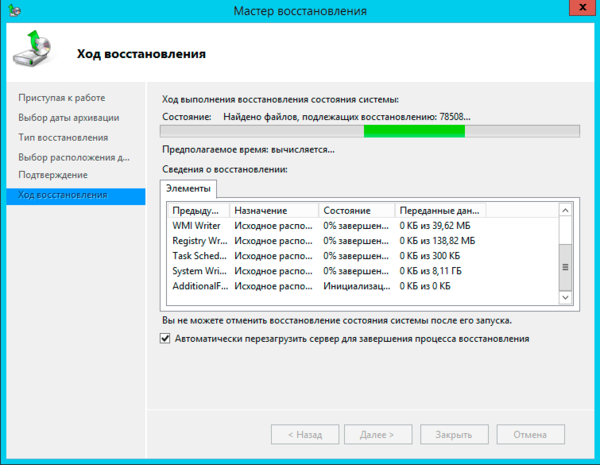
Причем второй этап выглядит как обычная загрузка ОС и не выводит никаких сообщений, просто выполняя перезагрузку через некоторое время. Может показаться что произошла ошибка или сбой, но это не так.

Поэтому просто следует запастись терпением и дождаться сообщения об успешном завершении операции. В зависимости от скорости сети, производительности дисков и объема данных эта операция может занять значительное время.
Альтернативой восстановления состояния системы может служить восстановление на уровне тома, при этом все данные будут уничтожены и том будет приведен в состояние, в котором он находился на указанную дату. Это может оказаться полезным в случае вирусного инцидента, когда вы хотите быть уверенным, что в системе не осталось закладок вредоносного ПО, а также в случаях, когда исходный том был поврежден.
В общем и целом, данная операция ничем не отличается от восстановления тома из образа любым иным ПО, например, Acronis.
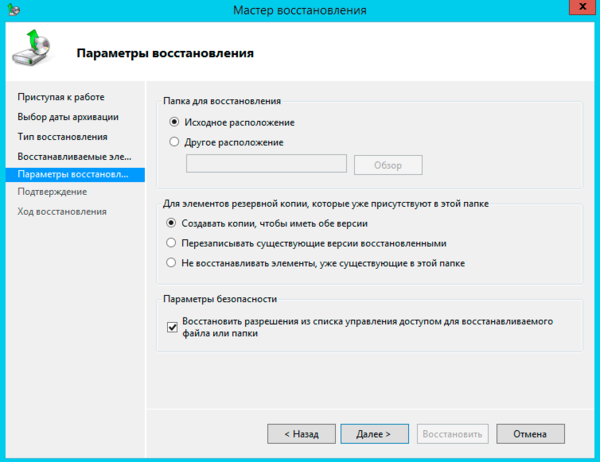
При восстановлении папок и файлов можно гибко управлять параметрами восстановления, например, сохранив обе версии файла: текущую и восстанавливаемую, это полезно в тех случаях, когда файл был случайно перезаписан, но результат текущей работы также нужен. При восстановлении можно также восстановить все права доступа на файлы и папки, что важно, если у вас используется сложная система назначения прав.
Как видим, система архивации Windows Server представляет собой весьма функциональный и удобный инструмент, позволяющий осуществлять успешное восстановление данных на любом уровне и в тоже время снимающая с администратора значительную часть забот по управлению этим процессом. Поэтому если вы еще не используете данную систему архивации, то после прочтения данного материала самое время более пристально к ней присмотреться.
Онлайн-курс по устройству компьютерных сетей
На углубленном курсе «Архитектура современных компьютерных сетей» вы с нуля научитесь работать с Wireshark и «под микроскопом» изучите работу сетевых протоколов. На протяжении курса надо будет выполнить более пятидесяти лабораторных работ в Wireshark.
By
March 5, 2024
You might occasionally need to restart the Windows Server Backup service. We have put together a detailed guide on how you could do this for almost every version of the Windows Server. The process is explained comprehensively, ready for your reference when required.
The procedure involves two main steps. Firstly, you must understand how to start the Windows Server Backup service. Afterward, you can learn the method to stop it. However, if the service is already operating in the background, you could simply follow the latter part to terminate the ongoing process.
To start the Windows Server Backup service, follow these steps:
Initiate by opening the Server Manager. You can do this by clicking on the Start Menu and locating the utility. After you’ve opened it, click on the Manage button located on the top-right corner and select the Add Roles and Features option.
First, disregard the initial screen, then select the Role-based or feature-based installation alternative and tap the Next button.
After that, you’ll need to select your server pool. If only a single choice is available, just press the Next button.
The following tab is named Server Roles. There’s no need to select anything here. Just hit the Next button to advance to the Features tab. Once you’re there, checkmark the Windows Server Backup box and hit the Next button.
Under the Confirmation tab, click the Install button and let the process complete.
Once completed, your service will be operational automatically. There is no requirement for a restart of your server.
If you need to halt the Windows Server Backup service, you need to adhere to the following steps:
For further knowledge regarding these steps, keep reading.
Initially, it’s essential to launch the Server Manager on your system. Subsequently, click on the Manage button and select the Remove Roles and Features option.
Next, select a server from the server pool in the Server Selection tab. Once selected, proceed to the Server Roles window and click on the Next button without ticking any options.
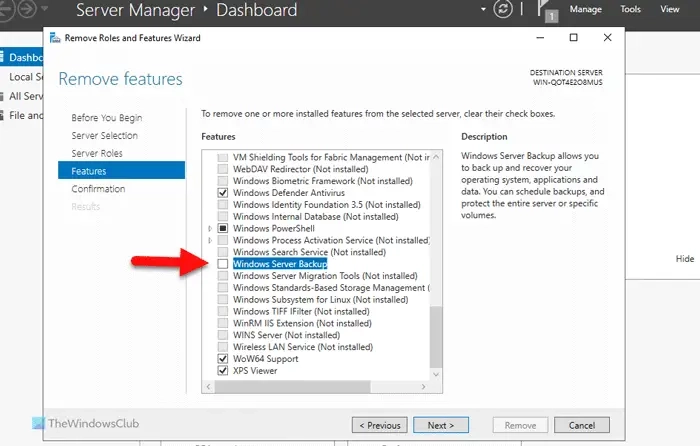
This will take you to the Features tab. Here, you are required to uncheck the Windows Server Backup option.
After completing this step, navigate to the Confirmation window, press the Remove button, and wait patiently.
If you wish to stop the Windows Server Backup service using the Command Prompt, follow the instructions below:
To Get More Info about these steps, continue reading.
First, you need to open the Command Prompt with administrator privileges. For that, search for cmdin the Taskbar search box, right-click on the search result, and select the Run as administrator option.
Then, enter this command:
Note: This command works only when your backup service is already running in the background. If not, you might come across some error.
Read: Best free backup software for Windows Server
To restart the backup service in Windows Server, you need to use the Server Manager. Utilize the Add Roles and Features option to start the Windows Server Backup service and use the Remove Roles and Features option to stop it. However, you can also use the Command Prompt to do the same thing. For that, you need to use the wbadmin stop job command.
Read: Server execution failed (0x80080005): Windows backup application could not start
To reset the Windows Server Backup service, you must first remove the functionality. For that, go to the Remove Roles and Features wizard in the Server Manager and remove it. Then, you would need to add it again. You can use the Manage > Add Roles and Features wizard for that. Whatever steps you take, ensure to choose the correct server from the server pool menu.
Read: Windows Server Backup GUI missing.
Published on March 5, 2024
Tags: Backup, Server
February 17, 2024
February 6, 2024
February 25, 2024
February 20, 2024
Hudson Valley Host is premier provider of cutting-edge hosting solutions, specializing in delivering a seamless online experience for businesses and individuals. We offer a comprehensive range of hosting services, including Shared Hosting, VPS, Dedicated Servers, and Colocation. With 24/7 technical support, robust security measures, and user-friendly control panels, we empower clients in managing their online presence effortlessly. Hudson Valley Host is your trusted partner in achieving online success.
For Inquiries or to receive a personalized quote, please reach out to us through our contact form here or email us at sales@hudsonvalleyhost.com.

Windows Server backup is a useful tool for Windows Server users. However, some users report that they encounter the “Windows Server backup service missing” issue on Windows Server 2008/2012/2016. This post from MiniTool tells you how to fix the issue.
For many Windows Server users, Windows Server Backup (WSB) is a useful tool for their data protection, as WSB provides backup and recovery options for Windows Server environments. You can use this feature to backup the full server, specific files, system state, etc. in Windows Server 2008, 2012, or 2016.
However, this feature can sometimes be so annoying that you receive the “Windows Server backup service missing” or “Windows Server backup service not showing” error messages. Next, let’s see how to get rid of the issue.
How to Fix “Windows Server Backup Service Missing”
There are 2 ways for you to fix the “Windows Server backup service missing” issue.
Way 1: Install Windows Server Backup manually
First, you can try to install Windows Server backup manually. Here is how to do that:
Step 1. Click the taskbar to open Server Manager. Then, go to Manage > Add roles and functionalities in the right Menu.
Step 2. In the Add Roles and Features Wizard, you will be asked to select installation type, server, roles, and features.
Step 3. Select them and check Windows Server Backup and click Next in the Features tab.
Step 4. Click the Yes and Install button to start installing Windows Server Backup.
Then you can close this window to do other things when Windows Server Backup is being installed in the background. You can check if the installation is complete by clicking the Notifications Center icon.
Way 2. Install Windows Server Backup service – Network Load Balancing (NLB)
Before installing the Windows Server Backup service – Network Load Balancing (NLB), you need to remove Windows Server Backup first. Then, install both features in the Server Manager. You can follow the steps below.
Step 1. In the Server Manager, select Manage and Remove Roles and Features.
Step 2. Then, it will open Remove Roles and Features Wizard. Click Next until you see the Features tab, uncheck Windows Server Backup, and click Remove.
Step 3. Wait for the installation process to complete.
Step 4. After you successfully remove Windows Server Backup, open the Add Roles and Features Wizard again and check both Windows Server Backup and Network Load Balancing in the Features tab.
Step 5. Click Next and Install to start the installation process.
How to install WSB and NLB using Powershell:
If you want to install Windows Server Backup service and NLB in Powershell, you can follow the steps below:
1. Search Powershell in the Start menu and select Run as administrator.
2. In the Windows Powershell window, type the following commands and hit Enter to run them.
- Uninstall – WindowsFeature Windows-Server-Backup – Remove
- Install – WindowsFeature NLB
- Install – Windows Feature Windows-Server-Backup
After that, you should be able to use Windows Server Backup to create a custom backup or full server backup.
How to Stop Windows Server Backup Service
You can also try to stop the Windows Server backup service. There are also 2 ways for you.
Solution 1. Stop Windows Server Backup via Server Manager
Step 1. Click Start in the lower-left corner of the computer. Type Server Manager in the search box and then open it.
Step 2. Click Manage and Remove Roles and Features subsequently.
Step 3. Click Next to select a server you want to remove roles and features.
Step 4. Uncheck the Windows Server Backup option box. Then press Next.
Step 5. Click Remove to turn off the Windows Server Backup service.
Solution 2. Stop Windows Server Backup service via Command Prompt
If you prefer to use the command line to stop any backups that have already started, you can follow these steps:
Step 1. Sign in to the computer as an administrator. Press Windows Key + X. Then choose Command Prompt (Admin).
Step 2. Type the command: wbadmin stop job and then press Enter.
Step 3. If there is a backup running, select Y to stop it.
Now, you may successfully stop the Windows backup service in server 2012, you don’t need to worry that the backup software will affect the use of your computer or it backs up when you don’t need it.
Windows Server Backup Alternative
After stopping the Windows Server backup service, you can try the Windows Server backup alternative. As to back up Windows Server, the free Windows Server Backup alternative – MiniTool ShadowMaker is competent. It is a piece of user-friendly and professional backup software, providing an all-in-one backup and recovery solution. It supports Windows Server 2008/2012/2016/2019/2022.
MiniTool ShadowMaker provides data protection services and disaster recovery solutions for PCs, Servers, and Workstations. It is designed to back up the operating system, disks, partitions, files, and folders.
Besides the Backup feature, it is a clone tool, allowing you to clone OS to SSD without data loss, and is a piece of file sync software.
Now, we will show you how to use the Windows Server Backup alternative – MiniTool ShadowMaker to back up Windows Server.
Step 1. Download it from the following button.
MiniTool ShadowMaker TrialClick to Download100%Clean & Safe
Step 2. Install and launch it.
Step 3. Then click Keep Trial.
Step 4. After entering its main interface, go to the Backup page. MiniTool ShadowMaker chooses the operating system as the backup source by default. If you want to change it, click the Sourcemodule to continue.
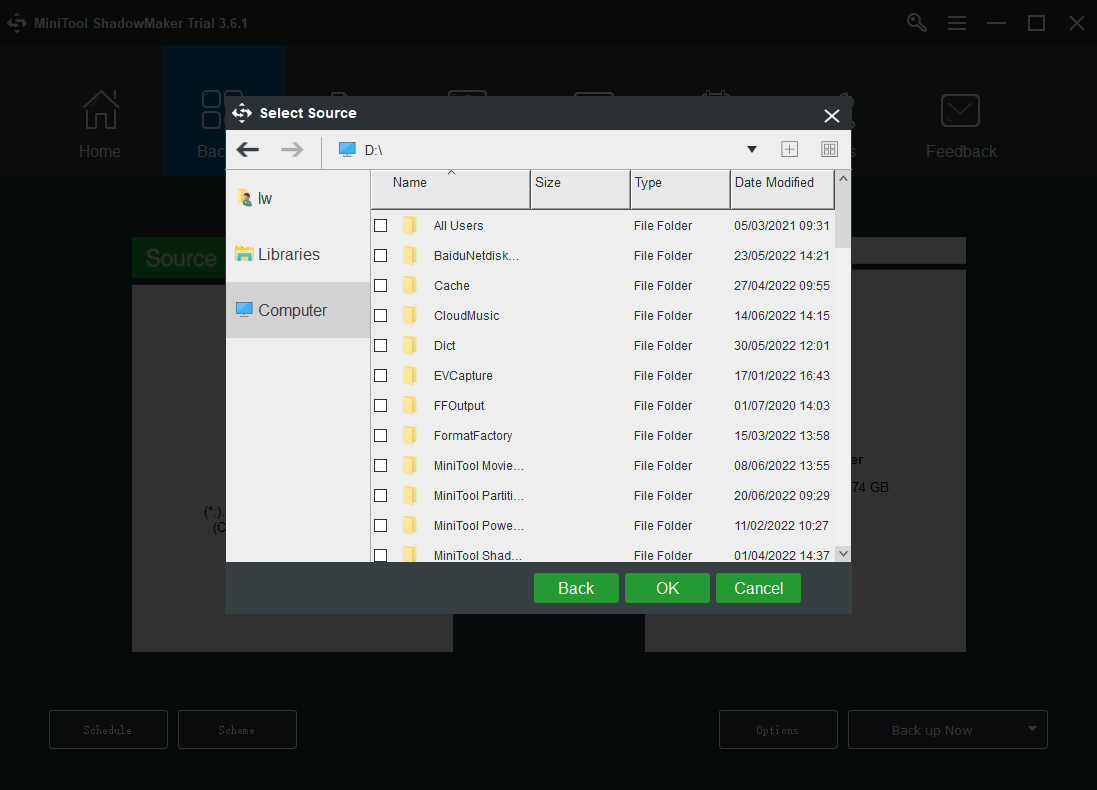
Step 5. Then click Destination to choose a target disk to save the backup image.
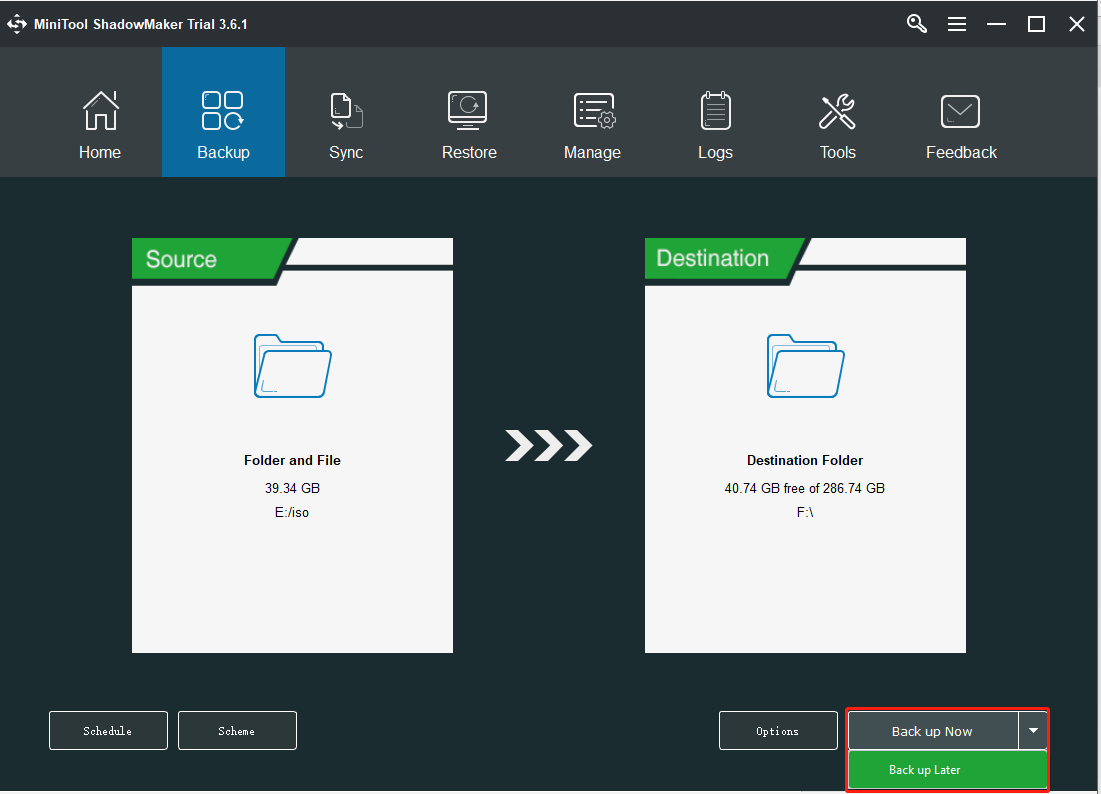
Step 6. Then click Back up Now to start the Windows Server backup process. Or, you can click Back up Later to delay the backup task. Then, you can find the task on the Manage page.
After that, you have performed a Windows Server backup. If you want to restore the system image, you can go to the Restore page and follow the on-screen wizard to continue. To get more details, refer to this post – Restore System Image from External Hard Drive in Windows 10/8/7.
In addition, MiniTool ShadowMaker also enables you to create an Automatic Backup and it offers three different backup schemes.
How to Perform Server Backup with Windows Server Backup?
Here, we will show you the step-by-step guide on using Windows Server Backup.
Step 1. Press the Windows + R keys together to open the Run dialogue box.
Step 2. Type wbadmin.msc in the box and click OK to continue.
Step 3. In the pop-up window, choose Backup Once Wizard on the right panel to continue.
Step 4. Then choose Backup options. Here, you need to choose Different Options and click Next.
Step 5. Select Backup Configuration. The options include Full Server: back up all Server data, applications and system state and Custom: choose custom volumes, files for backup. It is recommended to choose Full Server backup. Then click Next.
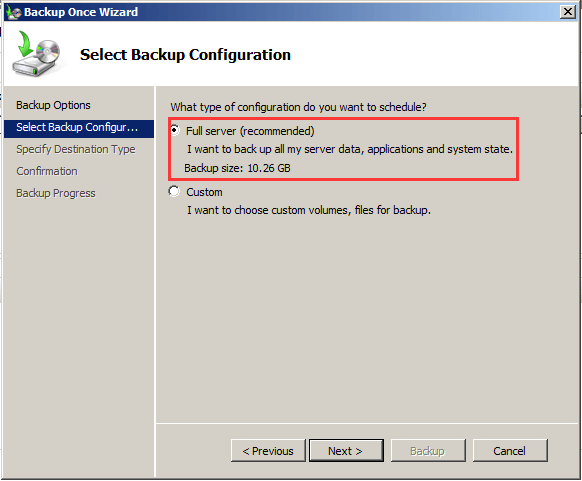
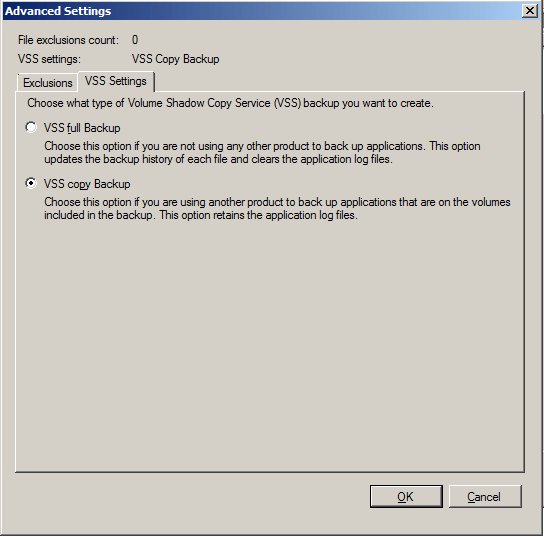
Please note if you choose Custom, you can choose what type of Volume Shadow Copy Service backup you want to create.
Step 6. Then choose a destination type to save the backups. You can save it to a local disk or a remote shared drive. Then click Next. If you choose a remote shared folder, you need to enter the shared folder address.
Step 7. If you choose a local drive to save the backup, next, you need to specify which volume to choose. Then click Next.
Step 8. After selecting the backup source and destination, you need to confirm the backup settings. Then click Backup to start Windows Server backup.
Once all steps are finished, Windows Server Backup software will start to back up the system and you may need to wait for a while for the process to be completed.
In the above part, we have shown how to back up Windows Server with these two pieces of Windows Server backup software. There is no doubt that there are some differences between them. So, in the following section, we will show some of the differences.
Similarities:
- Windows Server Backup and MiniTool ShadowMaker can backup the Server, restore backup images, and create a scheduled backup.
- Both of them can save image files to shared folders.
Differences:
- MiniTool ShadowMaker enables you to back up images to a USB flash drive. Windows Server Backup can’t do that.
- Windows Server Backup only can create a full backup, while MiniTool ShadowMaker provides three backup schemes, including full backup, incremental backup, and differential backup.
- Windows Server Backup can’t encrypt backup images, yet MiniTool ShadowMaker does that.
- MiniTool ShadowMaker provides more features, such as Sync, Media Builder, Disk Clone, Universal Restore, Backup Compression, etc.
So, MiniTool ShadowMaker would provide you with more powerful features. Download it and have a try.
Bottom Line
Have you encountered the error – Windows Server backup service missing? How to fix the issue on your PC? After reading this post, you know what you should do – try some ways to get rid of the error and try the Windows Server backup alternative – MiniTool ShadowMaker. Besides, some related information is introduced here.
If you have any other solutions that are proven to be useful to fix the issue on your computer, let us know by leaving a comment below. Thanks a lot.