
Для резервного копирования Exchange Server 2013 существует достаточно большое количество специализированных программных продуктов, каждый из которых обладает своими сильными и слабыми сторонами. Однако большинства из них платные, а их цена может нанести существенный удар по скромному ИТ-бюджету небольших российских компаний.
К счастью, можно воспользоваться функционалом Windows Server Backup (WSB) Features, который является встроенным модулем резервного копирования в Windows Server 2008 / 2008 R2. Конечно, его функционал не слишком радует количеством поддерживаемых функций и удобством управления, но как минимум позволяет в случае ЧП не остаться без актуальной резервной копией с базой почтовых ящиков пользователей.
Итак, имеем следующую конфигурацию: сеть с почтовым сервером Exchange Server 2013 (на Windows Server 2008 R2) с одной почтовой базой. Наша задача – настроить резервное копирование почтового хранилища Exchange 2013 с помощью стандартных средств Windows.
Несколько основных технических моментов касательно бэкапа почтовых баз Exchange 2013 средствами WSB:
- Резервное копирование выполняется с помощью службы теневого копирования томов (VSS — Volume Shadow Copy Service) на уровне тома целиком
- Возможен только локальный запуск и управление резервным копированием
- Резервную копию можно писать как на локальный диск, так и по сети в шару
- Возможно создать только полную (full) резервную копию базы. Инкрементальные, дифференциальные и т.п. бэкапы не поддерживаются.
- Возможен бэкап только активной базы DAG
По умолчанию функционал Windows Server Backup в Windows Server 2008 R2 не установлен. Установим этот компонент из командной строки:
Import-Module ServerManager
Add-WindowsFeature "Backup-Features" | Add-WindowsFeature "Backup-Tools"
Проверить установлен ли компонент Backup-Features можно так:
Get-windowsfeature | where {$_.name -like "*backup*"}

Примечание. Установить компонент резервного копирования можно и из графической консоли Server Manager:

Резервное копирование базы Exchange 2013 можно настроить из GUI Server Backup или с помощью Powershell. Рассмотрим 2 способ.
Импортируем команды Windows Backup в сессию Powershell:
add-pssnapin windows.serverbackup
Создадим новую политику резервного копирования, которая будет содержать все параметры резервного копирования и расписание его запуска.
$WBPolicyExch = New-WBPolicy
Укажем диск, на котором хранится почтовая база Excnahge (в примере E:\)
$BackupSrc = New-WBFileSpec –FileSpec E:\
Добавим диск в политику
Add-WBFileSpec –Policy $WBPolicyExch –FileSpec $BackupSrc
Укажем диск или сетевую шару, куда будут складываться резервные копии (здесь нельзя указать системный диск или тот же самый диск с базой):
$WBTargetFolder = New-WBbackupTarget –NetworkPath "\\srvBak01\bak\exchange2013"
Добавим устройство хранения резервных копий в политику
Add-WBBackupTarget –Policy $WBPolicyExch -Target $WBTargetFolder
Укажем, что для резервного копирования будет использоваться метод VSS Full Backup
Set-WBVssBackupOptions -Policy $WBPolicyExch -VssFullBackup
Проверим политику на ошибки:
$WBPolicyExch
Проверим статус почтовой базы перед запуском бэкапа:
Get-MailboxDatabase mdb001 –Status

В данном случае видно, что резервное копирование почтовой базы ни разу не выполнялось.
Запустить резервное копирование почтовой базы Exchange 2013 можно немедленно:
Start-WBBackup -Policy $WBPolicyExch
Или по расписанию:
Set-WBSchedule –Policy $WBPolicyExch –Schedule 23:00

После завершения резервного копирования WSB обновит заголовок почтовой базы данных и запишет в него информацию о времени выполнения последнего бэкапа:
Get-MailboxDatabase mdb001 -Status | select Lastfullbackup

Вывести список резервных копий можно так:
Get-WBBackupSet
Получить статус выполнения последнего задания:
Get-WBJob -previous 1
Примечание. После выполнения резервного копирования почтовой базы сбрасываются (удаляются) логи транзакций журналов Exchange, освобождая дополнительно место на диске.
https://winitpro.ru/index.php/2014/02/19/vosstanovlenie-mailboxstore-exchange-2013/
Microsoft Exchange Server is a critical component for organizations relying on email communication and collaboration. Ensuring its consistent backup and recovery is vital for business continuity. Windows Server Backup, a native feature in Windows Server, provides a robust and cost-effective solution for safeguarding Exchange data.
What is Windows Server Backup?
Windows Server Backup is a feature that provides a set of wizards and other tools. Starting from Windows Server 2008, Windows Server Backup introduced new backup and recovery technologies, replacing the previous Windows backup feature available in earlier versions of the Windows operating system. It is a built-in backup and recovery feature from Microsoft, enabling servers with the feature installed to perform basic backup and recovery tasks.
With Windows Server Backup, you can back up the entire server (all volumes), selected volumes, system state, or specific files or folders. You can also create backups for bare-metal recovery. It supports the recovery of volumes, folders, files, certain applications, and system state. Additionally, in the event of disasters like a hard drive failure, bare-metal recovery can be performed. (To do this, you need to back up the entire server or only the volumes containing the operating system files and the Windows Recovery Environment, which will restore the complete system to the old system or a new hard drive.) You can use Windows Server Backup to create and manage backups for both local and remote computers. Backups can also be scheduled to run automatically.
Windows Server Backup is designed for anyone who needs a basic backup solution, from small businesses to large enterprises, but it is also suitable for smaller organizations or individuals who are not IT professionals. (Note: Windows Server Backup cannot guarantee the preservation of all Volume Shadow Copy (VSS) snapshots. In some cases, VSS snapshots restored to a new volume may become unrecognizable and inaccessible. To ensure VSS snapshots are protected, mount the VSS snapshots and run a backup job on them.)
To configure a backup schedule, you must be a member of the Administrators group. To perform all other tasks with this command, you must be a member of the Backup Operators or Administrators group, or you must have been delegated the appropriate permissions.
How to Install Windows Server Backup?
Graphical Installation:
1. Open Server Manager, and select Add Roles and Features.
2. Click Next to continue.
3. Select Role-based or feature-based installation.
4. Choose Select a server from the server pool.
5. Click Next to continue.
6. In the Features section, check Windows Server Backup, and click Next to continue.
7. Click Install to proceed.
8. After the role installation is complete, click Close to finish the installation.
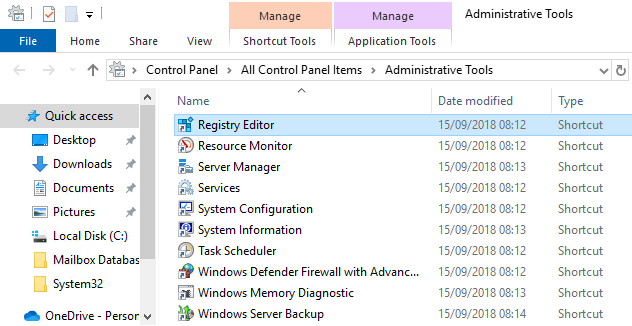
9. Open Administrative Tools to verify that Windows Server Backup is available.
Install via Command Line:
1. Check the current status of Windows Server Backup:
Get-WindowsFeature Windows-Server-Backup
2. Install Windows Server Backup using PowerShell:
Install-WindowsFeature -Name Windows-Server-Backup
Backup Exchange Server Using Windows Server Backup
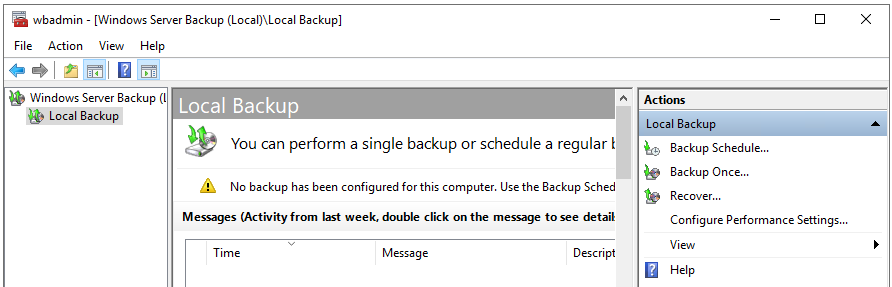
1. Open Windows Server Backup from the Administrative Tools menu.
2. Schedule or Perform a One-Time Backup:
— For a one-time backup:
Click Local Backup > Backup Once.
— To schedule a backup:
Click Local Backup > Backup Schedule.
3. On the Backup Options page, select Different options, and then click Next.
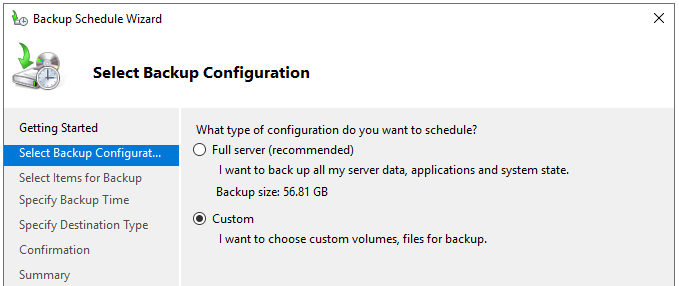
4. Select Backup Configuration:
Choose Custom and click Next.
5.Click Add Items and select:
— The volumes containing the Exchange database files (Mailbox Database .edb).
— The volumes containing the Transaction Logs.
Click OK.
6. Exclude Non-Essential Volumes:
Ensure volumes unrelated to Exchange or the system state are excluded.
7. The VSS settings should be set to «VSS Full Backup» so that Exchange can automatically truncate the transaction log after the backup is complete. If the transaction log cannot be truncated, the transaction log will grow very quickly and may cause insufficient disk space.
8. Select Backup Destination:
— Choose a dedicated hard disk, volume, or network share as the backup location.
— Avoid using the same disk that contains Exchange or system files.
9. Start the Backup:
— For a one-time backup, click Backup.
— For a scheduled backup, set the desired frequency and start time.
Second Line of Defense to Protect Exchange Server
Vinchin Backup & Recovery offers reliable, enterprise-grade protection for Microsoft Exchange, supporting backups on virtual machines and physical servers to on-premises, offsite, or cloud storage like Amazon S3. It features forever incremental backups, flexible scheduling, and granular data selection, ensuring efficient and consistent data protection. With RSA encryption for data transfer, AES 256 encryption, and role-based access control, Vinchin ensures end-to-end security. High-speed data transfer and customizable throttling policies further enhance efficiency, while a web-based console simplifies centralized backup management for Exchange Server 2013, 2016, 2019, and Exchange Online.
It only takes you 4 steps to backup Exchange Server:
1.Select the backup object.

2.Select backup destination.

3.Configure backup strategies.

4.Review and submit the job.

Vinchin Backup & Recovery provides a 60-day free trial with full access to all its advanced backup and recovery features. Click the button below to explore its robust capabilities.
Backup Exchange FAQs
1. Q: Is Exchange part of Windows Server?
No, Microsoft Exchange is not part of Windows Server. It is a separate software product for email and collaboration that can be installed on a Windows Server.
2. Q: Should I backup Exchange Online?
Yes, you should back up Exchange Online. While Microsoft ensures high availability and some data protection for Exchange Online, they do not guarantee complete protection against accidental deletions, data corruption, or compliance needs. Backing up ensures you can recover data quickly and meet long-term retention requirements.
Conclusion
Windows Server Backup can be used in a virtual machine environment in the same way that it is used on physical servers to provide backup and recovery services. It can also be used from Windows Azure virtual machines for bare metal backup and recovery, system state backup and recovery, and file and folder backup and recovery.
You need to fulfil some prerequisites when it comes to take a backup of Exchange Server using Windows Server Backup. These are:
- The user must have the right permissions before configuring a backup or restore. You need to give the user (which will be doing the backup and restore) the Mailbox Recovery role permission. The user must also be a part of the Organization Management group.
- The Windows Server Backup, which can be installed via the Server Manager, must be installed on the Exchange Server. You cannot use Windows Server Backup to back up a remote server.
- A consistency check will be executed on the Exchange Server databases to confirm that these are healthy and can be used for restoring data. If successful, the Exchange Server databases will be available to restore. If the consistency fails (although it will back up the server), you will not be able to recover any data from it.
Setting up Windows Server Backup
Windows Server Backup is compatible with Exchange Server and is application-aware. Nonetheless, you must always make sure that the version of the Windows Server is in the compatibility matrix. When in doubt, check with the supplier or vendor. Now, follow the below steps to create backup using the Windows Server Backup feature.
- After installing the Windows Server Backup feature from the Server Manager, open the Windows Server Backup from the Administrative Tools in Control Panel.
- Click on Local Backup in the left pane and then click on Backup Schedule in the right-pane.
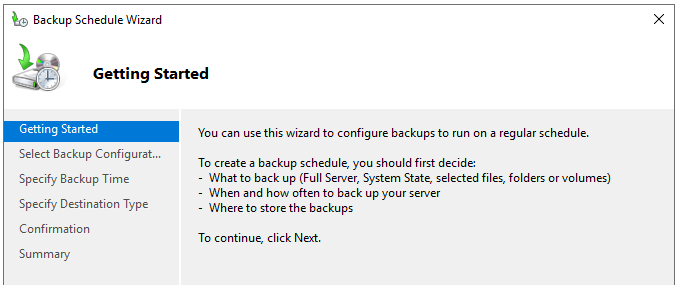
- On the Getting Started screen, click on Next.
- On the Select Backup Configuration screen, click on Custom to select custom criteria to backup from the server and click Next.
- On the Select Items for Backup screen, click on Add Items.
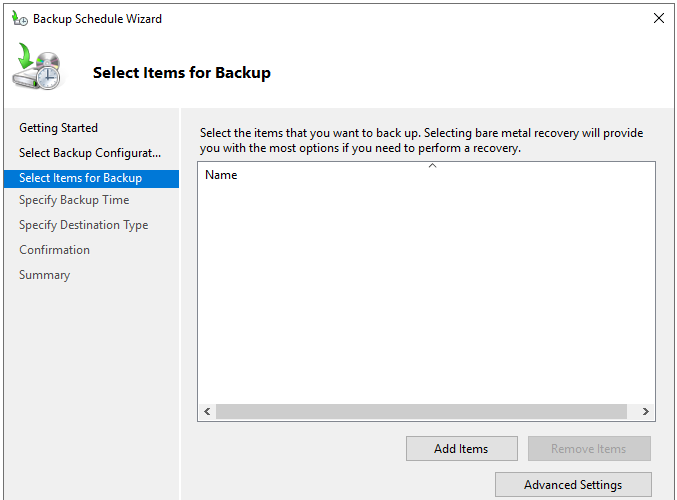
- Here, you need to add the drives where you have the databases. For the sake of backup, select the operating system drive. Once done, click on OK.
Note: In our case and for our test-bed server, all is installed and configured on the C drive. In a real scenario, you can separate the operating system drive from the drive holding the actual Exchange Server databases. It’s important not to select individual files as this will not work properly. To benefit from application-level backup and restore, the entire volume must be selected.
- You will be back on the Select Items for Backup screen. Here, click on the Advanced Settings button. Click on Exclusions to exclude any folders or file types from the backup. Then, click on Add Exclusion.
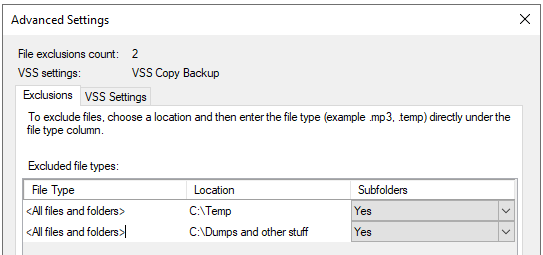
- You can add multiple exclusions. For each exclusion, you can select to exclude the root folder along with the subfolders or just the root folder. You can also specify all the files and folders or a specific file type by typing the extension in the File Type field.

- Once ready, click on the VSS Settings tab. Here, you need to make sure that the VSS full Backup is selected. Then, click OK.

- Click Next.
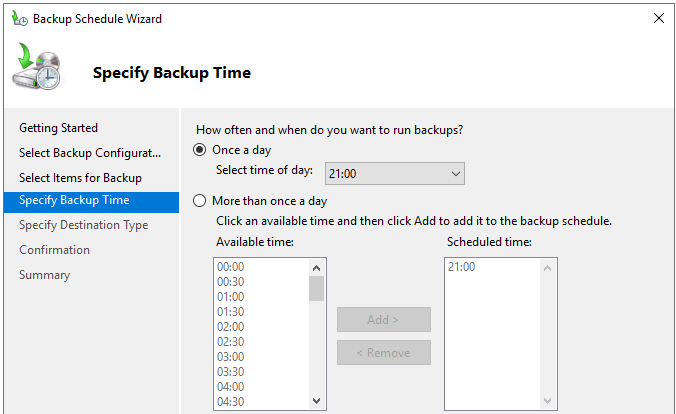
- On the Specify Backup Time screen, you need to enter the time when the backup will be taken.
- In the Specify Destination Type screen, select the backup destination and click Next.

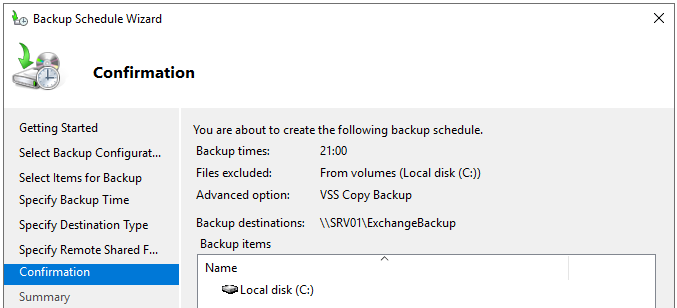
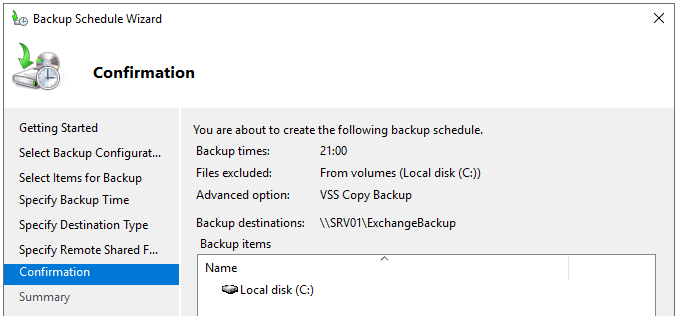
- Once the destination is selected, you will be presented with the Confirmation screen to review your selection.
- Once done, click Finish.
- The backup will now run when it’s scheduled. If you want to run it manually, you need to open the Task Scheduler and modify the job to allow it to run on demand.
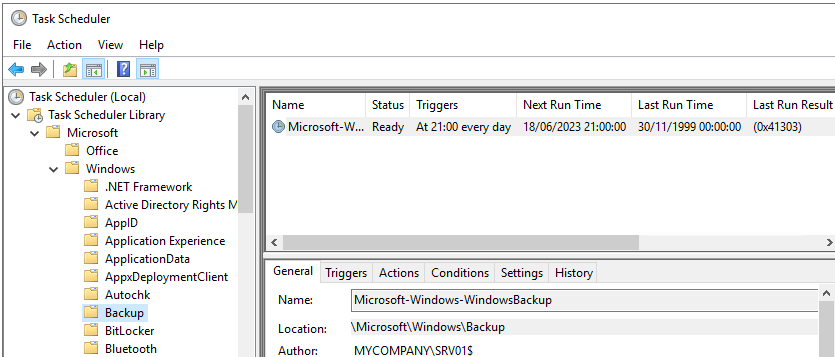
- Find the task in the Microsoft, Windows and Backup section and edit the task. Click on the Settings tab, tick Allow task to be run on demand and click OK.
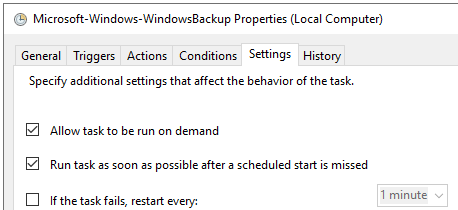
- You can run the backup on demand. Once the time comes, the backup will start.
To confirm if the backup is successful, open the Exchange Management Shell (EMS) and run the Get-MailboxDatabase cmdlet as given below.
Get-MailboxDatabase -Server -Status | Format-List Name,*FullBackup
Restoring the Backup
When restoring data, you cannot restore only one mailbox or one email. You will need to restore the entire database. Here are the steps:
- Open the Windows Server Backup.
- Click on Recover.
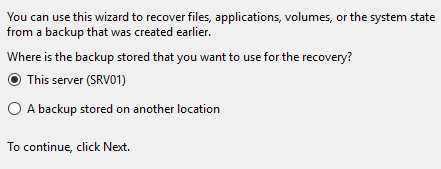
- Choose the server and click Next.
- Choose the date you wish to restore from and click Next.

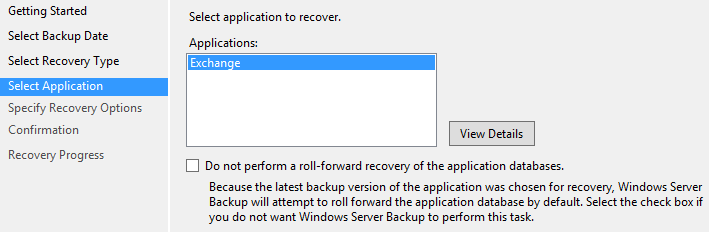
- Select Exchange and click Next.
- Choose the location to recover and click Next.
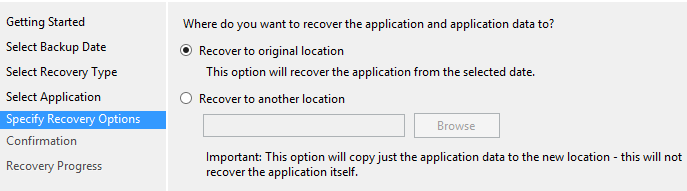
Note: By restoring the database, you will affect all the volumes. Also, you cannot granularly restore the data. This process will involve replacing all the data. Hence, you may suffer data loss as it will overwrite the current data.
Final Thoughts
The Windows Server Backup application comes in-built in the Windows Server. It works well when configured properly. However, you may encounter a problem if something happens to your Exchange Server. In this case, you need to restore the whole server. But what would happen to the data which was created after the backup is taken till the time the server was crashed?
The process is a bit resource hungry as you need to restore the entire Exchange Server database on the same server, attach it, and extract the data from there using Outlook. So, if you don’t have enough storage on the Exchange Server, you will not be able to restore any data.
In such a situation, you can use a third-party application, such as Stellar Repair for Exchange to extract data from the damaged or corrupt local Exchange Server database. With this application, you can open the corrupted database with no size limit and even without a running Exchange Server. This means you can granularly extract the desired data from the damaged database and save it in PST and other file formats. You can also use the application to export data directly to a live Exchange Server database or Office 365, with minimal effort and resources.
Microsoft Exchange provides Database Availability Groups (DAG) for database replication and high availability of Exchange Server. Off-site DAGs may not be feasible for small to medium organizations. While DAGs can reduce the need for backup application, backup of Exchange server ensures that you are ready for disaster recovery in a traditional way. Make sure that the backup application you are using to backup Exchange 2016 is Exchange-aware. Windows server comes with it’s own backup application called Windows Server Backup which is Exchange aware. So in this post, I will show steps to backup Exchange 2016 with Windows Server Backup application. It is better to understand components of Exchange database before configuring backup of Exchange server.

Here, I have single Exchange server 2016 without DAG. For backup storage I have dedicated local volume (drive F) on Exchange Server (MBG-EX01). You can also have NAS (Network Attached Storage) as backup destination which is more preferred and popular method of backup. I will perform full backup of Exchange 2016 using Windows Server Backup application. At first, Log on to Exchange server and install Windows Server Backup feature. You can install from PowerShell as shown below.
PS C:\Users\Administrator.MUSTBEGEEK> Install-WindowsFeature Windows-Server-Backup

Success Restart Needed Exit Code      Feature Result
------- -------------- ---------      --------------
True    No             Success        {Windows Server Backup}
After successful installation, open Windows Server Backup application.
Right-click local backup and click Backup Schedule to create new backup schedule. Backup schedule wizard opens up. Click Next on Getting started window.

Choose backup configuration type. You can choose full server or custom option. Full server option will backup whole server with less option to choose from. Here I will choose Custom option. Click Next.

Click Add items to add backup items. Check all boxes except the backup destination which is F drive. Bare metal option allows you to recover the whole server from scratch in new physical server or virtual machine. System state option backs up current system state data like boot files, system files, registry keys, and so on. After checking required items, click OK. Click Advanced Settings to modify VSS (Volume Shadow Copy Service) setting.

VSS (Volume Shadow Copy Service) service creates a snapshot of current state of the server and creates backup. Click VSS Settings tab. Choose VSS full Backup option. VSS full backup option will truncate the transaction logs which creates free space in drive where transaction logs are stored. VSS copy backup option will perform backup in same manner as VSS full backup does but does not truncate the transaction logs. Click OK. Click Next.

Specify backup time, once a day or more than once a day. Click Next. Make sure you don’t define time during busy hours.

Choose backup destination. Click Next.

Choose disk. You might have to click show all available disks if disk is not showing by default. Check the available disk. I have checked F drive. Click Next.

You will be presented with the warning saying the drive will be formatted and any existing data on the drive will lost. Click Yes on the warning.

Review the confirmation and click Finish. The application will now format the disk and will start the backup automatically as per the defined time.

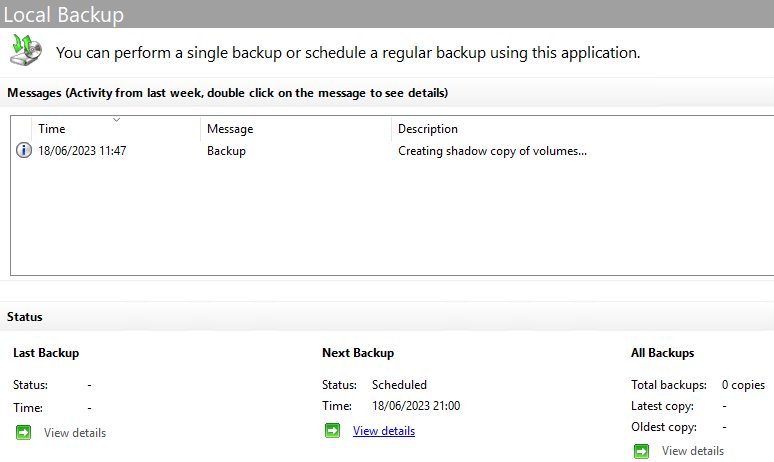
If you want to run the backup manually, right-click local backup and click Backup once option.

Choose scheduled backup option and click next and click backup to start the backup. The backup will now start.

You can also verify the Exchange backup using Exchange Management Shell (EMS) as shown below.
[PS] C:\Windows\system32>Get-MailboxDatabase -Server MBG-EX01 -Status | fl Name,*FullBackup


Name                   : Mailbox Database 2095368010
SnapshotLastFullBackup : True
LastFullBackup         : 10/25/2015 11:22:51 PM

Name                   : DB01
SnapshotLastFullBackup : True
LastFullBackup         : 10/25/2015 11:22:51 PM
The backup is now completed. You can now restore Exchange server if it fails for some reason.
The following two tabs change content below.
- Bio
- Latest Posts
Bipin is a freelance Network and System Engineer with expertise on Cisco, Juniper, Microsoft, VMware, and other technologies. You can hire him on UpWork. Bipin enjoys writing articles and tutorials related to Network technologies. Some of his certifications are, MCSE:Messaging, JNCIP-SEC, JNCIS-ENT, and others.