Протокол Remote Desktop Protocol (RDP) позволяет удаленно подключиться к рабочему столу компьютера с Windows и работать с ним, как будто это ваш локальный компьютер. По умолчанию RDP доступ в Windows запрещен. В этой статье, мы покажем, как включить и настроить RDP доступ в Windows 10 и Windows Server 2016/2019.
Содержание:
- Включаем удаленный рабочий стол в Windows 10
- Как включить RDP доступ с помощью PowerShell?
- RDP доступ к Windows Server 2016/2019
- Включение RDP с групповых политик в домене Active Direcrtory
- Как удаленно включить RDP на компьютере Windows?
Включаем удаленный рабочий стол в Windows 10
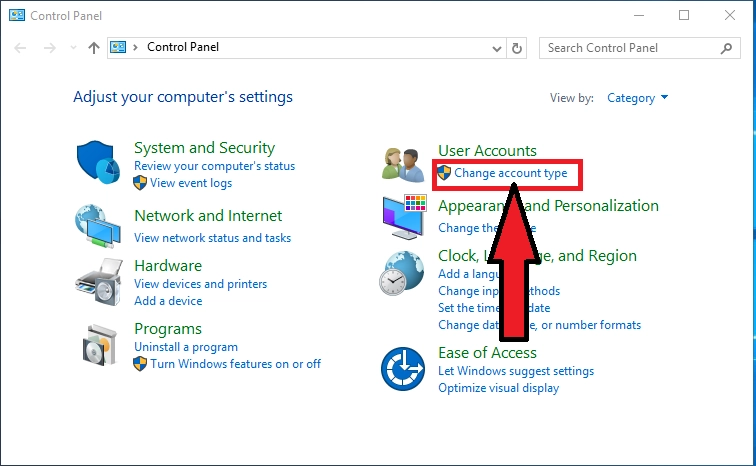
Самый простой способ включить RDP доступ в Windows – воспользоваться графическим интерфейсом.
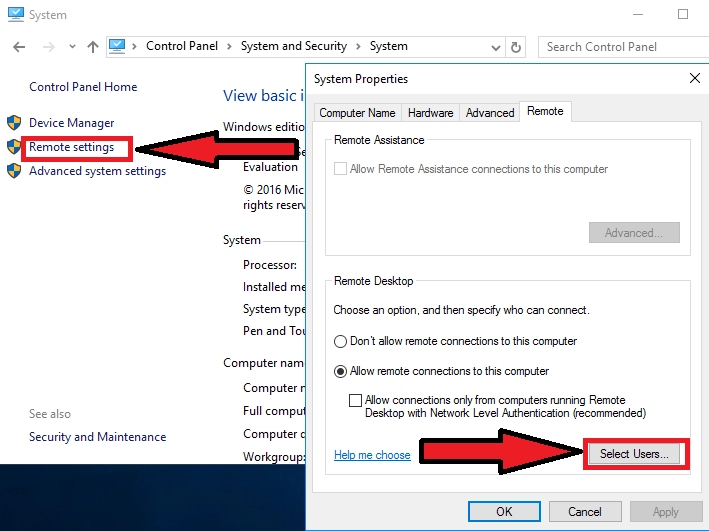
Откройте свойства системы через панель управления, или выполнив команду SystemPropertiesRemote.
Перейдите на вкладку Remote Settings (Удаленный доступ), включите опцию Allow remote connection to this computer (Разрешить удалённые подключения к этому компьютеру).
В целях безопасности желательно разрешить подключение только с клиентов RDP с поддержкой протокола NLA (Allow connections only from computers running Remote Desktop with Network Level Authentication/ Разрешить подключение только с компьютеров, на которых работает удаленный рабочий стол с проверкой подлинности на уровне сети).

Сохраните изменения, нажав ОК.
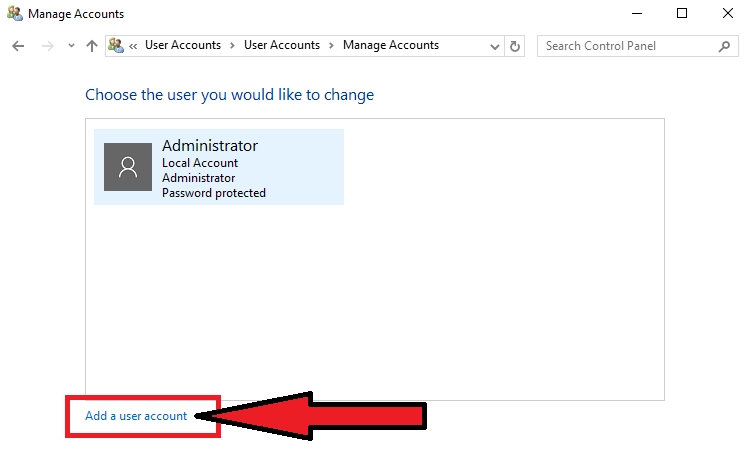
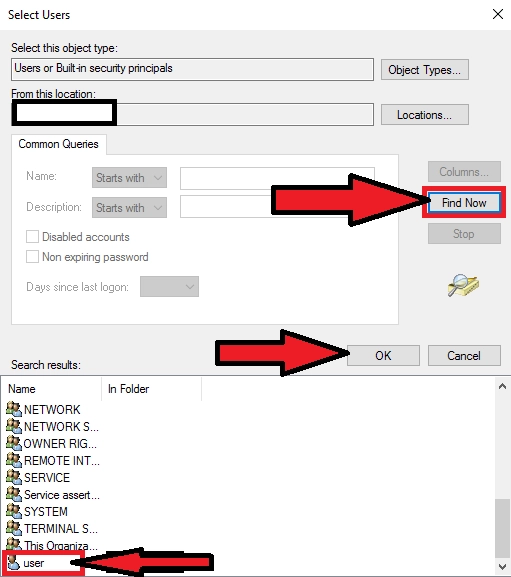
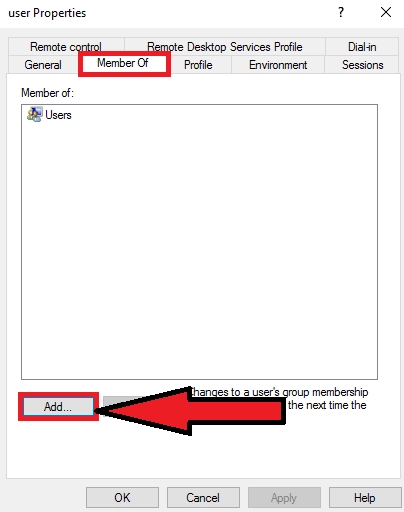
По умолчанию право на подключение к компьютеру через RDP есть только у членов группы локальных администраторов. Если вам нужно разрешить RDP доступ другим пользователям, нажмите кнопку Select Users.
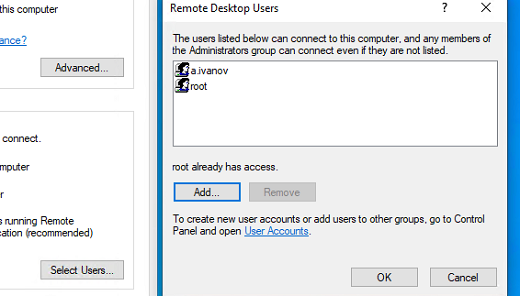
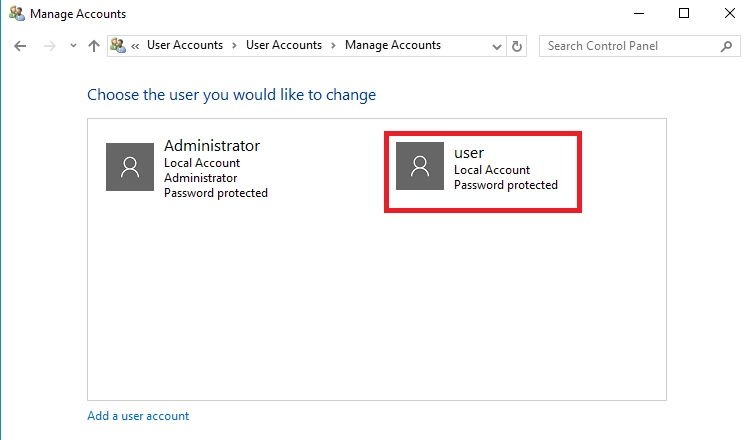
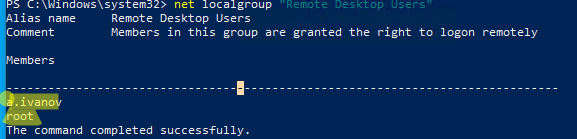
Все пользователи, которых вы укажете здесь будет добавлены в локальную группу Remote Desktop Users. Вы можете в командной строке вывести список пользователей в этой группе:
net localgroup "Remote Desktop Users"
или
net localgroup “Пользователи удаленного рабочего стола”
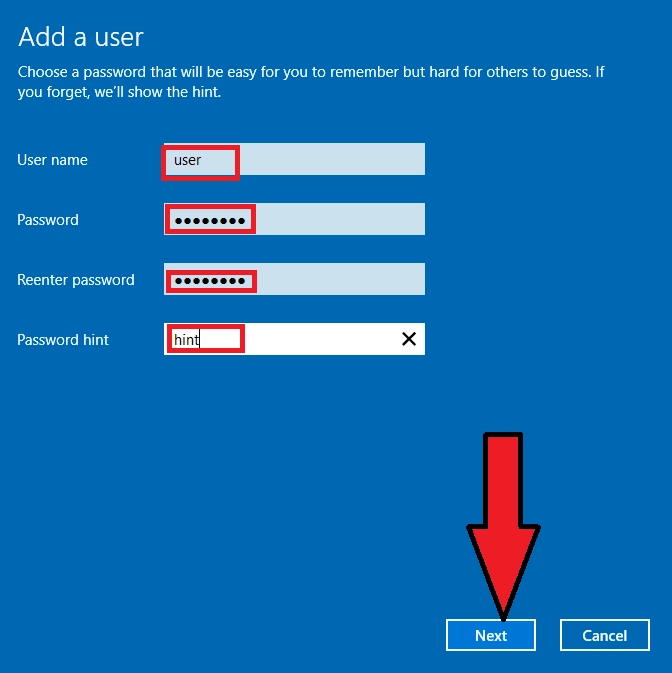
Чтобы добавить нового пользователя в группу доступа RDP, выполните:
net localgroup "Remote Desktop Users" /add publicuser
В русской версии Windows измените название группы на “Пользователи удаленного рабочего стола”.
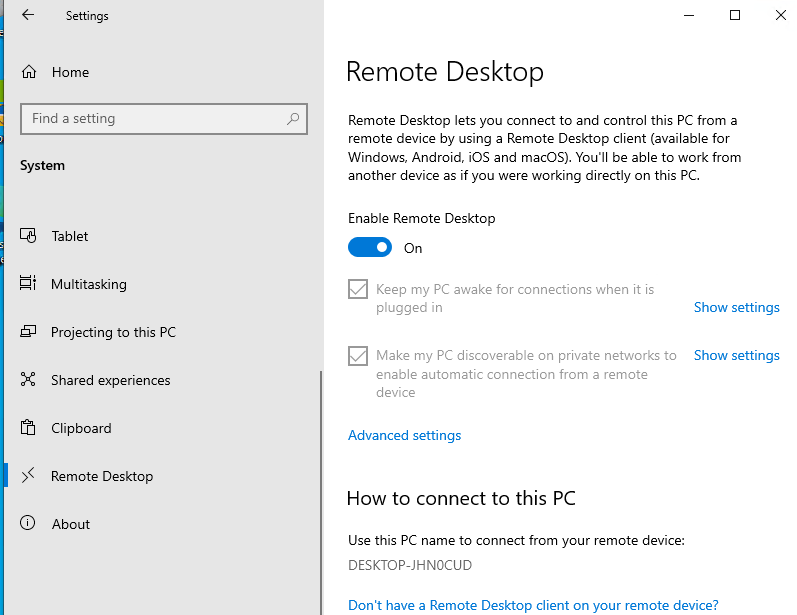
В новых билдах Windows 10 классическая панель для включения RDP доступа теперь спрятана и Microsoft рекомендует пользоваться новой панелью Setting.
- Перейдите в Settings -> System —> Remote Desktop;
- Включите опцию Enable Remote Desktop;

- Подтвердите включение RDP на компьютере.
Обратите внимание, что вы не можете включить RDP доступ к редакции Windows 10 Home. RDP сервер работает только на Windows 10 Pro и Enterprise. Впрочем, есть обходное решение.
Обратите внимание, что по умолчанию при включении Remote Desktop, включаются две опции:
- Keep my PC awake for connection when it is plugged in ;
- Make my PC discoverable on private networks to enable automatic connection from a remote device
На жмите на ссылку “Advanced settings”. Здесь можно включить использование протокола “Network Level Authentication” для RDP подключений (рекомендуется).
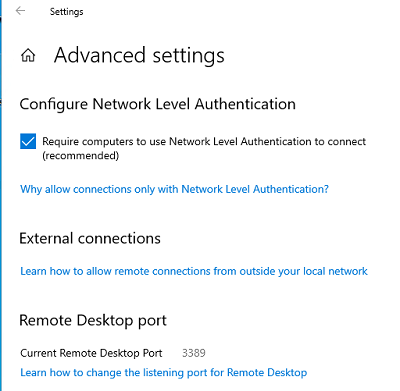
Если на компьютере включен Windows Defender Firewall (брандмауэр), то нужно проверить, что в нем разрешены входящие RDP подключения. По умолчанию для RDP подключений используется порт TCP
3389
, а в последних билдах Windows также используется
UDP 3389
( см. статью про кейс с черным экраном вместо рабочего стола при RDP доступе).
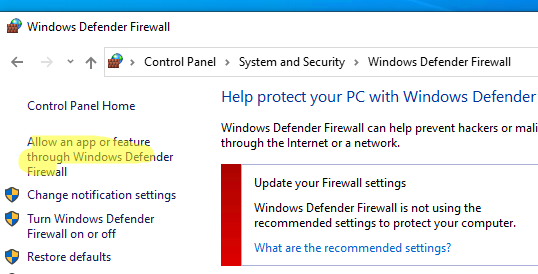
Перейдите в панель управления и выберите элемент Windows Defender Firewall. Откройте список стандартных правил брандмауэра Windows, щелкнув в левом столбце по ссылке Allow an app or feature through Windows Firewall.
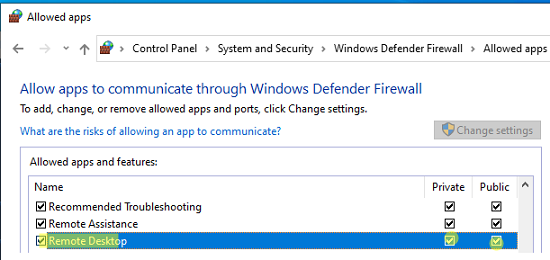
Проверьте, что правило Remote Desktop включено для профиля Private (домашняя или рабочая сеть) и, если необходимо, для профиля Public (общедоступные сети).
Подробнее про типы сетей и профили брандмауэра Windows здесь.
Если нужно, вы можете дополнительно ограничить длительность RDP сессий с помощью GPO.
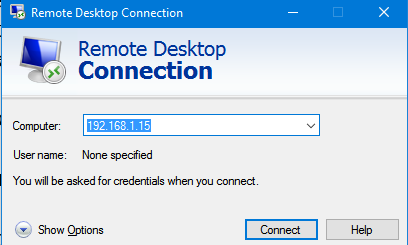
Теперь к данному компьютеру можно подключится с помощью RDP клиента. Встроенный RDP клиент Windows –
mstsc.exe
. Он сохраняет всю историю RDP подключений с компьютера. Поддерживается копирование файлов между локальным и удаленным компьютером прямо через буфер обмена RDP.
Также вы можете использовать менеджеры RDP подключений, такие как RDCMan или mRemoteNG, или альтернативные клиенты.
Для удобства пользователей пароль для RDP подключения можно сохранить в Windows Credential Manager.
Как включить RDP доступ с помощью PowerShell?
Вы можете включить RDP доступ в Windows с помощью пары PowerShell команд. Это гораздо быстрее:
- Запустите консоль PowerShell.exe с правами администратора;
- Включите RDP доступ в реестре с помощью командлета Set-ItemProperty:
Set-ItemProperty -Path 'HKLM:\System\CurrentControlSet\Control\Terminal Server' -name "fDenyTSConnections" -value 0Чтобы закрыть RDP доступ, измените значение fDenyTSConnections на 1.
- Разрешите RDP подключения к компьютеру в Windows Defender Firewall. Для этого включите предустановленное правило :
Enable-NetFirewallRule -DisplayGroup "Remote Desktop"
- Если нужно добавить пользователя в группу в локальную группу RDP доступа, выполните:
Add-LocalGroupMember -Group "Remote Desktop Users" -Member 'a.petrov'

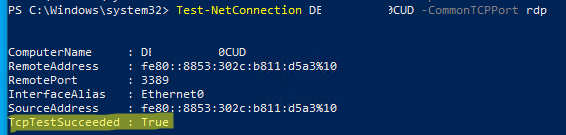
Чтобы проверить, что на компьютере открыт RDP порт, воспользуйтесь командлетом Test-NetConnection:
Test-NetConnection -ComputerName deskcomp323 -CommonTCPPort rdp
RDP доступ к Windows Server 2016/2019
В отличии от десктопной редакции Windows 10, в Windows Server по умолчанию поддерживается два одновременных RDP подключения. Эти подключения используются администраторами для управления сервером.
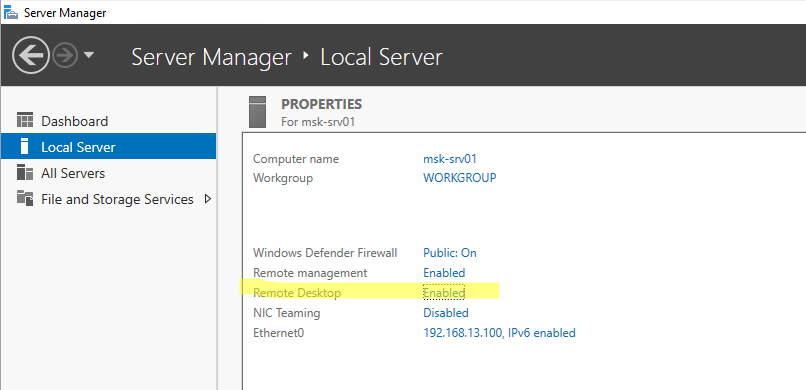
Включается RDP в Windows Server аналогично. Через SystemPropertiesRemote, через Server Manager или командами PowerShell, рассмотренными выше.
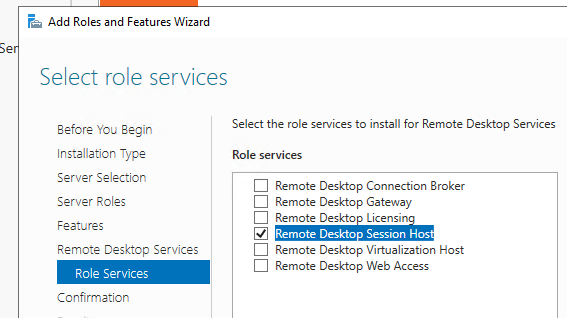
Вы можете использовать Windows Server в качестве терминального сервера. В этом случае множество пользователей могут одновременно подключаться к собственному рабочему столу на сервере. Для этого нужно установить и настроить на сервере роль Remote Desktop Session Host. Это требует приобретения специальных RDS лицензии (CAL). Подробнее о RDS лицензировании здесь.
Для дополнительно защиты RDP сессий можно использовать SSL/TLS сертификаты.
Включение RDP с групповых политик в домене Active Direcrtory
Если вам нужно включить RDP доступ сразу на большом количестве компьютеров, можно воспользоваться групповыми политиками (GPO). Мы подразумеваем, что все компьютеры включены в домен Windows.
- Запустите консоль управления доменными GPO
gpmc.msc
; - Создайте новую (или отредактируйте уже существующую) групповую политику и привяжите ее к целевой OU с компьютерами или серверами;
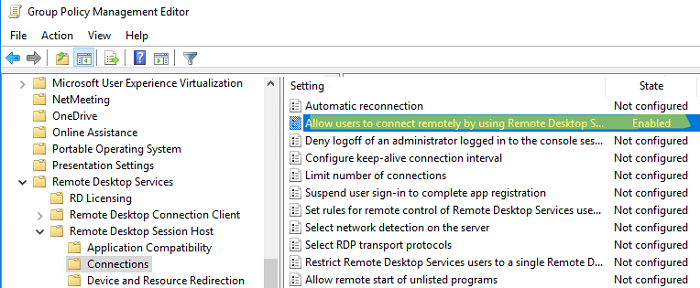
- Переключитесь в режим редактирования политики и перейдите в секцию GPO Computer Configuration -> Administrative Templates -> Windows Components -> Remote Desktop Services -> Remote Desktop Session Host -> Connections;
- Найдите и включите политику Allow Users to connect remotely by using Remote Desktop Services, установив ее в Enable;
- Обновите параметры групповых политик на клиентах;
- После применения данной политики вы сможете подключится ко всем компьютерам по RDP (политика применится как к десктопным клиентам с Windows 10, так и к Windows Server). Если нужно, вы можете более тонко нацелить политики на компьютеры с помощью WMI фильтров GPO.
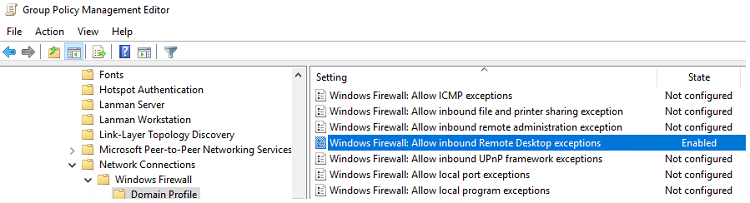
- Если на компьютерах включен Windows Defender Firewall, нужно в этой же GPO разрешить RDP-трафик для доменного профиля. Для этого нужно активировать правило Windows Firewall: Allow inbound Remote Desktop Exceptions (находится в разделе Computer Configuration -> Administrative Templates -> Network -> Network Connections -> Windows Firewall -> Domain Profile).
Подробнее о настройке правил брандмаура Windows через GPO рассказано здесь.
Как удаленно включить RDP на компьютере Windows?
Также вы можете удаленно включить RDP на любом компьютере Windows. Для этого у вас должен быть удаленный доступ к этому компьютеру (через PowerShell или WMI) и ваша учетная запись состоять в группе локальных администраторов на этом компьютере.
Вы можете удаленно включить RDP через реестр. Для этого на удаленном компьютере должна быть включена служба Remote Registry (по умолчанию она отключена). Чтобы запустить службу:
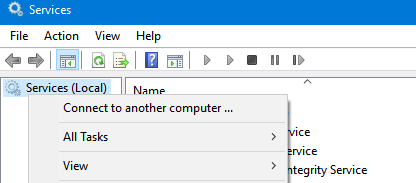
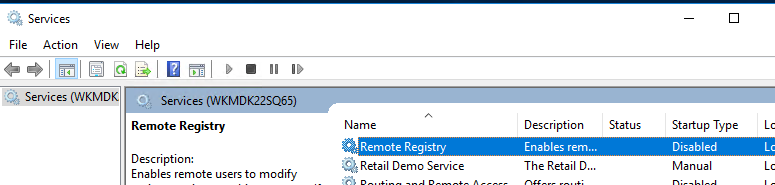
- Запустите консоль управления службами (
services.msc
); - Выберите Connect to another computer и укажите имя удаленного компьютера;
- Найдите в списке службу Remote Registry, измените тип запуска на Manual (ручной) и затем запустите службу – Start.
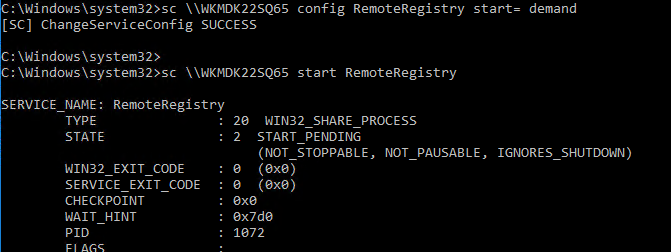
Тоже самое можно выполнить удаленно из командной строки с помощью встроенной утилиты
sc
(позволяет создавать, управлять или удалять службы Windows):
sc \\WKMDK22SQ65 config RemoteRegistry start= demand
sc \\WKMDK22SQ65 start RemoteRegistry
Затем на локальном компьютере
- Запустите редактор реестра
regedit.exe - Выберите в меню Файл пункт Connect Network Registry (Подключить сетевой реестр)
- Укажите имя или IP адрес удаленного компьютера, на котором нужно включить службу RDP;
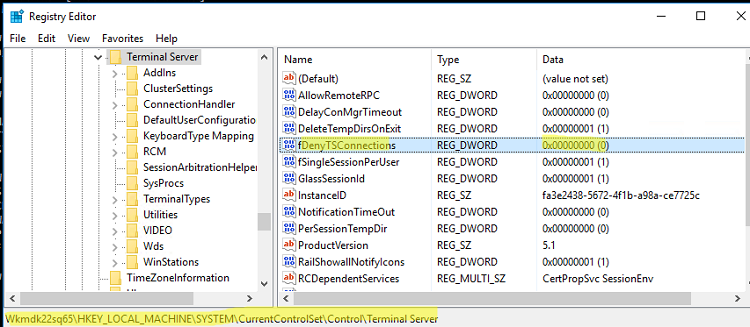
- Перейдите в раздел
HKEY_LOCAL_MACHINE\SYSTEM\CurrentControlSet\Control\Terminal Server
; - Найдите параметр fDenyTSConnections (тип REG_DWORD). Если данный ключ отсутствует – создайте его. Измените его значение на 0, чтобы включить RDP.
Для отключения RDP доступа нужно изменить значение fDenyTSConnections на 1.
Сразу после этого без перезагрузки удаленный компьютер должен стать доступным по RDP.
Но гораздо быстрее можно включить RDP в реестре удаленого компьютера через командную строку:
REG ADD "\\WKMDK22SQ65\HKLM\SYSTEM\CurrentControlSet\Control\Terminal Server" /v fDenyTSConnections /t REG_DWORD /d 0 /f
Если на удаленном компьютере настроен PowerShell remoting, вы можете выполнить на нем удаленную команду через Invoke-Command:
Invoke-Command -Computername WKMDK22SQ65 -ScriptBlock {Set-ItemProperty -Path "HKLM:\System\CurrentControlSet\Control\Terminal Server" -Name "fDenyTSConnections" –Value 0}
Если в Windows установлен OpenSSH сервер, вы можете подключиться к нему любым ssh клиентом и внести изменения в реестр в локальной ssh сессии.
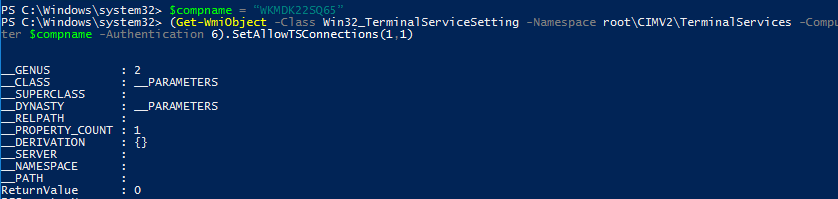
Также вы можете подключиться к удаленному компьютеру и включить RDP через WMI:
$compname = “WKMDK22SQ65”
(Get-WmiObject -Class Win32_TerminalServiceSetting -Namespace root\CIMV2\TerminalServices -Computer $compname -Authentication 6).SetAllowTSConnections(1,1)
Why Enable Remote Desktop on Windows Server 2022?
Remote Desktop Protocol (RDP) is a powerful tool for accessing Windows servers from remote locations. It allows administrators to perform system maintenance, deploy applications, and troubleshoot issues without physical access to the server. By default, Remote Desktop is disabled on Windows Server 2022 for security purposes, necessitating deliberate configuration to enable and secure the feature.
RDP also simplifies collaboration by enabling IT teams to work on the same server environment simultaneously. Additionally, businesses with distributed workforces depend on RDP for efficient access to centralized systems, boosting productivity while reducing infrastructure costs.
Methods to Enable Remote Desktop
There are several ways to enable Remote Desktop in Windows Server 2022, each tailored to different administrative preferences. This section explores three primary methods: the GUI, PowerShell, and Remote Desktop Services (RDS). These approaches ensure flexibility in configuration while maintaining high standards of precision and security.
Enabling Remote Desktop via the Server Manager (GUI)
Step 1: Launch Server Manager
The Server Manager is the default interface for managing Windows Server roles and features. Open it by:
- Clicking the Start Menu and selecting Server Manager.
- Alternatively, use the Windows + R key combination, type ServerManager, and press Enter.
Step 2: Access Local Server Settings
Once in Server Manager:
- Navigate to the Local Server tab in the left-hand menu.
- Locate the «Remote Desktop» status, which typically shows «Disabled.»
Step 3: Enable Remote Desktop
- Click on «Disabled» to open the System Properties window in the Remote tab.
- Select Allow remote connections to this computer.
- For enhanced security, check the box for Network Level Authentication (NLA), requiring users to authenticate before accessing the server.
Step 4: Configure Firewall Rules
- A prompt will appear to enable the firewall rules for Remote Desktop. Click OK.
- Verify the rules in the Windows Defender Firewall settings to ensure port 3389 is open.
Step 5: Add Authorized Users
- By default, only administrators can connect. Click Select Users… to add non-administrator accounts.
- Use the Add Users or Groups dialog to specify usernames or groups.
Enabling Remote Desktop via PowerShell
Step 1: Open PowerShell as Administrator
- Use the Start Menu to search for PowerShell.
- Right-click and select Run as Administrator.
Step 2: Enable Remote Desktop via Registry
- Run the following command to modify the registry key controlling RDP access:
- Set-ItemProperty -Path ‘HKLM:\System\CurrentControlSet\Control\Terminal Server’ -Name «fDenyTSConnections» -Value 0
Step 3: Open the Necessary Firewall Port
- Allow RDP traffic through the firewall with:
- Enable-NetFirewallRule -DisplayGroup «Remote Desktop»
Step 4: Test Connectivity
- Use PowerShell’s built-in networking tools to verify:
- Test-NetConnection -ComputerName <ServerName> -Port 3389
Installing and Configuring Remote Desktop Services (RDS)
Step 1: Add the RDS Role
- Open Server Manager and select Add roles and features.
- Proceed through the wizard, selecting Remote Desktop Services.
Step 2: Configure RDS Licensing
- During the role setup, specify the licensing mode: Per User or Per Device.
- Add a valid license key if required.
Step 3: Publish Applications or Desktops
- Use the Remote Desktop Connection Broker to deploy remote apps or virtual desktops.
- Ensure users have appropriate permissions to access published resources.
Securing Remote Desktop Access
While enabling Remote Desktop Protocol (RDP) on Windows Server 2022 provides convenience, it can also introduce potential security vulnerabilities. Cyber threats like brute-force attacks, unauthorized access, and ransomware often target unsecured RDP setups. This section outlines best practices to secure your RDP configuration and protect your server environment.
Enable Network Level Authentication (NLA)
Network Level Authentication (NLA) is a security feature that requires users to authenticate before a remote session is established.
Why Enable NLA?
- It minimizes exposure by ensuring only authorized users can connect to the server.
- NLA reduces the risk of brute-force attacks by blocking unauthenticated users from consuming server resources.
How to Enable NLA
- In the System Properties window under the Remote tab, check the box for Allow connections only from computers running Remote Desktop with Network Level Authentication.
- Ensure client devices support NLA to avoid compatibility issues.
Restrict User Access
Limiting who can access the server via RDP is a critical step in securing your environment.
Best Practices for User Restrictions
- Remove Default Accounts: Disable or rename the default Administrator account to make it harder for attackers to guess credentials.
- Use the Remote Desktop Users Group: Add specific users or groups to the Remote Desktop Users group. Avoid granting remote access to unnecessary accounts.
- Audit User Permissions: Regularly review which accounts have RDP access and remove outdated or unauthorized entries.
Enforce Strong Password Policies
Passwords are the first line of defense against unauthorized access. Weak passwords can compromise even the most secure systems.
Key Elements of a Strong Password Policy
- Length and Complexity: Require passwords to be at least 12 characters long, including uppercase letters, lowercase letters, numbers, and special characters.
- Expiration Policies: Configure policies to force password changes every 60–90 days.
- Account Lockout Settings: Implement account lockout after a certain number of failed login attempts to deter brute-force attacks.
How to Configure Policies
- Use Local Security Policy or Group Policy to enforce password rules:
- Navigate to Computer Configuration > Windows Settings > Security Settings > Account Policies > Password Policy.
- Adjust settings such as minimum password length, complexity requirements, and expiration duration.
Restrict IP Addresses
Restricting RDP access to known IP ranges limits potential attack vectors.
How to Restrict IPs
- Open Windows Defender Firewall with Advanced Security.
- Create an Inbound Rule for RDP (port 3389):
- Specify the rule applies only to traffic from trusted IP ranges.
- Block all other inbound traffic to RDP.
Benefits of IP Restrictions
- Drastically reduces exposure to attacks from unknown sources.
- Provides an additional layer of security, especially when combined with VPNs.
Implement Two-Factor Authentication (2FA)
Two-Factor Authentication adds an extra layer of protection by requiring users to verify their identity with something they know (password) and something they have (e.g., a mobile app or hardware token).
Setting Up 2FA for RDP
- Use third-party solutions such as DUO Security or Authy to integrate 2FA with Windows Server.
- Alternatively, configure Microsoft Authenticator with Azure Active Directory for seamless integration.
Why Use 2FA?
- Even if a password is compromised, 2FA prevents unauthorized access.
- It significantly enhances security without compromising user convenience.
Testing and Using Remote Desktop
After successfully enabling Remote Desktop Protocol (RDP) on your Windows Server 2022, the next critical step is testing the setup. This ensures connectivity and verifies that the configuration works as expected. Additionally, understanding how to access the server from various devices—regardless of the operating system—is essential for a seamless user experience.
Testing Connectivity
Testing the connection ensures the RDP service is active and accessible over the network.
Step 1: Use the Built-in Remote Desktop Connection Tool
On a Windows machine:
- Open the Remote Desktop Connection tool by pressing Windows + R, typing mstsc, and pressing Enter.
- Enter the server’s IP address or hostname in the Computer field.
Step 2: Authenticate
- Input the username and password of an account authorized for remote access.
- If using Network Level Authentication (NLA), ensure the credentials match the required security level.
Step 3: Test the Connection
- Click Connect and verify that the remote desktop session initializes without errors.
- Troubleshoot connectivity issues by checking the firewall, network configurations, or server status.
Accessing from Different Platforms
Once the connection has been tested on Windows, explore methods for accessing the server from other operating systems.
Windows: Remote Desktop Connection
Windows includes a built-in Remote Desktop client:
- Launch the Remote Desktop Connection tool.
- Input the IP address or hostname of the server and authenticate.
macOS: Microsoft Remote Desktop
- Download Microsoft Remote Desktop from the App Store.
- Add a new PC by entering the server details.
- Configure optional settings such as display resolution and session preferences for an optimized experience.
Linux: RDP Clients like Remmina
Linux users can connect using RDP clients such as Remmina:
- Install Remmina via your package manager (e.g., sudo apt install remmina for Debian-based distributions).
- Add a new connection and select RDP as the protocol.
- Provide the server’s IP address, username, and password to initiate the connection.
Mobile Devices
Accessing the server from mobile devices ensures flexibility and availability:
iOS:
- Download the Microsoft Remote Desktop app from the App Store.
- Configure a connection by providing the server’s details and credentials.
Android:
- Install the Microsoft Remote Desktop app from Google Play.
- Add a connection, enter the server’s IP address, and authenticate to begin remote access.
Troubleshooting Common Issues
Connectivity Errors
- Check that port 3389 is open in the firewall.
- Confirm the server is accessible via a ping test from the client device.
Authentication Failures
- Verify the username and password are correct.
- Ensure the user account is listed in the Remote Desktop Users group.
Session Performance
- Reduce display resolution or disable resource-intensive features (e.g., visual effects) to improve performance on low-bandwidth connections.
Explore Advanced Remote Access with TSplus
For IT professionals seeking advanced solutions, TSplus Remote Access offers unparalleled functionality. From enabling multiple concurrent connections to seamless application publishing and enhanced security features, TSplus is designed to meet the demands of modern IT environments. Streamline your remote desktop management today by visiting TSplus.
Conclusion
Enabling Remote Desktop on Windows Server 2022 is a critical skill for IT administrators, ensuring efficient remote management and collaboration. This guide has walked you through multiple methods to enable RDP, secure it, and optimize its usage for professional environments. With robust configurations and security practices, Remote Desktop can transform server management by providing accessibility and efficiency.
TSplus Remote Access Free Trial
Ultimate Citrix/RDS alternative for desktop/app access.Secure, cost-effective,on-permise/cloud
Как разрешить обычным пользователям RDP доступ к Windows Server?
По умолчанию удаленный RDP доступ к рабочему столу рядовых серверов с Windows Server или к контроллерам домена Active Directory разрешен только пользователям, добавленных в локальную группу Administrators, или администраторам домена (Domain Admins). В этой статье показано, как предоставить RDP доступ к хостам Windows Server или контроллерам домена обычным пользователям без предоставления прав административных полномочий.
По умолчанию настройки безопасности Windows позволяют RDP подключение удаленному пользователю через службу Remote Desktop Services (TermService) если:
- Пользователь состоит в локальной группе Administrators или Remote Desktop Users;
- Пользователю разрешено подключение через локальную политику Allow the log on through Remote Desktop Services.
Чтобы войти в систему, вам нужно право на вход через службу удаленных рабочих столов
При попытке удаленно подключиться к рабочему столу Windows Server, у пользователя появится ошибка:
To sign in remotely, you need the rights to sign in Remote Desktop Services.
By default only members of the Administrators group have this right.
If the group you’re in doesn’t have this right, or if the right has been removed
from Administrators group, you need to be granted this right manually.
Чтобы войти в систему удаленно, вам нужно право на вход через службы удаленных рабочих столов.
По умолчанию такое право имеют члены группы Администраторы.
Если у вашей группы нет этого права или оно было удалено для группы Администраторы,
попросите предоставить его вам вручную.
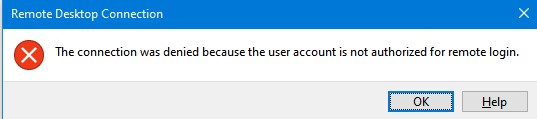
Если на удаленном хосте для RDP включена проверка подлинности NLA (Network Level Authentication), то при подключении появится другая ошибка:
The connection was denied because the user account is not authorized for remote login.
Подключение было запрещено, так как учетная запись пользователя не имеет прав для удаленного входа в систему.
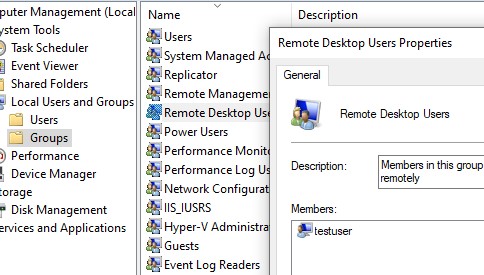
В этом случае, чтобы разрешить пользователю подключаться к Windows Server по RDP, вам достаточно добавить его в локальную группу Remote Desktop User. Для этого:
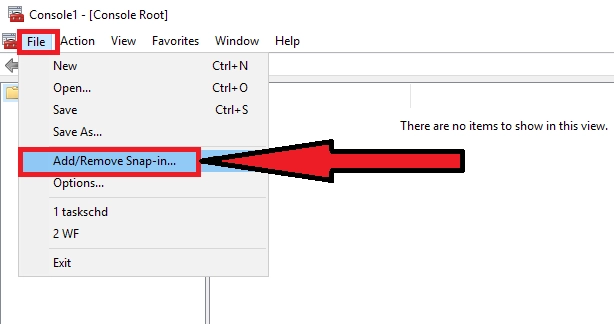
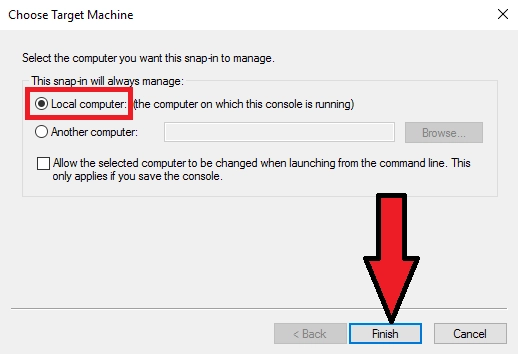
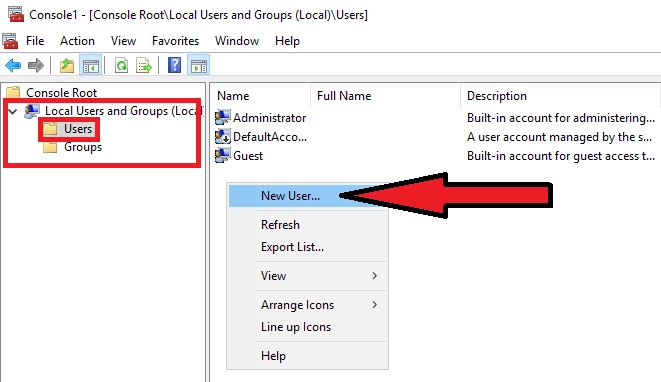
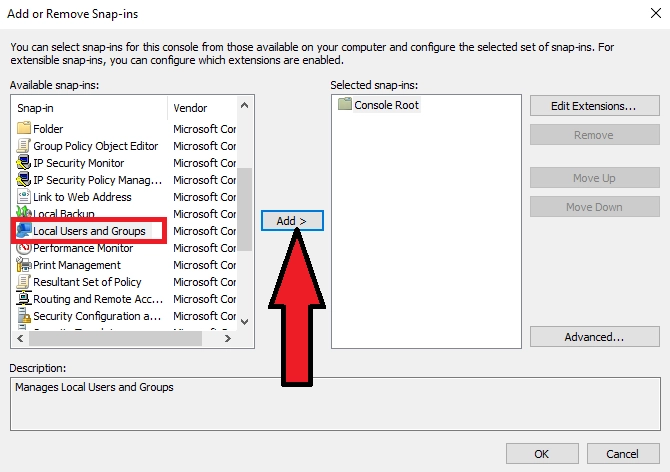
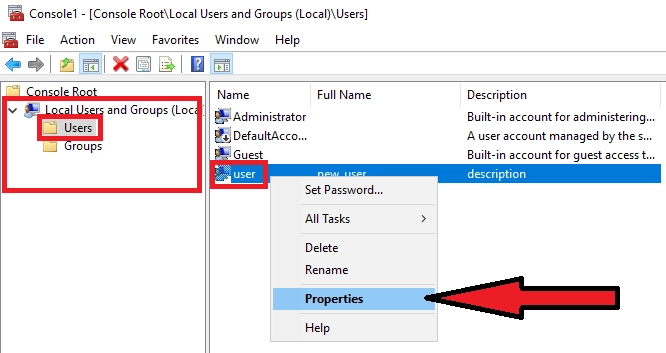
- Откройте mmc оснастку Local Users and Groups MMC ( lusrmgr.msc ) и перейдите в раздел Groups;
- Щелкните по группе Remote Desktop User (Пользователи удаленного рабочего стола);
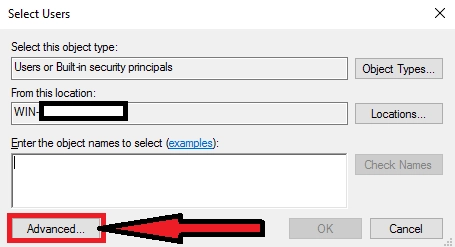
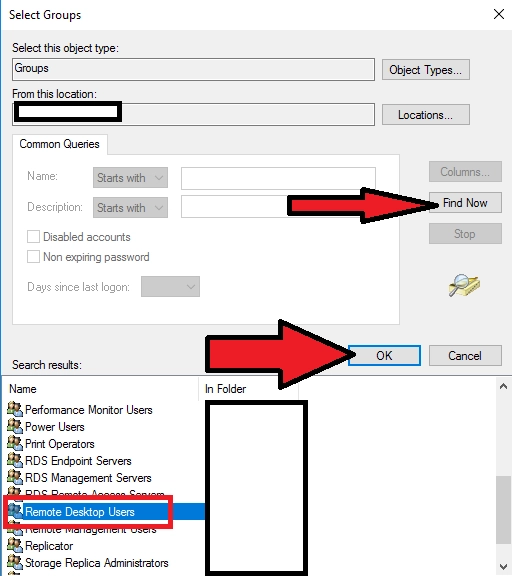
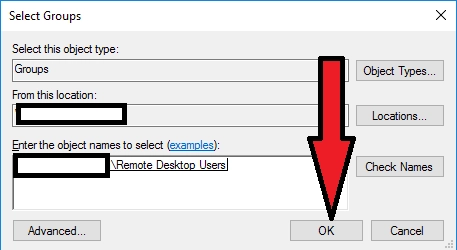
- Нажмите кнопку Add и укажите имя пользователя (или группы), которому вы хотите предоставить RDP доступ;

- После этого пользователь сможет подключиться к этому хосту Windows по RDP.
Также вы можете добавить пользователя в группу доступа RDP из командной строки:
net localgroup «Remote Desktop Users» /add itoservice\kbuldogov
или из PowerShell
Add-LocalGroupMember -Group «Remote Desktop Users» -Member kbuldogov
Вывести список пользователей в группе Remote Desktop Users
Get-LocalGroupMember -Group ‘Remote Desktop Users’

По аналогии вы можете предоставить пользователям RDP доступ к рабочим станциям с Windows 10 или 11 (не забудьте включить на них RDP)
По умолчанию Windows Server разрешает две одновременные удаленные RDP сессии. Т.е. два пользователю могут одновременно работать в собственных Remote Desktop сеансах. Если вам нужно большее количество одновременных RDP подключений, придется приобрести и активировать лицензии (RDP CAL) на сервере лицензирования RDS и установить роль Remote Desktop Services (это может быть отдельностоящий сервер с ролью RDSH или полноценная RDS ферма из нескольких серверов).
В RDS ферме для предоставления удаленного доступа можно использовать RDS коллекции. Откройте Server Manager > Remote Desktop Services > Tasks > Edit Deployment Properties.
Откройте коллекцию и в разделе User Group будут указаны группу безопасности, которым разрешено подключаться к RDSH хостам в этой коллекции.
Как предоставить RDP доступ к контроллеру домена Active Directory?
Если вам нужно предоставить рядовому пользователю, удаленный доступ к рабочему столу контроллера домена, то способ, описанный выше не сработает.
Дело в том, что после повышения роли сервера до контроллера домена Active Directory в оснастке управления компьютером пропадает возможность управления локальными пользователями и группами. При попытке открыть консоль Local Users and Groups (lusrmgr.msc). появляется ошибка:
The computer xxx is a domain controller. This snip-in cannot be used on a domain controller.
Domain accounts are managed with the Active Directory Users and Computers snap-in.
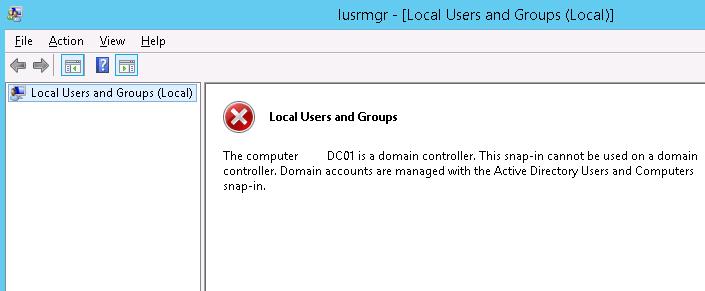
Как вы видите, на контроллере домена отсутствуют локальные группы. Вместо локальной группы Remote Desktop Users, на DC используется встроенная доменная группа Remote Desktop Users (находятся в контейнере Builtin). Управлять данной группой можно из консоли ADUC или из командной строки на DC.
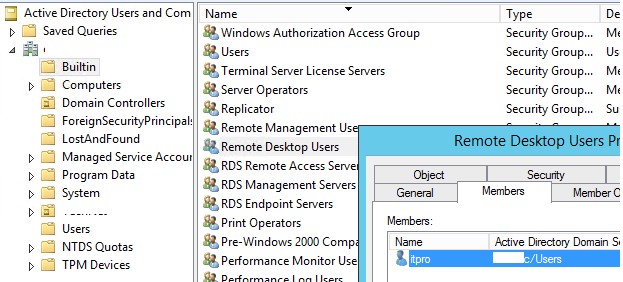
Однако использовать эту группу для предоставления доступа нежелательно, т.к. она предоставит пользователю доступ ко всем DC в домене. В этом случае для предоставления прав лучше использовать политику Allow log on through Remote Desktop Services.
Многие могут вполне обоснованно возразить, зачем, собственно, рядовым пользователям нужен удаленный доступ к рабочему столу DC. Действительно, в small и middle-size инфраструктурах, когда всю инфраструктуру обслуживают несколько администраторов, обладающих правами администратора домена, такая необходимость вряд ли понадобится. Обычно хватает возможностей делегирования пользователям административных полномочия в Active Directory или предоставления прав с помощью PowerShell Just Enough Administration (JEA).
Однако в больших корпоративных сетях, обслуживаемых большим количеством персонала, нередко возникает необходимость предоставления RDP доступа к DC (как правило к филиальным DC или RODC) различным группам администраторов серверов, команде мониторинга, дежурным администраторам и прочим техническим специалистам. Также бывают ситуации, когда на DC разворачивают сторонние службы, управляемые не доменными администраторами, которое также необходимо как-то обслуживать.
Политика “Разрешить вход в систему через службу удаленных рабочих столов”
Чтобы разрешить доменному пользователю или группе удаленное RDP подключение к Windows, необходимо предоставить ему право SeRemoteInteractiveLogonRight. Вы можете предоставить это полномочие с помощью политики Allow log on through Remote Desktop Services (Разрешить вход в систему через службу удаленных рабочих столов).
В Windows Server 2003 и ранее политика называется Allow log on through terminal services.
Чтобы разрешить RDP подключение к DC членам группы SPB-Server-Admin, нужно изменить настройку этой политики на контроллере домена:
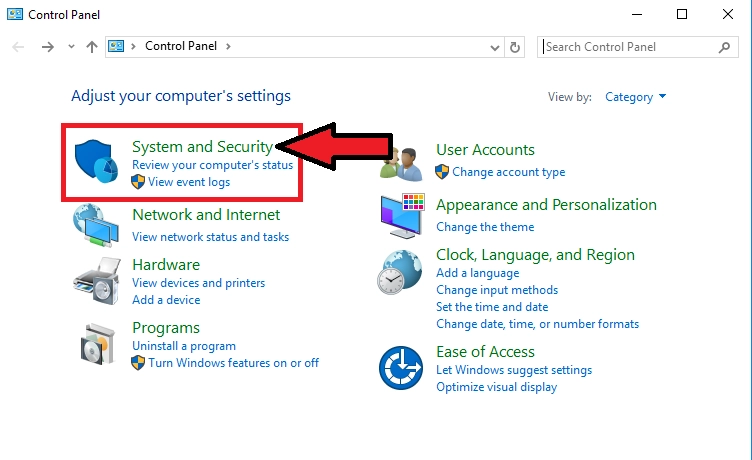
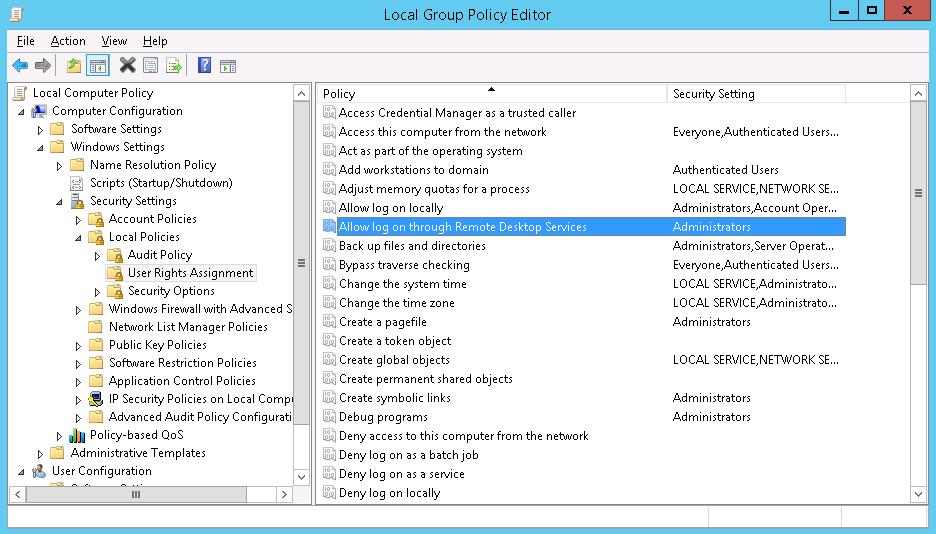
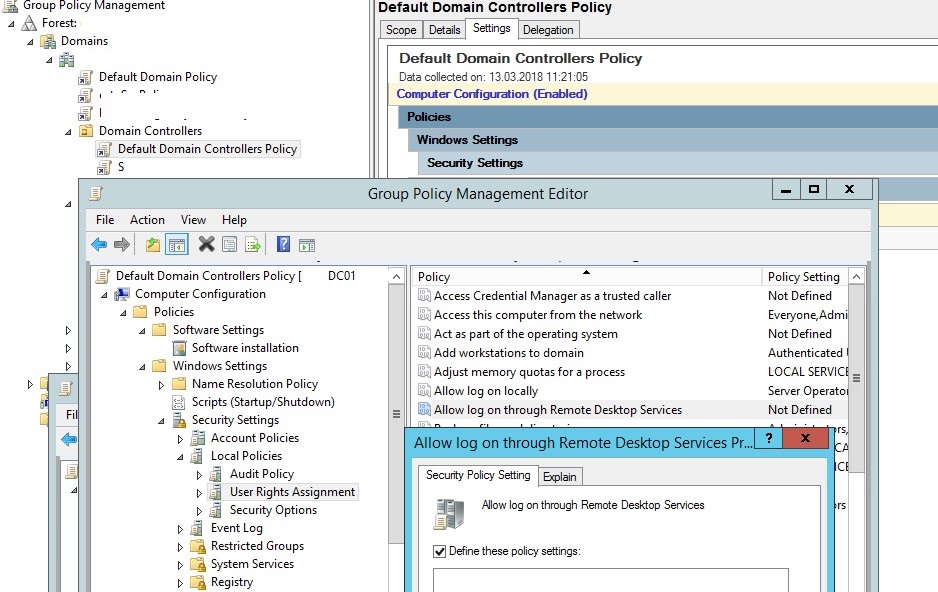
- Запустите редактор локальной политики ( gpedit.msc );
- Перейдите в раздел Computer Configuration -> Windows settings -> Security Settings -> Local policies -> User Rights Assignment;
- Найдите политику с именем Allow log on through Remote Desktop Services (Разрешить вход в систему через службу удаленных рабочих столов);
После повышения роли сервера до DC в этой локальной политике остается только группа Administrators (это администраторы домена).
- Отредактируйте политику, добавьте в нее непосредственно доменного пользователя или группу (в формате domain\somegroupname);

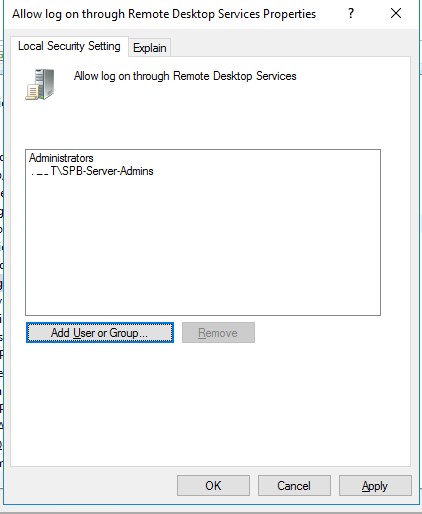
- Обновите настройки групповых политик командой:
gpupdate /force
Обратите внимание, что группа, которую вы добавили в политику Allow log on through Remote Desktop Services, не должны присутствовать в политике “Deny log on through Remote Desktop Services”, т.к. она имеет приоритет. Также, если вы ограничиваете список компьютеров, на которые могут логиниться пользователи, нужно добавить имя сервера в свойствах учетной записи в AD (поле Log on to в атрибуте LogonWorkstations).
Примечание. Чтобы разрешить пользователю локальный вход на DC (через консоль сервера), его учетную запись или группу, нужно добавить также в политику Allow log on locally. По умолчанию это право есть у следующих доменных групп:
- Account Operators
- Administrators
- Backup Operators
- Print Operators
- Server Operators.
Если это не сделать, при входе появится ошибка Этот метод входа запрещено использовать.
Для удобства вы можете создать в домене новую группу безопасности, например, AllowDCLogin. Затем нужно добавить в нее учетные записи пользователей, которым нужно разрешить удаленный доступ к DC. Если нужно разрешить доступ сразу на все контроллеры домена AD, вместо редактирования локальной политики на каждом DC, лучше через консоль управления доменными политиками ( GPMC.msc ) добавить группу пользователей в доменную политику Default Domain Controllers Policy (политика Allow log on through Remote Desktop Services находится в разделе Computer Configuration\Windows Settings\Security Settings\Local Policies\User Rights Assignment).
Важно. Если вы изменяете доменную политику, не забудьте добавить в нее группы администраторов домена/предприятия, иначе они потеряют удаленный доступ к контроллерам домена.
Теперь пользователи, которых вы добавили в политику, смогут подключаться к рабочему столу контроллеру домена по RDP.
Доступ к требуемому сеансу RDP отклонен
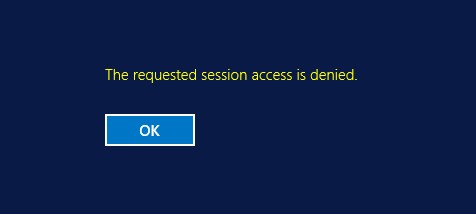
В нескорых случаях при подключении по RDP к контроллеру домена, вы можете получить ошибку:
The requested session access is denied
Доступ к требуемому сеансу отклонен
Если вы подключаетесь к DC под неадминистративной учетной записью, это может быть связано с двумя проблемами:
- Вы пытаетесь подключиться к консоли сервера (с помощью mstsc /admin ). Такой режим подключения разрешен только пользователям с правами администратора сервера. Попробуйте подключиться к серверу в обычном режиме (без параметра /admin );
- Возможно на сервере уже есть две активные RDP сессии (по умолчанию к Windows Server без службы RDS можно одновременно подключиться не более чем двумя RDP сеансами). Список активных сессий на удалённом компьютере и залогиненых пользователей можно вывести так:
qwinsta /server:dc01
Без прав администратора вы не сможете завершить сессии других пользователей. Нужно дождаться, пока администраторы освободят или завершат одну из сессий; - На хосте Windows Server включен режим Restricted Admin или Windows Defender Remote Credential Guard