
In this post I want to show how easily you can set up an NFS server in Windows Server 2022 (2012 and later). Further we will see how Windows Server can also connect to UNIX or Linux NFS shares that allows anonymous access by installing the Client for NFS on Windows Server.
Network File System (NFS) provides a file sharing solution that lets you transfer files between computers running Windows Server and UNIX or Linux operating systems by using the NFS protocol.
NFS itself is a network file sharing protocol such as SMB or AFP that provides access to files over a network, but finally all of them depending on an underlying local file system to store and manage the files physically like the ext3, ext4, XFS, Btrfs, ZFS or NTFS as in this post on a Windows NFS Server.
NFS in Windows Server includes Server for NFS and Client for NFS. A computer running Windows Server can use Server for NFS to act as an NFS file server for other non-Windows client computers.
Client for NFS allows a Windows-based computer running Windows Server to access files stored on a non-Windows NFS server.
When a file share is configured, it’s shared with both the SMB and NFS protocols. Windows users access their files over the SMB protocol, and users on UNIX-based computers typically access their files over the NFS protocol.
For this scenario, you must have a valid identity mapping source configuration. Windows Server supports the following identity mapping stores:
Mapping File, Active Directory Domain Services (AD DS), RFC 2307-compliant LDAP stores such as Active Directory Lightweight Directory Services (AD LDS), User Name Mapping (UNM) server.
Source: https://learn.microsoft.com/en-us/windows-server/storage/nfs/nfs-overview
About how to set up an NFS Server on SUSE Linux Enterprise Server 15, you can read my following post.
- Introduction to the Network File System (NFS)
- Introduction to CIFS (Common Internet File System) and SMB (Server Message Block)
- Running NFS behind a Firwall
- Install and set up Server for NFS
- Using PowerShell to install Server for NFS
- Add new Shares
- Using PowerShell to add new Shares
- Install and set up Client for NFS
- Mount NFS Network Shares on Windows
- Mount NFS Network Shares on UNIX or Linux operating systems
- Mount NFS Network Shares by default by using /etc/fstab
- Troubleshooting
- mount Network Error – 53
- NFS version 4.1
- Links
Network File System (NFS) is a distributed file system protocol allowing a user on a client computer to access files over a network as if they were on the local machine. NFS servers facilitate this process by managing the shared directories and files, making them accessible to client systems within the network.
An NFS server essentially acts as a centralized storage repository, allowing multiple client machines to access and manipulate files stored on it. It simplifies file sharing and collaboration within networks, enabling users to seamlessly access resources regardless of their physical location or operating system.
Key features of NFS servers include robust security mechanisms to control access to shared files, efficient data transfer protocols to optimize performance, and scalability to accommodate growing storage needs within organizations.
SMB, or Server Message Block, is a network protocol working at the application layer of the OSI communications model. SMB is used for providing shared access to resources over the network. The SMB protocol is widely used to share files on file servers, share files between user computers, and copy files between computers.
In addition to manipulating files, the other use case for SMB is messaging and printing (general purpose remote transactions), as well as browsing computers in the network. IBM developed SMB in 1983, and since then the protocol has been improved multiple times.
SMB file shares are directories on a remote host that are made available via the SMB protocol. They are configured on file servers, and read and write access can be configured to these shares. One file server can have multiple SMB shares.
The SMB protocol can work:
CIFS, or Common Internet File System, is a particular implementation or dialect of SMB developed by Microsoft in 1996 following the Windows 95 release. A dialect is a version and not a separate independent protocol. A dialect is a set of message packets sent/received for communicating between hosts that defines a particular protocol version. CIFS is not a file system, unlike the name suggests.
The CIFS protocol specification is based on the original SMB protocol but with some additional features added by Microsoft. Microsoft implemented direct connections via TCP and port 445 without using NetBIOS over TCP (which was used on the first SMB 1 implementations). CIFS is an implementation of SMB 1 and not a separate file-sharing protocol.
When we are talking about the SMB1 implementation by Microsoft, we can use the CIFS term. In all other cases, and in general, SMB is the correct term to refer to this network protocol.
Source: https://www.nakivo.com/blog/cifs-vs-smb/
SMB 2 was introduced in Windows Vista in 2006 and SMB 3 in Windows 8 and Windows Server 2012. The latest version as of today is SMB 3.1.1 and was introduced with Windows 10 and Windows Server 2016.
In Windows Server 2019 and later, the SMB 1.0/CIFS protocol is disabled by default.
On Windows Server 2012 R2 and Windows Server 2016 the SMB 1.0/CIFS protocol is enabled by default.
More about SMB and CIFS you will also find in the following article by NAKIVO https://www.nakivo.com/blog/cifs-vs-smb/.
By default the NFS server is listening on TCP/UDP port 2049 for incoming connection requests. Further you should allow TCP/UDP port 111 for RPC binding.
NFS and portmap
NFS relies upon remote procedure calls (RPC) to function. portmap is required to map RPC requests to the correct services. RPC processes notify portmap when they start, revealing the port number they are monitoring and the RPC program numbers they expect to serve. The client system then contacts portmap on the server with a particular RPC program number. portmap then redirects the client to the proper port number to communicate with its intended service.Source: https://mirror.apps.cam.ac.uk/pub/doc/redhat/redhat7.3/rhl-rg-en-7.3/ch-nfs.html
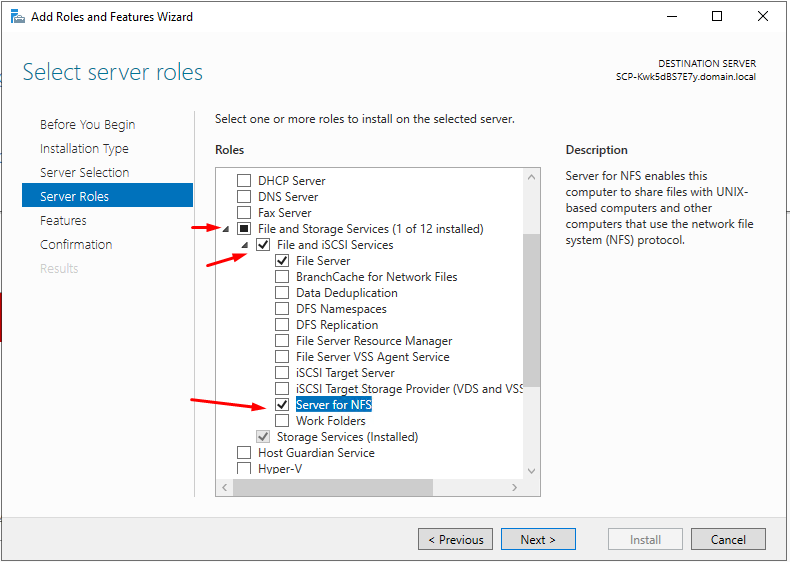
To set up an NFS server on Windows Server we first need to install the Server for NFS server role.
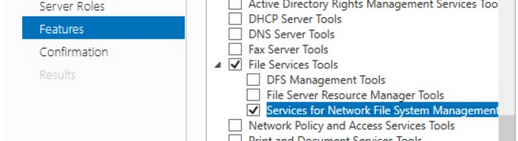
Under server roles expand File and Storage Services -> File and iSCSI Services and select the Server for NFS role. This will also add the File Server role and the Services for Network File System Management Tools feature as shown below.
File Server role -> File Server manages shared folders and enables users to access files on this computer from the network.
Services for Network File System Management Tools -> Includes the Network File System snap-in and the nfsadmin showmount, and rpcinfo commands.
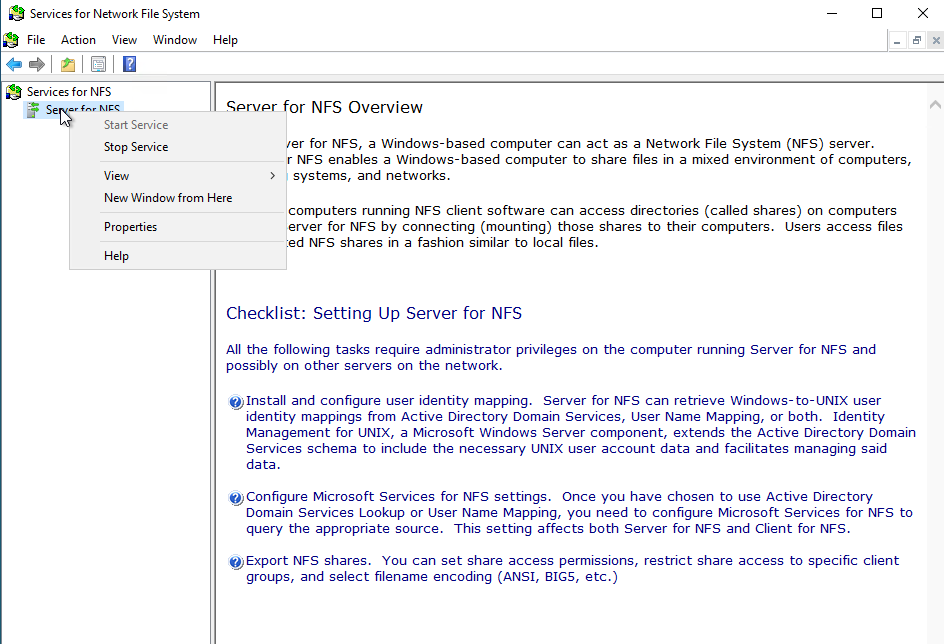
Below you will find from now on the NFS server also in the services console.
Using PowerShell to install Server for NFS
You can also use PowerShell to install the server roles and features by using the following commands.
Import-Module ServerManager
Add-WindowsFeature FS-NFS-Service
Import-Module NFS
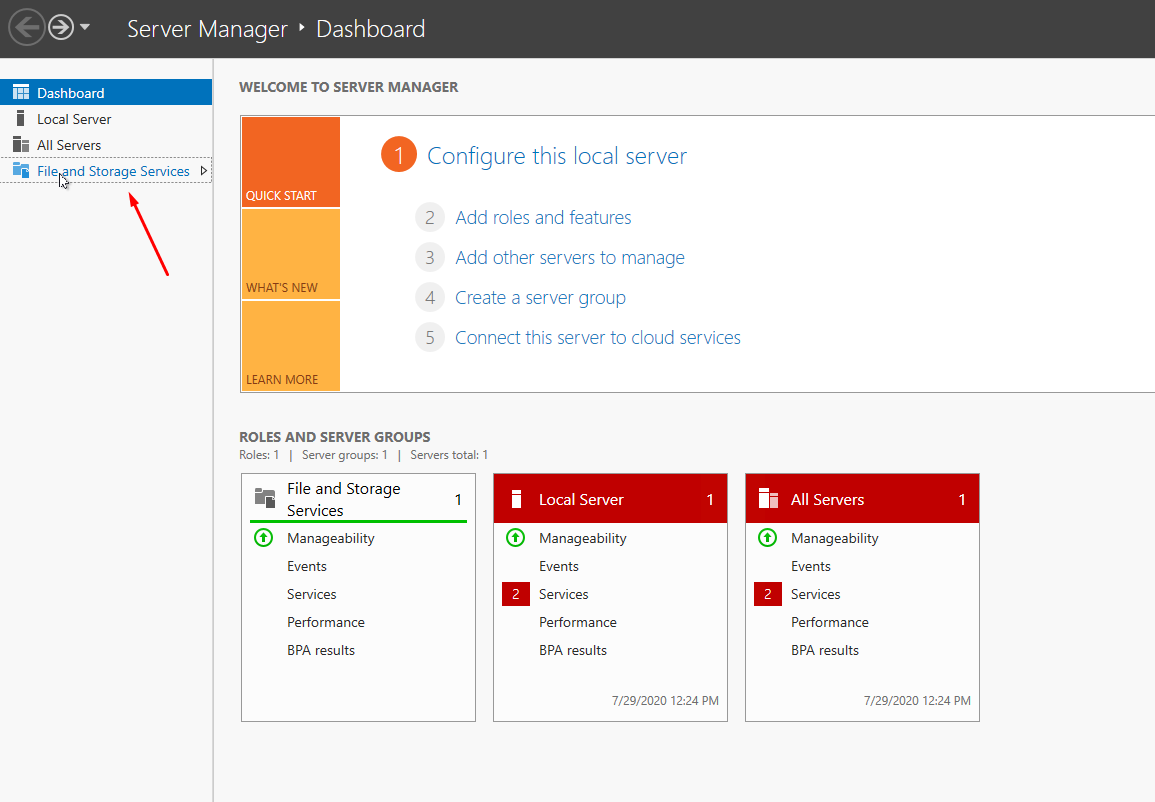
We can now add new shares on the NFS server by using the Server Manager from Windows Server as shown below.
Sharing directories or files is in UNIX NFS terminology is called exporting directories or files. To mount these shares on an NFS client later is then called importing the file system.
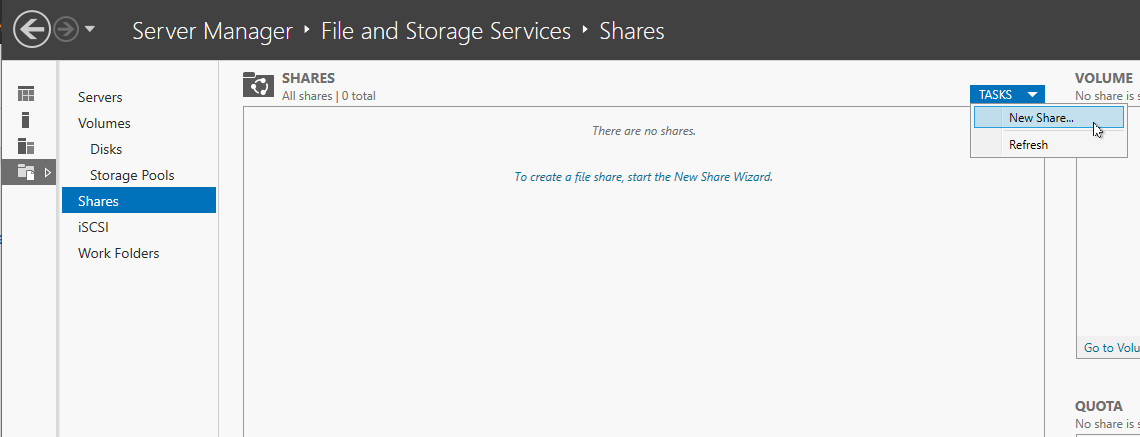
Select File and Storage Services -> Shares -> TASKS and click on New Share …
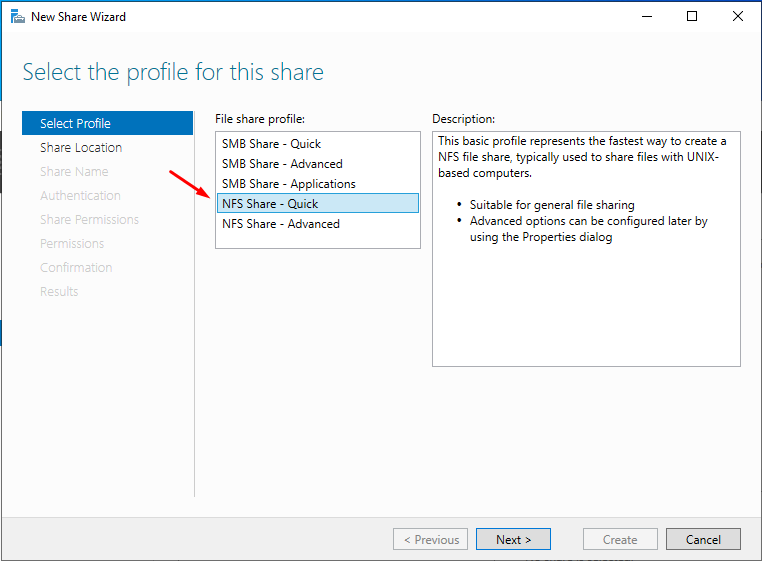
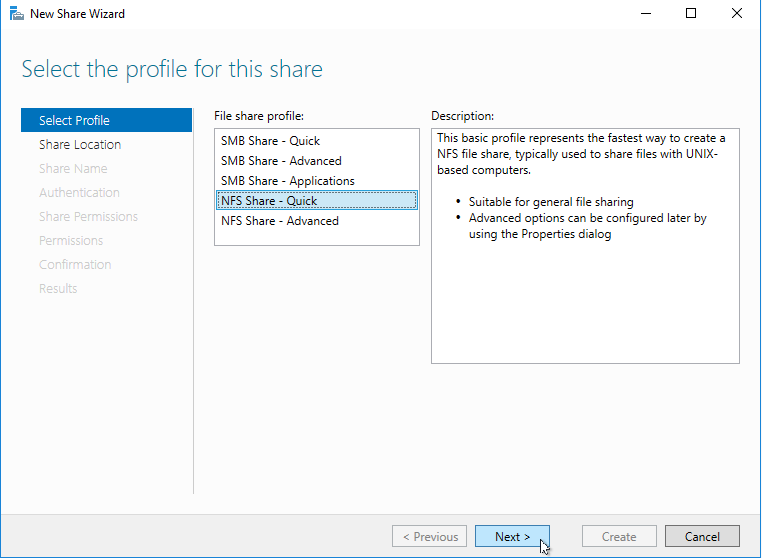
Select either NFS Share – Quick or NFS Share – Advanced, then select Next.
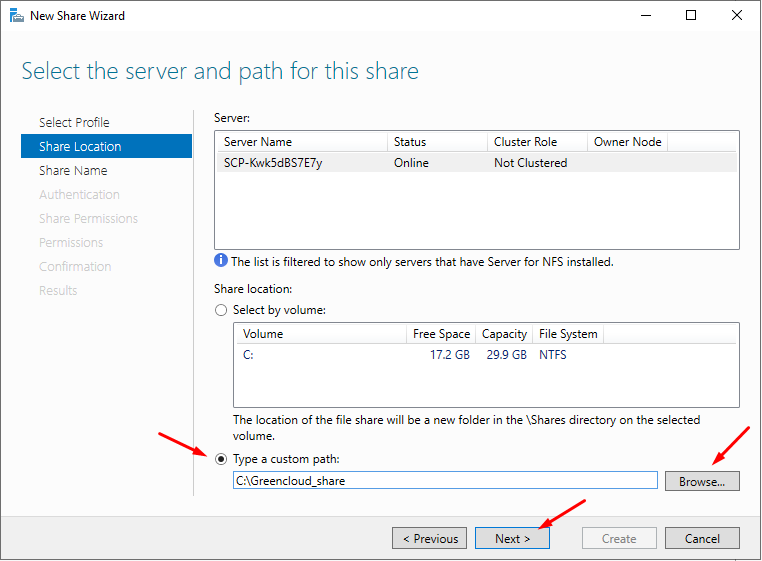
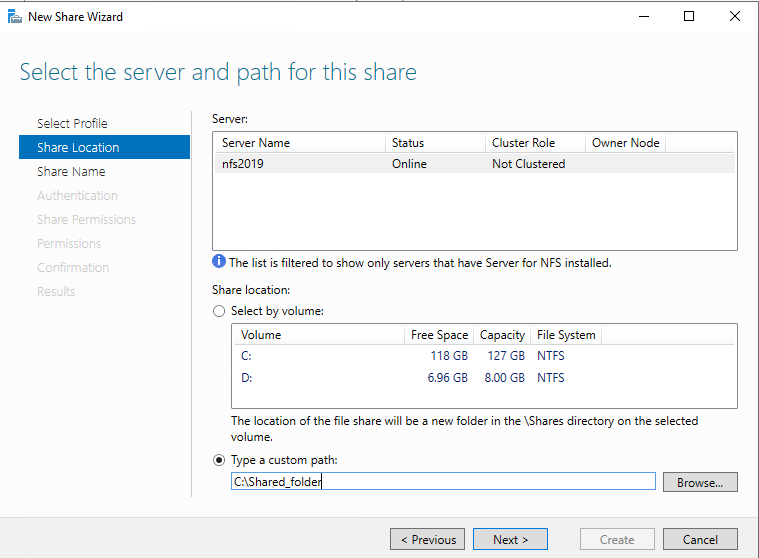
On the Share Location page, select a server and a volume, then select Next.
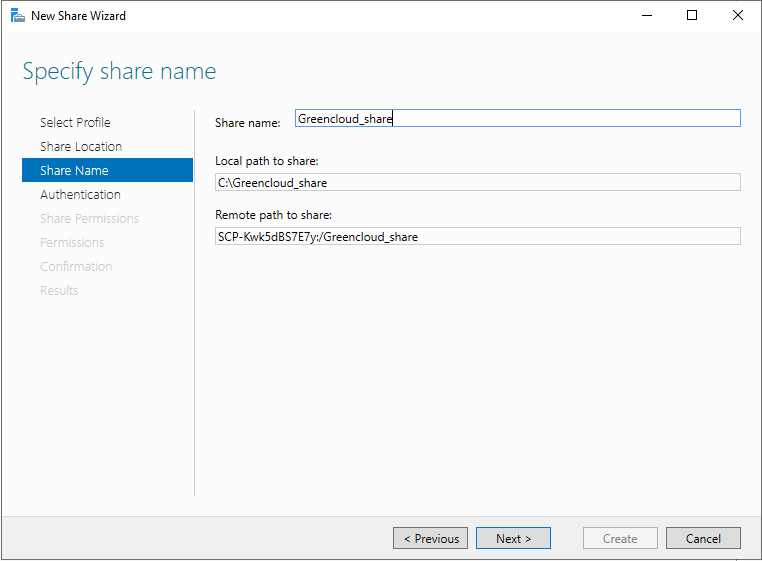
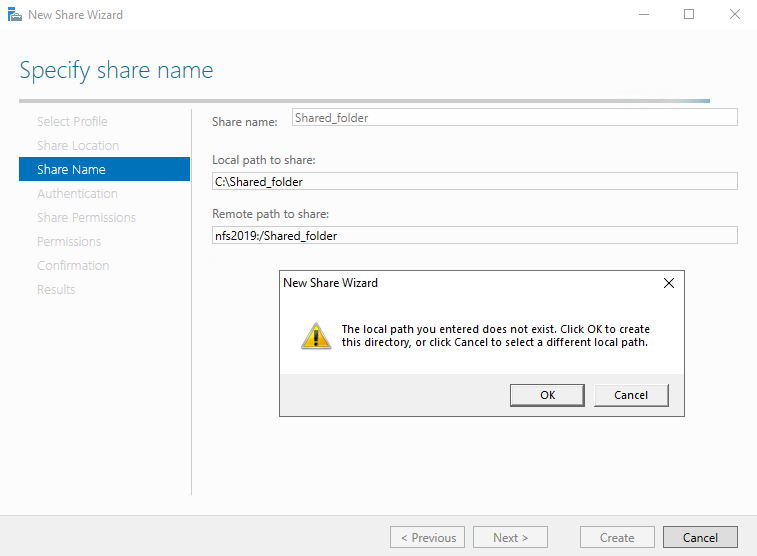
On the Share Name page, enter a name for the new share, then select Next.
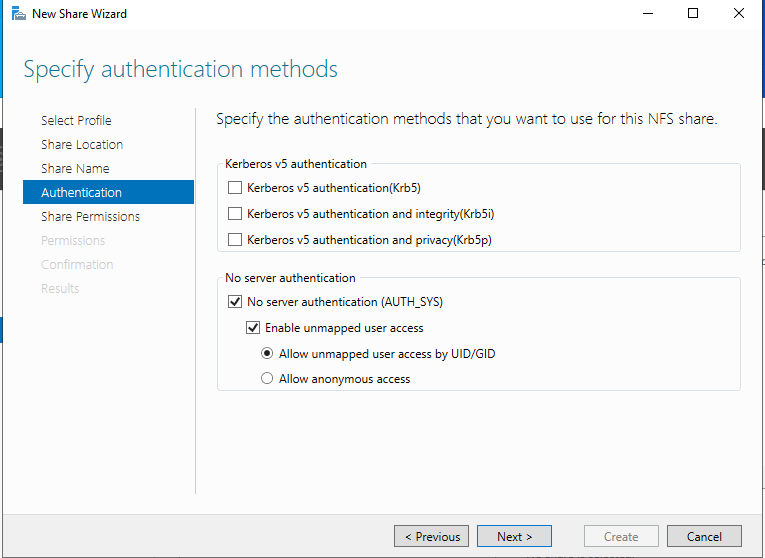
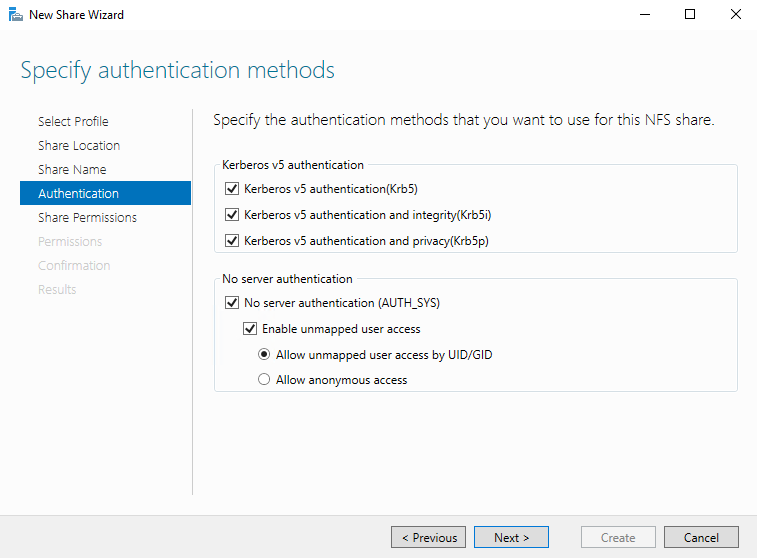
On the Authentication page, specify the authentication method you want to use, then select Next.
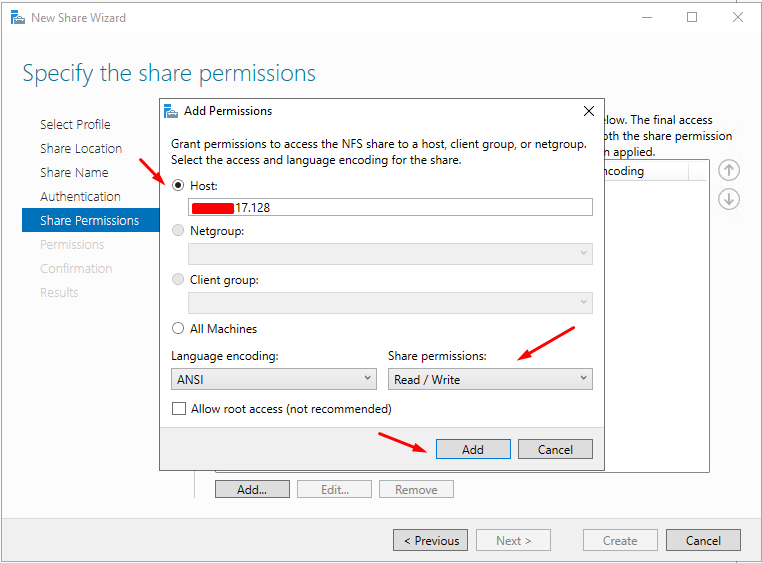
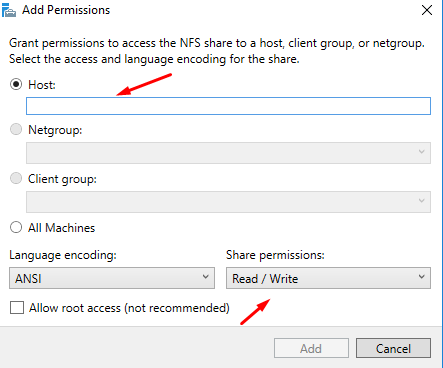
On the Share Permissions page, select Add. The Add Permissions dialog opens. Choose the level of user permissions to grant: Host, Netgroup, Client group, or All Machines.
The share permissions we can later also check by using PowerShell.
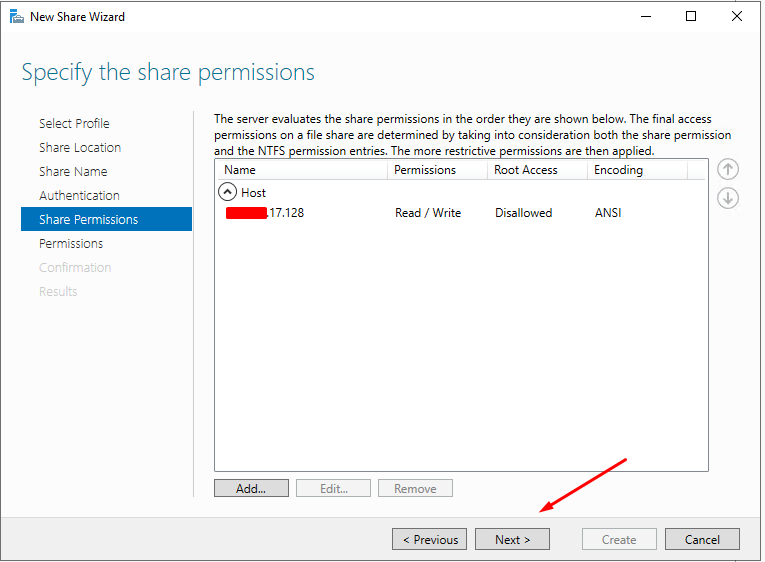
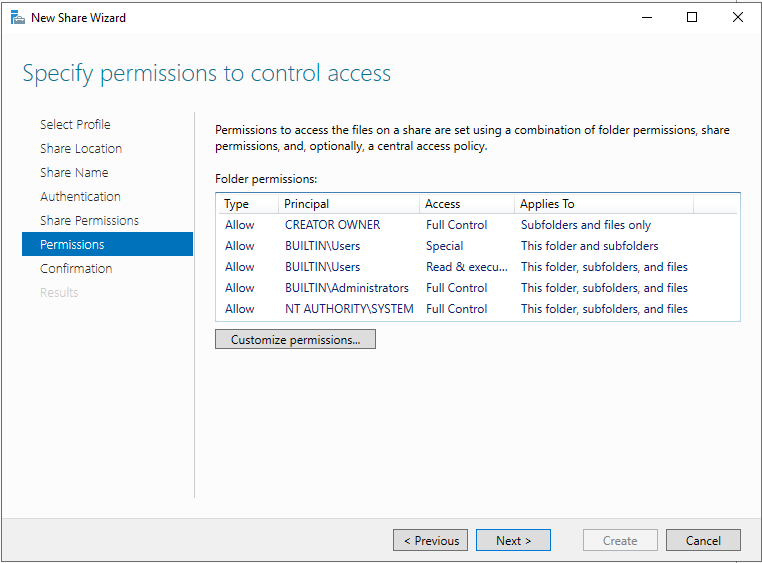
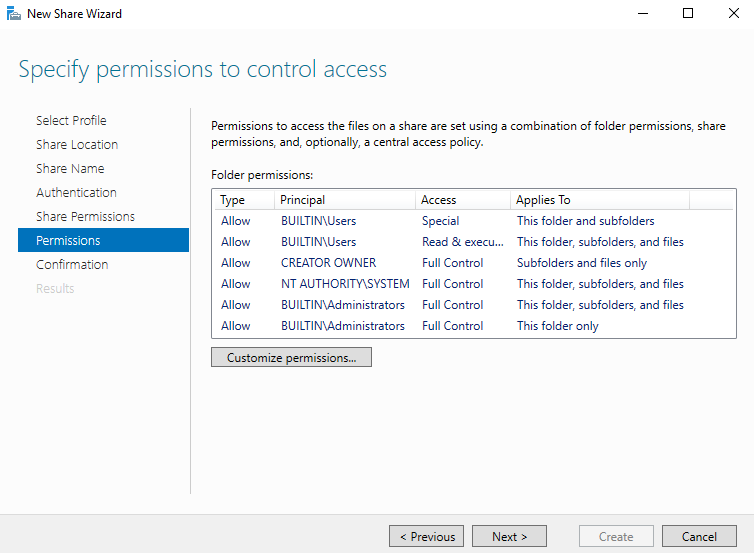
On the Permissions page, configure access control for your selected users. When you’re ready, select Next.
We also need to configure the NTFS permissions for Windows clients, here the more restrictive permissions between the Share permissions and NTFS permissions wins finally.
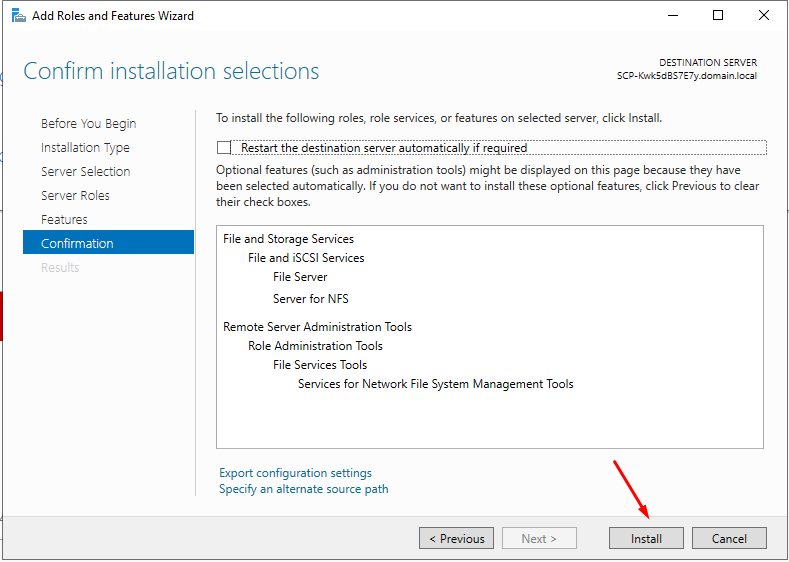
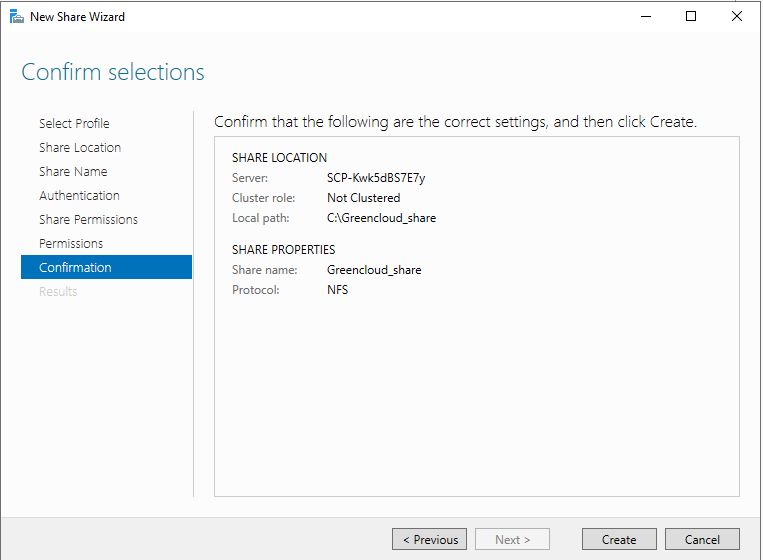
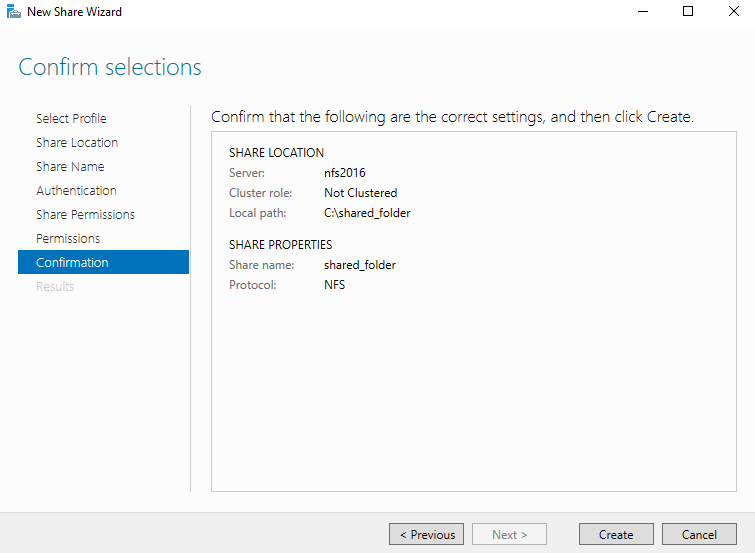
On the Confirmation page, review your configuration, and select Create to create the NFS file share.
We can also any time change the settings for the share by right clicking on and select Properties as shown below.
Using PowerShell to add new Shares
The following Windows PowerShell cmdlet can also create an NFS file share (where nfs1 is the name of the share and C:\shares\nfsfolder is the file path):
New-NfsShare -Name nfs1 -Path C:sharesnfsfolder
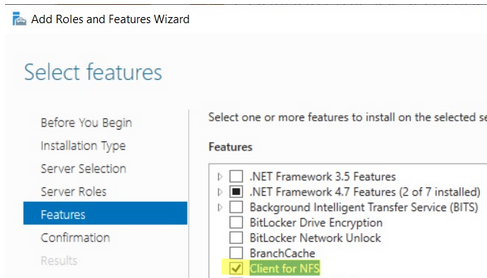
In order that Windows operating systems are able to connect to an NFS server, we first need to install the Client for NFS.
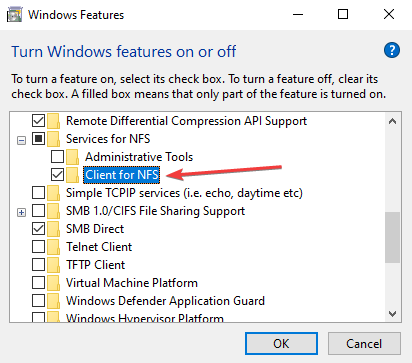
Select the Client for NFS feature as shown below.
Client for NFS enables this computer to access files on UNIX-based NFS servers. When installed, you can configure a computer to connect to UNIX NFS shares that allow anonymous access.
In order to mount Network File System (NFS) network shares on Windows we can either use the mount command-line utility or we can also just map the share by using its UNC path like for normal SMB shares.
The mount utility is available only if Client for NFS is installed.
To install the Client for NFS on Windows Server you can use either the PowerShell or the Server Manager.
By using the Server Manager check the Client for NFS feature.
By using PowerShell enter the following command.
PS C:> Install-WindowsFeature -Name NFS-Client
To install the Client for NFS on Windows 10 or 11 you can use also either the PowerShell or the Control Panel and Windows Features wizard.
By using the Windows Features wizard check the Client for NFS feature.
By using PowerShell enter the following command.
PS C:> Enable-WindowsOptionalFeature -FeatureName ServicesForNFS-ClientOnly, ClientForNFS-Infrastructure -Online -NoRestart
To mount a Network File System (NFS) network share execute the following command.
> mount \\ServerIP\ShareName Z:
> mount \\braincloud07.braincourt.de\NFS-Share N:
Source: https://learn.microsoft.com/en-us/windows-server/administration/windows-commands/mount
As mentioned we can also just map the share like for SMB shares by using its UNC path as shown below.
On UNIX or Linux operating systems we will also use the mount command which is here by default available and one of the essential commands.
Below I first created a new directory named NFS to mount the shares from the remote NFS server in.
sudo mount -t nfs <hostname/FQDN or IP address>:/<nfs Share> /<target folder mountpoint>
sudo mount -t nfs 192.168.195.42:/NFS-Share /NFS-t limit the set of filesystem types and here set to nfs
Mount NFS Network Shares by default by using /etc/fstab
In order to not have every time to mount the NFS share by hand, we can add the following entry in the /etc/fstab to mount it always when the system is booting.
x-systemd.mount-timeout= : option to specify how long systemd should wait for the mount command to finish
x-systemd.automount : option to be mounted only upon access
_netdev : option ensures systemd understands that the mount is network dependent and order it after the network is online.Device: usually the given name or UUID of the mounted device (sda1/sda2/etc)
Mount Point: designates the directory where the device is/will be mounted
File System Type: nothing trick here, shows the type of filesystem in use
Options: lists any active mount options. If using multiple options they must be separated by commas
Backup Operation: (the first digit) this is a binary system where 1 = dump utility backup of a partition. 0 = no backup. This is an outdated backup method and should NOT be used.
File System Check Order: (second digit) Here we can see three possible outcomes. 0 means that fsck will not check the filesystem. Numbers higher than this represent the check order. The root filesystem should be set to 1 and other partitions set to 2.Source: https://www.redhat.com/sysadmin/etc-fstab
In order to unmount the NFS share we can use:
sudo umount 192.168.195.42:/NFS-Share
mount Network Error – 53
When trying to mount a remote NFS share the Network Error – 53 appears.
A common error here is that the permissions on the NFS server are not set correctly. In my case for demonstration purpose I want to allow read/write access on the root. Before the permissions were set to No Access and therefore on the clients the Network Error -53 was appearing when trying to mount the share.
After switching above the permissions to Read / Write, I was able to mount the share from a different server.
By just enter mount all NFS remote shares will be listed.
NFS version 4.1
NFS version 4.1 allows the file names to be created or copied with illegal characters. If you attempt to open the files with vi editor, it shows the files as being corrupt. You can’t save the file from vi, rename, move it, or change permissions. So avoid using illegal characters.
Source: https://learn.microsoft.com/en-us/windows-server/storage/nfs/deploy-nfs#known-issue
Network File System (NFS)
https://en.wikipedia.org/wiki/Network_File_SystemNetwork File System overview
https://learn.microsoft.com/en-us/windows-server/storage/nfs/nfs-overviewDeploy Network File System
https://learn.microsoft.com/en-us/windows-server/storage/nfs/deploy-nfsmount
https://learn.microsoft.com/en-us/windows-server/administration/windows-commands/mountNFS Server and File Permissions
https://learn.microsoft.com/en-us/troubleshoot/windows-server/networking/nfs-server-file-permissions
Estimated reading: 3 minutes
442 views
In this guide, we are going to install and configure NFS Server and create NFS Share. This is an efficient way to share a directory with other client machines in your organization. You can use it as a central repository that can be mounted to clients and hence be able to access similar files as though they were part of the system.
Follow the steps shown in this post to install and configure the NFS Server in your Windows Server 2022. If you encounter any issues don’t hesitate to contact us in the comments section.
Install NFS Server
Install NFS Server to share files and folders. There are 2 ways:
Method 1: Run PowerShell with Admin Privilege and Install NFS Server
You can run the following command on Powershell.
Install-WindowsFeature FS-NFS-Service -IncludeManagementTools
Method 2: Using GUI
Step 1: Open Server Manager
Hit the “Windows” key and search for “Server Manager“. Once open, click on “Add Roles and Features“
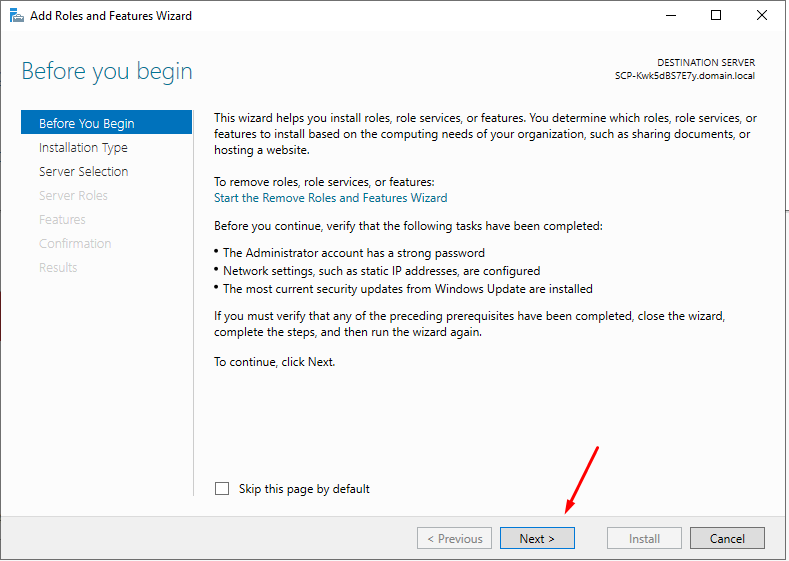
Step 2: Click Next on Wizard
On the first page of the “Add Roles and Features Wizard“, click “Next“
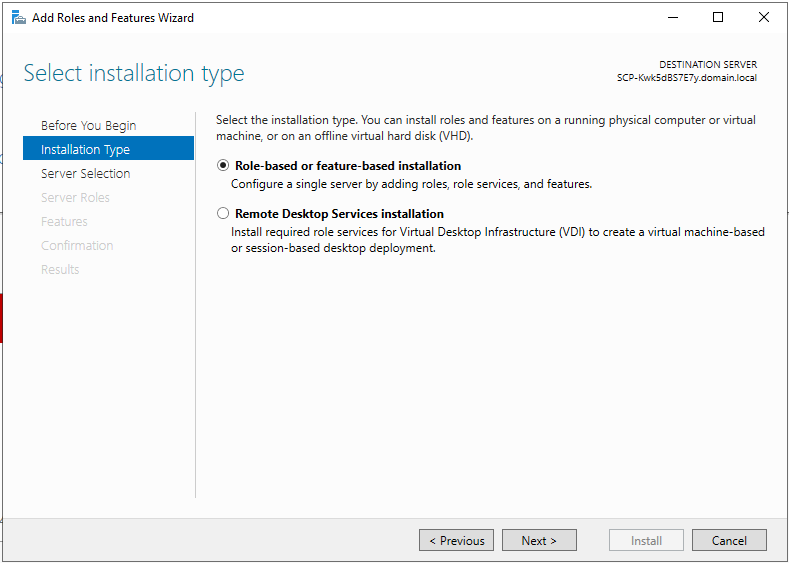
Step 3: Role-Based
In the “Select Installation type page“, select “Role-based or feature-based-installation” and click “Next“
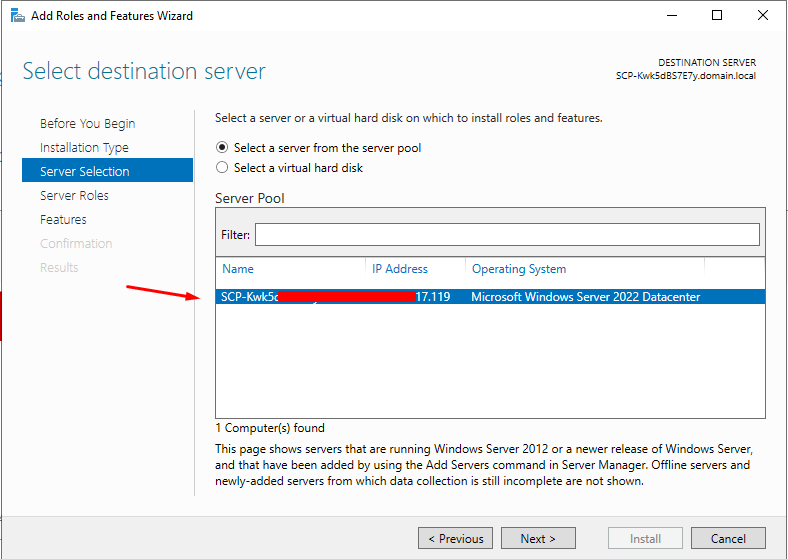
Step 4: Choose Server
Select the server you will install NFS on and click “Next“.
Step 5: Select Role
In this “Select server roles” part, expand “File and Storage Services” and further expand “File and iSCSI Services” then check the box against “Server for NFS“. A pop-up window will come forth.
Step 6: Add Features
In the pop-up window, click “Add Features” and hit “Next“.
Step 7: Features
In this “Select features” page, simply click on “Next“.

Step 8: Confirm and Install
Confirm your installation selections and hit “Install“. Let’s finish installing then click “Close” and you will have finished the installation process.
Configure NFS Server
Step 1: Configure NFS Share Folder
We are now going to configure a folder that we shall export to clients. Create a directory/folder in your desired disk partition. I will create TestShare in the C partition.
Head over to “Server Manager“. Click “File and Storage Services” and select Shares from the expanded menu. After that, click on the “TASKS” drop-down menu and select “New Share…“. A “New Share Wizard” will open.
Step 2: Select profile
On the first page of the wizard, select “NFS Share-Quick” and Click “Next” as shown below.
Step 3: Select the Share Folder
On this page, choose “Type a custom path“, browse for your directory, and click “Next“
Step 4: Name your Share
Type in a name for your share and hit “Next“
Step 5: Specify authentication methods
Depending on the authentication methods that your organization uses, you have a choice to make at this stage. Choose the one that befits your use case and hit “Next“.
Step 6: Choose Hosts to Access the Share
Click on “Add” in the window below and you now have many options to choose the hosts to access the share. You can place only one host, a Netgroup, a Client group, or all servers that can reach it. Make your choice and click on “Next“
Step 7: Specify Permissions
You can tweak the permissions to befit your scenario here. Once done, click “Next“.
Step 8: Confirm your selections and click Create
Step 9: Finish
Once done creating, click “Close“

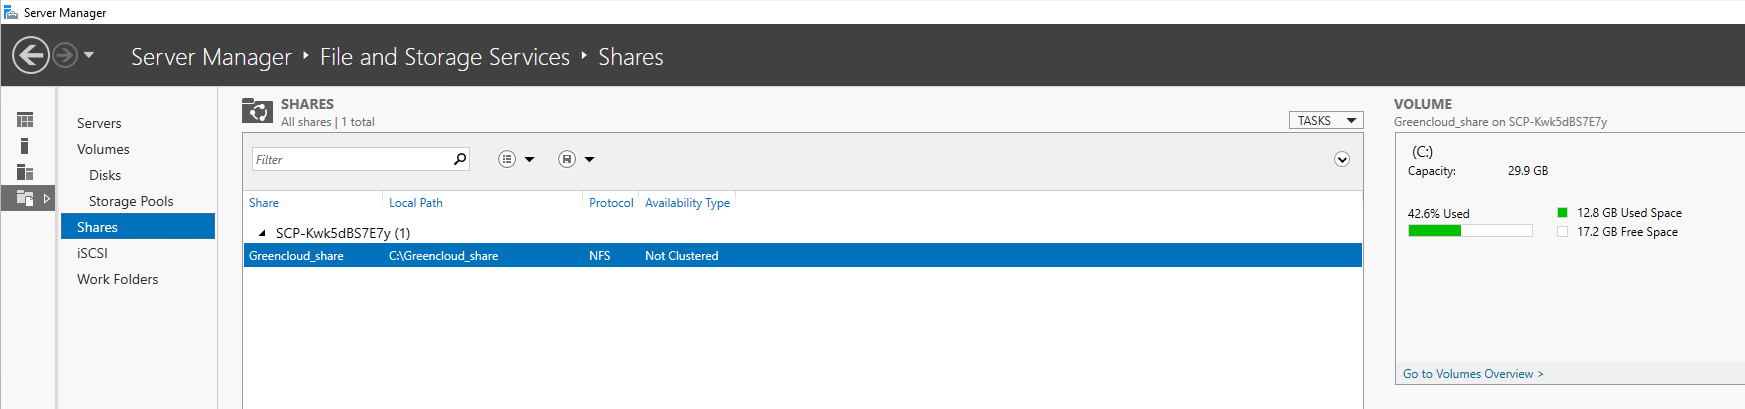
Step 10: Confirm your share is created
Go back to “Server Manager” > “File and Storage Services” > “Shares“
Conclusion
We have successfully installed the Server and created a share. Next, we are going to install an NFS Client and connect to our created NFS Share.
Network File System, or NFS, is a server-client protocol used for sharing files between computers on a network. In order for NFS to work, a server must first be configured to export a directory, and a client must be configured to mount that directory. This document will cover how to configure a Windows Server 2022 machine to export an NFS directory, and how to configure a Windows 10 machine to mount that directory.
Before starting, make sure that the following prerequisites have been met:
• The server and client machines must be on the same network.
• The server must have the NFS Server role installed. This can be done through Server Manager > Add Roles and Features.
• The client must have the NFS Client role installed. This can be done through Control Panel > Programs and Features > Turn Windows features on or off.
Configuring the Server
1. Open the Server Manager console and select the File and Storage Services role.
2. Under the Shares heading, select the Shares option.
3. Click the Tasks drop-down menu and select New Share.
4. Select the NFS Share – Quick Wizard option and click Next.
5. Select the folder that you wish to share and click Next.
6. Select the desired permissions for the share and click Next.
7. Click Next again on the Confirmation page.
8. Click Create.
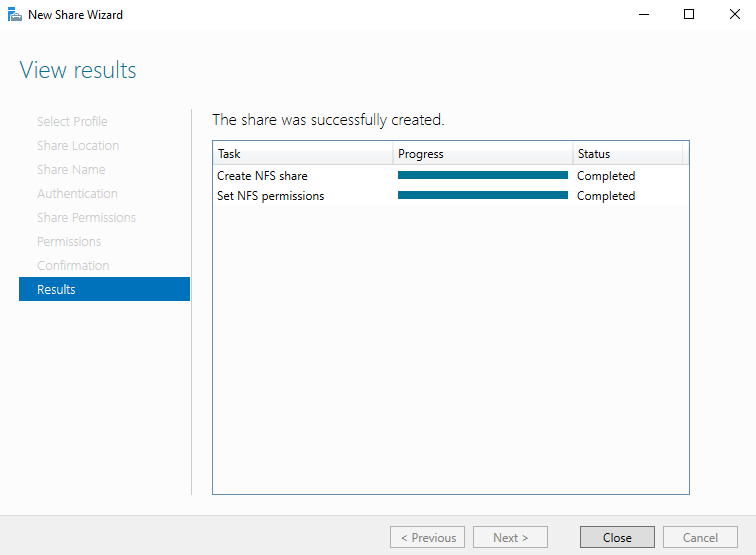
Your NFS share should now be created and accessible to clients.
Configuring the Client
1. Open the Control Panel and select Network and Sharing Center.
2. Click Change advanced sharing settings.
3. Expand the section for the network profile that you are currently using.
4. Select the Turn on network discovery and Turn on file and printer sharing options.
5. Click Save changes.
6. Open a command prompt and type the following command:
mount -o anon \ :
For example, if the server’s IP address is 192.168.1.100 and the shared folder is called share, the command would be:
mount -o anon \192.168.1.100share Z:
Replace with the drive letter that you wish to use for the mount point. In this example, we are using Z:
7. You should now be able to access the shared folder from Windows Explorer.
Network File System (NFS) is a distributed file system protocol that allows a computer to access files over a network as if they were on its local storage devices. NFS was originally developed by Sun Microsystems in the early 1980s.
NFS allows a server to share a directory with a client, and the client can access the files in that directory as if they were stored locally. NFS uses the Remote Procedure Call (RPC) protocol to communicate between the server and the client.
NFS can be used to share files between computers running Windows and other operating systems, such as Linux or UNIX. In order to use NFS, you must first install and configure a Windows NFS server.
Installing an NFS Server
To install an NFS server on Windows Server 2022, you can use either the Server Manager graphical user interface (GUI) or the PowerShell command-line interface (CLI).
To install an NFS server using the Server Manager GUI:
1. Open the Server Manager console.
2. In the left-hand pane, click on “Manage” and then select “Add Roles and Features”.
3. On the “Before you begin” page, click “Next”.
4. On the “Select installation type” page, select “Role-based or feature-based installation” and click “Next”.
5. On the “Select destination server” page, select the server on which you want to install the NFS server role and click “Next”.
6. On the “Select server roles” page, check the box next to “File and Storage Services” and click “Next”.
7. On the “Select features” page, check the box next to “NFS Server” and click “Next”.
8. On the “Confirm installation selections” page, click “Install”.
9. On the “Installation progress” page, you can track the progress of the installation. Once the installation is complete, click “Close”.
Configuring an NFS Server
Once the NFS server role has been installed, you can begin configuring it. To configure an NFS server using the Server Manager GUI:
1. Open the Server Manager console.
2. In the left-hand pane, click on “File and Storage Services”.
3. In the main pane, click on “Shares”.
4. In the Tasks pane, click on “New Share”.
5. On the “Select the profile for this share” page, select “NFS Share – Quick” and click “Next”.
6. On the “Select the server and path for this share” page, select the server on which you want to create the share and specify the path to the directory that you want to share. Click “Next”.
7. On the “Specify share name” page, enter a name for the share and click “Next”.
8. On the “Configure share settings” page, you can optionally change the share permissions. By default, the share will be accessible to all users. Click “Next”.
9. On the “Specify NFS permissions” page, you can configure the NFS permissions for the share. By default, the share will be accessible to all users. Click “Next”.
10. On the “Specify NFS client” page, you can specify which clients will be able to access the share. By default, the share will be accessible to all clients. Click “Next”.
11. On the “Confirm selections” page, review your selections and click “Create”.
12. On the “Results” page, click “Close”.
Configuring NFS Client
In order to access an NFS share, you must first install and configure an NFS client. To install an NFS client on Windows Server 2022, you can use either the Server Manager GUI or the PowerShell CLI.
To install an NFS client using the Server Manager GUI:
1. Open the Server Manager console.
2. In the left-hand pane, click on “Manage” and then select “Add Roles and Features”.
3. On the “Before you begin” page, click “Next”.
4. On the “Select installation type” page, select “Role-based or feature-based installation” and click “Next”.
5. On the “Select destination server” page, select the server on which you want to install the NFS client role and click “Next”.
6. On the “Select server roles” page, check the box next to “File and Storage Services” and click “Next”.
7. On the “Select features” page, check the box next to “NFS Client” and click “Next”.
8. On the “Confirm installation selections” page, click “Install”.
9. On the “Installation progress” page, you can track the progress of the installation. Once the installation is complete, click “Close”.
10. On the “Results” page, click “Close”.
To install an NFS client using the PowerShell CLI:
1. Open a PowerShell console with elevated privileges.
2. Run the following command to install the NFS client role:
Install-WindowsFeature -Name FS-NFS-Client
3. Press “Y” when prompted to confirm the installation.
Once the NFS client role has been installed, you can begin configuring it. To configure an NFS client using the Server Manager GUI:
1. Open the Server Manager console.
2. In the left-hand pane, click on “File and Storage Services”.
3. In the main pane, click on “Shares”.
4. In the Tasks pane, click on “Mount NFS Share”.
5. On the “Specify Network File System Share” page, enter the UNC path to the NFS share that you want to mount. Click “Next”.
6. On the “Confirm selections” page, review your selections and click “Mount”.
7. On the “Results” page, click “Close”.
Network File System (NFS) клиент по умолчанию не установлен в Windows Server 2022/2019/2016 и десяточных версиях Windows 11/10. Для его установки запустите Server Manager, выберите Add Roles and Features -> Client for NFS.
Если вы хотите установить графические консоли управления NFS (nfsmgmt.msc), выберите дополнительно Services for Network File System Management Tools в Remote Server Administration Tools -> Role Administration Tools -> File Services Tools.
Или вы можете установить клиент NFS и консоль управления с помощью PowerShell:
Install-WindowsFeature NFS-Client, RSAT-NFS-Admin
В Windows 10/11 для установки NFS клиента выполните:
Enable-WindowsOptionalFeature -FeatureName ServicesForNFS-ClientOnly, ClientForNFS-Infrastructure -Online -NoRestart
Клиент NFS в Windows поддерживает NFSv2 и NFSv3.
Теперь вы можете подключить NFS шару с помощью PowerShell:
New-PSdrive -PSProvider FileSystem -Name M -Root \\192.168.0.211\mnt\hyperv -Persist
Опция Persist включает автоматическое подключение NFS шары после перезагрузки.
Из CMD:
mount -o anon nolock \\192.168.0.211\mnt\hyperv M:
Также вы можете смонтировать NFS каталог из графического интерфейса File Explorer.
Для отключения NFS шары, выполните:
Umount M:
Или
Remove-PSdrive -Name M
При подключении NFS шары может появится ошибка:
The remote device or resource won’t accept the connection.
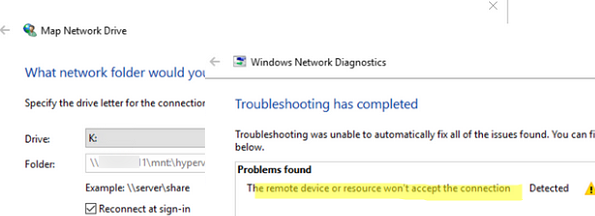
Чтобы исправить проблему, запустите консоль Services for Network File System (NFS) и проверьте права для подключения к удаленному ресурсу.
Если вы хотите подключиться к NFS ресурсу под anonymouse пользователем, нужно добавить два параметра реестра:
New-ItemProperty HKLM:\SOFTWARE\Microsoft\ClientForNFS\CurrentVersion\Default -Name AnonymousUID -Value 000001f4 -PropertyType "DWord"
New-ItemProperty HKLM:\SOFTWARE\Microsoft\ClientForNFS\CurrentVersion\Default -Name AnonymousGID -Value 00000064 -PropertyType "DWord"
Если для подключения нужно всегда использовать учетную запись root, измените значения параметров AnonymousUID и AnonymousGID на 0.
Если вы используете NFS подключения в окружении Active Directory, нужно отменить важный нюанс.
Если в AD не добавлены UNIX атрибуты и User Name Mapping не настроен, то для подключения к NFS серверу из Windows будет использоваться анонимное подключение. Для использование учетных данных для подключения к NFS вам нужно внести изменения в схему AD (атрибуты uidNumber и gidNumber).
На контроллерах домена WS 2012R2 можно добавить вкладку UNIX атрибутов в свойствах пользователя AD:
Dism.exe /online /enable-feature /featurename:adminui /all
Однако эта опция является deprecated в Windows Server 2016 и атрибуты пользователя предлагается править вручную или с помощью PowerShell:
Set-ADUser -identity user1 -add @{uidNumber="<user_unix_uid>";gidNumber="<user_unix_gid>"}
При подключении NFS каталога также может появится ошибка:
You can't access this shared folder because your organization's security policies block unauthenticated guest access. These policies help protect your PC from unsafe or malicious devices on the network.
В этом случае нужно создать параметр реестра AllowInsecureGuestAuth:New-ItemProperty HKLM:\SYSTEM\CurrentControlSet\Services\LanmanWorkstation\Parameters -Name AllowInsecureGuestAuth -Value 00000001
New-ItemProperty HKLM:\ oftware\Policies\Microsoft\Windows\LanmanWorkstation -Name AllowInsecureGuestAuth -Value 00000001
Затем перепустите службу NFS.
NFS Server on Windows Server 2022 Datacenter simplifies file sharing across multiple platforms with top-notch security features.
Effortless installation. Ready-to-run with easy maintenance. Explore now for a smooth experience!
Configuration and connection to NFS Server on Windows Server 2022 Datacenter
Server tuning
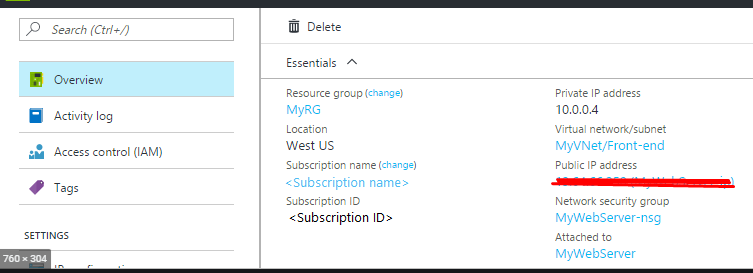
- After purchasing and starting the VM you should know its IP address. You can find it in the personal account of Azure. (You should select the virtual machine from the list. By clicking the item “Overview”, your IP would be displayed in the line “Public IP Address”).
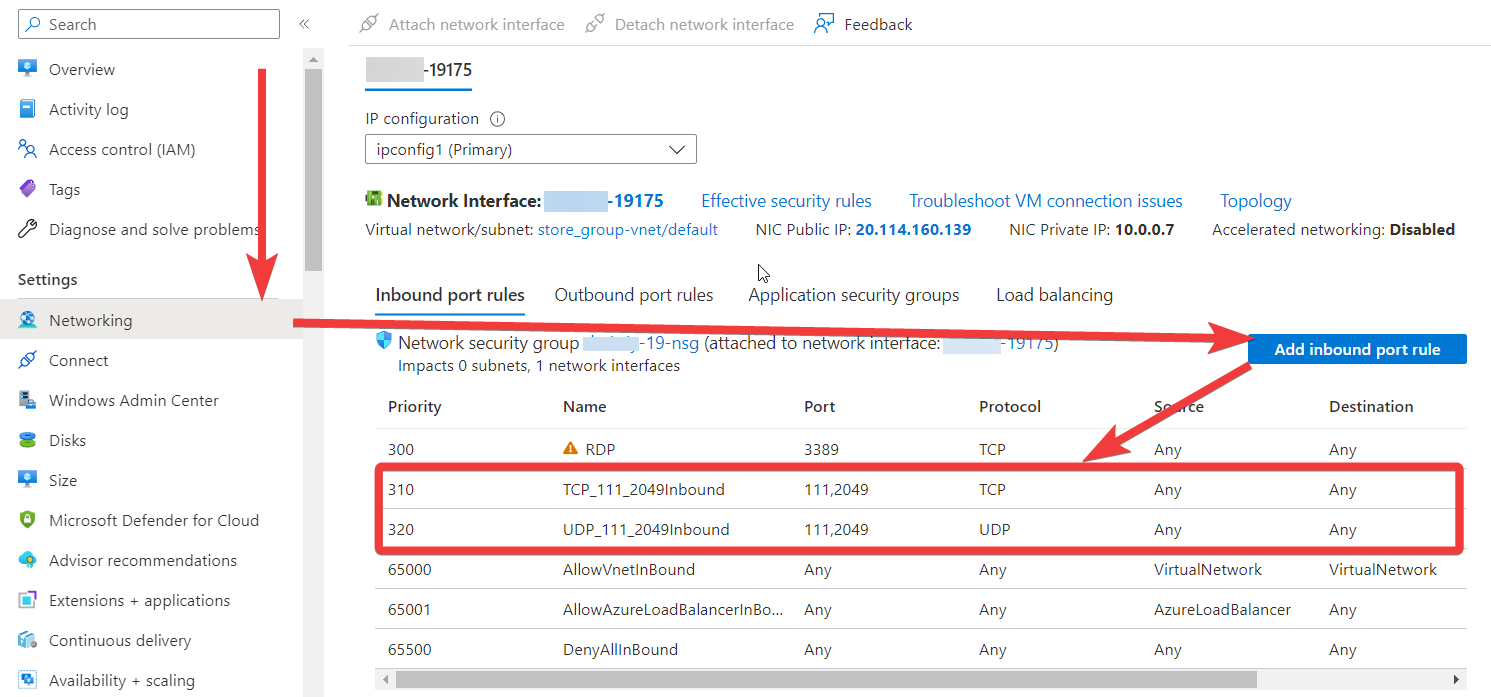
- First, you need to open TCP and UDP ports 111 and 2049 in the network properties of the Azure Firewall.
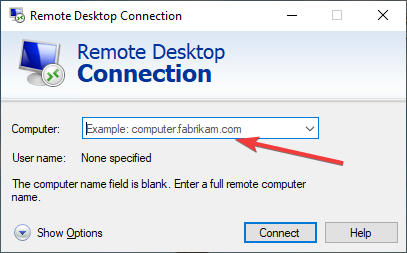
- To connect to the virtual machine, run the “Remote Desktop Connection” shortcut “Win + R”
- In the window that appears, enter “mstsc” and click “OK”.
- In the window that appears, enter the IP of the virtual machine and click “Connect”.
- In the window that appears, enter your username and password and click “OK”.
- Check the box and click “Yes”.
- Once logged in, open up “Server Manager” (if it doesn’t start automatically)
- Select “File and Storage Services” in the window that opens.
- Select the “Shares” section, and click “TASKS” – New Share.
- Select “NFS Share – Quick” and click “Next” in the window that appears.
- For example, you can configure a specific folder as Shared. To do this, you should click on “Type a custom path” and select a folder or write the folder name, which will be created in the directory you selected, if there is no such folder. Click “Next”.
Attention:
Share_folder is an example of a folder name, it is not necessary to specify it exactly. You can specify any folder that you want to make available on your VM
- Click “Next”, and click “OK” (in the case in the previous step you wrote the name of the folder that would be created)
- Specify authentication methods.
- Set the share permissions. Click the “Add” button.
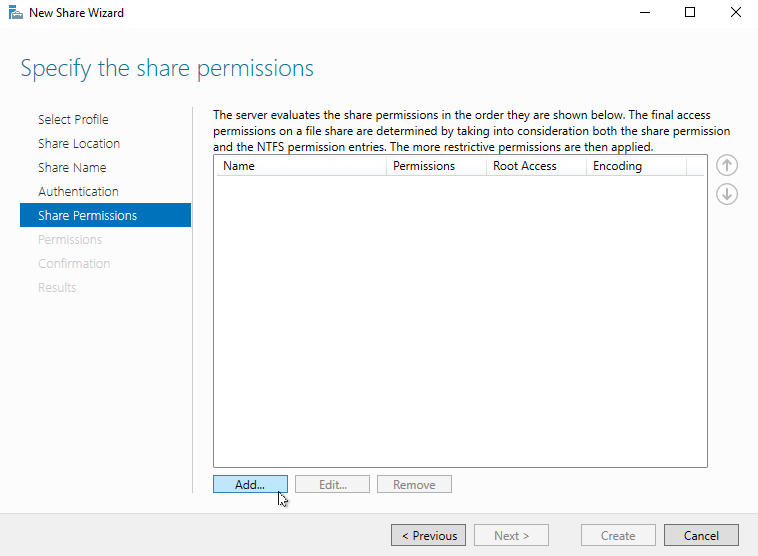
- Specify the Hosts you’d like to grant access permissions like the example below. Enter the IP address and choose the permissions that will be available to this host.
- Click “Next”.
- Click “Create”.
- Click “Close”.
- Now you can manage the NFS server with ‘NFS tools’

Connecting to NFS Share
- In the search field, enter “windows features” and open this menu.
- In this window, scroll down to “Services for NFS” and check the box “Client for NFS” and then click the “OK” button.
- Open “Explorer – This PC”, and select “Computer – Map network drive – Map network drive” on top.
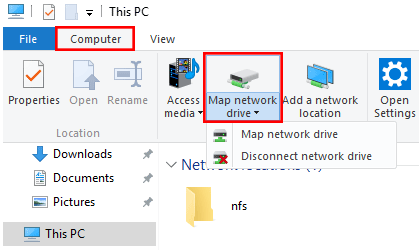
- Enter \\vm_ip\shared_folder and click “Finish”.
Attention:
Vm_ip and share_folder are given as an example, you should insert the IP address of your VM instead of vm_ip, and instead of share_folder you should insert the Share name of your NFS.