
In this article, I will show you how to install file server in Windows Server 2022. Here I am talking about a file server. I mean that the server is competent to provide a central location in your local network to store files/folders and folders, which users can then share with the domain users. For this type of work, we can reasonably go with confident permissions based on the criteria and level of privacy of the information. Read this article for more information.
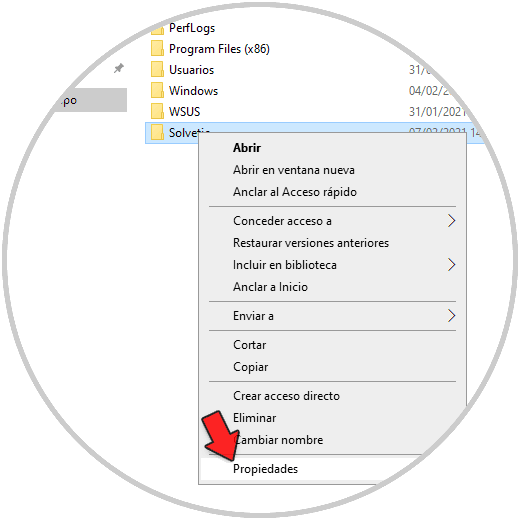
First, we have to create a shared folder inside the Windows server. This folder will work as a file server. After creating a folder, right-click on it and then choose properties.
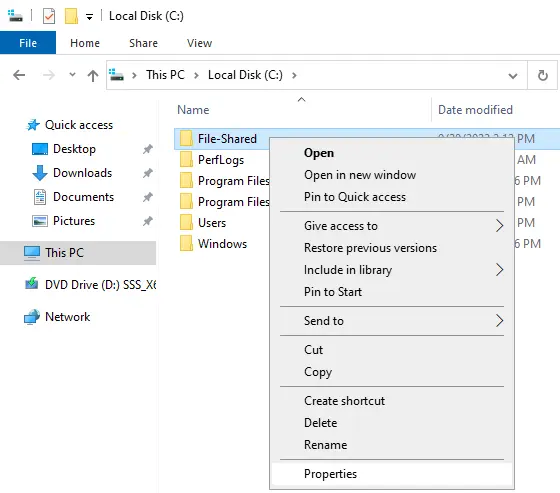
Select the Sharing tab, and then choose Advanced Sharing.
On the advanced sharing page, select the box “Share this folder” and then click on the permissions button.
First, click on everyone and choose to remove them.
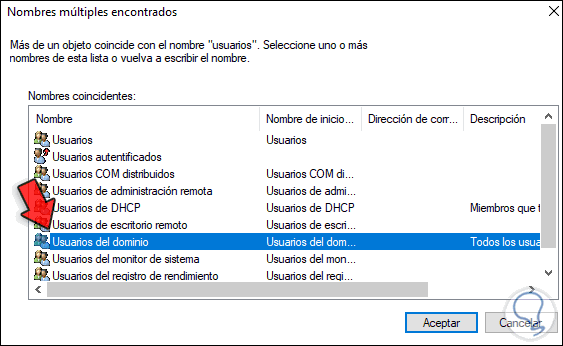
Click on the Add button.
Type domain users the group of users you want access to the folder and then click OK.
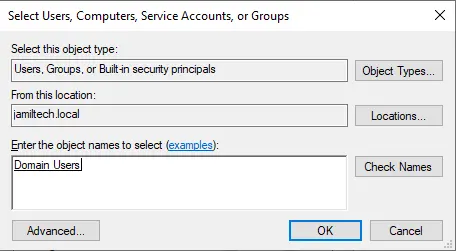
Select read and write permission and select OK.
Click ok
Choose close.
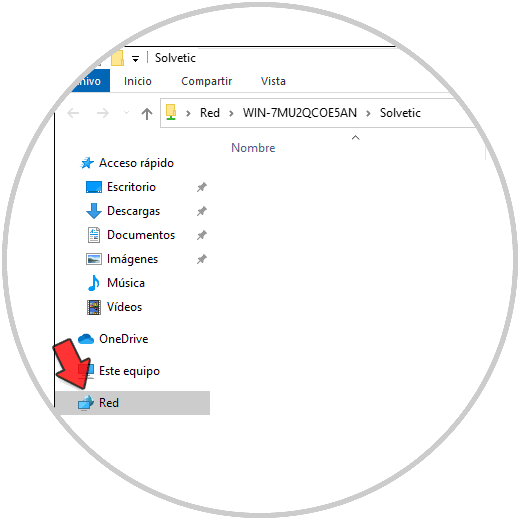
The folder for the file server has been created and configured. To view shared folder functionality, just log in from any client system and then view the newly created folder.

Install File Server
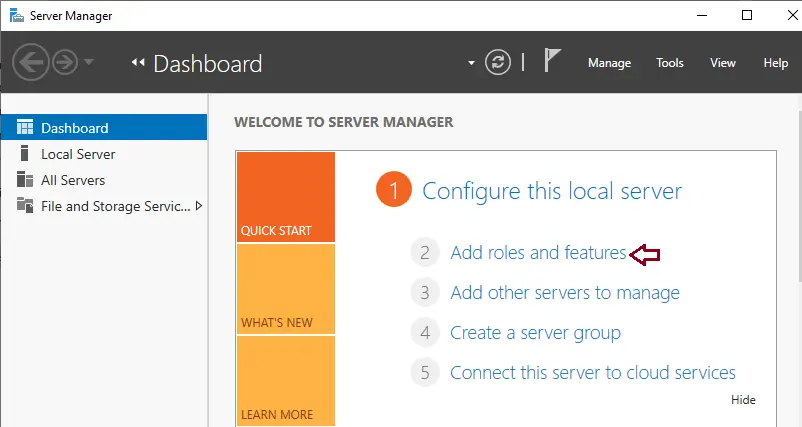
Open server manager, click on dashboard, and then click on add roles and features.
Choose Next
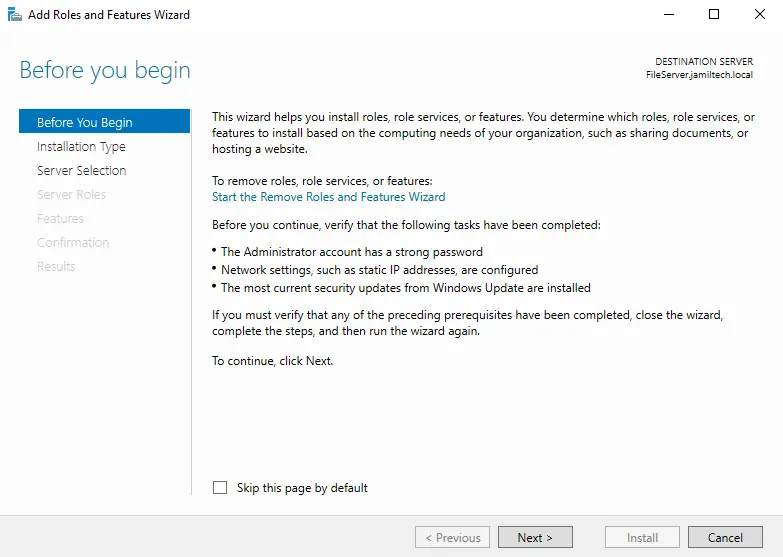
Select next
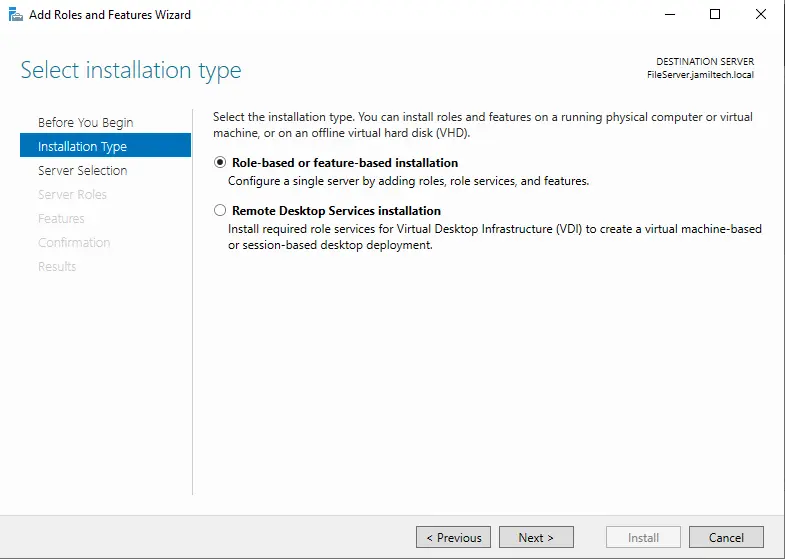
Click next
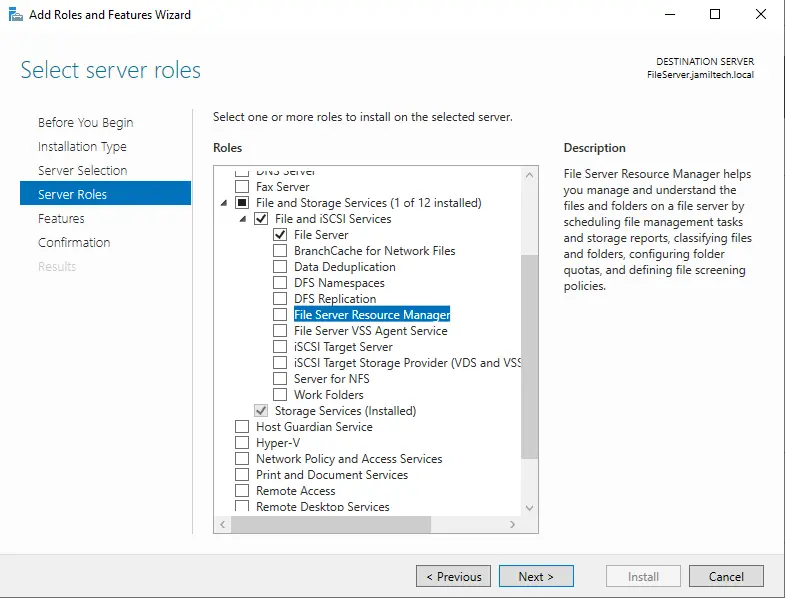
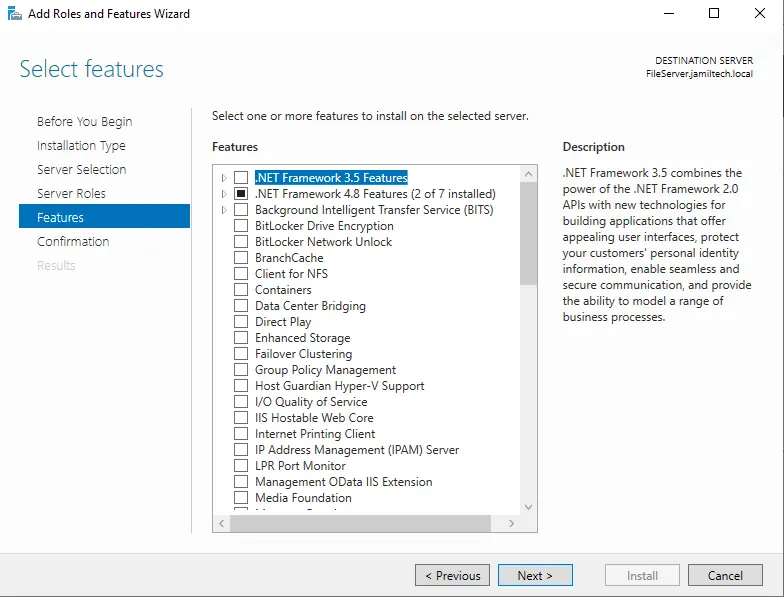
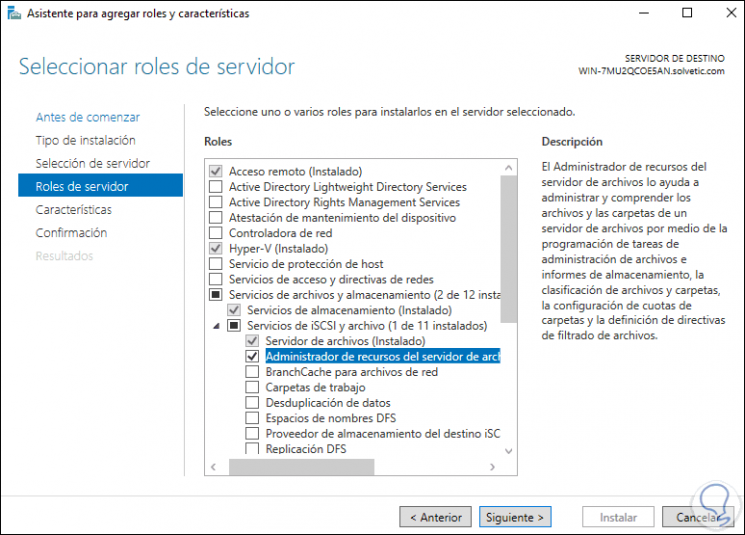
Expand the “File and Storage Services role” and then tick the file server box.
Now tick the File Server Resource Manager feature box.
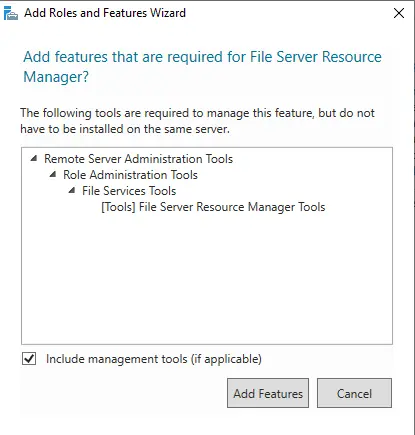
Choose the Add Features button to install the required features.
Click next

Select next
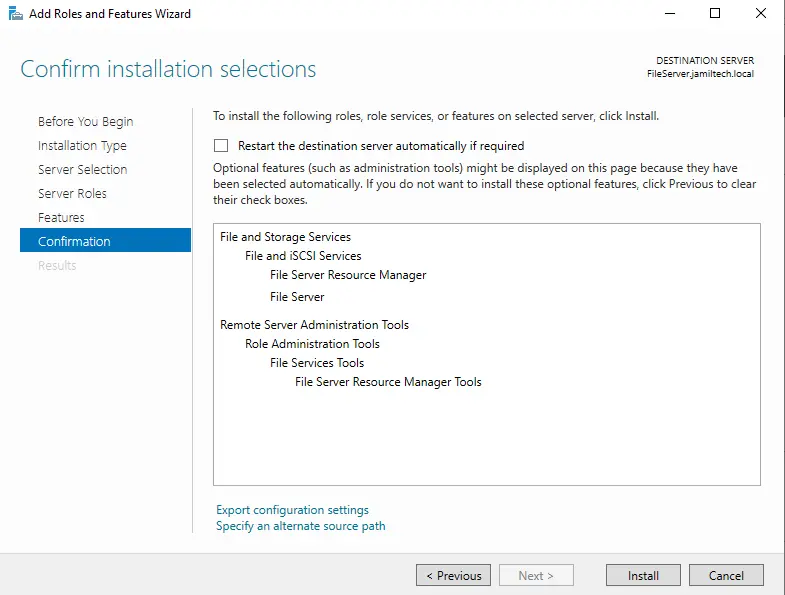
Select the Install button to install the file server in Windows Server 2022.
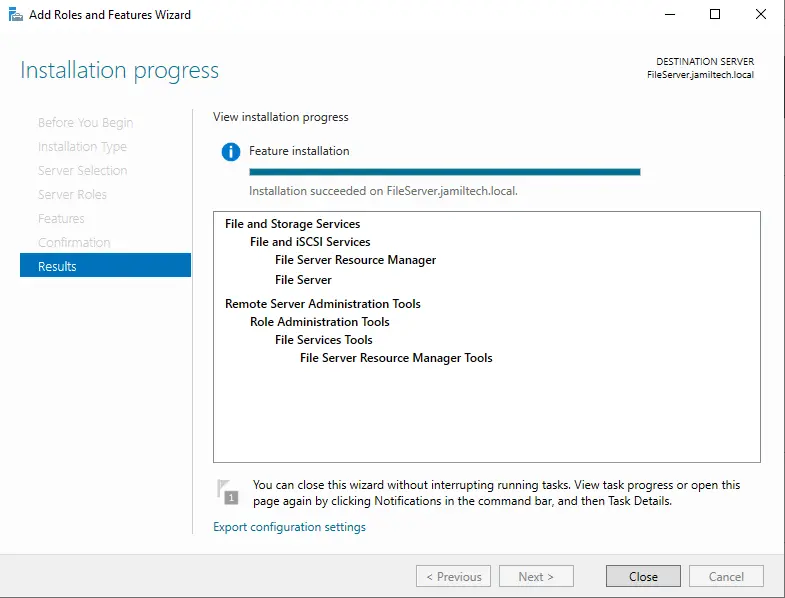
File server role installation is complete; click on the close button.
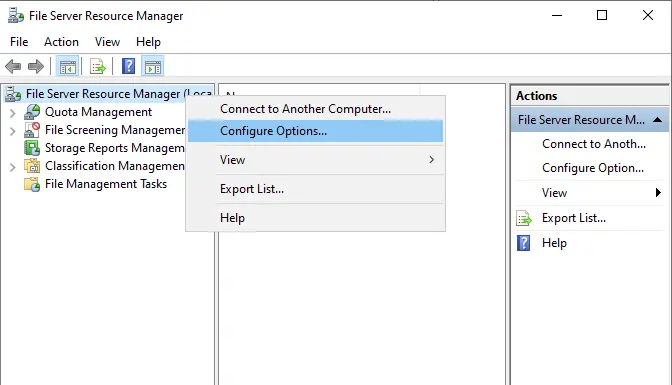
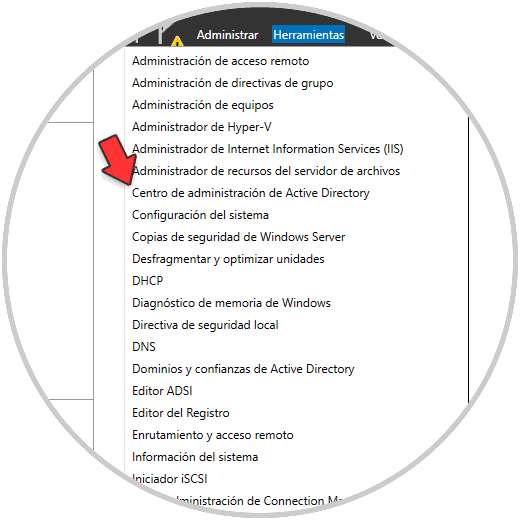
Select the tools tab, and then launch File Server Resource Manager.
Right-click on the File Server resource manager and then choose Configure Options to configure the main settings.
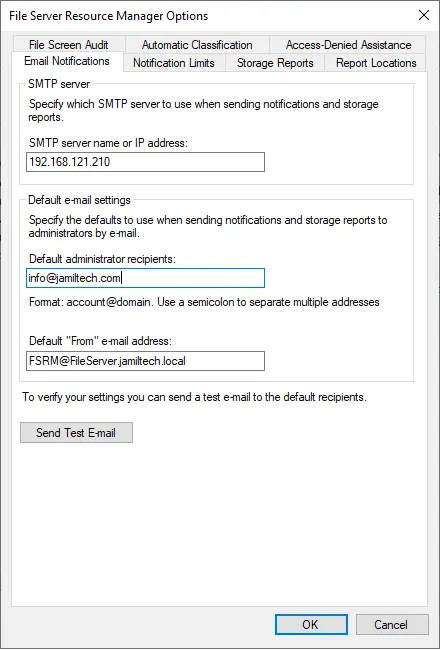
Click on the Email Notifications tab, and then configure email notifications.
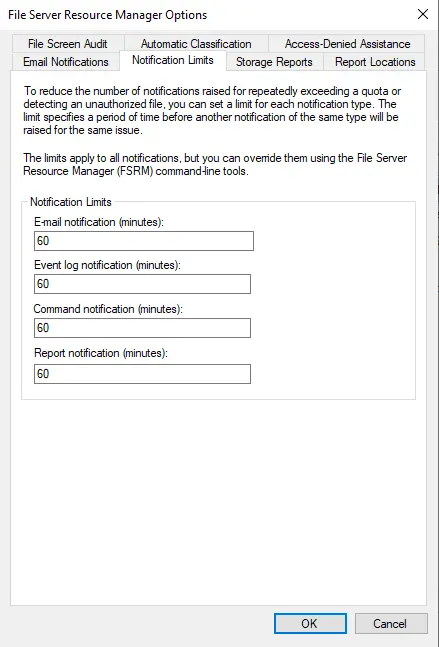
Select the Notifications Limits tab, and then edit the values or leave them as they are.
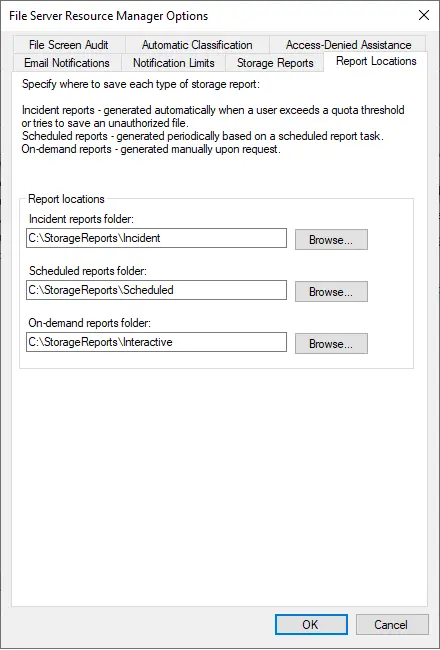
Now click on the Reports Locations tab. Here you can change the area where the reports are stored or leave them as they are.
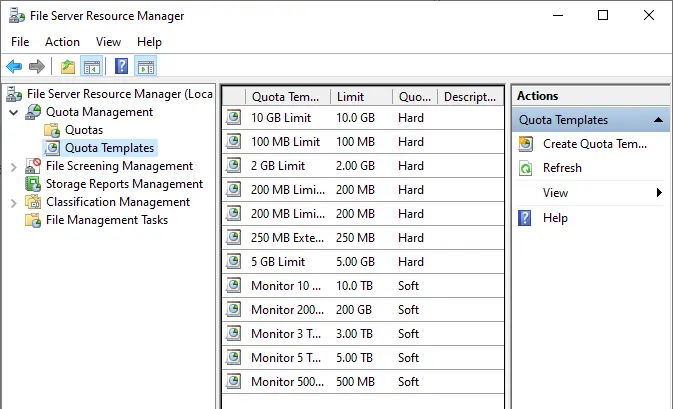
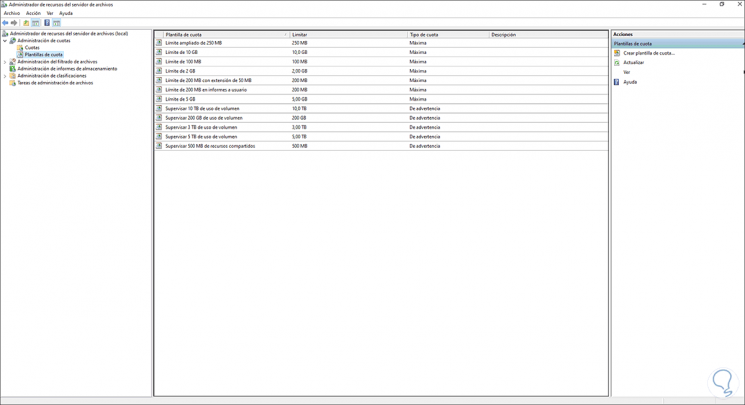
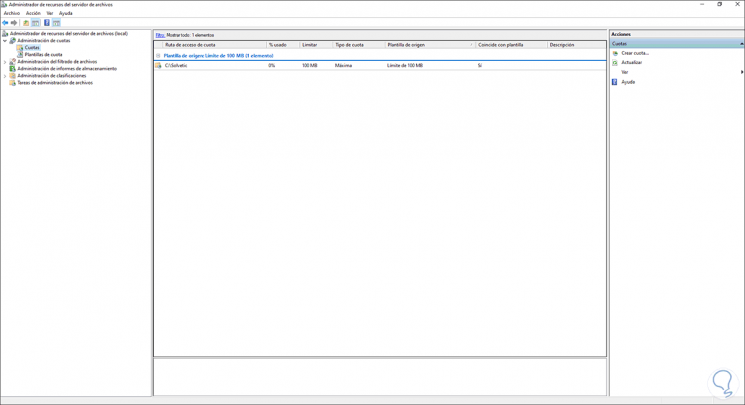
First, select the QUOTA Templates option. Now you can see ready templates prepared in MB, GB, and TB.
Also, read this article: How to Configure Disk Quota with File Server.
Jamilhttp://jamiltech.com
A Professional Technology Blog Writer | An energetic professional with more than 20+ years of rich experience in Technology, Planning, Designing, Installation, and Networking.
Microsoft through its Insider program gives us the opportunity to know what will come in the next edition of Windows Server and it is its version 2022 ( Windows Server 2022 ) which changes its appearance but maintains the essence of the system in terms of roles, services and performance is concerned..
Windows Server is tasked with being a central point for administrators to offer client computers and users better management options, and one of these roles is the ability for Windows Server 2022 to act as a file server.
When we talk about a file server we mean that the server is able to offer a central location in the local network to store files and share them with domain users, facilitating this type of task, this logically can go with certain permissions in based on the criteria and level of privacy of the information..
In Windows Server we can manage
By acting in this mode, Windows Server 2022 allows us to manage:
- Work folders: these allow users to store and have access to work files, being these managed by the server administrator
- ISCSI Target Server — Allows you to create hardware independent iSCSI disk subsystems which are based on storage area network (SAN) software
- Data deduplication: is a feature that reduces the hard disk space requirements of files by optimizing overall storage space
- Storage spaces: it is a function that allows to have high availability storage
- Windows PowerShell: known to all, this gives us the opportunity to automate the management of file server administration tasks
- Storage Spaces Direct — Creates a new level of scalable and available storage through local storage servers
- Storage Quality of Service — centrally monitors storage performance on the system
- Storage Replica — Synchronously replicate storage across servers and clusters for data availability
TechnoWikis will explain how to install and configure a file server in Windows Server 2022.
To stay up to date, remember to subscribe to our YouTube channel! SUBSCRIBE
How to install and configure a file server in Windows Server 2022
Step 1
We go to the folder that will act as a repository, we right click on it and select «Properties»:
Step 2
In the pop-up tab we go to the «Share» tab. We click on «Advanced sharing»:
Step 3
We activate the «Share this folder» box and assign the name to the shared resource:
Step 4
Now we click on «Permissions» and we will see the following:
Step 5
Remove «All»:
Step 6
Click on «Add»
Step 7
We add «Domain users»:
Step 8
We see the added group:
Step 9
We configure the appropriate permissions and apply the changes, we can see the path established with the shared folder:
We close the window..
Step 10
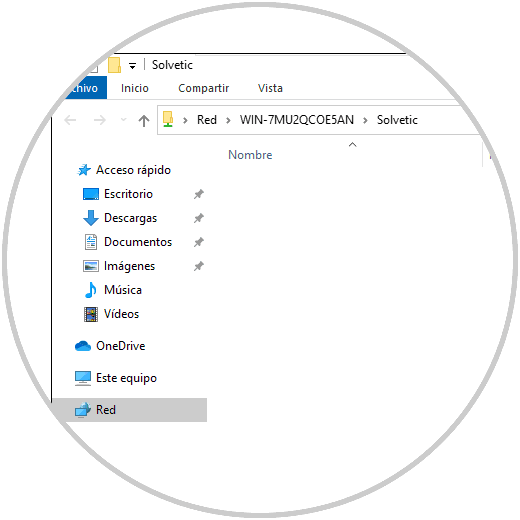
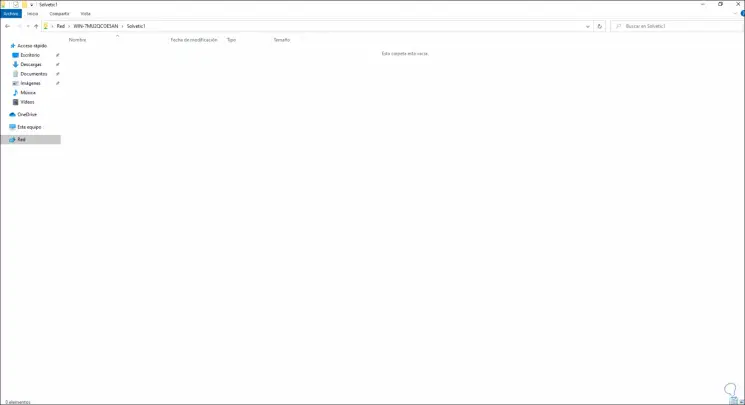
On the client computer from «Network» you can access the shared folder on the server:
Step 11
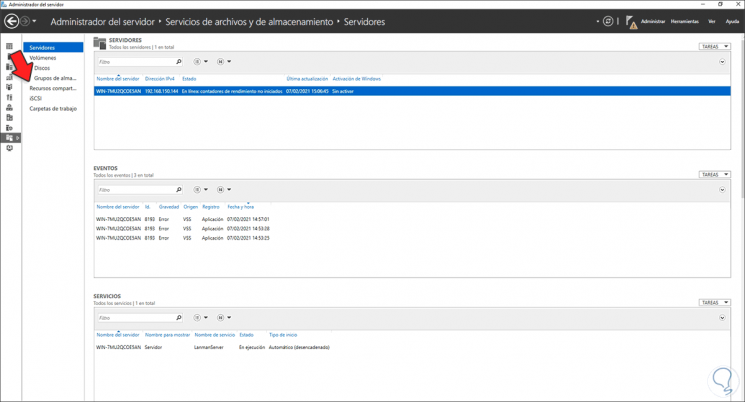
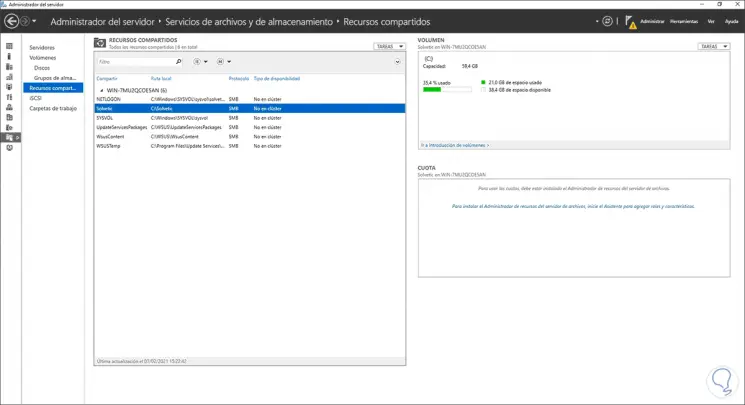
In the «Server Manager» we go to «File Services and Shares»:
Step 12
In «Shared Resources» we will see the previously shared folder:
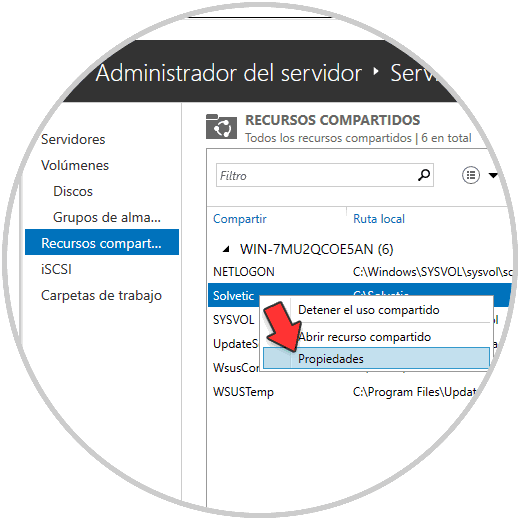
Step 13
We right click on the folder and go to «Properties»:
Step 14
Then we go to «Configuration» and we will see the following:

Step 15
We activate the «Enable enumeration based on access» box:
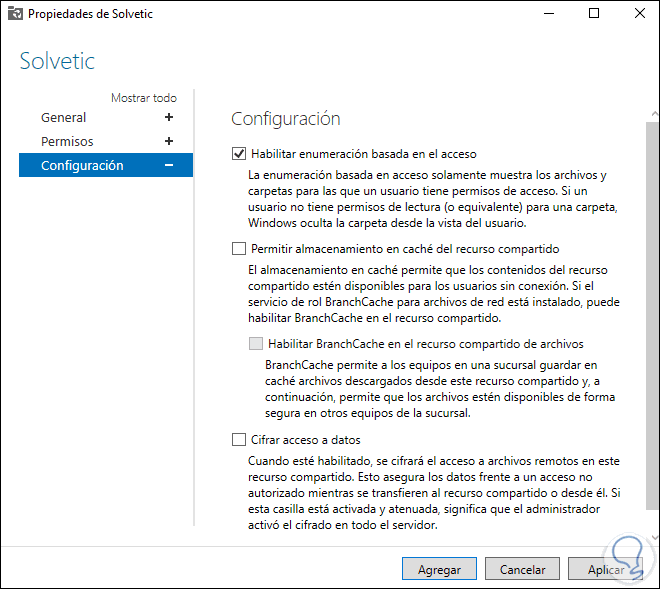
Apply the changes by clicking apply and then Add.
Step 16
Choices
The available options are:
- Enable access-based enumeration: allow users to only view folders with edit permission, those that are read-only will be hidden
- Allow share caching: enable sharing without connection
- Enable BranchCache on file share: This option caches resources for later access
- Encrypt Data Access — Encrypts access to files for added security.
Now we create a folder with read-only permissions:
Step 17
We can verify that this will not be visible from the client computer:
Step 18
We go to the Server Manager and click on «Add roles and characteristics»:
Step 19
The following wizard will be displayed:
Step 20
We select «Feature-based or role-based installation»:

Step 21
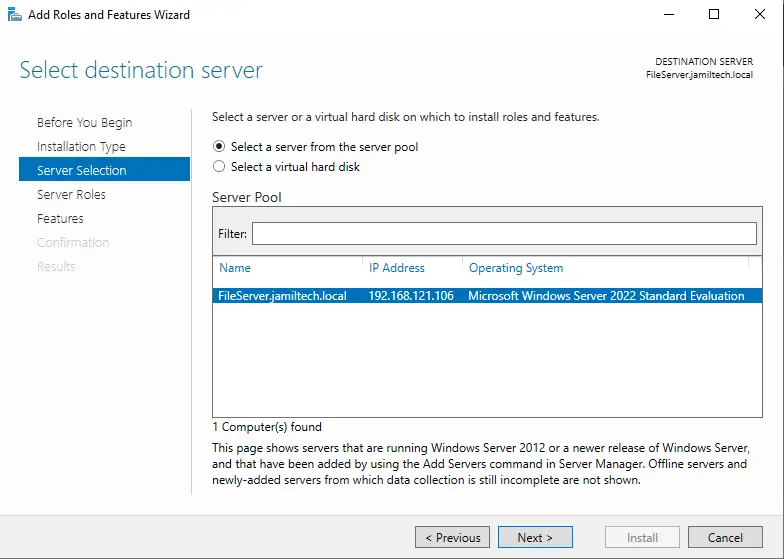
In the next window we select the server:
Step 22
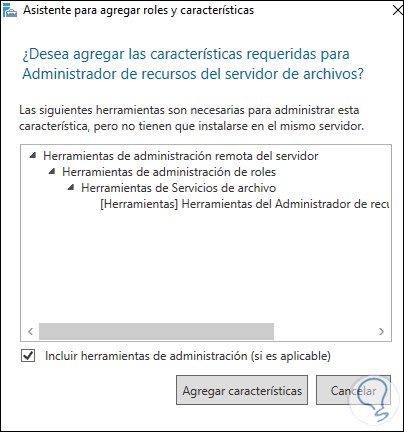
Click Next to go to the roles section, go to «File and storage services», display «iSCI and file services» and locate «File server resource manager»:
Step 23
We activate its box and we must add the characteristics:
Step 24
We will see the active role:
Step 25
Click Next and skip the “Features” section, we will see a summary of the role to add:
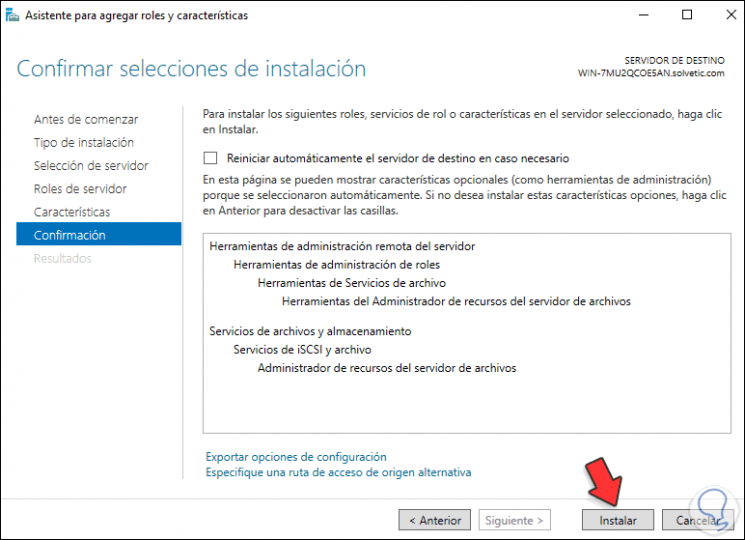
Step 26
Click Install to complete the process:
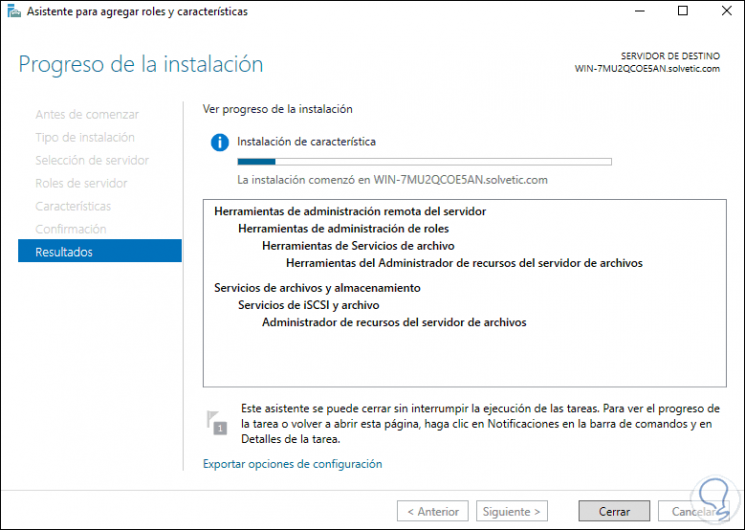
Step 27
At the end of the action we will see the following:

We left the assistant.
Step 28
Now we go to «Tools — File server resource manager»:
Step 29
The following window will be displayed where we can see the various options to use:
Step 30
In this section we can apply quotas or limits for storage so that the disk is not occupied with non-essential data. We can filter the types of files to be used on the file server if we want:
Step 31
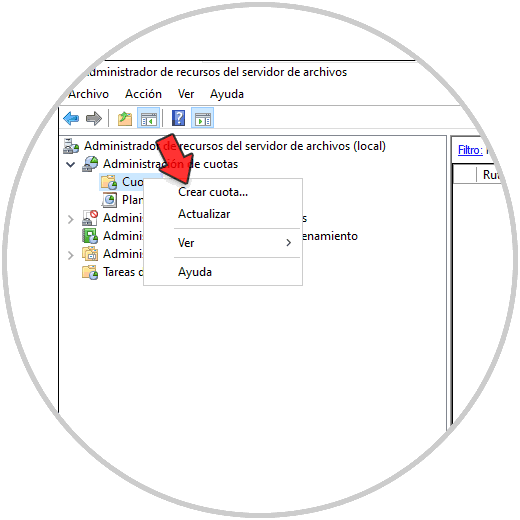
We are going to create a quota to see how it works, right click on «Quotas» and select «Create quota»:
Step 32
We set the path and the parameter, apply the changes:
Step 33
We see the quota created:
Step 34
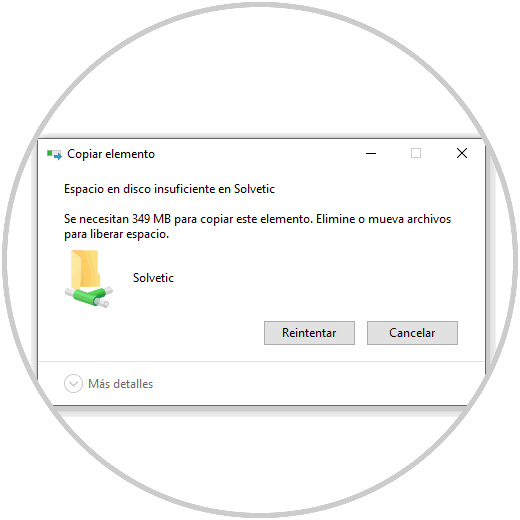
When we try to copy something in the folder that exceeds the quota we will see the following error:
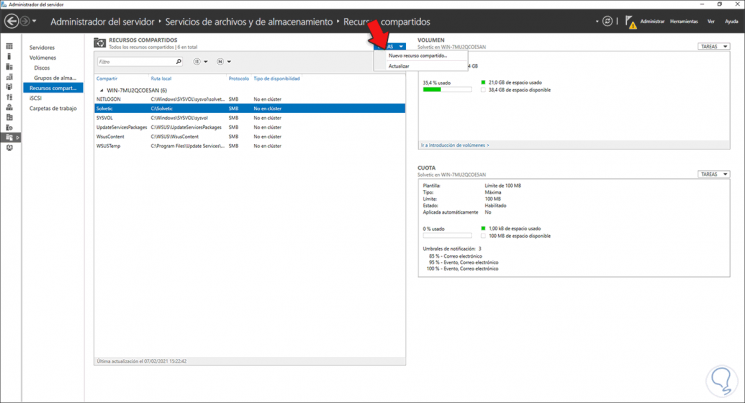
Step 35
It is possible to create a shared resource from the administrator, for this we go to «File services and shared resources», then we go to Shared Resources and in Tasks select «New share»:
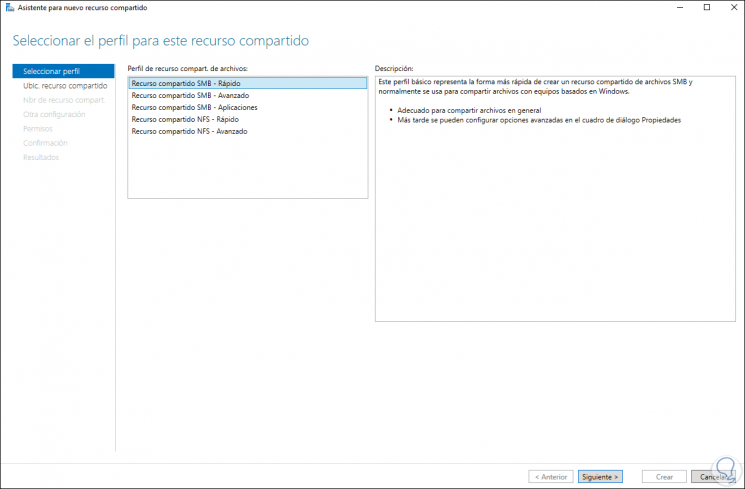
Step 36
The following window will be displayed where we select the profile to use:
Step 37
We select the location where the resource will be:
Step 38
Then we set the resource path:

Step 39
Click Next and configure the desired parameters:
Step 40
Next we define the permissions:
Step 41
Click Next to see a summary of the resource:
Step 42
Click on Create to apply the changes:
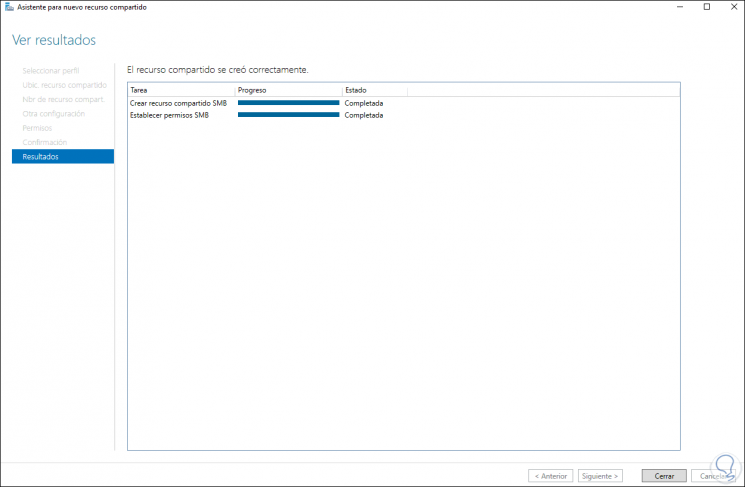
Step 43
We will see the new share:
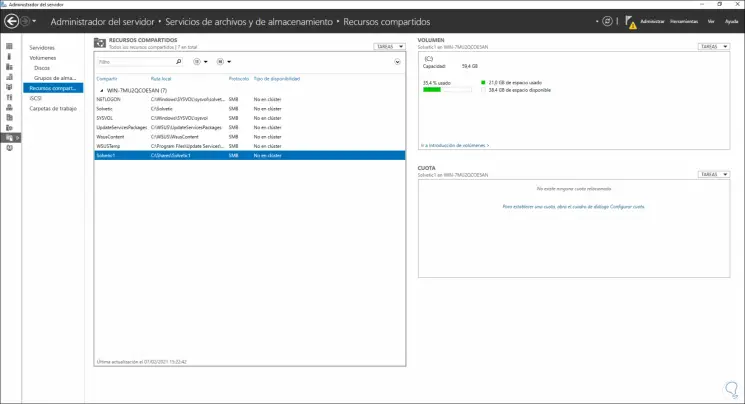
Step 44
On the client computer we will have access to the new share in Windows Server 2022:
This is the step-by-step process to install and configure a file server on Windows Server 2022.
Type Your Question
Thursday, 12 December 2024
WINDOWS SERVER 2022
Creating a file server in Windows Server 2022 is a straightforward process, especially when following best practices. This guide walks you through setting up a robust, secure, and user-friendly file sharing environment, enabling you to efficiently store and manage your data.
Step 1: Preparing the Server
- Ensure Server Roles and Features: The File Server role comes pre-installed in Windows Server 2022. To double-check:
- Go to Server Manager -> Manage -> Add Roles and Features.
- Verify «File and Storage Services» is present and active. If not, install it.
- Storage Allocation: Choose your storage method:
- Local Disks: For small, localized files, assign a specific drive for the file server data.
- Shared Storage: For large datasets, or to enable multiple servers accessing the data, set up a shared storage solution such as iSCSI or Fibre Channel.
- Cloud Storage: Utilize services like Azure File Sync to integrate cloud-based file sharing within your server setup.
- File Server Folder Creation: Create a dedicated folder on your selected storage. This folder will be the base for all your file shares:
- Navigate to File Explorer and create a new folder. For example, you might call it ‘FileShares’ at the root of your storage volume.
Step 2: Creating File Shares
- Server Manager Navigation: Open Server Manager -> File and Storage Services -> Shares.
- New Share Wizard: Click «Create a share.» This will open the «New Shared Folder» wizard.
- Share Location and Name:
- Browse to your designated file server folder (e.g., ‘FileShares’ you created earlier).
- Choose a clear and concise name for your file share (e.g., ‘MarketingDocs’). A descriptive name improves manageability.
- Permissions: Carefully assign access rights to ensure proper data protection:
- Everyone: Offers minimal rights like Read-only for a basic public folder.
- Domain Users/Groups: Establish specific user/group access with different permissions for your organization:
- Full control: Grants all permissions: create, edit, and delete.
- Modify: Allows modifications but not deletion.
- Read: Restricts users to viewing the content.
- Advanced Share Properties: Explore these options to fine-tune the share’s behavior:
- Share Quotas: Control individual user disk space to prevent resource exhaustion.
- Share Permissions: Add/edit/remove users or groups.
- Security: Utilize File Server Resource Manager for advanced file and share permissions and quotas.
- Network Access: Review and set network visibility of your file share:
- Enable/disable file share access through specific network protocols like SMB and FTP.
- Confirmation: Confirm all your selections. You will receive a confirmation message after your file share is successfully created.
Step 3: Connecting to File Shares (from Client PCs)
- Open File Explorer: Go to your Windows File Explorer.
- Network Connection:
- Type «
\\\» in the address bar (e.g.,\\fileserver\marketingdocs). - You may also find your file server in the «Network» location in File Explorer.
- Type «
- Credential Input: Enter your username and password to gain access to the file share if required.
Best Practices for Secure File Sharing
- Strong Passwords: Require robust user passwords to enhance data security.
- Password Policy: Configure and enforce strong password policies for your entire organization to maintain password strength and reduce the likelihood of simple password breaches.
- Two-Factor Authentication (2FA): Implement 2FA to further increase security by requiring a secondary authentication factor besides your password. This significantly improves the security posture of your file server.
- Permissions and User Access: Granular permissions based on roles ensure each user can access only the data they require, reducing potential breaches from accidental or malicious access.
- Network Security:
- Ensure the server itself is protected with firewalls, both software- and hardware-based, to reduce vulnerabilities.
- Monitor and restrict network access through the file share, controlling IP addresses that can access specific data.
- Encryption: Encrypt your file server data using the best practices supported by Windows Server 2022 to prevent access even in cases of data theft.
- Backup Regularly: Schedule automatic data backups for your file server using built-in tools like File History, or by implementing a comprehensive data protection strategy with solutions such as Windows Server Backup, or third-party data protection solutions. This ensures business continuity and allows recovery in the event of disaster.
- Regular Security Auditing: Review your server configurations, file share settings, and user permissions to identify and correct security vulnerabilities.
Additional File Sharing Capabilities in Windows Server 2022
Beyond basic file sharing, Windows Server 2022 offers powerful capabilities for centralized data management:
- File Server Resource Manager (FSRM): Enforce stricter control over file storage by implementing quotas, data retention policies, and automatic file classifications based on various parameters.
- BranchCache: Enables files cached on client computers, resulting in reduced network traffic and improved file access speed, especially in geographically distributed environments.
- Storage Spaces: Enhance resilience and improve efficiency with a virtualized storage solution for the file server. It allows for aggregating various disks from different sources into a single storage space, providing failover capabilities and improved disk utilization.
- DirectAccess: Offers a direct, encrypted connection between client PCs and the file server without a VPN, enhancing data access flexibility and security for remote users.
- Storage Replica: Replicate your file shares to another server for disaster recovery. This can ensure near-real-time data replication and minimize downtime if one server goes offline.
- Offline Files: Enable users to access shared files even when disconnected from the network. The data is synchronized when they reconnect. This can improve productivity by enabling mobile access.
Conclusion
Setting up a file server with Windows Server 2022 is straightforward but requires attention to best practices for optimal performance and data security. This comprehensive guide provides a structured approach to creating a secure and efficient file server environment, giving you the confidence to effectively store, manage, and access your data. Always keep in mind the evolving nature of security threats, and regularly adapt your security measures accordingly for optimal data protection. For the most current guidance, consult Microsoft documentation for specific instructions and security updates related to Windows Server 2022.
File Server Shares
View : 47
Related
Translate :
Обновлено:
Опубликовано:
В качестве примера используется Windows Server 2012 R2 (2016, 2019). Инструкция разбита на несколько шагов и представляет из себя полный цикл настройки файлового хранилища для использования в малых и средних компаниях.
Выбор оборудования и подготовка сервера
Установка Windows и настройка системы
Базовые настройки файлового сервера
Тюнинг файлового сервера или профессиональные советы
Настройка средств обслуживания
Тестирование
Шаг 1. Выбор оборудования и подготовка сервера
В качестве сервера, желательно, выбрать профессиональное оборудование. Системные требования для файлового сервера не высокие:
- Процессор может быть самый простой;
- Оперативная память также не сильно используется;
- Дисковая система — самый основной компонент. Ее объем зависит от специфики бизнеса. Примерная формула — не менее 15 Гб на пользователя и не менее 1 Тб на сервер. До 50 пользователей можно рассматривать диски SATA, после — SAS или SSD.
Например, для компании в 300 пользователей подойдет сервер с процессором Xeon E3, 8 Гб ОЗУ и 5 Тб дискового пространства на дисках SAS 10K.
Дополнительные требования
- Для обеспечения сохранности информации при выходе из строя жесткого диска, необходим RAID-контроллер. Настройка последнего выполняется из специального встроенного программного обеспечения, которое запускается при загрузке сервера;
- Сервер должен быть подключен к источнику бесперебойного питания;
- Необходимо предусмотреть резервное копирование. Для этого нужен дисковый накопитель (внешний жесткий диск) или другой сервер.
Подробнее о выборе оборудования читайте статью Как выбрать сервер.
Шаг 2. Установка Windows и настройка системы
Установка системы
На этом шаге все стандартно, за исключением одного нюанса: разбивая во время установки Windows жесткий диск, стараемся выделить небольшую часть (70 — 120 Гб) для системы и все остальное под данные. Если выделить много дискового пространства для системного раздела, увеличится время его обслуживания и фрагментация, что негативно скажется на производительности и надежности системы в целом.
Настройка системы
- Проверяем правильность настройки времени и часового пояса;
- Задаем понятное имя для сервера и, при необходимости, вводим его в домен;
- Если сервер не подключен напрямую к сети Интернет, стоит отключить брандмауэр;
- Для удаленного администрирования, включаем удаленный рабочий стол;
- Устанавливаем все обновления системы.
Шаг 3. Базовые настройки файлового сервера
Это стандартные действия, которые выполняются при настройке обычного файлового сервера.
Установка роли и вспомогательных компонентов
Как правило, данная роль устанавливается вместе с Windows. Остается только это проверить и доустановить компоненты, которые нужны для полноценной эксплуатации сервиса.
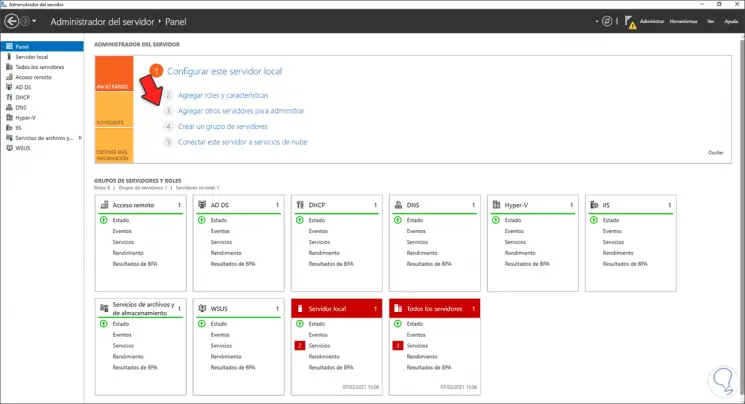
Открываем Диспетчер серверов. Он может быть запущен из панели быстрого запуска.
Нажимаем Управление — Добавить роли и компоненты.
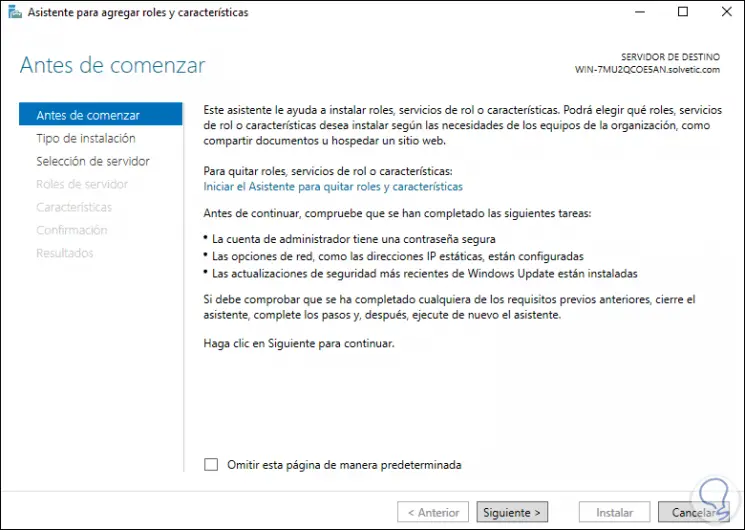
В открывшемся окне оставляем Установка ролей и компонентов и нажимаем Далее.
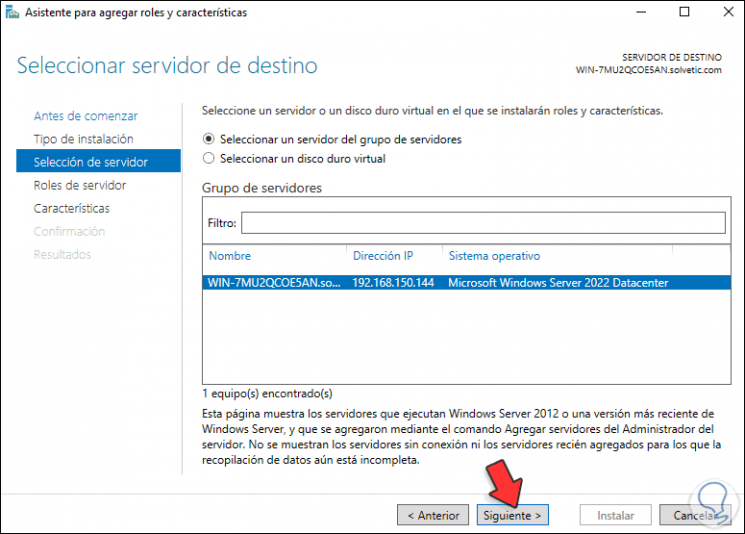
В следующем окне выбираем нужный сервер (выбран по умолчанию, если работаем на сервере, а не через удаленную консоль) и нажимаем Далее.
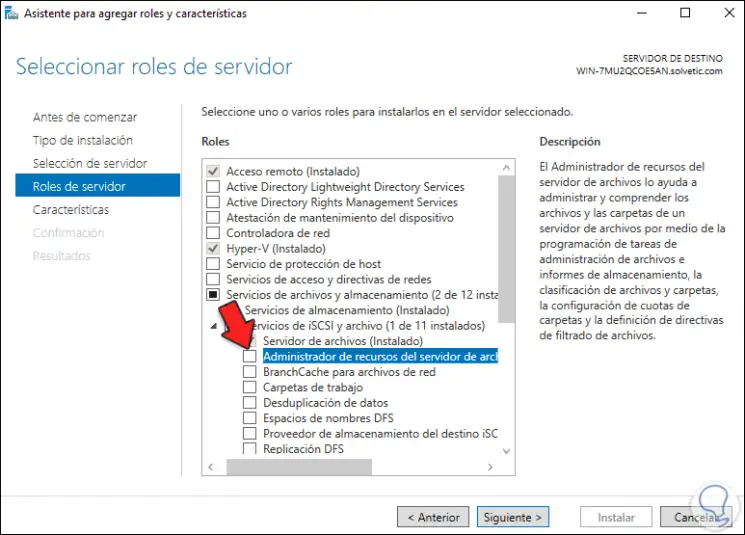
Среди ролей находим Файловые службы и службы хранилища, раскрываем ее и проверяем, что установлены галочки напротив следующих компонентов:
- Службы хранения;
- Файловый сервер;
Если данные службы не установлены, выбираем их и нажимаем Далее.
В окне Выбор компонентов просто нажимаем Далее.
Откроется окно Подтверждение установки компонентов. Нажимаем Установить и после окончания процесса перезагружаем сервер.
Настройка шары (общей папки)
Создаем первую папку, которую хотим предоставить в общее использование. Затем кликаем по ней правой кнопкой мыши и нажимаем Свойства:
В открывшемся окне переходим на вкладку Доступ и нажимаем Расширенная настройка:
Ставим галочку Открыть общий доступ к этой папке и нажимаем кнопку Разрешения:
Предоставляем полный доступ всем пользователям:
* конечно же, мы не будем давать доступ всем пользователям, но для этого есть вкладка безопасность (см. ниже).
Нажимаем OK и еще раз OK.
Теперь переходим на вкладку Безопасность и нажимаем Дополнительно:
В открывшемся окне нажимаем Отключение наследования и Преобразовать унаследованные разрешения в явные разрешения этого объекта.

Нажимаем OK и Изменить.
Выставляем необходимые права на папку, например:
Совет: старайтесь управлять правами на ресурсы только при помощи групп. Даже если доступ необходимо предоставить только одному человеку!
Теперь нажимаем OK два раза. Папка настроена для общего использования и в нашем примере доступна по сетевому пути \\fs1\Общая папка.
Шаг 4. Тюнинг файлового сервера или профессиональные советы
Данные настройки, по сути, представляют секреты того, как сделать файловый сервер лучше, надежнее и безопаснее. Применяя их, администраторы создают более правильную и профессиональную среду ИТ.
DFS
С самого начала стоит создавать общие папки в пространстве имен DFS. На это есть две основные причины:
- При наличии или появлении нескольких файловых серверов пользователям будет удобнее находить общие папки в одном месте.
- Администратор легко сможет создать отказоустойчивую систему при необходимости.
Как создать и настроить DFS читайте в статьях Как установить и настроить DFS и Как установить и настроить DFS с помощью Powershell.
Теневые копии
Позволят вернуться к предыдущим версиям файлов. Это очень полезная функция позволит не только восстановить некорректно отредактированный документ, но и вернуть случайно удаленный файл или папку.
Как настроить и пользоваться данной возможностью, читайте подробнее в инструкции Как включить и настроить теневые копии.
Аудит
Аудит позволит вести протокол доступа к данным — понять, кто и когда удалил важные данные или внес в них изменения.
О том, как настроить данную возможность читайте статью Как включить аудит доступа к файлам Windows.
Анализатор соответствия рекомендациям
В диспетчер управления серверами Windows встроен инструмент для проверки конфигурации сервера — анализатор соответствия рекомендациям. Чтобы им воспользоваться переходим в диспетчере в Локальный сервер:
Находим раздел «Анализатор соответствия рекомендациям» и справа кликаем по ЗАДАЧИ — Начать проверку BPA:
Рассмотрим решения некоторых рекомендаций.
1. Для XXX должно быть задано рекомендованное значение.
Это набор однотипных рекомендаций, для выполнения которых нужно обратить внимание на описание и задать значение параметро, которое в нем указано. Например, для CachedOpenLimit в описании проблемы есть описание решения — «Задайте для CachedOpenLimit рекомендуемое значение 5». Чтобы это сделать, открываем Powershell от администратора и вводим команду:
Set-SmbServerConfiguration -CachedOpenLimit 5
* мы задаем параметру CachedOpenLimit значение 5, как это и рекомендовано анализатором.
На запрос, уверены ли мы, что хотим выполнить команду, отвечаем утвердительно.
Остальные параметры задаем аналогичными действиями.
2. Файл Srv.sys должен быть настроен на запуск по требованию.
В командной строке от имени администратора вводим:
sc config srv start= demand
3. Создание коротких имен файлов должно быть отключено.
В командной строке от имени администратора вводим:
fsutil 8dot3name set 1
Шаг 5. Настройка средств обслуживания
Ни одна инфраструктура не может полноценно существовать без мониторинга и резервного копирования. Предупредить о возможной проблеме, узнать о последней раньше пользователей или иметь возможность восстановить данные — показатели высокой ответственности и профессионализма системного администратора.
Резервное копирование
Для файлового сервера все просто — необходимо резервировать все рабочие папки и файлы. Лучшим решением будет ежедневное копирование новых данных, и с определенной периодичностью (например, раз в месяц), создавать полный архив.
Мониторинг
Мониторить стоит:
- Сетевую доступность сервера;
- Свободное дисковое пространство;
- Состояние жестких дисков.
Шаг 6. Тестирование
Тестирование состоит из 3-х основных действий:
- Проверить журналы Windows и убедиться в отсутствие ошибок. В случае их обнаружения, необходимо устранить все проблемы.
- Выполнить действия анализатора соответствий рекомендациям.
- Провести живой тест работы сервиса с компьютера пользователя.
Have you ever thought about setting up a file server but felt overwhelmed by the complexity? Well, you’re in luck! Today, we’re diving deep into setting up Windows Server 2022 file services. By the end of this guide, you’ll know exactly how to set up, configure, and manage your file services like a pro. So, let’s get started!
Introduction to Windows Server 2022 File Services
Windows Server 2022 brings a lot to the table, especially when it comes to file services. It’s designed to be more secure, efficient, and user-friendly than ever before. Whether you’re managing a small business or a large enterprise, having a robust file server is crucial. In this guide, we’ll cover everything from initial setup to advanced configurations.
Preparing Your Environment
Before we dive into the setup, let’s make sure your environment is ready. You’ll need:
- A machine with Windows Server 2022 installed
- Administrative privileges
- A reliable internet connection
- Basic knowledge of Windows Server administration
Got all that? Great! Let’s move on.
Installing the File Services Role
The first step is to install the File Services role. This is pretty straightforward, but let’s go through it step-by-step.
-
Open Server Manager. You can find this in the Start menu or by pressing Win + R, typing
servermanager, and hitting Enter. -
In Server Manager, click on Add roles and features. This will launch the Add Roles and Features Wizard.
-
Click Next until you reach the Select server roles page. Here, check the box for File and Storage Services and then check File and iSCSI Services. You might be promted to add other required features, go ahead and accept it.
-
Click Next until you reach the Select role services page. Here, you can choose which services you want to install. For a basic file server, you’ll need File Server.
-
Click Next and then Install. The installation process will begin, and it might take a few minutes.
Once the installation is complete, you’re ready to configure your file server.
Configuring File Services
Now that the File Services role is installed, it’s time to configure it. This is where things get a bit more complex, but don’t worry, I’ll walk you through it.
The first thing you’ll want to do is create a file share. This is where users will store and access their files.
-
Open File and Storage Services in Server Manager.
-
Click on Shares and then click on Tasks in the top right corner. Select New Share.
-
Choose the profile for the share you want to create. For most cases, SMB Share – Quick will be fine.
-
Select the server and path for the share. You can create a new folder or use an existing one.
-
Give your share a name and description. This is what users will see when they connect to the share.
-
Configure the share permissions. You can add users or groups and set their permission levels. Make sure to set these carefully, as they control who can access the share and what they can do.
-
Review your settings and click Create. Your new file share will be created, and you’ll see it listed in the Shares section.
That’s it! You’ve created your first file share. But we’re not done yet. There’s a lot more you can do to configure and optimize your file server.
Setting Up Permissions
Permissions are a crucial part of file services. They control who can access what and what they can do with it. It’s important to get these right to ensure security and usability.
There are two types of permissions you need to worry about:
- Share Permissions: These control access to the share itself.
- NTFS Permissions: These control access to the files and folders within the share.
To set share permissions, you can use the Share and Storage Management console. Just right-click on the share, select Properties, and go to the Share Permissions tab. Here, you can add users or groups and set their permission levels.
Setting NTFS permissions is a bit more complex. You’ll need to use the Security tab in the properties of the folder you want to configure. Here, you can add users or groups and set their permission levels for the files and folders within the share.
Remember, it’s always better to be too restrictive than too permissive. You can always grant more access if needed, but it’s harder to recover from a security breach.
Configuring Quotas
Quotas are a great way to manage disk space usage. They allow you to set limits on how much space users can use, helping to prevent any one user from hogging all the resources.
To configure quotas, open the File Server Resource Manager and go to Quota Management. Here, you can create new quotas and set their properties.
You can set quotas based on:
- User
- Group
- Folder
- Volume
You can also set soft and hard limits. A soft limit will send a warning when it’s reached, while a hard limit will prevent the user from using more space.
Quotas are a powerful tool, but they can also be a bit complex. Make sure to test your quotas thoroughly to ensure they’re working as expected.
Advanced File Services Configurations
Now that we’ve covered the basics, let’s dive into some more advanced configurations. These aren’t strictly necessary, but they can help you get more out of your file server.
Setting Up DFS Namespaces
DFS (Distributed File System) Namespaces allow you to create a virtual view of shared folders. This can make it easier for users to find and access the files they need, especially in larger organizations.
To set up a DFS Namespace, open the DFS Management console and click on New Namespace. Follow the prompts to create your namespace and add folders to it.
DFS Namespaces can be a bit tricky to set up, but they’re well worth the effort. They can greatly simplify file access and management, especially in complex environments.
Configuring BranchCache
BranchCache is a feature that can greatly improve file access performance for branch office users. It caches files locally, reducing the need to transfer them over the WAN.
To configure BranchCache, open the Group Policy Management Console and create a new GPO. Enable the BranchCache settings and configure them as needed.
BranchCache can make a big difference in performance, but it’s important to configure it correctly. Make sure to test it thoroughly to ensure it’s working as expected.
Setting Up File Classification
File Classification allows you to automatically classify files based on their properties. This can be used to apply policies, set quotas, or even automate tasks.
To set up File Classification, open the File Server Resource Manager and go to Classification Management. Here, you can create new classifications and set their properties.
File Classification can be a powerful tool, but it can also be a bit complex. Make sure to plan your classifications carefully and test them thoroughly.
Monitoring and Maintaining Your File Server
Once your file server is up and running, it’s important to monitor and maintain it to ensure it continues to run smoothly.
Monitoring Performance
Performance monitoring is crucial for ensuring your file server is running smoothly. You can use tools like Performance Monitor and Resource Monitor to keep an eye on things.
Some key metrics to watch include:
- CPU usage
- Memory usage
- Disk I/O
- Network I/O
If you notice any issues, it’s important to address them promptly to prevent them from becoming bigger problems.
Regular Maintenance
Regular maintenance is also important for keeping your file server running smoothly. This includes tasks like:
- Updating the server
- Backing up data
- Checking for and fixing errors
- Monitoring disk space usage
It’s a good idea to create a maintenance schedule and stick to it. This will help ensure that nothing falls through the cracks.
Troubleshooting Common Issues
Even with the best planning and maintenance, issues can still arise. Here are some common issues and how to troubleshoot them:
- Users can’t access the file share: Check the share and NTFS permissions. Make sure the user has the necessary access.
- Slow performance: Check the performance metrics. Look for any bottlenecks or high usage areas.
- Disk space running low: Check the quotas and usage. Consider adding more storage or archiving old files.
Troubleshooting can be a bit of an art, but with practice, you’ll get the hang of it.
Conclusion
And there you have it! A comprehensive guide to setting up Windows Server 2022 file services. We’ve covered everything from initial setup to advanced configurations and maintenance.
Remember, the key to a successful file server is careful planning and regular maintenance. Take the time to set things up right and keep an eye on them, and you’ll be rewarded with a reliable and efficient file server.
So, what are you waiting for? Get out there and set up your file server! And if you have any questions or run into any issues, don’t hesitate to reach out. I’m always here to help.
FAQ
What are the system requirements for Windows Server 2022?
The system requirements for Windows Server 2022 are fairly modest. You’ll need a 1.4 GHz 64-bit processor, at least 512 MB of RAM, and 32 GB of available disk space. Of course, more powerful hardware will provide better performance.
Can I upgrade from an older version of Windows Server?
Yes, you can upgrade from Windows Server 2012 R2 and Windows Server 2016 to Windows Server 2022. However, it’s always a good idea to do a clean install if possible, as this can help prevent issues.
What are the different editions of Windows Server 2022?
Windows Server 2022 comes in three editions: Standard, Datacenter, and Essentials. Each edition is designed for different use cases and has different features.
How do I activate Windows Server 2022?
You can activate Windows Server 2022 using a product key or through the Volume Licensing Service Center. If you’re using a trial version, you’ll need to activate it before the trial period expires.