
В этой статье мы рассмотрим детально как установить Windows Server 2019 и самую первичную настройку, что нужно сделать сразу после установки системы. Как детально настроить Windows Server 2019 читайте в нашей следующей статье.
1) Итак, первое — Вам нужно скачать дистрибутив. Скачать его можете на следующей странице.
2) После скачивания дистрибутива — его нужно записать на флешку, сделав ее загрузочной. Инструкция как записать дистрибутив на флешку.
3) Далее Вам нужно загрузиться с флешки из под биоса для начала самой установки. Краткая инструкция как загрузиться с флешки.
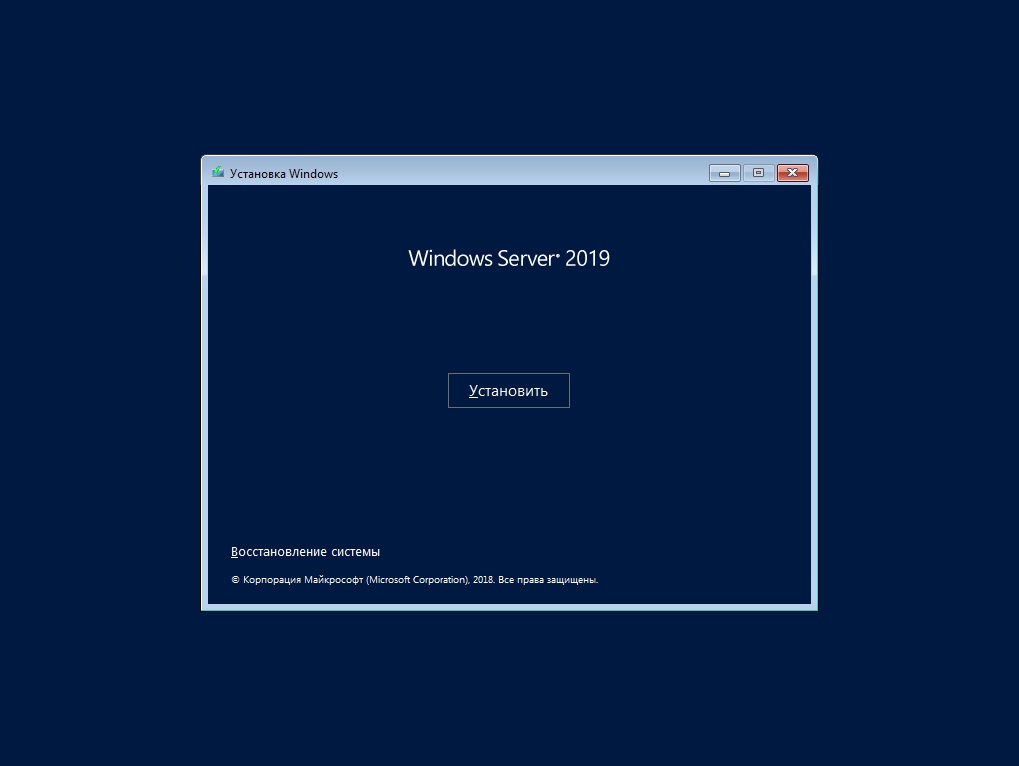
4) Теперь после того, как Вы загрузились с флешки, приступаем к началу установки.

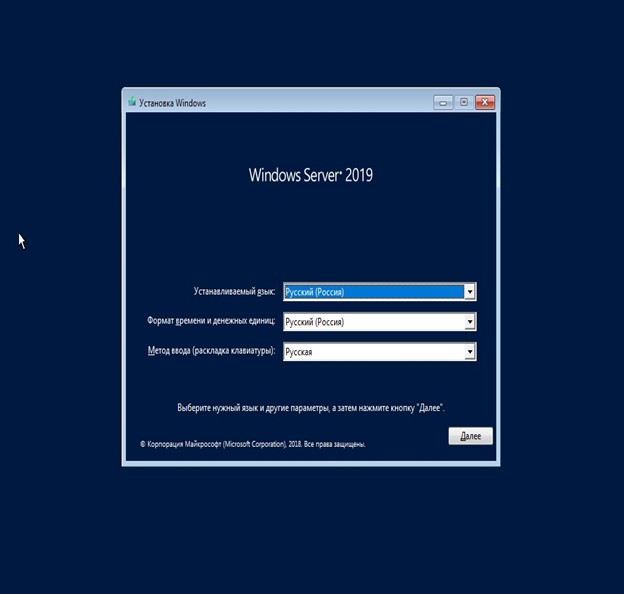
Выбираем язык операционной системы, выберем русский.

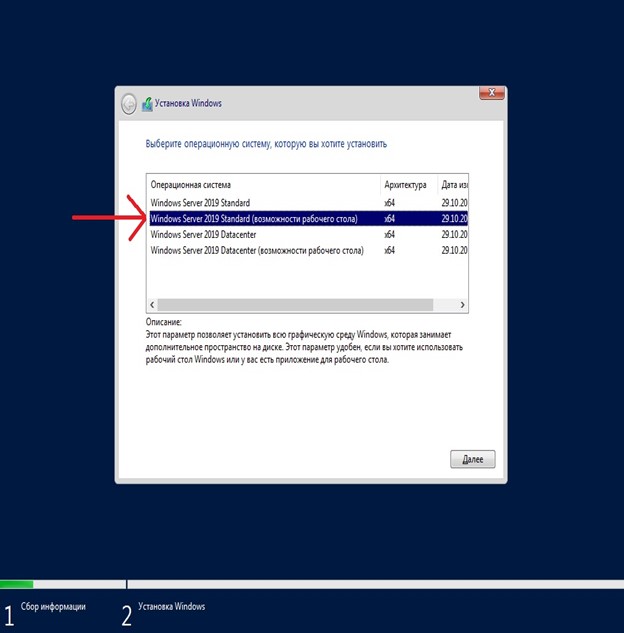
Далее выбираем желаемую редакцию Windows Server 2019 для установки. В данной статье мы установим версию Standard, но Вы можете выбрать другую версию, к примеру Datacenter. Порядок установки в ней аналогичный.
А так же, обязательно выбираете дистрибутив с «Возможности рабоче стола», иначе у Вас система установится без графической оболочки и управление операционной системой будет только из под консоли.

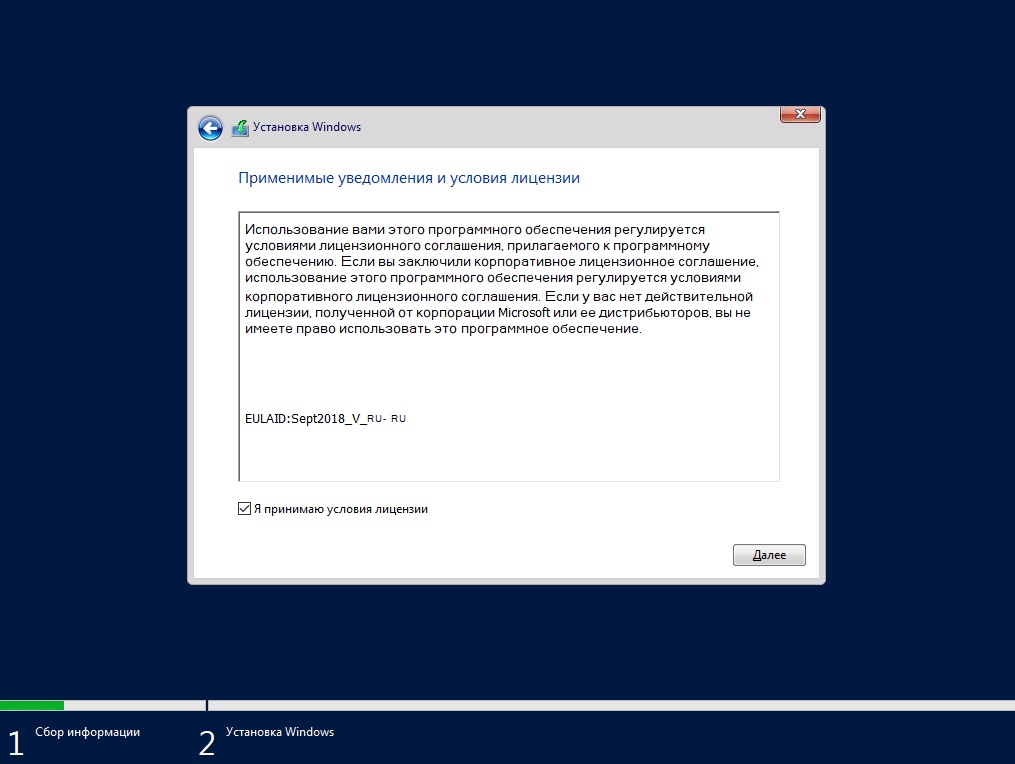
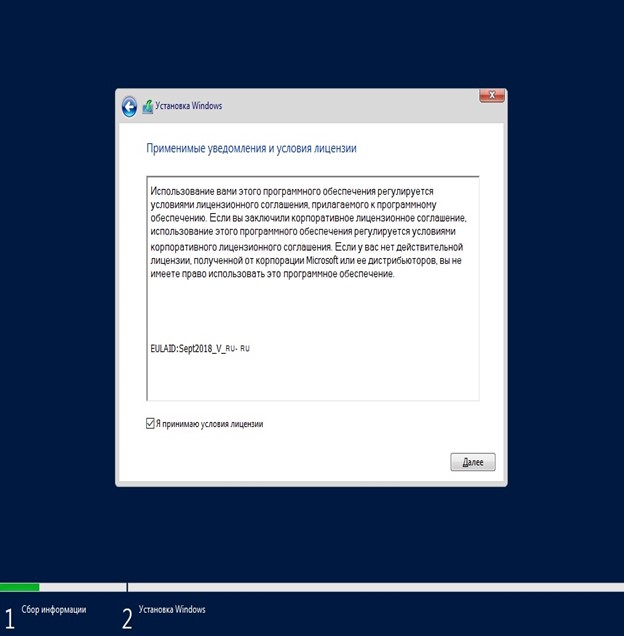
Принимаем условия лицензирования.
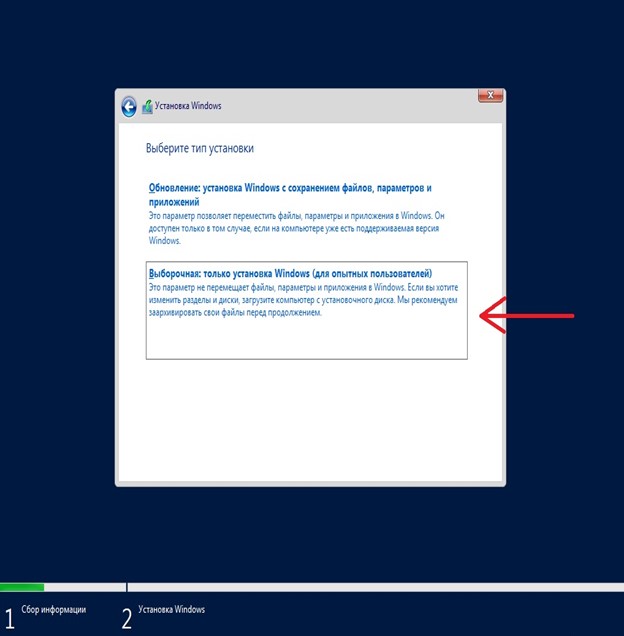
Далее, выбираем выборочную установку, т.к мы устанавливаем систему с нуля.

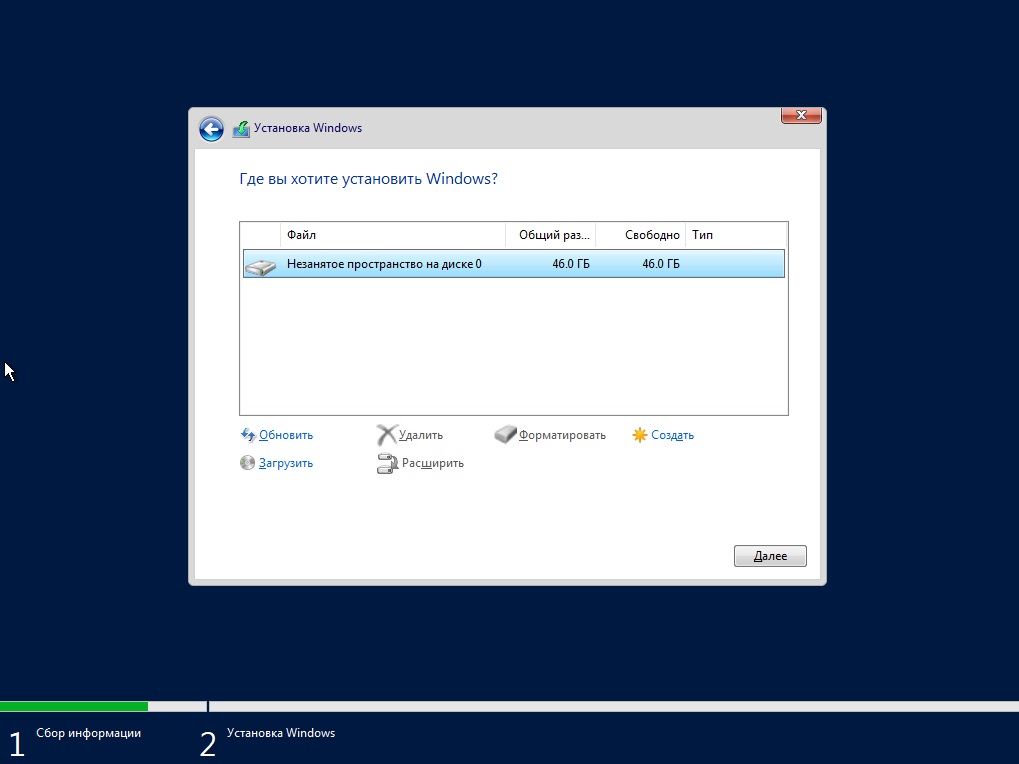
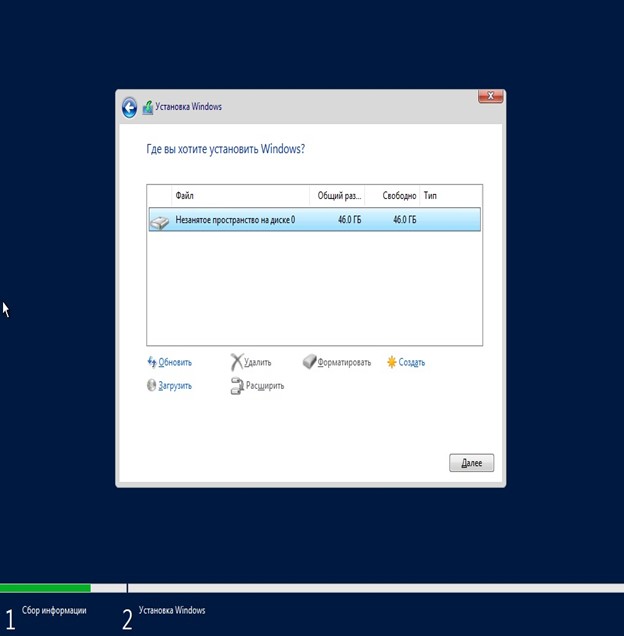
После у Вас будет меню выбора диска куда установить систему. На нашем примере только один диск, у Вас же их может быть больше. Выбираете нужный диск для установки и нажимаем «Далее».
И теперь начинается непосредственно сама установка, ожидайте ее окончание.

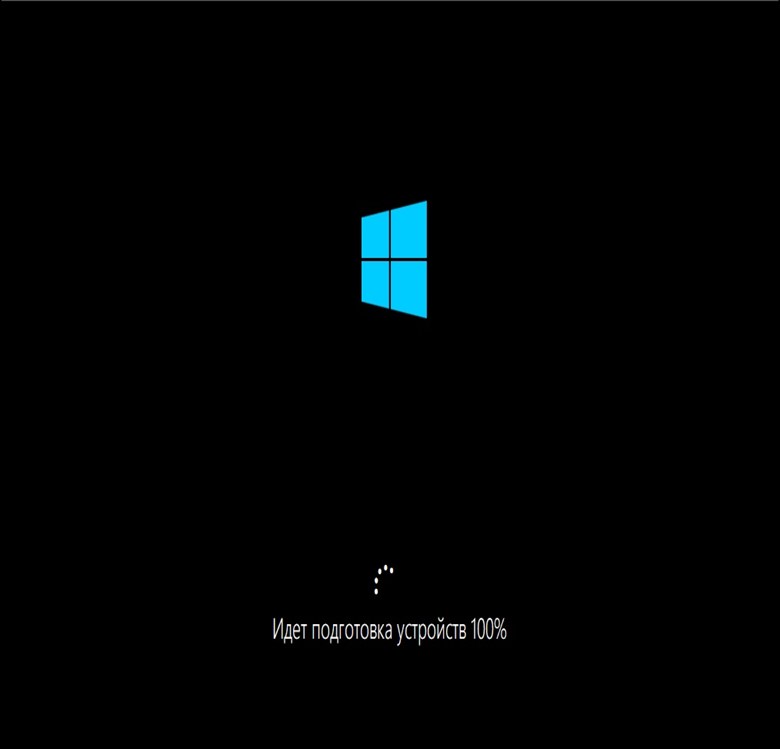
Во время установки система перезагрузится несколько раз.

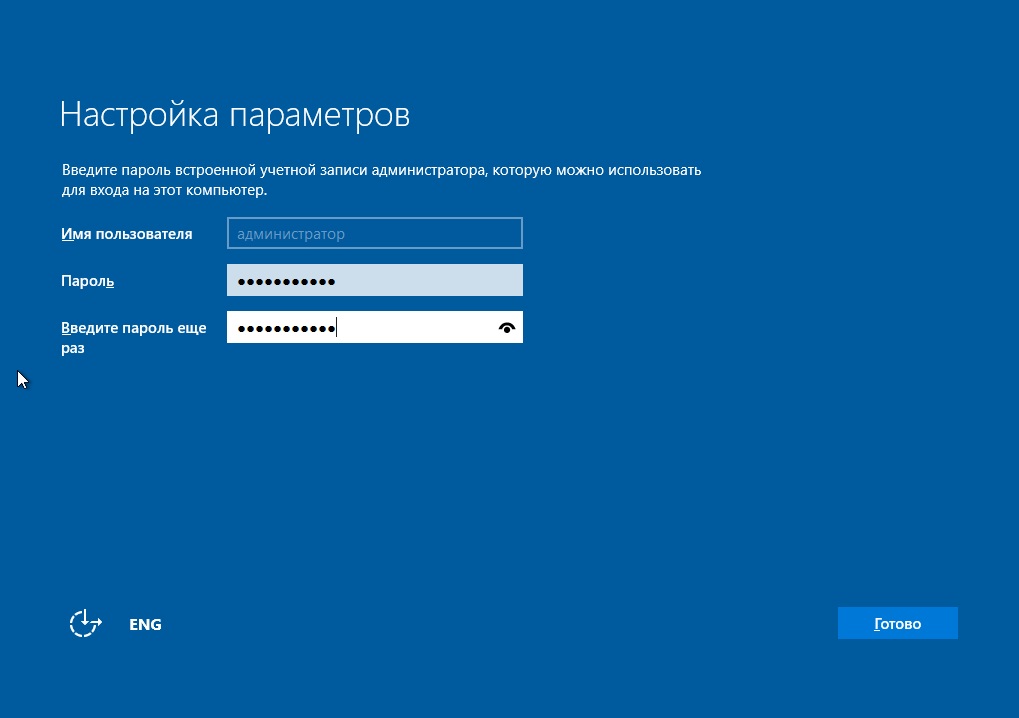
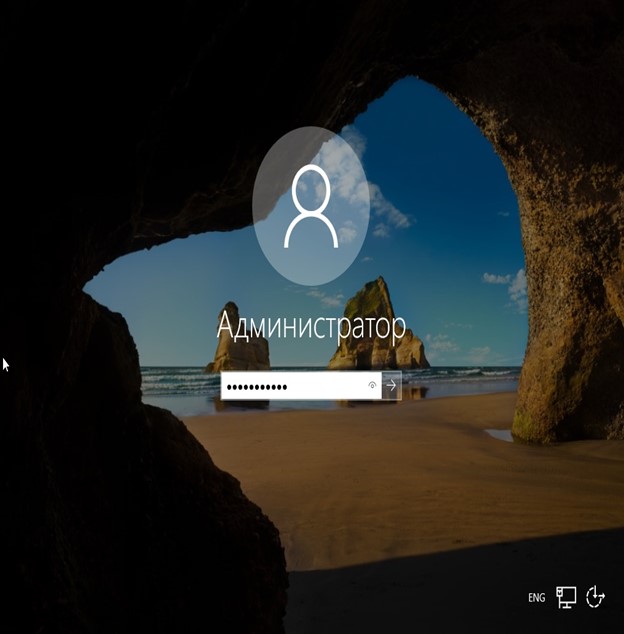
После завершения установки Вам нужно будет задать пароль для учетной записи администратора. Пароль лучше задавать латинскими буквами с цифрами.
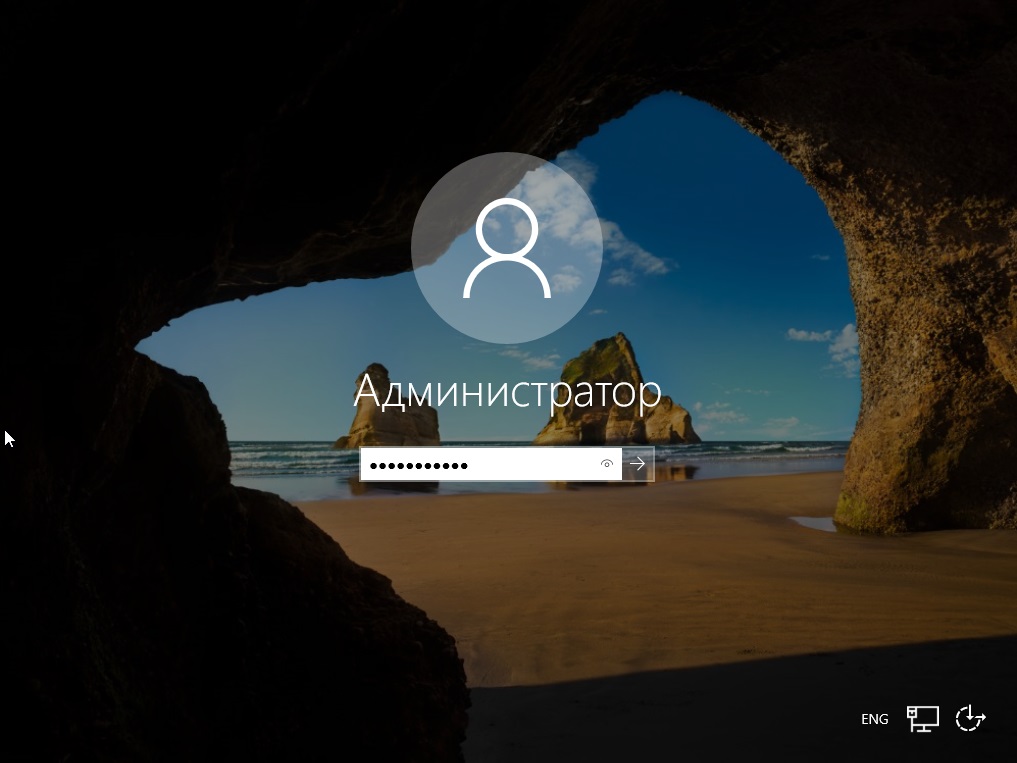
Далее заходим под учетной записью администратора в систему.
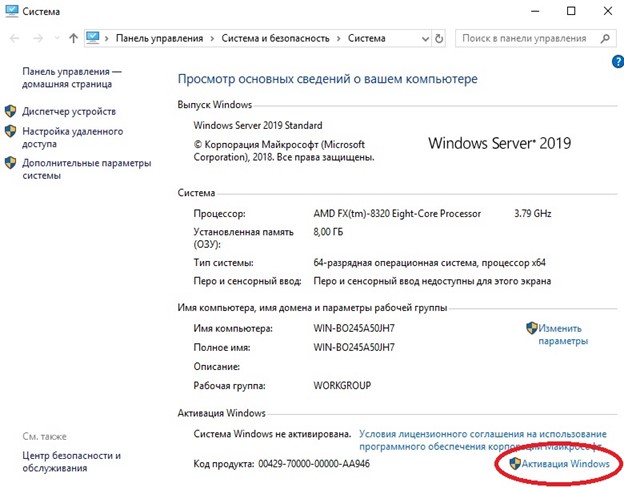
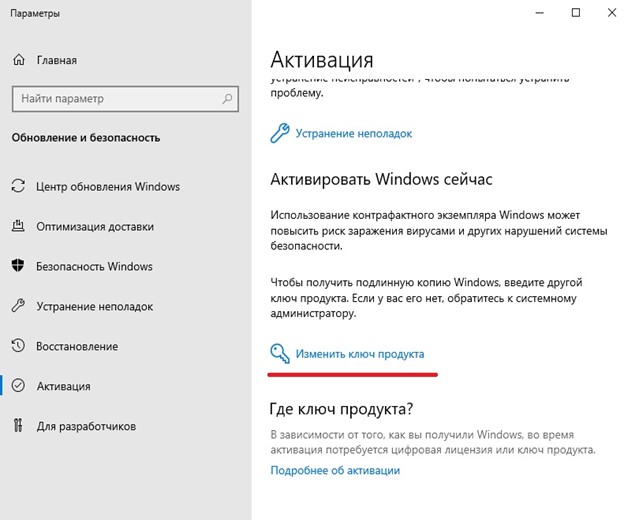
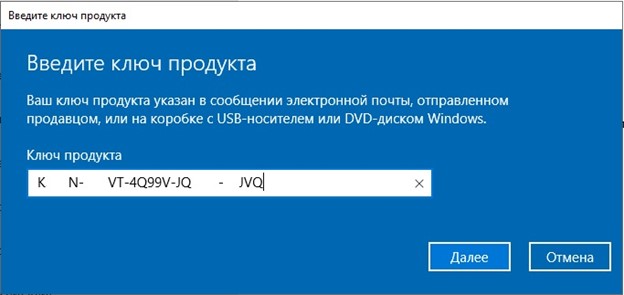
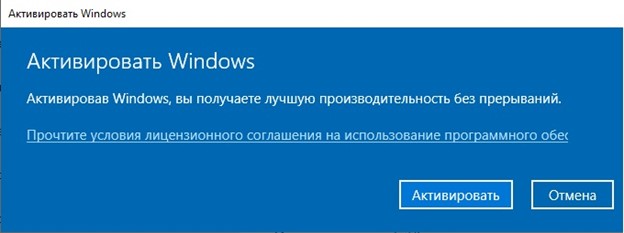
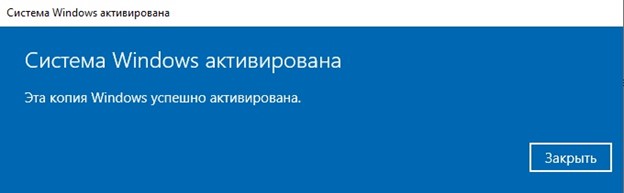
5) После установки переходим к первичной настройке, что нужно сделать сразу после установки — это активировать систему и загрузить все актуальные обновления. Приступим для начала к активации. Заходим меню в «Свойства системы» => Активация Windows => Изменить ключ продукта => и вводите Ваш ключ в поле ввода. Если у Вас нет ключа, то приобрести ключ активации можете в нашем интернет-магазине по самым низким ценам на следующей странице. Моментальная доставка ключа на Вашу электронную почту не заставит Вас должно ожидать активации системы!
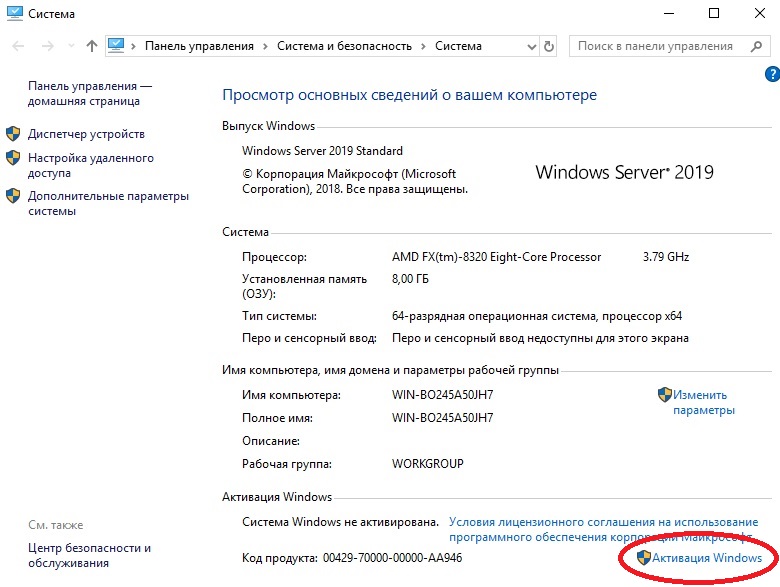
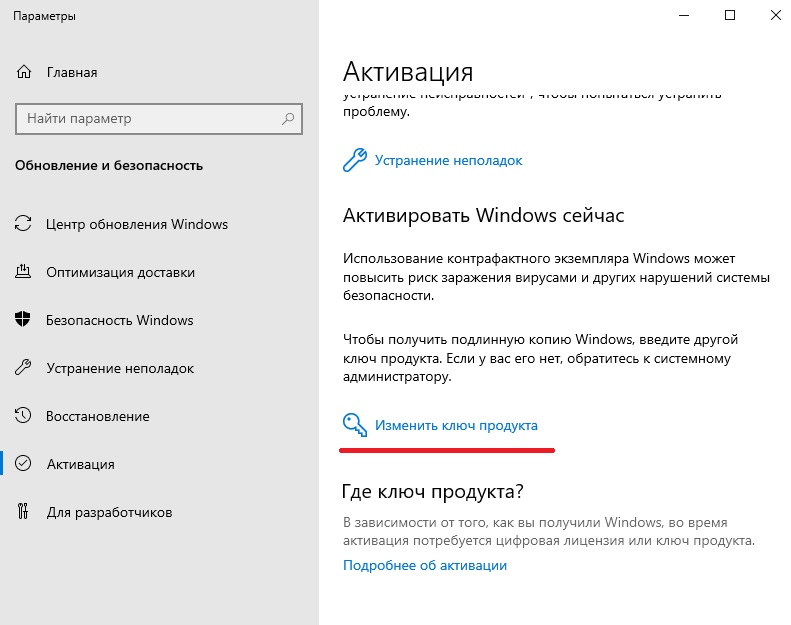
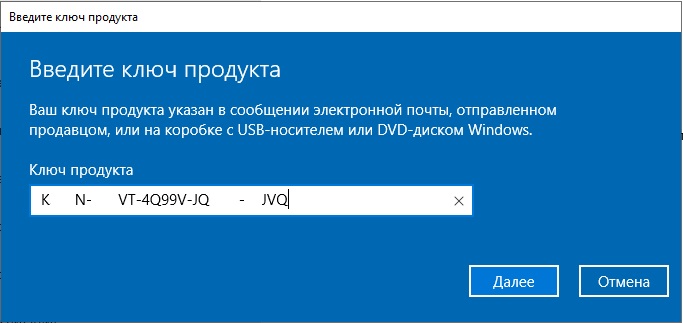
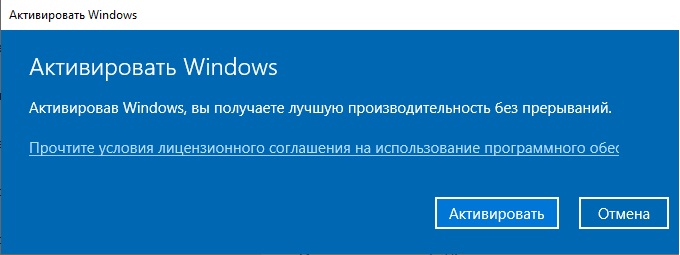
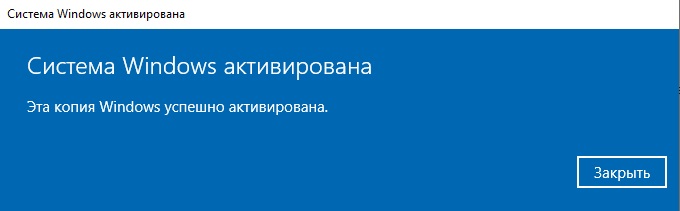
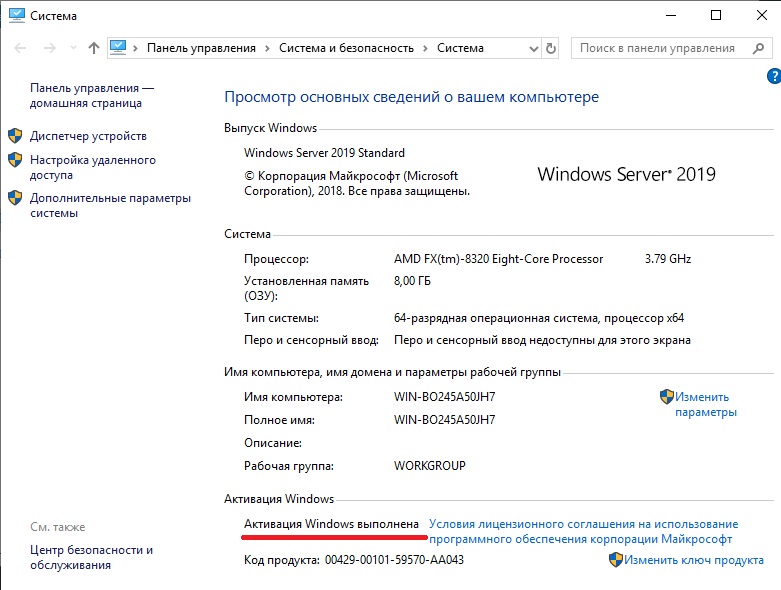
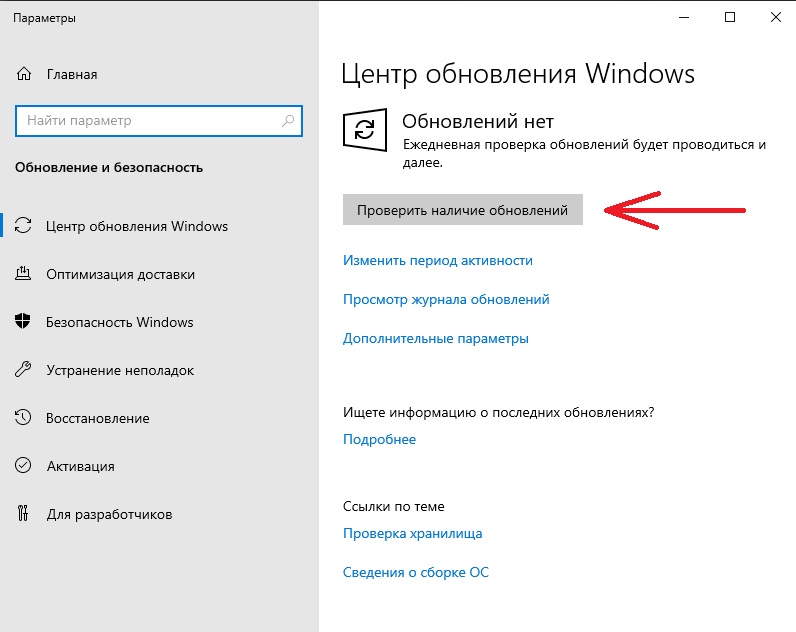
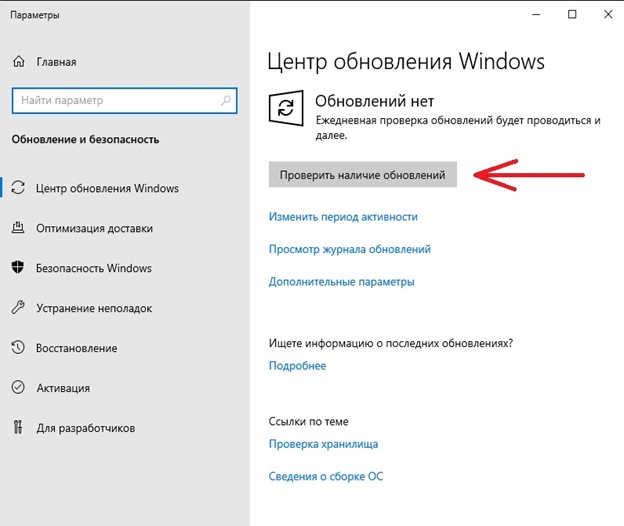
После активации переходим снова в меню «Свойства системы» и проверяем все ли активировалось. Если да, то переходим к загрузке актуальных обновлений.
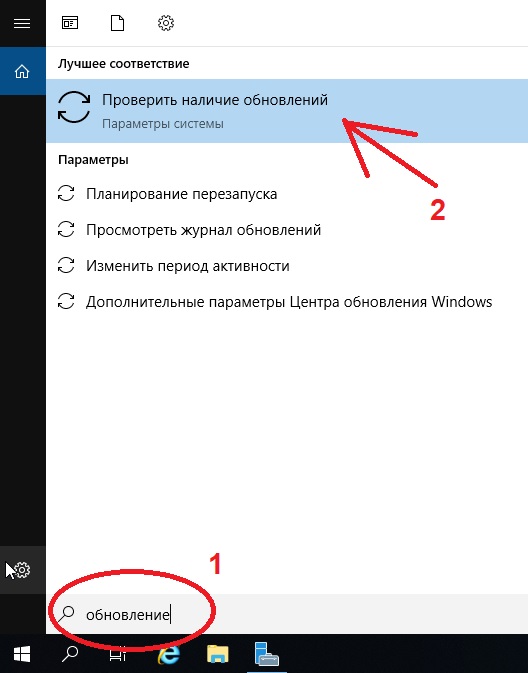
Нажимаем на кнопку «Проверить наличие обновлений».
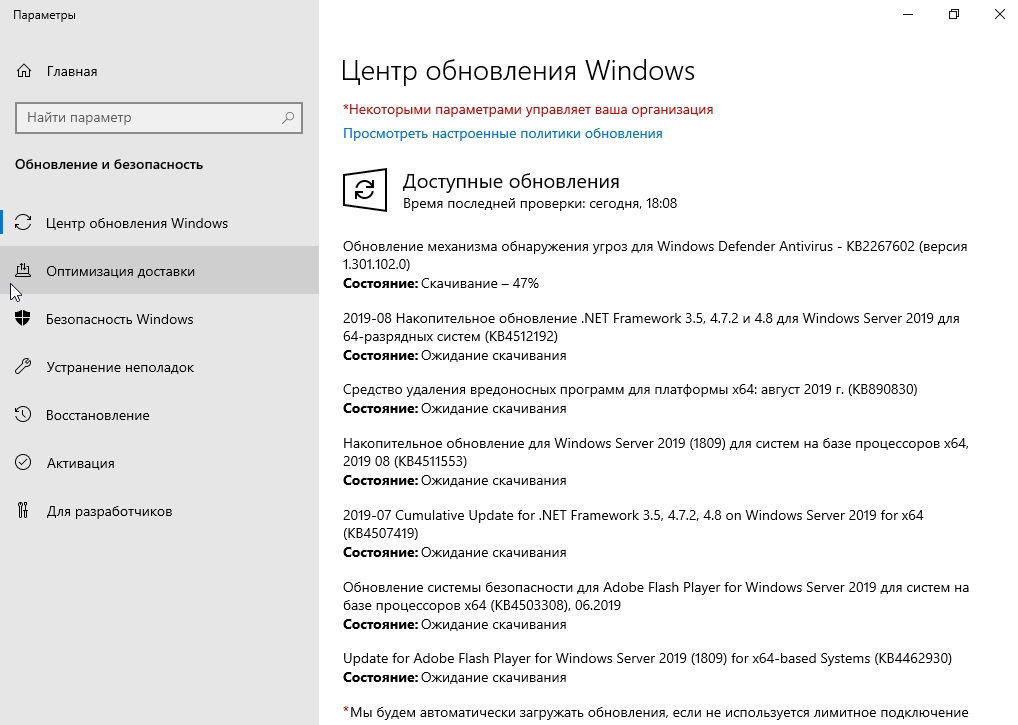
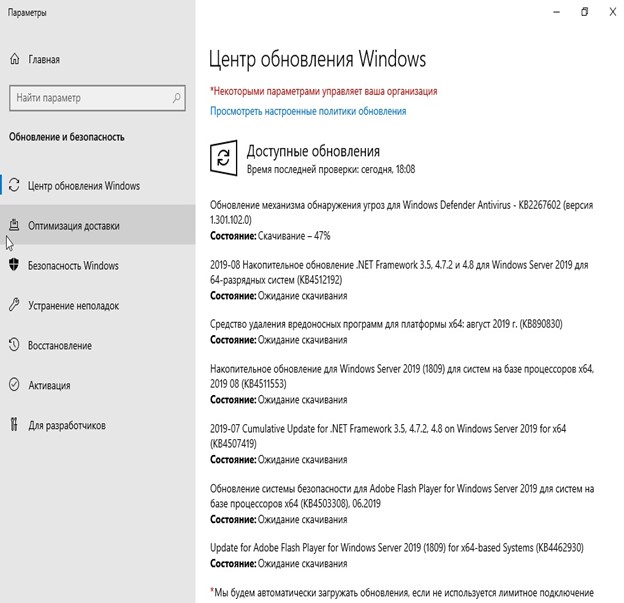
Загружаем обновления, после устанавливаем их. После установки нужно перезагрузить систему.
На этом все. Установка и первичная настройка закончена. Как детально настроить Windows Server 2019 читайте в нашей следующей статье.
Лицензионный ключ активации Windows Server 2019 от
В этой статье мы рассмотрим детально как установить Windows Server 2019 и самую первичную настройку, что нужно сделать сразу после установки системы. Как детально настроить Windows Server 2019 читайте в нашей статье
1) Итак, первое – Вам нужно скачать дистрибутив.
2) После скачивания дистрибутива – его нужно записать на флешку, сделав ее загрузочной.
3) Далее Вам нужно загрузиться с флешки из под биоса для начала самой установки.
4) Теперь после того, как Вы загрузились с флешки, приступаем к началу установки.
Выбираем язык операционной системы, выберем русский.

Далее выбираем желаемую редакцию Windows Server 2019 для установки. В данной статье мы установим версию Standard, но Вы можете выбрать другую версию, к примеру Datacenter. Порядок установки в ней аналогичный.
А так же, обязательно выбираете дистрибутив с “Возможности рабоче стола”, иначе у Вас система установится без графической оболочки и управление операционной системой будет только из под консоли.
Принимаем условия лицензирования.
Далее, выбираем выборочную установку, т.к мы устанавливаем систему с нуля.
После у Вас будет меню выбора диска куда установить систему. На нашем примере только один диск, у Вас же их может быть больше. Выбираете нужный диск для установки и нажимаем “Далее”.
И теперь начинается непосредственно сама установка, ожидайте ее окончание.
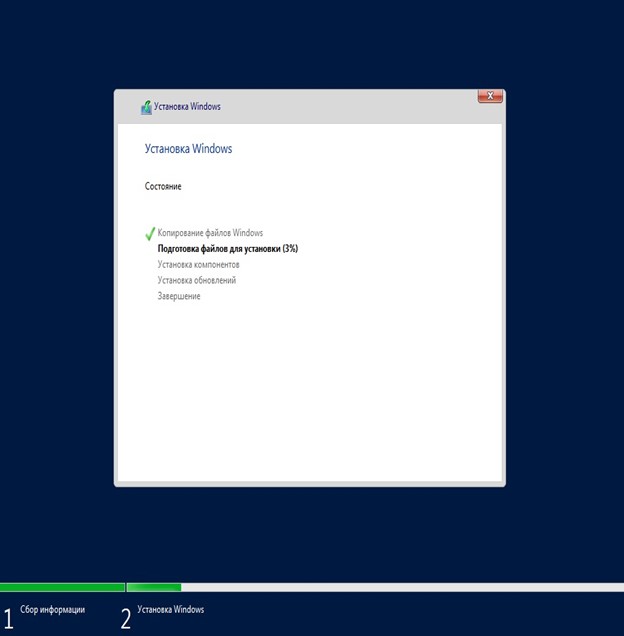
Во время установки система перезагрузится несколько раз.
После завершения установки Вам нужно будет задать пароль для учетной записи администратора. Пароль лучше задавать латинскими буквами с цифрами.


Далее заходим под учетной записью администратора в систему.
5) После установки переходим к первичной настройке, что нужно сделать сразу после установки – это активировать систему и загрузить все актуальные обновления. Приступим для начала к активации. Заходим меню в “Свойства системы” => Активация Windows => Изменить ключ продукта => и вводите Ваш ключ в поле ввода.
После активации переходим снова в меню “Свойства системы” и проверяем все ли активировалось. Если да, то переходим к загрузке актуальных обновлений.


Нажимаем на кнопку “Проверить наличие обновлений”.
Загружаем обновления, после устанавливаем их. После установки нужно перезагрузить систему.
На этом все. Установка и первичная настройка закончена. Как детально настроить Windows Server 2019 читайте дальше.
В этой статье мы рассмотрим базовые настройки Windows Server 2019, это AD, DNS, DHCP и лицензирование терминального сервера. Данные настройки актуальны на большинстве серверов и являются самыми необходимыми.
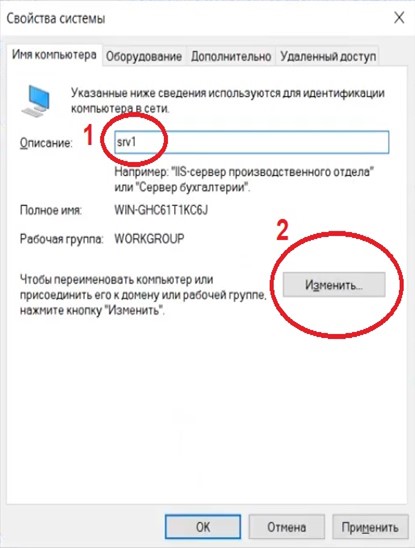
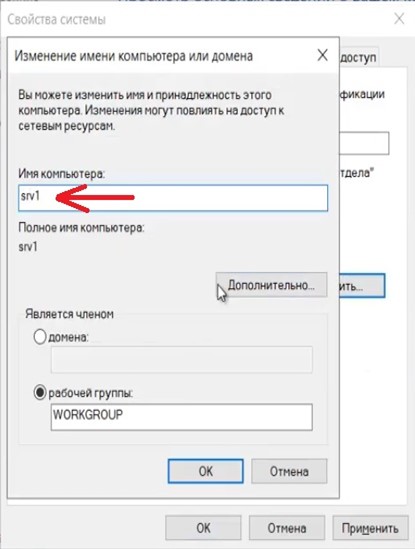
1) Меняем имя сервера и его описание (если нужно). Переходим в свойства системы => изменить параметры => изменить. Задаем «Имя компьютера», и если нужно, то имя рабочей группы. После изменения параметров нужно перезагрузиться.
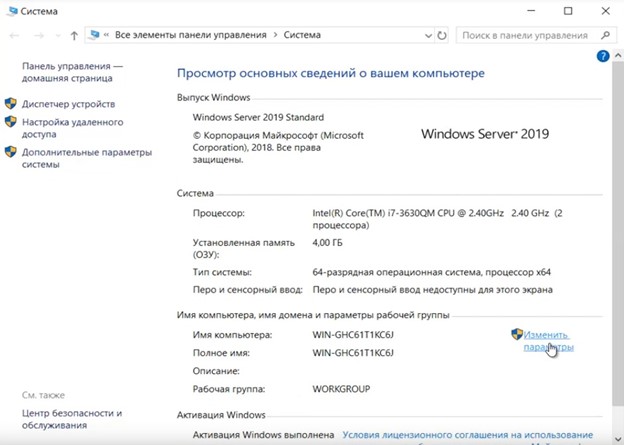

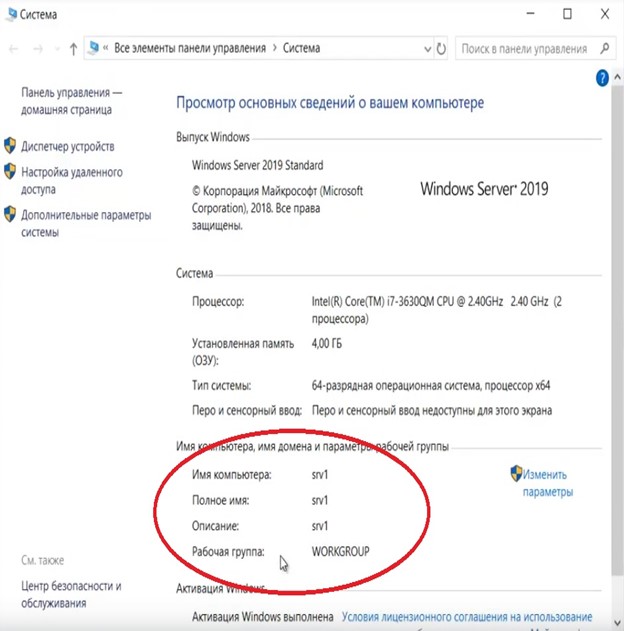
После перезагрузки можете проверить, все ли у вас прошло успешно с изменением имени.
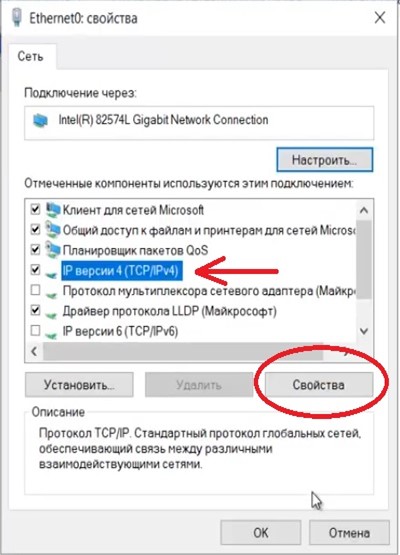
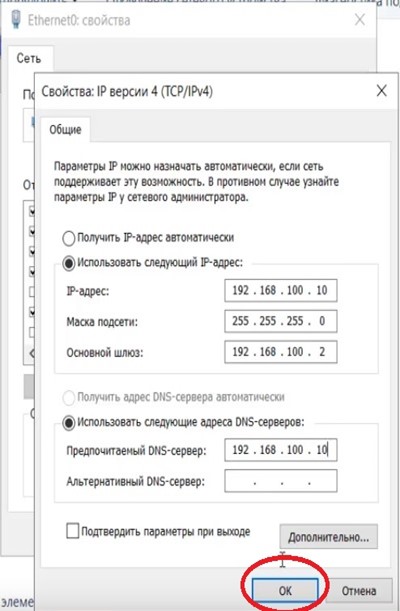
2) Далее меняем сетевые настройки, IP, маску и шлюз ставите обязательно статичными, настройки производятся в зависимости от Вашей сети.
Переходим в свойства сетевой карты.
И далее в свойства IPv4
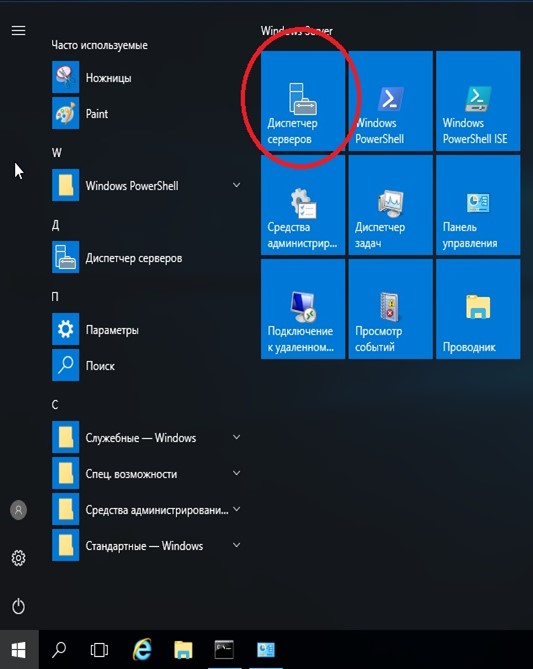
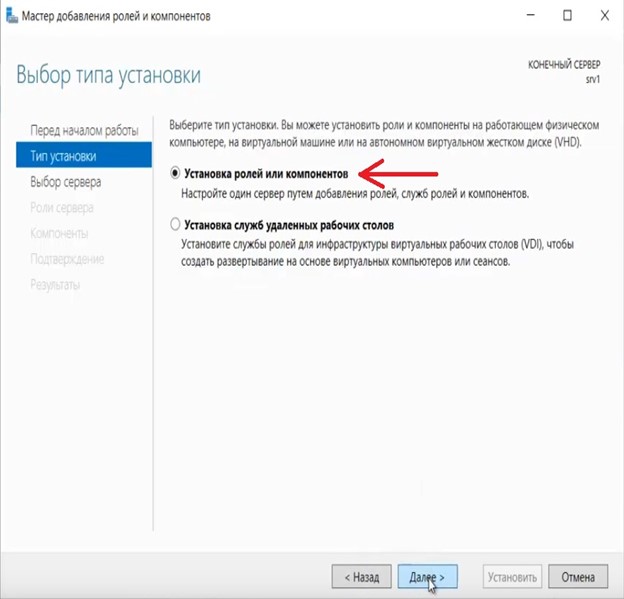
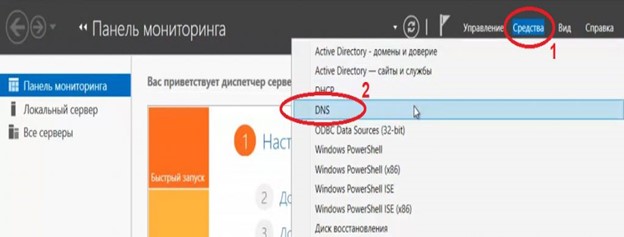
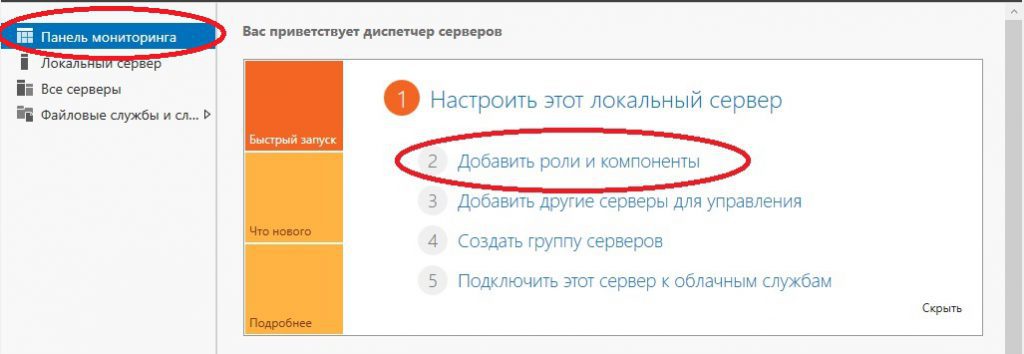
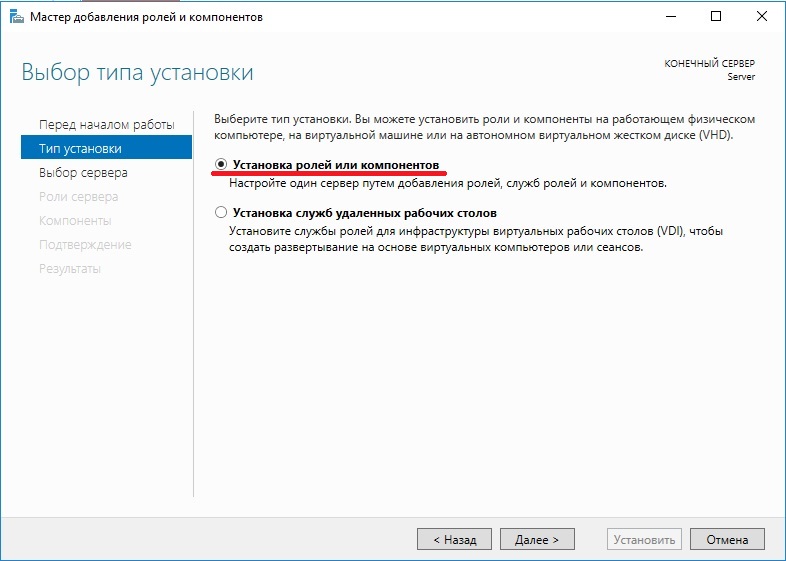
3) Следующим пунктом настраиваем Active Directory. Добавляем роли и компоненты. Для этого переходим меню «Пуск» => Диспетчер серверов.
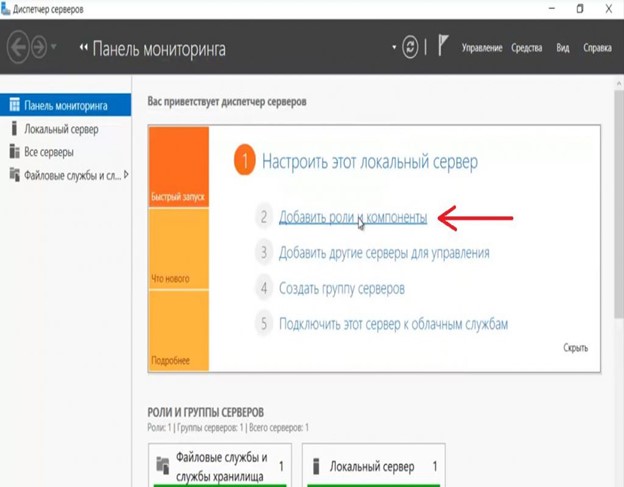
Установка “Ролей и компонентов”.
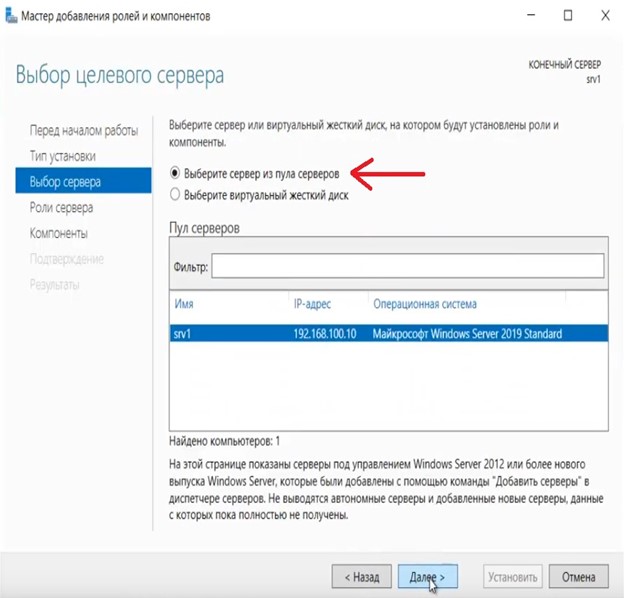
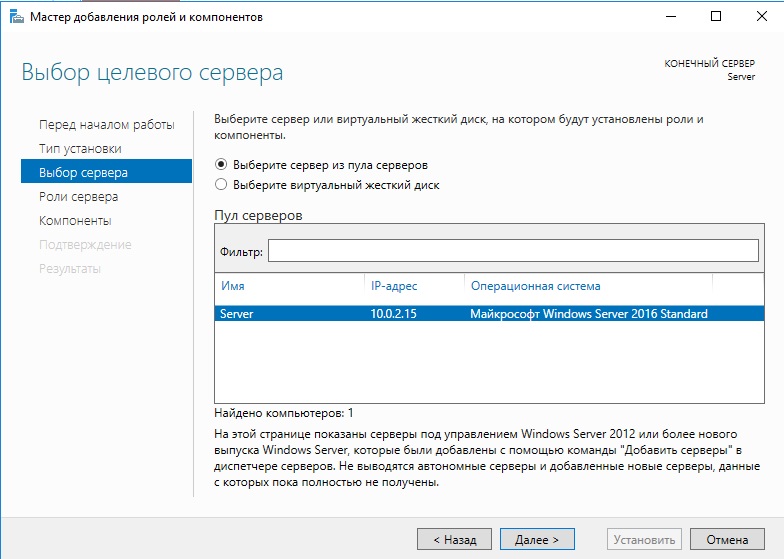
Соответственно выбираем нужный нам пул сервера.
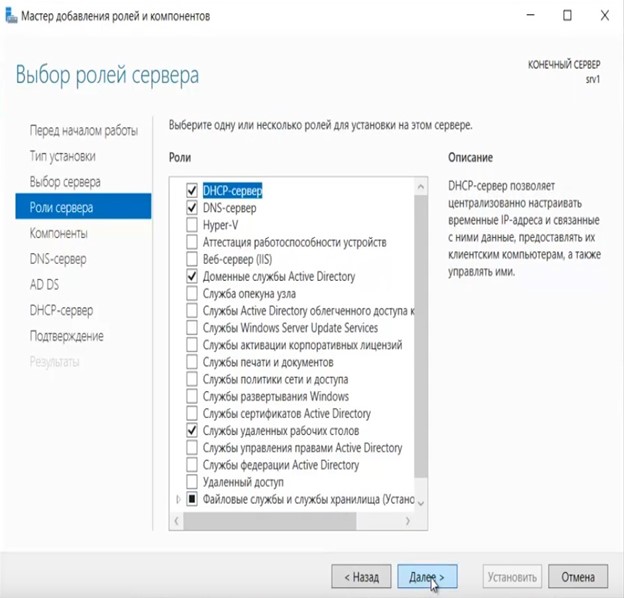
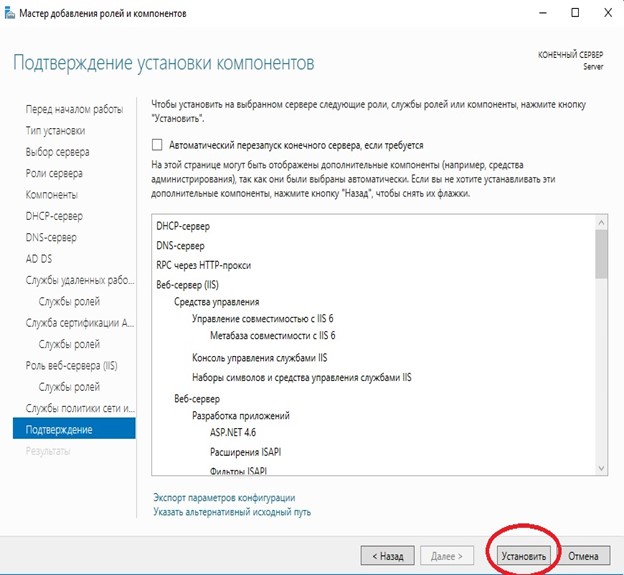
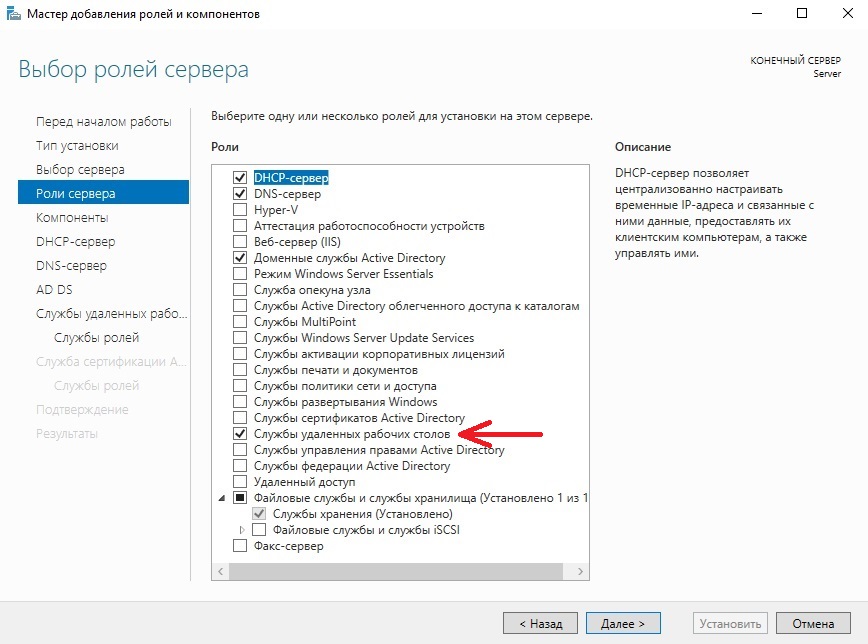
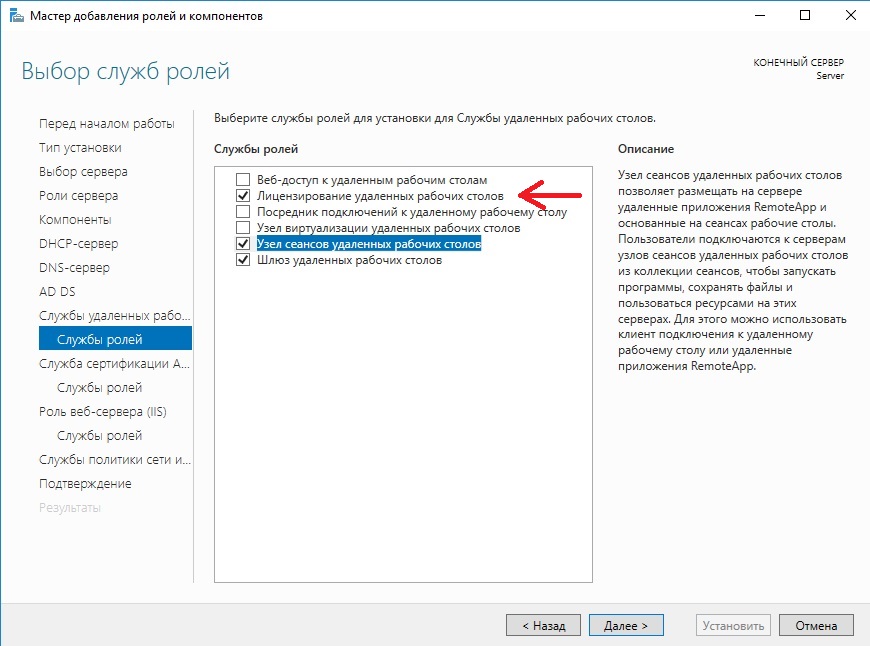
В “Роли сервера” для всех наших настроек выберем “DHCP-сервер”, “DNS-сервер”, “Доменные службы Active Directory” и “Службы удаленных рабочих столов”.
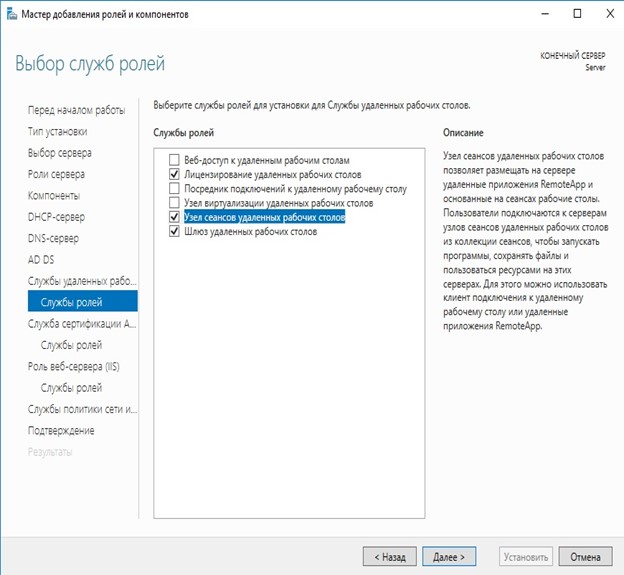
Идем далее до “Службы ролей” и выбираем пункты как на скриншоте ниже.
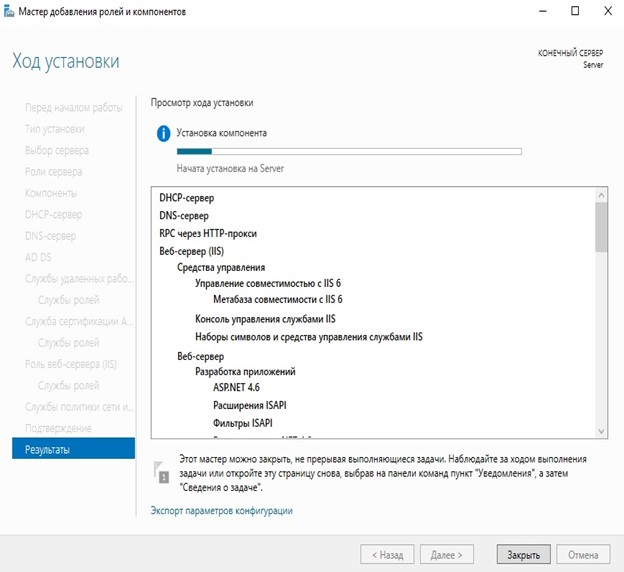
После так же идем “Далее” до пункта “Подтверждение” и устанавливаем все, что мы выбрали.
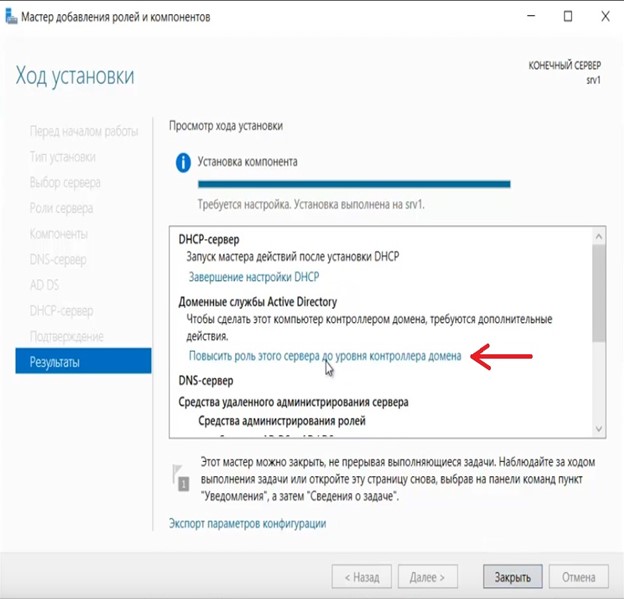
После установки в “Результатах” выбираем пункт “Повысить роль этого сервера до уровня контроллера домена”.
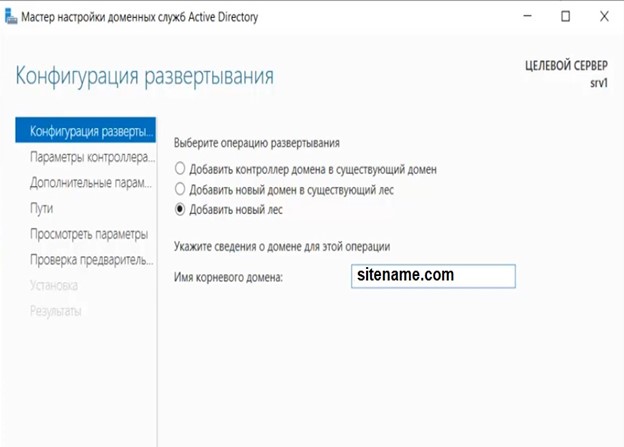
В мастере настроек доменных служб выбираем “Добавить лес” и вводим имя корневого домена, это может быть любое имя, к примеру домен вашего сайта.
В параметрах контроллера нужно придумать пароль.
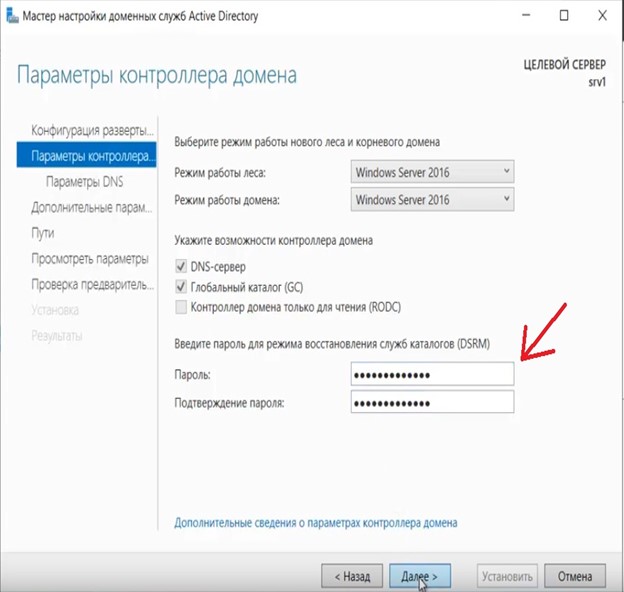
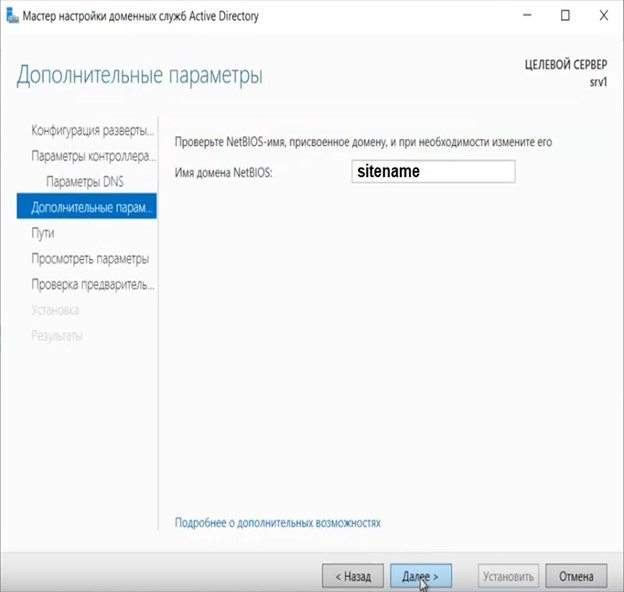
По каталогу настроек идем дальше, до дополнительных параметров, там нужно указать имя домена NetBIOS, если он у вас там уже стоит, то можете оставить как есть, либо поменять по своему желанию.
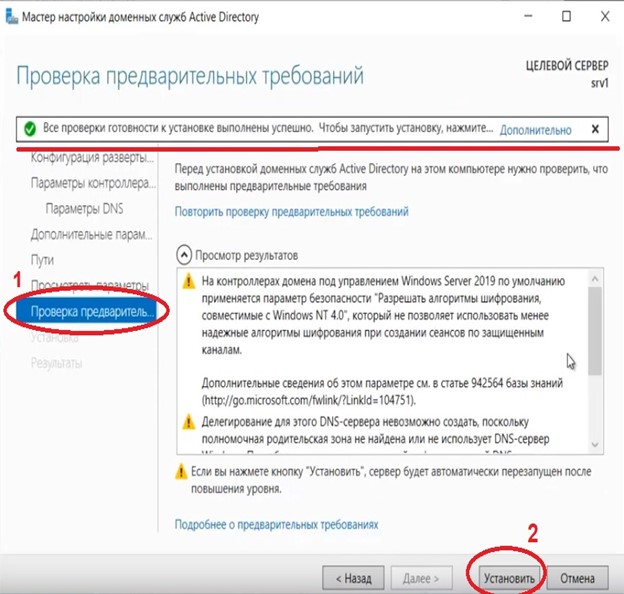
Далее идем до “Проверки предварительных требований”, если проверка прошла успешно, то устанавливаем примененные настройки.
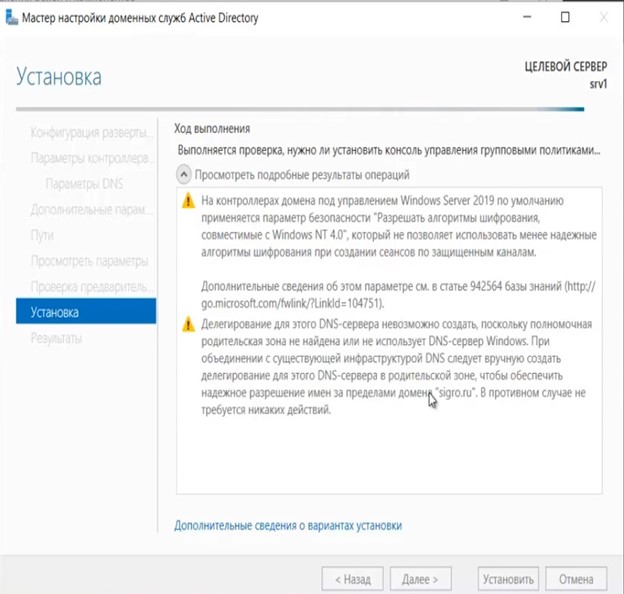
После полной установки необходимо перезагрузиться.

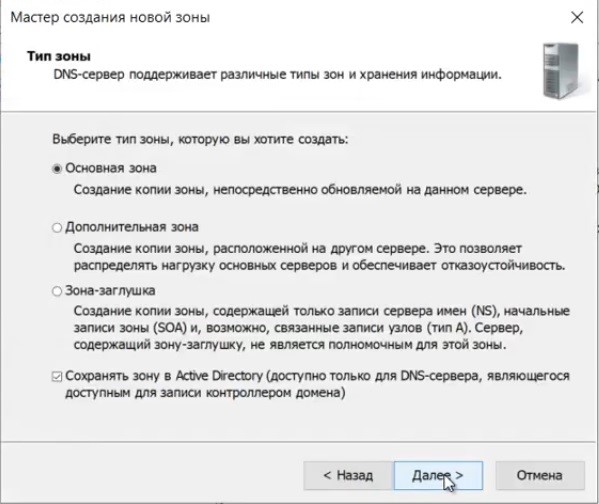
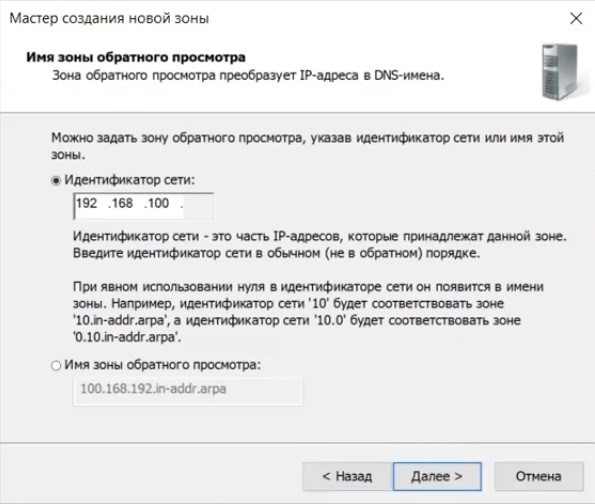
4) Производим настройку “Зона обратного просмотра”.
На пункте “Зона обратного просмотра” => Создать новую зону.

Выбираем “Основную зону”.
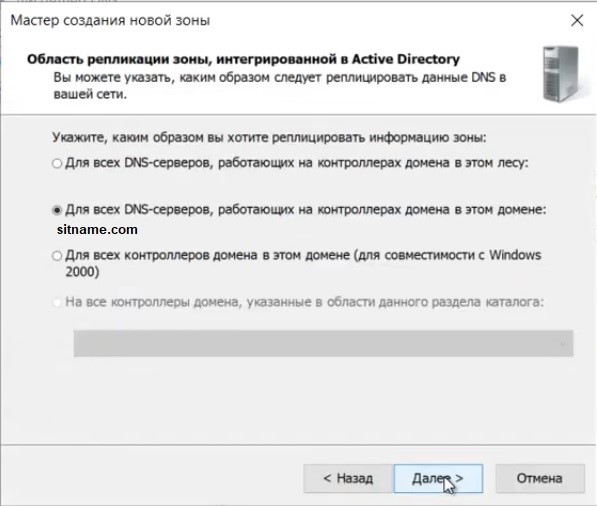
Для всех DNS-серверов, работающих на контроллерах домена в этом домене:
Зона обратного просмотра IPv4
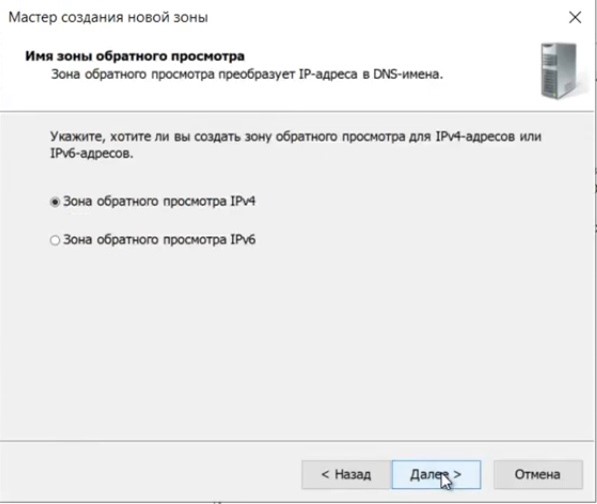
Ну и соответственно выводим индефикатор сети.
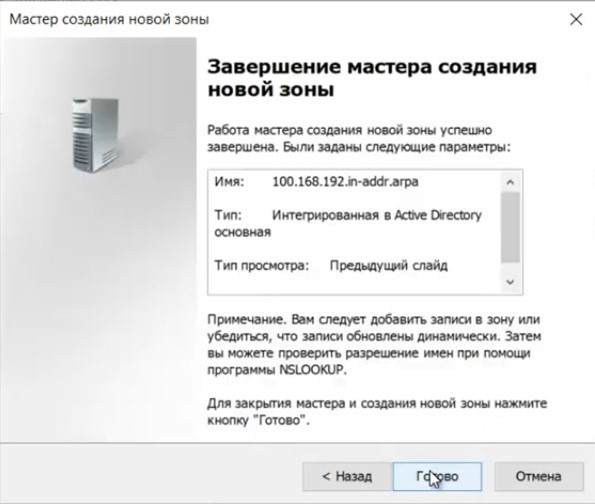
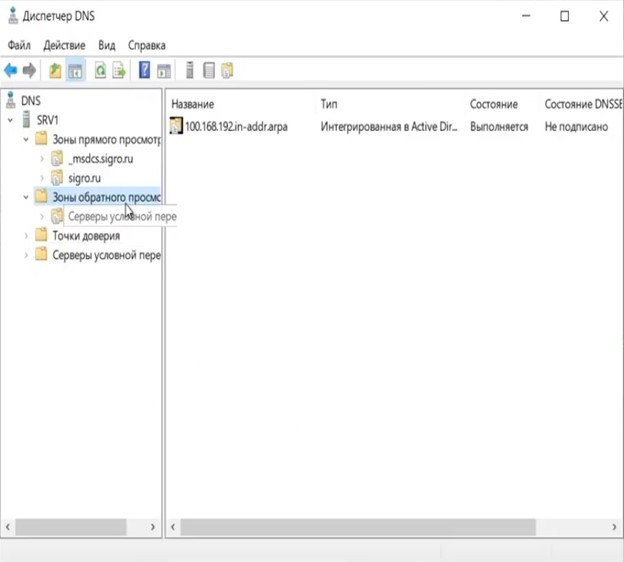
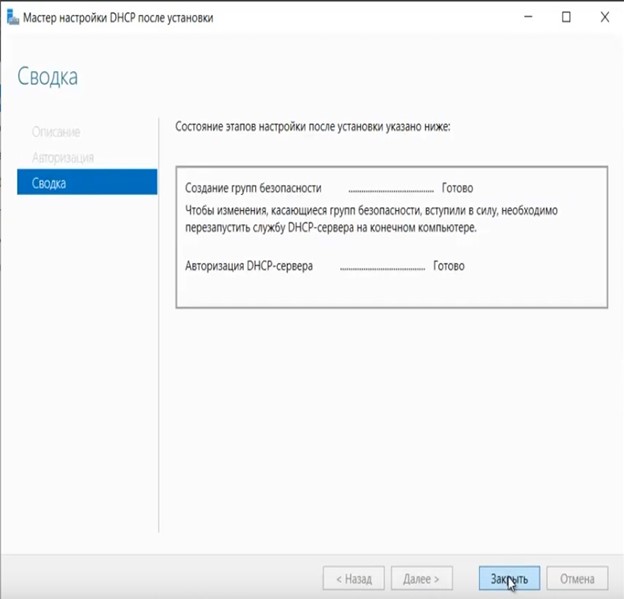
Проверяем, что все установилось.
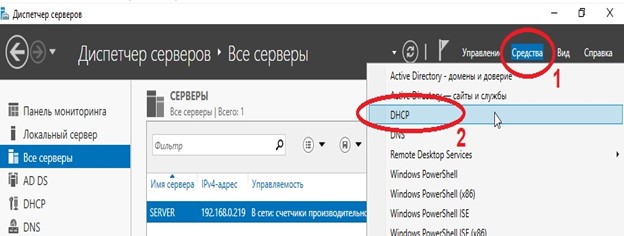
5) Переходим к настройке DHCP. Переходим в мастер установки.
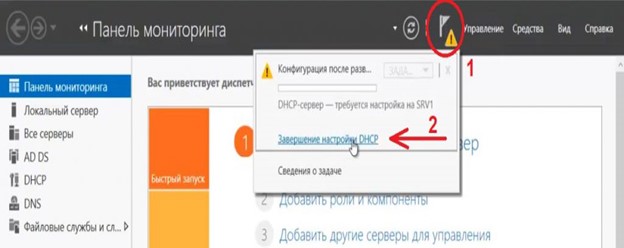

После завершения установки => Диспетчер => Средства => DHCP
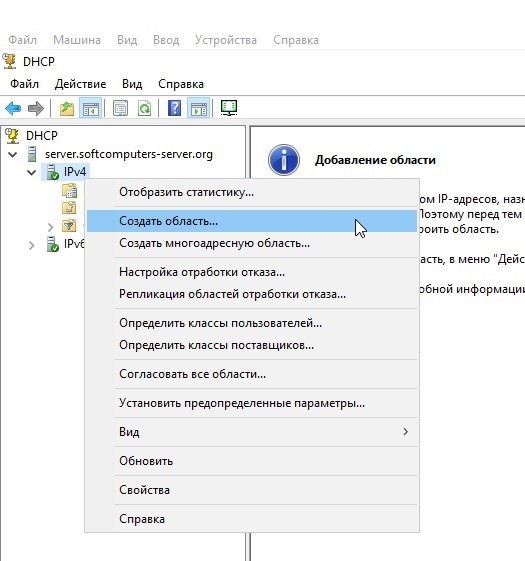
На DHCP => Имя вашего сервера => IPv4 – правой кнопкой мыши => Создать область.
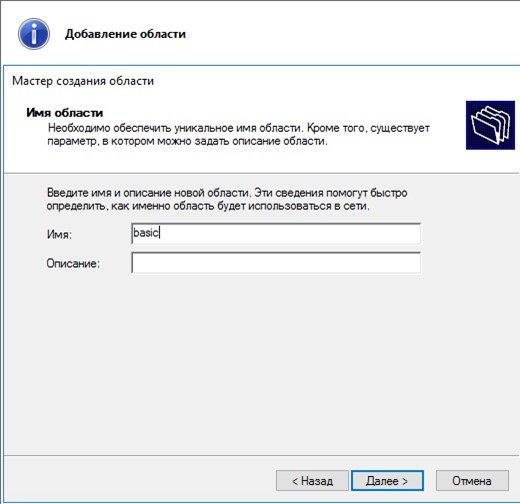
Задаем любое имя области DHCP.
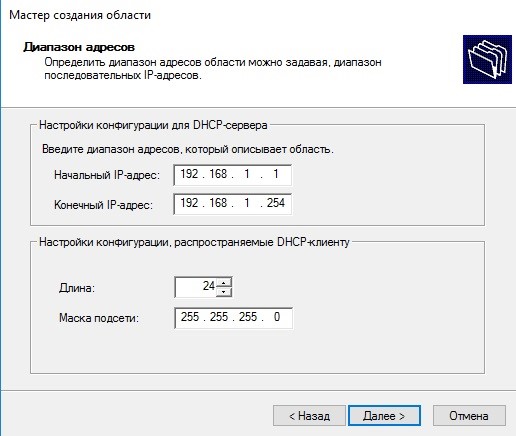
В диапазоне адресов задаем начальный и конечный интервал области IP адресов, который будет раздавать сервер.
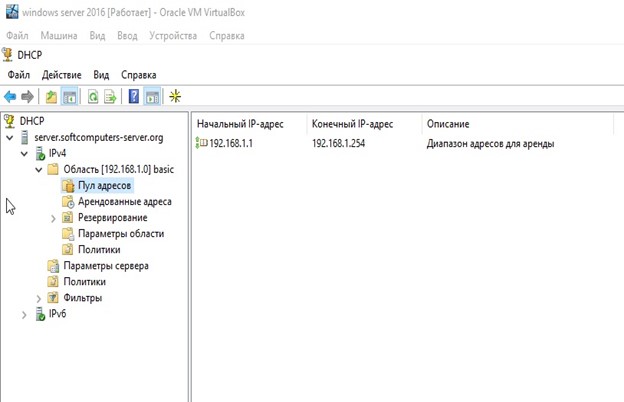
Далее в дереве каталогов DHCP => Имя сервера => Область => Пул адресов. В списке должен быть указан начальный и конечный диапазон, который Вы указывали в настройках.
6) Теперь по настройкам лицензирования удаленных рабочих столов (терминального сервера). Пошаговую инструкцию как лицензировать терминальный сервер можете прочитать далее.
В данной инструкции мы рассмотрим как лицензировать сервер удаленных рабочих столов (терминальный сервер), или другими словами настройка сервера для подключения к нему по RDP. Данная инструкция распространяется для версий Windows Server 2012, 2016, 2019 и 2022.
1) Первое, что нам нужно сделать – это добавить службы и роли удаленных рабочих столов, если Вы их еще не установили. Заходим в Active Directory => Установка ролей или компонентов => Выбор нужного сервера.
Далее добавляете в ролях “Службы удаленных рабочих столов”, а в службе ролей “Лицензирование удаленных рабочих столов”, так же можете установить “Узел сеансов удаленных рабочих столов” и “Шлюз удаленных рабочих столов”.

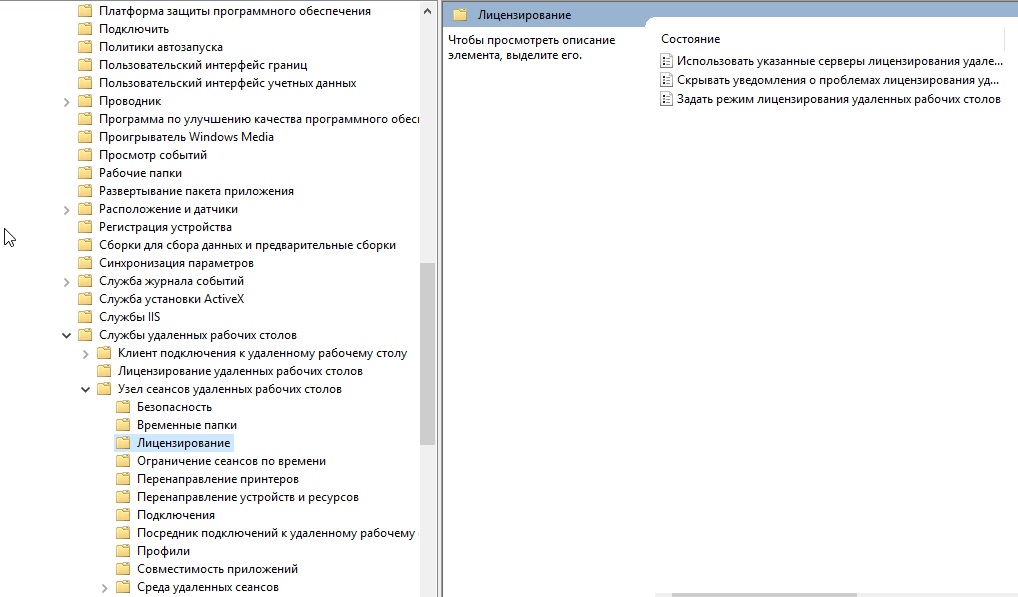
2) Следующим пунктом нам нужно настроить групповую политику. Чтобы произвести настройку заходим в “Поиск” на панели инструментов => gpedit.msc => Конфигурация компьютера => Административные шаблоны => Компоненты Windows => Службы удаленных рабочих столов => Узел сеансов удаленных рабочих столов => Лицензирование.
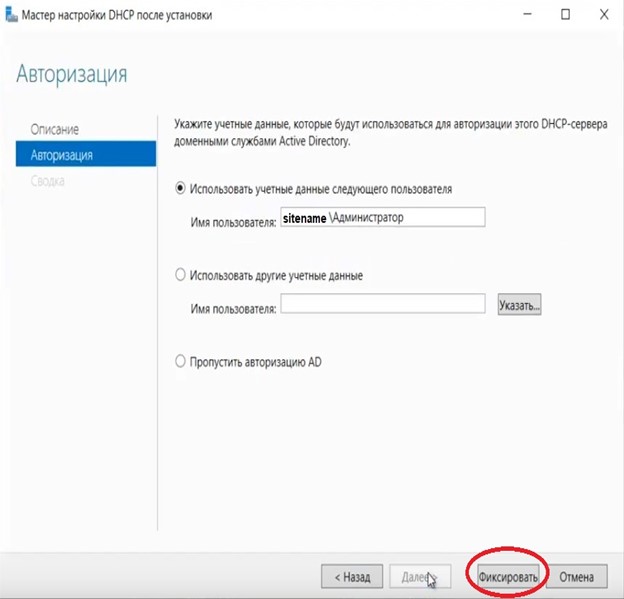
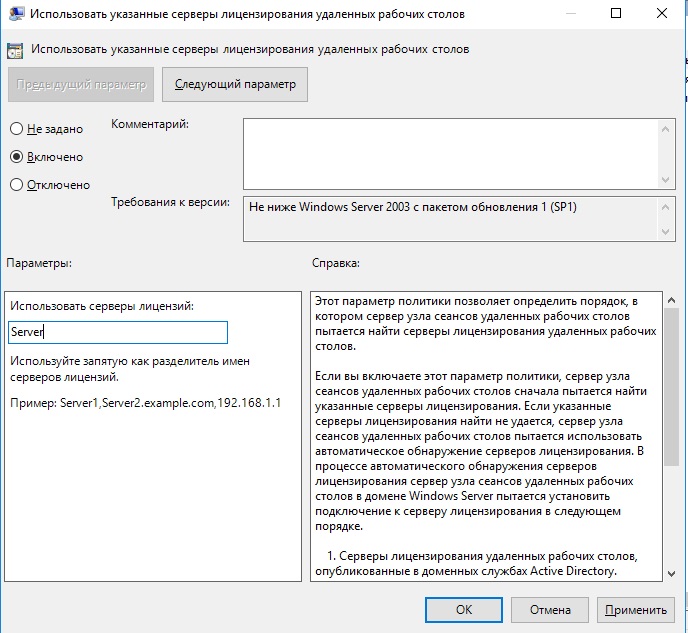
Переходим в меню «Использовать указанные серверы лицензирования удаленных рабочих столов» и вводим в поле имя Вашего сервера, либо его IP.
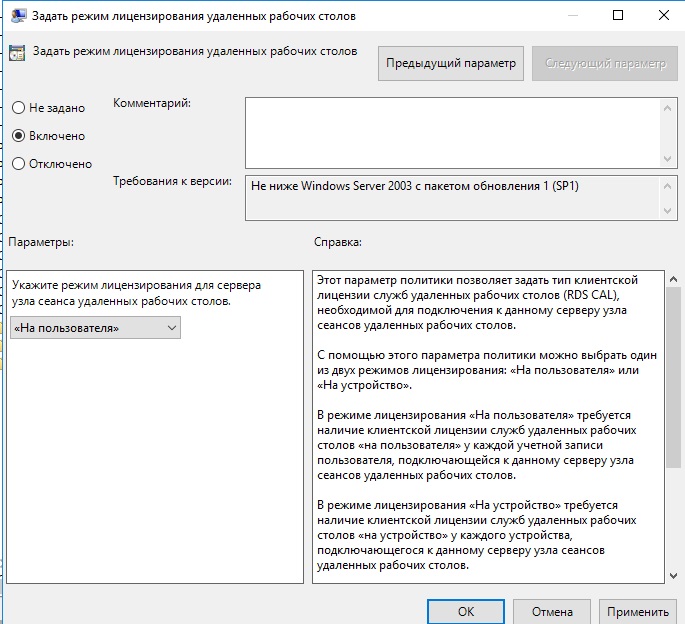
После переходим в меню «Задать режим лицензирования удаленных рабочих столов», в раскрывающемся меню выбираем «На пользователя», либо “На устройство” в зависимости от Вашей лицензии. (см. 3 пункт про лицензию).
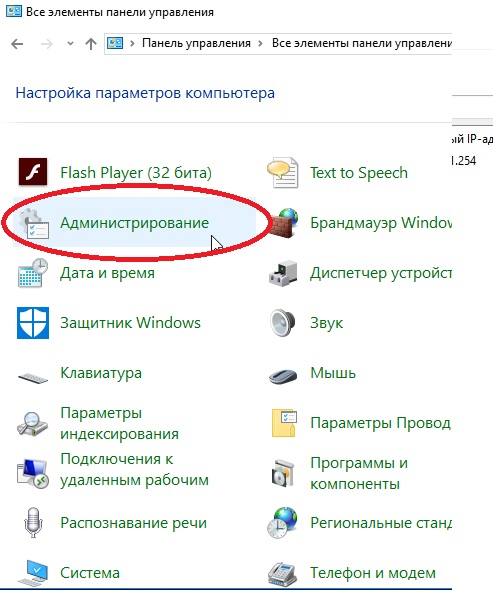
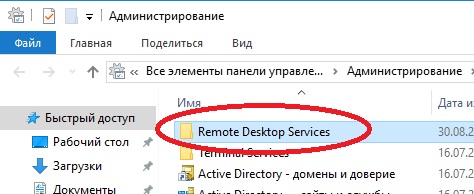
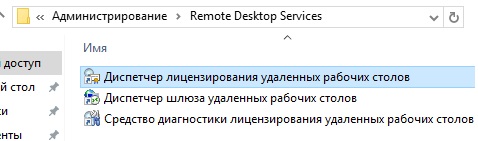
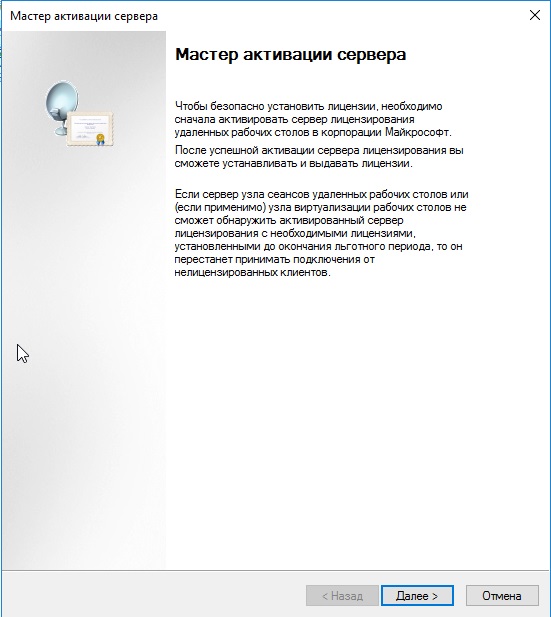
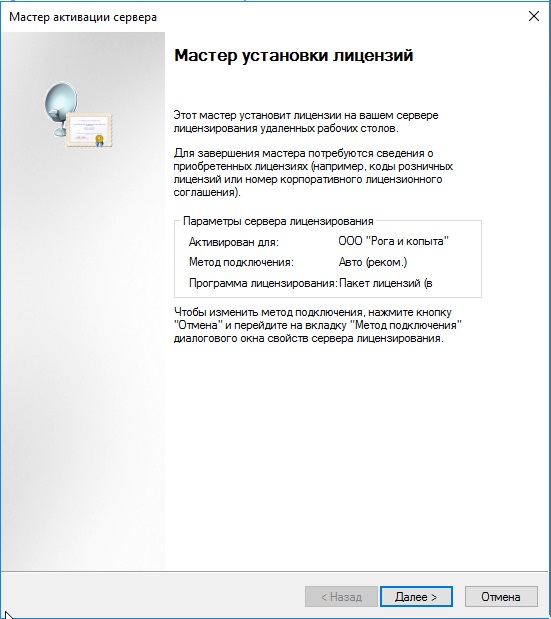
3) Теперь можно перейти непосредственно к самому лицензированию. Переходим в «Панель управления» => Администрирование => Remote Desktop Services => Диспетчер лицензирования удаленных рабочих столов.
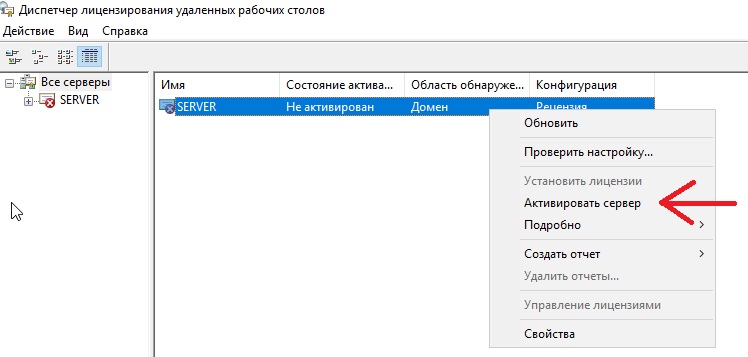
Переходим в «Мастер активации сервера».
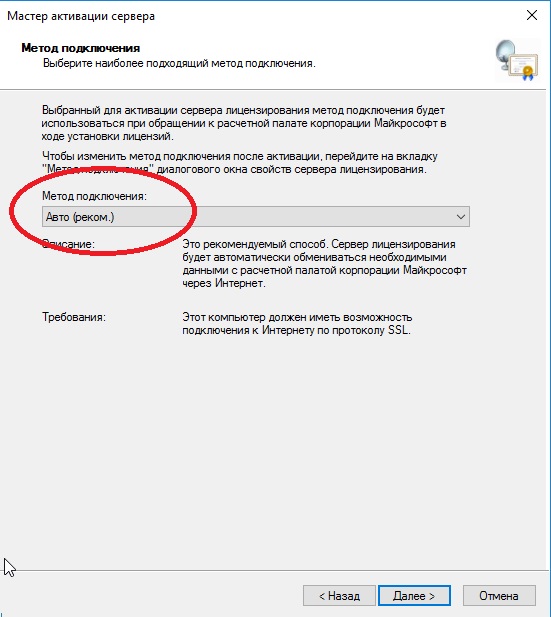
Выбираем рекомендуемый «Авто» метод подключения.
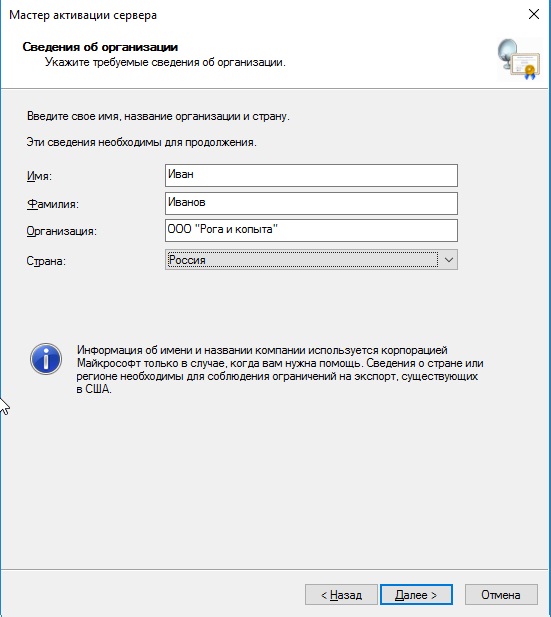
Далее вводите опционально имя и фамилию, название Вашей организации и страну размещения сервера. (Можно вводить любые данные, они не требуют проверки).
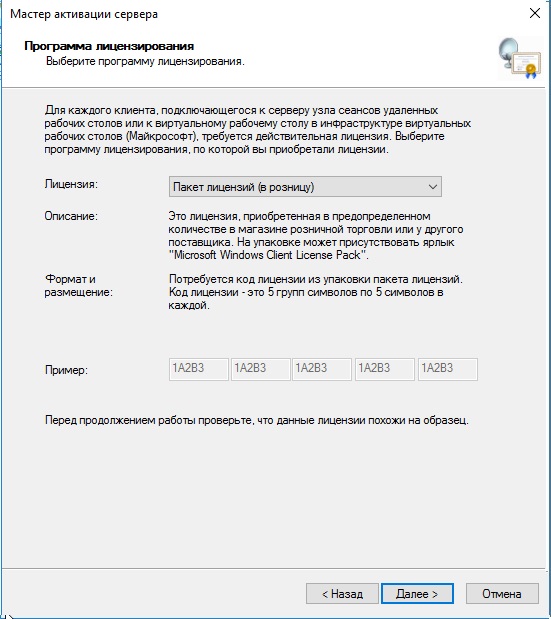
Приступаем к самому лицензированию после регистрации выше. Вам нужен ключ активации для лицензирования терминального сервера — CAL (Client Access Licence). В нашем случае – это будет лицензирование “На пользователя”, он обеспечивает подключение 50 пользователей (клиентов) по RDP к серверу.
При лицензировании – выбираем «Пакет лицензий в розницу» => Далее.
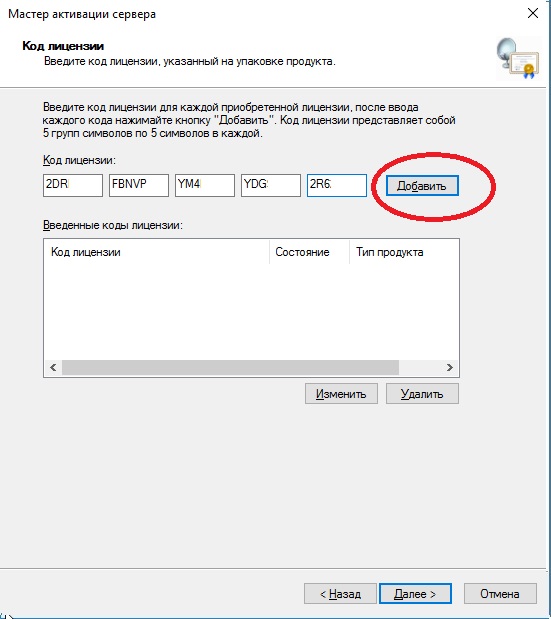
Вводим ключ активации.
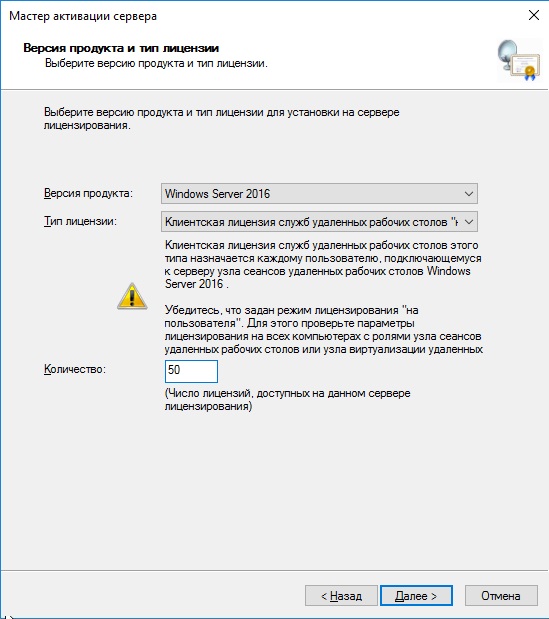
Далее в зависимости от лицензии она может определиться сразу на 50 пользователей, или устройств, либо Вам нужно будет это указать самим как на скриншоте ниже. (указав больше пользователей, чем позволяет лицензия — данная настройка просто не активируется). Тип лицензии соответственно выбираем «По пользователю», в нашем случае.
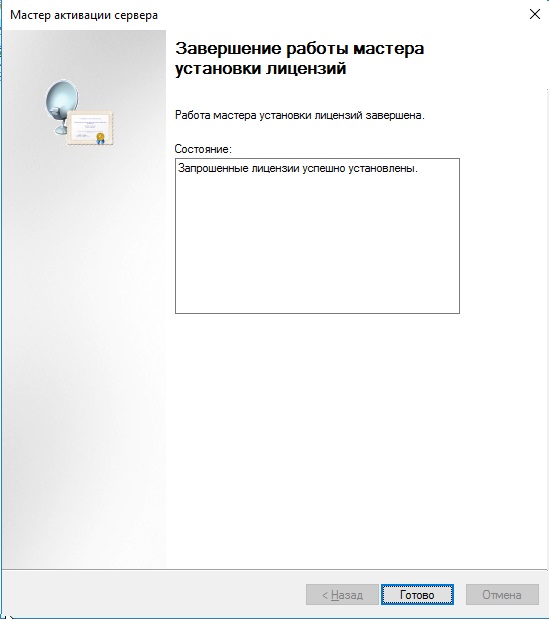
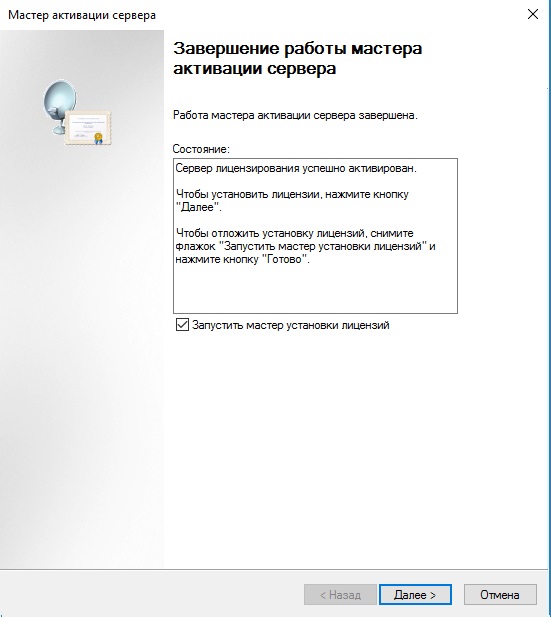
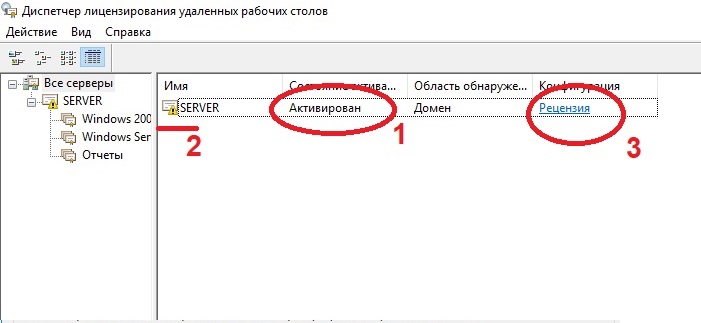
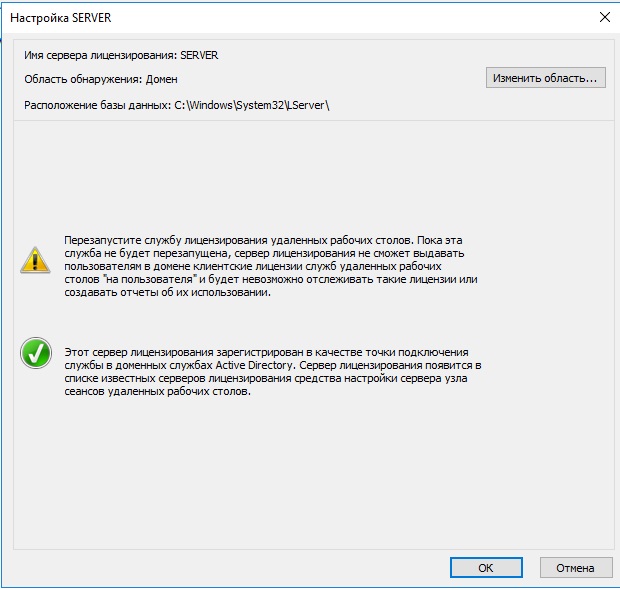
После возвращаемся в диспетчер лицензирования удаленных рабочих столов. И смотрим активирован ли сервер. Если да, то значит, что все прошло успешно. Но у Вас еще может быть «желтое предупреждение» на иконке сервера. Чтобы устранить проблемы переходим в «Рецензия». В меню данной «Рецензии» могут быть пункты которые нужно отметить, нажмите соответствующие кнопки, если они у вас будут.
Подробное и понятное руководство о том, как установить Windows Server 2019.
Настоятельно рекомендую никогда не использовать никаких сторонних сборок Windows. Используйте только оригинальные установочные образы.
Рекомендую всегда использовать англоязычные издания Windows Server. Оригинальные (английские) версии Windows работают стабильнее.
После успешной загрузки с установочной флешки или DVD-диска Windows Server 2019, первым делом необходимо выбрать языковые параметры.
В данном руководстве рассматривается установка Windows Server 2019 на английском языке.
Нажимаем на кнопку “Next”.

Нажимаем на кнопку “Install now”.

Обратите внимание, если вам необходимо установить Windows Server 2019 в режиме Server Core (без GUI), то вам нужно выбрать “Windows Server 2019 Standard Evaluation” или “Windows Server 2019 Datacenter Evaluation”.
В данном примере рассматривается установка Windows Server 2019 Datacenter Evaluation (Desktop Experience).
Выбираем “Windows Server 2019 Datacenter Evaluation (Desktop Experience)” и нажимаем “Next”.

Теперь необходимо принять условия лицензии.

На этом шаге предлагается два варианта установки:
1. “Upgrade”. Это не самый лучший вариант. Как показывает практика, многочисленные программы могут быть не совместимы с новой операционной системой, и после обновления вы не сможете с ними работать, кроме того есть вероятность перетащить проблемы со старой операционной системы в новую, таким, образом потеряв всякую стабильность.
2. “Custom”. Это лучший вариант для установки любой версии операционной системы Windows. Он позволяет начать работу с системой “с чистого листа”, таким образом, после установки вы получите максимальное быстродействие и стабильность. Останется только установить драйвера и привычное для работы программное обеспечение.

Теперь необходимо выбрать на какой диск будет установлена новая операционная система и выделить место для установки.
В случае если у вас установлено более одного диска или на диске уже имеется несколько разделов, все это будет отображаться на данном этапе. Необходимо соблюдать осторожность и заранее понимать, на какой раздел вы хотите установить операционную систему.
В данном примере установлен один диск объемом 50 GB.
Нажимаем на кнопку “New”.

В данном случае под систему будет выделено все свободное место на диске, поэтому оставляем значение в разделе “Size” по умолчанию.
Нажимаем на кнопку “Apply”.

Операционная система уведомляет о том, что ей может понадобиться создать дополнительные разделы на диске для хранения системных файлов.
Нажимаем на кнопку “OK”.

Таким образом, под операционную систему было выделено все свободное место на диске, но в то же время система зарезервировала для себя небольшой раздел.
Теперь необходимо выбрать раздел, на который предполагается установить операционную систему, и нажать на кнопку “Next”.

Начался процесс установки операционной системы.

Компьютер автоматически перезагрузится.

Теперь нужно указать надежный пароль для учетной записи “Administrator”.
Нажимаем на кнопку “Finish”.

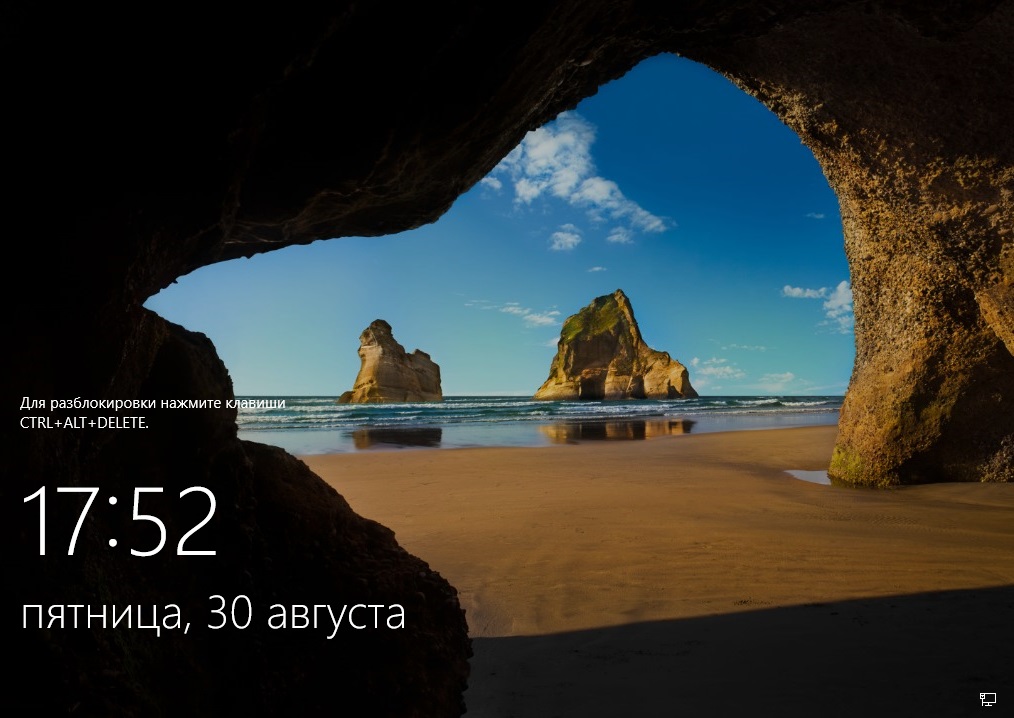
После завершения настроек, вас встретит экран блокировки Windows Server 2019.
Нажимаем “Ctrl+Alt+Delete”.

Далее необходимо войти в систему под учетной записью “Administrator”.

Далее будет возможность включить сетевое обнаружение, чтобы сервер был виден другим компьютерам в сети.
Обратите внимание, сетевое обнаружение не рекомендуется включать в публичных сетях.
Нажимаем на кнопку “Yes”.

Поздравляю! Установка Windows Server 2019 завершена.

Are you ready to install Windows Server 2019 and take advantage of its powerful features? This comprehensive guide will walk you through the entire installation process, from obtaining the Windows Server 2019 ISO to configuring your system. Whether you’re setting up a standalone system or integrating it into a larger network, we’ll cover the essentials to ensure a smooth installation.
Don’t miss important details like the Windows Server 2019 end of life considerations and the different editions available, including Windows Server 2019 Standard. Let’s get started and make your Windows Server setup a success!
A Quick Guide:
The article provides a step-by-step guide for installing Windows Server 2019, starting with ensuring your system meets the minimum hardware requirements, including a 64-bit processor, 2 GB RAM, and 32 GB storage. It then instructs you to access the Voxfor website, select a subscription plan, and complete the signup process. Once subscribed, you prepare for installation by accessing the Voxfor management interface, locating, and loading the Windows Server 2019 ISO image, and rebooting the virtual machine.
The installation involves selecting the preferred Windows Server 2019 edition, accepting the license terms, choosing the custom installation type, and loading necessary drivers from the “virtio-win” ISO image. You also need to partition the disk by deleting existing partitions and creating new ones for the installation. Post-installation steps include setting up the initial user account and password, accessing the server via Remote Desktop Connection, and performing system updates and configurations, such as enabling Ethernet drivers and remote desktop access. This comprehensive guide ensures a smooth and complete installation of Windows Server 2019 on your system.
Windows Server 2019 Requirements
Minimum Requirements
- Processor: 1.4 GHz 64-bit, supports NX, DEP, CMPXCHG16b, LAHF/SAHF, PrefetchW, SLAT
- Memory: 512 MB (2 GB for Desktop Experience)
- Storage: 32 GB
- Network: Gigabit Ethernet adapter, PCI Express, PXE boot support
- Other: UEFI 2.3.1c, TPM 2.0, Super VGA (1024 x 768), DVD drive, Internet access
Recommended Requirements
- Processor: 3.1 GHz or faster multi-core
- Memory: 16 GB or more
- Storage: 64 GB or more
These requirements ensure that Windows Server 2019 runs effectively and efficiently.
Voxfor Lifetime Server Offer
First you need to navigate to voxfor website and then move to the windows vps price.
To subscribe to a plan, follow these steps:
- First Scroll down and select Windows Server 2019.
- You can select the 7 days trial only for $1 or just choose the plan you need.
- Choose the “Purchase Plan” option.
On the new page, sign up by entering your details.
Complete all steps and you’ll receive an email from Voxfor confirming your subscription.
Your Server is ready
After following all the above steps you’ll receive a confirmation email from voxfor confirming your subscription and the server information.

After getting the confirmation email from voxfor, you just need to click on the services as shown in the below image:

Windows 2019 Server Installation Steps
Follow these simple steps to install Windows 2019 Server iso:
1. Prepare Your Server:
Access the Voxfor management interface and select and click on your server from the list Under Services.

2. Service Management
Locate the “Service Management” section on your dashboard.
Click on the “ISO Images” option, which is represented by an icon with a disc and the text “ISO Images”.

3. ISO images:
Windows Server 2019 download or ISO for installation: In the search box, type the “Windows” and press Enter.
From the list of available ISO images, locate “Windows Server 2019 English.”
To load the ISO image, click on the refresh icon button next to “Windows Server 2019 iso English”.

After this you will get a confirmation dialogue box and you just need to click on the confirm button as you can see in the below image.

4. Reboot To Load ISO Image:
Return to the main service management page.
In the “Service Actions” section, click on the “Reboot” option to load the ISO image.

5. Reboot This Virtual Machine:
A confirmation box will appear asking, “Are you sure that you want to reboot this virtual machine?” Click “Yes” to proceed.

6. Navigate To Console:
In the “Service Management” section, click on the “Console” option to navigate to the console.

7. Windows Server 2019 Boot Menu:
On the console screen, you will see the Windows Server 2019 boot menu. Select the Language to install, set time and currency format and keyboard and input method and then press Next.

To proceed with configuring the Server Core installation, click Install Now

8. Windows Server 2019 Standard:
The setup wizard lists the install options below. In this list, editions without Desktop Experience are the Server Core install options:
- Windows Server Standard
- Windows Server Standard with Desktop Experience
- Windows Server Datacenter
- Windows Server Datacenter with Desktop Experience
Choose the operating system you would like to install, which in this case is Windows Server 2019 Standard (Desktop Experience). Depending on the license that you have, you may select Windows Server 2019 Datacenter as well. The options with the suffix Desktop Experience should not be selected because they will not install the Server Core edition.

Accept the License Terms for Windows Server Core 2019. Click Next.

Select the Server Core Installation Type: Upgrade or Custom. Selecting Upgrade will upgrade the existing server to the core edition. Since we are installing Windows Server 2019 Core on a VM, select Custom.

9. Virtio ISO Images:
Go to the services again and in the search box, type “virtio” and press Enter. From the list of available ISO images, locate “virtio-win-0.1.248.iso”. To load the ISO image, click on the refresh icon button next to “virtio-win-0.1.248.iso.” We are doing this because we need to install the driver during the installation.

After this you will get a confirmation dialogue box and you just need to click on the confirm button as you can see in the below image.

10. Load Driver:
Click on the load drive as you can see in the below image.

You have to select Browse from the options as you can see the image below:

You can select the CD Drive option under This PC as you can also see in the image.

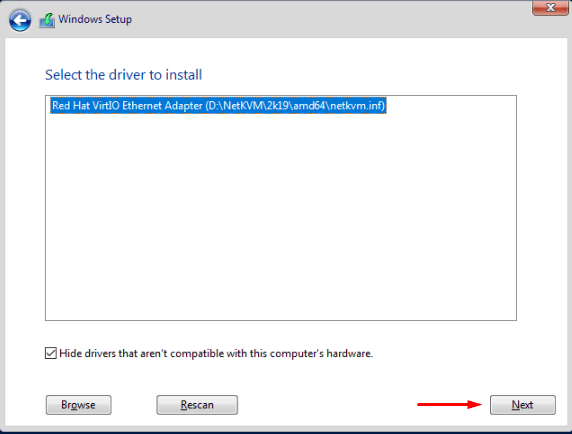
Search NetKVM in CD drive.

In the dropdown menu of NetKVM you have to find 2k19 and click on that.

Select amd64 and click on Next as shown in the below image.

After this you will get the below image and you have to click on next.
11. Available ISO Images:
After this you need to go once again in Services and in the search box, type the “Windows” and press Enter.
From the list of available ISO images, locate “Windows Server 2019 English”
To load the ISO image, click on the refresh icon button next to “Windows Server 2019 English.”
After this you will get a confirmation dialogue box and you just need to click on the confirm button as you can see in the below image.

12. Release Storage:
Select the Disk for installing Windows Server 2019 Core. First you have to release some space by selecting and clicking on Delete as shown in the image. Click Next.

After this you can get a confirmation box and you have to click OK.

Select Drive 0 Partition 1, click on delete and press Next.

It will show you a warning message and hit OK on it.

Same step you will do for this option also.

After this you can get a confirmation box and you have to click OK.

Next, click on “New” to create a new partition for the installation of Windows Server 2019. Select the desired size, click on “Apply,” and then press “Next.”

After this, a confirmation box will appear. You will need to click “OK.”

Now, select the partition you created for the installation of the operating system and click “Next.”

13. Windows Server 2019 Core Installation:
Windows Server 2019 Core Installation begins now. All you need to do is wait a few minutes to complete the installation. While the installation is in progress, if you’re feeling too sleepy, why not grab a cup of coffee?
The Server 2019 installation should be quick, with the entire process taking no more than 5-10 minutes. This completes the steps to install Windows Server 2019 Core.

You may click “Restart Now,” but if you do not, the system will automatically reboot after 10 seconds.

After reboot you will see this window.
14. Administrator Creation:
Next, you will need to enter your login password and retype it for confirmation. After this, click on “Finish.”

Press “Alt+Ctrl+Del” to log in to your operating system.

Enter the password you set during the installation.

15. Windows Server 2019 Interface:
After a successful login, you will access the Windows Server 2019.

As you can see that your Ethernet drivers have been installed automatically. Click on “No,” and proceed on.

Windows has successfully updated your drivers. Simply click on “Close”.

16. Local Storage:
The Control Panel is available in the same way as it is on conventional Windows operating systems, so you can start customizing your server from here or explore more possibilities there. After this you have to select a local server.

17. Enhanced Security Manager:
In the server manager find If Enhanced Security Manager and click at ON as you can see in the below image.

After selecting on you have a new menu and click on OFF at Admin

18. Enable Remote Desktop:
In the server manager screen you need to find the remote desktop and click on disabled written in front of Remote desktop as you can see in the below image.

After this you will see the system properties menu in which you have to select Allow remote connections to the computer, then you will see the new window click OK as shown in image.

First click ok and then hit apply as you can see in the image.

19. Command Prompt:
Left-click on the Command Prompt and select “Run as administrator”.

20. Ethernet Drivers Ping Test:
To verify your Ethernet drivers, you can perform a ping test from the Command Prompt. Type ping 8.8.8.8. If your drivers are working correctly, you will see successful ping responses.

21. Voxfor Control Panel
Once again, navigate to the services section of Voxfor.

Copy the IP Address. In this case, the IP Address is 5.161.235.159, as shown in the image below.

22. Remote Desktop Connection:
Now, go to the search box and type “remote.” Click on “Remote Desktop Connection,” as shown in the image.
Paste the IP Address that you copied from the Voxfor dashboard into the provided field, and then click on “Connect,” as shown in the image.

You will now see a pop-up where you need to enter your credentials. In the username field, type “Administrator.” Then, enter the password you set during the installation.
After this, you will receive a pop-up message from Remote Desktop Connection. Check the box that says “Don’t ask me again for connections to this computer,” and then click on “Yes.”
Now, you will see that your Remote Desktop Connection is connecting to the server.

After the connection is established, you will have successfully entered your operating system.

23. Check For updates:
Now, search for “updates” in the search box and click on “Check for updates.”

If you find any updates, click on “Install now,” as shown in this case.

Conclusion
Congratulations! You now have an installation of Windows 2019 Server up and running. Windows Server 2019 is a powerful and stable distribution, perfect for servers and workstations alike. Ready for more? Choose Voxfor for your server needs and enjoy the simplicity of a ready-to-use server with Windows Server 2019 installed, available in just two minutes. Visit Voxfor to get started today! Thank you for following this guide. For more tips and tutorials, stay tuned to our website. If you have any questions or need further assistance, feel free to reach out to our support team.For further installation guides, visit the Voxfor website where you can find information on Almalinux, CentOS 7.9, and windows 2022 server.
With the release of the latest technical preview of Windows Server 2019, we decided to learn how to install and configure Windows Server 2019. The Honolulu project has been officially released as the Windows Admin Center. Microsoft has also released the Honolulu project, which is a new management platform for Windows Server. In this tutorial, we’ll take a look at the Windows Server 2019 installation and configuration and the Henololo project. You can visit the packages available in Eldernode to purchase a Windows VPS server.
Table of Contents
Tutorial install and configure Windows Server 2019
In the first step, you have to download the latest version. In the continuation of this article, join us to learn how to install and configure Windows Server 2019.
Install and Configure Windows Server 2019
Windows Server is one of the server-specific operating systems that users install on their server according to their needs when purchasing a VPS Server or Dedicated Server. Among the different versions of Windows Server, the latest and most recent version is Windows Server 2019, which has better performance than previous versions. It should be noted that this version, despite the time since its introduction by Microsoft, is still not recognized as a completely stable version, and new updates for it are constantly released. Follow us in the continuation of this tutorial.
How to install Windows Server 2019 via ISO file in VMware
To install Windows Server 2019 on VMware, we used the following virtual machine:
– Windows Server 2019 x64 bit
– VMware ESXi version 6.5
In the images below, you can see the Windows Server 2019 installation page, the ISO file of which is in the VMware virtual machine:
On the page above, specify the language and keyboard, and then click Next.
Click Install to begin the installation process.
Select the Windows Server version and click Next.
Confirm the agreement (check I accept the license terms).
Select the drive in which you are installing Windows.
As you can see, the installation process is very simple.
How to install Windows Server 2019 on Hyper-V 2016
With Hyper-V, all you have to do is download the VHDX file and copy it to the datastore where you want to run the Hyper-V virtual machine. Details of the Hyper-V environment are as follows:
– Windows Server 2016 Hyper-V
– Windows Server 2016 is installed on VMware ESXi 6.5.
The process of using the downloaded VHDX file is similar to creating other Hyper-V virtual machines. But here we connect the disk to the downloaded Microsoft Insider file.
In the image above, we specify the name and path of the virtual machine storage.
Then select Generation 2 for the Generation version:
In the image below, we allocate only 2 GB of RAM to this virtual machine.
Note: If you do this in operating environments, be aware that high RAM should be allocated to virtual machines, otherwise you will face many problems when loading high.
Then select the network card configuration for the Hyper-V virtual machine in Windows Server 2019.
In the Connect Virtual Hard Disk section, select Use an existing virtual hard disk. Below is the path to the downloaded VHDX file that is attached to the virtual machine.
On the last page, you will see a summary of the status of the virtual machine that you configured. Click Finish to create this machine.
After turning on Hyper-V, you will see that the technical preview is Server Core.
How to install the Honolulu project on Windows Server 2019
Honolulu is a browser-based local tool that allows you to manage Windows Server without the need for Azure or cloud. Honolulu allows IT administrators access to full control of all server structural features. It is generally suitable for management on private networks that are not connected to the Internet.
Honolulu is a modern evolutionary tool for in-box management tools, such as Server Manager or MMC. In fact, the project complements the System Center and Operations Management Suite but has not been created to replace these products and services.
You can install the Honolulu project locally on the Windows Server 2019 Core version. To do this, we need to run and install the MSI package using CMD.
C:\Users\administrator.CLOUD\Downloads>msiexec /i honolulu_install.msi /qn /L*v log2.txt SME_port=6513 SSL_CERTIFICATE_OPTION=generateNote: Instructions for installing the Honolulu project on the Windows Server 2019 can be found on the official Microsoft page.
msiexec /i <HonoluluInstallerName>.msi /qn /L*v log.txt SME_PORT=6513 SSL_CERTIFICATE_OPTION=generateAs you can see in the above command, we also specify the log file. Using the log file to see the installation status and troubleshooting problems during installation is appropriate. At first, the installation of Honolulu was faulty, but after resetting the server and reinstalling it, the problem was solved.
The Honolulu project and its implementation on Windows Server 2019
At first glance, the Honolulu project on Windows Server 2019 was very appealing to us. Microsoft has done an interesting job of designing and adding charm to it. In addition, the dashboard has an interesting search feature that allows you to easily find different items. You can type the letters in it so that the Honolulu project quickly displays the item you were looking for. Of course, the Search feature still needs improvements, which I hope will be improved in future versions.
Below you can see pictures of the Honolulu project on Windows Server 2019.
*
**
***
****
Conclusion
This article is one of the most complete Windows Server 2019 installation and configuration training references. In this tutorial, we tried to fully teach you how to install Windows Server 2019 via ISO file in VMware and Hyper-V 2016. You were also taught how to install the Honolulu project on Windows Server 2019.