
Предположим, что у нас уже установлена операционная система Windows Server 2019. Рассмотрим базовую настройку.
Минимальные требования:
- 64-разрядный процессор с тактовой частотой 1,4 ГГц;
- ОЗУ 512 МБ (2 ГБ для варианта установки “Сервер с рабочим столом”);
- диск 32 ГБ;
- доступ к Интернет.
Первоначальные настройки Windows Server 2019 можно разделить на несколько пунктов:
- Создание новой учетной записи Администратора.
- Настройка статического IP-адреса сервера.
- Проверка правильности настройки времени и часового пояса.
- Установка всех обновлений системы.
- Задать понятное имя для сервера и, при необходимости, ввести его в домен.
- Активировать лицензию Windows Server 2019.
- Настроить основные параметры безопасности.
Создание новой учетной записи Администратора
Первым шагом будет создание новой учетной записи администратора. Сервер может быть подвергнут атакам, т.к. предполагается, что вы используете “Администратор” в качестве основной учетной записи администратора. Поэтому создадим новую учетную запись и выдадим ей права администратора.
Нажимаем сочетание клавиш WIN+R, чтобы у вас открылось окно Выполнить, в котором для вызова панели Управление компьютером, вам нужно написать:
Затем на вкладке “Локальные пользователи и группы” переходим в “Пользователи” и по клику правой кнопки мыши в основном окне выбираем пункт “Новый пользователь”. После создаем пользователя, задаем ему пароль и выдаем права Администратора. Затем выходим из учетной записи “Администратор” и заходим в свою новую учетную запись.
Повторите все описанные действия выше до момента создания нового пользователя, отключите базовую учетную запись “Администратор” в целях безопасности сервера, так как вы будете выполнять остальные действия по настройке под учетной записью нового администратора.
Настройка статического IP-адреса сервера
Серверы должны иметь фиксированные IP-адреса. Это требование для многих служб (Active Directory,DNS,DHCP).
Нажимаем сочетание клавиш WIN+R, чтобы у вас открылось окно выполнить, в котором для вызова сетевых настроек, вам нужно написать:
У вас появится окно “сетевые подключения” со списком доступных вам сетевых адаптеров. Щелкните по нужному левой кнопкой мыши дважды.
В окне “Состояние” выберите Свойства -> IP версии 4(TCP/IP) -> Использовать следующий IP-адрес -> Введите данные статического адреса -> Нажмите “Ок”.
Настройка времени и часового пояса
В целях безопасности, таких как правильная работа двухфакторной аутентификации и правильной работы журналов, служб, отдельных программ на Windows Server 2019 — нужно, чтобы время на всех серверах совпадало и было верным по часовому поясу. Иначе неправильное системное время будет отражено во всех программах, где время является критически важным показателем.
Для настройки времени и часового пояса нажмите на: Пуск -> Параметры -> Время и язык.
Установка обновлений
Обновление Windows Server является обязательной ежемесячной рутиной, которая устраняет дыры в безопасности и исправляет неправильно работающие на сервере службы, программное обеспечение. Но, обновляя сервер на последние не протестированные патчи, будьте предельно внимательны, читайте отзывы. Для первоначальной настройки сервера, установить обновления нужно обязательно. Установите обновления Windows: Пуск -> Параметры -> Обновление и безопасность.
В нижней части экрана Центра обновления Windows есть опция “Изменить период активности”. Установите этот параметр, иначе вы станете свидетелем перезагрузки вашего рабочего сервера в рабочее время.
Настройка имени сервера и ввод в домен
Сервер настраивается для определенных целей, ему нужно имя, по которому можно будет проще понимать что это за сервер, отследить его статистику в сетевых подключениях, подключиться к нему, настроить службы и т.д. Меняем имя сервера и его описание (если нужно), вводим в домен.
Нажимаем сочетание клавиш WIN+R, чтобы у вас открылось окно Выполнить, в котором вам нужно написать:
В окне Панель управления -> Система и безопасность -> Система.
Переходим в свойства системы -> Изменить параметры -> Изменить. Задаем «Имя компьютера», и если нужно, то имя домена. После изменения параметров нужно перезагрузиться.
Активация лицензии
Без активированной лицензии, после того как закончится пробный период пользования, сервер будет перезагружаться каждые 30 минут, чтобы этого не происходило, нужно обязательно активировать сервер для дальнейшей его эксплуатации. Для активации операционной системы нужно: Пуск -> Параметры -> Обновление и безопасность -> Активация -> Изменить ключ продукта. Введите ключ продукта от Windows Server 2019.
Основные параметры безопасности
Как правило, необходимые параметры безопасности связаны с защитой сети, поэтому Брандмауэр Windows должен быть включен, узнайте какие порты нужны вашим службам для работы, настройте его соответствующим образом, но не выключайте брандмауэр.
Дальнейшая настройка заключается в настройке локальной политики безопасности сервера.
Нажимаем сочетание клавиш WIN+R, чтобы у вас открылось окно Выполнить, в котором для вызова панели локальной политики безопасности, вам нужно написать:
В локальной политике безопасности мы установим несколько параметров в разделе Политики учетных записей и Локальные политики. Политика первой учетной записи -> Политика паролей. Установим минимальный срок действия пароля равным 0 (нулю) дней, а минимальную длину пароля – 12 символов.
Политика учетных записей -> Политика Блокировки Учетной Записи -> Порог блокировки учетной записи -> 3 недопустимые попытки входа в систему. Продолжительность блокировки учетной записи и сброса блокировки учетной записи установлена на 30 минут. Если кто-то попытается принудительно ввести ваш пароль Windows Server, то после трех промахов, этот IP-адрес не сможет войти в систему в течение 30 минут.
Перейдем к следующему Локальные политики -> Политика Аудита. Здесь мы установим параметры ведения журнала. У каждого из вариантов, которые установлены, есть карточка с описанием, которую вы можете увидеть для получения более подробной информации.

Рисунок 1 — Политика аудита
Нужна помощь? Настройки Windows Server и обслуживание серверов мы осуществляем в рамках услуги ИТ-аутсорсинг. Также возможны разовые проектные работы.
Network Time Protocol (NTP) is a highly scalable internet protocol that determines the best time information and synchronizes accurate settings on a computer system. This guide explains how to set the time zone and configure NTP on a Windows Server.
This guide uses Windows Server 2019, but these instructions work on any machine with Server 2016 or later.
Prerequisites
Before you begin:
- Deploy a Vultr Windows Server.
- Connect to the server.
Set the Timezone
- Using the Windows Start Menu, open Server Manager.
- Locate Time zone in the local server properties section.
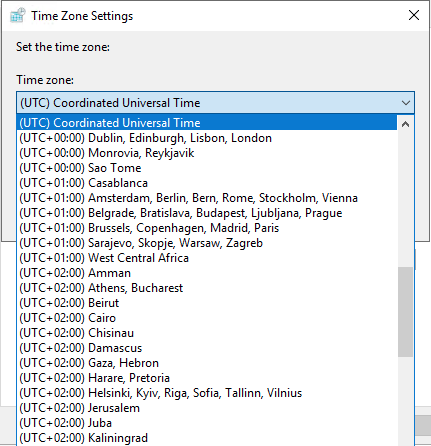
- Click the current timezone, which is UTC Coordinated Universal Timeby default.
- In the Date and Time window, click Change time zone.
- Expand the Time zone drop-down list.
- Select your preferred timezone. It’s recommended to set it to your server location.
- Click OK to save changes.
- Click Apply to load changes on the server.
- Re-open Server Manager, and verify the timezone change.
Optional: Set the Timezone using PowerShell
-
From the start menu, open Windows PowerShell, or open the run dialog (Win key + R), type
powershellin the search bar, and click OK to start PowerShell. -
Run the following command to check the server timezone.
PS > Get-Timezone -
View all available timezones.
PS> Get-Timezone -ListAvailableTo find your target timezone, use the following command to filter by name.
PS> Get-Timezone -ListAvailable | Where-Object {$_.displayname -like "*US*"}> The command above displays all names containing the characters
US. You can use a different string such as London. -
Change your timezone.
PS> Set-Timezone -Name "Central Standard Time"You can also change the timezone by ID.
PS> Set-Timezone -Id "Central Standard Time"
Configure NTP
In addition to setting the timezone, you can also configure Windows to use NTP to synchronize the time.
-
Open the Run dialog window by pressing the Windows key (WIN) + R on your keyboard.
-
In the search bar, enter
regeditand click OK to open Registry Editor. -
Expand the registry navigation tree:
HKEY_LOCAL_MACHINE -> SYSTEM -> CurrentControlSet -> Services
-
Expand W32Time.
-
Click Config.
-
Select AnnounceFlags
-
Enter
5in the Value data field. -
Click OK to save changes.
-
In the left pane, click Parameters.
Optional: Change the NTP Server
By default, Vultr uses the time.constant.com time server, located on our high-speed infrastructure. If you want to use a different time server, you can change the value of the NtpServer parameter by following these steps.
-
Double-click NtpServer
-
Change the value data field to your preferred value. For example, to sync with the United States NTP pool, use:
us.pool.ntp.orgYou can find a list of NTP Pool servers at the official website.
-
Expand TimeProviders.
-
Click NtpServer.
-
Double click Enabled, change the value data from
0to1, and click OK to save changes. -
Close the registry editor, open the start menu, and search the keyword
services. -
In the services window, scroll through the list, select Windows Time, right-click, and select Restart to apply NTP changes.
Optional: Configure NTP Using PowerShell
If you prefer to use Powershell, you can use the following commands to configure NTP.
-
Open PowerShell with administrative privileges.
-
Check the NTP time synchronization status.
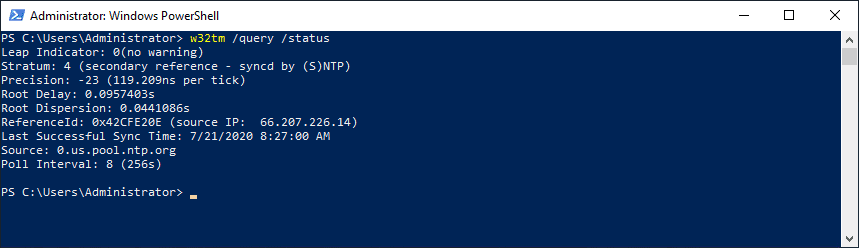
PS> w32tm /query /status -
Enter the following command to set the time AnnounceFlags to
5.PS> Set-ItemProperty -Path "HKLM:\SYSTEM\CurrentControlSet\services\W32Time\Config" -Name "AnnounceFlags" -Value 5 -
(Optional) If you want to use NTP pool servers instead of Vultr’s NTP server, run the following command.
PS> Set-ItemProperty -Path "HKLM:\SYSTEM\CurrentControlSet\Services\w32time\Parameters" -Name "NtpServer" -Value us.pool.ntp.org -
Enable NTP Server.
PS> Set-ItemProperty -Path "HKLM:\SYSTEM\CurrentControlSet\Services\w32time\TimeProviders\NtpServer" -Name "Enabled" -Value 1 -
Restart the Windows Time service.
PS> Restart-Service w32Time -
Test NTP synchronization.
PS> w32tm /resync
Next Steps
You have successfully set the timezone and configured NTP on Windows Server 2019. If you plan to have other machines on a Vultr VPC use your NTP server, allow port 123 in the Windows Server Firewall. For further information, refer to the following guides.
- Official NTP Documentation
- List of database TimeZones
- Configure the Firewall on Windows Server 2019
- Create A Vultr Virtual Private Cloud (VPC)
Maintaining accurate time on your server is critical largely because many services and IT applications rely on accurate time settings to function as expected. These include logging services, monitoring and auditing applications, and database replication to mention a few.
Time skew in servers, and any client systems for that matter, is undesirable and usually causes conflict in time-critical applications. To maintain accurate time settings on your server and across the network by extension, it’s preferred to install and enable a NTP server on your server.

What is an NTP server?
NTP, short for Network Time Protocol, is a protocol that synchronizes time across network devices. It listens on UDP port 123 and always ensures that time inconsistencies across the server and client systems are mitigated and that client systems are always in sync with the server.
NTP server refers to a network device or a service that fetches time from an external time source and syncs the time across the network using the NTP protocol. This guide will focus on installing NTP service on Windows server 2019.
How Does NTP Work ?
Being a protocol, NTP requires a client-server architecture. The NTP client residing on a Windows PC, for example, initiates a time request exchange with the NTP server.
A time-stamp data exchange happens between the server and client and this helps in adjusting the clock on client’s systems to the highest degree of accuracy to match the time on the NTP server. In this guide, we will walk you through the installation and configuration of NTP server on Windows Server 2019.

There are several ways of setting up NTP server and we will look at each in turn.
In Windows Server environments, there is a special Windows time service that handles time synchronization between the server and the client systems. This is known as Windows Time service. PowerShell provides a command-line tool known as w32tm.exe and comes included in all versions of Windows from Windows XP and Windows Server 2008 to the latest versions of each OS.
Using the w32tm.exe utility, you can configure your Windows system to sync with online time servers. Usually, this is the tool of choice when setting up and monitoring time on your Windows Server system.
Using the command-line utility is quite straightforward.
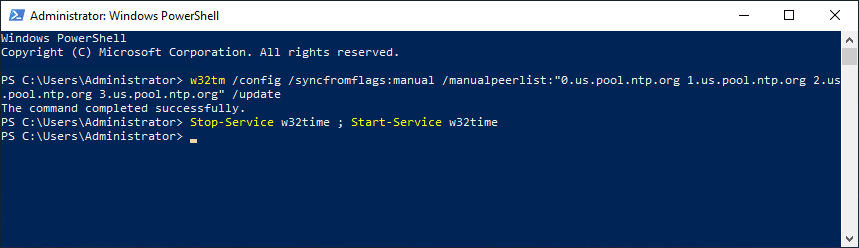
For example, to set the Server to point to 2 different time servers, namely 0.us.pool.ntp.org and 1.us.pool.ntp.org , launch PowerShell as the Administrator and run the command below
w32tm /config /syncfromflags:manual /manualpeerlist:”0.us.pool.ntp.org 1.us.pool.ntp.org” /update
Then restart Windows Time service using the commands:
Stop-Service w32time
Start-Service w32time
Here’s a snippet of the commands.

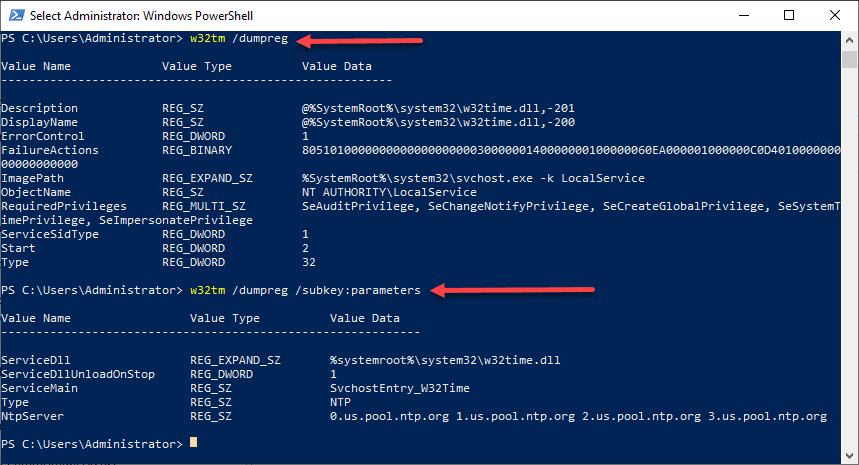
You can thereafter confirm the values of NTP servers configured in the registry by running this command:
w32tm /dumpreg /subkey:parameters

Configure NTP Server on Windows Server 2019 using Registry editor
The second method of installing and configuring the NTP server is using the registry editor. If you are not a fan of the Windows PowerShell, then this will truly come in handy.
To get started, open the registry editor. Press ‘Windows key + R’ and type ‘regedit’ and hit ENTER. The windows registry will be launched as shown below.

Next, head over to the path shown below
Computer\HKEY_LOCAL_MACHINE\SYSTEM\CurrentControlSet\Services\W32Time\TimeProviders\NtpServer
On the right pane. Be sure to find & double-click the file labelled ‘Enabled’ in the diagram shown below.

Next, In the ‘value data’ text field, set the value to ‘1’ and click the ‘Ok’ button.

Next, head over to the path:
Computer\HKEY_LOCAL_MACHINE\SYSTEM\CurrentControlSet\Services\W32Time\Config
In the right pane, double click the ‘Announce Flags’ file.

Double-click the file and in the Value data text field, type the value ‘5’ and click ‘OK’.

For the changes to come into effect, you need to reboot the NTP server by heading to the services Window. To achieve this, press ‘Windows key + R’ and type ‘services.msc’. Scroll and find ‘Windows Time’, right-click on it and select the ‘Restart’ option.

Useful w32tm commands
Once you have set up your NTP server, you can use the following commands to verify various aspects of the server:
To check the status of the NTP server, run the command:
w32tm /query /status

To reveal the current NTP pool being used to sync time with execute:
w32tm /query /source

You can also display a list of NTP time servers along with their configuration status as shown.
w32tm /query /peers

To display NTP server configuration settings, run the command:
w32tm /query /source
This shows quite a wealth of information.

Final Take
We cannot stress enough how important it is to maintain accurate time and date settings on your server. As you have seen, setting up an NTP server on your Windows server instance is quite easy and straight forward.
Once you have configured the NTP service on your server, other domain controllers in your environment will sync with this server and the Windows clients in the domain will sync with the domain controllers. Hopefully, you can now install and configure NTP on Windows Server 2019.
Отметим, что часовой пояс, как и дата/время, является одним из значимых параметров компьютера, влияющих на правильное функционирование Windows и различных приложений. Рекомендуется устанавливать часовой пояс в соответствии с географическим положением компьютера.
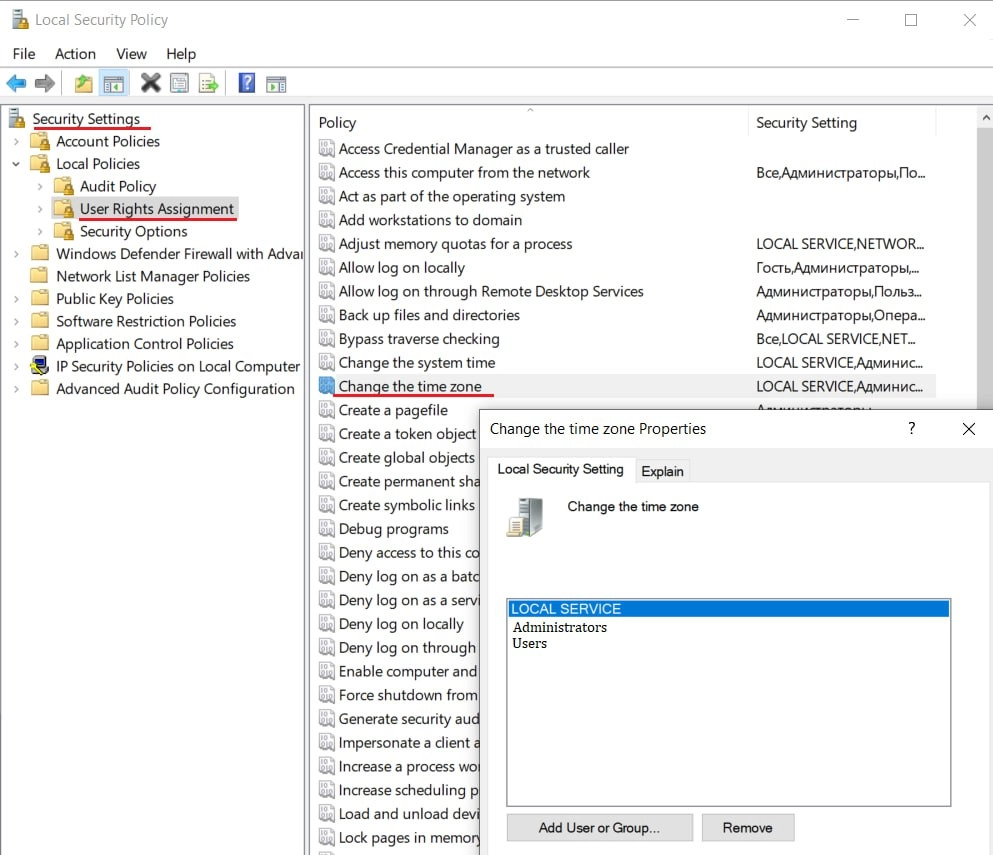
Предоставление прав на изменение часового пояса в Windows.
Чтобы ограничить права пользователей на изменение часового пояса, необходимо открыть локальную политику безопасности через командную строку с помощью команды: secpol.msc В открывшемся окне перейдите по пути: Security Settings -> Local Policy -> User Rights Assignment -> Change the time zone (Изменение часового пояса).
Чтобы ограничить права пользователей на изменение часового пояса, необходимо удалить ‘Users’ из списка учетных записей пользователей. В Windows Server изменять часовой пояс могут пользователи из групп ‘Local Service’ и ‘Administrators’.
Изменение часового пояса в Windows / Windows Server.
Изменение часового пояса в графическом интерфейсе Windows
В операционных системах Windows 10 и Windows Server 2019/2016 для настройки времени и часового пояса можно:
— перейти в раздел «Настройки» через меню «Пуск»;
— перейти в раздел «Параметры», щелкнув правой кнопкой мыши по значку часов на панели задач, где можно выбрать опцию «Настроить дату и время»;
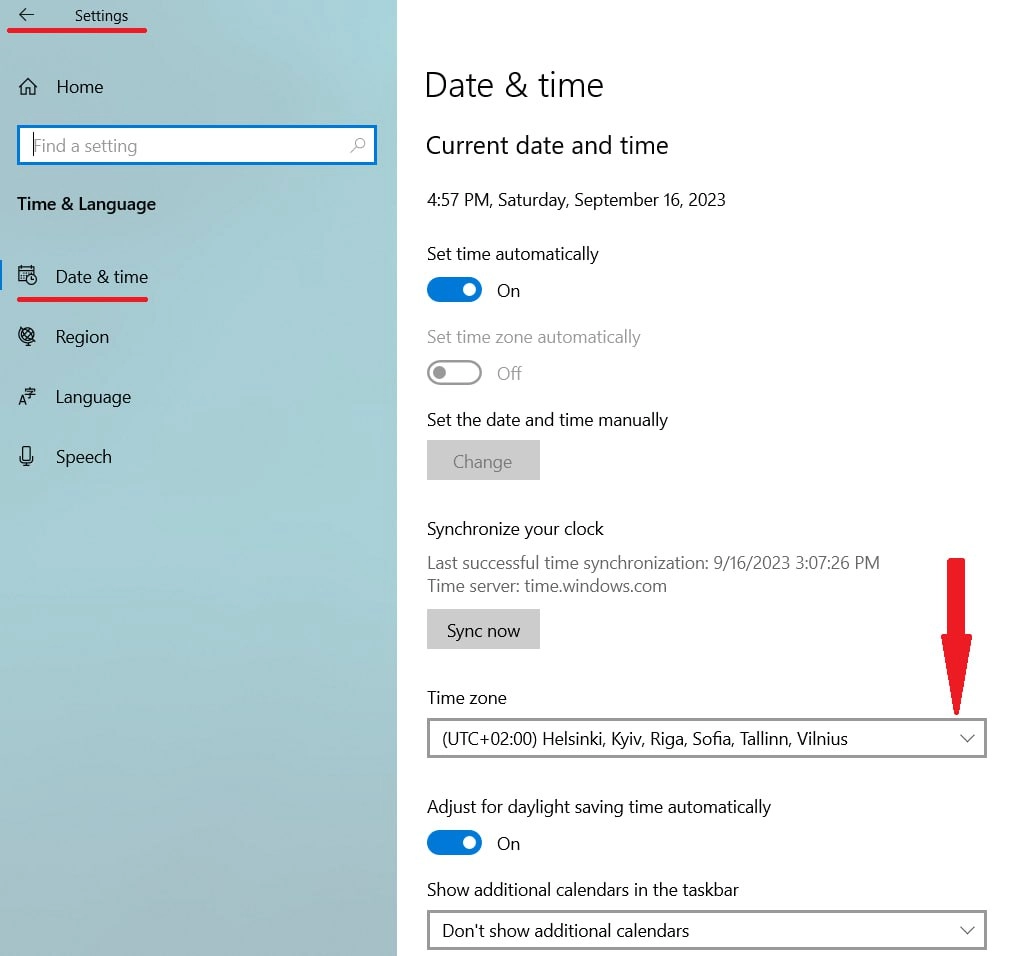
*Поумолчанию опция «Устанавливать время автоматически» будет отмечена. Вы можете отключить эту опцию и вручную выбрать нужный часовой пояс из выпадающего списка.
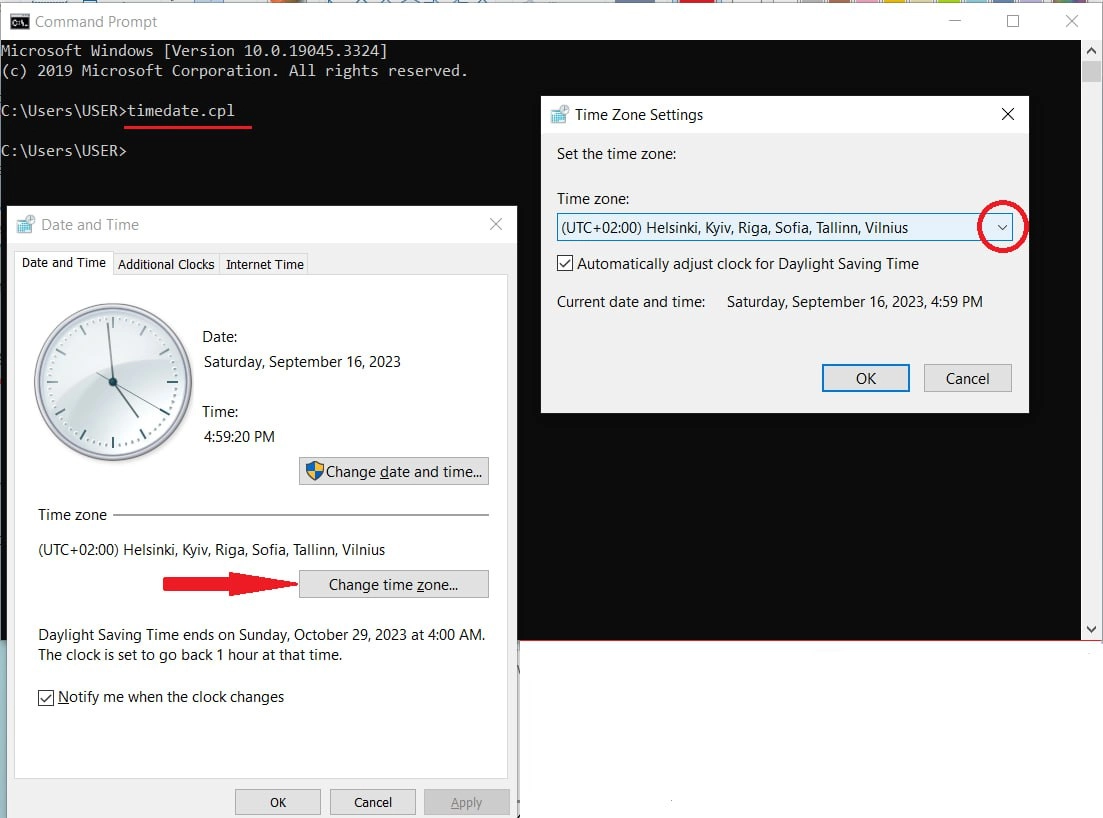
— Запустите timedate.cpl из cmd, и он откроет окно настроек времени Windows, где вы можете указать часовой пояс с помощью кнопки «Изменить часовой пояс».
Изменение часового пояса из cmd с помощью утилиты TZUtil
Откройте командную строку cmd.exe
* Отметим, что утилита tzutil.exe подходит для Windows 10/11, Windows Server 2016/2019/2022
Сначала определите текущий часовой пояс и его идентификатор (TimeZoneID). Для этого введите команду:
tzutil /g
Если вы не уверены в точном названии нужного часового пояса, выведите список всех часовых поясов с их названиями и идентификаторами с помощью следующей команды:
tzutil /l
Вы также можете найти актуальный список часовых поясов Windows у Microsoft.
Чтобы изменить текущий часовой пояс, укажите идентификатор нового часового пояса в следующем формате:
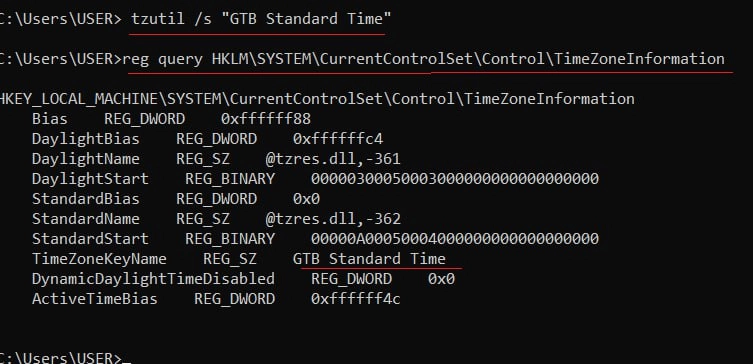
tzutil /s "GTB Standard Time"
В реестре Windows можно проверить текущий часовой пояс:
reg query HKLM\SYSTEM\CurrentControlSet\Control\TimeZoneInformation
Чтобы отключить переход на летнее время для определенной зоны, необходимо указать идентификатор часового пояса с окончанием: _dstoff
tzutil /s "GTB Standard Time_dstoff"
Чтобы отобразить полную информацию о часовом поясе и настройках сезонных часов, введите следующую команду :
w32tm /tz

Изменение часового пояса с помощью PowerShell
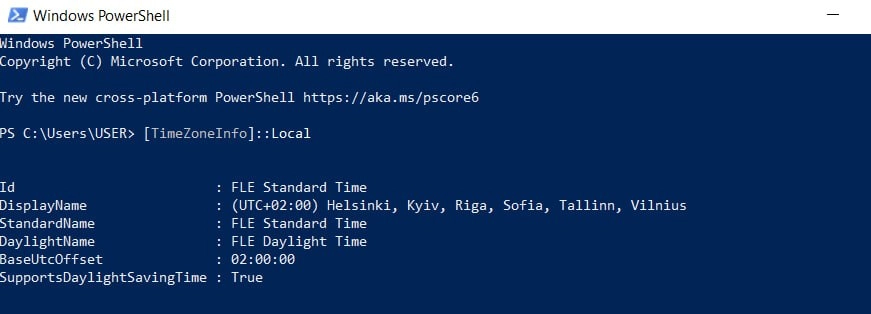
Чтобы определить текущий часовой пояс в консоли PowerShell, используйте одну из следующих команд:
[TimeZoneInfo]::Local
Get-TimeZone
Чтобы просмотреть список всех доступных часовых поясов в консоли PowerShell, вы также можете использовать одну из следующих команд:
Get-TimeZone -ListAvailable
[System.TimeZoneInfo]::GetSystemTimeZones()
Список всех часовых поясов достаточно велик, поэтому для удобства рекомендуется использовать фильтр, в котором указывается часть названия, например:
Get-TimeZone -ListAvailable | Where-Object {$_.Id -like "*FLE*"}

Чтобы изменить текущий часовой пояс из консоли PowerShell, введите команду:
Set-TimeZone -Name "FLE Standard Time"
*укажите название нужного часового пояса в кавычках.
Home » OS’s » Windows » Set NTP Server Windows 2016 or Windows 2019
There is no question about it, having accurate time in your environment set in critical infrastructure systems is a must. Many business-critical applications and infrastructure systems rely on accurate time synchronized between them to ensure the system functions as expected. Time skew can cause all kinds of weirdness when it is misconfigured or out of sync between different servers/systems. This is especially true in a Windows Server Active Directory domain. Having accurate time between a client computer and domain controllers is essential. Let’s take a look at how to set ntp server Windows 2016 or Windows 2019 to see how this can be easily carried out.
What is NTP?
Wen it comes to synchronizing time in most enviornments, Network Time Protocol (NTP) is the protocol that is used to ensure accurate time across your environent. In most environments, NTP servers, special time servers, are configured that provide an external time source for which your internal servers can synchronize with.
There are several widely known NTP IP addresses on the Internet that provide reliable time sources for your network. The NTP.org servers are one such set of time servers that provide an NTP source for configuration.
There are a few NTP values to be aware of:
- NTP Server – This is a specialized server that is able to detremine the precise time from an external timing reference such as GPS and passes these precise time values on to your network
- Offset – This is the difference in time between the external time server and the time on a local client computer. The larger the offset, the more inaccurate the timing source is.
- Delay – This is the value of the round-trip time (latency) of the timing message between the client to the server and back again.
How Time is synchronized in a Windows Server domain
In a Windows domain, Microsoft has default configuration in place that takes care of a good portion of the NTP configuration. Starting with Windows 2000 Server, Windows clients are configured as NTP Clients. When configured as an NTP client, Windows computers only attempt to contact the domain controller for NTP synchronization or a manually specified NTP server.
Microsoft has made the domain controller the default in a Windows domain since it makes sense that clients already have a secure channel established with DCs for other types of communications. Additionally, accurate and synchronized time between domain controllers and clients is especially important for all kinds of things such as logins, group policy synchronization and other tasks/operations.
The order of operations or hierarchy in a Windows domain is as follows:
- Domain members attempt to synchronize time with any domain controller located in the domain
- Domain controllers synchronize with a more authoritative domain controller
- The first domain controller that is installed in the environment is automatically configured to be a reliable time source.
- Other than the first domain controller installed, the PDC emulator (if role has been moved from the first DC installed) generally holds the position of best time source.
An important point to consider and that comes into play when thinking about why we set ntp server in Windows 2016 or Windows 2019 is the authoritative domain controller must have a reliable source to synchronize with as well. This is generally an external time server outside of the domain hierarchy.
Now that we know how the domain hierarchy for time is configured, how is the external time source configured on your domain controller that is configured as the reliable source of time?
Configuring Windows Time Service with W32tm.exe
When it comes to Windows Server environments like Windows Server 2016 or Windows Server 2019, there is a special Windows service that controls the time synchronization of your Windows hosts. This is the Windows Time Service.
Microsoft provides a command line tool to interact with the Windows Time Service called W32tm.exe. This has been included in Windows operating systems since Windows XP/Windows 2003 and later. It can be used to configure Windows Time service parameters as well as diagnose time service problems. This is generally the tool of choice when it comes to configuring, monitoring, and administering Windows Time.
Using the W32tm.exe utility is fairly straightforward. It can be used from a normal command prompt as well as from a PowerShell prompt. There are several command parameters included that allow not only configuring the NTP servers you want to query, but also parameters that allow viewing the low level registry configuration as well as the synchronization status.
You can read the official Microsoft KB on the Windows Time service and the W32tm.exe utility here:
- https://docs.microsoft.com/en-us/windows-server/networking/windows-time-service/windows-time-service-tools-and-settings
However, there are a few commands I would like to show you for the purposes of configuring your Domain controller that is to be the reliable time source (PDC Emulator) for your domain.
The first command is the command line entry to specify your NTP servers, which in this case I am using the NTP.org servers to set as the source of my NTP synchronization.
w32tm /config /syncfromflags:manual /manualpeerlist:"0.us.pool.ntp.org 1.us.pool.ntp.org 2.us.pool.ntp.org 3.us.pool.ntp.org" /update

Stop-Service w32time
Start-Service w32time
If you want to view the status of the NTP synchronization on your server after you have configured the values and restarted the w32time service, you can use the following command:
w32tm /query /status
You can also check the values configured in your registry key hkey local machine system currentcontrolset services w32time config using the commands below. You can drill into the configuration parameters using the /dumpreg /subkey command.
w32tm /dumpreg

w32tm /dumpreg /subkey:parameters
Final Thoughts
As shown, you can easily set NTP Server Windows 2016 or Windows 2019 using the w32tm command utility that allows interacting with the time service in Windows Server.
In a Windows domain, you want to configure your authoritative time source domain controller, which by default is the PDC Emulator, to pull time information from an authoritative source like NTP.org or some other reliable NTP time server.
After configuring the time source, the other domain controllers will synchronize with this server and then the Windows clients joined to the domain will synchronize with the domain controllers that have the corrected time from the authoritative server.
Brandon Lee is the Senior Writer, Engineer and owner at Virtualizationhowto.com, and a 7-time VMware vExpert, with over two decades of experience in Information Technology. Having worked for numerous Fortune 500 companies as well as in various industries, He has extensive experience in various IT segments and is a strong advocate for open source technologies. Brandon holds many industry certifications, loves the outdoors and spending time with family. Also, he goes through the effort of testing and troubleshooting issues, so you don’t have to.