
Время на прочтение4 мин
Количество просмотров55K
Одним из реально полезных нововведений в Windows Server 2019 является возможность вводить серверы, не делая Sysprep или чистую установку. Развернуть инфраструктуру на виртуальных серверах с Windows Server никогда еще не было так просто.

Сегодня поговорим о том, насколько же, оказывается, просто устанавливать и управлять Active Directory через Powershell.
Устанавливаем роль
RSAT или локальный сервер с GUI:
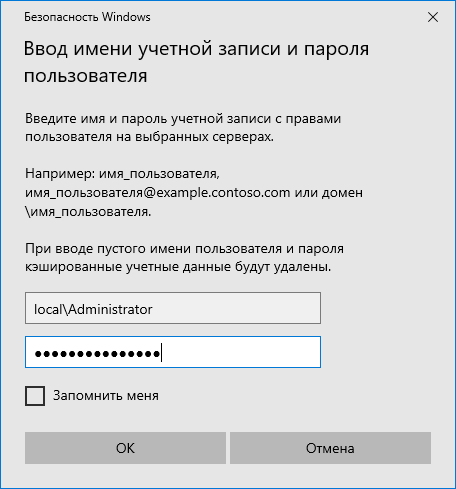
Сначала нужно добавить сервер в RSAT. Добавляется он на главной странице с помощью доменного имени или ip адреса. Убедитесь, что вы вводите логин в формате local\Administrator, иначе сервер не примет пароль.
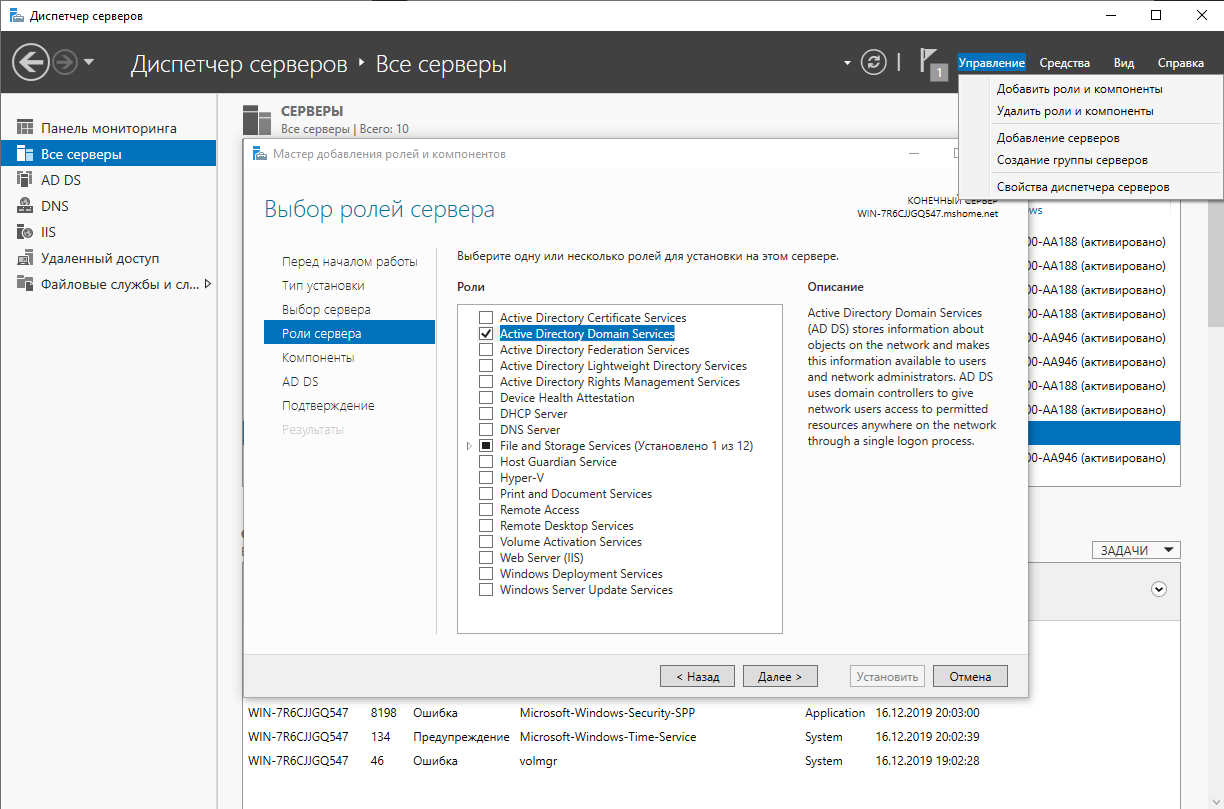
Переходим в добавление компонентов и выбираем AD DS.
Powershell:
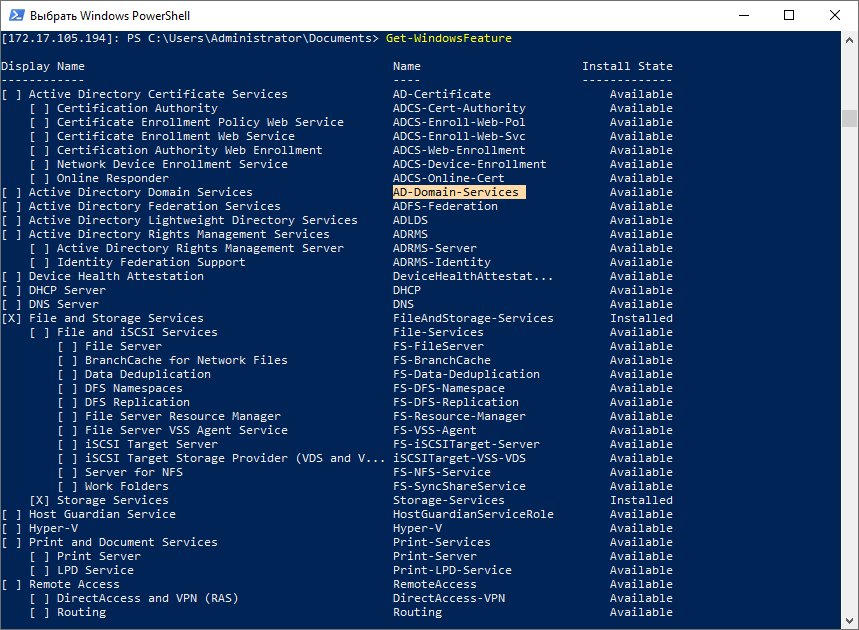
Если вы не знаете, как называется компонент системы, можно выполнить команду и получить список доступных компонентов, их зависимостей и их имена.
Get-WindowsFeature
Копируем имя компонента и приступаем к установке.
Install-WindowsFeature -Name AD-Domain-ServicesWindows Admin Center:

Переходим в «Роли и компоненты» и выбираем ADDS (Active Directory Domain Services).
И это буквально всё. Управлять Active Directory через Windows Admin Center на текущий момент невозможно. Его упоминание не более чем напоминание о том, насколько он пока что бесполезен.
Повышаем сервер до контроллера домена
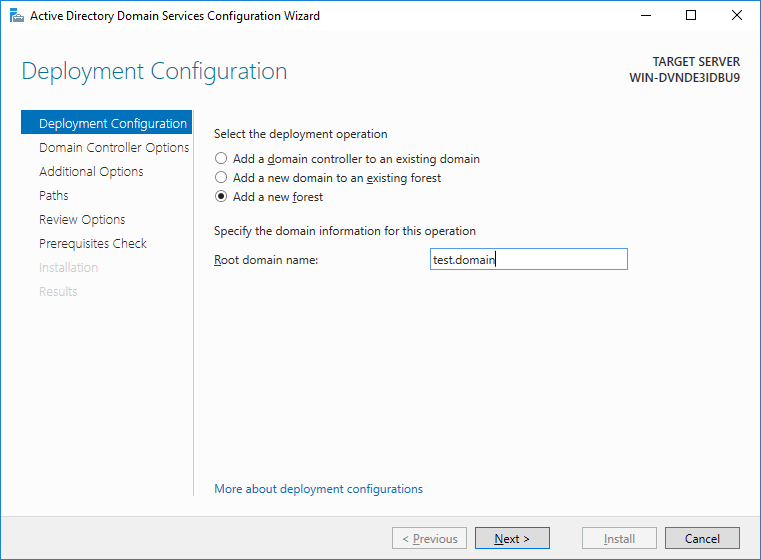
А для этого создаем новый лес.
RSAT или локальный серверс GUI:

Очень рекомендуем оставлять все по умолчанию, все компоненты из коробки прекрасно работают и их не нужно трогать без особой на то необходимости.
Powershell:
Сначала нужно создать лес и установить пароль от него. В Powershell для паролей есть отдельный тип переменной – SecureString, он используется для безопасного хранения пароля в оперативной памяти и безопасной его передачи по сети.

$pass = Read-Host -AsSecureStringЛюбой командлет который использует чей угодно пароль нужно вводит таким образом. Сначала записываем пароль в SecureString, а затем указываем эту переменную в командлет.

Install-ADDSForest -DomainName test.domain -SafeModeAdministratorPassword $passКак и в установке через GUI, даже вывод в консоль один и тот же. В отличие от сервера с GUI, как установка роли, так и установка сервера в качестве контроллера домена не требует перезагрузки.
Установка контроллера с помощью RSAT занимает больше времени, чем через Powershell.
Управляем доменом
Теперь, чтобы понять насколько сильно различается управление Active Directory через Powershell и AD AC (Active Directory Administrative Center), рассмотрим пару рабочих примеров.
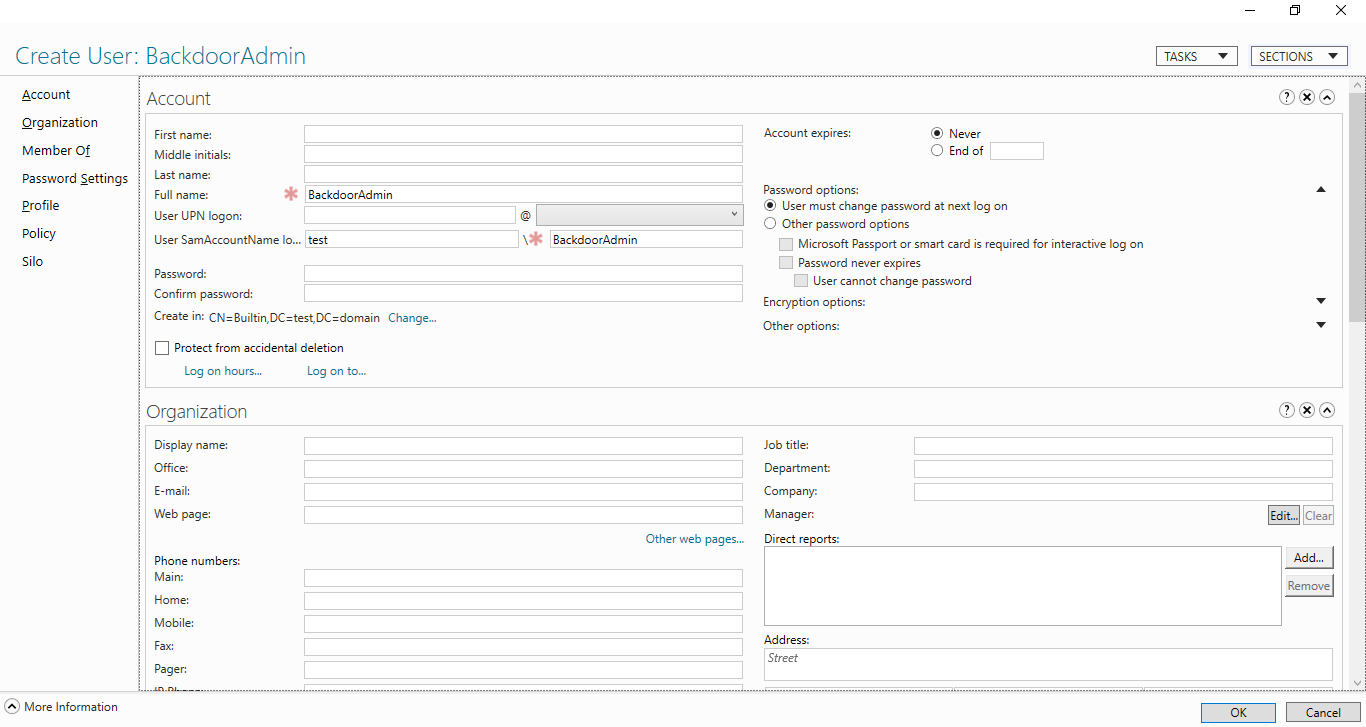
Создание нового пользователя
Скажем, мы хотим создать пользователя в группе Users и хотим чтобы он сам установил себе пароль. Через AD AC это выглядит так:
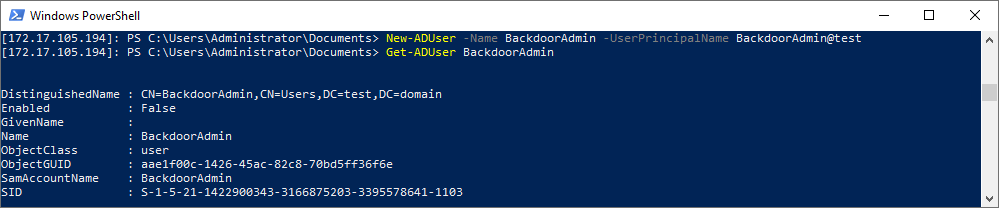
New-ADUser -Name BackdoorAdmin -UserPrincipalName BackdoorAdmin@test
Get-ADUser BackdoorAdmin
Отличий между AD DC и Powershell никаких.
Включить пользователя
RSAT или локальный серверс GUI:
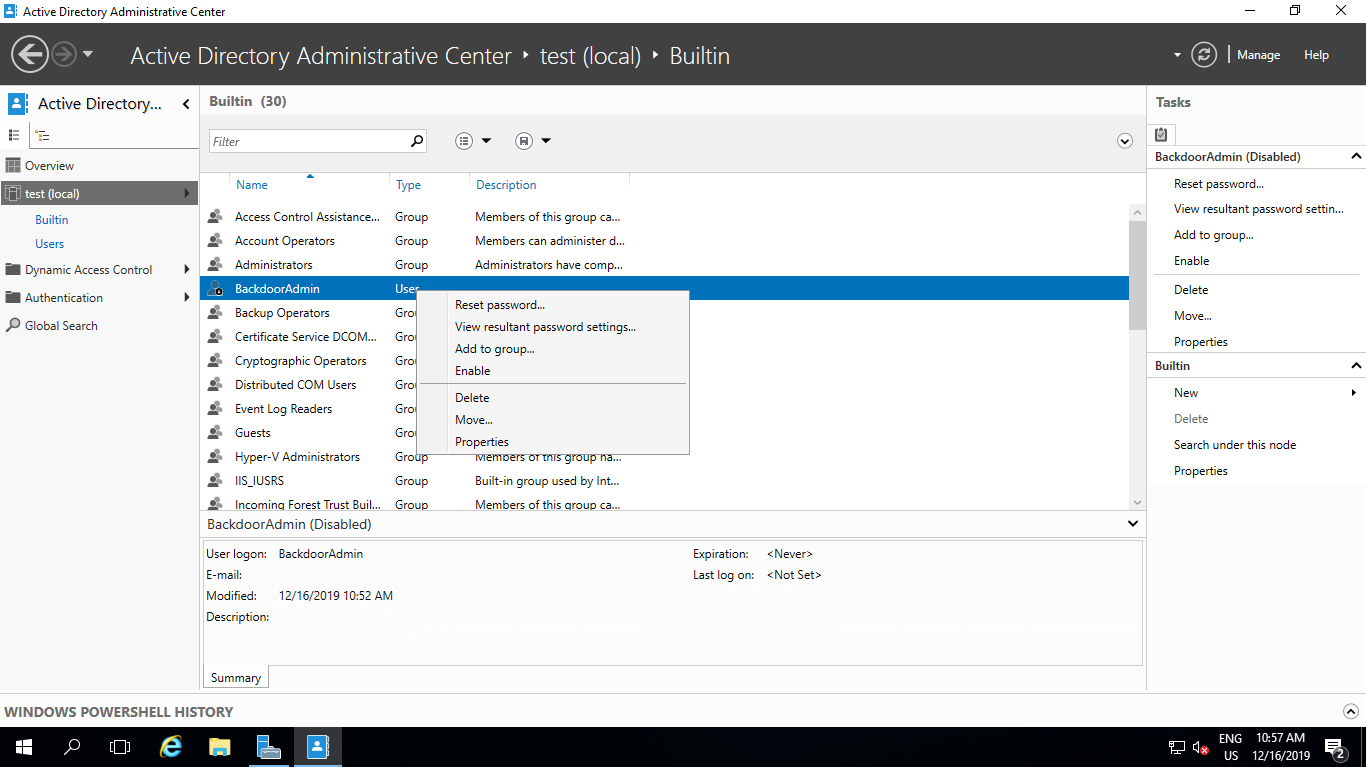
Через GUI пользователю нужно сначала задать пароль отвечающий GPO и только после этого его можно будет включить.
Powershell:
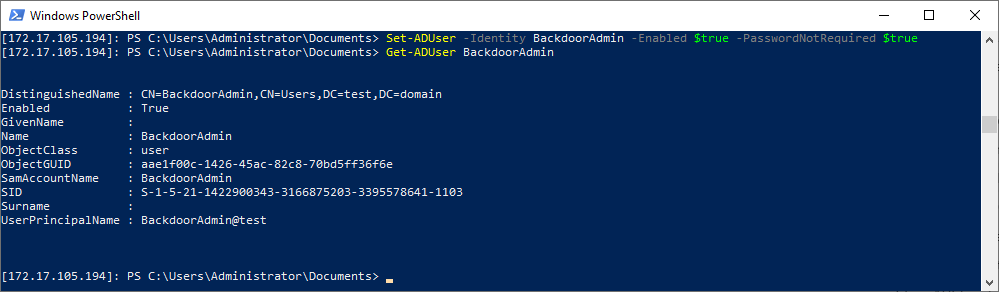
Через Powershell почти то же самое, только пользователя можно сделать активным даже без пароля.
Set-ADUser -Identity BackdoorAdmin -Enabled $true -PasswordNotRequired $trueДобавляем пользователя в группу
RSAT или локальный сервер с GUI:
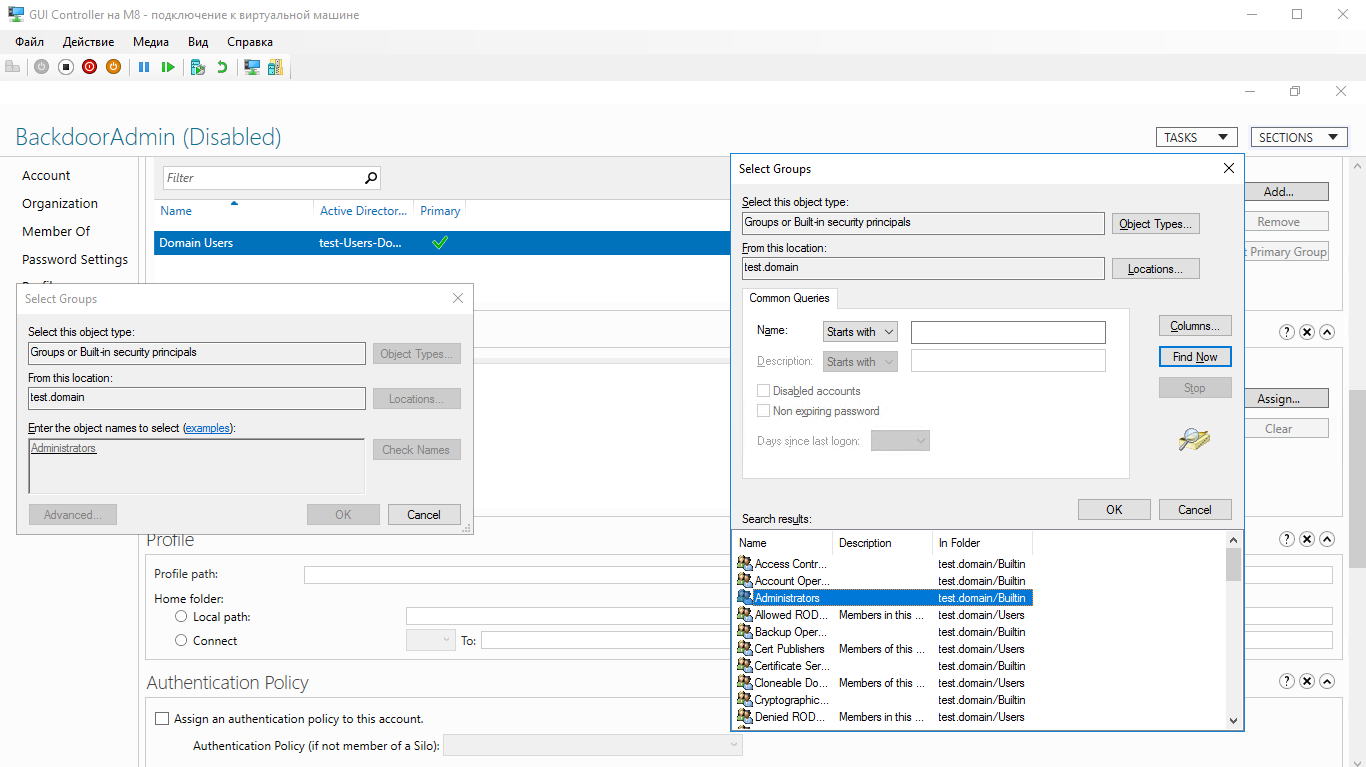
С помощью AD DC нужно перейти в свойства пользователя, найти графу с членством пользователя в группах, найти группу в которую мы хотим его поместить и добавить его наконец, а затем кликнуть OK.
Powershell:
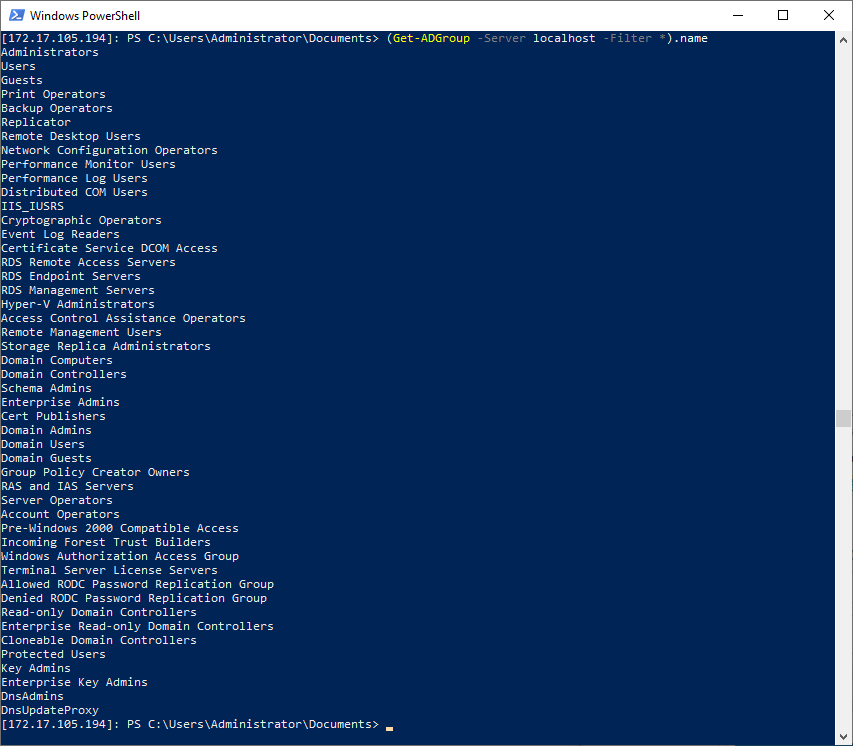
Если мы не знаем как называется нужная нам группа, получить их список мы можем с помощью:
(Get-ADGroup -Server localhost -Filter *).nameПолучить группу со всеми свойствами можно так:

Get-ADGroup -Server localhost -Filter {Name -Like "Administrators"}Ну и наконец добавляем пользователя в группу:

Далее, из-за того, что в Powershell все является объектами, мы как и через AD DC должны сначала получить группу пользователя, а затем добавить его в неё.
$user = Get-ADUser BackdoorAdminЗатем добавляем этот объект в группу:
Get-ADGroup -Server localhost -Filter {Name -Like "Administrators"} | Add-ADGroupMember -Members $userИ проверяем:
Get-ADGroupMember -Identity AdministratorsКак видим, отличий в управлении AD через AD AC и Powershell почти нет.
Вывод:
Если вы уже сталкивались с развертыванием AD и других служб, то вы, возможно подмечали сходство развертывания через RSAT и Powershell, и насколько на самом деле все похоже. GUI в ядре, как никак.
Надеемся, статья была полезна или интересна.
Ну и напоследок пару дельных советов:
- Не устанавливайте других ролей на контроллер домена.
- Используйте BPA (Best practice analyzer), чтобы чуточку ускорить контроллер
- Не используйте встроенного Enterprice Admin’а, всегда используйте свою собственную учетную запись.
- При развертывании сервера на белом IP адресе, с проброшенными портами или на VSD обязательно закройте 389 порт, иначе вы станете точкой амплификации DDoS атак.
Предлагаем также прочитать наши прошлые посты: рассказ как мы готовим клиентские виртуальные машины на примере нашего тарифа VDS Ultralight с Server Core за 99 рублей, как работать с Windows Server 2019 Core и как установить на него GUI, а также как управлять сервером с помощью Windows Admin Center, как установить Exchange 2019 на Windows Server Core 2019
Предлагаем обновлённый тариф UltraLite Windows VDS за 99 рублей с установленной Windows Server 2019 Core.

Установим роль контроллера домена на Windows Server 2019. На контроллере домена работает служба Active Directory (AD DS). С Active Directory связано множество задач системного администрирования.
AD DS в Windows Server 2019 предоставляет службу каталогов для централизованного хранения и управления пользователями, группами, компьютерами, а также для безопасного доступ к сетевым ресурсам с проверкой подлинности и авторизацией.
Подготовительные работы
Нам понадобится компьютер с операционной системой Windows Server 2019. У меня контроллер домена будет находиться на виртуальной машине:
Установка Windows Server 2019 на виртуальную машину VMware
После установки операционной системы нужно выполнить первоначальную настройку Windows Server 2019:
Первоначальная настройка Windows Server 2019
Хочется отметить обязательные пункты, которые нужно выполнить.
Выполните настройку сети. Укажите статический IP адрес. DNS сервер указывать не обязательно, при установке контроллера домена вместе с ним установится служба DNS. В настройках сети DNS сменится автоматически. Отключите IPv6, сделать это можно и после установки контроллера домена.

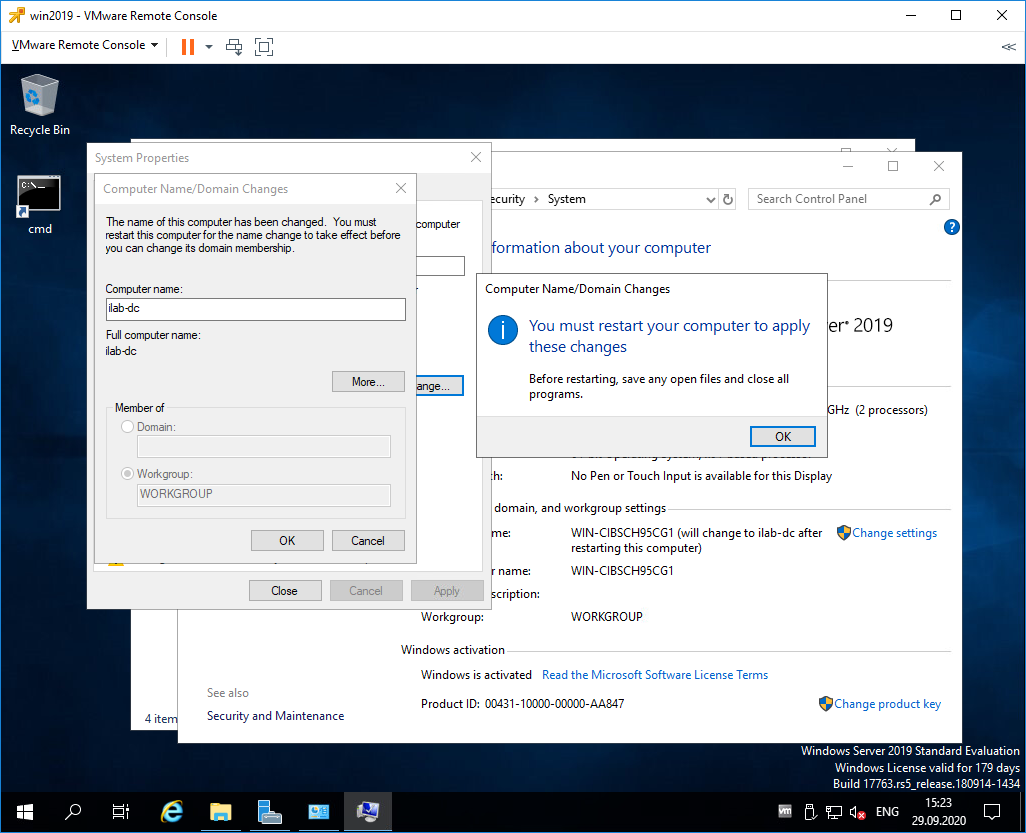
Укажите имя сервера.
Было бы неплохо установить последние обновления, драйвера. Указать региональные настройки, время. На этом подготовка завершена.
Установка роли Active Directory Domain Services
Работаем под учётной записью локального администратора Administrator (или Администратор), данный пользователь станет администратором домена.
Дополнительно будет установлена роль DNS.
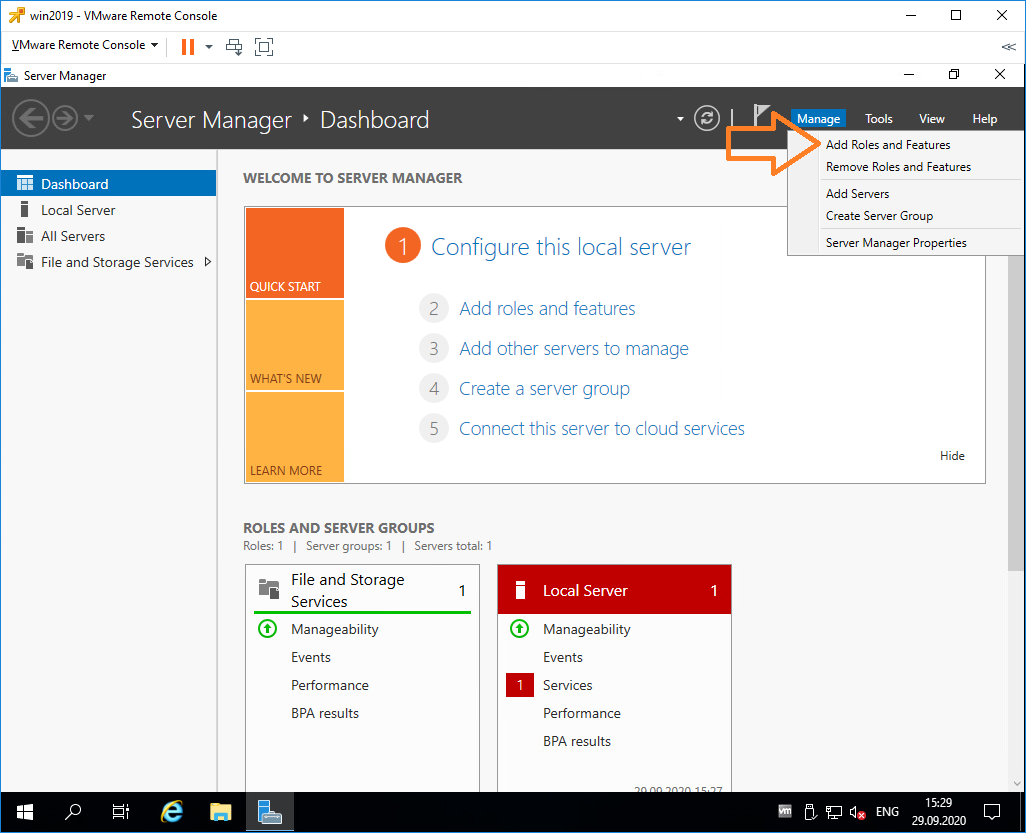
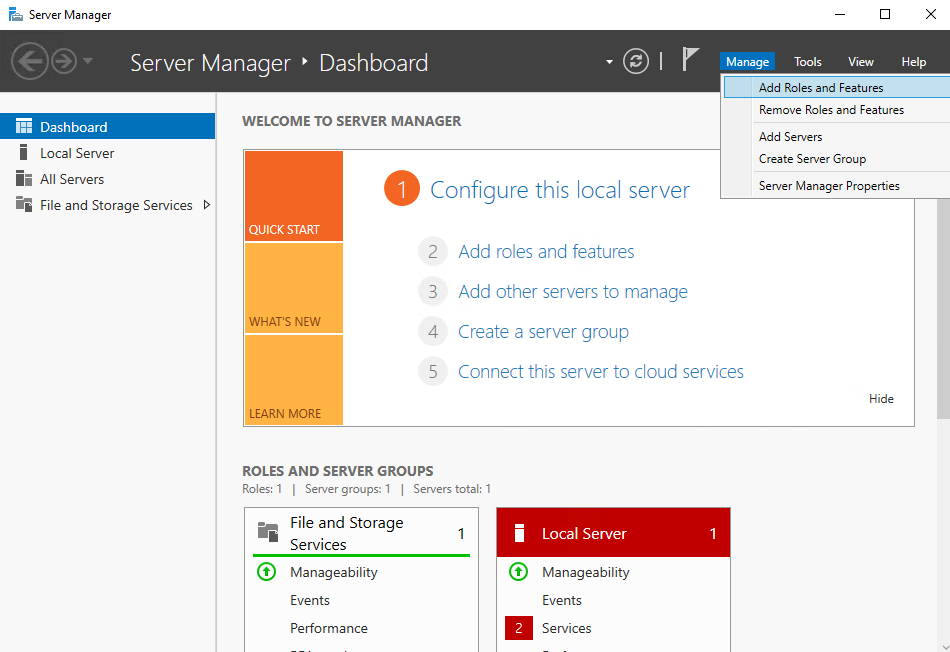
Следующий шаг — установка роли AD DS. Открываем Sever Manager. Manage > Add Roles and Features.
Запускается мастер добавления ролей.

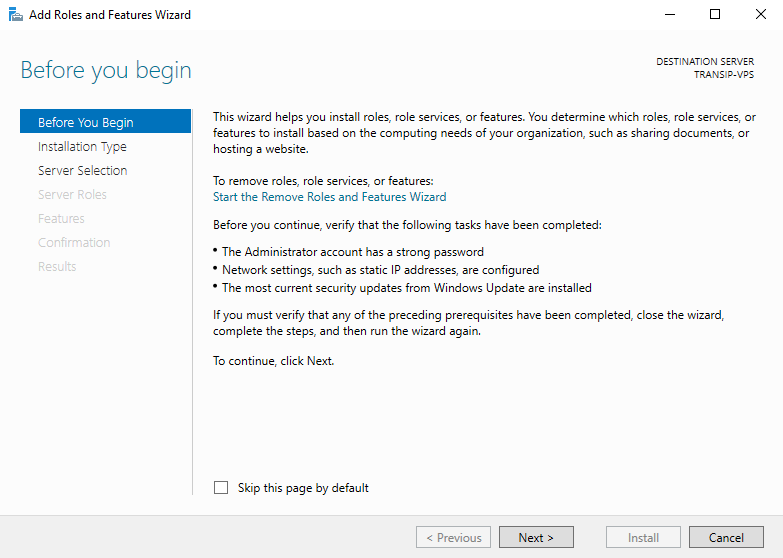
Раздел Before You Begin нас не интересует. Next.
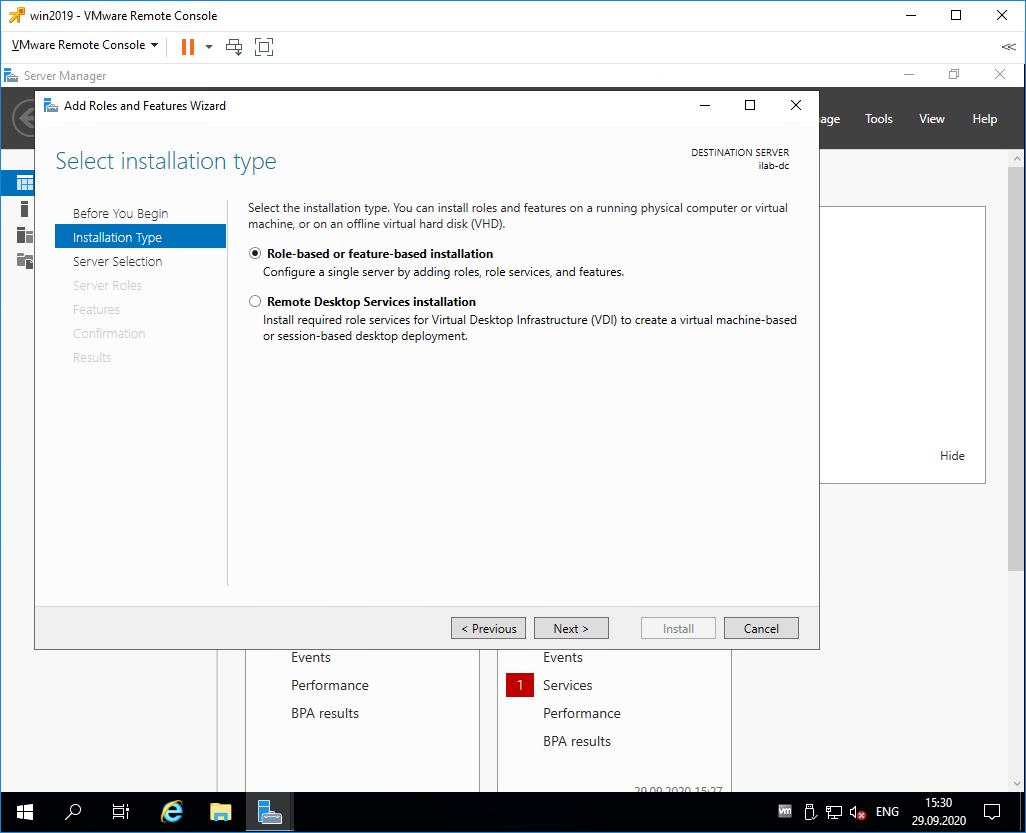
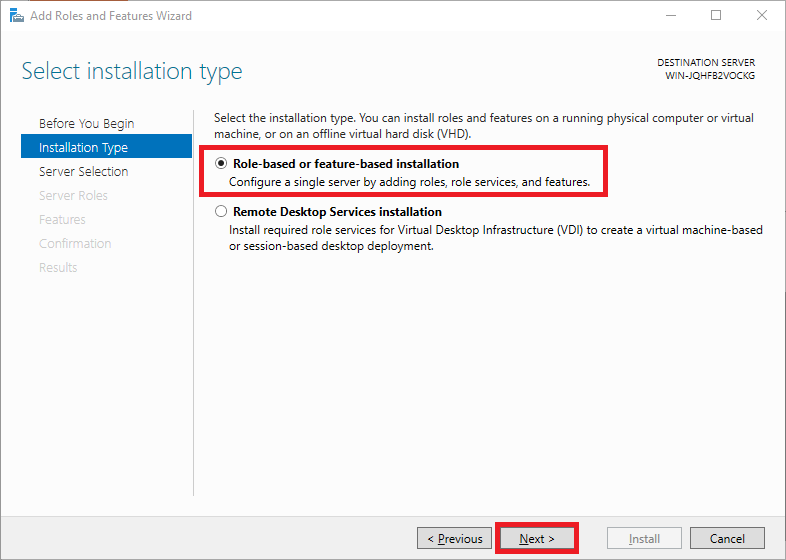
В разделе Installation Type выбираем Role-based or feature-based installation. Next.
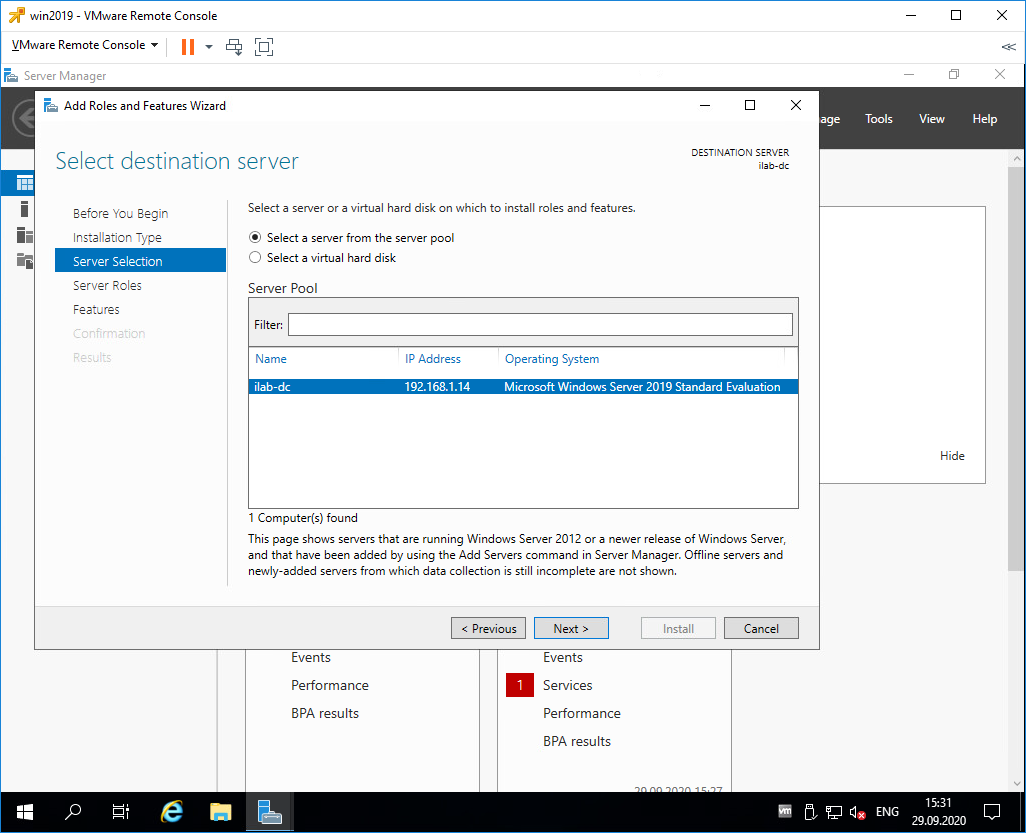
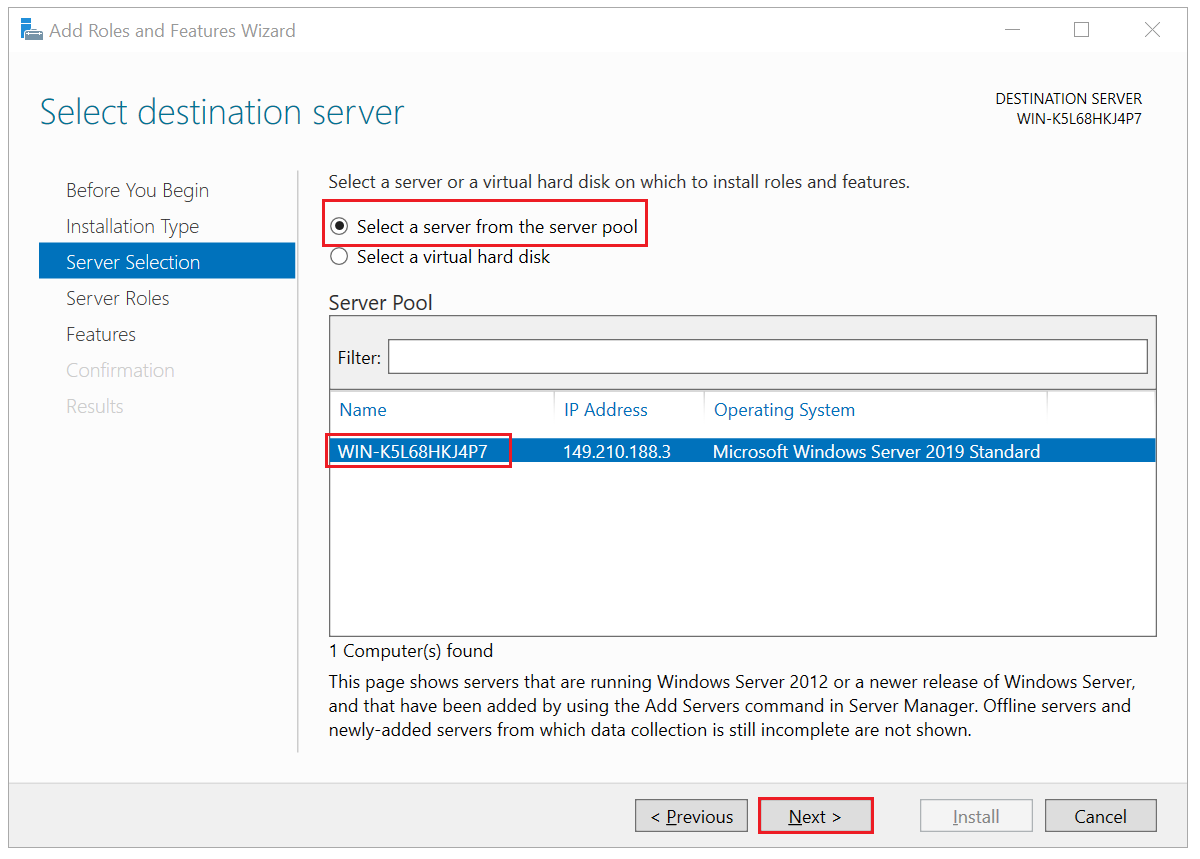
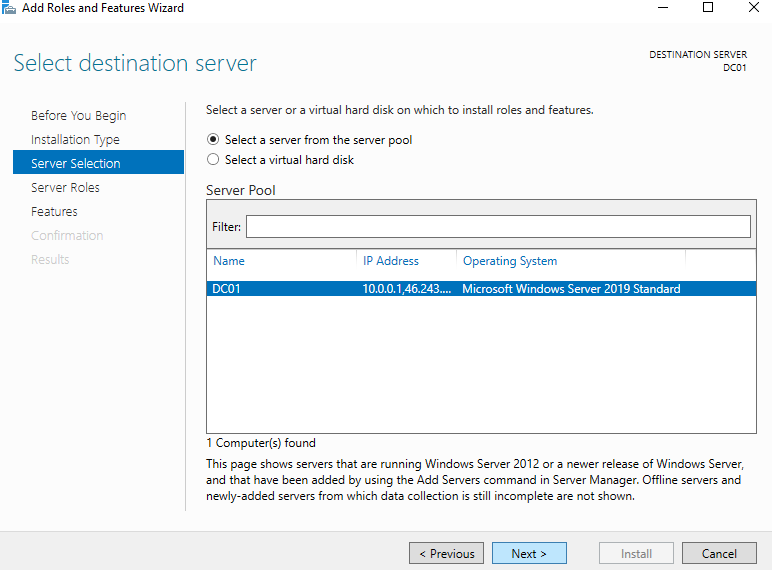
В разделе Server Selection выделяем текущий сервер. Next.
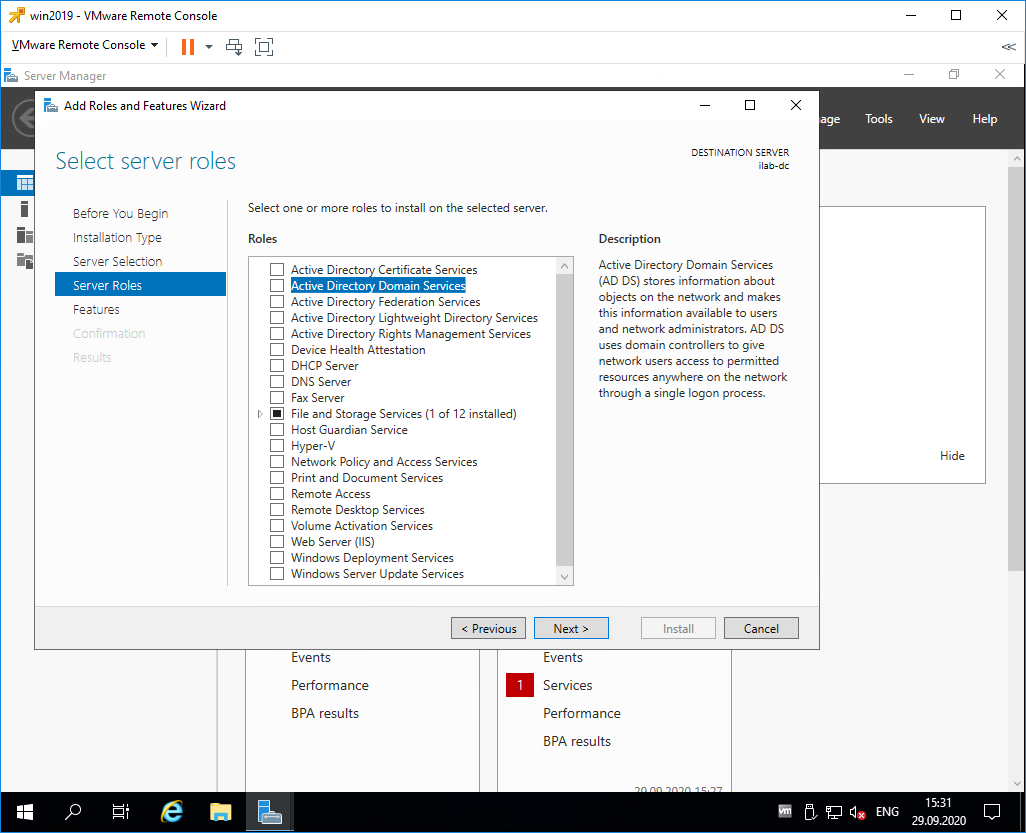
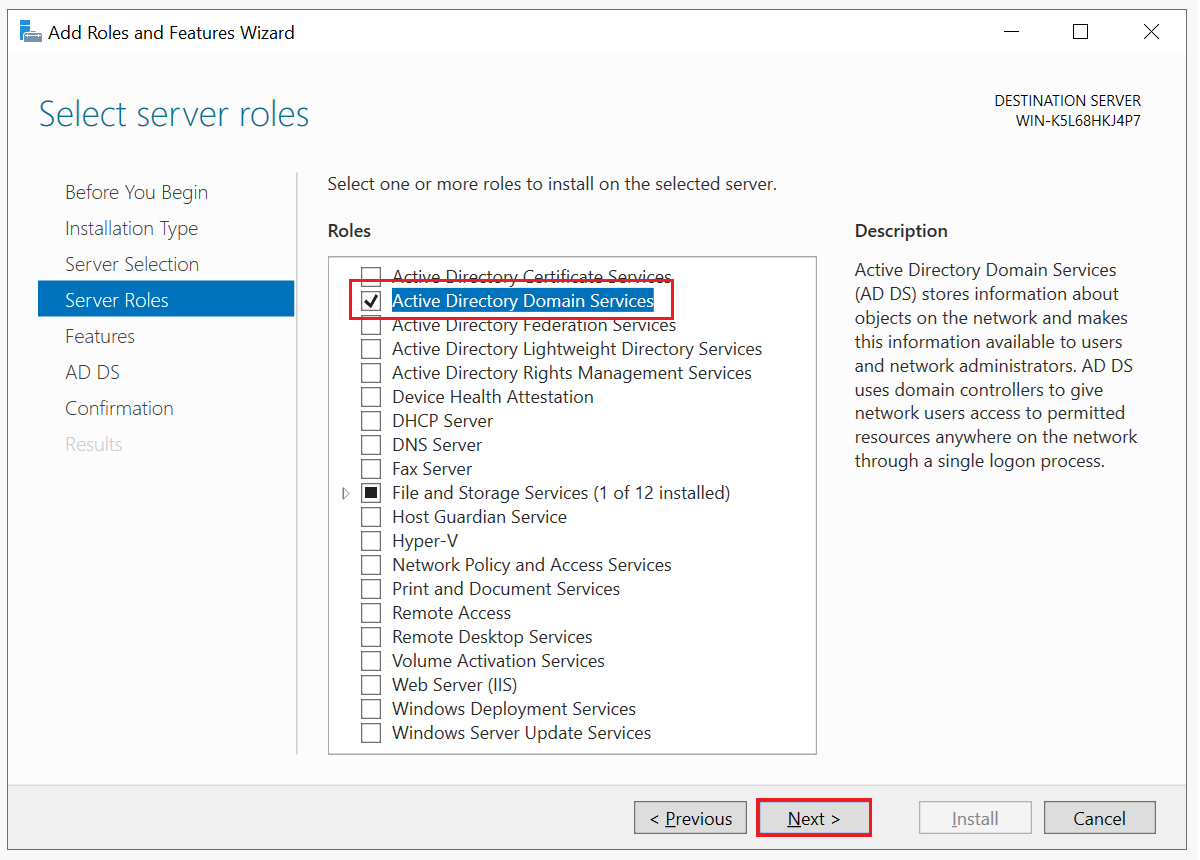
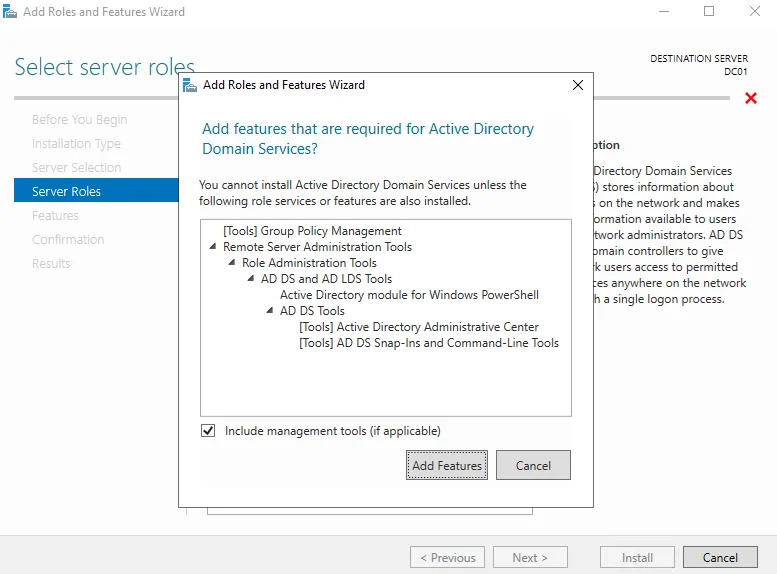
В разделе Server Roles находим роль Active Directory Domain Services, отмечаем галкой.
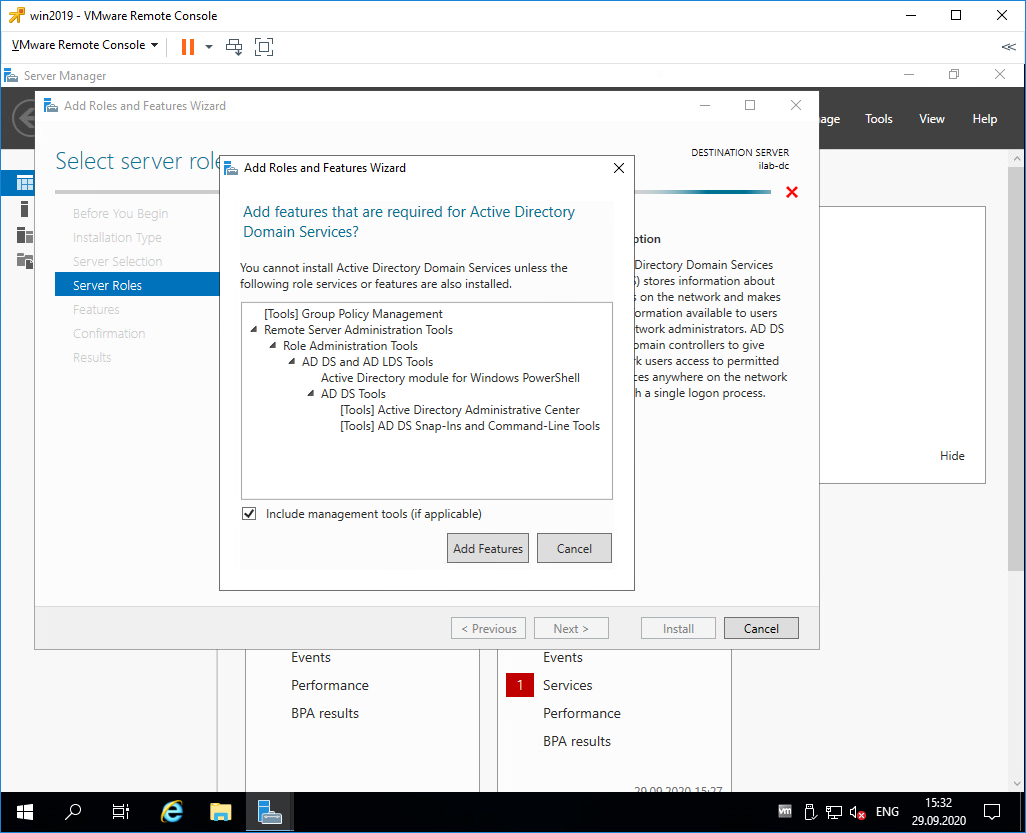
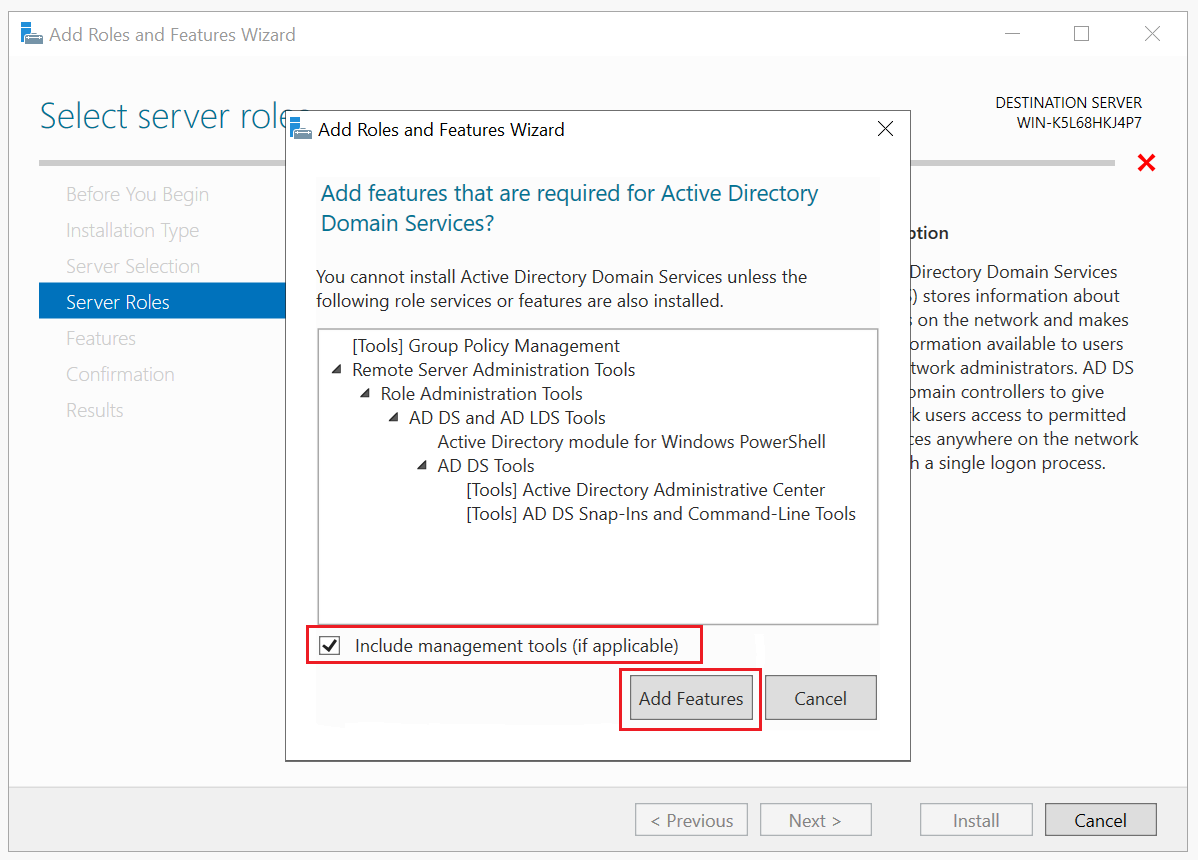
Для роли контроллера домена нам предлагают установить дополнительные опции:
- [Tools] Group Policy Management
- Active Directory module for Windows PowerShell
- [Tools] Active Directory Administrative Center
- [Tools] AD DS Snap-Ins and Command-Line Tools
Всё это не помешает. Add Features.

Теперь роль Active Directory Domain Services отмечена галкой. Next.
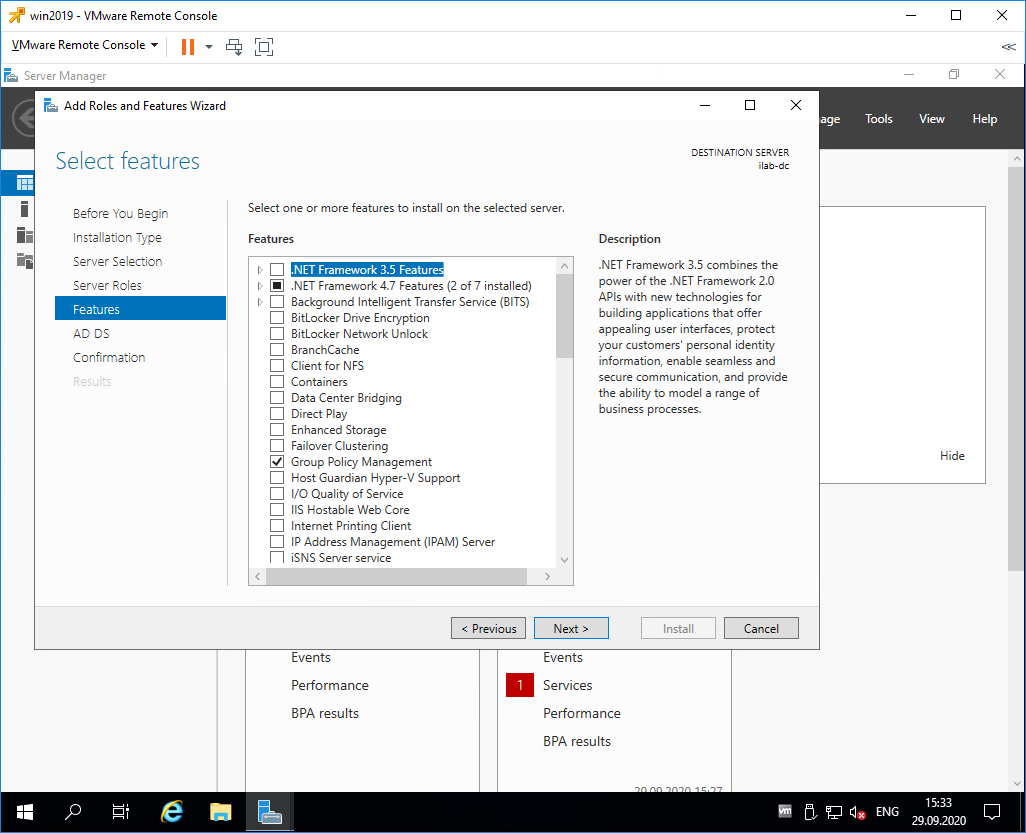
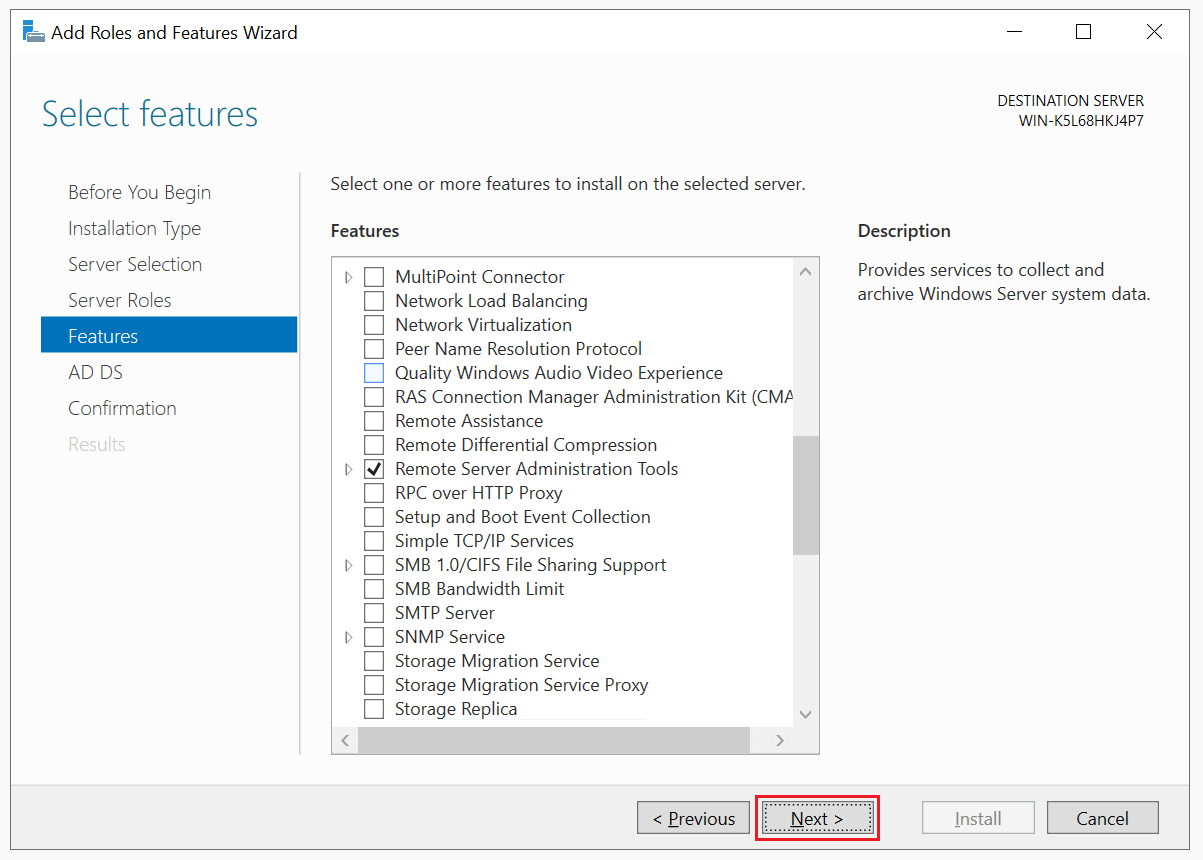
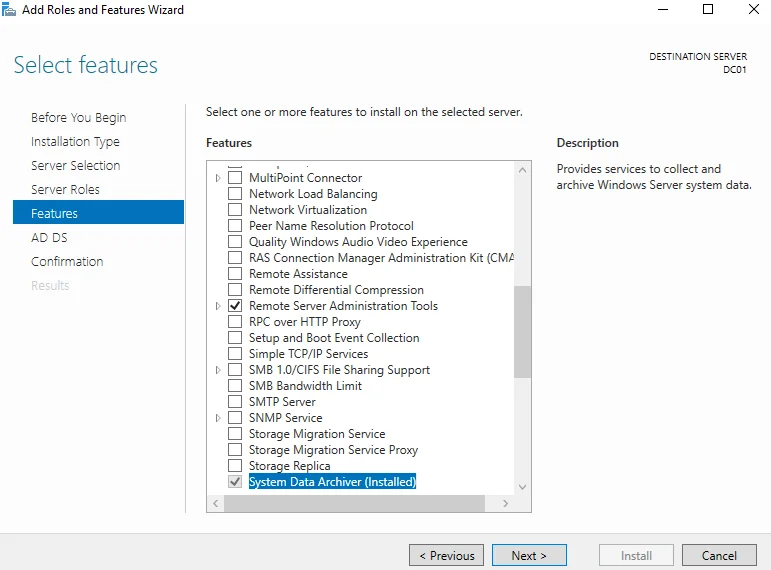
В разделе Features нам не нужно отмечать дополнительные опции. Next.
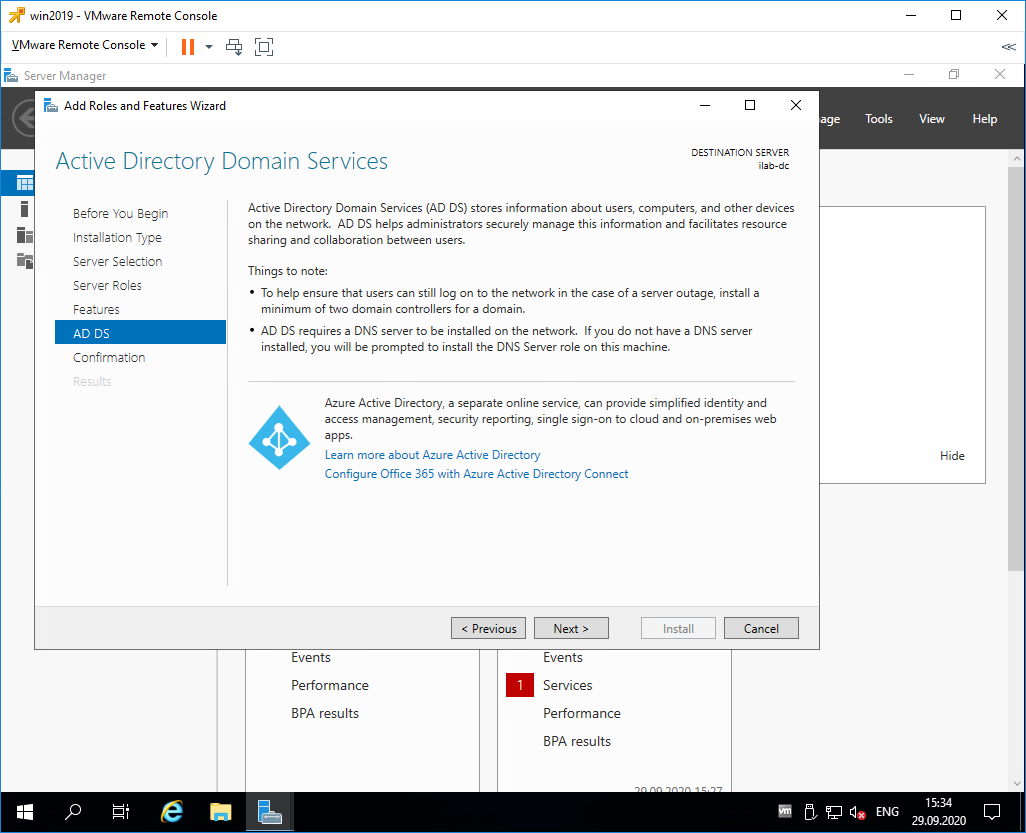
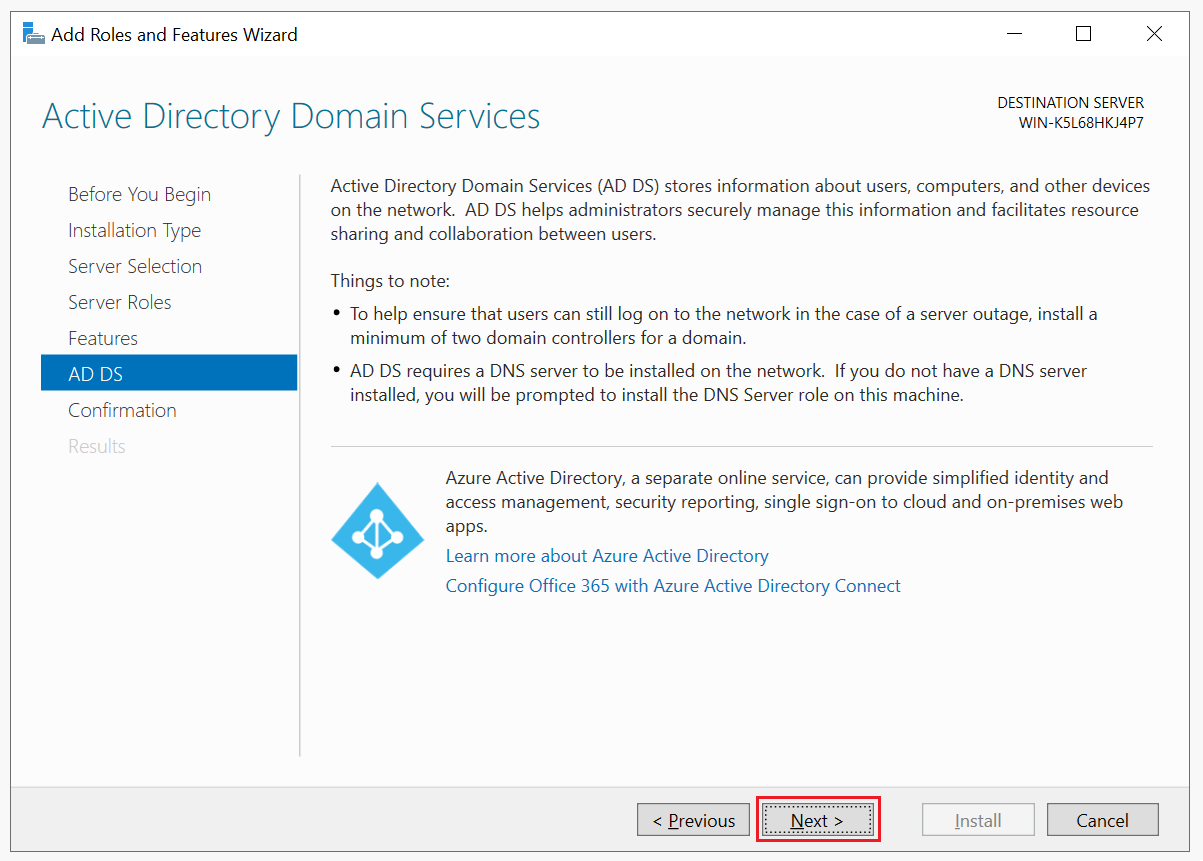
У нас появился раздел AD DS. Здесь есть пара ссылок про Azure Active Directory, они нам не нужны. Next.
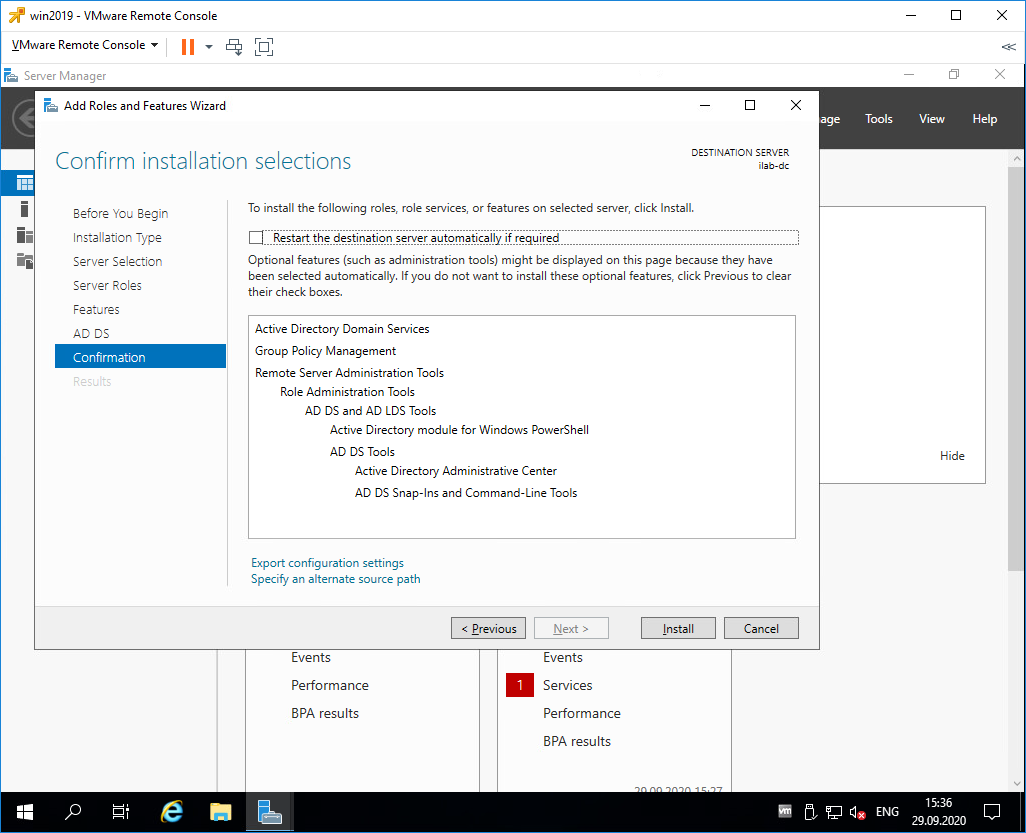
Раздел Confirmation. Подтверждаем установку компонентов кнопкой Install.
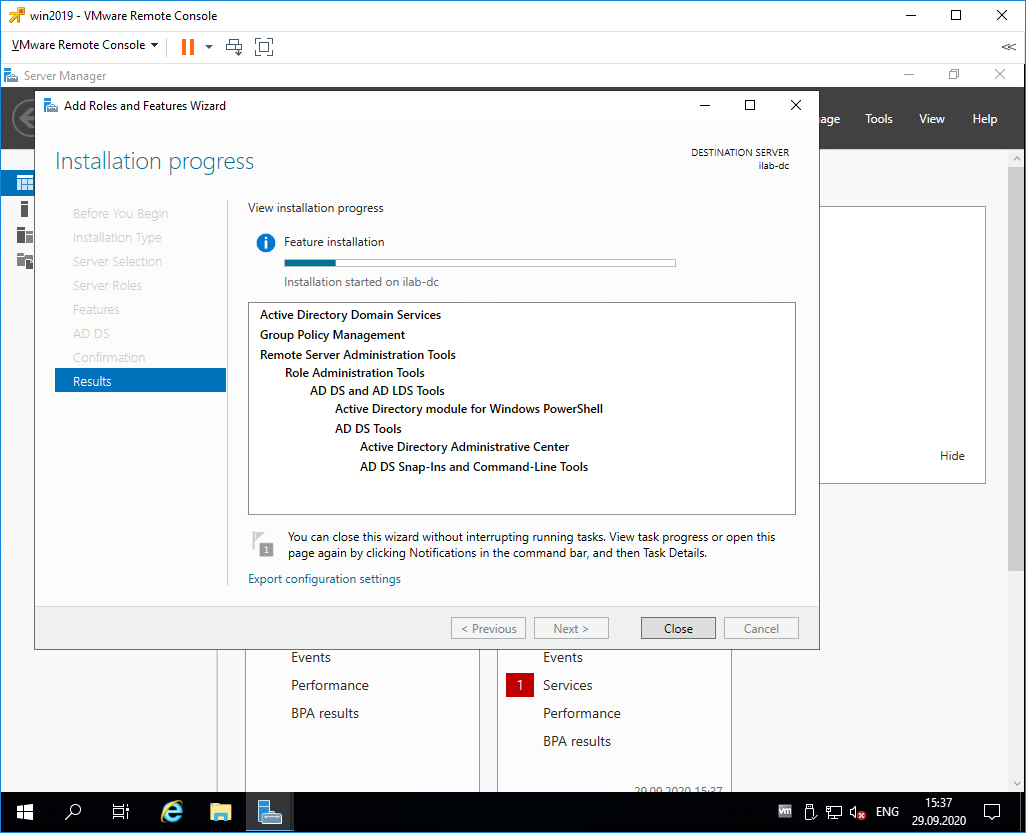
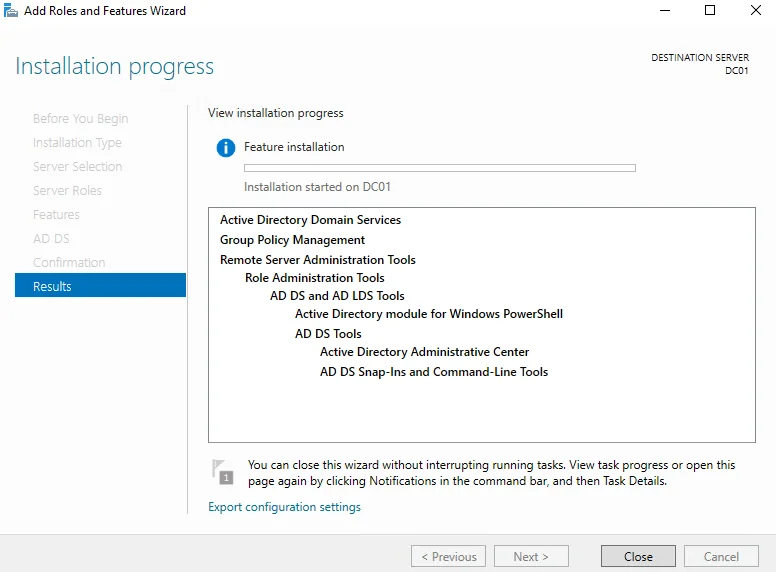
Начинается установка компонентов, ждём.
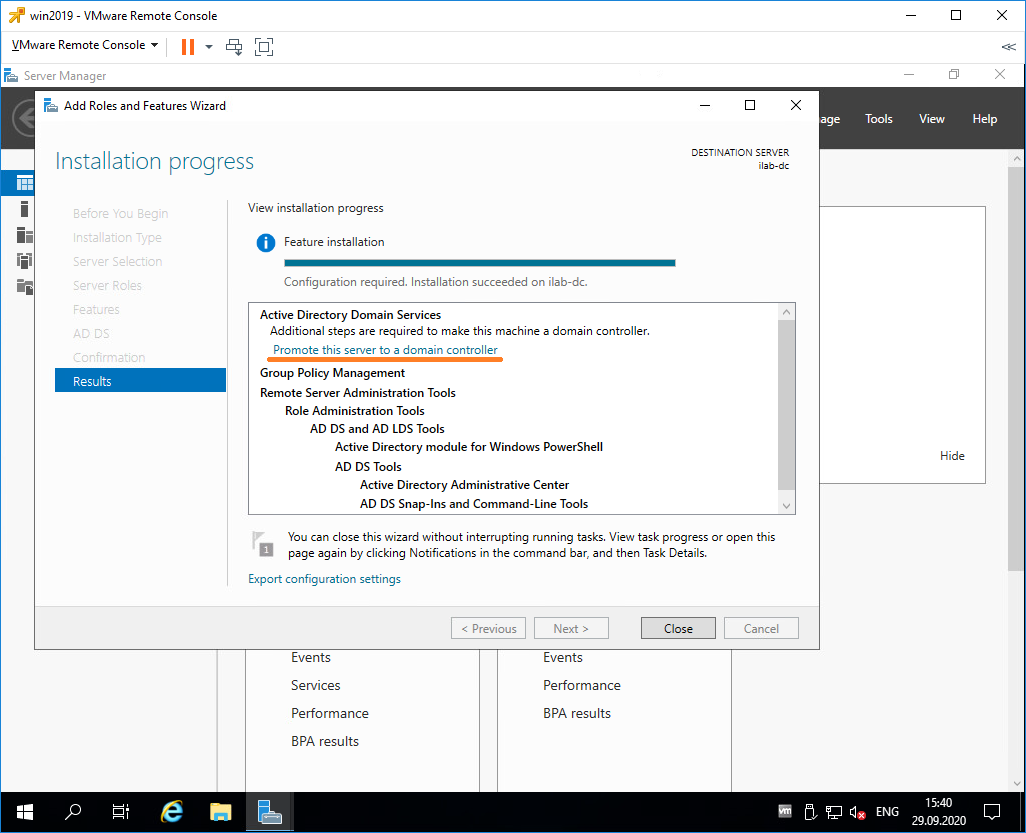
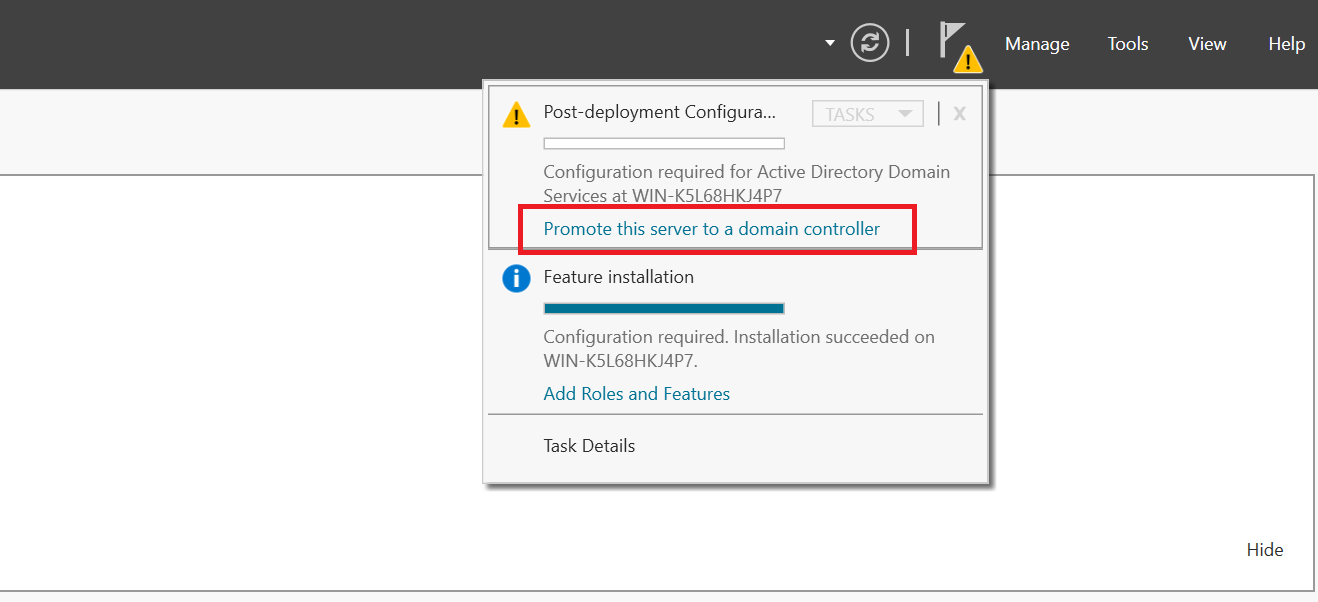
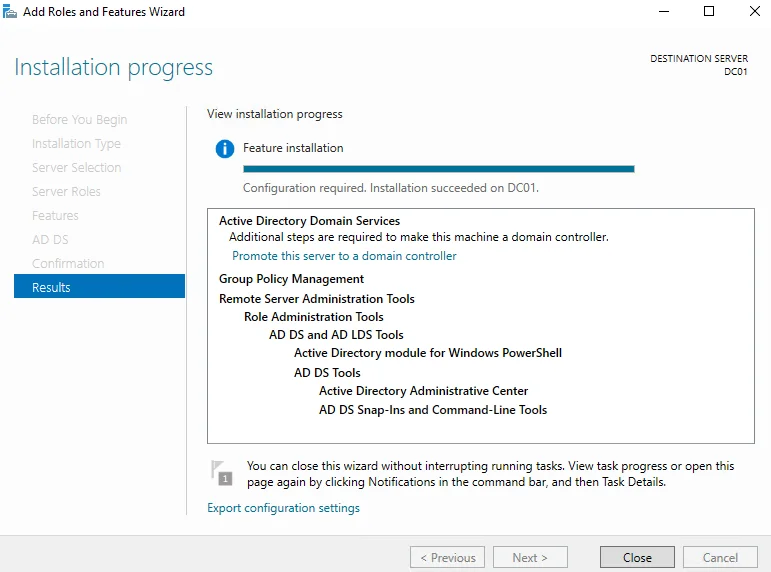
Configuration required. Installation succeeded on servername. Установка компонентов завершена, переходим к основной части, повышаем роль текущего сервера до контроллера домена. В разделе Results есть ссылка Promote this server to domain controller.
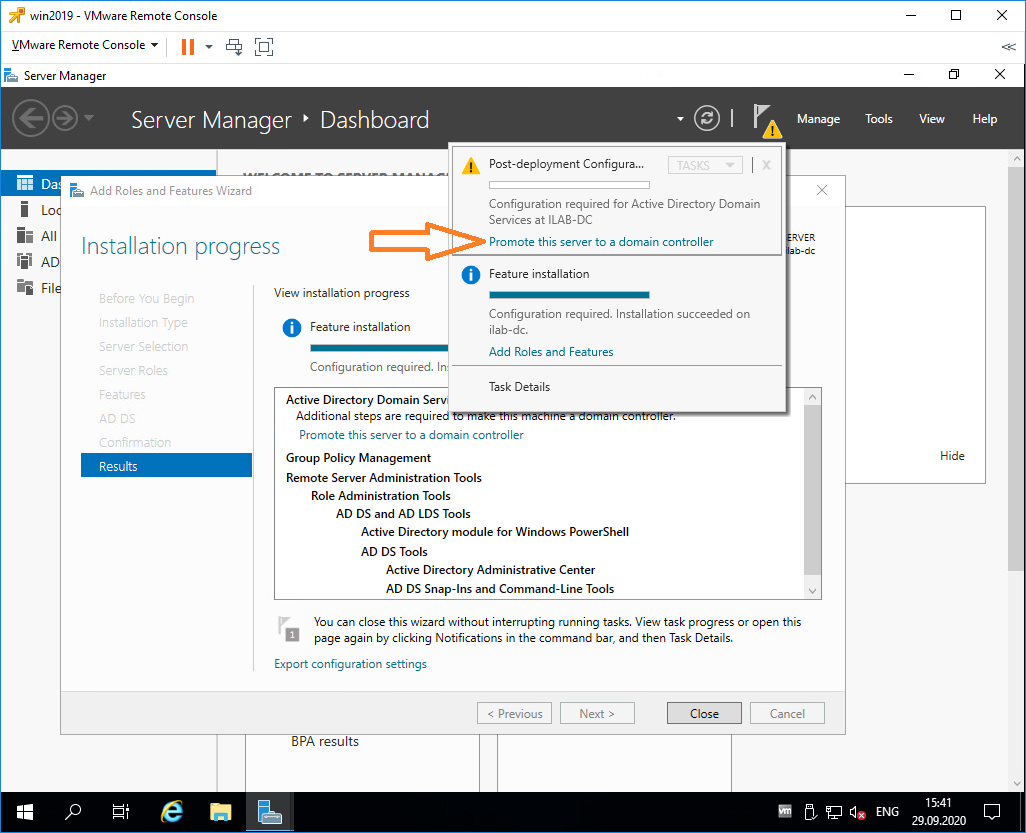
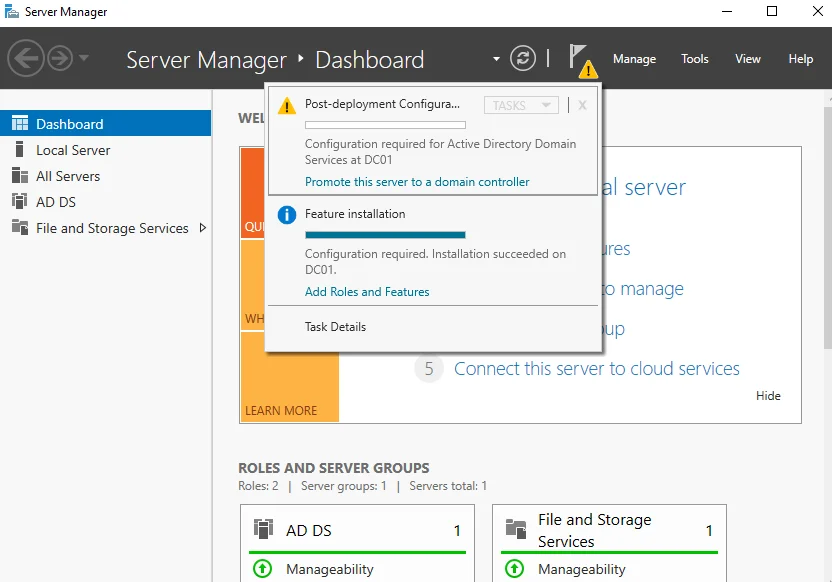
Она же доступна в предупреждении основного окна Server Manager. Нажимаем на эту ссылку, чтобы повысить роль сервера до контроллера домена.
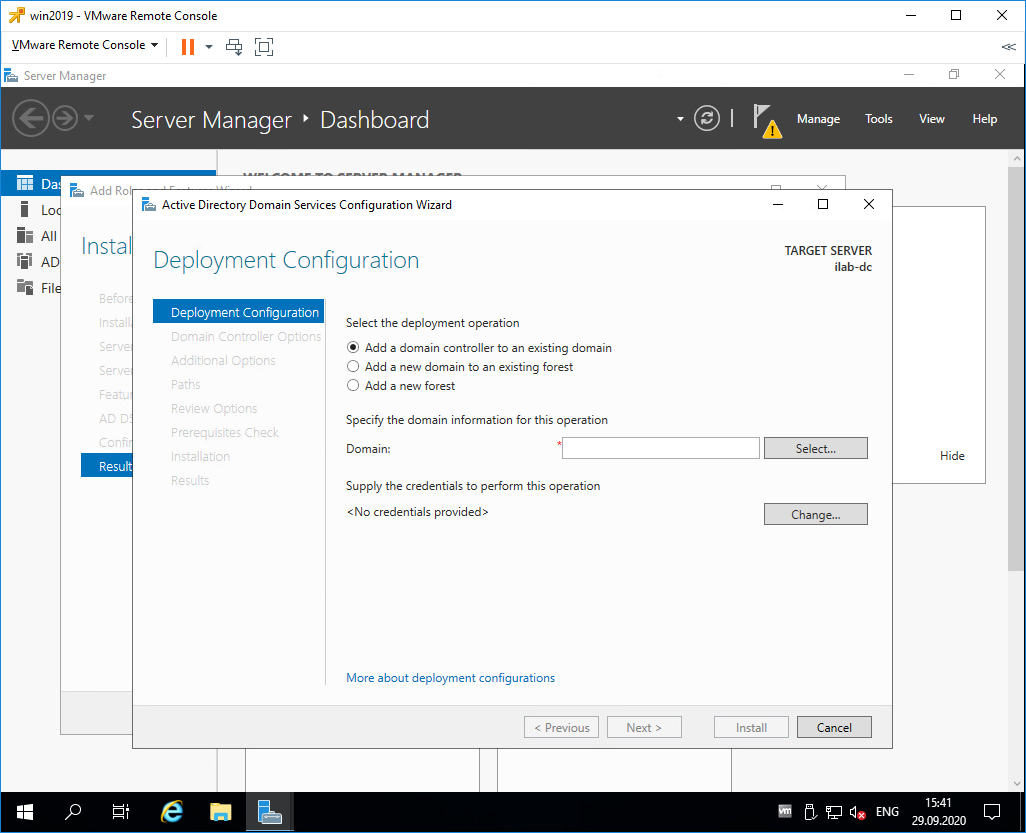
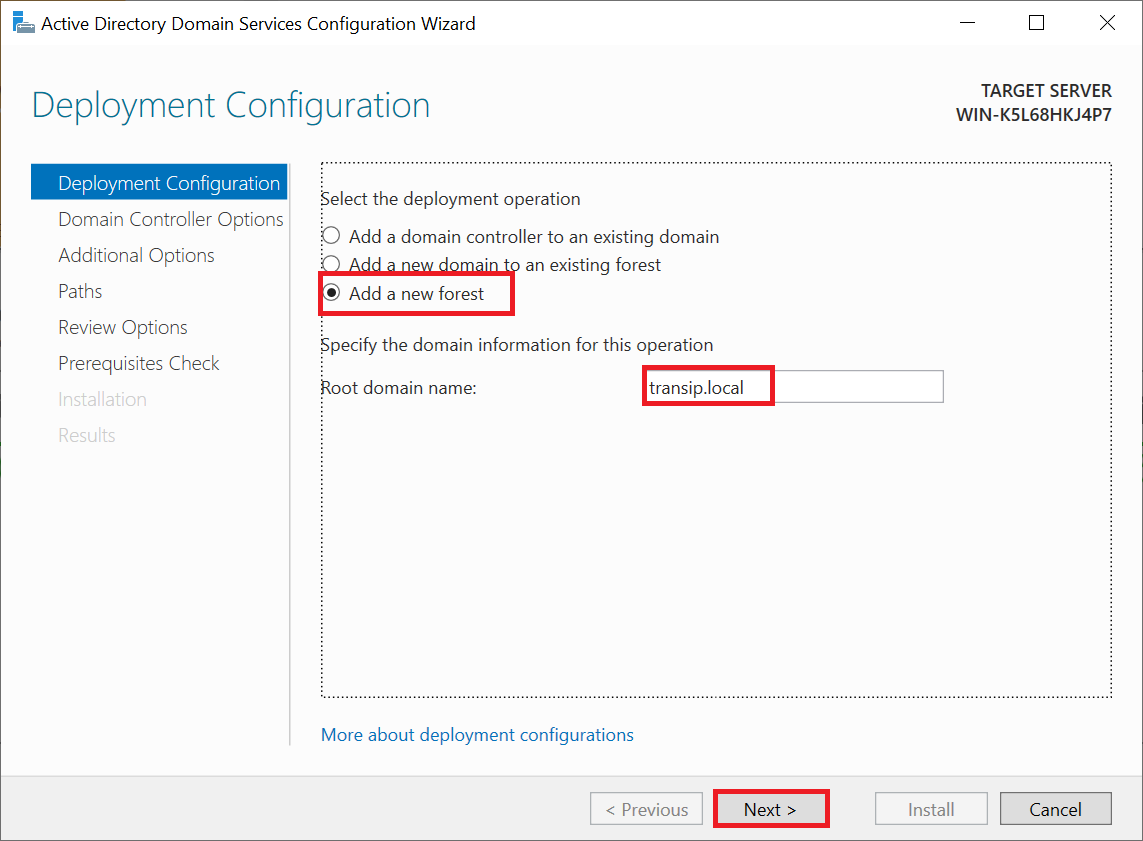
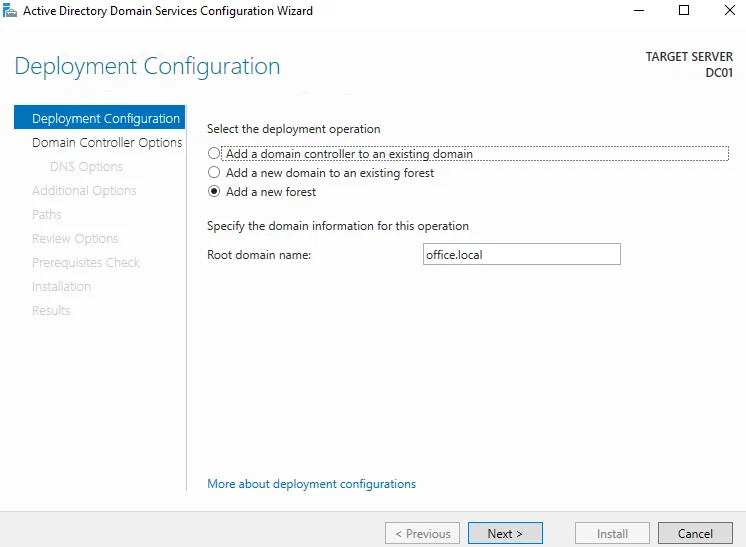
Запускается мастер конфигурации AD DS — Active Directory Domain Service Configuration Wizard. В разделе Deployment Configuration нужно выбрать один из трёх вариантов:
- Add a domain controller to an existing domain
- Add a new domain to an existing forest
- Add a new forest
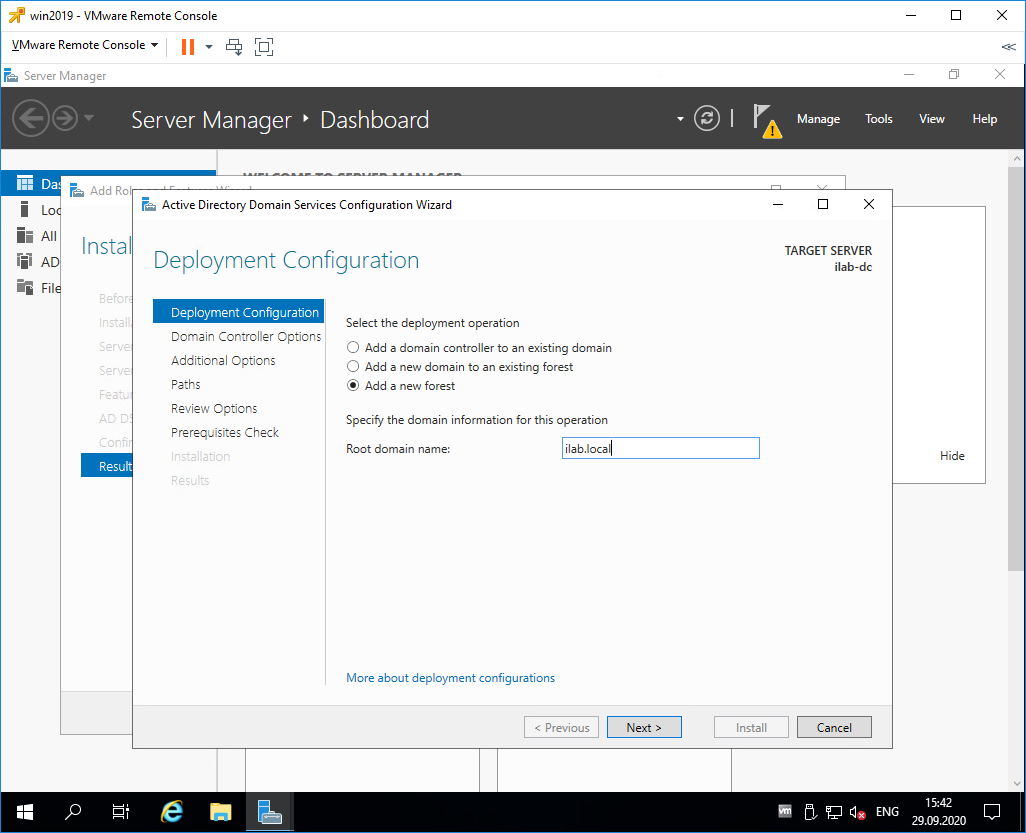
Первый вариант нам не подходит, у нас нет текущего домена, мы создаём новый. По той же причине второй вариант тоже не подходит. Выбираем Add a new forest. Будем создавать новый лес.
Укажем в Root domain name корневое имя домена. Я пишу ilab.local, это будет мой домен. Next.
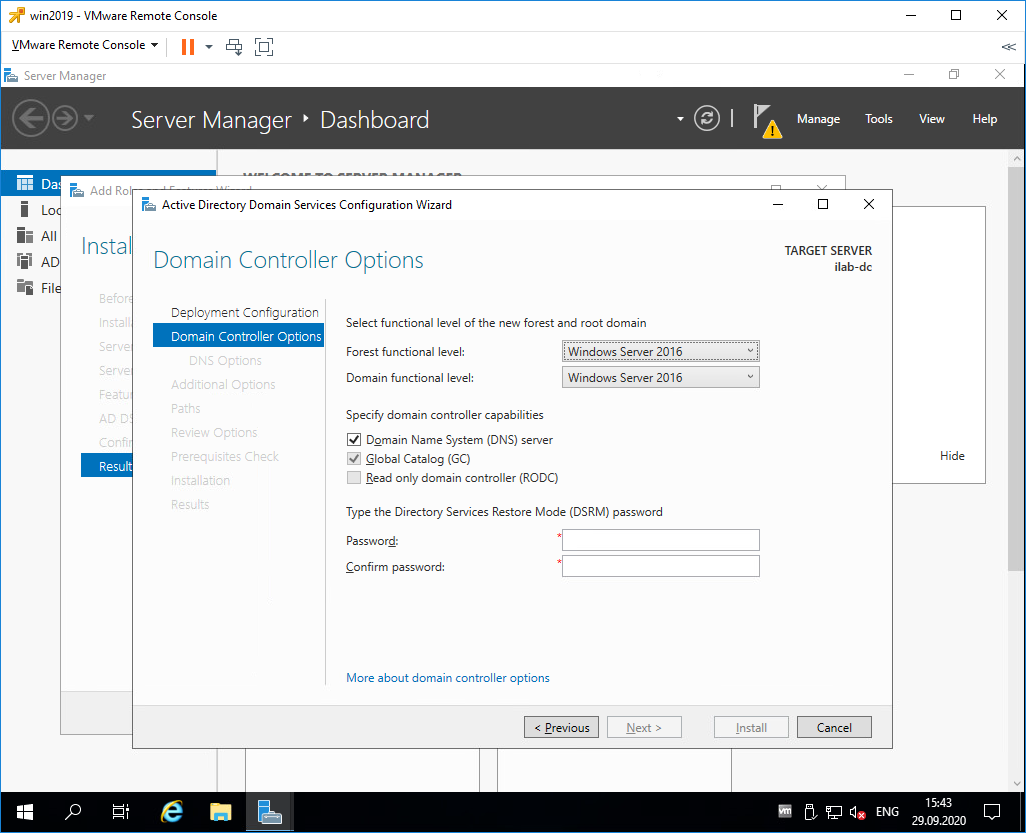
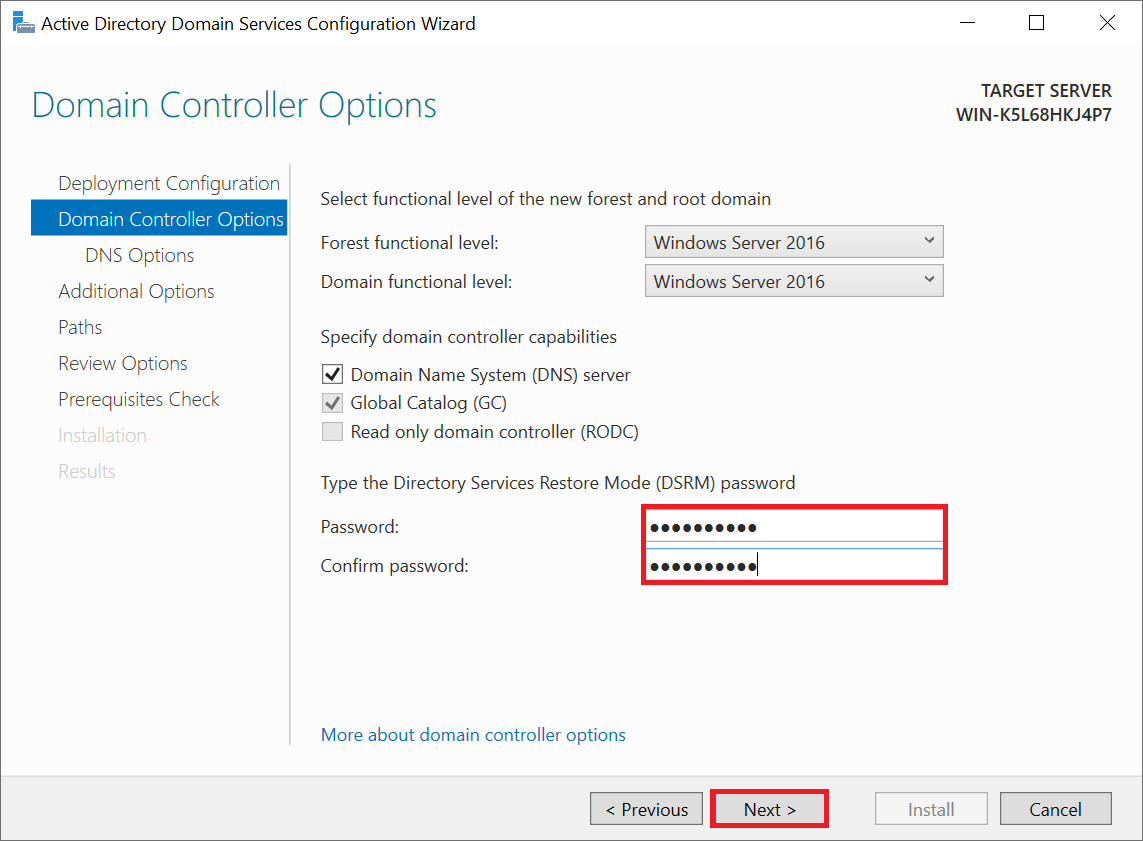
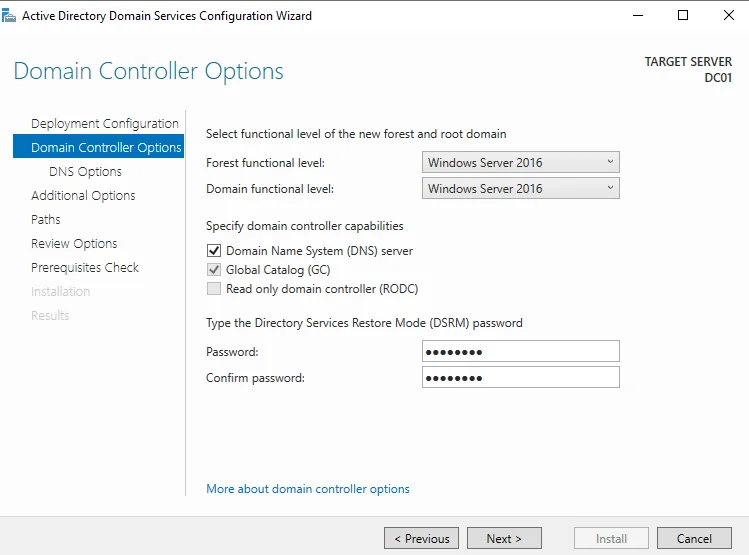
Попадаем в раздел Doman Controller Options.
В Forest functional level и Domain functional level нужно указать минимальную версию серверной операционной системы, которая будет поддерживаться доменом.

У меня в домене планируются сервера с Windows Server 2019, Windows Server 2016 и Windows Server 2012, более ранних версий ОС не будет. Выбираю уровень совместимости Windows Server 2012.
В Domain functional level также выбираю Windows Server 2012.
Оставляю галку Domain Name System (DNS) server, она установит роль DNS сервера.
Укажем пароль для Directory Services Restore Mode (DSRM), желательно, чтобы пароль не совпадал с паролем локального администратора. Он может пригодиться для восстановления службы каталогов в случае сбоя.
Next.
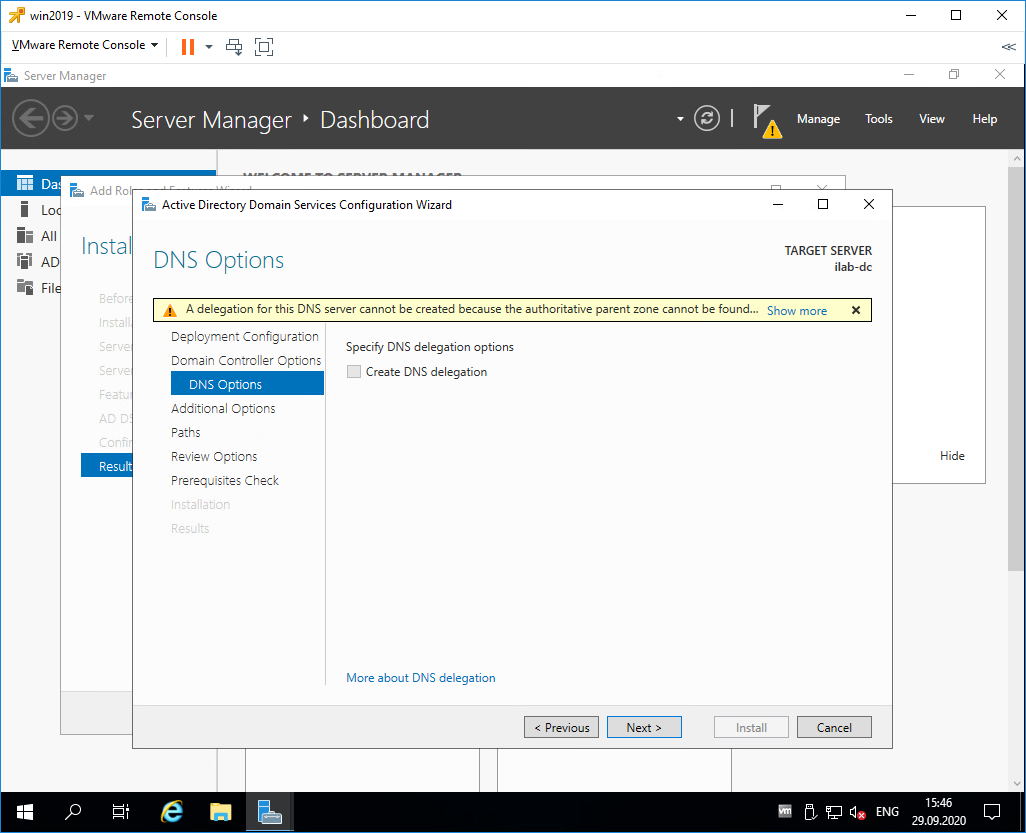
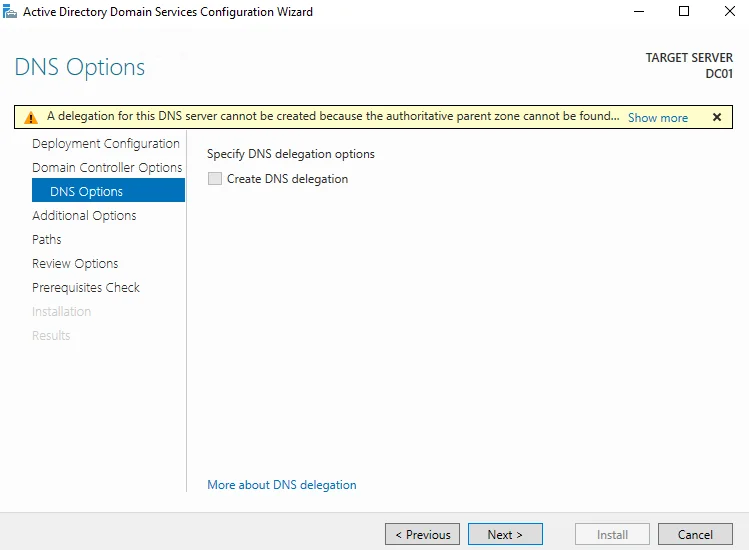
Не обращаем внимание на предупреждение «A delegation for this DNS server cannot be created because the authoritative parent zone cannot be found…». Нам не нужно делать делегирование, у нас DNS сервер будет на контроллере домена. Next.
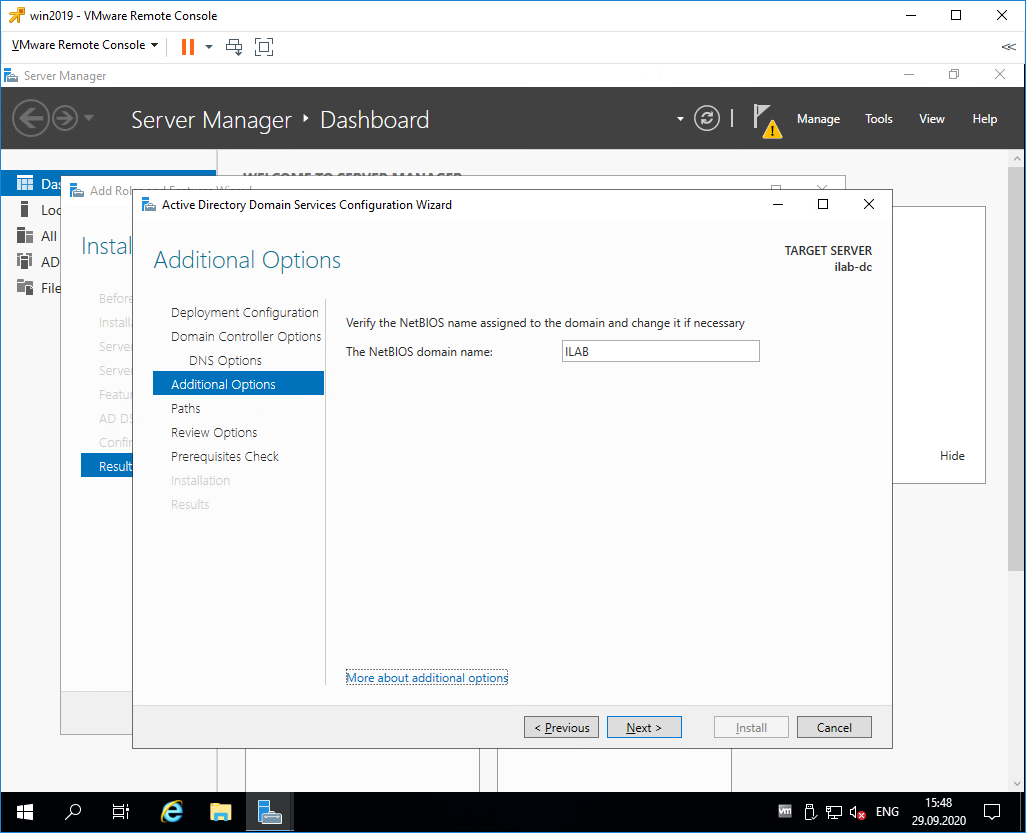
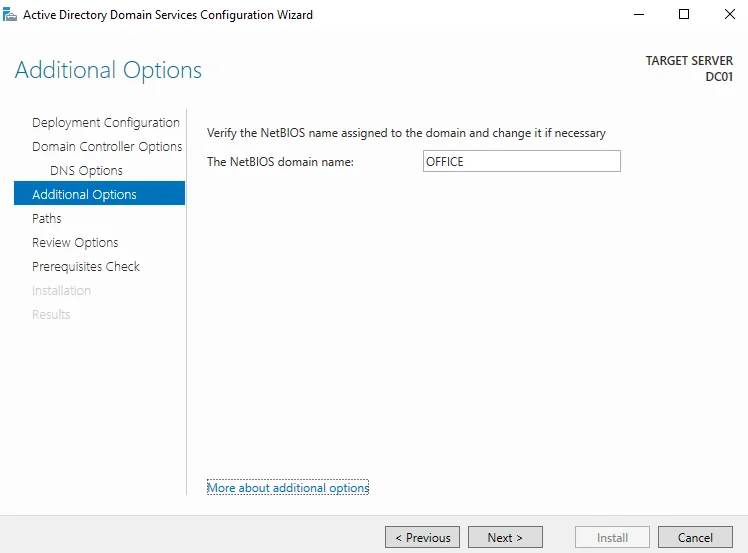
В разделе Additional Options нужно указать NetBIOS name для нашего домена, я указываю «ILAB». Next.
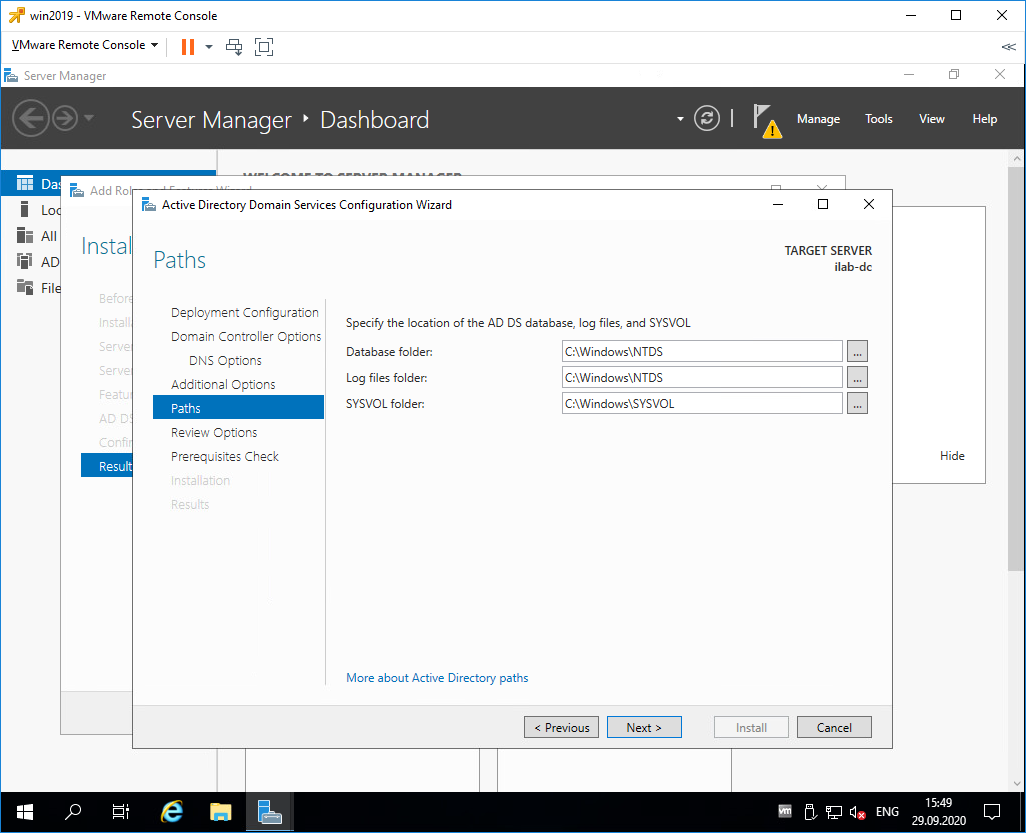
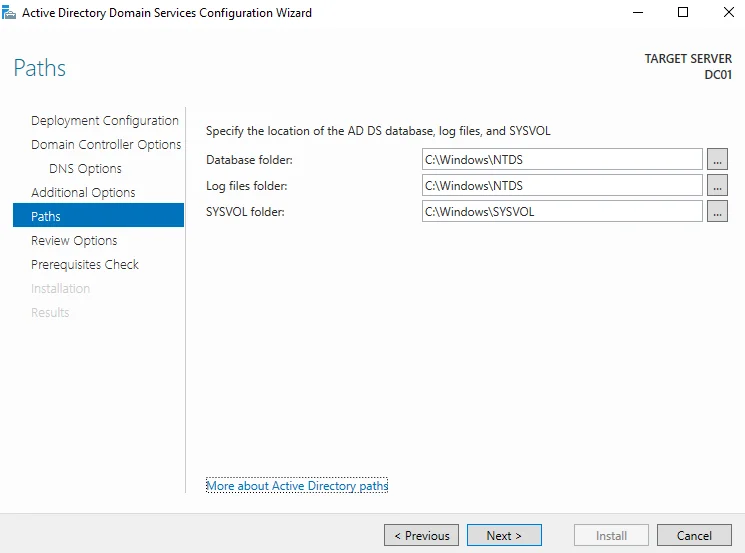
В разделе Paths можно изменить пути к базе данных AD DS, файлам журналов и папке SYSVOL. Без нужды менять их не рекомендуется. По умолчанию:
- Database folder: C:\Windows\NTDS
- Log files folder: C:\Windows\NTDS
- SYSVOL folder: C:\Windows\SYSVOL
Next.
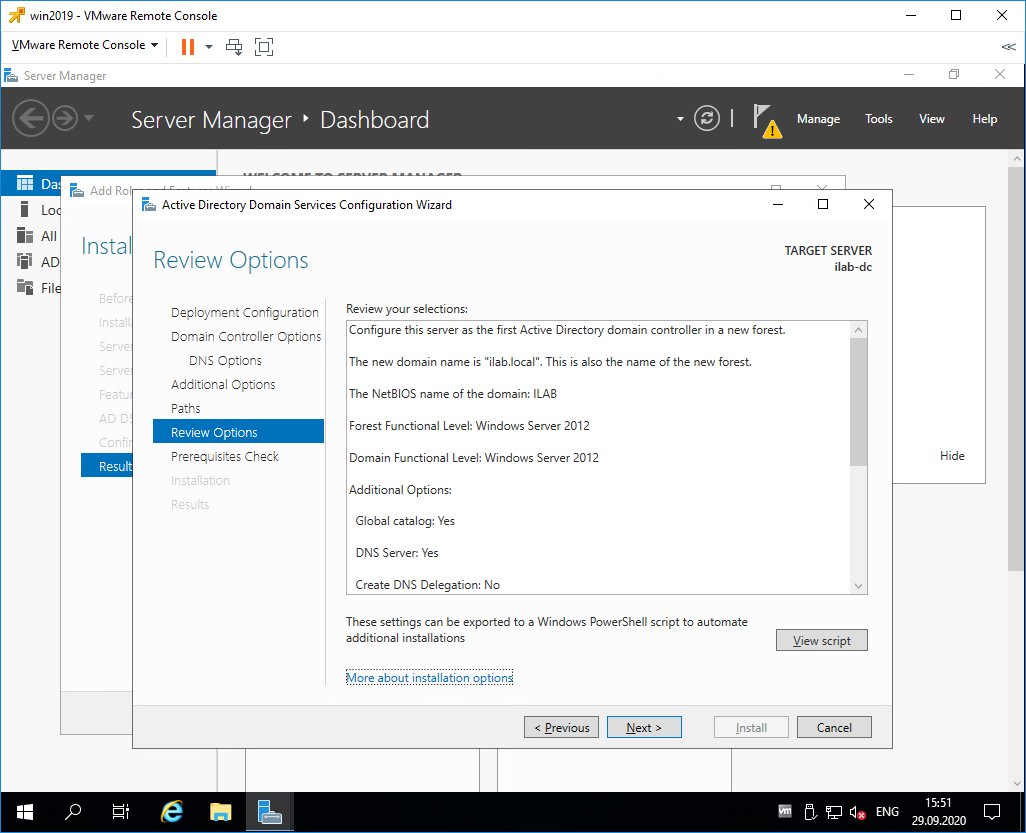
В разделе Review Options проверяем параметры установки. Обратите внимание на кнопку View script. Если её нажать, то сгенерируется tmp файл с PowerShell скриптом для установки контроллера домена.
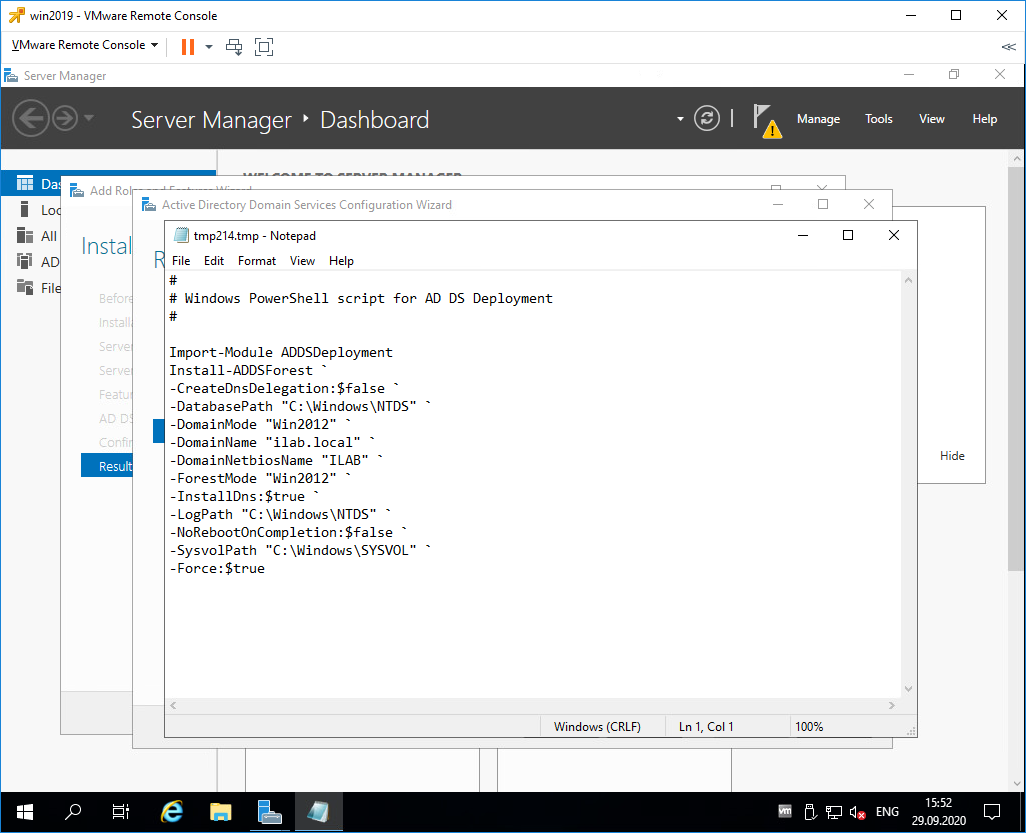
Сейчас нам этот скрипт не нужен, но он может быть полезен системным администраторам для автоматизации установки роли контроллера домена с помощью PowerShell.
Next.
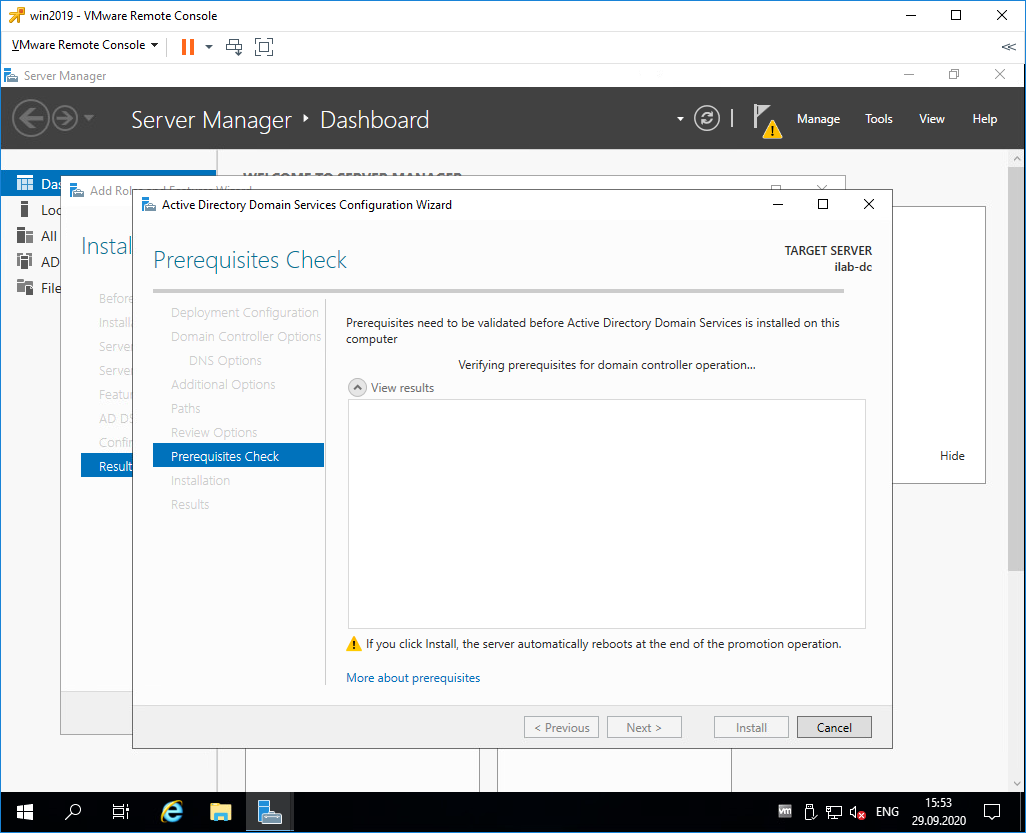
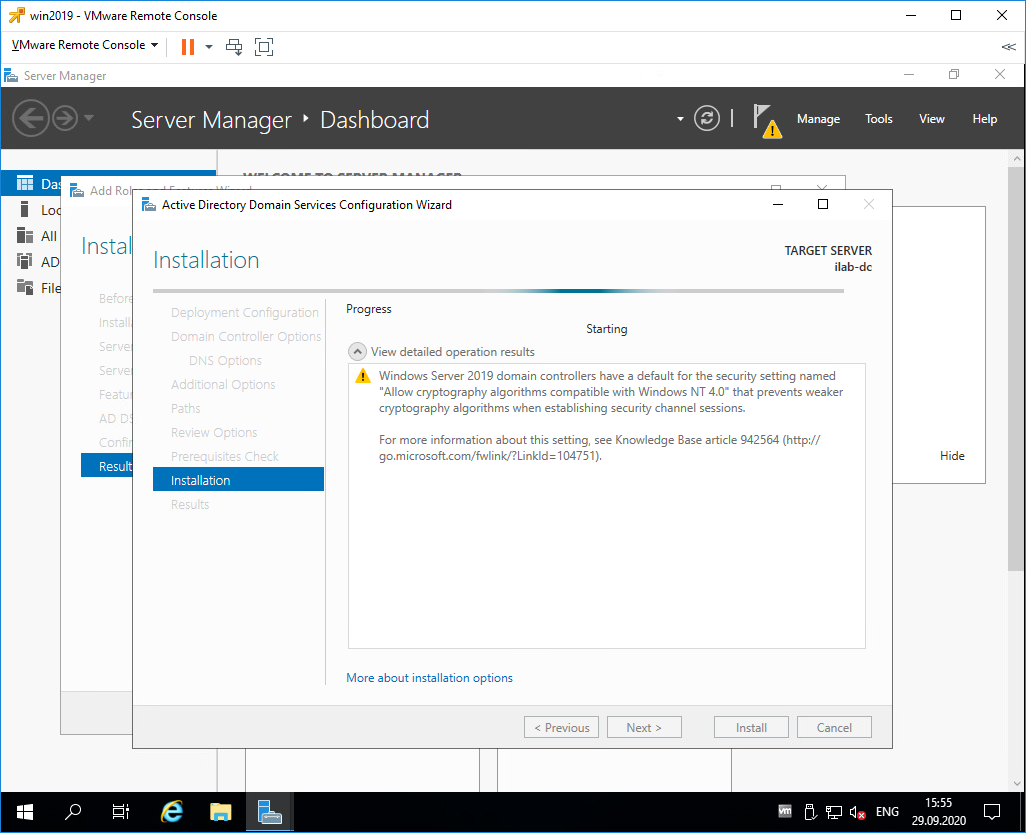
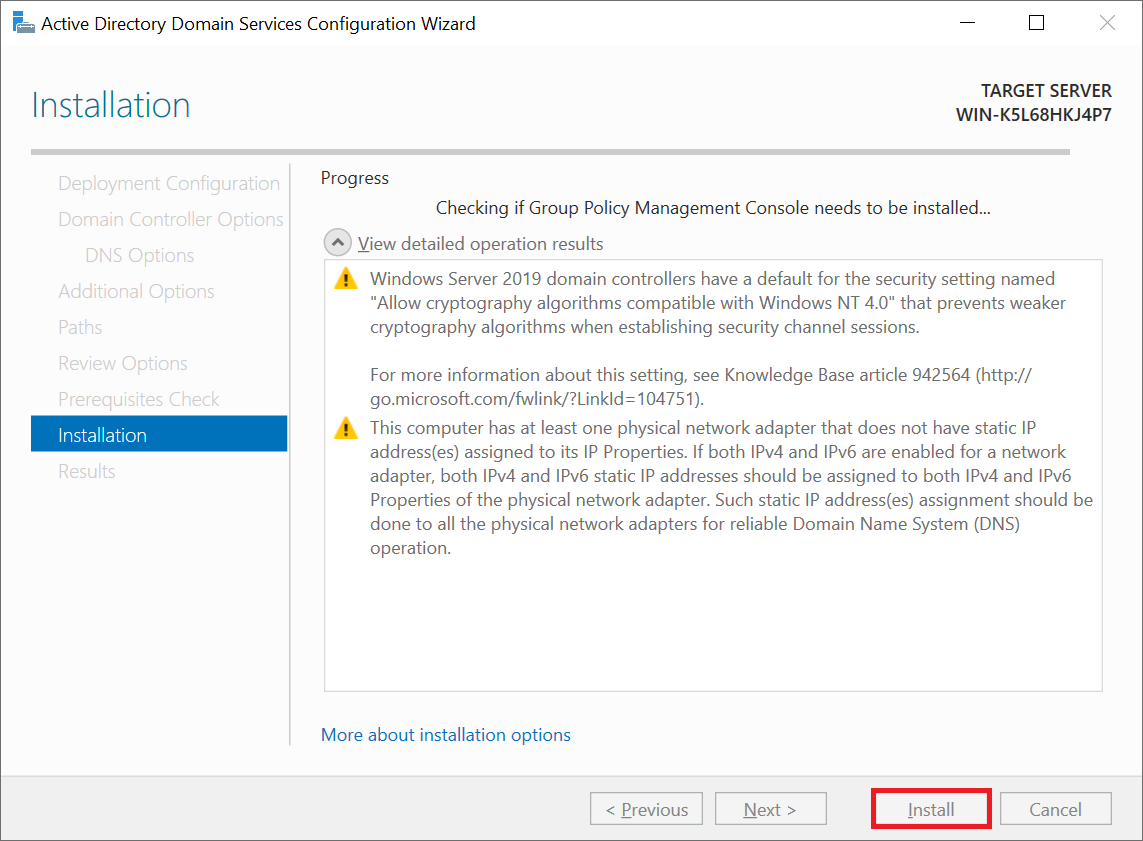
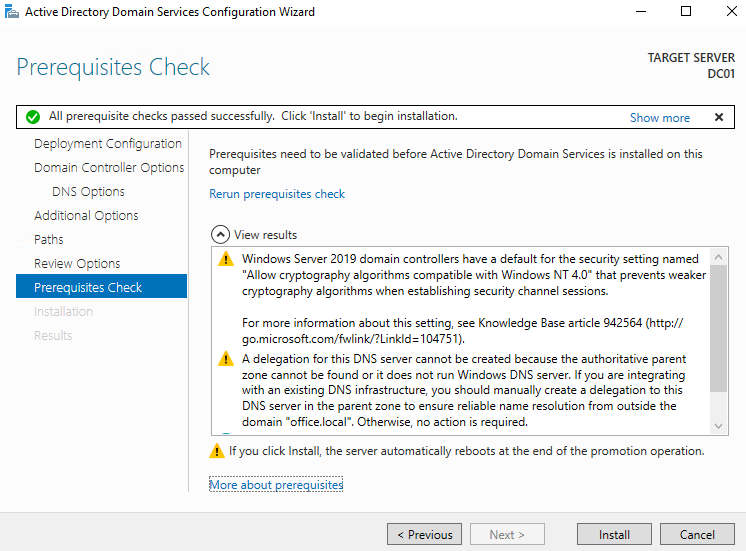
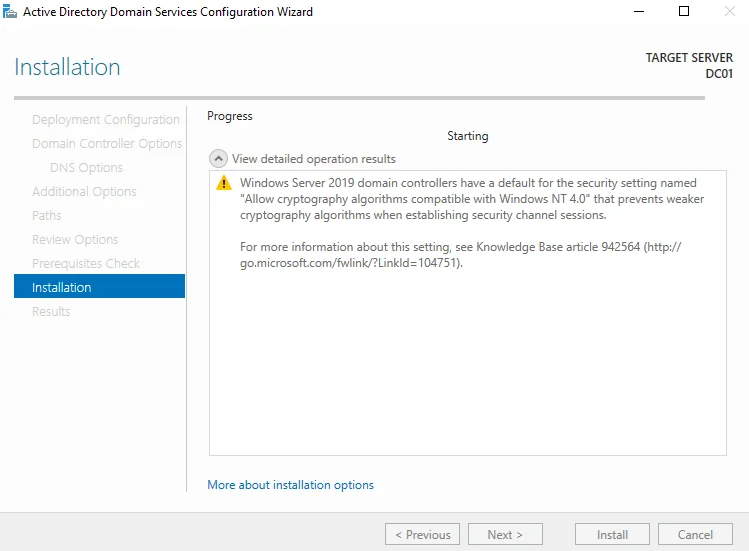
Попадаем в раздел Prerequisites Check, начинаются проверки предварительных требований.
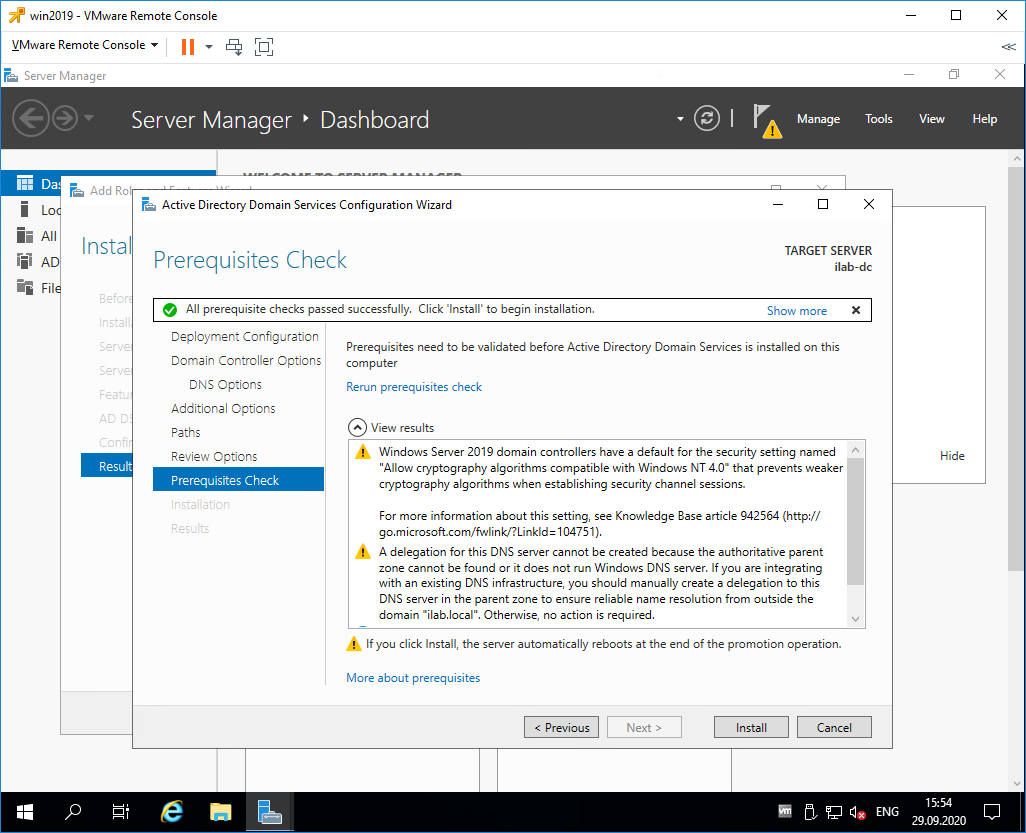
Проверки прошли успешно, есть два незначительных предупреждения про DNS, которое мы игнорируем и про безопасность, тож игнорируем. Пытался пройти по предложенной ссылке, она оказалась нерабочей.
Для начала установки роли контроллера домена нажимаем Install.
Начинается процесс установки.
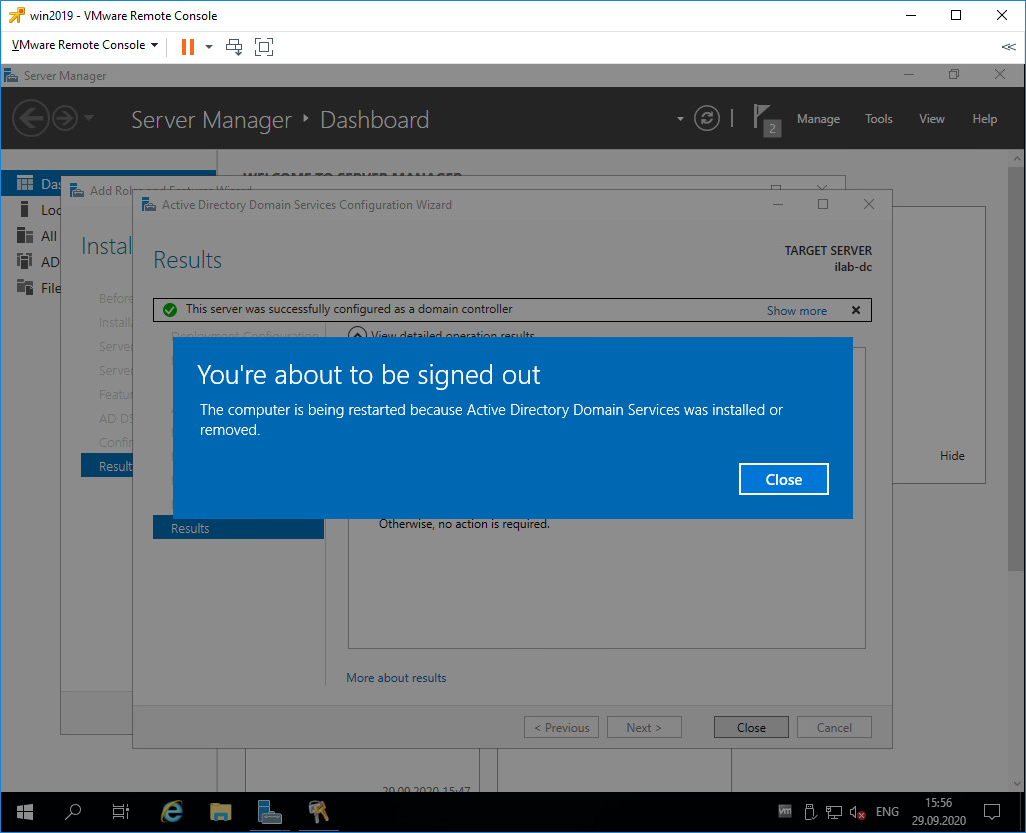
Сервер будет перезагружен, о чём нас и предупреждают. Close.

Дожидаемся загрузки сервера.
Первоначальная настройка контроллера домена
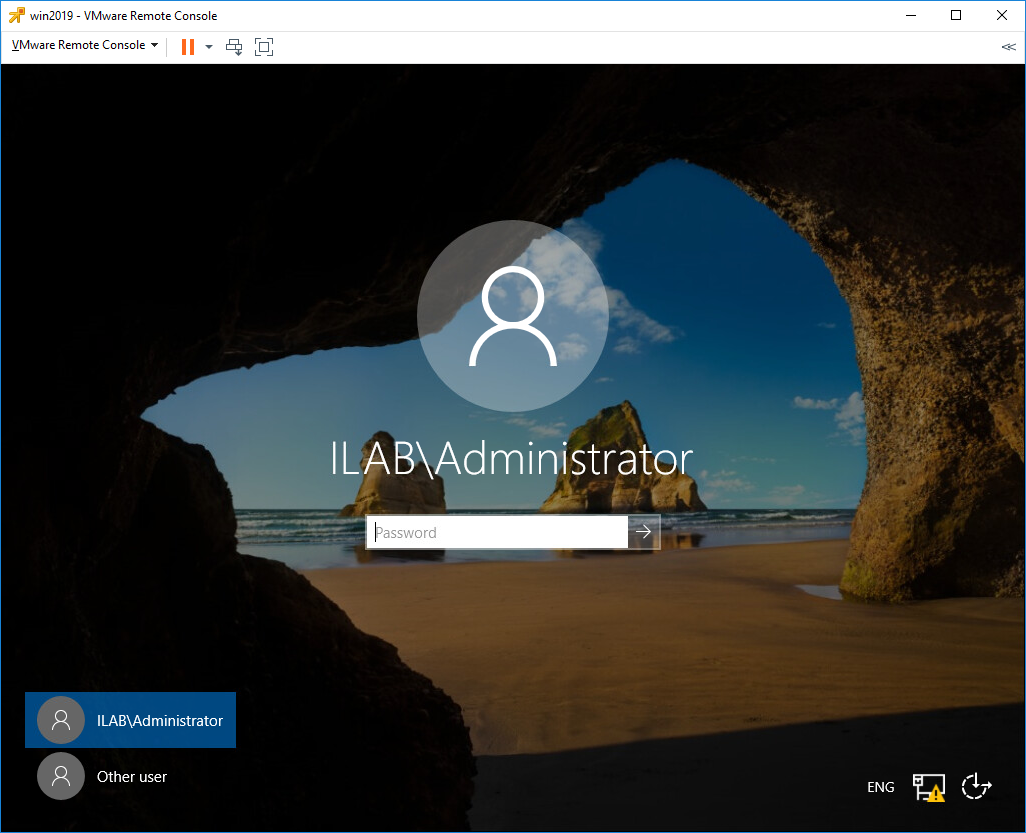
Наша учётная запись Administrator теперь стала доменной — ILAB\Administrator. Выполняем вход.
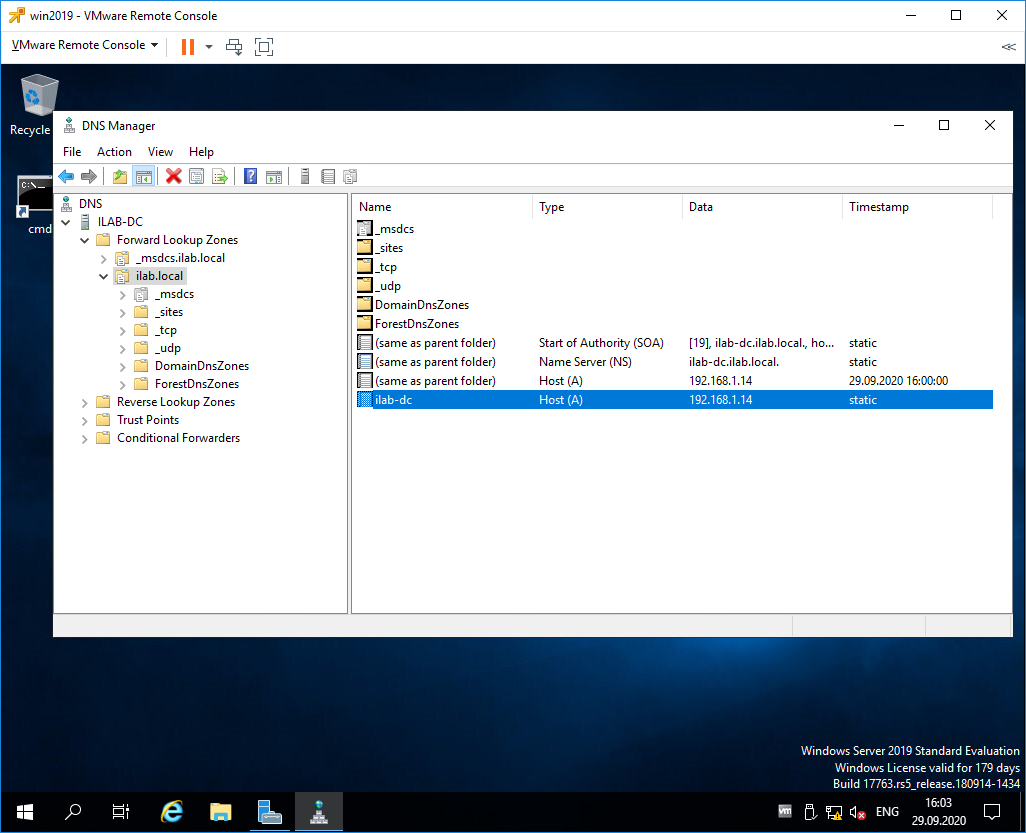
Видим, что на сервере автоматически поднялась служба DNS, добавилась и настроилась доменная зона ilab.local, созданы A-записи для контроллера домена, прописан NS сервер.
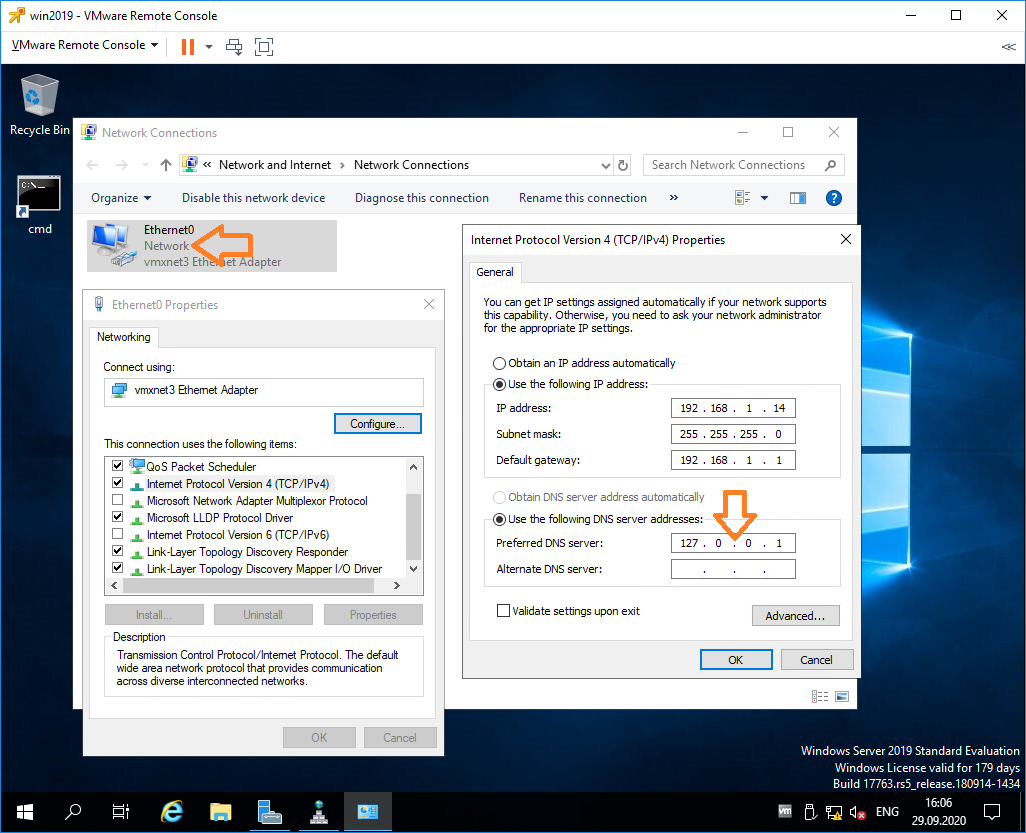
На значке сети отображается предупреждение, по сетевому адаптеру видно, что он не подключен к домену. Дело в том, что после установки роли контроллера домена DNS сервер в настройках адаптера сменился на 127.0.0.1, а данный адрес не обслуживается DNS сервисом.
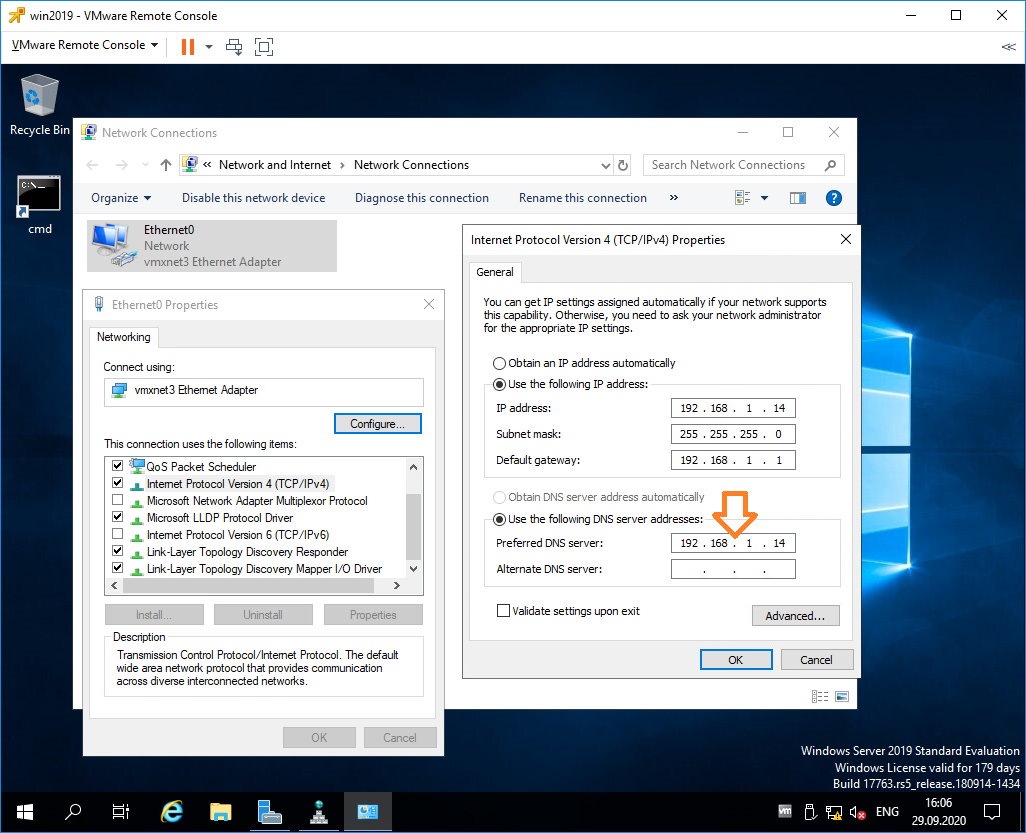
Сменим 127.0.0.1 на статический IP адрес контроллера домена, у меня 192.168.1.14. OK.
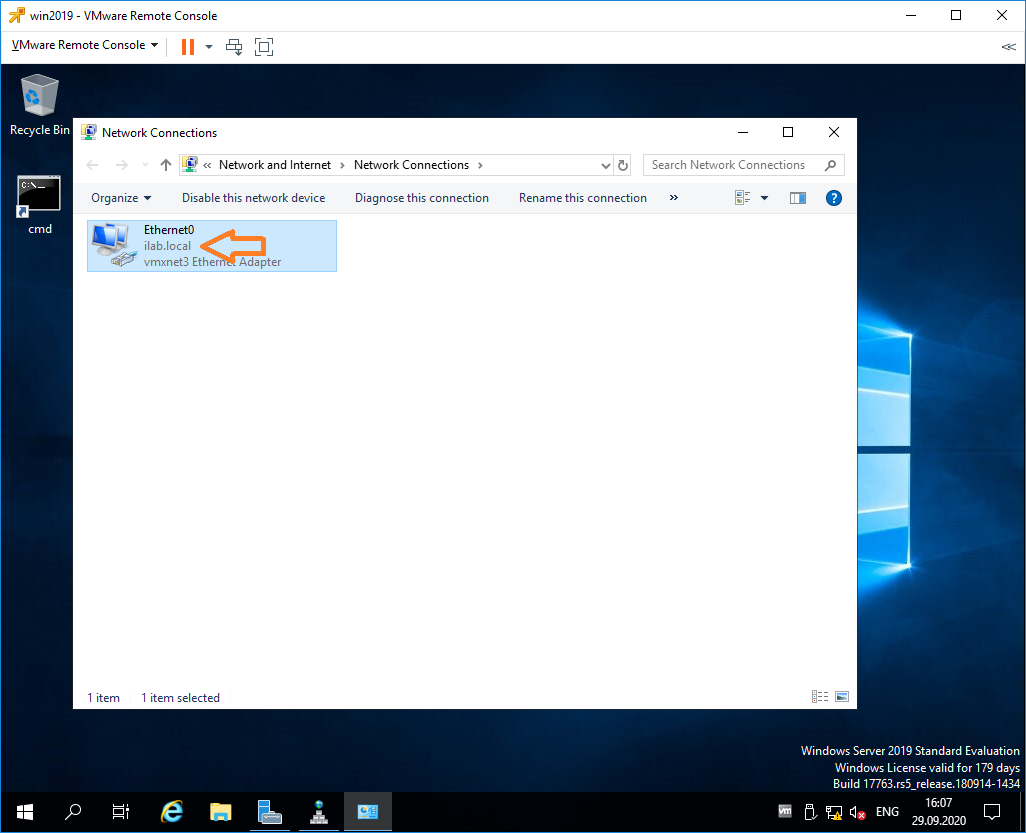
Теперь сетевой адаптер правильно отображает домен, предупреждение в трее на значке сети скоро пропадёт.
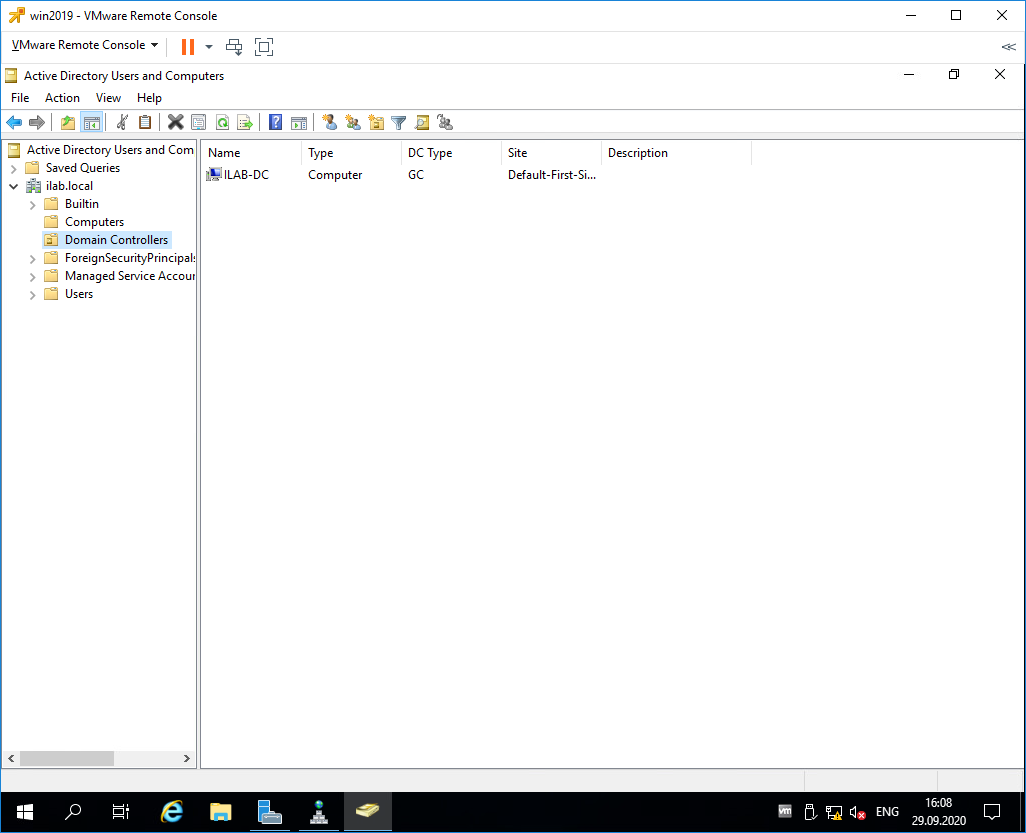
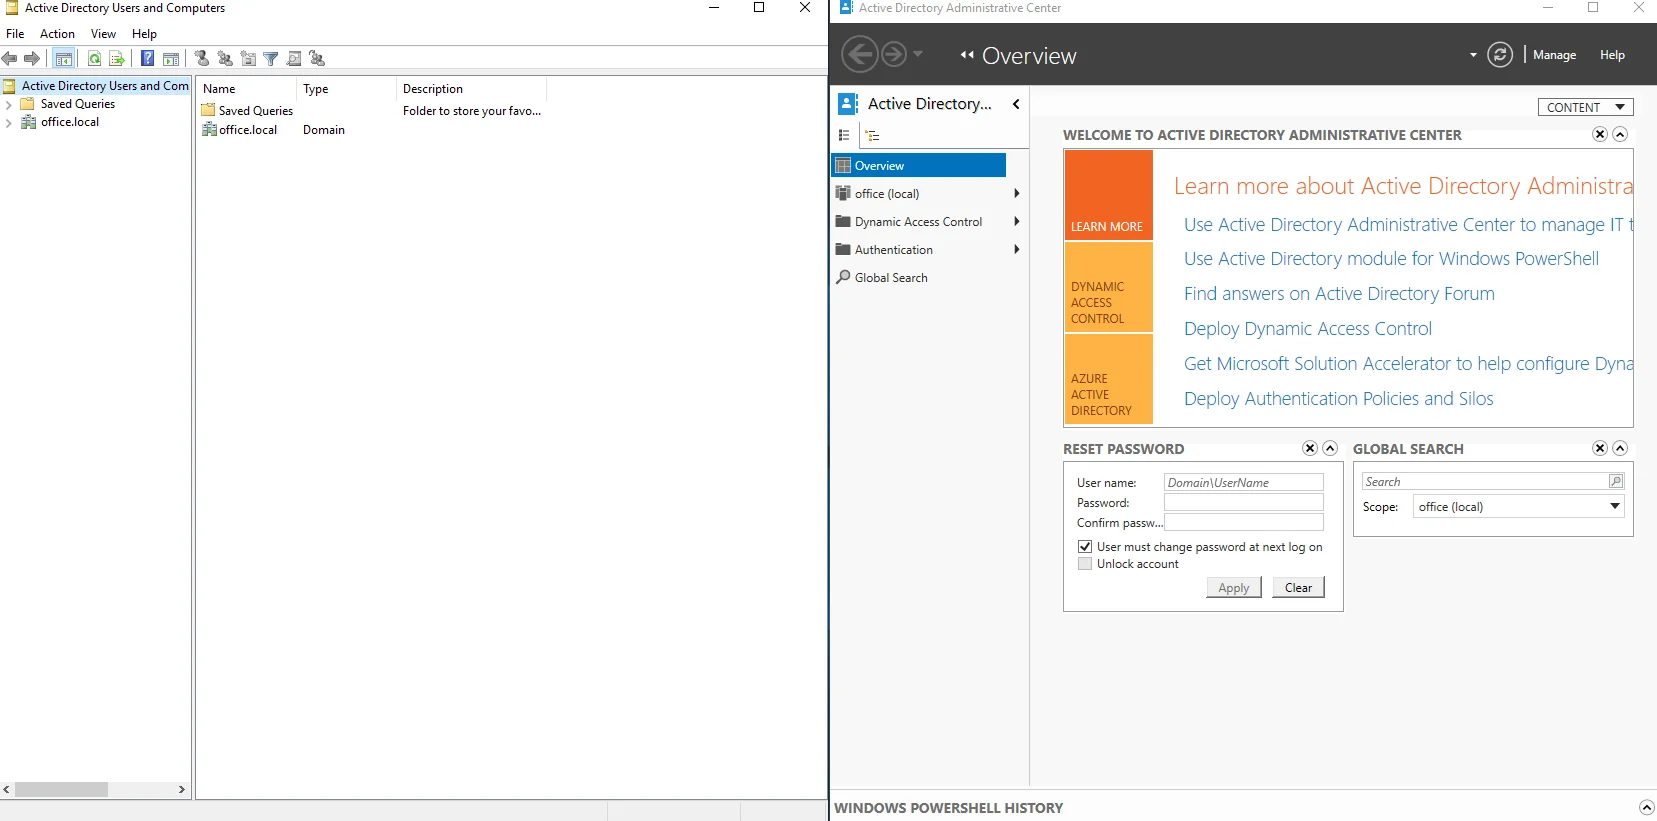
Запускаем оснастку Active Directory Users and Computers. Наш контроллер домена отображается в разделе Domain Controllers. В папкe Computers будут попадать компьютеры и сервера, введённые в домен. В папке Users — учётные записи.

Правой кнопкой на корень каталога, New > Organizational Unit.
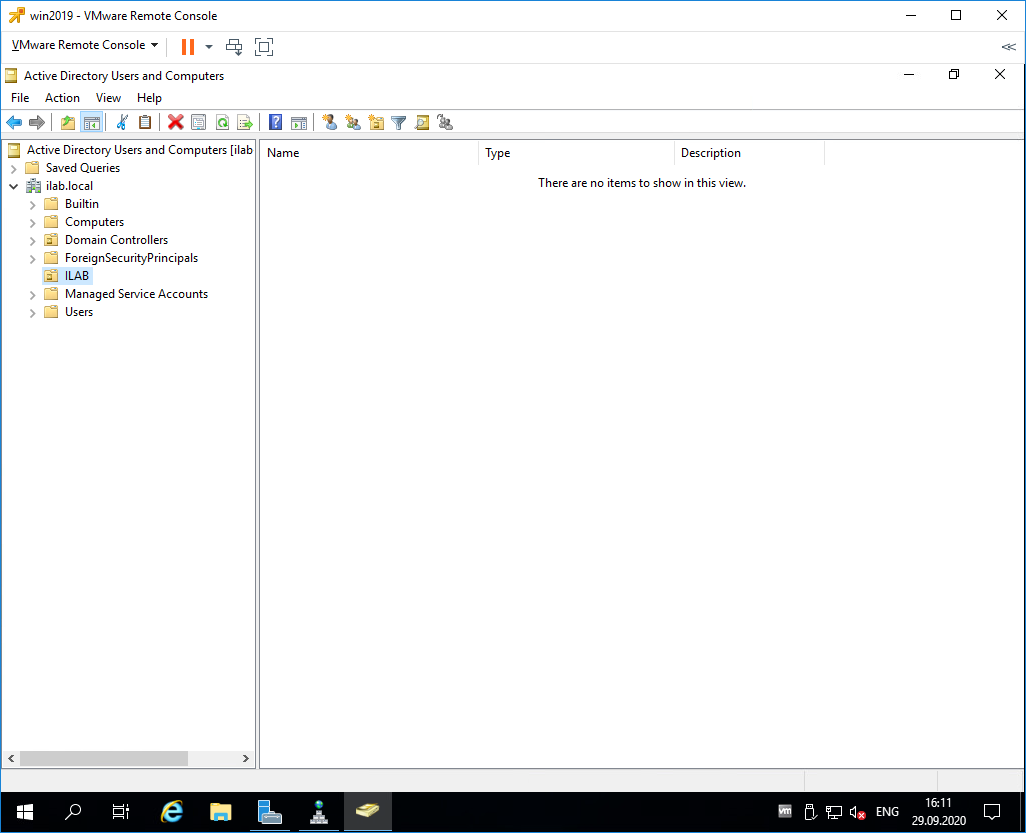
Создаём корневую папку для нашей компании. При создании можно установить галку, которая защищает от случайного удаления.

Внутри создаём структуру нашей компании. Можно создавать учётные записи и группы доступа. Создайте учётную запись для себя и добавьте её в группу Domain Admins.
Рекомендуется убедиться, что для публичного сетевого адаптера включен Firewall, а для доменной и частной сетей — отключен.
An Active Directory (AD) is a ‘directory service‘ for Windows networks (also known as a ‘Windows domain‘). This allows you to manage, for example, who has access to certain resources within the domain of a Windows network, like shared folders or Remote Desktop servers. The server that offers an Active Directory within a Windows network is called the ‘Domain Controller‘ (DC). The DC authenticates and authorizes all users and computers within a Windows network.
To designate a server as a Domain Controller, the Active Directory Domain Services (AD DS) role must be installed on that server. In this manual, we will show you how to install Active Directory Domain Services and how to designate a server as Domain Controller.
Installing an Active Directory
Step 1
Connect to your Windows Server via Remote Desktop or the VPS console.
Step 2
Click the Windows Start button and then click ‘Server Manager‘.
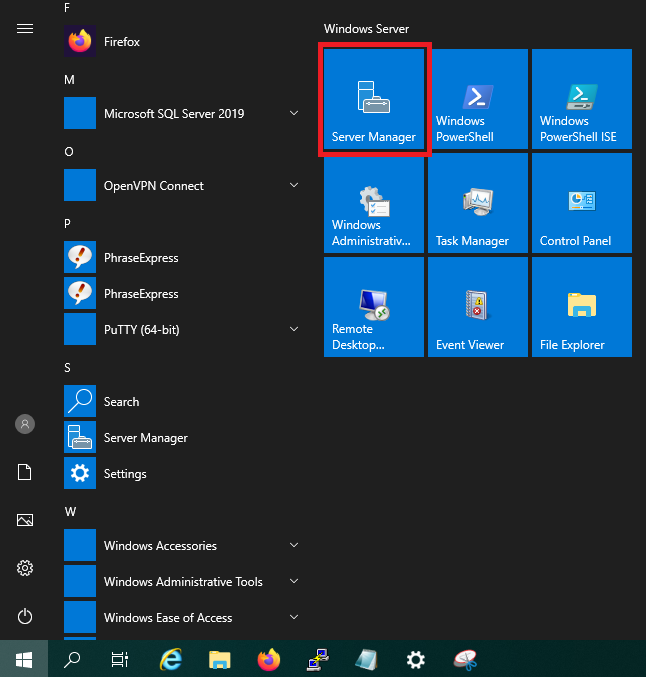
Step 3
Click on ‘Add roles and features‘.

Step 4
You will now see the ‘Before You Begin‘ page. Read this and optionally check ‘Skip this page by default‘ to not see this page again when you add roles & features in the future. Click ‘Next‘ after you have gone through the items under ‘before you continue‘.
Step 5
Under ‘Installation Type‘ you can choose from ‘Role-based or feature-based‘ and ‘Remote Desktop Services installation‘. Choose ‘Role-based or feature-based‘ and proceed to the next step.
Roles add software focused on specific tasks such as hosting websites to Windows Servers, features add extra functionality to that software.
Step 6
Then choose which VPS you want to perform the installation on and click ‘Next‘ to continue.
- We recommend that you do not use the chosen server for any other roles, except as a RD Connection Broker.
- By default, the VPS on which you will go through the installation will be selected. If you manage a server pool, select the server you want to use as Domain Controller.
Step 7
Check the box next to ‘Active Directory Domain Services‘. A window will appear asking you to install required features. Check if the option ‘Include management tools‘ is checked and then click ‘Add Features‘.
The ‘Active Directory Domain Services‘ option is now selected. Click ‘Next‘ to continue.
Step 8
No additional features are required for normal operation of a Domain Controller. Therefore, do not select any optional features and click ‘Next‘.
Step 9
You are shown a screen with some general information and the option to purchase an Azure Active Directory service. Click ‘Next‘ to continue and skip this offer.
Step 10
You will see an overview of the options you selected in the previous steps. Click ‘Install‘ to start the installation.

You do not need to check the option ‘Restart the destination server automatically if required‘. The installation of an Active Directory does not require a reboot.
Step 11
After the installation finishes, you will see a screen like the one below. As the message indicates, further configuration is required. Click ‘Close‘ for now.

Step 12
You are now back in the Server Manager. At the top right you will find a flag below which notifications appear. There is now an exclamation mark because additional action is required. When you click this, you will see a notification ‘Configuration required for Active Directory Domain Services‘. Click ‘Promote Server to Domain Controller‘ at this notification.
Below that you will also see that a Feature installation has been completed (that of the Active Directory) and additional configuration is required. You can ignore this message.
Step 13
Select the option ‘Add a new Forest‘. Enter the name of your domain in the box behind ‘Root domain name‘. For security reasons, we recommend using a local domain (a local domain can only be accessed via a private network), for example ‘transip.local‘. A malicious person cannot obtain any information about your private network because the DNS settings are not publicly available.
After entering your domain name, click ‘Next‘.
An Active Directory can contain multiple domains. This collection of domains is called a ‘forest‘.
The use of domains by an Active Directory is the reason that one speaks of a Domain Controller, Active Directory Domain Services, and Windows Domain for example.
Step 14
In the ‘Domain Controller Options‘ screen, enter a password and click ‘Next‘. This password is for the ‘Directory Services Restore Mode‘. DSRM is a maintenance mode with which backups of Active Directory objects can be restored.
You do not need to adjust the Domain and Forest functional level and will be set to ‘Windows Server 2016‘ (for Server 2016, 2019 and 2022). Enter a DSRM password and repeat it (this password will be used if you want to roll back the entire process).
Step 15
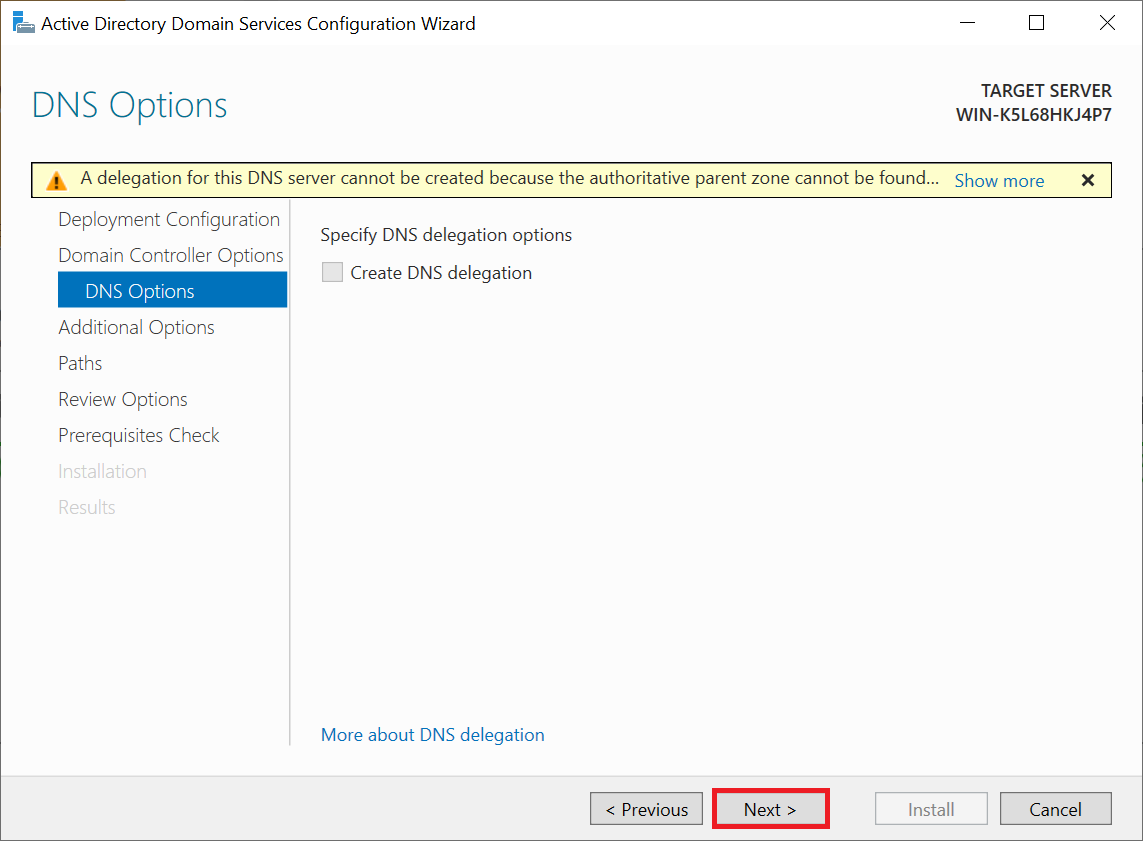
You will now see a DNS warning in the ‘DNS Options‘ screen. This warning is due to the fact that it concerns the first Domain Controller of your new Windows Domain. You can safely ignore this warning.
Click ‘Next‘ to continue.
Step 16
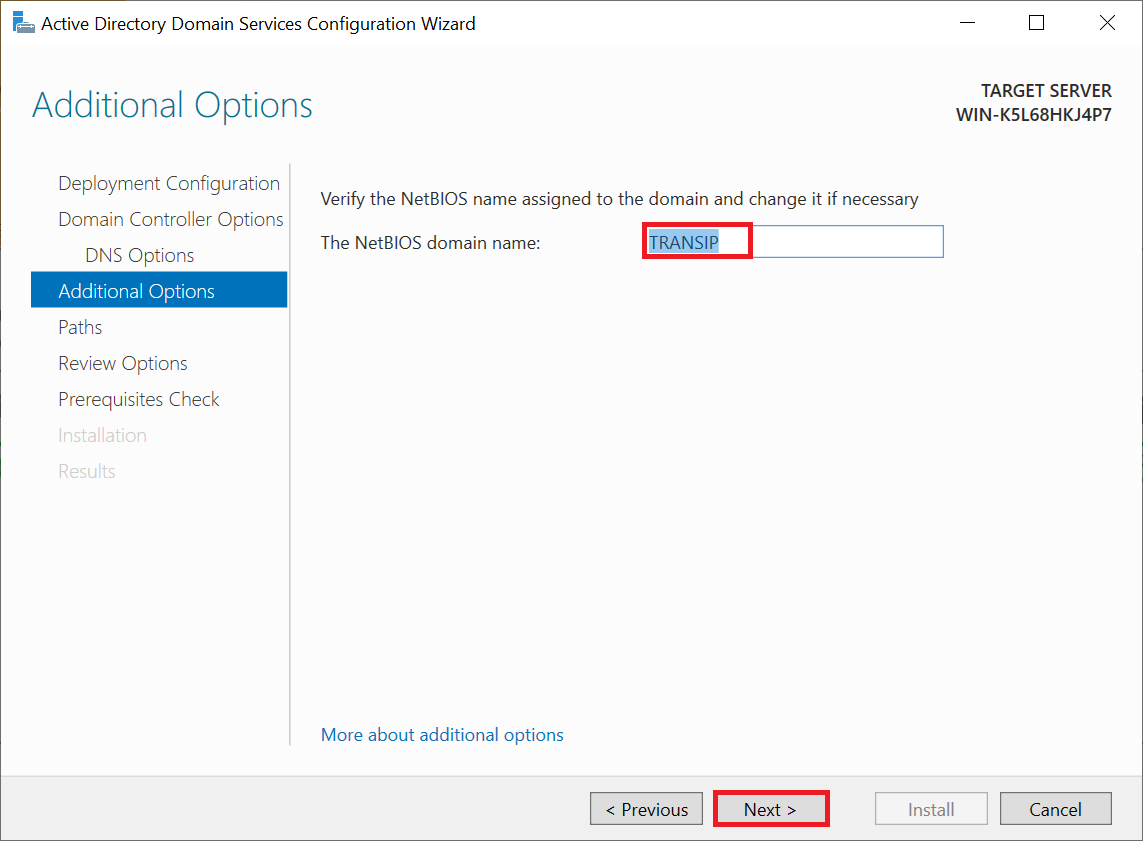
You do not need to change the NetBIOS name as already provided. You are however allowed of course to optionally change the name to another name of up to 15 characters (in capital letters).
Step 17
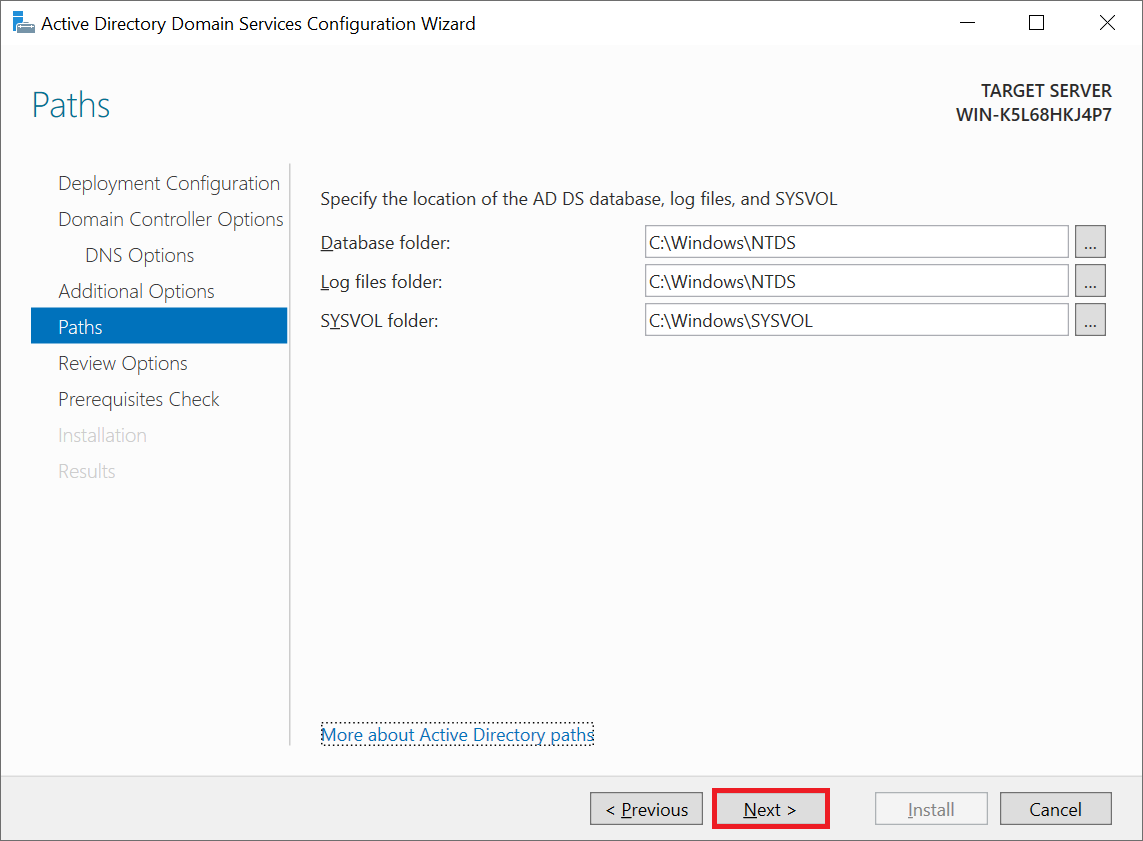
In the ‘Paths‘ screen, click ‘Next‘. There is no need to modify the database, log file or SYSVOL directories.
Step 18
You will now see an overview of the options you selected in the previous steps. Click ‘Install‘ to start the installation.
Step 19
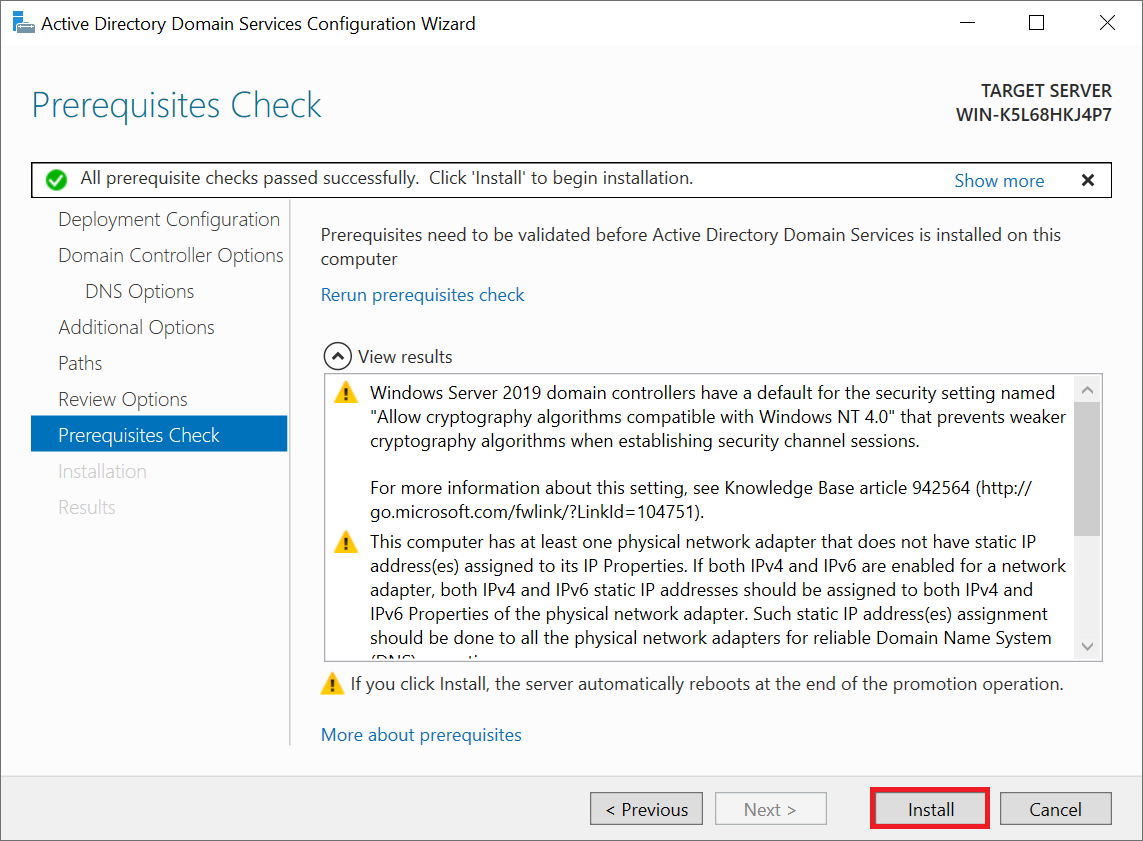
The system checks whether all required components for the installation (prerequisites) are installed on your server. Here you will see some warnings that you can ignore (yellow exclamation mark) and a message that the checks have been approved.
Click ‘Install‘ to start the installation.
During the installation you will see the same points of attention as in the previous screen. After installation, your server will reboot automatically.
Firewall
The right ports are automatically opened during the configuration of your Active Directory. One of these ports is used for the LDAP service. Simply put, this service allows you to access an Active Directory / Service. However, the LDAP service can be abused for DDoS attacks. It is therefore important to limit access to the LDAP service to your private network (if you only use VPSs with TransIP), specific IP’s, or VPN connection (if, for example, your laptop also needs access to the Active Directory). You restrict access as follows:
Step 1
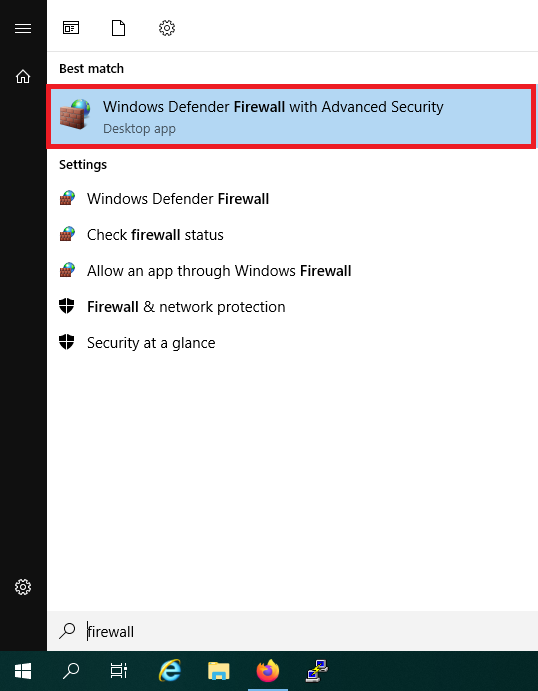
Click the start button and use the search term ‘Firewall‘. Alternatively, you can also find the firewall in the Server Manager under ‘Tools‘.
In the search results, click ‘Windows Firewall with Advanced Security‘.
Step 2
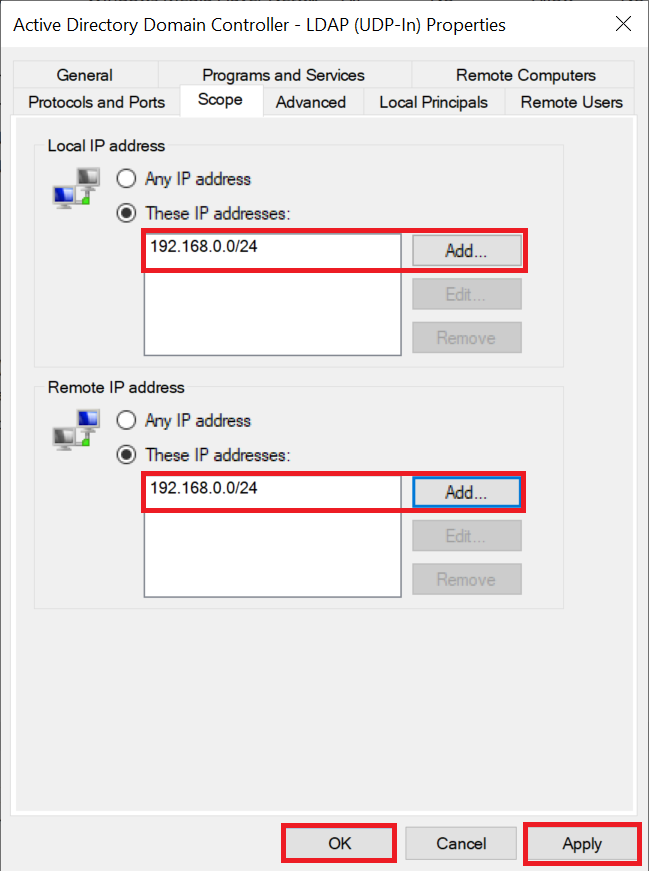
Double click the rule ‘Active Directory Domain Controller — LDAP (UDP-In)‘.

Step 3
Click the ‘Scope‘ tab and click ‘Add‘ to add the IP range of your private network or VPN, followed by ‘Apply‘ and ‘OK‘.
The installation of your Active Directory is now complete! Please note: when logging in you no longer use your username, for example Administrator, but the domain or Netbios name from step 16 with the addition \username, for example: transip.local\Administrator or WINDOWS\Administrator.
Should you have any questions left regarding this article, do not hesitate to contact our support department. You can reach them via the ‘Contact Us’ button at the bottom of this page.
The store will not work correctly in the case when cookies are disabled.
In this post, I will provide you with a detailed guide on how to configure Active Directory in Windows Server 2019. Active Directory is a Microsoft directory service used to manage users, groups, and resources in an enterprise network. With the following steps, you will be able to successfully deploy and configure Active Directory in your Windows Server 2019 environment.

Step 1: Installing Windows Server 2019
The first step is to install Windows Server 2019 on the designated server. Follow the installation instructions provided by Microsoft to complete this process successfully.
Step 2: Promote the server to domain controller
Once Windows Server 2019 is installed, the next step is to promote the server to domain controller. This will enable Active Directory functionality. Below are the steps to follow:
-
Open the «Server Manager» from the «Start» menu and select «Manage» in the upper right corner.
-
In the «Manage» window, select «Add Roles and Features».
-
Follow the instructions in the installation wizard and choose «Active Directory Domain Services» as the role to install.
-
Configure the domain details, such as the domain name and the Directory Service Restore Mode (DSRM) password.
-
Complete the installation and restart the server when prompted.
Step 3: Active Directory Configuration
Once the server has been successfully promoted to domain controller, you can start configuring Active Directory. Follow these essential steps:
-
Open the «Active Directory Administration Tool» from the «Start» menu.
-
In the «Active Directory Manager», right click on the domain and select «Create a new domain».
-
Choose «Create a domain in a new forest» and provide a name for the forest.
-
Set the forest and domain level functionality options according to your needs.
-
Review the settings and click «Next» to continue.
-
Configure the DNS domain controller and make sure it is configured correctly.
-
Review the configuration summary and click «Next» to start the configuration process.
Step 4: Active Directory Administration
Once you’ve completed setting up Active Directory in Windows Server 2019, you can manage users, groups, and resources on your network. Here are some common tasks you can perform:
-
Creating and managing users and groups. Use the «Active Directory Administration Tool» to create user accounts and groups, assign permissions, and configure security policies.
-
Group Policy Management. Use the «Group Policy Management Tool» to configure group policies that control the behavior of users and computers on the network.
-
Shared resource management. Use the «Active Directory User and Computer Management» to create and manage shared resources, such as create and manage shared resources, such as folders and network drives, within Active Directory in Windows Server 2019.
Active Directory setup Windows Server 2019
Configuring Active Directory in Windows Server 2019 is essential for centrally managing users, groups, and resources in an enterprise network. Through the steps outlined above, you will be able to successfully deploy and configure Active Directory in your Windows Server 2019 environment. Make the most of this powerful management tool and improve the efficiency and security of your network. Remember that Active Directory offers numerous additional features, such as group policies and shared resource management, which you can explore and use to meet the specific needs of your organization.
In this tutorial, you will find installation of Active Directory in Windows Server 2019. This will be accomplished by installing the appropriate role and upgrading the server to a master domain controller (DC). We will also add the DNS role to take advantage of the zone capabilities integrated into Active Directory.
Basically, it is a two-step process, installing the ADDS role and upgrading it to a DC.
Adding the Active Directory Domain Services Role
But at first, you should set a static IP address on your server, and find the appropriate name for your Windows Server to match your company’s naming policy. After completing this step, proceed to set up ADDS.
Run Server Manager, click Manage -> Add Roles and Features.
Right after that the wizard window appears. Under «Before You Begin» click «Next«.
Now we need to select an installation type, it can be based on server roles or virtual infrastructure (based on Hyper-V), chose the first setting and continue in a new window.

In the «Server selection», we need to choose our server, usually it is allocated by default and continue to the next section.
Here we came to Server Roles, select Active Directory Domain Services and accept addition of related features. Click the Add Features -> Next.
The next window is named «Features» but here we need nothing to add so just go to the next section.
The ADDS section displays summary info about your AD, here we just click Next.
And at last, we proceed to installation, click Install and wait a little bit until installation completes.
Upgrading Server to a DC
After finishing the installation, unless you close the window, there will be a link in finish summary to promote the server to a DC. This is highlighted as blue text.
However, it is possible to promote the server through notifications in server manager.
Click on «Promote server to domain controller«. And you will be brought to AD deployment wizard that will help you to create a forest in AD.
In «Deployment Configuration«, you should choose the «Add a new forest«, and then you need to think about your domain name (Note that it must not be like a domain name on your organization’s website, it must differ, otherwise you will have serious DNS problems) and type it in the proper field. In my case it is office.local, and click Next afterwards.
Now we have reached the»Domain Controller Options«. Here you need to specify the domain functional level. Note that it can differ from you current OS version, for 2019 Windows server, 2016 is only available. For the first AD server chose the latest version of the functional level. And if it is not the first one then you need to sync the level among other controllers.
In our example we will also choose DNS server option because we dont have standalone DNS, chose it whether you need it or not in your infrastructure.
You should also specify the password for restore mode (DSRM), save it in your corporate password manager and click «Next» to continue.
Probably you will notice a DNS warning message, but it should not bother you at this time. Ignore it and move further.
So, we arrived to the NetBIOS name, I recommend you to leave it as it is but you can change it as you like, don’t forget to specify it in capital letters. Move Next.
Under «Paths» choose where the location of NTDS, SYSVOL and LOG folders. You can choose a different drive depending on your preferences and settings but default is also acceptable.
Under «Review Options» you will see a summary of your selections. Check it carefully for mistakes, move next if it is ok.
The «Prerequisites Check» section checks for your server prerequisites. Here, if it finds an error the installation process will be aborted and you will need to correct it. Otherwise, if only warning messages are displayed (which is usual), but the check was successful as shown, click Install to continue.
And here you need to wait a little bit for installation process to complete. Immediately after that, the server automatically restarts.
After server finishes its reboot process, your first domain controller will be ready to use and you can leverage all the features such as ADUC and ADAC.
1101
CT Amsterdam
The Netherlands, Herikerbergweg 292
+31 20 262-58-98
700
300
ITGLOBAL.COM NL
1101
CT Amsterdam
The Netherlands, Herikerbergweg 292
+31 20 262-58-98
700
300
ITGLOBAL.COM NL