Windows Server 2019, a robust and reliable operating system, is widely used for managing enterprise environments, hosting applications, and enabling remote access. Remote Desktop Protocol (RDP) is one of its core features, allowing users to easily connect remotely and manage servers. However, a common question among administrators is: How many RDP connections are allowed in Windows Server 2019? This blog’ll explore this in detail, covering default configurations, licensing models, and how to configure RDP connections for optimal use.
Default RDP Connection Limit in Windows Server 2019
By default, Windows Server 2019 permits two simultaneous Remote Desktop connections for administrative purposes. This limitation exists to prevent the misuse of resources and ensure the stability of the server when it’s used as a primary domain controller or for other critical roles. These two connections are not licensed for general user access—they are strictly for administrators to perform maintenance or configuration tasks.
If you attempt to initiate a third connection without proper licensing or configuration, you will likely encounter an error message stating that the limit has been reached.
Expanding the Number of RDP Connections
To exceed the default limit of two simultaneous connections, you need to configure the server to act as a Remote Desktop Session Host (RDSH). This setup involves enabling Remote Desktop Services (RDS) and acquiring the appropriate Client Access Licenses (CALs). Below, we’ll discuss the steps and considerations involved in expanding the RDP connection capacity.
Understanding RDS Licensing in Windows Server 2019
Remote Desktop Services (RDS) is a feature in Windows Server that allows multiple users to connect to the server simultaneously using RDP. To enable this feature for more than two connections, you need to:
- Install the RDS Role
- Open the Server Manager and navigate to the Add Roles & Features Wizard.
- Select the Remote Desktop Services role and follow the prompts to install it.
- Activate the RDS Licensing Role
- Once the RDS role is installed, activate the Remote Desktop Licensing Manager.
- This involves setting up a licensing server to issue and manage CALs.
- Purchase and Install CALs
- You need to purchase Remote Desktop Services Client Access Licenses (RDS CALs) based on the number of users or devices that will access the server concurrently.
- Install these licenses on your RDS licensing server to authorize more connections.
Types of RDS CALs
When purchasing RDS CALs, you can choose between two types:
- User CALs
- These licenses are assigned to individual users, permitting them to connect to the server from any device.
- Ideal for environments where users frequently switch devices.
- Device CALs
- These licenses tied to specific devices, regardless of who uses them.
- Best suited for fixed workstations or shared computers.
Configuring RDP for Multiple Connections
After setting up RDS and installing CALs, follow these steps to configure your server for multiple RDP connections:
- Increase the Limit in Group Policy
- Open the Group Policy Editor (gpedit.msc).
- Navigate to:
Computer Configurations -> Administrative Templates -> Windows Components -> Remote Desktop Services -> Remote Desktop Session Host -> Merger. - Enable the Limit number of connections setting & specify the desired number of concurrent connections.
- Adjust Settings in Remote Desktop Session Host Configuration
- Access the Remote Desktop Session Host Configuration tool.
- Under the Connections section, modify the properties of the RDP-TCP connection to allow more simultaneous sessions.
- Ensure Network and Hardware Capacity
- Ensure your server hardware, including CPU, RAM, and network bandwidth, can handle the increased load.
Performance Considerations for Multiple RDP Connections
As you increase the number of RDP connections, it’s vital to monitor server performance to prevent resource contention and maintain a smooth user experience. Key factors to consider include:
- CPU and Memory Usage
- Each active RDP session consumes server resources. Adding too many users without sufficient hardware upgrades can lead to slow performance.
- Network Bandwidth
- Ensure your network infrastructure can handle the increased data flow from multiple RDP sessions.
- Security Measures
- Implement robust security measures, such as Network Level Authentication (NLA) and secure RDP gateways, to protect your server from unauthorized access.
Alternatives to Increasing RDP Connections
If expanding the number of RDP connections on a single server becomes challenging, consider the following alternatives:
- Deploy Additional Servers
- Set up additional Windows Server 2019 instances to distribute the RDP load.
- Use Virtual Desktop Infrastructure (VDI)
- Leverage VDI solutions to provide users with virtual desktops while offloading resource-intensive tasks to a dedicated infrastructure.
- Implement a Cloud Solution
- Consider cloud-based services like Microsoft Azure Virtual Desktop (formerly Windows Virtual Desktop) for scalable and cost-effective RDP access.
Troubleshooting Common Issues
When configuring multiple RDP connections, you might encounter some common issues. Here’s how to address them:
- Connection Denied Errors
- Verify that the required CALs installed & correctly assigned.
- Slow Performance
- Upgrade server hardware or optimize resource usage by limiting background processes.
- Security Warnings
- Ensure that all RDP sessions encrypted, and implement firewalls to block unauthorized access.
Use Cases for Increased RDP Connections
Expanding the number of RDP connections in Windows Server 2019 is particularly beneficial in scenarios such as:
- Team Collaboration
- Allow multiple team members to access shared resources or applications on a centralized server.
- Application Hosting
- Enable remote access to applications without requiring users to install them locally.
- Training and Demonstrations
- Use RDP to provide access to a server-based training environment for large groups.
Conclusion
By default, Windows Server 2019 supports two concurrent RDP merger for administrative tasks. To expand this limit and enable multiple user connections, you need to configure Remote Desktop Services and purchase the necessary CALs. With the right setup, Windows Server 2019 can support hundreds of simultaneous RDP sessions, making it a versatile solution for businesses of all sizes.
However, always consider your hardware capacity, licensing costs, and security requirements when scaling RDP connections. Proper planning & configuration ensure a seamless & efficient remote desktop experience for all users.
This article describes about enable multiple RDP sessions to a Windows Server Operating System by installation, configuration, and activation using a Remote Desktop License Server. By default, Microsoft Windows Server Operating System will allow only 2 remote desktop sessions at-a-time. In order to use more than 2 users we need to configure RDS CALs (Remote Desktop Services client access licenses).
Remote Desktop Services enables clients to connect to virtual desktops and remotely access programs, including graphics-intensive applications. Using a Remote Desktop, the client computer can connect remotely to a “host” computer.
In order to install Windows Server Operating System on the server, a customer needs to purchase a license for that operating system activation. Windows Server Operating System licenses do not give them the legal right to provide connections to users or computers, which is why CALs (Client Access Licenses) are needed.
Install Remote Desktop Licensing Role
Step 1: Logged in windows server 2019, open Server Manager ->Manage-> Add Roles and Features.

Select RDP service
Step 2: At Role Services select Remote Desktop Session Host

Remote Desktop Session host
Step 3: Remote Desktop session host must be selected with added features like Remote Server Administration Tools, Role Administration Tools, Remote Desktop Services Tools, and Remote desktop Licensing Diagnoser Tools.
Step 4: After installation server needs to be rebooted.
Install Remote Desktop Licensing Diagnoser
It is a tool that provides administrators with a quick diagnostic for checking configurations and communication between RD License servers and RD Session Hosts.
After rebooting the server, you will get a notification as shown below “ No license server is required for 120 days during the licensing grace period ”
licensing grace period of 120 Days
Now it will allow multiple users to access the machine using remote desktop for 120days. until completion of 120days we can use the RDP services.
Check Remote Desktop Licensing Diagnoser using lsdiag.msc command.

RD License Server status
You can see the license is not configured. After 120days you can configure the license. When users access the Remote Desktop Services session host, the license server provides them with client access licenses (CALs).
Activate CAL License
Configure Client Access Licenses (CALs) on remote desktop licensing as shown below.
Login into the server and open the server manager, enable the Remote Desktop Licensing option

Remote Desktop Licensing
It will install the Remote Desktop Licensing Manager tool as well. After installation reboot the server.
once reboot has been done, run the licmgr.exe command to open Remote Desktop Licensing Manager. Select your computer, click on Action and select Activate server to configure the license for CALs.

Remote Desktop Licensing Manager
We can activate license using one of the options shown below

Remote Desktop Licensing Management.
- Automatic connection: Required Internet connection
- Web Browser: login into Microsoft select Activate a license server
- Telephone: call to a toll-free number and need to provide the Product ID.
Once activation is done, have to configure RDS client access licenses (CALs) in the windows machine.
Basically, we have 2 types of RDS (Remote Desktop Session) client access licenses (CALs) model
- RDS Per Device CALs: Each device has its own RDS CAL. The maximum number of hosts that can connect to your RDS server, for example (40) if you have a license for 40per device only. It is possible we can revoke RDS CALs.
- RDS Per User CALs: This type of RDS license enables users to connect from any number of machines to the server.
- It can’t be revoked RDS CALs.
Configure Local Group Policy for RD licensing Server
- Open a command prompt and run gpedit.msc to open local group policy and navigate as shown below
Local Computer Policy>> Computer Configuration\Administrative Templates\Windows Components\Remote DesktopServices\Remote Desktop Session Host\Licensing\Use the specified RD license servers.
License Servers to use: Here we need to provide server ipaddress which RDP license has configured.

Use the specified RD license server
2. Final steps to configure the RDS client access licenses (CALs) model
Open a command prompt and run gpedit.msc to open local group policy and navigate as shown below
Local Computer Policy>> Computer Configuration\Administrative Templates\Windows Components\Remote DesktopServices\Remote Desktop Session Host\Licensing\Set the Remote Desktop licensing mode.

Set the Remote Desktop licensing mode
Now restart the machine. The license has been configured successfully.
To check the license status, open the Remote Desktop Licensing Manager tool and verify it.
3. Provide elevated privileges for MSLicensing key:
Make sure that necessary permissions to run the remote desktop software, either by adding users to administrator’s group or by editing the relevant key’s permissions to give your user profile full control.
Open Windows Registry(regedit) with Run as Administrator, navigate to below location.
Computer\HKEY_LOCAL_MACHINE\SOFTWARE\Microsoft\MSLicensing
Right click on MSLicensing and select Permission as shown below

Permissions to MSLicensing
Select Permissions, you will get Security Tab. Here will see Groups and Users. Select the group which you required and enable Full Control flag.
conclusion:
As mentioned above enable multiple RDP sessions to a Windows Server in Windows server 2019 machine has been explained step by step procedure. The above-mentioned procedure is the same for windows server 2012r2/2016/2019/2022 machines as well. if you have any question regarding enable multiple RDP sessions to a Windows Server, please drop a comment.
9 марта 2025 г. 11:00
867
Содержание:
- Настройка лицензирования RDS
- Конфигурация параметров через групповую политику
- Настройка пользователей и доступа
- Оптимизация производительности сервера терминалов
- Обеспечение безопасности RDS
- Решение распространённых проблем
- Вывод
Сервер терминалов в Windows Server 2019 позволяет организовать удаленный доступ пользователей к программам и файлам, запущенным на сервере. Для стабильной и безопасной работы требуется правильная настройка RDS Windows Server 2019, включая лицензирование, параметры удаленного рабочего стола, безопасность и права пользователей. В этом руководстве подробно рассмотрим все этапы настройки.
Настройка лицензирования RDS
О том, как установить терминальный сервер в Windows Server 2019, мы рассказывали в другой своей статье. После того как произошла установка роли терминального сервера на Windows Server 2019 сервер работает в пробном режиме, позволяя пользователям подключаться без активации лицензий. Этот период длится 120 дней, после чего подключение становится невозможным. Чтобы избежать сбоев, необходимо настроить сервер лицензирования.
1. Откройте «Диспетчер серверов» и перейдите в раздел «Remote Desktop Services» → «Диспетчер лицензирования удаленных рабочих столов».
2. Выберите ваш сервер, нажмите правой кнопкой мыши и выберите «Активировать сервер».
3. В мастере активации выберите автоматическое подключение и следуйте инструкциям.
4. После активации нажмите «Установить лицензии».
5. Укажите программу лицензирования (например, Open License) и введите лицензионный ключ. Если у вас еще нет ключа активации RDS, купить по отличной стоимости и с мгновенной доставкой можно здесь.
6. Выберите режим лицензирования:
-
- На пользователя (Per User) – лицензия привязывается к конкретному пользователю.
- На устройство (Per Device) – лицензия закрепляется за конкретным устройством.
После выполнения этих шагов лицензирование будет настроено, а сервер сможет корректно выдавать лицензии пользователям.
Конфигурация параметров через групповую политику
Чтобы сервер терминалов работал стабильно, необходима в Windows Server 2019 настройка удалённого рабочего стола через редактор локальной групповой политики.
1. Откройте редактор локальной групповой политики (gpedit.msc).
2. Перейдите в «Конфигурация компьютера» → «Административные шаблоны» → «Компоненты Windows» → «Службы удаленных рабочих столов».
3. Включите параметр «Использовать указанные серверы лицензирования удаленных рабочих столов» и укажите имя сервера лицензирования.
4. Активируйте «Задать режим лицензирования удаленных рабочих столов» и выберите тип лицензии.
5. Включите параметр «Требовать проверку подлинности на уровне сети» для повышения безопасности.
Эти параметры помогут избежать проблем с лицензированием и обеспечат более безопасную работу терминального сервера.
Настройка пользователей и доступа
После активации лицензий необходимо разрешить пользователям подключаться к серверу терминалов. Вот как это сделать:
- Откройте «Параметры системы» → «Дополнительные параметры системы» → «Удаленный доступ».
- В разделе «Удаленный рабочий стол» выберите «Разрешить подключения».
- Нажмите «Выбор пользователей» и добавьте всех, кто должен иметь доступ.
- Для массового управления пользователями можно использовать lusrmgr.msc (если сервер не в домене) или Active Directory Users and Computers (если сервер в домене).
Если пользователь не добавлен в группу «Пользователи удаленного рабочего стола», он не сможет подключиться к серверу. Убедитесь, что в параметрах удаленного доступа все необходимые пользователи имеют разрешение.
Оптимизация производительности сервера терминалов
Чтобы сервер мог поддерживать большое количество одновременных подключений, также необходима настройка сервера удаленных рабочих столов Windows Server 2019 и оптимизация параметров производительности. Отключение ненужных визуальных эффектов снижает нагрузку на процессор и видеокарту, а ограничение числа активных сеансов помогает избежать перегрузки системы. Использование протокола UDP вместо TCP уменьшает задержки в RDP-сессиях, а включение сжатия данных позволяет экономить сетевые ресурсы. Если сервер обслуживает большое количество пользователей, можно настроить балансировку нагрузки или распределить подключения между несколькими узлами RDS.
Обеспечение безопасности RDS
Чтобы терминальный сервер работал безопасно, важно настроить RD Gateway, который позволяет скрыть RDP-сервер от прямого доступа и создать защищенный туннель для подключения пользователей. Включение проверки подлинности на уровне сети (NLA) и использование двухфакторной аутентификации снижают вероятность взлома. Ограничение подключений по IP-адресам и настройка брандмауэра Windows позволяют контролировать входящие соединения. Также рекомендуется задать лимит на количество неудачных попыток входа, чтобы предотвратить атаки перебором паролей, и регулярно обновлять систему для устранения уязвимостей.
Решение распространённых проблем
Иногда в Windows Server 2019 настройка терминального сервера вызывает ошибки, мешающие работе. Если сервер завершает сеансы сразу после подключения, возможно, не активированы лицензии или не задан сервер лицензирования. Следует проверить настройки через диспетчер серверов и групповые политики.
Если пользователи не могут подключиться, убедитесь, что они добавлены в группу «Пользователи удаленного рабочего стола». Также проверьте, что в параметрах системы разрешены RDP-подключения. Если соединение нестабильное, возможно, проблема связана с сетью. В таком случае рекомендуется проверить настройки сетевого адаптера, обновить драйверы и включить протокол UDP для RDP.
Проблемы могут возникать по разным причинам, но чаще всего они связаны с некорректными настройками лицензирования и политики безопасности.
Вывод
Грамотная настройка терминального сервера Windows Server 2019 обеспечивает стабильную работу, безопасный доступ и удобное управление пользователями. Оптимизированная система снижает нагрузку, а продуманная защита предотвращает несанкционированные подключения, делая удалённую работу надежной и эффективной.
Hello, how are you today? In this opportunity, we are going to talk about multiple desktops in Windows Server 2019. It is a type of technology that allows a user to work on a computer through their graphical desktop from another terminal located elsewhere. In other words, it is the possibility of completely controlling a distant device through a network connection. In Windows, this function is present since the XP version. Indeed, it is possible to activate it also in Windows Server. However, its use in the desktop version is limited to a single user. While in Windows Server 2019, the number of users is only two. But we’re here to help you, so we’ll show you how to jump this limitation. Through an open-source tool, we will see how to enable multiple remote desktops on Windows Server 2019.
Part 1. Preparing the server.
The first thing we need to do is check to see if the remote desktop is activated. With this intention we follow the following path: Control Panel>System and Security>Advanced system settings. Once there, please select the Security tab. Verify that the box corresponding to Allow remote connections to this computer is checked.

Create users who will connect by remote desktop.
Next, we will create the users who will be able to connect remotely to the server. We will then add these users to the corresponding group. To see in detail how to manage groups and users, please click here. With this in mind, press the Win+X combination and select Computer Management.
Then follow this path: Local users and groups>Users

At this point, add users who will be able to connect by the remote server. In this case, I will add 5 users, but you can add any number of users.

Then go to the Groups section, and click on Remote Desktop Users.

Step 2. Downloading RDPWrapper
As mentioned above, to bypass this Microsoft ban we will use an opensource software called RDPWrapper. With this in mind, please go to the project’s GitHub page. There you can download the zipped file.

Then unzip the file to the location of your choice. Once the folder is unzipped, double click on the file install.bat

The installation will begin immediately, please wait a few seconds while the installer does his job.

Then click on RDPConf.exe. Wait until the program’s configuration tab loads. You can leave the default settings. Please note that all three diagnostic options must be green and fully supported. However, it is likely that the not supported warning will appear in red. If this happens, the program will not work and you will not be able to connect multiple users. But do not worry, we will solve this issue.

This problem arises because Windows has released updates that have broken the program. The solution is to replace the rdpwrap.ini file in the installation folder of the program (C:\Program Files\RDP Wrapper). To download the new file, please go to the following link.

Now, in order to replace the file, it is necessary to stop the remote desktop service. If you don’t, the file will issue an access denied warning. So open a command prompt with administrative privileges and type the following command:
net stop termservice
Then replaces the rdpwrap.ini file in the installation folder. And at the same command prompt with administrative privileges, please run the following command to restart the remote desktop protocol
net start termservice Once the protocol starts, please go to the program folder and re-run RDPConf.exe. If you have done everything correctly, the result of the configuration window should be as follows:

By activating the program it will be possible to enable multiple remote desktops in Windows Server 2019.
Connecting Multiple Remote Desktop Users to Windows Server 2019
Finally, we will check if it is possible to connect more than two users per remote desktop. To achieve this, we will connect from a Windows 10 computer. Please follow the directions in this article. Here you can see the 5 remote writer users connected simultaneously from a Windows 10 computer.

In the following image, you can see the 5 users running in the task manager.

In the final analysis, we have seen how to enable multiple remote desktops on Windows Server 2019. With these instructions, it is possible to bypass the restrictions imposed by Microsoft and be able to connect more than two desktops. Even if Windows updates damage the program, we learned how to solve the problem. I hope you enjoyed the tutorial as much as I did. Greetings and see you soon!
— Advertisement —
Everything Linux, A.I, IT News, DataOps, Open Source and more delivered right to you.
Subscribe
«The best Linux newsletter on the web»

Windows Server 2019
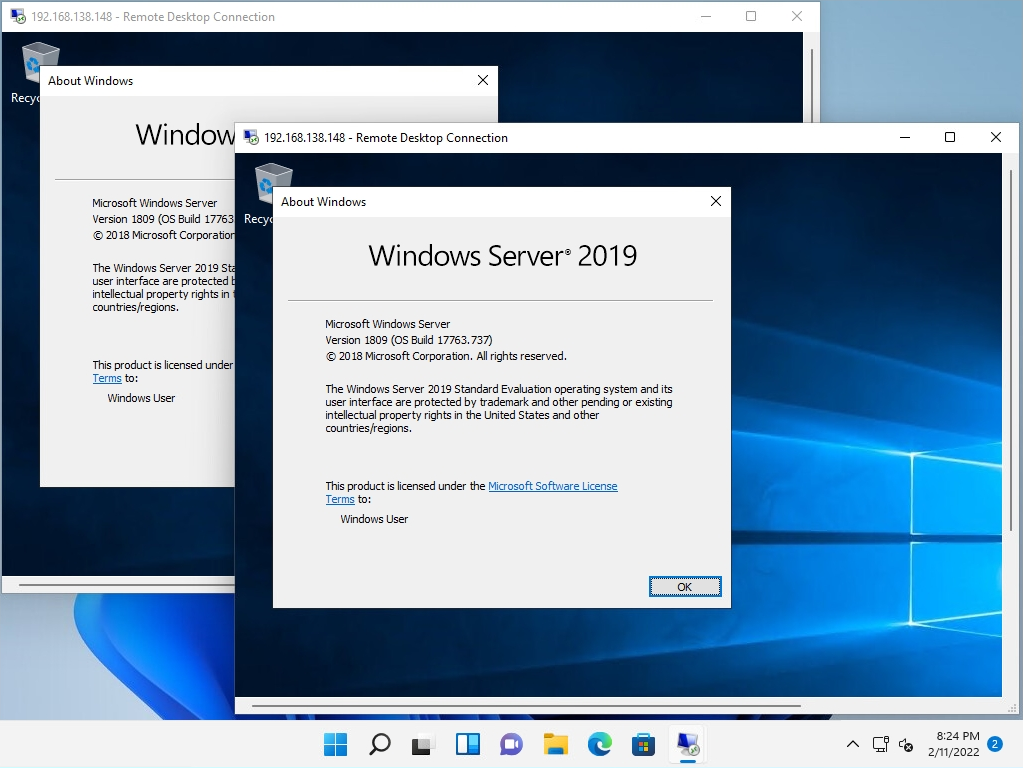
The number of users who can connect to Windows Server 2019 by Remote Desktop (RDP) at the same time with the same account is up to two, but the default setting of the local group policy is a connection restriction setting that allows only one person to connect, and there are multiple server administrators. If you connect by person, it will be a session conflict. This default setting is inconvenient because multiple members cannot work together.
This article describes the procedure for changing the settings of the local group policy to allow multiple (two) users to connect to Remote Desktop with the same user account
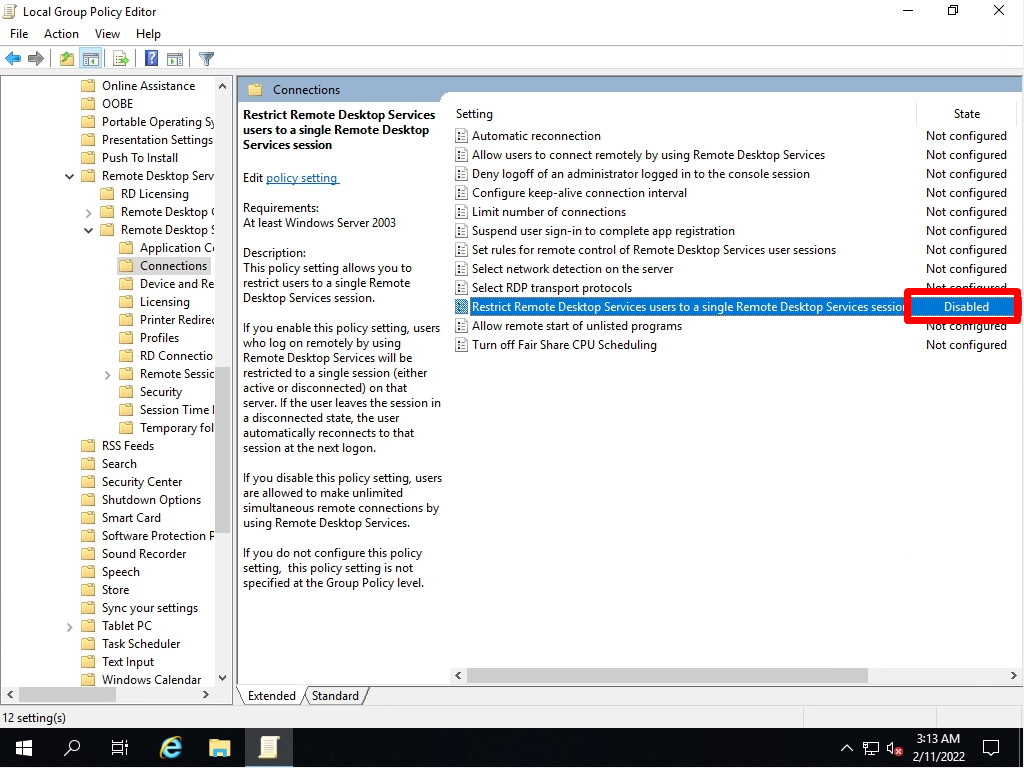
Change Remote Desktop Connection limit in Local Group Policy
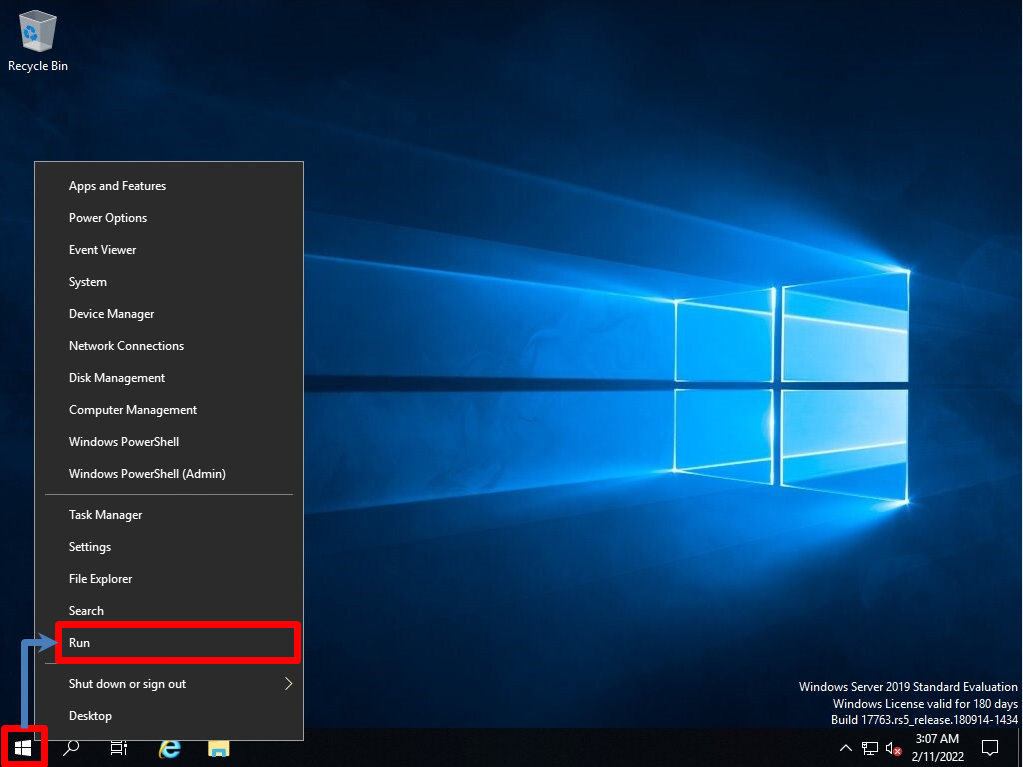
Step 1:
Right-click “Windows Mark” at the bottom left of the desktop screen -> select “Run”.
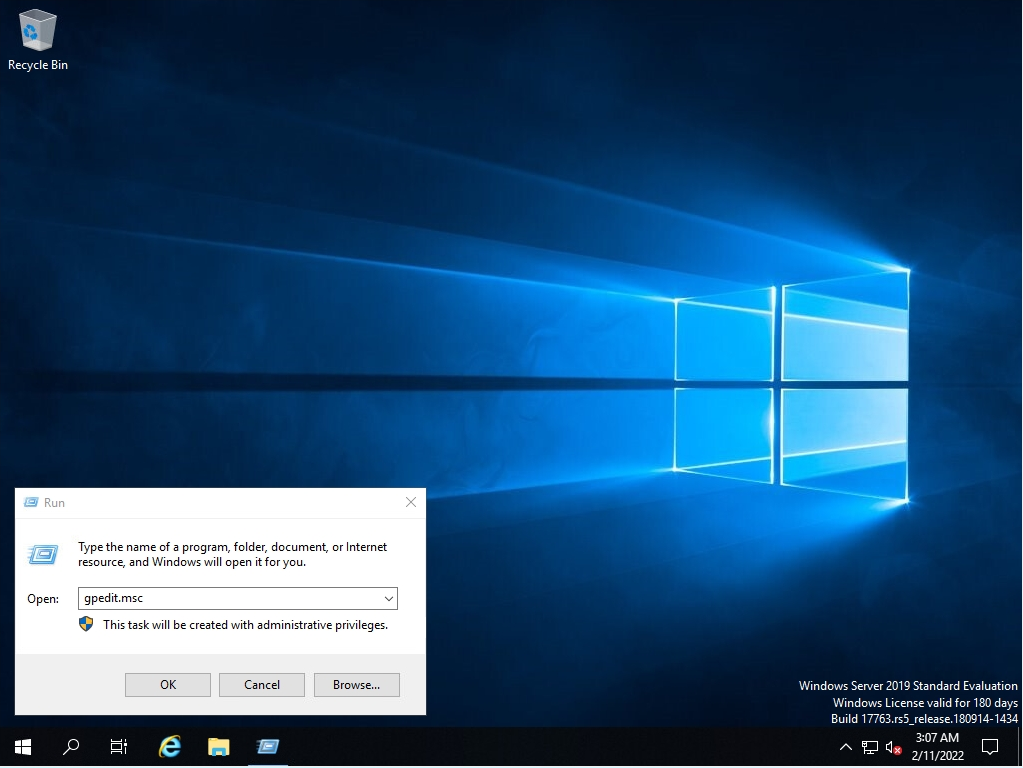
Step 2:
Enter “gpedit.msc” as the name -> select “OK” to launch the Local Group Policy Editor
Step 3:
Expand the tree on the left and double-click the following settings
[Computer Configuration]
-[Administrative Templates]
-[Windows Components]
-[Remote Desktop Services]
-[Remote Desktop Session Host]
- [Connections]
-[Restrict Remote Desktop Services users to a single Remote Desktop Services session]

Step 4:
Select “Disabled”
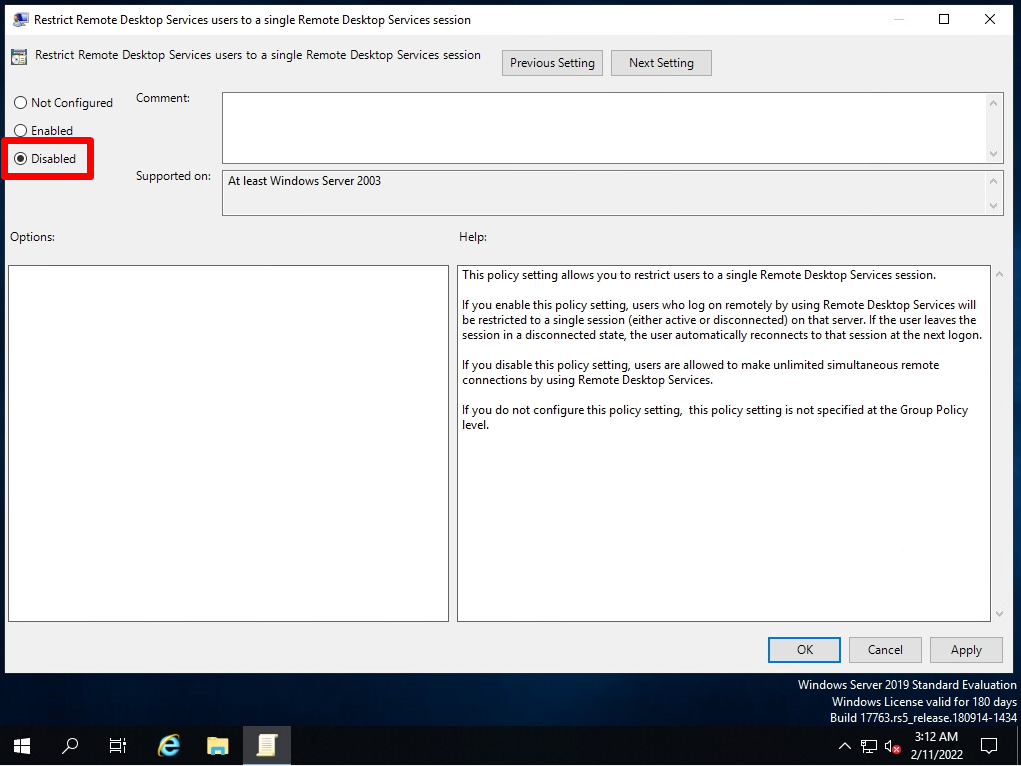
Step 5:
Confirm that the state is Disabled
Confirm multiple session connections with the same account from the connected terminal
Step 1:
Select “Run” on the connected device
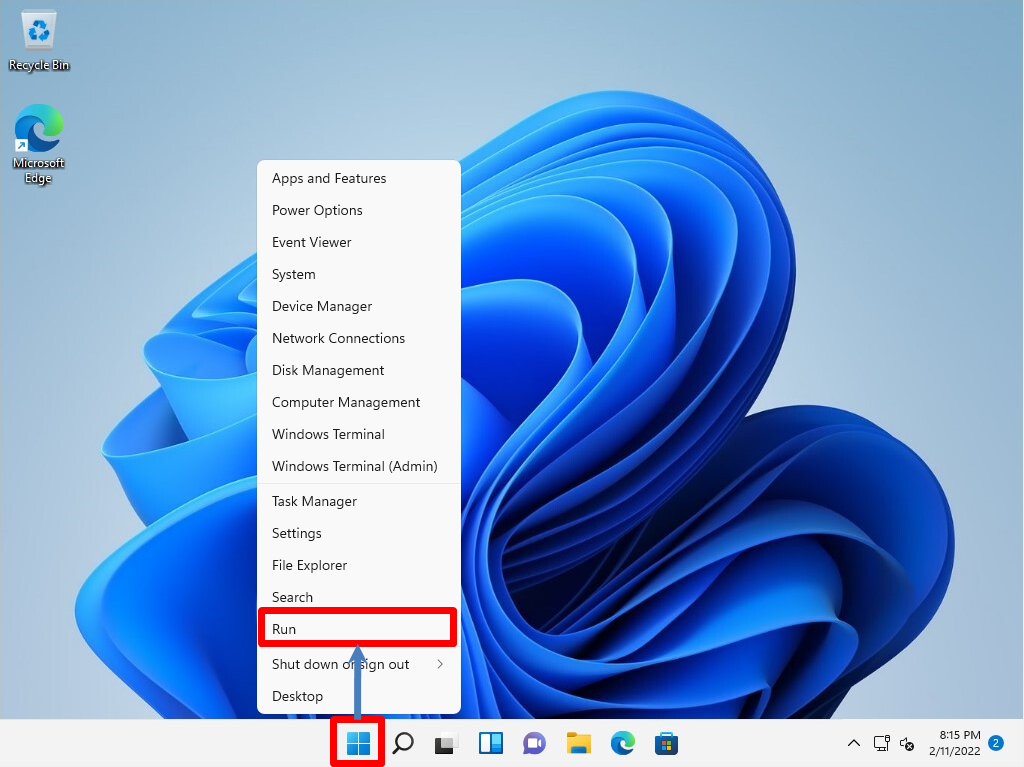
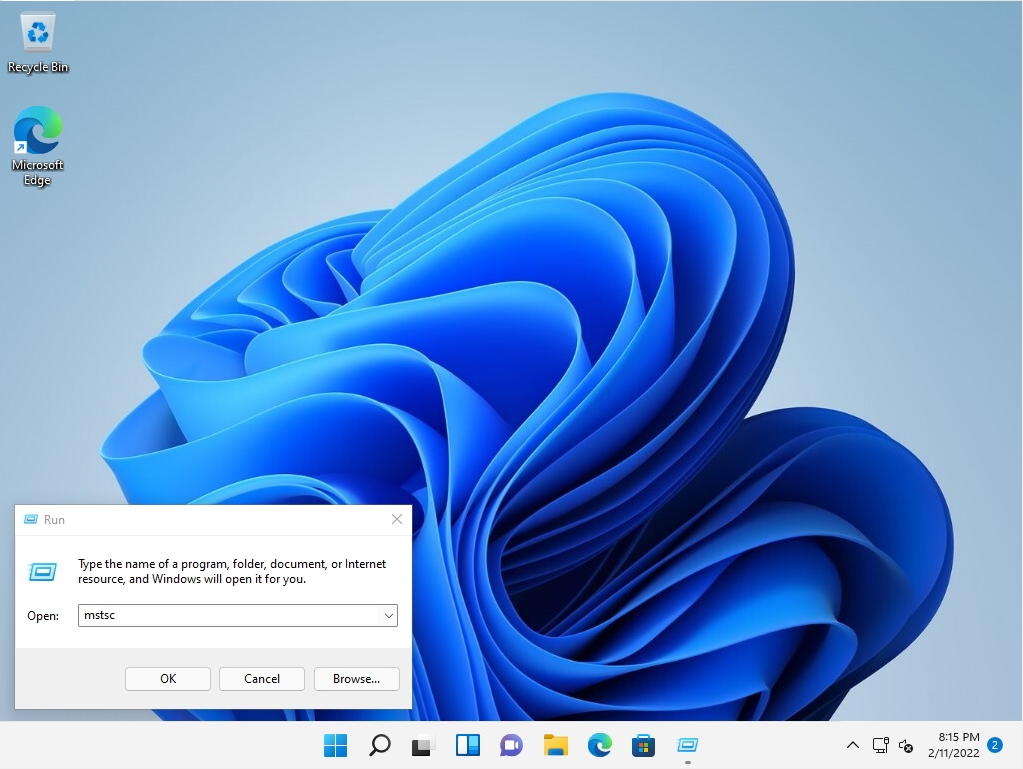
Step 2:
Open : Enter mstsc -> Select OK.
Step 3:
Computer: Enter “Remote IP Address” -> Select “Connect”
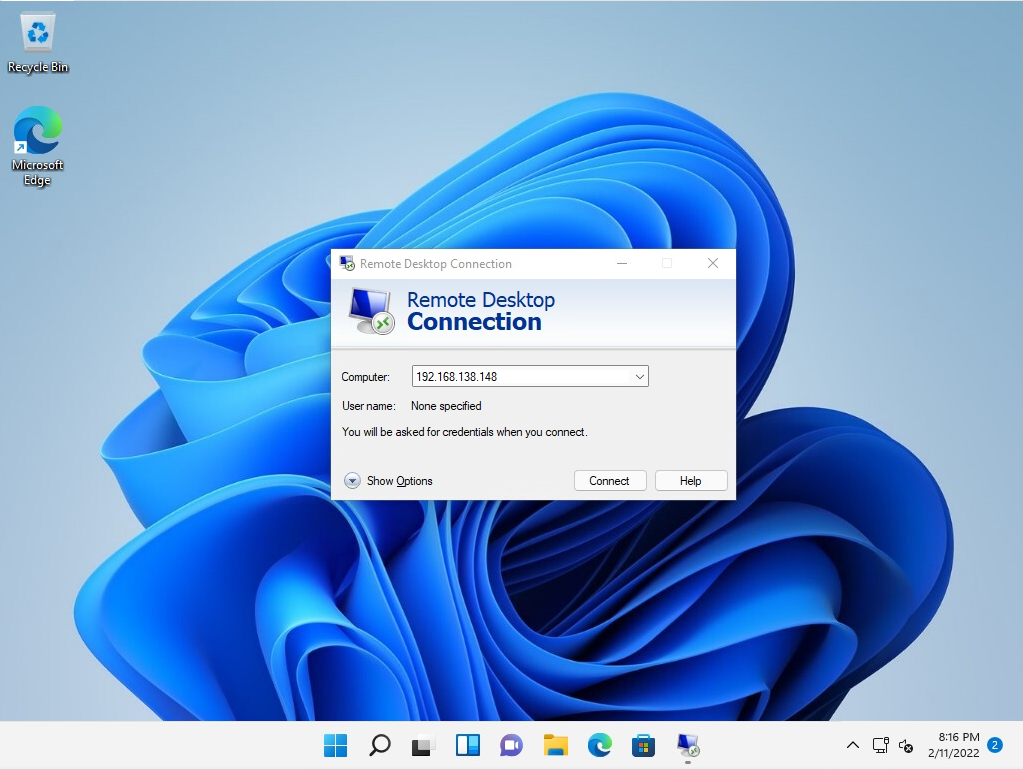
Step 4:
Enter user name and password -> Select “OK”
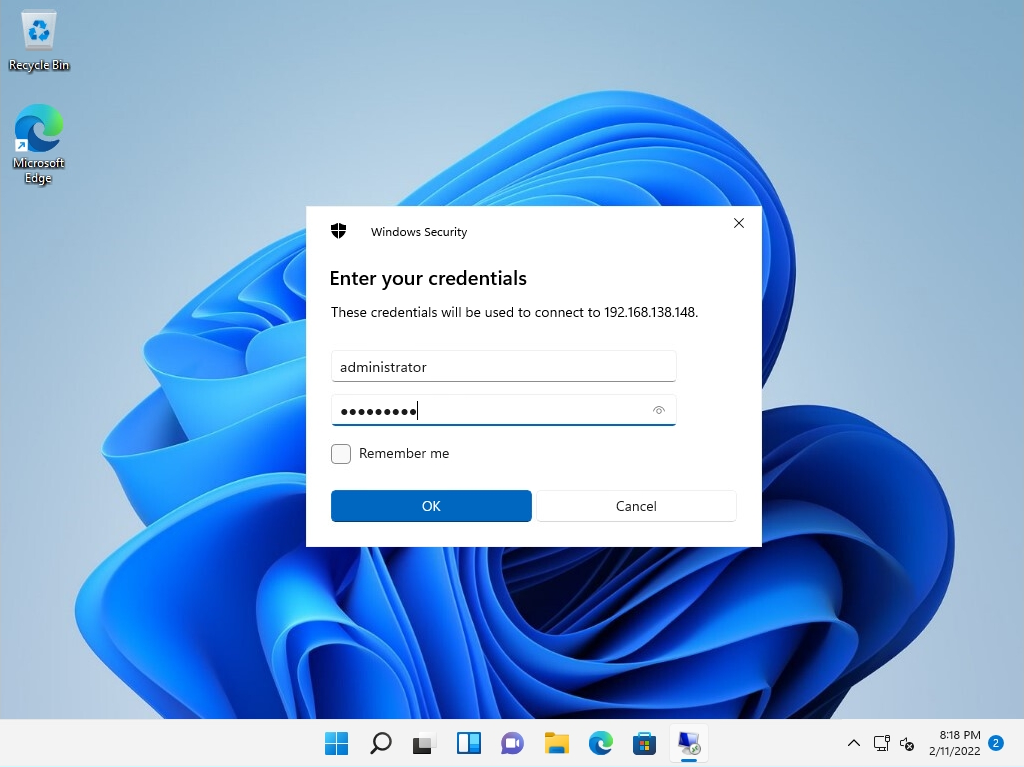
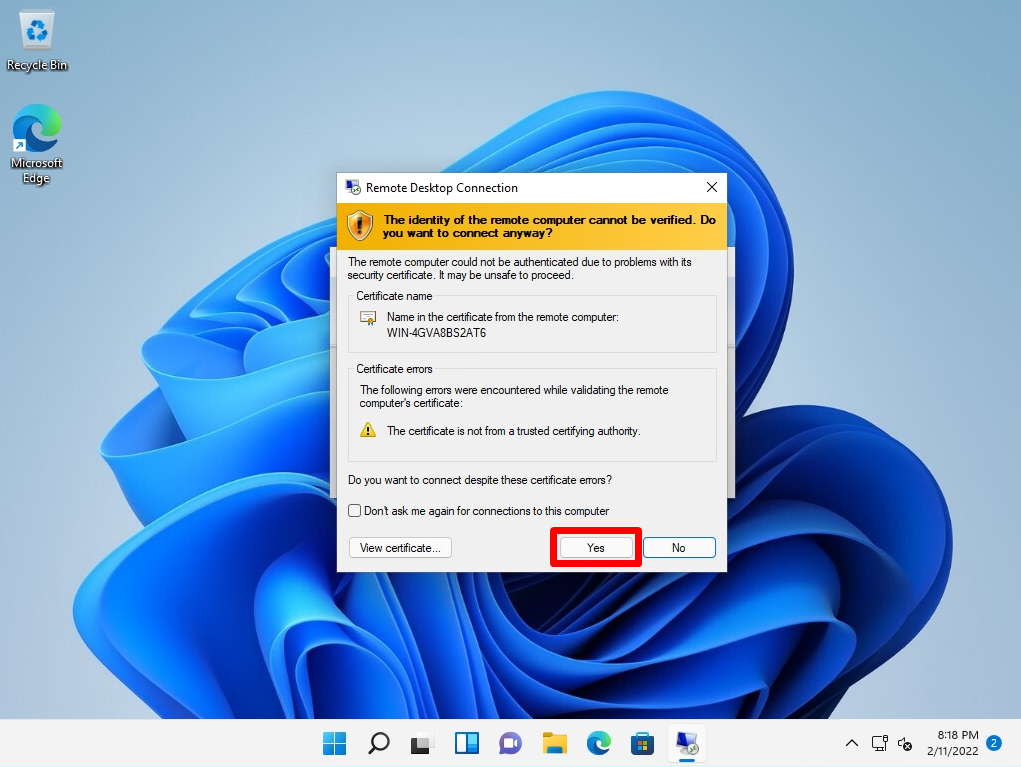
If the security certificate screen is output, select “Yes”
Step 5:
Repeat steps 1 to 4 again to confirm that you can connect with the same account