

As mentioned in my previous post, Microsoft has completely removed the Windows Server Essentials Experience (WSEE) server role from Windows Server 2019. However, since the entire Windows Server Essentials Experience is basically just an elaborate .NET application that is installed on top of the Windows Server operating system (and not some tightly integrated system component of the OS itself), it can quite readily be installed onto Windows Server 2019 and beyond.
Background Information And Proof Of Concept
Windows Server 2016 is built upon the Windows 10 version 1607 platform, and so it stands to reason that any .NET application that runs on it “should” run equally well on Windows Server 2019 (which is built upon the similar, but newer, Windows 10 version 1809 platform). This certainly holds true for the Windows Server Essentials Experience .NET application seeing as it runs exactly the same under Windows Server 2019 (and beyond) as it does under Windows Server 2016.
To install the Windows Server Essentials Experience on Windows Server 2019 / 2022 / 2025, all that needs to be done is for you to copy its required files and registry entries from Windows Server 2016 over to Windows Server 2019 / 2022 / 2025, add its prerequisite server roles and features, create its required services, and then complete its setup process by running the Configure Windows Server Essentials wizard. As you can see from the following screenshots, everything works quite nicely once it has been properly installed and configured.
• The “Configure Windows Server Essentials” wizard works perfectly when performing the initial configuration of Windows Server Essentials on Windows Server 2019 / 2022 / 2025…
• The configuration wizard even works when Windows Server 2019 / 2022 / 2025 is joined to an existing domain (i.e. when it is running as a member server, rather than acting as the primary domain controller)…
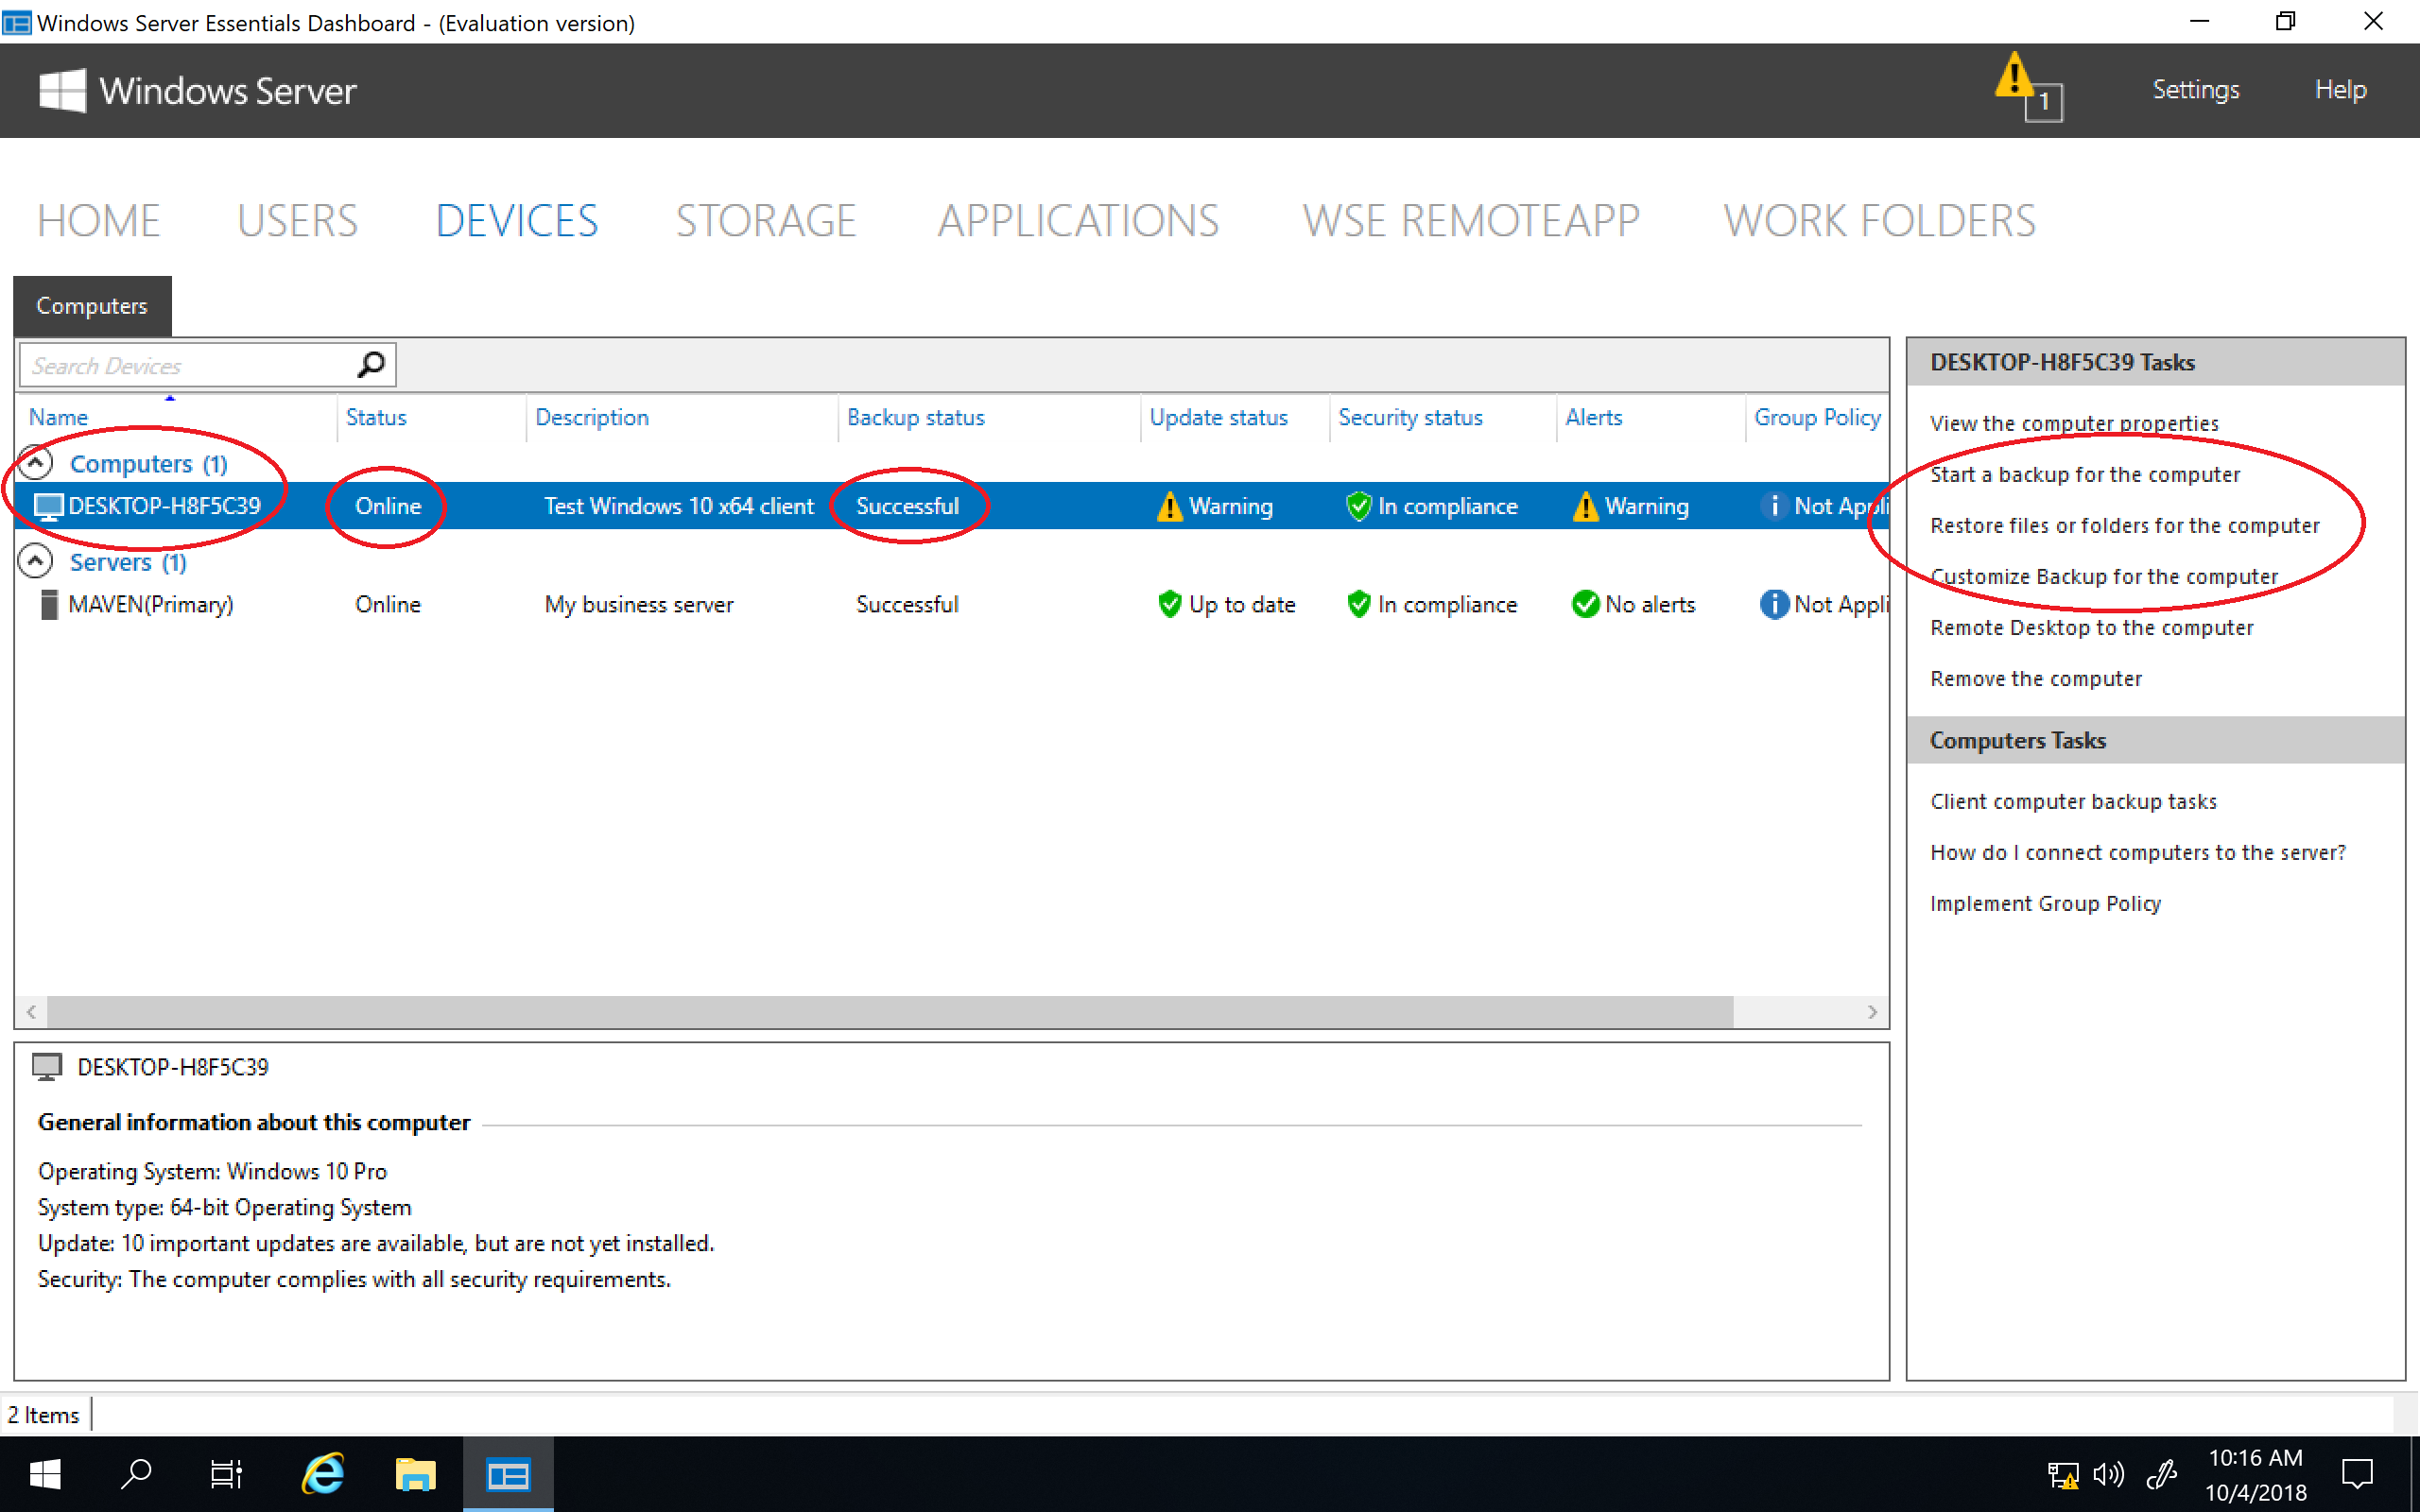
After Windows Server Essentials has been successfully configured you can then simply open up the server Dashboard (as usual) and start enjoying all the features of the Windows Server Essentials Experience server role on Windows Server 2019 / 2022 / 2025.
• Client Connect and Client Backup works…
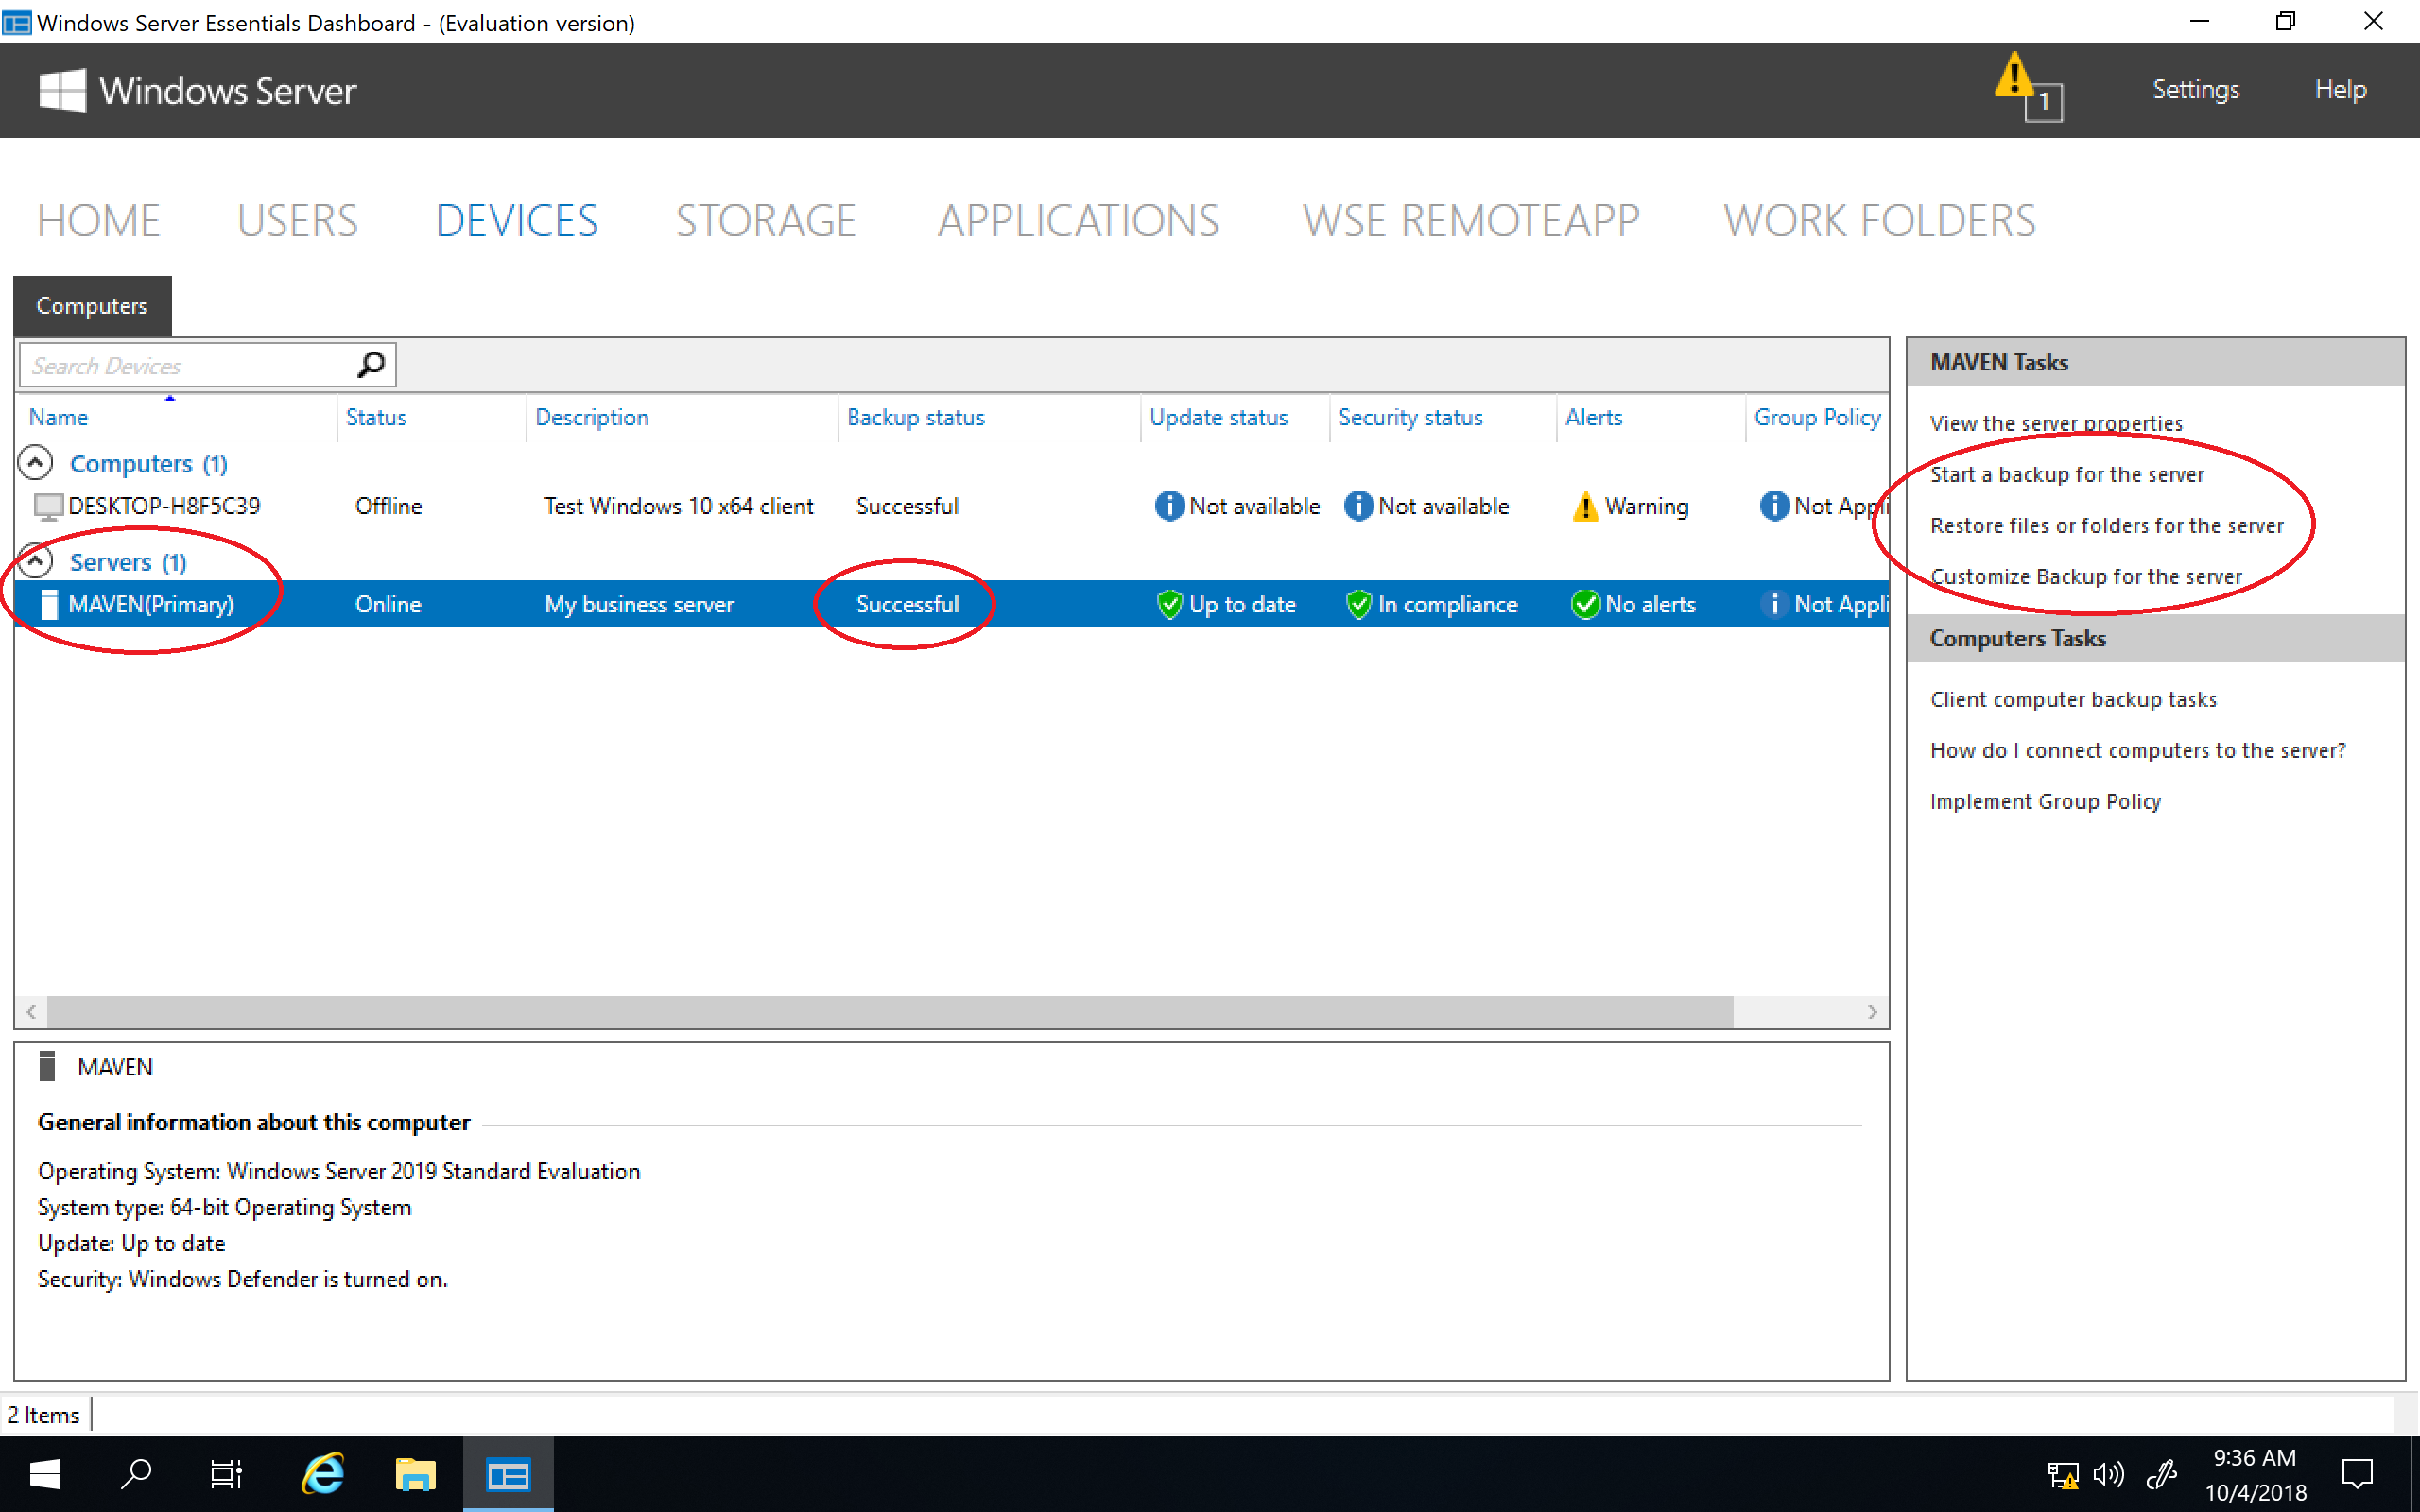
• Server Backup works…
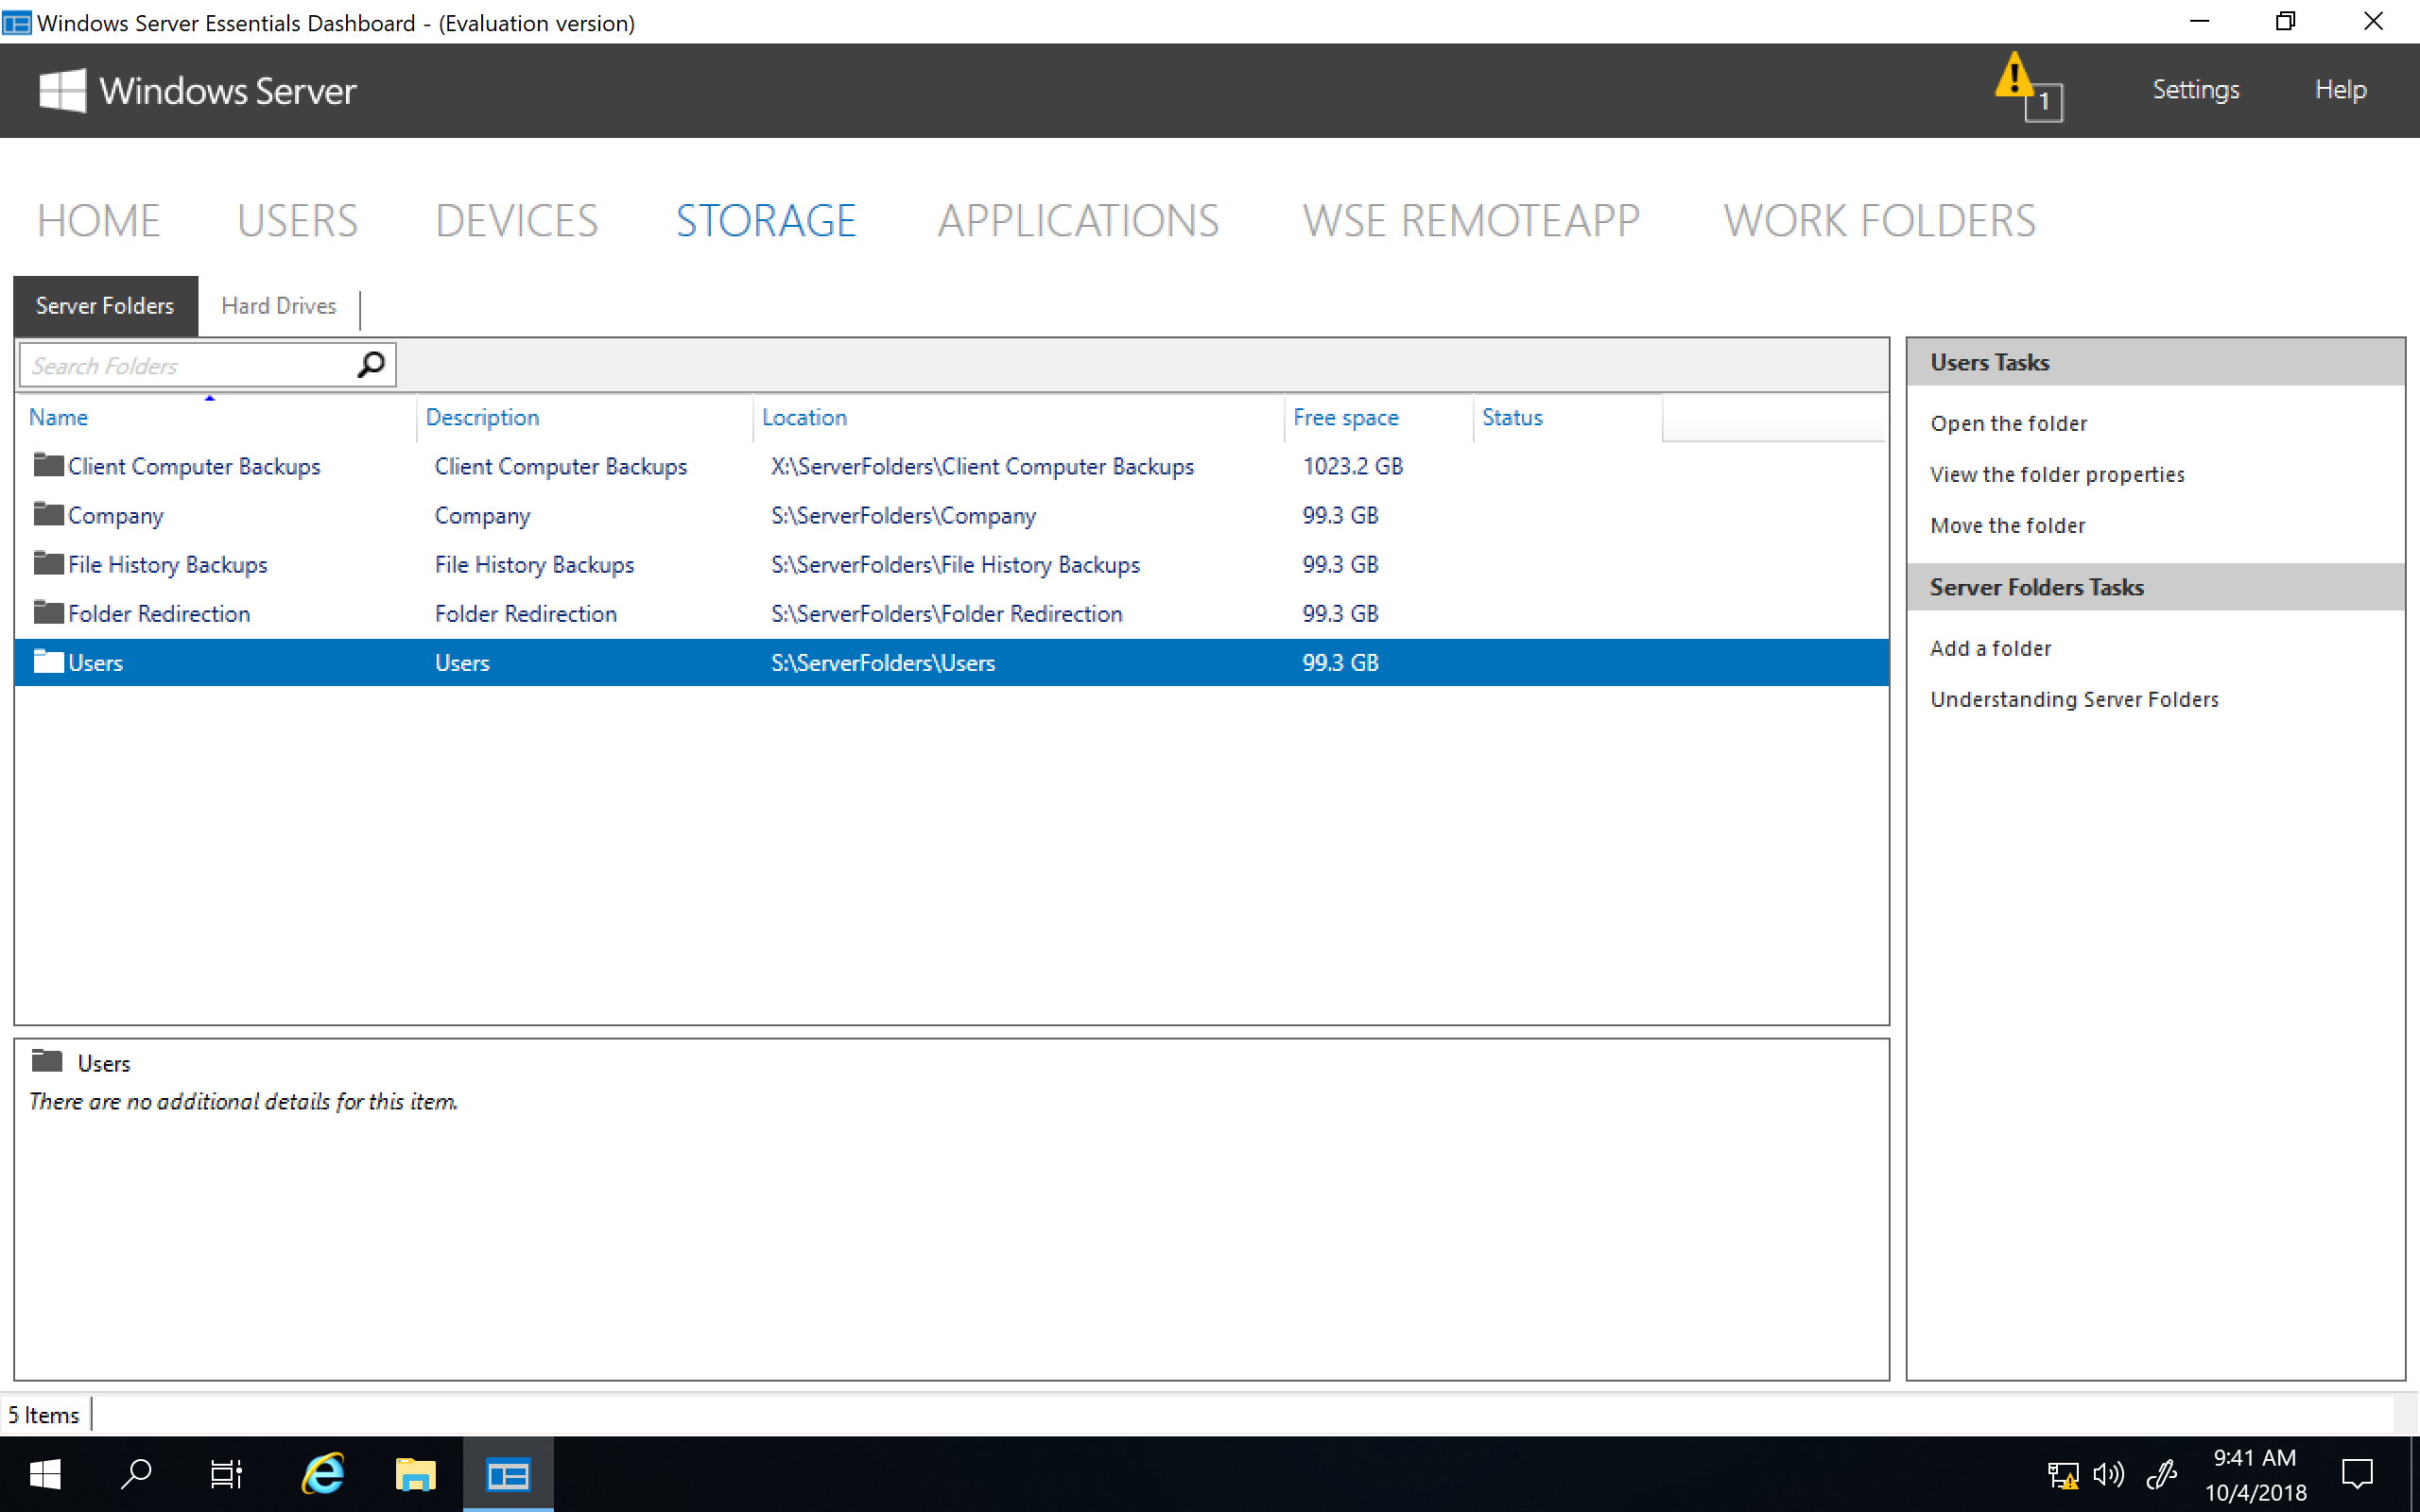
• Storage (Server Folders, Storage Spaces, etc.) works…
• Anywhere Access / Remote Web Access works…

• Add-ins work…
INFO: Our WSE RemoteApp and WSE WorkFolders products run splendidly on Windows Server 2019 / 2022 / 2025 with WSEE installed. Your existing, or newly purchased, license covers the use of the product on Windows Server 2016, 2019, 2022, or 2025. 😎

Everything works exactly as it does under Windows Server 2016!
Obviously, doing this will never be sanctioned nor supported by Microsoft, and so you may be asking yourself why not just stick with using Windows Server 2016 since it is supported by Microsoft until January 12, 2027? While you certainly can (and should) do that, probably the best answer I can give you is… Because you can! That being said, it’s worth mentioning that since Windows Server 2019, Windows Server 2022, and Windows Server 2025 have all now reached General Availability (A.K.A. RTM), there will most likely come a time, in the not too distant future, when Microsoft will stop selling Windows Server 2016 licenses. Being able to do this will allow those folks who wish to set up a newer server with the Windows Server Essentials Experience to continue to be able to do so once those Windows Server 2016 licenses become hard (if not impossible) to find. It will also allow those folks who would like to enjoy the added security, and other benefits, that come along with using Windows Server 2019 / 2022 / 2025 to be able to continue using the Windows Server Essentials Experience on their Small Office / Home Office (SOHO) servers.
How To Get Started
The installation can be performed by grabbing the install.wim file from a Windows Server 2016 Essentials installation disc (or from a mounted ISO image), and then mounting and extracting it using the Deployment Image Servicing and Management (DISM) command-line tool by following the steps Microsoft provides here. After doing that, grab all of the required Windows Server Essentials files (including the ones in the GAC), extract the required registry entries, and copy them over to Windows Server 2019 / 2022 / 2025. Then use Server Manager to add the prerequisite server roles and features, create the required services, and use PowerShell to start the initial configuration of Windows Server Essentials.
ALTERNATIVELY, if you already own (or newly purchase) a license for one of our software products, then you can contact us with the User Name from the license of your purchased software product, and we’ll be more than happy to share (at no additional charge) a password that you can enter below in order to download the WSEE Installer package (i.e. MSI file) that we’ve built for our own use in installing the Windows Server Essentials Experience onto Windows Server 2019 / 2022 / 2025.


The WSEE Installer makes installing the Windows Server Essentials Experience (WSEE) from Windows Server 2016 on Windows Server 2019 / 2022 / 2025 super simple! You just install Windows Server 2019 / 2022 / 2025 Standard or Datacenter, with the Desktop Experience GUI in the language of your choice, onto your server and then run the WSEE Installer package’s MSI file directly from the server desktop (the Windows Server 2019 Essentials SKU can be used, but is NOT recommended!). The WSEE Installer will handle installing all required files, registry entries, prerequisite server roles/features, services, permissions, etc., and then launch the “Configure Windows Server Essentials” wizard to walk you through configuring Windows Server Essentials on your server (as shown in the images above). The WSEE Installer will even monitor your installation and alert you whenever updates become available (via a health alert that gets displayed within the server Dashboard, and optionally emailed to you via the Windows Server Essentials server’s built-in Health Report Add-In feature). Available updates can then be, quickly and easily, installed via our WSEE Updater program.
INFO: The WSEE Installer does so much more for you than can ever be achieved with a manual installation of WSEE, that we no longer recommend folks attempt to install WSEE manually. Using the WSEE Installer will net you a MUCH MORE complete / proper / secure (and hassle free) installation of WSEE (including support for in place upgrades from prior releases of Windows Server and alerts whenever feature and/or security updates become available; along with a simple/easy means of installing those updates via our WSEE Updater program), and so we now STRONGLY RECOMMEND that everyone use it instead.
NOTE: We DO NOT SELL the WSEE Installer (seeing as the “Essentials bits” it installs are not ours to sell, and since we DO NOT officially provide support for it). It is ONLY made available, at no additional charge, as a convenience (and thank you) to purchasers of our software products.
NOTE: You may use the WSEE Installer to install WSEE on a single server only (i.e. it’s one WSEE installation per purchased software product). If you wish to use the WSEE Installer to install WSEE on multiple servers (for testing or migration purposes, for other clients, family members, friends, etc.), then each server installation MUST be associated with a unique licensee (i.e. User Name) from one of our software products. For additional information see the WSEE Installer policy.
NOTE: The WSEE Installer was built using Windows Server 2016 Standard OS Build 14393.7969 as its source. It is available in Dutch, English, French, German, Italian, Spanish, etc. Be sure to specify your language preference when requesting download access. The language of the WSEE Installer that you use should match the language of the installation media used to install Windows Server onto your server (i.e. don’t mismatch the languages).
💡 UPDATE (4/28/2025): The WSEE Installer Version 10.0.14393.7969 (Revision 2) is available for download (by entering a password below). Click here to see what’s new!
INFO: If you’ve installed WSEE on your server via any prior version of the WSEE Installer, use the WSEE Updater to bring your existing WSEE installation up-to-date. 😉
Enter Password to Download:
Enter Password to Download:
Enter Password to Download:
Enter Password to Download:
Enter Password to Download:
Enter Password to Download:
Enter Password to Download:
❗IMPORTANT NOTE: Support for Windows Server 2016, and hence for the Windows Server Essentials Experience and the WSEE Installer, ends on January 12, 2027.
Suggestions, Limitations, and Known Issues
• While in-place upgrades and domain migrations from earlier versions of Windows Server (Essentials) work just fine, we highly recommend that you always start off with a brand new/clean (i.e. straight out-of-the-box) installation of Windows Server 2019 / 2022 / 2025 Standard or Datacenter (with the Desktop Experience GUI in the language of your choice), that has all of the latest Windows Updates installed. The server may be natively joined to a domain if desired, but make sure that no other server roles, features or applications have been installed on the server.
• You should NOT attempt to install the Windows Server Essentials Experience on the Windows Server 2019 Essentials SKU (which, despite its name, has absolutely nothing whatsoever to do with “Essentials” as we currently know it). This is because Microsoft has removed all of the Remote Desktop Services roles from the SKU, and so the required Remote Desktop Gateway role will not be available for use by the Anywhere Access / Remote Web Access features of Windows Server Essentials. Save yourself the time and hassle, and just use Windows Server 2019 / 2022 / 2025 Standard or Datacenter instead (and don’t fret about silly CALs). If needed, you can convert the Windows Server 2019 Essentials SKU into Standard or Datacenter by running one of the DISM commands mentioned below…
NOTE: You can download an evaluation version of Windows Server 2019 (Standard or Datacenter), in ISO format, from the Microsoft Evaluation Center here. You can download an evaluation version of Windows Server 2022 (Standard or Datacenter), in ISO format, from the Microsoft Evaluation Center here. You can download an evaluation version of Windows Server 2025 (Standard or Datacenter), in ISO format, from the Microsoft Evaluation Center here.
INFO: You can evaluate the product for up to 180 days, and you can extend the trial period for another full 180 days (up to six times for a grand total of 3 years) by running the following command from an elevated command prompt:
slmgr -rearm
INFO: You can run one of the following commands, from an elevated command prompt, in order to convert the evaluation version into a regular retail version (Standard or Datacenter) using a purchased retail Product Key:
DISM /online /Set-edition:ServerStandard /ProductKey:XXXXX-XXXXX-XXXXX-XXXXX-XXXXX /AcceptEula
DISM /online /Set-edition:ServerDatacenter /ProductKey:XXXXX-XXXXX-XXXXX-XXXXX-XXXXX /AcceptEula
💡 HINT: You can use Windows Server 2019 / 2022 / 2025 for free by running one of the following commands, from an elevated command prompt, in order to convert the evaluation version into a volume-licensed version (Standard or Datacenter) using a Generic Volume License Key (GVLK) from Microsoft:
Windows Server 2019:
DISM /online /Set-edition:ServerStandard /ProductKey:N69G4-B89J2-4G8F4-WWYCC-J464C /AcceptEula
DISM /online /Set-edition:ServerDatacenter /ProductKey:WMDGN-G9PQG-XVVXX-R3X43-63DFG /AcceptEula
Windows Server 2022:
DISM /online /Set-edition:ServerStandard /ProductKey:VDYBN-27WPP-V4HQT-9VMD4-VMK7H /AcceptEula
DISM /online /Set-edition:ServerDatacenter /ProductKey:WX4NM-KYWYW-QJJR4-XV3QB-6VM33 /AcceptEula
Windows Server 2025:
DISM /online /Set-edition:ServerStandard /ProductKey:TVRH6-WHNXV-R9WG3-9XRFY-MY832 /AcceptEula
DISM /online /Set-edition:ServerDatacenter /ProductKey:D764K-2NDRG-47T6Q-P8T8W-YP6DF /AcceptEula
After doing that, you can then automate activation of the volume-licensed version using abbodi’s KMS_VL_ALL script that sets up a local KMS server emulator on the server. 😎
• (8/25/2019): If the Windows Server Essentials (Client) Connector software has trouble locating your Essentials server, or if you see a health alert stating that your “Active Directory domain names can’t be resolved“, then change the adapter settings/options for the network connection on your Essentials server so that its preferred IPv4 DNS server address is set to the default 127.0.0.1 localhost/loopback address, and its alternate IPv4 DNS server address is set to the IP address of your network router (e.g. 192.168.1.1) or other DNS server (e.g. 8.8.8.8). You should also verify that the preferred IPv6 DNS server address is set to its default ::1 value.
❗ NOTE: In addition, you should also change the adapter settings/options for the network connection on ALL of your client computers so that their preferred IPv4 DNS server address is set to the static IP address of your Essentials server, and their alternate IPv4 DNS server address is set to the IP address of your network router (e.g. 192.168.1.1) or other DNS server (e.g. 8.8.8.8). Doing so will allow the client-side Windows Server Essentials Connector software’s installer (which you can download from each of your client computers by browsing to http://<ServerName>/connect; where <ServerName> is the name of your Essentials server) to be able to successfully locate and connect the client computer to your Essentials server.
❗ INFO: If the Windows Server Essentials Connector software (still) has trouble locating your Essentials server, then try adding the “SchUseStrongCrypto” and “SystemDefaultTlsVersions” .NET Framework security settings to the Windows Registry of BOTH your server and ALL of your client computers, and then reboot them. The settings allow the older v2 and v4 versions of Microsoft’s .NET Framework packages (used in Windows Server Essentials) to be able to utilize newer/stronger TLS 1.2 SSL connections whenever the clients attempt to communicate with the server.
💡 HINT: If you do not want to join your connected client computers to the Windows Server Essentials domain, then you can use Microsoft’s SkipDomainJoin connection method instead.
• During (and after) the configuration of Anywhere Access / Remote Web Access, you may see a benign error about your firewall settings (e.g. “There is an error in your firewall settings – Your firewall may be blocking Anywhere Access to your server and the problem cannot be repaired automatically.“). You can safely ignore this error seeing as it is just a false-positive that is being caused by an issue where the localized names of the required firewall rules are not being properly read from their resource files.
NOTE: The accompanying health alert will automatically be disabled for you when using our WSEE Installer (but the error will still appear within the Configure/Repair Anywhere Access Wizard itself).
• (3/8/2021): The Microsoft Online Integration Services (such as Office 365 and Azure Active Directory) will work as designed when WSEE has been installed using our WSEE Installer (Version 10.0.14393.4169 (Revision 3) or greater).
NOTE: The online integration services in Windows Server Essentials are NOT compatible with multi-factor authentication (MFA) being enabled on your Office 365 / Azure Active Directory user accounts. Therefore, you should make sure that MFA is disabled by signing in to the Microsoft 365 admin center, clicking on Users → Active users, clicking on your admin user, and then clicking on the Manage multifactor authentication link located on the Account tab.
Microsoft has also implemented something called security defaults in Azure Active Directory, and since enforcing the enabling of MFA on all of your user accounts (within 14 days) is part of this security feature, you will need to disable it as follows:
• Sign in to the Azure portal as an administrator.
• Browse to Manage Azure Active Directory → Properties.
• Select Manage security defaults.
• Set the Enable security defaults toggle to No.
• Select Save.
• (3/15/2021): The Windows Server Essentials Best Practice Analyzer (BPA) tool works when WSEE has been installed using the WSEE Installer (Version 10.0.14393.4169 (Revision 4) or greater).
NOTE: To run the Windows Server Essentials Best Practice Analyzer (BPA) tool:
• Log on to the Essentials server as an administrator, and then open the Configure Windows Server Essentials wizard (click Start → type EssentialsRoleConfigWizard.exe).
• Close the configuration wizard after confirming that Windows Server Essentials has been successfully configured on the server.
• Open Server Manager, and then click the Windows Server Essentials Experience tab.
• In the details pane, scroll down to the BEST PRACTICES ANALYZER.
• If a filter is applied, click Clear All.
• Click TASKS, and then click Start BPA Scan.
• Review each BPA message, and follow the instructions to resolve issues, if necessary.
SEE: Rules used by the Windows Server Essentials Best Practices Analyzer (BPA) Tool
Closing Remarks
We’ve tested all of this quite extensively, and it consistently works great for us here. However, your results may vary. Please don’t blame us (nor Microsoft) if you can’t get it to work, or if something goes wrong on your server. None of this is officially supported by Microsoft (nor by us!), and so you should proceed at your own risk. You fully assume all risk, responsibility, and liability associated with the installation. And as always, make sure that you have a working backup of your server, and all of your data, before proceeding.
That being said, it works so well for us here, that we have now switched all of our SOHO servers over to running Windows Server 2019 / 2022 / 2025 with the Windows Server Essentials Experience installed.
That’s it! Enjoy using the Windows Server Essentials Experience on Windows Server 2019 / 2022 / 2025.
— MIKE (The Office Maven)
EDIT (6/26/2019): As the months keep flying on by, we’re finding that the longer we use the Windows Server Essentials Experience on Windows Server 2019, the more we’re coming to realize just how much better Windows Server 2019 is than Windows Server 2016. While the “Essentials” bits themselves are of course identical (seeing as they’re just being brought straight over, untouched, from 2016), they run just fine under 2019. Windows Server 2019 is leaps-and-bounds faster than Windows Server 2016 is (it boots up faster, and everything, including the server Dashboard, etc., just runs faster/better under it). Lots of bugs that plague 2016 are fixed under 2019, and overall, we’re finding that using WSEE on 2019 is an all-around better experience.
EDIT (9/1/2021): The Windows Server Essentials Experience installs, and runs wonderfully, on Microsoft’s GA/RTM release of Windows Server 2022 Version 21H2 OS Build 20348. — Enjoy! 😎
EDIT (5/23/2024): The Windows Server Essentials Experience installs, and runs okay, on Microsoft’s GA/RTM release of Windows Server 2025 Version 24H2 OS Build 26100 (i.e., the next version of Windows Server with the new Windows 11 style Graphical User Interface). — Enjoy! 😎
Windows Server Essentials offers a flexible, affordable, and easy-to-use server solution for small businesses with up to 25 users and 50 devices. An ideal first server, Windows Server Essentials can also be used as the primary server in a multi-server environment for small businesses. Windows Server 2019 Essentials provides a wide range of new and enhanced features and capabilities for Windows Server Essentials, allowing small businesses to be more productive.
Languages
-
Chinese (Simplified), Czech, Dutch (Netherlands), English, French, Hungarian, Italian, Japanese, Korean, Polish, Portuguese (Brazil), Portuguese (Portugal), Russian, Spanish, Swedish (Sweden), Turkish
Editions
-
Windows Server 2019 Essentials | 64-bit ISO
Microsoft 365 for business: The modern small business solution
Over the years since Windows Server 2016 Essentials was released, we have been working hard on the next solution for large and small businesses alike: Microsoft 365. We highly recommend Microsoft 365 for small business customers as a replacement for all versions of Windows Server Essentials. Microsoft 365 is a modern solution for file sharing and collaboration, and includes Microsoft 365, Windows 10, and Enterprise Mobility + Security.
Evolve your business further with Microsoft 365 for business, which includes even more Office App features like e-mail and calendaring, file storage in the cloud, data protection, and more. Microsoft 365 Business will help your small business achieve new levels of productivity.
Find the right plan for your business.
-
Home
-
News
- Download Windows Server 2019 Essentials ISO Image
By Daisy | Follow |
Last Updated
Windows Server 2019 Essentials is a good choice for small businesses with basic IT requirements. You can find details about Windows Server 2019 Essentials given by MiniTool, including its overview, how to download Windows Server 2019 Essentials, and how to install it.
Windows Server 2019 Essentials is ideal for small businesses with basic IT requirements. Windows Server Essentials provides flexible, affordable, and easy-to-use server solutions for small businesses with up to 25 users and 50 devices.
It includes all the new hardware support, features, and improvements in Windows Server 2019 Standard, including Storage Migration Services, System Insights, and more. The following part introduces how to download Windows Server 2019 Essentials and how to install it.
Related posts:
- How to Install/Reinstall Windows Server 2019? Here Is a Guide!
- Windows Server 2019 Essentials vs Standard vs Datacenter
Download Windows Server 2019 Essentials
How to get Windows Server 2019 Essentials? Follow the guide below:
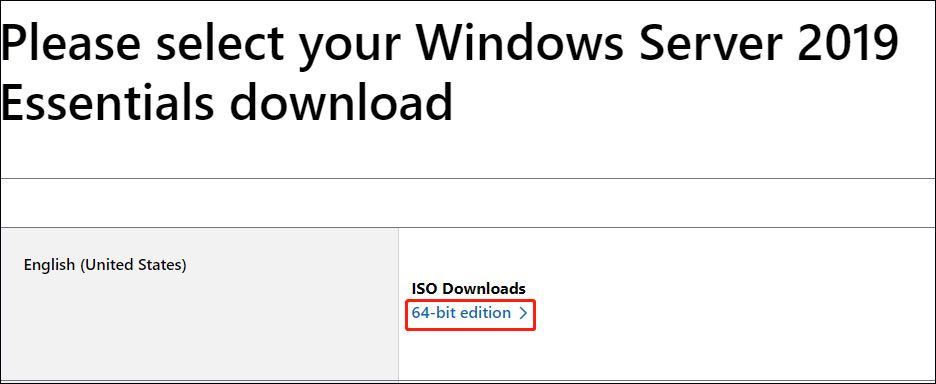
1. Go to the Windows Server 2019 Essentials official download page.
2. Choose the language you need and click the 64-bit edition link.
3. Choose a location on your disk to save the Windows Server 2019 Essentials ISO image.
4. Then, it will start to download it and you just need to wait patiently. It depends on your Internet speed.
Install Windows Server 2019 Essentials
After downloading Windows Server 2019 Essentials, you can start to install it. Here is a full guide.
Before installing Windows Server 2019 Essentials, make sure that you have created a backup for the important data on your computer since the installation can completely erase the entire system.
To keep data safe, the Server backup software – MiniTool ShadowMaker can help you back up crucial files. It works well in Windows Server 2022/2019/2016/2012/2012 R2 and Windows 11/10/8/7. Now, download it to have a try!
MiniTool ShadowMaker TrialClick to Download100%Clean & Safe
1. Download and install Rufus on your PC. Connect a USB flash drive to your computer.
2. Then, run Rufus. Click the SELECT button to choose the downloaded Windows Server 2019 Essentials ISO file.
3. Then, click the START button. After the process is finished, connect the bootable drive to the computer you want to install Windows Server 2019 Essentials.
4. Enter the boot menu by pressing a certain key and set the connected USB drive as the first boot. Then, press Enter to continue. Then, your PC will boot from it.
5. On the Windows Installation dialog box, click Install Now.
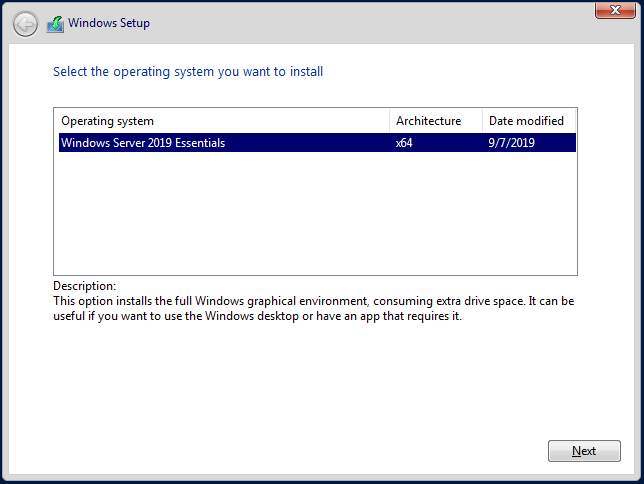
6. Then, select the operating system you want to install. Here, you need to select Windows Server 2019 Essentials and click Next.
7. Select I accept the license terms after reviewing the license agreement.
8. In the window, click Custom (advanced) to be the installation type.
9. Then, choose Custom: Install Windows only (advanced). Otherwise, if upgrading from a previous version of Windows Server, choose the Upgrade: Install Windows and keep files, settings, and applications option.
10. It will take some time and your PC may restart several times.
Final Words
Now you know what Windows Server 2019 Essentials is, and how to download Windows Server 2019 Essentials on your PC. Take action if you need! Hope this post can help you a lot.
About The Author
Position: Columnist
Having been an editor at MiniTool since graduating college as an English major, Daisy specializes in writing about data backups, disk cloning, and file syncing as well as general computer knowledge and issues. In her free time, Daisy enjoys running and going with friends to the amusement park.
Installation guide
Windows Server 2019 Essentials
- 1 gigahertz (GHz) or faster or 64-bit (x64) processor
- 2 gigabyte (GB) RAM
- 60 GB of available hard disk space
- DirectX 9 graphics device with WDDM 1.0 or higher driver
Verify that you have a stable Internet connection during installation. Please follow these steps for a successful activation
If you already have a (installed) version of Windows Server 2019 Essentials as a download or on USB / DVD, first try activating this version with our product key. Make sure your version of Windows matches the Windows version of the product key. Otherwise, or in case the installation doesn’t work, continue with point 2.
Download your version of Windows Server from the following link:
Windows Server 2019 Essentials
The ISO file is the version for a permanent installation on a PC
After downloading, burn the ISO file to DVD or save it to USB. Once you boot your PC / Laptop with the DVD / Pendrive the installation program will run. Follow the guided steps of the program to complete its installation.
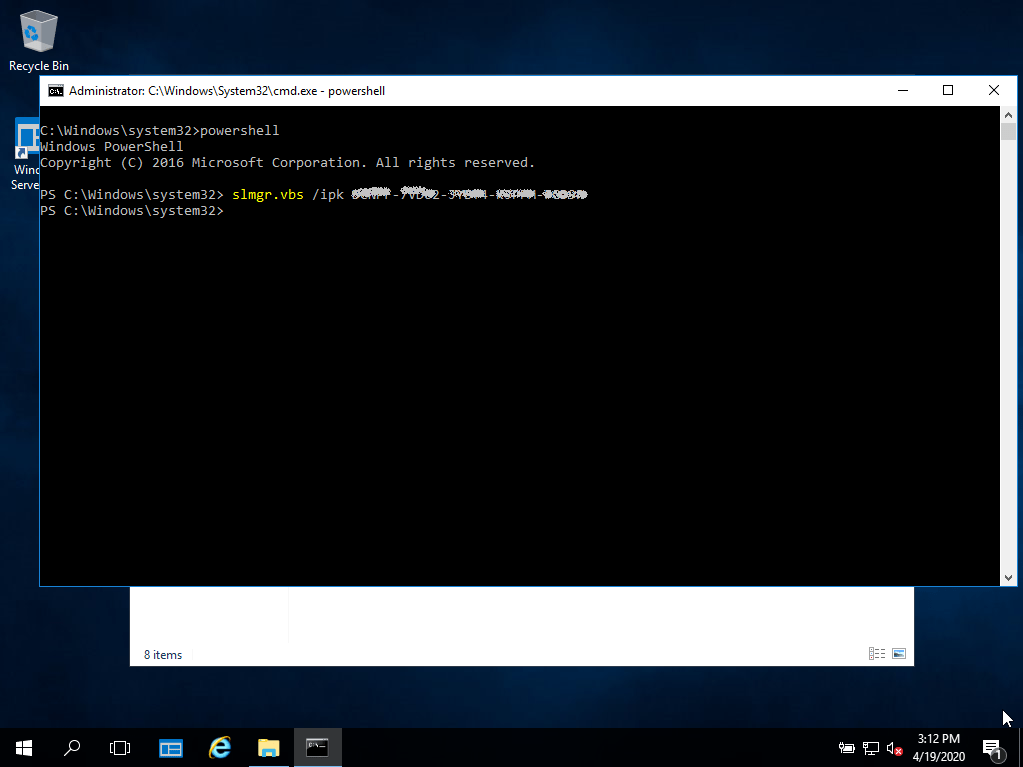
This supplied Microsoft installation includes a 180-day trial. To convert to a full version, run the command:
cmd / Powershell
as administrator:
slmgr.vbs /ipk XXXXX-XXXXX-XXXXX-XXXXX-XXXXX
(Instead of the Xs, enter the product key)
We wish you a successful installation. If you still have problems or questions about the installation, please contact our customer service at any time. We will help you as soon as possible.
Windows Server Essentials 2019 download is available on the Microsoft official website. Officially you can download Microsoft Windows Server 2019 64-bit ISO files without any cost. You can install successfully with the ISO file if your device meets the minimum system guides for installing the Essentials edition of windows server 2019. You can easily activate the Windows Server 2019 Essentials with an original product key. If you are a new Windows server user or don’t know the process of downloading, installing, and activating, follow the article to learn the complete guidelines.
Download Windows Server 2019 Essentials ISO File
Windows Server Essentials download process starts with the Download of the ISO file from the Microsoft Website. Let’s have a look at the download process:
- Go to the Windows Server 2019 evaluation center by clicking here [link – https://www.microsoft.com/en-us/evalcenter]
- Under the Windows Server tab, navigate to the Windows Server 2019 Essentials 2019 version.
- Scroll down and click on the Download the ISO options.
- You will guide to the Evaluate Windows Sever 2019 Essentials page for registration.
- Fill up the form with all the original information.
- Then click on the Download Now button.
- Click on your targeted language and 64-bit edition.
- Within a few seconds, it starts windows server 2019 Essentials ISO download
Note: The download speed and period will depend on your internet connection. It usually takes 15 to 30 minutes for a complete download guide.
How to make a bootable USB drive for Windows Server 2019 Essentials
Whether it is complete to download Microsoft Windows server 2019 ISO file, you can get prepared to make the bootable drive for installing the Essentials edition of Windows Server 2019. Let’s check out the process:
- Input a USB or DVD drive into your computer device
- Type CMD on the start menu of the search bar

- Then select the Open option to run the command prompt on your device.
- On the next screen, type diskpart on the command prompt like the image below.

- The system will detect the USB drive and show you on the screen
- Next, type list disk and click on the Enter button. The order shows the list of disks

Again type disk<x> and press enter button. X refers to the drive letter or number.

Type clean and press the Enter button, and the order will delete all the for the USB drive.

- To create a new primary partition type Create partition and press the Enter button
- You can type format fs=ntfs quick and press the enter button to format the drive partition

- You can type active and press the enter button to enter
- Also, type exit and press enter button to exit
- Navigate your ISO image and save it to the root folder of the USB flash drive.
Installation Process of Windows Server 2019 Essentials
After making sure you have prepared the bootable USB drive, you can install the software easily by following the steps:
- Turn on the Switch of your device and input the booted USB drive
- Then press any of the keys to launch the process
- Select your required language, time, currency and keyboard input option and click on the Next button.

- Press the Install Now button from the next screen.

- Select the Windows Server 2019 Essentials desktop experience version from the list and press the Next button.
Read the terms and agree; checkmark the “ I accept the license agreements” check box options and press the Next button.

- Select Custom: Install Windows Server Operating system option.

- Select the drive partition where you want to install the Windows server and press the Next button.

- It will automatically restart and install the Essentials edition of Windows Server 2019

- Fill up all the information and continue to the following process.
- Then, the system will guide you to the Microsoft PowerShell interface
- Now set the setting as your want and manage the Windows Server 2019 Essentials.
Windows Server 2019 Standard Activation Process
After completing the Windows Server 2019 Essentials installation, you must activate the software with a genuine license key. Let’s jump into the activation process:
- Type CMD on the search bar of the Windows start menu and click on the Run as administrator options.

You need to Input the command with a valid product key (Dism /online /Set-Edition: ServerEssentials /AcceptEula /ProductKey: XXXXX-XXXXX-XXXXX-XXXXX-XXXXX) of your Windows server.

System Requirement of Windows Server 2019 Essentials
To install Windows Server 2019 Essentials, your device must meet the below minimum system requirements:
Required Processor: 1.4 GHz 64-bit processor
Required RAM: 2 GB (ECC recommended)
Minimum Hard disk space: 160 GB (Additional space may be required for updates, service packs, and other system files.)
Network adapter: Gigabit Ethernet adapter (10/100/1000baseT)
Display: Super VGA (1024 x 768) or higher resolution monitor
Required Input devices: Keyboard and mouse (or other pointing device)
DVD drive: DVD-ROM drive, if you want to install the operating system from a DVD-ROM.
Conclusion
Finally, if your business has 25 to 50 users and devices, you can use Windows Server 2019 Essentials without a doubt. This version of Windows Server provides an easy-to-use platform for managing and sharing files, email, and other resources. In this blog post, we have discussed the download, installation and activation process of Windows Server 2019 Essentials in detail. Hope, by following our simple process and instructions, you can complete the entire process successfully.