
Протокол Remote Desktop Protocol (RDP) позволяет удаленно подключиться к рабочему столу компьютера с Windows и работать с ним, как будто это ваш локальный компьютер. По умолчанию RDP доступ в Windows запрещен. В этой статье, мы покажем, как включить и настроить RDP доступ в Windows 10 и Windows Server 2016/2019.
Содержание:
- Включаем удаленный рабочий стол в Windows 10
- Как включить RDP доступ с помощью PowerShell?
- RDP доступ к Windows Server 2016/2019
- Включение RDP с групповых политик в домене Active Direcrtory
- Как удаленно включить RDP на компьютере Windows?
Включаем удаленный рабочий стол в Windows 10
Самый простой способ включить RDP доступ в Windows – воспользоваться графическим интерфейсом.
Откройте свойства системы через панель управления, или выполнив команду SystemPropertiesRemote.
Перейдите на вкладку Remote Settings (Удаленный доступ), включите опцию Allow remote connection to this computer (Разрешить удалённые подключения к этому компьютеру).
В целях безопасности желательно разрешить подключение только с клиентов RDP с поддержкой протокола NLA (Allow connections only from computers running Remote Desktop with Network Level Authentication/ Разрешить подключение только с компьютеров, на которых работает удаленный рабочий стол с проверкой подлинности на уровне сети).

Сохраните изменения, нажав ОК.
По умолчанию право на подключение к компьютеру через RDP есть только у членов группы локальных администраторов. Если вам нужно разрешить RDP доступ другим пользователям, нажмите кнопку Select Users.
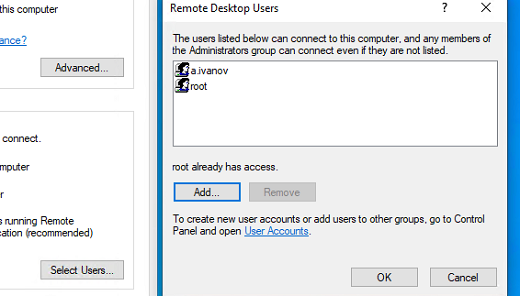
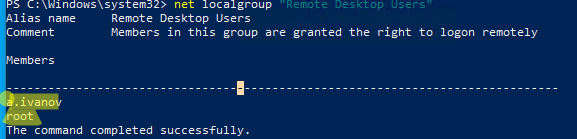
Все пользователи, которых вы укажете здесь будет добавлены в локальную группу Remote Desktop Users. Вы можете в командной строке вывести список пользователей в этой группе:
net localgroup "Remote Desktop Users"
или
net localgroup “Пользователи удаленного рабочего стола”
Чтобы добавить нового пользователя в группу доступа RDP, выполните:
net localgroup "Remote Desktop Users" /add publicuser
В русской версии Windows измените название группы на “Пользователи удаленного рабочего стола”.
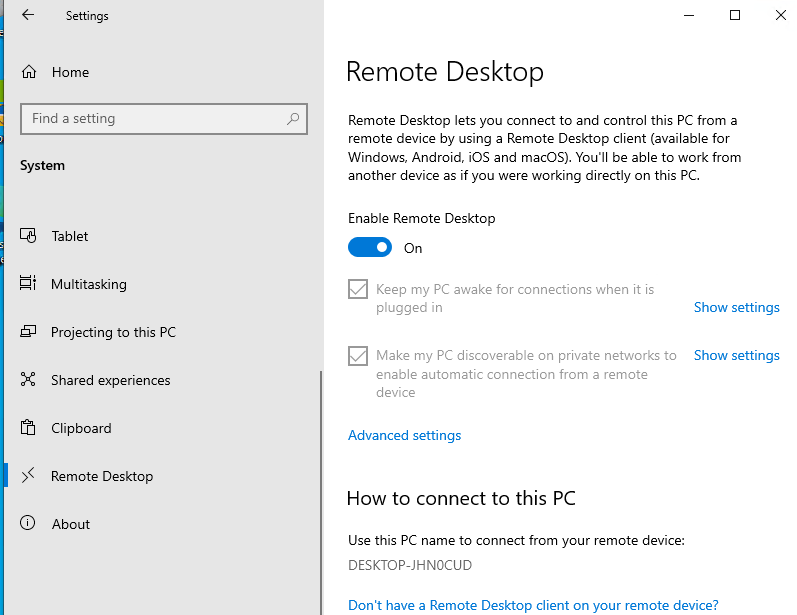
В новых билдах Windows 10 классическая панель для включения RDP доступа теперь спрятана и Microsoft рекомендует пользоваться новой панелью Setting.
- Перейдите в Settings -> System —> Remote Desktop;
- Включите опцию Enable Remote Desktop;

- Подтвердите включение RDP на компьютере.
Обратите внимание, что вы не можете включить RDP доступ к редакции Windows 10 Home. RDP сервер работает только на Windows 10 Pro и Enterprise. Впрочем, есть обходное решение.
Обратите внимание, что по умолчанию при включении Remote Desktop, включаются две опции:
- Keep my PC awake for connection when it is plugged in ;
- Make my PC discoverable on private networks to enable automatic connection from a remote device
На жмите на ссылку “Advanced settings”. Здесь можно включить использование протокола “Network Level Authentication” для RDP подключений (рекомендуется).
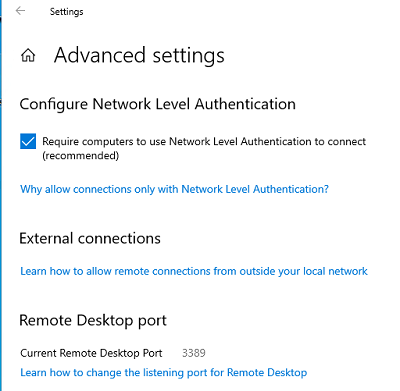
Если на компьютере включен Windows Defender Firewall (брандмауэр), то нужно проверить, что в нем разрешены входящие RDP подключения. По умолчанию для RDP подключений используется порт TCP
3389
, а в последних билдах Windows также используется
UDP 3389
( см. статью про кейс с черным экраном вместо рабочего стола при RDP доступе).
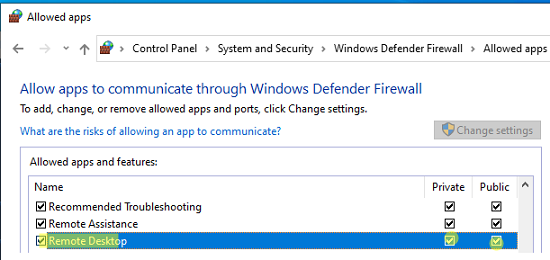
Перейдите в панель управления и выберите элемент Windows Defender Firewall. Откройте список стандартных правил брандмауэра Windows, щелкнув в левом столбце по ссылке Allow an app or feature through Windows Firewall.
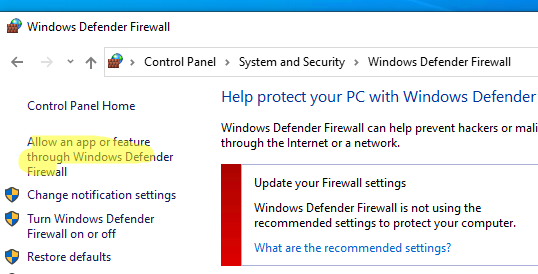
Проверьте, что правило Remote Desktop включено для профиля Private (домашняя или рабочая сеть) и, если необходимо, для профиля Public (общедоступные сети).
Подробнее про типы сетей и профили брандмауэра Windows здесь.
Если нужно, вы можете дополнительно ограничить длительность RDP сессий с помощью GPO.
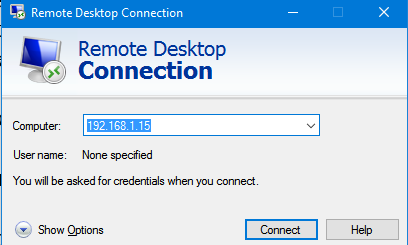
Теперь к данному компьютеру можно подключится с помощью RDP клиента. Встроенный RDP клиент Windows –
mstsc.exe
. Он сохраняет всю историю RDP подключений с компьютера. Поддерживается копирование файлов между локальным и удаленным компьютером прямо через буфер обмена RDP.
Также вы можете использовать менеджеры RDP подключений, такие как RDCMan или mRemoteNG, или альтернативные клиенты.
Для удобства пользователей пароль для RDP подключения можно сохранить в Windows Credential Manager.
Как включить RDP доступ с помощью PowerShell?
Вы можете включить RDP доступ в Windows с помощью пары PowerShell команд. Это гораздо быстрее:
- Запустите консоль PowerShell.exe с правами администратора;
- Включите RDP доступ в реестре с помощью командлета Set-ItemProperty:
Set-ItemProperty -Path 'HKLM:\System\CurrentControlSet\Control\Terminal Server' -name "fDenyTSConnections" -value 0Чтобы закрыть RDP доступ, измените значение fDenyTSConnections на 1.
- Разрешите RDP подключения к компьютеру в Windows Defender Firewall. Для этого включите предустановленное правило :
Enable-NetFirewallRule -DisplayGroup "Remote Desktop"
- Если нужно добавить пользователя в группу в локальную группу RDP доступа, выполните:
Add-LocalGroupMember -Group "Remote Desktop Users" -Member 'a.petrov'

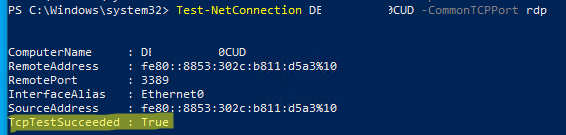
Чтобы проверить, что на компьютере открыт RDP порт, воспользуйтесь командлетом Test-NetConnection:
Test-NetConnection -ComputerName deskcomp323 -CommonTCPPort rdp
RDP доступ к Windows Server 2016/2019
В отличии от десктопной редакции Windows 10, в Windows Server по умолчанию поддерживается два одновременных RDP подключения. Эти подключения используются администраторами для управления сервером.
Включается RDP в Windows Server аналогично. Через SystemPropertiesRemote, через Server Manager или командами PowerShell, рассмотренными выше.
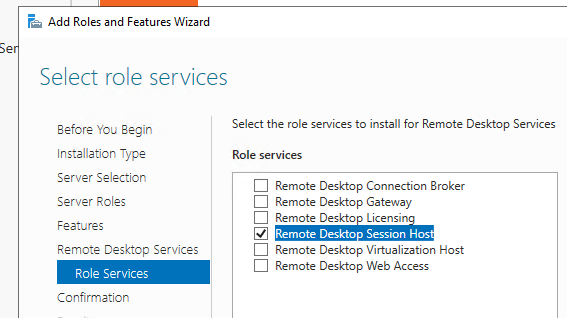
Вы можете использовать Windows Server в качестве терминального сервера. В этом случае множество пользователей могут одновременно подключаться к собственному рабочему столу на сервере. Для этого нужно установить и настроить на сервере роль Remote Desktop Session Host. Это требует приобретения специальных RDS лицензии (CAL). Подробнее о RDS лицензировании здесь.
Для дополнительно защиты RDP сессий можно использовать SSL/TLS сертификаты.
Включение RDP с групповых политик в домене Active Direcrtory
Если вам нужно включить RDP доступ сразу на большом количестве компьютеров, можно воспользоваться групповыми политиками (GPO). Мы подразумеваем, что все компьютеры включены в домен Windows.
- Запустите консоль управления доменными GPO
gpmc.msc
; - Создайте новую (или отредактируйте уже существующую) групповую политику и привяжите ее к целевой OU с компьютерами или серверами;
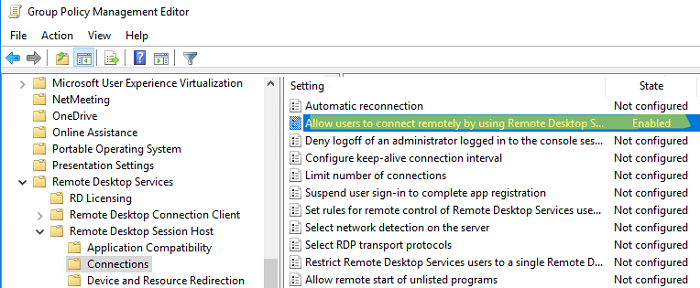
- Переключитесь в режим редактирования политики и перейдите в секцию GPO Computer Configuration -> Administrative Templates -> Windows Components -> Remote Desktop Services -> Remote Desktop Session Host -> Connections;
- Найдите и включите политику Allow Users to connect remotely by using Remote Desktop Services, установив ее в Enable;
- Обновите параметры групповых политик на клиентах;
- После применения данной политики вы сможете подключится ко всем компьютерам по RDP (политика применится как к десктопным клиентам с Windows 10, так и к Windows Server). Если нужно, вы можете более тонко нацелить политики на компьютеры с помощью WMI фильтров GPO.
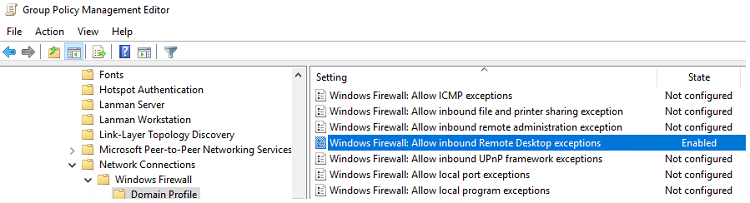
- Если на компьютерах включен Windows Defender Firewall, нужно в этой же GPO разрешить RDP-трафик для доменного профиля. Для этого нужно активировать правило Windows Firewall: Allow inbound Remote Desktop Exceptions (находится в разделе Computer Configuration -> Administrative Templates -> Network -> Network Connections -> Windows Firewall -> Domain Profile).
Подробнее о настройке правил брандмаура Windows через GPO рассказано здесь.
Как удаленно включить RDP на компьютере Windows?
Также вы можете удаленно включить RDP на любом компьютере Windows. Для этого у вас должен быть удаленный доступ к этому компьютеру (через PowerShell или WMI) и ваша учетная запись состоять в группе локальных администраторов на этом компьютере.
Вы можете удаленно включить RDP через реестр. Для этого на удаленном компьютере должна быть включена служба Remote Registry (по умолчанию она отключена). Чтобы запустить службу:
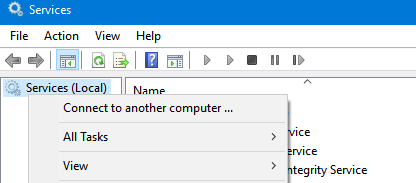
- Запустите консоль управления службами (
services.msc
); - Выберите Connect to another computer и укажите имя удаленного компьютера;
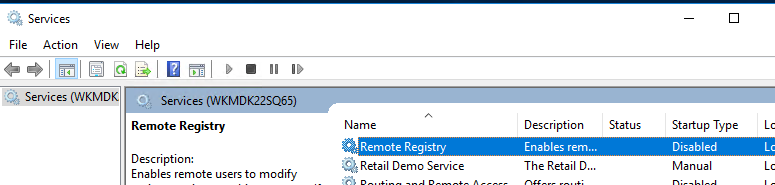
- Найдите в списке службу Remote Registry, измените тип запуска на Manual (ручной) и затем запустите службу – Start.
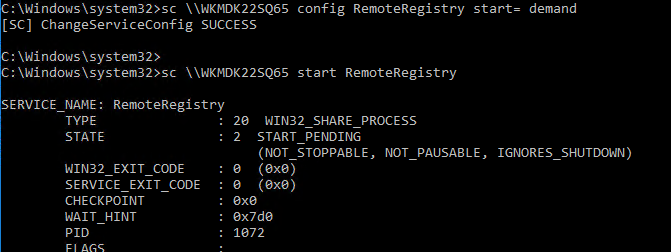
Тоже самое можно выполнить удаленно из командной строки с помощью встроенной утилиты
sc
(позволяет создавать, управлять или удалять службы Windows):
sc \\WKMDK22SQ65 config RemoteRegistry start= demand
sc \\WKMDK22SQ65 start RemoteRegistry
Затем на локальном компьютере
- Запустите редактор реестра
regedit.exe - Выберите в меню Файл пункт Connect Network Registry (Подключить сетевой реестр)
- Укажите имя или IP адрес удаленного компьютера, на котором нужно включить службу RDP;
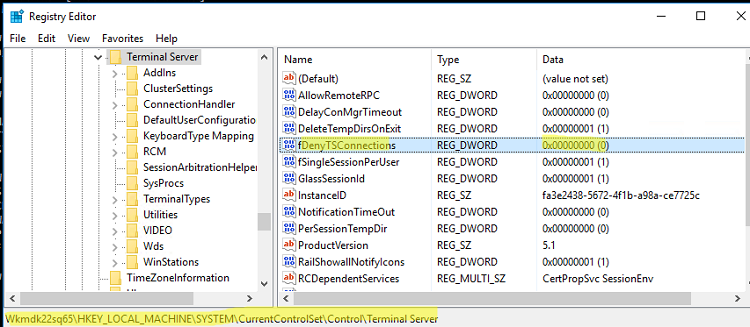
- Перейдите в раздел
HKEY_LOCAL_MACHINE\SYSTEM\CurrentControlSet\Control\Terminal Server
; - Найдите параметр fDenyTSConnections (тип REG_DWORD). Если данный ключ отсутствует – создайте его. Измените его значение на 0, чтобы включить RDP.
Для отключения RDP доступа нужно изменить значение fDenyTSConnections на 1.
Сразу после этого без перезагрузки удаленный компьютер должен стать доступным по RDP.
Но гораздо быстрее можно включить RDP в реестре удаленого компьютера через командную строку:
REG ADD "\\WKMDK22SQ65\HKLM\SYSTEM\CurrentControlSet\Control\Terminal Server" /v fDenyTSConnections /t REG_DWORD /d 0 /f
Если на удаленном компьютере настроен PowerShell remoting, вы можете выполнить на нем удаленную команду через Invoke-Command:
Invoke-Command -Computername WKMDK22SQ65 -ScriptBlock {Set-ItemProperty -Path "HKLM:\System\CurrentControlSet\Control\Terminal Server" -Name "fDenyTSConnections" –Value 0}
Если в Windows установлен OpenSSH сервер, вы можете подключиться к нему любым ssh клиентом и внести изменения в реестр в локальной ssh сессии.
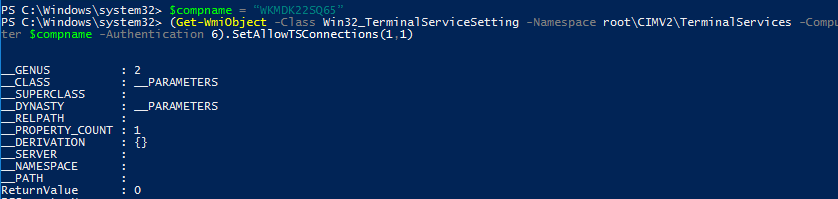
Также вы можете подключиться к удаленному компьютеру и включить RDP через WMI:
$compname = “WKMDK22SQ65”
(Get-WmiObject -Class Win32_TerminalServiceSetting -Namespace root\CIMV2\TerminalServices -Computer $compname -Authentication 6).SetAllowTSConnections(1,1)
Салимжанов Р.Д
Part 2 Basic Configuration of Windows Server 2019 (RDP, DHCP)
Salimzhanov R.D.
В первой части, мы рассмотрели, как настроить сетевые компоненты, а также рассмотрели создание учетных записей пользователей и настройку прав доступа.
Сейчас мы рассмотрим настройку удаленного доступа и установку необходимых служб (DHCP-сервер).
Воспользуемся протоколом Remote Desktop Protocol (RDP) — это протокол удаленного рабочего стола, который предоставляет возможность удаленного управления компьютером через сеть. Пользователь может подключаться к удаленному компьютеру и управлять им, как если бы он находился непосредственно перед ним. Протокол RDP обеспечивает безопасное и зашифрованное соединение, что позволяет защитить данные и предотвратить несанкционированный доступ к компьютеру.
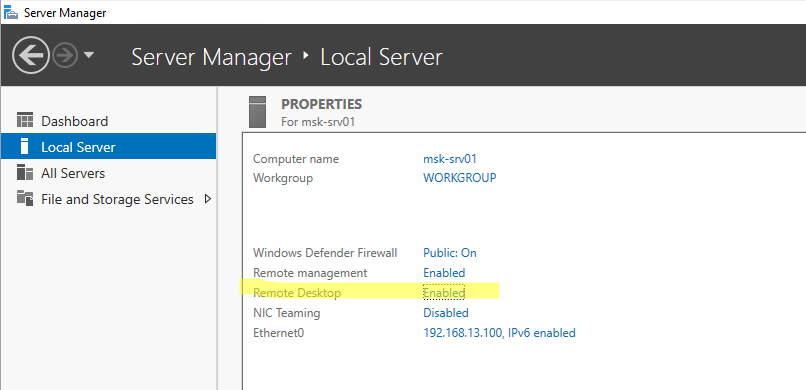
Для подключения удаленного стола, следует перейти “Диспетчер серверов” и найти там в локальном сервере пункт “Удаленный рабочий стол”:
Нажимаем на него, и выбираем “Разрешить удаленные подключения к этому компьютеру”:
Далее выбираем пользователей, которым разрешим подключение:
Нажимаем “Добавить”:
Выбираем пользователя “USER_admin”:
Нажимаем “ok” и теперь этот пользователь может подключится к серверу, проверим подключение через основной ПК, заранее дав ему доступ:
Открываем основной ПК, пишем в поиске “Подключение к удалённому рабочему столу”:
Далее прописываем IP сервера:
Прописываем пользователя и пароль:
Нажимаем “да”:
Теперь мы подключились:
DHCP-сервер (Dynamic Host Configuration Protocol) — это сервис, который автоматически распределяет IP-адреса между устройствами в сети. Это позволяет упростить процесс настройки сетевых устройств и обеспечивает централизованное управление IP-адресами.
Установка и настройка DHCP-сервера на Windows Server может понадобиться в следующих случаях:
1. Автоматическое назначение IP-адресов: DHCP-сервер автоматически назначает IP-адреса устройствам в сети, что облегчает управление сетью. Это устраняет необходимость вручную настройки IP-адресов на каждом устройстве и помогает избежать конфликтов IP-адресов.
2. Управление адресами: DHCP-сервер управляет пулом доступных IP-адресов и может динамически выделять и освобождать их по мере необходимости. Это позволяет эффективно использовать доступные адреса и предотвращает избыточное расходование адресов.
3. Улучшенное контроль безопасности: DHCP-сервер обеспечивает возможность контроля доступа к сети через использование фильтра MAC-адресов и других методов аутентификации. Это помогает обеспечить безопасность сети и предотвратить несанкционированный доступ.
Для настройки и установки DHCP в диспетчере серверов нажимаем на “Управление” и “Добавить роли и компоненты”:
После следуем инструкции в скринах:
Далее уже выбраны нужные нам компоненты, но для определенных задач следует выбирать конкретно что вам нужно, оставляю ссылку на описание компонентов URL: https://info-comp.ru/softprodobes/572-components-in-windows-server-2016.html
Ждем установки:
После установки слева появился DHCP сервер:
Далее переходим в меню “Средства” и выбираем “DHCP”:
В разделе IPv4 создаем область:
Далее мы можем, добавить машину как отдельный DNS сервер, или создать на этой машине, просто нажав “Далее”.
Точно также, если надо мы можем добавить WINS серверы, если требуется:
Теперь появился пул адресов:
А да и еще, нажав на флажок, диспетчер попросит создать вас две новые группы:
(там нажимаем “Фиксировать” и они автоматически создаются)
Осталось теперь только протестировать:
В следующий части базовой настройки Windows Server 2019, разберем:Настройка DNS-сервера и Active Directory (AD)
1) Как включить и настроить удаленный рабочий стол (RDP) в Windows? // [электронный ресурс]. URL: https://winitpro.ru/index.php/2013/04/29/kak-vklyuchit-udalennyj-rabochij-stol-v-windows-8/ / (дата обращения 01.08.2024).
2) Помощник Админа // [канал]. URL: https://t.me/channel_adminwinru (дата обращения 01.08.2024).
Estimated reading: 3 minutes
996 views
RDP (Remote Desktop Protocol) is the protocol that allows a user to connect to a Windows Server through a graphical interface over any network.
In fact, there are several ways to enable Remote Desktop on Windows Server 2019 and 2022. So you can choose one of them that is suitable for you to enable RDP on Server 2019. After RDP is enabled, you can access the remote server from your local device
Method 1. Enable Server 2019 RDP from Server Manager
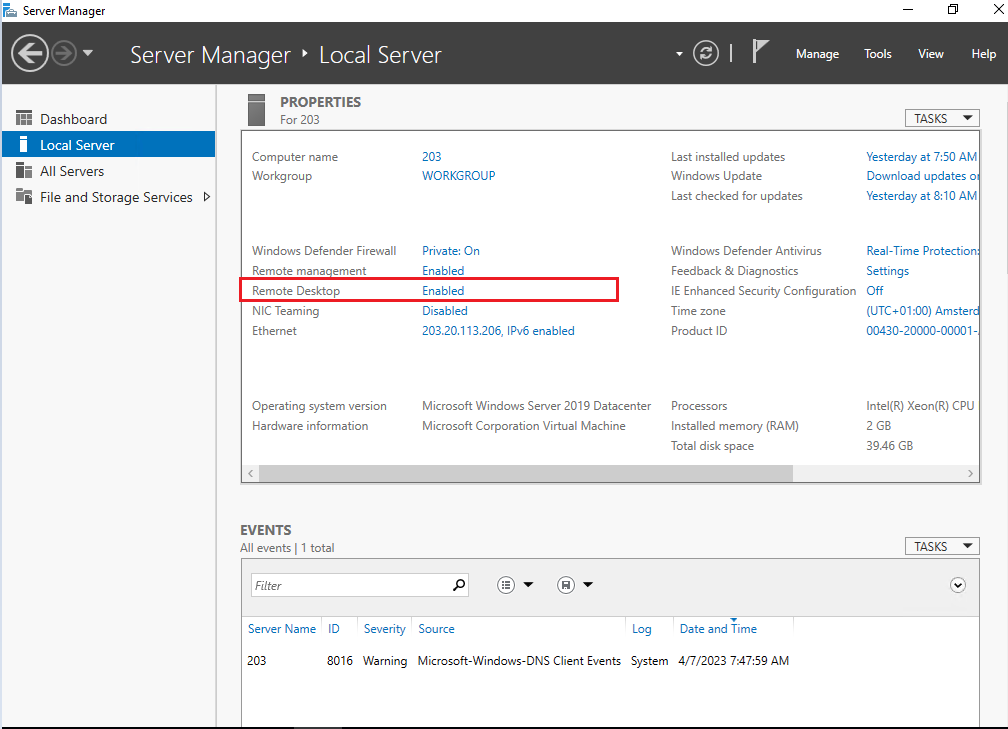
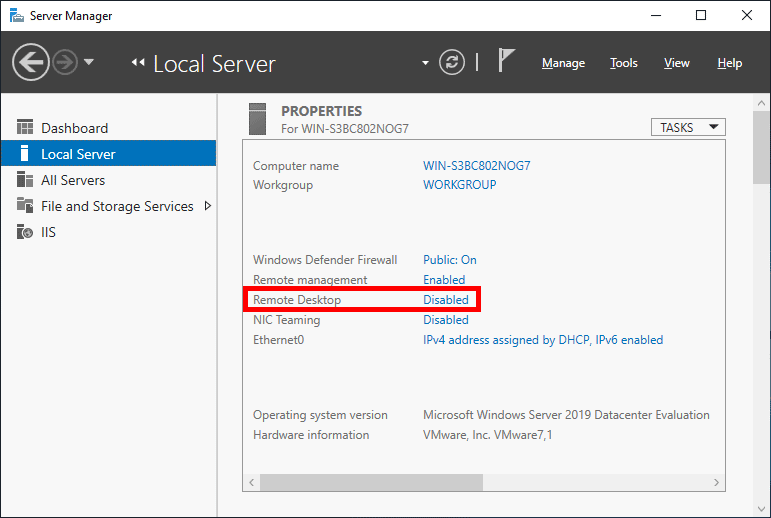
- Step 1. Click on the Start button and you can see Server Manager.

- Step 2. Click on “Local Server” on the left in Server Manager window. We can see that Remote Desktop is “Disabled”.

- Step 3. Click on the “Disabled” text to open the “System Properties” window, and then locate on the “Remote” tab.

NOTE: The System Properties window can also be accessed from Control Panel option by clicking on System and then on Remote settings in the left panel or from the Windows command prompt by executing the below command.
SystemPropertiesRemote


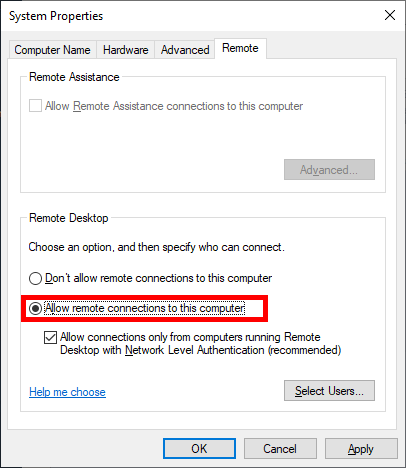
- Step 4. Tick “Allow remote connections to this computer” in the “Remote Desktop” tab.

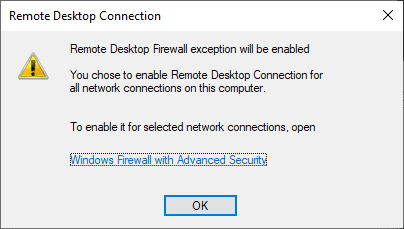
- Step 5. You’ll receive a warning message after the above step, click on “OK”

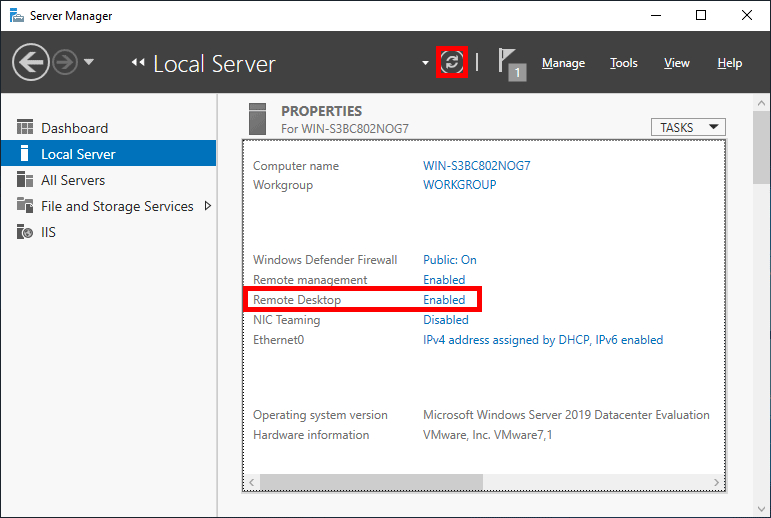
Now, Remote Desktop may still show as “Disabled”; you can refresh or press Control + F5 to refresh to “Enabled”.
Method 2: Using the Command Prompt
- Step 1. Search cmd in the search box to open Command Prompt.
- Step 2.In the Command Prompt window, type the following command and press the enter key: net start termservice

Method 3. Allow Remote Desktop on Win Server 2019 from Powershell
If you can’t enable RDP from Server Manager, you can try to enable Remote Desktop in Windows Server 2019 with Powershell.
- Step 1. Search “PowerShell” in the Search box and then select Run as Administrator.

- Step 2. The registry value that enables/disables Remote Desktop can be modified using the Set-ItemProperty cmdlet
Set-ItemProperty -Path 'HKLM:\System\CurrentControlSet\Control\Terminal Server' -name "fDenyTSConnections" -value 0
- Step 3. Once this is completed, the
Enable-NetFirewallRulecmdlet can be used to set the Windows firewall to allow remote desktop connections.
Enable-NetFirewallRule -DisplayGroup "Remote Desktop"Note:With this method if you want to disable Remote Desktop connection you can change the value 0 to 1
Set-ItemProperty -Path 'HKLM:\System\CurrentControlSet\Control\Terminal Server' -name "fDenyTSConnections" -value 1
Method 4. Using Windows Firewall
- Step1: Press Start and enter firewall.cpl in the text box and press the enter key.
- Step 2.On the Windows Defender Firewall page, click on the Allow an app or feature through the Windows Defender Firewall option.

- Step 3. Click on the Change settings button. Scroll down and tick the Remote Desktop and Remote Desktop (WebSocket) option in the list.

Method 5.Using Group Policy
In addition, Remote Desktop can also be enabled by using Group Policy.
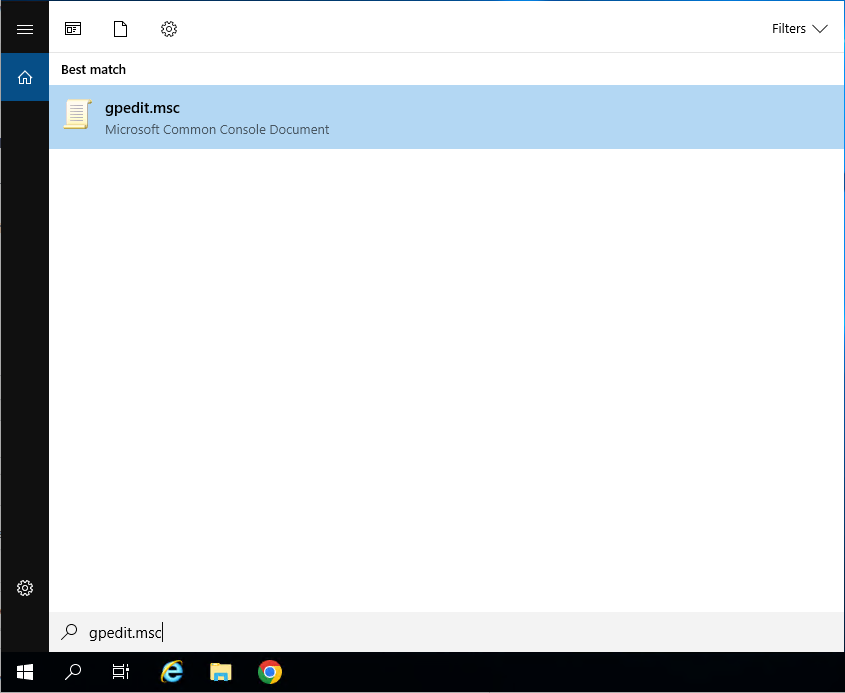
- Step 1. Press Start and enter “gpedit.msc” to open Group Policy .
- Step 2. Navigation:
Computer Configuration -> Administrative Templates -> Windows Components -> Remote Desktop Services -> Remote Desktop Session Host\Connections
- Step 3. In the right pane, double click on “ Allow users to connect remotely by using Remote Desktop Services.”

- Step 4. Select “Enabled” and click on “OK”.

There you have it. Once you’ve completed these steps, you’ll be able to use Remote Desktop on Windows Server. You can now enjoy wider connectivity and access to your files, data, and apps.

Posted by
on December 20, 2018
By default in Windows Server 2019 remote desktop is disabled. This post will cover how to turn on and enable Remote Desktop Protocol (RDP) in Windows Server 2019, using either PowerShell or the GUI.
Note: In Windows Server 2019 Essentials edition, remote desktop is already enabled by default so you will not need to manually do this.
Remote desktop can be enabled through the graphical user interface (GUI) with the following easy steps.
Allowing Remote Desktop With The GUI
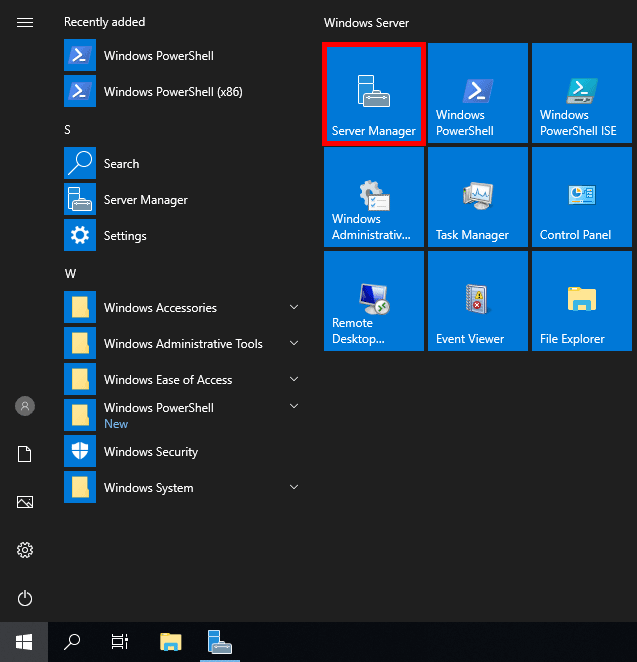
- Open Server Manager. This can be found by opening the start menu, as shown below.

If Server Manager does not show here, simply type “Server Manager” into the start menu to search for it. By default Server Manager will open when you log in to the GUI, otherwise you can select it from the task bar.
- Within the Server Manager window, select Local Server from the left hand side. You may need to wait a little for it to detect the current state of your system. You should see that Remote Desktop is listed as Disabled as shown below.

- Click on the Disabled text which will open the System Properties window in the Remote tab.
- From the System Properties window, select “Allow remote connections to this Computer” as shown below.

Tip: You can also open the System Properties window shown above by entering “SystemPropertiesRemote” into a Command Prompt or PowerShell terminal.
- Once you select “Allow remote connections to this computer” the below warning message will appear, advising that this will create the required firewall rules in Windows firewall to allow remote desktop traffic in from any source address, select OK to proceed.

- At this point you can optionally click the “Select Users…” button to define specific users or groups that have permission to connect via remote desktop. Select the OK button to close out of the System Properties window and enable remote desktop.
- Back in Server Manager, Remote Desktop may still show as Disabled until you refresh the view. After clicking the refresh button as highlighted below (or pressing F5 on the keyboard), the status should update to Enabled.
That’s it, remote desktop should now be ready to use!
Allowing Remote Desktop With PowerShell
While there isn’t currently an explicit PowerShell cmdlet used for enabling remote desktop, we can use the Set-ItemPropery cmdlet to modify the registry value that enables or disables Remote Desktop:
Set-ItemProperty -Path 'HKLM:\System\CurrentControlSet\Control\Terminal Server' -name "fDenyTSConnections" -value 0
Once complete we can use the ‘Enable-NetFirewallRule’ to configure Windows Firewall to allow remote desktop connections in:
Enable-NetFirewallRule -DisplayGroup "Remote Desktop"
Remote Desktop should now be accessible in Windows Server 2019.
By default this will allow all connections in, the same as if we had just enabled it using the GUI steps shown above. It is highly recommended that you configure more specific firewall rules where possible to only allow inbound traffic from known hosts.
Summary
By default Windows Server 2019 sets external remote desktop access to disabled as a security measure, we can easily optionally enable it from within the server console or via PowerShell to allow everyone or a specific set of users or groups.
How to set up RDP on Windows Server 2019 is an essential task for administrators who need to access and manage servers remotely. RDP allows users to connect to another computer over a network and interact with it as though they were sitting in front of it. In this guide, we’ll cover everything from configuring the Remote Desktop feature to securing the connection to ensure a smooth and secure setup.
1. Prerequisites for Remote Desktop Setup
Before configuring Remote Desktop on your Windows Server 2019, ensure that you have:
- Administrative privileges on the server.
- A stable network connection between the local machine and the server.
- A valid license for Remote Desktop Services if you plan to use it with multiple users simultaneously (RDS setup).
- A firewall configured to permit RDP connections (default port: 3389).
2. Enable Remote Desktop on Windows Server 2019
By default, Remote Desktop is disabled on Windows Server 2019 for security reasons. Follow these steps to enable it:
Step-1: Access Server Manager
- Open Server Manager by clicking on the Start button or typing “Server Manager” in the search bar.
- Once Server Manager is open, navigate to Local Server from the left-hand panel.
Step-2: Enable Remote Desktop
- In the Properties section of Local Server, find the option labeled Remote Desktop.
- Click on the “Disabled” status to open the system properties window.
Step-3: Allow Remote Connections
- In the Method Properties window under the Remote tab, select Allow remote connections to this computer.
- For better security, it’s recommended to check the box for Allow connections only from computers running Remote Desktop with Network Level Authentication (NLA).
Step-4: Apply Settings
- Click Apply and then OK to enable Remote Desktop.
3. Configure Remote Desktop Users
By default, only administrators can log in via Remote Desktop. If you want to allow other users access, follow these steps:
Step-1: Open System Properties
- Go back to the Remote tab in the System Properties window.
Step-2: Add Users
- Click the Select Users button. A dialog box will appear allowing you to add specific users or groups.
- Type in the names of users or groups you want to grant RDP access and click OK.
4. Configure Firewall to Allow Remote Desktop
Once Remote Desktop is enabled, ensure that your server’s firewall is configured to allow incoming RDP traffic. Here’s how to do it:
Step-1: Open Firewall Settings
- In Server Manager, press on Tools and select Windows Defender Firewall with Advanced Security.
Step-2: Create a New Rule
- In the left-hand panel, click on Inbound Rules.
- In the right-hand panel, click on New Rule.
Step-3: Enable RDP Port
- Choose Port as the rule type, and then click Next.
- Specify the protocol as TCP and type 3389 in the specific port field. Click Next.
- Allow the connection, select the network profiles you want this rule to apply to (Domain, Private, Public), and then name the rule, for example, “Allow RDP”.
- Click Finish to create the rule and allow Remote Desktop connections.
5. Connecting to the Server Using Remote Desktop
Now that you’ve configured your server for Remote Desktop, you can connect to it from another machine. Here’s how:
Step-1: Open Remote Desktop Connection
- On your local machine, press Win + R, type mstsc, and press Enter to open the Remote Desktop Connection tool.
Step-2: Enter Server Details
- In the Computer field, enter the IP address or the hostname of your Windows Server 2019 machine.
Click Connect.
Step-3: Log In
- When prompted, enter the credentials (username and password) for a user account that has RDP access to the server.
If you are connecting for the first time, you may receive a warning about the server’s certificate. You can choose to Accept and continue with the connection.
6. Optimizing Performance for Remote Desktop
Depending on your network bandwidth and usage, you may want to optimize your Remote Desktop connection to ensure smoother performance. Here are some tips:
- Adjust Remote Desktop Display Settings
- When launching the Remote Desktop tool, click Show Options before connecting.
- Under the Display tab, reduce the Color depth to 16-bit or adjust the screen resolution to match your requirements.
- Disable Resource-Intensive Features
- Under the Experience tab, choose an appropriate connection speed based on your network.
- Uncheck resource-heavy options like Desktop background, Font smoothing, and Persistent bitmap caching if you’re experiencing lag.
7. Securing Remote Desktop on Windows Server 2019
To protect your server from unauthorized access, you must take additional steps to secure the RDP connection.
Step-1: Change the RDP Port
-
- By default, RDP uses port 3389, which is commonly targeted by attackers. Changing this port can help reduce exposure.
- You can modify the RDP listening port by editing the Windows Registry:
- Open the Registry Editor (regedit), navigate to HKEY_LOCAL_MACHINE\System\CurrentControlSet\Control\Terminal Server\WinStations\RDP-Tcp.
- Find the PortNumber key, change its value to a new port number, and restart the server.
Step -2: Enable Network Level Authentication (NLA)
- Network Level Authentication adds a layer of security by requiring users to authenticate before establishing a full RDP session.
- Ensure that NLA is enabled in the Remote Desktop settings under the Remote tab.
Step-3: Enable Two-Factor Authentication
- Adding two-factor authentication (2FA) is another way to secure your RDP connections. Many third-party tools, such as Duo Security, can be integrated with Windows Server to provide 2FA for Remote Desktop.
Step-4: Limit User Access and Permissions
- Make sure only the necessary users or administrators have RDP access. Consider creating separate accounts for users who need limited access to specific server resources.
Step-5: Use a VPN
- For additional security, consider setting up a VPN to connect to the server. By doing so, you’ll restrict RDP access to users connected via the secure VPN tunnel.
Conclusion
Setting up Remote Desktop on Windows Server 2019 is a straightforward process, but securing it is just as important. By enabling the right features, optimizing performance, and securing the connection, you can enjoy seamless and safe remote access to your server. Whether for administration, troubleshooting, or working remotely, Remote Desktop is a powerful tool that can streamline server management when configured correctly.