
Современные версии Windows поддерживают протокол DNS over HTTPS (DoH), который позволяет выполнять разрешение имен (DNS запросы) через шифрованное HTTPS соединение. В этой статье мы рассмотрим, для чего нужен протокол DNS over HTTPS, как его включить и использовать в Windows.
Содержание:
- Как включить DNS over HTTPS из графического интерфейса Windows?
- Настройка DNS over HTTPS в Windows 11 из командной строки
- Как убедиться, что для разрешения имен в Windows используется DNS over HTTPS?
По умолчанию DNS трафик не шифруется. Это означает, что все запросы с вашего компьютера на разрешение имен к DNS-серверу передаются по сети в открытом виде. Сторонние лица могут подслушать ваш DNS трафик, определить какие ресурсы вы посещали, или манипулировать DNS трафиком по типу main-in-the-middle. Протокол DoH позволяет инкапсулировать DNS запросы в шифрованное HTTPS соединение и отправить их DNS серверу (нужен специальный DNS сервер с поддержкой DoH).
Как включить DNS over HTTPS из графического интерфейса Windows?
Встроенная поддержка протокола DNS-over-HTTPS (DoH) в DNS клиенте доступна в Windows 11 и Windows Server 2022. Чтобы ваш клиент использовал DoH для шифрования DNS трафика, нужно в настройках сетевого подключения указать IP адрес сервера с поддержкой DoH.
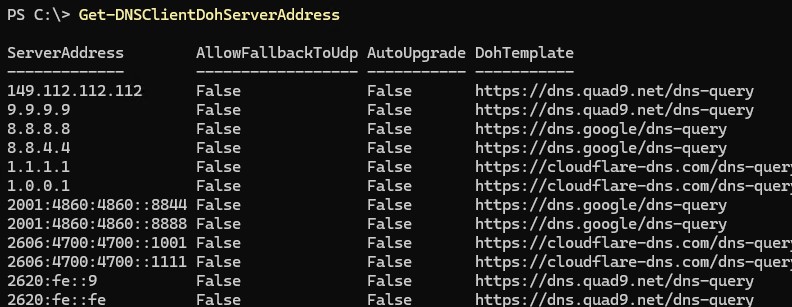
Список IP адресов публичных DNS серверов с поддержкой DoH можно вывести PowerShell командой:
Get-DNSClientDohServerAddress
| Провайдер | IPv4 адреса DNS серверов с поддержкой DNS over HTTPS |
| Cloudflare | 1.1.1.1, 1.0.0.1 |
| 8.8.8.8, 8.8.4.4 | |
| Quad9 | 9.9.9.9, 149.112.112.112 |
Нужно указать IPv4 и IPv6 адрес одного из этих DNS сервера (или адрес любого альтернативного DNS сервера с поддержкой DoH, предварительно добавив его, о чем ниже) в настройках сетевого интерфейса.
- Перейдите в Settings -> Network & Internet -> Ethernet (или Wi-Fi)
- В данном случае видно, что DNS трафик не зашифрован.

- Нажмите кнопку Edit
- Укажите IP адрес DNS сервера, и для параметра DNS over HTTPS выберите -> On (automatic template)
- Сохраните изменения. Теперь DNS запросы будут отправляться в шифрованном виде.

В DNS клиенте Windows Server 2022 также поддерживается DoH (но служба DNS Server в этой версии Windows Server пока не поддерживает DoH).
Укажите IP адрес DNS сервера в настройках сетевого интерфейса и включите режим обязательного использования шифрования: Encrypted only (DNS over HTTPS).
Ни один из релизов Windows 10 сейчас не поддерживает протокол DoH. В одной из инсайдерской версии (Insider Preview OS Build 19628) этот протокол можно было включить через реестр. Для включения поддержки DoH, нужно было создайть параметр реестра с помощью командлета New-ItemProperty:
$AutoDohPath = 'HKLM:\SYSTEM\CurrentControlSet\Services\Dnscache\Parameters'
$AutoDohKey = 'EnableAutoDoh'
New-ItemProperty -Path $AutoDohPath -Name $AutoDohKey -Value 2 -PropertyType DWord -Force
Но в финальный релиз Windows 10 этот функционал не внедрен!
Настройка DNS over HTTPS в Windows 11 из командной строки
В Windows можно включить и настроить использование DNS over HTTPS из командной строки.
Сначала нужно добавить IP адрес сервера DoH в список известных серверов. Например, чтобы добавить альтернативные DNS сервера Cloudflare Family
1.1.1.3
и
1.0.0.3
(фильтруют вредоносный и взрослый контент), выполните PowerShell команду:
$DNSServer="1.1.1.3"
Add-DnsClientDohServerAddress -ServerAddress $DNSServer -DohTemplate "https://family.cloudflare-dns.com/dns-query" -AllowFallbackToUdp $False -AutoUpgrade $True
После того, как вы зарегистрировали шаблон для DNS сервера DoH нужно назначить этот IP в качестве предпочтительного DNS сервера в настройках сетевого интерфейса с помощью PowerShell команды:
Set-DnsClientServerAddress Ethernet0 -ServerAddresses ($DNSServer)
Затем включить обязательное использование DNS over HTTPS для сетевого интерфейса:
$i = Get-NetAdapter -Physical -Name Ethernet0
 $s1 = "HKLM:System\CurrentControlSet\Services\Dnscache\InterfaceSpecificParameters\" + $i.InterfaceGuid + "\DohInterfaceSettings\Doh\$DNSServer"
New-Item -Path $s1 -Force | New-ItemProperty -Name "DohFlags" -Value 1 -PropertyType QWORD
Clear-DnsClientCache
С помощью отдельного параметра GPO можно включить обязательное использование DoH:
- Запустите редактор локальной GPO (
gpedit.msc
) - Перейдите в Computer Configuration -> Policies -> Administrative Templates -> Network -> DNS Client section
- Включите политику «Configure DNS over HTTPS (DoH) name resolution» и задайте значение Require DoH.

Как убедиться, что для разрешения имен в Windows используется DNS over HTTPS?
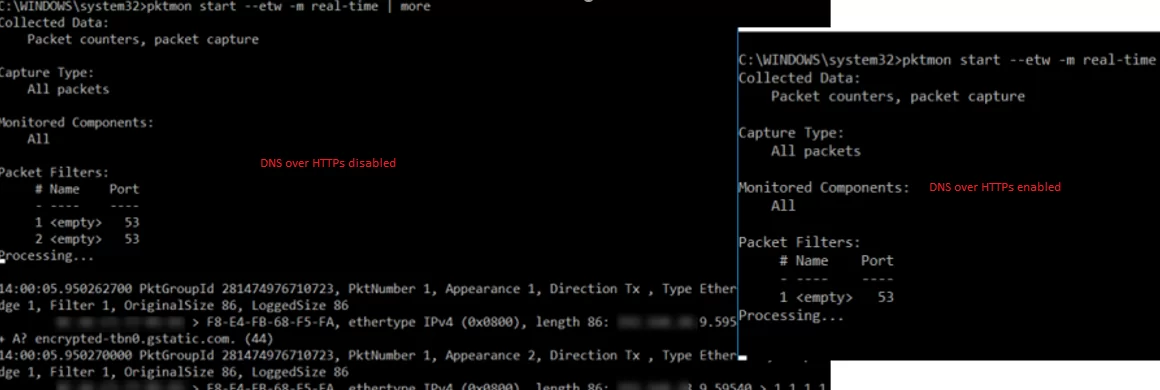
Чтобы проверить, что клиент DNS использует для разрешения имен протокол HTTPS по порту 443 вместо обычного 53 порта, используете встроенную утилита захвата сетевого трафика PktMon.exe (о которой мы говорили ранее).
Удалите все текущие фильтры Packet Monitor:
pktmon filter remove
Создайте новый фильтр для стандартного DNS порта 53:
pktmon filter add -p 53
Запустите мониторинг трафика в реальном времени (трафик выводится в консоль):
pktmon start --etw -m real-time
Если вы правильно настроили DNS over HTTPS, то трафик по порту 53 должен отсутствовать. Это ожначает, что все DNS запросы отправляются в шифрованной HTTPS сессии (на скриншоте ниже показан вывод в консоль при отключённом DoH и при включенном).
DNS over HTTPS реализован во всех популярных браузерах (Google Chrome, Mozilla Firefox, Microsoft Edge, Opera). В каждом из этих браузеров вы можете включить поддержку DoH. Таком образом все DNS запросы от браузера будут шифроваться (DNS трафик других приложений по-прежнему будет идти в открытом текстовом виде).
Больше все проблем технологии DNS over HTTPS и DNS over TLS создадут администраторам корпоративных сетей, которым станет сложнее блокировать доступ к внешним ресурсам из внутренних сетей. Также не понятно, что планирует делать Роскомнадзор, чья методика глубокой проверки и управления сетевым трафиком Deep Packet Inspection (DPI) перестанет работать при переходе протокола DNS на рельсы шифрованного https.
Provide feedback
Saved searches
Use saved searches to filter your results more quickly
Sign up
Securing DNS (DNSSEC, DoH, LLMNR, NetBIOS, LMHOSTS) [Windows Server 2019]
I (tobor), cover how to better secure DNS on Windows 10 devices as well as Windows Server 2019. If you like what you see please Subscribe!
DoH BLOG
https://roberthosborne.com/f/dns-prot…
Enable-DoH Cmdlet
https://github.com/tobor88/BTPS-SecPa…
INVEIGH TOOL
https://github.com/Kevin-Robertson/In…
STARTUP SCRIPT
https://github.com/OsbornePro/ConfigT…
0:00 Intro Summary
0:30 Enable DNS over HTTPS (Enable-DoH)
2:52 Firefox Enable DoH
3:18 Cloudflare DNS
4:03 Chrome Enable DoH
5:07 NetBIOS Traffic
6:33 Danger of NetBIOS Demo (Inveigh)
9:44 Control Panel Disable NetBIOS and LMHOSTS
10:48 LMHOSTS File
11:29 Disabling NetBIOS in a Domain Environment
12:15 Disabling LLMNR in Domain Environment
13:08 Startup Script to disable LMHOSTS and NetBIOS
13:54 WMI vs CIM
15:50 Code Sign the Startup script
17:15 Zone Transfers on a DNS Server
18:28 Commands that are used to perform a zone transfer
19:31 DNSSEC Summary
20:06 Setting up DNSSEC
21:18 Enable Trust Anchors
22:13 DNSSEC test using Resolve-DnsName
22:55 Reverse Lookup and not setting up DNSSEC
23:18 GPO to have clients use DNSSEC
24:14 Subscribe or leave a comment
View my Verified Certifications!
https://www.credly.com/users/robertho…
Follow us on GitHub!
https://github.com/tobor88
https://github.com/OsbornePro
Official Site
https://osbornepro.com/
Give Respect on HackTheBox!
https://www.hackthebox.eu/profile/52286
Like us on Facebook!
/ osborneprollc
View PS Gallery Modules!
https://www.powershellgallery.com/pro…
The B.T.P.S. Security Package
https://btpssecpack.osbornepro.com/
На этой странице сайта вы можете посмотреть видео онлайн Securing DNS (DNSSEC, DoH, LLMNR, NetBIOS, LMHOSTS) [Windows Server 2019] длительностью часов минут секунд в хорошем качестве, которое загрузил пользователь OsbornePro TV 27 Январь 2021, поделитесь ссылкой с друзьями и знакомыми, на youtube это видео уже посмотрели 3,984 раз и оно понравилось 92 зрителям. Приятного просмотра!
The latest versions of Windows support the DNS over HTTPS (DoH) protocol, which allows domain name resolution (DNS queries) to be performed over an encrypted HTTPS connection. In this article, we’ll look at what the DNS over HTTPS protocol is used for, and how to use it in Windows.
Contents:
- How to Enable DNS over HTTPS from the Windows GUI
- DNS over HTTPS Configuration on Windows 11 via Command Prompt
- How to verify that DNS over HTTPS works on Windows
By default, DNS traffic is not encrypted. All queries from your computer to a DNS server to resolve names are sent over the network in plain text. Third parties can intercept your DNS traffic, determine what resources you have visited, or manipulate DNS responses in main-in-the-middle attacks. The DoH protocol can encapsulate DNS queries in an encrypted HTTPS connection and send them to a DNS server (a DNS server with DoH support is required).
How to Enable DNS over HTTPS from the Windows GUI
Windows 11 and Windows Server 2022 have built-in DNS-over-HTTPS (DoH) support in the DNS client. The client will use DoH to encrypt DNS traffic if you have specified the IP address of the DNS server that supports DoH in the settings of the network adapter.
Use PowerShell to list the IP addresses of public DNS servers that support DoH:
Get-DNSClientDohServerAddress

| Provider | IP addresses of public DNS servers supporting DNS-over-HTTPS |
| Cloudflare | 1.1.1.1, 1.0.0.1 |
| 8.8.8.8, 8.8.4.4 | |
| Quad9 | 9.9.9.9, 149.112.112.112 |
Specify the IPv4 or IPv6 address of one of these DNS servers in the network interface settings (or the address of an alternative DNS server with DoH support, after you have added it as described below.)
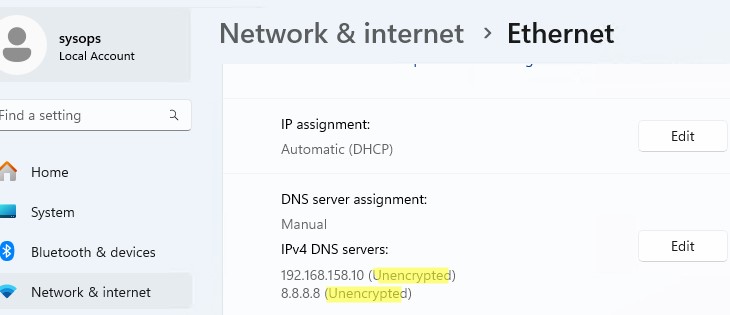
- Navigate to Settings -> Network & Internet -> Ethernet (or Wi-Fi)
- DNS traffic is not encrypted in this case.

- Click the Edit
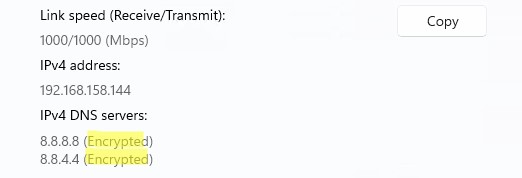
- Enter the IP address of the DNS server and select -> On (automatic template) for the DNS over HTTPS parameter.
- Save the changes. Now the DNS queries from the computer will be encrypted.

Windows Server 2022 DNS client also supports DoH (however, the DNS Server service itself does not support DoH in this release.).
Specify the DNS server IP address in the network interface settings and enable the Encrypted only (DNS over HTTPS) mode.
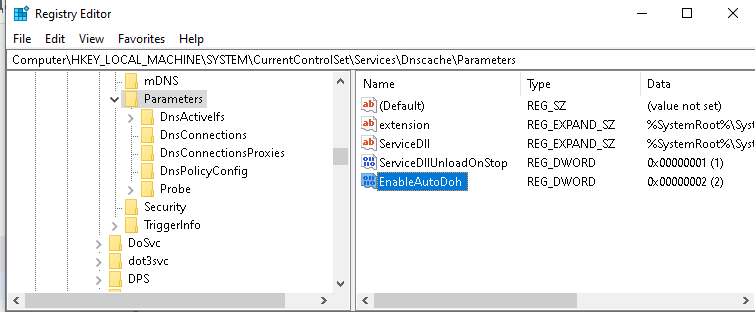
None of the Windows 10 releases currently support the DoH protocol. In one of the Insider Windows 10 releases (Insider Preview OS Build 19628), this protocol could be enabled via the registry. To enable DoH support, you had to create a registry parameter by using the New-ItemProperty cmdlet:
$AutoDohPath = 'HKLM:\SYSTEM\CurrentControlSet\Services\Dnscache\Parameters'
 $AutoDohKey = 'EnableAutoDoh'
 New-ItemProperty -Path $AutoDohPath -Name $AutoDohKey -Value 2 -PropertyType DWord -Force
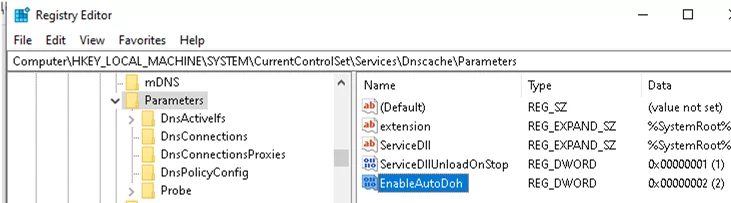
However, this feature has not been implemented in the final release of Windows 10!
DNS over HTTPS Configuration on Windows 11 via Command Prompt
On Windows, you can use the command line interface to enable and configure DNS over HTTPS.
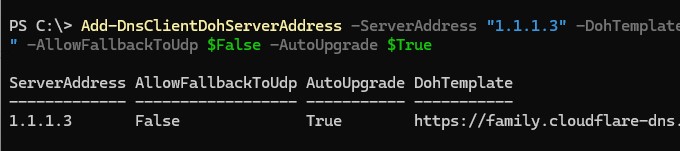
First, add the IP address of the DoH server to the list of known DNS servers. For example, to add Cloudflare Family alternative DNS servers 1.1.1.3 and 1.0.0.3 (used to filter malware and adult content), run:
$DNSServer="1.1.1.3"
 Add-DnsClientDohServerAddress -ServerAddress $DNSServer -DohTemplate "https://family.cloudflare-dns.com/dns-query" -AllowFallbackToUdp $False -AutoUpgrade $True

After you register the template for the DoH DNS server, assign that IP as the preferred DNS server in the network interface settings using the following PowerShell command:
Set-DnsClientServerAddress Ethernet0 -ServerAddresses ($DNSServer)
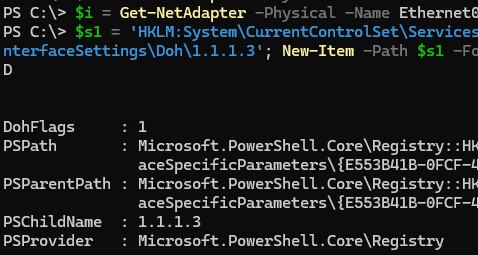
Then enable mandatory use of DNS over HTTPS for the network interface:
$i = Get-NetAdapter -Physical -Name Ethernet0
 $s1 = "HKLM:System\CurrentControlSet\Services\Dnscache\InterfaceSpecificParameters\" + $i.InterfaceGuid + "\DohInterfaceSettings\Doh\$DNSServer"
 New-Item -Path $s1 -Force | New-ItemProperty -Name "DohFlags" -Value 1 -PropertyType QWORD
 Clear-DnsClientCache
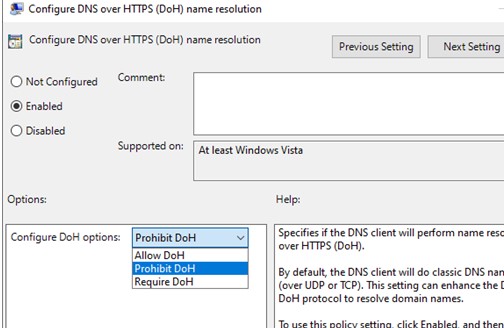
Or use a separate GPO setting to enforce using DoH:
- Open the local GPO editor (
gpedit.msc) - Navigate to Computer Configuration -> Policies -> Administrative Templates -> Network -> DNS Client section
- Enable the policy Configure DNS over HTTPS (DoH) name resolution and set the value to Require DoH.


How to verify that DNS over HTTPS works on Windows
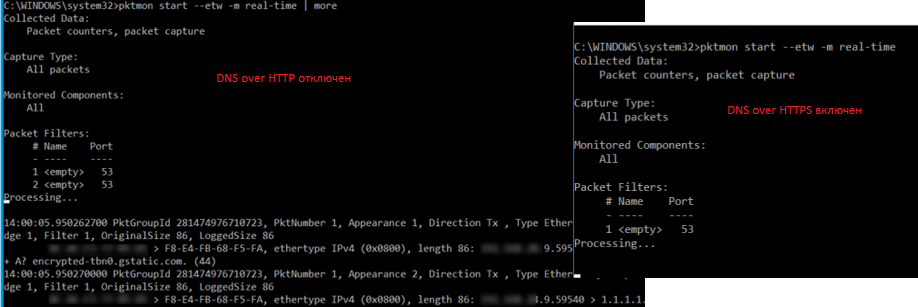
To verify that the DNS client is using the encrypted HTTPS (443) protocol for name resolution instead of the default UDP/TCP port 53, use the built-in network traffic capture tool named PktMon.exe.
Remove all current Packet Monitor filters:
pktmon filter remove
Create a new filter for the default DNS port (53):
pktmon filter add -p 53
Start real-time traffic monitoring (traffic will be output to the console):
pktmon start --etw -m real-time
There should be no traffic on port 53 if you have properly configured DNS over HTTPS. This means that all DNS queries are sent in an encrypted HTTPS session (the screenshot below shows the console output with DoH disabled and enabled).
DNS over HTTPS support is implemented in all popular browsers (Google Chrome, Mozilla Firefox, Microsoft Edge, Opera). You can enable DoH support in any of them. This encrypts your browser’s DNS queries (DNS traffic from other apps will still sent as plain text).
DNS over HTTPS and DNS over TLS will cause problems for corporate network administrators by making it more difficult to restrict access to external resources from internal networks.
The Domain Name System (DNS) is a crucial component of the TCP/IP protocol suite that maps human-readable domain names to IP addresses. It enables seamless communication between computers on a network or the internet. In this guide, we’ll walk through the steps to install and configure a DNS Server on Windows Server 2019.
Prerequisites
Before proceeding, ensure that your Windows Server 2019 has a static IP address configured. A static IP address is required for the DNS Server to function correctly.
Step 1: Install the DNS Server Role
1. Open the Server Manager.
2. Navigate to the “Manage” menu and select “Add Roles and Features.”
3. In the “Add Roles and Features Wizard,” click “Next” until you reach the “Server Roles” page.
4. Select the “DNS Server” role from the list of available roles.
5. Click “Add Features” when prompted, and then click “Next.”
6. Proceed through the remaining prompts, confirming the installation selections.
7. Click “Install” to begin the installation process.
8. Wait for the installation to complete, and then click “Close.”
Step 2: Configure DNS Forward Lookup Zone
With the DNS Server installed, you can now configure a DNS Forward Lookup Zone. A Forward Lookup Zone requests the IP address that corresponds to a fully qualified domain name (FQDN). When you type a domain name like “example.com” in your browser, the DNS Forward Lookup Zone translates that FQDN to the IP address of the server hosting that site.
Follow these steps to add a DNS Forward Lookup Zone:
2. Right-click your server name and choose “New Zone…” to open the New Zone Wizard.
3. Click “Next” on the first Wizard screen.
4. Choose the “Primary Zone” option and click “Next.”
5. Select “Forward Lookup Zone” and click “Next.”
6. Enter the desired “Zone Name” for the lookup and click “Next.”
7. Specify a “Zone File” or use the auto-generated one, then click “Next.”
8. Configure dynamic updates if needed, or click “Next” to proceed.
9. Review the settings and click “Finish” to complete the New Zone Wizard.
10. Verify that your Forward Lookup Zone appears in the DNS Manager.
With the Forward Lookup Zone configured, you can now add DNS records for your domain names and their corresponding IP addresses.
Conclusion
You have successfully installed and configured a DNS Server on Windows Server 2019, including setting up a DNS Forward Lookup Zone. With the DNS Server up and running, you can now manage domain name resolution for your network or organization. Remember to follow best practices and keep your DNS Server updated with the latest security patches and updates.